Cerbera/Griffith rear suspension/hub assembly
Discussion


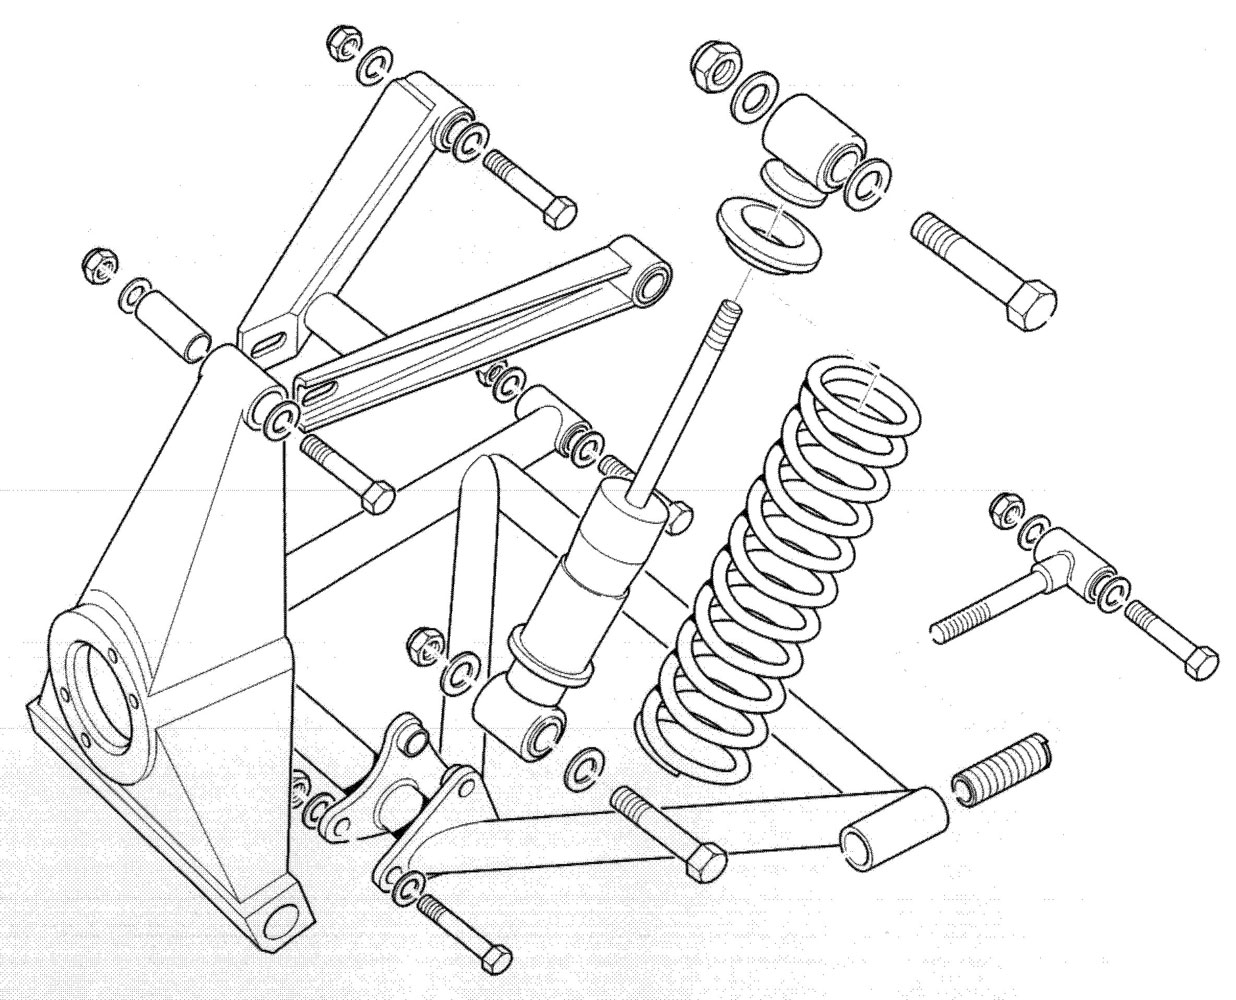
Gents, in the cerbera workshop manual the only reference to the rear suspension is that its the same as the griff's bar a few differences. I am trying to take it apart today but cant find any exploded diagrams or instructions on the best way to do it.
Can anyone point me in the right direction?
Thanks,
Mark
Can anyone point me in the right direction?
Thanks,
Mark

markh1 said:
Thats very helpful tim thankyou.
Did your brake disk just come off becasue mine is stuck fast. There is nothing holding it on is there?
Brake disc will be held in place by the brake pads and 1no. crosshead countersunk screw into the hub (this screw can be located on approx. the same pcd as the wheel studs).Did your brake disk just come off becasue mine is stuck fast. There is nothing holding it on is there?
Bluebottle said:
markh1 said:
Thats very helpful tim thankyou.
Did your brake disk just come off becasue mine is stuck fast. There is nothing holding it on is there?
Brake disc will be held in place by the brake pads and 1no. crosshead countersunk screw into the hub (this screw can be located on approx. the same pcd as the wheel studs).Did your brake disk just come off becasue mine is stuck fast. There is nothing holding it on is there?
Mark
Rust on the inside of the handbrake 'drum' can cause it to be tight too.
If you need to 'persuade' the disk off, do remember to use a block of wood between hammer and disk as it could break the disk otherwise.
You should also wind the shoe adjuster all the way in too. Use a screwdriver to turn the geared wheel through the hole in the disk. Hope that makes sense.
Good luck
Tim
TT Tim said:
Rust on the inside of the handbrake 'drum' can cause it to be tight too.
If you need to 'persuade' the disk off, do remember to use a block of wood between hammer and disk as it could break the disk otherwise.
You should also wind the shoe adjuster all the way in too. Use a screwdriver to turn the geared wheel through the hole in the disk. Hope that makes sense.
Good luck
Tim
Got the disk off now (left the handbrake on!!)If you need to 'persuade' the disk off, do remember to use a block of wood between hammer and disk as it could break the disk otherwise.
You should also wind the shoe adjuster all the way in too. Use a screwdriver to turn the geared wheel through the hole in the disk. Hope that makes sense.
Good luck
Tim
Im trying to remove the drive shaft, I have taken the hub nut and the five allen bolts at the back off but the hub assembly still wont pull free??
Also how do you remove the handbrake cable?
Thanks again.
markh1 said:
TT Tim said:
Rust on the inside of the handbrake 'drum' can cause it to be tight too.
If you need to 'persuade' the disk off, do remember to use a block of wood between hammer and disk as it could break the disk otherwise.
You should also wind the shoe adjuster all the way in too. Use a screwdriver to turn the geared wheel through the hole in the disk. Hope that makes sense.
Good luck
Tim
Got the disk off now (left the handbrake on!!)If you need to 'persuade' the disk off, do remember to use a block of wood between hammer and disk as it could break the disk otherwise.
You should also wind the shoe adjuster all the way in too. Use a screwdriver to turn the geared wheel through the hole in the disk. Hope that makes sense.
Good luck
Tim
Im trying to remove the drive shaft, I have taken the hub nut and the five allen bolts at the back off but the hub assembly still wont pull free??
Also how do you remove the handbrake cable?
Thanks again.
Have you undone the driveshaft nut? That's the big 41mm one.
This is what the driveshaft looks like without the hub:

Tim
Edited by TT Tim on Thursday 27th November 16:28
I have removed the 41mm nut. Behind the nut there is something else that I cannot get off.
Gutted about not having to remove the allen bolts - they took bloody ages to get off!
Thanks for your help Tim, most invaluable!
Edited to add...
Should the Splined shaft slide out of the hub assembly once the hub nut is off?
Gutted about not having to remove the allen bolts - they took bloody ages to get off!
Thanks for your help Tim, most invaluable!
Edited to add...
Should the Splined shaft slide out of the hub assembly once the hub nut is off?
Edited by markh1 on Thursday 27th November 16:36
markh1 said:
I have removed the 41mm nut. Behind the nut there is something else that I cannot get off.
Gutted about not having to remove the allen bolts - they took bloody ages to get off!
Thanks for your help Tim, most invaluable!
I can't think of anything else that there is to stop it moving.Gutted about not having to remove the allen bolts - they took bloody ages to get off!
Thanks for your help Tim, most invaluable!
Just remembered there is a conical 'spacer' but from memort that should be free once the nuts off. Is that what you're talking about?
Have you tried tapping the driveshaft with a copper hammer? Remember to put the nut back on first to save damaging the driveshaft thread.
Tim
Edited by TT Tim on Thursday 27th November 16:43
markh1 said:
Thanks Tim I will try that.
Been looking at your site and the rebuild pictures, you have done what I want to do. How did you clean up the chassis so well without removing the body?
I got the wife to do it. Been looking at your site and the rebuild pictures, you have done what I want to do. How did you clean up the chassis so well without removing the body?
 She's got a lot more patience than I have.
Time and patience with a wire brush and emery paper. that's what you need.
Mine is far from perfect, and I've only done the 4 corners so far.
The suspension components were sandblasted and refinished, alloy components were glass peened and lacquered.
Tim
markh1 said:
You got the wife to do it?!?!? to say im highly impressed is an understatement!
That rust remover you used on the ball joints looked it impressive, why did you decide to sand blast the wishbones rather than bathing it in that stuff?
Because you need to remove what's left of the powder coat and the 'rust eater' wouldn't do that.That rust remover you used on the ball joints looked it impressive, why did you decide to sand blast the wishbones rather than bathing it in that stuff?
As for my wife, Ali, she's as much a petrolhead as I am.
Years of Triumph Spitfire ownership and restoration is great to bring a couple together. :-D
Not to mention my 2 yr old offering his help too!

Tim
TT Tim said:
You shouldn't need to remove the five allen bolts they're part of the driveshaft.
Have you undone the driveshaft nut? That's the big 41mm one.
This is what the driveshaft looks like without the hub:
Tim
The five allen bolts attach the driveshaft to the stub axle. The stub axle is the bit with the splines on. You can leave the 41mm nut on and disconnect the drive shaft from the stub, leaving it in place in the hub. Or you can leave the stub on the driveshaft and extract that from the hub. The advantage of the former method is you don't have to replace the 41mm nut which is single use.Have you undone the driveshaft nut? That's the big 41mm one.
This is what the driveshaft looks like without the hub:
Tim
All the suspension is in bits now however im having issues removing the upper ball joint on the front hub. The ball joint seal gets in the way of the small allen bolts and have managed to round two of them off! Is there a trick to removing them without having to drill the bolts out?
Also how do you remove the lower ball joint on the front hubs The ball joint just spins when try and take the nut off. (Tim I have linked to your site, hope you dont mind.)
http://tvrcerbera.co.uk/Gallery/displayimage.php?a...
Also how do you remove the lower ball joint on the front hubs The ball joint just spins when try and take the nut off. (Tim I have linked to your site, hope you dont mind.)
http://tvrcerbera.co.uk/Gallery/displayimage.php?a...
Gassing Station | General TVR Stuff & Gossip | Top of Page | What's New | My Stuff