Terry's tale. (S3 resto ++)
Discussion


Not that these parts (or anything else car related) are going to be on my mind for at least a week or so from Monday 
And they're not so important in the greater scheme of things anywhere.
But here's a thought for you to ponder on... While I'm away.
If the tophat cap is tight on the shaft and oscillates with it, rather than it being tight & stationary on the wheel box threaded outer sleeve, with the shaft rotating through the cap, and wearing the 'seal'. Then water shouldn't be able to get to the shaft.
D'you know what... I'm going to buy enough caps to try both ways.
Oh, you think I'm not skilled and equipped enough to create a suitable round hole, no matter what its being created in.... You're having a laugh !!!!
So I'll treat that with the contempt it deserves.
Great reminder Phillpot, cheers. I've got a set of leather punches somewhere. Last needed when I needed to create a new (elliptic) hole to tighten my belt
T.
Edited by Blue 30 on Saturday 31st August 19:57
Edited by Blue 30 on Saturday 31st August 20:01
Edited by Blue 30 on Saturday 31st August 20:07
They say necessity is the mother of invention.
So is improvisation, and that's what real owners of real cars are doing every day.
When you non classic car owners see any classic car on the road or at a show, it is usually there due to the hands-on hard graft and dedication of the owner that has got it there. And most likely including doing it "their way". The rule book, the manual, the 21st century access to info that is all so easily plagiarised, are all so easy to quote from. But as most of the spanner men (and ladies) know... That ain't the real world of classic car ownership.
See, I can waffle on too....
What have I done in my garage today, she asked... Not a lot, is my reply, but I have thought through how to do an awful lot.... Next time.
Glue, screw, solder, braze, weld, drill, file, grind, crimp, tape, nail, rivet, bolt, punch.... Are just the words behind getting the job done...
That's the important bit, to those who don't know what that is !
And finally.... Failure is progress, only in the wrong direction !
So don't knock it, unless you tried it.
T.
Back from hols now...
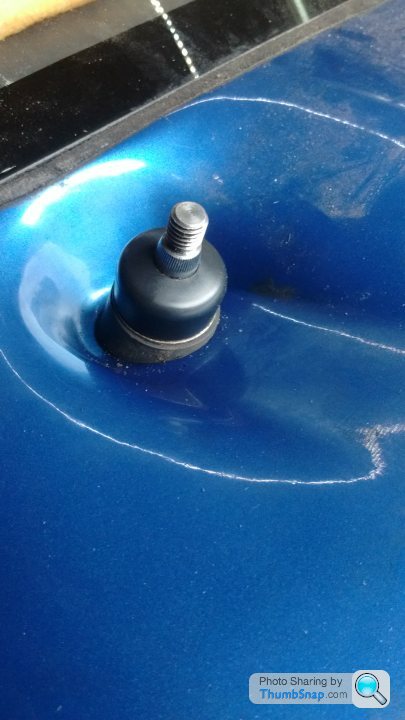
Cable caps purchased for £3.39 for x4.
Hole punched in.
Cap length reduced to suit fitting.
Cap is tight on wiper arm shaft, so turns with it.
Cap totally covers the wheelbox to body fixing nut.
Job done...
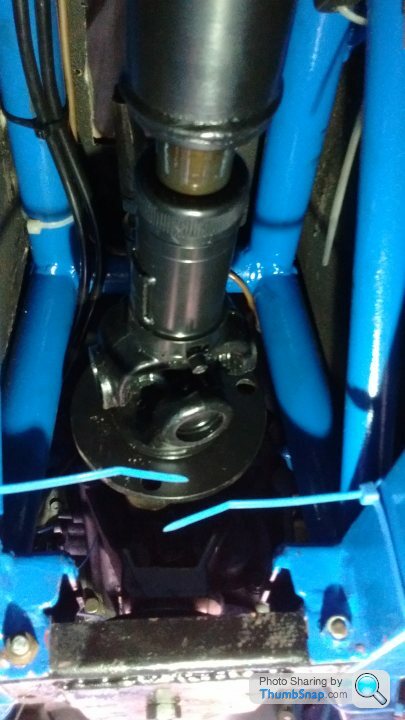
Oh, I haven't sealed under/around the wheelbox 'wedge' to body yet. See the attached photo.
Cable caps purchased for £3.39 for x4.
Hole punched in.
Cap length reduced to suit fitting.
Cap is tight on wiper arm shaft, so turns with it.
Cap totally covers the wheelbox to body fixing nut.
Job done...
Oh, I haven't sealed under/around the wheelbox 'wedge' to body yet. See the attached photo.
Edited by Blue 30 on Monday 16th September 21:11
Next....
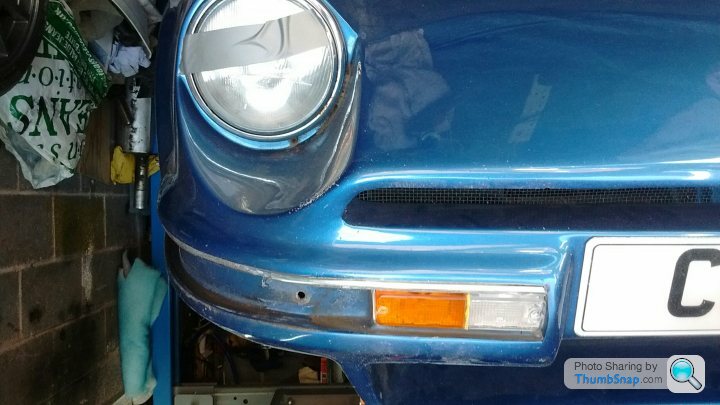
In common with other S owners, my front indicators had issues.
One cracked, one fell out, as the wood screws, sorry fixings had corroded through !
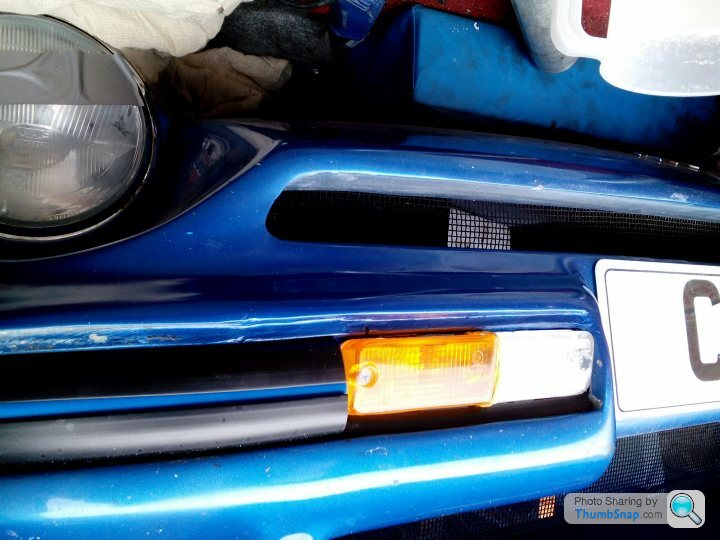
My lower valance area of the bonnet is pretty beat up, scratches, gouges etc, so being as I need to get the filler out, I might as well do something new with the indicators. Some time back I bought a pair of new old stock Fiat indicator/sidelight units, in the remote chance they might fit... Fettling reqd !!
So here is my today's efforts..
Bumper rubbers and chrome trim removed.
Chrome trim recess extended to over the indicator.
Trial fitted the new units. Infill reqd underneath, but I might use black trim strip.
Then new bumper rubbers of course, maybe in a new style....If I can find something I like... And fits !
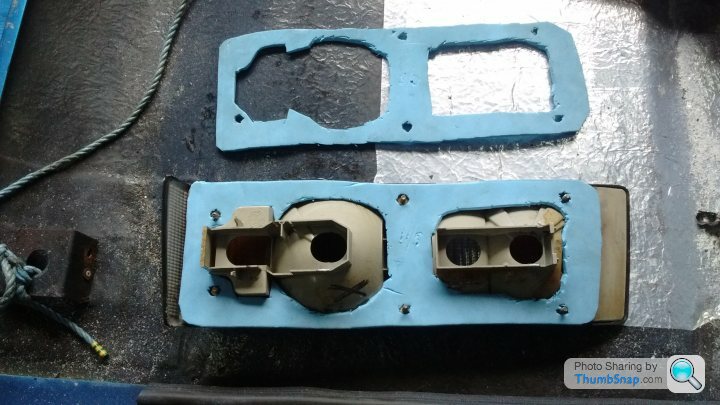
Tomorrow I need to create new back walls behind the indicator units, but fortunately I kept the GRP sheet that I cut out from cockpit back bulkhead, so I will cut that and glass it into place. That will give me the secure fixings for the units...
Yes they do have integral sidelights, but my intention is to connect those as DRLs.
T.

In common with other S owners, my front indicators had issues.
One cracked, one fell out, as the wood screws, sorry fixings had corroded through !
My lower valance area of the bonnet is pretty beat up, scratches, gouges etc, so being as I need to get the filler out, I might as well do something new with the indicators. Some time back I bought a pair of new old stock Fiat indicator/sidelight units, in the remote chance they might fit... Fettling reqd !!
So here is my today's efforts..
Bumper rubbers and chrome trim removed.
Chrome trim recess extended to over the indicator.
Trial fitted the new units. Infill reqd underneath, but I might use black trim strip.
Then new bumper rubbers of course, maybe in a new style....If I can find something I like... And fits !
Tomorrow I need to create new back walls behind the indicator units, but fortunately I kept the GRP sheet that I cut out from cockpit back bulkhead, so I will cut that and glass it into place. That will give me the secure fixings for the units...
Yes they do have integral sidelights, but my intention is to connect those as DRLs.
T.

Now getting on with more time consuming infill jobs !
I have bought some 2-part boat rubber bumper strip. Its about 1mm too wide in some areas of the bonnet recess but I think that's the car, not the strip. Its a bugger to bend and cut, but a hot air gun helps. Not yet final fitted, hence no photos.
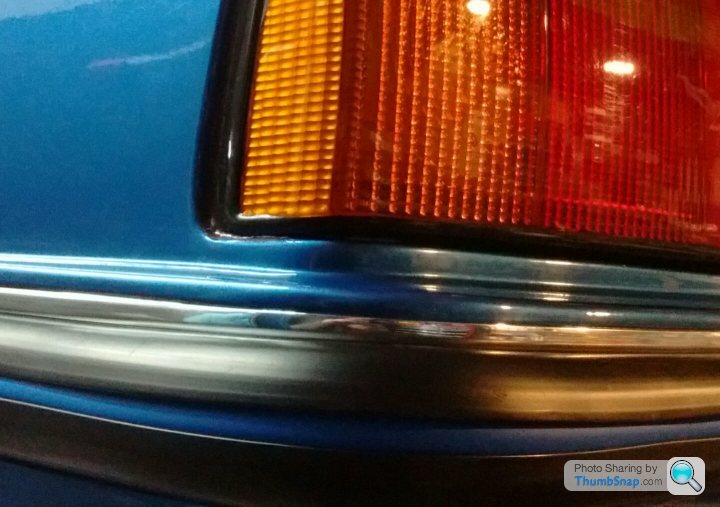
My rear light units were ugh, so sometime ago a bought & squirreled away a pair of new ones. Blimey, I've never seen so much body sealant between them and the body !! Obviously done to ensure a watertight seal (original Tvr?)
Once the body area had been cleaned of the goo, the new units were binding on the body, so careful filing and sanding was required to get them to be a snug fit. New soft neoprene gaskets made, followed by a bead of waterproof silicone seems to have done the job, and much neater...
Now I (dont) need to do some glue sniffing, to get the boot carpets refitted.
T.
I have bought some 2-part boat rubber bumper strip. Its about 1mm too wide in some areas of the bonnet recess but I think that's the car, not the strip. Its a bugger to bend and cut, but a hot air gun helps. Not yet final fitted, hence no photos.
My rear light units were ugh, so sometime ago a bought & squirreled away a pair of new ones. Blimey, I've never seen so much body sealant between them and the body !! Obviously done to ensure a watertight seal (original Tvr?)
Once the body area had been cleaned of the goo, the new units were binding on the body, so careful filing and sanding was required to get them to be a snug fit. New soft neoprene gaskets made, followed by a bead of waterproof silicone seems to have done the job, and much neater...
Now I (dont) need to do some glue sniffing, to get the boot carpets refitted.
T.
Chrome strips are readily available anything from 3mm to 30mm wide. 10mm seems about right in replacement for original. You can also get it in colours, black, red, blue, yellow etc.
Fleebay is the easy option. I find strips with grey or black sticky backing tape sticks better than the white tape. Warm it slightly in cold weather !
See eBay item.... 152999870457 for the boat fender rubber. Available in different widths, and different coloured inserts. Requires lots of patience (trimming etc) to get it to fit nicely... And a hot air gun !!!
T.
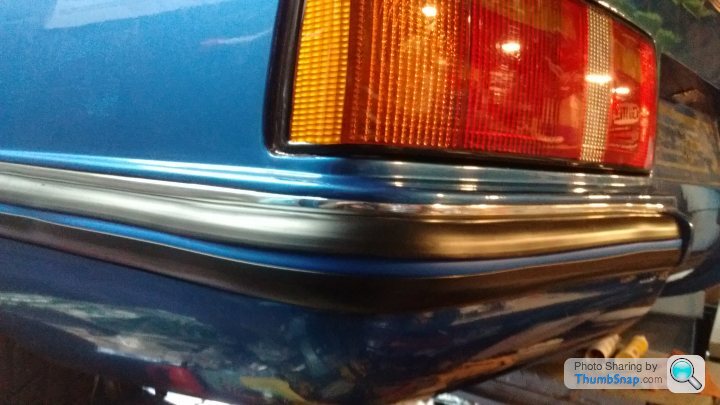
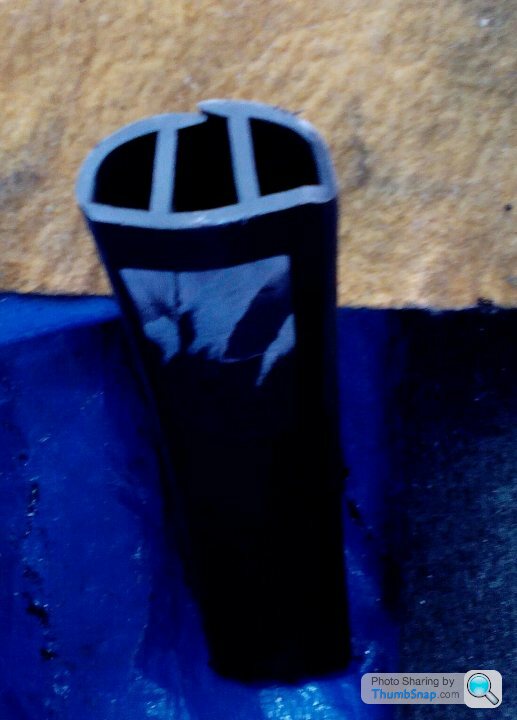
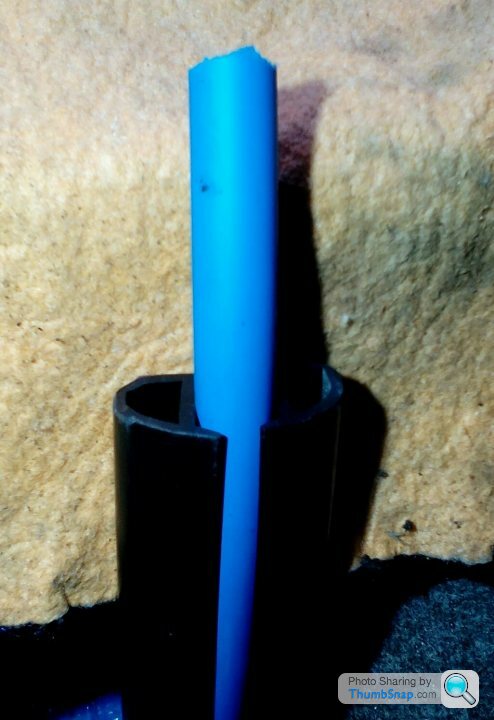
Here is an offcut of the bumper rubber (boat fender) strip.
Both without and with the insert.
But as I said previously, it is a bugger to work with, and a hot air gun is an essential (or hair dryer). Mine needed plenty of fine grinding of the back edges to ensure a snug fit into the body recess.
Now here's a mad thought... Replace the coloured insert tube with opaque tubing, and run some Led string lights inside it......... Mmmm maybe not !
And here is the first fit at the front, note no chrome finisher fitted as yet.
Edited by Blue 30 on Tuesday 1st October 14:48
No apologies reqd from fellow owners, hands on guys.
I did think about indicators in the tubes, but being as I don't like those Audi sequential funny flashy things, I couldn't bring myself to do it. Plus maybe one step too far as far as changing light patterns are concerned.
Thanks for the offer of 3D printing of a bumper insert end cap. You're pushing my skills as a printer/scanner operator, but I'll try... I might be some time !
The condition of your wheels are something I allude to, albeit at the end of my project. Mine are currently in good solid condition, but with plenty of scabby clear lacquer. I might go for a 2 colour powder coating as apposed to diamond cutting & clear coating again.
All wheels do have their original centre caps in good condition, but they can stay on the wheels for now... At least I can't loose them
T.
Edited by Blue 30 on Tuesday 1st October 22:02
No photos to accompany this latest post...
Which was back to the serious work.
Get the new battery installed onto the boot battery tray, including suitable clamps. (I never knew there were so many types, some not looking very robust, so I chose yer basic/simple bolt clamp type).... Done
Tighten/check all of the new remote oil filter & cooler unions. Then fill engine with oil. (I did pre fill the cooler & filter to help with priming)... Done.
Check pas pipe unions, and fill with oil... Done.
Then.... Being as my new ecu is unplugged, I could do some basic systems checks.
Turn ignition 'on'... No noises, no smoke.... Always a good sign
But no oil light ( yes, I have now have one).
Who said... Using and installing new components will always work.
Ha, not always !!
Check jag sender for Neg... Tick.
Check Neg at lamp holder... Tick
Check Pos at bulb holder... Tick
Take lamp out and test across a battery... Tick
Re insert lamp into holder, and turn ignition 'on', low and behold it now works, so it must have been a bad contact between lamp and holder. (Good quality Lucas holder and lamp used).
Ignition light also is a new Lucas lamp & holder... That works.
So I might as well go for cranking.... Here goes.
Perfect, obviously it doesn't start (no ecu, no fuel). The oil light goes out, and the oil gauge shows pressure... Big Tick.
Recheck all of the hose unions, a couple are weeping, but a 1/4 turn fixes them.
Check the 'fan belt' and seating around each wheel.
The belt around the pas pump wheel has jump one notch (6 notch flat belt), Mmmm....
The Jag original belt setup has x7 wheels that the belt goes around, x3 of which are idlers. On my setup x2 of those had to be replaced & repositioned.
I thought I had got the alignment right !
So check them all again.... Ah, I can see its the pas pump that's sitting slightly too far forward. A washer between each bracket and pump moves it back just enough.
Re crank, and its all good, so today I'm happy !!!!
Next.... Dunno yet
T.
Yet more progress...
Mainly on wiring tidying, and additions such as a new remote central locking controller, USB sockets, cigar type socket etc.
Plus trial fitting of the new Jag to Ford prop shaft, and the original middle & tail sections of the exhaust to see how easy/hard its going to be to mate it up to my custom Jag manifold pipes.
Not too bad it appears !
Oh... A QUESTION.
Can anyone take a photo of their S3 handbrake warning light switch assembly (its hiding behind the handbrake leather gaitor), as mine seems to have vanished.
Although thinking about it, I don't recall ever removing it, but the wiring is there.
Tis amazing what a photo can do in help terms.
I have now looked closely at my carpet area by the handbrake lever. And sure enough there is an indent in the carpet with x2 little holes.
So that confirms what should be there. I'll sort it out as I get bored doing other jobs
Many thanks.
T.
I have now looked closely at my carpet area by the handbrake lever. And sure enough there is an indent in the carpet with x2 little holes.
So that confirms what should be there. I'll sort it out as I get bored doing other jobs
Many thanks.
T.
Gassing Station | S Series | Top of Page | What's New | My Stuff