Terry's tale. (S3 resto ++)
Discussion


In reply to 'magpies' question...
Hi Terry...Are the pipes 50mm id ? If smaller they may compromise the power.
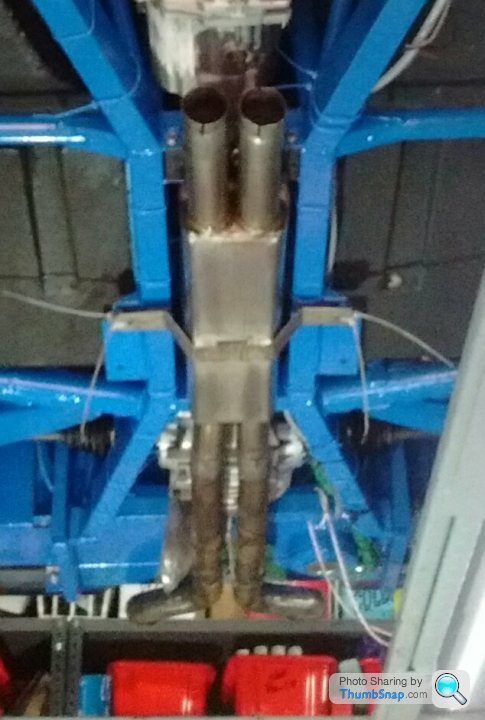
My reply and thoughts are... My exhaust is 50mm +/- 2mm on the flanges. The cars exhaust system was one of the good features on the car at purchase, as it is in very good condition, s/steel of course. I think it must have been a custom build, as it doesn't use the tank frame as a support, its on the cross rail by the diff. My fuel tank sump is offset, so both tail pipes exit straight out and up, but well apart (like the V8 does... I think).
In reality I don't think it would make that much difference say going down to 45mm in power terms, as the Jag has x2 cats, and x4 silencers restricting the system. I just have x1 common silencer !
I think its gonna be loud...
I can't show you a photo of the tail pipe layout just yet, as I've took the exhaust back off again to do other bits and pieces... Sorry !
T.
Hi Terry...Are the pipes 50mm id ? If smaller they may compromise the power.
My reply and thoughts are... My exhaust is 50mm +/- 2mm on the flanges. The cars exhaust system was one of the good features on the car at purchase, as it is in very good condition, s/steel of course. I think it must have been a custom build, as it doesn't use the tank frame as a support, its on the cross rail by the diff. My fuel tank sump is offset, so both tail pipes exit straight out and up, but well apart (like the V8 does... I think).
In reality I don't think it would make that much difference say going down to 45mm in power terms, as the Jag has x2 cats, and x4 silencers restricting the system. I just have x1 common silencer !
I think its gonna be loud...
I can't show you a photo of the tail pipe layout just yet, as I've took the exhaust back off again to do other bits and pieces... Sorry !
T.
Edited by Blue 30 on Friday 18th October 14:31
One of those straight forward jobs that wasn't..
Obtaining new headlight rims seemed like a pretty easy job to deal with, but I thought it best to do a Google search on S ph for replacing the rims.
From reading those it appears that once again S headlight parts can and do vary.
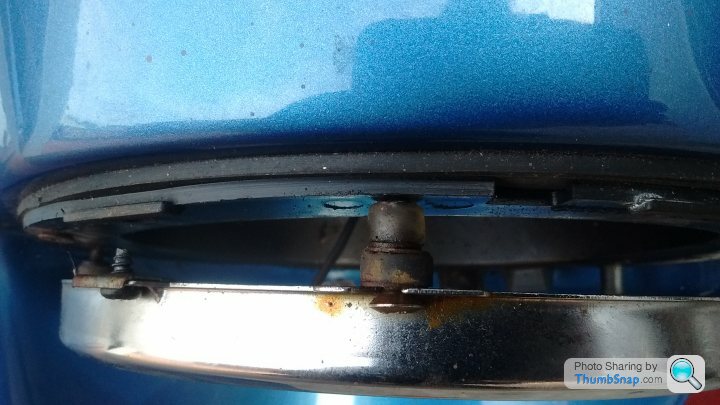
There are x2 common sizes (203mm & 213mm). Both having varying designs of the rim back edge. Some are folded, some are square edged.
Mini, land rover, mg being the obvious source. Mine were 203mm with a small rear lip. The buckets are plastic with 2 lugs for the rim to engage with.
Being as I didn't want to risk an online purchase only to find they wouldn't fit, I went to a local-ish resto show armed with my rusty rim. Only Chase MG had any, the MGA ones looked close but not exactly the same. Barry (of Chase MG) said I could return them if they didn't fit, so I bought a pair. Oh, they are chrome on brass.
Photos attached of the bucket lugs.
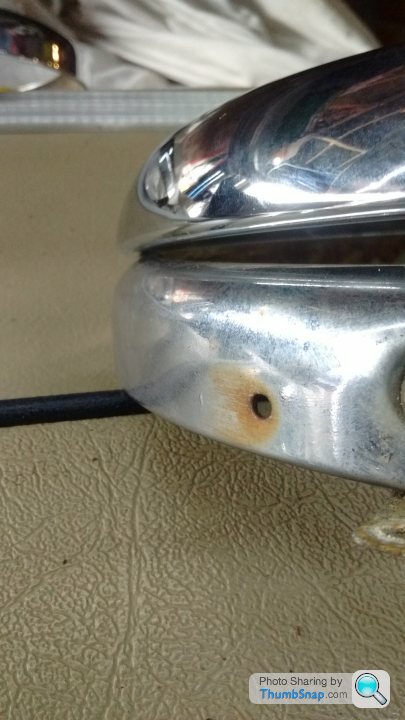
The rim profile difference.
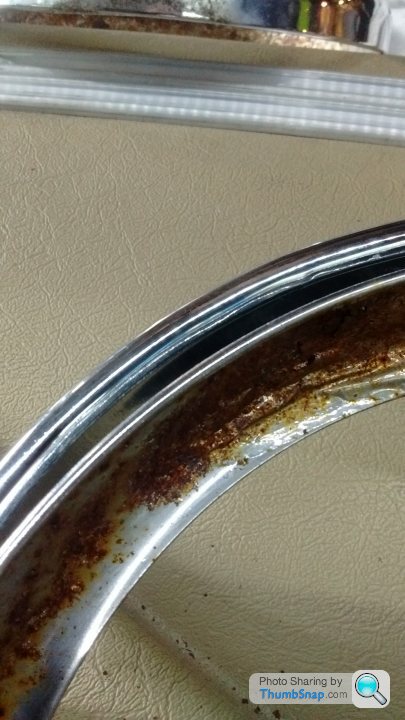
The rear rolled edge difference.
But they DO fit, I just have to make & attach that little TVR securing bracket.
T.
Obtaining new headlight rims seemed like a pretty easy job to deal with, but I thought it best to do a Google search on S ph for replacing the rims.
From reading those it appears that once again S headlight parts can and do vary.
There are x2 common sizes (203mm & 213mm). Both having varying designs of the rim back edge. Some are folded, some are square edged.
Mini, land rover, mg being the obvious source. Mine were 203mm with a small rear lip. The buckets are plastic with 2 lugs for the rim to engage with.
Being as I didn't want to risk an online purchase only to find they wouldn't fit, I went to a local-ish resto show armed with my rusty rim. Only Chase MG had any, the MGA ones looked close but not exactly the same. Barry (of Chase MG) said I could return them if they didn't fit, so I bought a pair. Oh, they are chrome on brass.
Photos attached of the bucket lugs.
The rim profile difference.
The rear rolled edge difference.
But they DO fit, I just have to make & attach that little TVR securing bracket.
T.
Edited by Blue 30 on Wednesday 30th October 22:26
I thought my quadoptic headlight lens/reflector units were serviceable albeit being grubby on the inside of the lens. So I tried to wipe it clean. One cleaned okay, the other also wiped away part of the reflector !!! So a new pair are on order, and the refit must wait a while.
T.
T.
Edited by Blue 30 on Friday 1st November 20:38
Onto summat else...
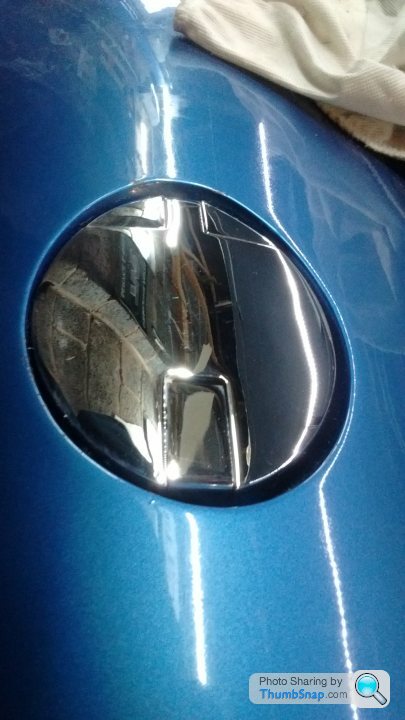
I had the fuel filler cap re chromed a while back, so I thought it about time I put the parts back together, and refit it to the car.
But as I had dismantled it, that's how it came back from the chromers. It's a fiddly job requiring lots of patience and a steady hand to knock the hinge pins back in, including the spring loaded inner cap.
Anyway, it's done and back on the car.
My re chroming was done at Howells of Walsall.
T.
Going back to the handbrake warning light switch issue.
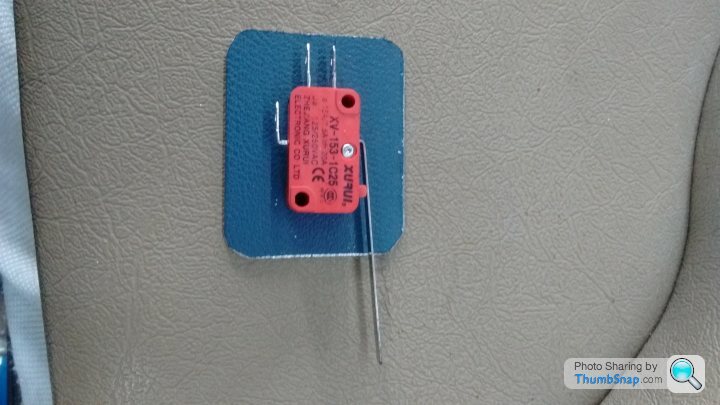
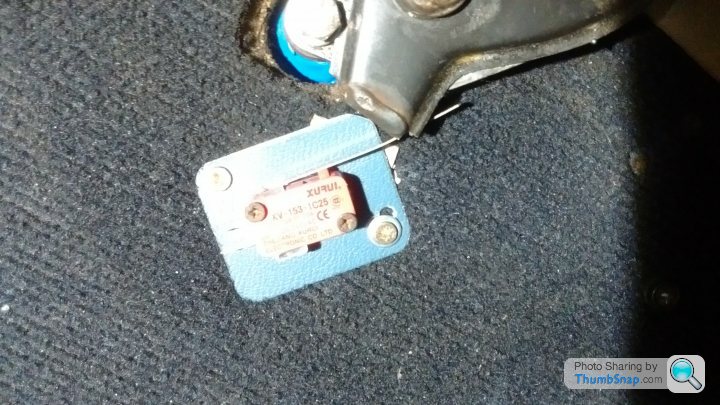
I got myself a long lever microswitch, mounted it onto an aluminium backplate (to stop it sinking into the carpet). X2 fixing holes, one elongated to allow adjustment.
Anyway it 'click clicks' okay, so all I need to do is add the wires, slide the cover on, and jobs a good un !
T.
I got myself a long lever microswitch, mounted it onto an aluminium backplate (to stop it sinking into the carpet). X2 fixing holes, one elongated to allow adjustment.
Anyway it 'click clicks' okay, so all I need to do is add the wires, slide the cover on, and jobs a good un !
T.
I have had the engine turning over (cranking), but being as I don't have any intentions to have to car running/moving under its own steam until at least Easter 2020, there's no point in putting fuel in it just to start it, and then let it stand over the winter gumming everything up etc.
As you can tell from my recent posts, I'm jumping all over the car getting lots of sundry jobs done. The car is on the ground (not on the lift) at the mo, the bonnet is back on hopefully for good this time, although I've yet to align it on the modified hinges allowing the 'wide open' look. Once that's done I have a pair of surplus gas rams to go on, that should be good as the tether. Then I can get all of the bonnet lighting wiring finished, secure the new sidelight/indicators.
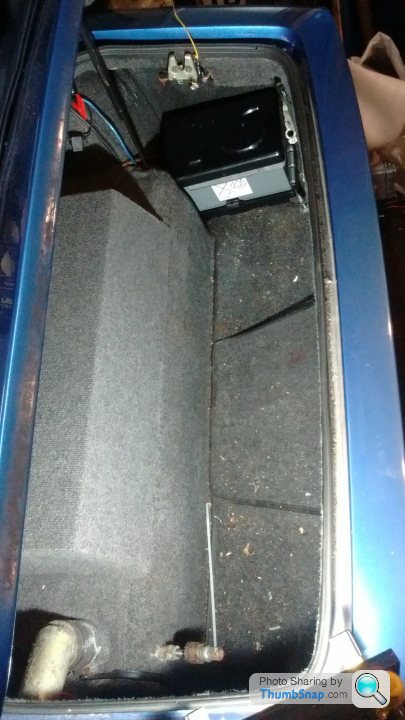
The boot is now empty of parts so I can re glue the carpet down.
That could be the front & back finished ?
The interior still has a way to go, plus I've only just touched the roof panels etc...
Oops, and I nearly forgot about the exhaust...
So I've plenty to do over the winter !!!
Don't worry, I'll let you know as soon as I connect my PC to the Emerald ecu.
As that'll mean I'm doing engine wiring & sensor checks, adding the odd software changes to suit my installation, in readiness for...... Vrummm.
Oh, I will more than likely have some grey ribbed carpet left over once I've done the boot... So if you want any, watch this space.
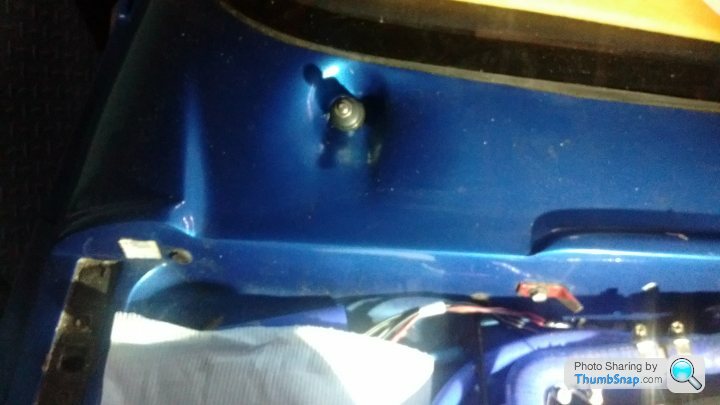
Question.... Does anyone know how to remove a wing repeater indicator (the square type). As mine just seem to turn, and I don't want to force and break one !
T.
As you can tell from my recent posts, I'm jumping all over the car getting lots of sundry jobs done. The car is on the ground (not on the lift) at the mo, the bonnet is back on hopefully for good this time, although I've yet to align it on the modified hinges allowing the 'wide open' look. Once that's done I have a pair of surplus gas rams to go on, that should be good as the tether. Then I can get all of the bonnet lighting wiring finished, secure the new sidelight/indicators.
The boot is now empty of parts so I can re glue the carpet down.
That could be the front & back finished ?
The interior still has a way to go, plus I've only just touched the roof panels etc...
Oops, and I nearly forgot about the exhaust...
So I've plenty to do over the winter !!!
Don't worry, I'll let you know as soon as I connect my PC to the Emerald ecu.
As that'll mean I'm doing engine wiring & sensor checks, adding the odd software changes to suit my installation, in readiness for...... Vrummm.
Oh, I will more than likely have some grey ribbed carpet left over once I've done the boot... So if you want any, watch this space.
Question.... Does anyone know how to remove a wing repeater indicator (the square type). As mine just seem to turn, and I don't want to force and break one !
T.
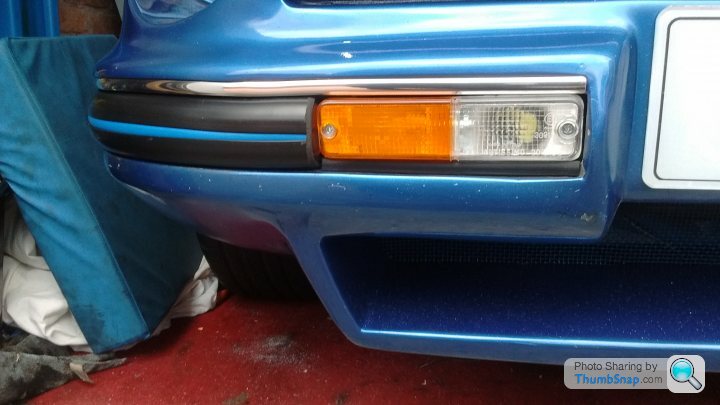


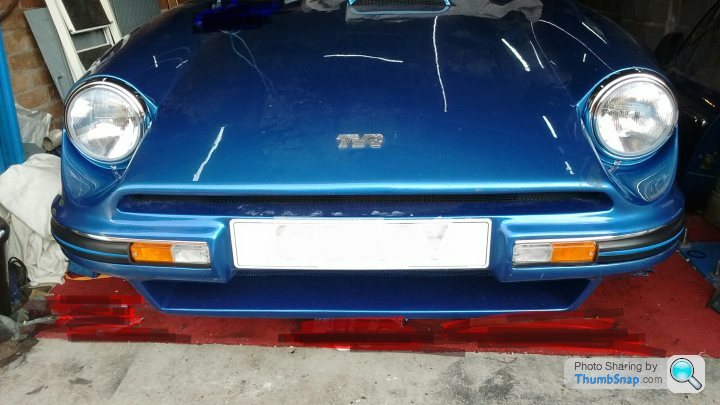
And now I have bright eyes, and the outside front is finished.
They are 7" Wipac Quadoptics lenses with Ring Xenon Ultima lamps.
And new Mga chrome on brass rims.
More importantly it was the last job (until the spring) where I needed the garage door open. So from now on I'll work on it through the winter with the door firmly closed.....
That's excepting our ensuite refit that I apparently agreed to, to be done in the new year
T.
88S1 said:
Terry, I can 3D print you something if you want. Do you have a scanner on your printer. If so scan the end of the tube with insert in it and send me the scan, or do a quick sketch, I’ll produce an AutoCAD drawing of it and email it to you, if you print at 1:1 and compare until
We get it perfect. Once we have the dims/shape right I can 3D print you some caps.
Hi Lee... In the end I decided to just superglue some flat section rubber onto the ends of the strips, then fine grind it to shape. I think it looks OK. See below.We get it perfect. Once we have the dims/shape right I can 3D print you some caps.
But thanks for the offer of 3D printing some caps.
T.
As I have recently said...
I have been concentrating on the general restoration,plus some mods of my S3.
The latest being, getting all of the bonnet wiring back in place, and introduce the Drl unit. Black box technology these days are pretty well 'plug & play' that's once you have everything in situ. Only the supplied diagram had the odd translation issue..
Listed as sidelights but really meaning indicators !!
Anyway tis sorted and they're working just fine.
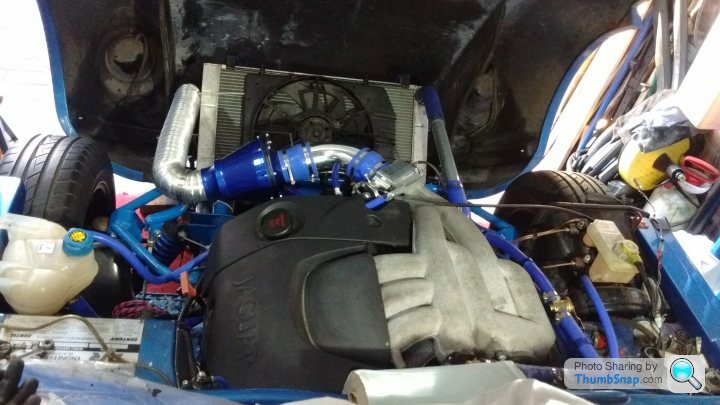
Lots to still do of course, but here's a general current 'state of play' view of the Jag AJ30 in situ.
T.
I have been concentrating on the general restoration,plus some mods of my S3.
The latest being, getting all of the bonnet wiring back in place, and introduce the Drl unit. Black box technology these days are pretty well 'plug & play' that's once you have everything in situ. Only the supplied diagram had the odd translation issue..
Listed as sidelights but really meaning indicators !!
Anyway tis sorted and they're working just fine.
Lots to still do of course, but here's a general current 'state of play' view of the Jag AJ30 in situ.
T.
Does anyone currently doing a resto and wanting to maintain originality, want an early Christmas present FOC ?
This is a totally unmolested, absent of any heat damage, ignition switch wiring connector (used & from my S3)
Although personally I think they only deserve to be dispatched to TVR heaven.
T.
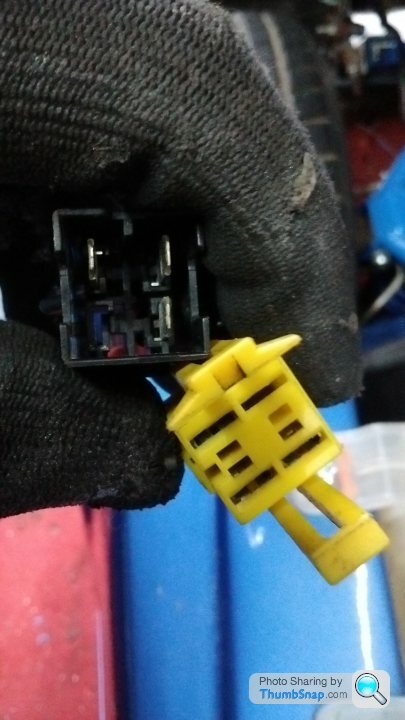
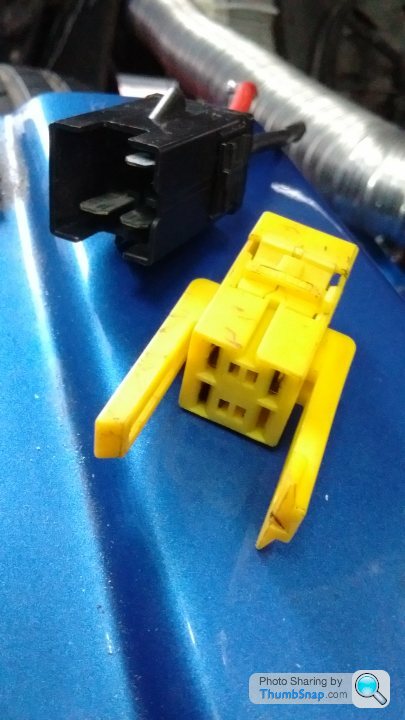
Oh, I am having a laugh, of course.
This is a totally unmolested, absent of any heat damage, ignition switch wiring connector (used & from my S3)
Although personally I think they only deserve to be dispatched to TVR heaven.
T.
Oh, I am having a laugh, of course.
Edited by Blue 30 on Sunday 24th November 14:13
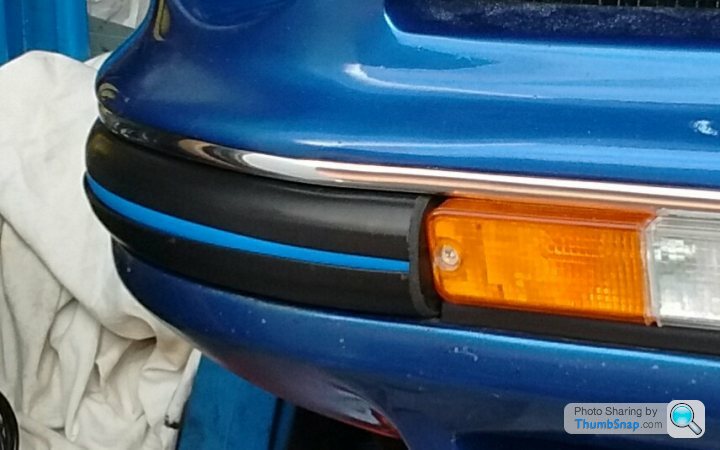
In common with most soft top sports cars, the S suffers from its own share of water ingress. But during the stripdown phase of my restoration, I soon realized that some of it was due to by poor design detail &/or build quality !
One of those areas of concern is the way water sheads off the windscreen, behind the bonnet, then onto the bulkhead, which in turn runs into the brake servo or the wiring loom. Neither being ideal !!
My plan was to build up the little dam wall that partially runs across the front of the scuttle. Then drill a hole and feed a drain pipe through the car, exiting on the floor.
Then I spied a photo on PH where someone had fitted a channel (read gutter) across the scuttle.
Mmmm, I like it.
Thank you to who ever thought up the idea.
So here is my version... Only one side done and yet to be painted.
Before.
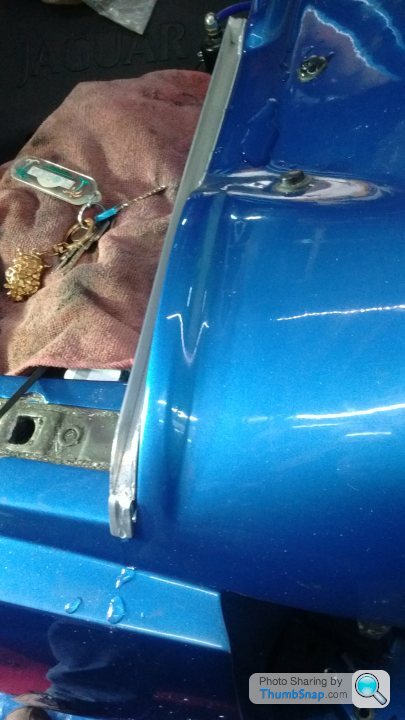
After. Note the water droplets, it works !
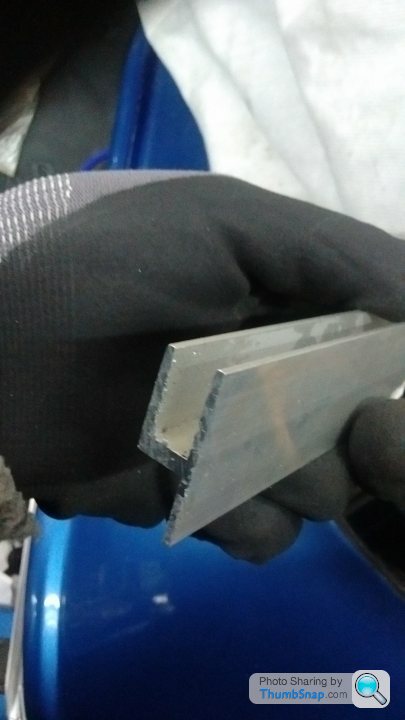
The channel I used. Double sided taped on at the moment, but screws could be used.
T.
One of those areas of concern is the way water sheads off the windscreen, behind the bonnet, then onto the bulkhead, which in turn runs into the brake servo or the wiring loom. Neither being ideal !!
My plan was to build up the little dam wall that partially runs across the front of the scuttle. Then drill a hole and feed a drain pipe through the car, exiting on the floor.
Then I spied a photo on PH where someone had fitted a channel (read gutter) across the scuttle.
Mmmm, I like it.
Thank you to who ever thought up the idea.
So here is my version... Only one side done and yet to be painted.
Before.
After. Note the water droplets, it works !
The channel I used. Double sided taped on at the moment, but screws could be used.
T.
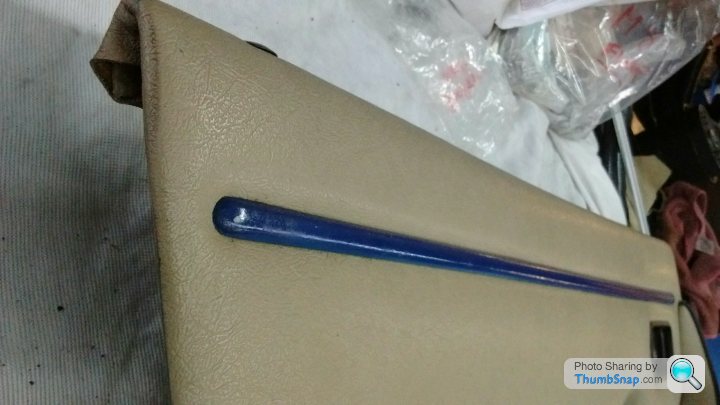
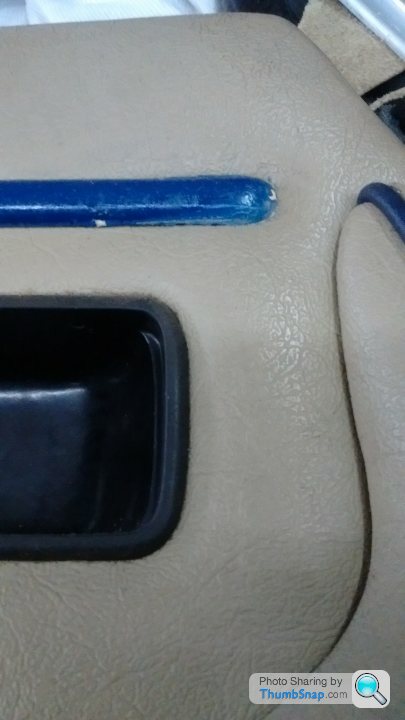
Continuing along the aluminium section theme...
My interior door panels required work, mainly due to someone (TVR ?) Seemingly painted the upper long strip with a tar brush in blue, plus in a couple of places the vinyl had been nicked, like a craft knife had been used !
The rest of the vinyl is good so I didn't want to get them recovered (or the cost). A plan was required...
On a couple of previous non TVR projects, I had replaced running board strips. They are aluminium with a rubber insert.
Mmmm, I wonder ??
I bought a length of the aluminium without the rubber, as that wouldn't be required. The width being a couple of mm wider than the TVR strip, so it covers the nicks, great. But now what to do about the recess...
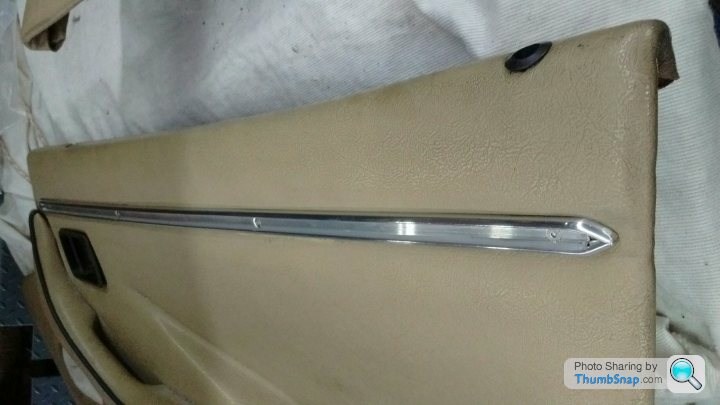
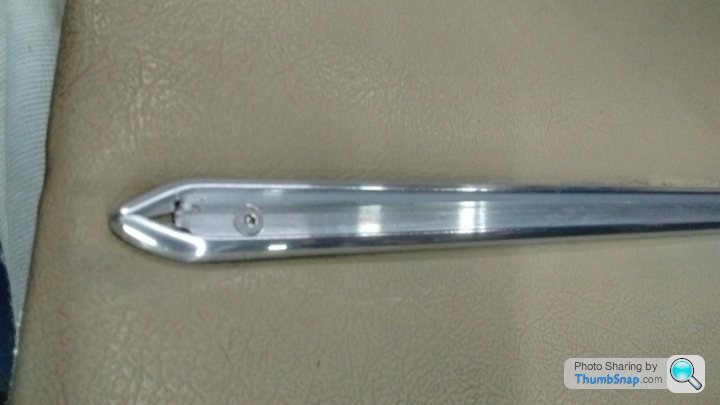
As you can see, I have cut and reshaped the ends.
Mmmm, I wonder ??
I bought a length of the aluminium without the rubber, as that wouldn't be required. The width being a couple of mm wider than the TVR strip, so it covers the nicks, great. But now what to do about the recess...
As you can see, I have cut and reshaped the ends.
Gassing Station | S Series | Top of Page | What's New | My Stuff