Exhaust grounding, what can be done?
Discussion


Richard, that was generally a very good summary.
However, the items some S Clubbers have obtained from Burton Performance are the stainless engine mount support cups, which help to counter any sagging of the rubber mounts by limiting the deformation
When I replaced my saggy old mounts, I made a couple of spacers to fit between the top of each mount and the engine mount bracket. I just found some 1/8" ( 3.25mm ) thick square washers and slotted them so they could be slipped into place before tightening up the engine mount nuts.
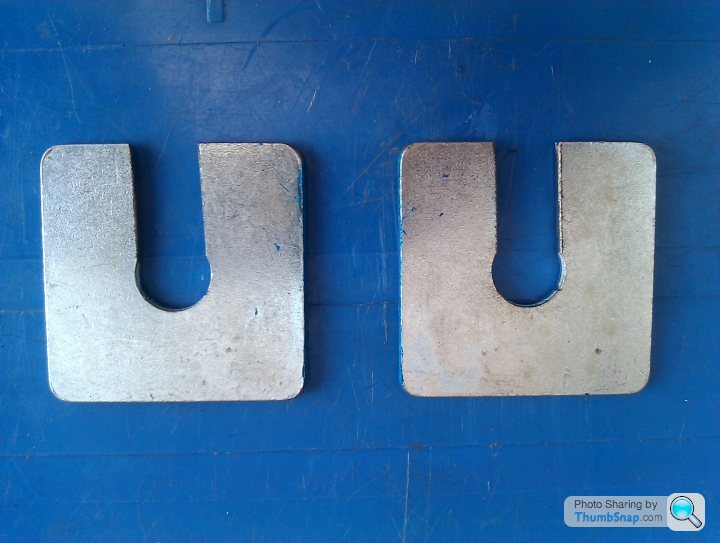
I only fitted a couple each side which raised the block by a further 6.5mm.
That was the limit because any more would cause problems with the alternator and other high points fouling on the underside of the bonnet.
When replacing the mounts, make sure the engine is sitting level before tightening up, as it is possible to have the engine "canted" to either side, which would reduce exhaust ground clearance on one side.
Definitely fit Mikalor type exhaust clamps.
And 60 profile tyres as per original to retain that extra bit of ground clearance. Every little helps as they say...
These days I seem to suffer more grounding with Percy, my S3c, than I did with my S1, Austin, once I had sorted things. Perhaps they are building speed humps higher these days? Like the ridiculous ramparts on the entrance to Basingstoke Services! Percy was almost beached on them, and that was even before I put in a tankful of fuel!
As for tyres, when the present 55 profiles are getting worn out, I shall be fitting 60's BlueRinse onto Percy.
Not long now....
However, the items some S Clubbers have obtained from Burton Performance are the stainless engine mount support cups, which help to counter any sagging of the rubber mounts by limiting the deformation
When I replaced my saggy old mounts, I made a couple of spacers to fit between the top of each mount and the engine mount bracket. I just found some 1/8" ( 3.25mm ) thick square washers and slotted them so they could be slipped into place before tightening up the engine mount nuts.
I only fitted a couple each side which raised the block by a further 6.5mm.
That was the limit because any more would cause problems with the alternator and other high points fouling on the underside of the bonnet.
When replacing the mounts, make sure the engine is sitting level before tightening up, as it is possible to have the engine "canted" to either side, which would reduce exhaust ground clearance on one side.
Definitely fit Mikalor type exhaust clamps.
And 60 profile tyres as per original to retain that extra bit of ground clearance. Every little helps as they say...
These days I seem to suffer more grounding with Percy, my S3c, than I did with my S1, Austin, once I had sorted things. Perhaps they are building speed humps higher these days? Like the ridiculous ramparts on the entrance to Basingstoke Services!
Percy was almost beached on them, and that was even before I put in a tankful of fuel!As for tyres, when the present 55 profiles are getting worn out, I shall be fitting 60's BlueRinse onto Percy.
Not long now....
I must admit, Phillpot, something looked odd on Steves car, a quick look underneath (hampered a bit on grass) suggested the very front of the system was lower than the rest, which shouldn't happen. Got distracted so I didnt investigate further. So someone who didnt understand about ground clearance botched it eh? TVR did a better job!!
Come on Steve, stop polishing and sort out the important bits
Thanks Glen, I couldnt remember how you did it, that was an easier solution than I expected , I see a little garage job coming up. You got 6.5mm. I have some 5mm plate I will try first. I dont want to go down the Burton route yet as the mountings are pretty recent, maybe when I finally get round to changing the engine.
Come on Steve, stop polishing and sort out the important bits
Thanks Glen, I couldnt remember how you did it, that was an easier solution than I expected
, I see a little garage job coming up. You got 6.5mm. I have some 5mm plate I will try first. I dont want to go down the Burton route yet as the mountings are pretty recent, maybe when I finally get round to changing the engine.Its starting to look better, spun the exhaust clamps round so there not vertical with the floor in return the bolts aren't aiming down at speed bumps now. Found one bolt had completely bent from where it had grounded at barn farm sending the clamp inwards indenting the actual stainless exhaust pipe *sigh*
Will see how it goes if not exhaust will come off & mikalor exhaust clamps on, only other thing I could do is raise the suspension but as I said earlier it looks about right to me.
Will see how it goes if not exhaust will come off & mikalor exhaust clamps on, only other thing I could do is raise the suspension but as I said earlier it looks about right to me.
Steve, Loose the U clamps and use Mikalors, it will reduce the amount of damage.
The S2 exhaust drags over speed bumps evey time, sits so low it's just inevitable.
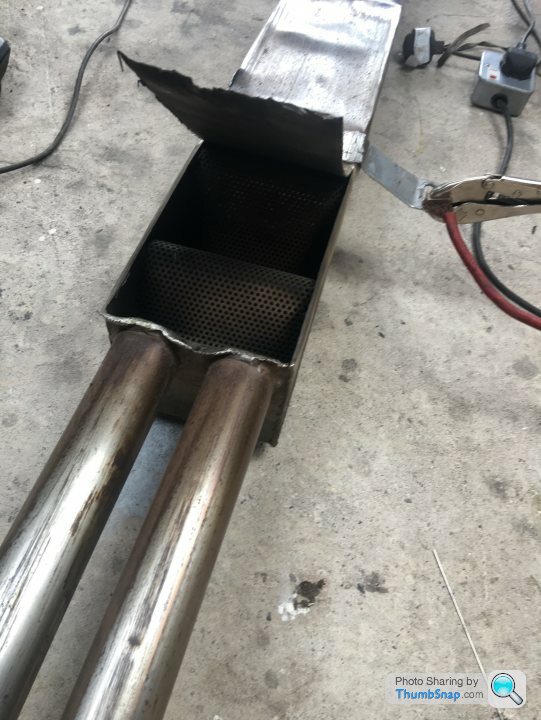
It was blowing a bit of late, the edges of the centre box had worn away, one of the centre brackets was adrift and there was a large crack in the join near the front of the silencer.
All welded up and fitted snug to the chassis, ready to scrub on the ground again.
Pity I don't get to see the sparks on bumpy roads,
it got stuck on the ferry ramp at Calais, the tyres made much smoke before freeing its self
Couldn't have been more pleased but no one else looked impressed
The S2 exhaust drags over speed bumps evey time, sits so low it's just inevitable.
It was blowing a bit of late, the edges of the centre box had worn away, one of the centre brackets was adrift and there was a large crack in the join near the front of the silencer.
All welded up and fitted snug to the chassis, ready to scrub on the ground again.
Pity I don't get to see the sparks on bumpy roads,
it got stuck on the ferry ramp at Calais, the tyres made much smoke before freeing its self
Couldn't have been more pleased
but no one else looked impressedEdited by Alan461 on Friday 14th July 17:28
Edited by Alan461 on Friday 14th July 21:02
Alan461 said:
Steve, Loose the U clamps and use Mikalors, it will reduce the amount of damage.
It was blowing a bit of late, the edges of the centre box had worn away, one of the centre brackets was adrift and there was a large crack in the join near the front of the silencer.
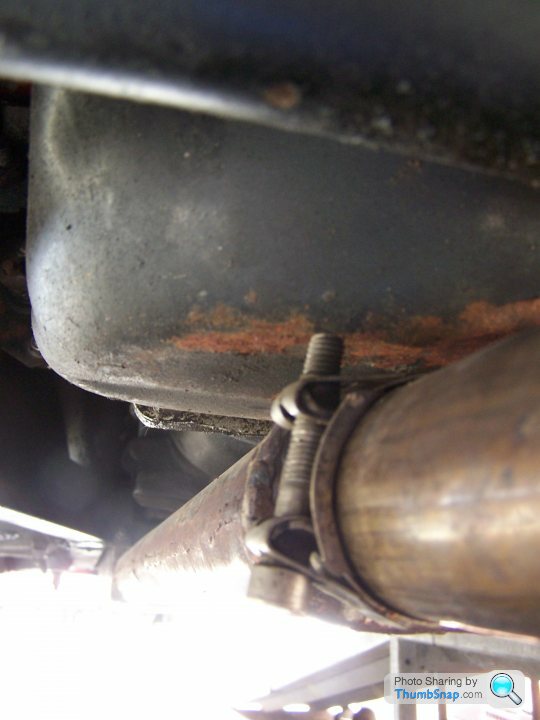
Hi Alan, do you not have the oval section or am I misinterpretting the photo?It was blowing a bit of late, the edges of the centre box had worn away, one of the centre brackets was adrift and there was a large crack in the join near the front of the silencer.
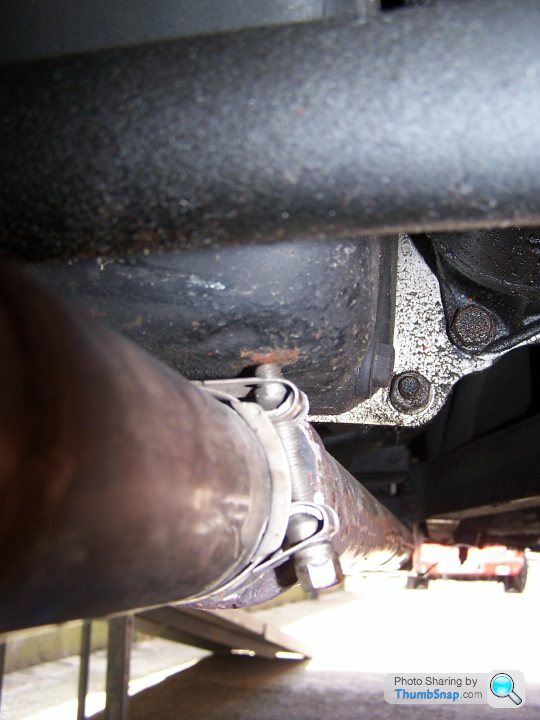
For info, here is Mikalor fitted but with a socket head alan bolt to get 2 mm more! Dont worry, the top (threaded) part is actually (just!) below the top of the pipe and cannot hit the sump. Steve, can you see how close the pipe is to the sump.
Second pic is of Mikalor with bolt as supplied, that little bit deeper head.
greymrj said:
Hi Alan, do you not have the oval section or am I misinterpretting the photo?
The oval section is out of shot and would be above the rest of the photo, pictured is the rear of the muffler box.greymrj said:
Alan461 said:
Couldn't you have ground a point on to the end of that thread to help it punch a hole through the sump?
Very funny!!! As it so happens the marks on the sump are from the old bolts. I did check that impact would NOT put the Mikalor ones into the sump!. Mind you the existing slight dent in the sump was useful and I wont be hammering it out! I have to say I am pleased, it was well worth going Mikalor and changing the bolt to 'allen'. I have had a couple of pretty good 'groundings' at speed since and it has all stayed together and has scaped along without other damage. A success. Now to try Glens approach and raise the engine a little. I was running the back suspension a little softer than needed and that did cause some unnecessary pitching. Lets see what happens next trip. glenrobbo said:
The spacers are easy enough to knock up. I bought the washers from my local DIY shop and slotted them with a hacksaw. Easy peasey.
A tip for fitting the spacers; if you slacken the top engine mount nut to the end of the thread you can jemmy the stud down against the the side of the block to slide the spacers in. Takes seconds and saves all the jacking. phillpot said:
Looks like all your problems could be solved soon ................ speed bumps ... 
 hopefully cured it already.. Just need to send shocks up an inch next
phillpot said:
Looks like all your problems could be solved soon ................ speed bumps ...
I saw that too (not in the Torygraph though , why would removing speed bumps and 'street furniture' have any difference on pollution, without prejudicing road safety? Gassing Station | S Series | Top of Page | What's New | My Stuff