Terry's tale. (S3 resto ++)
Discussion


Blue 30 said:
Good call...
I saw that thread, but completely forgot about it.... Drrr !
I'll have a rummage in my garage to see what I've got.
Thanks.
T.
Terry, I can 3D print you something if you want. Do you have a scanner on your printer. If so scan the end of the tube with insert in it and send me the scan, or do a quick sketch, I’ll produce an AutoCAD drawing of it and email it to you, if you print at 1:1 and compare untilI saw that thread, but completely forgot about it.... Drrr !
I'll have a rummage in my garage to see what I've got.
Thanks.
T.
We get it perfect. Once we have the dims/shape right I can 3D print you some caps.
If you are going to do some caps I'd suggest making them slightly narrower than standard at the badge end. This is because they are usually a very tight fit and can damage the lacquer. When I had my wheels refurb'd I opened out the centre holes very slightly before I handed them over. When I got the wheels back I was able to pop the centre caps in and out with just thumb pressure because they weren't catching the lacquer on the inside of the centre hole. Hope that make sense 
v8s4me said:
If you are going to do some caps I'd suggest making them slightly narrower than standard at the badge end. This is because they are usually a very tight fit and can damage the lacquer. When I had my wheels refurb'd I opened out the centre holes very slightly before I handed them over. When I got the wheels back I was able to pop the centre caps in and out with just thumb pressure because they weren't catching the lacquer on the inside of the centre hole. Hope that make sense
It’s end caps for the rubber bumper insert to close the open end off, not the wheels I think anyway. Blue 30 said:
Here is an offcut of the bumper rubber (boat fender) strip.
Both without and with the insert.
But as I said previously, it is a bugger to work with, and a hot air gun is an essential (or hair dryer). Mine needed plenty of fine grinding of the back edges to ensure a snug fit into the body recess.
Now here's a mad thought... Replace the coloured insert tube with opaque tubing, and run some Led string lights inside it......... Mmmm maybe not !
You could put an orange one in with the LEDs behind and turn it into an indicator. 😁Both without and with the insert.
But as I said previously, it is a bugger to work with, and a hot air gun is an essential (or hair dryer). Mine needed plenty of fine grinding of the back edges to ensure a snug fit into the body recess.
Now here's a mad thought... Replace the coloured insert tube with opaque tubing, and run some Led string lights inside it......... Mmmm maybe not !

No apologies reqd from fellow owners, hands on guys.
I did think about indicators in the tubes, but being as I don't like those Audi sequential funny flashy things, I couldn't bring myself to do it. Plus maybe one step too far as far as changing light patterns are concerned.
Thanks for the offer of 3D printing of a bumper insert end cap. You're pushing my skills as a printer/scanner operator, but I'll try... I might be some time !
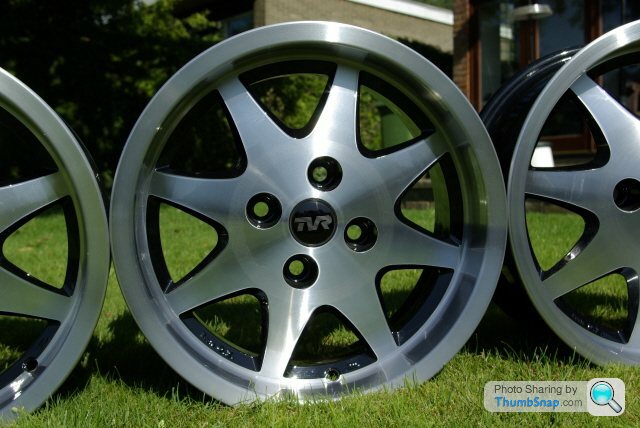
The condition of your wheels are something I allude to, albeit at the end of my project. Mine are currently in good solid condition, but with plenty of scabby clear lacquer. I might go for a 2 colour powder coating as apposed to diamond cutting & clear coating again.
All wheels do have their original centre caps in good condition, but they can stay on the wheels for now... At least I can't loose them
T.
I did think about indicators in the tubes, but being as I don't like those Audi sequential funny flashy things, I couldn't bring myself to do it. Plus maybe one step too far as far as changing light patterns are concerned.
Thanks for the offer of 3D printing of a bumper insert end cap. You're pushing my skills as a printer/scanner operator, but I'll try... I might be some time !
The condition of your wheels are something I allude to, albeit at the end of my project. Mine are currently in good solid condition, but with plenty of scabby clear lacquer. I might go for a 2 colour powder coating as apposed to diamond cutting & clear coating again.
All wheels do have their original centre caps in good condition, but they can stay on the wheels for now... At least I can't loose them
T.
Edited by Blue 30 on Tuesday 1st October 22:02
Blue 30 said:
.... I might go for a 2 colour powder coating as apposed to diamond cutting & clear coating again....
Much more sensible. The diamond cut finish looks great but the lacquer is oh so delicate and not at all practical.There are lots of posts on here showing the different finishes for you to have a think about.
v8s4me said:
Blue 30 said:
.... I might go for a 2 colour powder coating as apposed to diamond cutting & clear coating again....
Much more sensible. The diamond cut finish looks great but the lacquer is oh so delicate and not at all practical.There are lots of posts on here showing the different finishes for you to have a think about.
No photos to accompany this latest post...
Which was back to the serious work.
Get the new battery installed onto the boot battery tray, including suitable clamps. (I never knew there were so many types, some not looking very robust, so I chose yer basic/simple bolt clamp type).... Done
Tighten/check all of the new remote oil filter & cooler unions. Then fill engine with oil. (I did pre fill the cooler & filter to help with priming)... Done.
Check pas pipe unions, and fill with oil... Done.
Then.... Being as my new ecu is unplugged, I could do some basic systems checks.
Turn ignition 'on'... No noises, no smoke.... Always a good sign
But no oil light ( yes, I have now have one).
Who said... Using and installing new components will always work.
Ha, not always !!
Check jag sender for Neg... Tick.
Check Neg at lamp holder... Tick
Check Pos at bulb holder... Tick
Take lamp out and test across a battery... Tick
Re insert lamp into holder, and turn ignition 'on', low and behold it now works, so it must have been a bad contact between lamp and holder. (Good quality Lucas holder and lamp used).
Ignition light also is a new Lucas lamp & holder... That works.
So I might as well go for cranking.... Here goes.
Perfect, obviously it doesn't start (no ecu, no fuel). The oil light goes out, and the oil gauge shows pressure... Big Tick.
Recheck all of the hose unions, a couple are weeping, but a 1/4 turn fixes them.
Check the 'fan belt' and seating around each wheel.
The belt around the pas pump wheel has jump one notch (6 notch flat belt), Mmmm....
The Jag original belt setup has x7 wheels that the belt goes around, x3 of which are idlers. On my setup x2 of those had to be replaced & repositioned.
I thought I had got the alignment right !
So check them all again.... Ah, I can see its the pas pump that's sitting slightly too far forward. A washer between each bracket and pump moves it back just enough.
Re crank, and its all good, so today I'm happy !!!!
Next.... Dunno yet
T.


Yet more progress...
Mainly on wiring tidying, and additions such as a new remote central locking controller, USB sockets, cigar type socket etc.
Plus trial fitting of the new Jag to Ford prop shaft, and the original middle & tail sections of the exhaust to see how easy/hard its going to be to mate it up to my custom Jag manifold pipes.
Not too bad it appears !
Oh... A QUESTION.
Can anyone take a photo of their S3 handbrake warning light switch assembly (its hiding behind the handbrake leather gaitor), as mine seems to have vanished.
Although thinking about it, I don't recall ever removing it, but the wiring is there.
phillpot said:
TVR used the same switch as for the footbrake (Mini/Land Rover) and, from memory, a "Heath Robinson" bit of bracketry 
Anything you can come up with will probably be a lot better
Mine was destroyed, I just screwed a long arm micro switch to the tunnel and adjusted the arm so that the hand brake lever operated it.Anything you can come up with will probably be a lot better
HTH,
Carl.
Blue 30 said:
Yet more progress...
Mainly on wiring tidying, and additions such as a new remote central locking controller, USB sockets, cigar type socket etc.
Plus trial fitting of the new Jag to Ford prop shaft, and the original middle & tail sections of the exhaust to see how easy/hard its going to be to mate it up to my custom Jag manifold pipes.
Hi TerryMainly on wiring tidying, and additions such as a new remote central locking controller, USB sockets, cigar type socket etc.
Plus trial fitting of the new Jag to Ford prop shaft, and the original middle & tail sections of the exhaust to see how easy/hard its going to be to mate it up to my custom Jag manifold pipes.
are the pipes 50mm id ?
If smaller they may compromise the power
Gassing Station | S Series | Top of Page | What's New | My Stuff