A body off in pictures, LOTS of pictures.
Discussion


Cheers Mick, nice to know my ramblings haven't done this  to everyone.
Okay, onwards.
Having devised a plan of attack the rebuild can begin. The theory is simple, as tempting as it was to slap on the suspension and wheels, I decided not to as I would then have to work around these things to do pretty much everything else. The plan therefore was to start in the middle and work outwards.
With the chassis still standing in the same position as in the background here.
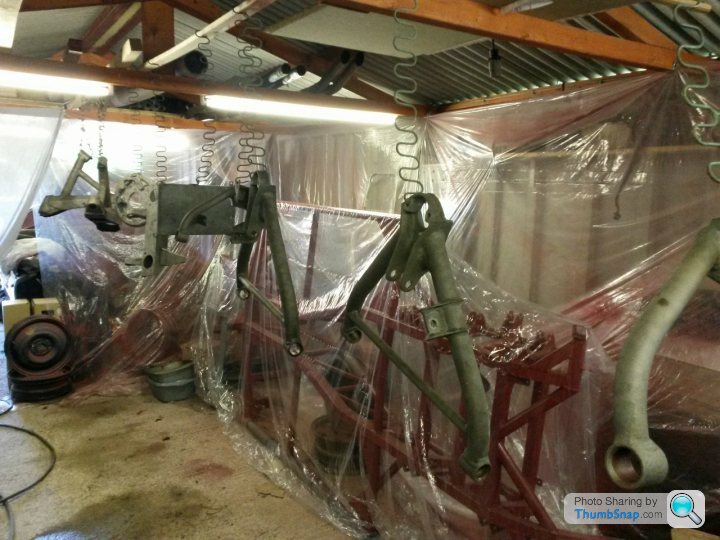
I fitted the diff carrier and then the diff, thinking it would be easier than stuffing it up from underneath. Not sure if I was correct but it wasn't to bad so will call it a success.
Got the chassis righted and onto the stands, yet again.
Then with somehinder assistance from my other half, in went the engine, box and prop.

Next to go on were, new brake hard lines to the rear end, all with metric unions rather than the mixture of metric and imperial that for some reason TVR used.
Fuel lines fitted along with the handbrake cable.
At this point I decided to give all of the chassis that can't be seen or got at with the body on a liberal coating with waxoyl as an extra layer of protection, the original clear type, not that nasty horrible black stuff.
Now it was time for the suspension and steering. Wishbones, hubs and steering rack all with new bushes, balljoints and track rod ends. Oh and anti roll bar.
New bushes in the trailing arms and on with those.
New flexi and hard lines on the trailing arms.
Rear brakes fitted with new wheel cylinders, drums dressed and all adjusted.
At this point I hit a snag.
I had put something vital to one side and forgotten about it..
You guessed it.
The bloody tank cradle!
It had a couple of small holes. No surprise there but I hadn't decided how to tackle them.
It would have repaired but since it seemed to have been constructed from Unobtanium, ERW that didn't seem to be any kind of standard size.
My thought was that it would take me longer to repair and make it look something like ok than to remake it.
So..


It is made from slightly bigger (40mmx40mm) and slightly heavier material but still fits nice, doesn't look out of place and is a hell of a lot stronger than original. I could now safely use the cradle as a jacking point without fear of damage.
Once that was done and fitted, it was on with the tank and fuel pump and then complete the fuel lines with a new 5/8" flexi pipe between the two.
Which got me to here.

I have to say, at this point, the light down that tunnel seemed to be getting awfully bright and I was feeling nothing short of well chuffed.
to everyone. Okay, onwards.
Having devised a plan of attack the rebuild can begin. The theory is simple, as tempting as it was to slap on the suspension and wheels, I decided not to as I would then have to work around these things to do pretty much everything else. The plan therefore was to start in the middle and work outwards.
With the chassis still standing in the same position as in the background here.
I fitted the diff carrier and then the diff, thinking it would be easier than stuffing it up from underneath. Not sure if I was correct but it wasn't to bad so will call it a success.
Got the chassis righted and onto the stands, yet again.
Then with some
Next to go on were, new brake hard lines to the rear end, all with metric unions rather than the mixture of metric and imperial that for some reason TVR used.
Fuel lines fitted along with the handbrake cable.
At this point I decided to give all of the chassis that can't be seen or got at with the body on a liberal coating with waxoyl as an extra layer of protection, the original clear type, not that nasty horrible black stuff.
Now it was time for the suspension and steering. Wishbones, hubs and steering rack all with new bushes, balljoints and track rod ends. Oh and anti roll bar.
New bushes in the trailing arms and on with those.
New flexi and hard lines on the trailing arms.
Rear brakes fitted with new wheel cylinders, drums dressed and all adjusted.
At this point I hit a snag.
I had put something vital to one side and forgotten about it..
You guessed it.
The bloody tank cradle!
It had a couple of small holes. No surprise there but I hadn't decided how to tackle them.
It would have repaired but since it seemed to have been constructed from Unobtanium, ERW that didn't seem to be any kind of standard size.
My thought was that it would take me longer to repair and make it look something like ok than to remake it.
So..
It is made from slightly bigger (40mmx40mm) and slightly heavier material but still fits nice, doesn't look out of place and is a hell of a lot stronger than original. I could now safely use the cradle as a jacking point without fear of damage.
Once that was done and fitted, it was on with the tank and fuel pump and then complete the fuel lines with a new 5/8" flexi pipe between the two.
Which got me to here.
I have to say, at this point, the light down that tunnel seemed to be getting awfully bright and I was feeling nothing short of well chuffed.
Edited by Ceejay73 on Monday 21st September 20:49
Edited by Ceejay73 on Monday 21st September 20:53


Carl.
Did you ever finish the project. Your thread just stops before you get the body back on. Maybe your having too much fun driving it around to post anymore 😁. Interested as I’ve just started my own journey on an S1 (you directed me to your post when I first got the car and posted on one of the forums).
Did you ever finish the project. Your thread just stops before you get the body back on. Maybe your having too much fun driving it around to post anymore 😁. Interested as I’ve just started my own journey on an S1 (you directed me to your post when I first got the car and posted on one of the forums).
Newarth said:
Carl.
Did you ever finish the project. Your thread just stops before you get the body back on. Maybe your having too much fun driving it around to post anymore ??. Interested as I’ve just started my own journey on an S1 (you directed me to your post when I first got the car and posted on one of the forums).
Agreed - would love to see an update.Did you ever finish the project. Your thread just stops before you get the body back on. Maybe your having too much fun driving it around to post anymore ??. Interested as I’ve just started my own journey on an S1 (you directed me to your post when I first got the car and posted on one of the forums).
How are you getting on Newarth?
I have done a bit of a refurb to my already modified S1 - check out Cossy sold...…….
magpies said:
Newarth said:
Carl.
Did you ever finish the project.
Agreed - would love to see an update.Did you ever finish the project.
How are you getting on Newarth?
I have done a bit of a refurb to my already modified S1 - check out Cossy sold...…….
Hi Lee,
that was a surprise seeing my old thread back on the first page.
I have been reading your posts and see you are cracking on, I just tend to keep quiet unless I have something of value (imo) to add.
Yes I did "finish" although they are never really FINISHED. I stopped adding to this thread because that was basically the end of the chassis part of it although the scabby old shocks were junked in favour of some nice new Protech items curtesy of Joolz at Kits and Classics (spitfire4v8 on here). Also upgraded the front brakes slightly to 260mm with Xr4i discs and Fiesta Mk6 calipers which are a direct bolt on replacement with no drilling or shimming required and much cheaper and easier to find than the old Sierra stuff or Chim/Griff calipers.
Made my own variation on bonnet hinges to give full opening but never did a thread on those.
Here's some links to a few other stuff I remember.
Some radiator stuff
Dash fascia and trim.
Back on the road
Not so great.
All good now.
More recently I have begun to piece my old MG BGT back together although I have spent the last month or so beating some tin worm out of the ST170 including fitting a pair of new wings oh and I have a new kitchen to fit but that's another story.
New battery ordered for the S this morning, will be out of the garage for a clean and then turn some fuel and probably rubber into smoke later in the week if the bloody rain stops!
Life would be so much simpler if I just sold them all and bought some boring euro s tbox but where's the fun in that?
So yes I am watching and reading, try to enjoy it. The best advice I can give is that if it starts to get you down at any point, down tools, take a week off and come back to it when you are in a better frame of mind. There's nothing worse than trying to tackle a job frustrated and that's the joy of a hobby car over yer daily, you can walk away and come back later.
All the best mate, good luck with it,
Carl.
that was a surprise seeing my old thread back on the first page.
I have been reading your posts and see you are cracking on, I just tend to keep quiet unless I have something of value (imo) to add.
Yes I did "finish" although they are never really FINISHED. I stopped adding to this thread because that was basically the end of the chassis part of it although the scabby old shocks were junked in favour of some nice new Protech items curtesy of Joolz at Kits and Classics (spitfire4v8 on here). Also upgraded the front brakes slightly to 260mm with Xr4i discs and Fiesta Mk6 calipers which are a direct bolt on replacement with no drilling or shimming required and much cheaper and easier to find than the old Sierra stuff or Chim/Griff calipers.
Made my own variation on bonnet hinges to give full opening but never did a thread on those.
Here's some links to a few other stuff I remember.
Some radiator stuff
Dash fascia and trim.
Back on the road
Not so great.
All good now.
More recently I have begun to piece my old MG BGT back together although I have spent the last month or so beating some tin worm out of the ST170 including fitting a pair of new wings oh and I have a new kitchen to fit but that's another story.
New battery ordered for the S this morning, will be out of the garage for a clean and then turn some fuel and probably rubber into smoke later in the week if the bloody rain stops!
Life would be so much simpler if I just sold them all and bought some boring euro s
tbox but where's the fun in that?So yes I am watching and reading, try to enjoy it. The best advice I can give is that if it starts to get you down at any point, down tools, take a week off and come back to it when you are in a better frame of mind. There's nothing worse than trying to tackle a job frustrated and that's the joy of a hobby car over yer daily, you can walk away and come back later.
All the best mate, good luck with it,
Carl.
Ceejay73 said:
Hi Lee,
that was a surprise seeing my old thread back on the first page.
Carlthat was a surprise seeing my old thread back on the first page.
Changed my user name to 88S1.
Thanks for the links, very helpful (just found that the radiator has a leak when the car was jacked up on one side so one link very useful) and had a look at your finished car, looks great, hoping I get mine done in less than six years, but you never know, it does need a hell of a lot of time and love to get this back to its former glory, but that’s half the inspiration for me. If I can do this anything else in the future will be a doddle.
Just battled getting the exhaust off, so just steering knuckle, disconnect handbrake from underneath and fuel pipe, then body off, so close now. Other than outriggers and front member below sump (which I was going to cut out and replace with a removable one as recommended upgrade anyway) chassis and other metalwork looks in really good condition (an oil leak around sump has given it a nice protective coating).
As the car is in the warehouse where I work I only do a few late nights on it a week at the moment, but there’s plenty of space and I can work very late with great lighting without annoying the neighbours, so has its benefits.
Edited by 88S1 on Saturday 15th June 08:59
Gassing Station | S Series | Top of Page | What's New | My Stuff