Discussion


Evening all,
After a managing to get a few hours in on the car today, I decided to have a go at the awful bonnet alignment and I mean awful, were talking out by inches and wagglier than a waggly thing, I think neil who had the car previously must have popped it back on quick and added the alignment of it to his 'to-do' list... I now understand why he left it on the list !
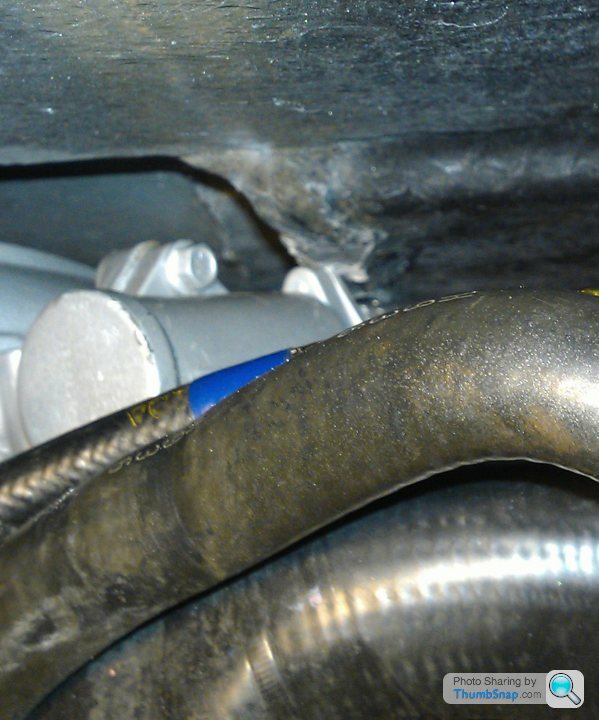
So after quite a few hours of fettling and head scratching I've managed to get the bonnet a lot better. The lines, height etc are not far off just need a bit more tweaking, but... the damn thing is fouling the Idle Speed Control Valve, not by much, a 3/16 of an inch (ish) I reckon

I think I could gain a little bit of clearance back buy removing some of the material around where the wire mesh of the bonnet vent is fixed as this looks a bit, well, clumpy, but I doubt that this on its own will be enough. I could file the ISCV a bit but I'm not sure that's a wise idea.
This being my first 'S' and not actually having seen a well fitting bonnet before, has anybody come across this before? any ideas on a fix, tweak, fettle, prayer... anything
The engine mounts have been replaced very recently but the looks of them and there is plenty of room between the sump and the ARB so the situation will improve as the mounts relax and squish a bit
Apart from the fouling it's not looking to bad, sitting a bit high windscreen end (due to the fouling) but if it didn't foul it would pretty close. I don't have any bonnet pins to try, but a marker bluetacked into the hole and masking tape over the latches showed them to be almost spot on

Any ideas gratefully received
After a managing to get a few hours in on the car today, I decided to have a go at the awful bonnet alignment and I mean awful, were talking out by inches and wagglier than a waggly thing, I think neil who had the car previously must have popped it back on quick and added the alignment of it to his 'to-do' list... I now understand why he left it on the list !
So after quite a few hours of fettling and head scratching I've managed to get the bonnet a lot better. The lines, height etc are not far off just need a bit more tweaking, but... the damn thing is fouling the Idle Speed Control Valve, not by much, a 3/16 of an inch (ish) I reckon
I think I could gain a little bit of clearance back buy removing some of the material around where the wire mesh of the bonnet vent is fixed as this looks a bit, well, clumpy, but I doubt that this on its own will be enough. I could file the ISCV a bit but I'm not sure that's a wise idea.
This being my first 'S' and not actually having seen a well fitting bonnet before, has anybody come across this before? any ideas on a fix, tweak, fettle, prayer... anything
The engine mounts have been replaced very recently but the looks of them and there is plenty of room between the sump and the ARB so the situation will improve as the mounts relax and squish a bit
Apart from the fouling it's not looking to bad, sitting a bit high windscreen end (due to the fouling) but if it didn't foul it would pretty close. I don't have any bonnet pins to try, but a marker bluetacked into the hole and masking tape over the latches showed them to be almost spot on
Any ideas gratefully received

I’ve done quite a bit of fiddling with mine but never had it completely off and started from scratch so some of what follows is hypothetical.
If I was in your position I’d get hold of some thick pieces of polystyrene and some of that green compressible foam they sell in flower shops.
First of all release both the front hinges so they are completely slack adjust the pins to give you the correct closure and making sure they release OK.
I’d then carefully lift the bonnet up again and tape the ‘styrene blocks in positions so that the bonnet sits in the position you want with the gaps you want (or can tolerate) (with the pins adjusted).
Use the “flower foam” over the “high” areas as this will compress and leave you, literally, with an impression of the high part and show you how much clearance you have.
Once you have the bonnet sitting in the position you want, bolt up the front hinges.
As I say, a lot of theory here, but based on a lot of farting about in the past.
glenrobbo said:
Just a thought, when the engine mounts were replaced, was the engine left slightly canted over to one side?
You could slacken the mounts a little & carefully twist the engine to a position where the ISCV no longer fouls.
Good luck Marc.
Ohhhh I was really hoping nobody was going to mention this, as I have a sneaky feeling that this is the root of the problemYou could slacken the mounts a little & carefully twist the engine to a position where the ISCV no longer fouls.
Good luck Marc.
So what's the procedure, I'm assuming its, loosen the engine mounts and jack on the near side of the engine (not sure where's best?) and try a wiggle it down a touch on the drivers side
Many thanks to all
Marc C said:
So what's the procedure, I'm assuming its, loosen the engine mounts and jack on the near side of the engine (not sure where's best?) and try & wiggle it down a touch on the drivers side
The mounts are a bit of a PITA to get at, but if they were renewed recently ( presumably before your ownership ) then they won't be rusted solid.You only need to loosen the body side of each mount so that they can move in the slotted brackets attached to the bodyshell. You will need a 17mm flexy headed ratchet ring spanner. The finer the ratchet the better, because there's minimal arc of movement.
I don't know if you can do this with the exhaust in place, I did my mounts when I was doing a lot of other jobs and the exhaust & wheels etc were off, making access a lot easier.
You should be able to jack the engine up on the nearside, and a bit of jiggling should get it to drop down slightly on the offside.
Don't damage the sump, and mind your fingers.
I always have some bits of timber to use as packers, load spreaders & for levering.
Make sure the car is properly supported on axle stands with no danger of falling off when you're jiggling things. When you take the front wheels off for access, put them under the sills each side as extra insurance
HTH
If I was in your position I’d get hold of some thick pieces of polystyrene and some of that green compressible foam they sell in flower shops.
Thanks Joe. It is indeed a bugger to reset after it has been off. Following your logic I suppose that I could loosen off all the bonnet mounting fastenings, make up a few temporary wood spacers to get the height right to the body sides, strap the bonnet down tight on to them, then tighten the mountings? Bonnet is coming off again soon so I will give it a try, might save some frustration!
Thanks Joe. It is indeed a bugger to reset after it has been off. Following your logic I suppose that I could loosen off all the bonnet mounting fastenings, make up a few temporary wood spacers to get the height right to the body sides, strap the bonnet down tight on to them, then tighten the mountings? Bonnet is coming off again soon so I will give it a try, might save some frustration!
Thanks for the replies...
I managed to move the engine a bit, which has given me just enough clearance for the bonnet, but it is still damn close. If anybody is thinking of changing their engine mounts check the levels for clearance before and after so you can get it right before putting everything back together again, luckily I had the manifolds, exhaust and various other bits off anyway which improved access and leverage but I imagine with the engine all in place and ready to go it would be a right royal PITA
Looking at it now I think that part of the problem is the hinges, the are old, worn and a bit bent. I know (i.e. looked at old posts) that Gerald-TVR used to be the 'go to' man for these things but his on a TVR sabbatical, so where are people sourcing shiny hinges from now (I don't have the skills to fabricate them from scratch) failing that, does anybody who fitted a set of new shiny hinges have a half decent pair of original hinges they're prepared to move on
This bonnet tweaking lark is quite addictive! spent ages today trying to line one tiny little bit even though there is a pile of other jobs I could be doing, and had a great time doing it. It looked good until I opened and closed the bonnet a couple of times
ATB
Marc
Top Gear TVR said:
stupid question: is it the bonnet or alignment and a dropped heat shield under the bonnet?
No heat shield under there, shuffling the engine on the mounts gave me just enough clearance to close the bonnet without fouling, but the alignment is being hampered by the hinges which are worn, sloppy and a both a bit bent Marc, if you do a search on here for S series bonnet hinge modification, you should be able to find Norman's excellent drawing on p3 of the topic. If you could print this off & take it to your local friendly one-off shop, they should be able to knock up a set for you in no time, either stainless or mild steel.
Or you could do the hard part yourself - procurement of the requisites.
It's basically nuts, bolts, four bosses or thick walled tube, & four plates guillotined from stock strip, filed up a bit to remove sharp edges & then drilled . A few welds & Robert's your Mum's brother.
How hard can it be? Just write out your shopping list & off you go to your nearest supplier. If you can drill a hole, then you only need the welding bit doing.
My local nut & bolt & steel stockist is Brian S. Pope in Stockport if that's any use to you.
Edit: Norman's fancy improved version uses rose joints & M12 threaded rod instead of tubes welded onto the bolt heads, which is better for rigidity, but at a price.
Edited by glenrobbo on Thursday 13th February 09:25
phillpot said:
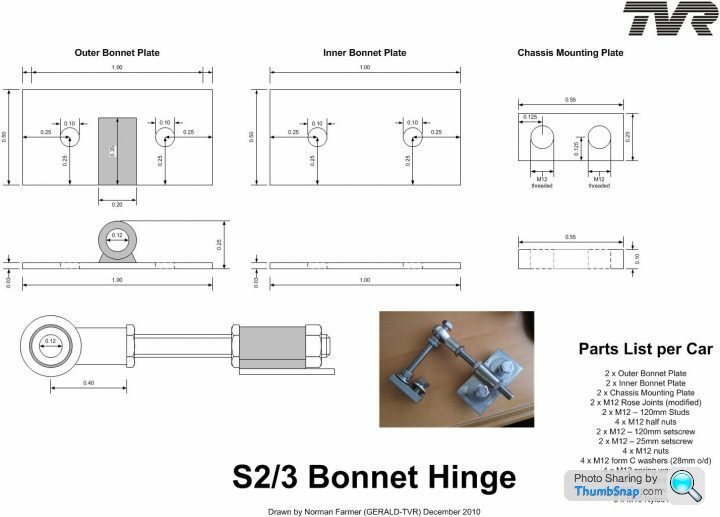
For some reason the dimensions given on the drawing are in decimeters, so you need to shift the decimal place 2 digits to the right to convert to millimeters.
e.g. The bonnet plates are ( a nominal ) 100mm long by 50mm wide.
I'm much too old to understand these new-fangled continental ways, so i just made my plates 4"x 2". Like me, so much simpler

Edited by glenrobbo on Thursday 13th February 09:18
Gassing Station | S Series | Top of Page | What's New | My Stuff