Repairable? Or am I looking for a donor body?
Discussion


I have now taken off everything I need to before the lift. Struggling to find front lift points due to splintered fibreglass which extends through the offside wheel arch (pic). Lifting from anywhere in front of the centre of front wheel arch could end up causing more damage I think.

Thinking of slipping two sections of L angle under the inner edges of the engine bay (indicated by white lines in next pic) and lifting from there. This would mean some drill holes through the 'glass probably.
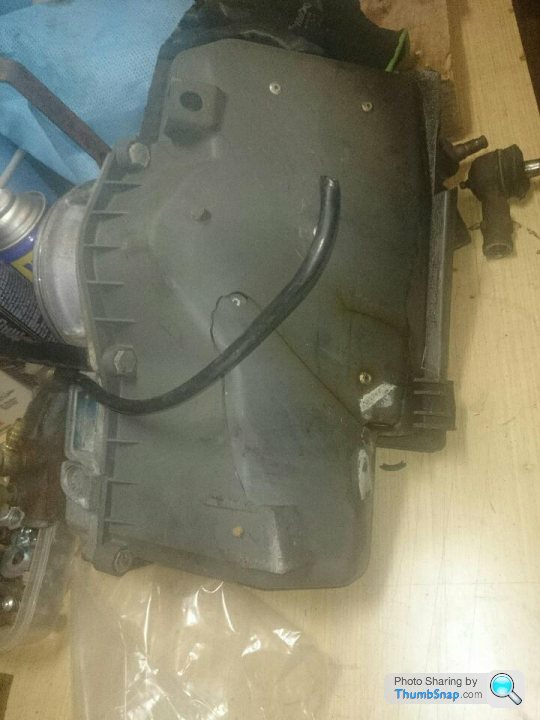
Also, not thrilled to find the air filter box has a big crack in it and a thumbnail sized hole in it.
Fun and games....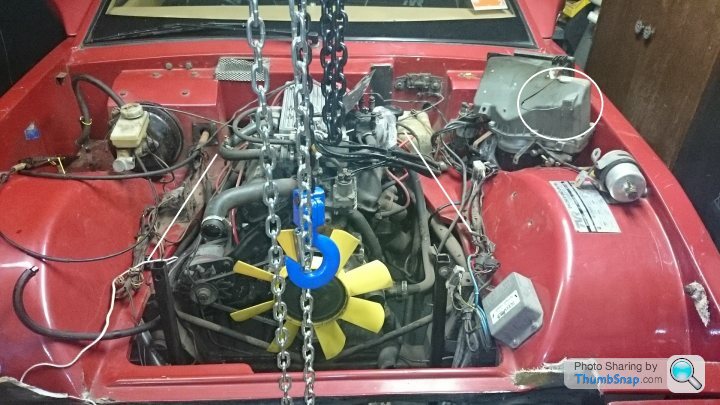
Thinking of slipping two sections of L angle under the inner edges of the engine bay (indicated by white lines in next pic) and lifting from there. This would mean some drill holes through the 'glass probably.
Also, not thrilled to find the air filter box has a big crack in it and a thumbnail sized hole in it.
Fun and games....
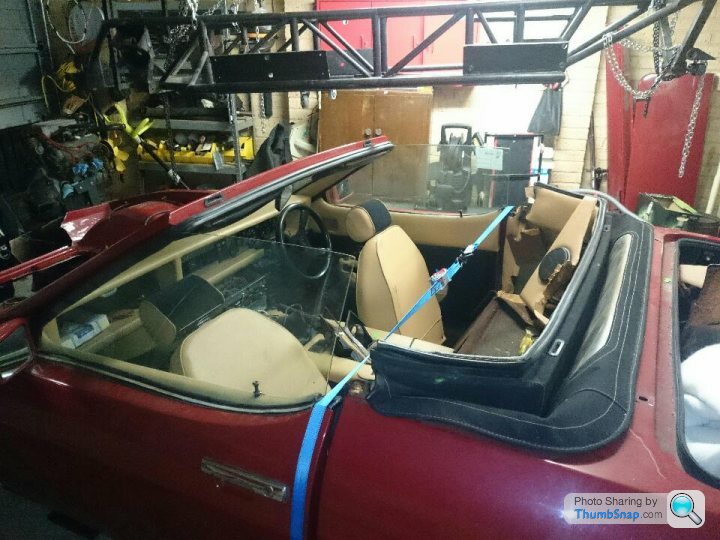
Body lift this weekend. Tried a partial lift and everything works fine, up she went. Ended up using wheel arches and boot holes as lift points.
Anyone got any advice/pics of best way to support the body once off the car please? Ideally I want to be able the slide the chassis out from underneath whenever I am working on it and the slide it back afterwards. Don't really want it hanging from the roof indefinitely..
Thanks, Toby
Anyone got any advice/pics of best way to support the body once off the car please? Ideally I want to be able the slide the chassis out from underneath whenever I am working on it and the slide it back afterwards. Don't really want it hanging from the roof indefinitely..
Thanks, Toby


Gents, thanks. Big relief re the diff. Thought the project might be a non-starter.
Adam thanks, spot on. The bottom link has a ripple in it, guessing they're impossible to find so will need to get current one repaired. Bracket looks okay. yes car is RND and damage is to passenger side.
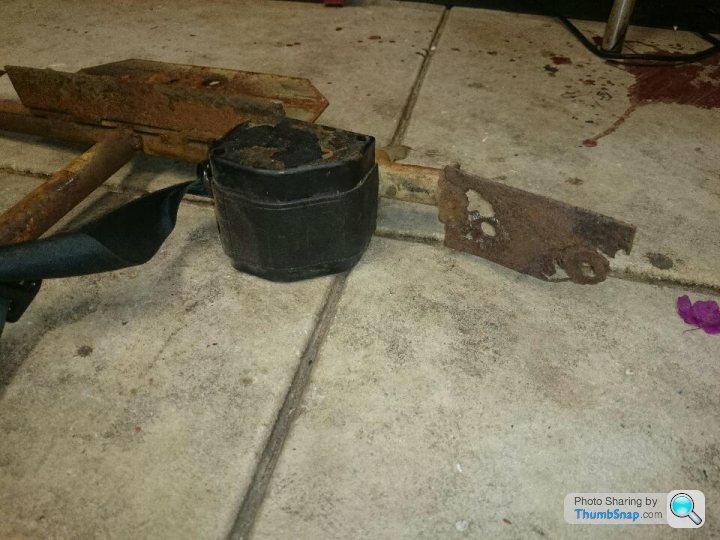
Left rear wheel could have been hit but no marks or anything obvious. Appears the fibreglass took almost all of the impact.
Zacky, I don't know how hard to find these airboxes are? If you have a good one it would be a great help. If you come across it would you mind p.m.ing me please?
Need to do a proper measure on the weekend, but distance (at outrigger height) between tyres on LHS is circa 1770mm and circa 1790 on the RHS. Somthing ain't quite straight.
Really appreciate your help guys.
Adam thanks, spot on. The bottom link has a ripple in it, guessing they're impossible to find so will need to get current one repaired. Bracket looks okay. yes car is RND and damage is to passenger side.
Left rear wheel could have been hit but no marks or anything obvious. Appears the fibreglass took almost all of the impact.
Zacky, I don't know how hard to find these airboxes are? If you have a good one it would be a great help. If you come across it would you mind p.m.ing me please?
Need to do a proper measure on the weekend, but distance (at outrigger height) between tyres on LHS is circa 1770mm and circa 1790 on the RHS. Somthing ain't quite straight.
Really appreciate your help guys.
Ah yes bushes.... Superflex? RT?
Thanks Zack, no screaming hurry as you can imagine...
Adam, thanks, should be a doddle.... (actually it might not be too hard, will get a matching set made).
Can't go ahead with ordering the nose and bumpers spoiler etc from Trevor until I know a bit more though.
Thanks Zack, no screaming hurry as you can imagine...
Adam, thanks, should be a doddle.... (actually it might not be too hard, will get a matching set made).
Can't go ahead with ordering the nose and bumpers spoiler etc from Trevor until I know a bit more though.
Update: I have rec'd advice to strip the chassis down completely while I have it detached from the body, and I think a proper refurb is warranted, so I'm starting at the front. front left is done and will do other side next weekend, and then tackle the back end. Once everything is off I can do some proper measurements and find out where my 25mm variance (left side vs right side) is. The only obvious damage from the accident is a bent drop link bolt so far. Ther will be more as I pull bits off and compare them I'm sure.
Haven't thought to much about the body yet, but I do have a question for others that have been here..
How much metal is in the body itself? Reason for asking is that I can see rust inside the holes in the sills that bolt up to the chassis outrigger plates. I can't see how to get inside the sills without cutting but I think having the body securely attached to the chassis is probably wise... Are there some steel plates with holes in them inside the sills? And if so how big/many are they and do I get to them?
I also saw steel tubing around the parcel shelf when I was taking the body off and obviously the door hinges bolt up the something. Can anyone enlighten me please? Are there diagrams in existence? Nothing in the "Bible" that I can see.
MANY thanks, Toby
Happy New Year chaps.
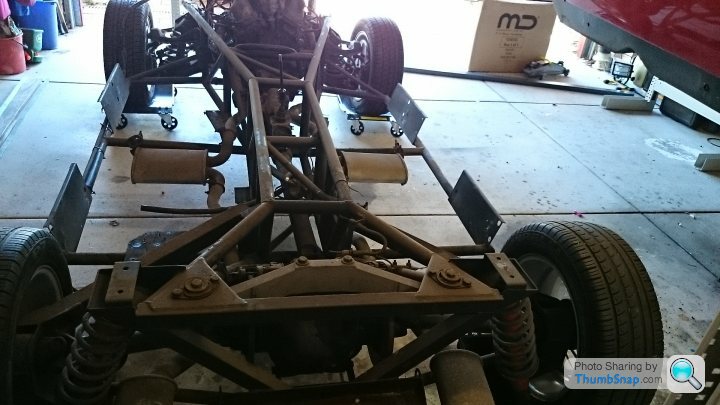
Update: I am going to pull the engine and gearbox out of the chassis, check the chassis for straightness and then make the decision on the rebuild. The chassis is off the body and all front end suspension/steering/brakes is already off.
Question 1: I am presuming I lift the engine and gearbox out together?
Question 2: Can I rest the engine gearbox on the sump or will I crush it? What have others done in this regard please?
Many thanks, Toby
Appreciate the comment Auto. Therefore I have decided to use the 4 engine mounting bolts to attach two steel legs which I will join under the engine with a crossbar. Put that on castors and I have a mobile engine/gearbox. Basic, but will do the job. Once the engine's out I can check it for straightness and then get an opinion/quote on the body to see if it can be repaired. If not I have many 280i parts for sale....
Celebrated my 50th by taking the engine and gearbox out! All went smoothly, phew. I am going the strip down the rest of the chassis today and then do some measurements and post a pic for comments as I'm not sure exactly straight it need to be to be serviceable and I'm hoping that someone who has been where I am before can give me some advice. Good news is no rust on it at all.
Haha, thanks Zig, our youth is gone... if only we knew then what we know now.... You either get older or you get dead, easy choice really.
Wifey bought me an 8 lap drive of a local circuit in a Fezza 360 which should be a hoot.
Back to the Tasmin..Rear suspension is off now, just the diff to go, after work today if I can face 39C or hotter in the garage....
Chassis is painted black, but no signs of anything underneath flaking. Car was imported to Oz in 1995 which explains it. (I am going to start a new thread on the body so others can find it.)
Wedg1e said:
Right, having laboriously typed an essay on how to remove the sills I re-read your post and see that you've already taken the shell off the chassis, so presumably you took the sills off first?
If I understand correctly, you're peering through the holes in the shell, through which it was bolted to the sill plates, and you can see rust...?
In that case you're looking at the bottom of the A and B post reinforcements (or what's left of them. which often isn't much).
Essentially there are steel tubes running up inside the shell (but not glassed-in to it): the A-post carries the door hinges while the B-post starts at the bottom with the seatbelt reel, then the door striker, then the seatbelt top hanger then (on a DHC) the pivot for the hood hoop. On a FHC it continues up the the roof but just stops, the two sides aren't tied together.
On the DHC there's a tube running across the front edge of the parrcel shelf that braces the B-posts; IIrc there's a joint in the middle that can be dismanteld to allow the two posts to be taken out if needed (but the entire interior trim needs to come out to do it).
The issue with both posts is at the bottom: welded to the tube ends was a bent bit of 2mm plate that is angled to follow the inside of the sill down. It's this plate that the sill bolts pass through, to tie the reinforcement posts to the chassis. With next to no anti-corrosion treatment, once the sill plates start to rust, the rust travels across the bolts and rots the plates off the bottom of the A and B reinforcements. You'd have to be a very dextrous welder to repair this without taking the posts out of the car, to say nothing of the fire hazard.
As an aside, I haven't been under my dash for a long time but it may be that the A-posts actually continue up inside the windscreeen frame; allegedly the frame was stiffened for roll-over protection but I have never seen any proof of this and pics I've seen of shells fresh from the mould don't show the A-post tubes in place so just what, if anything, was done to reinforce the screen frame I have no idea, perhaps someone can shed some light?
Early Tasmins didn't have one, but later cars also got a cross-brace between the A-posts, I think it was added at the same time as they beefed-up the steering column mountings (early cars' columns were shockingly flexible!).
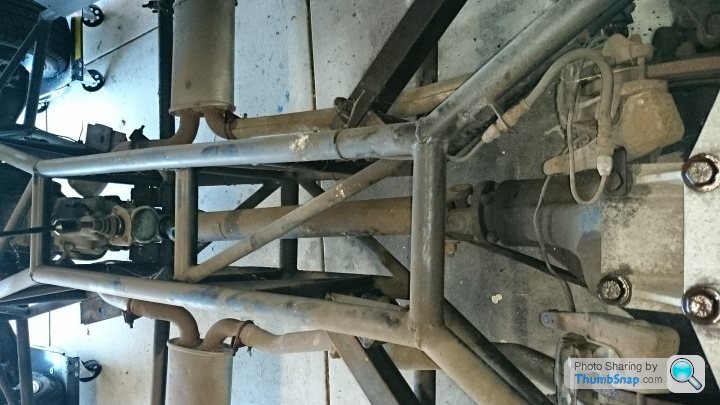
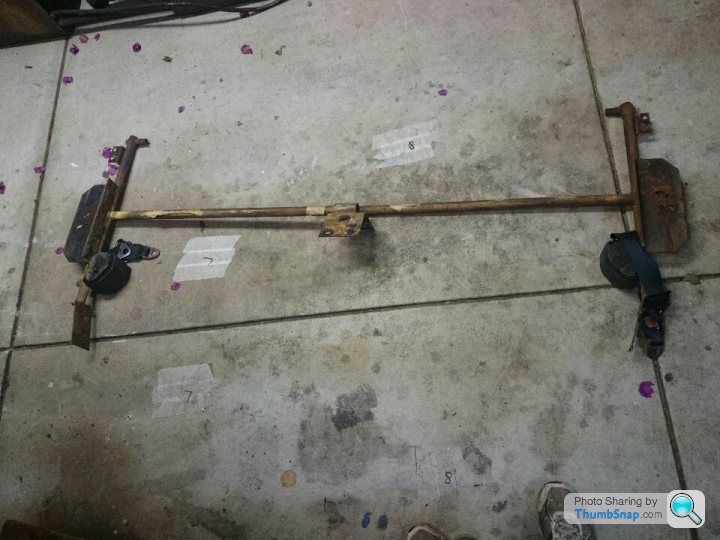
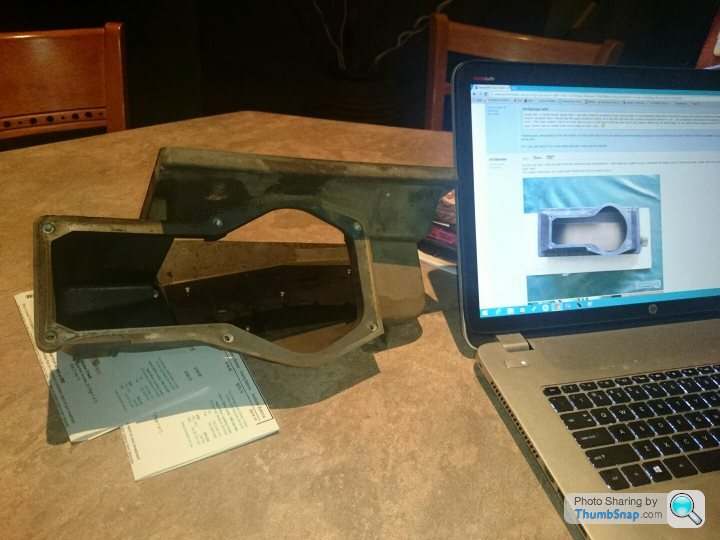
Wow, this was November last year... I have however made progress. I have managed to take out the parcel shelf tube Ian has very accurately described above. here's a couple of pics for those who have not attempted major surgery on their pride and joy. Note the tinworm in the sill plate I could see when I took the body off. No way I'm doing a restoration and leaving that there! Can't complain given this is the only rust in the car. Needless to say, the doors have nothing to close against now, so the old girl looks a bit forlorn... :-( only temporary though.
The tubing will go with the chassis to be sandblasted, welded and returned for POR15 painting over the next few weeks.
If I understand correctly, you're peering through the holes in the shell, through which it was bolted to the sill plates, and you can see rust...?
In that case you're looking at the bottom of the A and B post reinforcements (or what's left of them. which often isn't much).
Essentially there are steel tubes running up inside the shell (but not glassed-in to it): the A-post carries the door hinges while the B-post starts at the bottom with the seatbelt reel, then the door striker, then the seatbelt top hanger then (on a DHC) the pivot for the hood hoop. On a FHC it continues up the the roof but just stops, the two sides aren't tied together.
On the DHC there's a tube running across the front edge of the parrcel shelf that braces the B-posts; IIrc there's a joint in the middle that can be dismanteld to allow the two posts to be taken out if needed (but the entire interior trim needs to come out to do it).
The issue with both posts is at the bottom: welded to the tube ends was a bent bit of 2mm plate that is angled to follow the inside of the sill down. It's this plate that the sill bolts pass through, to tie the reinforcement posts to the chassis. With next to no anti-corrosion treatment, once the sill plates start to rust, the rust travels across the bolts and rots the plates off the bottom of the A and B reinforcements. You'd have to be a very dextrous welder to repair this without taking the posts out of the car, to say nothing of the fire hazard.
As an aside, I haven't been under my dash for a long time but it may be that the A-posts actually continue up inside the windscreeen frame; allegedly the frame was stiffened for roll-over protection but I have never seen any proof of this and pics I've seen of shells fresh from the mould don't show the A-post tubes in place so just what, if anything, was done to reinforce the screen frame I have no idea, perhaps someone can shed some light?
Early Tasmins didn't have one, but later cars also got a cross-brace between the A-posts, I think it was added at the same time as they beefed-up the steering column mountings (early cars' columns were shockingly flexible!).
Wow, this was November last year... I have however made progress. I have managed to take out the parcel shelf tube Ian has very accurately described above. here's a couple of pics for those who have not attempted major surgery on their pride and joy. Note the tinworm in the sill plate I could see when I took the body off. No way I'm doing a restoration and leaving that there! Can't complain given this is the only rust in the car. Needless to say, the doors have nothing to close against now, so the old girl looks a bit forlorn... :-( only temporary though.
The tubing will go with the chassis to be sandblasted, welded and returned for POR15 painting over the next few weeks.
Footnote: The A pillar steel tubing does not go through the windscreen, they stop at its base. It may go across the front of the dashboard but not sure about that. Plus it becomes rectangular rather than round when it gets down to the footwells.
Edited by 440Interceptor on Wednesday 18th March 14:29
Edited by 440Interceptor on Wednesday 18th March 14:30
Edited by 440Interceptor on Tuesday 24th March 08:21
Update: I have ordered a bit over a grands worth of new panels from TET. Have to get busy now working out what else I need from the UK so I can send it to Trevor for throwing into the big box he will be sending me.
I reckon I can get almost all bushes here (www.superpro.com.au) except for a few bespoke bits and pieces.
I will need a new corrugated airhose for the injection though. Does anyone know if/where these are available please?
Also need to get the shocks changed (can't afford Gaz Gold and car will not be tracked). are these a TVR specific shock?
Cheers, Toby
mrzigazaga said:
Good call...I totally forgot about that..I did use a leak fix plumbers 2 part epoxy putty on my expansion tank and it worked for ages and could be sanded and painted..The JB cold weld is good stuff too..If i had to compare then i would say the putty would be better as it can get into any tiny cracks so would be better for air....JB is excellent and is better for joining stuff together....Rather than patching over...The main reason i did it on mine was to give a cold feed to the air inlet and it did make a difference..At least 5bhp...It can still be done however with a 3" 90 degree soil stack plastic fitting, A heat gun, Some cold air intake hose and a K&N air filter cone....
Thanks guys, yes glueing is the last resort, but the other side of the unit shows a corner missing and part of the air filter lip so I don't thinks it will be successful. Zig your solution sounds interesting would love to see some pics.Or I can just leave it for a few years and get a new one 3D printed!
Too far gone Adam, but thanks. Zig that looks a LOT better. Pulling mine to bits tonight and we'll see what can be salvaged.
Rocket, thanks but yes, a tad too late, my TET panels are ready to be shipped, hence the running around (figuratively speaking) to get other stuff to throw in the box.
Rocket, thanks but yes, a tad too late, my TET panels are ready to be shipped, hence the running around (figuratively speaking) to get other stuff to throw in the box.
Gassing Station | Wedges | Top of Page | What's New | My Stuff