Which sandpaper?
Discussion


Hi
I am preparing a bare shell for a respray. It will be changing colour from white to red.
Without having to go back to bare metal what grades paper would be advised?
I was thinking of going over the whole shell with 400 grit before going over throughly again with 800 grit, in both cases with lots of water.
Of course any scratches would be sanded out with something more like 180 grit.
Does this sound acceptable for a decent prep job?
Cheers
No doubt a current pro will be along to help soon, I am talking my old days of cellulose finishes. I think that 800 is too fine to get a decent key between the old and new paints.
Personally, I would cut the existing paint with a 240 "flattener" and 320 finish. Then de-grease and prime and de-nib with 400 before thoroughly degreasing the primer, then on with the top coats. As you said, loads of water to stop the paper clogging and scratching.
Big scratches I would cut back with 180 and treat the rust if present and apply stopper /bondo and flat before primer. Little scratches I would tend to fill with stopper / primer filler and flat rather than rub out in the old paint if there is no rust present.
A spotty mist coat followed by a light hit with wet 400 will show up any faults in prep (the mist will be left in the depressions). When all your mist is gone, you should be good to go with a top coat. Remember to use the full content of the book of swear words when you get a run after all that prep.
Good luck. Plan a bank job immediately afterwards as you are just about to remove your fingerprints
Edited by SeeFive on Monday 15th August 22:07

SeeFive said:
No doubt a current pro will be along to help soon, I am talking my old days of cellulose finishes. I think that 800 is too fine to get a decent key between the old and new paints.
Personally, I would cut the existing paint with a 240 "flattener" and 320 finish. Then de-grease and prime and de-nib with 400 before thoroughly degreasing the primer, then on with the top coats. As you said, loads of water to stop the paper clogging and scratching.
Big scratches I would cut back with 180 and treat the rust if present and apply stopper /bondo and flat before primer. Little scratches I would tend to fill with stopper / primer filler and flat rather than rub out in the old paint if there is no rust present.
A spotty mist coat followed by a light hit with wet 400 will show up any faults in prep (the mist will be left in the depressions). When all your mist is gone, you should be good to go with a top coat. Remember to use the full content of the book of swear words when you get a run after all that prep.
Good luck. Plan a bank job immediately afterwards as you are just about to remove your fingerprints
Firstly, thank you very much for taking the time to reply.Personally, I would cut the existing paint with a 240 "flattener" and 320 finish. Then de-grease and prime and de-nib with 400 before thoroughly degreasing the primer, then on with the top coats. As you said, loads of water to stop the paper clogging and scratching.
Big scratches I would cut back with 180 and treat the rust if present and apply stopper /bondo and flat before primer. Little scratches I would tend to fill with stopper / primer filler and flat rather than rub out in the old paint if there is no rust present.
A spotty mist coat followed by a light hit with wet 400 will show up any faults in prep (the mist will be left in the depressions). When all your mist is gone, you should be good to go with a top coat. Remember to use the full content of the book of swear words when you get a run after all that prep.
Good luck. Plan a bank job immediately afterwards as you are just about to remove your fingerprints
Edited by SeeFive on Monday 15th August 22:07
Ok, I am new to this but my concerns of using circa 240 would be that I would scratch the surface?
Once the shell has been sanded should I be looking for a finish that is as smooth as glass?
The same question with the primer; when flattened before top coat should I be aiming to achieve a smooth a finish as possible on all areas?
Many thanks in advance
TROOPER88 said:
Firstly, thank you very much for taking the time to reply.
Ok, I am new to this but my concerns of using circa 240 would be that I would scratch the surface?
Once the shell has been sanded should I be looking for a finish that is as smooth as glass?
The same question with the primer; when flattened before top coat should I be aiming to achieve a smooth a finish as possible on all areas?
Many thanks in advance
This is so difficult in text. Easy to show, hard to write about. A lot depends on the paint. A baked in factory finish versus a softer surface. All paints are different so it is a bit dodgy to generalise.Ok, I am new to this but my concerns of using circa 240 would be that I would scratch the surface?
Once the shell has been sanded should I be looking for a finish that is as smooth as glass?
The same question with the primer; when flattened before top coat should I be aiming to achieve a smooth a finish as possible on all areas?
Many thanks in advance
Using less grit than 240 to start on hard paint will simply run over the bumps in the paint surface rather than cutting them off flat IMO. Don't be shy to refresh the paper frequently - dull paper does not cut and you will have to work too hard. Are you prepping by hand or using a random orb / DA?
Either way, 240 scratches will be removed by the 320 - working through the grits, each grit removes the scratches of the one before and replaces them with smaller ones. If you are going finer, do not skip a grade - 240 - 320 - 400 - 600 - 800 etc, not 240 - 600 as it just will not work or you will kill yourself trying. I personally used to stop at 320 and then prime. The new paint needs tiny imperfections in the old shine to get a grip on the paint below - 320 always did fine for me with hard cellulose - again not sure about today's paints so was hoping for a recent pro to put me right. The pre-primer finish I would look for is a smooth finish with an all over look a bit like one of those rolled icing birthday cakes - no shine anywhere at all but no nasty scratches.
Primer - yes, de-nibbing is removing all the tiny little bumps that the spray gun leaves. It really is a light touch with 400 (I always did it by hand) with lots of water although try to get the water off the primer when you have finished a panel. I try to save worn 400 as I am working for a final pass - so I guess going to 600 is an option - it certainly isn't gonna to any harm, except to your arms and hands doing an extra pass.... It is difficult to find a description for the finish, but it is very smooth - a bit like no-shine silk with no bumps, dips or marks from the paper edges etc. Anything you can see will be magnified by the finish except for the tiniest of scratches.
Also, in prep, you will not see bits you missed too easily, but you will feel them with your fingertips. It is also hard to see where you are when you are doing filling - different colours hide errors like hard edges and slightly low sinks. I would do the filler prep and local the repair area plus a bit with primer and flat it just to make sure I had no hard edges or sinks, but it ain't easy to get it spot on unless you do it every day.
If you are not using a paint-only booth, remember to clean the place up thoroughly after prep (and blow the rafters and your masking with an air line to get dust and any water out) and put water on the floor before you start blowing in or all the dust will kick up off the floor onto your wet paint when you do the low panels. I heard a rumour (may not be true) that today's paint takes ages to go off out of an oven, so you will need to keep the air clean for some time while it dries - again, not personal experience.
Above all, take your time on the prep and make sure it is right before going anywhere hear it with finish paint. Shiny red is going to show underlying faults far more than a light colour. Although others may not see your faults, you will know they are there and seeing them will irk you no end. Don't forget to de-grease and a last minute panel wipe before painting.
SeeFive said:
This is so difficult in text. Easy to show, hard to write about. A lot depends on the paint. A baked in factory finish versus a softer surface. All paints are different so it is a bit dodgy to generalise.
Using less grit than 240 to start on hard paint will simply run over the bumps in the paint surface rather than cutting them off flat IMO. Don't be shy to refresh the paper frequently - dull paper does not cut and you will have to work too hard. Are you prepping by hand or using a random orb / DA?
Either way, 240 scratches will be removed by the 320 - working through the grits, each grit removes the scratches of the one before and replaces them with smaller ones. If you are going finer, do not skip a grade - 240 - 320 - 400 - 600 - 800 etc, not 240 - 600 as it just will not work or you will kill yourself trying. I personally used to stop at 320 and then prime. The new paint needs tiny imperfections in the old shine to get a grip on the paint below - 320 always did fine for me with hard cellulose - again not sure about today's paints so was hoping for a recent pro to put me right. The pre-primer finish I would look for is a smooth finish with an all over look a bit like one of those rolled icing birthday cakes - no shine anywhere at all but no nasty scratches.
Primer - yes, de-nibbing is removing all the tiny little bumps that the spray gun leaves. It really is a light touch with 400 (I always did it by hand) with lots of water although try to get the water off the primer when you have finished a panel. I try to save worn 400 as I am working for a final pass - so I guess going to 600 is an option - it certainly isn't gonna to any harm, except to your arms and hands doing an extra pass.... It is difficult to find a description for the finish, but it is very smooth - a bit like no-shine silk with no bumps, dips or marks from the paper edges etc. Anything you can see will be magnified by the finish except for the tiniest of scratches.
Also, in prep, you will not see bits you missed too easily, but you will feel them with your fingertips. It is also hard to see where you are when you are doing filling - different colours hide errors like hard edges and slightly low sinks. I would do the filler prep and local the repair area plus a bit with primer and flat it just to make sure I had no hard edges or sinks, but it ain't easy to get it spot on unless you do it every day.
If you are not using a paint-only booth, remember to clean the place up thoroughly after prep (and blow the rafters and your masking with an air line to get dust and any water out) and put water on the floor before you start blowing in or all the dust will kick up off the floor onto your wet paint when you do the low panels. I heard a rumour (may not be true) that today's paint takes ages to go off out of an oven, so you will need to keep the air clean for some time while it dries - again, not personal experience.
Above all, take your time on the prep and make sure it is right before going anywhere hear it with finish paint. Shiny red is going to show underlying faults far more than a light colour. Although others may not see your faults, you will know they are there and seeing them will irk you no end. Don't forget to de-grease and a last minute panel wipe before painting.
What a great reply; thank you.Using less grit than 240 to start on hard paint will simply run over the bumps in the paint surface rather than cutting them off flat IMO. Don't be shy to refresh the paper frequently - dull paper does not cut and you will have to work too hard. Are you prepping by hand or using a random orb / DA?
Either way, 240 scratches will be removed by the 320 - working through the grits, each grit removes the scratches of the one before and replaces them with smaller ones. If you are going finer, do not skip a grade - 240 - 320 - 400 - 600 - 800 etc, not 240 - 600 as it just will not work or you will kill yourself trying. I personally used to stop at 320 and then prime. The new paint needs tiny imperfections in the old shine to get a grip on the paint below - 320 always did fine for me with hard cellulose - again not sure about today's paints so was hoping for a recent pro to put me right. The pre-primer finish I would look for is a smooth finish with an all over look a bit like one of those rolled icing birthday cakes - no shine anywhere at all but no nasty scratches.
Primer - yes, de-nibbing is removing all the tiny little bumps that the spray gun leaves. It really is a light touch with 400 (I always did it by hand) with lots of water although try to get the water off the primer when you have finished a panel. I try to save worn 400 as I am working for a final pass - so I guess going to 600 is an option - it certainly isn't gonna to any harm, except to your arms and hands doing an extra pass.... It is difficult to find a description for the finish, but it is very smooth - a bit like no-shine silk with no bumps, dips or marks from the paper edges etc. Anything you can see will be magnified by the finish except for the tiniest of scratches.
Also, in prep, you will not see bits you missed too easily, but you will feel them with your fingertips. It is also hard to see where you are when you are doing filling - different colours hide errors like hard edges and slightly low sinks. I would do the filler prep and local the repair area plus a bit with primer and flat it just to make sure I had no hard edges or sinks, but it ain't easy to get it spot on unless you do it every day.
If you are not using a paint-only booth, remember to clean the place up thoroughly after prep (and blow the rafters and your masking with an air line to get dust and any water out) and put water on the floor before you start blowing in or all the dust will kick up off the floor onto your wet paint when you do the low panels. I heard a rumour (may not be true) that today's paint takes ages to go off out of an oven, so you will need to keep the air clean for some time while it dries - again, not personal experience.
Above all, take your time on the prep and make sure it is right before going anywhere hear it with finish paint. Shiny red is going to show underlying faults far more than a light colour. Although others may not see your faults, you will know they are there and seeing them will irk you no end. Don't forget to de-grease and a last minute panel wipe before painting.
To give you a better idea as to what the shell is like I will try and take a couple of close up pictures later of the paint and post them up. (just tried adding pictures but the Pistonheads website is playing up)
The shell in question is a Ford shell that has never been used.....
What I mean by this is that I think it was purchased as a replacement shell circ 10-15 years ago and was simply not used. It did not even have door hinges welded on; this I have now had done.
Since it has been stood outside there was surface rust which has all be treated, sanded and zinc primed.
I dont know what Ford sprayed the shell with before it left the factory (a picture will help you identify it). It is finished in white but not a gloss white and when I have sanded scratches out the bare surface is not that deep.
I am thinking that the shell was not painted but had a layer or two of some kind of protection put on to prevent it rusting?
On the rear panel there are still 2 Ford stickers (very worn) that I would have thought would have definately been removed in the Ford factory had the shell undegone a routine paint job?
TROOPER88 said:
Ford 'worn' stickers
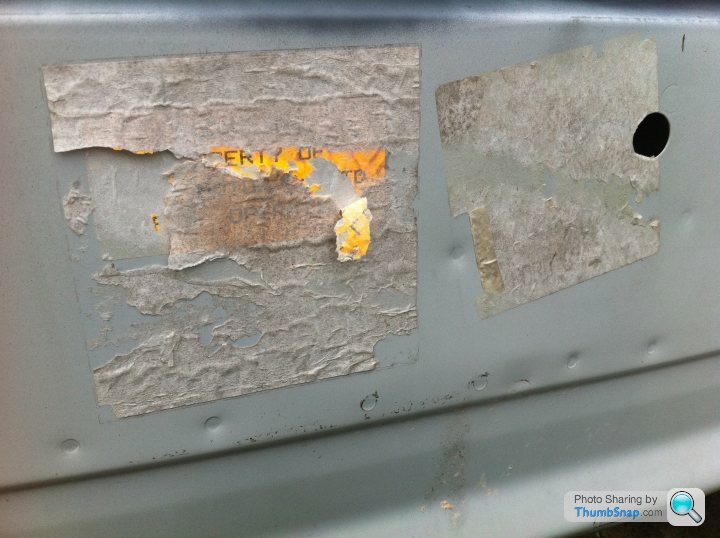
Front wing after a bit of prepping
400 grit with water and some rubbing, 60 seconds and down to metal
Oh bugger! - bare metal. Try not go through any more for the moment.Front wing after a bit of prepping
400 grit with water and some rubbing, 60 seconds and down to metal
My gut feel is that may be primer / etch primer, so my earlier advice on grits are well up the spout. That is very soft and thin, and will require a delicate touch with light grits. Depending on its smoothness and cleanliness, I'd be half tempted to just de-grease it thoroughly and get some more depth of primer on it before flatting it, and avoid going thru to metal.
Depending on the target finish (epoxy etc) you may need to etch prime the bare metal. There will be a lot more on this from your paint supplier and the web than I can type, or have knowledge of with today's materials.
Once you find out what primer you should be using, to cover the metal, put a fairly dusty one across it, let it go off for a couple of minutes and then hit it again to gradually build up thickness to enable a flat and de-nib without breaking thru. If you do not put a dry one over it first, the paint can just run off metal quite easily - hence try not go through too many places.
The old days bare metal prep was red-oxide followed by primer, but today's finishes can require different bare metal treatments depending on the paint - hence check with the supplier. Also, talk to him about which panel wipe to use between primer and paint to minimise potential reaction in your finish.
Looking forwards to seeing the result.
SeeFive said:
Oh bugger! - bare metal. Try not go through any more for the moment.
My gut feel is that may be primer / etch primer, so my earlier advice on grits are well up the spout. That is very soft and thin, and will require a delicate touch with light grits. Depending on its smoothness and cleanliness, I'd be half tempted to just de-grease it thoroughly and get some more depth of primer on it before flatting it, and avoid going thru to metal.
Depending on the target finish (epoxy etc) you may need to etch prime the bare metal. There will be a lot more on this from your paint supplier and the web than I can type, or have knowledge of with today's materials.
Once you find out what primer you should be using, to cover the metal, put a fairly dusty one across it, let it go off for a couple of minutes and then hit it again to gradually build up thickness to enable a flat and de-nib without breaking thru. If you do not put a dry one over it first, the paint can just run off metal quite easily - hence try not go through too many places.
The old days bare metal prep was red-oxide followed by primer, but today's finishes can require different bare metal treatments depending on the paint - hence check with the supplier. Also, talk to him about which panel wipe to use between primer and paint to minimise potential reaction in your finish.
Looking forwards to seeing the result.
CoolMy gut feel is that may be primer / etch primer, so my earlier advice on grits are well up the spout. That is very soft and thin, and will require a delicate touch with light grits. Depending on its smoothness and cleanliness, I'd be half tempted to just de-grease it thoroughly and get some more depth of primer on it before flatting it, and avoid going thru to metal.
Depending on the target finish (epoxy etc) you may need to etch prime the bare metal. There will be a lot more on this from your paint supplier and the web than I can type, or have knowledge of with today's materials.
Once you find out what primer you should be using, to cover the metal, put a fairly dusty one across it, let it go off for a couple of minutes and then hit it again to gradually build up thickness to enable a flat and de-nib without breaking thru. If you do not put a dry one over it first, the paint can just run off metal quite easily - hence try not go through too many places.
The old days bare metal prep was red-oxide followed by primer, but today's finishes can require different bare metal treatments depending on the paint - hence check with the supplier. Also, talk to him about which panel wipe to use between primer and paint to minimise potential reaction in your finish.
Looking forwards to seeing the result.
Well I will contine with 400-800 grit and warm soapy water.
Since as has been seen there is only a light coating on the car it should make sanding a lot easier. Any small (and I mean small) areas that I do have to rub down to metal to get rid of scratches I will zinc prime immediately.
I will then put it into the area I am going to use to paint and give it another going over with 800 grit and a scoth pad before priming.
I will post the pics when done
Thanks again
SeeFive said:
Oh bugger! - bare metal. Try not go through any more for the moment.
My gut feel is that may be primer / etch primer, so my earlier advice on grits are well up the spout. That is very soft and thin, and will require a delicate touch with light grits. Depending on its smoothness and cleanliness, I'd be half tempted to just de-grease it thoroughly and get some more depth of primer on it before flatting it, and avoid going thru to metal.
Depending on the target finish (epoxy etc) you may need to etch prime the bare metal. There will be a lot more on this from your paint supplier and the web than I can type, or have knowledge of with today's materials.
Once you find out what primer you should be using, to cover the metal, put a fairly dusty one across it, let it go off for a couple of minutes and then hit it again to gradually build up thickness to enable a flat and de-nib without breaking thru. If you do not put a dry one over it first, the paint can just run off metal quite easily - hence try not go through too many places.
The old days bare metal prep was red-oxide followed by primer, but today's finishes can require different bare metal treatments depending on the paint - hence check with the supplier. Also, talk to him about which panel wipe to use between primer and paint to minimise potential reaction in your finish.
Looking forwards to seeing the result.
I just read back through my posting with the pictures and I think I may have confused you a bit.....My gut feel is that may be primer / etch primer, so my earlier advice on grits are well up the spout. That is very soft and thin, and will require a delicate touch with light grits. Depending on its smoothness and cleanliness, I'd be half tempted to just de-grease it thoroughly and get some more depth of primer on it before flatting it, and avoid going thru to metal.
Depending on the target finish (epoxy etc) you may need to etch prime the bare metal. There will be a lot more on this from your paint supplier and the web than I can type, or have knowledge of with today's materials.
Once you find out what primer you should be using, to cover the metal, put a fairly dusty one across it, let it go off for a couple of minutes and then hit it again to gradually build up thickness to enable a flat and de-nib without breaking thru. If you do not put a dry one over it first, the paint can just run off metal quite easily - hence try not go through too many places.
The old days bare metal prep was red-oxide followed by primer, but today's finishes can require different bare metal treatments depending on the paint - hence check with the supplier. Also, talk to him about which panel wipe to use between primer and paint to minimise potential reaction in your finish.
Looking forwards to seeing the result.
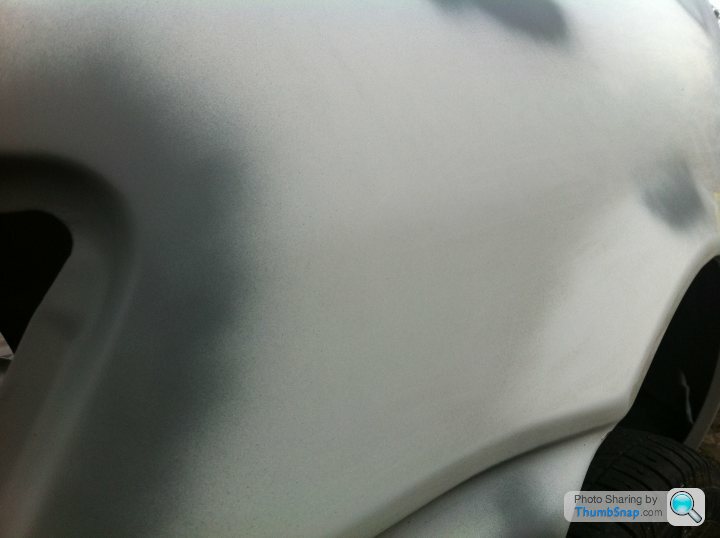
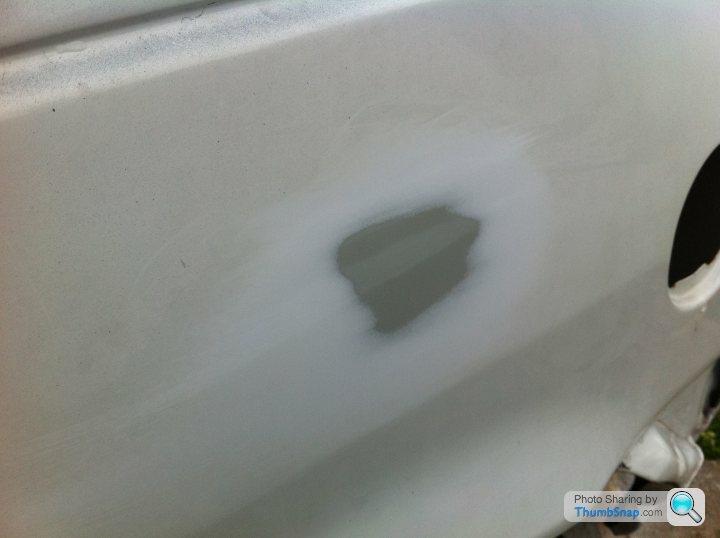
The grey in the middle picture of the front wing is zinc primer that I have applied; not what was on the shell already.....
The only bit that has been sanded back to the metal is in the bottom picture. As soon as I sanded a scratch out I took this pictures before zinc priming it as in the middle picture.
Sorry for any confusion.
Gassing Station | Bodywork & Detailing | Top of Page | What's New | My Stuff