First kit in 22 years !
Discussion


No.
You can get excellent airbrushes for under £100. I bought a £90 Harder and Steenbeck Evolution two years ago and it is excellent.
To get started in airbrushing, the AB range sold in the Expo Tools catalogue can be as litle at £30. They may not be as precise or as brilliant as H & S, or Iwata, but they are good for getting started.
I bought one a few years before the H & S and it was extremely easy to use. I still use it today - but mainly for spraying varnishes rather than paint.
Airbrushes have never been so affordable.
I use Halfords (or sometimes Tamiya) spray can undercoat grey on almost all my models - no matter how big or small they are.
For the main colours, I would only tend to use Halfords spray can paints if the colour is fairly generic or not available from one of the model paint manufacturers. For military aircraft camouflage schemes, I would normally use either Xtracrylic or Tamiya acrylic pains sprayed through the H & S Airbrush.
The other main use of Halfords aerosols is with white airliners, when I make use of Halfords Appliance White - as mentioned earlier.
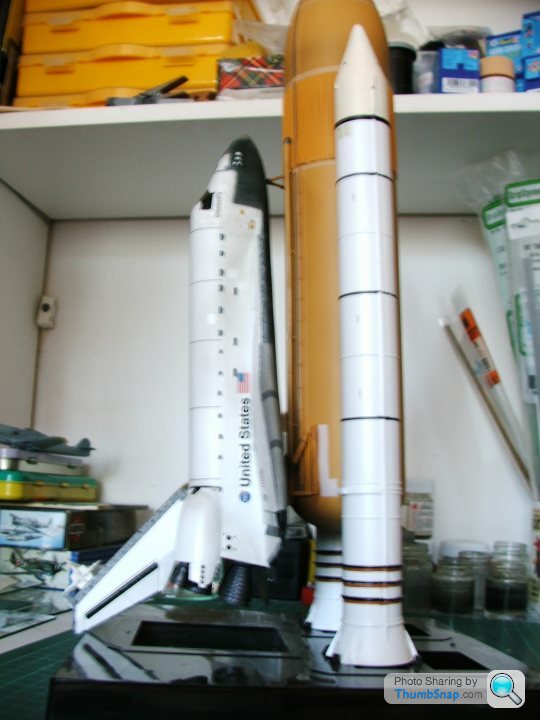
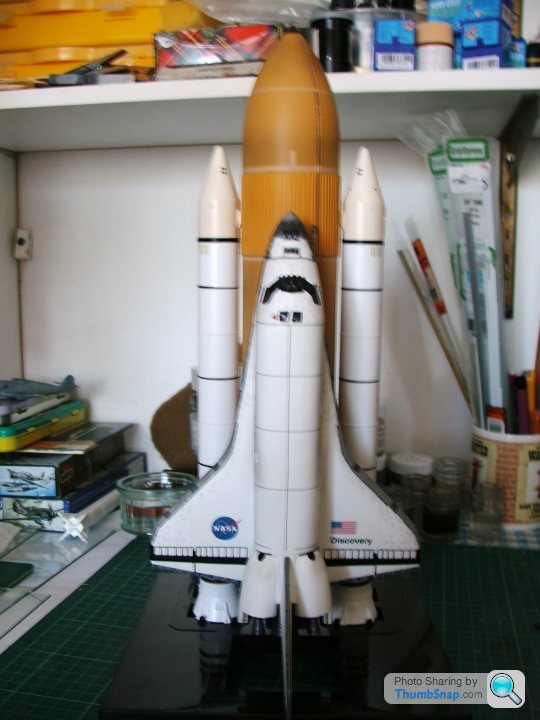
One kit I made not so long ago which was almost excluisvely painted with various Halfords paints was my 1/144 Space Shuttle.
For the main colours, I would only tend to use Halfords spray can paints if the colour is fairly generic or not available from one of the model paint manufacturers. For military aircraft camouflage schemes, I would normally use either Xtracrylic or Tamiya acrylic pains sprayed through the H & S Airbrush.
The other main use of Halfords aerosols is with white airliners, when I make use of Halfords Appliance White - as mentioned earlier.
One kit I made not so long ago which was almost excluisvely painted with various Halfords paints was my 1/144 Space Shuttle.
HoHoHo said:
I think you're right about an airbrush but I'm not sure if this is going to become a reasonable hobby again or just a flash in the pan.
I've had a look a few months ago and they seem to be around £200 for anything worth having, is that the case?
Bear in mind that you'll need a decent compressor as well as a decent airbrush. Throw in a few accesories such as a holder and cleaning equipment, and your figure of £200 'for an airbrush' might well be a bit low.I've had a look a few months ago and they seem to be around £200 for anything worth having, is that the case?
HoHoHo said:
Looks great - are they out of focus because the main engines have just ignited or did you have a wobbly hand 
I have slightly better pictures but because I'm working I didn't have time to track them down for you.I was more concerned about showing what can be done with Halfords Acrylic.
dr_gn said:
Bear in mind that you'll need a decent compressor as well as a decent airbrush. Throw in a few accesories such as a holder and cleaning equipment, and your figure of £200 'for an airbrush' might well be a bit low.
At Farnborough Modelfest, you could buy H & S airbrushes from one trader starting at £70 and another was selling nice compressors starting at around £70 too - so a decent set up for £140.If you bought one of the AB brushes - you could be off and spraying for just over £100.
I think that you don't have to spend a fortune to learn the ropes at airbrushing.
Obviously, you could spend lots and lots if you want to.
Eric Mc said:
dr_gn said:
Bear in mind that you'll need a decent compressor as well as a decent airbrush. Throw in a few accesories such as a holder and cleaning equipment, and your figure of £200 'for an airbrush' might well be a bit low.
At Farnborough Modelfest, you could buy H & S airbrushes from one trader starting at £70 and another was selling nice compressors starting at around £70 too - so a decent set up for £140.If you bought one of the AB brushes - you could be off and spraying for just over £100.
I think that you don't have to spend a fortune to learn the ropes at airbrushing.
Obviously, you could spend lots and lots if you want to.
Well, number two done and aside from a bit of touching up and finishing and attaching the Blue Steel Missile, then hung in little Sammy's room along with the 747 400.
Thought for a change I'd have 558 as a white Vulcan, wheels up looking like she does best - flying

Vulcan XH 558 by Martin_Bennett, on Flickr

Vulcan XH 558 by Martin_Bennett, on Flickr

Vulcan XH 558 by Martin_Bennett, on Flickr

Vulcan XH 558 by Martin_Bennett, on Flickr
Used Halfords primer and then Appliance White as per Eric's instructions and the results are much, much better than a brush
I'm now going away on business for 6 weeks but will tackle a smaller 1:72 Harrier GR Mk3 when I get back.
Thought for a change I'd have 558 as a white Vulcan, wheels up looking like she does best - flying
Vulcan XH 558 by Martin_Bennett, on Flickr
Vulcan XH 558 by Martin_Bennett, on Flickr
Vulcan XH 558 by Martin_Bennett, on Flickr
Vulcan XH 558 by Martin_Bennett, on Flickr
Used Halfords primer and then Appliance White as per Eric's instructions and the results are much, much better than a brush
I'm now going away on business for 6 weeks but will tackle a smaller 1:72 Harrier GR Mk3 when I get back.
Thanks Eric
I need to focus on filling and making good without destroying any panel lines and so on. I'm not interested in becoming a 'scale' modeler with the fine detail exactly as it should be, however a good representation of what I'm building will suit with a reasonable finish.
I'm quite pleased with it and your suggestion of spray paint certainly worked a treat , thanks 
I need to focus on filling and making good without destroying any panel lines and so on. I'm not interested in becoming a 'scale' modeler with the fine detail exactly as it should be, however a good representation of what I'm building will suit with a reasonable finish.
I'm quite pleased with it and your suggestion of spray paint certainly worked a treat
, thanks Destroying panel line detail when sanding and smoothing is the main problem with older kits which feature raised panel lines. The best course of action is, when filling and sanding a seam, to protect surrounding panel lines with masking tape.
Engraved, recessed lines are easier to restore after the sanding process.
Engraved, recessed lines are easier to restore after the sanding process.
To be honest, I don't always follow my own advice. It depends on how extensive the sanding needs to be. Some older kits (Heller in particular) are very nice and go together really well - with often little sanding required. So, their panel lines usually survive quite well.
Older Airfix kits are often festooned with excessive and inappropriate rivet detail and usually this just needs to be completely obliterated by sanding down, forcing the replacement of panels by rescribing.
A good example of one of these old kits is their 1/72 Chipmunk - which is accurate in outline but covered in rivets.
Eric Mc said:
Destroying panel line detail when sanding and smoothing is the main problem with older kits which feature raised panel lines. The best course of action is, when filling and sanding a seam, to protect surrounding panel lines with masking tape.
Or, as I've said many, many, many, many, many times before, just use Milliput for seam gaps and remove the excess with a damp cloth before it sets, then there's no sanding to do afterwards whatsoever. Apart from not having a gap in the first place, there's no simpler solution.HoHoHo said:
Well, number two done and aside from a bit of touching up and finishing and attaching the Blue Steel Missile, then hung in little Sammy's room along with the 747 400.
Thought for a change I'd have 558 as a white Vulcan, wheels up looking like she does best - flying
Vulcan XH 558 by Martin_Bennett, on Flickr
Vulcan XH 558 by Martin_Bennett, on Flickr
Vulcan XH 558 by Martin_Bennett, on Flickr
Vulcan XH 558 by Martin_Bennett, on Flickr
Used Halfords primer and then Appliance White as per Eric's instructions and the results are much, much better than a brush
I'm now going away on business for 6 weeks but will tackle a smaller 1:72 Harrier GR Mk3 when I get back.
Looks superb - clean build.Thought for a change I'd have 558 as a white Vulcan, wheels up looking like she does best - flying
Vulcan XH 558 by Martin_Bennett, on Flickr
Vulcan XH 558 by Martin_Bennett, on Flickr
Vulcan XH 558 by Martin_Bennett, on Flickr
Vulcan XH 558 by Martin_Bennett, on Flickr
Used Halfords primer and then Appliance White as per Eric's instructions and the results are much, much better than a brush
I'm now going away on business for 6 weeks but will tackle a smaller 1:72 Harrier GR Mk3 when I get back.
Eric Mc said:
The only comment I would make is that you have put 1980s style RAF roundels on a 1960s colour scheme. The RAF roundels that were used on the anti-flash scheme were pale blue and pink - with the serials in pale blue.

That's the very picture I used (or one of them) for my black bits.I realised rounders were incorrect, but they came with the 558 kit so I thought...........they'll be ok
Finished now and hanging proudly in Sam's bedroom.
Gassing Station | Scale Models | Top of Page | What's New | My Stuff