Airfix 1:72 Vulcan B.2
Discussion


MBBlat said:
dr_gn said:
No idea - I started watching some build videos on YouTube, but they’re in about 400 parts, so I couldn’t be bothered to finish them.
Florey models did a 5 part build series and didn’t seem to find the problems your experiencing The amount of waffle that seems to happen in certain, usually British or Australian, YouTubers to stretch a simple build into a multi part series is amazing. The Yanks and Eastern Europeans seem to be able to convey the same build in one or two videos.
I suppose I could have got an early or pre-production version - I’ve not seen anyone else have issues with faulty windscreens either for example.
Hopefully you can see the issues with mine fairly clearly from the photos I’ve posted.
dr_gn said:
Airfix just announced a new-tool 1:24 Spitfire for 2022. I hope there’s something smaller as well.
£94.99 though…just within my voucher budget
And it's a Mk.IXc £94.99 though…just within my voucher budget
Edited by dr_gn on Sunday 9th January 12:14
 If it's as good as the computer renderings, it should be pretty good.
I think we'd all like to see you have a go at this one, with no holds barred when it comes to extras.
CanAm said:
dr_gn said:
Airfix just announced a new-tool 1:24 Spitfire for 2022. I hope there’s something smaller as well.
£94.99 though…just within my voucher budget
And it's a Mk.IXc £94.99 though…just within my voucher budget
Edited by dr_gn on Sunday 9th January 12:14
If it's as good as the computer renderings, it should be pretty good.I think we'd all like to see you have a go at this one, with no holds barred when it comes to extras.
New consignment of sanding sticks arrived today, so was able to start blending the filler between the exhaust inserts and the wings. I also made some intake sanders from Tamiya sanding sponge glued to stainless tubes. They worked on these too:
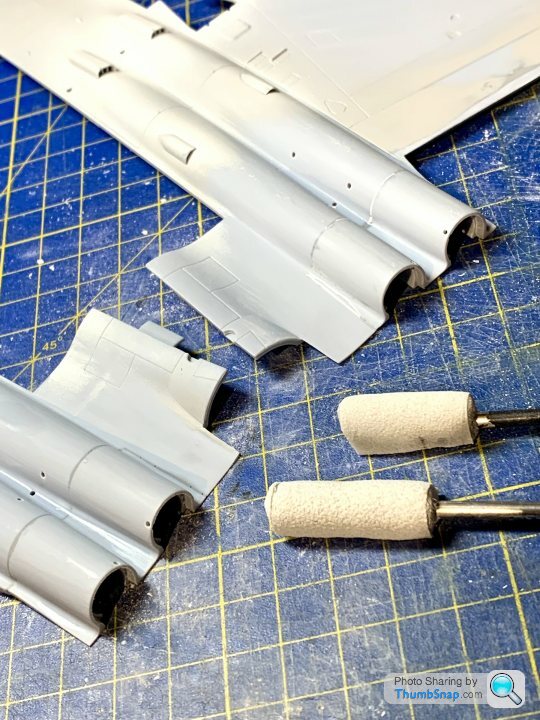
After a guide coat, only a few small gaps remained. Still needs some plastic card sticking to various edges to get the exhaust ends fitting well.
I decided to strip the intake paint and start again. The IPA also strips filler, so I had to re-daub the gaps again. Hopefully this time around, I can get a run-free finish:
Got the intakes flatted again:

But for some reason a guide coat still showed some imperfections, so more work needed.
Then the exhaust inserts. Re-scribed all the panel lines that were lost during correcting the fit. Used Dymo tape as a guide as usual. I’m glad that the central trough between the fairings is covered - tricky to scribe in there.

I offset the new scribing a fraction into new plastic:

After a coat of primer, a few dots showed up along the filler, so put some surfacer on with a cocktail stick:

I’ll flat that back tomorrow, re-scribe the lines to keep them sharp, then -hopefully - a final coat of white primer.
I hope after all that there should indeed be panel lines there! It certainly looked a bit bland all smooth.
But for some reason a guide coat still showed some imperfections, so more work needed.
Then the exhaust inserts. Re-scribed all the panel lines that were lost during correcting the fit. Used Dymo tape as a guide as usual. I’m glad that the central trough between the fairings is covered - tricky to scribe in there.
I offset the new scribing a fraction into new plastic:
After a coat of primer, a few dots showed up along the filler, so put some surfacer on with a cocktail stick:
I’ll flat that back tomorrow, re-scribe the lines to keep them sharp, then -hopefully - a final coat of white primer.
I hope after all that there should indeed be panel lines there! It certainly looked a bit bland all smooth.
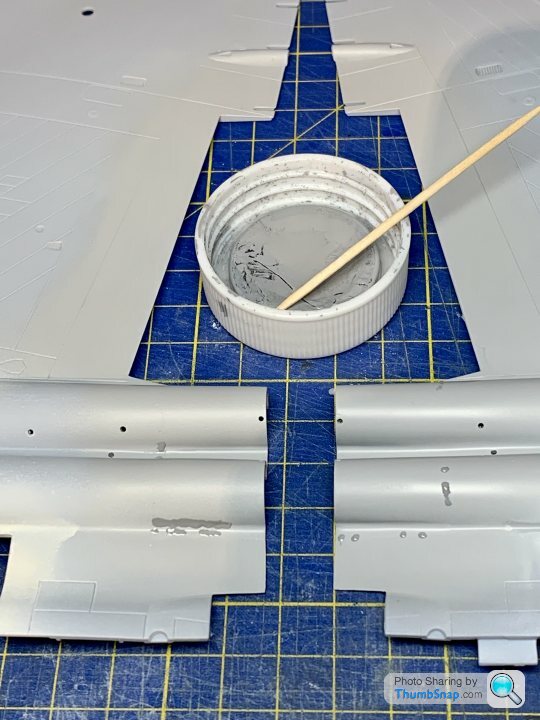
Another day, another session of filling sink marks. This time between the engine bulge pairs at the trailing edge of the wings:

Hopefully nearing the end of intake fettling. I’ve used white Milliput to try and eliminate the remaining depressions around the nose of the splitters:

Also put some surfacer along the missile joint line:

Hopefully at some point soon, everything will come together one day, and I can get some camo on it.
Hopefully nearing the end of intake fettling. I’ve used white Milliput to try and eliminate the remaining depressions around the nose of the splitters:
Also put some surfacer along the missile joint line:
Hopefully at some point soon, everything will come together one day, and I can get some camo on it.
So on to the intakes. Again. After a successful re-flatting and priming, once again the Vallejo Off-White pooled and ran. This was despite using thicker than normal paint in the airbrush, and a low pressure. The paint also seems to blister in random places for some reason. I can’t remember this happening before with Tamiya primer and Vallejo paint. Obviously there are different chemicals in different colours, but still a bit odd.


Not quite sure what I keep doing wrong here, but, I can’t progress until they’re done. Every error here takes days for the paint to harden before it’s worth trying to correct it.
The wing sink mark filling did’t go well; they’re deep enough to see (and can’t be unseen), but too shallow to fill effectively. Exactly like the sink marks in the Airfix Swordfish wing. Plus, the more I look at it, more sink marks become apparent. Like the Swordfish, this thing is slowly sapping the enthusiasm to bother.
Anyway, I’m not starting another until it’s done this time, so on to the Blue Steel missile. Flatted the seams and filled any gaps with Milliput:

It’s perfect for jobs like that, because you can remove the excess and blend to a perfect finish without trying to sand in impossible to get to places:

Plan with this is to use Tamiya white primer as the final finish, and use a mechanical pencil for the panel lines. I want it to look pristine, but with something to break up the expanse of white.
Not quite sure what I keep doing wrong here, but, I can’t progress until they’re done. Every error here takes days for the paint to harden before it’s worth trying to correct it.
The wing sink mark filling did’t go well; they’re deep enough to see (and can’t be unseen), but too shallow to fill effectively. Exactly like the sink marks in the Airfix Swordfish wing. Plus, the more I look at it, more sink marks become apparent. Like the Swordfish, this thing is slowly sapping the enthusiasm to bother.
Anyway, I’m not starting another until it’s done this time, so on to the Blue Steel missile. Flatted the seams and filled any gaps with Milliput:
It’s perfect for jobs like that, because you can remove the excess and blend to a perfect finish without trying to sand in impossible to get to places:
Plan with this is to use Tamiya white primer as the final finish, and use a mechanical pencil for the panel lines. I want it to look pristine, but with something to break up the expanse of white.
dr_gn said:
So on to the intakes. Again. After a successful re-flatting and priming, once again the Vallejo Off-White pooled and ran. This was despite using thicker than normal paint in the airbrush, and a low pressure. The paint also seems to blister in random places for some reason. I can’t remember this happening before with Tamiya primer and Vallejo paint. Obviously there are different chemicals in different colours, but still a bit odd.
Not quite sure what I keep doing wrong here, but, I can’t progress until they’re done. Every error here takes days for the paint to harden before it’s worth trying to correct it.
The wing sink mark filling did’t go well; they’re deep enough to see (and can’t be unseen), but too shallow to fill effectively. Exactly like the sink marks in the Airfix Swordfish wing. Plus, the more I look at it, more sink marks become apparent. Like the Swordfish, this thing is slowly sapping the enthusiasm to bother.
Anyway, I’m not starting another until it’s done this time, so on to the Blue Steel missile. Flatted the seams and filled any gaps with Milliput:
It’s perfect for jobs like that, because you can remove the excess and blend to a perfect finish without trying to sand in impossible to get to places:
Plan with this is to use Tamiya white primer as the final finish, and use a mechanical pencil for the panel lines. I want it to look pristine, but with something to break up the expanse of white.
Bugger on the intakes...out of interest when I use Milliput its as sticky as a bNot quite sure what I keep doing wrong here, but, I can’t progress until they’re done. Every error here takes days for the paint to harden before it’s worth trying to correct it.
The wing sink mark filling did’t go well; they’re deep enough to see (and can’t be unseen), but too shallow to fill effectively. Exactly like the sink marks in the Airfix Swordfish wing. Plus, the more I look at it, more sink marks become apparent. Like the Swordfish, this thing is slowly sapping the enthusiasm to bother.
Anyway, I’m not starting another until it’s done this time, so on to the Blue Steel missile. Flatted the seams and filled any gaps with Milliput:
It’s perfect for jobs like that, because you can remove the excess and blend to a perfect finish without trying to sand in impossible to get to places:
Plan with this is to use Tamiya white primer as the final finish, and use a mechanical pencil for the panel lines. I want it to look pristine, but with something to break up the expanse of white.
 d, what do you do to stop it going all over everything when mixing it?
IJWS15 said:
It looks as if the front winglets are movable in flight so shouldn't there be a slight gap between them and the missile body?
Yes, the canards move, but they were a very close fit. It's very difficult to get a very small, but consistent gap of the right scale - too big a gap and it looks all wrong. I opted to fill it, and then I'll go around the joint with a dark wash to suggest a gap. I found a picture somewhere of the real thing, but it's on my other laptop.r159 said:
Bugger on the intakes...out of interest when I use Milliput its as sticky as a bd, what do you do to stop it going all over everything when mixing it?
I mix it using a bit of spit, and accept it goes over your fingers and anything else it happens to contact. Once it's mixed, I wash it all off my hands and don't touch it again. I use some plastic spreaders or a cocktail stick, and wipe any excess off with a damp cloth.d, what do you do to stop it going all over everything when mixing it?Tried for the second time to get the radome scribing right. When viewed from the side, the rear vertical panel line needs to appear parallel to the bulkhead line further back. After eyeballing it and getting it wrong, I opted to set it with a height gauge. First checking the bulkhead line is parallel with the bench all around:

Then dotting some black paint on the scriber tip, and touching it on to the compound curved surface of the nose:

I’ll join the dots by best-fitting a thin strip of Dymo tape, and scribing the line to that.
Then dotting some black paint on the scriber tip, and touching it on to the compound curved surface of the nose:
I’ll join the dots by best-fitting a thin strip of Dymo tape, and scribing the line to that.
davettf2 said:
Excellent alternative use for slip gauges!
Fantastic dedication, and following with interest, keep up the great work.
Thanks! Slip gauges are great for many things totally inappropriate for maintaining their accuracy. Has the added benefit of causing outrage on the Model Engineer forum - on a par with my occasional use of digital calipers as scribers and clamps.Fantastic dedication, and following with interest, keep up the great work.
Anyway, the scribed radome line seems to be in the right place now:


Intake masking. I wanted to do this before assembly, because it looked quite tricky.
Airfix thoughtfully provided paper cut-out templates as a guide, but how on Earth you’re supposed to use them is anyone’s guess. The instructions seem to show them being used to draw around before assembly of the intake halves…but the white would have to have been applied first for this to work, in which case how are you supposed to deal with the joint lines without ruining the paint? Anyway, I put them in place at this stage (when access is pretty much impossible). They are marked for top and bottom:
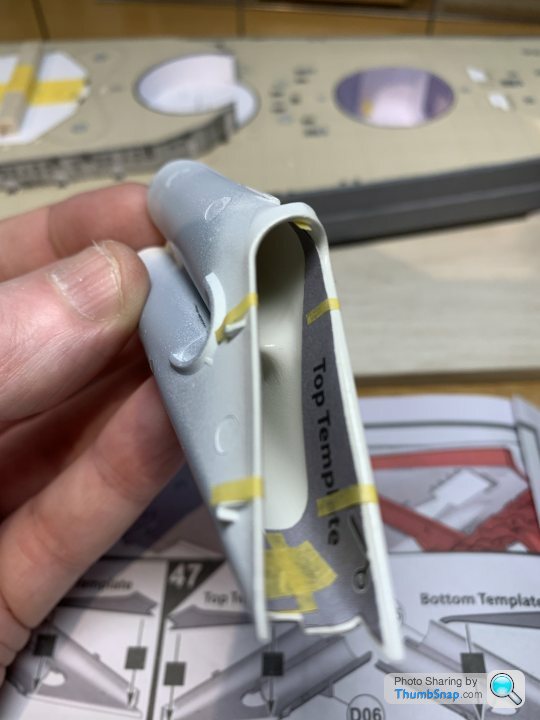

Oh dear:

Somewhat confused, I then removed them, turned them print side down, but they’re still wrong - just wrong on the opposite side. The only way I could get them kind of right was to swap them top to bottom. Seems like they been printed on the wrong parts.
All in all a bit of a pointless exercise as far as I can see. Would have been better to make the intake mouths separate parts along the demarcation line for what it’s worth.
So currently doing it all by eye, which inevitably ends in re-work at a very tricky stage.
Airfix thoughtfully provided paper cut-out templates as a guide, but how on Earth you’re supposed to use them is anyone’s guess. The instructions seem to show them being used to draw around before assembly of the intake halves…but the white would have to have been applied first for this to work, in which case how are you supposed to deal with the joint lines without ruining the paint? Anyway, I put them in place at this stage (when access is pretty much impossible). They are marked for top and bottom:
Oh dear:
Somewhat confused, I then removed them, turned them print side down, but they’re still wrong - just wrong on the opposite side. The only way I could get them kind of right was to swap them top to bottom. Seems like they been printed on the wrong parts.
All in all a bit of a pointless exercise as far as I can see. Would have been better to make the intake mouths separate parts along the demarcation line for what it’s worth.
So currently doing it all by eye, which inevitably ends in re-work at a very tricky stage.
Intake masking pretty much done:


I’ll cut out some oval paper discs and Maskol them around their edges to seal the inner ducts.
Then prepared the compressor and turbine faces:
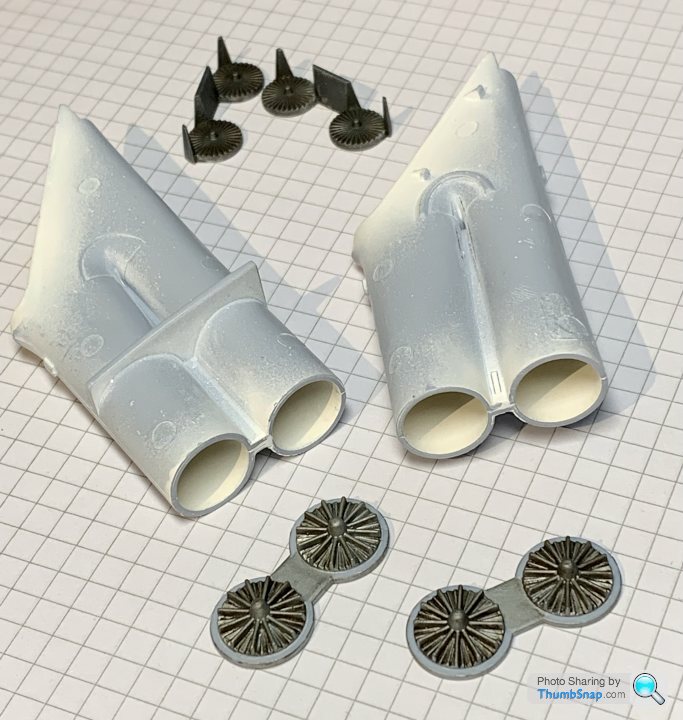
Seems like a long time since I applied any glue to this model, but attached the inserts:

I’d already Matt varnished the back of the ducts (adjacent to the faces), because I assumed once capped, they’d form a big dead spot for the airbrush. I left the forward openings gloss so that the masking tape would attach better.
Then the turbines:

After cleaning up all mating faces, I temporarily fixed the spar structure to the lower wing halves:
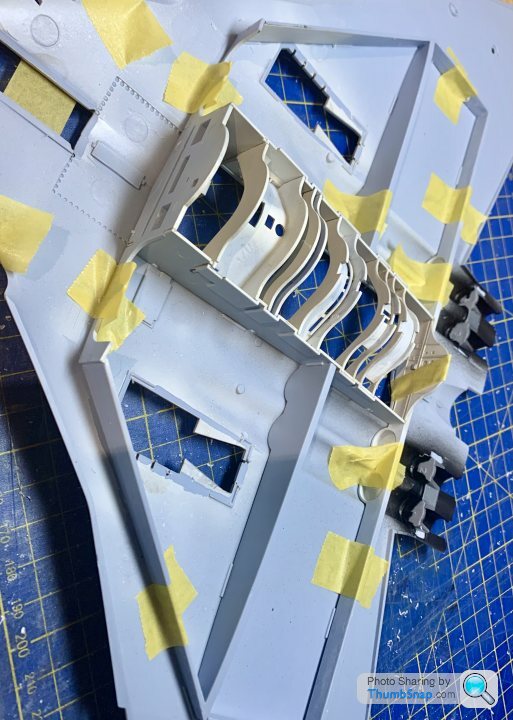
And glued the central joints:

I want to eliminate the joint lines on the front wheel well and bomb bay edges, paint and weather, before fitting the already finished well and bay.
Finally, had to clamp the front joint with locking forceps. It was so badly warped that tape or clothes pegs wouldn't hold it. It’ll be pure luck if that join lines up with the nose properly; I’m expecting a load of corrective work to be needed around there:

I’ll cut out some oval paper discs and Maskol them around their edges to seal the inner ducts.
Then prepared the compressor and turbine faces:
Seems like a long time since I applied any glue to this model, but attached the inserts:
I’d already Matt varnished the back of the ducts (adjacent to the faces), because I assumed once capped, they’d form a big dead spot for the airbrush. I left the forward openings gloss so that the masking tape would attach better.
Then the turbines:
After cleaning up all mating faces, I temporarily fixed the spar structure to the lower wing halves:
And glued the central joints:
I want to eliminate the joint lines on the front wheel well and bomb bay edges, paint and weather, before fitting the already finished well and bay.
Finally, had to clamp the front joint with locking forceps. It was so badly warped that tape or clothes pegs wouldn't hold it. It’ll be pure luck if that join lines up with the nose properly; I’m expecting a load of corrective work to be needed around there:
Noticed that the distinctive crew hatch actuators are missing. Strange, since the other similar items for the gear doors are included, but barely visible.

Since they are a conspicuous feature that should have been included in the kit, I made some up out of brass tube:

Locating dimples were also made in the hatch and the cockpit floor:

I’d have made the brackets for each end for any other build, but these will do for this one:

After wrestling the warped forward fuselage together, I noticed a large gap at the back of the front wheel well:

So currently making a plasticard shim to fill it. At times, the work needed on this thing is like building an old school short-run kit.
Since they are a conspicuous feature that should have been included in the kit, I made some up out of brass tube:
Locating dimples were also made in the hatch and the cockpit floor:
I’d have made the brackets for each end for any other build, but these will do for this one:
After wrestling the warped forward fuselage together, I noticed a large gap at the back of the front wheel well:
So currently making a plasticard shim to fill it. At times, the work needed on this thing is like building an old school short-run kit.
Gassing Station | Scale Models | Top of Page | What's New | My Stuff