Tamiya 1:72 Mosquito FB Mk.VI
Discussion


This is going to look amazing when finished, but, at risk of being pedantic (well, OK not "at risk" just being pedantic!) weren't Mosquitos more or less completely covered with fabric over the ply skin before painting? - So in effect wouldn't an unpainted airframe would simply be an off white, linen colour?
I can very strongly recommend the DH museum by the way. Lots of DH aircraft you can explore as well as several Mosquitos in restoration etc. They also had a section of the ply fuselage that you can pick up and look at - it is amazingly light.
I can very strongly recommend the DH museum by the way. Lots of DH aircraft you can explore as well as several Mosquitos in restoration etc. They also had a section of the ply fuselage that you can pick up and look at - it is amazingly light.
Edited by Lotus 50 on Sunday 7th June 08:58
Lotus 50 said:
This is going to look amazing when finished, but, at risk of being pedantic (well, OK not "at risk" just being pedantic!) weren't Mosquitos more or less completely covered with fabric over the ply skin before painting? - So in effect wouldn't an unpainted airframe would simply be an off white, linen colour?
Come on..keep up! 
dr_gn said:
I realise that this would never be possible (or extremely unlikely) in real life due to the way the aircraft was assembled and finished, but the idea is to give an impression of the different materials used in construction.
As far as I can tell, the bare surface wood (which whould be peppered with thousands of white dots where the screw heads were filled flush) would be covered with cloth/dope, then given a primer layer, then an aluminised paint for uv protection, then the final paint coats.Ah, OK, apols read your post too quickly! I think you're right re the finishing. Aside from the light weight the other thing that amazed me about the construction of the skin was the relative thickness of the different woods - a very thin inner and outer skin (can't remember which wood was used for this) with a relatively thick balsa core so the overall skin is quite thick.
Anyway, looking forward to seeing the final result!
Anyway, looking forward to seeing the final result!
Edited by Lotus 50 on Sunday 7th June 09:36
Lotus 50 said:
Ah, OK, apols read your post too quickly! I think you're right re the finishing. Aside from the light weight the other thing that amazed me about the construction of the skin was the relative thickness of the different woods - a very thin inner and outer skin (can't remember which wood was used for this) with a relatively thick balsa core so the overall skin is quite thick.
Anyway, looking forward to seeing the final result!
I think it was Douglas Fir veneer sandwiching Balsa wood. Exactly the same concept as carbon/foam sandwich in more modern applications: The skins take most of the loads, the low density core keeps them separated giving more stiffness:weight.Anyway, looking forward to seeing the final result!
Edited by Lotus 50 on Sunday 7th June 09:36
Incidentally I still can't find any comprehensive diagrams showing the complete break-down and orientatons of the outer skins, so I'm having to make some assumptions.
FWIW in "Mosquito: the original multi-role combat aircraft" there's some info on construction that may help:
"The prototype's wing, with a span of 55 feet 10 inches (slightly smaller than on later production machines), was manufactured in one piece from tip to tip It was built up around two wooden box spars with laminated spruce flanges and plywood webs. To develop compression in the birch, plywood double skins were used separated by spruce stringers. A false leading edge, built up of nose-rib formers and a D-skin was attached to the front spar. The whole structure was screwed glued and pinned before being finally covered with fabric over the plywood. They hydraulically operated slotted flaps, fitted between the fuselage, engine nacelles, and ailerons were also of wooden construction. Ailerons were metal framed and skinned, incorporating controllable trim tabs..."
"The oval-section fuselage, was also constructed from wood which offered the advantage of jig-building in two halves complete with seven bulkheads. The fuselage was built up from laminations of cedar ply, separated by a layer of balsa wood. At the point where the bulkheads were attached the balsa core was replaced with a spruce ring. For local strengthening, where attachments were made to the skin, a bakelite plug was inserted into the balsa with a plywood flange glued to the inner surface to spread the load. The join line was along the vertical centre plane, the two halves being scarfed together with fee notches reinforced by ply inserts above and below and an additional overlapping ply strip on the inside of the joint... ...The underside of the fuselage was later cut out to accommodate the wing, which was attached via four massive pick-up points with additional bolts passing through the bottom flanges of the inner ribs. The lower portion of the fuselage was then replaced after assembly, the whole structure covered with Madapolam, doped, then painted."
"The tail surfaces were conventional in desing, but all fixed surfaces were wooden structures consisting of two box spars and stressed plywood skins, while the rudder and elevators were aluminium with fabric covering."
The book isn't that clear on what changed in the production versions but things that it does mention are - the lengthening of the engine nacelles, strakes along the fuselage to strengthen it, metal skinned ailerons replacing fabric. In a later section on construction the author says that the inner and outer fuselage skins were birch ply separated by balsa with laminated spruce strengthening around the bulkheads etc... The description of construction is very detailed so it might be worth getting (you can get it on Kindle etc) the spec for doping (for the version produced in Canada) the fabric cover was to use a red-brown dope then grey filler followed by wet sanding, finally using two coats of aluminium cellulose. In finishing this was then covered by two coats of sea grey then the fuselage was masked at "83 degrees tangent" and the top surfaces sprayed with 2 coats of ocean-grey and two coats of olive-grey then camouflaged.
There's lots of photos of the construction process which may help but sadly no plan showing surfaces...
Thanks for that ^^ I'll have a read through it later. I'm intrigued by the angle/masking comment. I wonder if it's something to do with getting the right degree of feathering on the demarcations? Mosquitos do seem to have less well defined edges than Spitfires or Hurricanes of the same era.
So this illustrates the problems I have with oil paint woodgrain (and why I was keen to try decals):
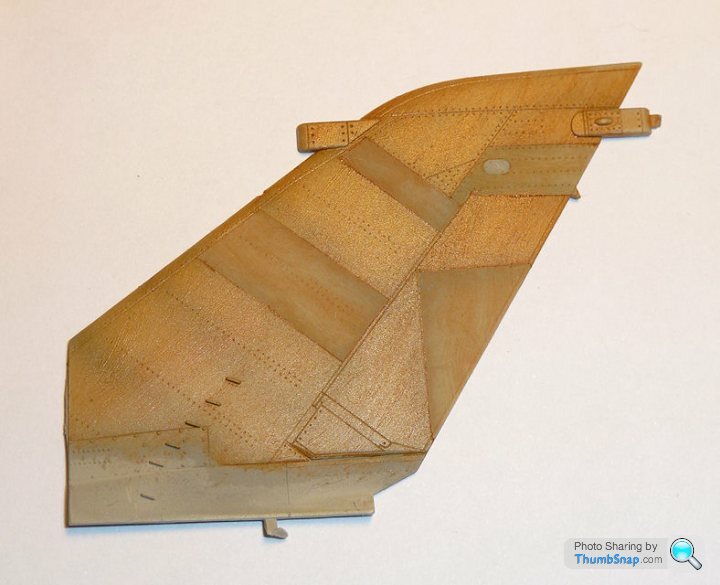
The first panels I did (the lighter ones) were masked off and more oils applied in another direction.
1) It's very difficult to judge the amount of oil paint to remove during the graining process. The second panels are much darker than the first, even though I assumed they'd look similar. As it stands there is too much contrast for my liking.
2) Even though I used Liquin drying medium again, the paint hasn't dried. The first panels went matt within a few minutes, whereas these look like they could take weeks to set, judging by how similar they look to my SE.5a parts did (in terms of sheen). Obviously there can be no masking before the oil is fully cured.
So there you go. I wondered whether to try using enamels instead of oils for the grain, after all its a dissimilar paint to the acrylic basecoat, and has the same thinners, but they dry predictably...so why not? In fact why use oils over enamels in the first place - it's not like oils are widely used in model aircraft modelling to start with?
A long way to go with this one I think.
dr_gn said:
Incidentally I still can't find any comprehensive diagrams showing the complete break-down and orientatons of the outer skins, so I'm having to make some assumptions.
This might help some - https://www.facebook.com/pages/Mosquito-Aircraft-R...AER said:
dr_gn said:
Incidentally I still can't find any comprehensive diagrams showing the complete break-down and orientatons of the outer skins, so I'm having to make some assumptions.
This might help some - https://www.facebook.com/pages/Mosquito-Aircraft-R...
"the lengthening of the engine nacelle"
The prototype is currently in pieces at the de Havilland Aircraft Museum (formerly the Mosquito Museum), and the outline of the original, shorter, nacelles is clearly visible. I think there might also be brackets left over from a dorsal turret mock-up still visible?
Just to add to the recommendations above, the museum is a really good place to visit, good exhibits, nice people and a very worthwhile cause.
http://www.dehavillandmuseum.co.uk/
David
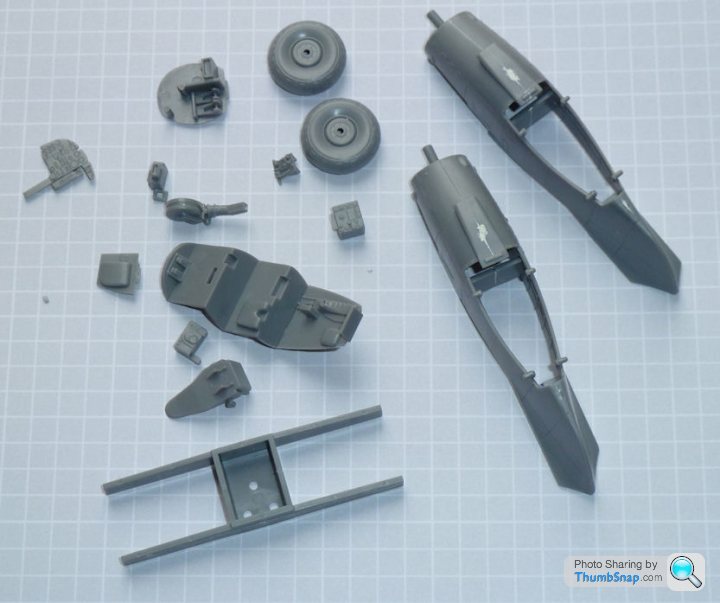
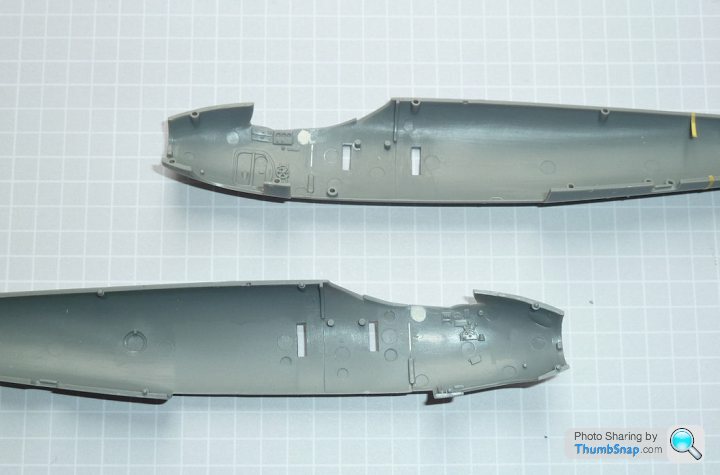
I'm still figuring out the subtleties of woodgrain (Alex from UvdR has been very helpful with this), so in the meantime I made a start on cleaning up cockpit parts and assembling the engine nacelles etc. There are a few ejector pin marks still to fill in the wheel wells, and I'm not sure if the ones in the cockpit are covered by random bits of office furniture or not, but it looks OK so far:
4321go said:
It might just be the photo, but those props don't look the same. Each sprue seems to have one broad-chord prop and one with a narrower chord and more pointed tips.
I agree, and my guess: the two different types of propellor are supplied to allow the builder to do either an accurate static model or an accurate in-flight model. Because de Havilland put that clever variable pitch thingummy* in the Mosquito. Dr_gn - I've got half a dozen random photos from the museum - I could email if you like?
* Sort of like an early version of VTEC, right?
EskimoArapaho said:
4321go said:
It might just be the photo, but those props don't look the same. Each sprue seems to have one broad-chord prop and one with a narrower chord and more pointed tips.
I agree, and my guess: the two different types of propellor are supplied to allow the builder to do either an accurate static model or an accurate in-flight model. Because de Havilland put that clever variable pitch thingummy* in the Mosquito. Dr_gn - I've got half a dozen random photos from the museum - I could email if you like?
* Sort of like an early version of VTEC, right?
Yes, 4321 was right, they are different: Early and late versions. The physical shape of the blade wouldn't change with pitch, each blade just rotates about it's axis.
dr_gn said:
Sure, I'd love to see the pics - please pm me and I'll give you my email.
Yes, 4321 was right, they are different: Early and late versions. The physical shape of the blade wouldn't change with pitch, each blade just rotates about it's axis.
PM sent. I thought the photo might be showing the same blade shape just presented at a different angle to the camera. But I sit corrected. Yes, 4321 was right, they are different: Early and late versions. The physical shape of the blade wouldn't change with pitch, each blade just rotates about it's axis.

dr_gn said:
Lotus 50 said:
This is going to look amazing when finished, but, at risk of being pedantic (well, OK not "at risk" just being pedantic!) weren't Mosquitos more or less completely covered with fabric over the ply skin before painting? - So in effect wouldn't an unpainted airframe would simply be an off white, linen colour?
Come on..keep up! dr_gn said:
I realise that this would never be possible (or extremely unlikely) in real life due to the way the aircraft was assembled and finished, but the idea is to give an impression of the different materials used in construction.
As far as I can tell, the bare surface wood (which whould be peppered with thousands of white dots where the screw heads were filled flush) would be covered with cloth/dope, then given a primer layer, then an aluminised paint for uv protection, then the final paint coats.Wing, flaps, fuselage, tailplane and fin were wood. Nacelles, ailerons and elevators metal skinned, rudder fabric skinned.
EskimoArapaho said:
dr_gn said:
Sure, I'd love to see the pics - please pm me and I'll give you my email.
Yes, 4321 was right, they are different: Early and late versions. The physical shape of the blade wouldn't change with pitch, each blade just rotates about it's axis.
PM sent. I thought the photo might be showing the same blade shape just presented at a different angle to the camera. But I sit corrected. Yes, 4321 was right, they are different: Early and late versions. The physical shape of the blade wouldn't change with pitch, each blade just rotates about it's axis.
Hi dr_gn,
There's a brief shot of a part built Mosquito at a Canadian museum here:
https://youtu.be/ZE8d3ChFuAM?t=17m10s
At about 17:20 it is shown in what looks like bare wood finish, they are using all the actual materials and an authentic manufacturing process. More info here: http://www.ch2a.ca/#!mosquito/c1tsl
Gassing Station | Scale Models | Top of Page | What's New | My Stuff