GB Airfix Tempest: EMcL
Discussion


Academy have been accused in the past of copying other manufacturers moulds - including the errors older mouldings may have contained.
At the end of the day, I don't suppose any model company can put any sort of restriction on this approach to manufacturing - after all - if anyone holds a copyright on the shape of a particular aircraft, it would be the original airframe manufacturer - who may not even exist anymore. Indeed, the original model manufacturer may not exist anymore either.
The position of copyrighting and royalties on models and decal sheets is quite complex and messy and you can see how some manufacturers sometimes try and get around these issues by not mentioning the original manufacturer of the original aircraft. Trumpeter's Gannet comes to mind.
As for Mr Surfacer, I used No.1200.
The fuselage has been given a primer coat of Tamiya Grey Primer and lightly rubbed down.
Next step is to start spraying those parts of the fuselage that will need to be white i.e. the white areas for the D-Day stripes and undercoat for the yellow leading edge ID markings, the propellor spinner and the propellor tips.
I have Blue Tacked the undercariage doors into place as they can act as mask when spraying the white (and black areas).
I managed to snap off the moulded on aerial mast (which was always likely) - most pre-moulded bits like this hardly ever survive the sanding and general handling involved in building a kit.
Eric Mc said:
I managed to snap off the moulded on aerial mast (which was always likely) - most pre-moulded bits like this hardly ever survive the sanding and general handling involved in building a kit.
Coming along nicely Eric, glad it's not just me that managed to snap the aerial off!Progress report - no pictures due to camera batteries being flat.
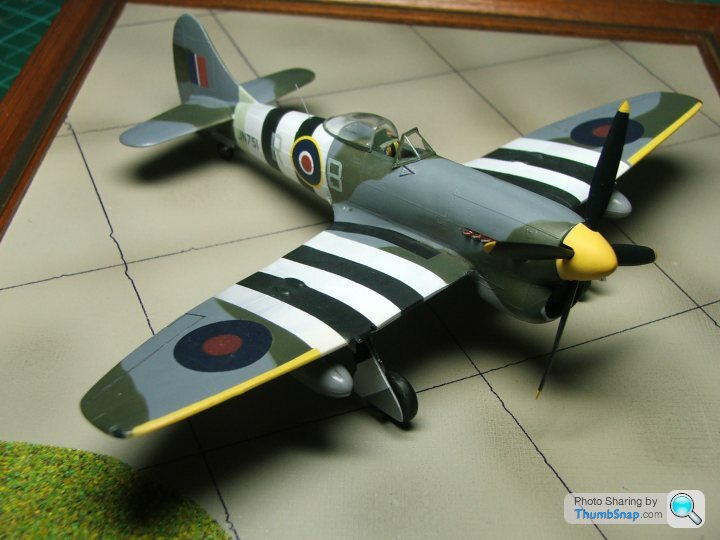
Areas to be white (D-Day stripes, wing leading edge - undercoat for yellow) sprayed.
Wing leading edge ID strip painted yellow.
Undercarriage components and wheels painted aluminium and a dark wash applied.
Vacform canopy cut out (a nerve-racking process), masked and interior green framing sprayed.
And er... that's it since last weekend.
I might go back to one of my earlier projects and try and finish it off (a "simple" Hobbyboss P-40)


It's the way I do it. Because of the white, I like to get white down first. I know that's not how it was done in most cases in WW2 but it worked when I did my Mossie a while ago so I thought I'd try the same technique.
In fact, Beamont had his stripes applied at the Hawker factory at Langley - it was delivered new to his squadron fresh from the factory with the stripes already applied - so they may have done them that way for real.
In fact, Beamont had his stripes applied at the Hawker factory at Langley - it was delivered new to his squadron fresh from the factory with the stripes already applied - so they may have done them that way for real.

No piccies today but decalling now completed.
Will give the model another coat of Klear to blend in the decals followed by a coat of Xtracrylic matt varnish.
I left the propellor assembly off to the end as I am not concerned about whether my props spin or not so it is more convenient to leave them off until final assembly.
Will give the model another coat of Klear to blend in the decals followed by a coat of Xtracrylic matt varnish.
I left the propellor assembly off to the end as I am not concerned about whether my props spin or not so it is more convenient to leave them off until final assembly.


Gassing Station | Scale Models | Top of Page | What's New | My Stuff