Latest Project: Matchbox 1/32 Bf-109E-3
Discussion


perdu said:
dr_gn said:
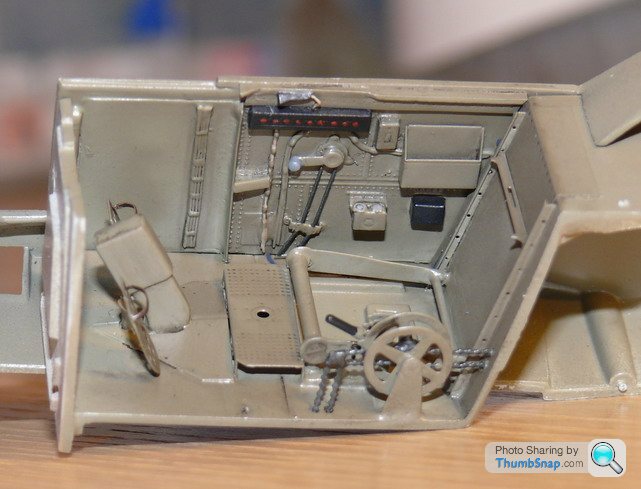
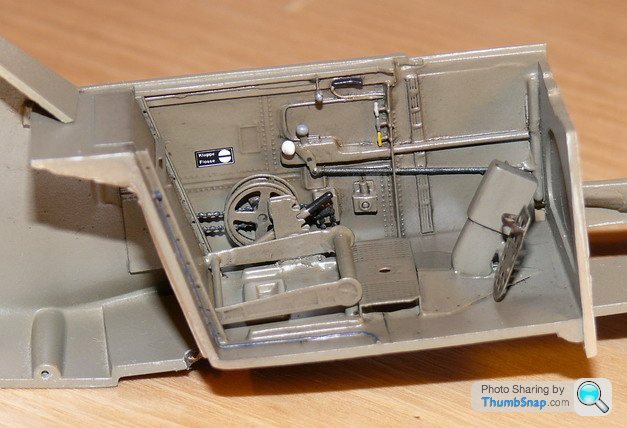
Made some progress on the cockpit tonight. Not 100% happy with the wash, but it looks OK even though I'm not sure how I achieved that result. Just needs some dry brushed aluminium and a few scratches, then overcoating with matt varnish:
oh yes that is working nicely
I see you saying not happy with the wash but TBH the look is just "right"
With the scratches and wear and with the two halves stuck together you will have a cockpit a Luftwaffe pilot would recognise and feel he could shrink, step in and fly away.
I do like the look of those add-ons, makes a world of difference
Cheers Predu. oh yes that is working nicely
I see you saying not happy with the wash but TBH the look is just "right"
With the scratches and wear and with the two halves stuck together you will have a cockpit a Luftwaffe pilot would recognise and feel he could shrink, step in and fly away.
I do like the look of those add-ons, makes a world of difference
I think it's the fact that it probably looks better than the effect I was aiming to achive that slightly annoys me. Having said that I'm going to dry brush it now, and add a few more significant chips to the appropriate areas.
Red Firecracker said:
Did you get hold of a fibreglass pencil? I've found they're excellent at giving a well worn through paint effect, ideal for the tops of the wheels etc.
Looking excellent so far.
Thanks for the encouragement. Yes I did get a fibreglass pencil - it was invaluable for removing the messed-up paint job I did on the fuse box in the cockpit (the black rectangular thing with red dots on it). I'll make another attempt at painting the canopy frames once I've used it to strip the paint off the brass.Looking excellent so far.
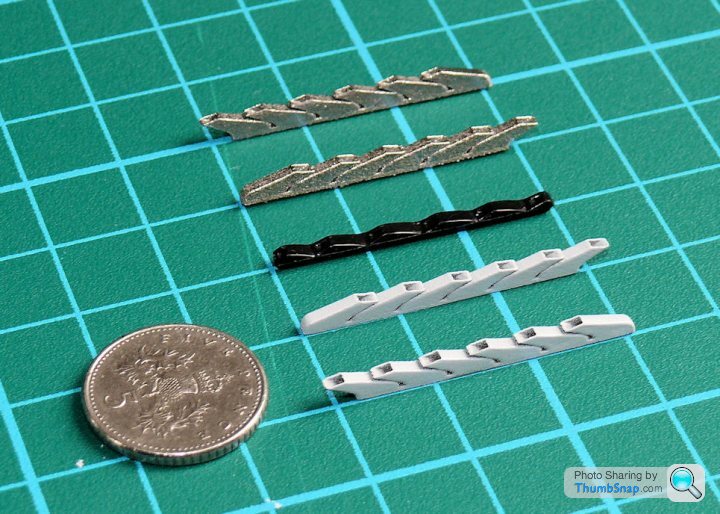
How cool is this? The Matchbox DB601 exhaust stubs were rubbish (black thing in the middle of the photo). I modelled some hollow stubs up in ProEngineer, and then had them 'grown' out of a Nickel based superalloy in a laser sintering machine at work (they are running some tests on various materials, so they put these in with a batch of other stuff). The silver ones are how they come out of the machine, the grey ones have had a bit of sanding and priming.
Couple more bits: the oxygen regulator was a bit crappy,
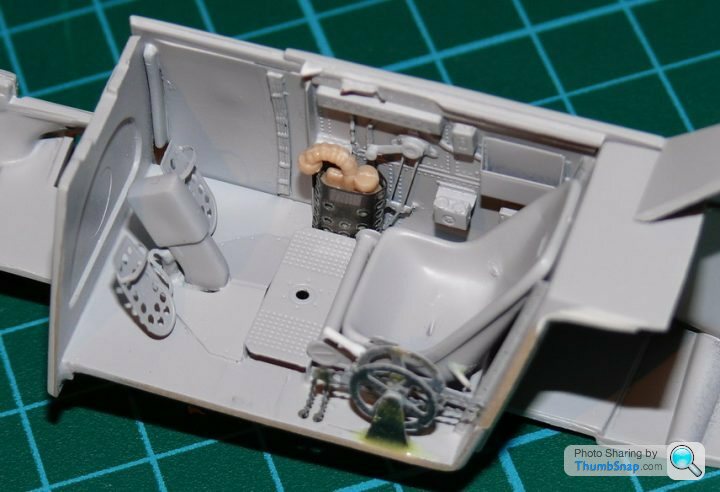
as was the gunsight, the reflector plate of which was solid plastic. I cut the moulded oxygen pipe off the regulator, and made my own out of 0.3mm lead wire, spiral wrapped with 0.1mm, and added some masking tape bands to represent end fittings. I also filled and smoothed the body down, and wrapped the whole thing in an Eduard photo-etch perforated screen. Finishing touch was a couple of generic Luftwaffe decals from MDC.
The gunsight was a simple mod: cut the solid reflector off and make a replacement out of acetate. Add a blob of PVA to represent the top lens and some lead wire for the power supply (plugs into the instrument panel).
Another item is a tiny scale map of the area of Kent where "White 5" crashed to put in the photo-etch map pocket. Simple job to find a 1940's map on Google, reduce it and print it out the the hi-res inkjet at work. Should add a bit of character to a coffin-like cockpit:

I'm enjoing this now! Can't wait to super-detail the engine and gun bay!
as was the gunsight, the reflector plate of which was solid plastic. I cut the moulded oxygen pipe off the regulator, and made my own out of 0.3mm lead wire, spiral wrapped with 0.1mm, and added some masking tape bands to represent end fittings. I also filled and smoothed the body down, and wrapped the whole thing in an Eduard photo-etch perforated screen. Finishing touch was a couple of generic Luftwaffe decals from MDC.
The gunsight was a simple mod: cut the solid reflector off and make a replacement out of acetate. Add a blob of PVA to represent the top lens and some lead wire for the power supply (plugs into the instrument panel).
Another item is a tiny scale map of the area of Kent where "White 5" crashed to put in the photo-etch map pocket. Simple job to find a 1940's map on Google, reduce it and print it out the the hi-res inkjet at work. Should add a bit of character to a coffin-like cockpit:
I'm enjoing this now! Can't wait to super-detail the engine and gun bay!
Edited by dr_gn on Friday 30th April 22:06
Yertis said:
dr_gn said:
perdu said:
I should think it is
you won't need to make any models soon just tell the pooter what to make next
I like the map
is it from an Air Ministry map, or an OS one
Just an OS map. A British one!you won't need to make any models soon just tell the pooter what to make next
I like the map
is it from an Air Ministry map, or an OS one

Here, try this:

According to Perdu the Luftwaffe did indeed buy a shed load of British OS maps before the war!
Thanks for that though - any chance you could scan it for me please?
Yertis said:
I just Googled Luftwaffe maps out of interest and found that one. I'm sure your OS version will suffice!
Nice build by the way. Was also impressed by your Spit 24 resto a while back, having made the same in about 1979 (bought it the same evening Blakes 7 first aired, whenever that was).
Ah yes, 2nd January 1978.Nice build by the way. Was also impressed by your Spit 24 resto a while back, having made the same in about 1979 (bought it the same evening Blakes 7 first aired, whenever that was).
Yertis said:
Looking back, I did a lot of 1/32 at that time. Hasegawa F104, Tamiya A10A, Revell F4E (in Microdecal IAF scheme, nice camouflage), Matchbox Lysander come to mind. Only the F104 survives.
Yep, great kits. From that era, I got the 1:32 Matchbox Bf109, Spitfire, Lysander, Tiger Moth and Venom. Only the Spitfire survived.


Eric Mc said:
It's looking better and better. You almost feel that you could climb into that cockpit and start fiddling with the knobs and switches.
Cheers Eric - I'm happy with it so far, although I have lost a couple of microscopic cockpit switches. They are in the carpet somewhere. I seem to be better at painting when I have consumed alcohol. Never noticed that before, but I think it steadies my hands.Edited by Eric Mc on Tuesday 11th May 08:36
perdu said:
nice
very nice and it's as Eric says the cockpit looks useable, switches would turn on the aircraft.
altogether a fine model coming along
super
Cheers Perdu,very nice and it's as Eric says the cockpit looks useable, switches would turn on the aircraft.
altogether a fine model coming along
super
Further to our offline chat about paint chips - I realised that the idea of using Maskol applied with a sponge might not be a good one: it reacts with acrylic paint as well as Johnsons Klear! I've heard of people using salt granules and even Marmite dabbed onto a wet surface for this kind of thing. Still not looking forward to the final finish...

Trying to get to grips with the camo pattern - thought I might as well start practicing now (on an old CD case quickly scribed and riveted) since it's going to be tricky.
With this model, the subject looks badly painted to start with, so even if I get a perfectly duplicated finished, it will still look crap! The colours are RLM02 Grey Green / RLM71 Dark Green over RLM65 Pale Blue, post shaded panel lines with Tamiya Smoke. I think the colours are OK, but I need more airbrush time. The post shading is too much on the blue, and I can't decide if the mottling is too subtle. If you look closely on the photo you can see the remains of a sharp demarcation line running back from the lower cockpit edge. I'm assuming this is RLM02/RLM71 splinter oversprayed with the same colours only in blotches. I think attempt at this bit at least is about right. Ignore the cack-handed panel line chipping attempt!


With this model, the subject looks badly painted to start with, so even if I get a perfectly duplicated finished, it will still look crap! The colours are RLM02 Grey Green / RLM71 Dark Green over RLM65 Pale Blue, post shaded panel lines with Tamiya Smoke. I think the colours are OK, but I need more airbrush time. The post shading is too much on the blue, and I can't decide if the mottling is too subtle. If you look closely on the photo you can see the remains of a sharp demarcation line running back from the lower cockpit edge. I'm assuming this is RLM02/RLM71 splinter oversprayed with the same colours only in blotches. I think attempt at this bit at least is about right. Ignore the cack-handed panel line chipping attempt!
More slow progress. I cut the original clunky plastic barrels off the machine guns and drilled out the breeches to suit the Master Model brass replacements. Just dry fitted everything to check the fit - seems a shame to paint them.
I also ground all the raised detail off the bulkhead 'table' and replaced it with lead wire, plastic card (for the electrical boxes) and scrap photo-etch brass (for the gun control cables bracket). The magazine feeds and cartridge collectors just had Eduard handles added to them, but they make them much more realsitic and less "plastic" Still plenty of work to do in this area, but even now looks better than the original.


I also ground all the raised detail off the bulkhead 'table' and replaced it with lead wire, plastic card (for the electrical boxes) and scrap photo-etch brass (for the gun control cables bracket). The magazine feeds and cartridge collectors just had Eduard handles added to them, but they make them much more realsitic and less "plastic" Still plenty of work to do in this area, but even now looks better than the original.
Been working on the engine this week - loads of scratch building and mods: all raised detail removed and replaced with wire/plasticard/guitar wire, magnetos and interrupter mechanisms modified, electrical boxes fabricated etc etc.

I guess I'm about 50% of the way there now with the engine bay...needs more wiring/coolant/fuel pipes and the bulkhead / throttle linkages / guns fitting.
I'm loosely basing the engine detailling on the well known pictures of Franz Von Werra's crashed Bf 109, which would be very similar to the one I'm modelling (for which I have only one engine bay picture).
perdu said:
dr_gn you dont need me to tell you, that is looking absolutely great
very nice work indeed
Cheers Perdu - it looks a lot better than I thought it would.very nice work indeed
Just wondering now about weathering: I'm going to use a dark wash around all the wires and lumps and bumps, followed by a bit of silver dry brush to hichlight bolt heads, then a coat of Vallejo Matt varnish. Might try adding some paint chips around the ammo boxes with a silver pencil, but not sure how this would turn out...
Gassing Station | Scale Models | Top of Page | What's New | My Stuff