FORD GT40 MKII 1/12TH TRUMPETER
Discussion


Finished my Ford windscreen washer bag which sits on the passenger side footwell next to the battery today. Made out of Epoxy instead of PVA, cut out the basic shape to the decal,drilled 0.8mm and fitted the pipe. Looks ok to me.

Onto finishing the dashboard switches etc. Then i can to the "too do,s"
Mount the coolant pipes i made some time ago.
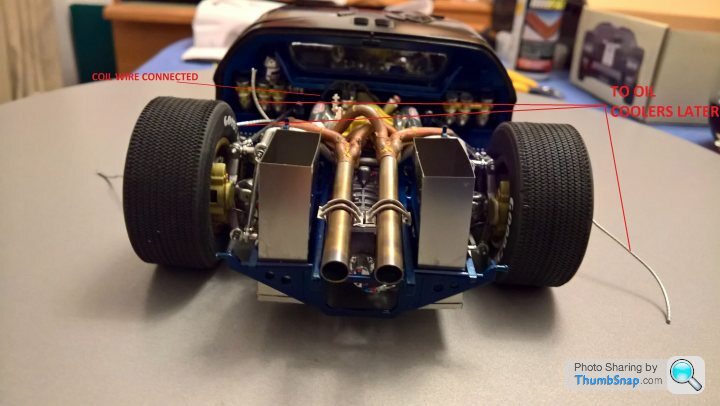
Connect the coil feed wire.
Mount the bulkhead shelf.
Fit the washer bag.
Then onto starting on the upper body/chassis
Cheers.
Onto finishing the dashboard switches etc. Then i can to the "too do,s"
Mount the coolant pipes i made some time ago.
Connect the coil feed wire.
Mount the bulkhead shelf.
Fit the washer bag.
Then onto starting on the upper body/chassis
Cheers.
Thankyou.
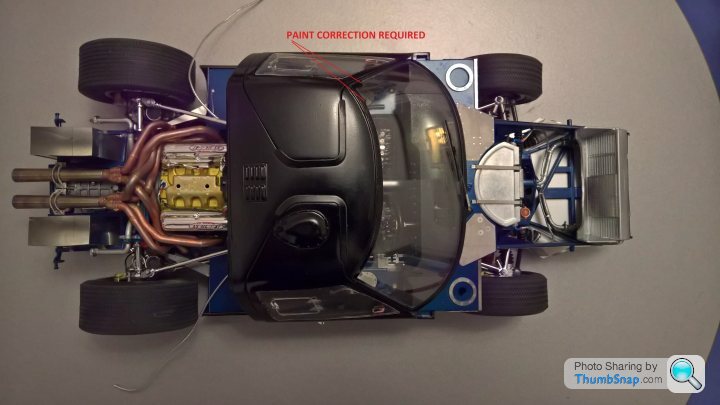
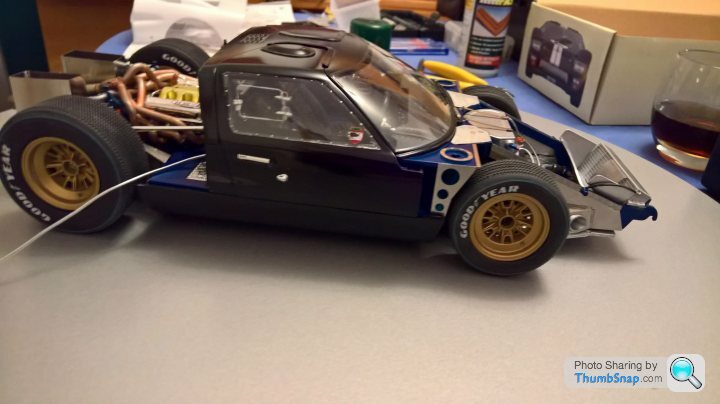
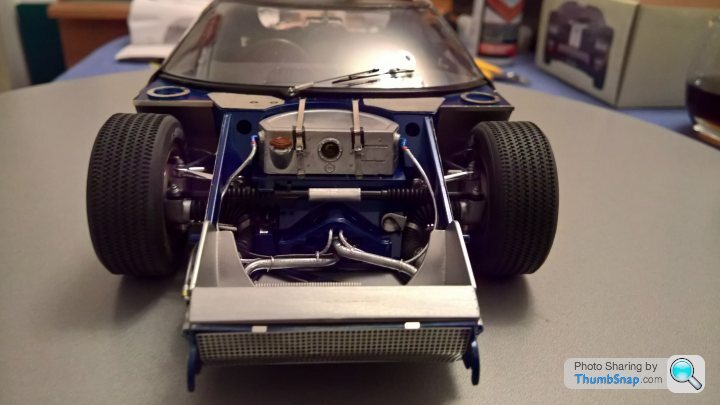
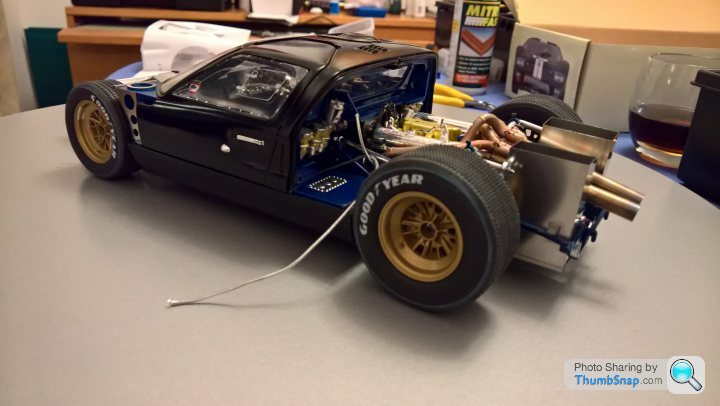
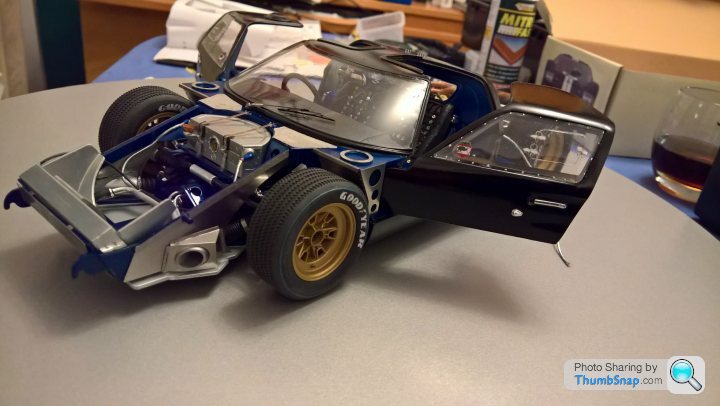
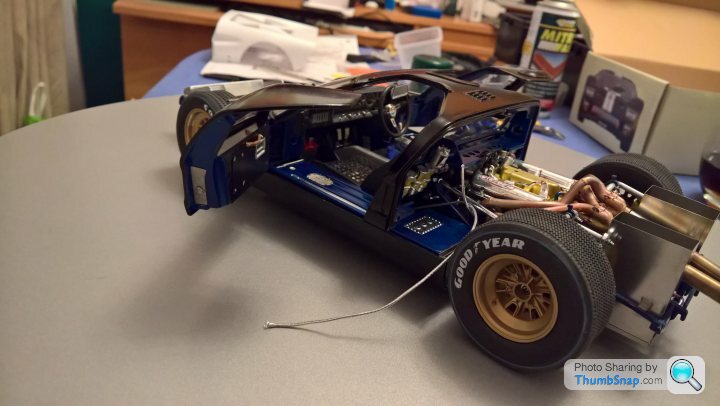
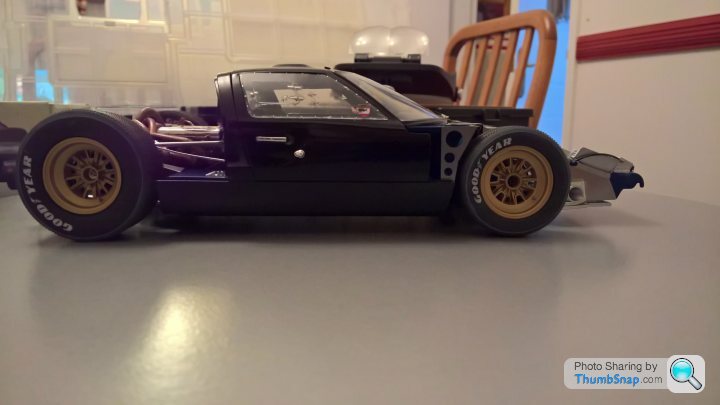
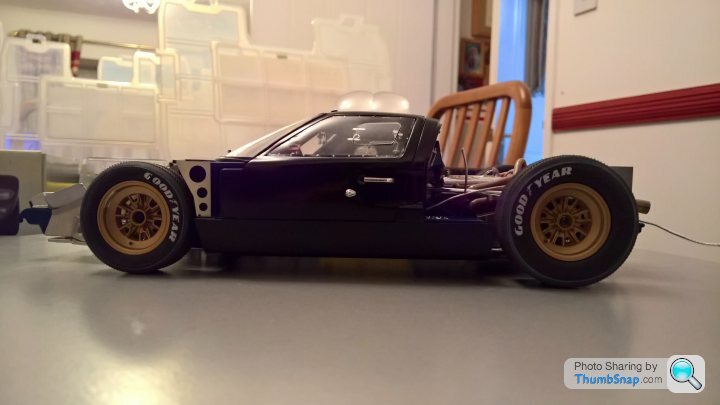
Well my project is in a few different parts now, feeling that i might be getting as bit lost. So after doing the dash,thought to semi assemble what ive done so far to see if ive missed anything and most importantly if it all fits.
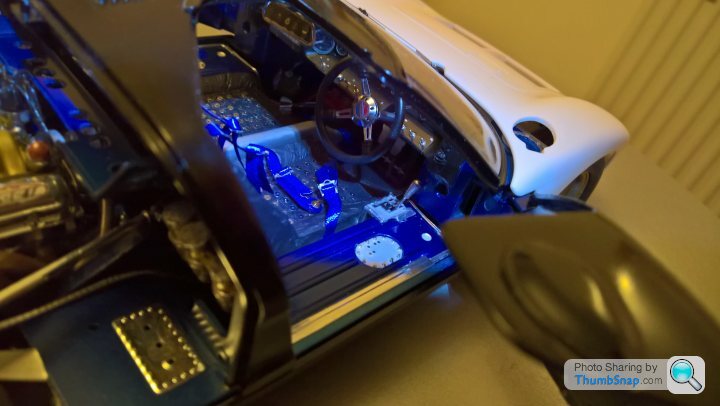
So heres my "vision on" gallery (if anyone can remember the tv programme and the music that was played in the background). Shows my age eh.The last photo is eye candy to my eyes, i can see the dash panel jewellery through the side window quite clearly.
 .
.
 .
.
 .
.
 .
.
 .
.
 .
.
 .
.
 .
.
 .
.
 .
.
 .
.
 .
.
 .
.
 .
.
 .
.
 .
.
 .
.
Taken back down to its parts and onto the upper body chassis.
Cheers
Well my project is in a few different parts now, feeling that i might be getting as bit lost. So after doing the dash,thought to semi assemble what ive done so far to see if ive missed anything and most importantly if it all fits.
So heres my "vision on" gallery (if anyone can remember the tv programme and the music that was played in the background). Shows my age eh.The last photo is eye candy to my eyes, i can see the dash panel jewellery through the side window quite clearly.
.................Taken back down to its parts and onto the upper body chassis.
Cheers
Well after watching some Le mans today got into doing some more of the Gt 40.
Some photos from the week and on.
Fitted the Ford windscreen washer bag.
 .
.
Now onto the upper chassis/ body.Cleaned, filed all edges, rubbed down then cleaned again before painting .
 .
.
Screwed supports on to allow spraying in all directions due to a lot of small/thin areas to paint.
 .
.
Etch primer
 .
.
Masked up the chassis area that had to be blue and painted the rest black.
 .
.
Looks ok
 .
.
Test fit the doors to see if there was too much paint. All good on 1st attempt a success


 :Phew.
 .
.
 .
.
 .
.
 .
.
 .
.
Masked of the black this time and painted in the blue inside and out.
 .
.
 .
.
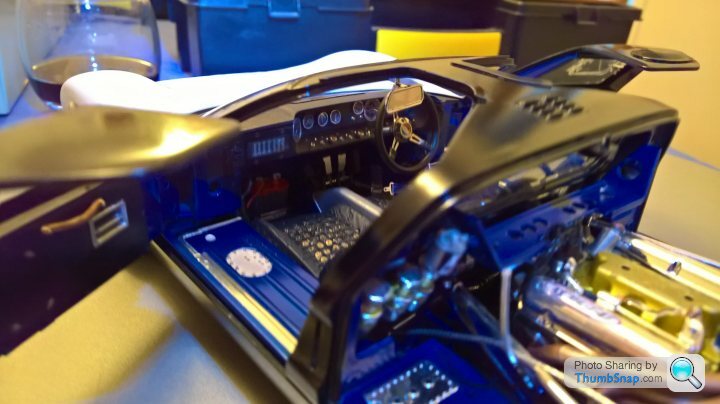
Fitted the dash assembly.
 .
.
 .
.
 .
.
 .
.
 .
.
 .
.
A little bit of finishing off to do, now onto fitting parts. About half way through this build. I think its coming along ok.
Hope this is of some interest to anyone looking, perhaps even helps anyone who may want to build this no longer available kit.
Cheers now back to watching Le Mans .
Some photos from the week and on.
Fitted the Ford windscreen washer bag.
.Now onto the upper chassis/ body.Cleaned, filed all edges, rubbed down then cleaned again before painting .
.Screwed supports on to allow spraying in all directions due to a lot of small/thin areas to paint.
.Etch primer
.Masked up the chassis area that had to be blue and painted the rest black.
.Looks ok
.Test fit the doors to see if there was too much paint. All good on 1st attempt a success
:Phew. .....Masked of the black this time and painted in the blue inside and out.
..Fitted the dash assembly.
......A little bit of finishing off to do, now onto fitting parts. About half way through this build. I think its coming along ok.
Hope this is of some interest to anyone looking, perhaps even helps anyone who may want to build this no longer available kit.
Cheers now back to watching Le Mans .
Onto the oil tank.
Way too much chrome on this, to shiny and really too clean on edges and overall finish, so very toy like. Ive removed the chrome,then primed and painted silver leaf,then laqured and finished off by making the edges up with weld lines by running a thin line of tamiya thin glue (mostly acetone based) to soften the laquer along the edges.Then using a nail cuticle finishing tool dabbed along the edges to produce a weld like look.Finished off with silver rubbing compound. looks ok. Did a bit of Photo etched straps, panels and rings.
Some photos.
With Chrome
 .
.
After dechroming.
 .
.
 .
.
Hindges and straps
 .
.
 .
.
 .
.
Some more PE on the chassis
 .
.
 .
.
 .
.
Onto steering,brake ducts and duct panels and more PE stuff
Cheers
Way too much chrome on this, to shiny and really too clean on edges and overall finish, so very toy like. Ive removed the chrome,then primed and painted silver leaf,then laqured and finished off by making the edges up with weld lines by running a thin line of tamiya thin glue (mostly acetone based) to soften the laquer along the edges.Then using a nail cuticle finishing tool dabbed along the edges to produce a weld like look.Finished off with silver rubbing compound. looks ok. Did a bit of Photo etched straps, panels and rings.
Some photos.
With Chrome
.After dechroming.
..Hindges and straps
...Some more PE on the chassis
...Onto steering,brake ducts and duct panels and more PE stuff
Cheers
Heres my version of "man jewellery" .
.
11 parts including the steering column and gear. The metal parts were from KA,s detail set.Really nice turned and polished bosses.
Historically the wheel i believe is wrong, it should be all black with a rubber bung in the centre, but i really like the extra detail.
The aluminium steering column supplied with the kit was way to long so im having to cut this down approx 4mm.
Anyway some pics.
 .
.
 .
.
 .
.
 .
.
A BLOB OF MICROKLEAR TO SEAL THE DECAL.
 .
.
 .
.
 .
.
Cheers
.11 parts including the steering column and gear. The metal parts were from KA,s detail set.Really nice turned and polished bosses.
Historically the wheel i believe is wrong, it should be all black with a rubber bung in the centre, but i really like the extra detail.
The aluminium steering column supplied with the kit was way to long so im having to cut this down approx 4mm.
Anyway some pics.
....A BLOB OF MICROKLEAR TO SEAL THE DECAL.
...Cheers
Thanks Rob, NDA.At the moment i have the same if not just a bit more attitude in this build as the Ferrari 250 GTO i did, as the chances of owning the real thing i think to put it very mildly "a bit out of my reach".In fact im doing more to this GT40 due to the lack of detail in this kit, a bit of prompting from CanAM  and trying to get it near to the same level of detail as the Ferrari.
Heres a shocker.
The rubber front brake ducting was so hard you couldnt bend it without kinking. If i fitted this it would break the steering.Ironically i had some very soft rubber bellows i saved from some scrap length guages that couldnt be repaired, which came from a automotive manufacturer. What a save and they flex easily. Looks great.
Some photos.
RUBBISH DUCTING
 .
.
NOT USED SIDE DUCTING PANELS FROM KIT
 .
.
MADE FROM KA DETAIL SET
 .
.
 .
.
 .
.
 .
.
 .
.
Here you can see how flexible my bellows are. Good save from my scrap box. Priceless
 .
.
Onwards.
Time for beers. Cheers
and trying to get it near to the same level of detail as the Ferrari.Heres a shocker.
The rubber front brake ducting was so hard you couldnt bend it without kinking. If i fitted this it would break the steering.Ironically i had some very soft rubber bellows i saved from some scrap length guages that couldnt be repaired, which came from a automotive manufacturer. What a save and they flex easily. Looks great.
Some photos.
RUBBISH DUCTING
.NOT USED SIDE DUCTING PANELS FROM KIT
.MADE FROM KA DETAIL SET
.....Here you can see how flexible my bellows are. Good save from my scrap box. Priceless
.Onwards.
Time for beers. Cheers
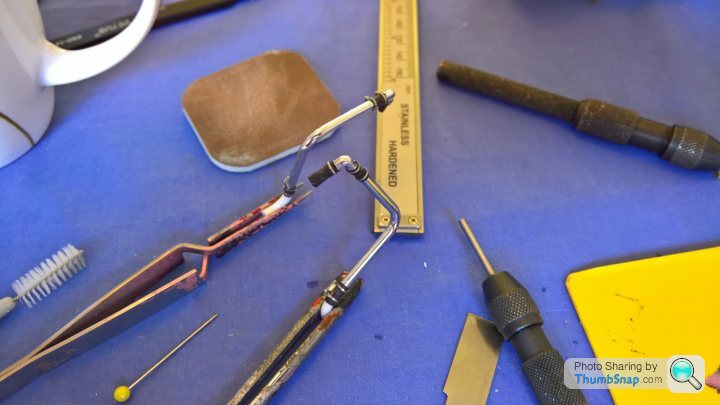
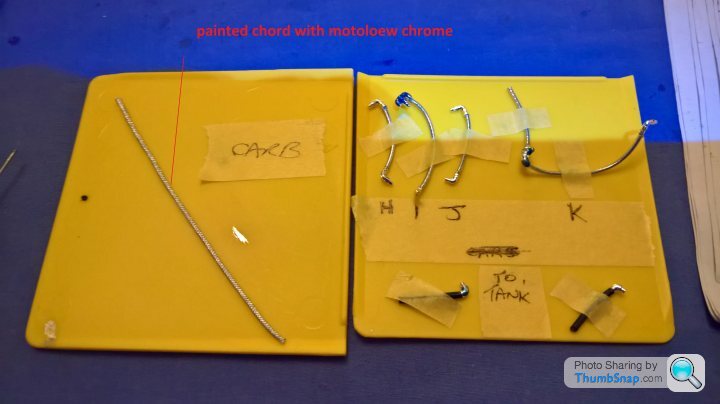
Hi! Onto the front coolant pipes . Same as usual, remove chrome filed off the nobbly bits and scribed in weld lines.
Made up some jubilee clips and rubber heat shrink for hoses.
 .
.
Finished off with Motolow chrome slightly duller than chrome.
 .
.
 .
.
Ive never taken so much chrome off, but worth the extra effort to get the parts back to looking like alluminium.
 .
.
 .
.
Just need to add some weld lines onto the radiator and cowl, same method as the oil tank.
Cheers.
Made up some jubilee clips and rubber heat shrink for hoses.
.Finished off with Motolow chrome slightly duller than chrome.
..Ive never taken so much chrome off, but worth the extra effort to get the parts back to looking like alluminium.
..Just need to add some weld lines onto the radiator and cowl, same method as the oil tank.
Cheers.
Been a little while, busy plus a break.
Back to it now.
Looking at the spare wheel i bought doesnt sit right so the cowl needs to be modified to suit the wheel.
 .
.
Removed some material from the cowl to allow the wheel to sit near to the same angle as the chassis and hopefully will clear the bonnet.
 .
.
 .
.
 .
.
Much better now. Onto the Oil tank lines from my own stock and jubilee clips to tie them to the coolant pipes. A proper patience testing exercise.
Heres some pics of the area worked on and see the jubilee clips and screw heads
 .
.
 .
.
 .
.
 .
.
 .
.
.
 .
.
Just some ties to go onto the brake ducts and get on and finish the radiator.
Cheers for now.
Back to it now.
Looking at the spare wheel i bought doesnt sit right so the cowl needs to be modified to suit the wheel.
.Removed some material from the cowl to allow the wheel to sit near to the same angle as the chassis and hopefully will clear the bonnet.
...Much better now. Onto the Oil tank lines from my own stock and jubilee clips to tie them to the coolant pipes. A proper patience testing exercise.
Heres some pics of the area worked on and see the jubilee clips and screw heads
.......Just some ties to go onto the brake ducts and get on and finish the radiator.
Cheers for now.
The radiator and cowl was chromed and very clean again so i dechoromed the parts, ruffed the surfaces for a bit of realism and added bolt heads, ran weld lines along edges that would have been welded, painted and finished off with silver rub to add a bit of lustre, also added the PE details and a bleed pipe added on the top of the radiator, ran the pipe down and along one of the coolant pipes and fitted to the chassis.
Heres some photos.
 .
.
 .
.
 .
.
 .
.
 .
.
 .
.
 .
.
 .
.
 .
.
 .
.
 .
.
 .
.

 .
.
 .
.
 .
.
So now its onto fitting the doors and then attaching the top half to the bottom of the car to go forward.
Thankyou for looking. Cheers
Heres some photos.
...............So now its onto fitting the doors and then attaching the top half to the bottom of the car to go forward.
Thankyou for looking. Cheers
Oooops. Almost forgot these.
Ties for the brake ducts.
 .
.
 .
.
Screen filed to fit.
 .
.
 .
.
Now onto the jewellery.KA detail kit ,Windscreen wiper, 9 parts bent fitted,glued and painted semi gloss black, took ages to do but nice detail.
 .
.
 .
.
 .
.
Some semi assembling showed a couple of issues. Bonnet and hatch sticking up due to the oil tank straps and radiator cowl fouling. Easy enough to fix before i finally secure the doors and assemble to the lower chassis.
 .
.
 .
.

Friday beers . Cheers
Ties for the brake ducts.
..Screen filed to fit.
..Now onto the jewellery.KA detail kit ,Windscreen wiper, 9 parts bent fitted,glued and painted semi gloss black, took ages to do but nice detail.
...Some semi assembling showed a couple of issues. Bonnet and hatch sticking up due to the oil tank straps and radiator cowl fouling. Easy enough to fix before i finally secure the doors and assemble to the lower chassis.
..Friday beers .
CheersEdited by henryk001 on Friday 12th July 21:03
Edited by henryk001 on Friday 12th July 21:05
NDA said:
It's the equivalent of a beautiful watch - impossible details that will rarely be seen.
A fantastic thing.
Thankyou very much NDA. One good thing out of this build is the clam shell design of the car allows much more detail to be viewed than a traditional design.A fantastic thing.
The doors open out at almost 90 degrees exposing most of the interior work, the rear will tilt up the same and the front can be pulled off
to view all inside. Regarding watches well theres is some watchmakers screws as you know ive used to make up the jubillee clips.
Once again thankyou for your praise. Its now coming together top to bottom. Still a lot of work left to do. I will put some photos on soon.
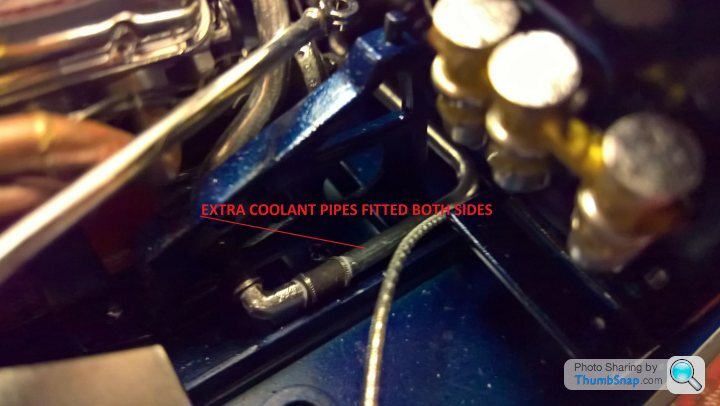
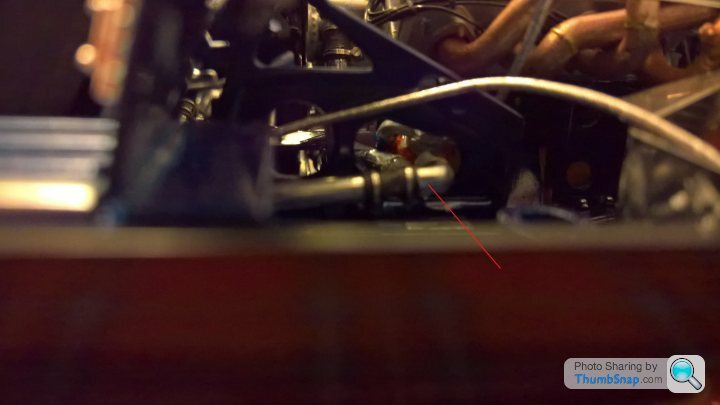
Remember these extra coolant pipes i made a while ago to show the connection between the radiator and engine.
 .
.
Fitted them to the engine and centre tunnel before screwing the top to bottom chassis parts.
 .
.
 .
.
 .
.
Fitted the steering rack through. The two main assemblies then went together well with 6 screws holding it all together quite nicely without having to use glue. Also will allow dismantling at a later date if necessary.
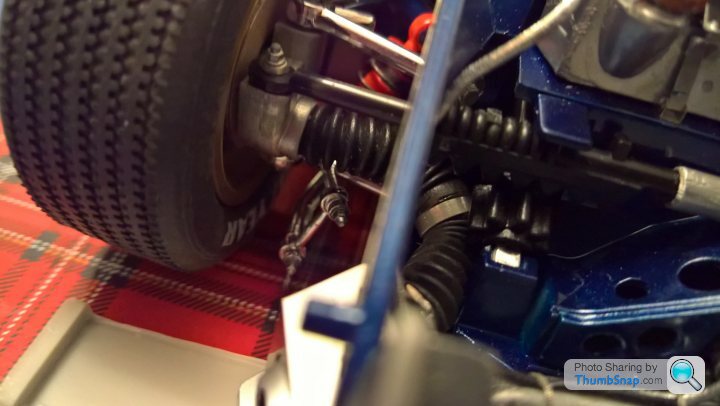
Connected the brake ducting i made from length guage gaiters that flex very well, connected to the calipers.
 .
.
 .
.
Some photos of the assembly and close ups so far.The doors which were my concearn earlier fitted very nicely after some reforming before painting especially the passenger door.
 .
.
 .
.
 .
.
 .
.
 .
.
 .
.
 .
.
 .
.
 .
.
 .
.
 .
.
 .
.
 .
.
 .
.
Onto the fuel lines, lots of them to make up to the 6 fuel pumps, oil coolers, carb, front and rear bodywork next.
Cheers
.Fitted them to the engine and centre tunnel before screwing the top to bottom chassis parts.
...Fitted the steering rack through. The two main assemblies then went together well with 6 screws holding it all together quite nicely without having to use glue. Also will allow dismantling at a later date if necessary.
Connected the brake ducting i made from length guage gaiters that flex very well, connected to the calipers.
..Some photos of the assembly and close ups so far.The doors which were my concearn earlier fitted very nicely after some reforming before painting especially the passenger door.
..............Onto the fuel lines, lots of them to make up to the 6 fuel pumps, oil coolers, carb, front and rear bodywork next.
Cheers
silverfoxcc said:
Henry
Really feeling pleased doing my Tender hornblocks and getting to 10BA with 12 BA heads in the right places, thinking i was getting into micro engineering and you pop up with watchmakers screws for the clip ( you swine lol)
Seriously have you ever thought of putting it on display at a couple of shows? You could get back you expenses by flogging £5.00 'backstage passes' and the use of a quality glass so people can get up close and personal!!!
Ron
.Really feeling pleased doing my Tender hornblocks and getting to 10BA with 12 BA heads in the right places, thinking i was getting into micro engineering and you pop up with watchmakers screws for the clip ( you swine lol)
Seriously have you ever thought of putting it on display at a couple of shows? You could get back you expenses by flogging £5.00 'backstage passes' and the use of a quality glass so people can get up close and personal!!!
Ron
Sorry Rob to take away your kudos on the BA screws, but ill give it back as your projects are true engineering compared to my just adding detail.
I dont think i could take it to a show. I would fall apart if the car got damaged in transit or got finger poked at a show. Im not as brave as you lot and Robs trek to a show almost having a accident on the way destroying his diorama was painfull reading.
Cheers
silverfoxcc said:
Henry
It is all good fun whatever medium you work in.
With ME CNC has made a difference and when you look at what you can do with kits nowadays is amazing photetching has given it a new dimension
I started of in OO and slowly built my way up. the bigger they got, the 'easier' it became, but parodoxically also harder as you started to look at the small things that could be put on locos and looking at what other people do then you want to add that to your model,
However i run a tight line between trying to get it looking right and keeping it so it will withstand the work it has been built to do
To give you and idea of what standards some guys are reaching now here are a couple of threads both worth reading to get an insight on how it is done
the first is Peters model of an Flying Scotsman
http://modeleng.proboards.com/thread/5733/building...
Now Rogers is on a different planet to most of us on the forum this guy is something else
http://modeleng.proboards.com/thread/8680/help-spe...
And then there is this chap in the car world
https://forums.aaca.org/topic/145354-construction-...
Another chap worth looking up is Gerald Wingrove who was doing stuff like this 40 years ago
apologies if you are already aware of all these
Yes seen these thankyou , fascinating stuff.It is all good fun whatever medium you work in.
With ME CNC has made a difference and when you look at what you can do with kits nowadays is amazing photetching has given it a new dimension
I started of in OO and slowly built my way up. the bigger they got, the 'easier' it became, but parodoxically also harder as you started to look at the small things that could be put on locos and looking at what other people do then you want to add that to your model,
However i run a tight line between trying to get it looking right and keeping it so it will withstand the work it has been built to do
To give you and idea of what standards some guys are reaching now here are a couple of threads both worth reading to get an insight on how it is done
the first is Peters model of an Flying Scotsman
http://modeleng.proboards.com/thread/5733/building...
Now Rogers is on a different planet to most of us on the forum this guy is something else
http://modeleng.proboards.com/thread/8680/help-spe...
And then there is this chap in the car world
https://forums.aaca.org/topic/145354-construction-...
Another chap worth looking up is Gerald Wingrove who was doing stuff like this 40 years ago
apologies if you are already aware of all these
Cheers
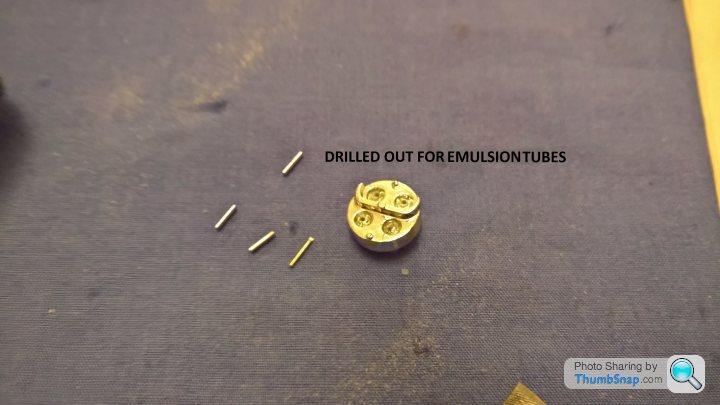
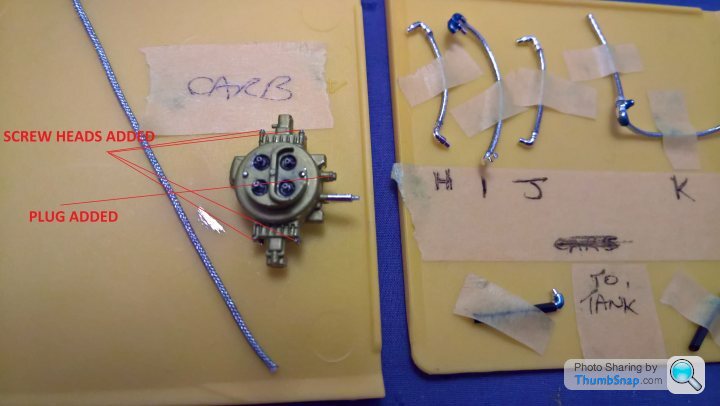
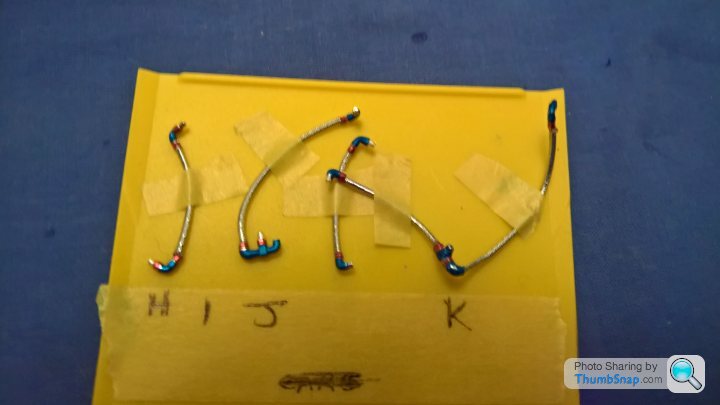
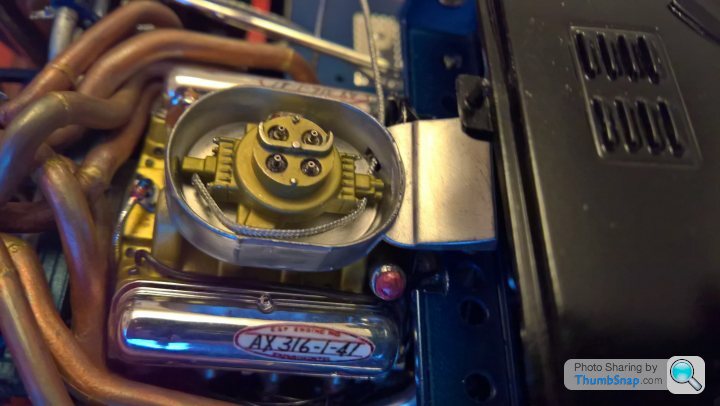
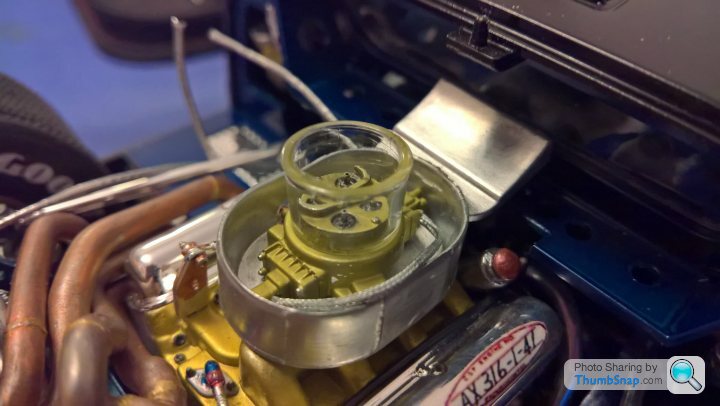
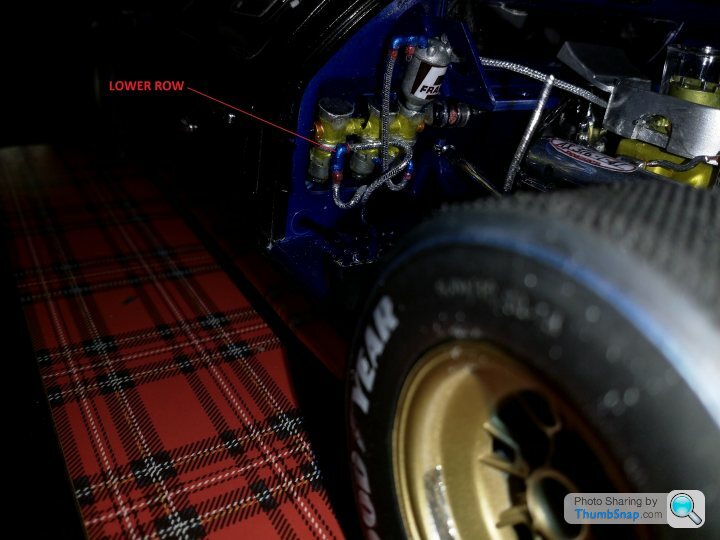
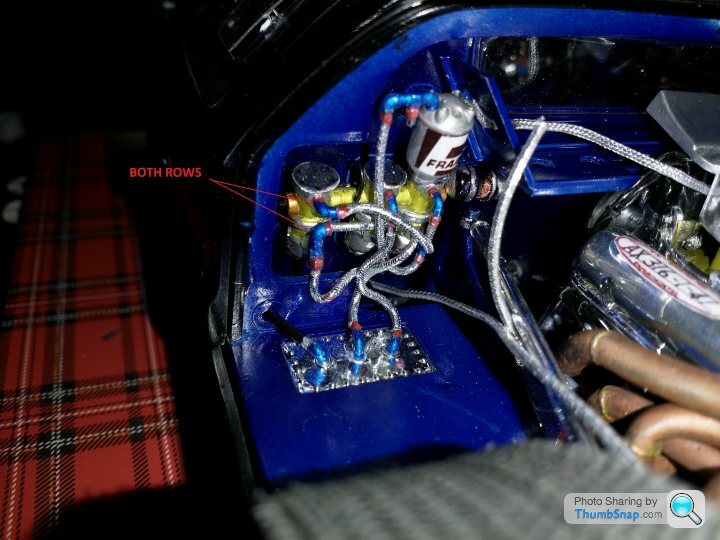
Onto Carb and fuel lines. Used my own stock as the kit braided pipes would kink.Found the right shade for the carb,scribed seperation lines, added some screw heads etc
Drivers side lines.
 .
.
Drilled out and fitted emulsion tubes.
 .
.
The real thing.
 .
.
 .
.
 .
.
 .
.
 .
.
 .
.
 .
.
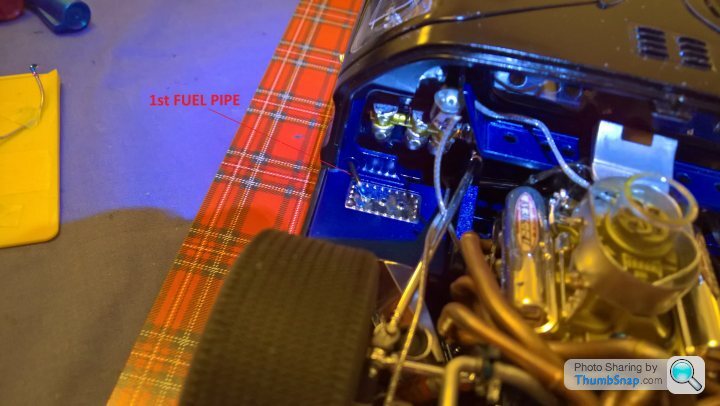
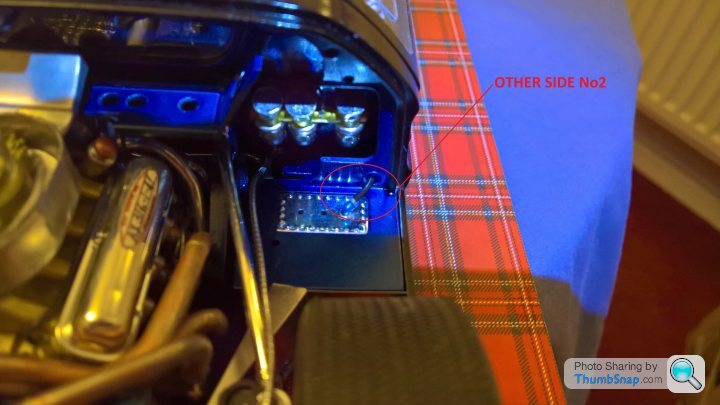
Stages of assembly of the fuel lines.
 .
.
 .
.
 .
.
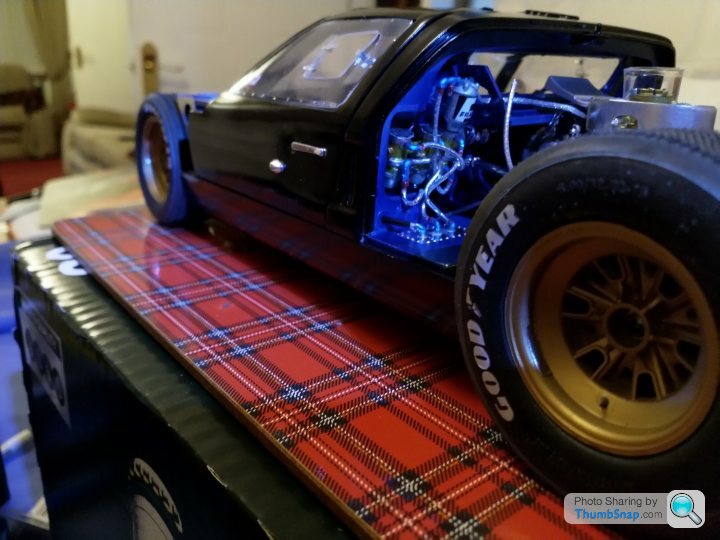
Onto the other side now.
Cheers
Drivers side lines.
.Drilled out and fitted emulsion tubes.
.The real thing.
.......Stages of assembly of the fuel lines.
...Onto the other side now.
Cheers
Gassing Station | Scale Models | Top of Page | What's New | My Stuff