GB: Academy : DR_GN
Discussion


perdu said:
That does look the business
I like the canopy too, far better than any moulded polystyrene one
I'll be moulding mine too and adding the roof bulge that allows the rear view mirror to be out of the airflow
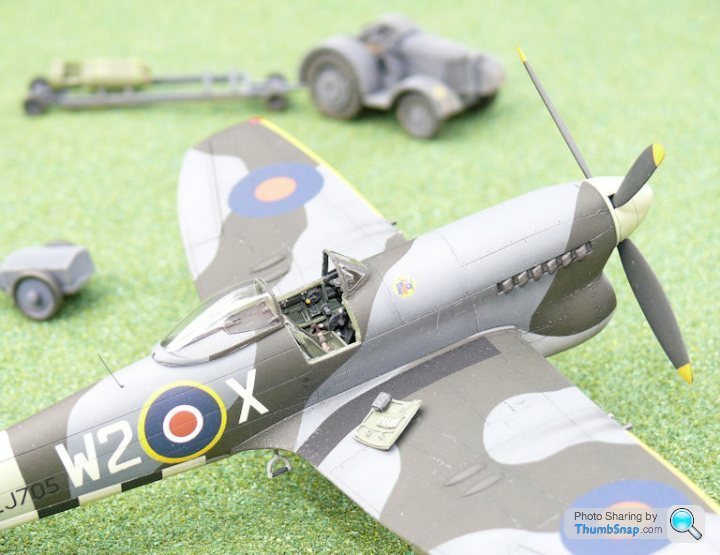
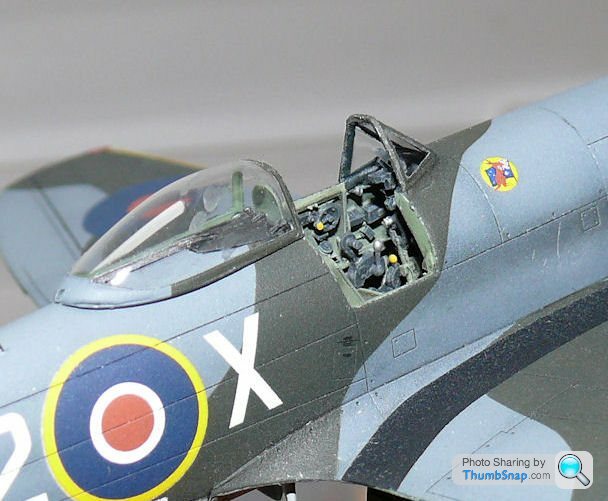
The reflector sight looks nice, a definite bonus from your resin kit and RFs instruments are dead cool too
(mine will be less impressive but it'll have to do)
Seems I snapped the very outer end of the collar bone last Monday, I found something sticking up, pressed down on it and made it go where it should have. Lucky huh! Lots of sling work now, just when I don't need it.
Three hours fifty eight minutes in the car park at the Hospital
Two more minutes and we'd have been up another quid
Thanks Perdu, I hope you're on the mend. At least it was A&E and not an admission!I like the canopy too, far better than any moulded polystyrene one
I'll be moulding mine too and adding the roof bulge that allows the rear view mirror to be out of the airflow
The reflector sight looks nice, a definite bonus from your resin kit and RFs instruments are dead cool too
(mine will be less impressive but it'll have to do)
Seems I snapped the very outer end of the collar bone last Monday, I found something sticking up, pressed down on it and made it go where it should have. Lucky huh! Lots of sling work now, just when I don't need it.
Three hours fifty eight minutes in the car park at the Hospital
Two more minutes and we'd have been up another quid
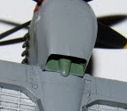
You no doubt noticed, but didn't comment that the gunsight mounting bar should be black, not green. Rest easy, it's black now

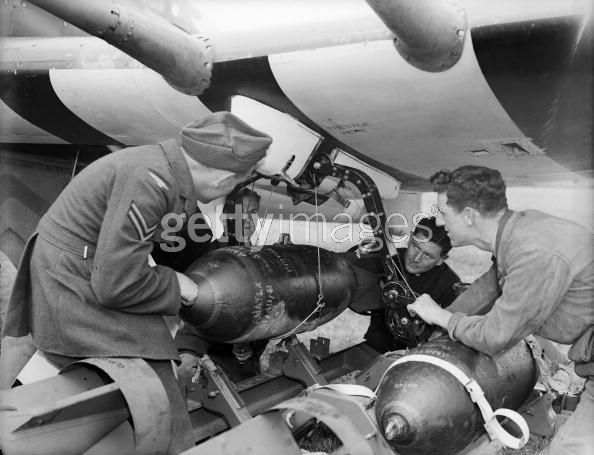
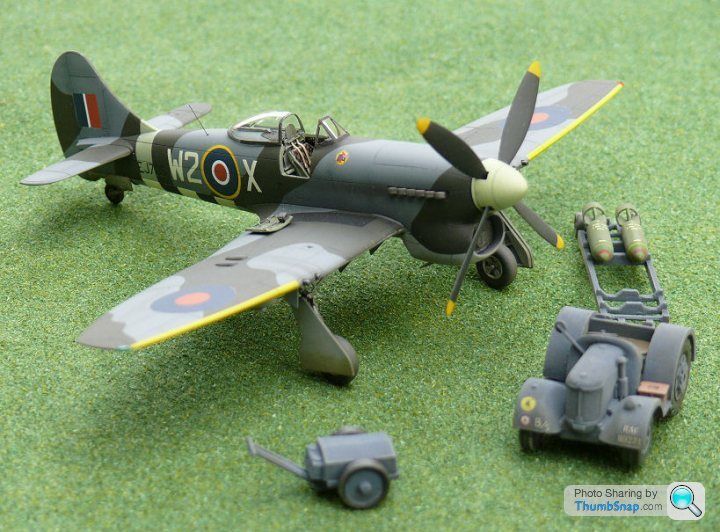
Finished the bombs by adding the tiny decals RedFirecracker printed for me. I ended up painting the red and green bands by hand by spinning them in the lathe and just touching the surface with a brush. Final touch was a coat of matt varnish:

Small details make a big difference. Shame the decals aren't in the kit as standard.
Small details make a big difference. Shame the decals aren't in the kit as standard.
perdu said:
They look good don't they
I had some decals for bombs years ago, I think they were Hasegawa
And they maybe wouldn't have been quite this authentic, but...
Wonder if they are still around?
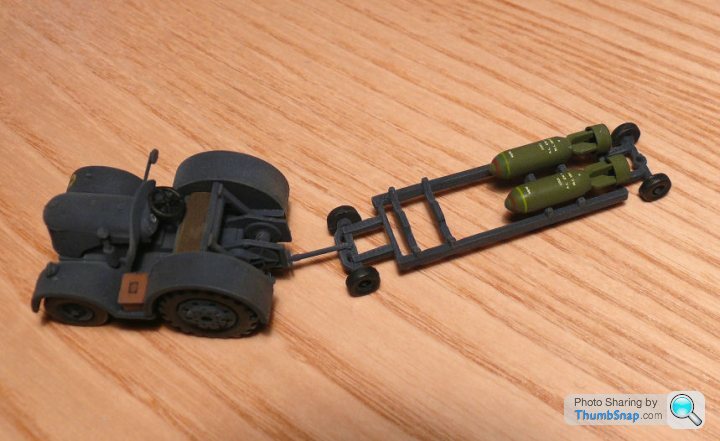
Tractor looks fine now too
RF printed me a few copies off, so you can have the spares if you want?I had some decals for bombs years ago, I think they were Hasegawa
And they maybe wouldn't have been quite this authentic, but...
Wonder if they are still around?
Tractor looks fine now too
Also got the Xtradecal Tempest sheet with about 10 options on it. Not sure if any roundels would be any use to you (just thinking your Frog ones might be dead by now)?
perdu said:
That's a kind offer
Still deciding between the rockets and bombs versions and comparing the cannon barrels
Still the bombs would give me the chance to have the bombing up scene from here, complete with blast pen structure as a dio
Did the top of that crane fit into a space in the bomb carrier? There seems to be just one mount on the bomb, which appears to be for both lifting and securing to the carrier...how did they mount the bombs then? Still deciding between the rockets and bombs versions and comparing the cannon barrels
Still the bombs would give me the chance to have the bombing up scene from here, complete with blast pen structure as a dio

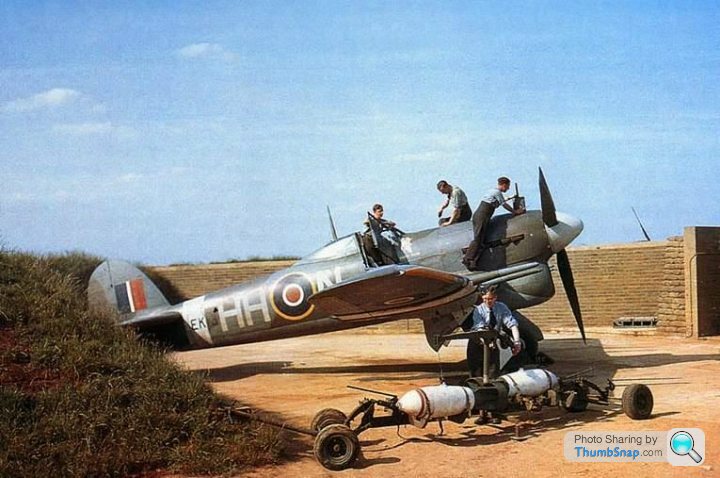
Interesting armourer/groundcrew story for Perdu here (from gokartmozart's link earlier):
http://www.flickr.com/photos/8270787@N07/252670099...
Read the comments to the photo for the story.
http://www.flickr.com/photos/8270787@N07/252670099...
Read the comments to the photo for the story.
perdu said:
just found out (for Eric) that the white bombs were concrete practise bombs being loaded in late '43
ISTR the bomb was hung from the lugs on the bomb rack and it was winched up using a sling type device that lifted via a strap mounted probably on the sides of the bomb rack
A quick Goog shows a sling strop lifting a "store" into the bomb bay of a Blenheim, I'm sure dad told me about this years ago
He were in t'trade ye know
Ahh lookit what I found
Yertis!
Sort of what I was saying
No doubt this was identical for the Tempest
I see. So what's the guy in the previous photo doing? There's no strap around that bomb.ISTR the bomb was hung from the lugs on the bomb rack and it was winched up using a sling type device that lifted via a strap mounted probably on the sides of the bomb rack
A quick Goog shows a sling strop lifting a "store" into the bomb bay of a Blenheim, I'm sure dad told me about this years ago
He were in t'trade ye know
Ahh lookit what I found
Yertis!
Sort of what I was saying
No doubt this was identical for the Tempest
I seem to remember there was some kind of huge explosion at an RAF base after the war? One of the largest non-nuclear explosions in the world if I rememer right.
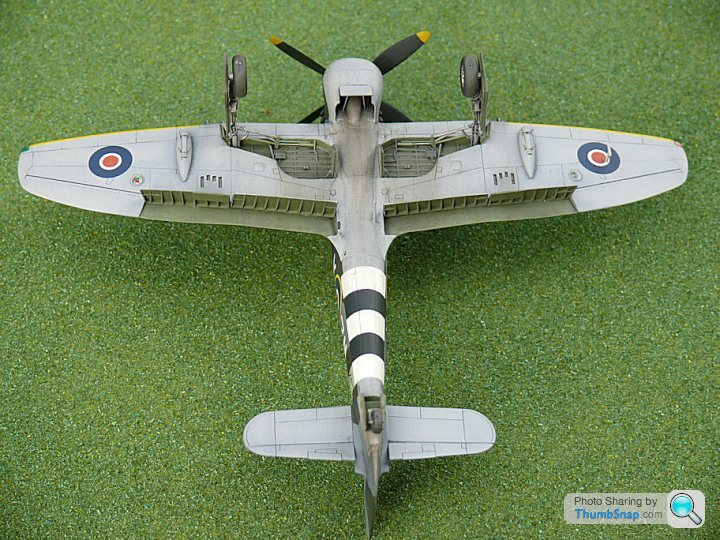
Anyhow, undersides masked up:

And preshaded and painted:
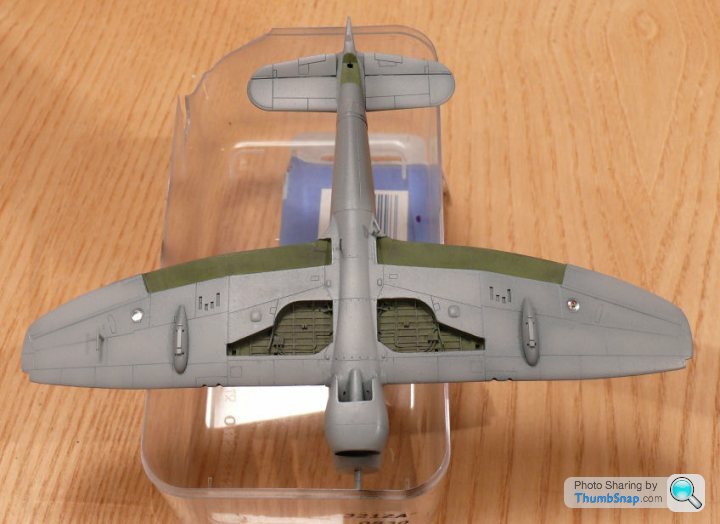
Preshading worked great, doesn't show up very well in artificial light though - it's very subtle. Undecided whether to add a wash to the panel lines on the underside. It's the first model I've built that has really nice panel lines, but still...
As ever with me, it wasn't as simple as the above. The Maskol removed some of the weathering on the flap sockets, so they had to be re-done. The Maskol was a nightmare to remove - it took the Vallejo paint with it at the mask boundaries (I also sliced my thumb with the scalpel while trying to remove the Maskol. Made a great job of it - somehow ended up with three very neat incisions with one stab, resulting in loads of blood and a flap of skin which needed a hell of a lot of coaxing back into position). With a light satin coat I also noticed a blatant sink mark on one of the wheel well covers, so that will have to be filled. Then I broke the access step off.
I did fix the stbd wing light issue - I drilled two shallow cuts into the surface of the lens and dotted transparent red and green paint into the cones. No distortion:

Anyhow, undersides masked up:
And preshaded and painted:
Preshading worked great, doesn't show up very well in artificial light though - it's very subtle. Undecided whether to add a wash to the panel lines on the underside. It's the first model I've built that has really nice panel lines, but still...
As ever with me, it wasn't as simple as the above. The Maskol removed some of the weathering on the flap sockets, so they had to be re-done. The Maskol was a nightmare to remove - it took the Vallejo paint with it at the mask boundaries (I also sliced my thumb with the scalpel while trying to remove the Maskol. Made a great job of it - somehow ended up with three very neat incisions with one stab, resulting in loads of blood and a flap of skin which needed a hell of a lot of coaxing back into position). With a light satin coat I also noticed a blatant sink mark on one of the wheel well covers, so that will have to be filled. Then I broke the access step off.
I did fix the stbd wing light issue - I drilled two shallow cuts into the surface of the lens and dotted transparent red and green paint into the cones. No distortion:
perdu said:
I see the underside of your Tempest and wish I'd taken a few more hours/minutes on the rad cowling, ho hum 'nother time better work
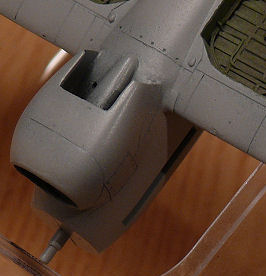
Cheers Perdu,The rad. exit duct on the Academy model is crap, totally wrong. Here it is built OOB:
Took some sanding, filling and rescribing of the upper insert area to get it looking smoother, but even now not perfect. I've also drilled a couple of holes for the flap actuators (course I already cut the flap out and made a new one out of plasticard):
72twink said:
often the skill in modelling is being able to invisibly cover your mistakes and mishaps.
Just noticed that the pitot-static tube under the wing is in the middle of where the roundel decal should go (just like it is on the previous 2 WW2 fighters I've built). I'll have to cut it off dammit. 

perdu said:
Painting the canopy (windscreen) sealing frame huh?
Like it, makes better sense than some of the models I see on Britmodeller where the canopy has huge scale gaps that would pull the blooming hood off along with the pilot's head too at 500mph
(refers to some very sad fast jet models I have seen out there)
Is this a special masking tape or just summat out of your DIY box?
edit for an after think
Windscreen sealing frame? I usually fit the windscreen after masking the glazed bits, then there are no gaps. Won't find out how good the join is until I get a coat of paint on it - the canopy glue is invisible!Like it, makes better sense than some of the models I see on Britmodeller where the canopy has huge scale gaps that would pull the blooming hood off along with the pilot's head too at 500mph
(refers to some very sad fast jet models I have seen out there)
Is this a special masking tape or just summat out of your DIY box?
edit for an after think
The masking tape is Tamiya: perfect tack, not worth using anything else IMO. I always try to mask everything that doesn't need painting. If I don't, I can guarantee that a bit of overspray will find it's way into even the most unlikely place.
Camo painted. Upper surface grey might be a bit too light (I dread to think what Perdu will make of it!), but...there's always something not quite right isn't there?


Strange diagonal line/scratch appeared on the engine cover - no idea how that happened, but an easy fix hopefully. Oh and the chuffing step broke off - again.
Strange diagonal line/scratch appeared on the engine cover - no idea how that happened, but an easy fix hopefully. Oh and the chuffing step broke off - again.
Thanks guys - as you all know I'm not good at colours. I think it will all darken anyway with a few layers of klear, weathering and some varnish.
Perdu, the rad flap is OK, it's the fuselage insert that was wrong - it ended in a hard step rather than being contoured to teh fuselage bottom.
ETA I already broke the head armour off several weeks ago!
Perdu, the rad flap is OK, it's the fuselage insert that was wrong - it ended in a hard step rather than being contoured to teh fuselage bottom.
ETA I already broke the head armour off several weeks ago!


Yep, it was pre shaded, nope, no pictures. All it is, is very thin lines of Tamiya NATO Black airbrushed along the panel lines (over the base colour), followed by thin overcoats of the base colour until the black is very nearly obscured. Easy to obscure it totally (which is better than not enough!). For me it's an easy and safe method of adding some contrast to flat colours, which can look a bit cartoon on small models.
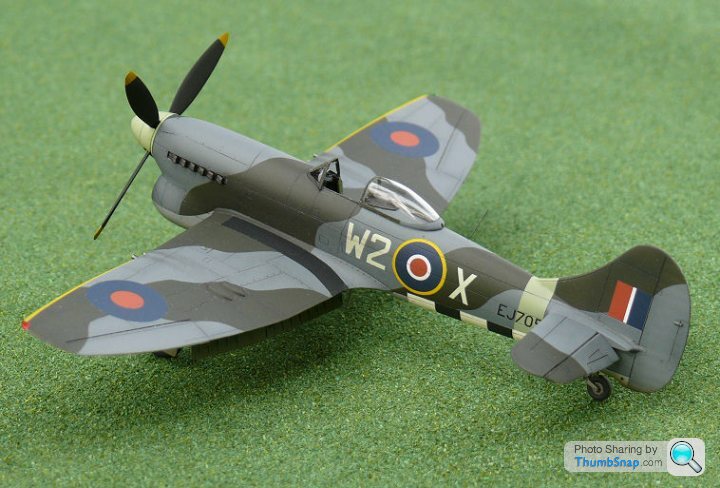
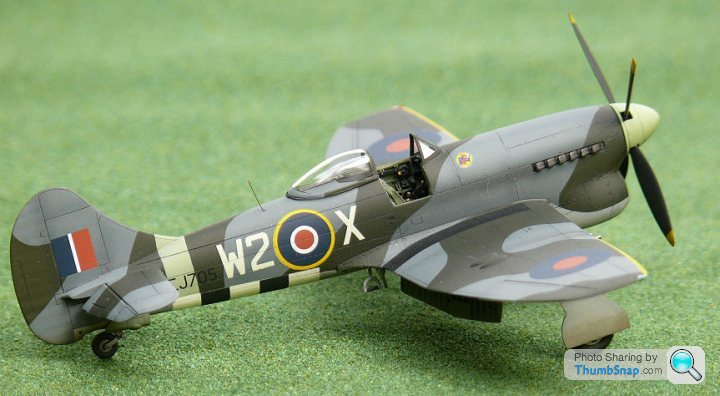
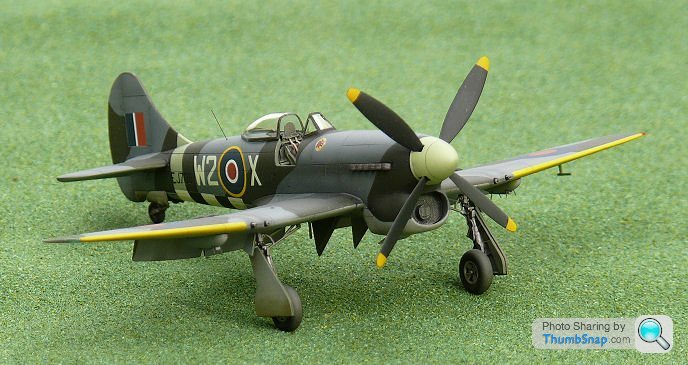
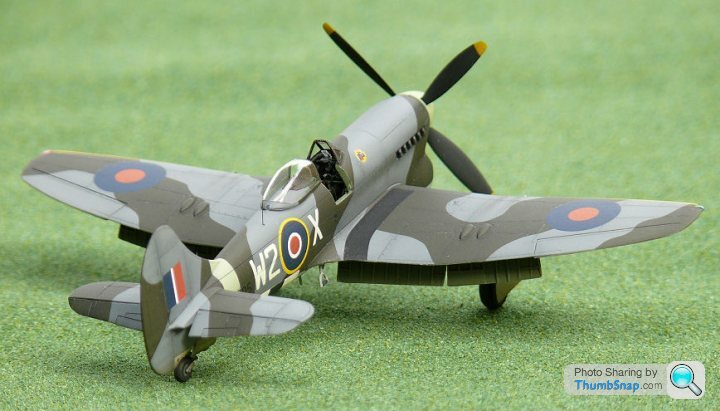
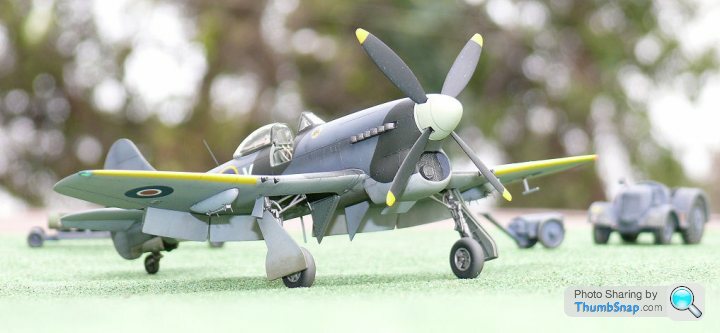
Going to call mine finished as of this evening! I'll post some pictures when I get chance to take them in daylight.
6 weeks, 3 days. Call it 1.5 hours per evening on average: 67.5 hours. I saw some excellent 1:72 model aircraft built up, on a display base, for £10 at the Crewe model show on Saturady. Very sad considering what must have gone in to building them; £10 wouldn't even cover materials. I'll post some pics of some of the show models on a new thread if I get chance.
6 weeks, 3 days. Call it 1.5 hours per evening on average: 67.5 hours. I saw some excellent 1:72 model aircraft built up, on a display base, for £10 at the Crewe model show on Saturady. Very sad considering what must have gone in to building them; £10 wouldn't even cover materials. I'll post some pics of some of the show models on a new thread if I get chance.


perdu said:
very nicely done
and exactly as good as I expected
I wish my offering could have been as well done, it won't be
It has been fun working it all out with you too
I enjoyed the process immensely
bill
Thanks guys - it turned out OK in the end (and I learned something about resin detail kits!).and exactly as good as I expected
I wish my offering could have been as well done, it won't be
It has been fun working it all out with you too
I enjoyed the process immensely
bill
Perdu - when did you last build a model? It'll take some getting back into, but you're doing a great job. I'm looking forward to learning how do make acetate canopies...
RF - Thanks again for the decals. I've put the model on Britmodeller, with a link to your custom decals website.
Gassing Station | Scale Models | Top of Page | What's New | My Stuff