FORD GT40 MKII 1/12TH TRUMPETER
Discussion


NDA said:
That's amazing work....!
I am not a modeller - but would be interested to know how you've made those jubilee clips look so realistic on the small rubber jointed parts.
It looks fabulous. Will it be a heavy thing when finished - have some heft to it?
Thanks NDA.I am not a modeller - but would be interested to know how you've made those jubilee clips look so realistic on the small rubber jointed parts.
It looks fabulous. Will it be a heavy thing when finished - have some heft to it?
The jubille clips are made from photo etched stainless, then i cut the parts off which are supposed to be the screw holders(too boxey for my liking).
I then bond a watchmakers screw on after ive wrapped one around the heatshrink,cover the treads with CA and chrome paint over the screw.
The model finished will be about half the weight of a 1/12th scale diecast i would assume as most of it is plastic, about 1.5-2 kgs i guess
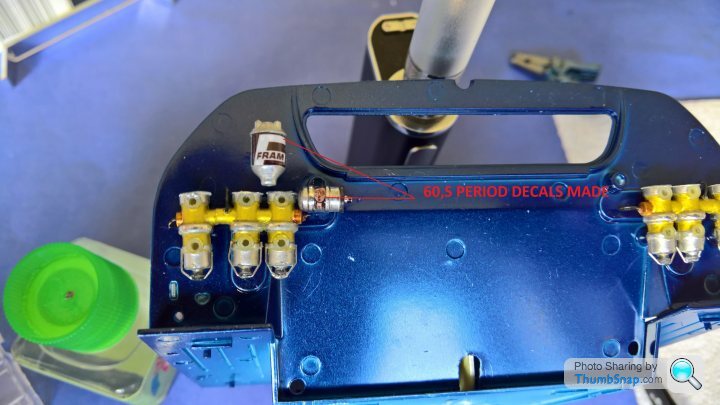
Couldnt resist.Did a few bits and pieces over the weekend.Made up a couple of period decals, Lucas and Fram.
 .
.
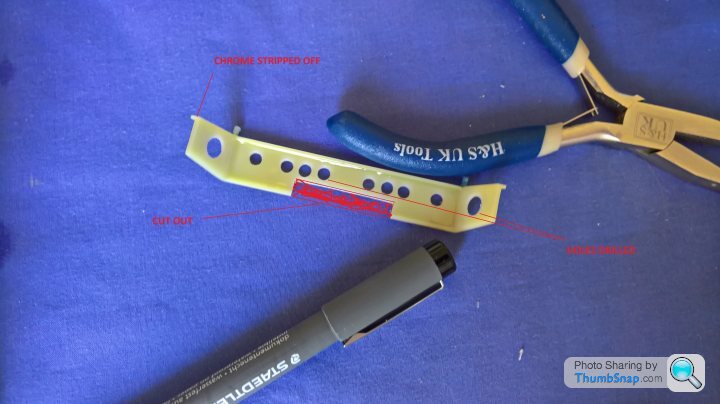
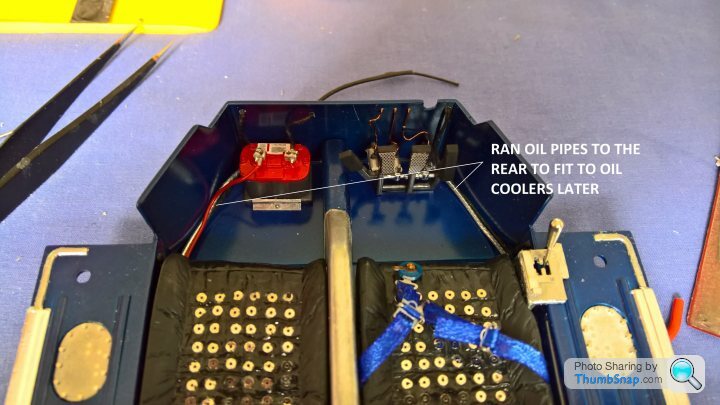
The rear bulkhead valance was a clunky, chrome covered part looked out of place, so i cut and drilled it to mimic what would have been seen on
the origional and paint it blue to finish.
 .
.
Thats better.
 .
.
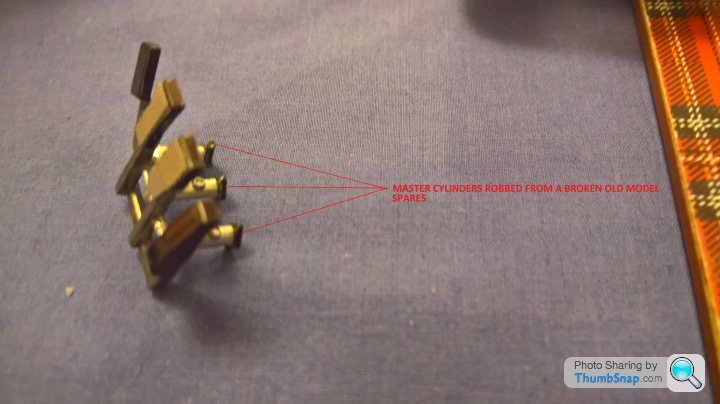
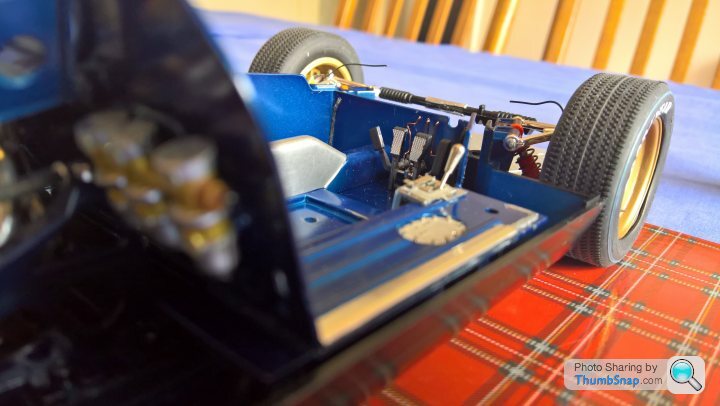
Found some brake master cylinders in my spares and added them on to where the brake bias bar is.
 .
.
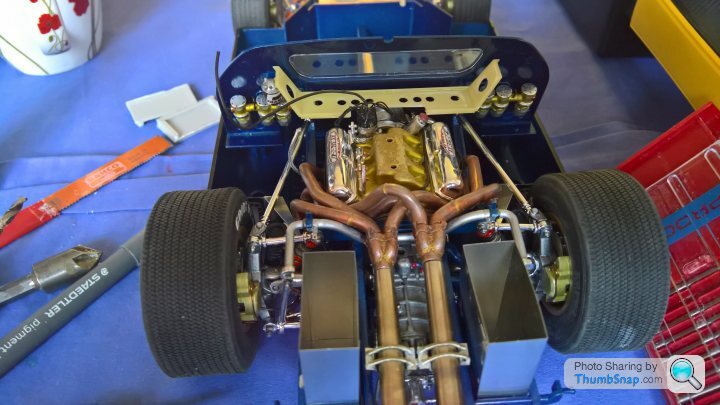
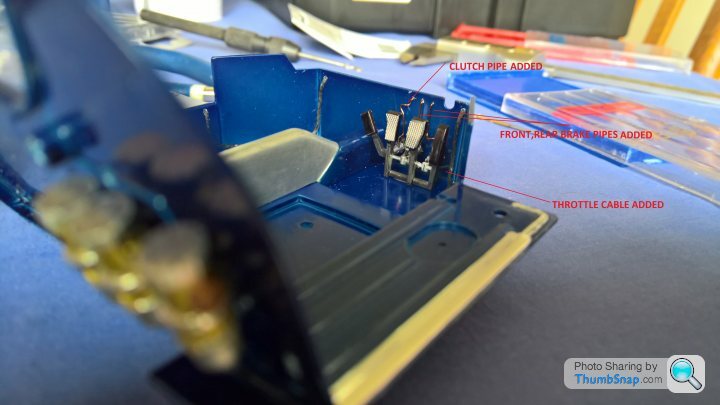
Made up,Added the throttle cable,brake and clutch pipes.
 .
.
 .
.
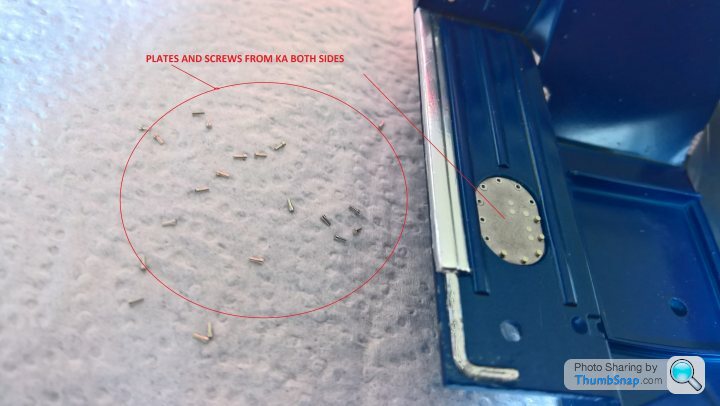
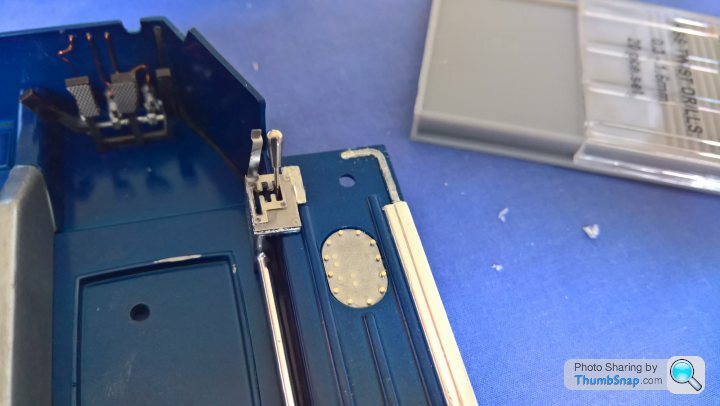
Onto the gear selector, parts from KA
 .
.
The reverse protector catch swings out of the way.
 .
.
 .
.
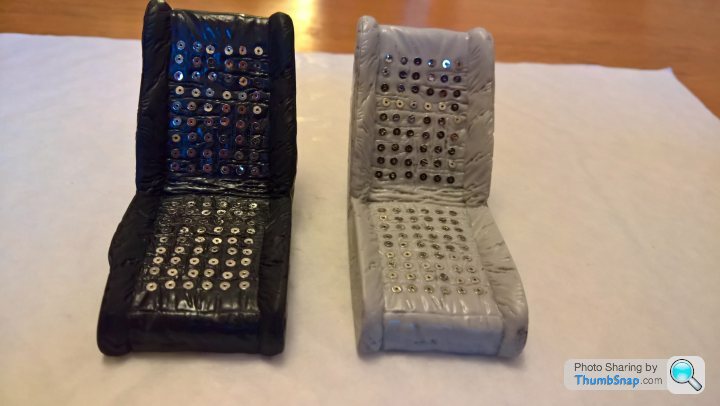
Seats are next, going to take up a lot of time to fit due to the KA models seats being to wide, sticking all those silver rivet holes on then painting, then polishing off the paint to expose the shiny bits.
Cheers for now
.The rear bulkhead valance was a clunky, chrome covered part looked out of place, so i cut and drilled it to mimic what would have been seen on
the origional and paint it blue to finish.
.Thats better.
.Found some brake master cylinders in my spares and added them on to where the brake bias bar is.
.Made up,Added the throttle cable,brake and clutch pipes.
..Onto the gear selector, parts from KA
.The reverse protector catch swings out of the way.
..Seats are next, going to take up a lot of time to fit due to the KA models seats being to wide, sticking all those silver rivet holes on then painting, then polishing off the paint to expose the shiny bits.
Cheers for now
henryk001 said:
Thanks NDA.
The jubille clips are made from photo etched stainless, then i cut the parts off which are supposed to be the screw holders(too boxey for my liking).
I then bond a watchmakers screw on after ive wrapped one around the heatshrink,cover the treads with CA and chrome paint over the screw.
The model finished will be about half the weight of a 1/12th scale diecast i would assume as most of it is plastic, about 1.5-2 kgs i guess
Thanks...The jubille clips are made from photo etched stainless, then i cut the parts off which are supposed to be the screw holders(too boxey for my liking).
I then bond a watchmakers screw on after ive wrapped one around the heatshrink,cover the treads with CA and chrome paint over the screw.
The model finished will be about half the weight of a 1/12th scale diecast i would assume as most of it is plastic, about 1.5-2 kgs i guess
I love this level of detail - it's quite incredible. I can only watch and admire!
CanAm said:
Excellent work! And the dark blue tub is looking good.
.The blue colour will definitely go with bringing out the black once on, instead of painting the whole car black absorbing all the detail I think. Enjoying following RK,s web and learning a thing or two along the process
Edited by henryk001 on Monday 6th May 16:33
The_Jackal said:
LOL I just saw the start of this thread for the first time, not realising its been up for a while, and thought I'll tell him about Molotow chrome pens.
Then I read the thread.....WOW
I think you know what you are doing lol
.Then I read the thread.....WOW
I think you know what you are doing lol
Yes not often anyone would take chrome off a model, but there was way too much of it in this kit. I am using Motolow chrome and metallic pens by running my brush over the nib to paint.
Well here it went.
This took up some time in the evenings, hurt my eyes too.
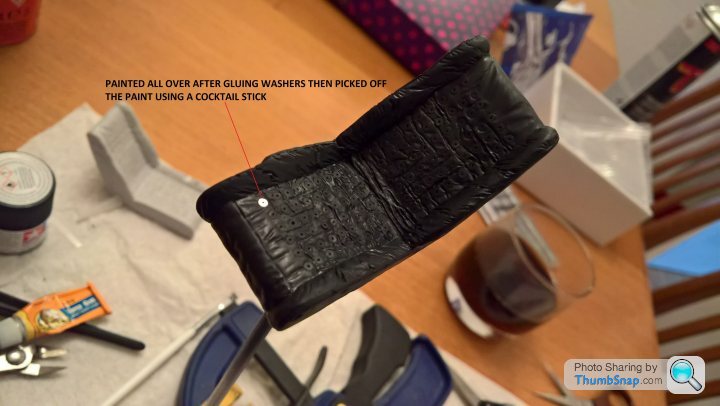
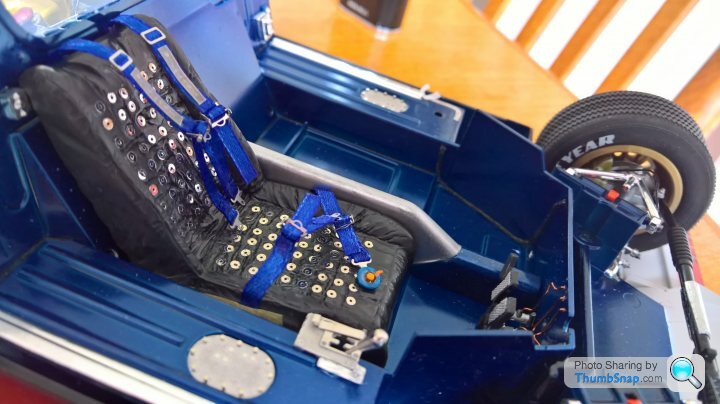
The silver self adhesive washers wernt adhesive any more, probably due to the age of the kit. so i had to dab a drop of glue (microscale PVA type) on every hole of the seat 108 of them on each seat to bond the washers on one at a time, then painted the seat all over matt black, once dried removed the black from the washers with a cocktail stick. Luckily enough it was very easy as the paint didnt take to the washers.
 .
.
 .
.
 .
.
BELT NEXT.
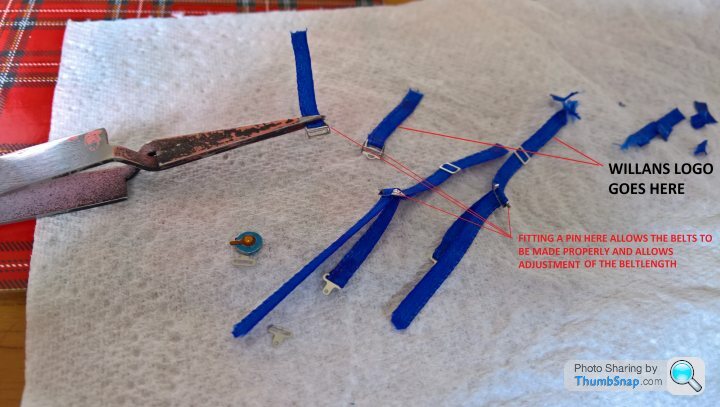
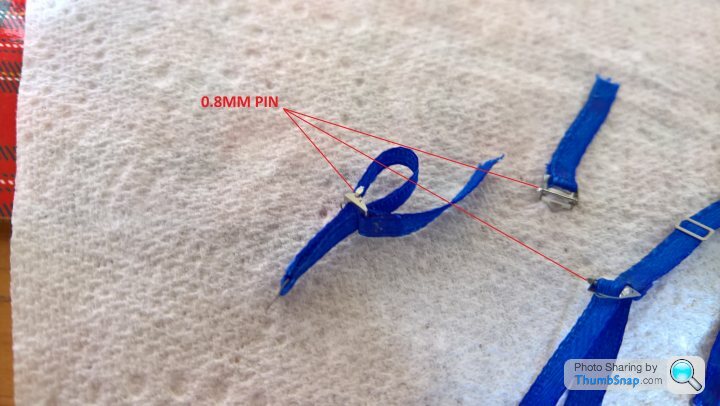
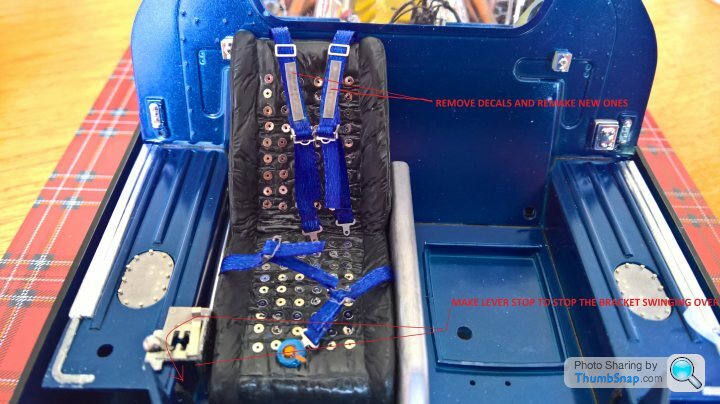
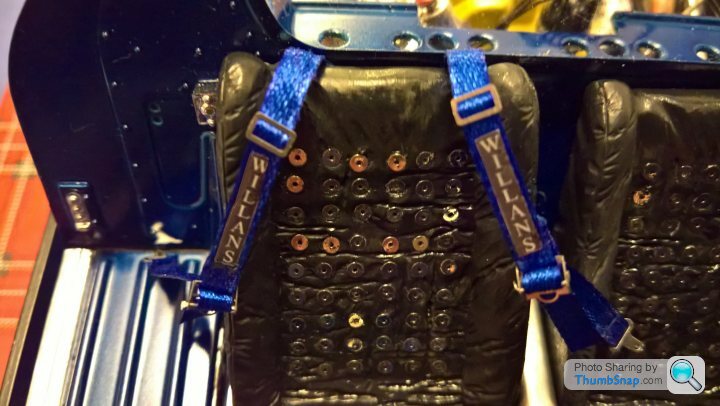
According to the RK motors website build there was only one seatbelt fitted for the driver.It might look a bit odd but obviously there was only one driver at any one time in the real car at Le mans. Ive made my belts work as fully adjustable belts by adding a pin to all the adjusting clasps,the belts can be connected to the quick release or left loose works great as long as you use tweezers . The Willans decals however were old ones i made years ago have faded to much because i didnt seal them then, so im going to do some new ones later.
THE REAL BELT.
 .
.
HERES MINE.
My wifes vast stock of embriodery materials presented me with blue silk ribbon to use, perfect width, a little bit too blue but hey, borrowed her fray stop. thanks love.XX.
 .
.
 .
.
 .
.
 .
.
Looks ok to me ,just need to make the lap belt pads to finish, some tidying up, fit the passenger seat and on to building the model.
Cheers, time for a beer
This took up some time in the evenings, hurt my eyes too.
The silver self adhesive washers wernt adhesive any more, probably due to the age of the kit. so i had to dab a drop of glue (microscale PVA type) on every hole of the seat 108 of them on each seat to bond the washers on one at a time, then painted the seat all over matt black, once dried removed the black from the washers with a cocktail stick. Luckily enough it was very easy as the paint didnt take to the washers.
...BELT NEXT.
According to the RK motors website build there was only one seatbelt fitted for the driver.It might look a bit odd but obviously there was only one driver at any one time in the real car at Le mans. Ive made my belts work as fully adjustable belts by adding a pin to all the adjusting clasps,the belts can be connected to the quick release or left loose works great as long as you use tweezers
. The Willans decals however were old ones i made years ago have faded to much because i didnt seal them then, so im going to do some new ones later.THE REAL BELT.
.HERES MINE.
My wifes vast stock of embriodery materials presented me with blue silk ribbon to use, perfect width, a little bit too blue but hey, borrowed her fray stop. thanks love.XX.
....Looks ok to me ,just need to make the lap belt pads to finish, some tidying up, fit the passenger seat and on to building the model.
Cheers, time for a beer
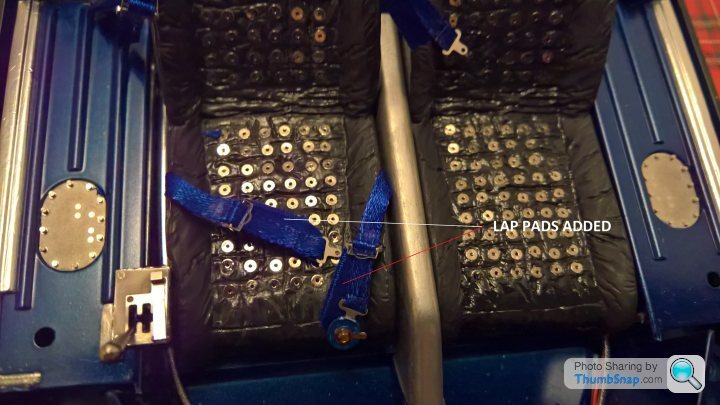
Finished the lap belt pads and remade Willans decals in the evenings.
 .
.
 .
.
Made up battery cable terminals from scrap white metal bits and formed and fitted a battery clamp from some PE sheet.
 .
.
Ran the live cable, earth and the 2 braided oil cooler pipes that runs from the front oil tank to connect up to the coolers later on in the engine bay.
 .
.
 .
.
Heres where im at.
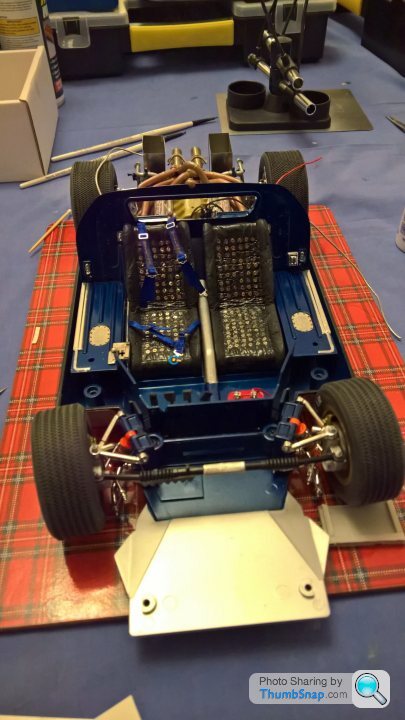
As pointed out by CanAm.The kit has a rollcage which wasnt used in the origonal car, so im blanking the holes out.
Main body and doors next. Rubbing down any edges, lines etc, test fitting before paint.
Cheers for now.
..Made up battery cable terminals from scrap white metal bits and formed and fitted a battery clamp from some PE sheet.
.Ran the live cable, earth and the 2 braided oil cooler pipes that runs from the front oil tank to connect up to the coolers later on in the engine bay.
..Heres where im at.
As pointed out by CanAm.The kit has a rollcage which wasnt used in the origonal car, so im blanking the holes out.
Main body and doors next. Rubbing down any edges, lines etc, test fitting before paint.
Cheers for now.
Edited by henryk001 on Saturday 11th May 21:46
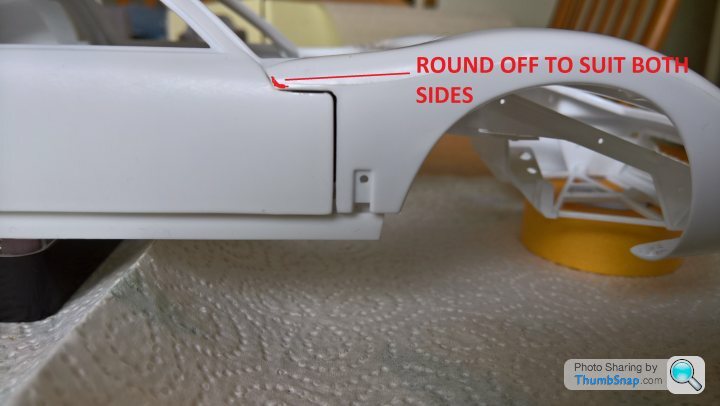
Not much to show at the moment, im doing a lot of filing and fitting prior to painting . Really good to see the close fit of the bodywork on my kit, however after primer and paint, i can see its all going to be to tight and would certainly rub especially on the doors, so ive got to make sure im getting the gapping right so i dont have to paint it two or three times.
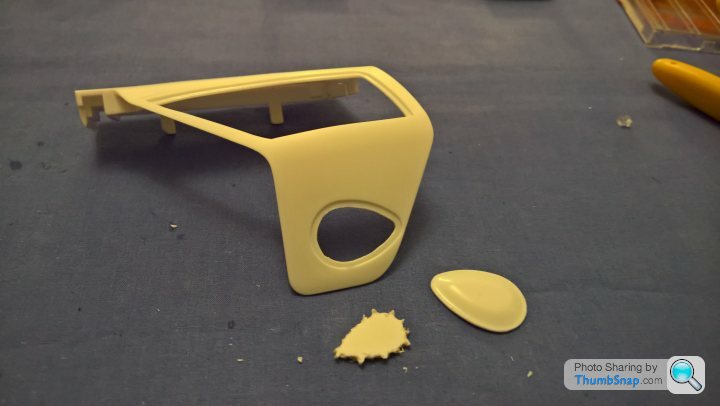
HOLE MADE FOR GURNEY BUBBLE
 .
.
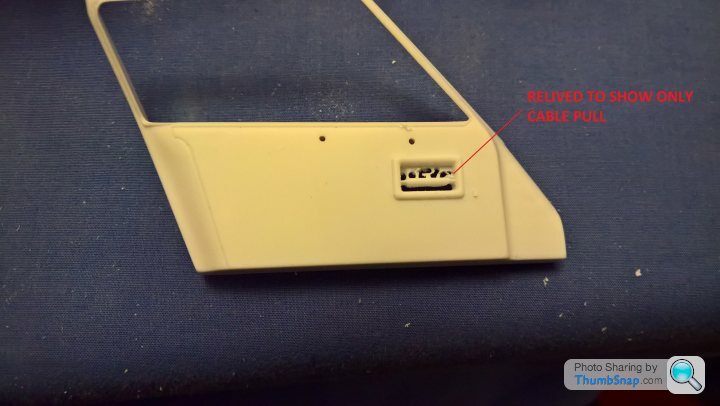
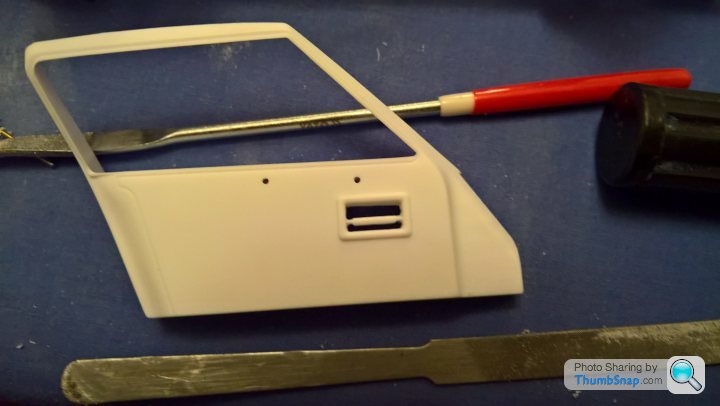
DOOR PULL RELIEVED
 .
.
 .
.
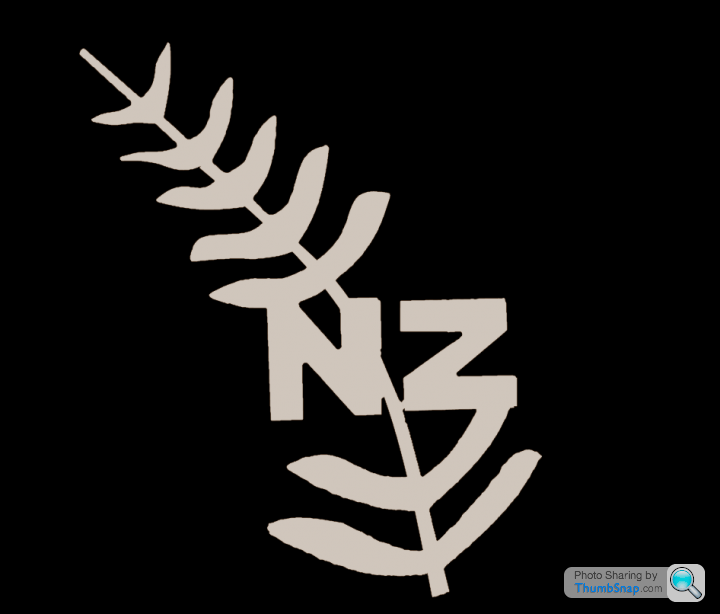
DREW UP MY OWN MCLAREN LOGOS TO GO IN THE SIDE WINDOWS AND FERN.
 .
.
 .
.
Sorry thats all for now, still filing and fitting.
Cheers
HOLE MADE FOR GURNEY BUBBLE
.DOOR PULL RELIEVED
..DREW UP MY OWN MCLAREN LOGOS TO GO IN THE SIDE WINDOWS AND FERN.
..Sorry thats all for now, still filing and fitting.
Cheers
CanAm said:
BTW Henryk, the fern was silver but the NZ letters were white.
.Thankyou CanAm, i couldnt see from the photo i had.Hows this one?.
The green on the Mclarren logo looks bright but it printed out much darker on my printer, came up very nicely ready for a decal at a later stage
Best regards

Edited by henryk001 on Tuesday 14th May 17:18
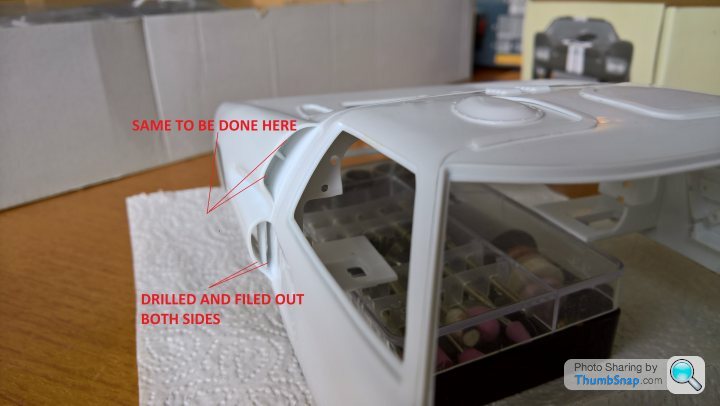
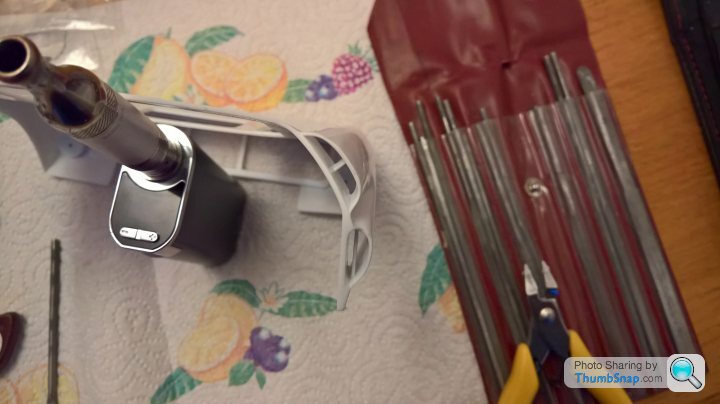
Hi! Before i can go any further im having to do a lot of cleaning, filing, drilling etc to get the bodywork right before painting.
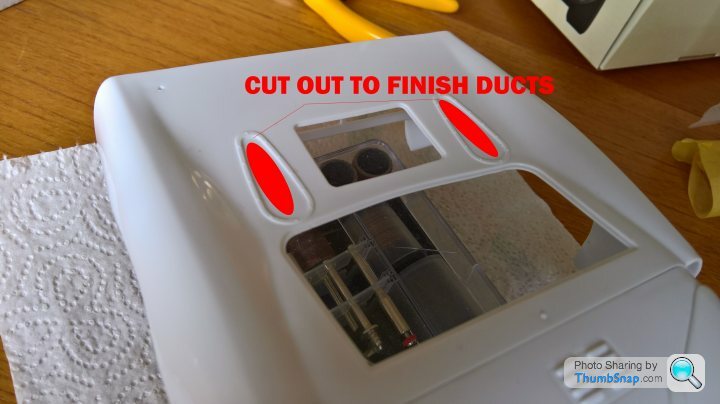
So sorry if the next bits are a bit on the boring side.The air periscopes and side vents were all solid blanked off so i drilled and cut into them with my jewellers files. Anyway heres what ive done.
 .
.
 .
.
 .
.
 .
.
 .
.
 .
.
 .
.
Ok so now i can get onto painting, before fitting more parts, still lots of fine details to do.
Next step after priming once on the doors then painting the door insides blue, then outside black and the photo etched door panels semi matt black
Carefull not to put to much paint on as the panel lines and fit are quite close.
Cheers.
So sorry if the next bits are a bit on the boring side.The air periscopes and side vents were all solid blanked off so i drilled and cut into them with my jewellers files. Anyway heres what ive done.
.......Ok so now i can get onto painting, before fitting more parts, still lots of fine details to do.
Next step after priming once on the doors then painting the door insides blue, then outside black and the photo etched door panels semi matt black
Carefull not to put to much paint on as the panel lines and fit are quite close.
Cheers.
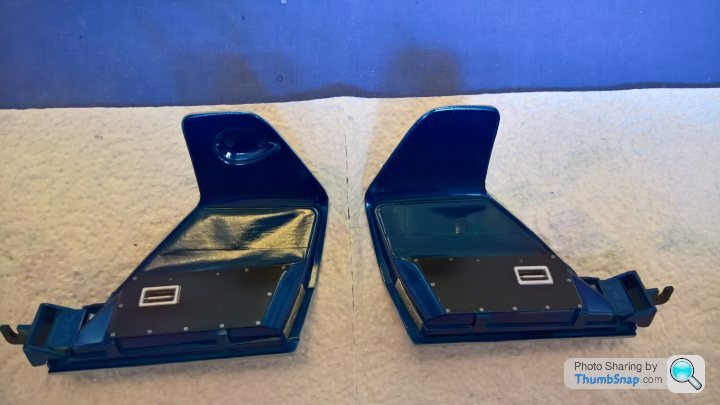
Hi!. Doing the doors at the moment. After making sure there was enough clearance to close properly on the body. Masked off 3 times as there is blue/black and Matt black.
Masked the outer skins and door panels and inside of window frame 1st. Sprayed in the blue interior colour.
Removed the masking tape and did the reverse to put the colours on. Only one coat of laquer as ive been informed the paintwork wasnt done to showroom standards for a Le Mans race back in the day.Im adding the access panels on for the door cards later on.
 .
.
 .
.
 .
.
 .
.
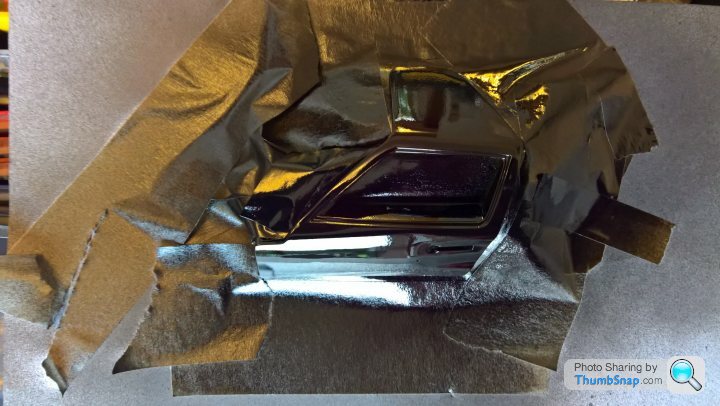
After fine line masking of the inside face of the door edges,rolled the doors over onto card and masked off then sprayed on the Tamiya rattle can Gloss Black.
 .
.
 .
.
Test fitted to body and alls fine, just some finishing to do.
Onto the windows which im going to make so hopefully the small hindged windows work using the KA PE hinges and brackets, well see.
Cheers for now
Masked the outer skins and door panels and inside of window frame 1st. Sprayed in the blue interior colour.
Removed the masking tape and did the reverse to put the colours on. Only one coat of laquer as ive been informed the paintwork wasnt done to showroom standards for a Le Mans race back in the day.Im adding the access panels on for the door cards later on.
....After fine line masking of the inside face of the door edges,rolled the doors over onto card and masked off then sprayed on the Tamiya rattle can Gloss Black.
..Test fitted to body and alls fine, just some finishing to do.
Onto the windows which im going to make so hopefully the small hindged windows work using the KA PE hinges and brackets, well see.
Cheers for now
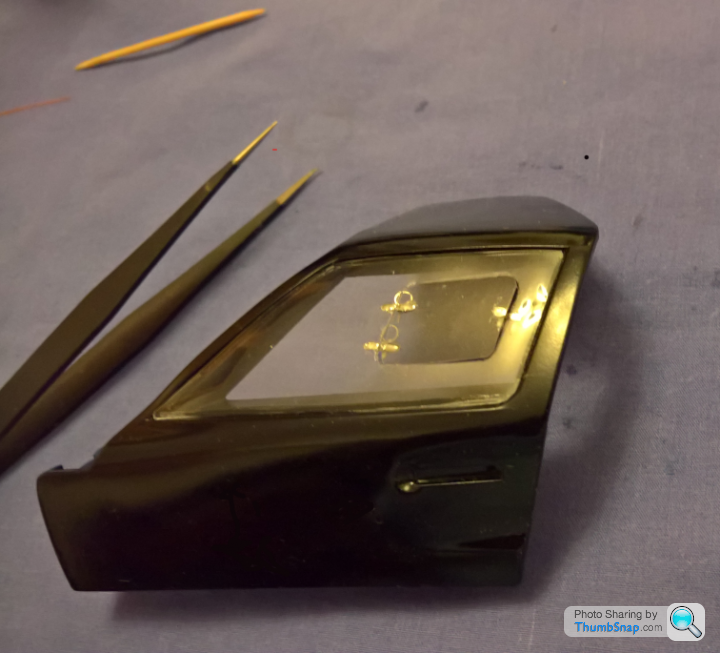
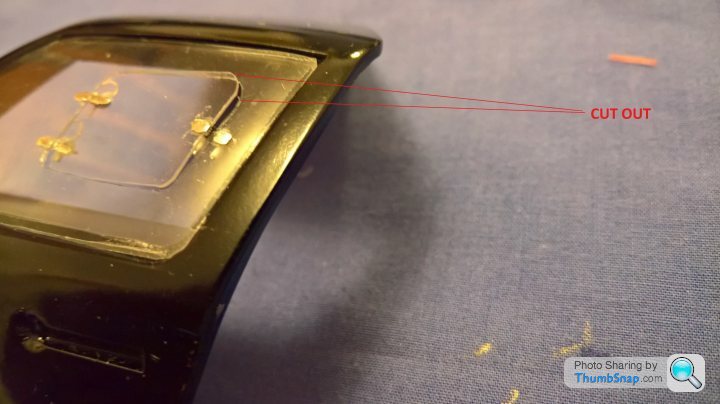
Oh Bxxxer!!!.
I tried to scribe the small window out to make it as a working hindged window using the KA detail parts, but the brittle poly plastic cracked then broke.
I hold my hand up, my fault wasnt patient enough to wait till it broke through
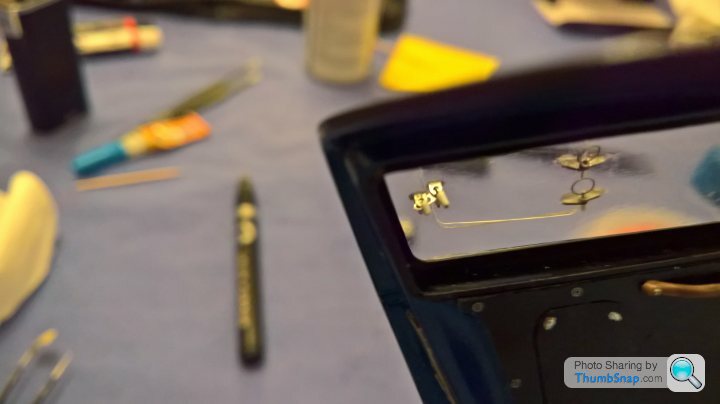
So ive had to make up my own.Gave myself so much more work to do but i think what ive managed to retrieve is accepable without looking at it with a magnifying glass.Ive used a special very strong 0.5mm wide, x 0.25mm thick adhesive strip thats used for assembling mobile phone parts to bond the window to the door.
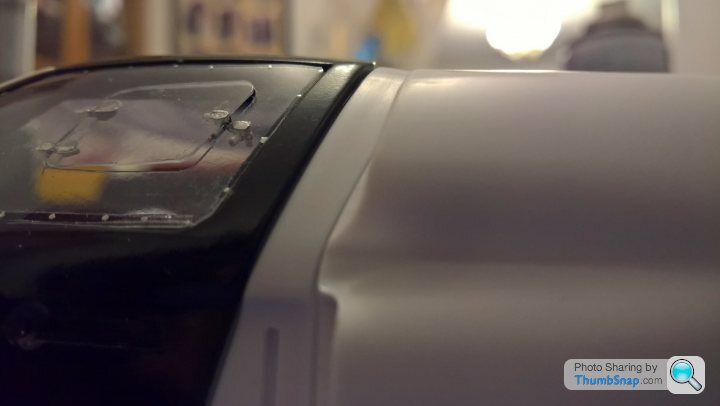
Anyway heres some pics showing the window in the open position.
 .
.
 .
.
 .
.
 .
.
 .
.
 .
.
 .
.
I think it looks ok?.
Got to do the other side now.
Cheers
I tried to scribe the small window out to make it as a working hindged window using the KA detail parts, but the brittle poly plastic cracked then broke.
I hold my hand up,
my fault wasnt patient enough to wait till it broke throughSo ive had to make up my own.Gave myself so much more work to do but i think what ive managed to retrieve is accepable without looking at it with a magnifying glass.Ive used a special very strong 0.5mm wide, x 0.25mm thick adhesive strip thats used for assembling mobile phone parts to bond the window to the door.
Anyway heres some pics showing the window in the open position.
.......I think it looks ok?.
Got to do the other side now.
Cheers
Gassing Station | Scale Models | Top of Page | What's New | My Stuff