Unusual job on the bench today
Discussion


Blackpuddin said:
The old watch is lovely.
Of all the metals, which is your favourite to work with?
In manufacturing I'd say platinum. You can work it hard and get away with intense heat without too much aggro. You have to be cautious when working with stone set items but in general it's a very compliant material..... but you can't easily melt it to reuse scrap. That's the only bad point.Of all the metals, which is your favourite to work with?
In repairs I'd say 18ct gold (all colours). Withstands a bit of heat without overheating and risking harder stones, is easily worked and easily polished.
Worst metals: silver is cheap and it's is low quality in nearly every way. Not my favourite and very difficult to earn money from.
Palladium is a trash metal and an absolute rip off. A pain to work with and embarrassing to talk about with customers who've been duped into buying it from the big highstreet stores.
9ct white. Cheap and poorly produced. Always gives unexpected problems when using heat.
NDA said:
How are those very small stones held in - such as on the bezel of a watch? They don't have claws (as far as I can see) and I doubt they're glued in. I guess they must be reasonably secure.
They are indeed held by claws. The type of claws are known as grains and are little nodules of metal that protrude from the main body and are pressed over the 4 corner edges of the stone. The stone is recessed into the bezel so that the grains can remain flush enough not to catch or look unsightly.NDA said:
ecain63 said:
NDA said:
How are those very small stones held in - such as on the bezel of a watch? They don't have claws (as far as I can see) and I doubt they're glued in. I guess they must be reasonably secure.
They are indeed held by claws. The type of claws are known as grains and are little nodules of metal that protrude from the main body and are pressed over the 4 corner edges of the stone. The stone is recessed into the bezel so that the grains can remain flush enough not to catch or look unsightly.So you have eyes like a hawk then?


Good evening again....
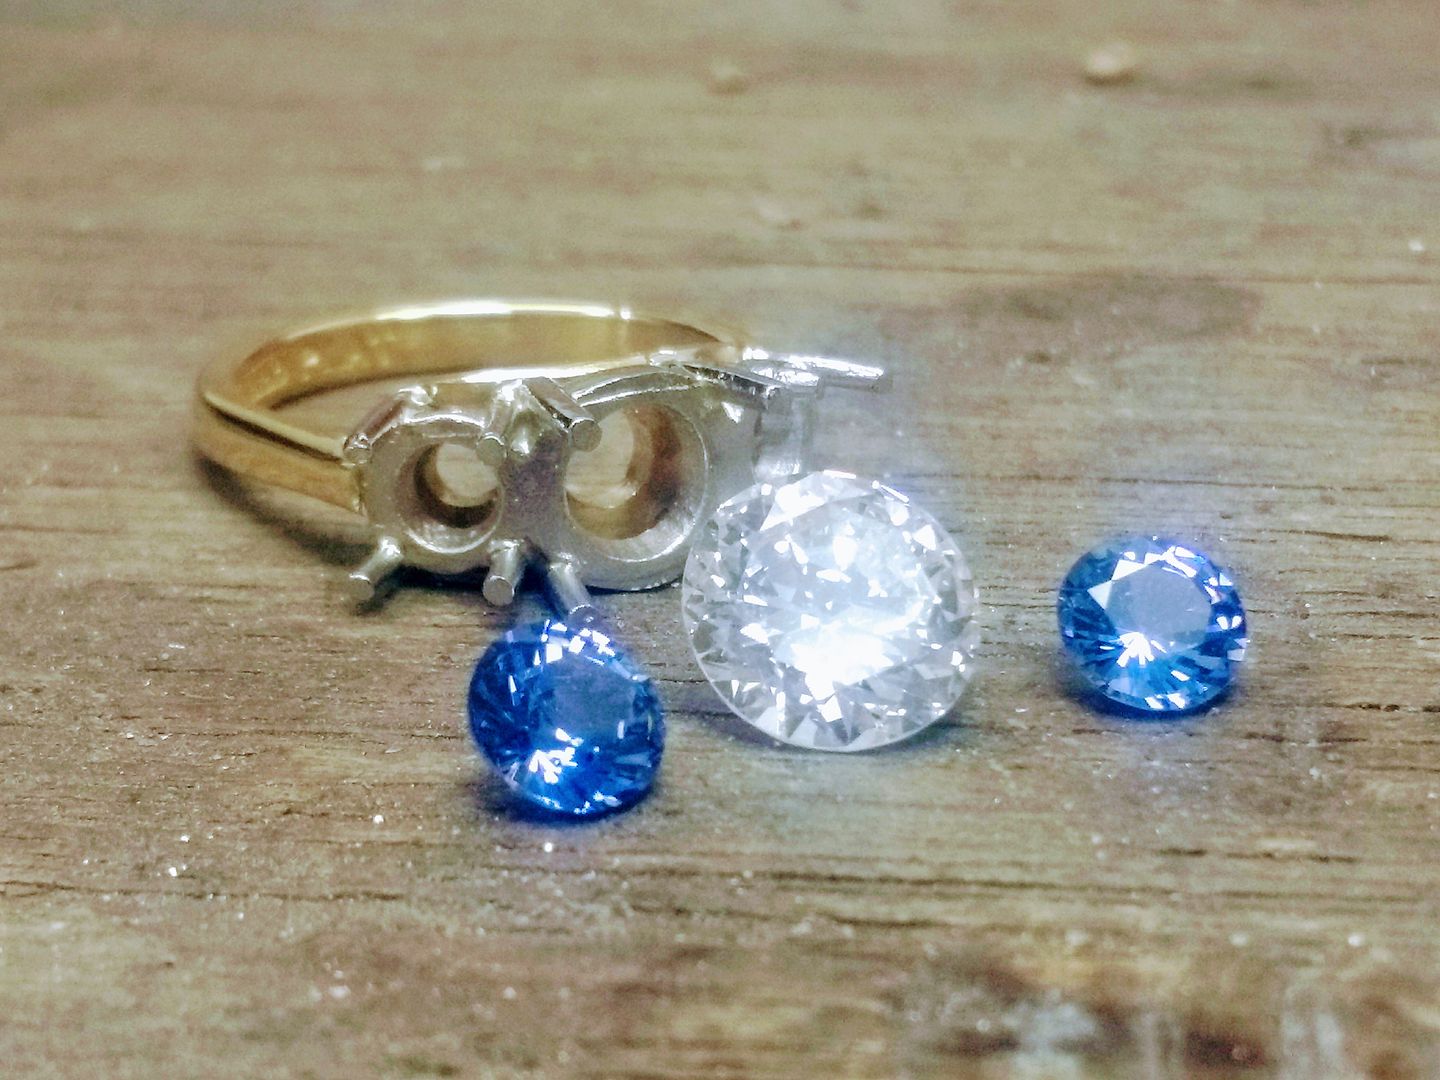
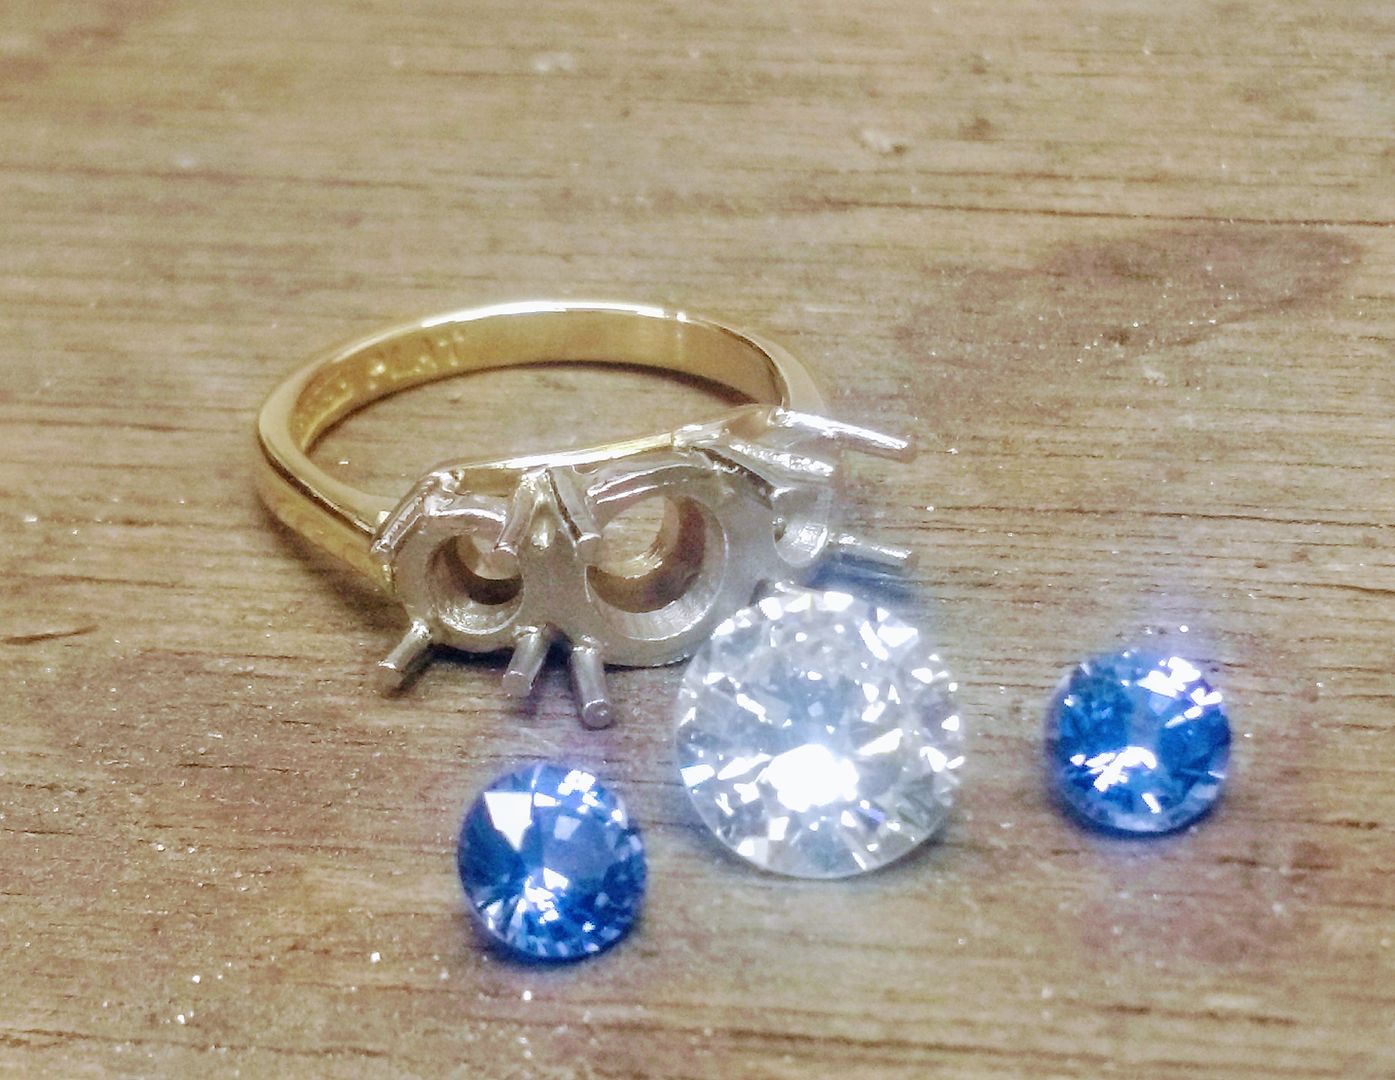
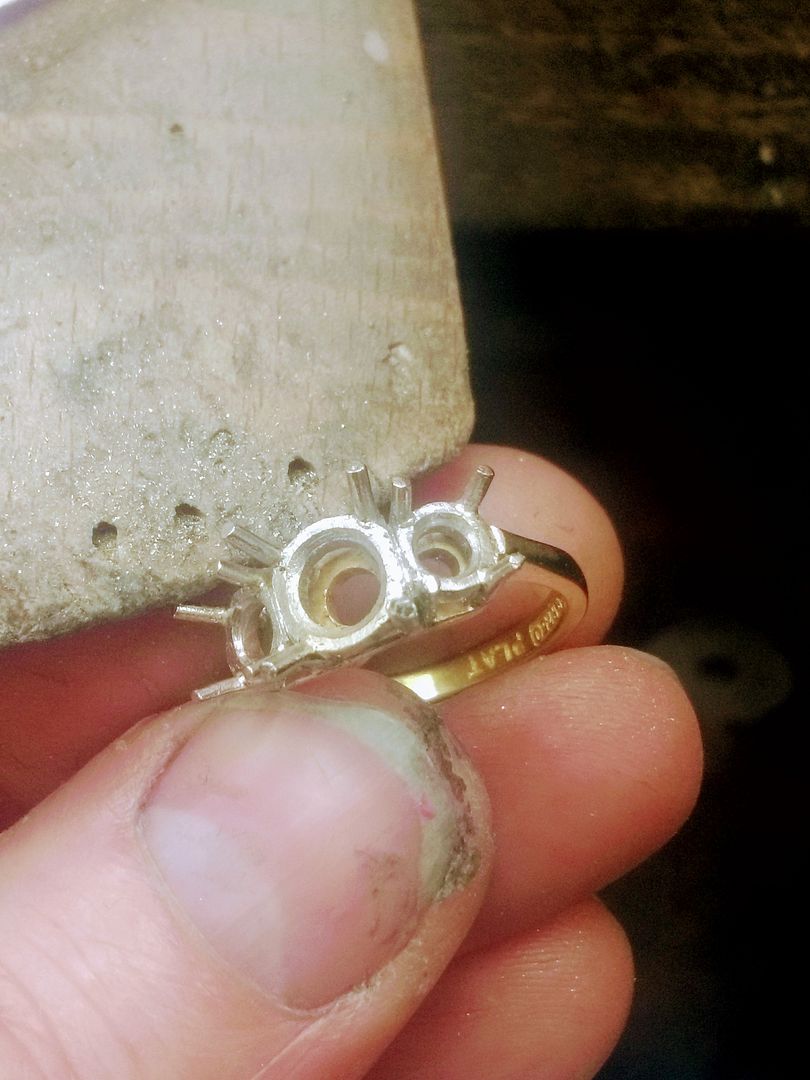
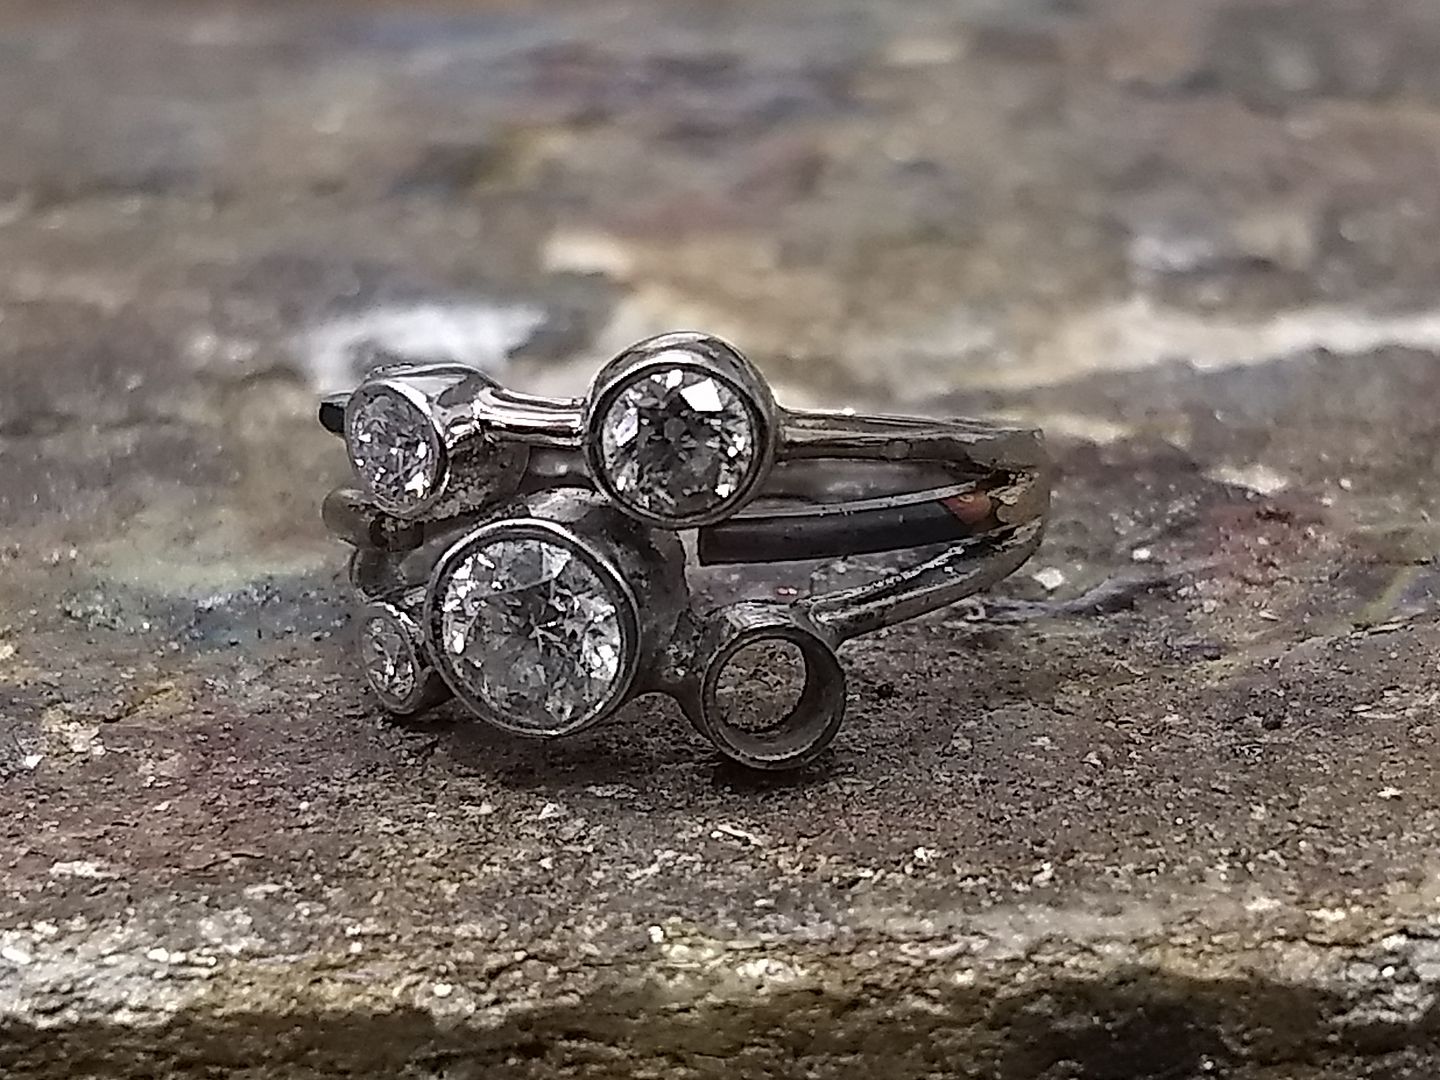
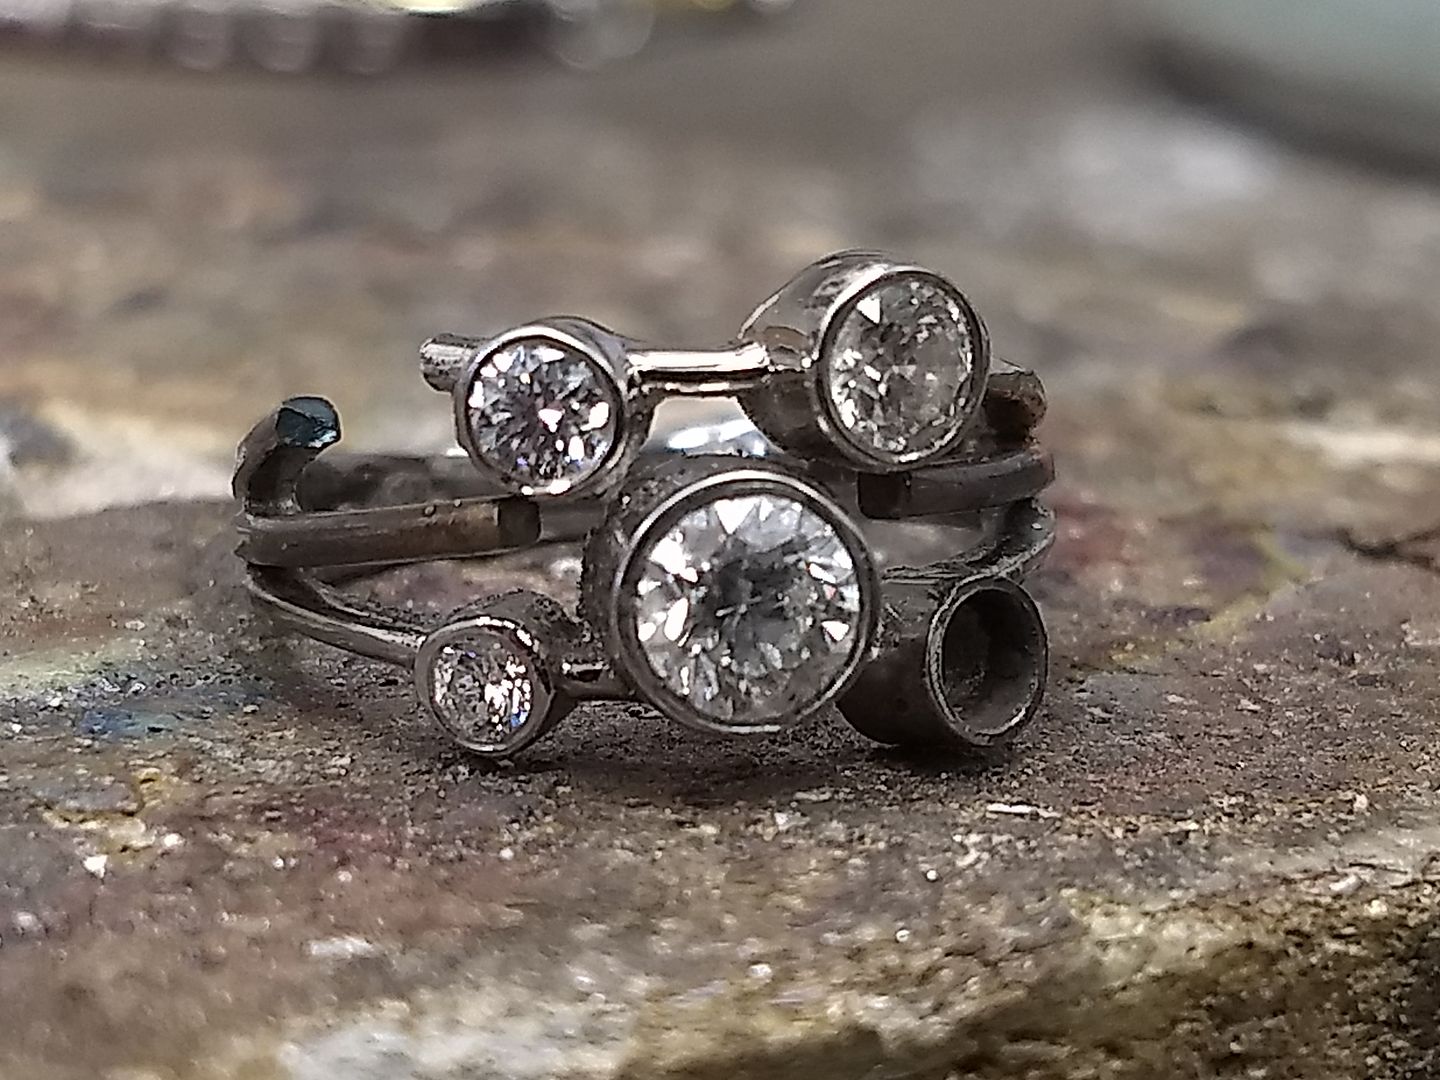
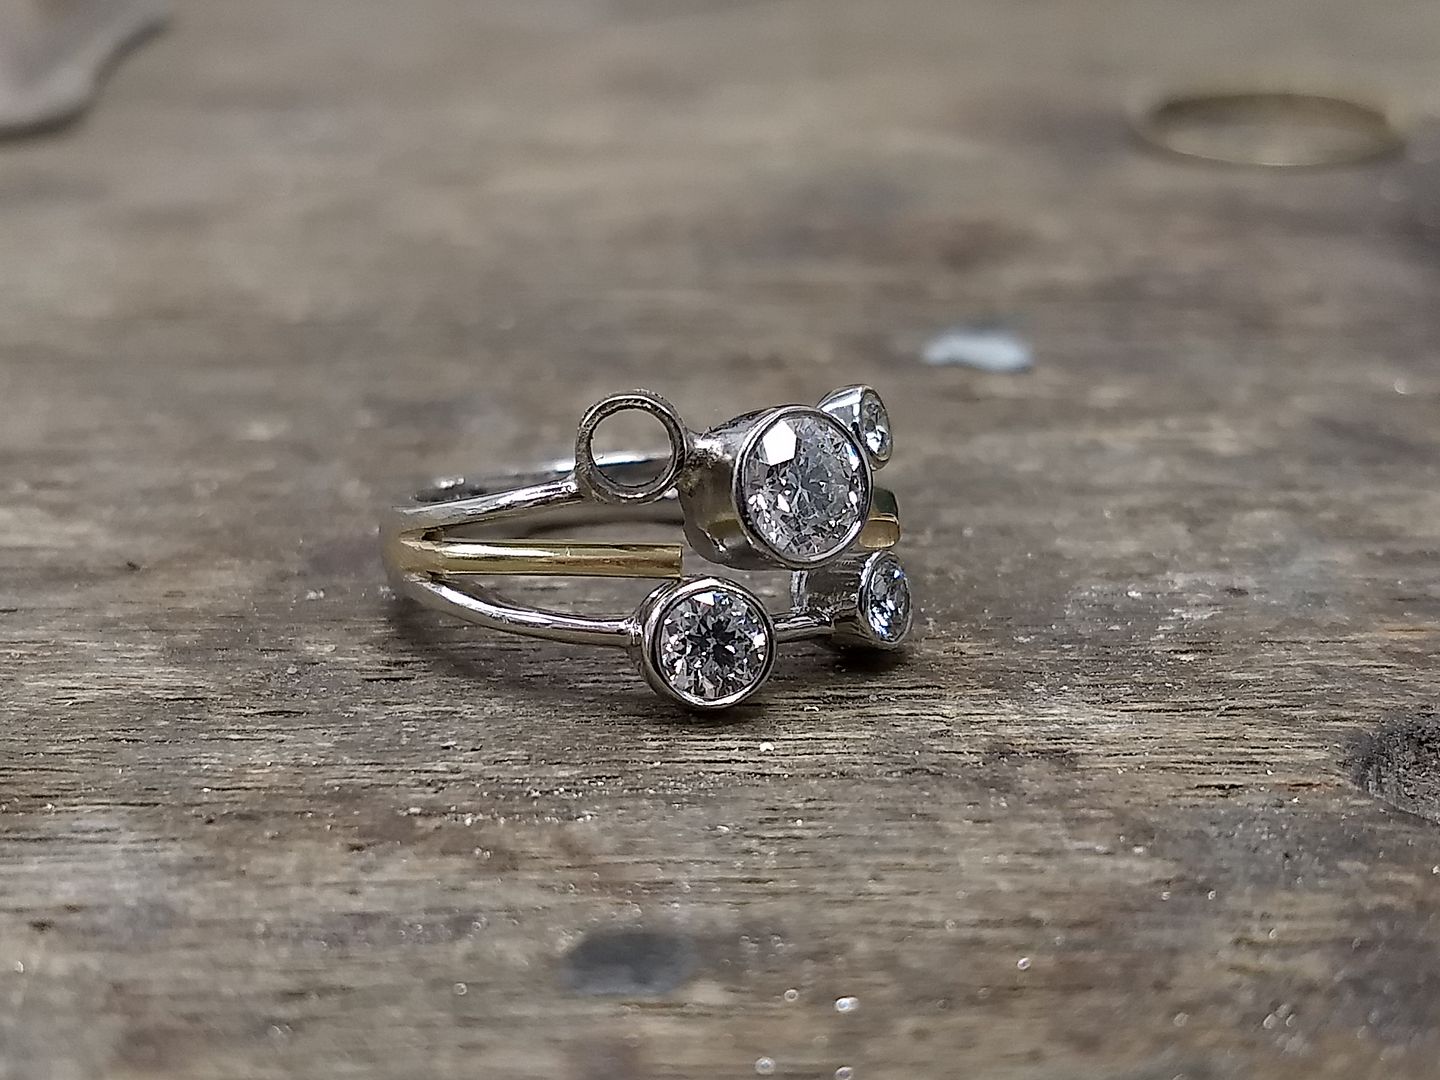
One for a PH client this time. The couple came in with a single stone diamond ring (18ct with a 2.01ct diamond) that they wanted to be redesigned and remodelled to incorporate a pair of high quality sapphires. They came prepared with a clutch of drawings and I had ready 3 pairs of light to mid blue, AAA quality stones between 5mm and 5.5mm. They chose the lighter of the stones (5.5mm) and after some negotiation we decided upon a final design.
Here's how it went:
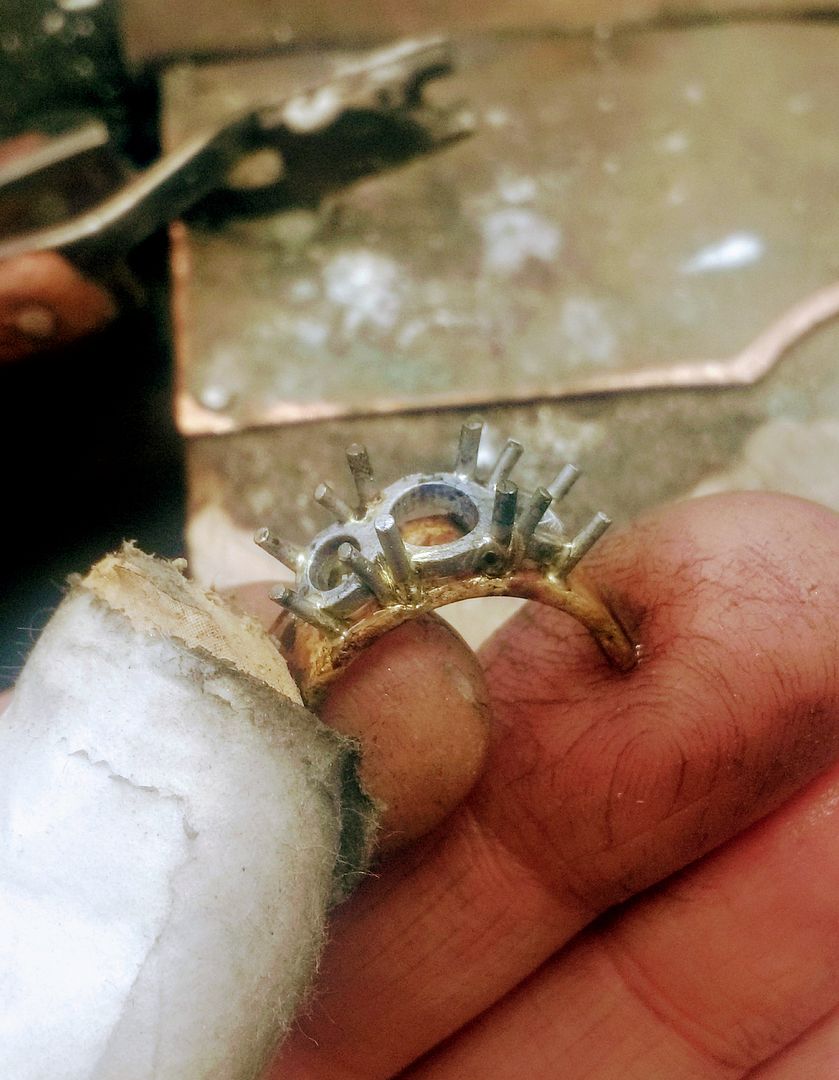
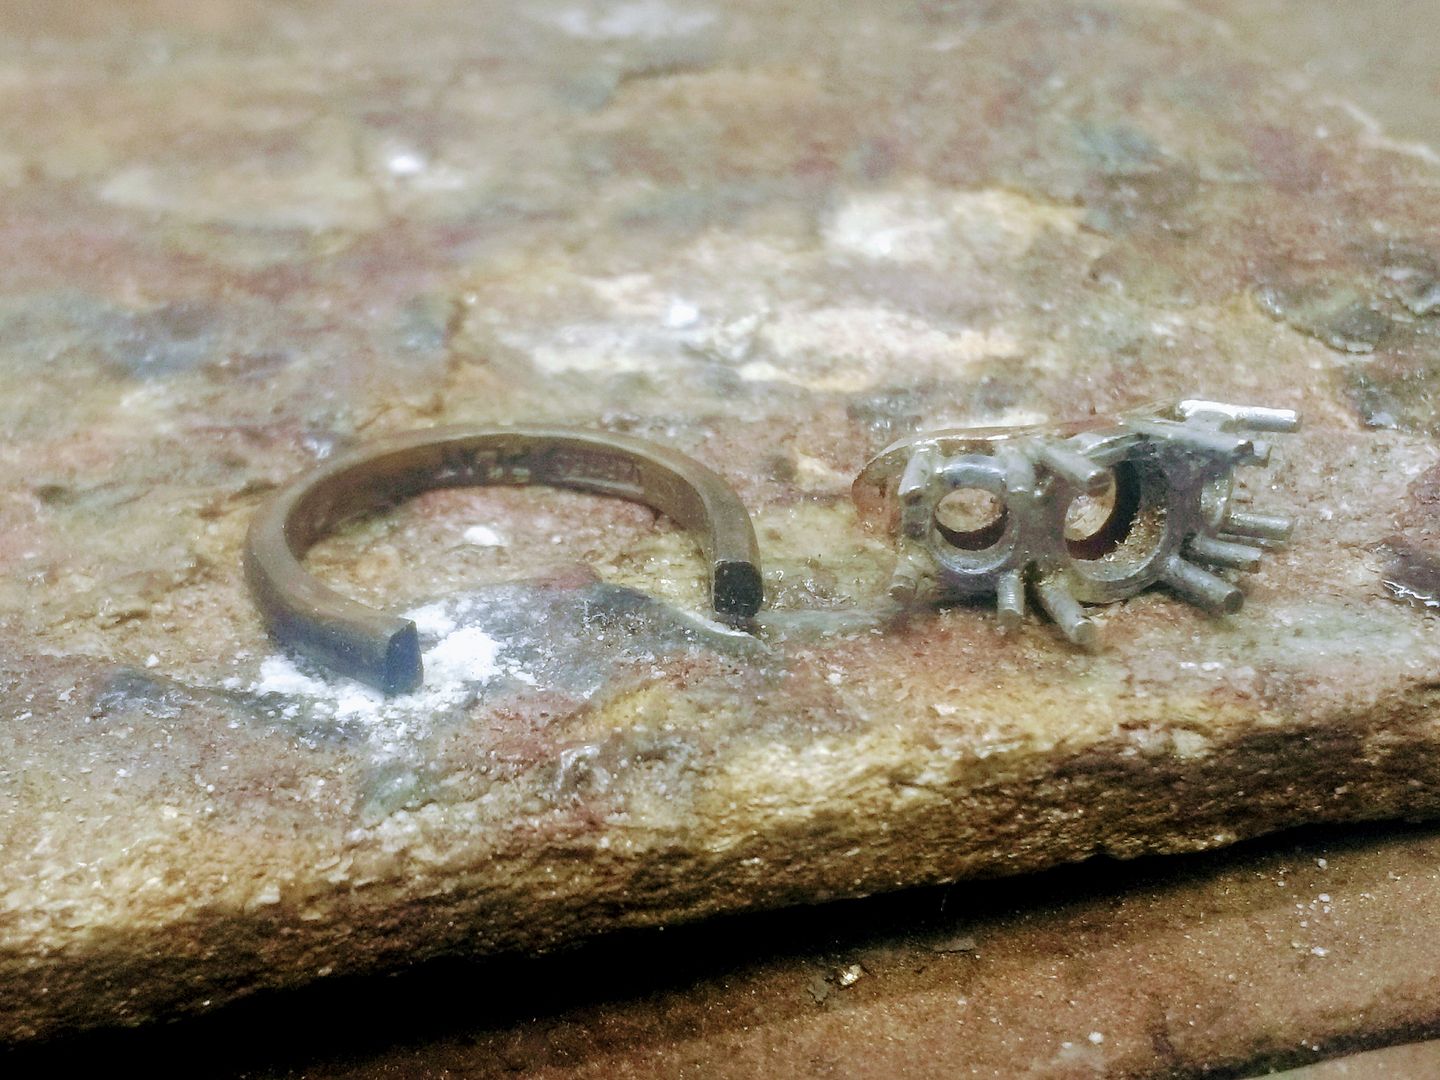
The 18ct white gold head / setting is separated from the 18ct yellow shank.
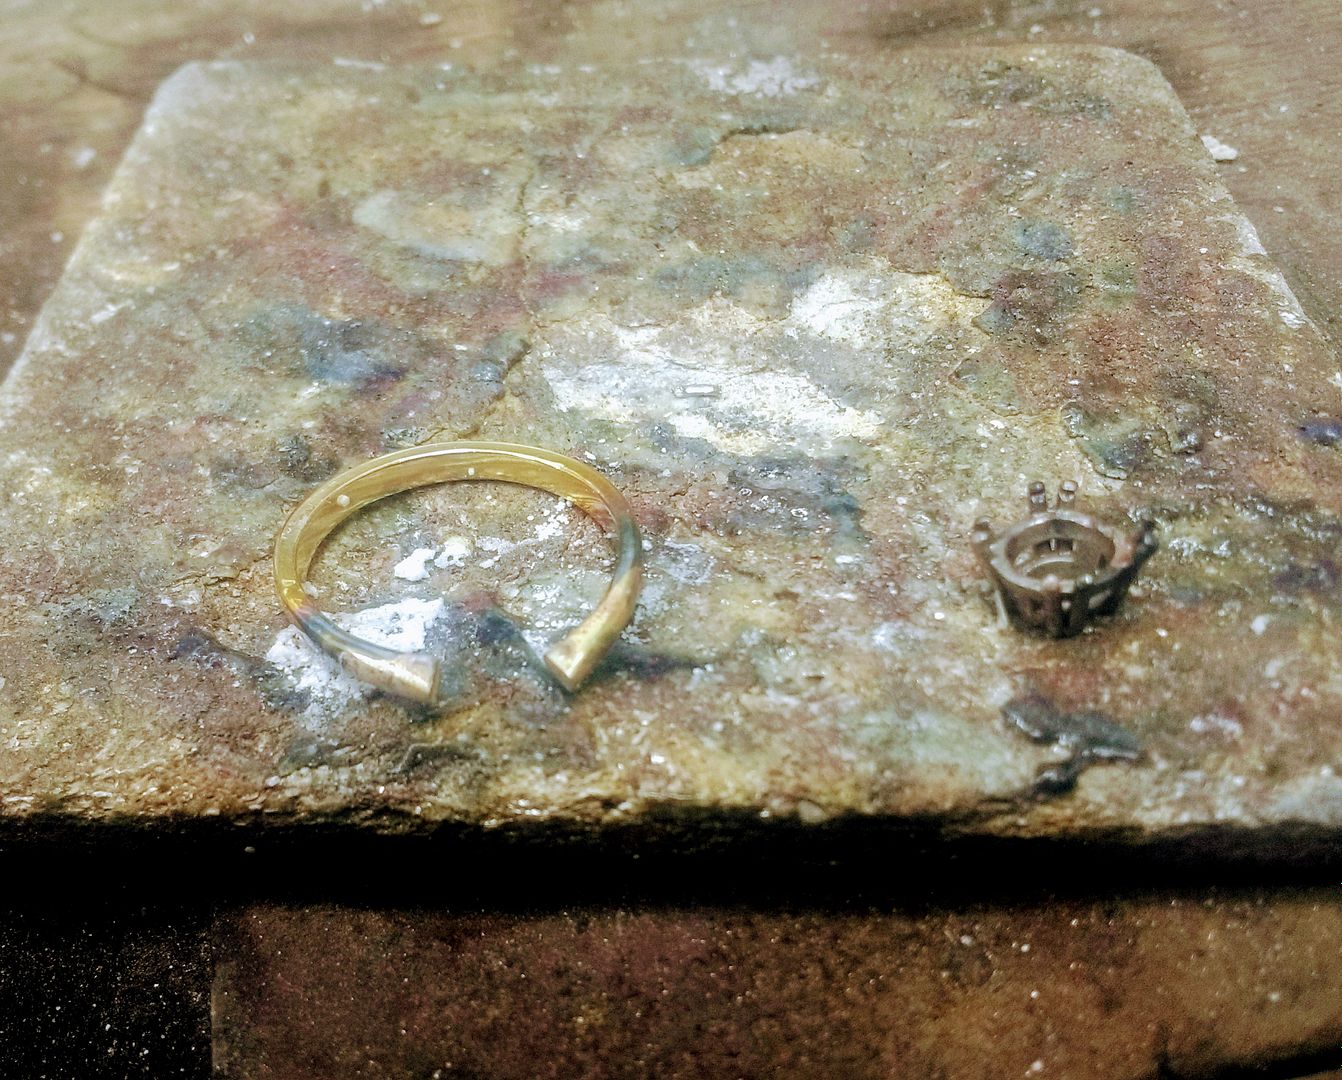
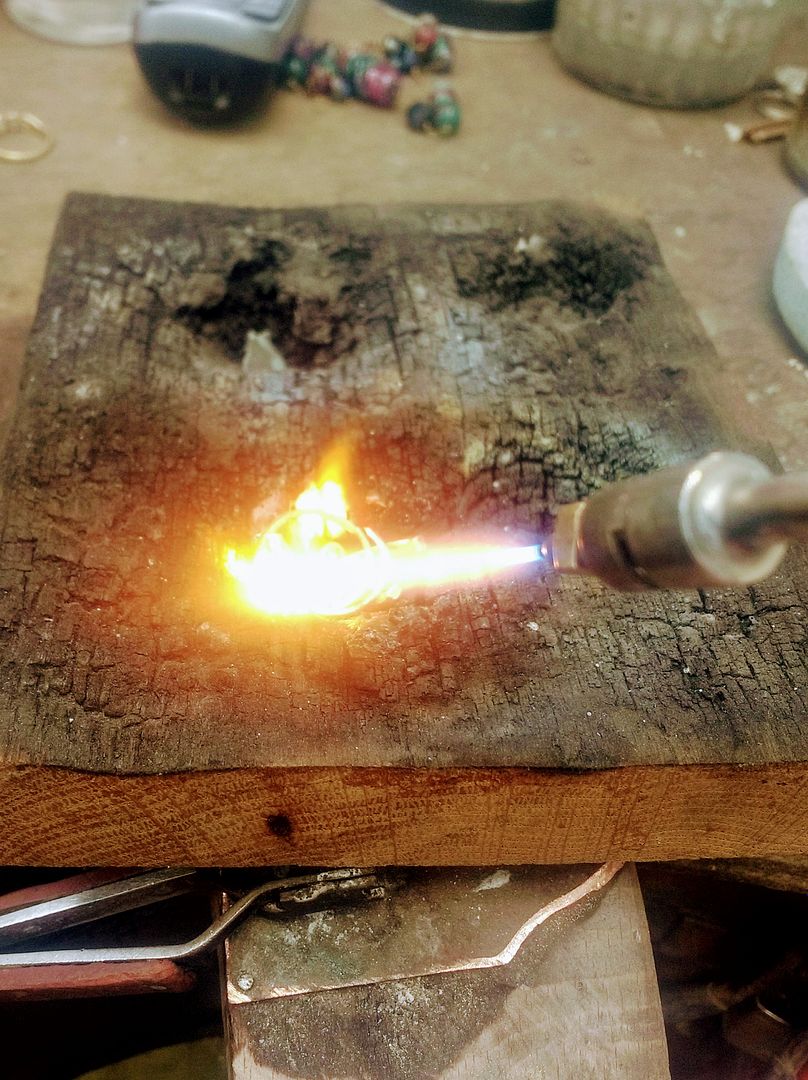
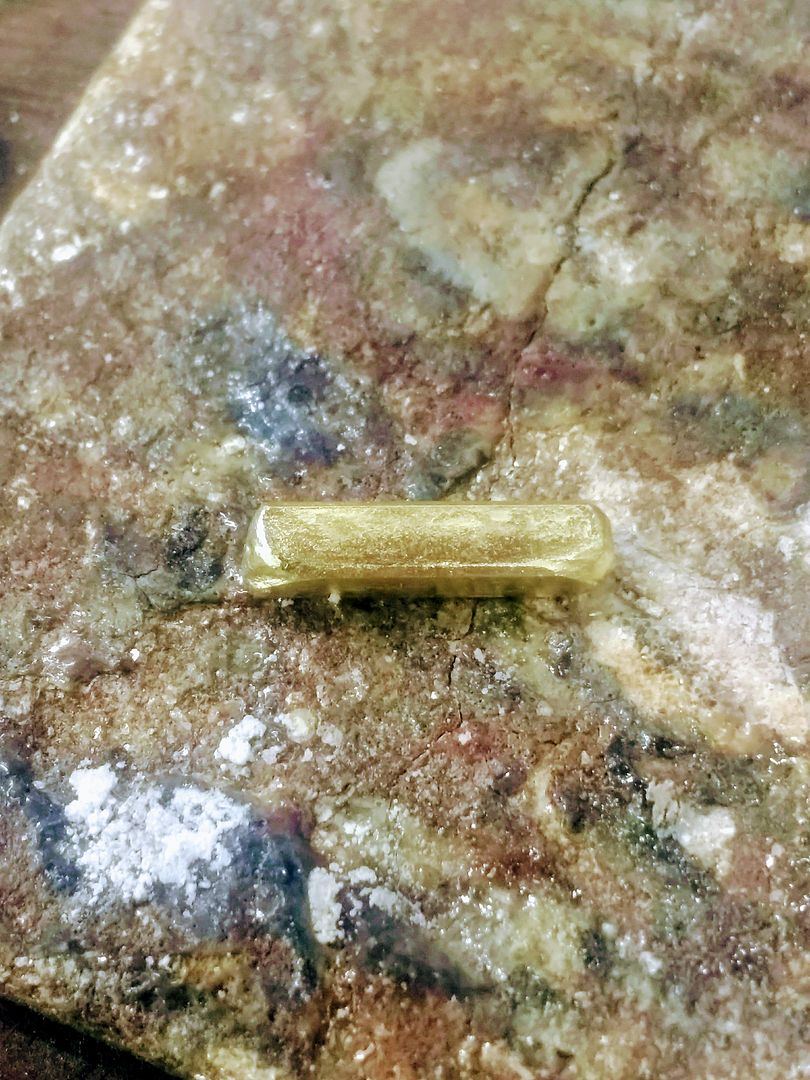
They wish the original shank to be used in the new mount so it is melted in with some 18ct yellow bullion to allow an excess during build.
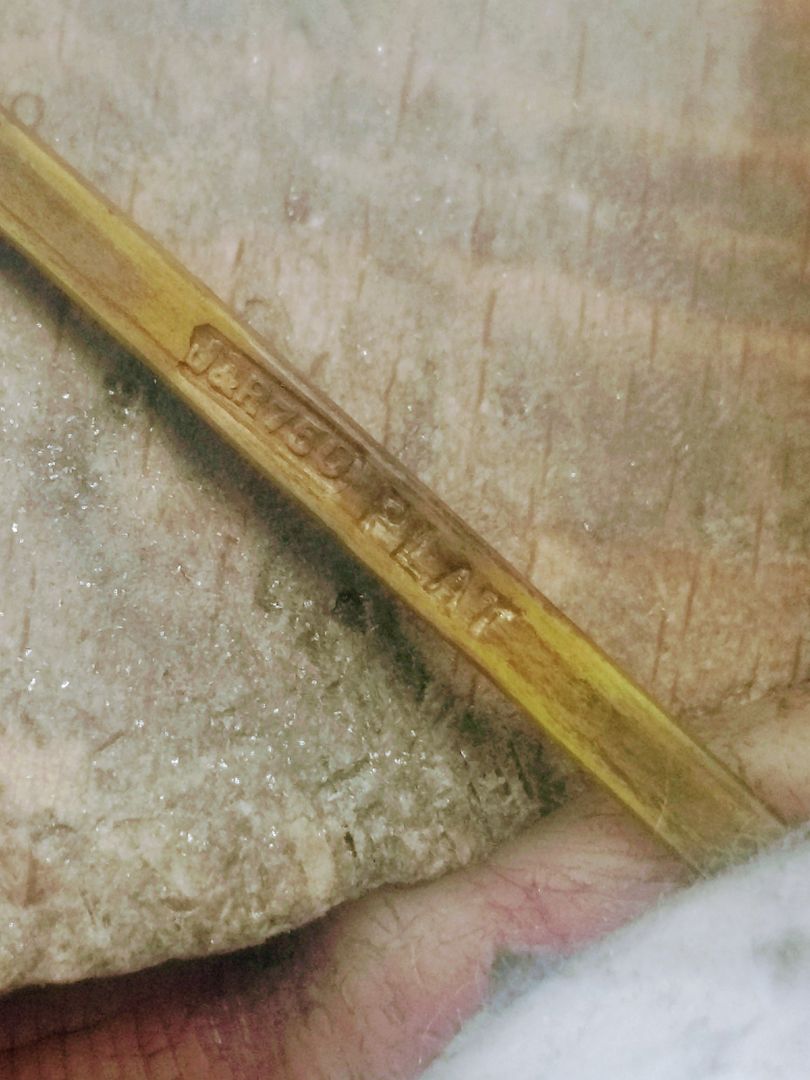
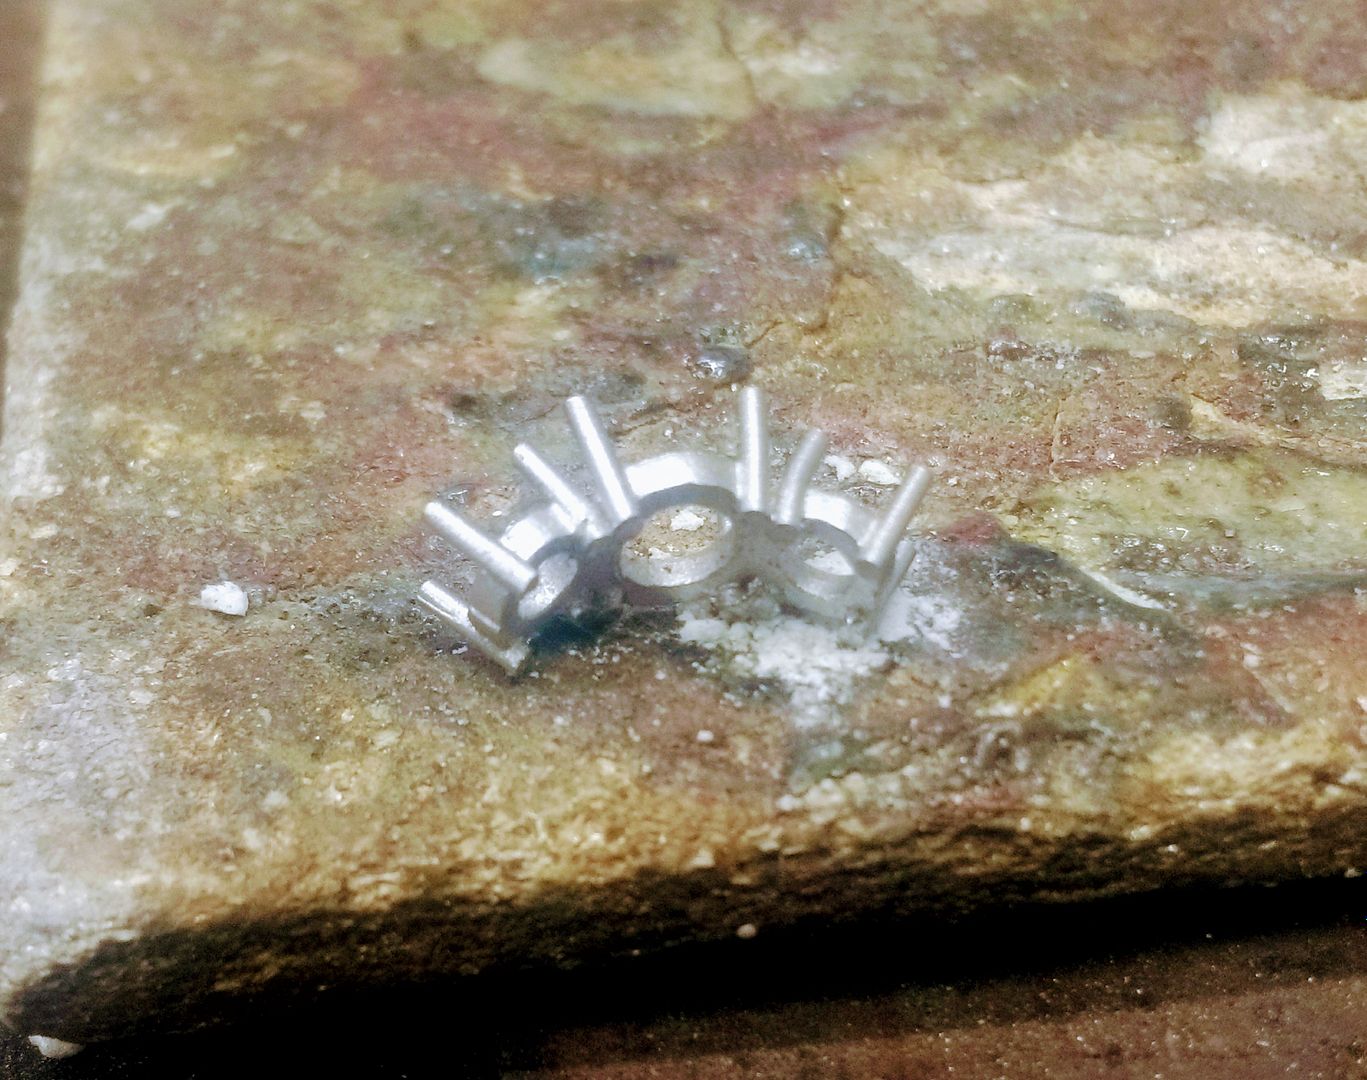
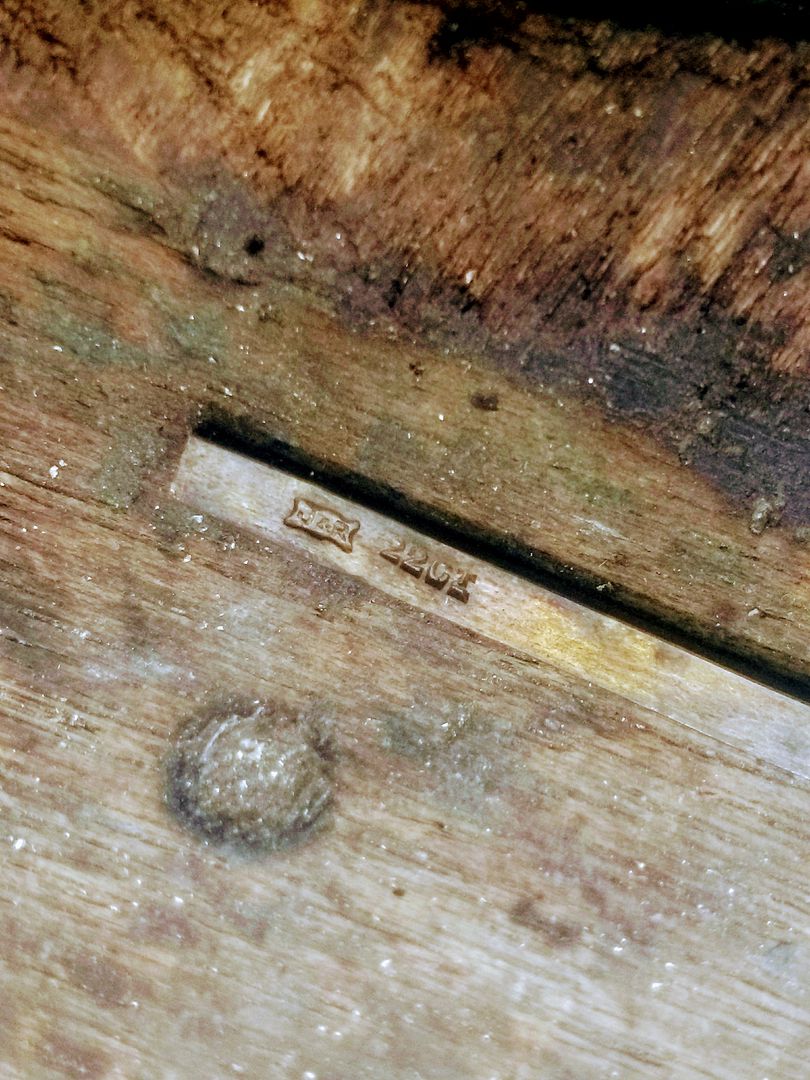
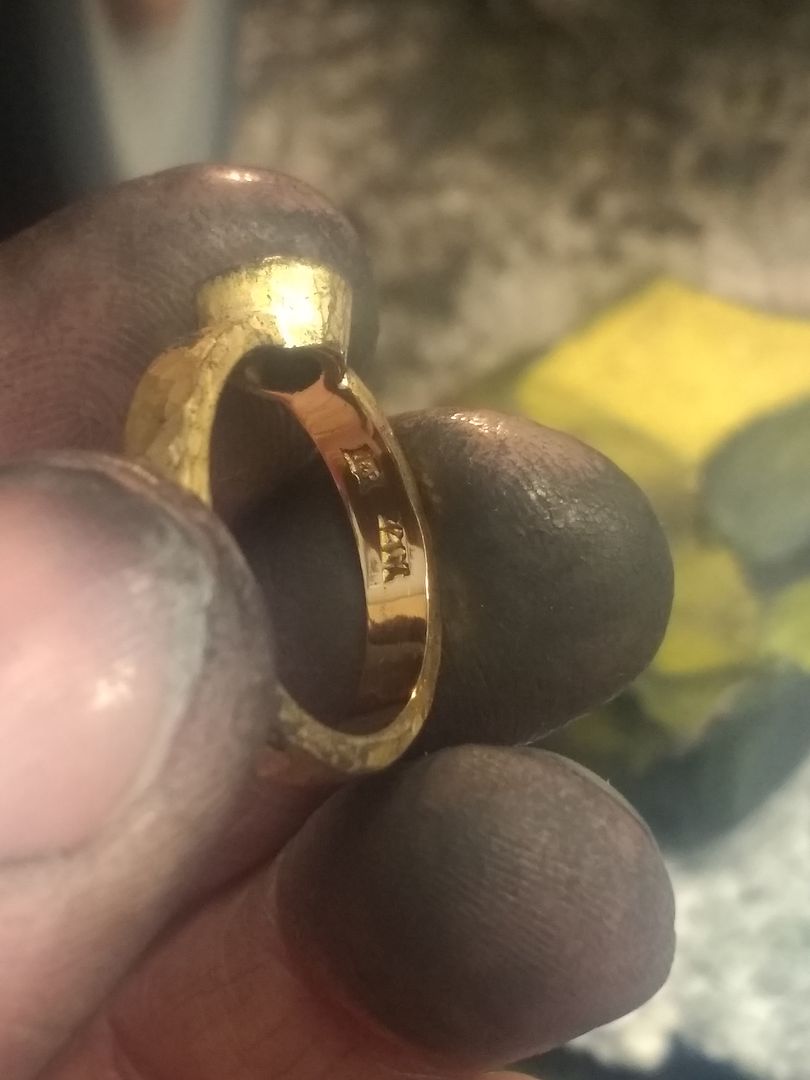
The new bar is rolled to 2.08mm square and then to 2.3mm x 1.75mm D-shape to form the new shank. This is then stamped at one end with the 18ct marking and a PLAT mark to show the material used for the top of the setting:
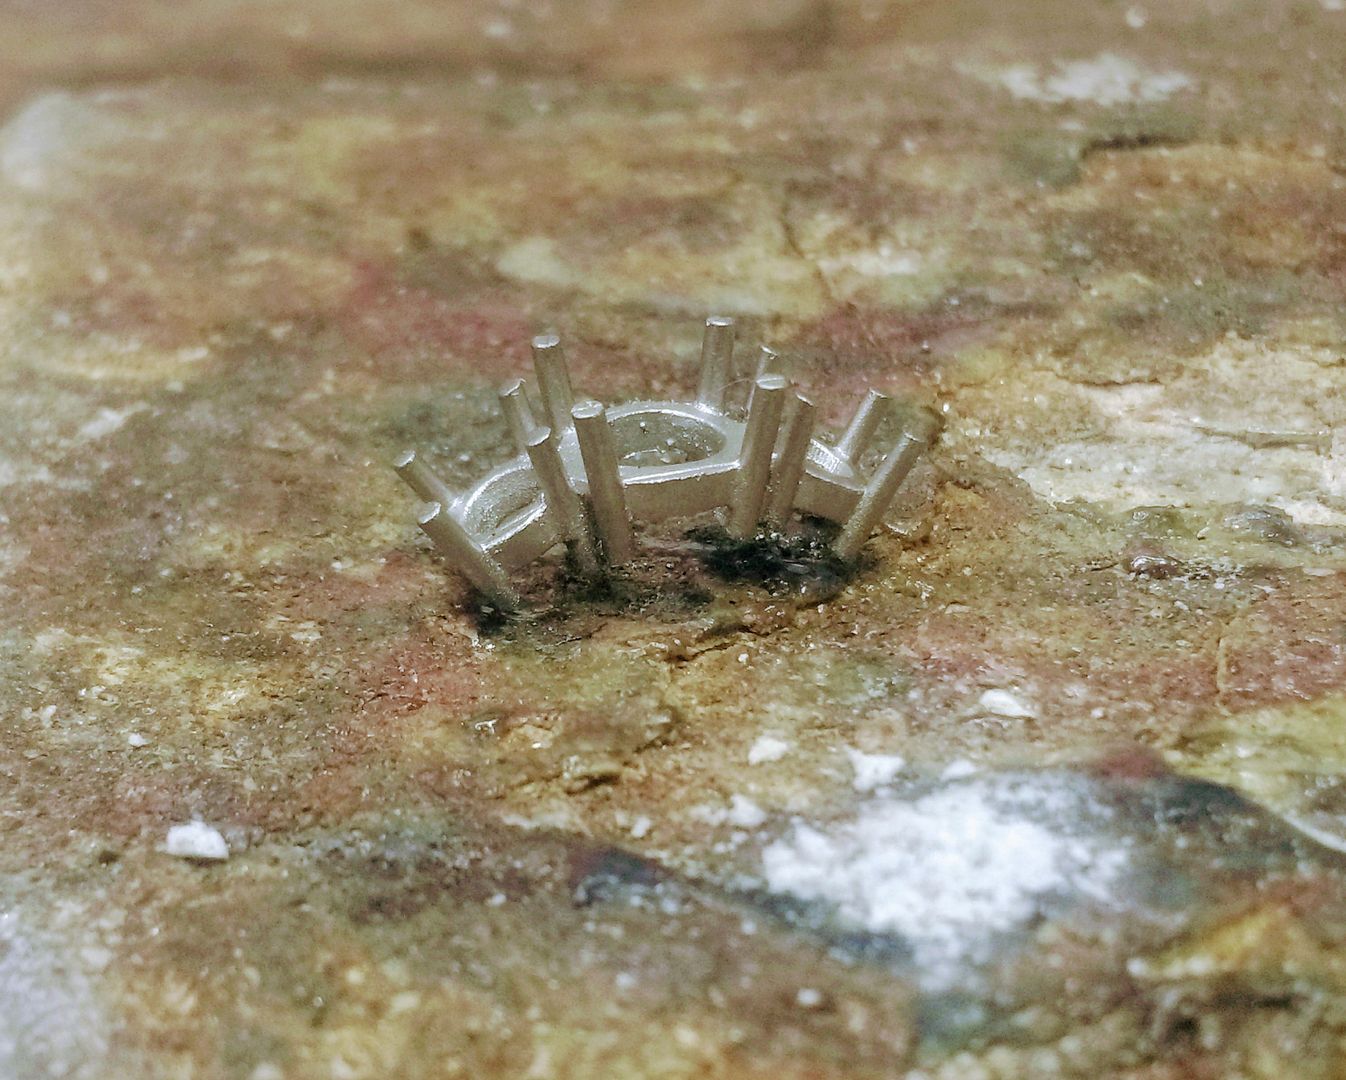
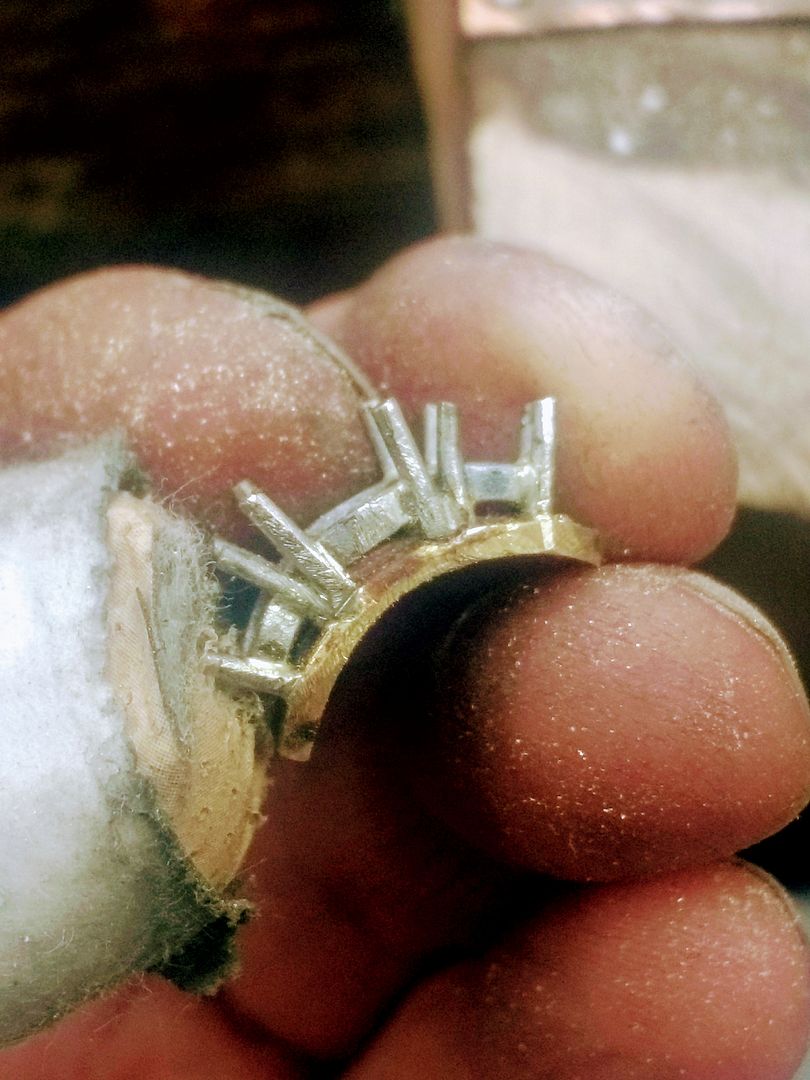
The top setting is a modified version of a ready made cast item. I could make this part from scratch but as it's on the shelf it pays to adjust what's readily available:
The customer wants an 18ct yellow undersetting that flowed in line with the shank. To start I have remelted an amount of the shank material and rolled it to a suitable width:
This is then turned to a shape that suits a size L finger:
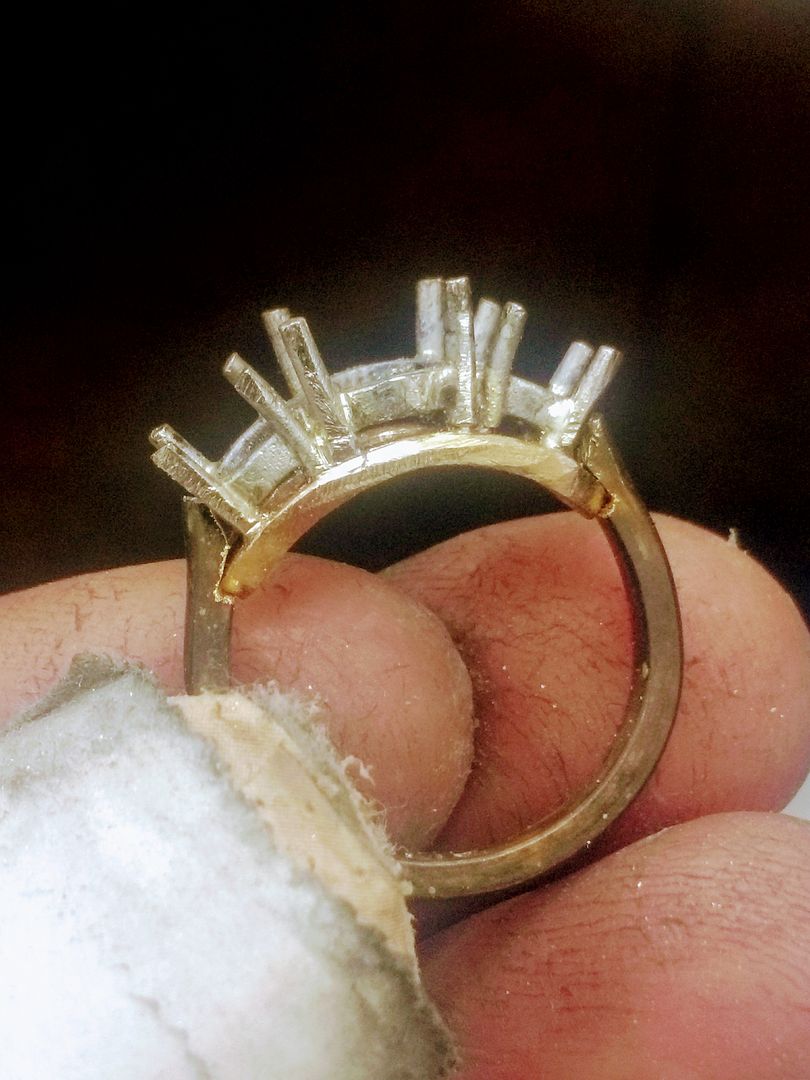
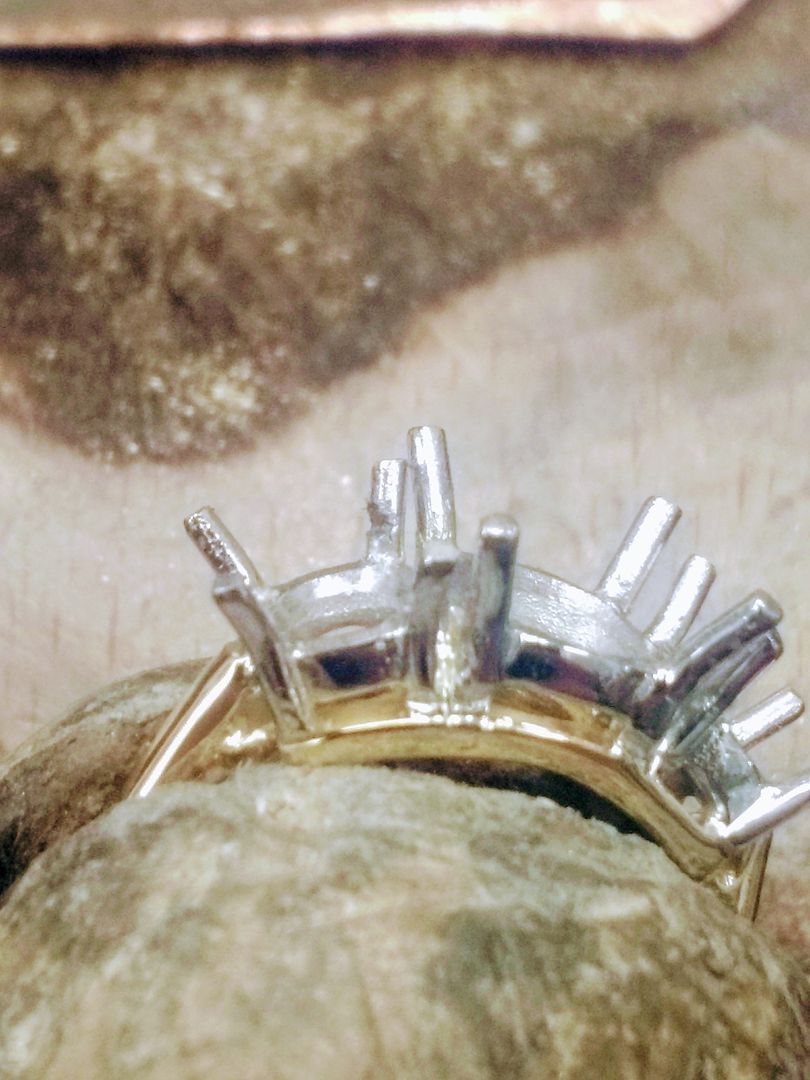
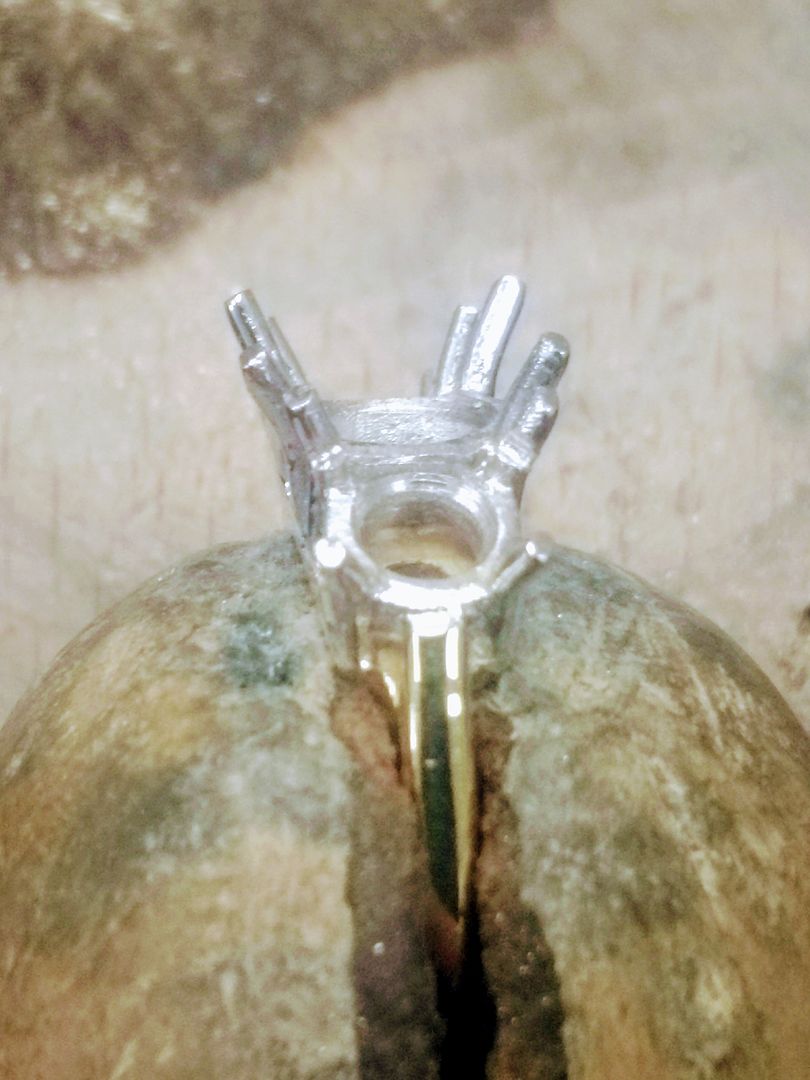
The top setting is then soldered on with 18ct solder:
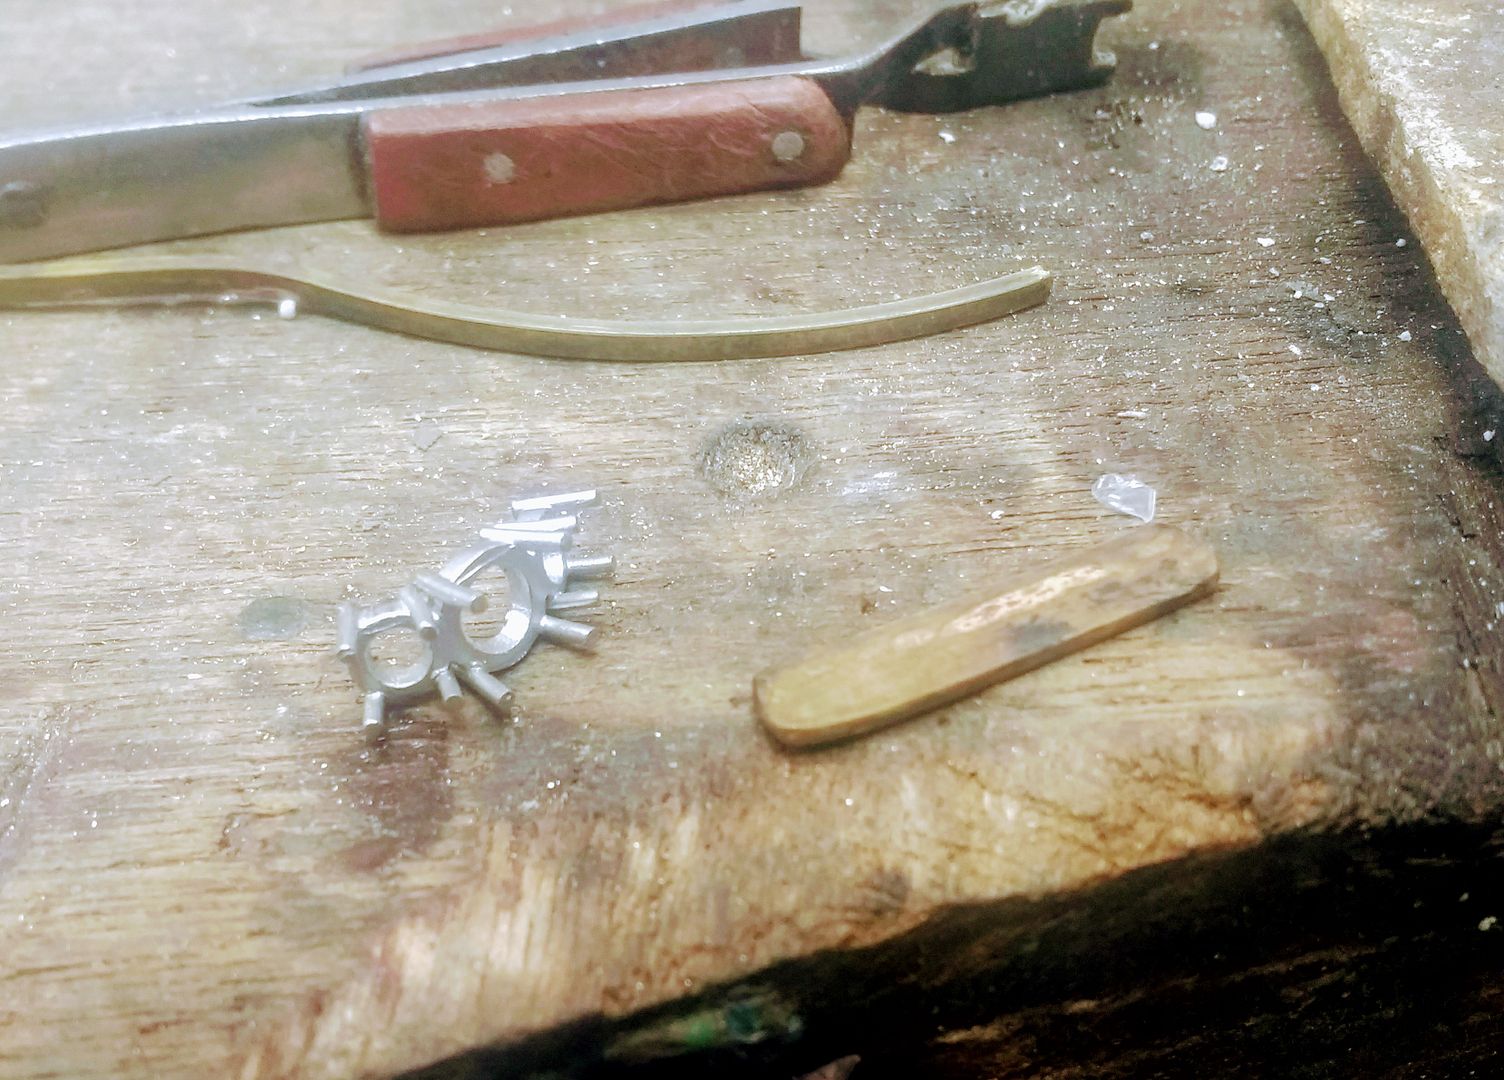
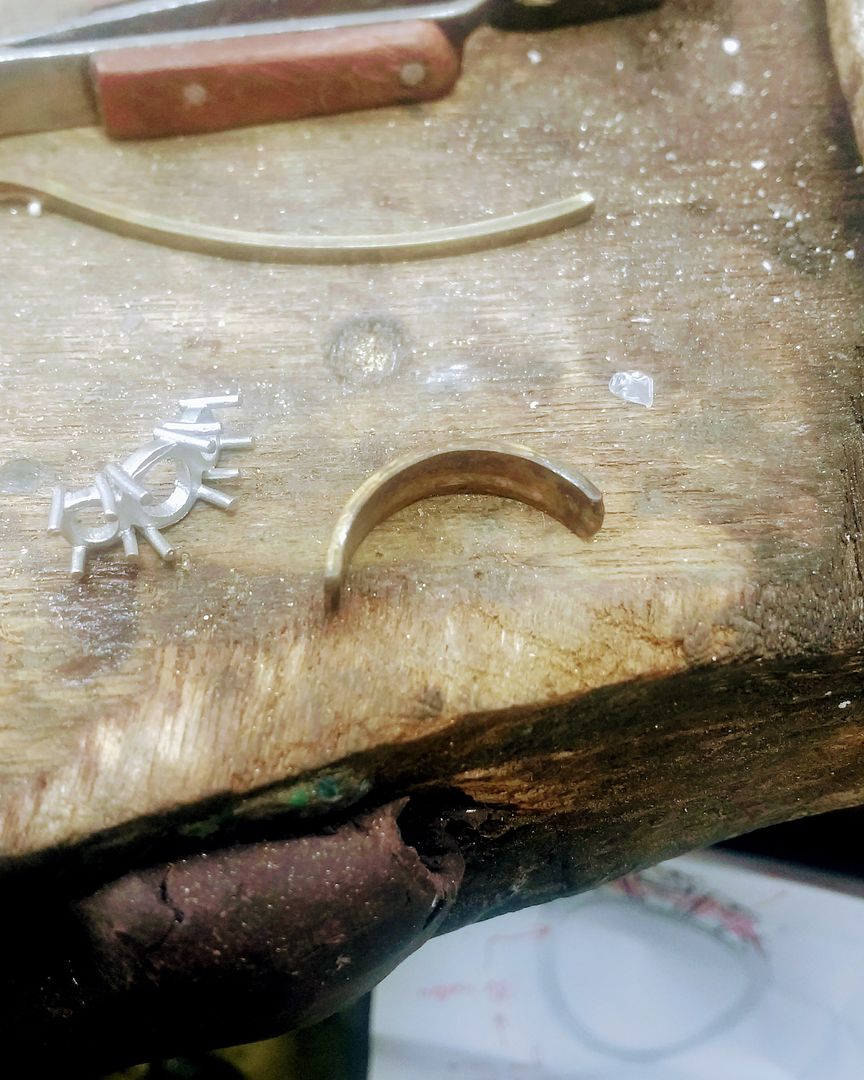
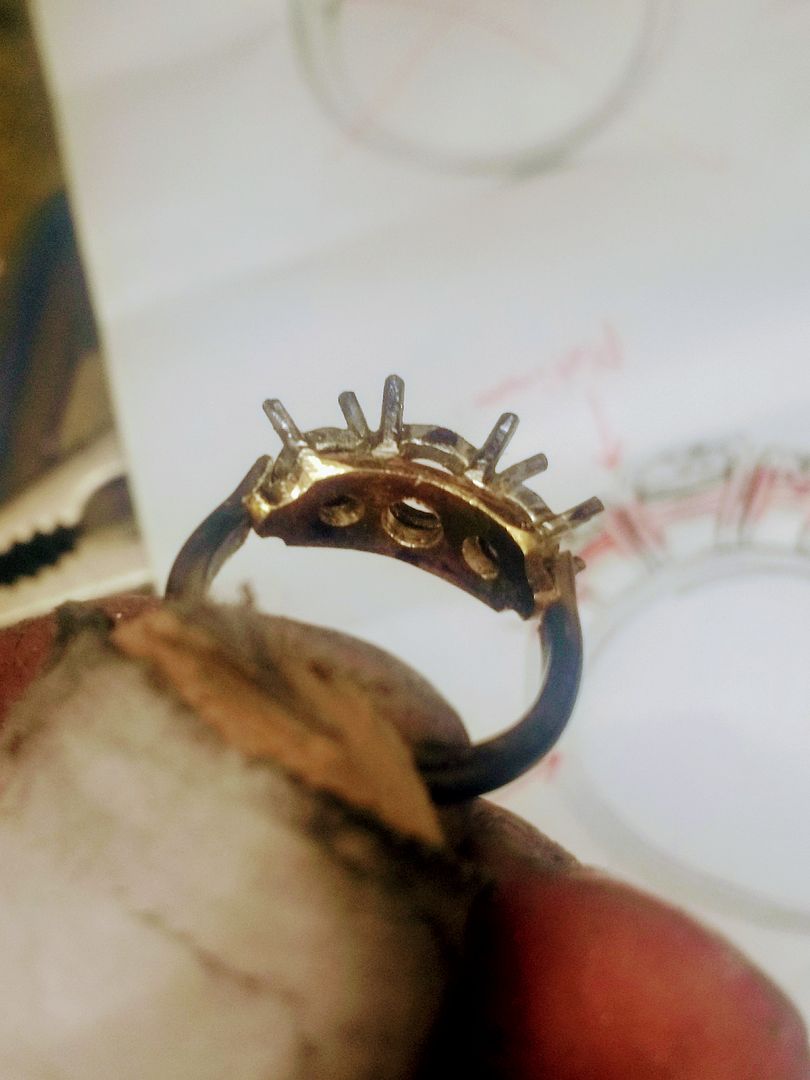
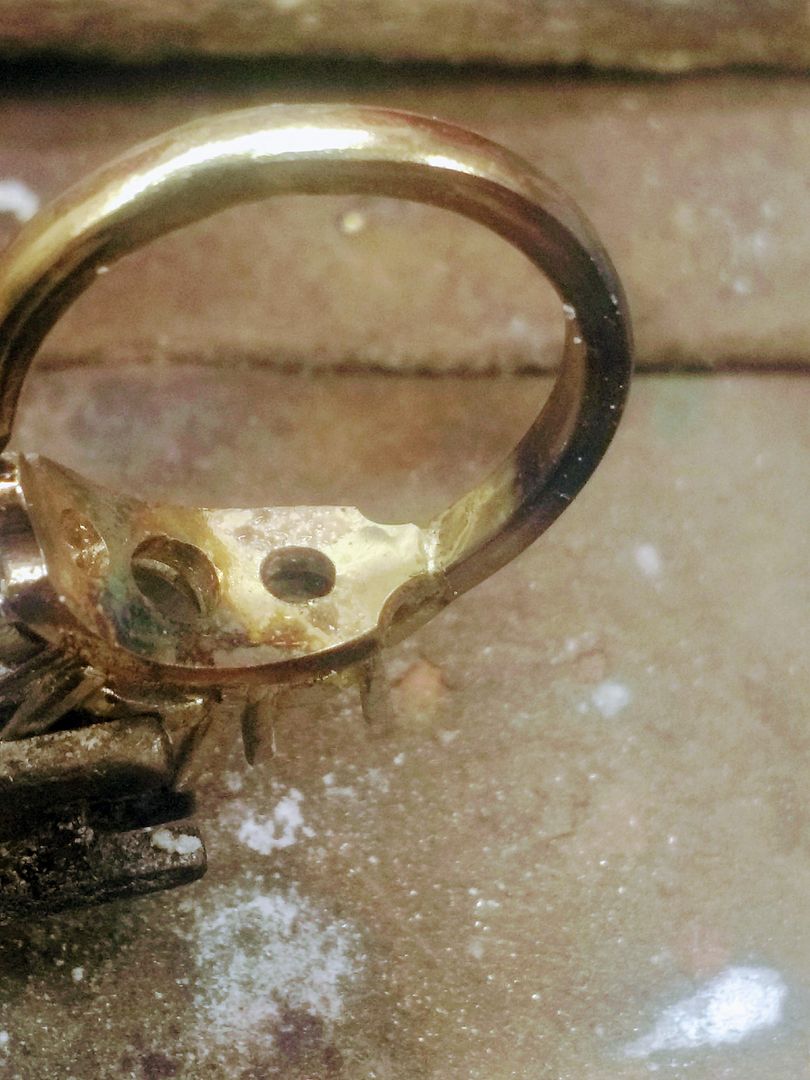
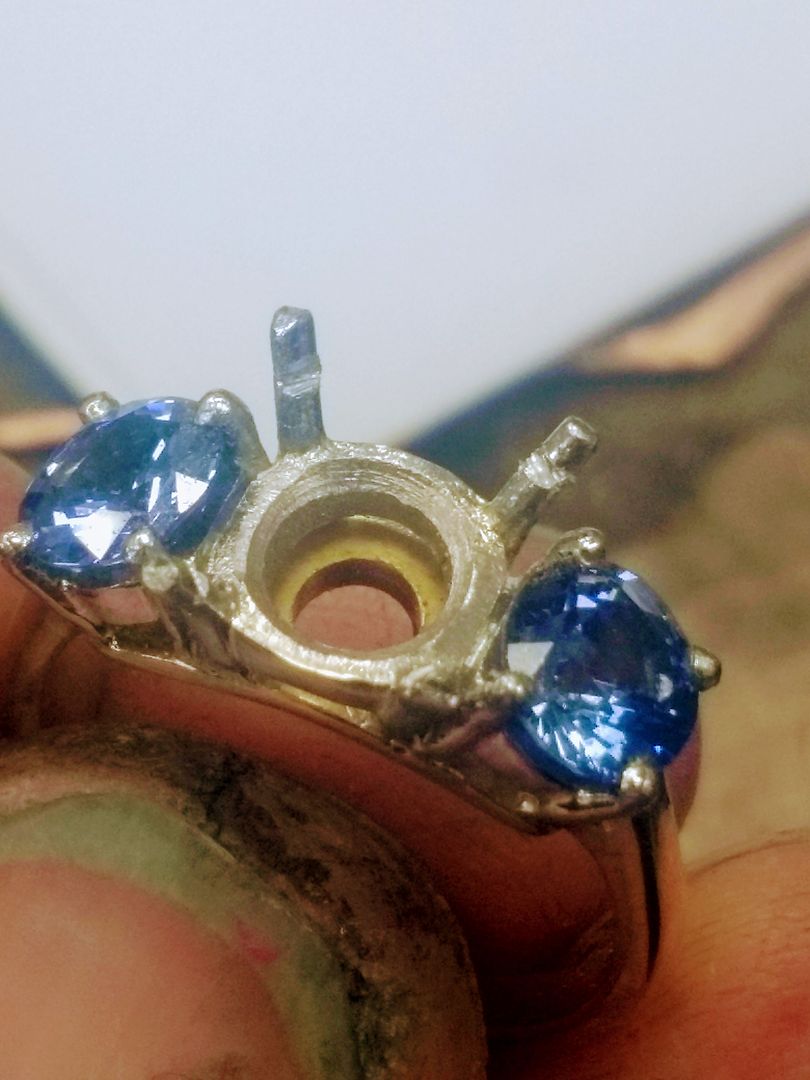
The undersetting is then shaped to suit. The stones are pretty big so the step from the wide setting to the narrower shank needs to be managed:
The setting is drilled........ and you can see it taking shape:

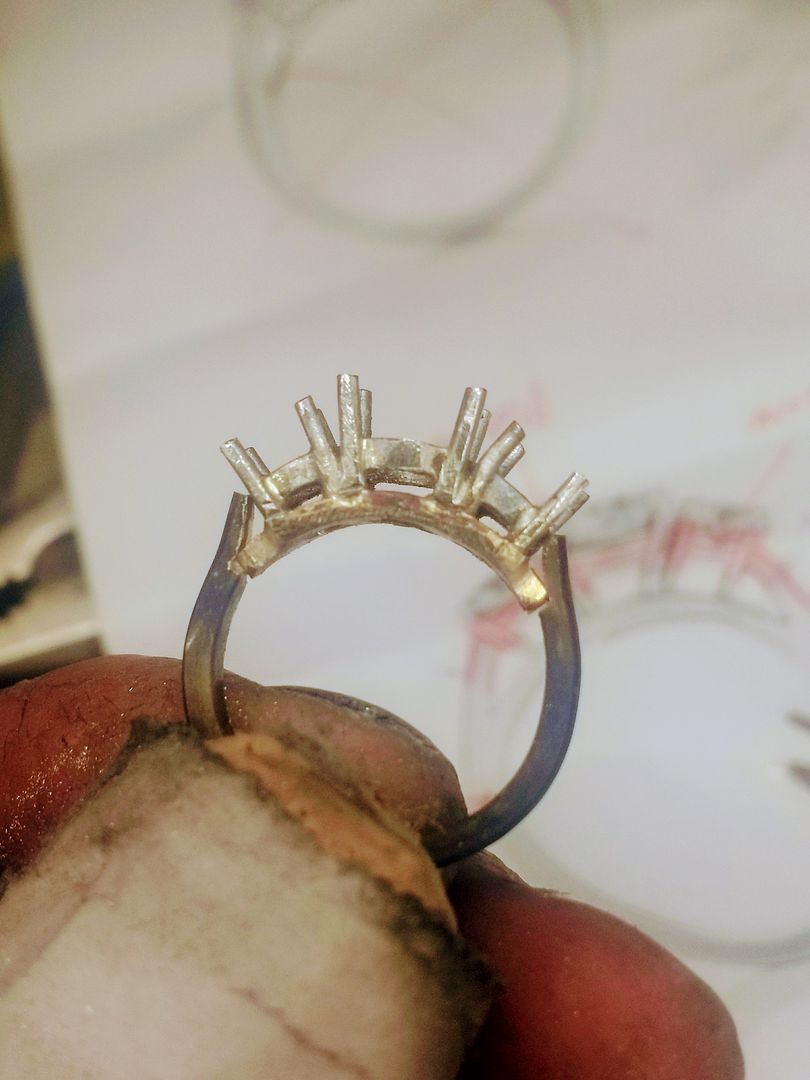
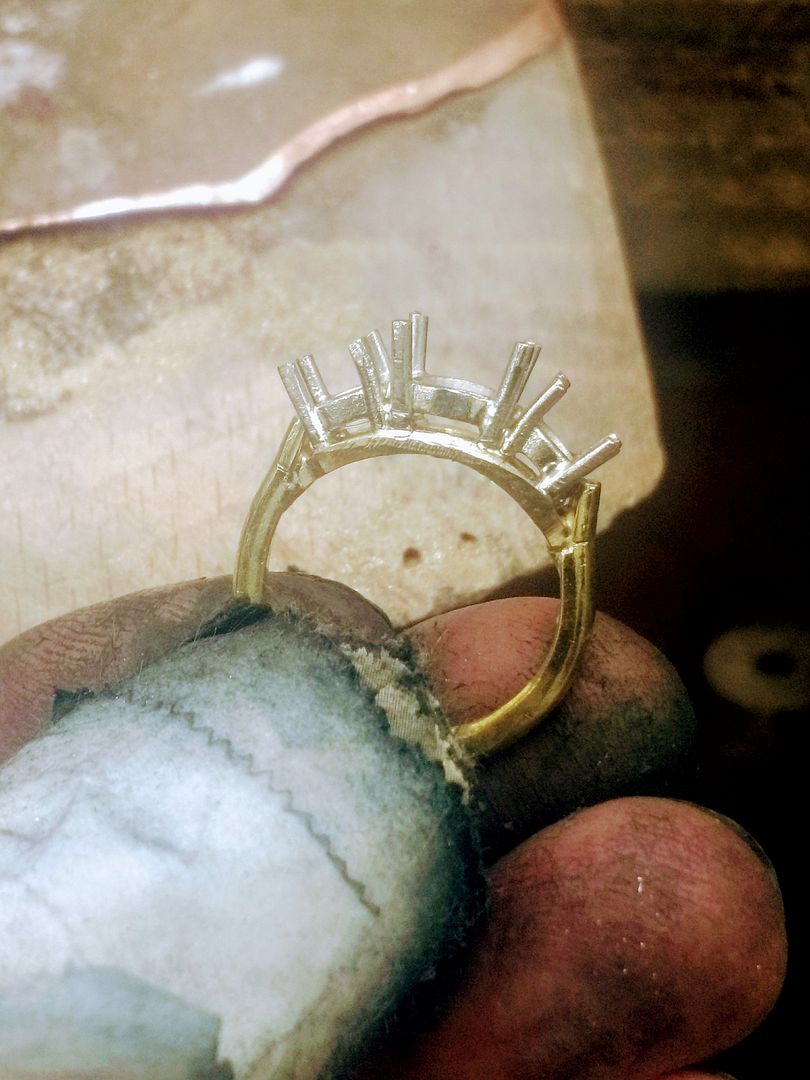
Now i make the shank. The required length is turned to match the size L head:
To make the split shoulders the ends are turned up and the underside of the shank is notched to fit the setting:
I've also made more of a flute in the end of the undersetting to allow it to marry up with the shank:
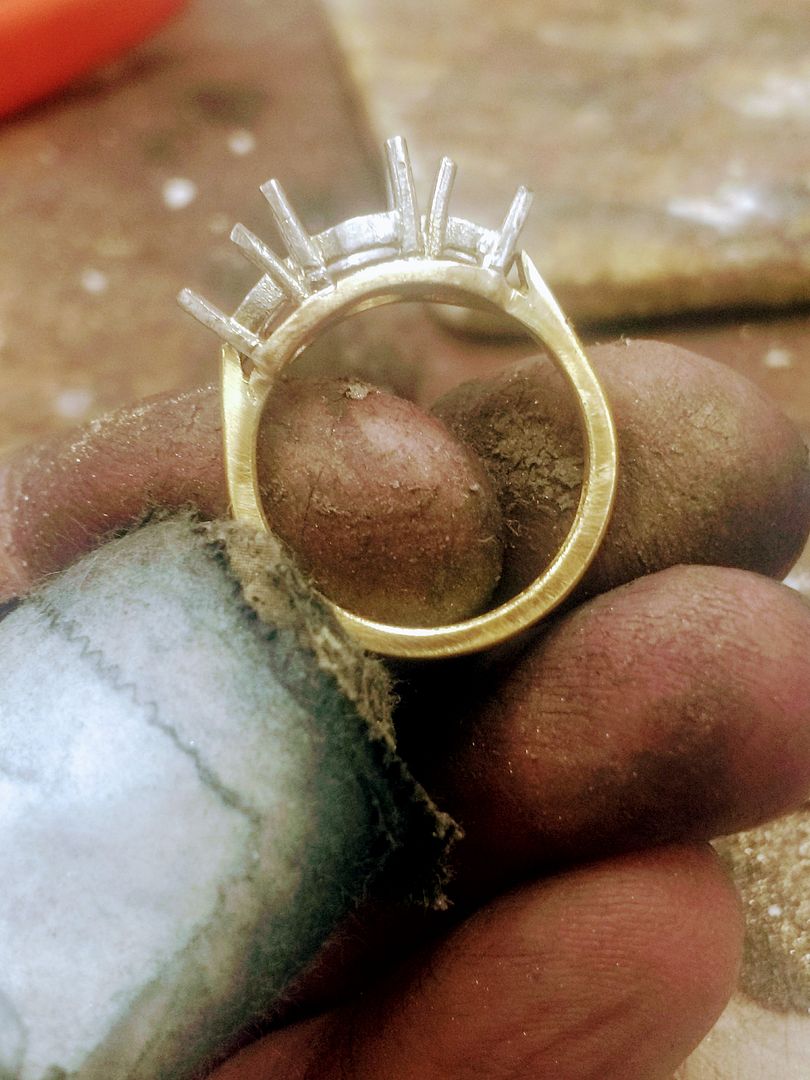
The parts are then cleaned in the 'pickle' before being soldered together with 18ct solder:
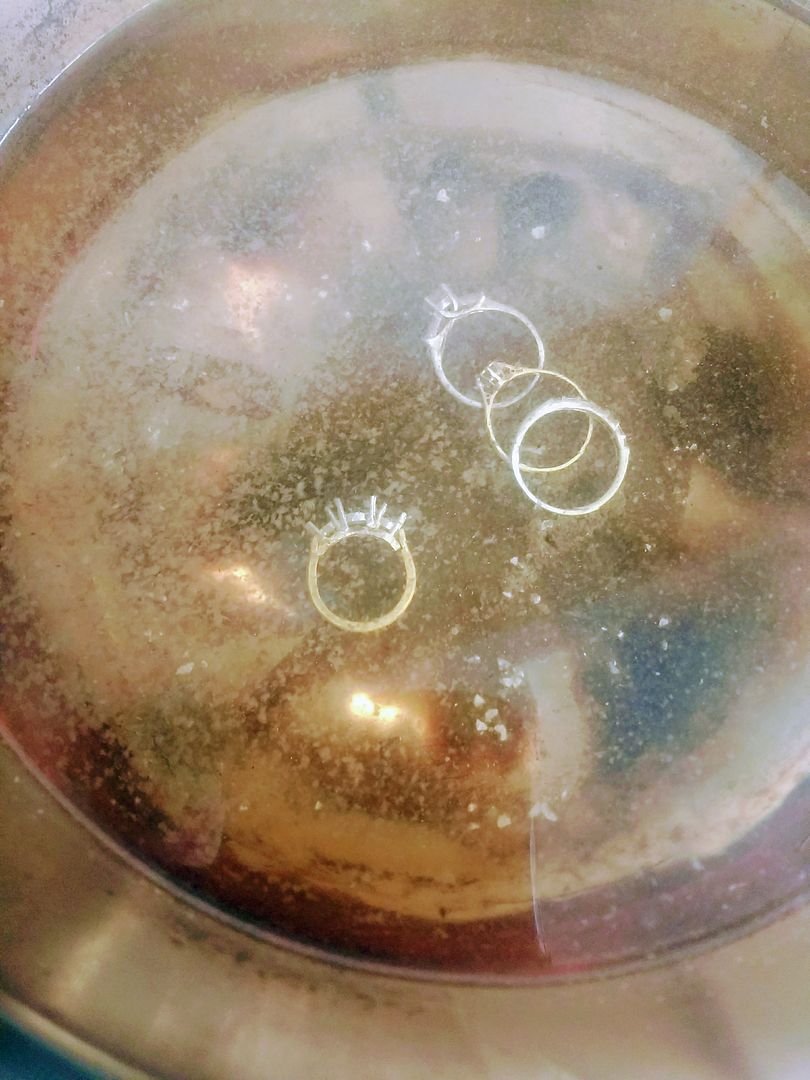
The mount is then tidied ready for a light polish. I'll do the setting work tomorrow, but the pics that follow give a rough idea of what it will look like:
More tomorrow I hope
One for a PH client this time. The couple came in with a single stone diamond ring (18ct with a 2.01ct diamond) that they wanted to be redesigned and remodelled to incorporate a pair of high quality sapphires. They came prepared with a clutch of drawings and I had ready 3 pairs of light to mid blue, AAA quality stones between 5mm and 5.5mm. They chose the lighter of the stones (5.5mm) and after some negotiation we decided upon a final design.
Here's how it went:
The 18ct white gold head / setting is separated from the 18ct yellow shank.

They wish the original shank to be used in the new mount so it is melted in with some 18ct yellow bullion to allow an excess during build.


The new bar is rolled to 2.08mm square and then to 2.3mm x 1.75mm D-shape to form the new shank. This is then stamped at one end with the 18ct marking and a PLAT mark to show the material used for the top of the setting:

The top setting is a modified version of a ready made cast item. I could make this part from scratch but as it's on the shelf it pays to adjust what's readily available:


The customer wants an 18ct yellow undersetting that flowed in line with the shank. To start I have remelted an amount of the shank material and rolled it to a suitable width:

This is then turned to a shape that suits a size L finger:

The top setting is then soldered on with 18ct solder:

The undersetting is then shaped to suit. The stones are pretty big so the step from the wide setting to the narrower shank needs to be managed:

The setting is drilled........ and you can see it taking shape:

Now i make the shank. The required length is turned to match the size L head:

To make the split shoulders the ends are turned up and the underside of the shank is notched to fit the setting:

I've also made more of a flute in the end of the undersetting to allow it to marry up with the shank:


The parts are then cleaned in the 'pickle' before being soldered together with 18ct solder:


The mount is then tidied ready for a light polish. I'll do the setting work tomorrow, but the pics that follow give a rough idea of what it will look like:


More tomorrow I hope
desolate said:
My wife has a pair of platinum earings that she never wears - there's a lot of platinum in them (think Pirates)
Is there no way they can be reworked into something more useable? (eg a ring or a pendant)
Sorry, didn't see this. It is possible, but depends on the metal after melting. It's not an easy material to recycle and takes a monumental amount of heat to convert to liquid form. Sometimes it's malleable enough to reform but often it becomes hard and brittle. Totally depends on what the metal has been mixed with and if any solder exists. Is there no way they can be reworked into something more useable? (eg a ring or a pendant)
NDA said:
Have you thought about being a hand model?
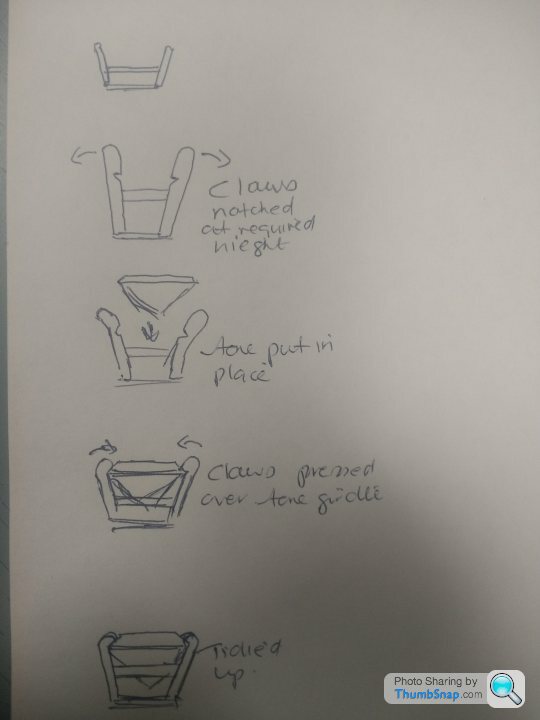
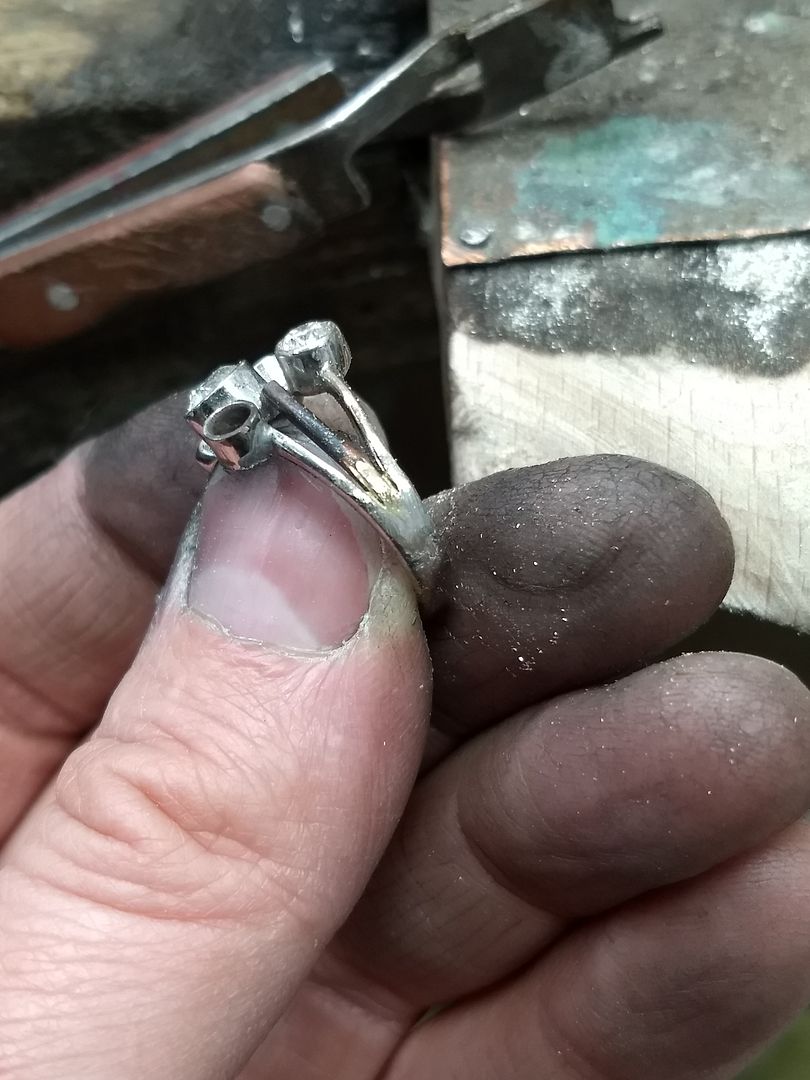
Assuming you haven't finished that ring, could you show how the claws are bent in such a way so that the stones are undamaged (by the bending) and tight in the setting?
I'll do a sequence of drawings later to show how it's done. You might not be able to see it in the job but on paper will be easy to understand and see. Assuming you haven't finished that ring, could you show how the claws are bent in such a way so that the stones are undamaged (by the bending) and tight in the setting?
To finish off yesterdays build.....
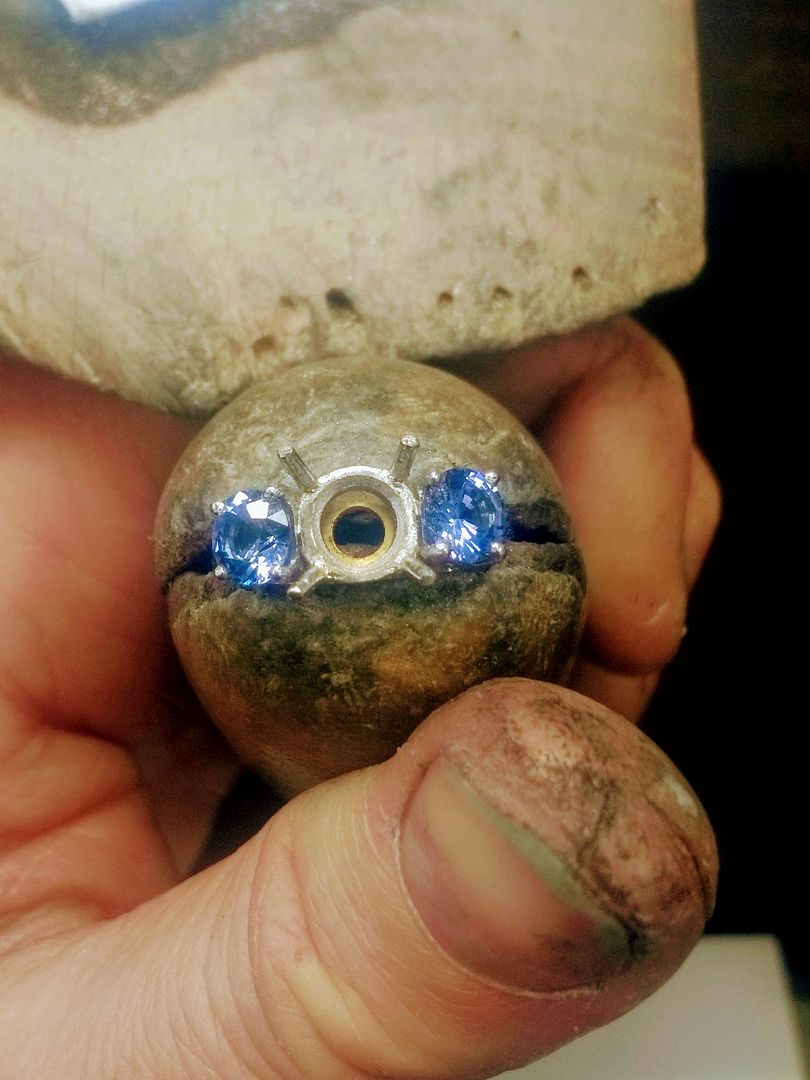
The ring is given a bit more of a tidy and some additional solder to boost the areas I tacked yesterday.
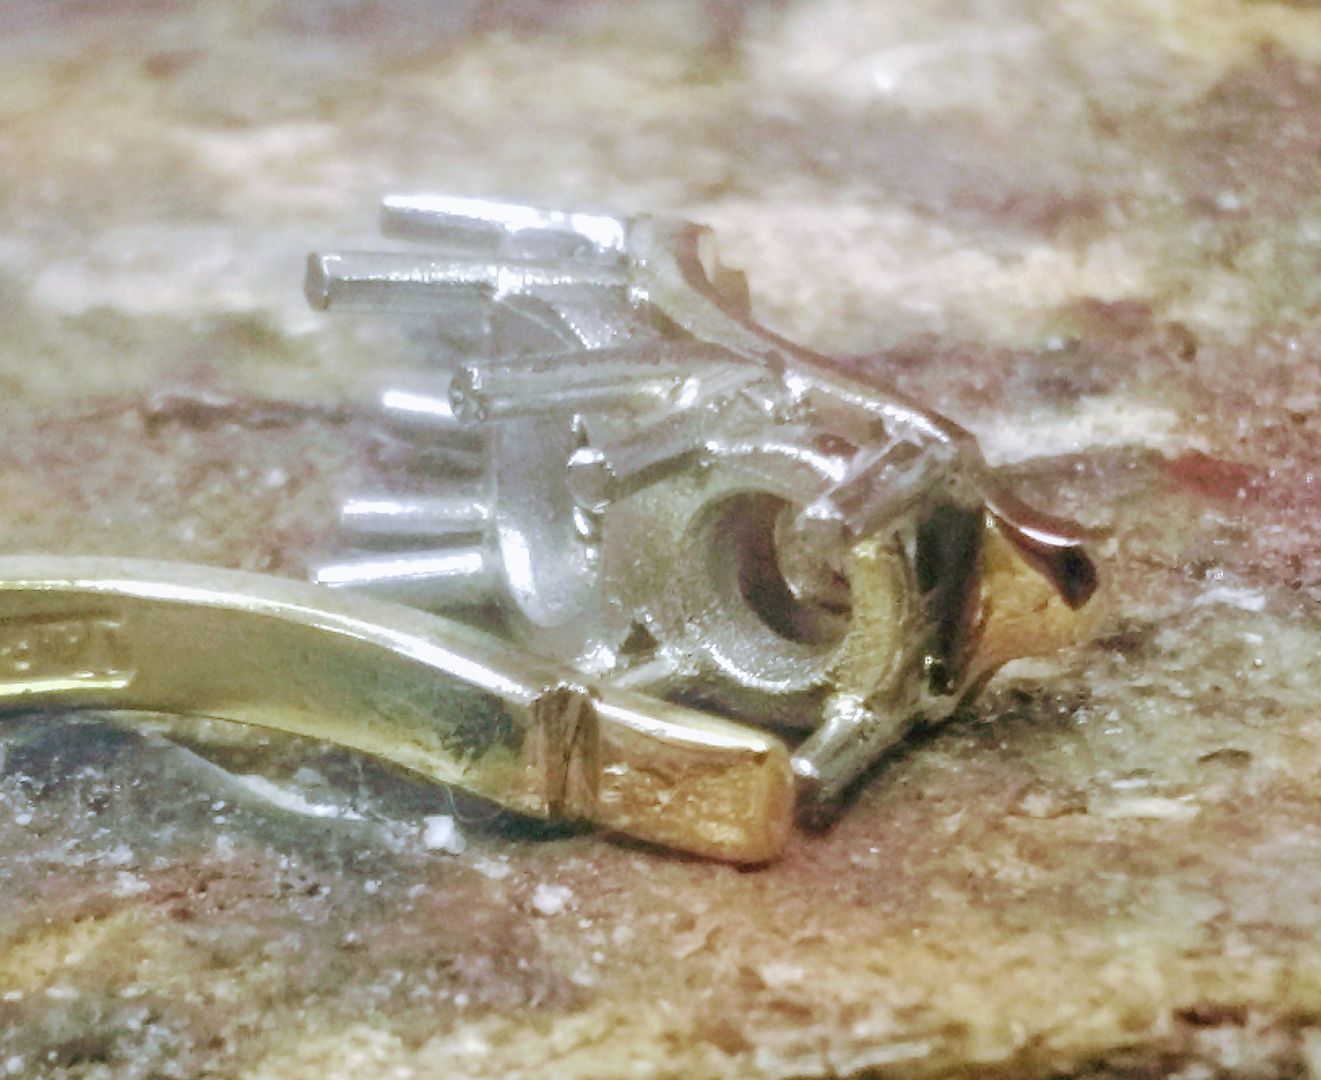
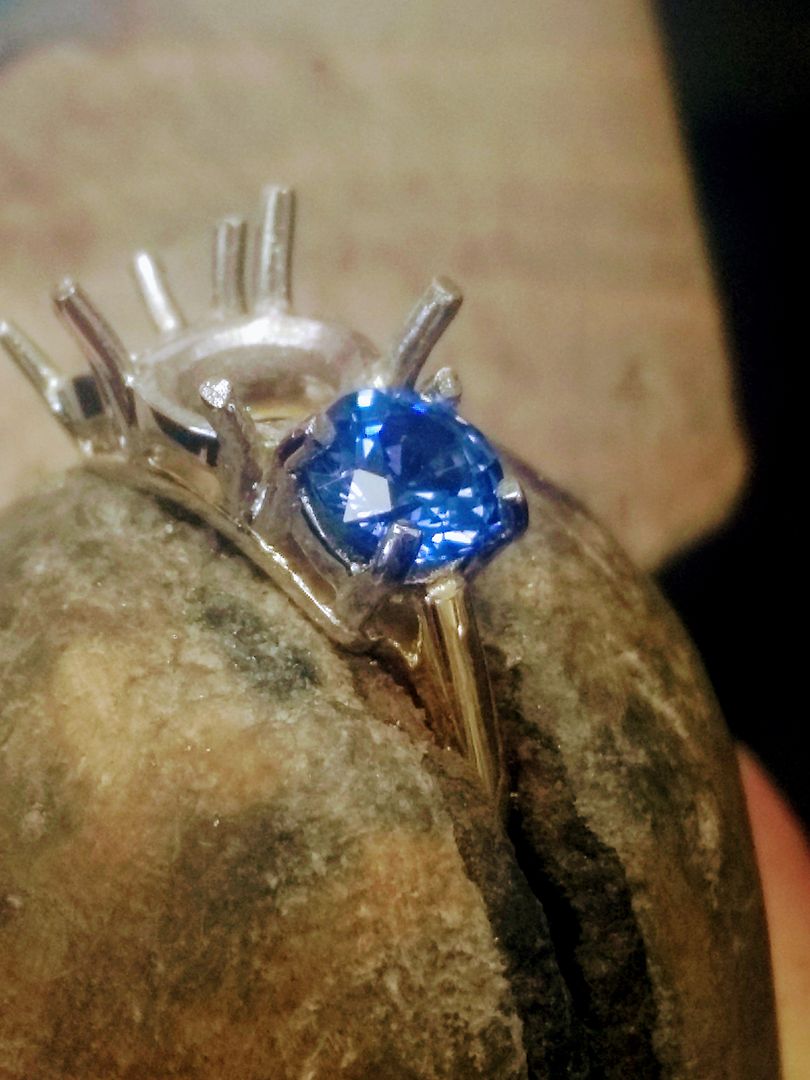
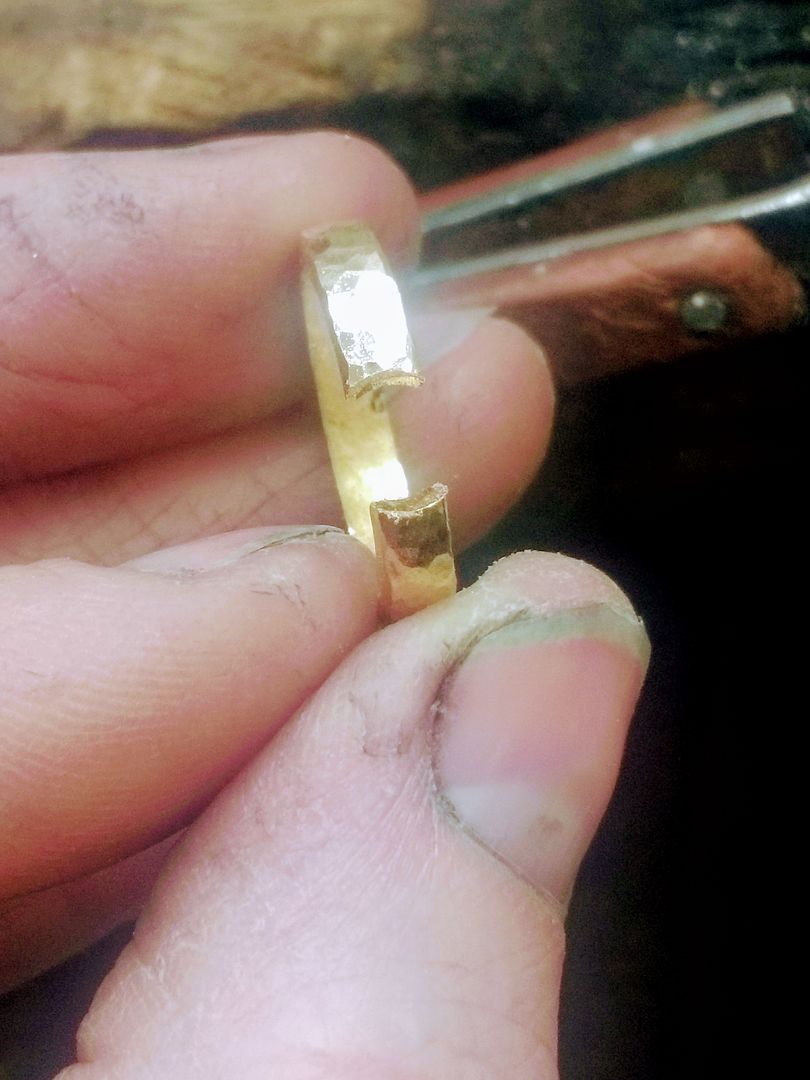
The sapphires need to go in first so I notch the claws at the required height.
The first sapphire is laid in and the claws pressed over the edge.
And then the second......
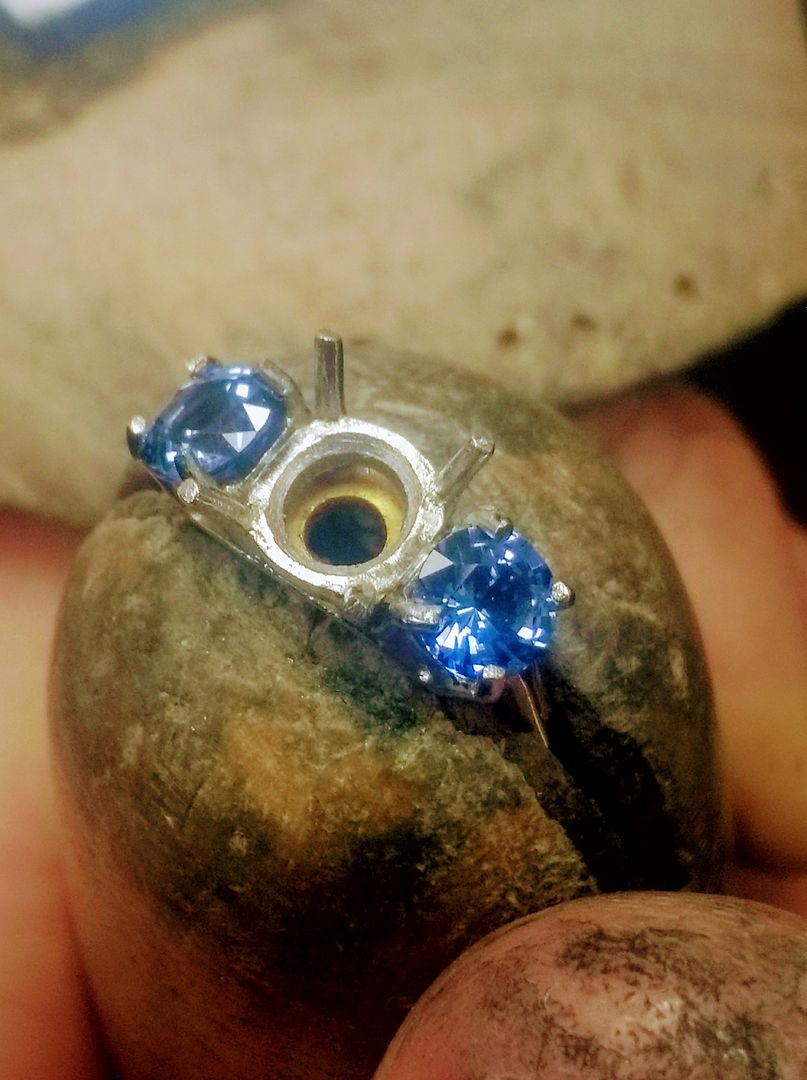
The claws are cut with a fine saw (also awesome at chopping thumbs) to reduce the length:
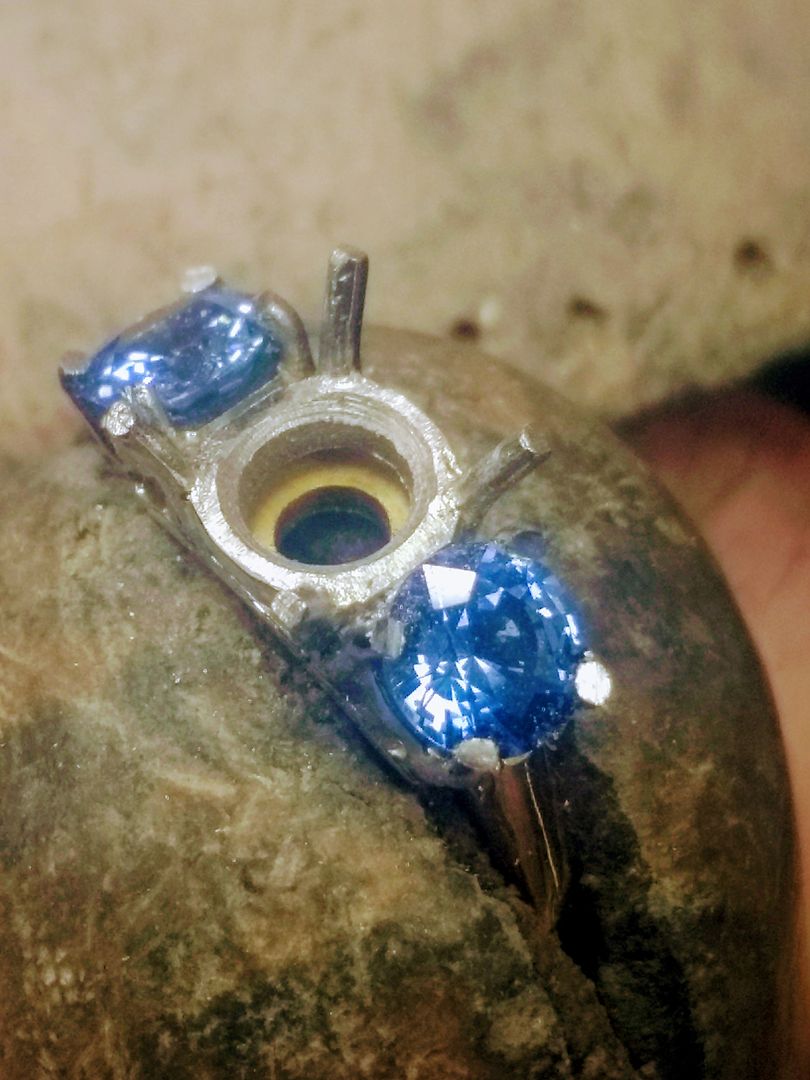
With a fine file the tips are rounded off and pressed with a domed graining tool:
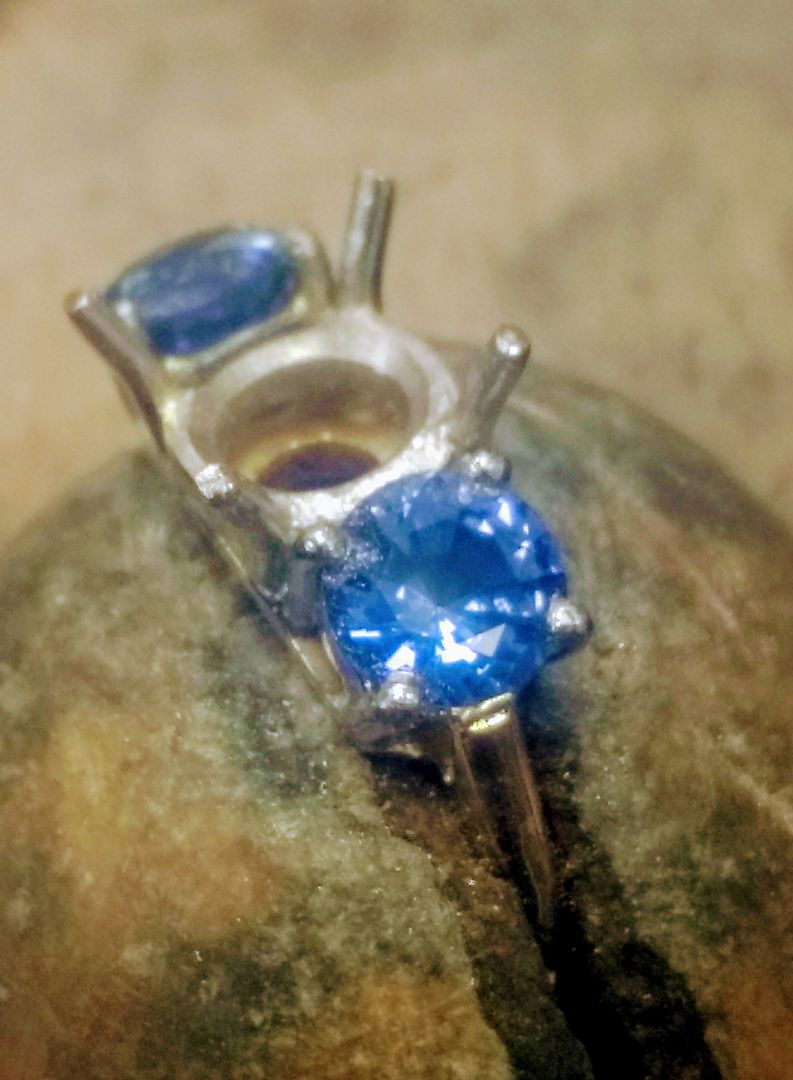
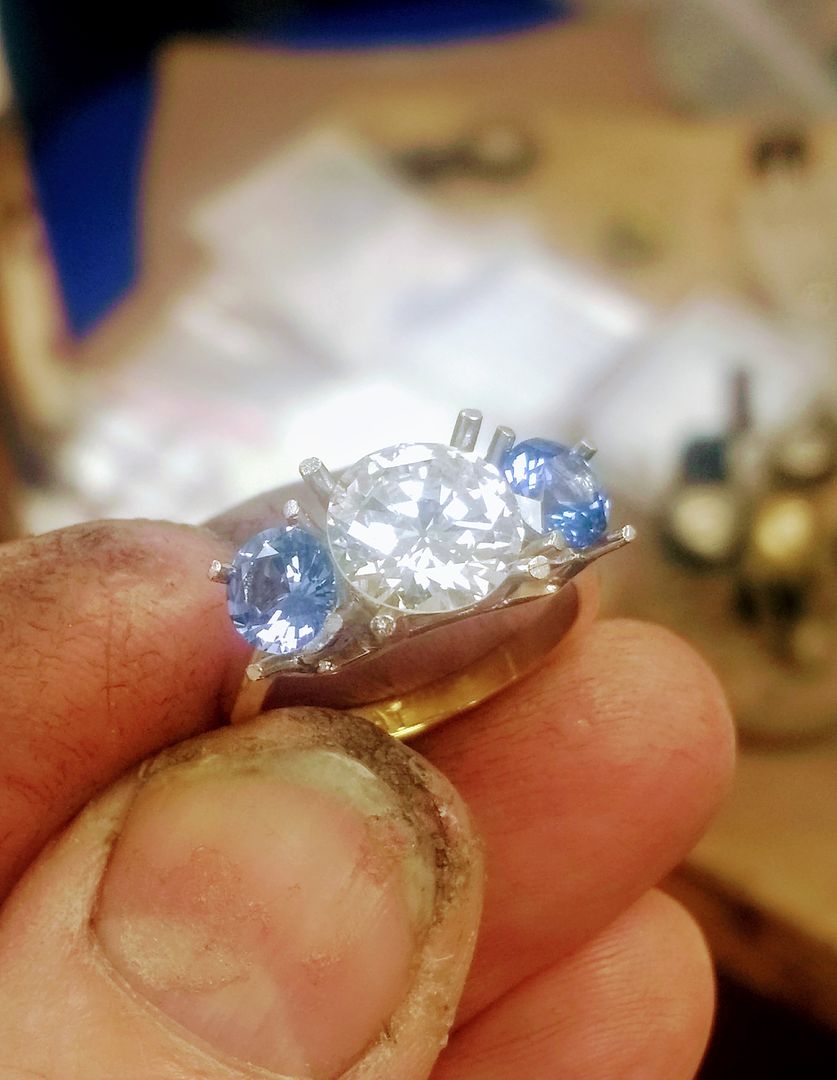
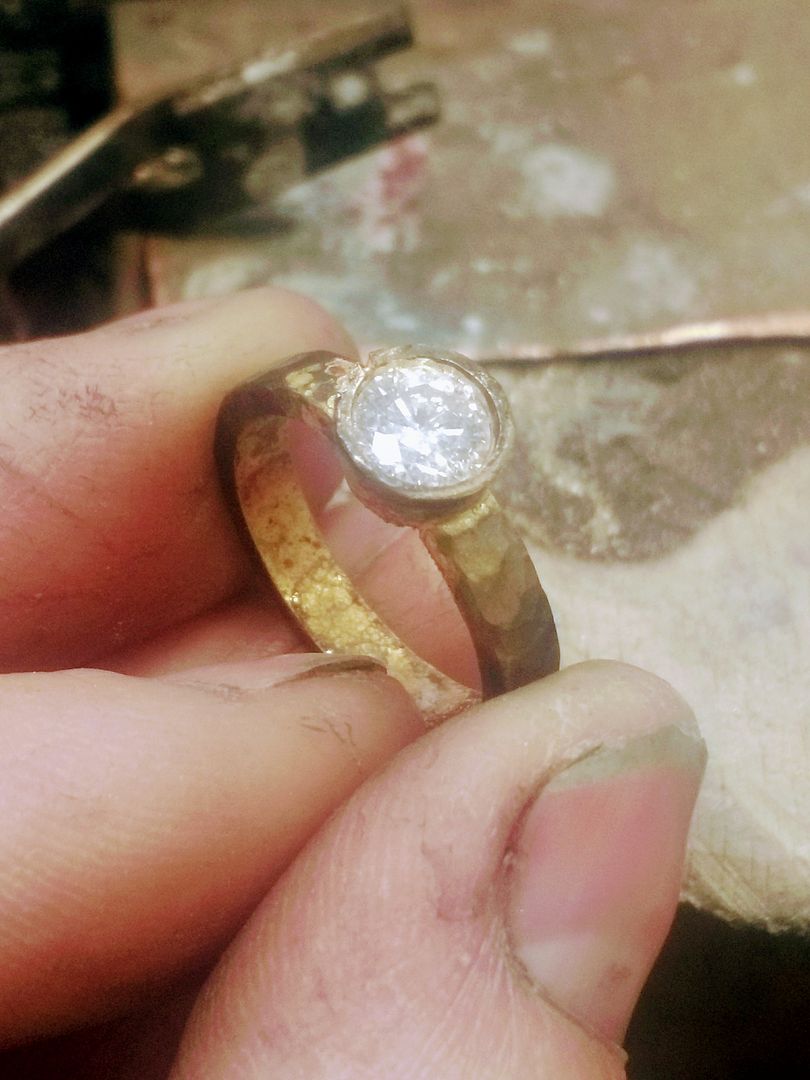
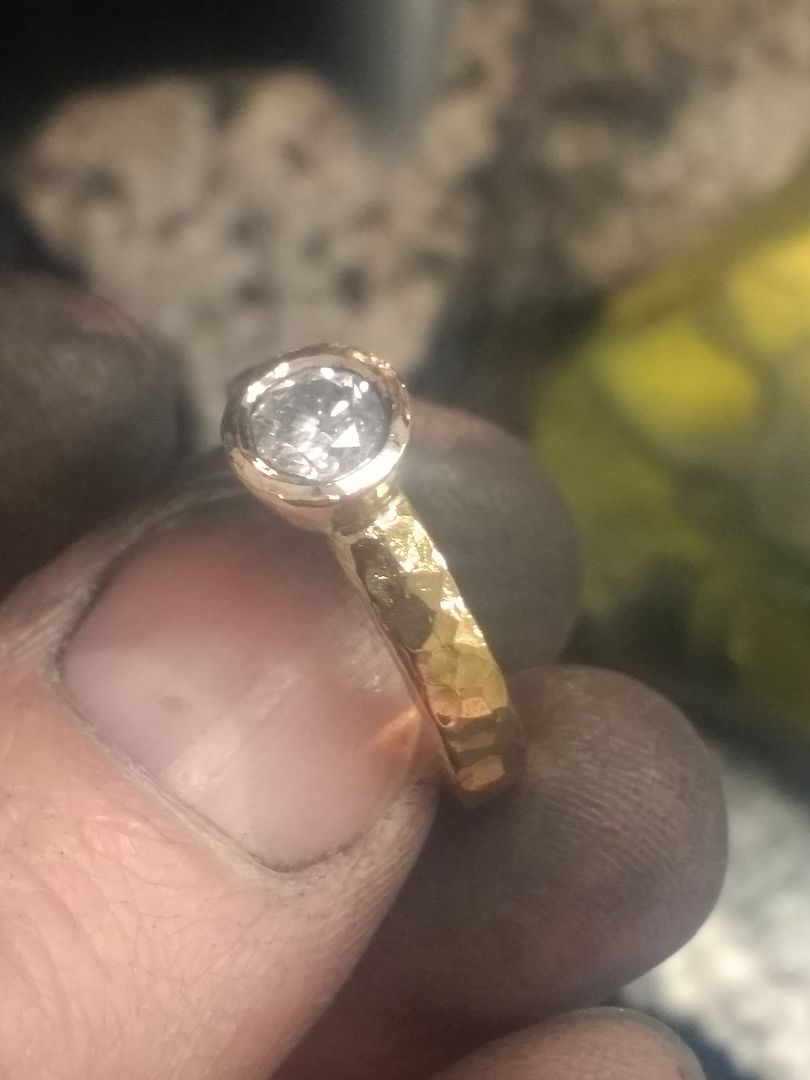
With the sapphires in place the diamond is next to go in. The girdle is not totally level on this stone so I have to be very accurate with my cut to ensure the diamond sits as level as possible:
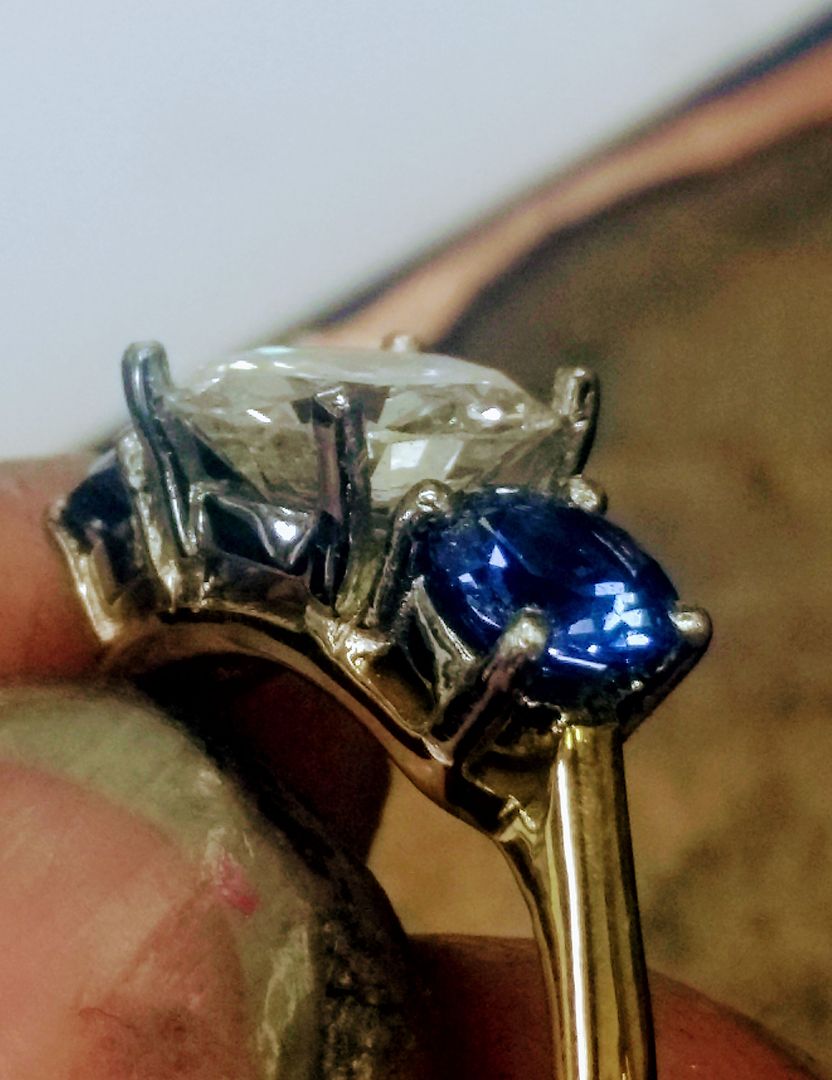
Using the same process as before the diamond is secured in the mount:


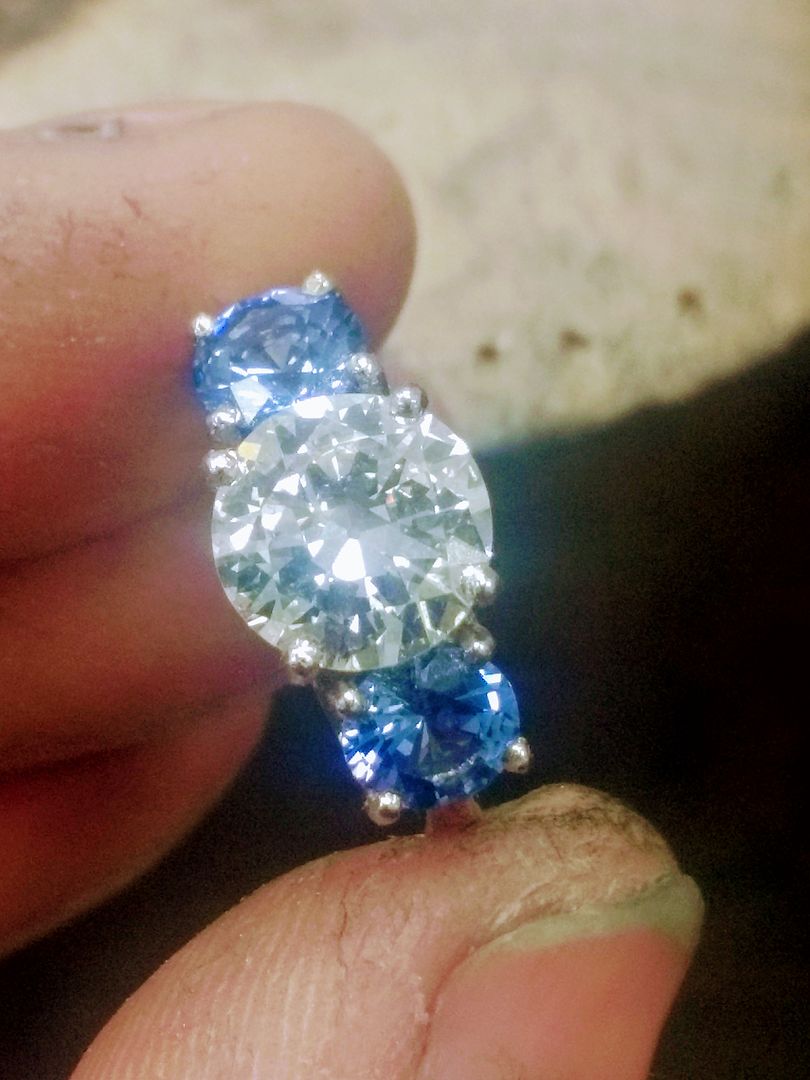
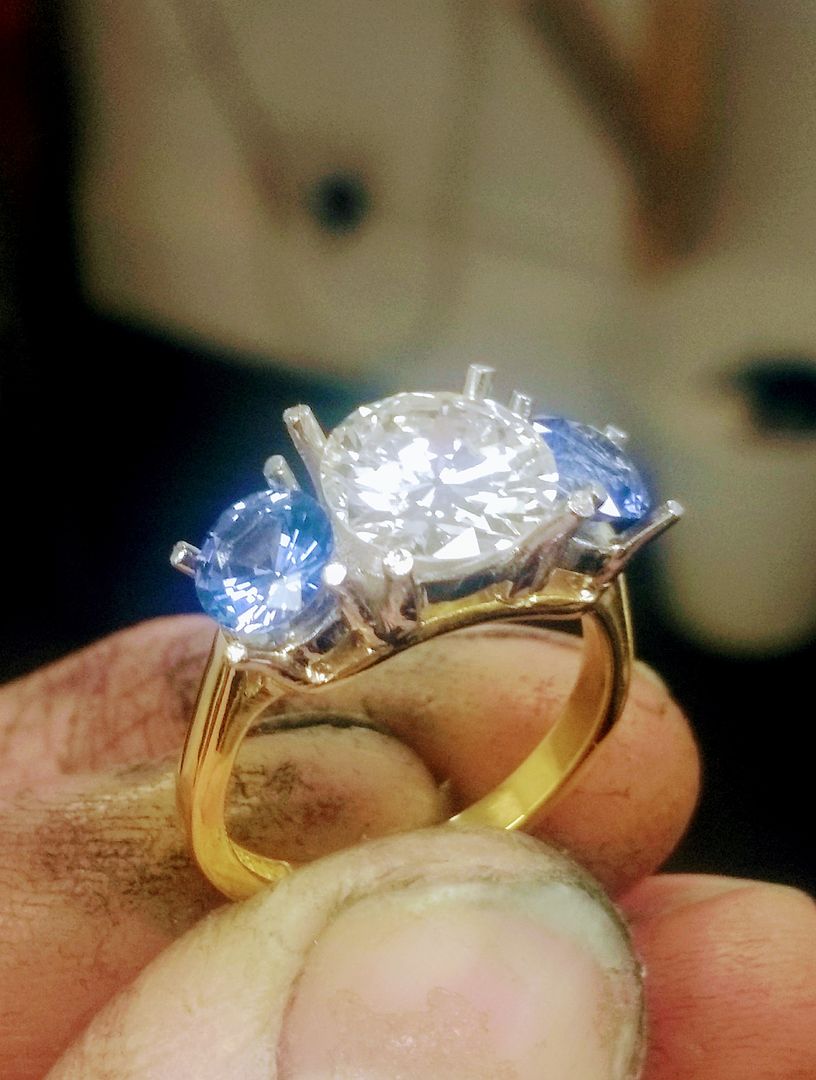
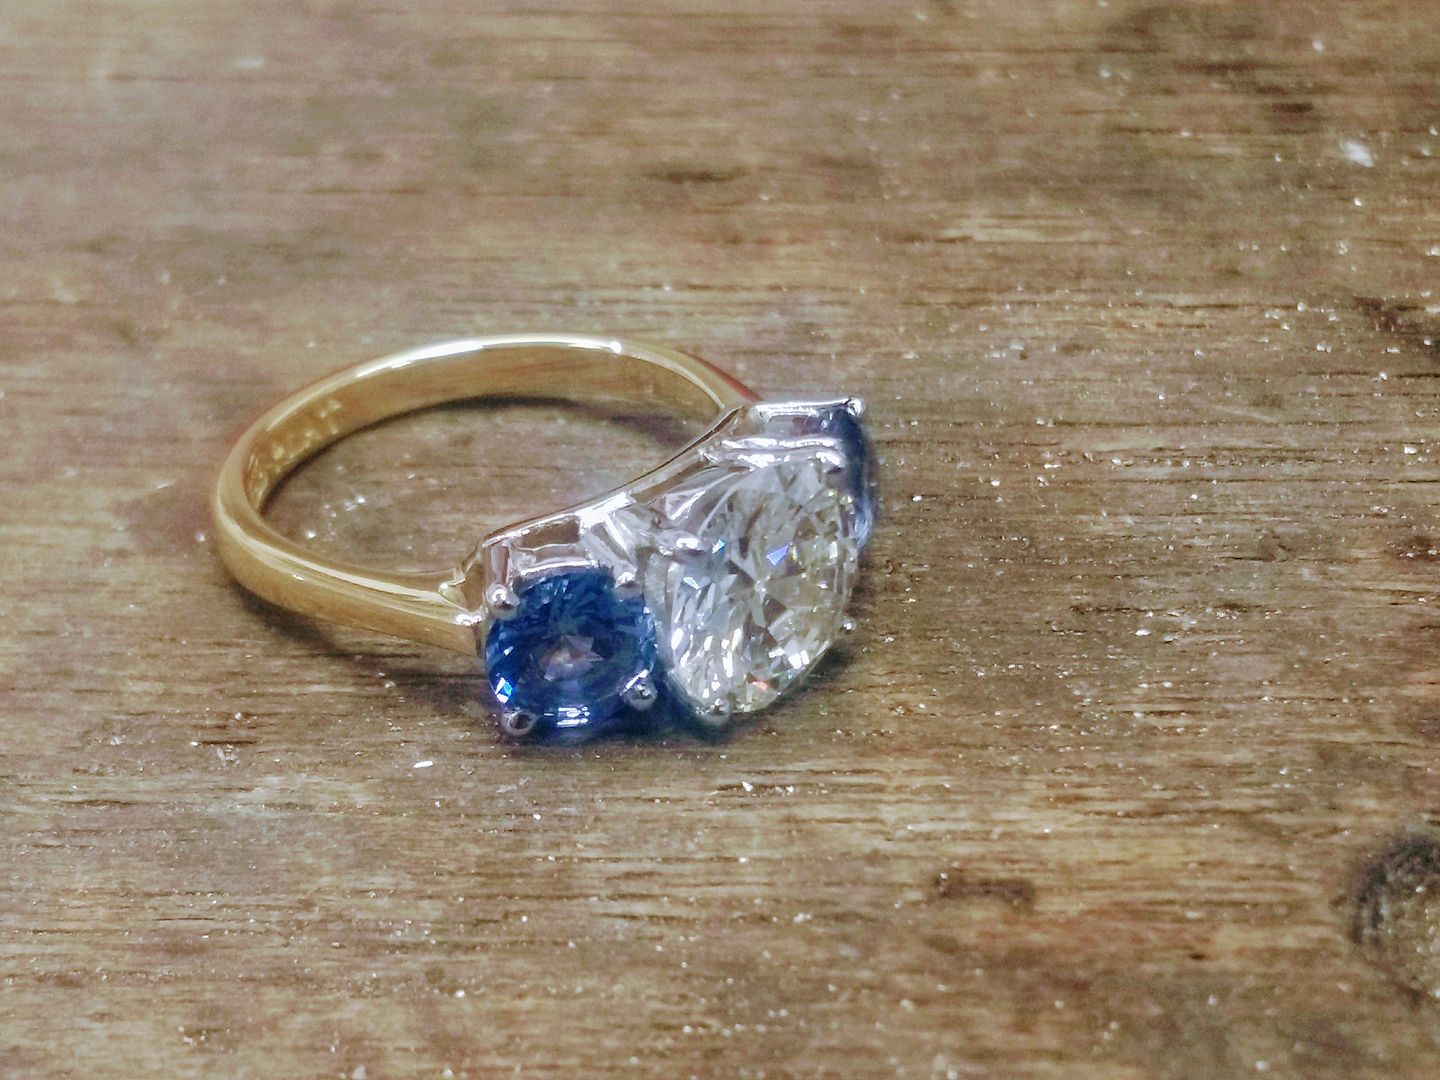
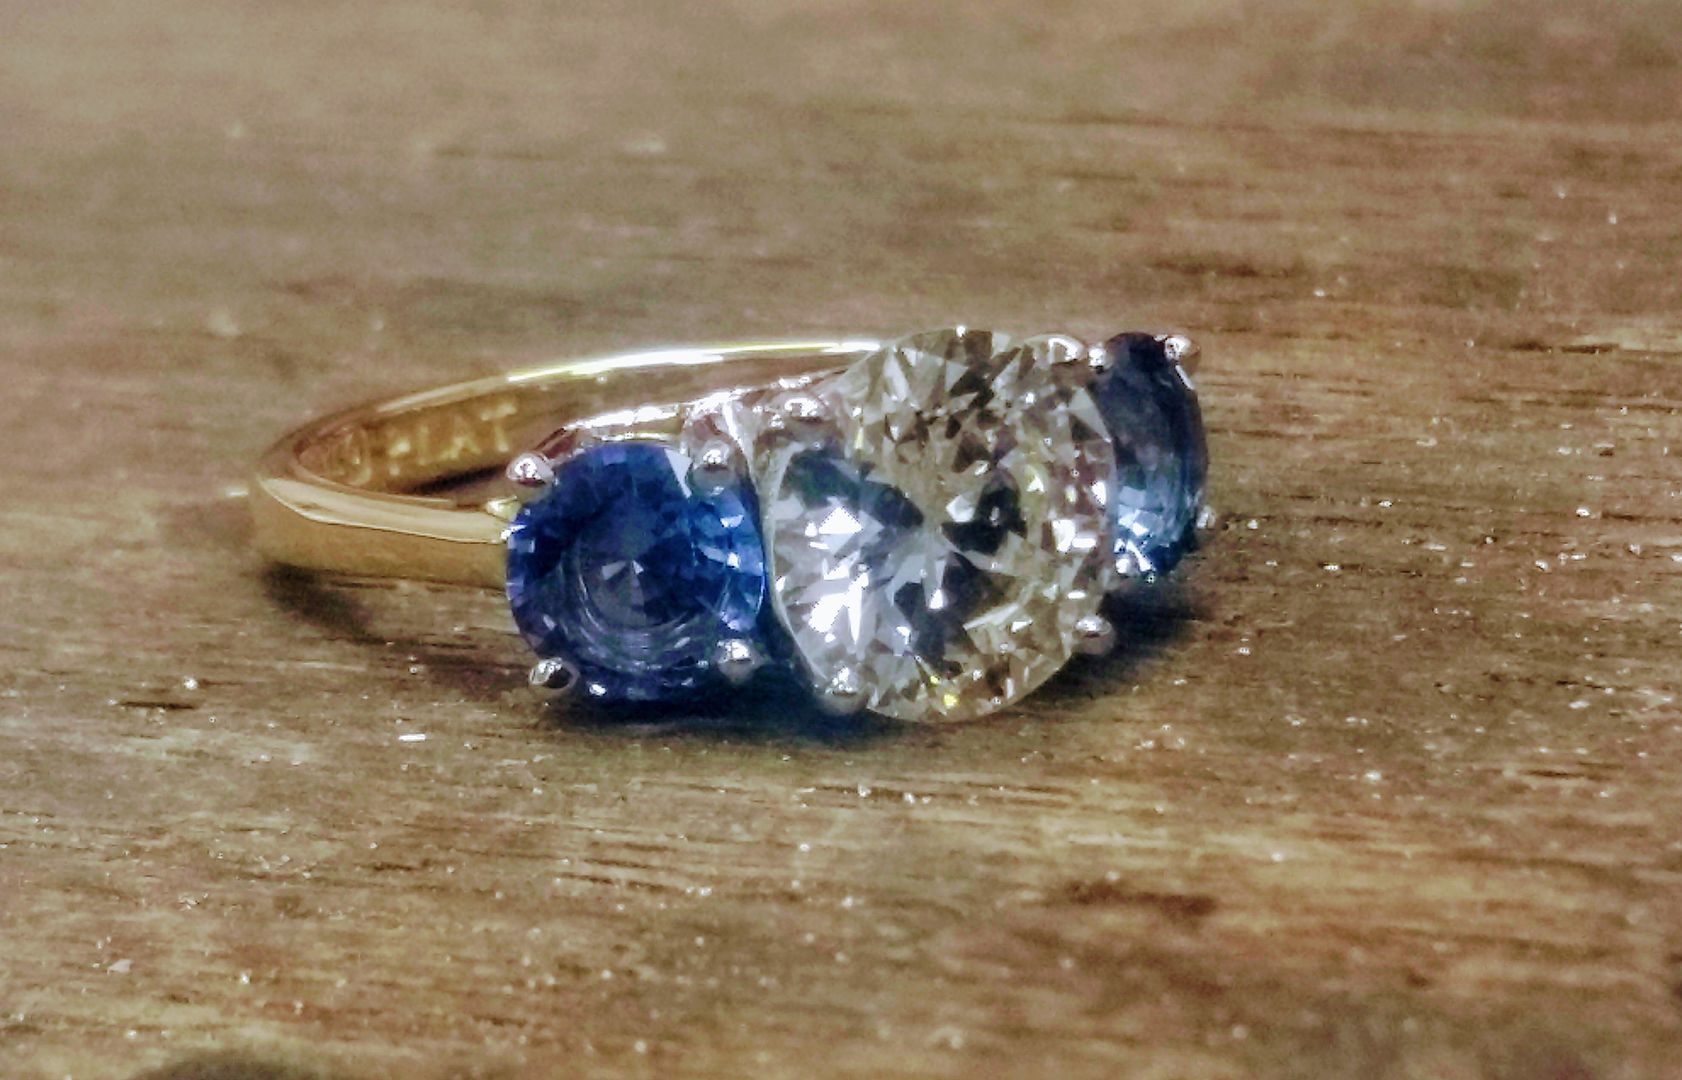
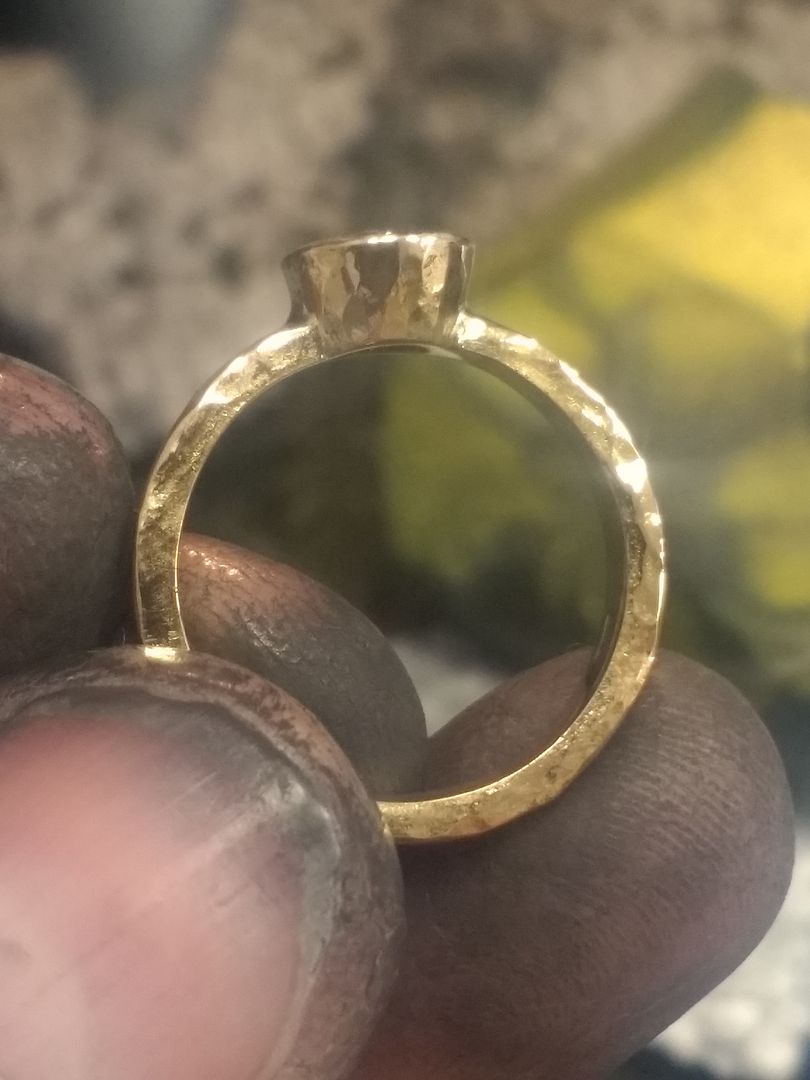
The ring is then fully polished and double checked for security and fit. Not a bad job I don't think


The ring is given a bit more of a tidy and some additional solder to boost the areas I tacked yesterday.

The sapphires need to go in first so I notch the claws at the required height.


The first sapphire is laid in and the claws pressed over the edge.

And then the second......

The claws are cut with a fine saw (also awesome at chopping thumbs) to reduce the length:

With a fine file the tips are rounded off and pressed with a domed graining tool:


With the sapphires in place the diamond is next to go in. The girdle is not totally level on this stone so I have to be very accurate with my cut to ensure the diamond sits as level as possible:


Using the same process as before the diamond is secured in the mount:


The ring is then fully polished and double checked for security and fit. Not a bad job I don't think


HIS LM said:
Wow your work is stunning, I need a ring for the Mrs I have no gems to bring in but if I let you know the gems required would you commission to order - pm if it's easier
Out of interest the sapphire and diamond ring what is that worth ?
Yup, that's pretty much what I do. You decide what you want and I give you options in and around the request. PM is the way forward..... Out of interest the sapphire and diamond ring what is that worth ?
Ref the value, it's being assessed this week. Easily in 5 figures, probably 2 or 3 multiples of 5 figures.
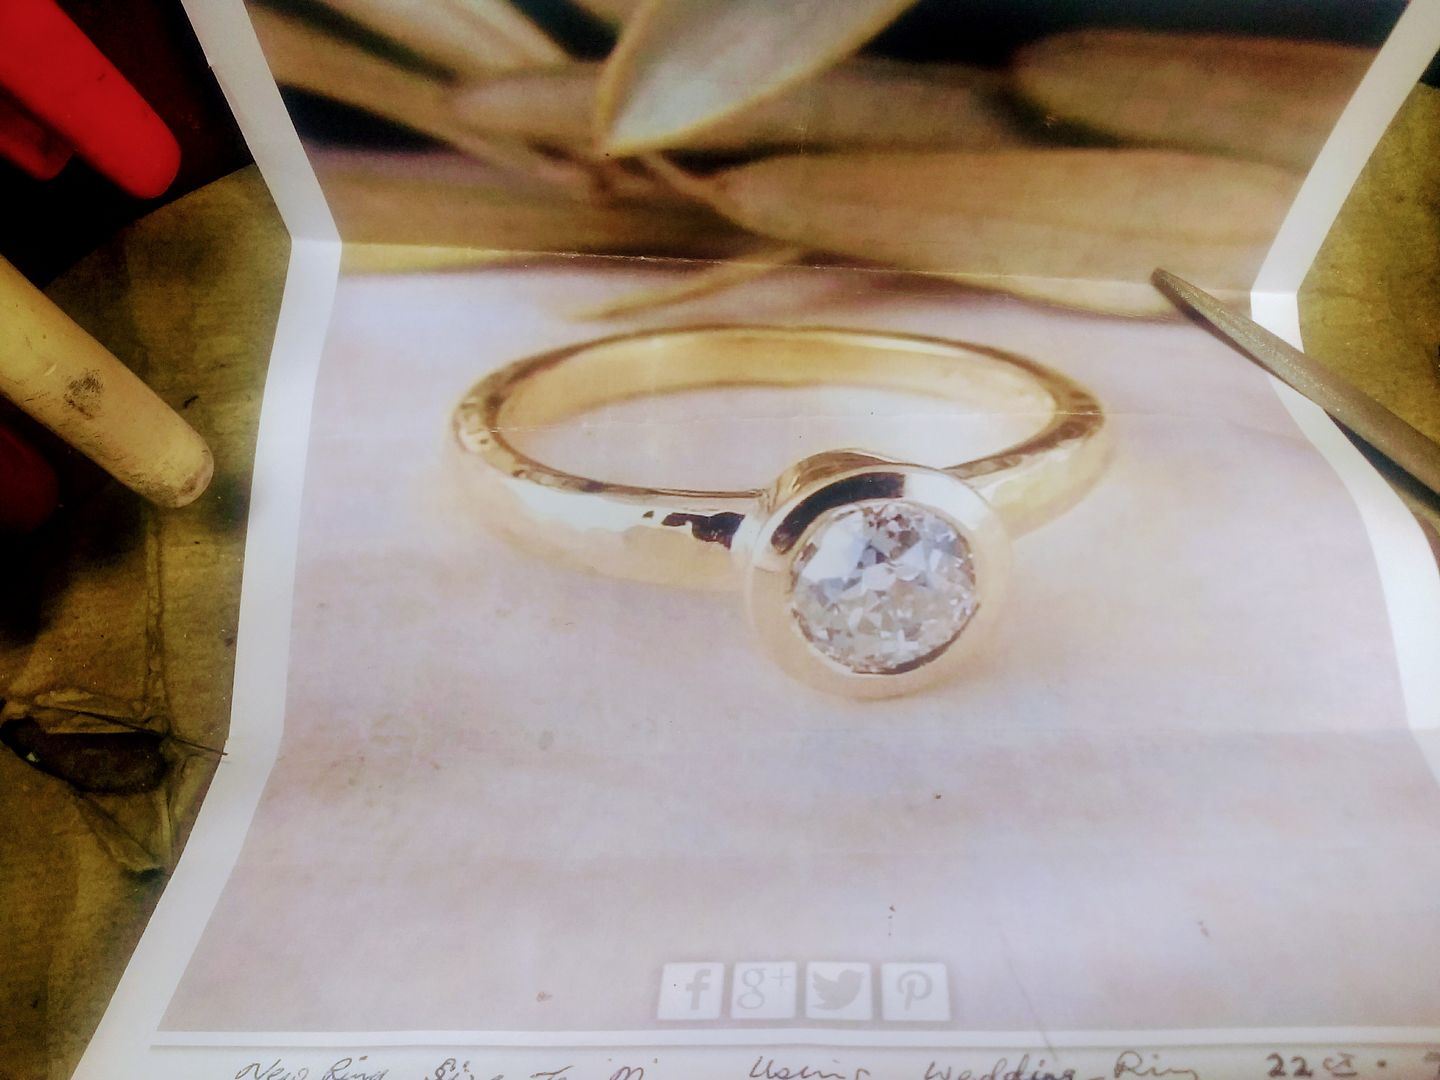
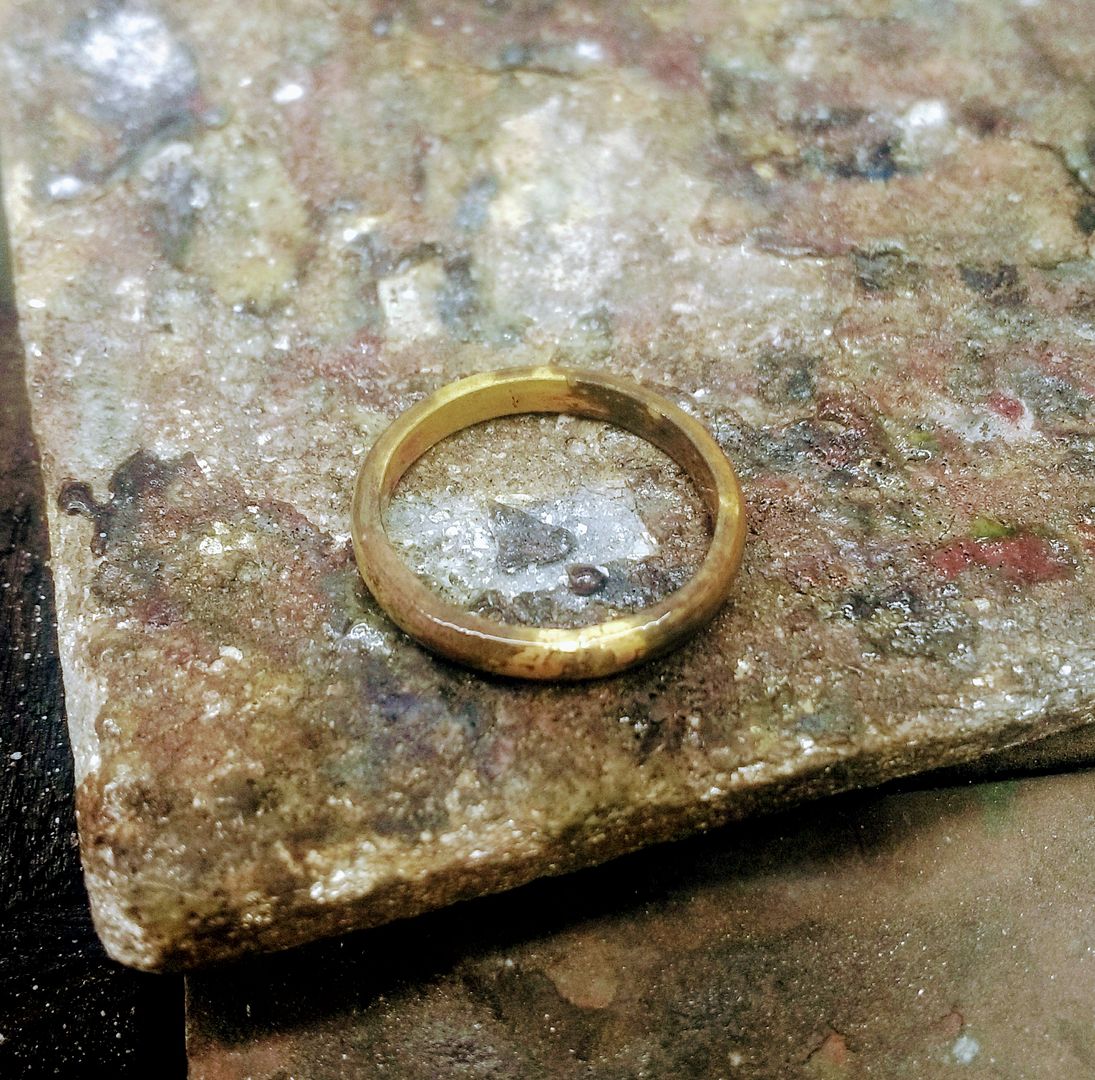
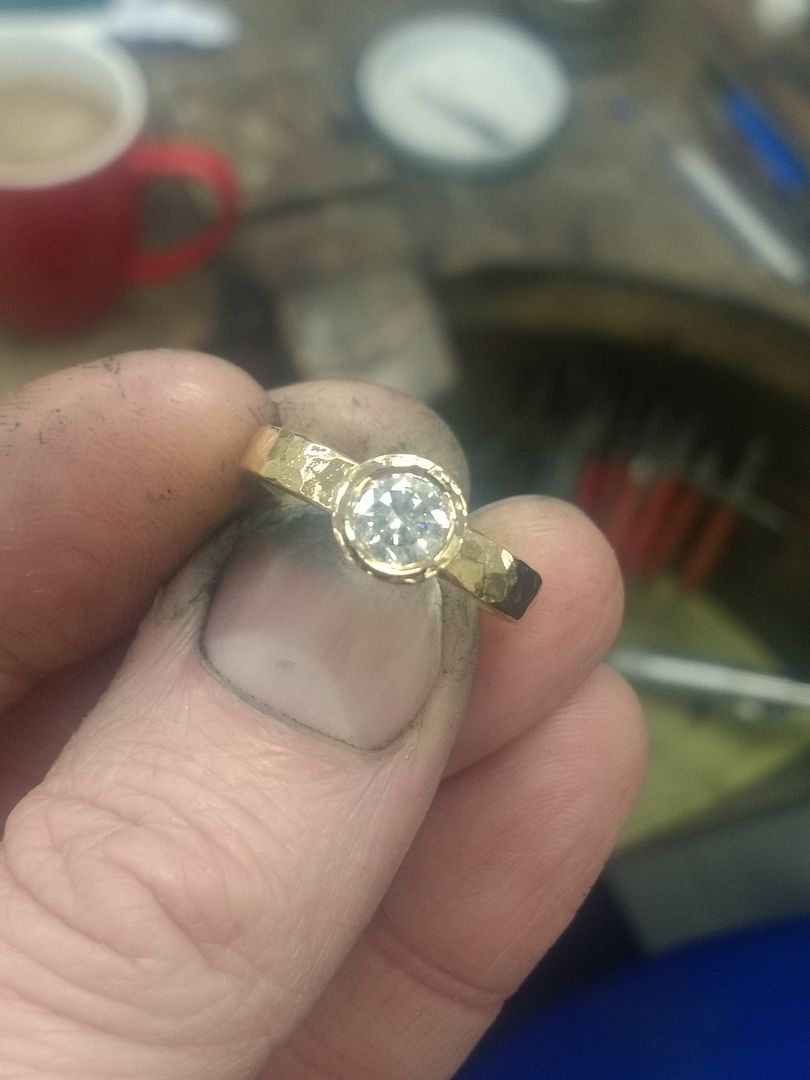
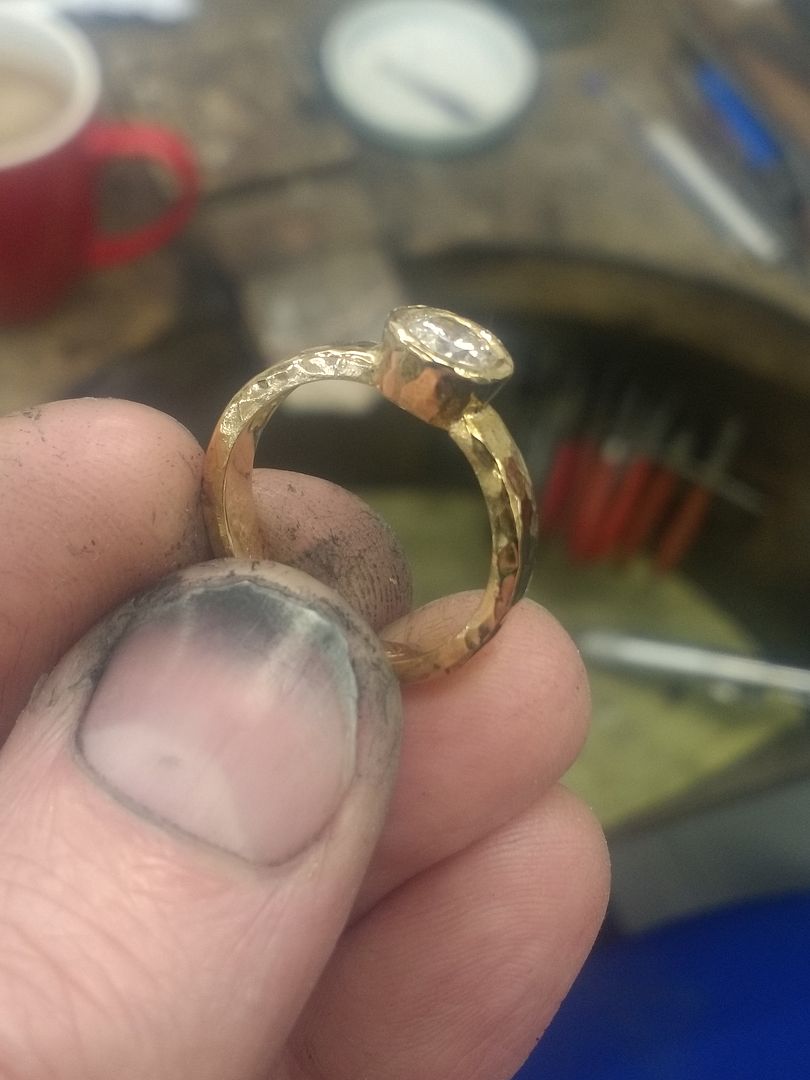
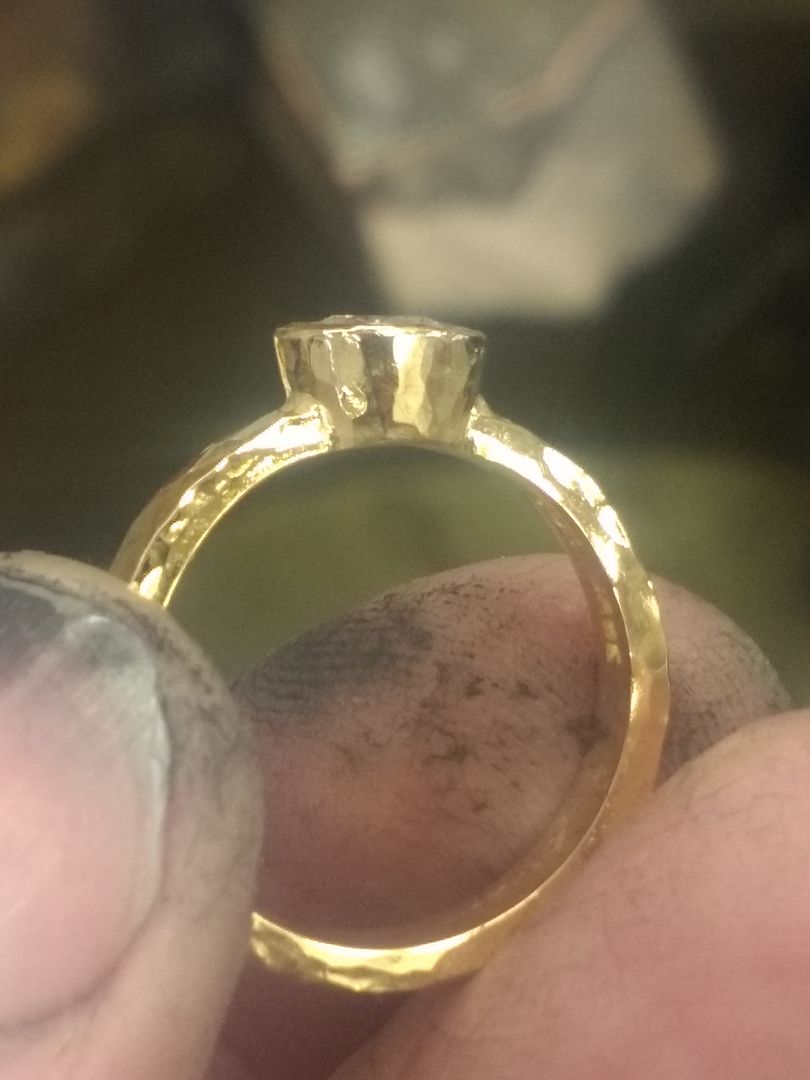
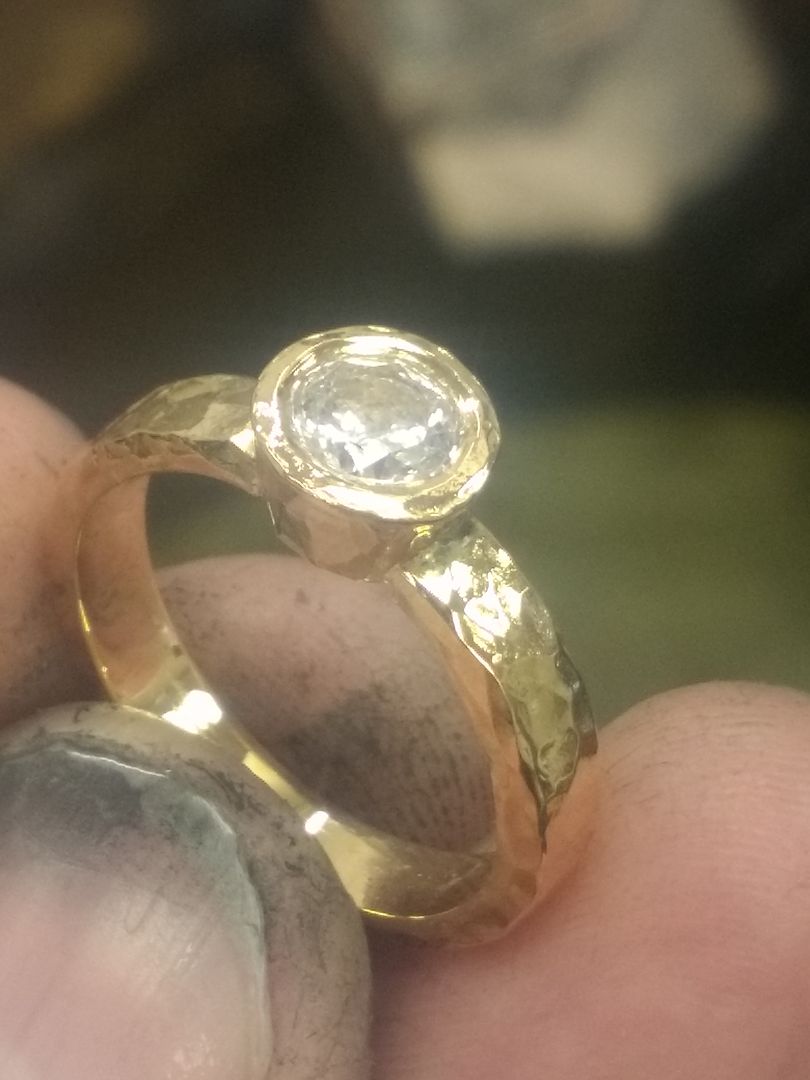
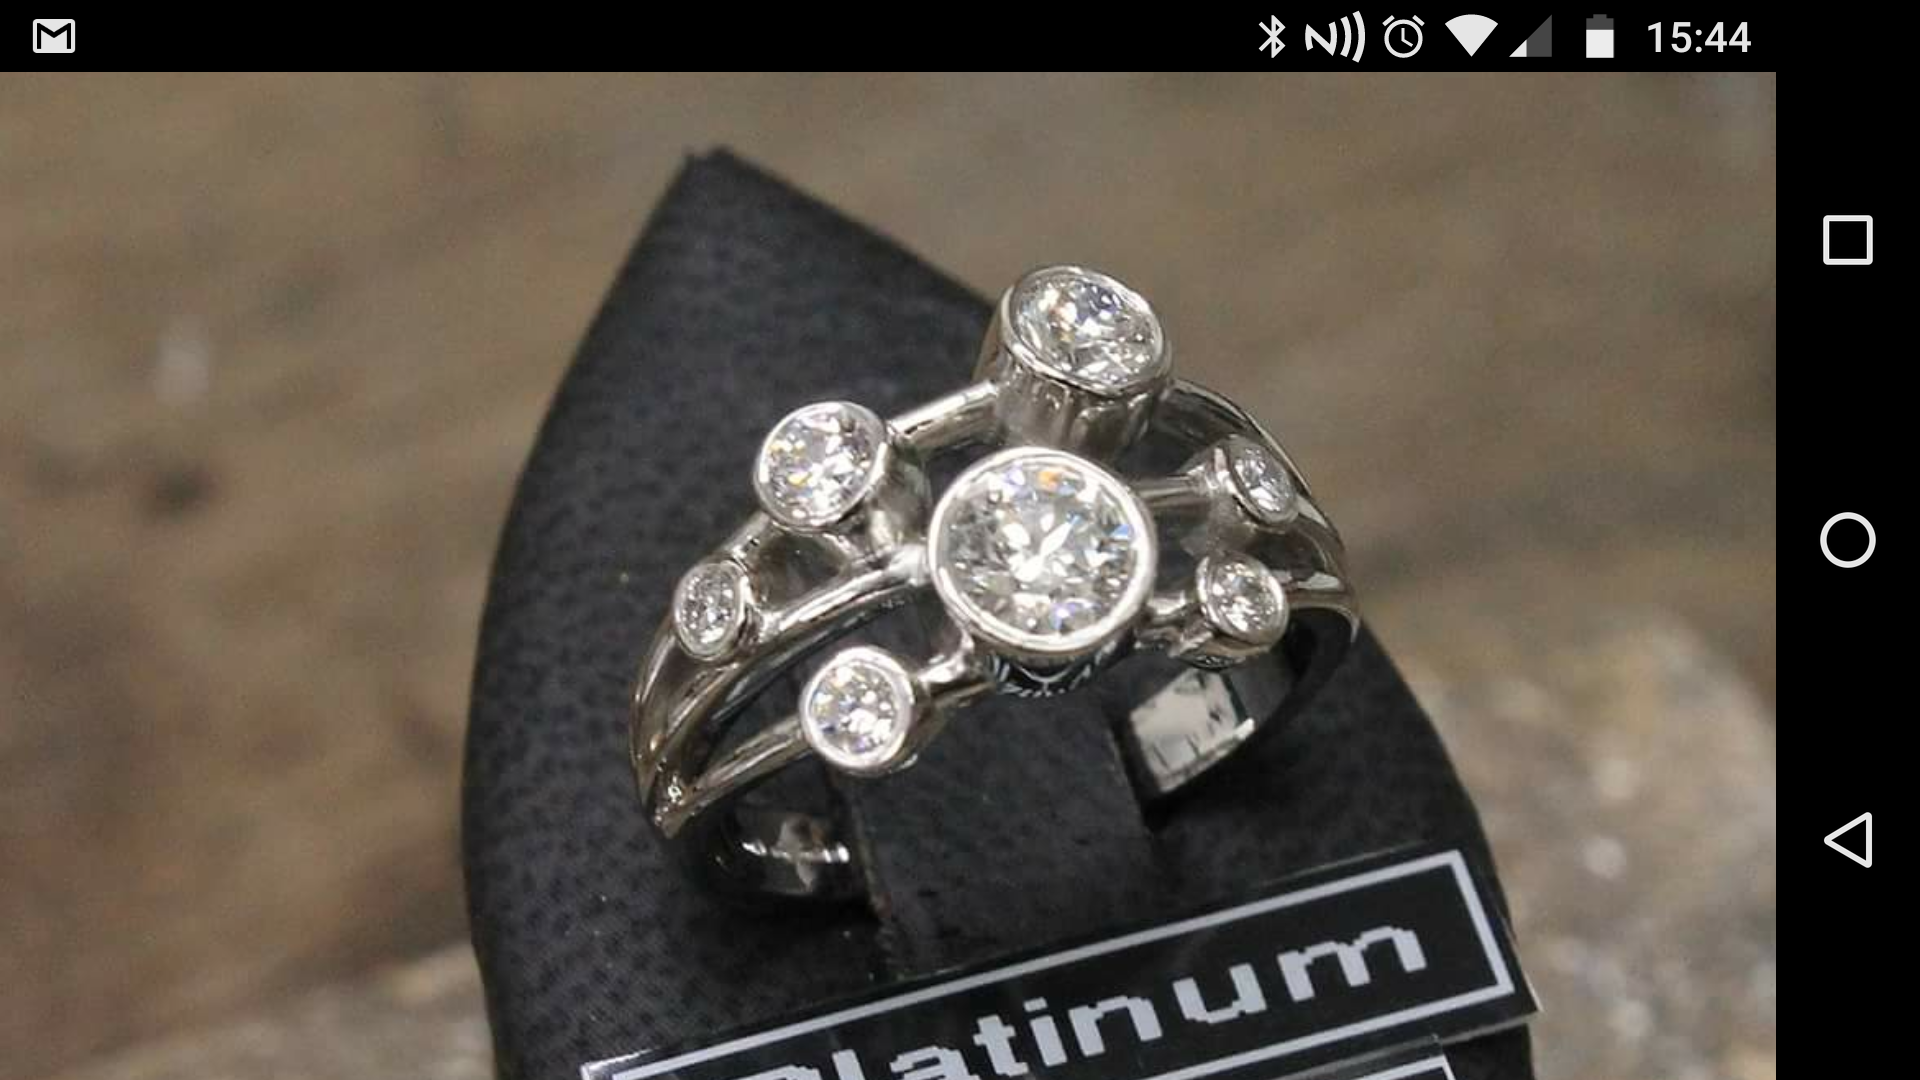
Another sentimental job on the bench today. A customer got in touch and asked if I could make a ring similar to the one in the picture using her inherited 22ct wedding band an a loose 5.8mm diamond that she had. Here's how it went.....
The guide image:
And the band:

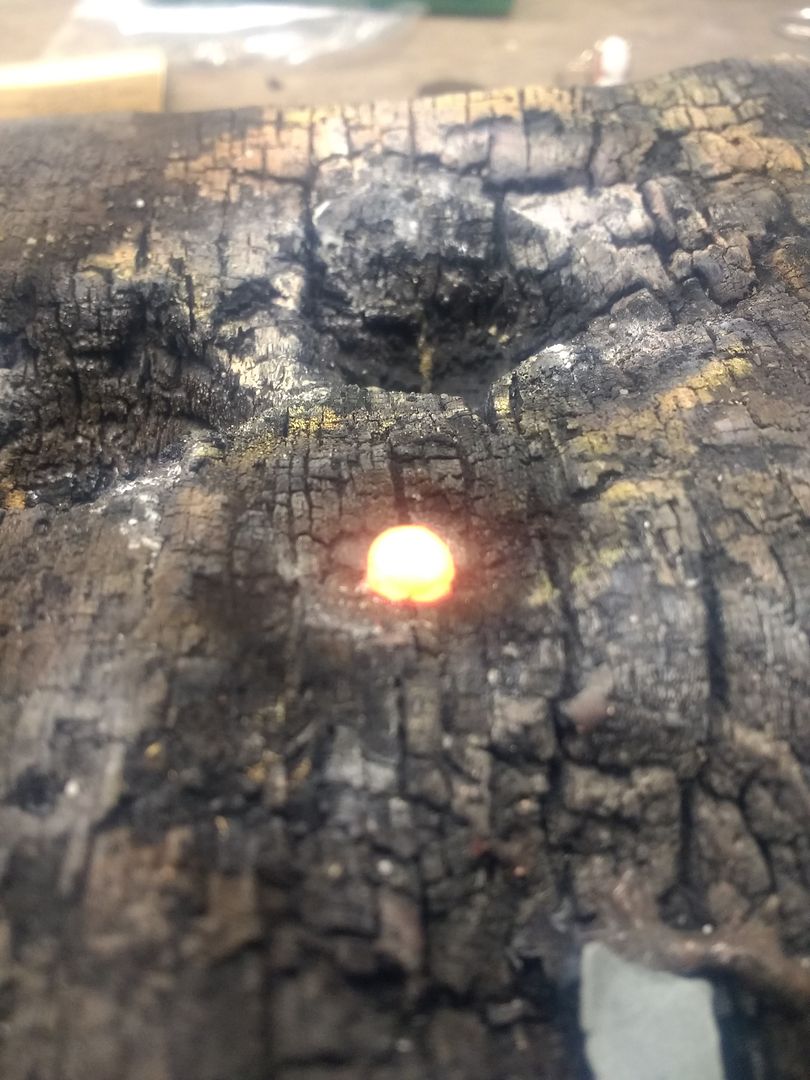
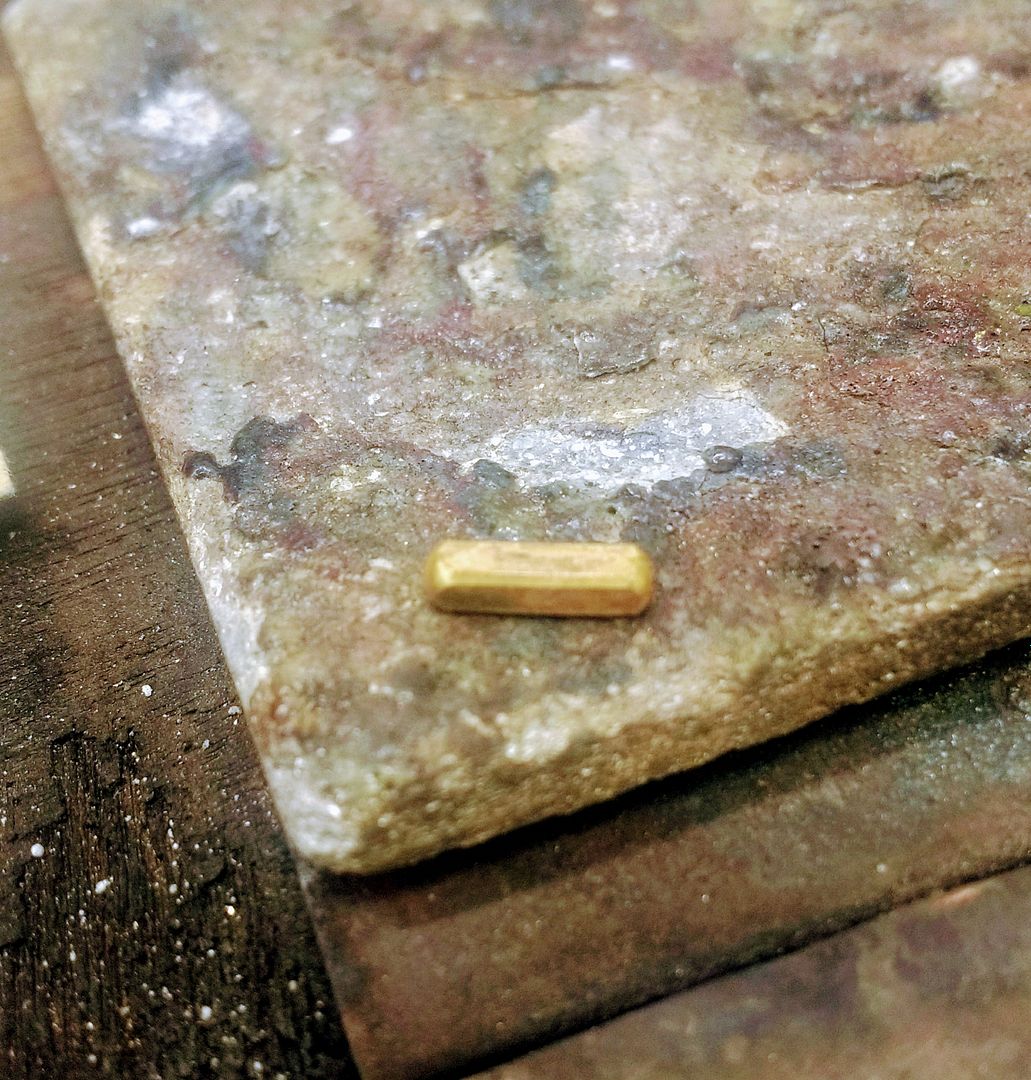
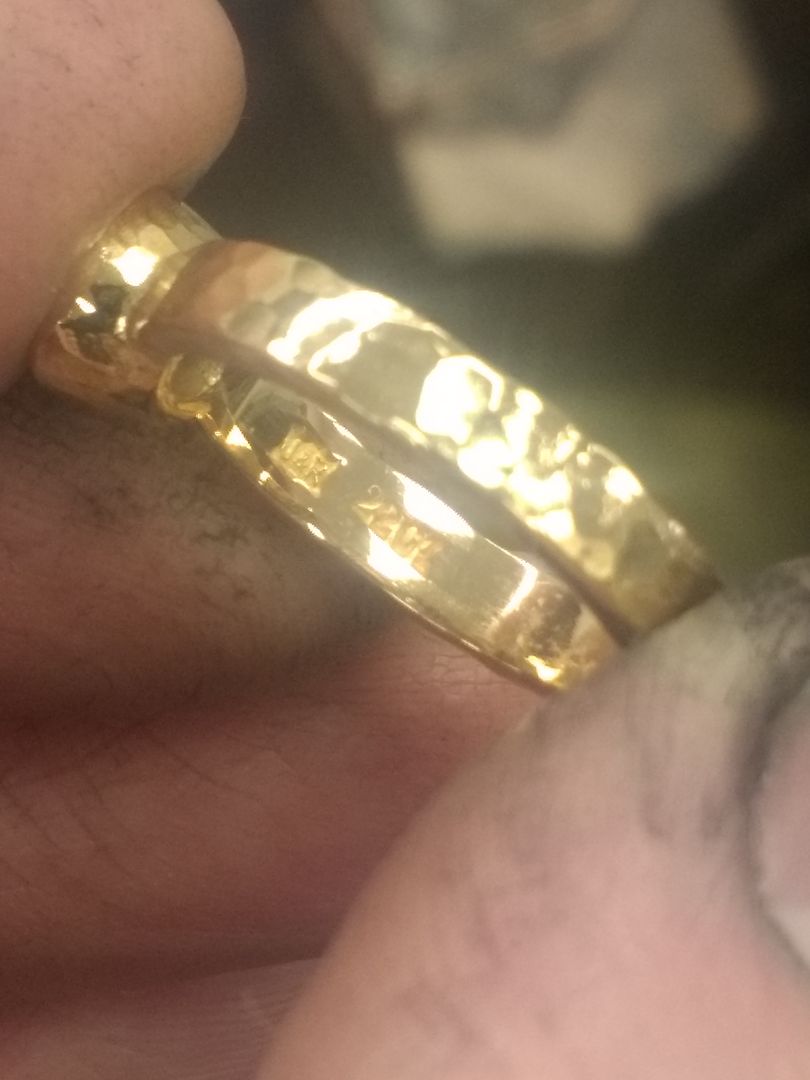
The band is melted down and then rolled to 2.7mm x 1.8mm D shape.
And stamped:
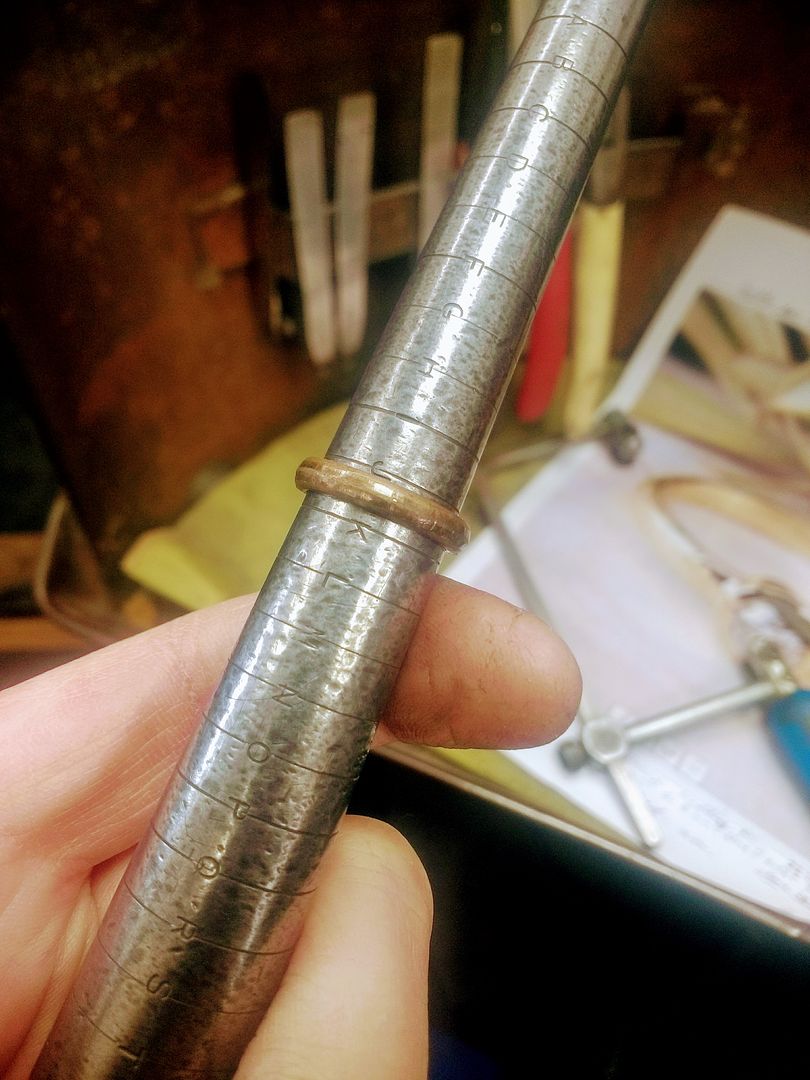
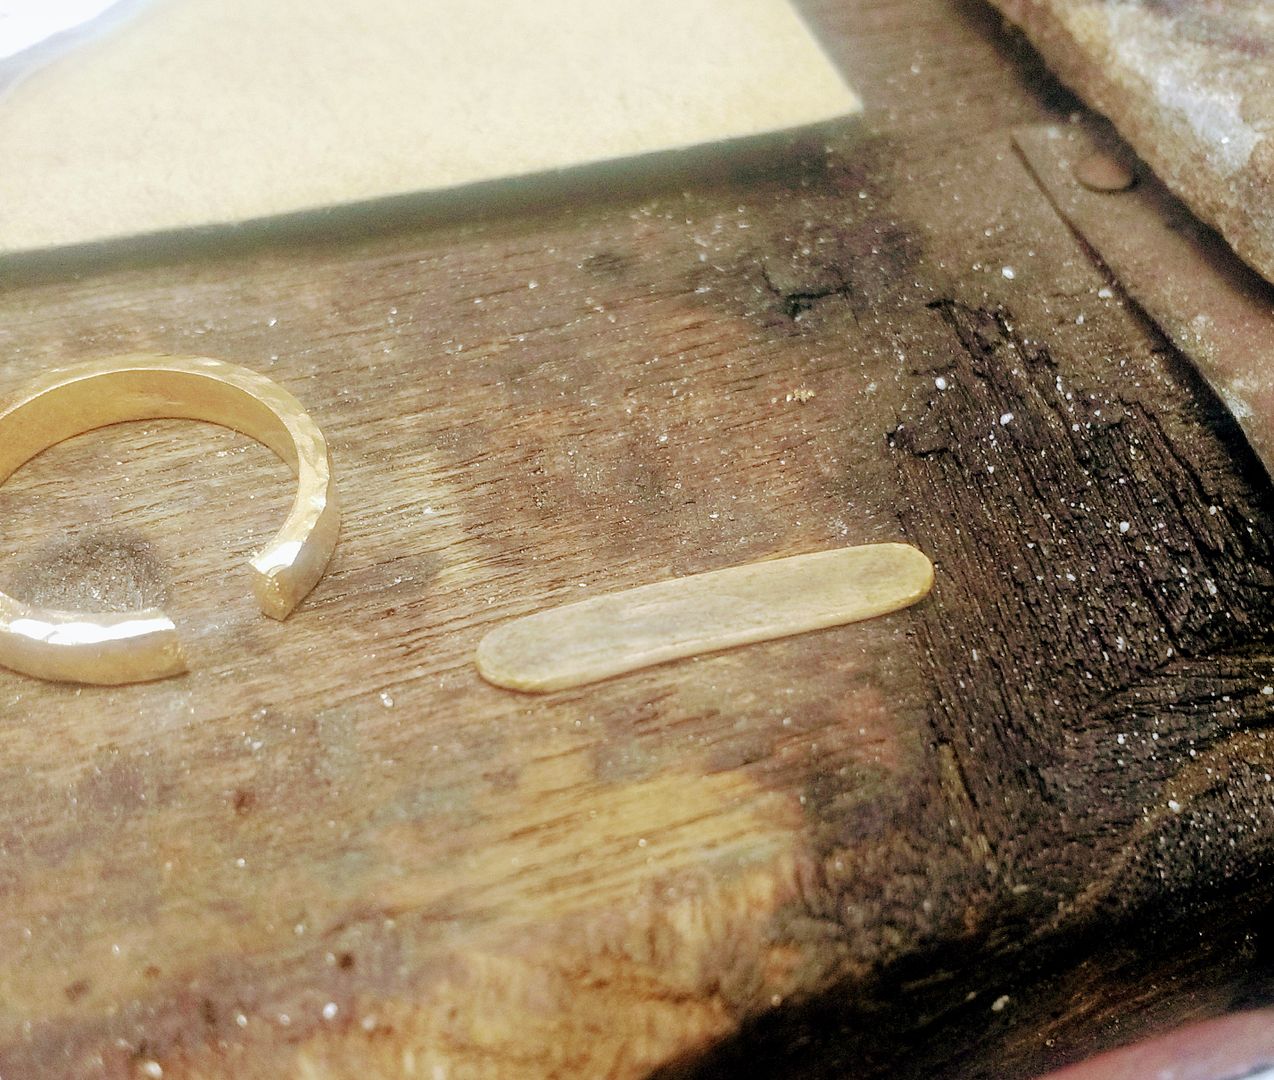
The wire is then turned to a band:
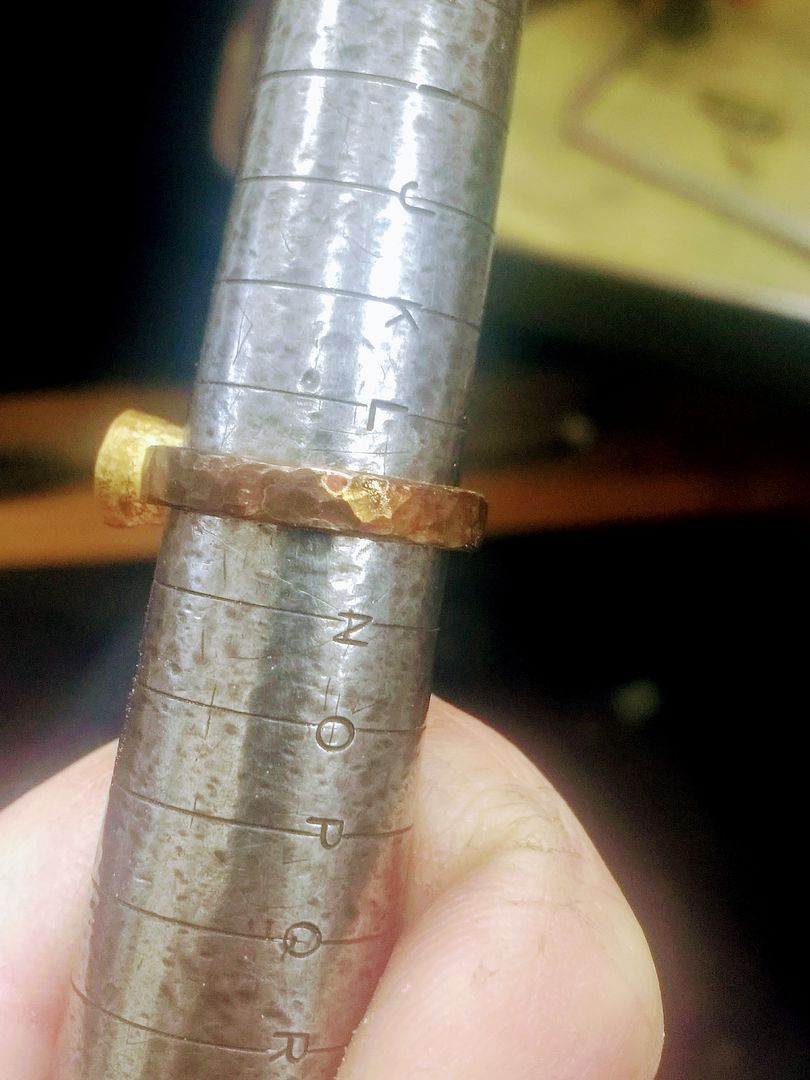
The ring is to be a size M once finished but because it needs a hammer finish I make it a few sizes smaller to account for the beating it'll get:
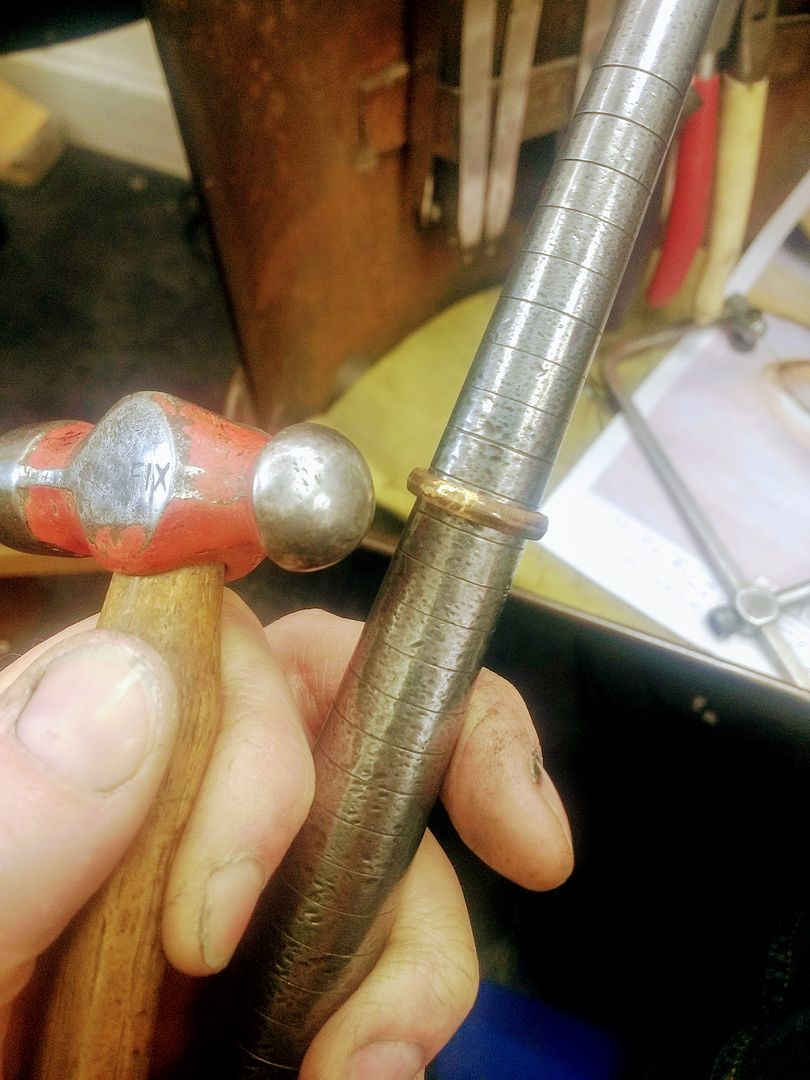
After some gentle tickling:
The off-cuts are then melted again and rolled into a plate:
Next I make the setting for the diamond. The plate is turned to make a roughly 5mm tube and soldered together:
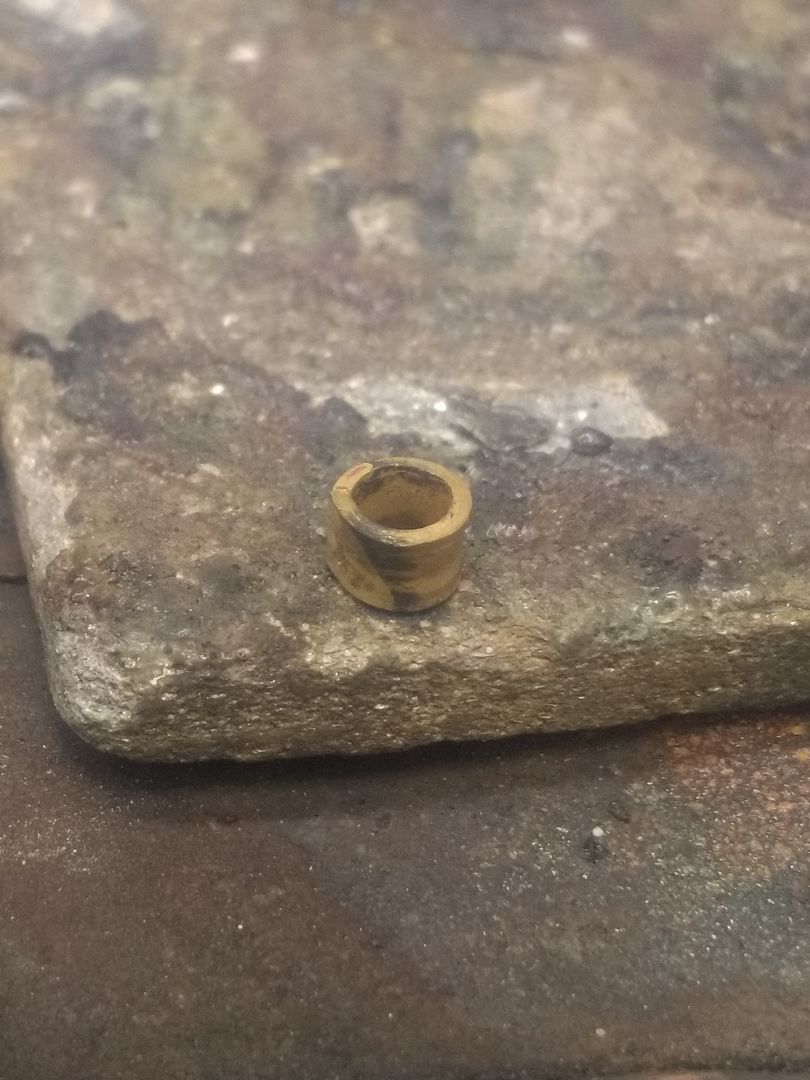
And then pressed into a cone shaped mould to form a taper:
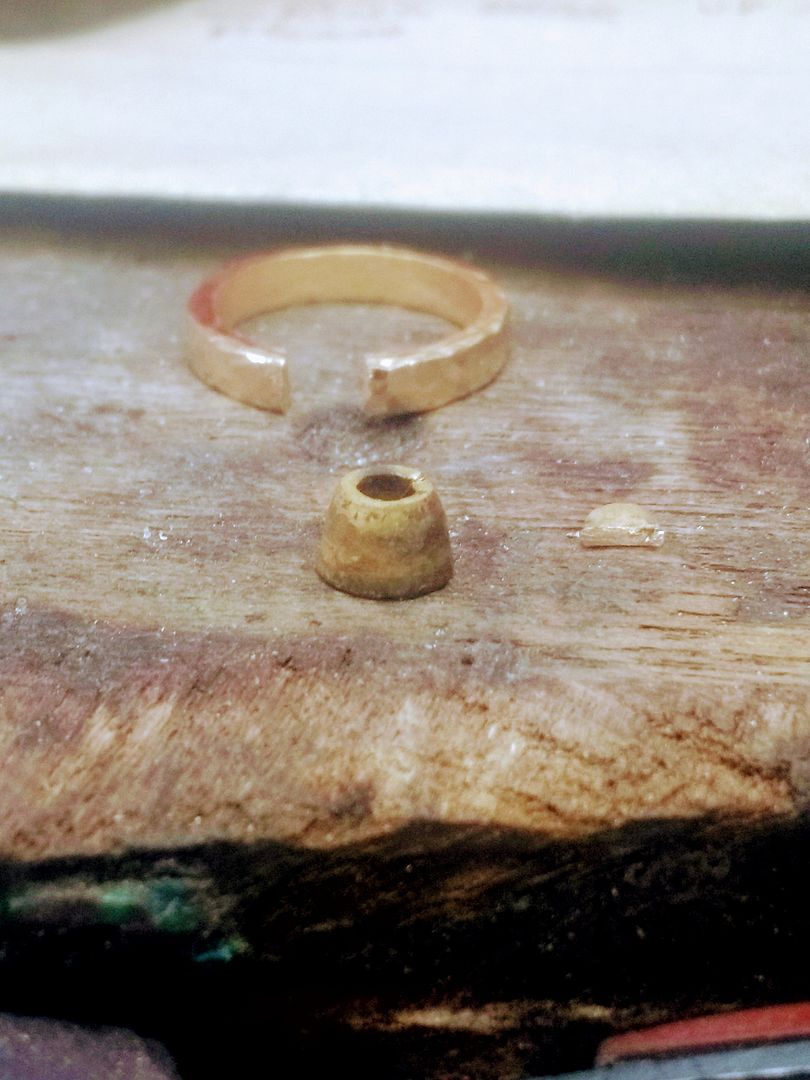
The cone is then treated to the same hammering that the shank took, until it;s the right size for the diamond:
The shank is cut to fit the setting:
And it's soldered in:
The little split can be repaired during setting:
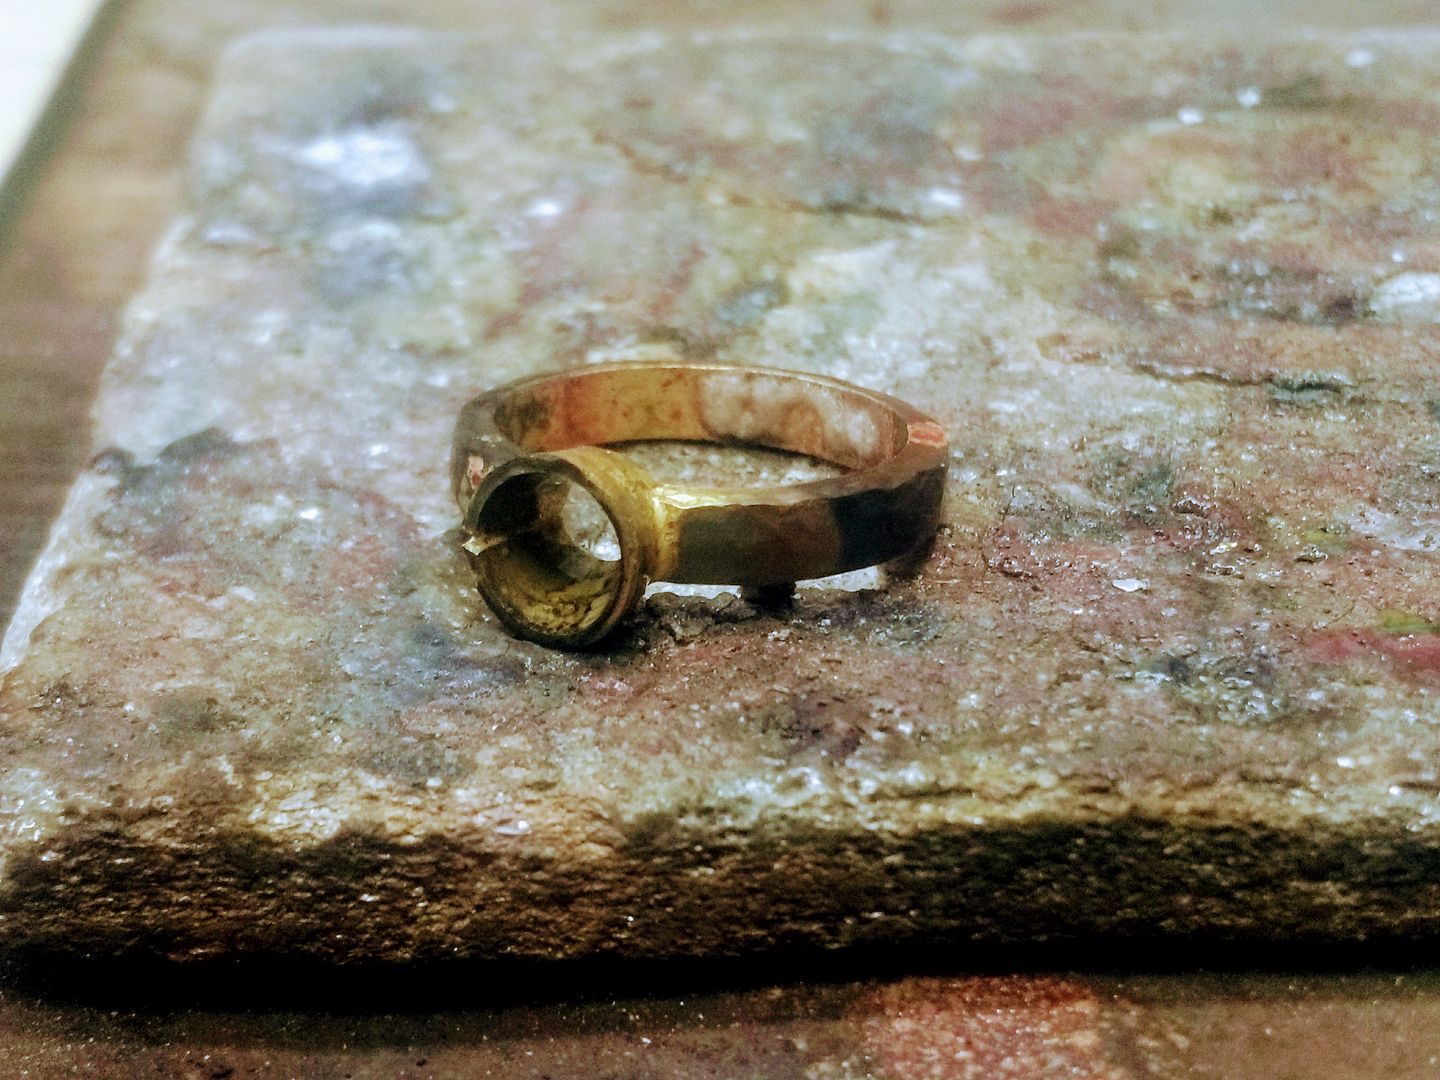
Size check:
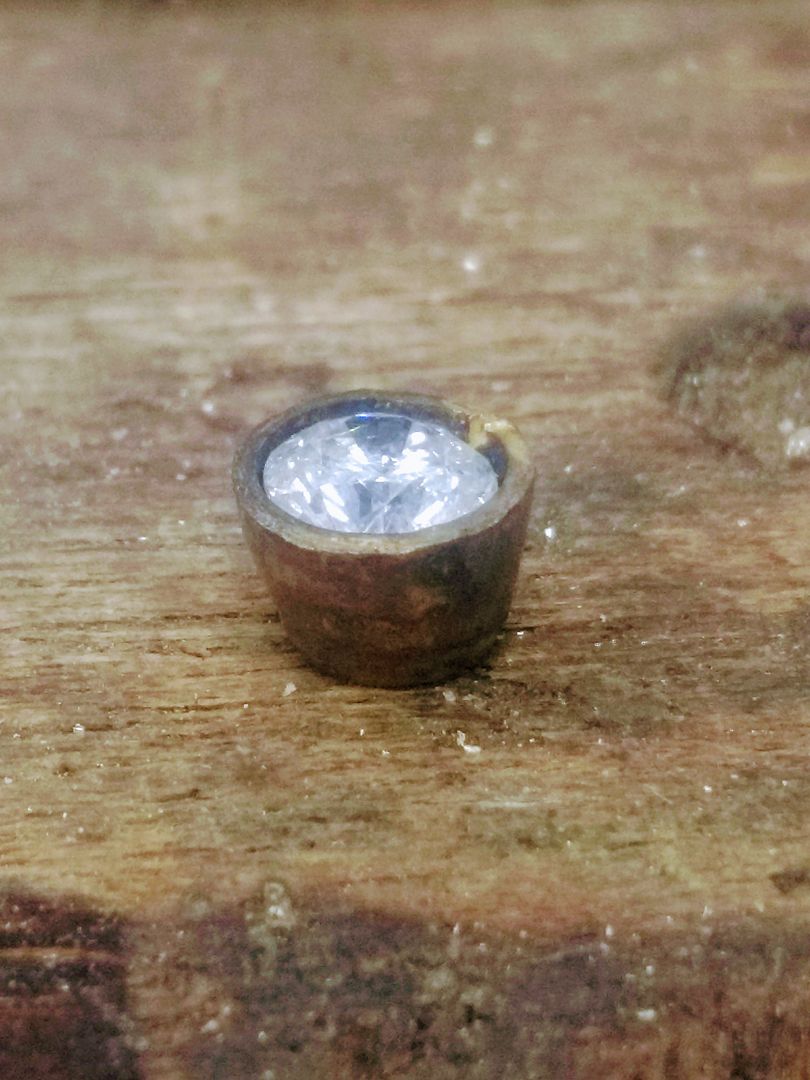
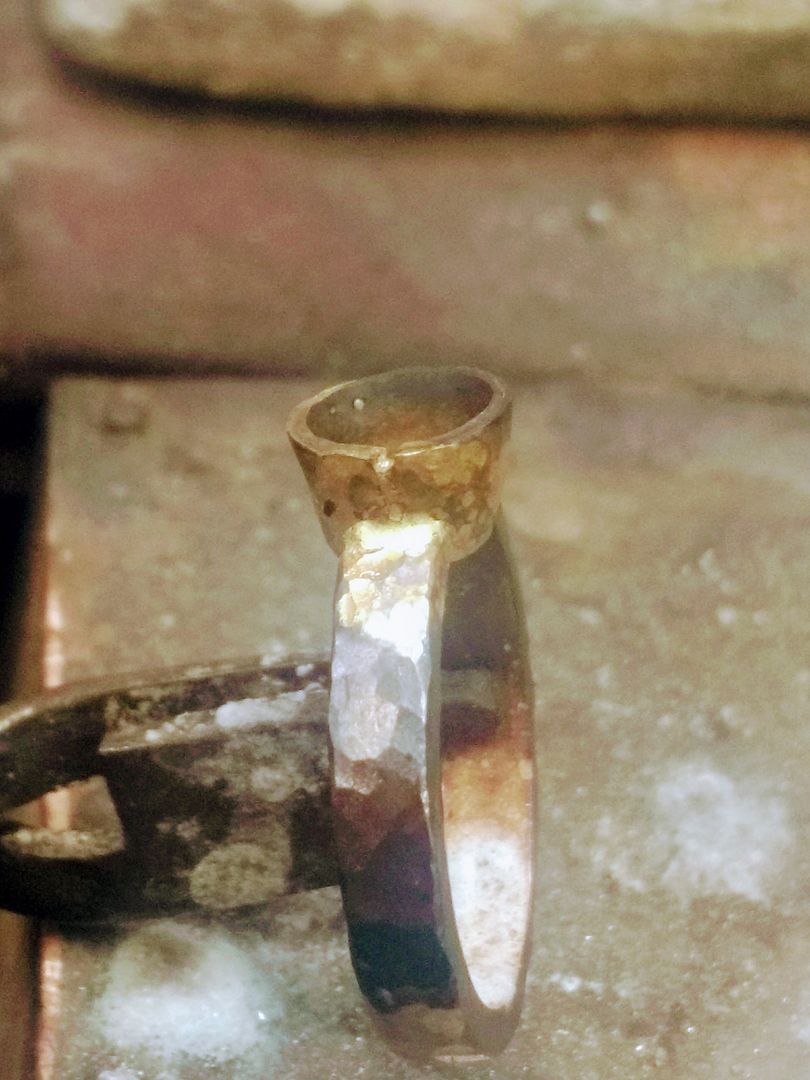
The inside of the setting is grooved to accept the diamond and the stone secured (and split repaired):
And the edge hammered gently


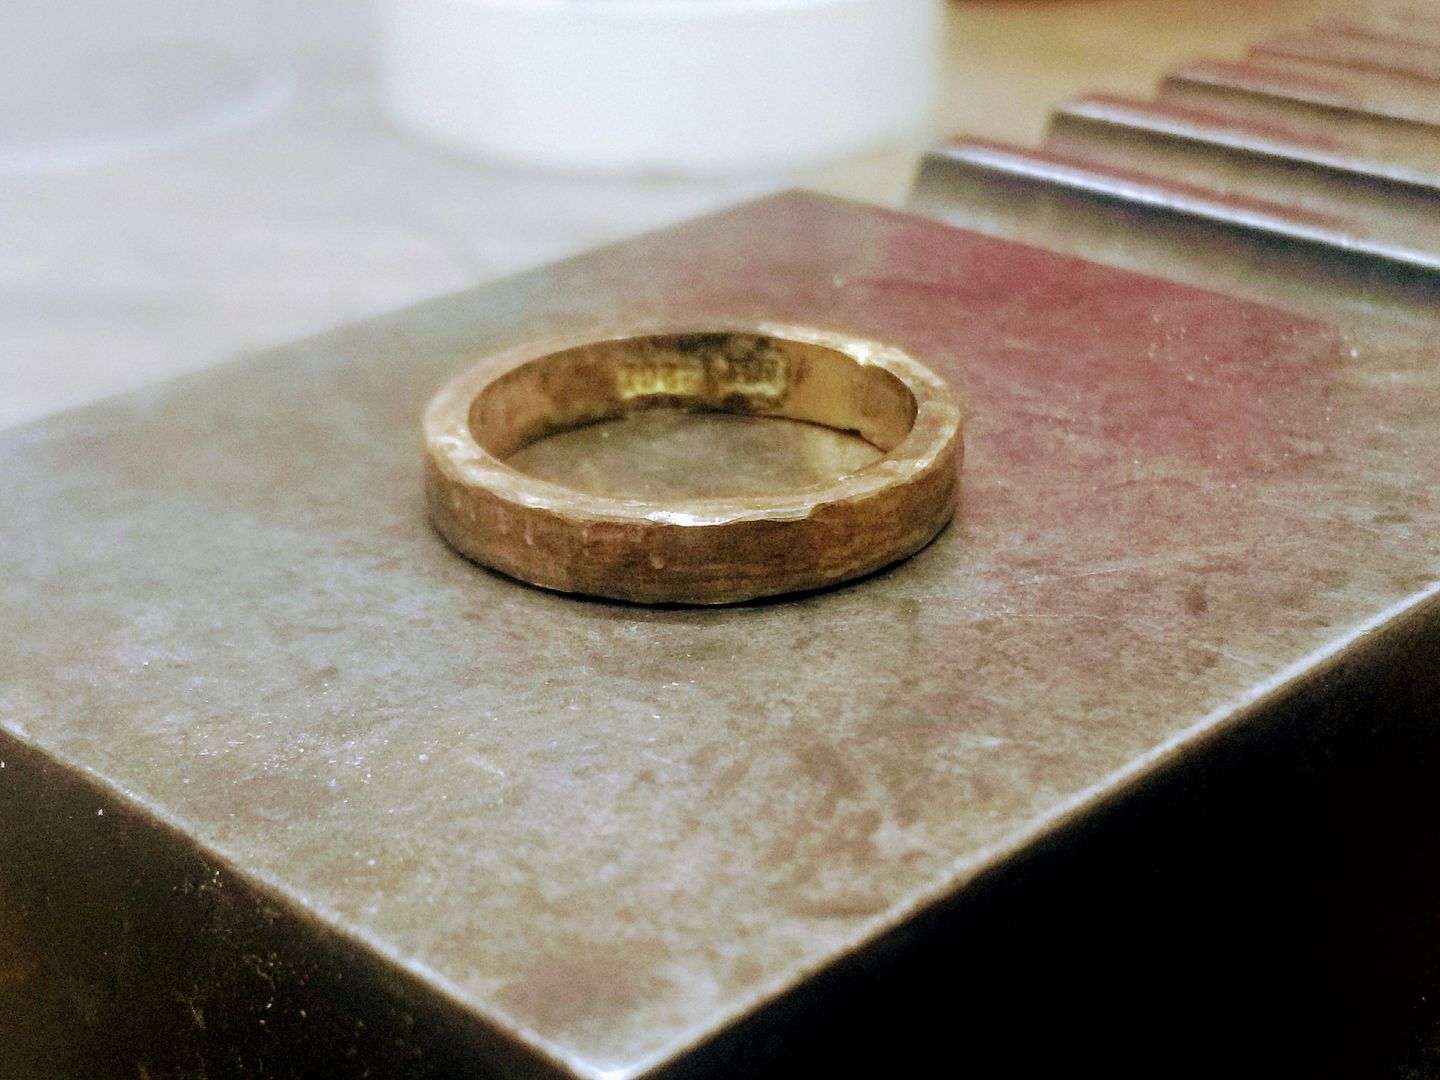
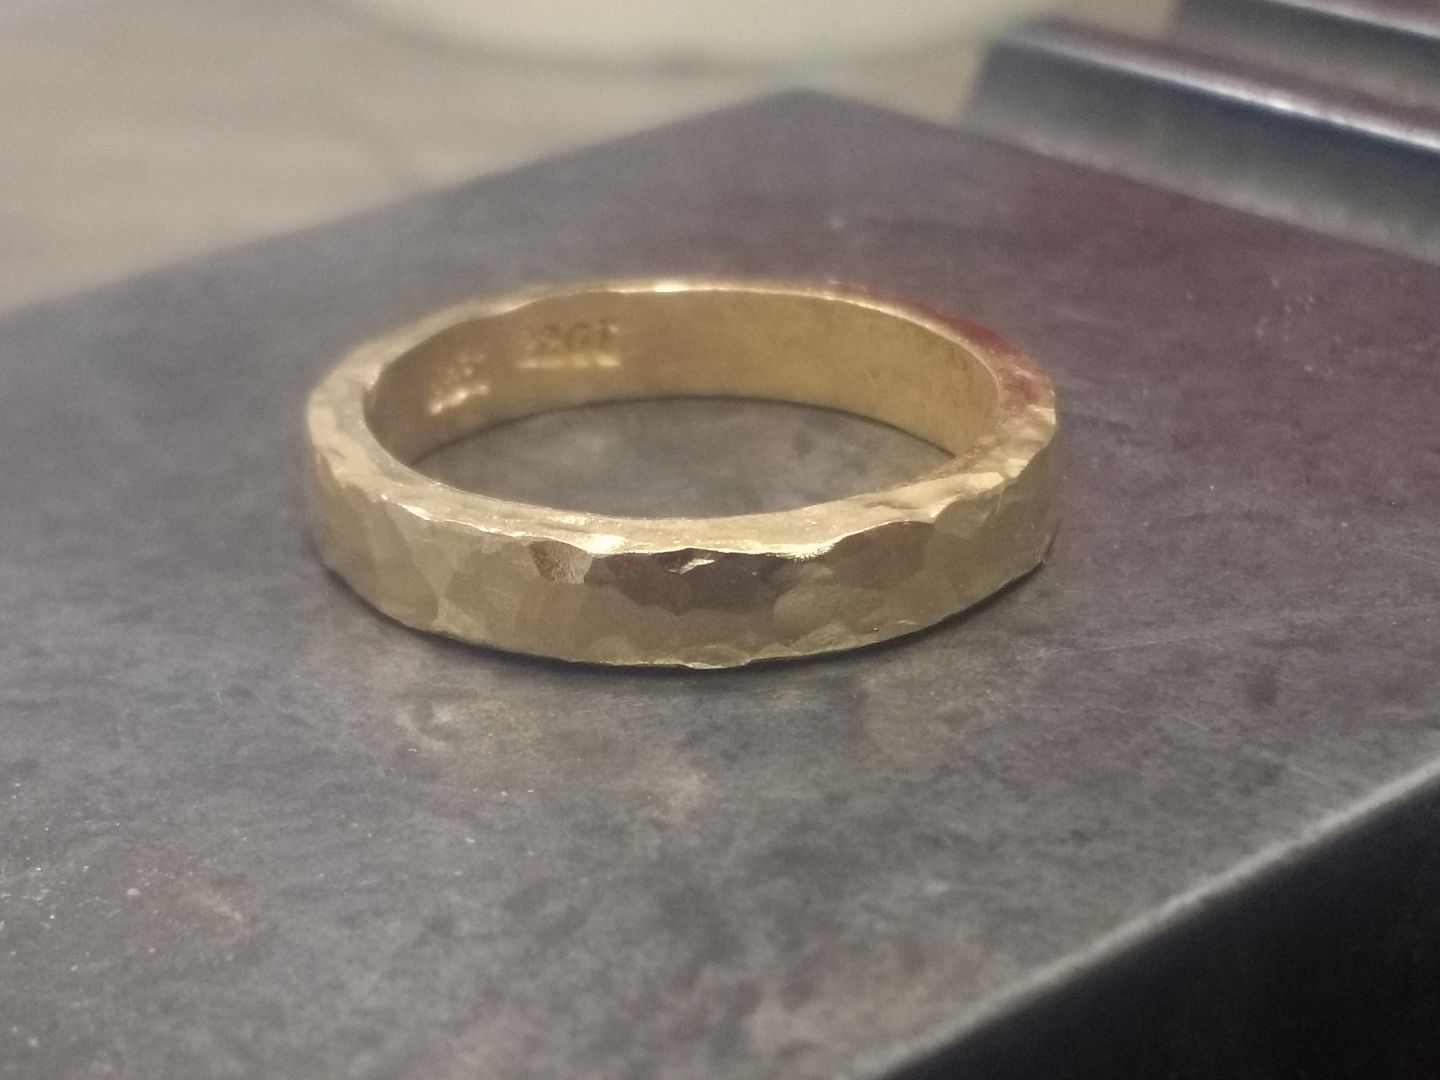
After a clean it gets a light polish to enhance the detail of the hammered effect:
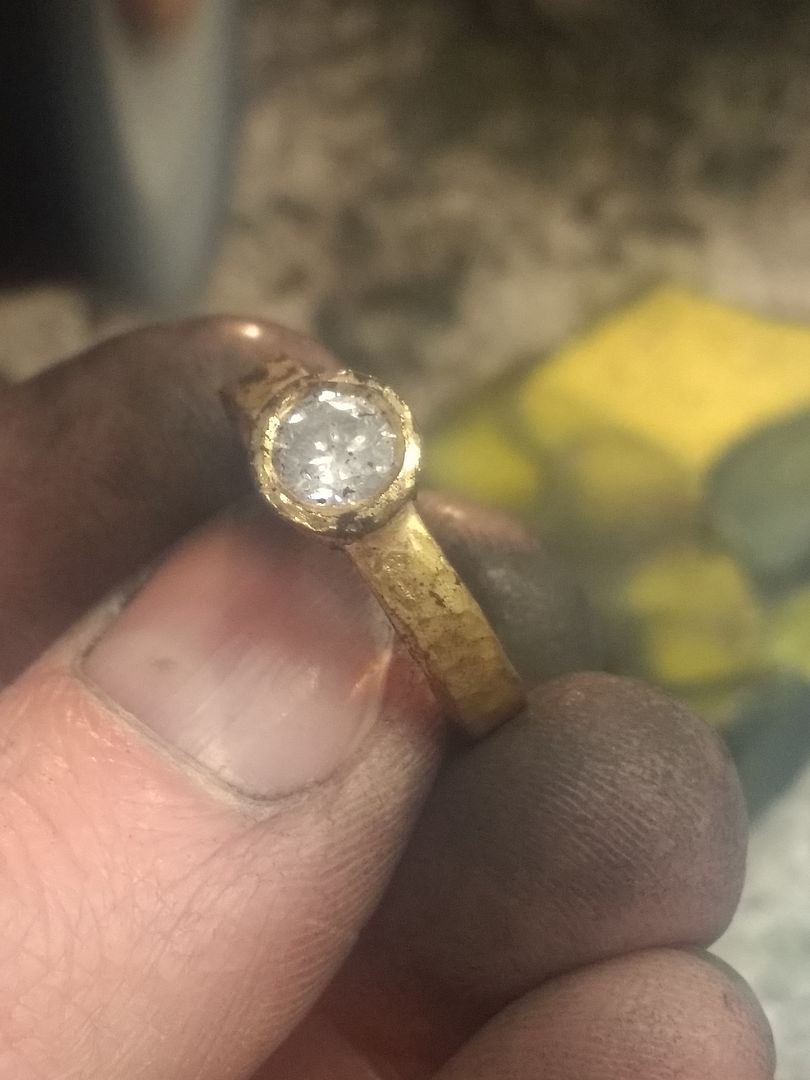
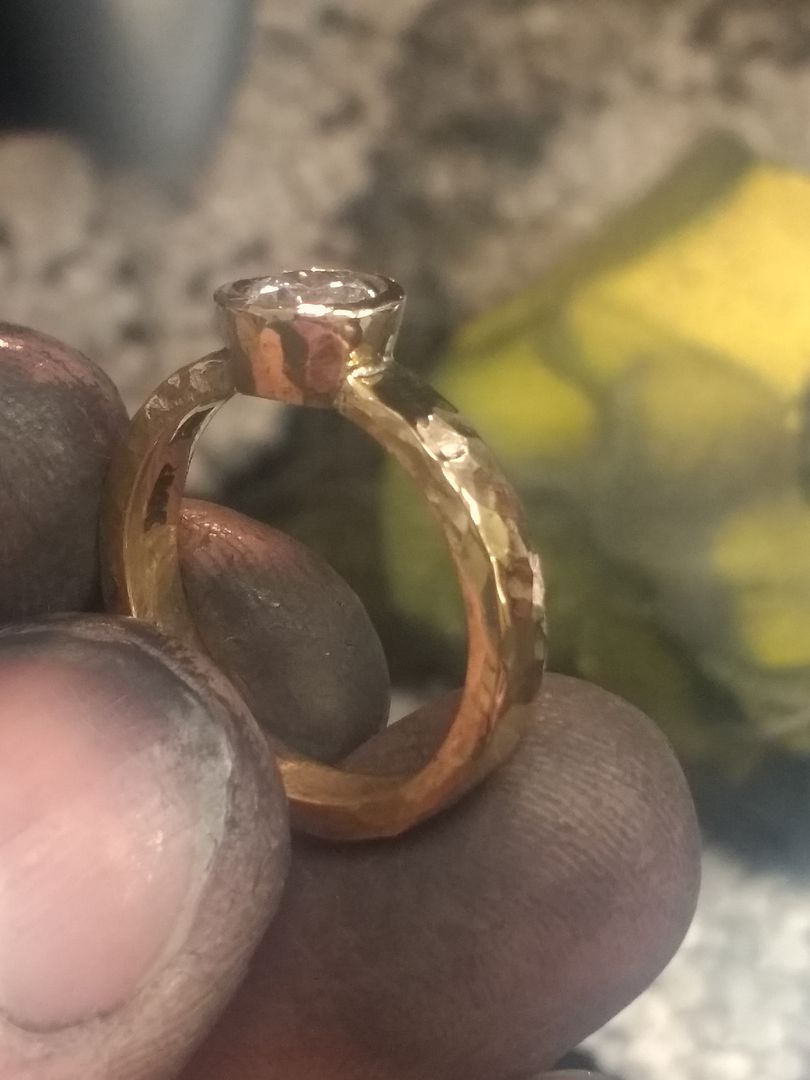
And it's done:

The guide image:

And the band:

The band is melted down and then rolled to 2.7mm x 1.8mm D shape.

And stamped:

The wire is then turned to a band:

The ring is to be a size M once finished but because it needs a hammer finish I make it a few sizes smaller to account for the beating it'll get:


After some gentle tickling:


The off-cuts are then melted again and rolled into a plate:


Next I make the setting for the diamond. The plate is turned to make a roughly 5mm tube and soldered together:

And then pressed into a cone shaped mould to form a taper:

The cone is then treated to the same hammering that the shank took, until it;s the right size for the diamond:

The shank is cut to fit the setting:

And it's soldered in:

The little split can be repaired during setting:

Size check:

The inside of the setting is grooved to accept the diamond and the stone secured (and split repaired):

And the edge hammered gently


After a clean it gets a light polish to enhance the detail of the hammered effect:


And it's done:


Edited by ecain63 on Tuesday 20th February 21:12


TravelsVeryRapid said:
Just discovered this thread Eddy, I used to do the same job as you. Retired about 2.5 years ago, looks like you are doing some good work there.
Steve.
Hi Steve,Steve.
Where did you work?
It's not often you come across proper jobbing jewellers outside B'ham and London these days. Very much a dying art, thanks to the internet and the invent of cheap, throw away jewellery.
Hi! Long time no speak
Truth is it gets harder and harder to find "unusual jobs" that you haven't already seen. But, after 5 weeks of dross I've finally found something that you might actually read without falling asleep.
What's on for today then?
As with any shop, we can't always guarantee that we have in the window display exactly what a customer is looking for. We might be close with the stock options but sometimes close isn't enough. Luckily many of our window shoppers come in to see what we do and ask questions about the items.
This ring is readily available in 18ct yellow gold and in platinum but the customer could't gel with either. She wanted a bit more 'splash' on the finger too but without plumping for the near £9k range topper there wasn't anything off the shelf to suit. So what do we do?
After a chat we decided that we would swap the centre platinum band for an 18ct yellow gold section and also change the 4 smaller diamonds and settings from 0.05ct each to 0.13ct each. It's a fiddly job with the use of different metals and solders but with care it can be achieved to a budget and short timescale. All in the conversion took me about 3 hours.
Enjoy:
First the centre band is cut out. The slot needs to be tapered in order to accept the yellow one when it comes:
18ct yellow wire is drawn down and length soldered in place at one end. I've skipped a pic too and you'll notice that I've also cut out one small setting and soldered in its place a section of 4mm platinum tubing:
The opposite end of the ring also gets a length of 18ct yellow fitted.
Stage 1 complete, a bit of a clean and on with the complex areas:
With some more 4mm platinum tube I start to add in the other upscaled settings:
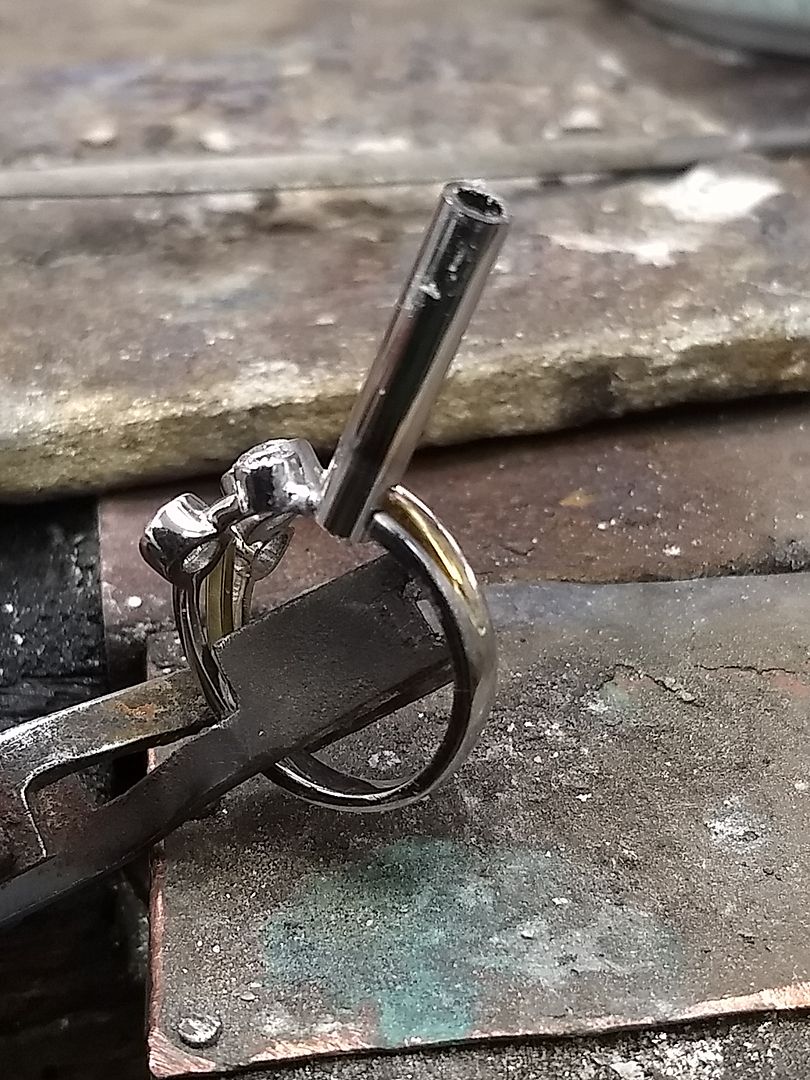
The positioning is to match the original item so a bit of overlapping is required. It's messy at first but will be soldered and cut to shape later:

Next one going in:
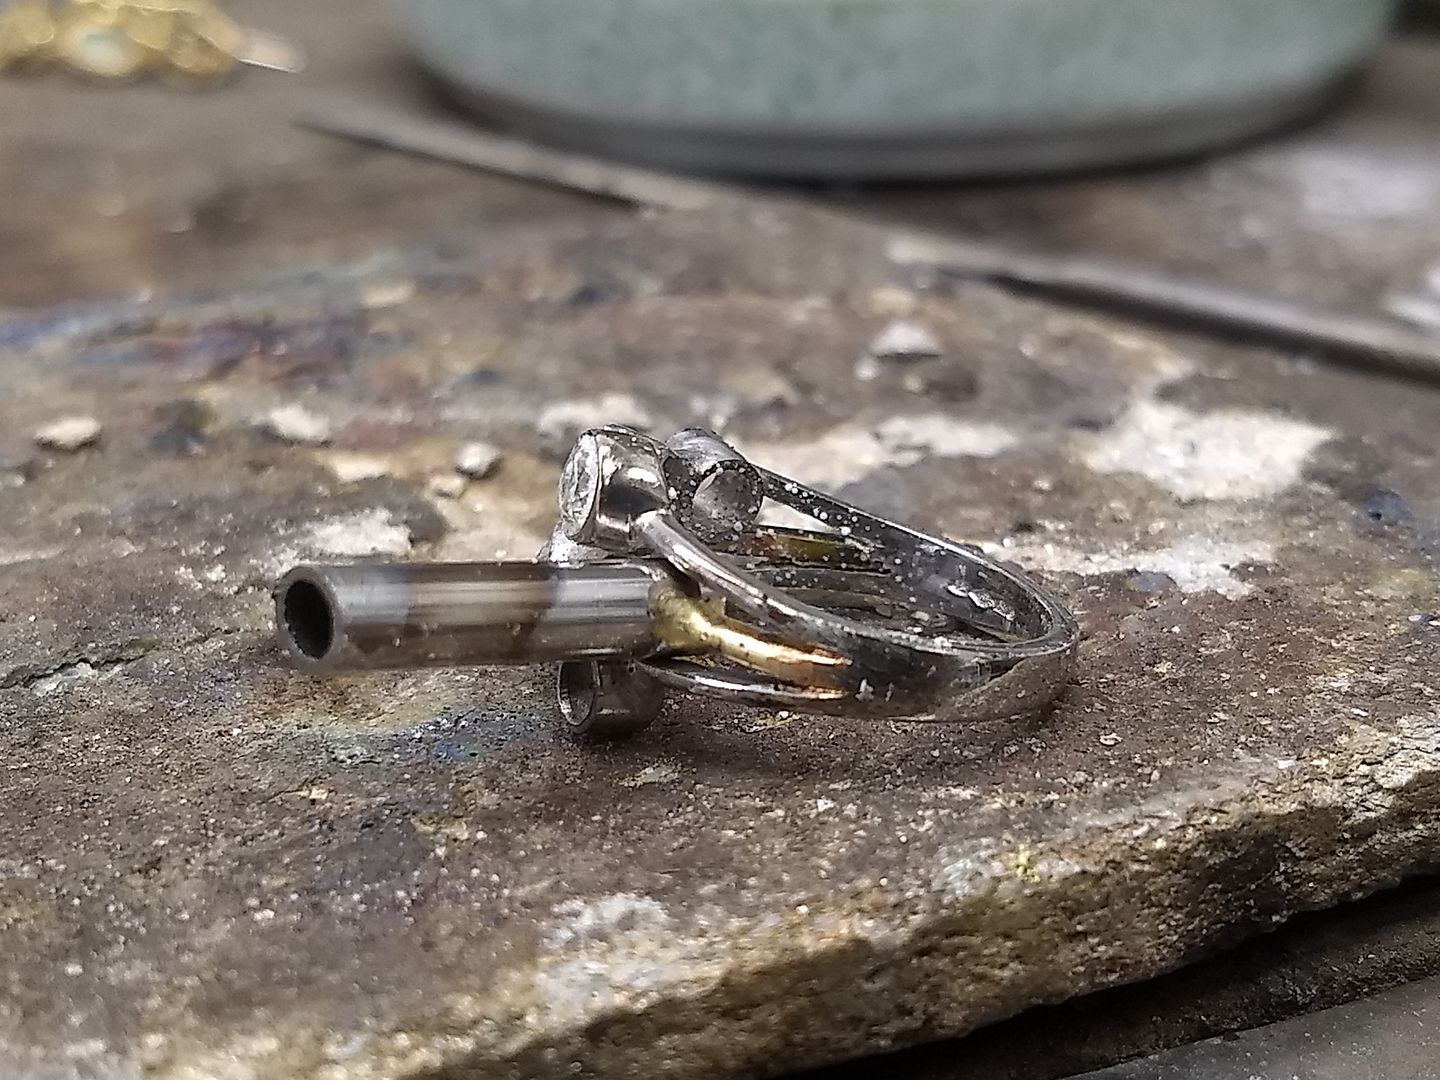
And then the fourth:

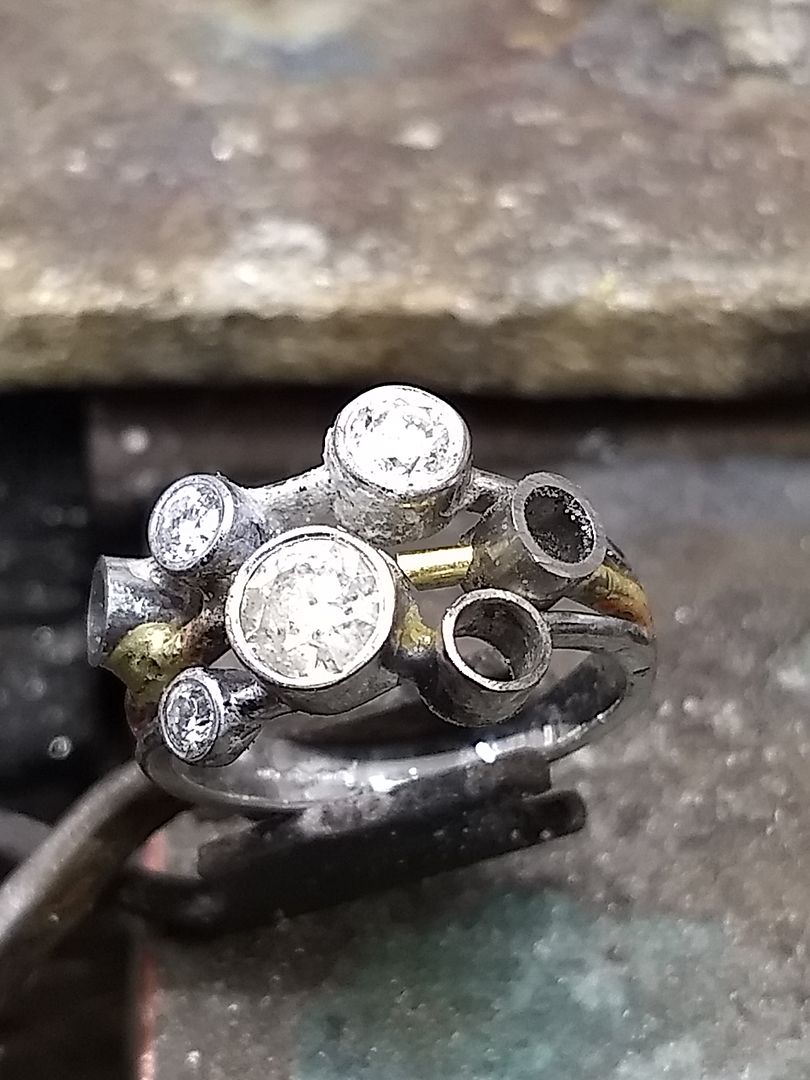
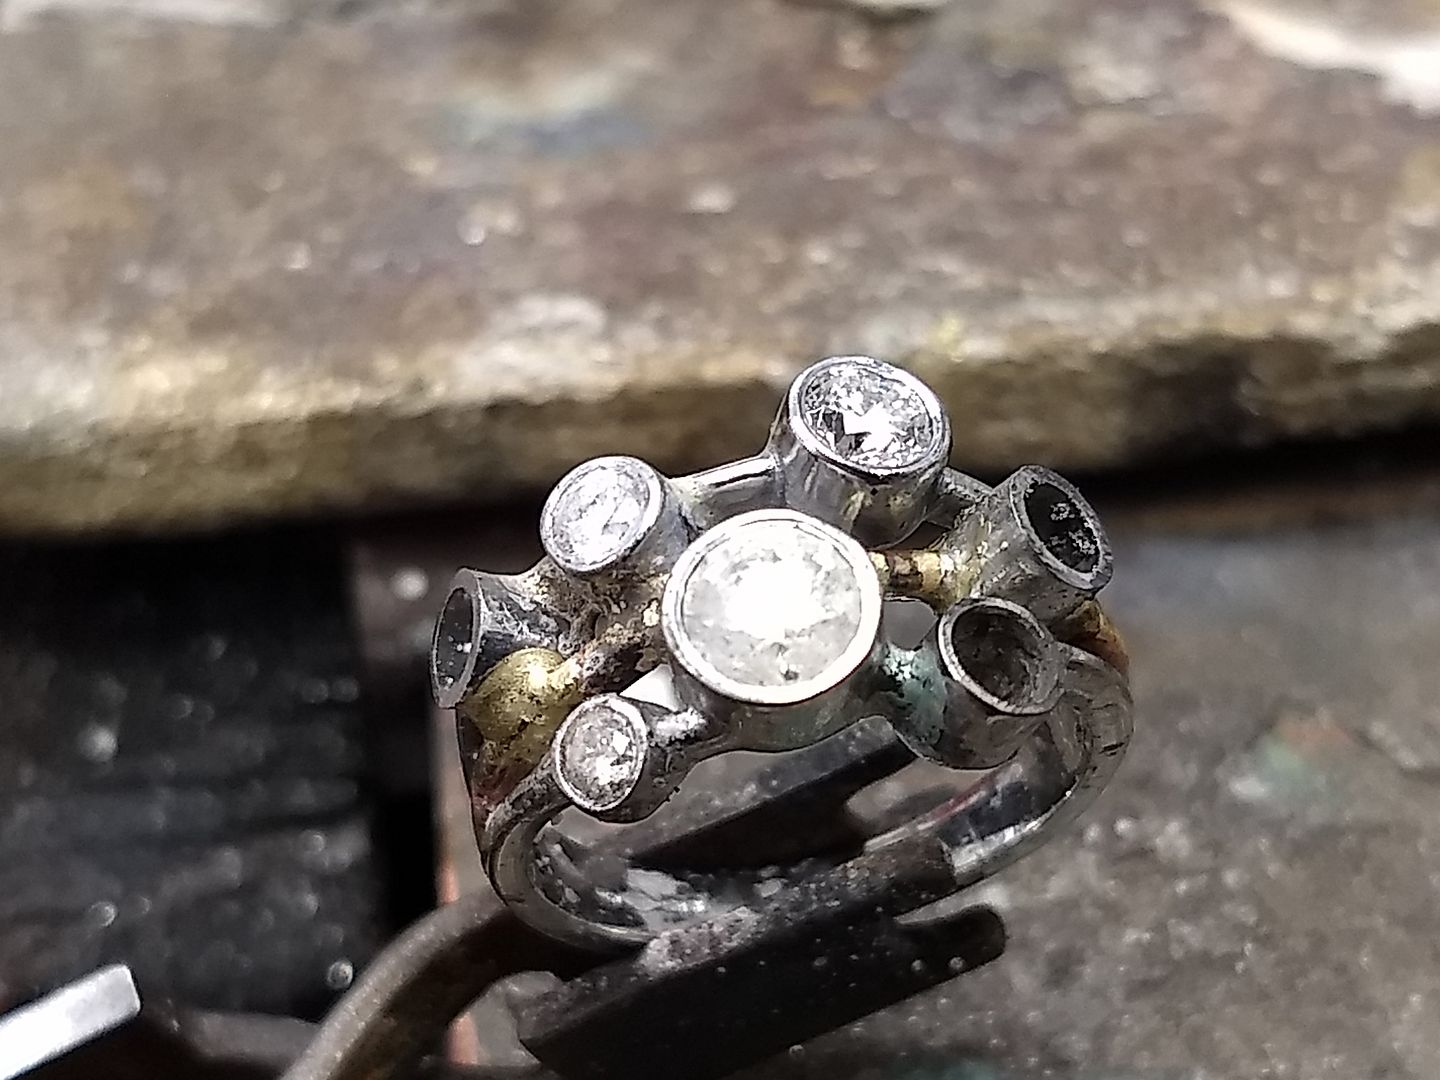
With the settings in place it's time to get the stones in:
One at a time they go in:
Until they are all set:
The ring is then tidied ready for polishing:
Then polished:
And it's all done:
Truth is it gets harder and harder to find "unusual jobs" that you haven't already seen. But, after 5 weeks of dross I've finally found something that you might actually read without falling asleep.
What's on for today then?
As with any shop, we can't always guarantee that we have in the window display exactly what a customer is looking for. We might be close with the stock options but sometimes close isn't enough. Luckily many of our window shoppers come in to see what we do and ask questions about the items.

This ring is readily available in 18ct yellow gold and in platinum but the customer could't gel with either. She wanted a bit more 'splash' on the finger too but without plumping for the near £9k range topper there wasn't anything off the shelf to suit. So what do we do?
After a chat we decided that we would swap the centre platinum band for an 18ct yellow gold section and also change the 4 smaller diamonds and settings from 0.05ct each to 0.13ct each. It's a fiddly job with the use of different metals and solders but with care it can be achieved to a budget and short timescale. All in the conversion took me about 3 hours.
Enjoy:
First the centre band is cut out. The slot needs to be tapered in order to accept the yellow one when it comes:

18ct yellow wire is drawn down and length soldered in place at one end. I've skipped a pic too and you'll notice that I've also cut out one small setting and soldered in its place a section of 4mm platinum tubing:

The opposite end of the ring also gets a length of 18ct yellow fitted.


Stage 1 complete, a bit of a clean and on with the complex areas:

With some more 4mm platinum tube I start to add in the other upscaled settings:

The positioning is to match the original item so a bit of overlapping is required. It's messy at first but will be soldered and cut to shape later:

Next one going in:


And then the fourth:


With the settings in place it's time to get the stones in:

One at a time they go in:

Until they are all set:


The ring is then tidied ready for polishing:


Then polished:


And it's all done:


Edited by ecain63 on Friday 13th April 21:36
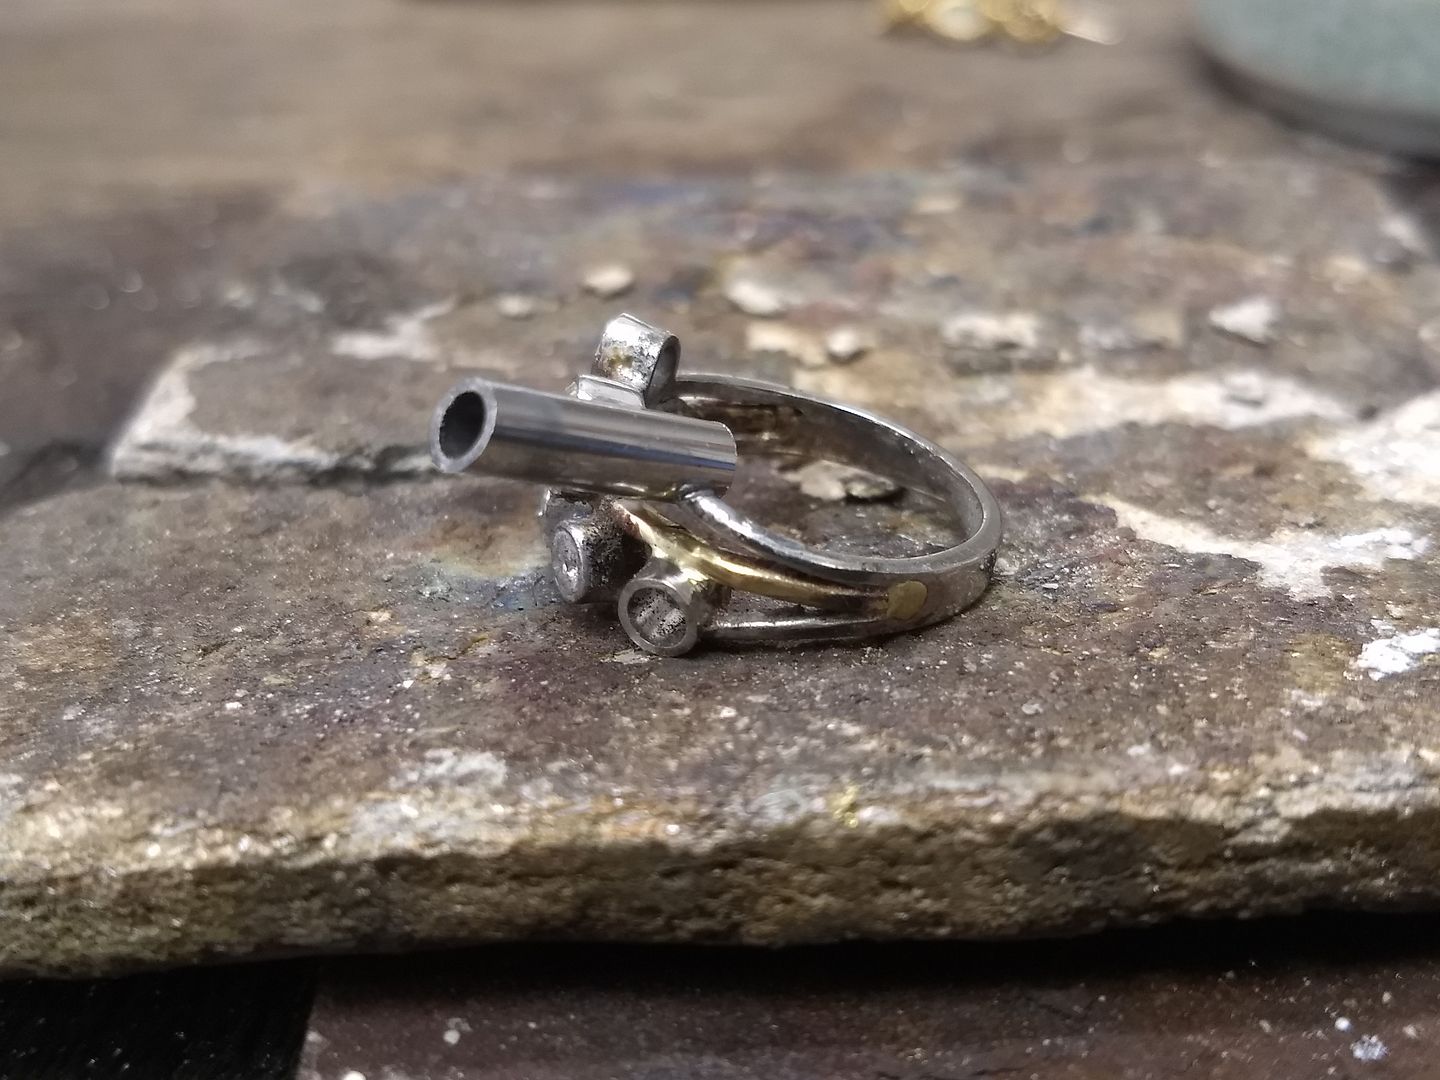
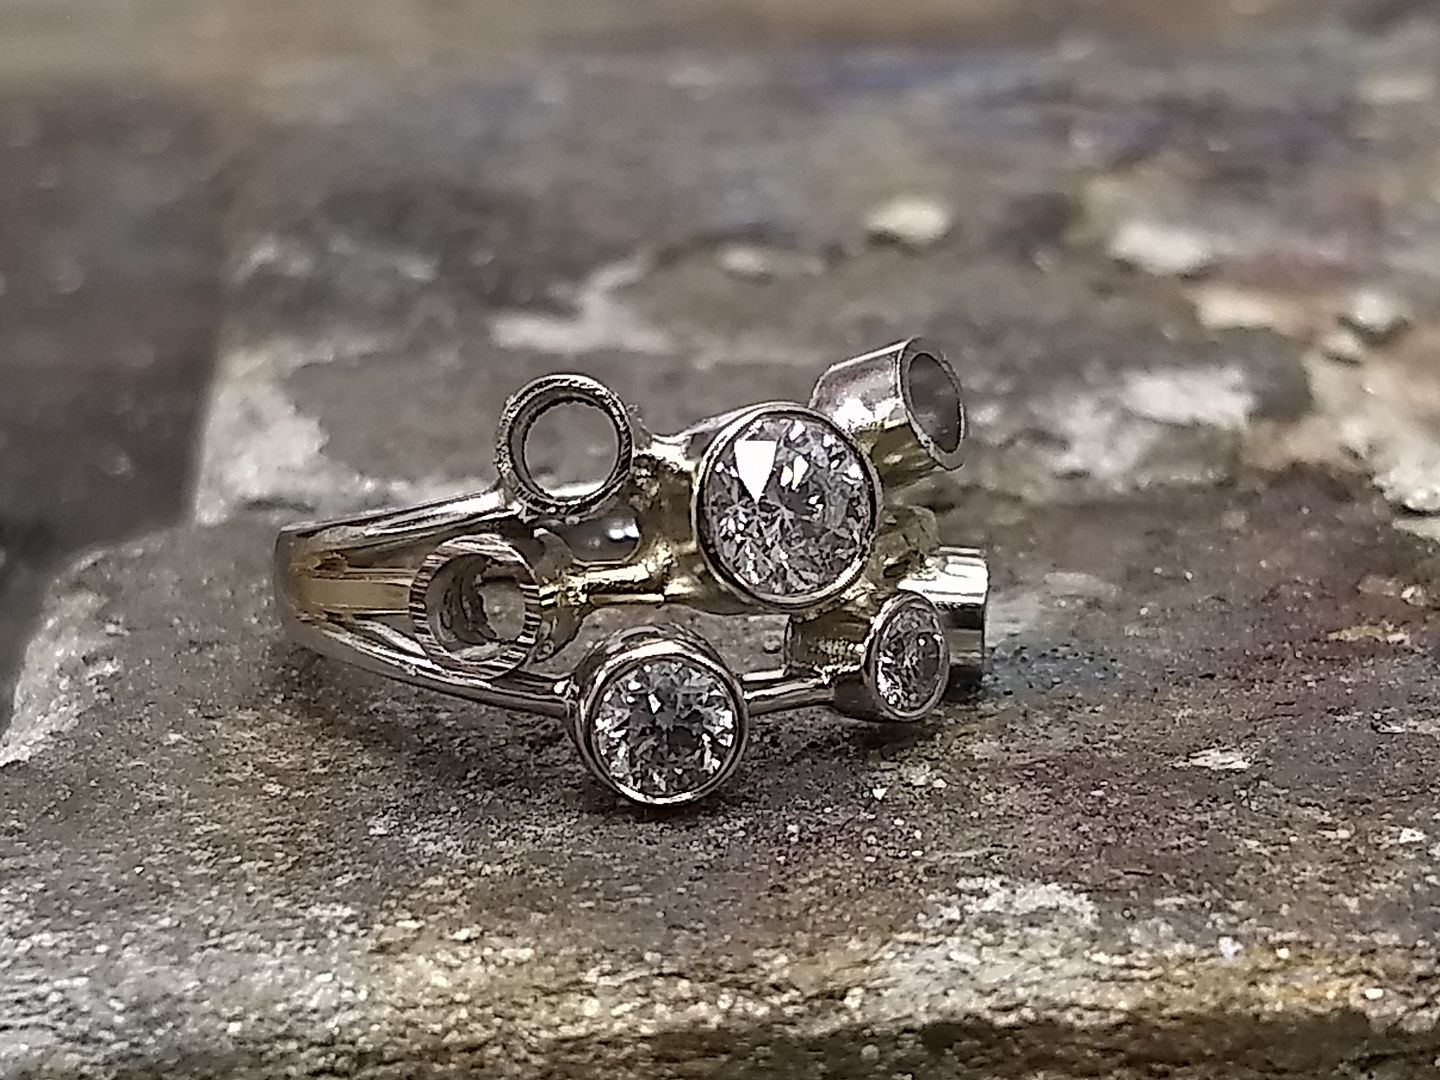
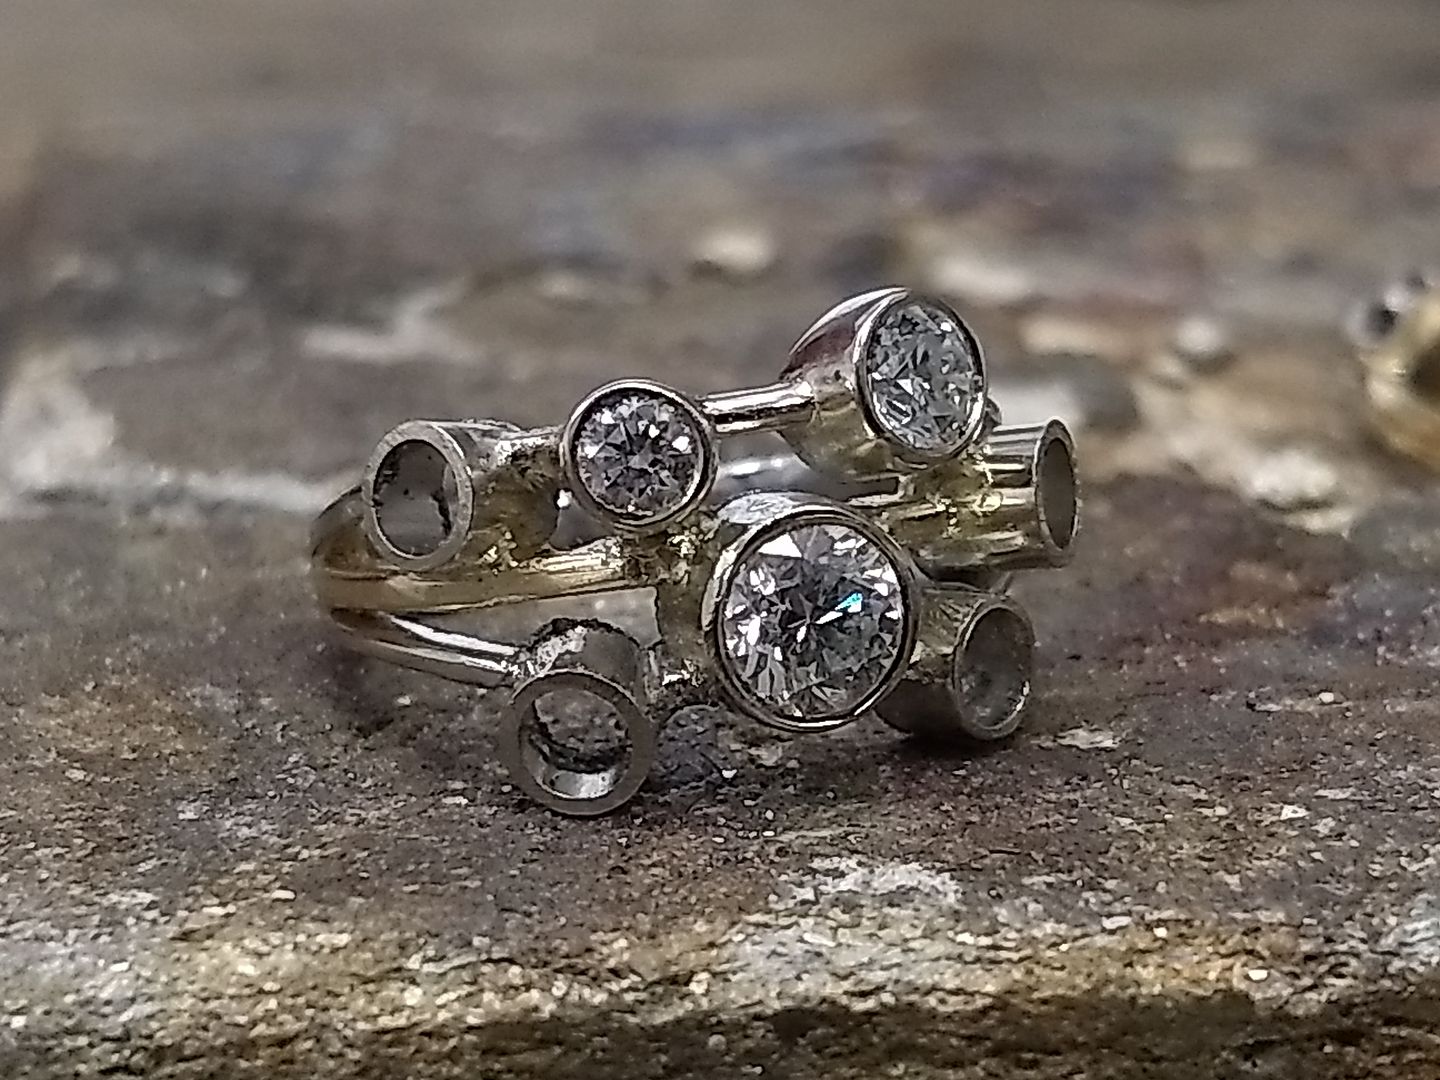
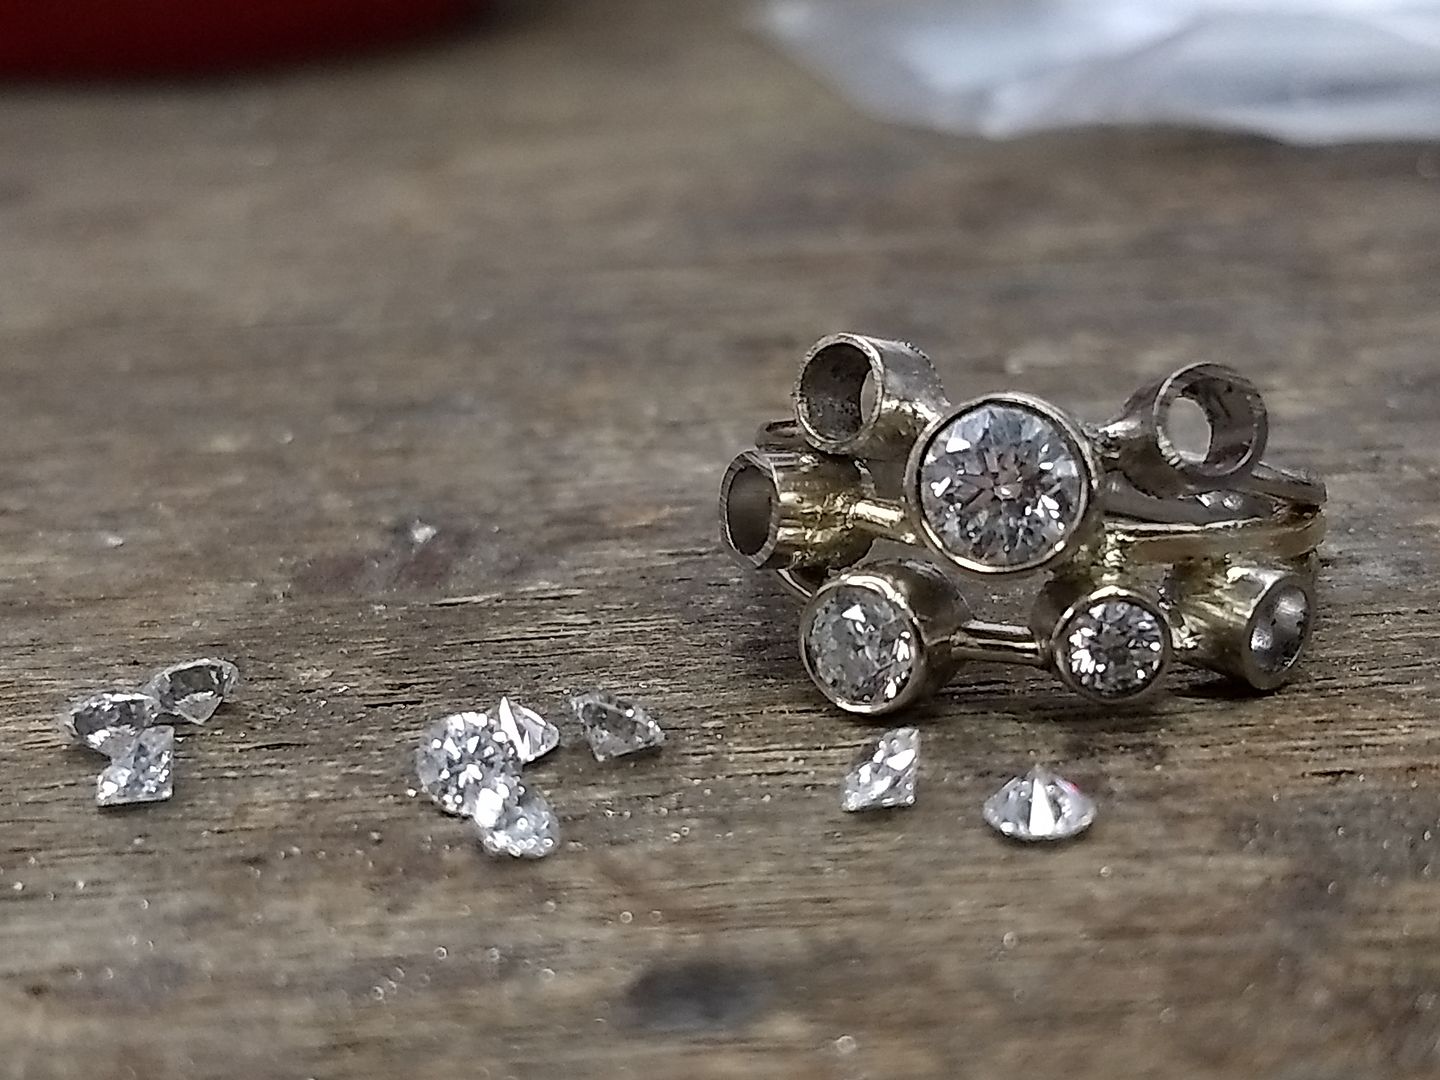
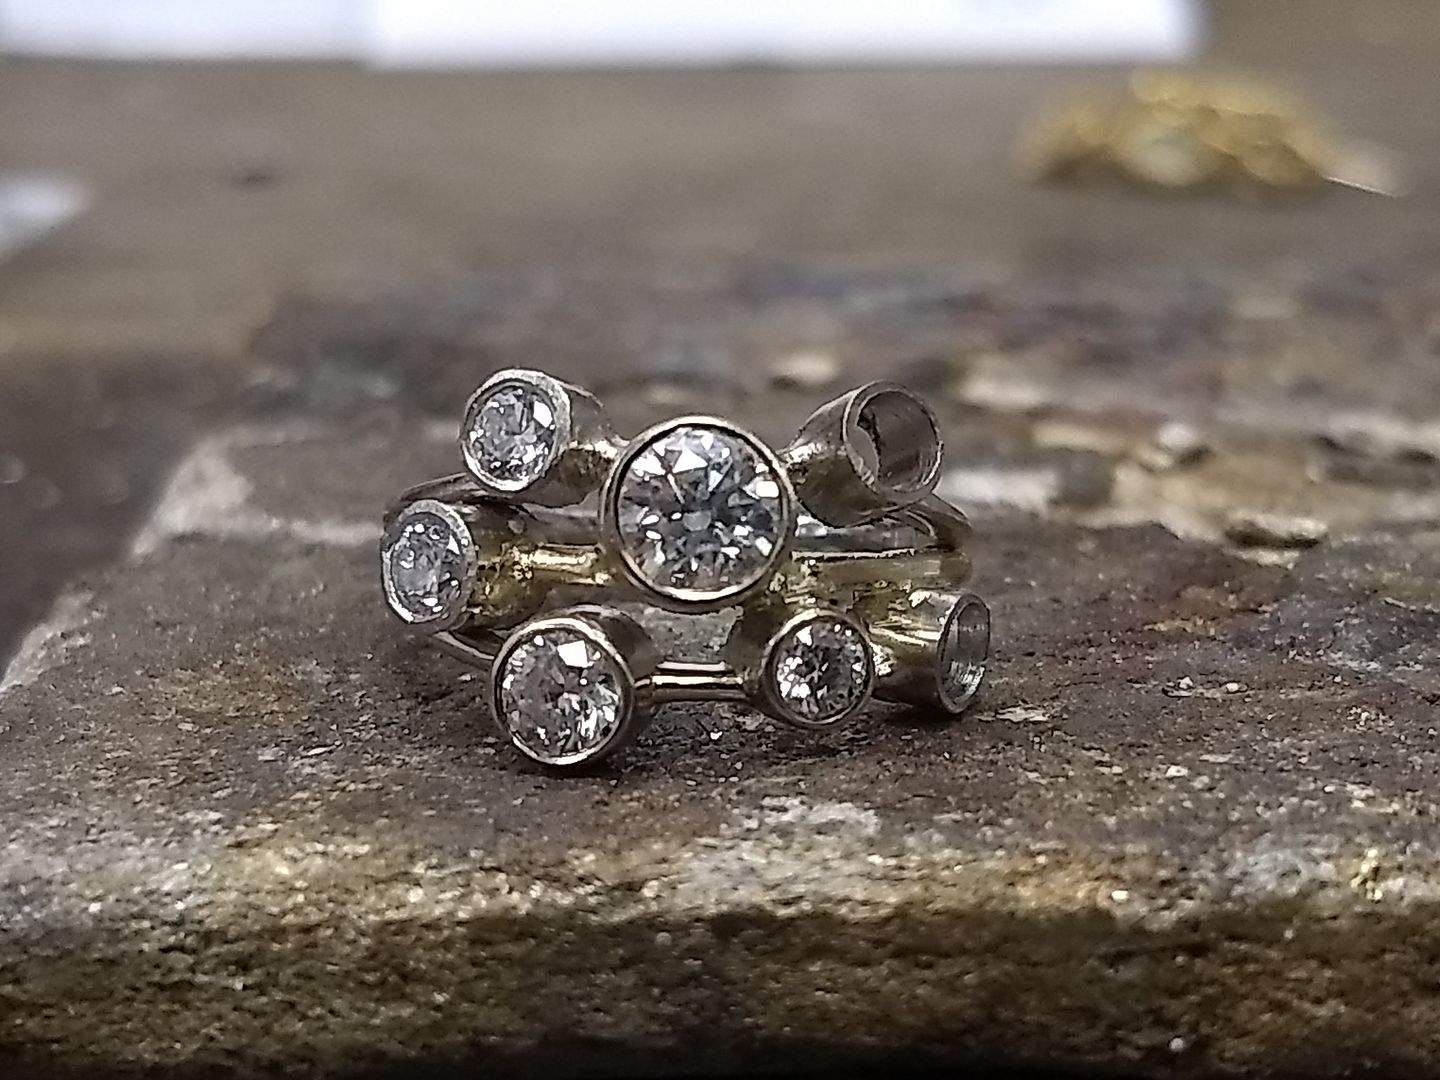
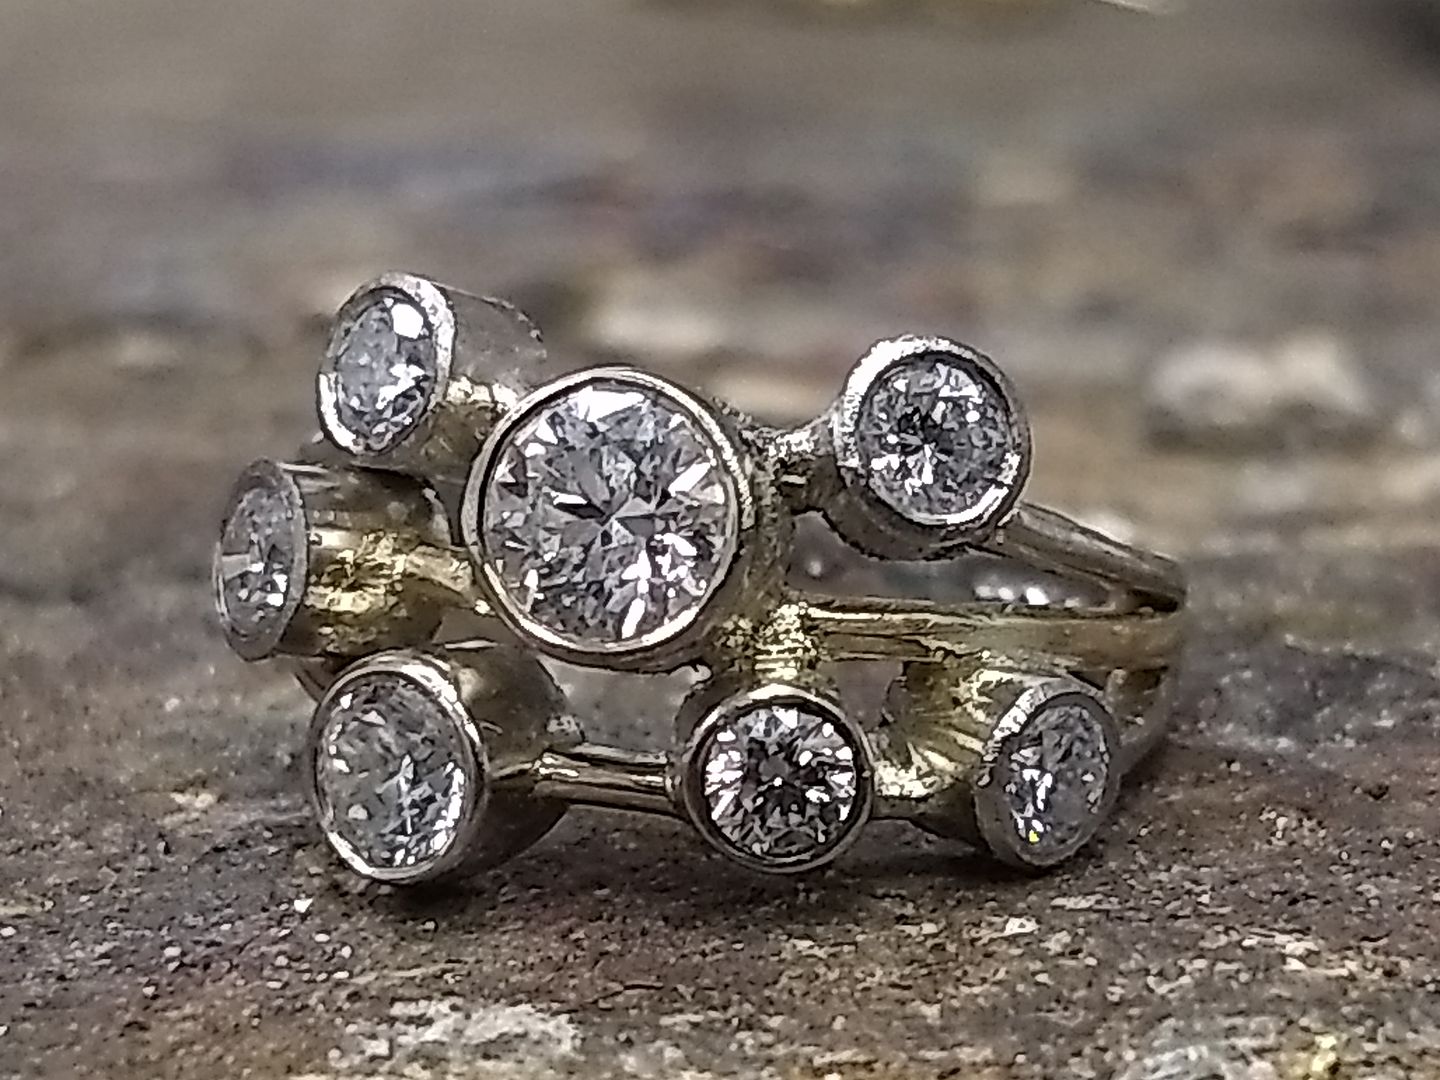
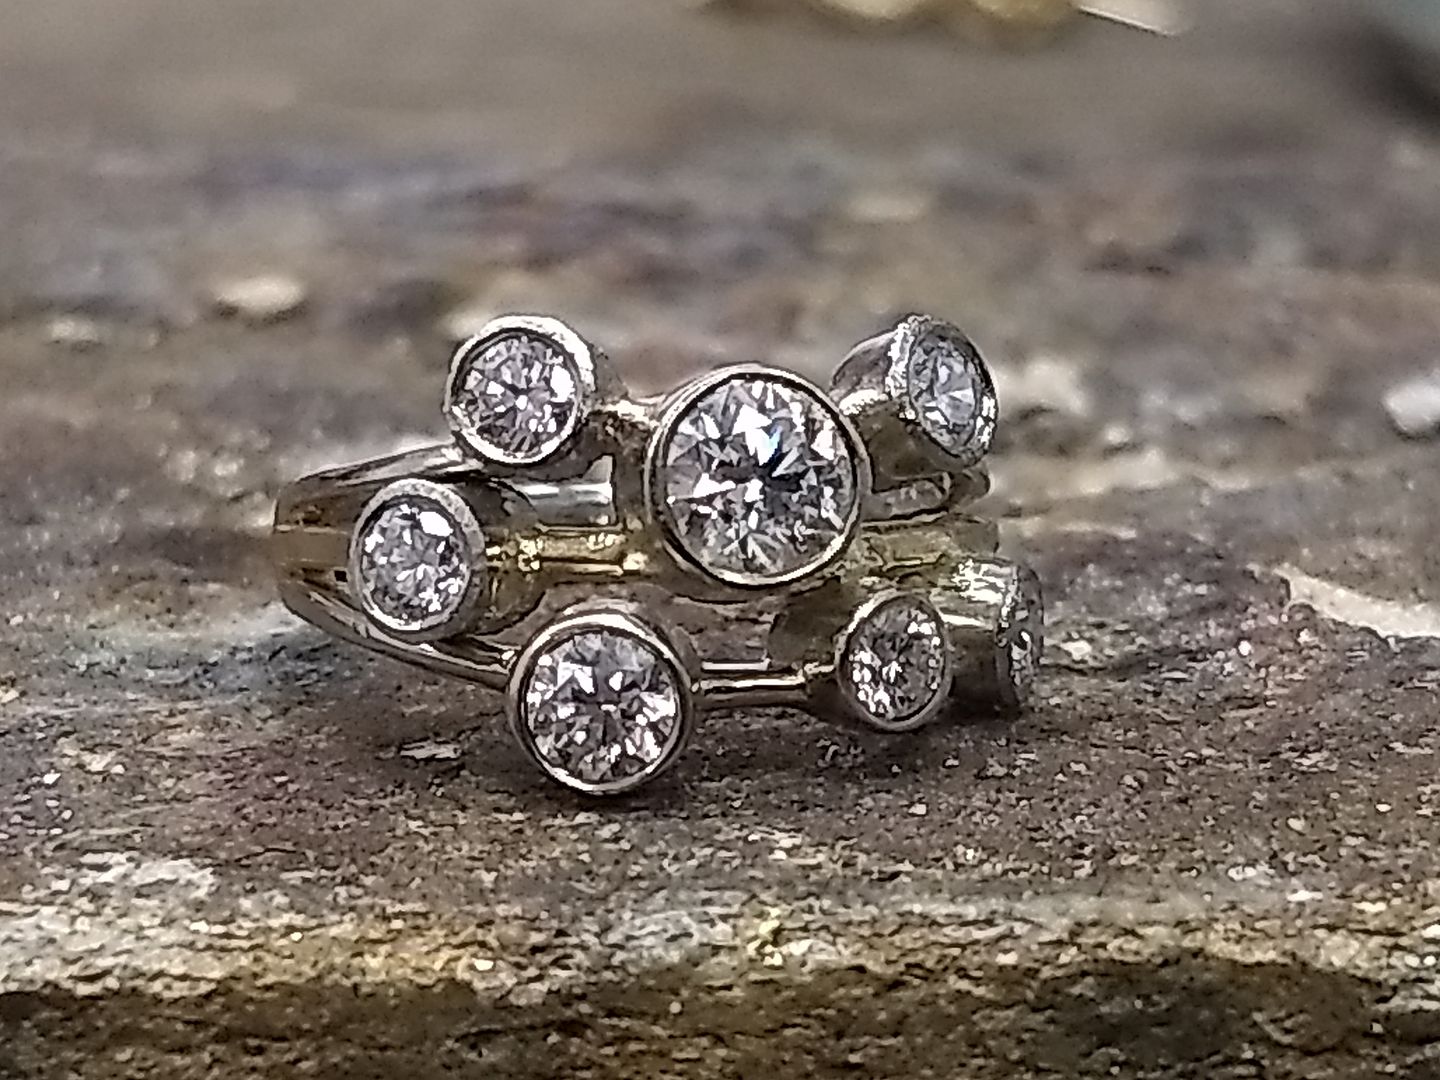
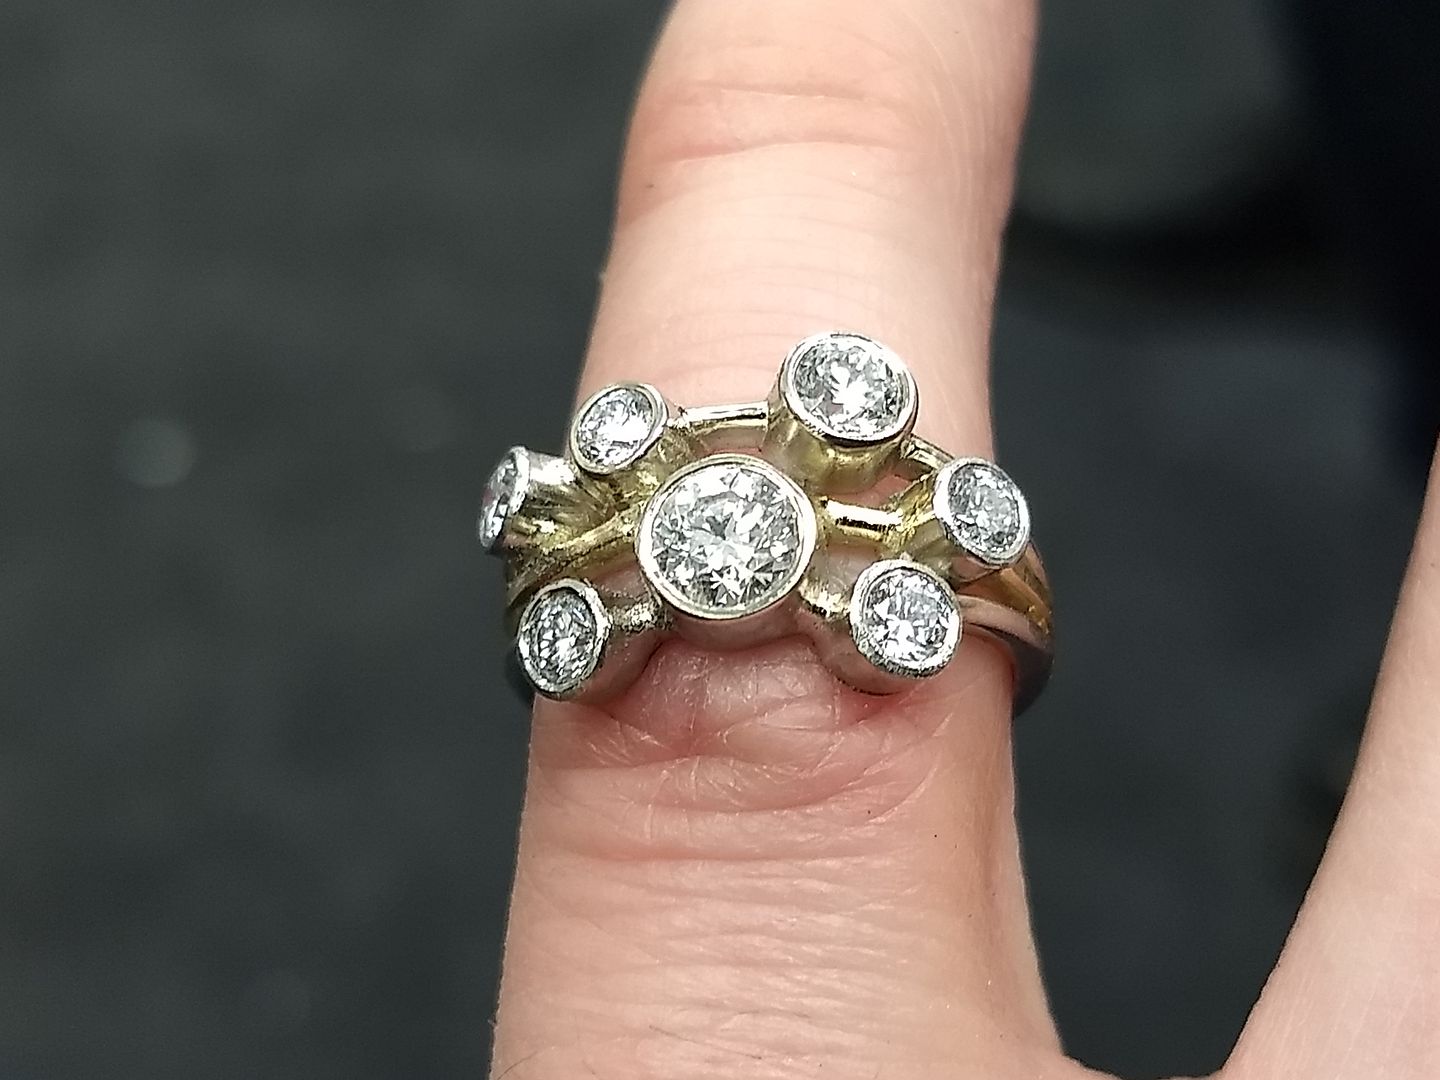
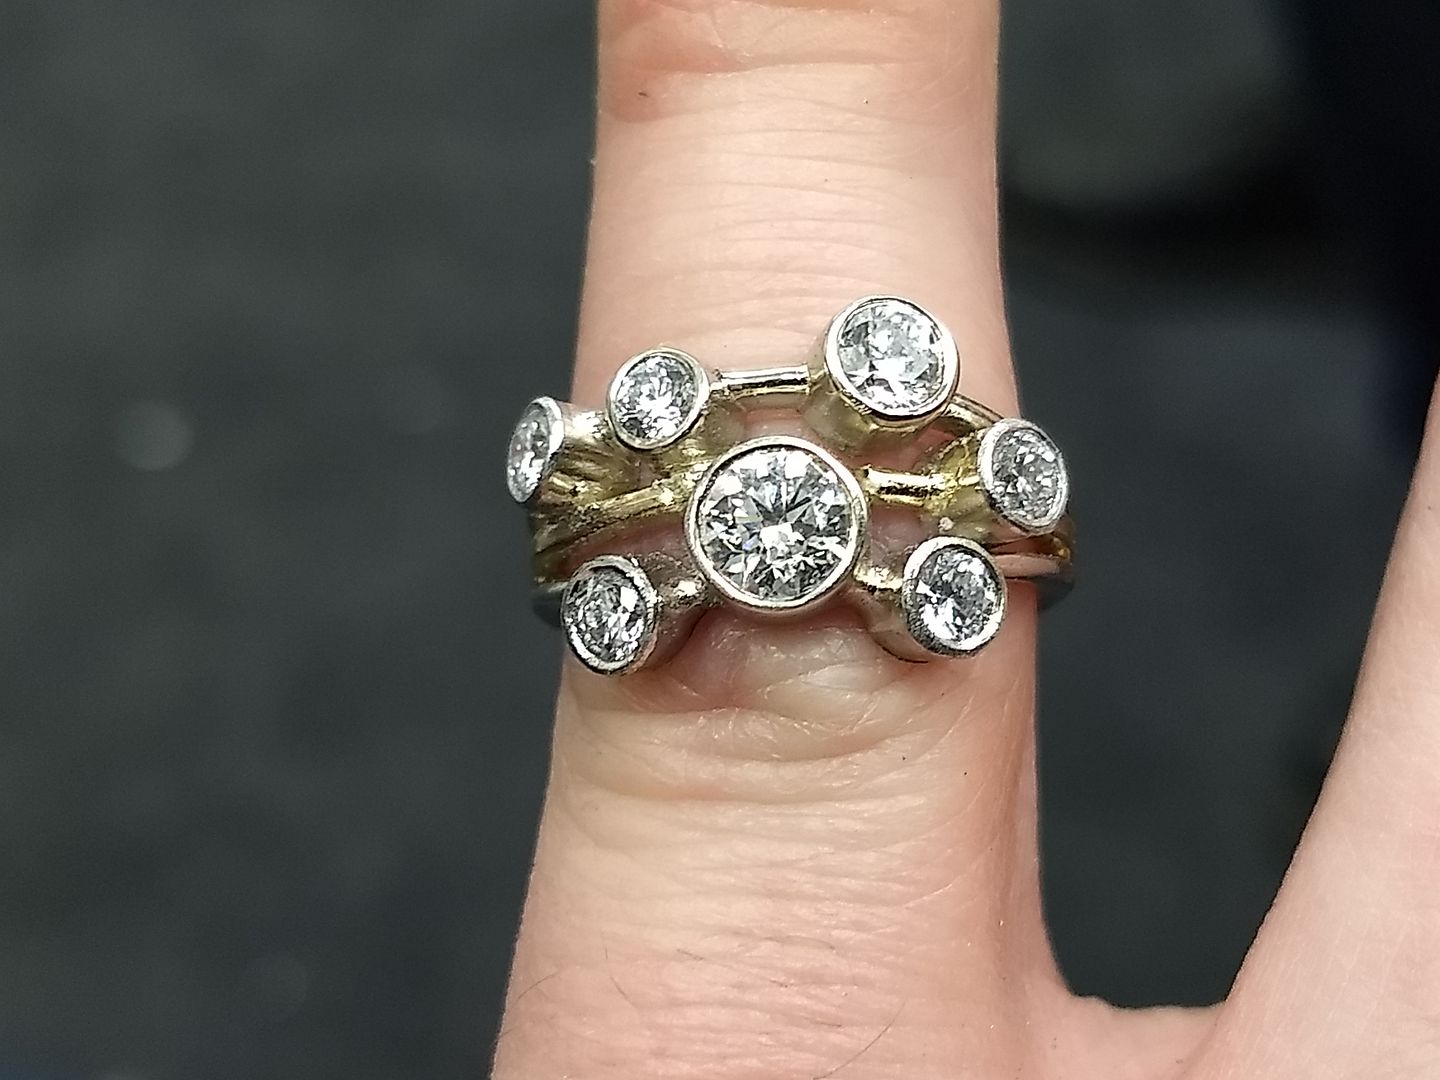
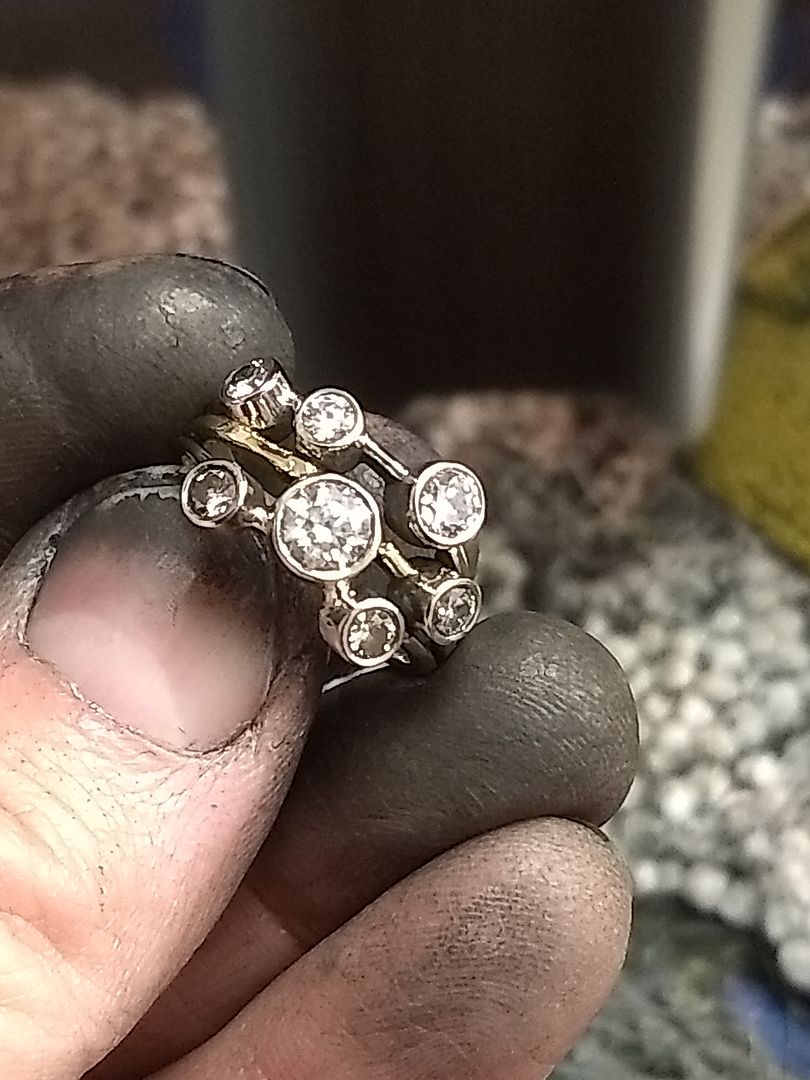
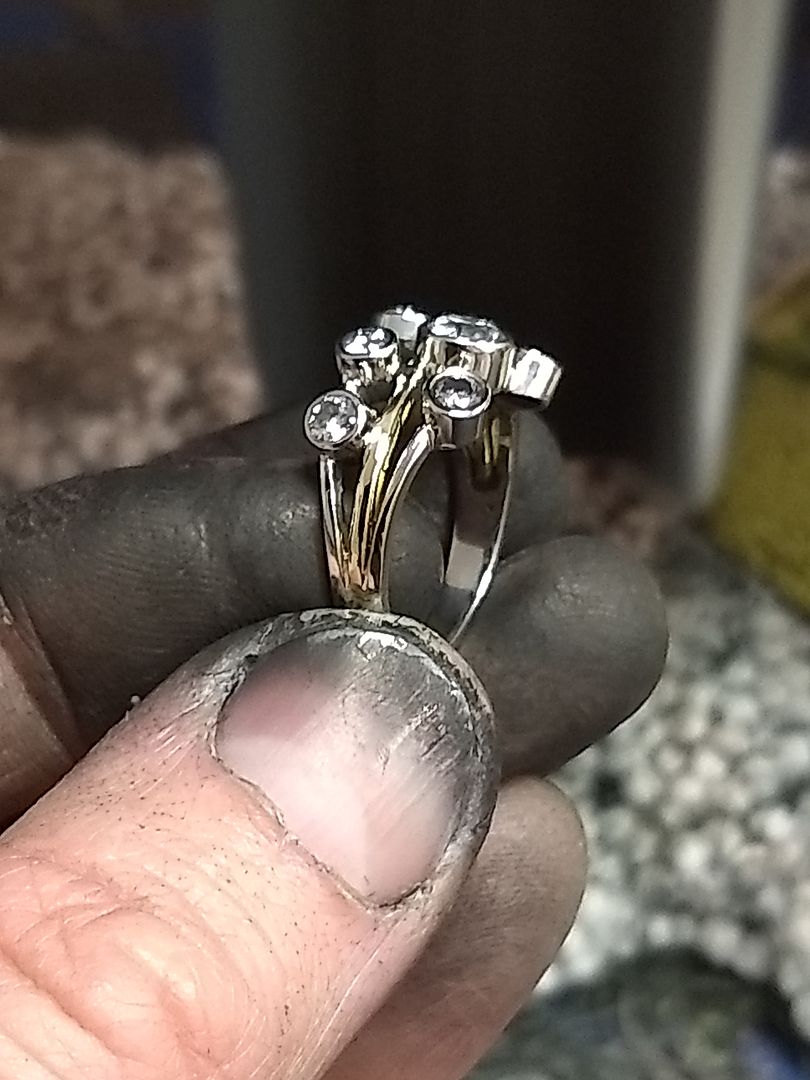
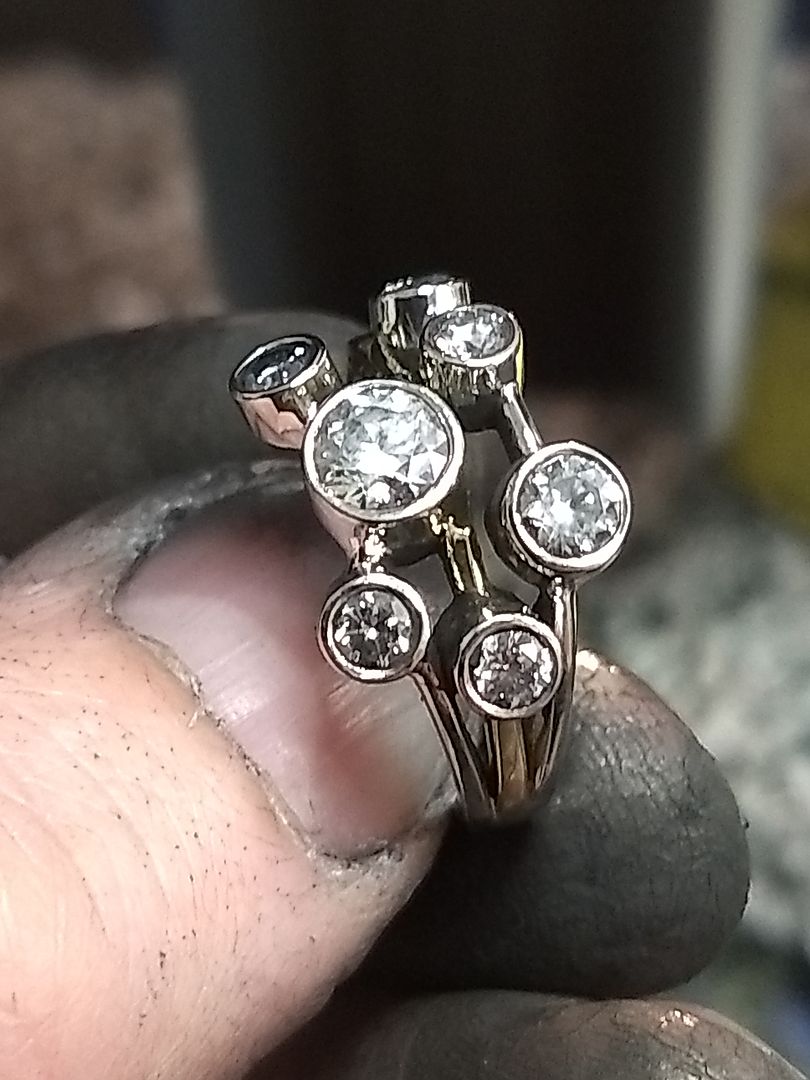
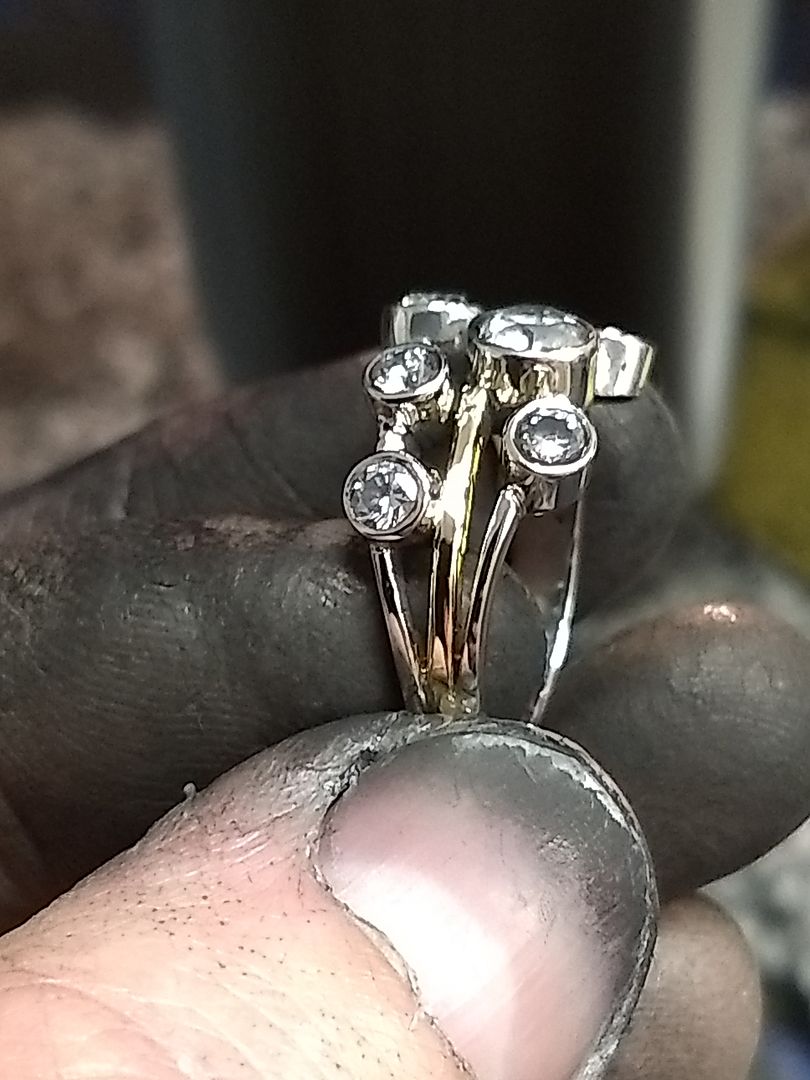
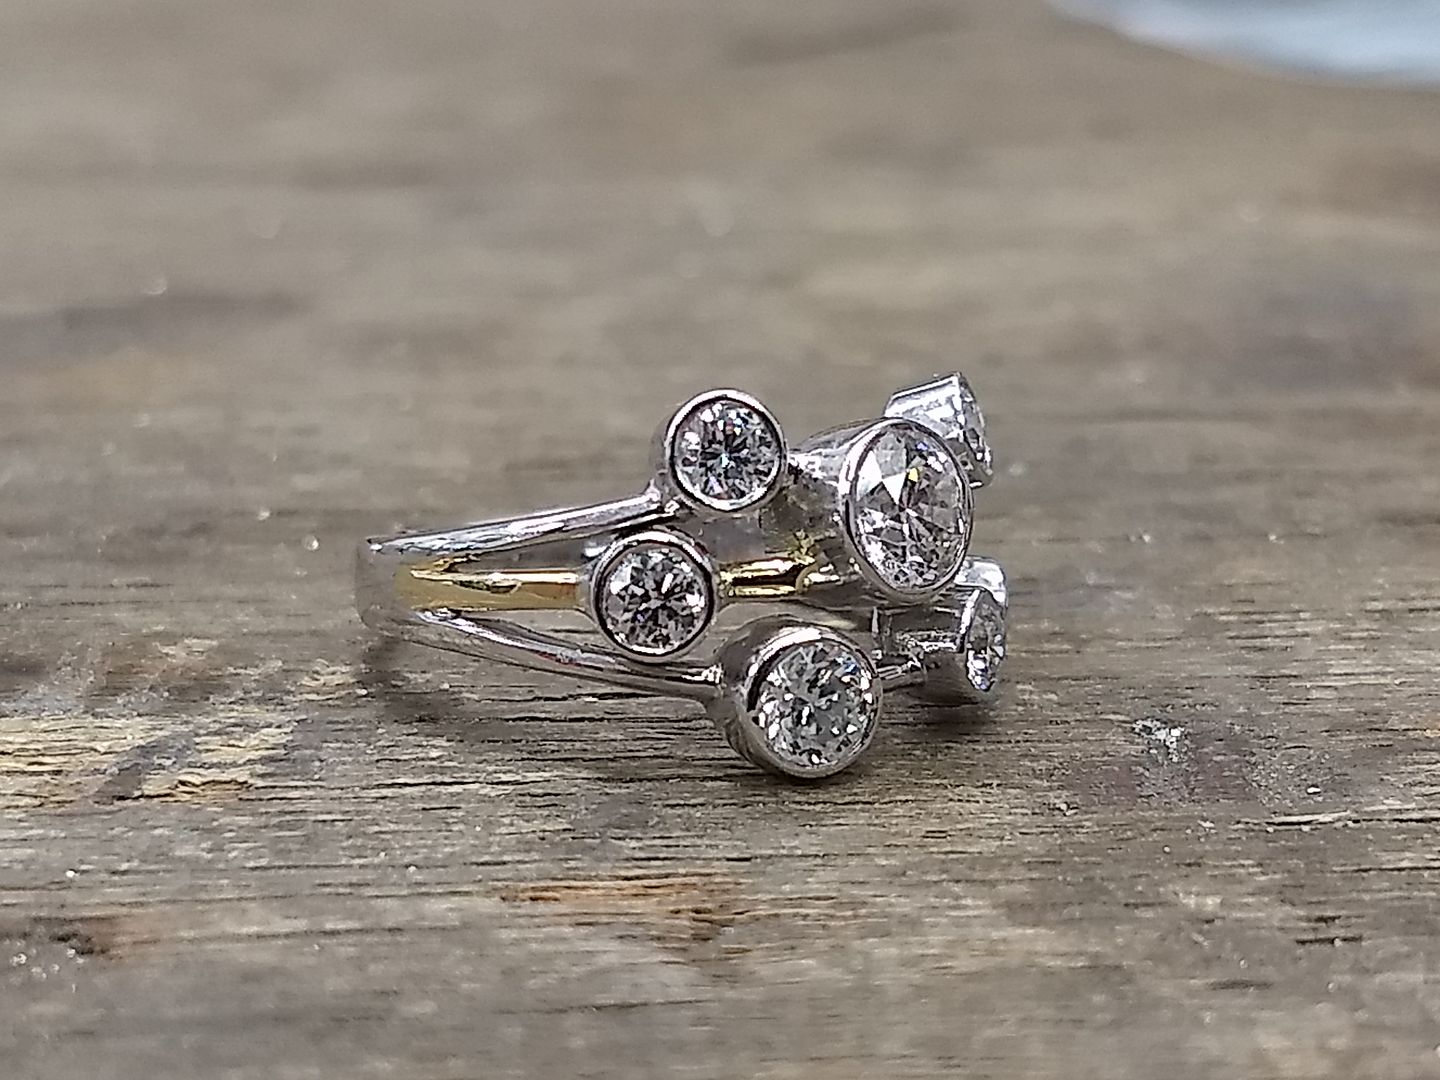
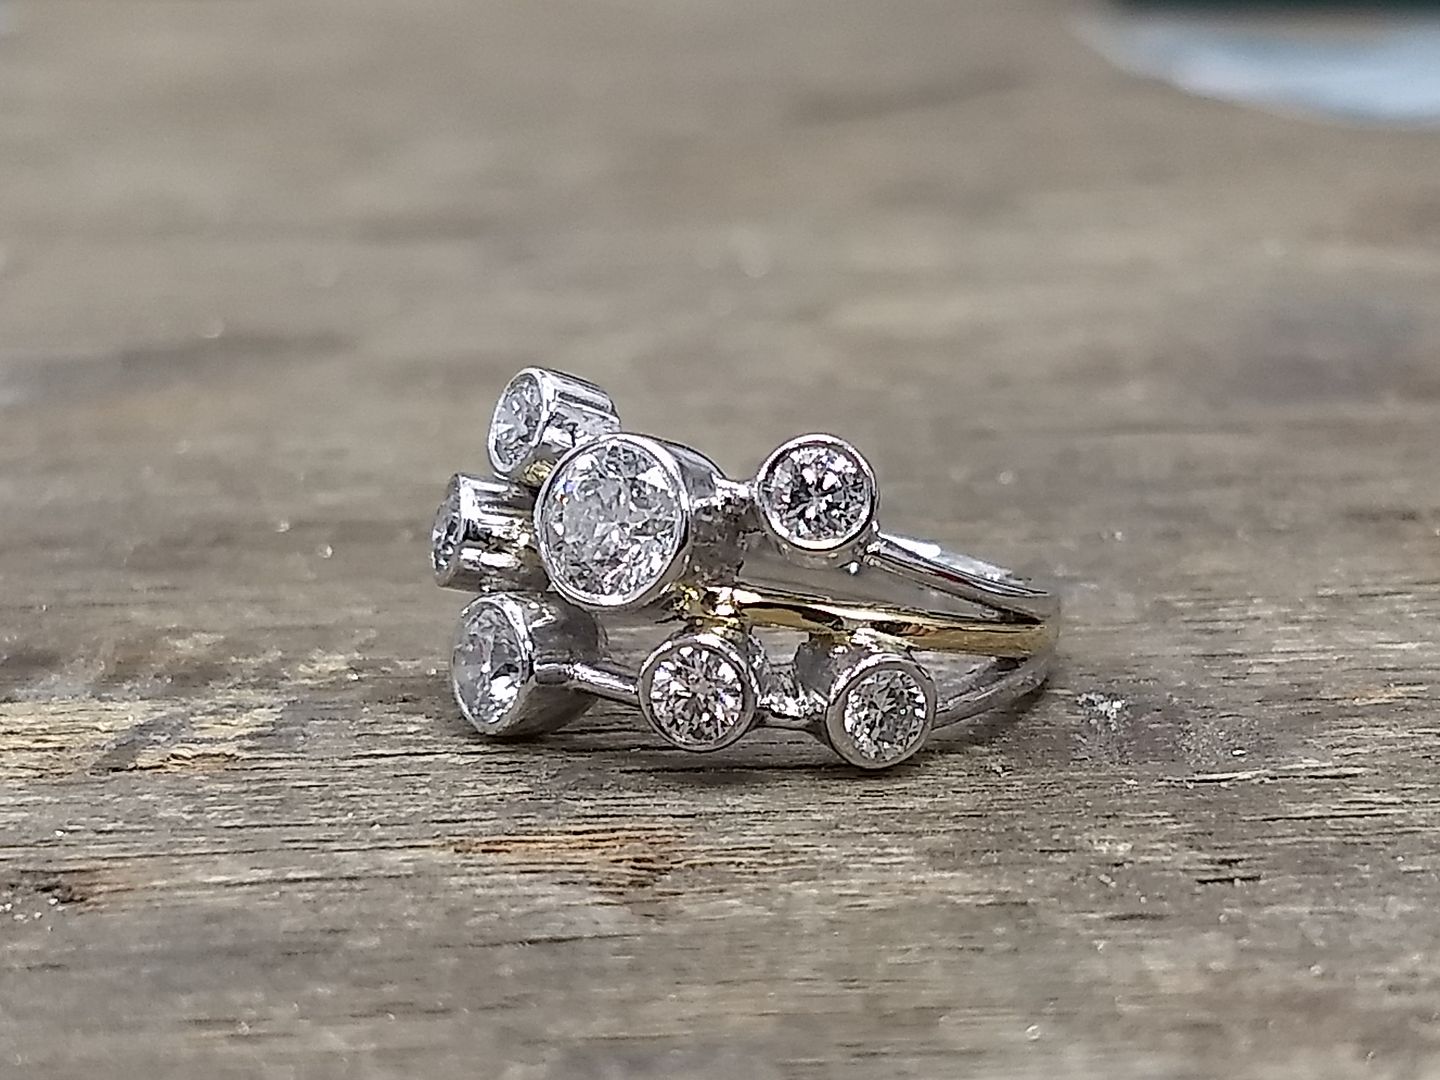
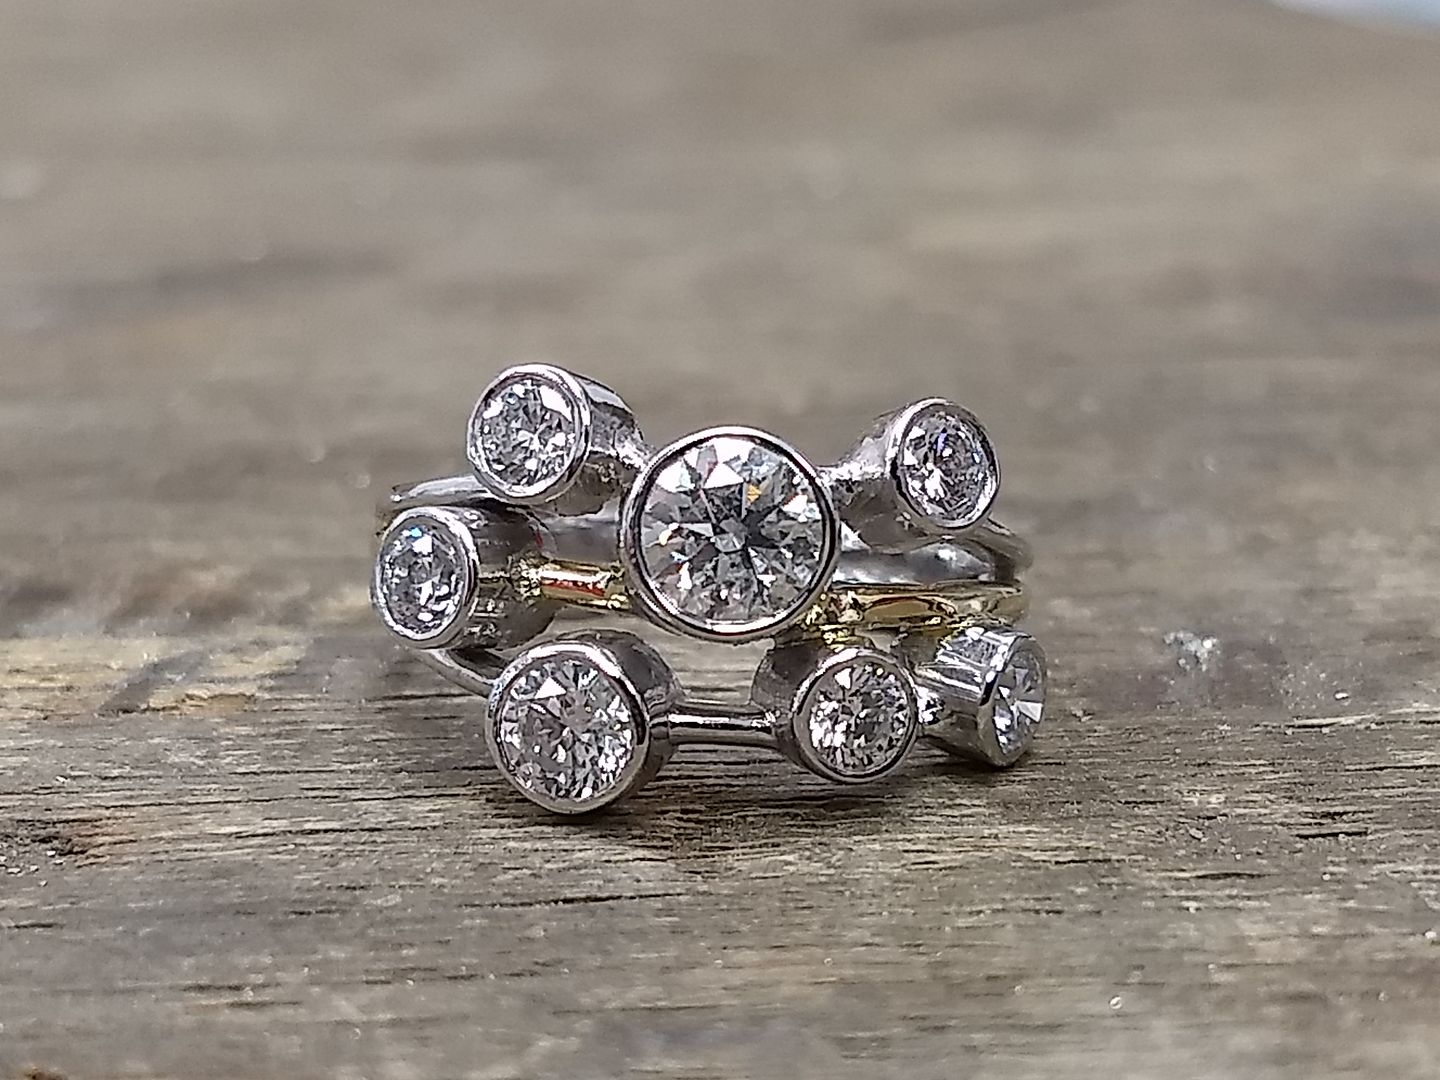
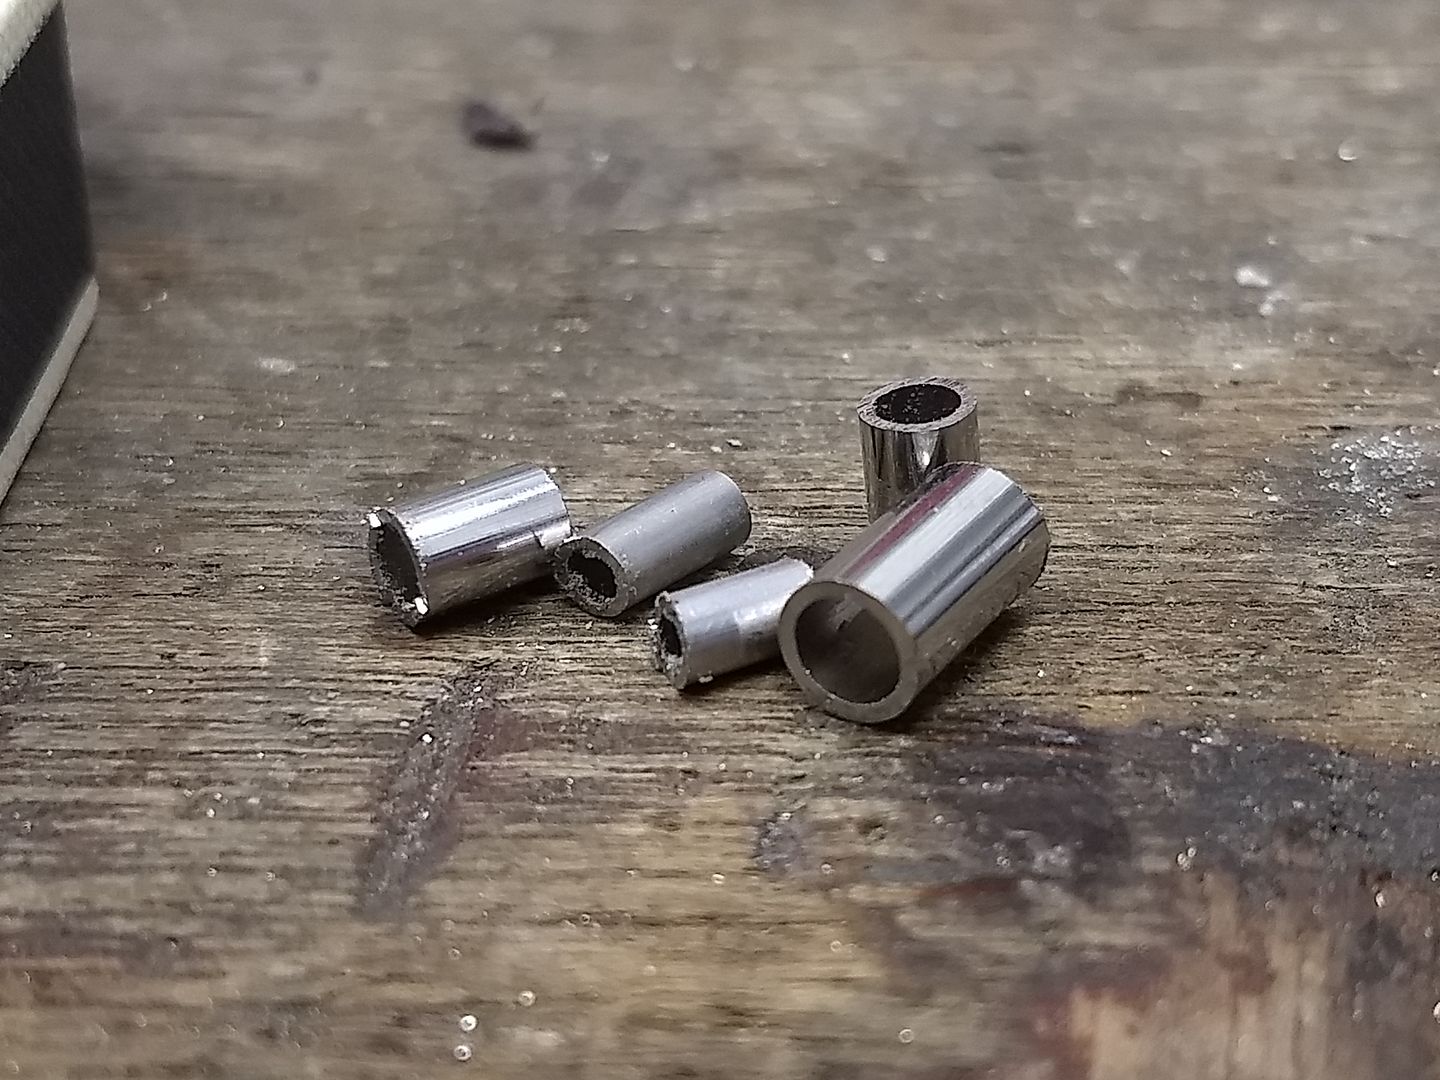
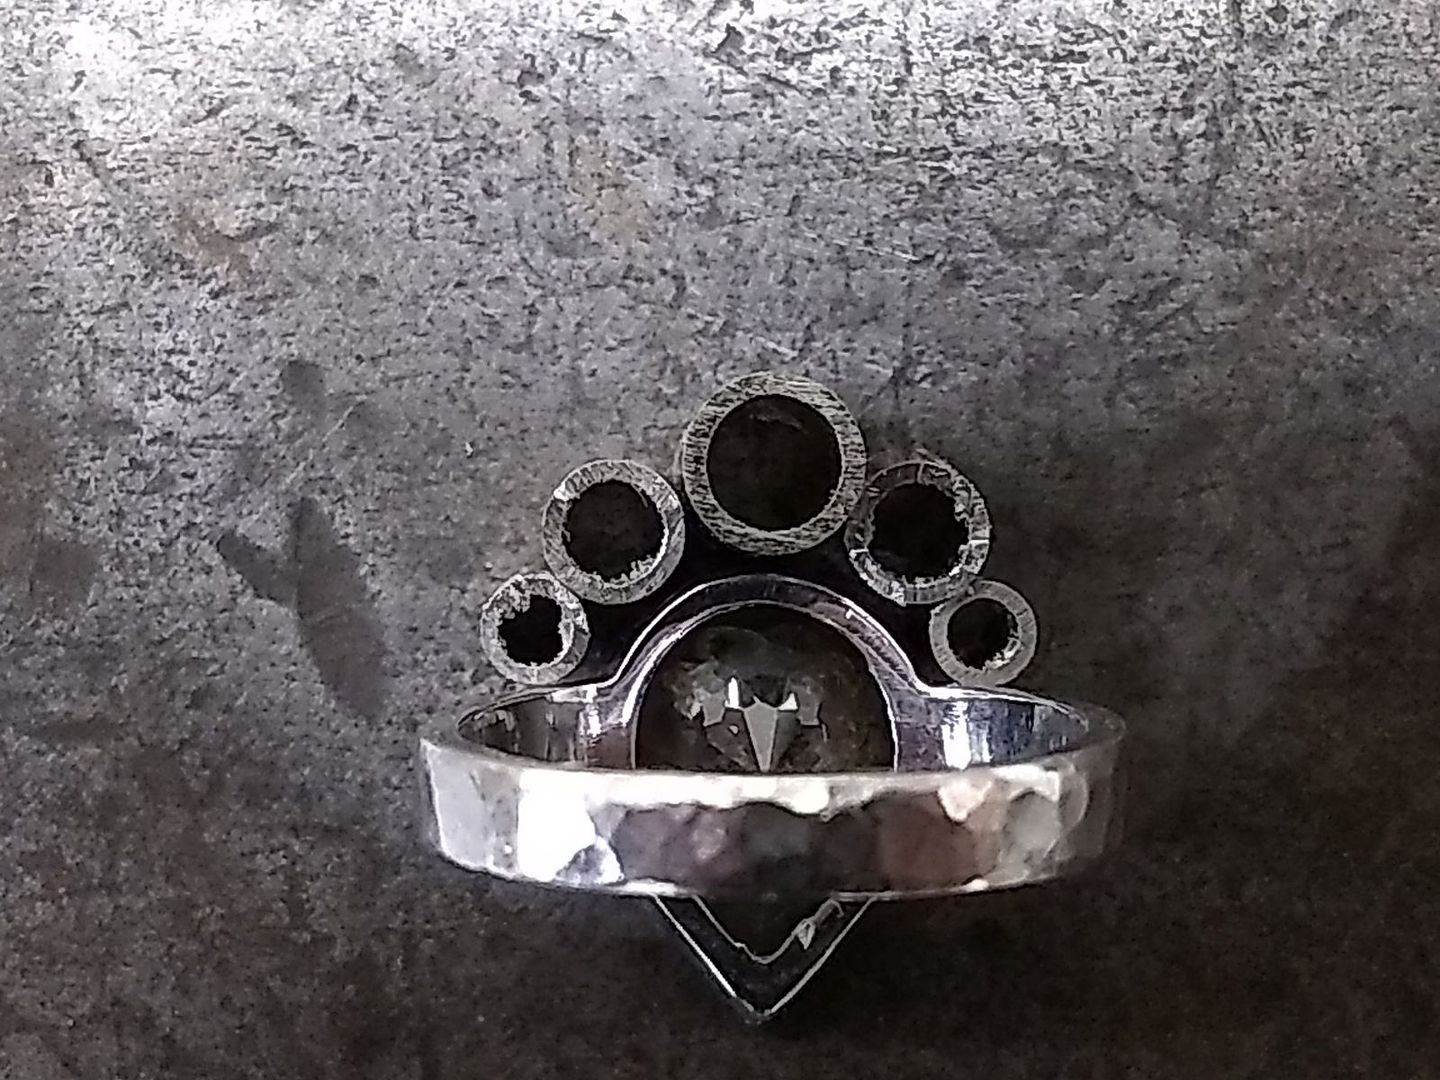
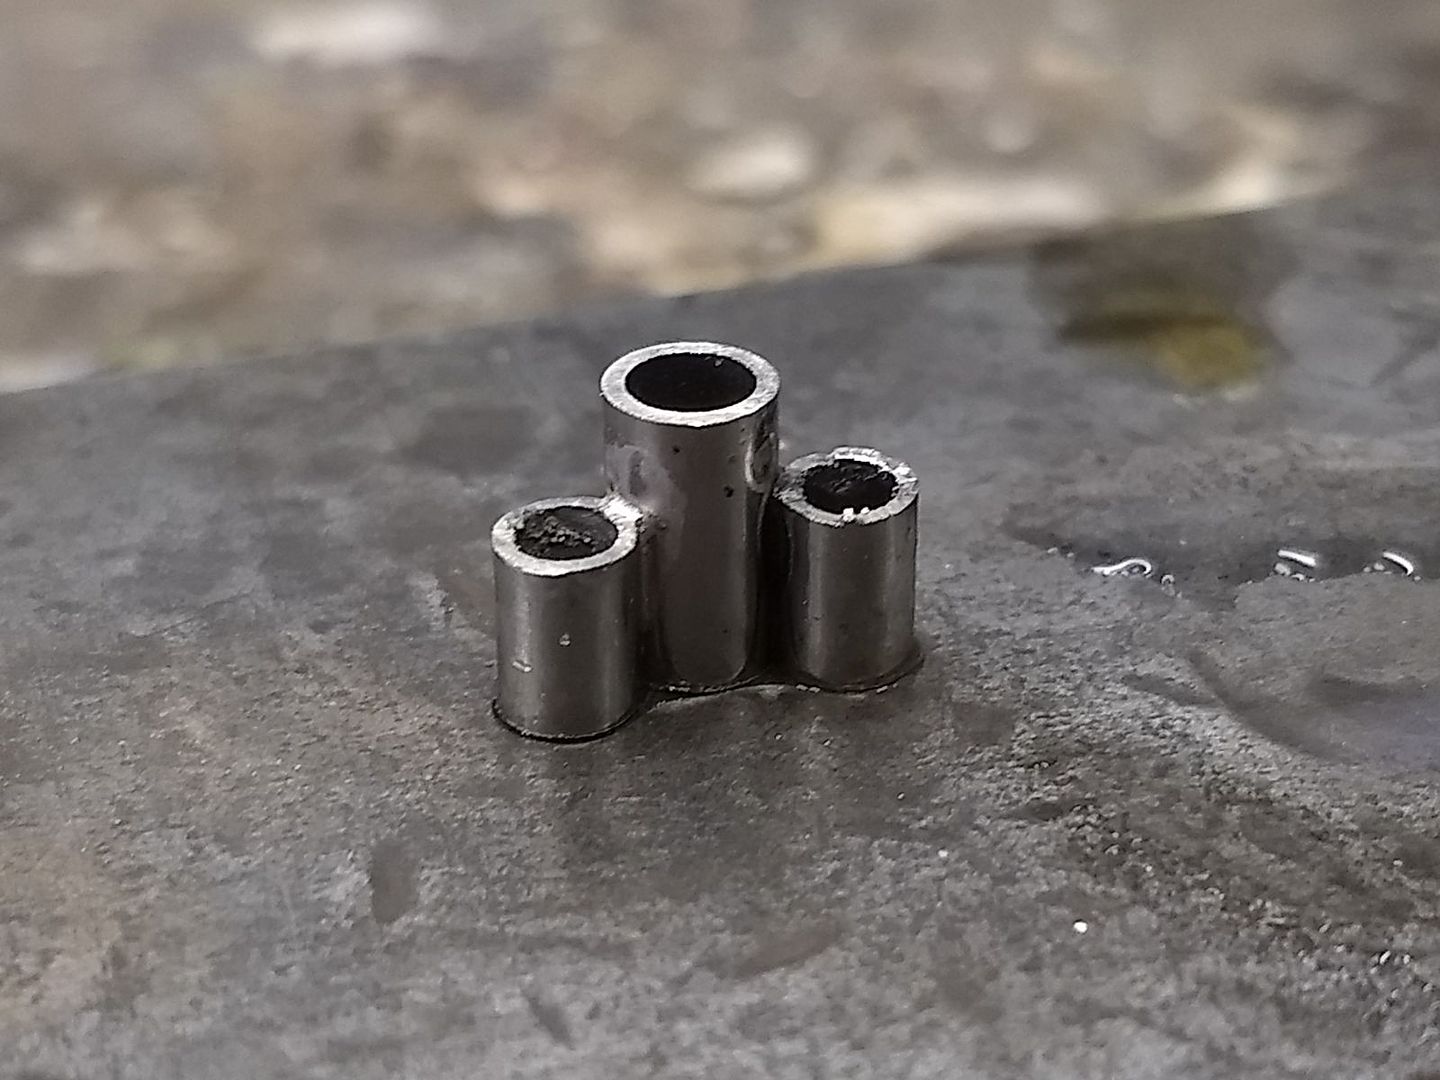
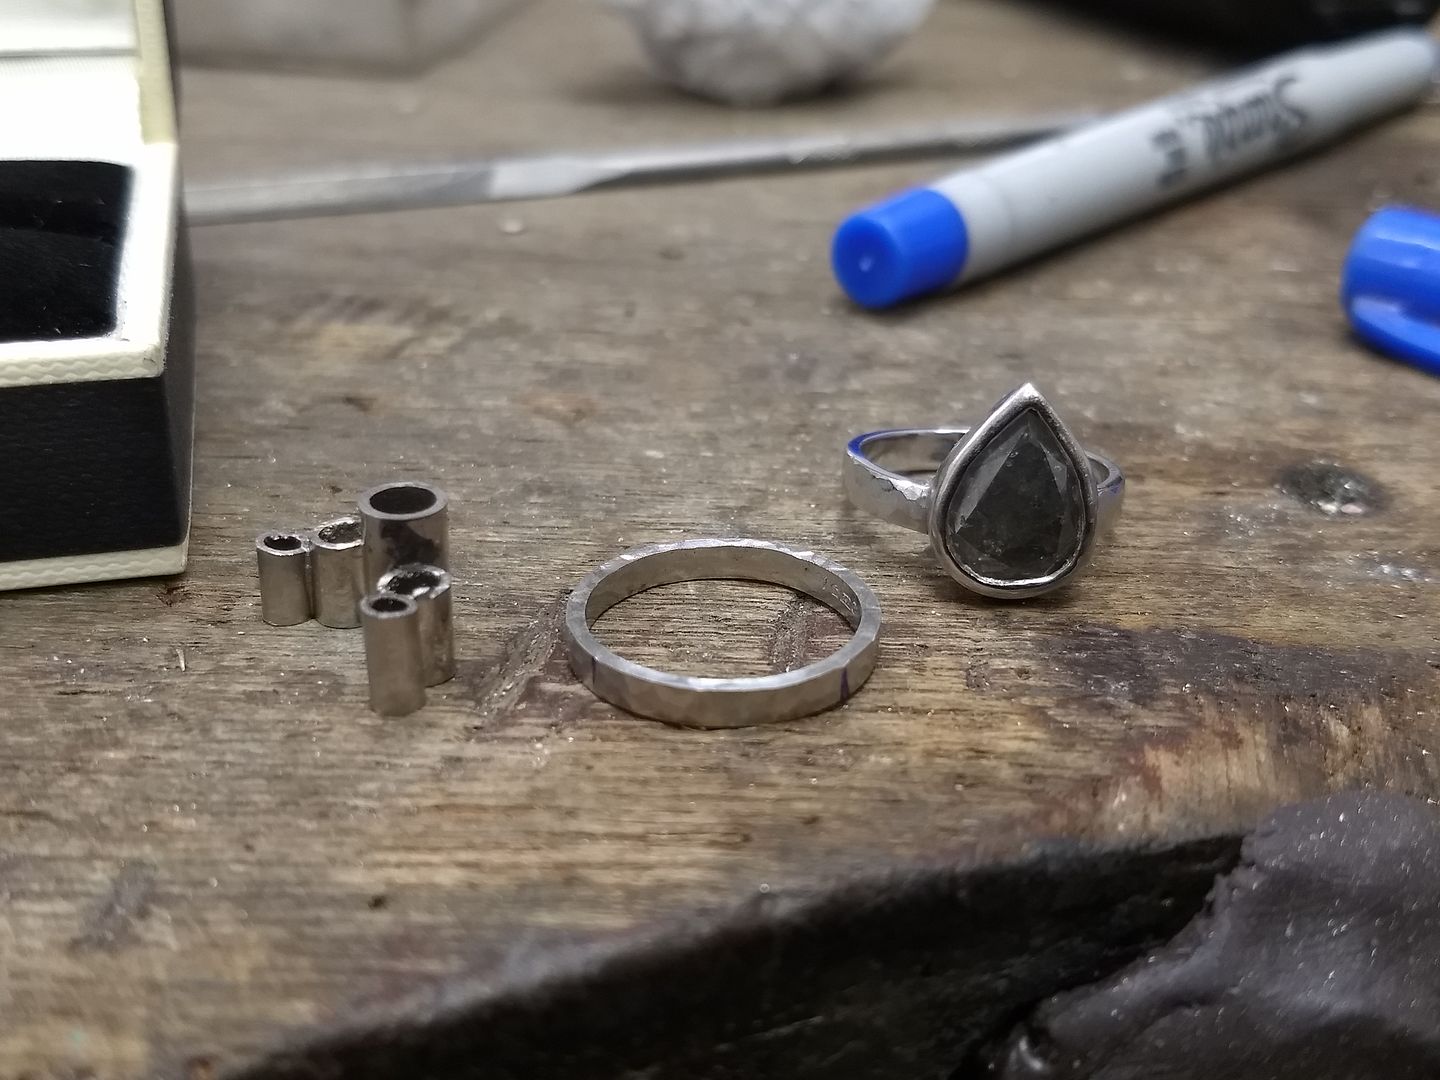
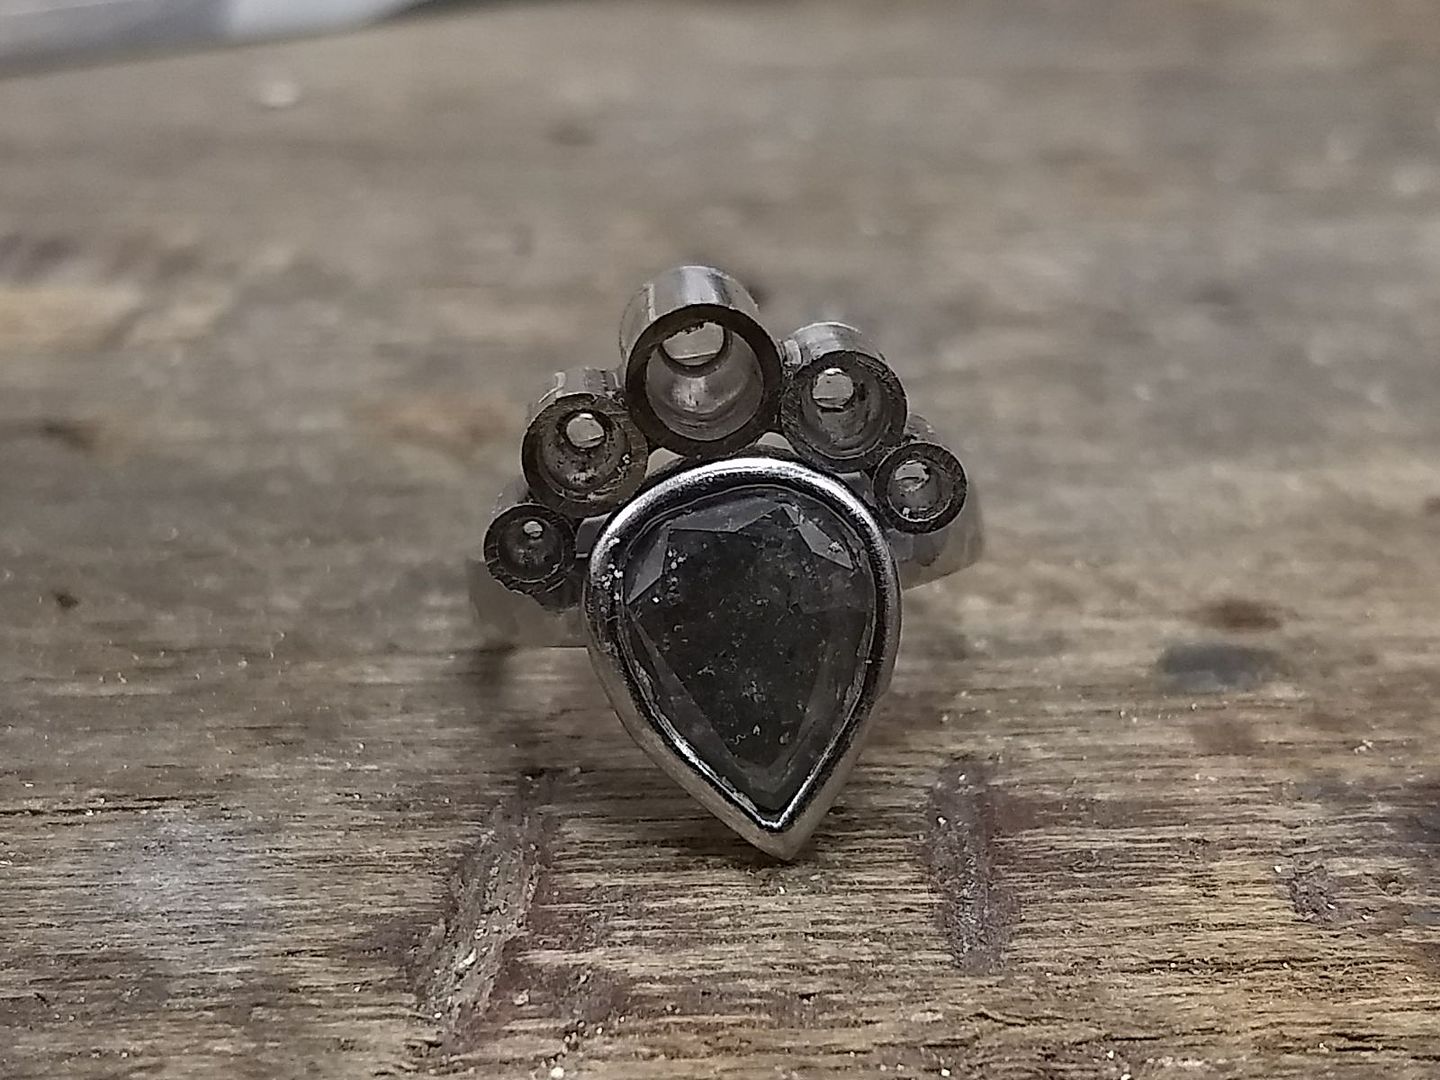
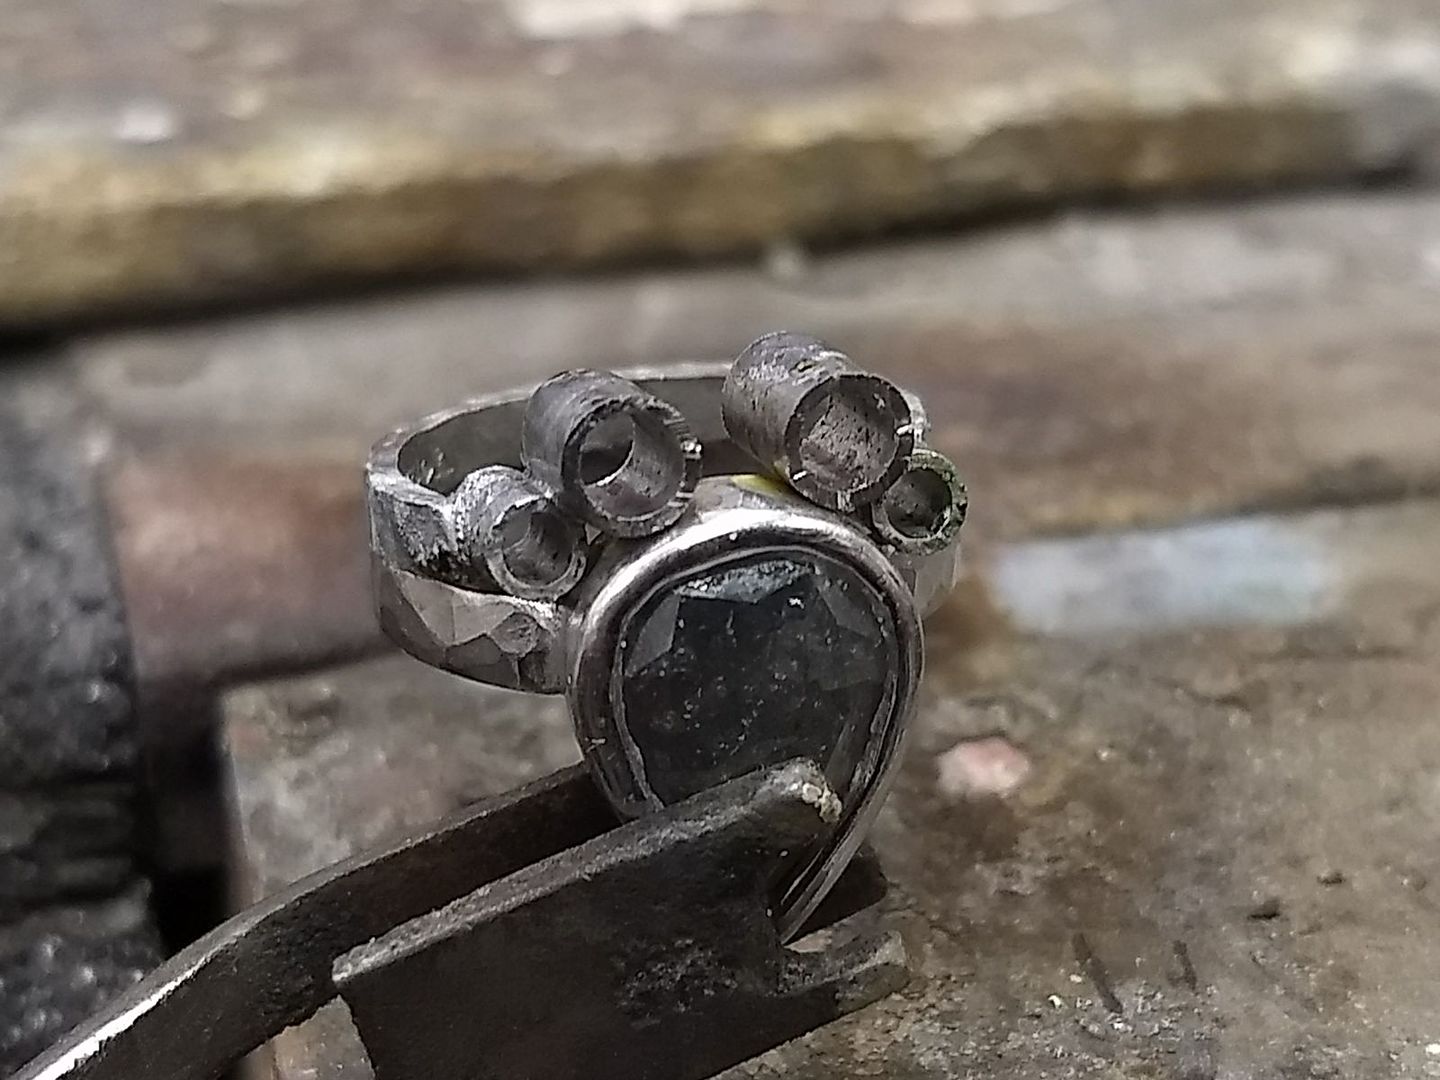
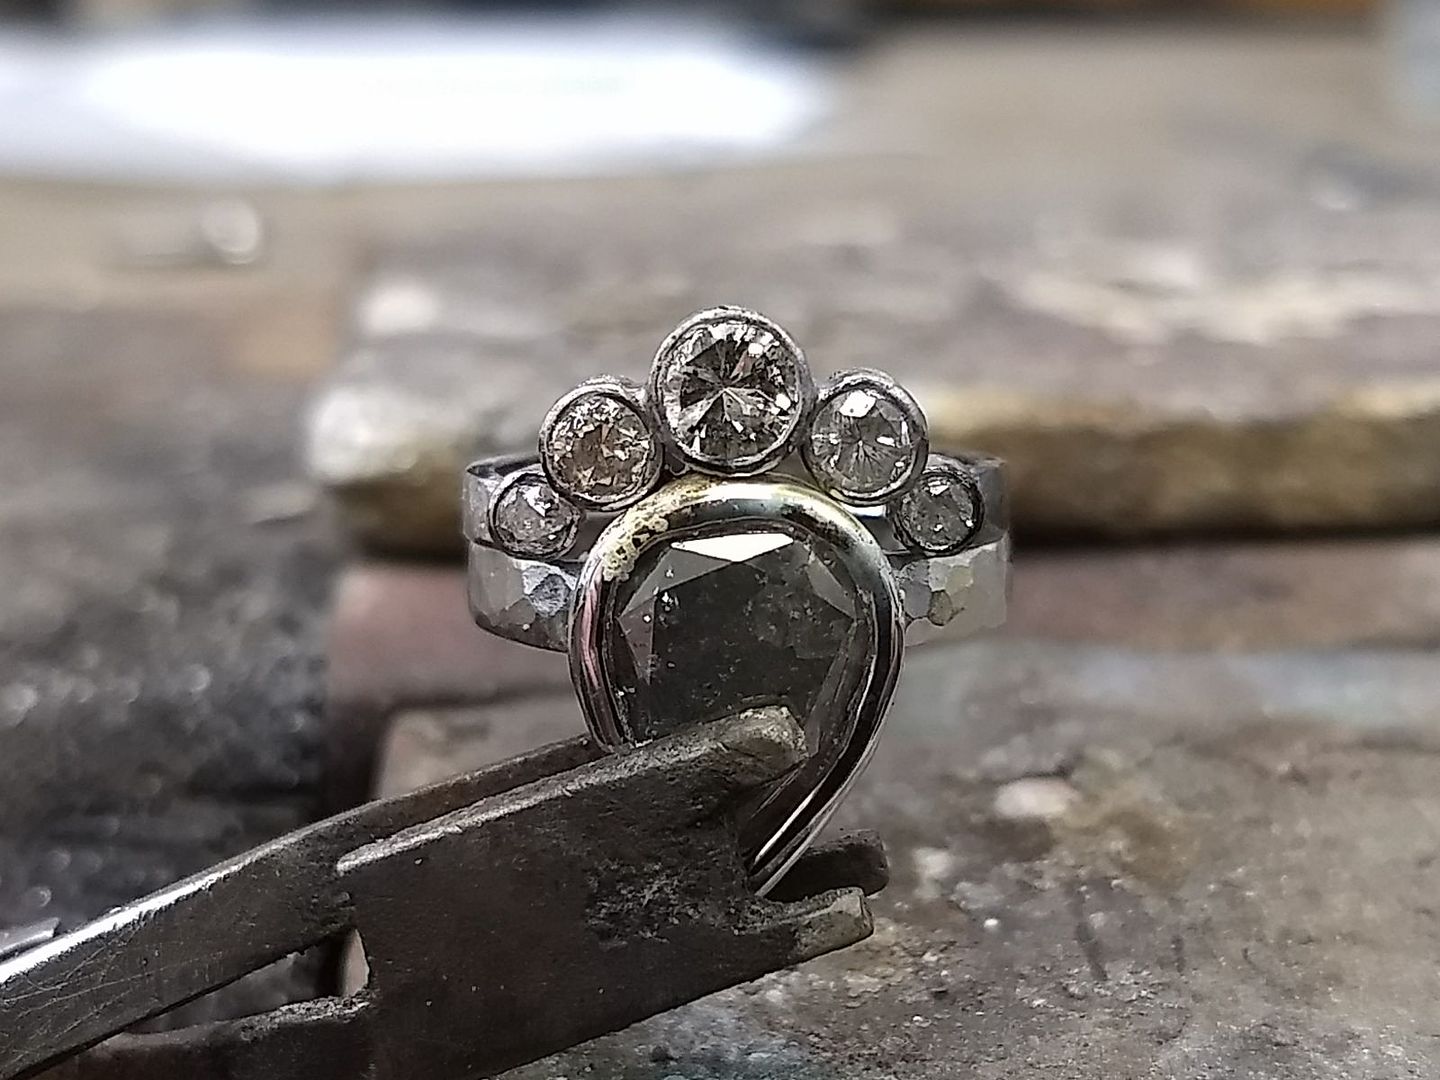
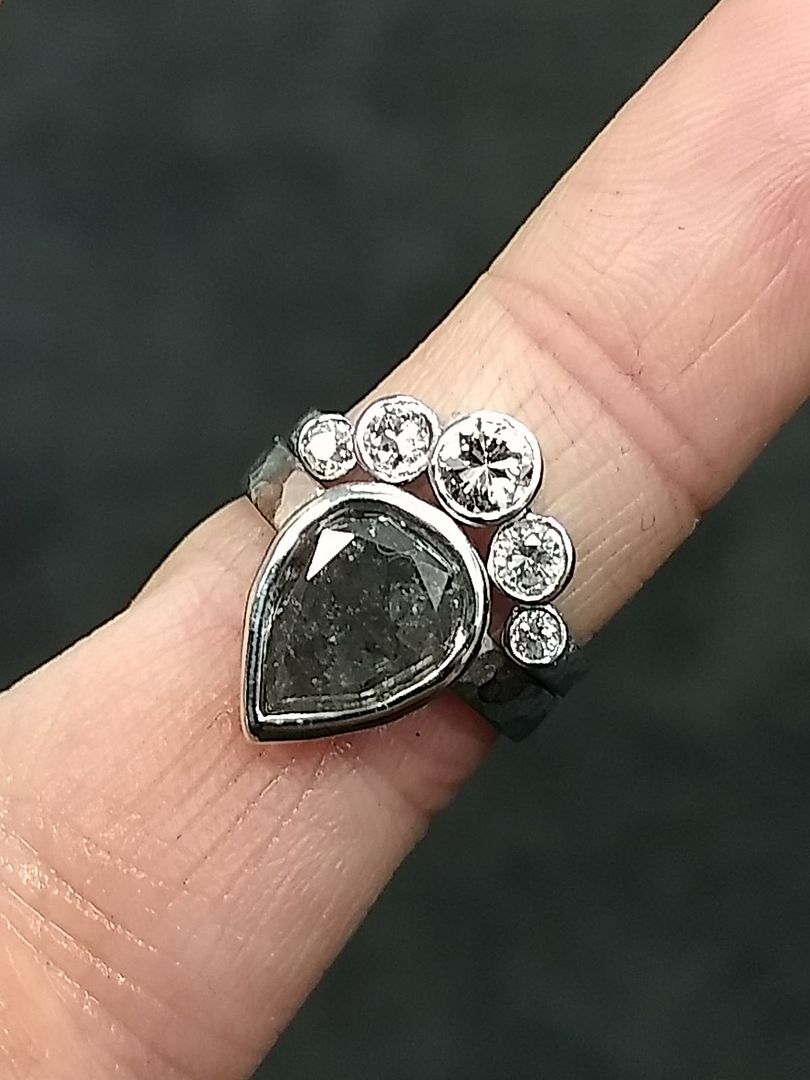
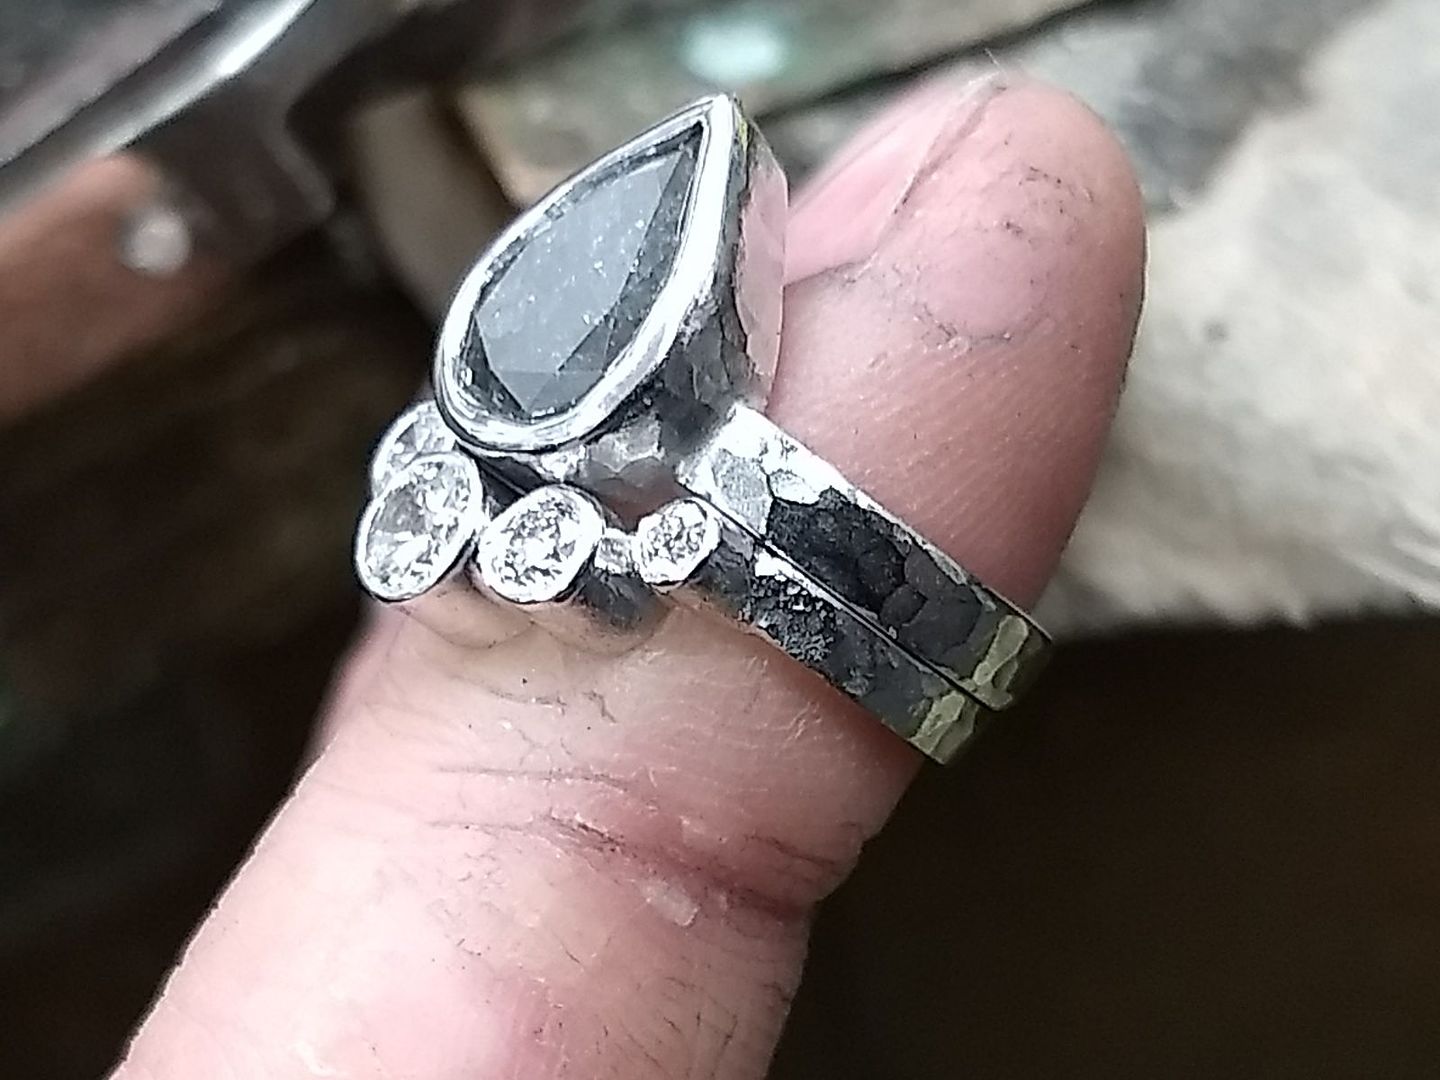
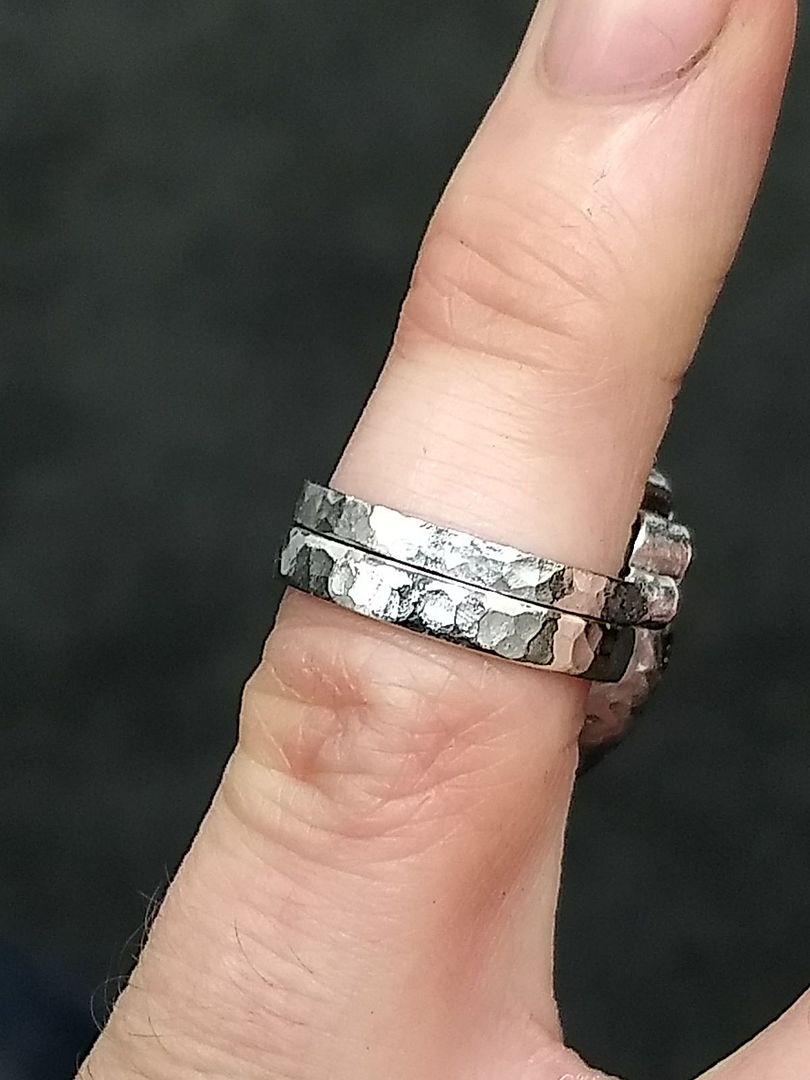
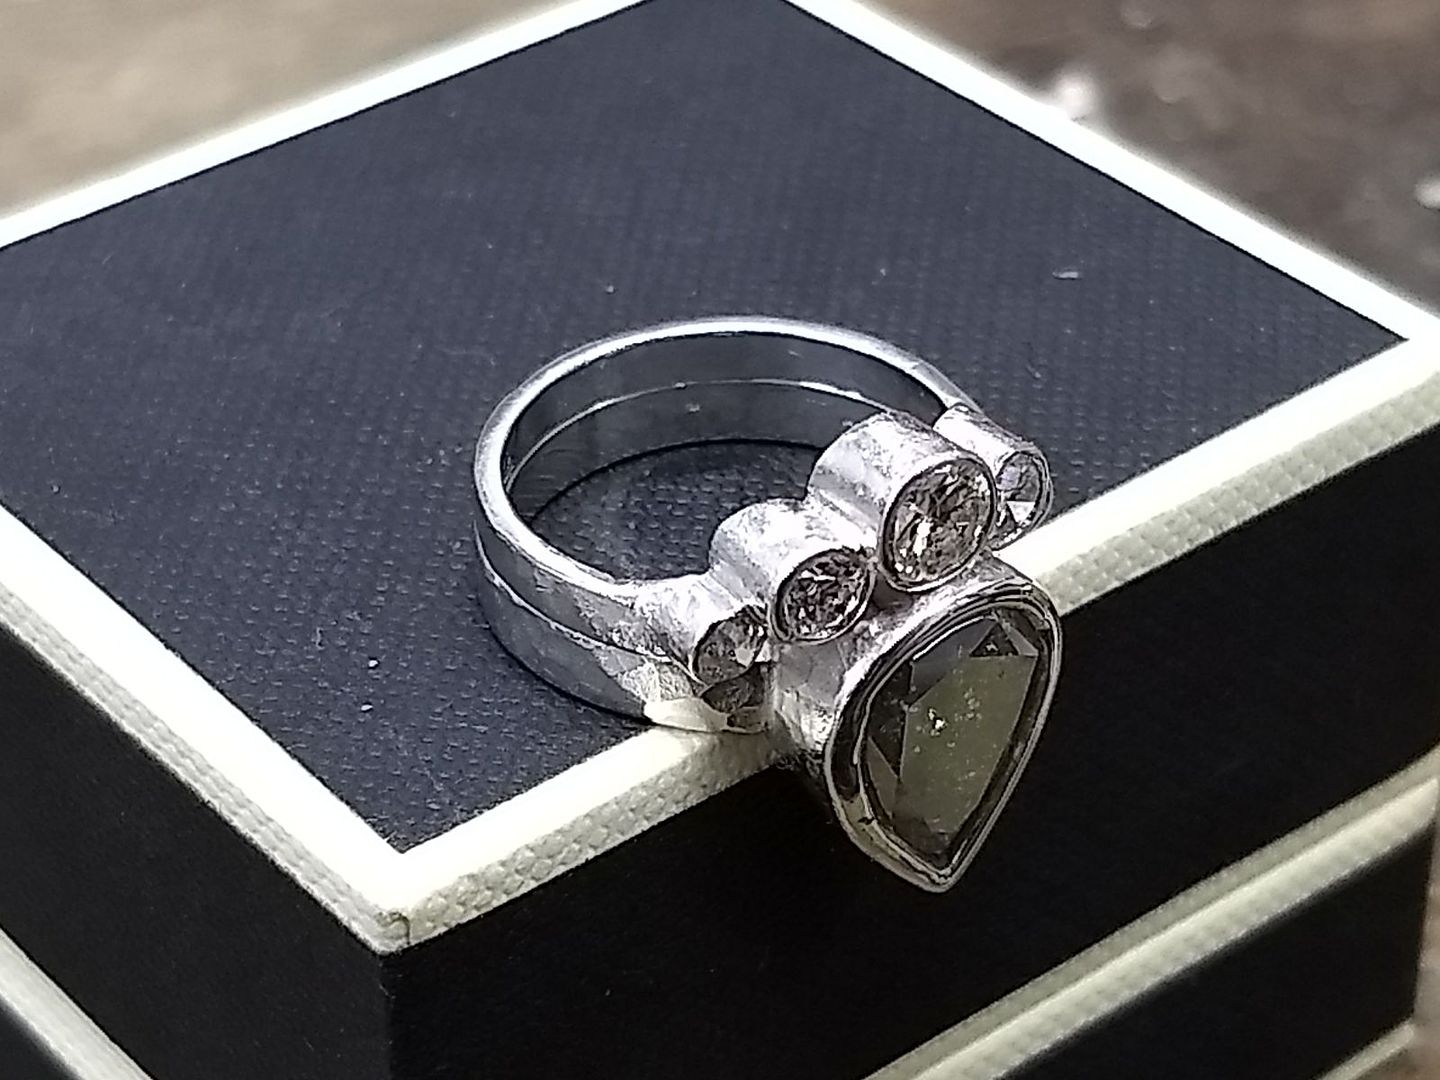
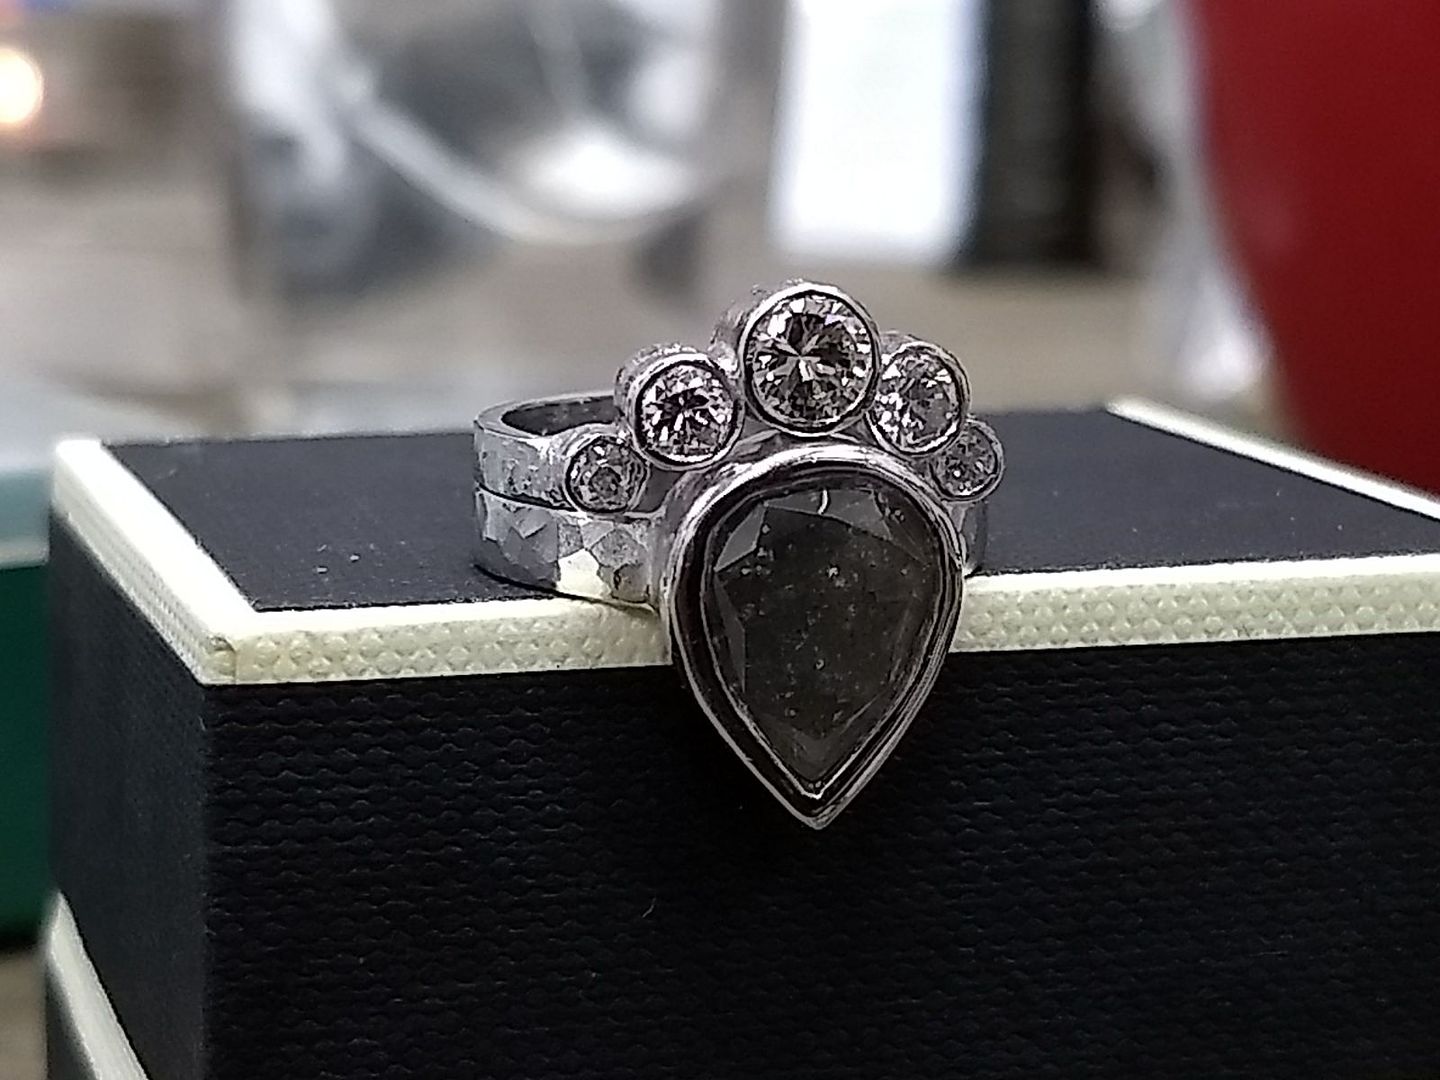
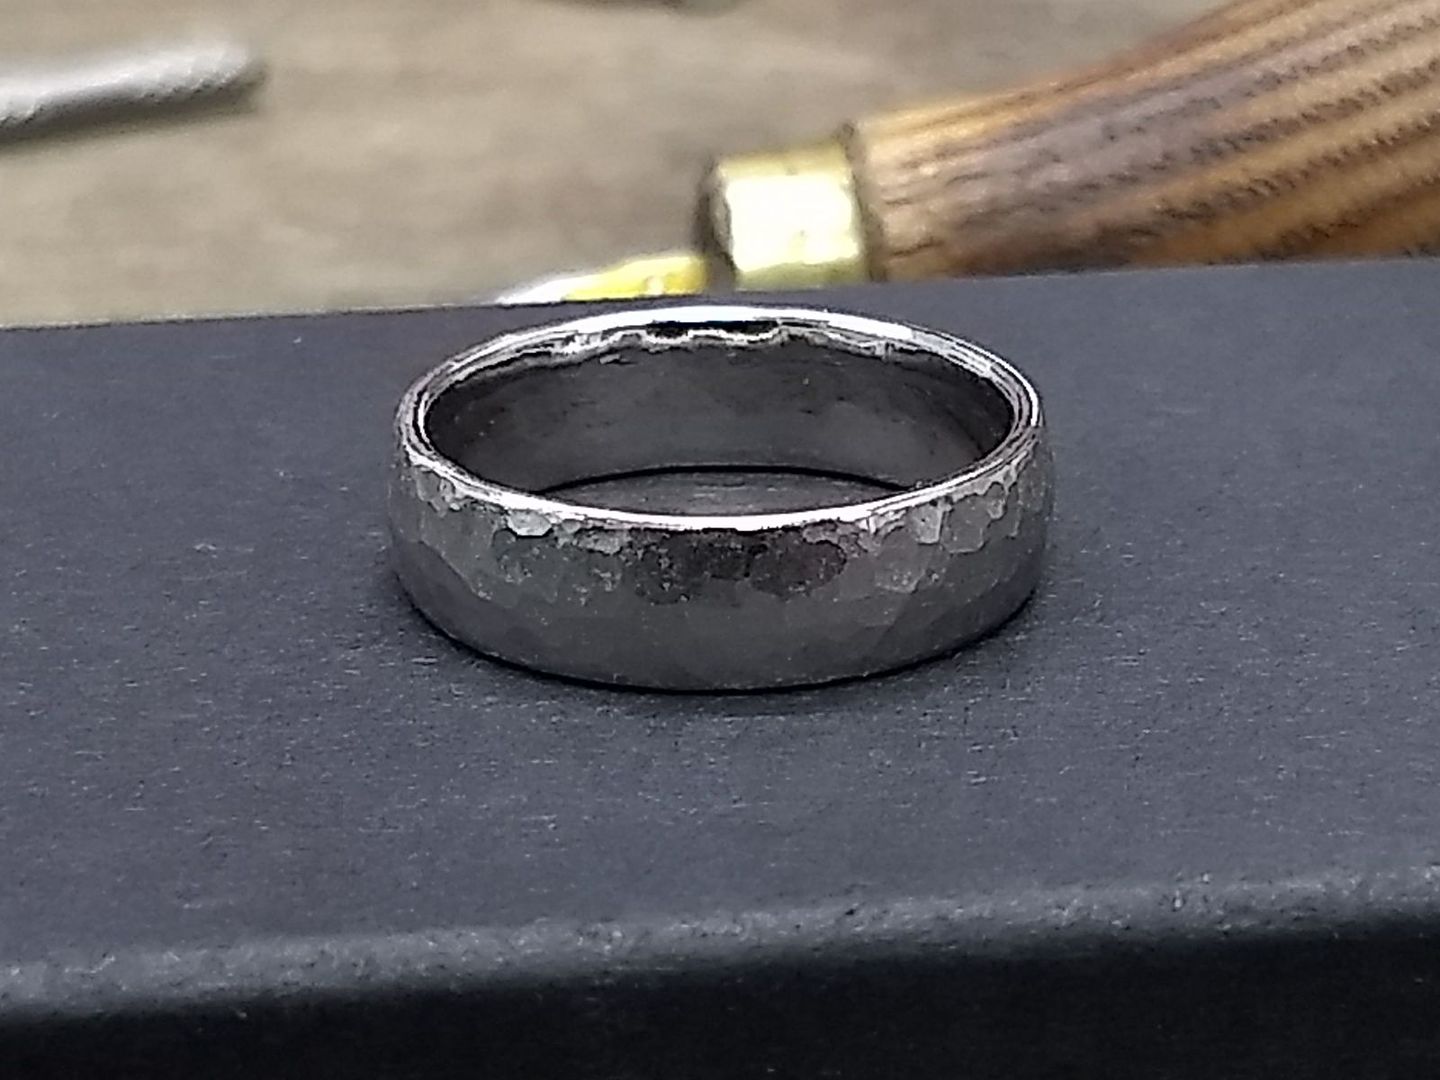
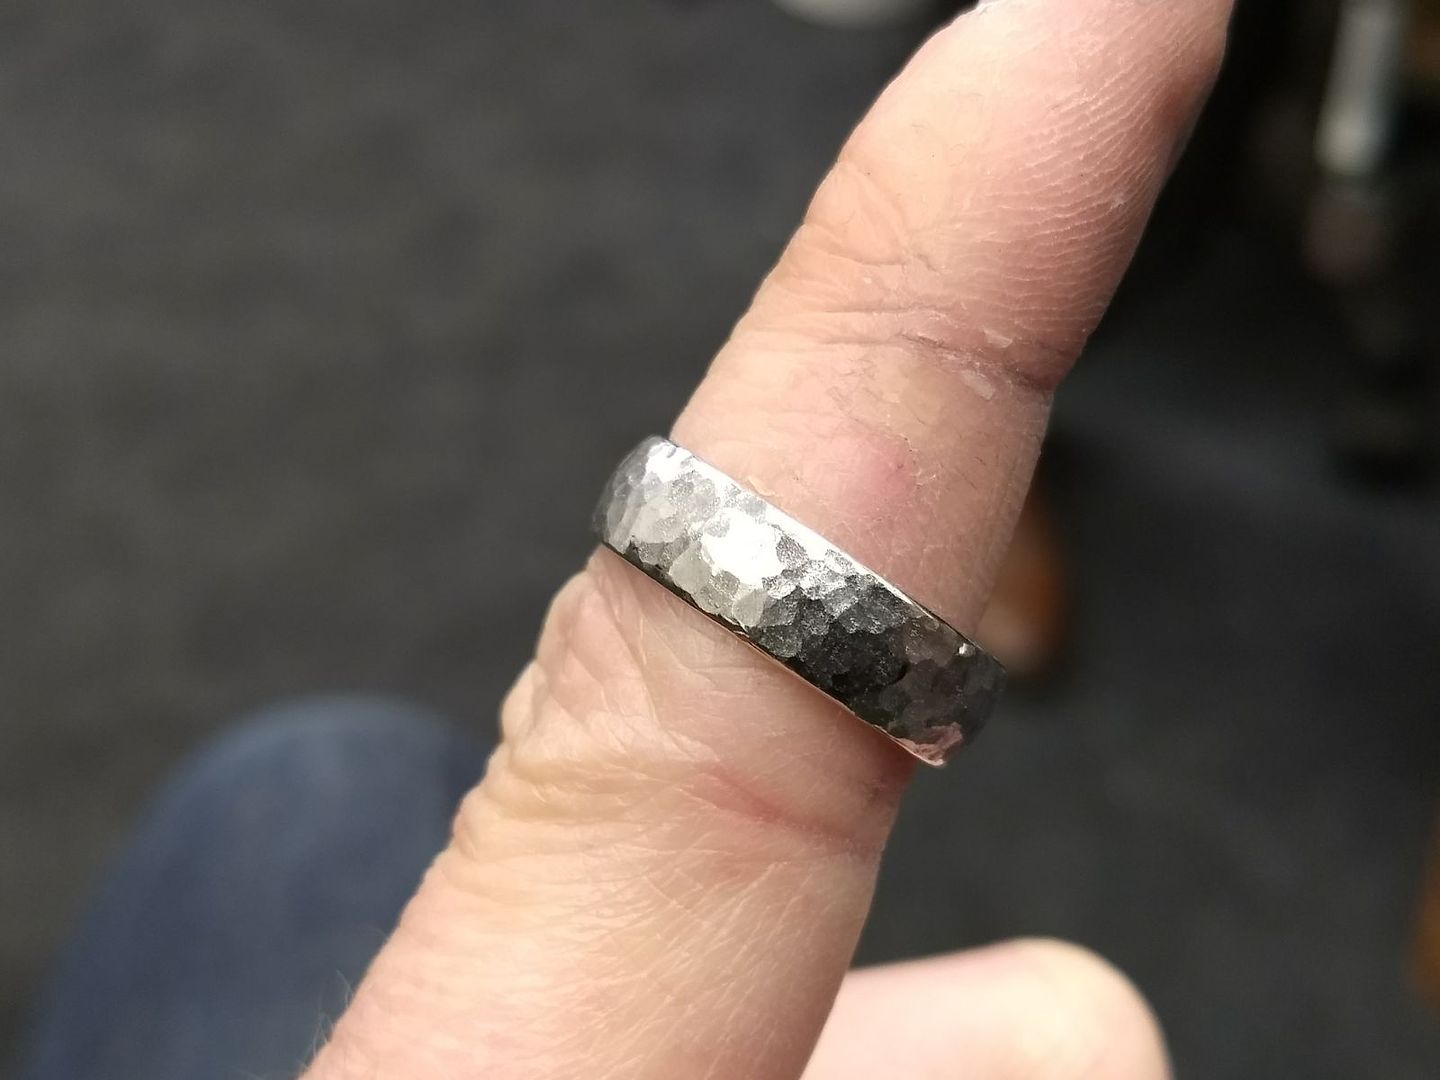
Another bespoke item produced today.
Remember that black, pear shaped diamond engagement ring I made a few months back? Here is the wedding band to match. The old cut diamonds were chosen to contrast the black stone while the metalwork is to be kept as close to the style of the engagement ring as possible:

Eddie
Remember that black, pear shaped diamond engagement ring I made a few months back? Here is the wedding band to match. The old cut diamonds were chosen to contrast the black stone while the metalwork is to be kept as close to the style of the engagement ring as possible:


Eddie
Gassing Station | Watches | Top of Page | What's New | My Stuff