Latest Model Production
Discussion


Those Saturn engines reminded me of the 1/20th resin kit Custom Replicas make. A mere $250 each 
http://www.customreplicas.com/images/Revised%20F1/...
(I didn't post the image as this is a thread for people to post their own work)
http://www.customreplicas.com/images/Revised%20F1/...
(I didn't post the image as this is a thread for people to post their own work)


This is the simple Airfix Spitfire Mk I. It is quite a basic little kit but goes together reasonably well. Dimensionally it is pretty much spot on and has captured the subtle curves of the original (especially the inverted gull wing section on the underside at the wing roots) better than nearly any other 1/72 Spitfire kit.
Here's the Revell 1/48 Sopwith Camel that I completed a few months ago...
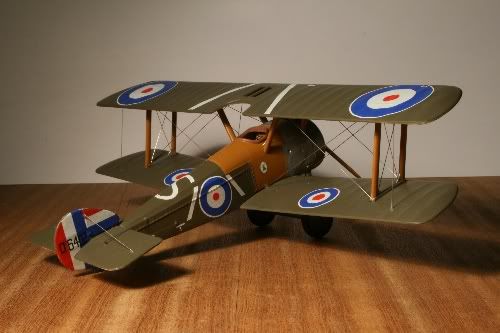
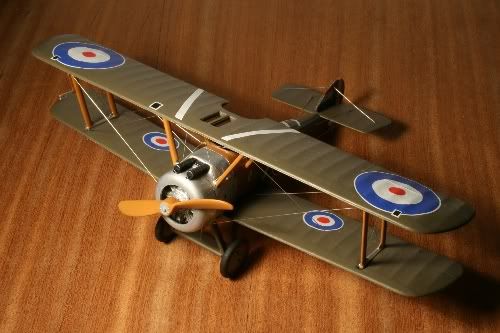
It was a good kit to use to get back into modelling. I tried several new things for the first time such as acrylic paints (brushed), dry brushing (cockpit panel and guns), using decal fix and some coats of satin varnish.
The rigging was done with 5amp fuse wire rolled under a steel rule to make it straight and fixed with PVA.
I was very pleased with the end result, I hope you like it too.
I made one of those kits to Simpo though I didnt have the realistic looking gold foil, mine was just painted gold.
These Saturn kits people are making...once its finished can you still seperate the various stages? I think it was on James May's U2 flight thing where he had a model that could be broken down in to all its stages and I thought I would quite fancy one of those!
These Saturn kits people are making...once its finished can you still seperate the various stages? I think it was on James May's U2 flight thing where he had a model that could be broken down in to all its stages and I thought I would quite fancy one of those!
deviant said:
I made one of those kits to Simpo though I didnt have the realistic looking gold foil, mine was just painted gold.
These Saturn kits people are making...once its finished can you still seperate the various stages? I think it was on James May's U2 flight thing where he had a model that could be broken down in to all its stages and I thought I would quite fancy one of those!
As I remember they have a lug-groove attachment so they twist off to come apart.These Saturn kits people are making...once its finished can you still seperate the various stages? I think it was on James May's U2 flight thing where he had a model that could be broken down in to all its stages and I thought I would quite fancy one of those!
mybrainhurts said:
Eric, that camera lens of yours needs a slap.
All your pics appear to depict an overdose of anhedral...
Too much macro setting.All your pics appear to depict an overdose of anhedral...
The next time I'll lay off the macro.
That's a smashing little Camel by the way.1/48 is probably better for WW1 subjects as they are very small in 1/72.
Eric, your wing roots needed a bit more attention. Also you seemed to have attached the canopy last. Correct way to do this is to put it on before painting, then you can rub down/fill it where it meets the fuselage. Then mask the glass bits and paint it along with the rest. Believe me it's a great feeling at the end when the tape comes off and you see the result. You will see what I mean later today when I post my build of the same kit.
Evangelion said:
Eric, your wing roots needed a bit more attention. Also you seemed to have attached the canopy last. Correct way to do this is to put it on before painting, then you can rub down/fill it where it meets the fuselage. Then mask the glass bits and paint it along with the rest. Believe me it's a great feeling at the end when the tape comes off and you see the result. You will see what I mean later today when I post my build of the same kit.
I'm having a nightmare with model filler on my 1:32 Spitfire rebuild. Getting rid of the gaps is no problem, feathering it all in isn't a problem, but trying to scribe panel lines in compound curved filler (I've tried car body filler and plastic filler, scalpel blades, scribers and a micro saw) is hopeless. It just crumbles away. In fact, since it's never going to make a perfect model anyway, I've given up with them. I'll just hope the preshading and camo covers them up well.With hindsight I wish I'd filled all the panel lines completely, painted the model and drawn them on afterwards with a pencil. Might even try that yet.
At least I'm learning stuff on a scrapper!
Eric Mc said:
That's a smashing little Camel by the way.1/48 is probably better for WW1 subjects as they are very small in 1/72.
Thanks Eric I moved onto an Italeri Macchi MB326 after completing the Camel, it's a nice looking jet, I thought in the Italian trainer all orange colour scheme it would be easy to paint too.
I'm still learning though, I made the mistake of filling some gaps and assuming that despite the slight mismatch in colour between the plastic and filler, the orange paint would cover them equally well. I will use primer next time.
deviant said:
I made one of those kits to Simpo though I didnt have the realistic looking gold foil, mine was just painted gold.
The photo was from Google; I'm sure I didn't use foil either. However for my A-level art project I made a scratchbuilt model of Skylab, based on brochures procured by writing to 'NASA, Houston, America' SlipStream77 said:
Here's the Revell 1/48 Sopwith Camel that I completed a few months ago...
It was a good kit to use to get back into modelling. I tried several new things for the first time such as acrylic paints (brushed), dry brushing (cockpit panel and guns), using decal fix and some coats of satin varnish.
The rigging was done with 5amp fuse wire rolled under a steel rule to make it straight and fixed with PVA.
I was very pleased with the end result, I hope you like it too.
Rigging looks very good; I've only tried it with stretched sprue. It was a good kit to use to get back into modelling. I tried several new things for the first time such as acrylic paints (brushed), dry brushing (cockpit panel and guns), using decal fix and some coats of satin varnish.
The rigging was done with 5amp fuse wire rolled under a steel rule to make it straight and fixed with PVA.
I was very pleased with the end result, I hope you like it too.
I guess the Camel is from the original Revell mould from mid 1960's? Still looks good - some of the Revell 1:72 aircraft are still cracking kits even by todays standards IMO.
mybrainhurts said:
dr_gn said:
Evangelion said:
Eric, your wing roots needed a bit more attention.
Looks like some carefully applied paint chipping/weathering along the wing root to me dr_gn said:
Rigging looks very good; I've only tried it with stretched sprue.
I guess the Camel is from the original Revell mould from mid 1960's? Still looks good - some of the Revell 1:72 aircraft are still cracking kits even by todays standards IMO.
Thanks, I don't actually know if the mould is a new one or not, it was pretty basic but there was some nice detail in places such as the cockpit panel.I guess the Camel is from the original Revell mould from mid 1960's? Still looks good - some of the Revell 1:72 aircraft are still cracking kits even by todays standards IMO.
Here's the box...
http://www.emodels.co.uk/plastic-kits/revell-sopwi...
SlipStream77 said:
dr_gn said:
Rigging looks very good; I've only tried it with stretched sprue.
I guess the Camel is from the original Revell mould from mid 1960's? Still looks good - some of the Revell 1:72 aircraft are still cracking kits even by todays standards IMO.
Thanks, I don't actually know if the mould is a new one or not, it was pretty basic but there was some nice detail in places such as the cockpit panel.I guess the Camel is from the original Revell mould from mid 1960's? Still looks good - some of the Revell 1:72 aircraft are still cracking kits even by todays standards IMO.
Here's the box...
http://www.emodels.co.uk/plastic-kits/revell-sopwi...
Gassing Station | Boats, Planes & Trains | Top of Page | What's New | My Stuff