Ultima Can Am Build: A Mini-Diary
Discussion


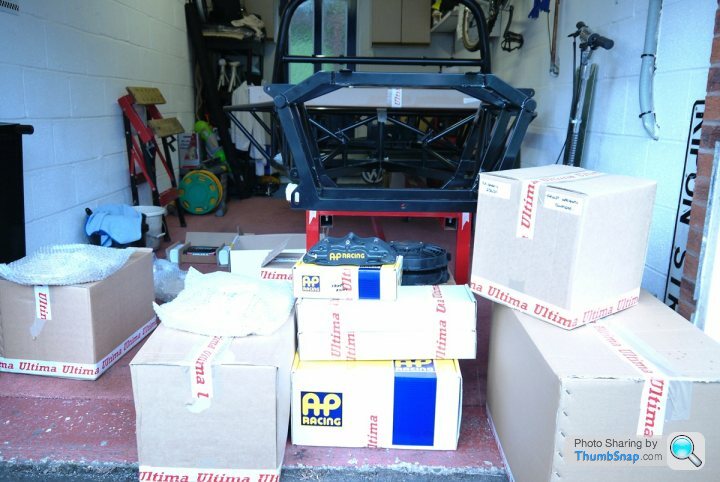
I'll try to keep this thread updated as I progress, but no doubt I'll fail miserably! While the Can Am will mostly follow the factory standard, I am planning a few personal touches of my own, which fellow builders may / may not find interesting. So, starting at the beginning……. I got my chassis at the end of June and started the build in early July. 6 weeks in and I'm fully panelled, the pedals, master cylinders, radiator & side pipes are all in. This week is all about the suspension & brakes – I can’t wait to get those big APs fitted!
As you’ll see, I’ve got put heat / sound proofing inside the double skin areas, as well as on the side panels. The front / rear bulkheads are both covered in gold reflective film and there’ll be more use of that in the future. The side radiator pipes are lagged too. Basically, I’m looking to manage as much heat of the car as possible, to make it more comfortable to drive. In order to compensate for lagging the pipes (as yes, I know these to aid in engine cooling), I’ve uprated the Pacet fans, fitting the largest I can to the factory radiator.
Rather than waffling any more, here’s a few pics. Time to order the remaining factory parts (except the body, that’ll have to wait until fitting time).
Enjoy & feel free to comment / discuss as I progress! Mark
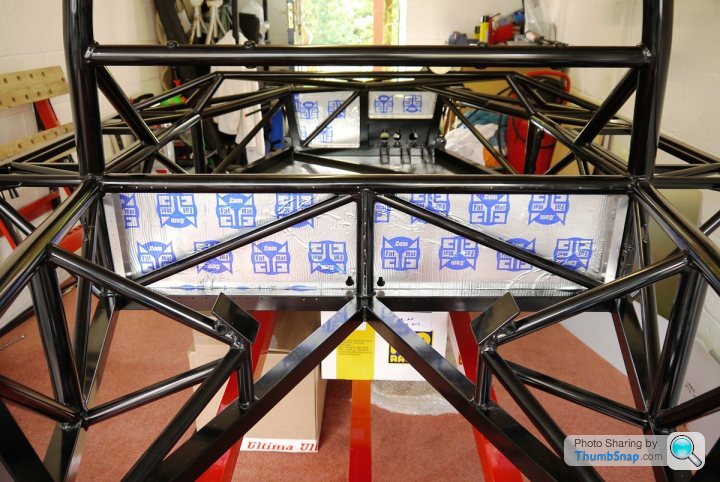
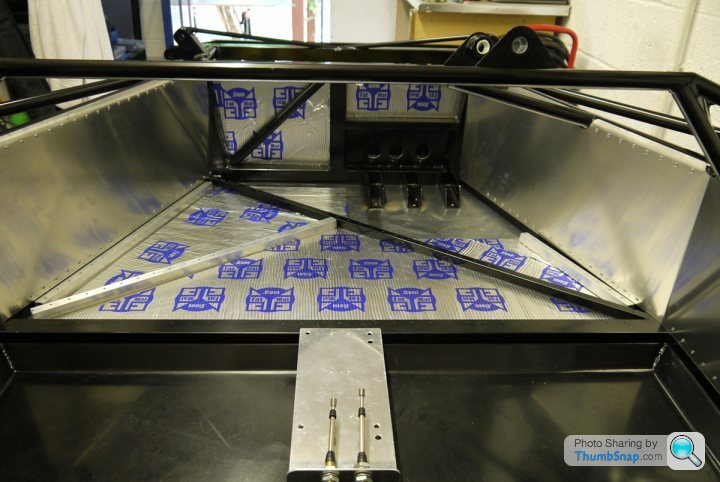
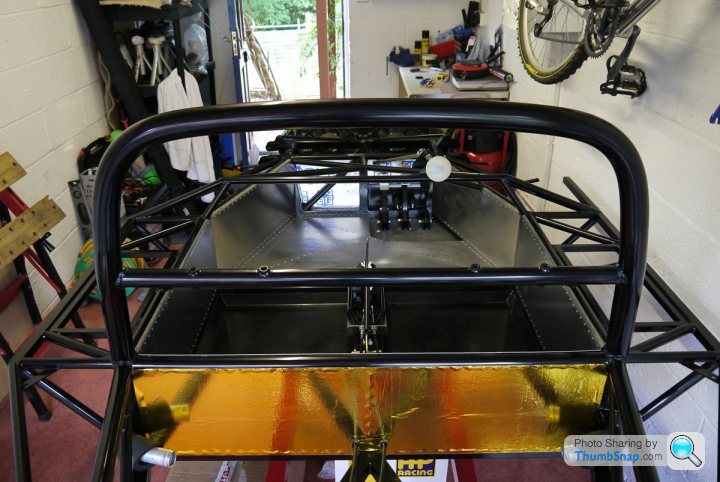
Thanks! The gold reflective stuff does look good and as you say, gives it a nice aerospace look. I'm not planning on having any alloy paneling on show, so everything will be covered one way or another.
Yes, the front of the car is Di-Noc'd. I did price up real carbon for all those pieces but I'm afraid my wallet couldn't afford it That said, applied carefully, it's hard to tell the difference (without close inspection), as an engineer mate of mine found a few weeks ago
Yes, the front of the car is Di-Noc'd. I did price up real carbon for all those pieces but I'm afraid my wallet couldn't afford it
That said, applied carefully, it's hard to tell the difference (without close inspection), as an engineer mate of mine found a few weeks ago Hi Graham... yes, now that I'm done with the paneling, things are much more fun.... I'm fed up of hoovering bucket loads of swarf out of my garage carpet & spending days with my hands covered in black silicon! Cheers for the tips, I've just ordered the remaining parts to get me to the body pre-fit stage, so will certainly watch all those areas for heat mgt.
I wasn't going to have A/C as I'm going the aeroscreen route, but having spoken to a few folks, it seems that it just helps to have it, no matter how much heat mgt is attempted.
I wasn't going to have A/C as I'm going the aeroscreen route, but having spoken to a few folks, it seems that it just helps to have it, no matter how much heat mgt is attempted.
spatz said:
looking at your coling pipe insualtion, I would say you will not be able to
get the luggage containers over them......maybe better try now and test it is much easier at this time of the build.
Luggage containers just ordered today get the luggage containers over them......maybe better try now and test it is much easier at this time of the build.
 The insulation is a rubberised foam and squishes down to just a few mm thick, so hopefully it'll compress enough. If not, I can trim accordingly... that said, I know another Ultima that used the same foam, so fingers crossed it should be OK
 UltimaCH said:
Looked through the Di-Noc stuff (3M) and found plenty of different shades of CF to choose from  Do you know if its the same stuff as Stig used in his Can Am build? How does it resist to wear and tear?
Not sure what Stig used, as that's a while ago and I believe Di-Noc is quite new - unless it was an early version / forerunner? I'm using the std 421 spec. Time will tell how resiliant it is, but so far it's pretty tuff stuff Do you know if its the same stuff as Stig used in his Can Am build? How does it resist to wear and tear?
drivin_me_nuts said:
Interesting photos thanls for posting them. I'm a few months behind you and still planning /deciding what to put in my GTR. One question your photos have brought up straight away and that is that you are building in a single garage. How are you finding it? Do you have enough space to work and move around?
(because it's one of the things I can't decide - and that's if I need to higher a workshop/garage for six months)
I had the same concern. However, having the dolly has made this a non-issue... so far. I can push the chassis easily from one side to the next (or even outside if the mood takes me!) and have plenty of room. As long as you can get something movable to put it on, I think you'll be fine. Now, when it comes to body pre-fit and the car is full width, this may be a different story!!(because it's one of the things I can't decide - and that's if I need to higher a workshop/garage for six months)
Steve_D said:
Perhaps a little late now but may help the next builder.
Don't drill and rivet the top edge of the ali skin of both the front and rear bulkheads. The body has to sit over this surface and be riveted at a later stage.
Steve
Steve - I didn't drill the top of the front b-head, but there's no mention in the build manual about not doing the rear, grrrr!!! That said there's a lot missing from the manual Don't drill and rivet the top edge of the ali skin of both the front and rear bulkheads. The body has to sit over this surface and be riveted at a later stage.
Steve
 Still at least there's still Stig's site out there
Storer said:
One of the issues with not riveting the top of the front and rear bulkheads is that with just the skin pins/clecos you do not get it as tight to the chassis rail as rivets would do while the adhesive cures.
That's why I used 4 clamps overnight while it went off Rather that than trying to line up all those rivet holes and transpose to the body, which unfortunately I'm going to have to do with the side pods & rear bodywork Stig said:
It isn't in the manual, but it is on my websites
To any would be builders, read & download Stig's sites, they are fab and have probably saved me hrs of swearing already!To the question of cooling.... I'm going the LS route, so from research and advice, it seems these are easier to keep cool than the SBC. Only time will tell!
Graham-P said:
This is my effort, on both sides I insulated the pipes then covered them with a couple of inches of dense foam then covered the top with self adhesive heat mat. It has cut down the heat but you can still feel warm air from under dash so hasn’t eliminated it completely.
Interesting idea..... maybe backed with some flexible plastic sheeting too, that could cut the warm waft down a bit more? What insulation did you use, out of interest?It's been a few weeks since my last update and despite helping friends join the Ultima scene, things are progressing nicely...
With another haul of parts in the garage, the wiring loom and a few other things have been sorted. I've managed to find some nice nylon twist wrapping that I'm covering the loom with (just for that finishing touch that no one will see!), as well as some great self-laminating labels that I'm putting on all the connectors as I go to make future work easier.
As it stands now, everything for the left hand side of the car is final fitted and the luggage pod is sound / heat proofed and fitted.


I'm working on a pair of rubber glands for the right hand side luggage pod (front & rear faces) which will allow me to push thru' the ECU connectors, but which will then close around loom to create a nice seal, keeping the housed ECU at a constant'ish temp. Once complete, I'll final fit the second luggage pod and with the exception of a few bits & bobs to tidy up, I'll be ready for the body, which is scheduled for the last week Oct.
The OZ wheels are in, which was a great delivery. When I got the tyres mounted, the guys at the garage were amazed by the size & lack of tread! They're expecting to be replacing them about 6mths after IVA, LOL!

My 996 turbo gearbox is away being 2WD converted & inverted, with a mixture of GT2 & turbo parts being fitted along the way. Many of the required engine components are on order / being fabricated and at the moment, the ambitious plan is to have the motor & 'box in place by Xmas, therefore, giving me 3-4mths to button everything up and build the interior, before my self-imposed Easter IVA.
For those of you who are that way inclined, I'm keeping a better updated photo diary of things over at: www.facebook.com/Ultima.Can.Am.Build although I will try to keep this thread updated once a month or so.
Thanks, Mark
With another haul of parts in the garage, the wiring loom and a few other things have been sorted. I've managed to find some nice nylon twist wrapping that I'm covering the loom with (just for that finishing touch that no one will see!), as well as some great self-laminating labels that I'm putting on all the connectors as I go to make future work easier.
As it stands now, everything for the left hand side of the car is final fitted and the luggage pod is sound / heat proofed and fitted.
I'm working on a pair of rubber glands for the right hand side luggage pod (front & rear faces) which will allow me to push thru' the ECU connectors, but which will then close around loom to create a nice seal, keeping the housed ECU at a constant'ish temp. Once complete, I'll final fit the second luggage pod and with the exception of a few bits & bobs to tidy up, I'll be ready for the body, which is scheduled for the last week Oct.
The OZ wheels are in, which was a great delivery. When I got the tyres mounted, the guys at the garage were amazed by the size & lack of tread! They're expecting to be replacing them about 6mths after IVA, LOL!
My 996 turbo gearbox is away being 2WD converted & inverted, with a mixture of GT2 & turbo parts being fitted along the way. Many of the required engine components are on order / being fabricated and at the moment, the ambitious plan is to have the motor & 'box in place by Xmas, therefore, giving me 3-4mths to button everything up and build the interior, before my self-imposed Easter IVA.
For those of you who are that way inclined, I'm keeping a better updated photo diary of things over at: www.facebook.com/Ultima.Can.Am.Build although I will try to keep this thread updated once a month or so.
Thanks, Mark
That sort of filling would need a sealed space, or like you say, it'll be snowing! Could be an option if the space could be made air-tight in some way.
I'm currently planning on building a removable panel for the space, but until the body arrives next mth, I'm not sure how feasible that is.
I'm currently planning on building a removable panel for the space, but until the body arrives next mth, I'm not sure how feasible that is.
SchimmS said:
Just on a side note, you`ll have to reroute the loom in the fuel tank area as the tanks have 2 flanges that are mounted on top of the chassis rail. On the first pic you posted you can see that the loom is fitted with 4 P-clips in that area (top).
Oh feck. I checked the manual for exactly that and couldn't find a chuffin pic showing them Thanks for the heads up, I'll either drop the wires over the side, or P-clip them to the flange if it's a mounting / anchoring location. Thanks for the spot!Quick update..... the body's here along with the tanks and a few other goodies! Time to get on with prefitting The width is fine in the garage, but length is a bit tricky, so I've removed the front clam and stored it in the conservatory along with the wheels (wifey loves me at the moment, LOL!).
I'm so glad I chose black, the car look stunning and when it's down on the ground with the aeroscreen, it should look quite menacing.


The width is fine in the garage, but length is a bit tricky, so I've removed the front clam and stored it in the conservatory along with the wheels (wifey loves me at the moment, LOL!).I'm so glad I chose black, the car look stunning and when it's down on the ground with the aeroscreen, it should look quite menacing.
It's been a while since I updated the thread, but I see a few PH'ers are following my build site on FB, so that's nice to see. Since the last update, I've been busy with the body pre-fit and panel alignments. It's an interesting task and I can see why folks ask the factory to do it... one tweak affects something else and sometimes, it's a little tricky to see how to adjust a particular joint. That said, there was a point where it just "clicked" and everything really started to come together. I'm now at the point where I'm really happy with the alignments (and £2K saved!) and it's time to start locking it all in. If all goes to plan, I should be able to take it off the dolly in the next 10'ish days.
While setting up the body, I've also been getting the tanks ready to fit. They're now painted and heat shielded on the engine side. Hopefully that'll help keep their temperatures under control.
Hopefully in the next couple of weeks I'll get some more engine pics out, as well as some showing the car down on the ground, which really will feel like a big step forwards. In the meantime, here's a few more pre-fit pics...
chucknorris said:
I am at exactly the same stage with my CanAm so it's great to be able to compare builds.
I am totally with you on the body fit, I must have spent a week of evenings tweaking the hinges thinking this is never going to line up, then bang! It all just fitted with perfect gaps all around :-)
Ah, I didn't realise! I thought I was about the only Can Am builder on here at the moment... do you have any pics or a build site? I notice you're fabricating some parts yourself, I'd be interested to hear what you're doing I am totally with you on the body fit, I must have spent a week of evenings tweaking the hinges thinking this is never going to line up, then bang! It all just fitted with perfect gaps all around :-)
Following fitment of the side pods, today was a big day... the Can Am was hoisted off the dolly (now for sale in the classifieds ) and onto the floor. Using 2 engine cranes, we got it down pretty quickly and without issue. Now sat on it's wheels, rear clam removed and reversed into the garage, it's surprising how much more room there is around the car... I should have done this ages ago!


) and onto the floor. Using 2 engine cranes, we got it down pretty quickly and without issue. Now sat on it's wheels, rear clam removed and reversed into the garage, it's surprising how much more room there is around the car... I should have done this ages ago!While more space would always be nice, for the vast majority of the time, the single garage has been fine... the caveat being, some overspill storage is required from time to time While on the dolly, it was easy to do all the hardware build up, as the chassis can just be pushed from side to side as needed.
With the body on, space got tighter, but mostly because of the height of the water heater in the garage and my workbench positioning. With the car on the floor & the rear clom off for painting & grills, etc, it's now back into easy mode. The water heater no longer intrudes and space all round is fine. If I want, I can now roll it onto the drive for max space.
I've done a few jobs sat in the lounge, which does get some huffs and rolled eyes, but they're always clean jobs, so no real probs there!
A Can Am is an easier car to work on because the bodywork comes off in more (smaller) pieces and the doors don't need any width to open, but I'd still say it's not too big an issue to build an Ultima in a single garage.... it just needs a bit more planning
While on the dolly, it was easy to do all the hardware build up, as the chassis can just be pushed from side to side as needed.With the body on, space got tighter, but mostly because of the height of the water heater in the garage and my workbench positioning. With the car on the floor & the rear clom off for painting & grills, etc, it's now back into easy mode. The water heater no longer intrudes and space all round is fine. If I want, I can now roll it onto the drive for max space.
I've done a few jobs sat in the lounge, which does get some huffs and rolled eyes, but they're always clean jobs, so no real probs there!
A Can Am is an easier car to work on because the bodywork comes off in more (smaller) pieces and the doors don't need any width to open, but I'd still say it's not too big an issue to build an Ultima in a single garage.... it just needs a bit more planning
Given how cold it is outside and my general lack of desire to freeze my backside off, I thought I'd do a quick update on the build. It's actually been an exciting week with interior panels going off for trimming, but more importantly the engine firing for the first time! My complete drivetrain, including engine electrical system, fuel system, 911 twin turbo gearbox and exhaust is installed in AB's spare chassis and being prepared for rolling road. Fingers crossed all will go well and I'll take delivery towards the end of the month. In the meantime, here's a short video for you to enjoy...
LS3 V8 & AutoBionics Exhaust
There's plenty of progress made in other areas with all engine bay work now complete and ready for the LS3 package's imminent arrival.
All the sidepod wheel facing surfaces have been PaintShilded...

The wheels have their machined billet centrecaps...

And the electronic servo controlled heater valve is fitted....

There's more updates to come on the interior and electrics, later in the month hopefully. Until then, enjoy the V8!
LS3 V8 & AutoBionics Exhaust
There's plenty of progress made in other areas with all engine bay work now complete and ready for the LS3 package's imminent arrival.
All the sidepod wheel facing surfaces have been PaintShilded...
The wheels have their machined billet centrecaps...
And the electronic servo controlled heater valve is fitted....
There's more updates to come on the interior and electrics, later in the month hopefully. Until then, enjoy the V8!
Gassing Station | Ultima | Top of Page | What's New | My Stuff