geeks Roll off roof observatory - pic heavy!
Discussion


Back just before the covid stuff I got into Astrophotography, it has since got a bit out of hand and I have been wanting my own observatory for some time. In April 2022 we moved and I suddenly had the space to fit one in. As I am now about 90% of the way through it seems like a good time to put a thread up.
I wanted a space where I could store some gear and also image from. A traditional Dome would be about 2-3k plus that again to automate it plus ground works. While it would look great it would lack some storage space and also the costs. So I decided to go down the other very popular route of a shed with a roof that slides off to one side. Again I looked at premade solutions, for what I wanted the price would have been 2-3k plus ground works plus a few hundred quid to automate so much better. But the more I thought about the more I felt that actually I could do this myself for a lower cost and also I love a project, so what the hell why not DIY this b h?!
h?!
Oh Dan, you should know better than that by now!
October 2022 having acquired some cement, a mixer and 90% of the materials to build it I started to get stuck in. October was the first chance I had to start it, having moved in April we had spent the summer (the hottest one on record if memory serves) getting the house and garden in order, what I hadn't appreciated when we bought the place is how much half an acre requires on the upkeep especially when the previous owners hadn't tended to things for a couple of years but we persevered and got to a stage where I could get started on my Ob. What I thought would be a 5 week project turned into an 18 months of excuses, more on that to follow.
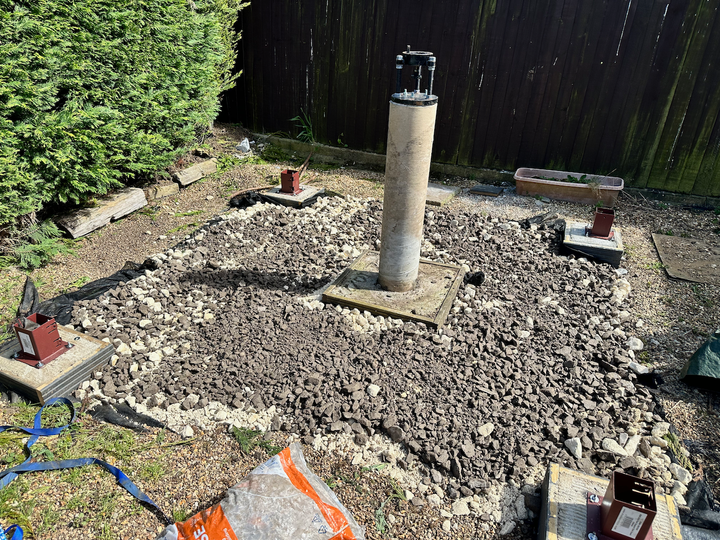
First up was to get the pier made up, the is main part of such things aparet from the surrounding structure, its where the telescope and associated gear will sit and dot he actual imaging from. I started by clearing the area of an old shed, weeds and general detritus and like all things building, digging a big arse hole! 2ft x 2ft wide and 3ft deep, I then shuttered the top edges with some scrap decking planks, place in some steel rebar and started filling the hole with cement to form a solid base.
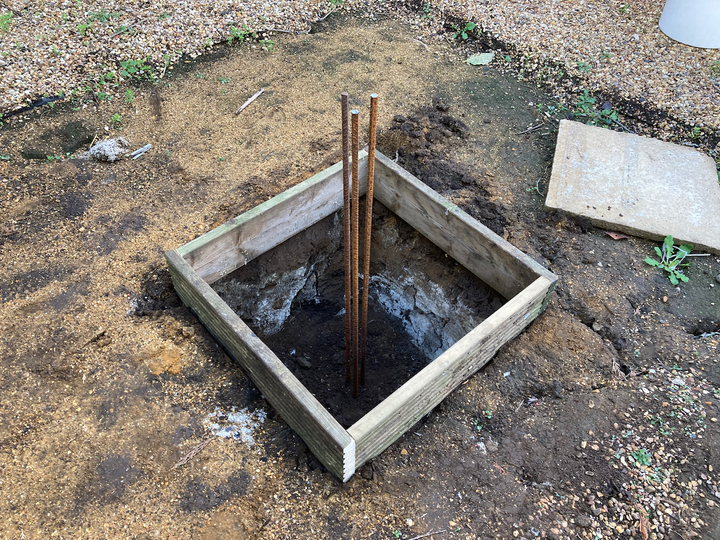
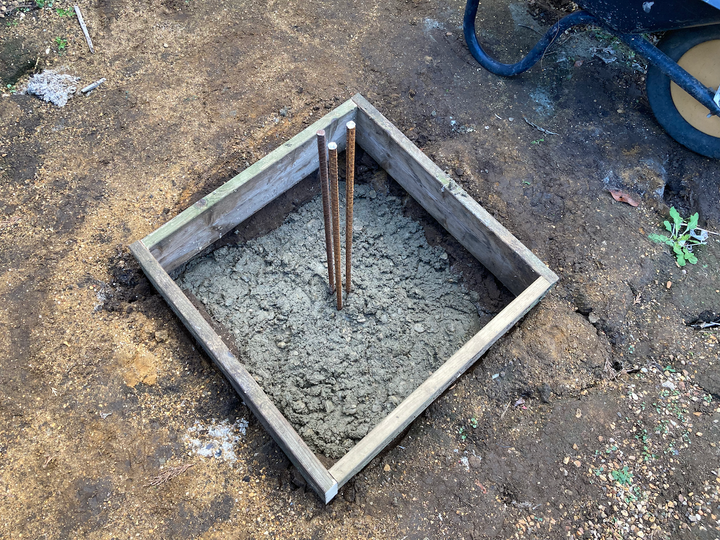
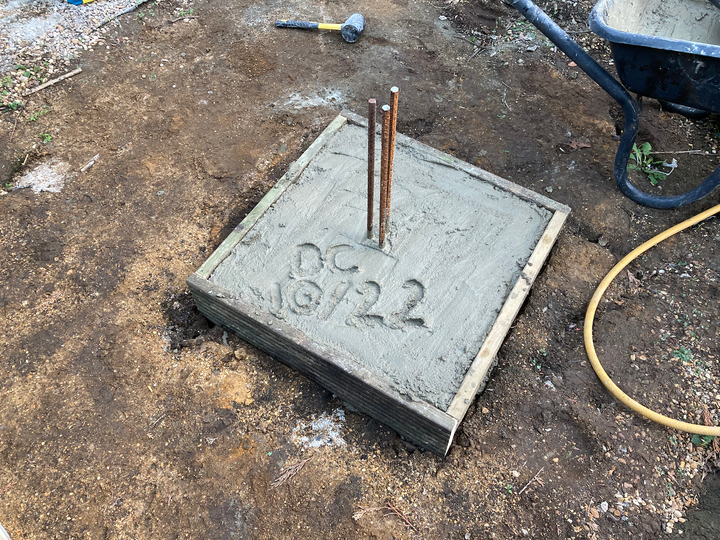
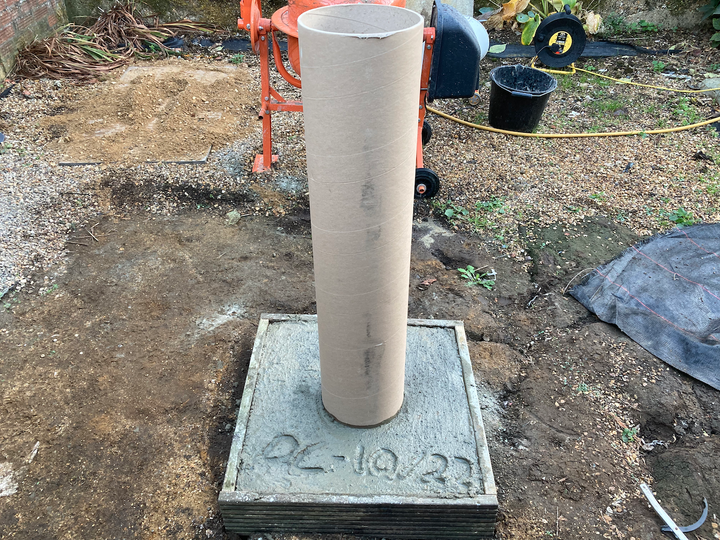
Next up was to make the pier, purchased an 8" tube from amazon, placed that on top and filled that with even more cement.
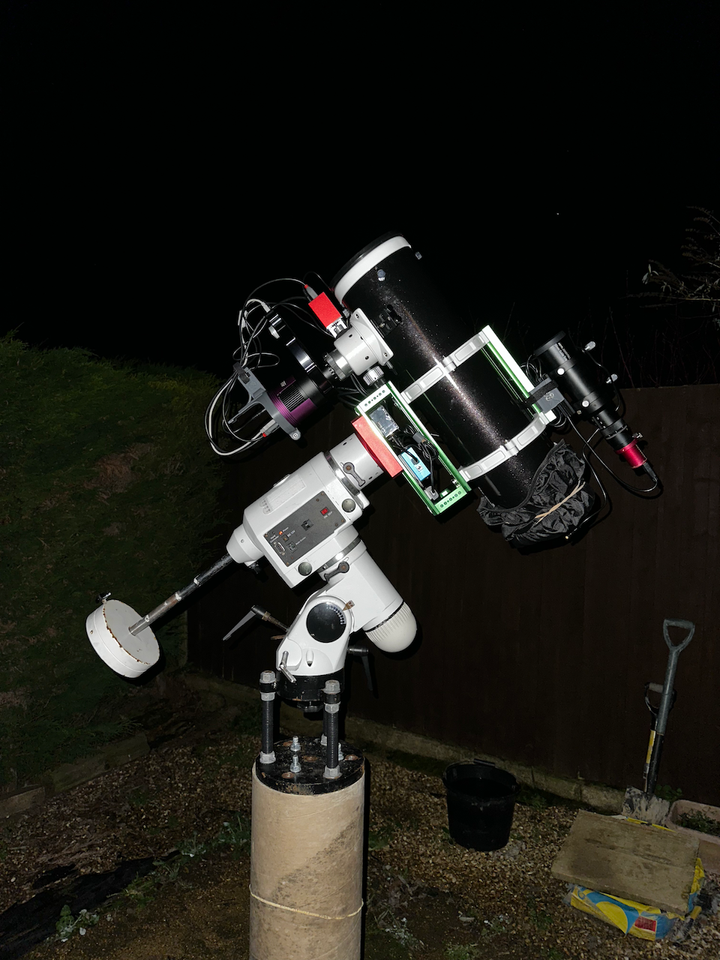
Now the tricky bit, I had purchased a cradle (also known as a pier adapter) to sit atop the pier that the mount is bolted to in order to do the imaging stuff. What I hadn't realised was that the OD and the original mounting holes were just too close to my 8" tube. New holes would need drilling but the steel plate was 3/4" thick! I had no way of drilling new ones, I started a thread on this and a very nice PH'er V10Mike came to my rescue, he had the kit to drill the holes out for me and was only 30 minutes from my door step, perfect, Mike I said it in September 2022 and I will say it again, thank you, you legend! (N.B this is the reason for this thread I had a few people request a build thread and Mike was very keen to see the results)
Pier adapter pre new holes:
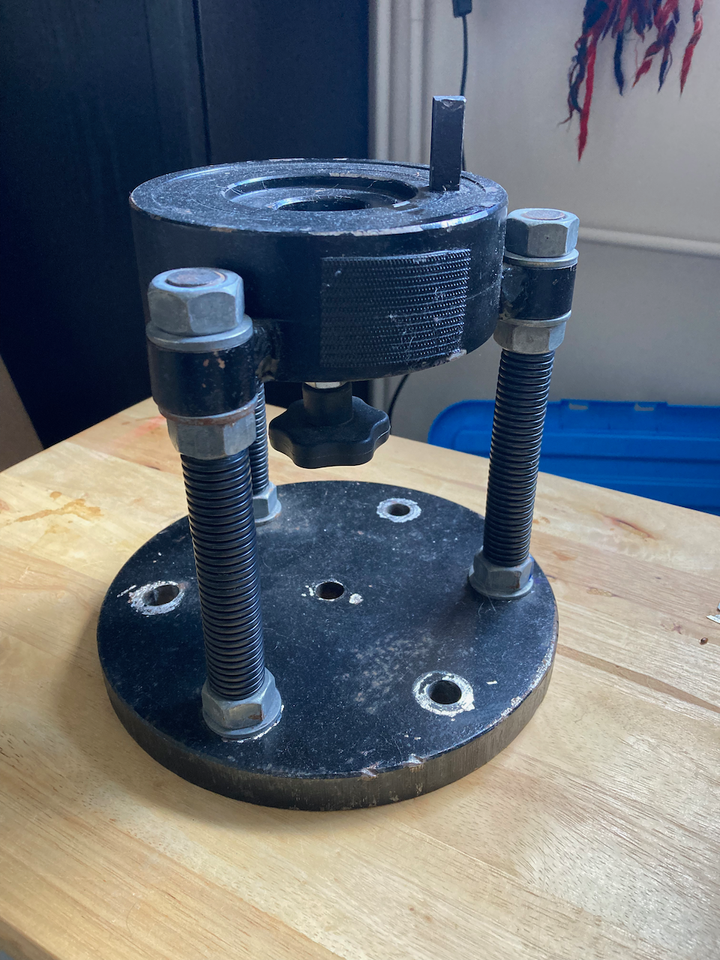
Pier adapter with freshly drilled PH approved holes and new threaded bar mounted:
Everything in place

My new pier covered over and visibile from my office window.
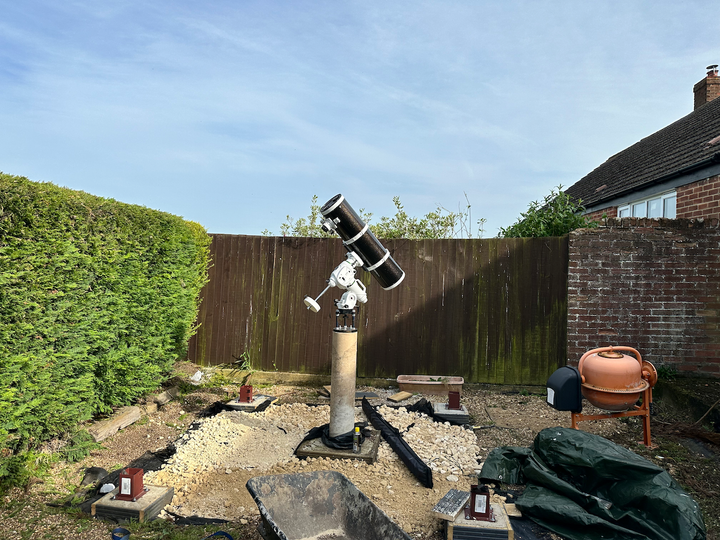
Having now assembled this I had to test it out, it was now November 2022, the weather had closed in around me, work had got busy and I had a birthday, Christmas was fast approaching and I was losing light to get things done, no matter I thought, I will spend the astro season imaging with the pier and get on with the build as soon as the weather opened up in 2023..... Famous last words, however, here are some action shots and some of the results.

I wanted a space where I could store some gear and also image from. A traditional Dome would be about 2-3k plus that again to automate it plus ground works. While it would look great it would lack some storage space and also the costs. So I decided to go down the other very popular route of a shed with a roof that slides off to one side. Again I looked at premade solutions, for what I wanted the price would have been 2-3k plus ground works plus a few hundred quid to automate so much better. But the more I thought about the more I felt that actually I could do this myself for a lower cost and also I love a project, so what the hell why not DIY this b
h?!Oh Dan, you should know better than that by now!
October 2022 having acquired some cement, a mixer and 90% of the materials to build it I started to get stuck in. October was the first chance I had to start it, having moved in April we had spent the summer (the hottest one on record if memory serves) getting the house and garden in order, what I hadn't appreciated when we bought the place is how much half an acre requires on the upkeep especially when the previous owners hadn't tended to things for a couple of years but we persevered and got to a stage where I could get started on my Ob. What I thought would be a 5 week project turned into an 18 months of excuses, more on that to follow.
First up was to get the pier made up, the is main part of such things aparet from the surrounding structure, its where the telescope and associated gear will sit and dot he actual imaging from. I started by clearing the area of an old shed, weeds and general detritus and like all things building, digging a big arse hole! 2ft x 2ft wide and 3ft deep, I then shuttered the top edges with some scrap decking planks, place in some steel rebar and started filling the hole with cement to form a solid base.
Next up was to make the pier, purchased an 8" tube from amazon, placed that on top and filled that with even more cement.
Now the tricky bit, I had purchased a cradle (also known as a pier adapter) to sit atop the pier that the mount is bolted to in order to do the imaging stuff. What I hadn't realised was that the OD and the original mounting holes were just too close to my 8" tube. New holes would need drilling but the steel plate was 3/4" thick! I had no way of drilling new ones, I started a thread on this and a very nice PH'er V10Mike came to my rescue, he had the kit to drill the holes out for me and was only 30 minutes from my door step, perfect, Mike I said it in September 2022 and I will say it again, thank you, you legend! (N.B this is the reason for this thread I had a few people request a build thread and Mike was very keen to see the results)
Pier adapter pre new holes:
Pier adapter with freshly drilled PH approved holes and new threaded bar mounted:
Everything in place
My new pier covered over and visibile from my office window.
Having now assembled this I had to test it out, it was now November 2022, the weather had closed in around me, work had got busy and I had a birthday, Christmas was fast approaching and I was losing light to get things done, no matter I thought, I will spend the astro season imaging with the pier and get on with the build as soon as the weather opened up in 2023..... Famous last words, however, here are some action shots and some of the results.

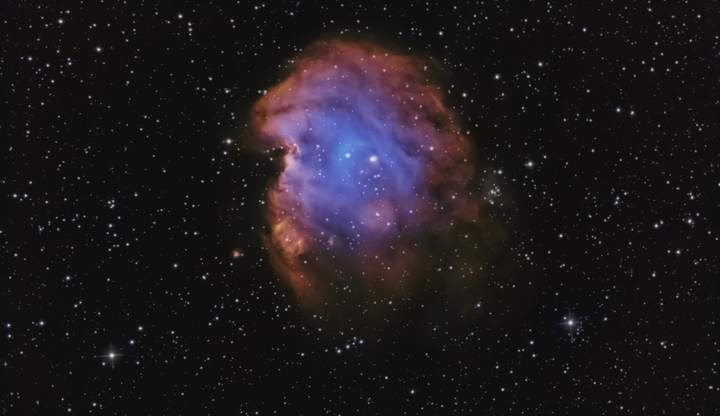
I got through the 2022/2023 astro season, the pier made things much easier than using a tripod, I had a cover for the mount so that didn't need to be lugged in and out every time, my gear was now essentially hot swappable (well, sort of, it made switching between different scopes and stuff MUCH easier) and I had finally got to grips with my transition away from OSC (One Shot Colour) imaging to Mono imaging with filters.
Spring 2023 came and I had to return to yet more garden up keep, other projects, a role in motorsport on top of my day job and before I knew it we were in Autumn 2023 and nothing had changed on the ob front, I just didn't have the time! Winter was fast approaching and the new astro season was already underway. I had to make a decision, keep using the pier as is and never get an ob built or do what I sometimes do with something like this and put myself on a self imposed ban. The theory behind this is that I get annoyed I can't do what I want to do and get on with what I am supposed to have finished before so I can do the thing I want to do. So I sat out the 23/24 imaging season, which actually turned out to be one of the worst seasons for Astro I can remember, winter was wet, very very wet and cloudy oh so cloudy! I was tempted to cheat and get the odd night of imaging in but the one or two times I attempted to setup things went array either with the gear or the weather so I admitted defeat, did my Christmas lights project and sulked until the weather started to improve.
Which brings us to 2024.
I got out into the garden early and got as much done as the weather would allow so that when I could turn my attention back to the ob so I could be in it for the long haul. This year is the year it has to be done summer, partly because I will have to return to other garden things but also because Mrs geek is due some "womens" surgery and her recovery means I cant be outside sawing bits of timber when she needs me to do stuff for her.
With that in mind and a fresh focus and dose of motivation I got stuck back in.
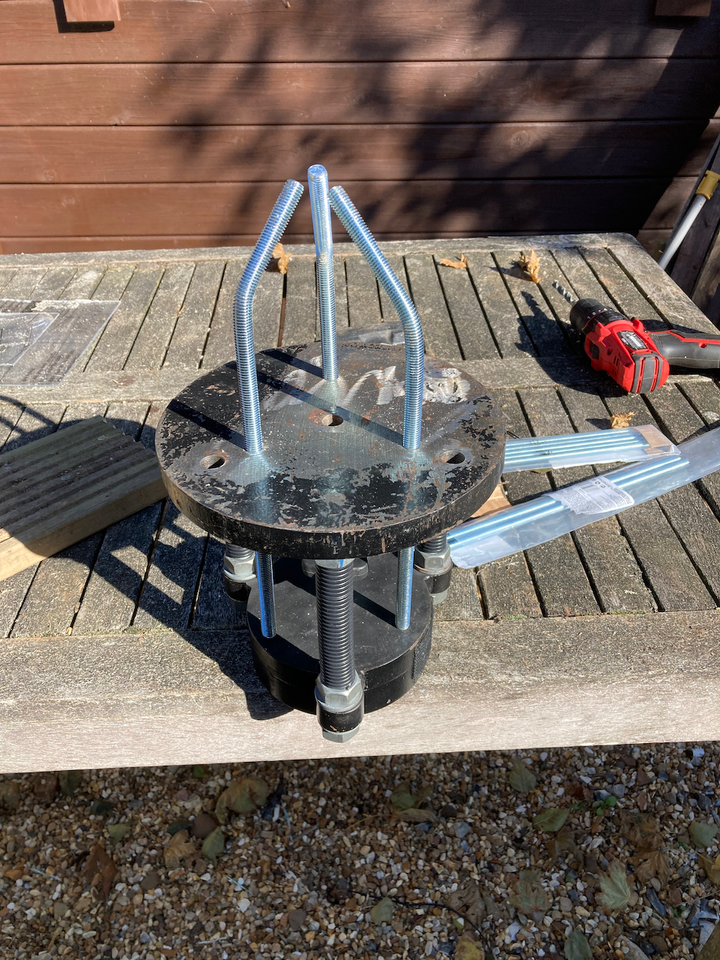
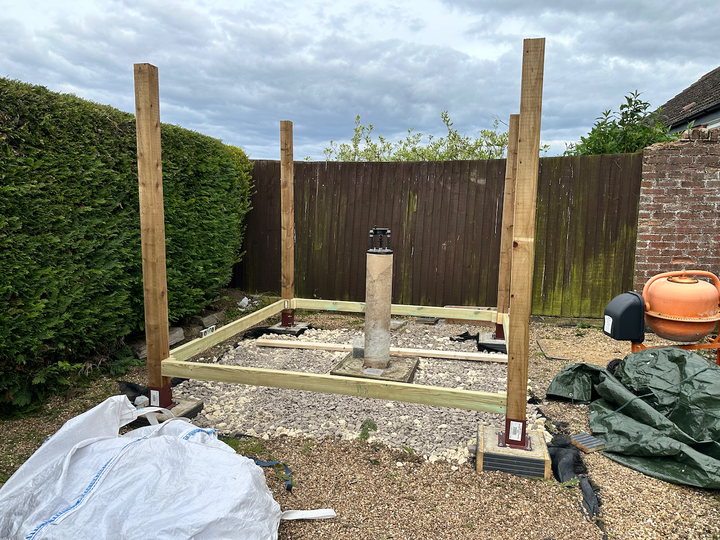
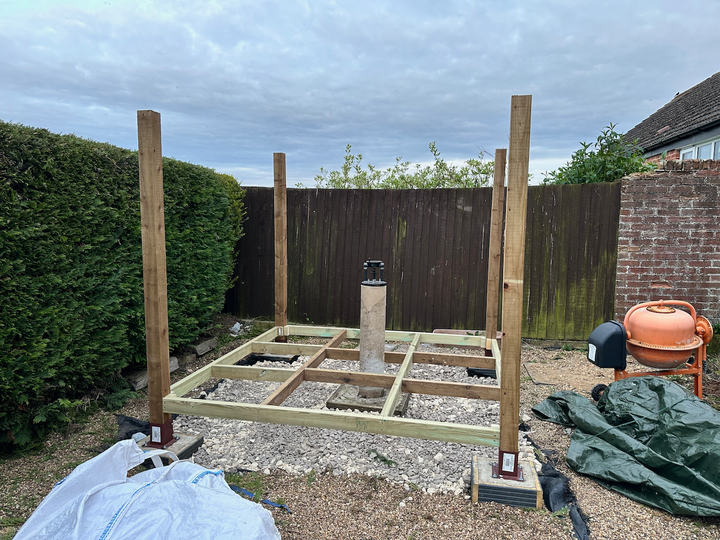
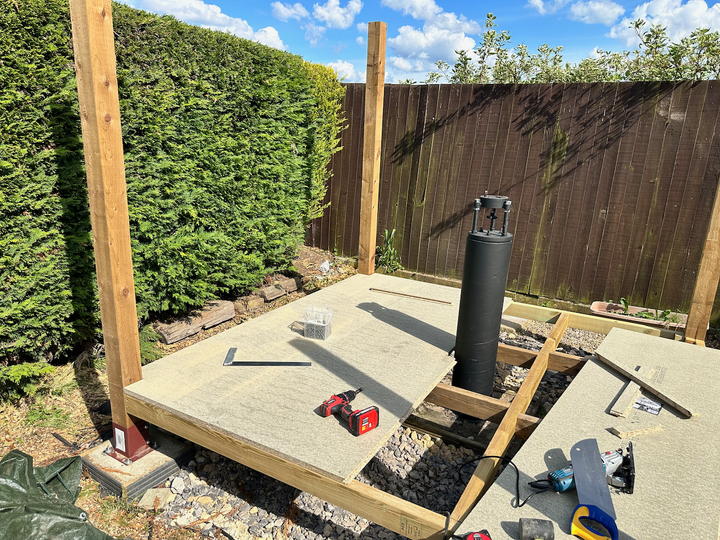
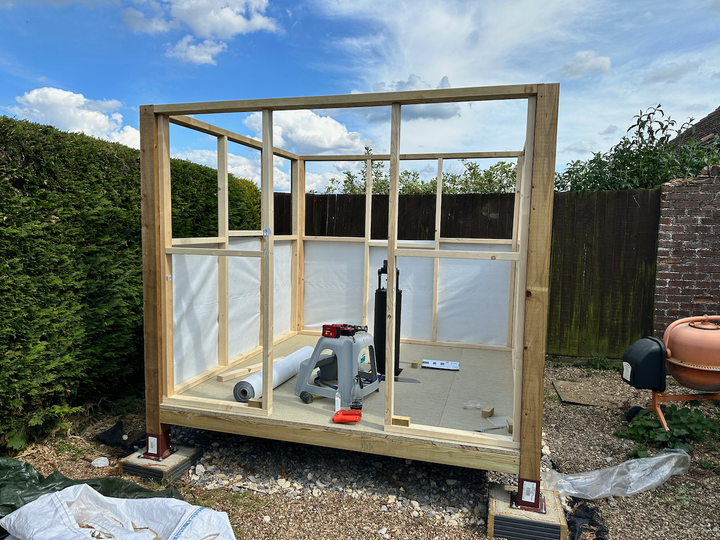
First up more ground stuff, I had already opted for a suspended floor as the ob itself needs be separated from the pier in order to not cause any vibration that will cause havoc with imaging. I marked out the area for the ob itself and where each post would need to go, dug some holes, made some more shutters out scrap decking and mixed some more cement, poured that into the ground and then... well, this is where the redditors would say "TIFU" in my somewhat over enthusiastic approach I had forgotten one really key element to the whole thing, that the fkin posts need to be inline with each other in order to make a structure, I had planned on the OD being 7ft x 7ft. Only once I had poured the pads and made up a 7x7 frame to mark them up i realised I had fked up. I had a sulk, moaned and bhed about it to Mrs geeks but after a few hours I put on my big boy pants and set about working out exactly what to do about it. I had to see if there was a way to salvage what I had, and as luck would have it, some clever positioning of the post bearers and a little imagination I could have a space with an OD of almost 8ftx8ft and everything would be ok. So that's what I did.
Some pictures
Making up the shutters
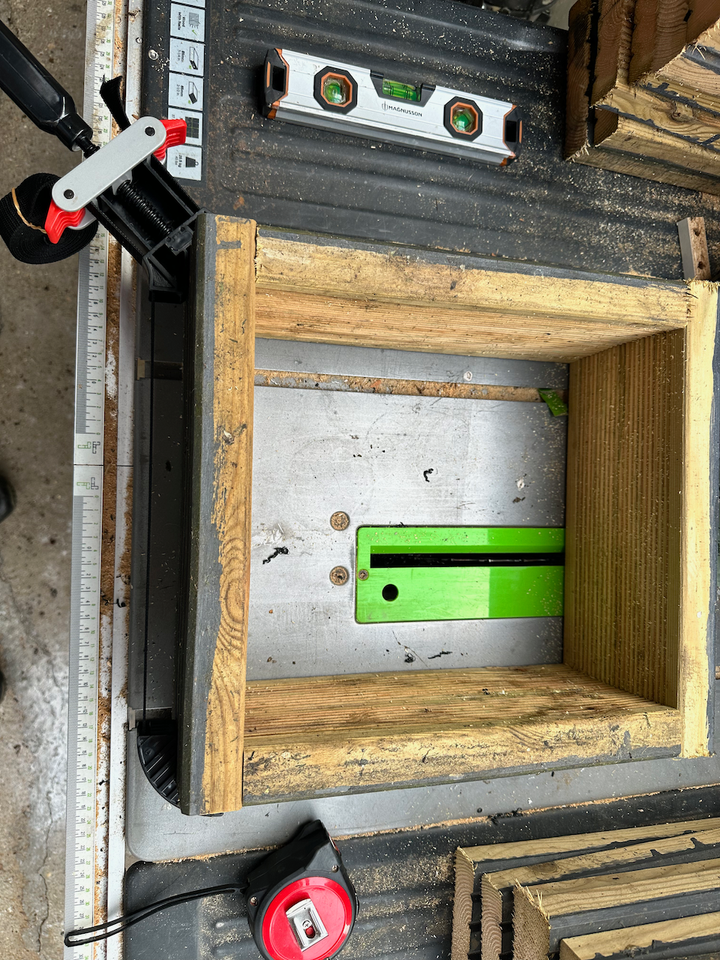
Holes dug and shutters in place (this is where I should have got the line out and checked everything was where it was supposed to be)
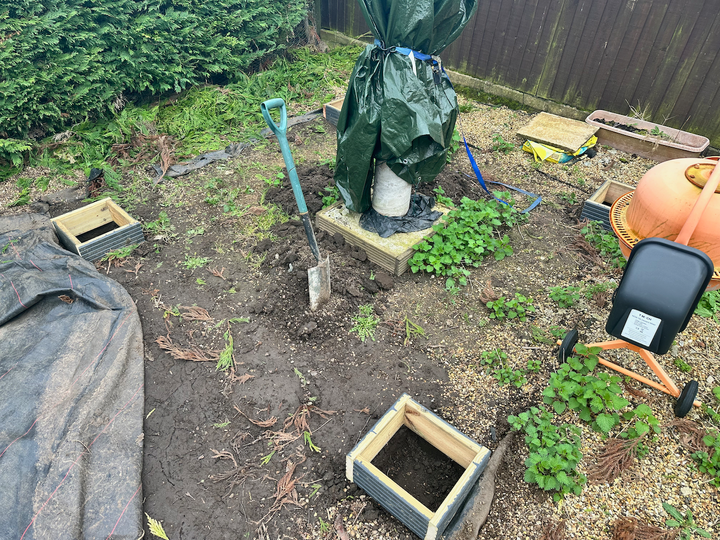
Holes filled and post bearers on top. I also scraped the ground, put some fresh weed fabric down and covered it with about a ton of crushed rock/MOT type stuff)
I think couldn't resist a cheeky test fit, notice the new mount that will be going on there and one of my larger scopes too. Very pleased and provided some much needed motivation to carry on. It also provided me with an minimum height for the roof to close and clear the scope.
I lost alot of time to my fk up, the ground clearing and backfill with the stone took longer than I thought it would and I still had other jobs to do in among this lot. But progress is progress.
Spring 2023 came and I had to return to yet more garden up keep, other projects, a role in motorsport on top of my day job and before I knew it we were in Autumn 2023 and nothing had changed on the ob front, I just didn't have the time! Winter was fast approaching and the new astro season was already underway. I had to make a decision, keep using the pier as is and never get an ob built or do what I sometimes do with something like this and put myself on a self imposed ban. The theory behind this is that I get annoyed I can't do what I want to do and get on with what I am supposed to have finished before so I can do the thing I want to do. So I sat out the 23/24 imaging season, which actually turned out to be one of the worst seasons for Astro I can remember, winter was wet, very very wet and cloudy oh so cloudy! I was tempted to cheat and get the odd night of imaging in but the one or two times I attempted to setup things went array either with the gear or the weather so I admitted defeat, did my Christmas lights project and sulked until the weather started to improve.
Which brings us to 2024.
I got out into the garden early and got as much done as the weather would allow so that when I could turn my attention back to the ob so I could be in it for the long haul. This year is the year it has to be done summer, partly because I will have to return to other garden things but also because Mrs geek is due some "womens" surgery and her recovery means I cant be outside sawing bits of timber when she needs me to do stuff for her.
With that in mind and a fresh focus and dose of motivation I got stuck back in.
First up more ground stuff, I had already opted for a suspended floor as the ob itself needs be separated from the pier in order to not cause any vibration that will cause havoc with imaging. I marked out the area for the ob itself and where each post would need to go, dug some holes, made some more shutters out scrap decking and mixed some more cement, poured that into the ground and then... well, this is where the redditors would say "TIFU" in my somewhat over enthusiastic approach I had forgotten one really key element to the whole thing, that the f
kin posts need to be inline with each other in order to make a structure, I had planned on the OD being 7ft x 7ft. Only once I had poured the pads and made up a 7x7 frame to mark them up i realised I had fked up. I had a sulk, moaned and bhed about it to Mrs geeks but after a few hours I put on my big boy pants and set about working out exactly what to do about it. I had to see if there was a way to salvage what I had, and as luck would have it, some clever positioning of the post bearers and a little imagination I could have a space with an OD of almost 8ftx8ft and everything would be ok. So that's what I did.Some pictures
Making up the shutters
Holes dug and shutters in place (this is where I should have got the line out and checked everything was where it was supposed to be)
Holes filled and post bearers on top. I also scraped the ground, put some fresh weed fabric down and covered it with about a ton of crushed rock/MOT type stuff)
I think couldn't resist a cheeky test fit, notice the new mount that will be going on there and one of my larger scopes too. Very pleased and provided some much needed motivation to carry on. It also provided me with an minimum height for the roof to close and clear the scope.
I lost alot of time to my f
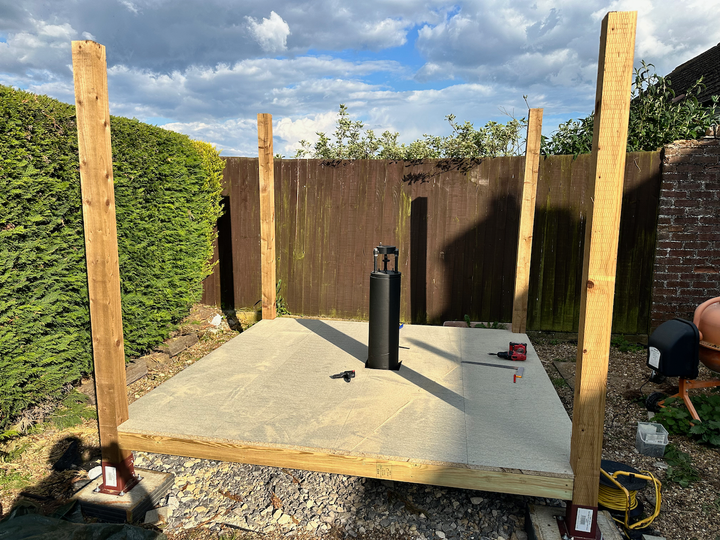
k up, the ground clearing and backfill with the stone took longer than I thought it would and I still had other jobs to do in among this lot. But progress is progress.With the ground works set and a grown man who had finished sulking over a slightly bruised ego from failing to do just basic things that I should know better about next up would be setting the posts and getting a floor on. Having worked out my min clearance height I set about installing the posts and getting a floor structure made up.
Posts in and outer frame for the floor
Joists and noggins (are they still called that when on a floor or is that just walls? Anyway you get the idea)
This took me the better part of a day, partly because I had other st to do and partly because Mrs geeks and I had an argument about how long this was all taking, bless her she has and remains very patient with me and my "neurodiversity" but she is/was entitled to give me a kick up the arse and actually she explained later that she wasnt actually frustrated with me but her mum who lives with us and actually she is really proud of how hard I was working, I just wish she had said something before hand before taking it out on me lol. Anywho, onto some pics.
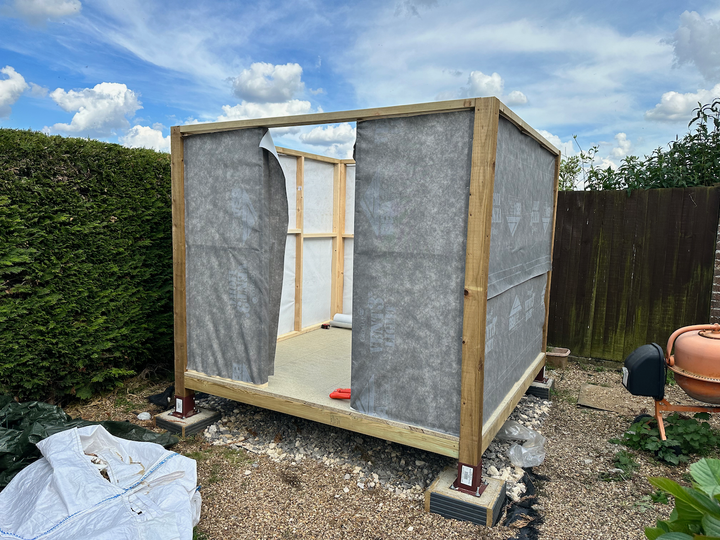
Time to drop in some flooring, I went for moisture resistant floorboards, the same time you get in a bathroom, I went for this as it was cheaper than ply, easier to get in the car and in my head useful for being moisture resistant. I also found a few minutes to paint my pier before putting the floor down as I didnt want to make a mess, some nice fresh matte black.
I also managed to squeeze in the first bit of framing on that day too, this was a major milestone, gave me a chance to see exactly what I was building.
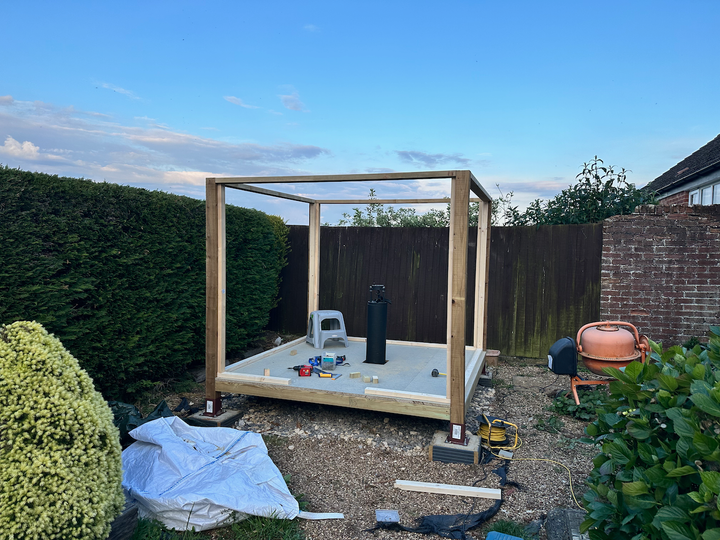
I then started the framing proper and got that in.
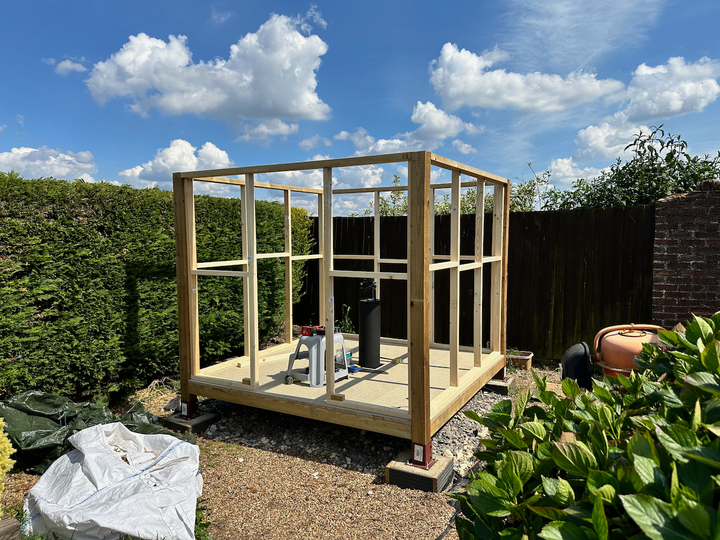
Then back to work, travel and other bits in the way, but more progress and very please with how it was starting to look.
Posts in and outer frame for the floor
Joists and noggins (are they still called that when on a floor or is that just walls? Anyway you get the idea)
This took me the better part of a day, partly because I had other s
t to do and partly because Mrs geeks and I had an argument about how long this was all taking, bless her she has and remains very patient with me and my "neurodiversity" but she is/was entitled to give me a kick up the arse and actually she explained later that she wasnt actually frustrated with me but her mum who lives with us and actually she is really proud of how hard I was working, I just wish she had said something before hand before taking it out on me lol. Anywho, onto some pics. Time to drop in some flooring, I went for moisture resistant floorboards, the same time you get in a bathroom, I went for this as it was cheaper than ply, easier to get in the car and in my head useful for being moisture resistant. I also found a few minutes to paint my pier before putting the floor down as I didnt want to make a mess, some nice fresh matte black.
I also managed to squeeze in the first bit of framing on that day too, this was a major milestone, gave me a chance to see exactly what I was building.
I then started the framing proper and got that in.
Then back to work, travel and other bits in the way, but more progress and very please with how it was starting to look.
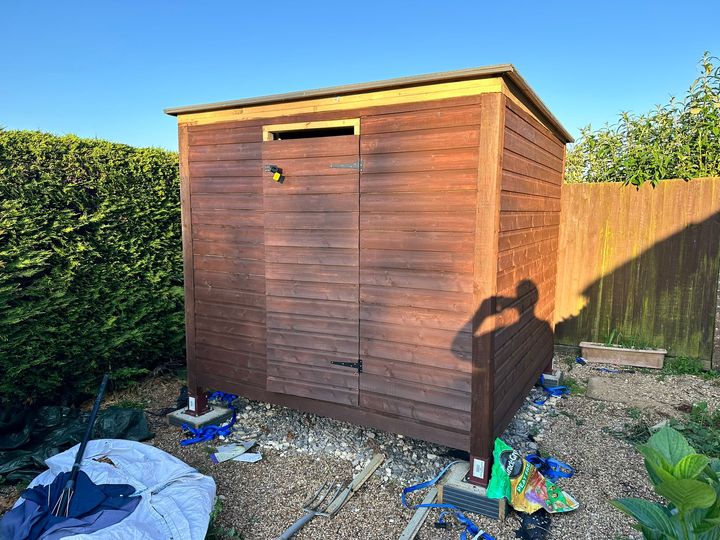
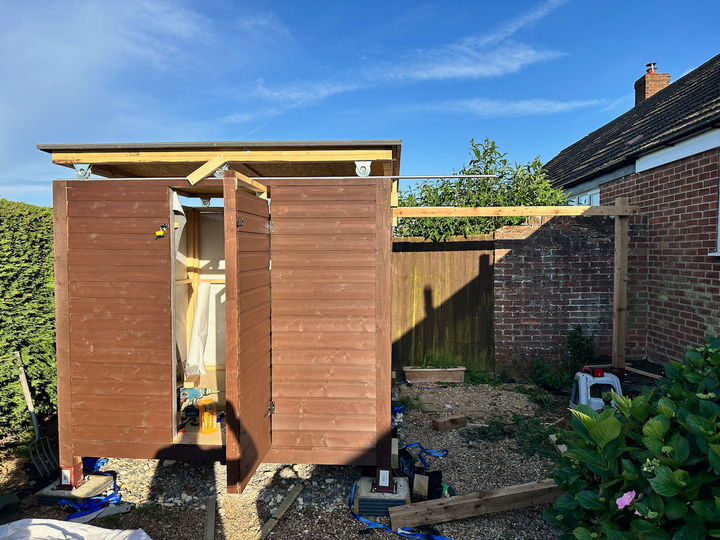
Ok time to get some sides on this bh! I had ordered the lap in 2022, a large order as I had a shed to rebuild in 2022. it had been sat laying flat in one of the outbuildings looking sad that I wasn't using it. Finally a chance to cut it up, fire up the compressor and get to work with the nail gun. Before I did that I went round with a roll of breathable membrane and popped on some DIY purlins (are these still called that when not on a roof?) then set about cladding.
Time to play with a nail gun! I'd actually packed up for the day for this pic you can see the air line just inside the door.
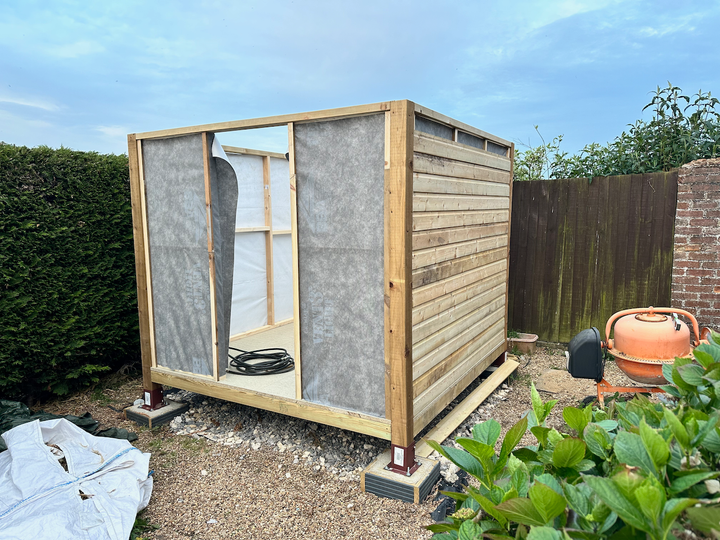
Cladding... completed it mate! (well mostly)
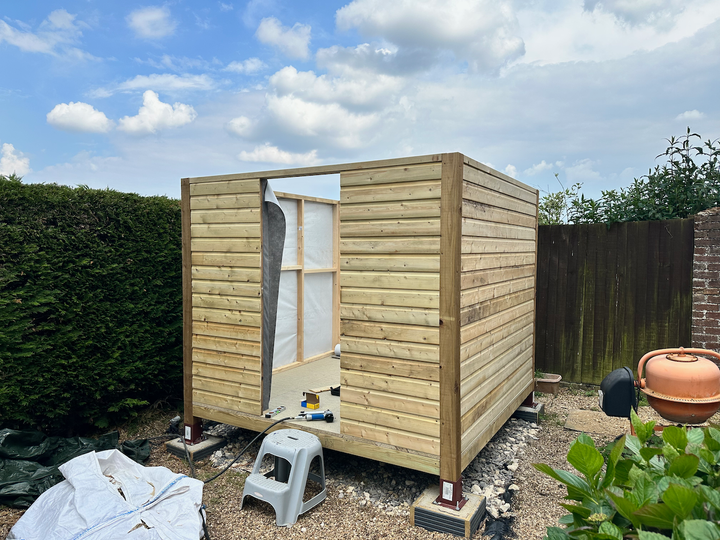
I then knocked a door and also a roof, no pics of this in progress so you'll have to use your imaginations. Mrs geeks also went round and started painting it for me as well, a quick note about this, I appreciate the colour is not to everyones taste, but its the same one we use for everything around the place and it fives a nice finish while also doing a decent job of protecting the timber. We like it anyway. BUT I would say, if i were to do this again actually not sure I would have painted it looking back at how smart it looked just bare, ho-hum!
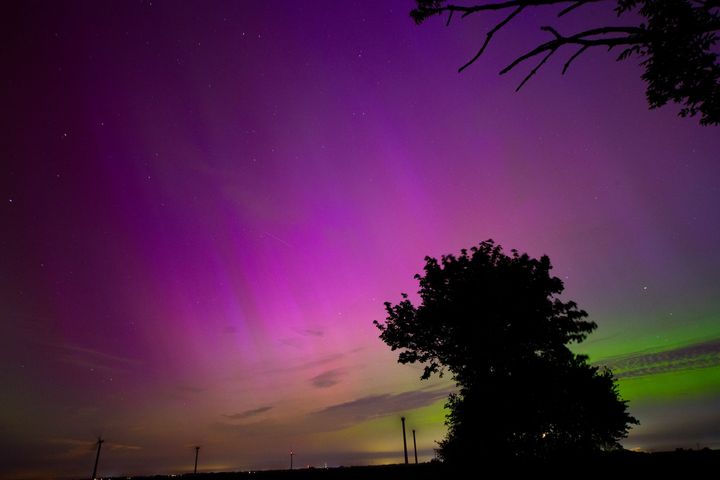
I then fitted the door and covered the roof with a tarp and had a well earned beer. I had scheduled the following weekend to be at Basingstoke Comic Con so work had to pause while I did this. I also got an aurora imaging session in as well, along with 2/3rds of the UK. Here is a pretty picture of that:
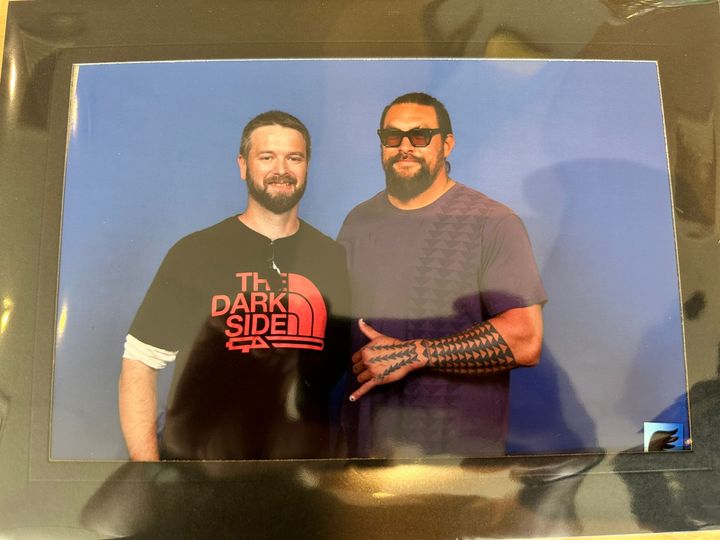
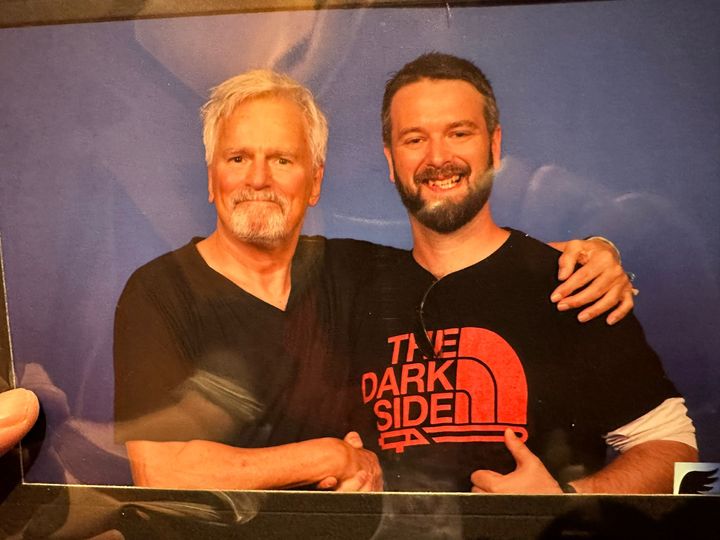
And a picture of me with Jason Mamoa and another with me and Richard Dean Anderson. It was a manic weekend, did many other photo ops and autographs and meet and greets. I am geeks by name, geek by nature!
h! I had ordered the lap in 2022, a large order as I had a shed to rebuild in 2022. it had been sat laying flat in one of the outbuildings looking sad that I wasn't using it. Finally a chance to cut it up, fire up the compressor and get to work with the nail gun. Before I did that I went round with a roll of breathable membrane and popped on some DIY purlins (are these still called that when not on a roof?) then set about cladding. Time to play with a nail gun! I'd actually packed up for the day for this pic you can see the air line just inside the door.
Cladding... completed it mate! (well mostly)
I then knocked a door and also a roof, no pics of this in progress so you'll have to use your imaginations. Mrs geeks also went round and started painting it for me as well, a quick note about this, I appreciate the colour is not to everyones taste, but its the same one we use for everything around the place and it fives a nice finish while also doing a decent job of protecting the timber. We like it anyway. BUT I would say, if i were to do this again actually not sure I would have painted it looking back at how smart it looked just bare, ho-hum!
I then fitted the door and covered the roof with a tarp and had a well earned beer. I had scheduled the following weekend to be at Basingstoke Comic Con so work had to pause while I did this. I also got an aurora imaging session in as well, along with 2/3rds of the UK. Here is a pretty picture of that:
And a picture of me with Jason Mamoa and another with me and Richard Dean Anderson. It was a manic weekend, did many other photo ops and autographs and meet and greets. I am geeks by name, geek by nature!
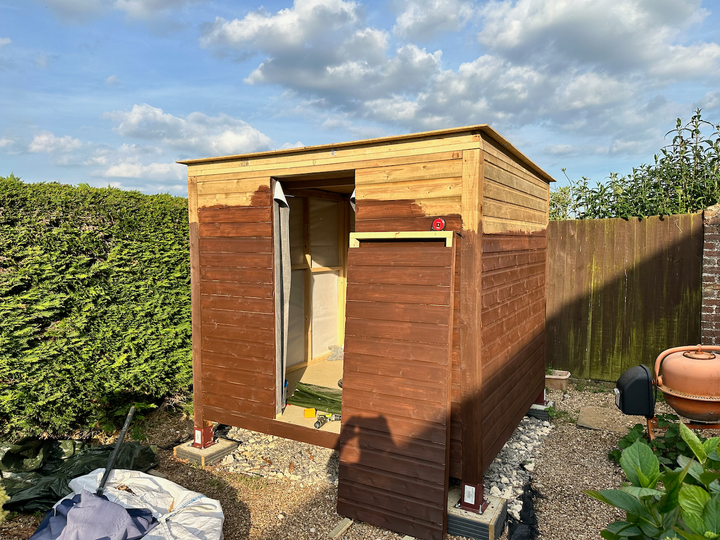
Last update which will bring you up to date. I am sure many of you are wondering just how exactly the roof will slide in order for me to use this thing for imaging. Well I am getting to that.
I finished off the painting and also felted the roof and added some edge strips I made out of some more scrap decking (having a table saw is very handy!)
After this I set about getting the roof to move, not many pictures of this as I had a helper over and we had to crack on. Basically the wheels and rails are the same type powerfully built PH'ers have for their sliding gates at the end of their mile long driveways to keep the peasants out. We lifted the roof onto supporting blocks, fitted the rail, centre lined the 3x2 that the castors would mount to and screwed everything together, then we lowered it onto the rails. Success!
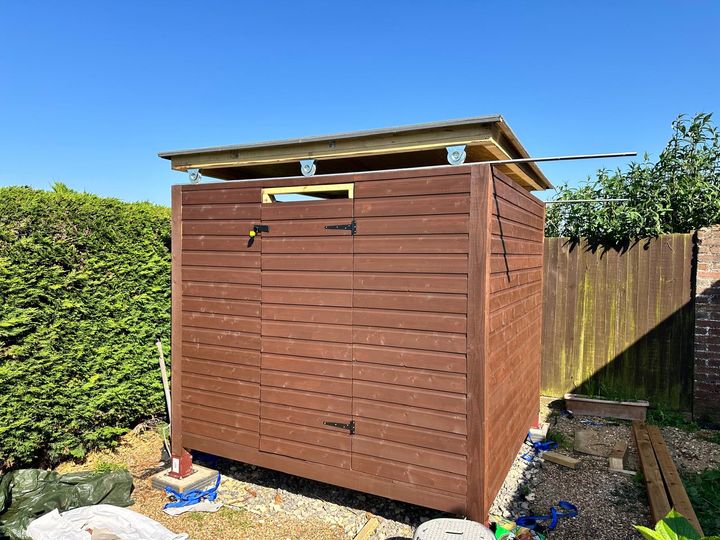
Once on it was time to get the supporting structure in for the roof to slide onto when imaging. 4 x 4"x4" fence posts later, much swearing and lifting them all into place and this is how it sits now.
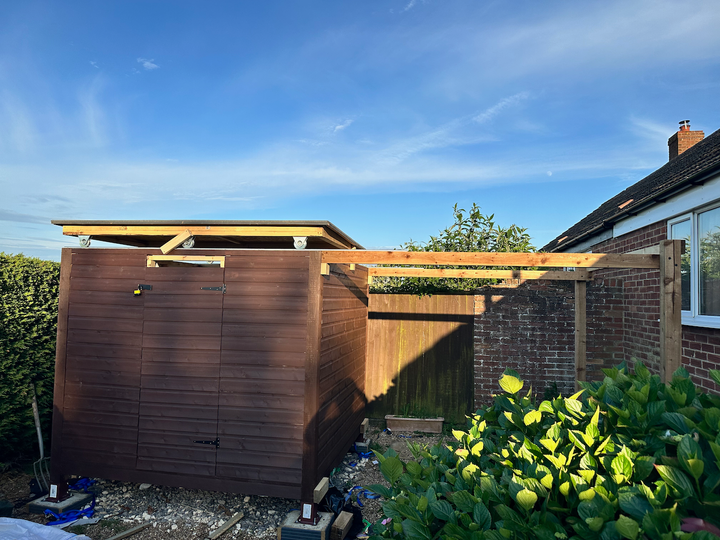
I then reinstalled the tarp as the rain has returned and it helps keep the rain from getting into the thing in the gaps.
Still to do (in no particular order)
Clad the roof drops so that the thing is water tight
Add the last part of the rails so the roof can slide all the way over
Add some sort of skirt to protect the underneath
Install Power
Add Allsky cam
Add automation
But the finish line for useability is in sight. We have next week off work for some rest so I dare say this weekend I will potter about doing odd jobs in between doing the rails and cladding.
I finished off the painting and also felted the roof and added some edge strips I made out of some more scrap decking (having a table saw is very handy!)
After this I set about getting the roof to move, not many pictures of this as I had a helper over and we had to crack on. Basically the wheels and rails are the same type powerfully built PH'ers have for their sliding gates at the end of their mile long driveways to keep the peasants out. We lifted the roof onto supporting blocks, fitted the rail, centre lined the 3x2 that the castors would mount to and screwed everything together, then we lowered it onto the rails. Success!
Once on it was time to get the supporting structure in for the roof to slide onto when imaging. 4 x 4"x4" fence posts later, much swearing and lifting them all into place and this is how it sits now.
I then reinstalled the tarp as the rain has returned and it helps keep the rain from getting into the thing in the gaps.
Still to do (in no particular order)
Clad the roof drops so that the thing is water tight
Add the last part of the rails so the roof can slide all the way over
Add some sort of skirt to protect the underneath
Install Power
Add Allsky cam
Add automation
But the finish line for useability is in sight. We have next week off work for some rest so I dare say this weekend I will potter about doing odd jobs in between doing the rails and cladding.
ewanjp said:
Awesome! I'd love to do this, but surrounded by trees :-(
Sounds like someone needs a chainsaw 
Super Sonic said:
Hi that's a big arse telescope, no wonder you needed to dig a big ahole for the foundation!
Actually its mid size compared to the other one in the test fit. As for a big ahole for the foundation!hole, you'd have to ask Mrs geeks what its like being married to one 
RC1807 said:
geeks, so cool!
Mrs RC would love to have something like this.
Too much light pollution around us, but had some great telescope use in the Algarve countryside in the past when visiting friends.
Thanks Mrs RC would love to have something like this.
Too much light pollution around us, but had some great telescope use in the Algarve countryside in the past when visiting friends.
as for the light pollution, I used to live in a heavily light polluted place and still managed to image just fine, its a case of finding the right filter to block it out, for example this was taken from Central Milton Keynes Austin_Metro said:
Looking good. Nice to see A PH project with some initial support from another PHer. Please chuck in a few of your photos and educate a little alongside the build!
Thank you. Yeah Mike came through for me which became more important when not a single local company replied. Will keep thread updated. illmonkey said:
Excellent, I love a build thread, mainly as it shows it's not just me that fks up!
I am however concerned that your concrete artwork changes between shots...
Yeah it was by far my biggest fks up!I am however concerned that your concrete artwork changes between shots...
k up for a while and really almost ended up pulling out two pads and redoing them. Ah yeah you noticed that did you? Well the first one got smoothed as I had to put the pier tube on so was redone lol
MrBig said:
This is great, fantastic pictures too and a build that's a bit different. I've often thought of building something similar just for sitting in the garden and stargazing!
Thanks it’s been lots of fun and I am pretty confident it’s the first build thread of its kind on PH Best way to do that is a lounger a warm coat and binoculars with a nice single malt late autumn


Gassing Station | Homes, Gardens and DIY | Top of Page | What's New | My Stuff