Discussion


Have you checked how much of the corner can you get rid of before your electronic boxes will no longer fit inside? It looks to me that there will be limited scope to narrow the side panels if you have any dvd or sky devices on shelves as in the 2nd picture, possibly making it an infeasible project for a design perspective without altering all the internals too. I don't think junking the entire sides will work if you have any rectangular receiver / player boxes inside.
SeeFive said:
Have you checked how much of the corner can you get rid of before your electronic boxes will no longer fit inside? It looks to me that there will be limited scope to narrow the side panels if you have any dvd or sky devices on shelves as in the 2nd picture, possibly making it an infeasible project for a design perspective without altering all the internals too. I don't think junking the entire sides will work if you have any rectangular receiver / player boxes inside.
To be fair I wasn't very clear with my plan, I am home now so will take some pictures tomorrow and sketch it up, there should still be enough room for a sky box if I do it properly I think.... Not looking to shrink it a great deal but trim the corners off, something like this (shape wise): 
A little help please, I got some timber bars (3by2, 4by4, 4by2s) but gotta drill M10 220mm Coach bolts through them, but its gotta be 230mm depth of deep drilling !
I believe the coach bolts are 10mm ? Its these set here it doesn't mention the size
https://www.toolstation.com/exterior-coach-bolt-nu...
I would need a long Auger bit but is this one good for the job ?
https://www.toolstation.com/auger-bit/p25711
Am trying to wrap my mind around it, since 10mm bolt does that mean 10mm Auger bit or I need slightly bigger 12mm Auger bit ?
Flibble said:
I think 235mm is the overall length, a Google suggests the cutting flukes only run for 150mm which might make it awkward for such a long hole.
Actually thinking about it more I don't need a 200mm+ deep drill, I can just do each timber part separatelywith 80-100mm so about 3-4inch deep(just gotta get markings right), maybe that auger bit is overkill in size then and I should look for a smaller 10mm one ?
I'd drill half a mm over sized if possible, especially on a long hole as you'll need to give those coach bolts a solid belt to get them in to a 10mm hole. Not that you'll get a 10.5mm auger bit.
I bought a set of augers on eBay recently to drill through some sandwiched timbers, paid £35 for a set from 8mm to 20mm that must be 350-400 long.
I bought a set of augers on eBay recently to drill through some sandwiched timbers, paid £35 for a set from 8mm to 20mm that must be 350-400 long.
geeks said:
To be fair I wasn't very clear with my plan, I am home now so will take some pictures tomorrow and sketch it up, there should still be enough room for a sky box if I do it properly I think.... Not looking to shrink it a great deal but trim the corners off, something like this (shape wise):
Jesus Geeks, I hope this isn’t your first woodwork project. It is a bugger to get right. 
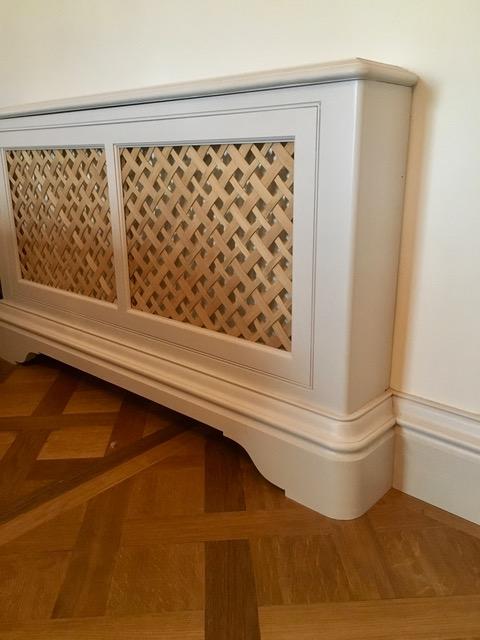
It looks like you want it freestanding? So back to your original picture, the sides are different to the second example above - it looks like someone has already butchered that one and it looks quite horrible at the sides (at least that!, god, those awful mitred hacked off breadboard edges!).
Your unit has flat panel rail and leg side panels which depending on the quality of unit will either be mortise and tenon at the corners of the frame or dowelled. The panel should just float in a groove (no glue) because of designing out a cross grain situation.
When you cut off the back corners, you will shorten that side panel, the rear panel and lose the rear leg in the process. So you need to put the leg back somehow. Personally, like Paul mentioned I would try to disassemble it, but if it is M&T and properly fitted/glued you have one hell of a job to get it apart and will probably (almost certainly) damage the wood. Glue dissolving agents are not going to reach inside the wood where the glue is on the tenon inside the mortise, and a lot depends on what glue they used. I have never tried to do this on anything I cared about, so perhaps someone else can chip in with a solution to that one (awaits heat gun suggestions
 )
)Alternatively, if you can saw accurately, as Paul also mentioned you may be able to cut down the rear joints on each rail, leaving the tenon glued in its hole. If I was doing that, I would leave a hair of waste on the leg and remove it after with a more gentle plane or sander rather than risk the offset saw teeth (or operator error) damaging the leg.
Then you need to re make the mortises top and bottom for the side panel, re make the tenons on the (now) shorter side rails (or use dowels if you can’t M&T), narrow the infill panel and glue it up again square (measure diagonals), remembering not to use any glue on the panel. If it is assembled how I think it should be, you should be able to leave the front joints on the side panel / front legs alone - the infill panel should just slide out when you cut the back leg joints free. Do this for each side, getting them identical and square. Set the existing rear panel aside, keep it but it is probably too short for the next step. Now for the back.... aaaargh.
This is the difficult bit. You have a choice. The hardest but best approach is to make what you have into a 6 legged panelled frame with new wood and some angled M&T or dowel joints depending on how strong you want it. Unless you have a lot of skills and/or a lot of time, don’t do this. I don’t have the skills (or space) to put what you need to do into words, but there are YouTube lessons on angled M&T / dowelling approaches if you want to take a look and frighten yourself.
Easiest is to make the new, narrower rear back panel (the one parallel to the front of the unit) go right to the floor. This will give the rear stability you need in the absence of an extra couple of legs. You are probably going to need some more wood here, or bodge some out of sight legs or something onto the existing shorter rear panel to make it reach right to the floor, but I think they will be weaker and get in the way later - your choice. Make sure that the top sits on this panel (cut it to the right height minus the thickness of the top). I am going to assume that the shelves are loose and the uprights are structural inside the cabinet. If so, fix this rear panel to the uprights (or whatever is structural inside) accurately and squarely.
Then find some method to infill the back angled sides with what you salvage out of the back panel you set aside, or if not possible, use new wood and fix that to both the top and bottom and anything else that remains structural on the inside uprights / shelves. You now need to join this to the legs, and without major wood surgery, this is probably going to be some kind of brackets out of sight at the back or on the internal structure (or both). The good news is nobody is going to see the back, so mechanical fixings will help here in all sorts of places to get strength back, even corner glue blocks / fixing blocks where they can’t be seen under the shelves and onto the panels etc will help.
The reason for this Heath-Robinson approach is to avoid re making the frame with 6 legs, requiring new, matching wood and avoiding the difficult angled M&T / dowel joints you will have now seen created on the YouTube videos. You really need for a 6 legged frame rail / stile assembly. You avoid this by using the floor length rear panel as a substitute for the extra 2 rear legs.
It is going to be really wobbly until you get the top back on and the rear infilled fully and fitted to anything structural which is left. Make sure it is on a very flat, solid surface at all stages of getting it back together, no carpets. The top will need fixing to the back panel and 2 side panels and maybe internal uprights (as I assume the uprights are structural, not the shelves) to add strength. You really need to get this all square or the front door might not close properly. So be really careful when fixing the top back on. I would mark out on the underside of the top exactly where each element lands square and assemble it all upside down to those lines. Set this out and check all round at least twice to get it right before fixing, and keep checking you are on your lines as you go.
Once you have got it all square, fixed solidly and back up the right way, the long rear bottom edge of the new rear panel may cause some instability on an uneven floor or carpet. If this is the case, cut a relief at the bottom (cut a long inch or two chunk out of the bottom) leaving two narrow “legs” touching the floor at the edges. If no instability, don’t bother if you don’t want / need to.
I am sure I have missed loads for brevity (riiiighht) and the inability to have a good look around the unit, but hopefully you get the gist of the approach / design and will work out the rest as you go.
Good luck, but I still say I would be putting that nice unit in a bedroom or on eBay rather than risk destroying it, and then go shopping for another very similar one that fits in the corner of the lounge. The worst possible outcome is it gets screwed up, and you go shopping anyway. Or if as you say you can’t find an exact matching item, get a local cabinetmaker to alter it properly, or even make you a custom matching item at a more scary price than the very nice, perfectly acceptable quality but mass produced CNC high street one you have.
Or leave it sticking out of the corner a bit
ETA: it’s late, I am tired... thinking simpler now... maybe shorten the side panels as above, panel it in all round the back with the existing leftovers as far as possible and get some adjustable feet under the bottom shelf at the very back, avoiding the long back panel completely?
Edited by SeeFive on Thursday 4th July 01:51
SeeFive said:
lots of useful and sage advice
First project? No... First cabinet project?... sort of 
I will have a proper look and get some better pictures tomorrow, the reality is, we can buy a similar matching cabinet that fits in the corner from elsewhere for about £300! The reason I am ambivalent to cutting this one up is that we paid very little for it. I may still not attempt it and by the proper one, but where would the fun in that be? Like you say it wont be seen anyway once it is in place so if the back looks shocking but acceptable from the front then it's far from the of the world, obviously I would rather it not look s
 t, but as you say, its a big one to tackle so that is no guarantee at my skill level
 geeks said:
SeeFive said:
lots of useful and sage advice
First project? No... First cabinet project?... sort of I will have a proper look and get some better pictures tomorrow, the reality is, we can buy a similar matching cabinet that fits in the corner from elsewhere for about £300! The reason I am ambivalent to cutting this one up is that we paid very little for it. I may still not attempt it and by the proper one, but where would the fun in that be? Like you say it wont be seen anyway once it is in place so if the back looks shocking but acceptable from the front then it's far from the of the world, obviously I would rather it not look s
t, but as you say, its a big one to tackle so that is no guarantee at my skill level 
I think you will have to royally screw up to make this look bad from the front. You shouldn’t be touching that at all if it is built how I think it is.
It is a kinda do what you need to do to get it solid and a different shape project. The only bit that would matter to me really is getting those side panels right as they will also be seen to some extent. After that, it is a bit of an ad lib from some ideas and bodges to get the back sorted and strong to your satisfaction.
The issue I have is that any new rear frame is going to be missing a joint to the existing rear legs (unless you really want to test yourself), meaning that there are some alternatives to be found in that area. The rest is just panelling.
I guess to avoid angled M&T or dowels, if there is enough meat in the leg you could cut a shallow rebate at the new angle in the top of the leg and at the lower frame joint and fit a new angled rail in each with a couple of dowels on a rail/leg butt within the rebate. Then do the same on some new legs with a new sized panel at the new back IYSWIM. But I am thinking way too complicated for my tired brain to explain concisely again...
Time for bed.
21TonyK said:
loughran said:
Here's a small side table I made in oak, 15" high.
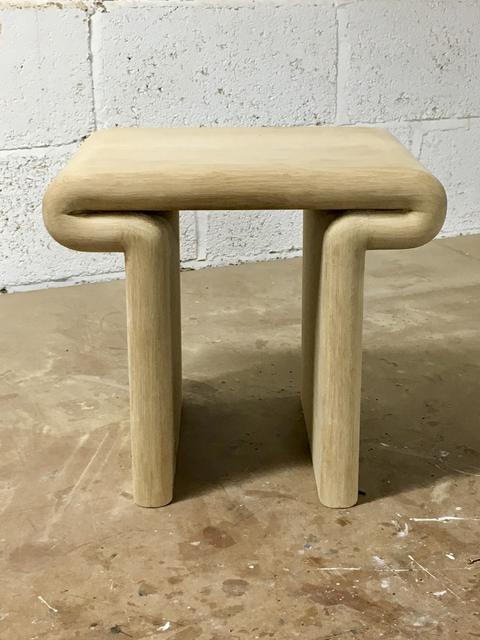
The rad cover I could manage but this... mmmmI spent a whole summer laminating and bending timber but that looks pretty clever.
Mind explaining the method?
paulrockliffe said:
21TonyK said:
loughran said:
Here's a small side table I made in oak, 15" high.
The rad cover I could manage but this... mmmmI spent a whole summer laminating and bending timber but that looks pretty clever.
Mind explaining the method?
Here's a bigger one I made.
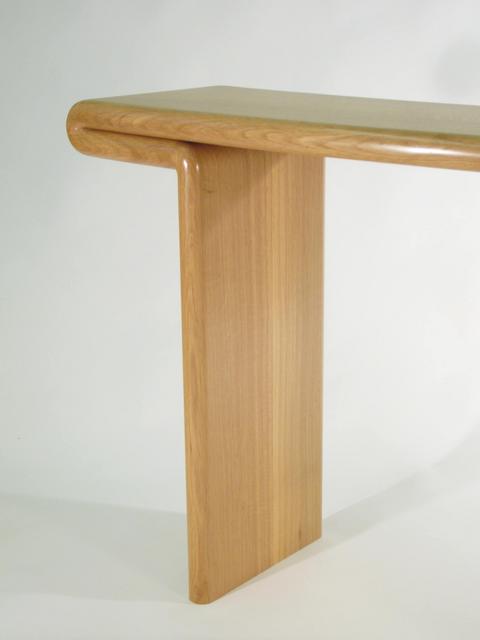
Edited by loughran on Saturday 6th July 13:48
21TonyK said:
loughran said:
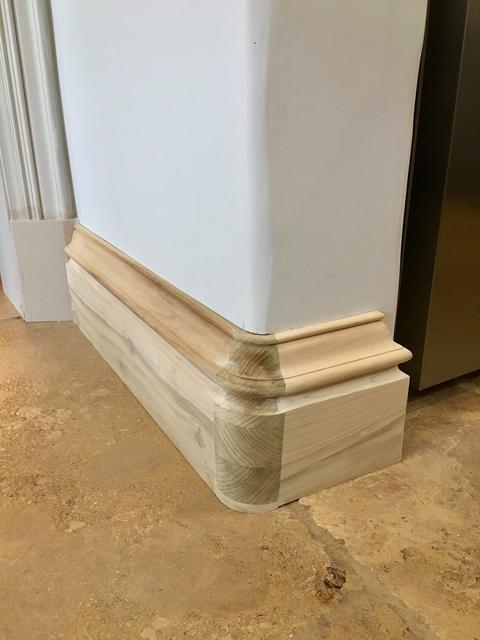
Yes, 5 pieces but routed rather than carved. A lot more straight forward than the skirting on the rad cover.
Edited by 21TonyK on Friday 5th July 15:50
The trick is to turn a bobbin to exactly the profile of the skirting board. Then cut the bobbin into quarters, you get 2 perfect quarters and two rejects because of the kerf of the saw blade. Then butt joint the skirting to the corner and attach with biscuits, PVA and because it's all but impossible to clamp the joint a dab of mitrebond here and there to hold things together until the PVA cures.

Then do it all round the house. Here's one before a coat of paint.
Gassing Station | Homes, Gardens and DIY | Top of Page | What's New | My Stuff