My "building a cobra" thread
Discussion


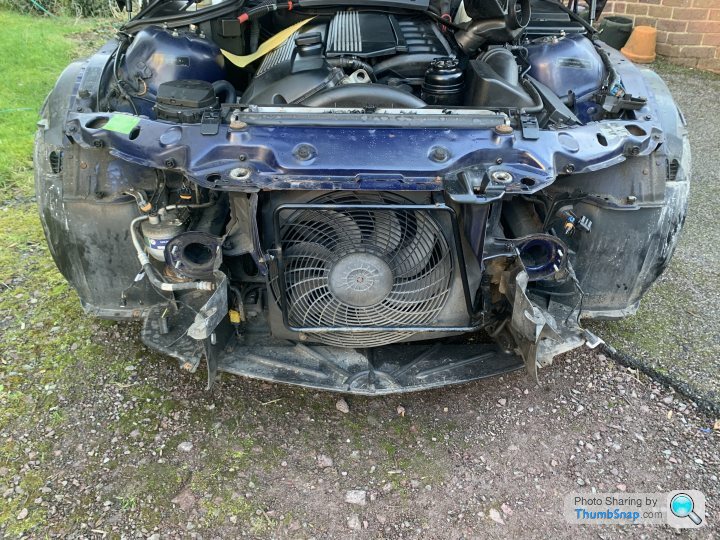
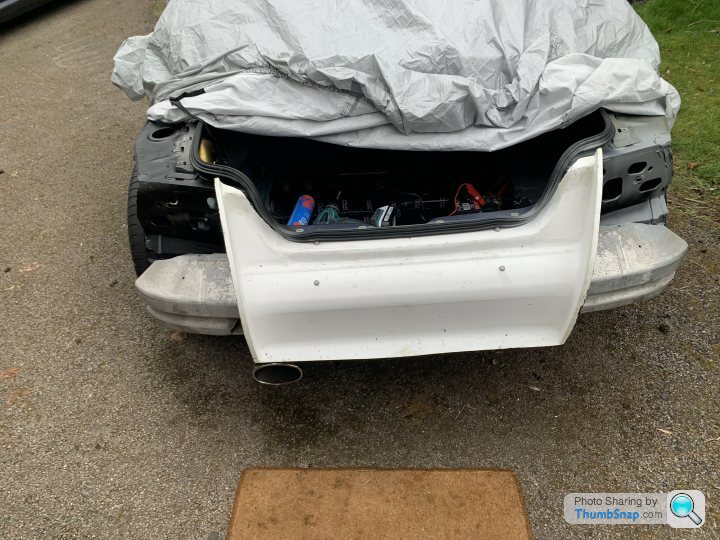
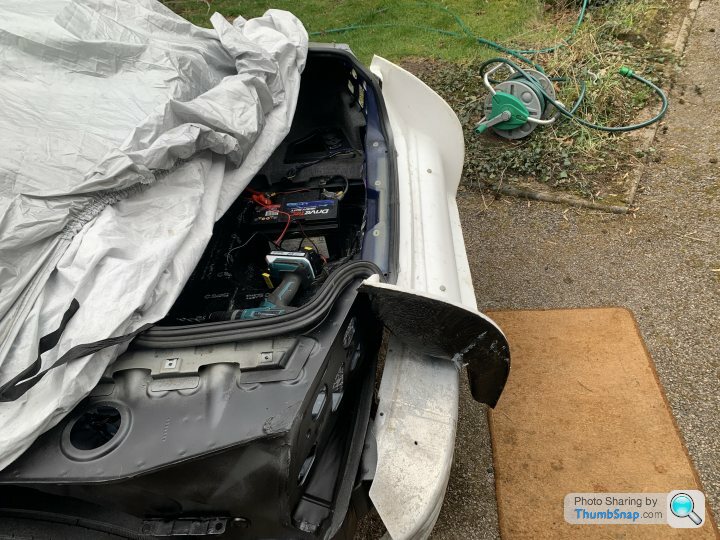
The next stage was removing the front bumper assembly. The outer cover was held on with about 20 little plastic clips, some of which were practically invisible. Two of the plastic clips had been replaced with rivets for some bizarre reason & needed to be drilled out; I love people who bodge repairs.
There were also a few screws where 25 years of exposure to the elements had pretty much rusted them into place but a mixture of WD40 & brute force got them out. I now have a bumper & reinforcing assembly for sale.
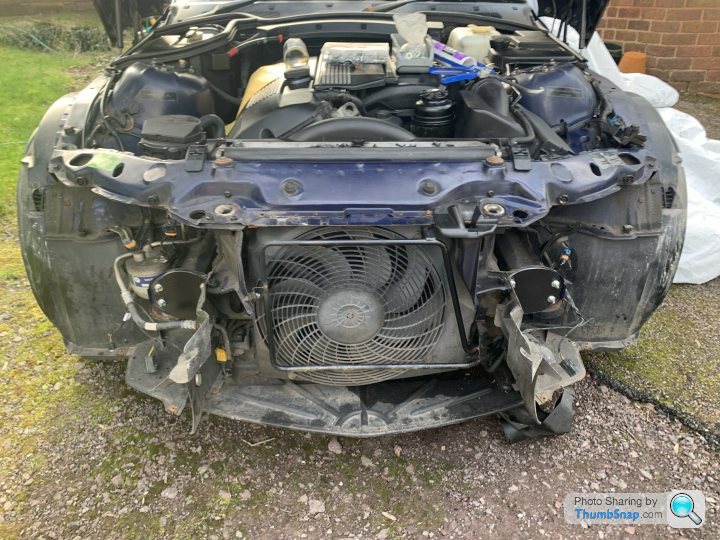
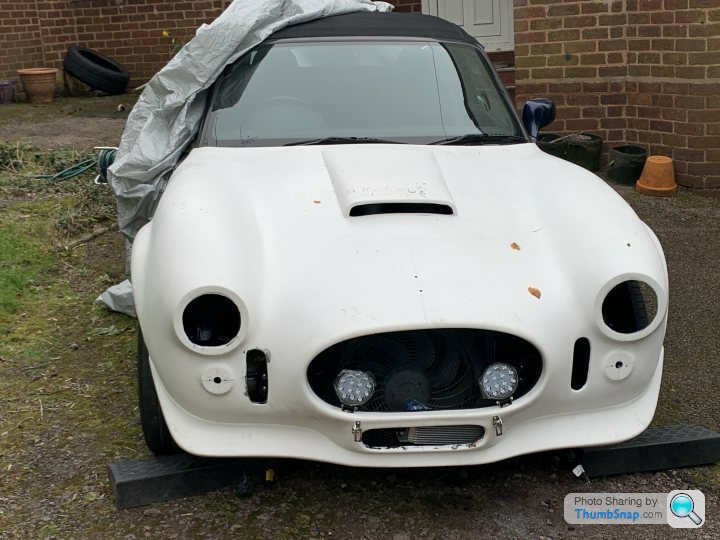
I mentioned in a previous post that the fibreglass circles cut for the headlights would be used at a later point: this is that point. The two circles either side of the fan will be a rust trap. The two circles will be trimmed to size & bolt holes drilled. After the tubes are cleaned, galv sprayed & painted the circles will get a mastic 'gasket' and be bolted into place to seal the tubes.
There were also a few screws where 25 years of exposure to the elements had pretty much rusted them into place but a mixture of WD40 & brute force got them out. I now have a bumper & reinforcing assembly for sale.
I mentioned in a previous post that the fibreglass circles cut for the headlights would be used at a later point: this is that point. The two circles either side of the fan will be a rust trap. The two circles will be trimmed to size & bolt holes drilled. After the tubes are cleaned, galv sprayed & painted the circles will get a mastic 'gasket' and be bolted into place to seal the tubes.
Biggy Stardust said:
I mentioned in a previous post that the fibreglass circles cut for the headlights would be used at a later point: this is that point. The two circles either side of the fan will be a rust trap. The two circles will be trimmed to size & bolt holes drilled. After the tubes are cleaned, galv sprayed & painted the circles will get a mastic 'gasket' and be bolted into place to seal the tubes.
Not the most exciting job I'll ever do but pleasing nevertheless.
A glance into my future reveals a great deal of cleaning.
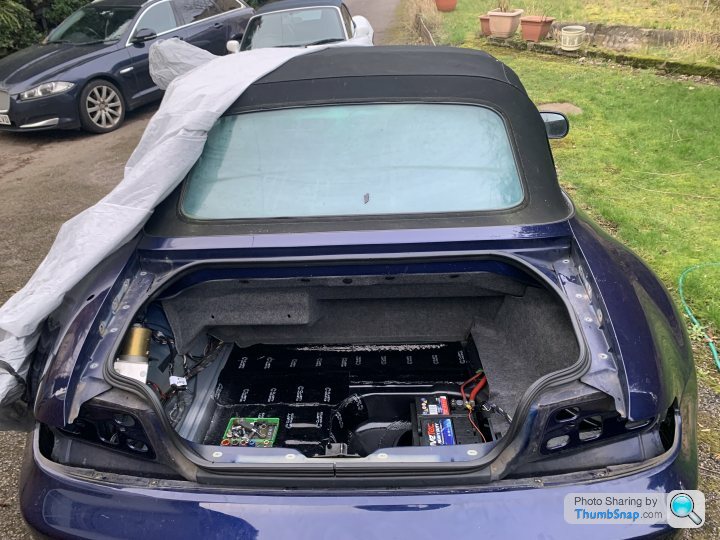
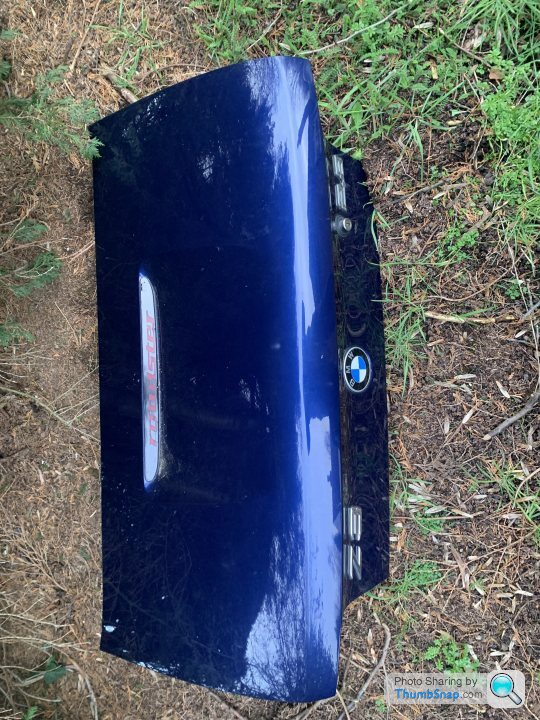
As I had some time & was sick of cleaning I decided to take the bootlid off as this is one of the steps prior to removing the rear wings. Detach the two props, undo six bolts, chop the lid wiring and voila- done.
Edited by Biggy Stardust on Monday 19th February 16:28
Todays effort was to put the bonnet right way up on a table & chop out the air scoop. Stitch drilling that many holes is a bit of a pain but just going straight in with the saw is far too risky for my taste. The fibreglass has completely ruined a drillbit in the process.
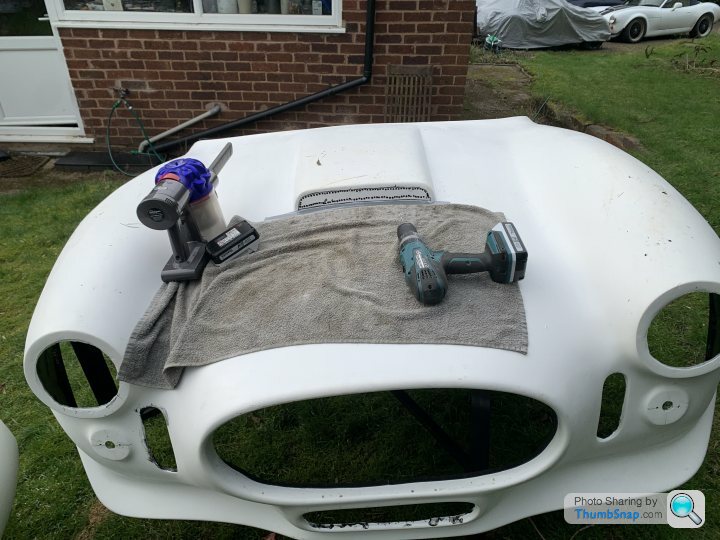
The purpose of the towel was to prevent the drill chuck from damaging the rest of the bonnet when drilling.
Next a very gentle hack in with the saw to remove the centre piece.
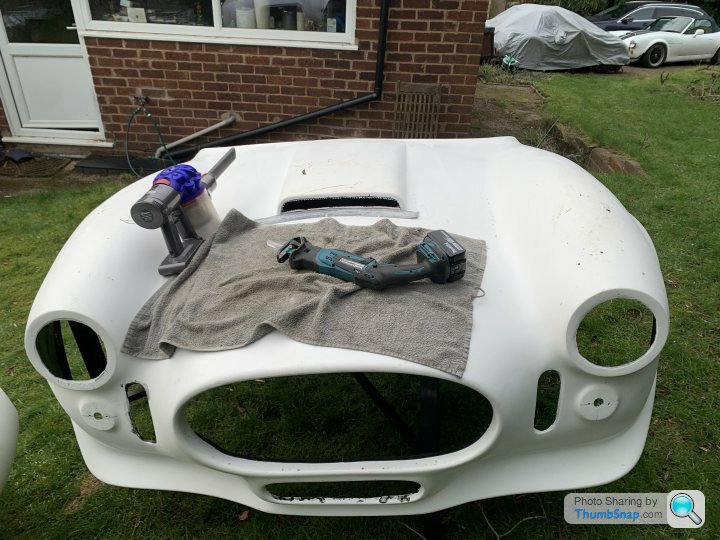
The next step will be smoothing with the big dremel & the detail sander but as I've spent a long time drilling & I'm conscious of the joys that vibration white finger can bring I'll save that to another day.
The purpose of the towel was to prevent the drill chuck from damaging the rest of the bonnet when drilling.
Next a very gentle hack in with the saw to remove the centre piece.
The next step will be smoothing with the big dremel & the detail sander but as I've spent a long time drilling & I'm conscious of the joys that vibration white finger can bring I'll save that to another day.
Although I've marked the bonnet centreline, the badge holes don't actually lie on this line; that would make the cobra seem to be leaning forward. Instead, the upper hole has its right edge on the line and the lower hole its left edge. A tiny detail that doesn't really matter but it matters to me.
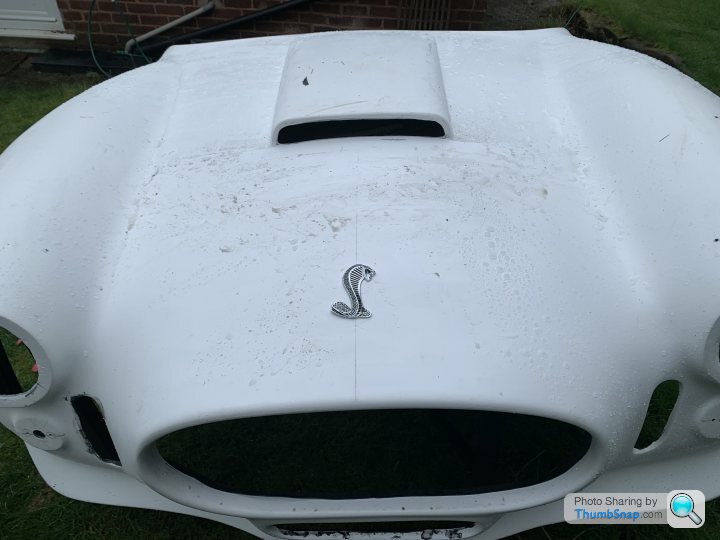
Bonnet scoop now mostly smoothed.
Bonnet scoop now mostly smoothed.
Edited by Biggy Stardust on Wednesday 21st February 14:37
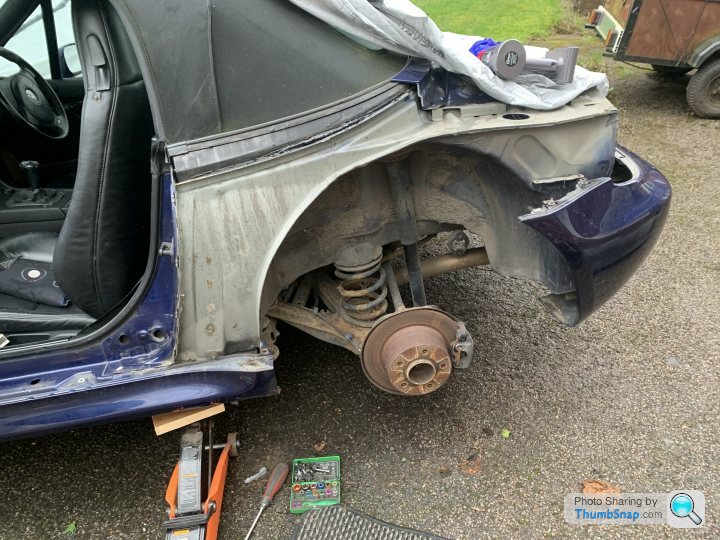
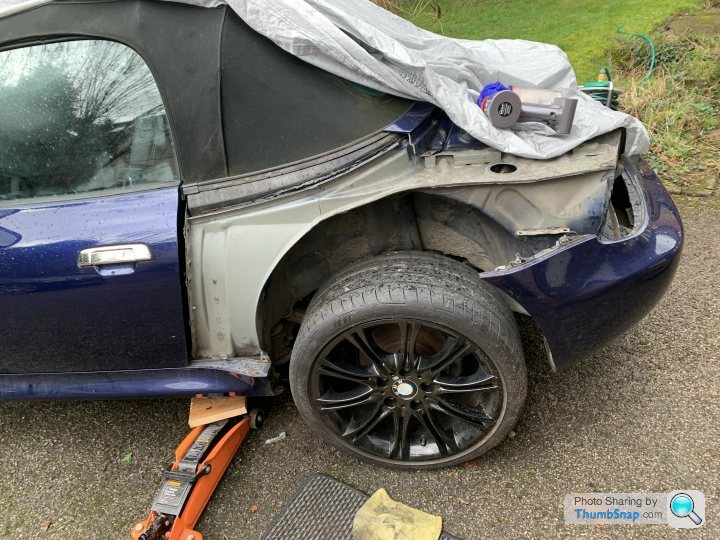
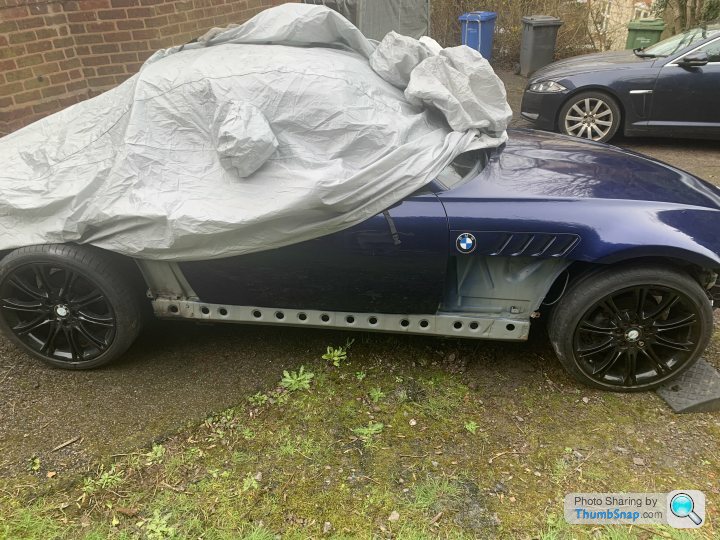
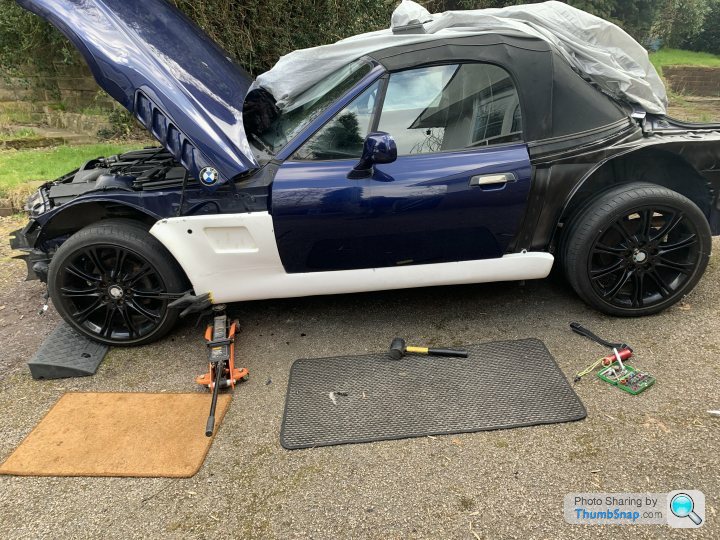
Apart from drilling a couple of holes in the bumper for spotlights the main job today was removal of one of the rear wings.
To do this I had to remove the arch liner; to do this I needed to remove the wheel. This is where the problems started:
A couple of days ago I'd established that every wheelnut on the car was so tight that I couldn't undo them. Not with socket set, not with spider wheelbrace, not with either of my impact guns nor my pneumatic wrench. Fortunately a friend loaned me the biggest breaker bar I'd ever seen. Even with 100+ kg of me standing on the end of it the nuts wouldn't budge. Finally, fearing sheared bolts I started jumping up & down on the bar, at which point there was a horrible groaning noise on the bolts & they eventually freed.
I found tiny remnants of copperslip on some of the bolts so presume that rather than being corroded into place they'd simply been overtightened by some ham-fisted Kwikfit apprentice or similar.
A quick inspection shows a surprising lack of rust on the bits I'll be keeping. The suspension has seen better days but as I'll eventually be replacing it that won't be a problem.
Then removal of a couple of rusted bolts, a little wiggling & the arch liner came free. Five minutes with a torch found the remaining bolts; I had to chisel away some paint before the socket would fit on them plus some of the bolts were an utter nightmare to access but eventually the wing would come away. Sometime in the past a previous owner had seen fit to apply plenty of tiger seal to the top edge and so an extra couple of minutes making sure nothing got bent during removal.
I started some cleanup but rain threatened to stop play so the wheel's back on, as is the cover. I'll continue another day.
Edited by Biggy Stardust on Friday 23 February 14:58
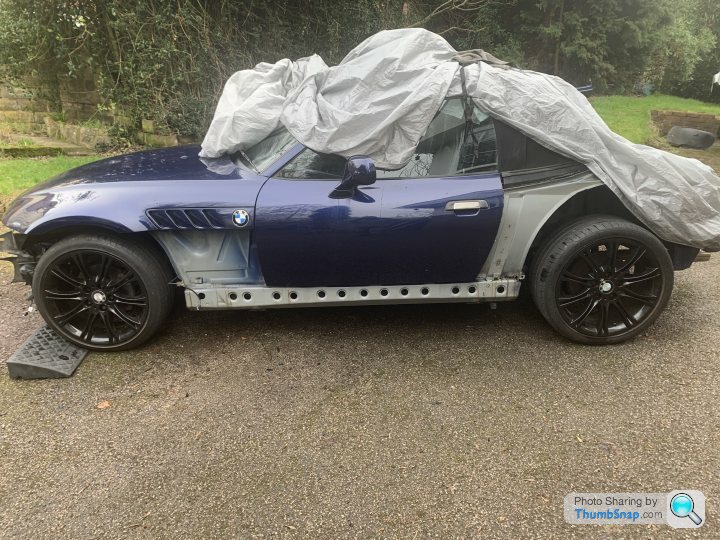
Another day, another corner.
The wheel came off easily enough now that I'd freed everything with the big breaker bar and the arch liner removal just needed a couple of bolts to be freed from where they'd more or less rusted into place. What fun.
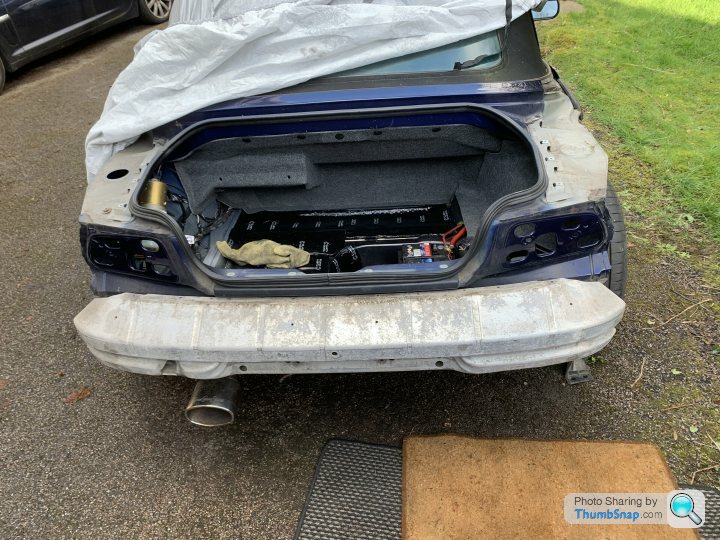
For removal of the rear wing I encountered more rusted bolts in inaccessible locations. I also finished up having to remove the entire bumper support frame in order to access 2 small plugs that would otherwise be impossible to remove. Eventually the plastic bumper cover came away.
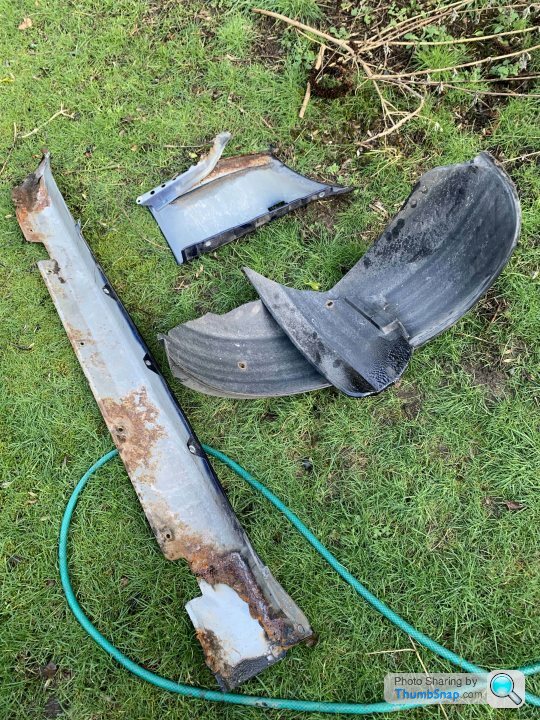
In the process I uncovered the two big steel weights that BMW see fit to attach to the back of the car.
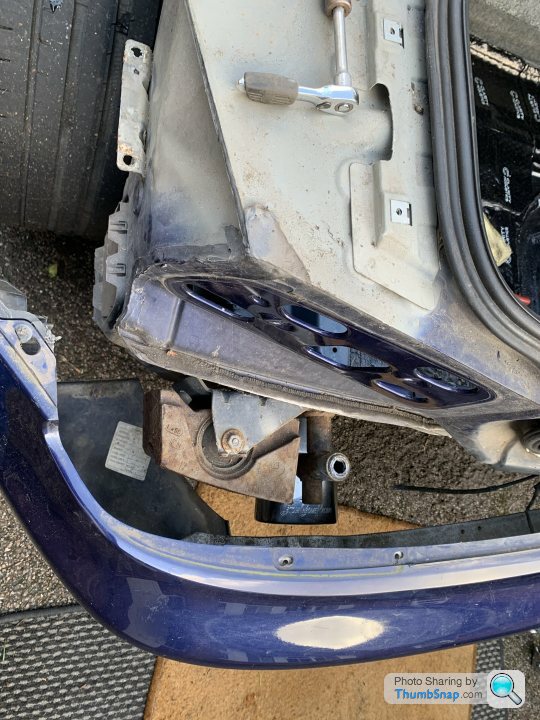
At 6.5kg each there was no question about it; unbolt, remove & throw away. 13kg is a huge weight saving on a car this light. This is on top of the 110kg saving on the body panels & 10kg on the spare wheel & carrier.
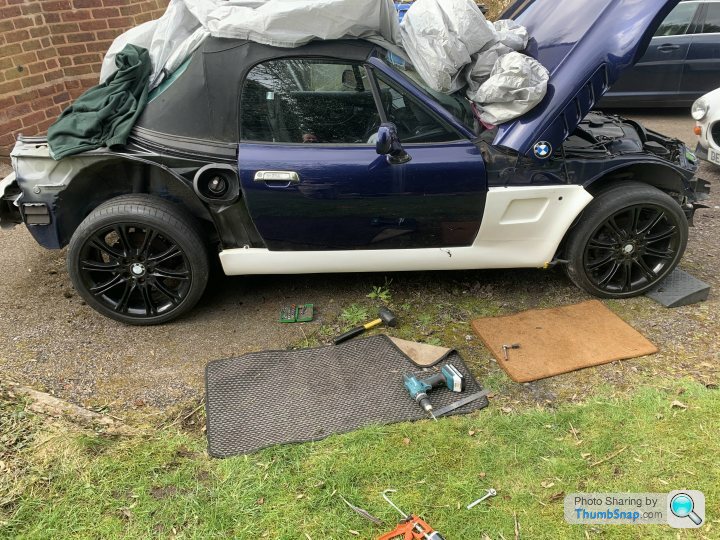
In order to remove the sill I needed to remove the front wing as well. It was pretty much rotten at the bottom so not worth saving. This sill came off with great difficulty due to the amount of hammerite & waxoyl gluing it into place but eventually it all came away.
And I'm left with this & a lot of cleaning. Tomorrow might see a quick blast with the jetwash.

The wheel came off easily enough now that I'd freed everything with the big breaker bar and the arch liner removal just needed a couple of bolts to be freed from where they'd more or less rusted into place. What fun.
For removal of the rear wing I encountered more rusted bolts in inaccessible locations. I also finished up having to remove the entire bumper support frame in order to access 2 small plugs that would otherwise be impossible to remove. Eventually the plastic bumper cover came away.
In the process I uncovered the two big steel weights that BMW see fit to attach to the back of the car.
At 6.5kg each there was no question about it; unbolt, remove & throw away. 13kg is a huge weight saving on a car this light. This is on top of the 110kg saving on the body panels & 10kg on the spare wheel & carrier.
In order to remove the sill I needed to remove the front wing as well. It was pretty much rotten at the bottom so not worth saving. This sill came off with great difficulty due to the amount of hammerite & waxoyl gluing it into place but eventually it all came away.
And I'm left with this & a lot of cleaning. Tomorrow might see a quick blast with the jetwash.
Edited by Biggy Stardust on Tuesday 19th March 22:51
Due to an unfortunate combination of poor weather & innate laziness, not much got done on the car over the last few days. The front wheels came off & the front arch liners were removed. What was revealed was a rusty front anti-roll bar & wishbones. The wishbones will benefit from a coat of hammerite but the ARB is in a sorry state; a breakers' yard provided a bar in massively better condition so that can be fitted in place of the rusty piece of scrap. It just needs cleaning up and some hammerite on the brackets.
Edited by Biggy Stardust on Thursday 29th February 16:09
And now the sills & arch liners have been removed; a good go-over with the jetwash probably removed a kilogram or so of dirt acquired over the last 25 years.
The next step will be plenty of galv spray including into all 28 side holes followed by a generous coating of hammerite anywhere that seems to need it. Once that's done I can start to attach the new body panels, starting with the sills.
All I need is a dry day.................
The next step will be plenty of galv spray including into all 28 side holes followed by a generous coating of hammerite anywhere that seems to need it. Once that's done I can start to attach the new body panels, starting with the sills.
All I need is a dry day.................
ConnectionError said:
Could the weights that have been binned have been there for a practical reason, such as roadholding?
As I'm changing the bodywork & the balance of the car I doubt that they would have had the same effect as on the original vehicle. They might put more weight on the rear wheels to improve grip but they also put more mass to make the rear end twitch; for cornering it's as broad as it's long, for acceleration & braking they are a hindrance.I have another cobra and don't notice anything detrimental due to their loss.
Error_404_Username_not_found said:
I have a feeling they're mass damping. Volvo used to do the same thing, bolting a massive chunk of ironmongery to the diff in a crude attempt to disguise vibration by shifting the oscillation freq.
Or perhaps not. You decide...

Perhaps. I'd have a similar answer, tbh- I've changed a great deal about the car so they probably wouldn't have the same effect as previously and I've certainly noticed no detrimental effect on my previous build.Or perhaps not. You decide...
Having eventually received a dry day it was time to paint the sills.
A good wipedown with a cloth impregnated with brake cleaner to remove any surface crap plus a brush into any little crevices gave a hopefully clean surface to work on. Stage one was to shoot galv spray into each of the holes in the sill, moving the spraycan around in the hope of covering everything inside.
Then the exterior faces. Hammerite & a 38mm brush gave a decently thick coat & a final aerosol spray of hammerite filled in any brushmarks & got into the places the brush couldn't reach. Depending on the weather it might be hard enough to attach the sill panels tomorrow but I'm more likely to exercise patience & leave it all until Thursday to let the paint dry properly.

The body under the wings didn't have any issues but I decided an extra layer of paint wouldn't harm & was well worth the extra 30 seconds it took each side.
A good wipedown with a cloth impregnated with brake cleaner to remove any surface crap plus a brush into any little crevices gave a hopefully clean surface to work on. Stage one was to shoot galv spray into each of the holes in the sill, moving the spraycan around in the hope of covering everything inside.
Then the exterior faces. Hammerite & a 38mm brush gave a decently thick coat & a final aerosol spray of hammerite filled in any brushmarks & got into the places the brush couldn't reach. Depending on the weather it might be hard enough to attach the sill panels tomorrow but I'm more likely to exercise patience & leave it all until Thursday to let the paint dry properly.
The body under the wings didn't have any issues but I decided an extra layer of paint wouldn't harm & was well worth the extra 30 seconds it took each side.
Edited by Biggy Stardust on Thursday 7th March 20:12
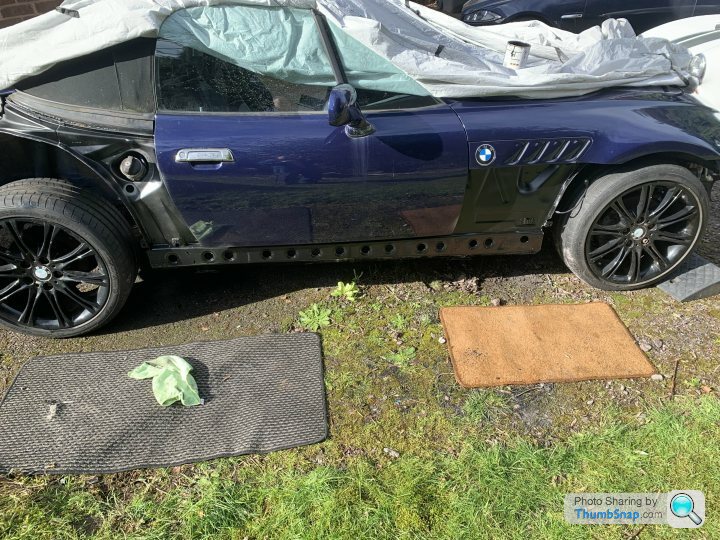
Finally time to start putting bits onto the car rather than just removing them.
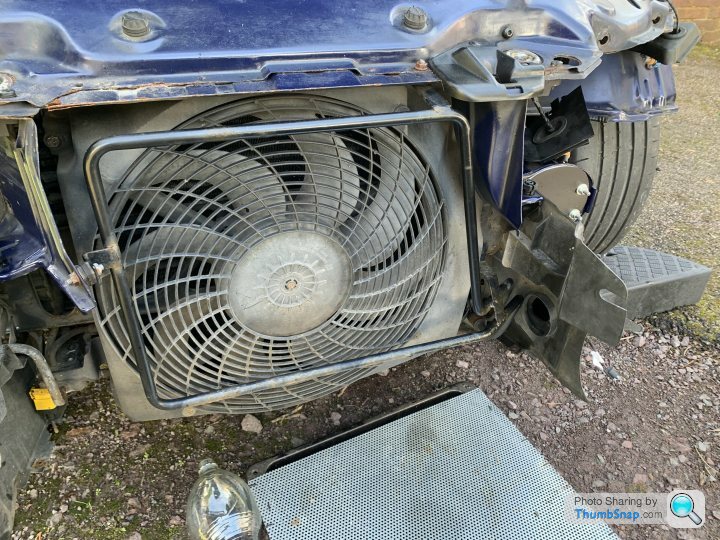
Off with the undertray & I can get at the hoses for the PAS cooling loop- a grotty, rusty, ugly item. This is bolted to the car with a pair of anti-vibration mounts, one of which will be used later.
As the loop comes off I manage to catch most of the oil in a bottle although some inevitably goes into the catch tray. The PAS reservoir has a little sump where a little oil remained, along with all the dirt that settles there from the PAS system. This got syringed out and a good wipedown to remove the last of the dirt. The car is 25 years old & I've no idea whether the PAS fluid has ever been changed so it's all getting disposed.
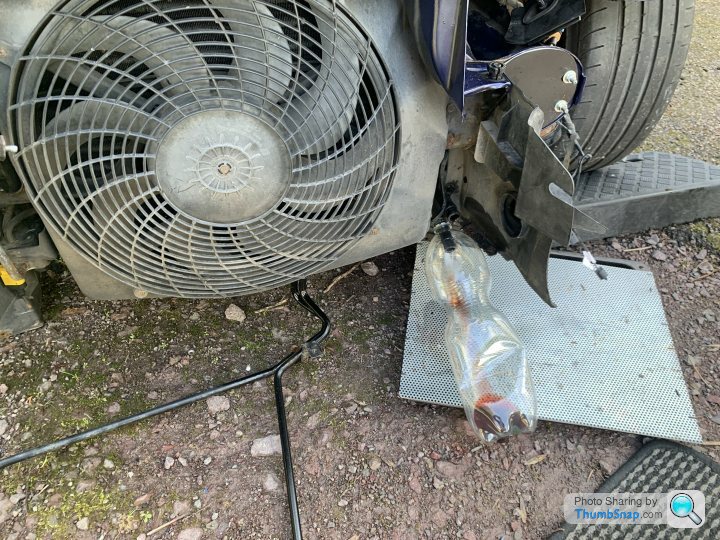
I'll eventually be getting new hoses to connect the oil cooler into the rest of the PAS but for now a little brass connecter to join the two pipes. I have some cheap but clean ATF to flush the system through and will put decent stuff in when the oil cooler is plumbed in.
Next step was to attach the oil cooler. The antivibration mount was just the right thickness to space the bracket I made from the car mounting point. The other end turns out to be different from my previous build (pre-vs post-facelift) so the bracket has nowhere to attach. Until I figure out a better way of doing things the left edge is now cable tied to the fan grille plus a meccano-type strip to carry the weight if everything goes horribly wrong. Probably totally unnecessary but I'll be happier with it there.

Undertray cleaned & reattached, time for tea & sticky buns.
Off with the undertray & I can get at the hoses for the PAS cooling loop- a grotty, rusty, ugly item. This is bolted to the car with a pair of anti-vibration mounts, one of which will be used later.
As the loop comes off I manage to catch most of the oil in a bottle although some inevitably goes into the catch tray. The PAS reservoir has a little sump where a little oil remained, along with all the dirt that settles there from the PAS system. This got syringed out and a good wipedown to remove the last of the dirt. The car is 25 years old & I've no idea whether the PAS fluid has ever been changed so it's all getting disposed.
I'll eventually be getting new hoses to connect the oil cooler into the rest of the PAS but for now a little brass connecter to join the two pipes. I have some cheap but clean ATF to flush the system through and will put decent stuff in when the oil cooler is plumbed in.
Next step was to attach the oil cooler. The antivibration mount was just the right thickness to space the bracket I made from the car mounting point. The other end turns out to be different from my previous build (pre-vs post-facelift) so the bracket has nowhere to attach. Until I figure out a better way of doing things the left edge is now cable tied to the fan grille plus a meccano-type strip to carry the weight if everything goes horribly wrong. Probably totally unnecessary but I'll be happier with it there.
Undertray cleaned & reattached, time for tea & sticky buns.
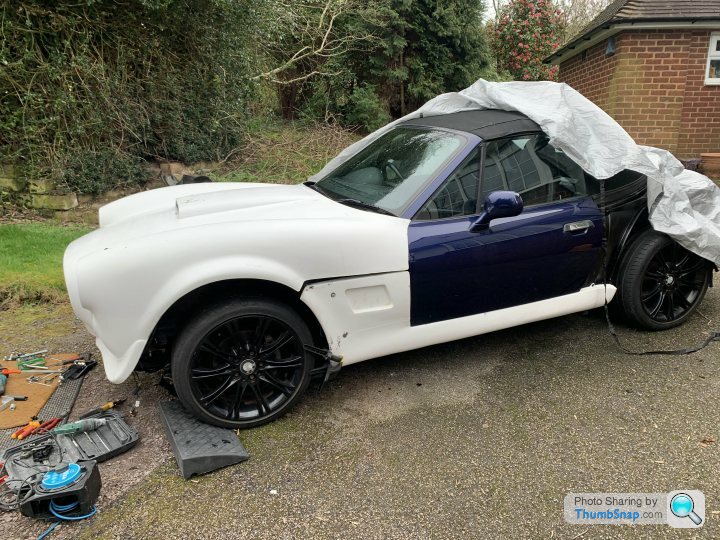
And finally I get to add some bodywork. A dry fit showed that it didn't fit- apparently the guy putting bolt holes in the bodykit didn't realise that they were supposed to align with the bolt holes on the car. A simple mistake, soon remedied with a tape measure & a drill for the top side.
The underside didn't fit either; the body panel wasn't wide enough to reach both the top & bottom holes at the same time so drilling wasn't the answer. The top has been bolted & the underside held together with a generous helping of tiger seal. Once that's had a week or so to fully set I'll consider firing a few tek screws through the bodywork holes into the sill just to make asolutely sure it's going nowhere.
I finally feel I'm getting somewhere.
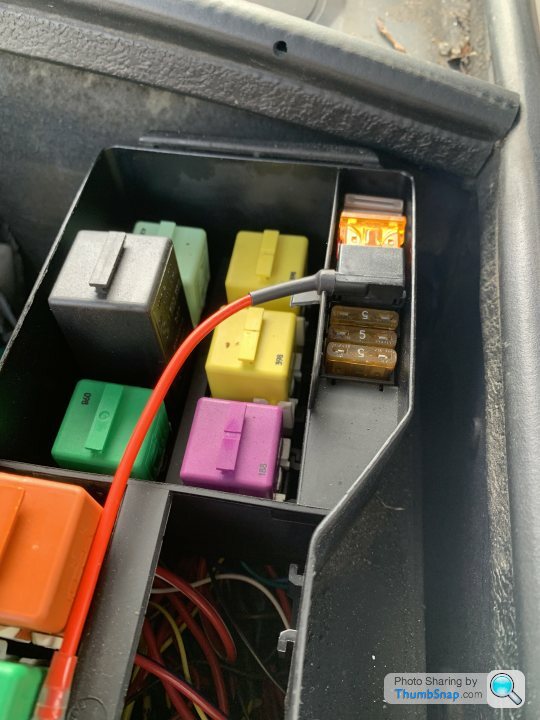
A minor job was going to be tapping into an ignition switched feed in order to power the DRL. I found the appropriate fuse & was trying to work out how to hack my way into the fusebox when I discovered a very elegant solution to the problem. I'd never seen one of these before but it piggybacks into the fuse socket & has slots for a fuse for the original circuit plus another fuse for the piggyback circuit. No unbolting fueseboxes & splicing into wires just a simple plug & unplug. It's low enough not to foul the fusebox lid and all I needed was a tiny hole to feed the wire through.
The underside didn't fit either; the body panel wasn't wide enough to reach both the top & bottom holes at the same time so drilling wasn't the answer. The top has been bolted & the underside held together with a generous helping of tiger seal. Once that's had a week or so to fully set I'll consider firing a few tek screws through the bodywork holes into the sill just to make asolutely sure it's going nowhere.
I finally feel I'm getting somewhere.
A minor job was going to be tapping into an ignition switched feed in order to power the DRL. I found the appropriate fuse & was trying to work out how to hack my way into the fusebox when I discovered a very elegant solution to the problem. I'd never seen one of these before but it piggybacks into the fuse socket & has slots for a fuse for the original circuit plus another fuse for the piggyback circuit. No unbolting fueseboxes & splicing into wires just a simple plug & unplug. It's low enough not to foul the fusebox lid and all I needed was a tiny hole to feed the wire through.
Edited by Biggy Stardust on Friday 8th March 14:27
Today's main task was to attach the boot extension- this takes the dimensions closer to that of an AC cobra.
Naturally it didn't fit properly- despite asking for the pre-facelift version I suspect (but can't prove) that I got the facelift item. No worries- either should fit the rear clamshell & any gaps can be patched in afterwards.
Centreline of the boot was marked, as was centreline of the extension. A huge amount of tiger seal was applied to wherever surfaces would mate plus a few big blobs along the top of the bumper, the blobs being bigger than the gap. The extension was then pushed into place and some tek screws drilled in. The bottom pair of tek screws wouldn't bite into the aluminium bumper securely- no worries, the holes were slightly oversized and suitable stainless bolts from the 'garage scraps' collection were put in their place. Probably not needed but I'd rather overdo it than underdo it.
As with the sills/wings, I'll give it a decent time to set rather than rushing anything. I've ordered some suitable tek screws for the underside of the sills but will probably wait until next week before fixing them.
Other jobs today included a bit more sanding on the air scoop as I wasn't satisfied with the finish. Whilst I had the sander out I went over various rough bits of bodywork- I anticipate 2 solid days of sanding & filling before it will be ready to send to the paint shop and I'd rather not do it all in one go.
Edited by Biggy Stardust on Saturday 9th March 16:16
A friend came round to give me a hand & finally the bonnet is on. Over the next couple of days I'll be nailing all the lights into place so I can see how I'm going to run the electrics and where I can fit P-clamps onto the light fitting bolts.
A tiny problem is that nothing quite fits, nothing quite lines up, etc. I've had to slot a few holes & file down a few surfaces here & there- I expect a great deal more of the same before I'm through.
The bonnet wouldn't quite close over the oil cooler so I've had to make a new bracket to hold it slightly lower- the cooler and its associated gubbins was a bit too wide for the space available so there's been plenty of work with the file. It's now leaning at an angle so I'll have to remount it to sit level.
Edited by Biggy Stardust on Saturday 16th March 19:10
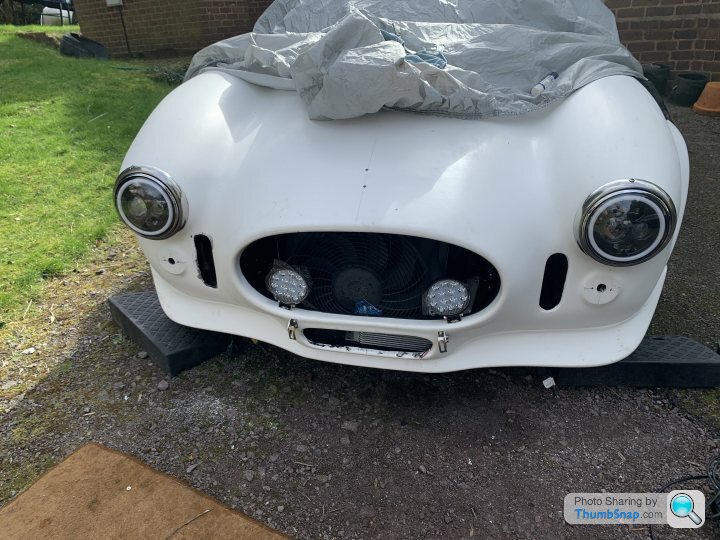
Today's job was to finish cutting the headlight holes to the correct size & fit the headlight bowls. Lots of offering up, marking a bit to file back, repeat several times until it's a nice tight fit. At that point rotate until the hole for the wiring is at the bottom & drill pilot holes for the fixing screws.
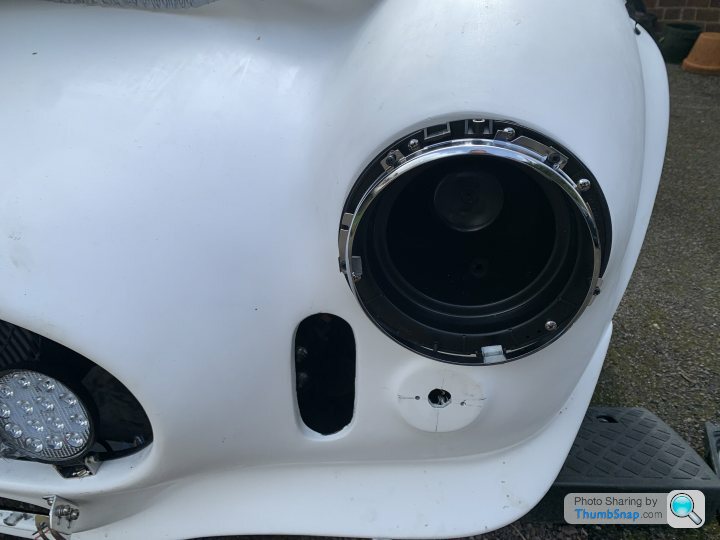
I want a more modern look including LED headlights & DRLs. Land Rover / MINI lights are the right size and seemed appropriate for a cobra. They come with plug & play connectors for their intended recipients but I chopped these off as they wouldn't feed through the wiring hole in the headlight bowl.
A stainless steel headlight ring completes the ensemble for now. Next step will be indicators followed by wiring but that will have to wait until I come back from a trip abroad.
Edited by Biggy Stardust on Tuesday 19th March 14:27
Happy Jim said:
Is that the ring mounting screw on top of the chrome trim ring? If so your bowl is 180deg out (screw should be at the bottom) - might be a trick of light though (in which case ignore!)
It's exactly what it looks like but it's not out 180 degrees ( daft though I might be, I'm not totally thick). The headlight bowl is the right way up (wiring/drain hole at the bottom) and the only way that ring goes on is by screwing the screw into the screwhole, which is where you see.Strange as it looks that's how it needs to be. The classic specialist I use had the exact same opinion when I asked about it on my other cobra.
I'll confess to the mistake I have made: the headlight units themselves are at 90 degrees to where they're meant to be. I'll need to extend the wires so they go through the bottom hole when I turn them to the correct orientation. I need to take them out anyway to ascertain which wire is which now I've cut the connector off.
Edited by Biggy Stardust on Tuesday 19th March 23:14
Biggy Stardust said:
Next step will be indicators followed by wiring but that will have to wait until I come back from a trip abroad.
I lied, slightly: I got the indicators fitted as well. They needed a surprising large amount of fettling to fit perfectly but I only intend to do the job once so I might as well do it properly.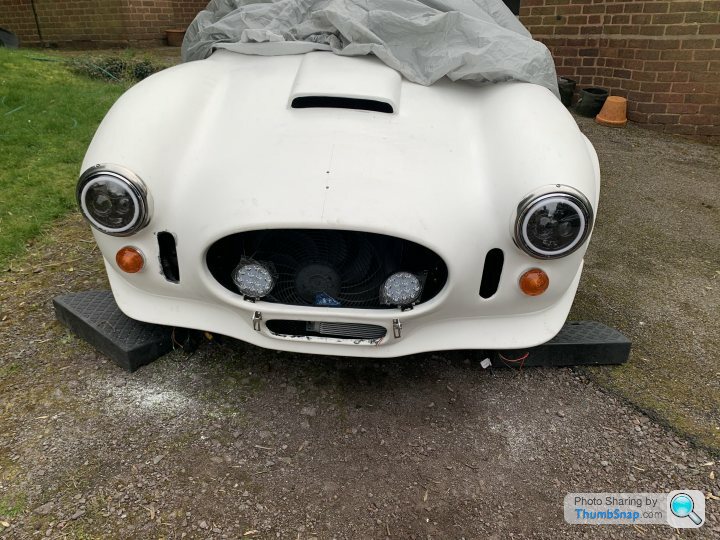
Wiring will be next, subject to time available & weather.
Gassing Station | Kit Cars | Top of Page | What's New | My Stuff