500+bhp Mk3 Fiesta Project
Discussion


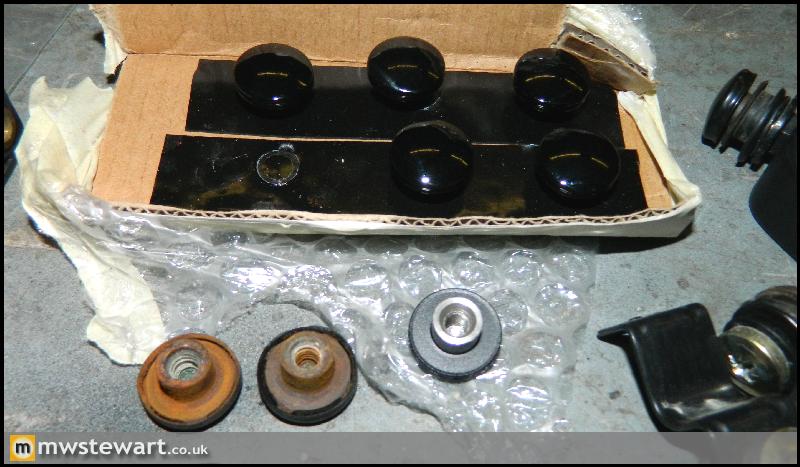
I'm retrofitting opening rear quarter quarter windows to the car and the external nut part of the through-bolt fixings tend to rust underneath their cosmetic caps leaving a near permanent stain on the glass. I want to avoid this as the glass I'm using is brand new, so I've had the externally facing part of the fixing replicated in stainless steel. The freshly painted stainless version can be seen in the top of the photo and in the foreground is a comparison of standard vs stainless.
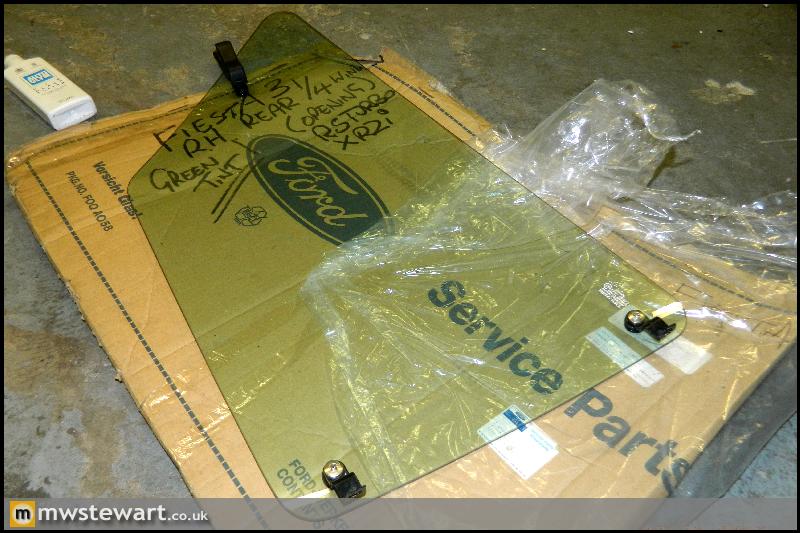
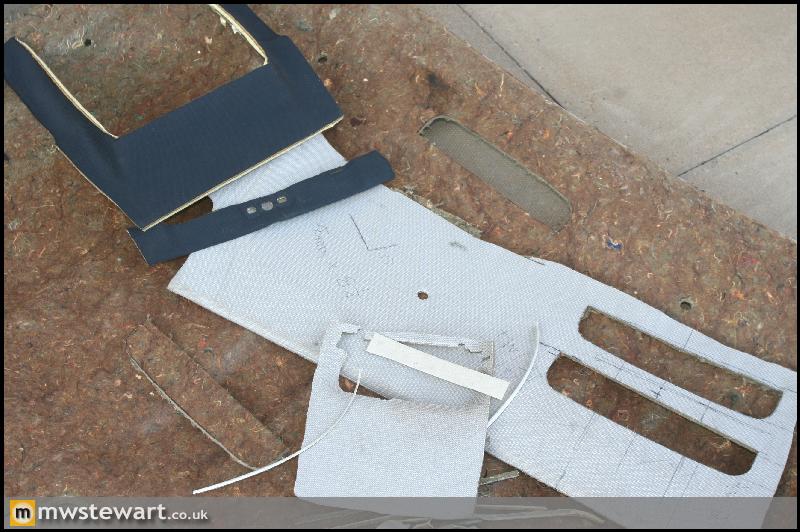
New glass built up with new fittings and rubber seals.
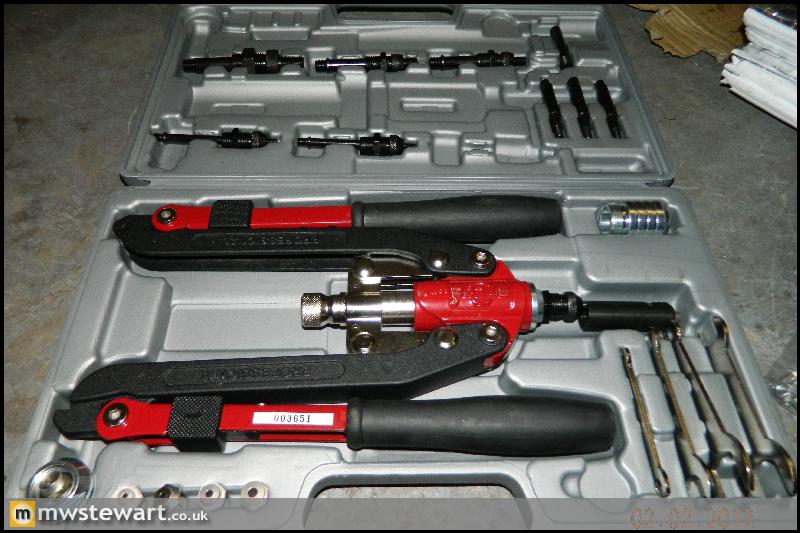
I bought a professional Rivnut tool to add captive fittings to the shell. It's the best tool purchase I've made for a while.
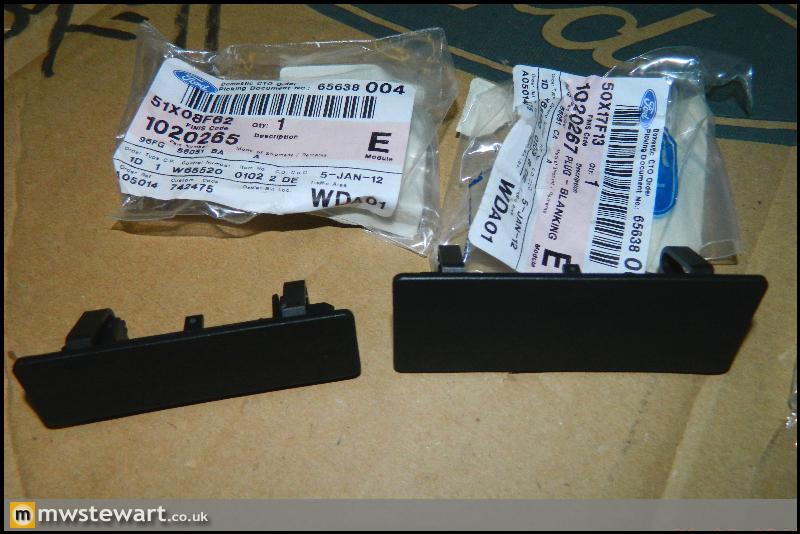
I've removed the Mk3 tailgate wiring and its sometimes unreliable brass pin and contact plate system that was used both to send power to the tailgate and act as an ajar switch, and replaced it with a tilt sensor inside the tailgate and rubber grommet to feed the loom inside. I've blanked up the original pin and contact plate holes with parts from a foreign market poverty spec model that didn't have a heated rear window or wiper.
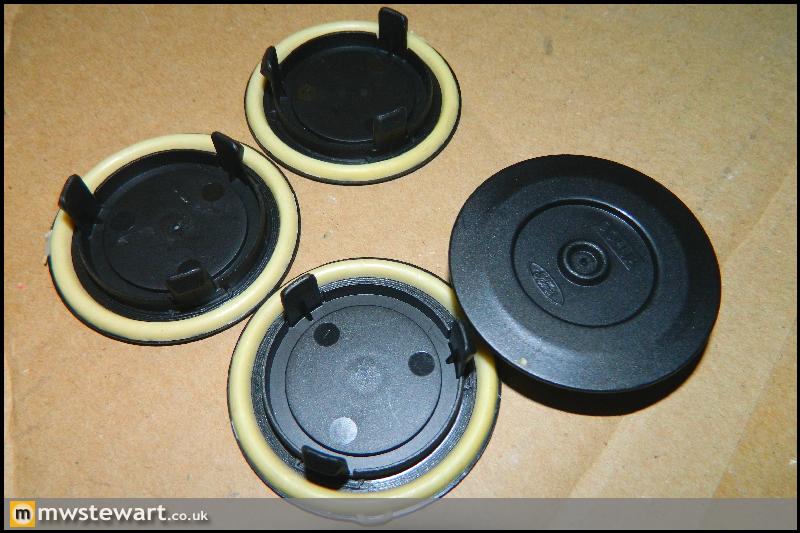
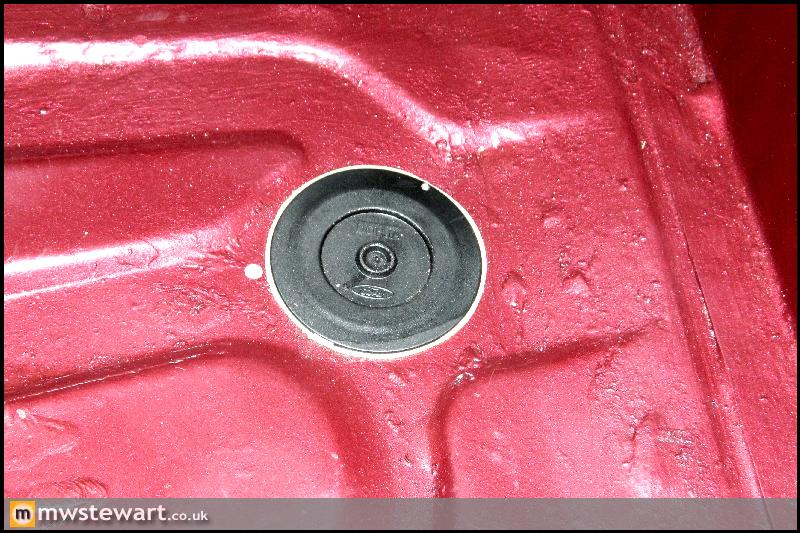
For a Ford fixing I thought the floor drain plugs were a very good part; they have a bead of wax around the circumference and once in position a hot air gun is used to melt the wax and seal them to the floor. They are almost Audi like in that they solve a problem where there isn't one (Ford could have used seam sealer instead).
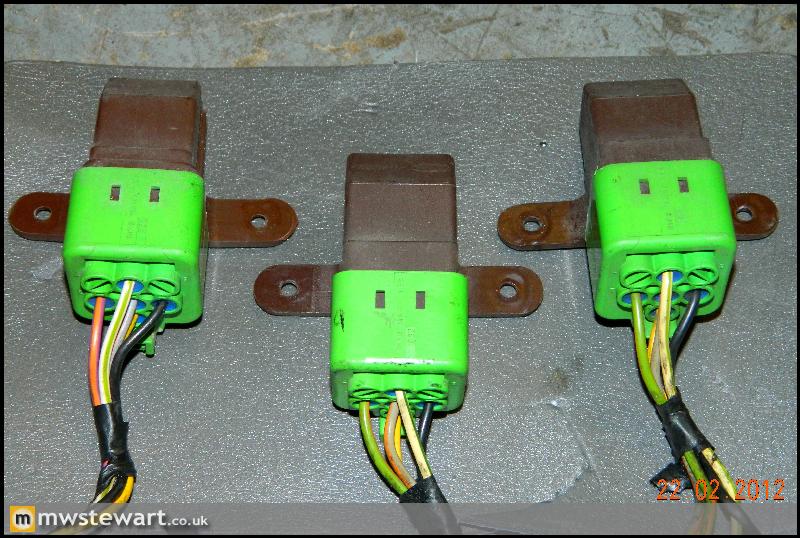
I now have most of my parts back from the electro platers. The finish is far better than any plating work I've had done in the past.

New glass built up with new fittings and rubber seals.
I bought a professional Rivnut tool to add captive fittings to the shell. It's the best tool purchase I've made for a while.
I've removed the Mk3 tailgate wiring and its sometimes unreliable brass pin and contact plate system that was used both to send power to the tailgate and act as an ajar switch, and replaced it with a tilt sensor inside the tailgate and rubber grommet to feed the loom inside. I've blanked up the original pin and contact plate holes with parts from a foreign market poverty spec model that didn't have a heated rear window or wiper.
For a Ford fixing I thought the floor drain plugs were a very good part; they have a bead of wax around the circumference and once in position a hot air gun is used to melt the wax and seal them to the floor. They are almost Audi like in that they solve a problem where there isn't one (Ford could have used seam sealer instead).
I now have most of my parts back from the electro platers. The finish is far better than any plating work I've had done in the past.
Nick,
The speakers will be mounted in the Ford standard locations: mid bass in the doors and tweeters in a bezel near the door handle. The speakers I've purchased look similar to most other speakers when not fitted to an enclosure it's just we're all used to seeing the speakers fitted; the rear part of the drivers will be hidden inside the doors, which in a car environment acts as the speaker enclosure.
Thanks,
Mark
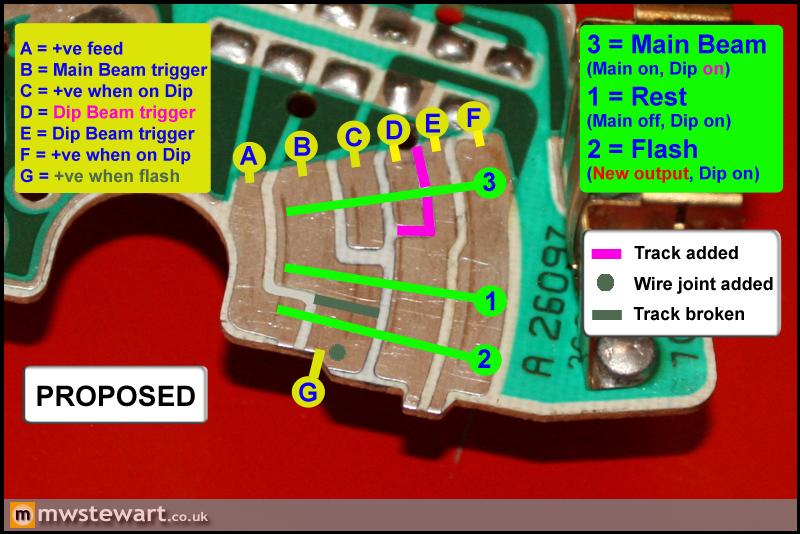
I've done a little more work in preparation for a Bi-Xenon headlamp conversion, as the standard Fiesta headlamp wiring and switch configuration is not suitable for either a Xenon or Bi-Xenon conversion. Here's why:
Fiesta: Halogen dip beam, Halogen main beam. Low beam is off when main beam is on. Main beam used to flash.
Xenon: Xenon dip beam, Halogen main beam. Dip beam remains on with main beam. Main beam used to flash.
Bi-Xenon: Xenon dip beam, Xenon main beam (the same bulb but cut off is modified by a solenoid and shield arrangement). Dip beam is main beam so remains on. Dedicated halogen flash unit.
So I had two requirements for Bi-Xenon: 1) modify the Fiesta switching behaviour, and 2) install a dedicated flashing bulb system.
The lack of a dedicated flashing bulb which is not a problem for night time use, as assuming dip beam is already on then the Bi-Xenon solenoid/cut off could be raised as normal to flash using the high beam setting, however during the day this is not an option because rapidly cycling a HID system is very detrimental to its lifespan. The same caveat applies to a Halogen bulb but the replacement cost is much less; also the bulb 'warm up' time for Halogen is much quicker which makes it more suitable for a flashing application. The other problem I must address is that the Fiesta switch configuration means that dip beam is switched off when main beam goes on, which would of course leave me in the dark with a Bi-Xenon system
The wiring configuration consists of a main & dip relay so the logic is actually contained within the column switches. I disassembled those to see how they worked.
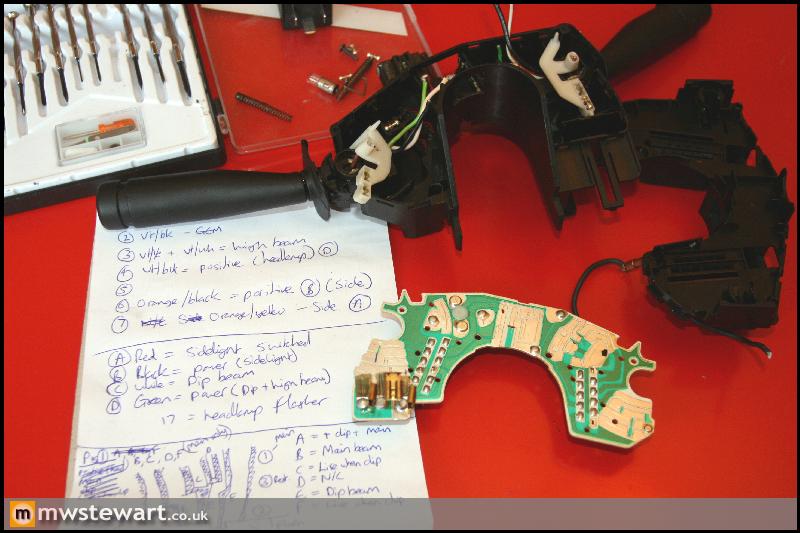
I figured out the contacts and wire functions by tracing them back to the loom, and located the the actual dip/main switch which is essentially a mechanical logic gate system. I am really impressed by the engineering that has gone into this switch system, as there are multiple switch axes on the stalks and each has a different state. Here's the switch which is actuated by a wiper moved by the column stalk.
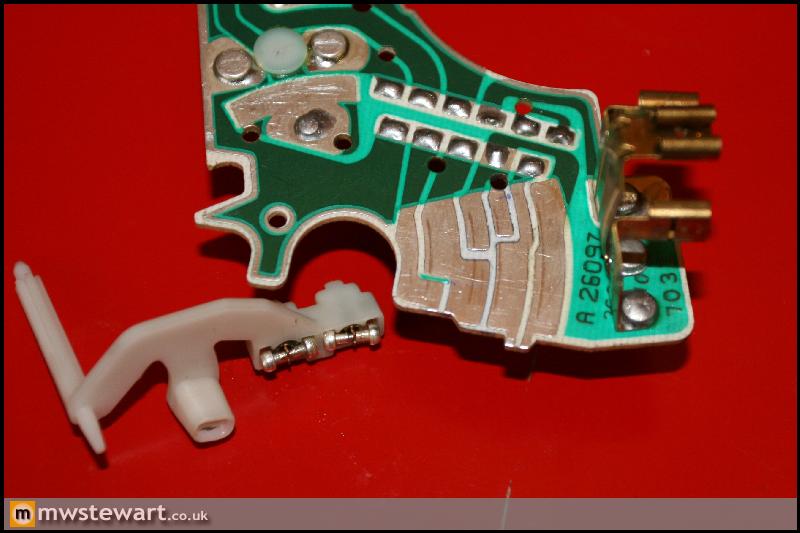
I figured out the states of the standard switch.
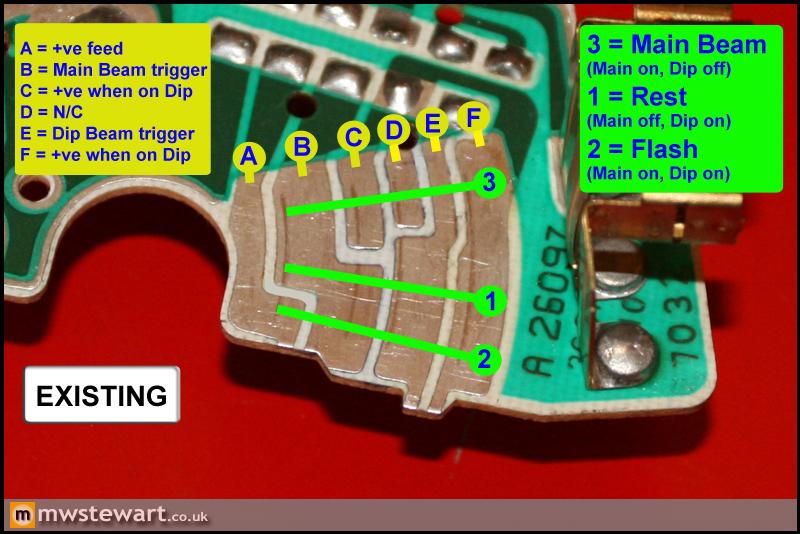
...which enabled me to modify it to suit my needs.
The speakers will be mounted in the Ford standard locations: mid bass in the doors and tweeters in a bezel near the door handle. The speakers I've purchased look similar to most other speakers when not fitted to an enclosure it's just we're all used to seeing the speakers fitted; the rear part of the drivers will be hidden inside the doors, which in a car environment acts as the speaker enclosure.
Thanks,
Mark
I've done a little more work in preparation for a Bi-Xenon headlamp conversion, as the standard Fiesta headlamp wiring and switch configuration is not suitable for either a Xenon or Bi-Xenon conversion. Here's why:
Fiesta: Halogen dip beam, Halogen main beam. Low beam is off when main beam is on. Main beam used to flash.
Xenon: Xenon dip beam, Halogen main beam. Dip beam remains on with main beam. Main beam used to flash.
Bi-Xenon: Xenon dip beam, Xenon main beam (the same bulb but cut off is modified by a solenoid and shield arrangement). Dip beam is main beam so remains on. Dedicated halogen flash unit.
So I had two requirements for Bi-Xenon: 1) modify the Fiesta switching behaviour, and 2) install a dedicated flashing bulb system.
The lack of a dedicated flashing bulb which is not a problem for night time use, as assuming dip beam is already on then the Bi-Xenon solenoid/cut off could be raised as normal to flash using the high beam setting, however during the day this is not an option because rapidly cycling a HID system is very detrimental to its lifespan. The same caveat applies to a Halogen bulb but the replacement cost is much less; also the bulb 'warm up' time for Halogen is much quicker which makes it more suitable for a flashing application. The other problem I must address is that the Fiesta switch configuration means that dip beam is switched off when main beam goes on, which would of course leave me in the dark with a Bi-Xenon system
The wiring configuration consists of a main & dip relay so the logic is actually contained within the column switches. I disassembled those to see how they worked.
I figured out the contacts and wire functions by tracing them back to the loom, and located the the actual dip/main switch which is essentially a mechanical logic gate system. I am really impressed by the engineering that has gone into this switch system, as there are multiple switch axes on the stalks and each has a different state. Here's the switch which is actuated by a wiper moved by the column stalk.
I figured out the states of the standard switch.
...which enabled me to modify it to suit my needs.
Thank you.
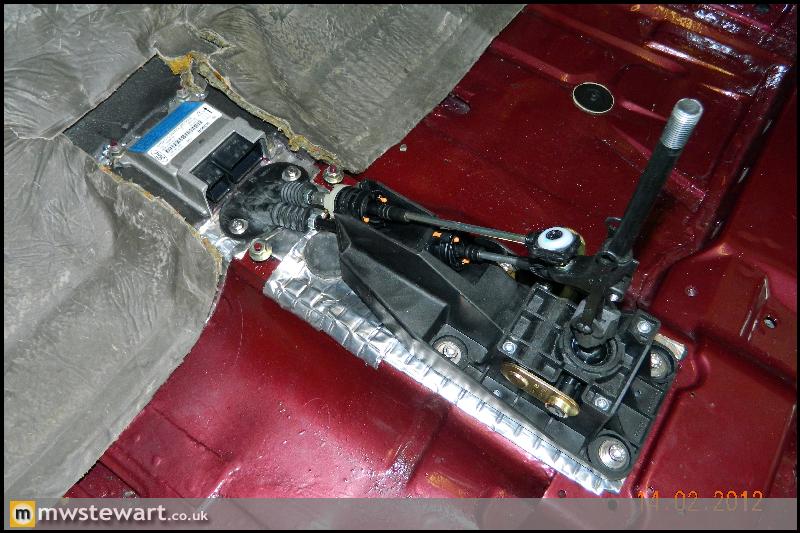
Focus RS gear lever mechanism (short throw) fitted to Rivnuts in the floor pan. I had previously welded up the original shifter mounting aperture.
Front left to right: Airbag module from a 2002 Fiesta, gear change cables and weatherproof grommet, new mounting studs for the Mk4/Mk5 Dashboard, original circular bung for automatic gearbox models, Focus RS linkage and brand new cables. It all just about fits in the centre console area!
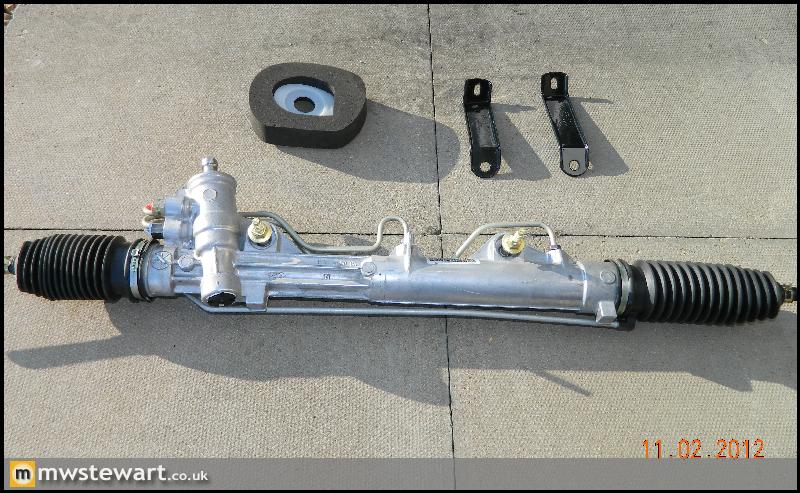
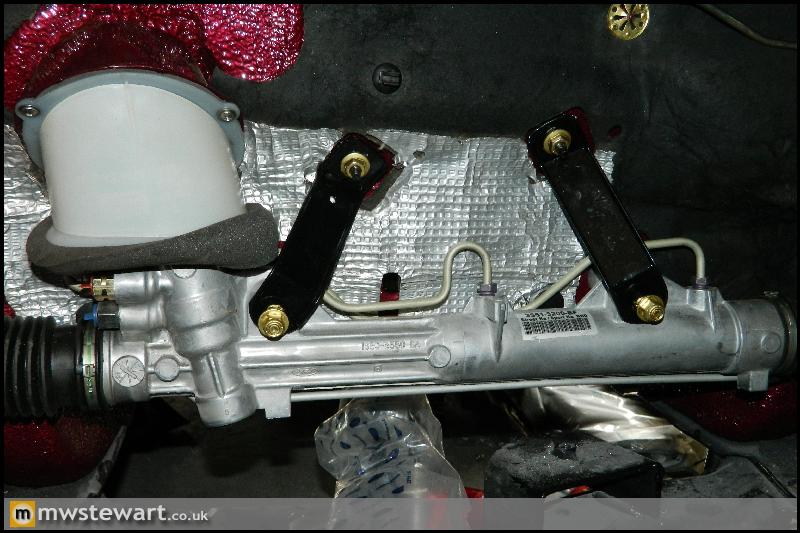
Top left is the steering rack universal joint weather seal I'm using from a later Fiesta, and top right is the rack to bulkhead reinforcement straps I'm using which have come back from being shot blasted and powder coated.
Bottom: New Street Ka/Sport Ka steering rack. To recap this is identical to the original rack at 2.4 turns lock-to-lock, only it is solidly mounted for improved feel and the track rods are +10mm.
Bulkhead sound deadening mat fitted, upper and lower sections of the new weather shroud/seal fitted using stainless fixings, and the rack itself in place.
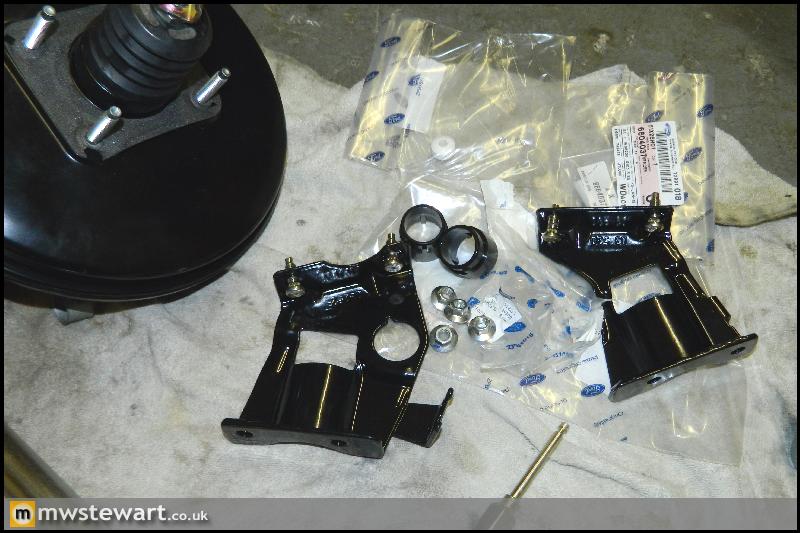
Brake servo brackets fresh back from powder coating. I'm rebuilding everything with brand new parts.
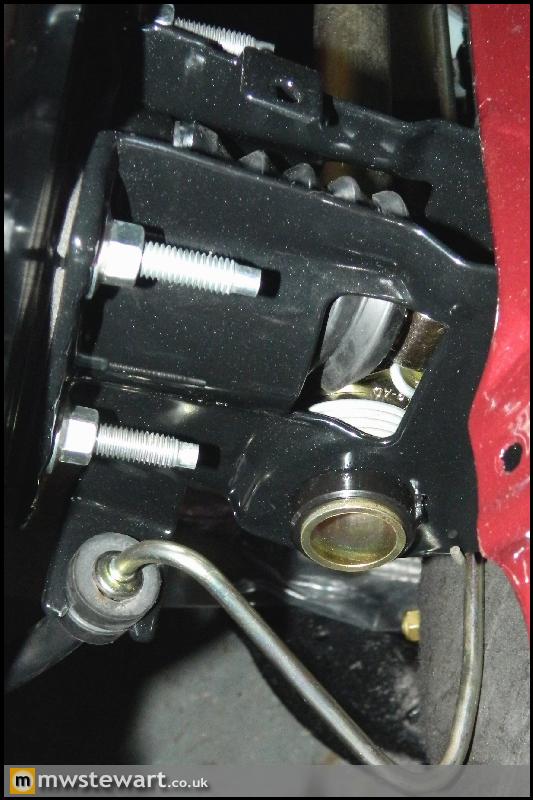
Here's the new Evo X servo mounted, and detail of the hydraulic clutch pipe and mount on the servo bracket. The clutch line is from a Racing Puma and I bent it to fit.
Everything in situ. Please ignore the dirty wheels and suspension components as all that will be replaced in due course. I slid the wrapping over the RS cables to prevent dirt getting to the ball joints.
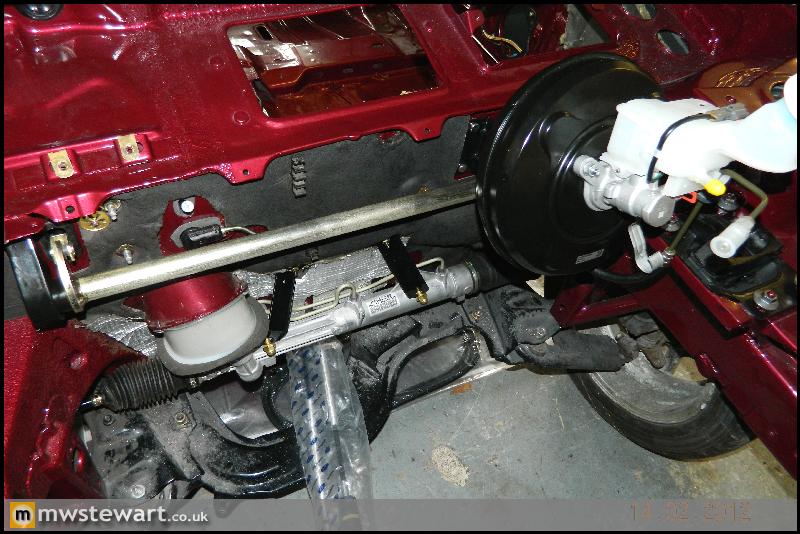
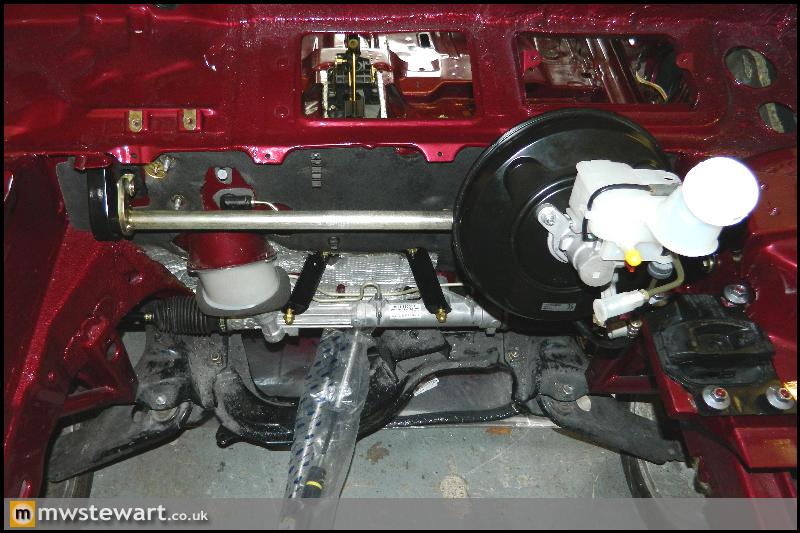
Focus RS Gearbox mount fitted. It's clear in this photo how far the top of the Evo brake fluid reservoir protrudes from the master cylinder. I'm going to cut this down and plastic weld the cap on a little lower.

During the last few months of Mk5 Fiesta production seat airbags became an option on some models and I've been fortunate enough to track down an undeployed module,the two Bosch side impact sensors for the seats and the loom which is plug and play with my interior loom. The period Recaro’s I've sent for trimming do not actually have seat airbags but I'm still making up my mind if the Recaro CS would suit the car, and if I go that way, I would want functional seat airbags.
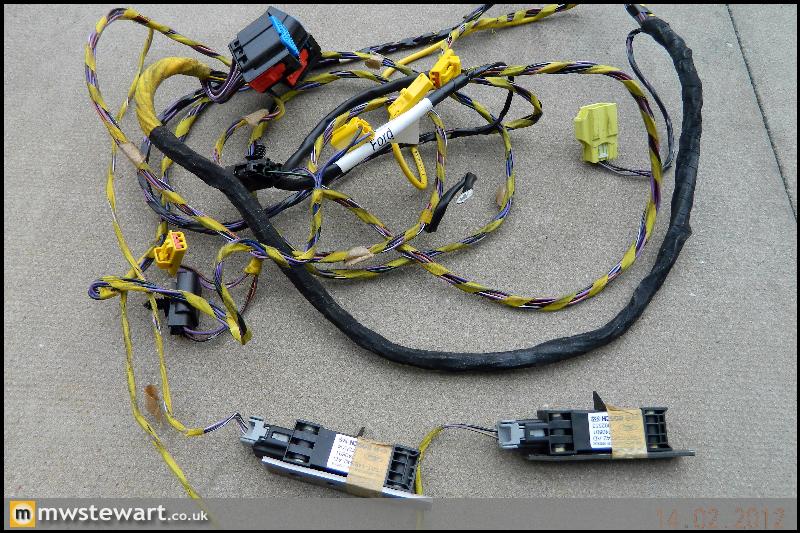
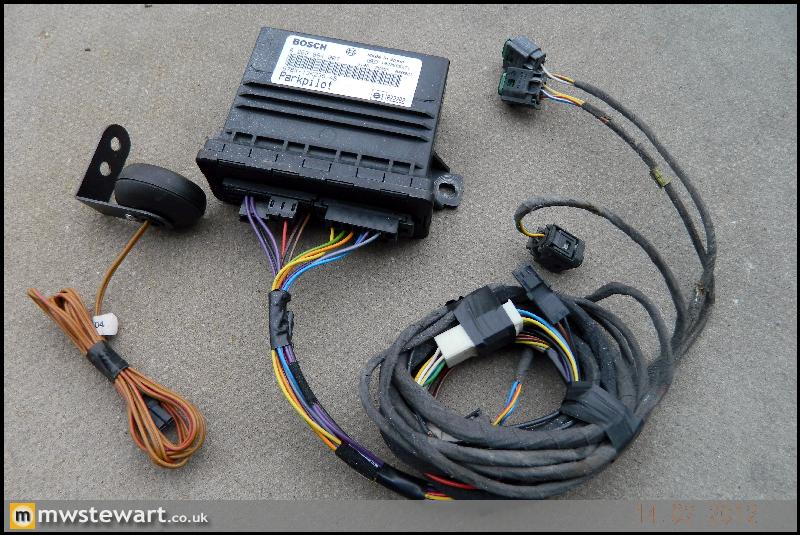
I have also picked up a couple of Bosch Parkpilot systems with sensors, one of which comes with a late Ford spec loom. I will install a kit on the rear.
Focus RS gear lever mechanism (short throw) fitted to Rivnuts in the floor pan. I had previously welded up the original shifter mounting aperture.
Front left to right: Airbag module from a 2002 Fiesta, gear change cables and weatherproof grommet, new mounting studs for the Mk4/Mk5 Dashboard, original circular bung for automatic gearbox models, Focus RS linkage and brand new cables. It all just about fits in the centre console area!
Top left is the steering rack universal joint weather seal I'm using from a later Fiesta, and top right is the rack to bulkhead reinforcement straps I'm using which have come back from being shot blasted and powder coated.
Bottom: New Street Ka/Sport Ka steering rack. To recap this is identical to the original rack at 2.4 turns lock-to-lock, only it is solidly mounted for improved feel and the track rods are +10mm.
Bulkhead sound deadening mat fitted, upper and lower sections of the new weather shroud/seal fitted using stainless fixings, and the rack itself in place.
Brake servo brackets fresh back from powder coating. I'm rebuilding everything with brand new parts.
Here's the new Evo X servo mounted, and detail of the hydraulic clutch pipe and mount on the servo bracket. The clutch line is from a Racing Puma and I bent it to fit.
Everything in situ. Please ignore the dirty wheels and suspension components as all that will be replaced in due course. I slid the wrapping over the RS cables to prevent dirt getting to the ball joints.
Focus RS Gearbox mount fitted. It's clear in this photo how far the top of the Evo brake fluid reservoir protrudes from the master cylinder. I'm going to cut this down and plastic weld the cap on a little lower.
During the last few months of Mk5 Fiesta production seat airbags became an option on some models and I've been fortunate enough to track down an undeployed module,the two Bosch side impact sensors for the seats and the loom which is plug and play with my interior loom. The period Recaro’s I've sent for trimming do not actually have seat airbags but I'm still making up my mind if the Recaro CS would suit the car, and if I go that way, I would want functional seat airbags.
I have also picked up a couple of Bosch Parkpilot systems with sensors, one of which comes with a late Ford spec loom. I will install a kit on the rear.
Thanks chaps! Here's some more.
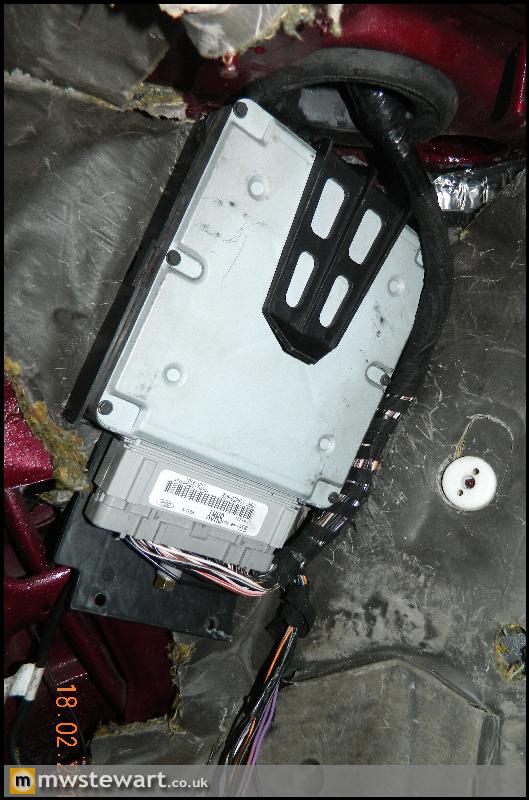
I have fitted an ECU bracket from a later Fiesta. I will retain the Ford ECU to control the engine fans, A/C compressor and a few other functions. I'll make use of the existing PATS immobiliser to secure power to the fuel pump and the Pectel ECU I'll use to actually run the engine.
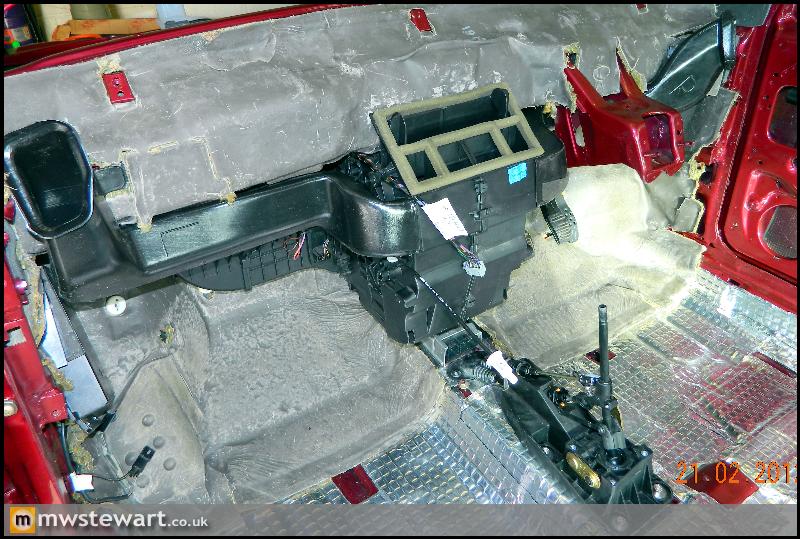
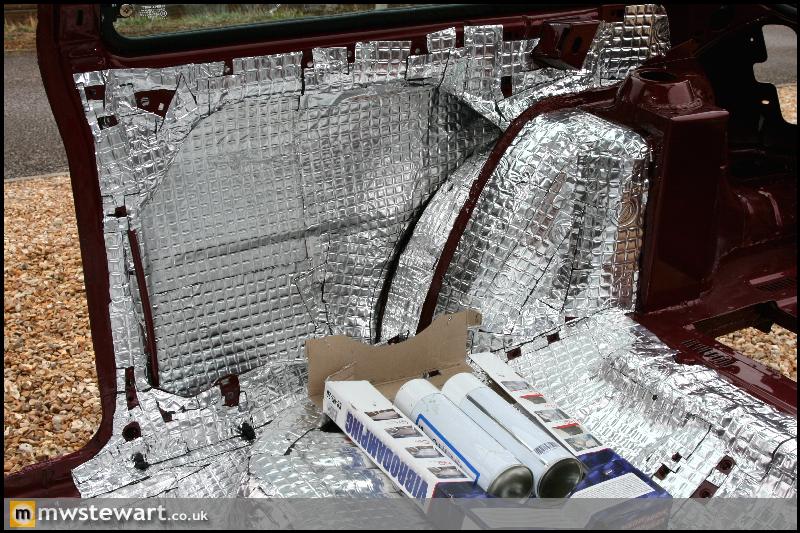
The Mk5 heater box is now in together with the air ducts. The eagle eyed may spot that the sound deadening material around the scuttle now has a grey finish; I found out that some models had a layer of mass loaded vinyl on top of the standard underlay type material (as per the bulkhead below). This arrangement offers improved sound deadening over a layer of foam alone.
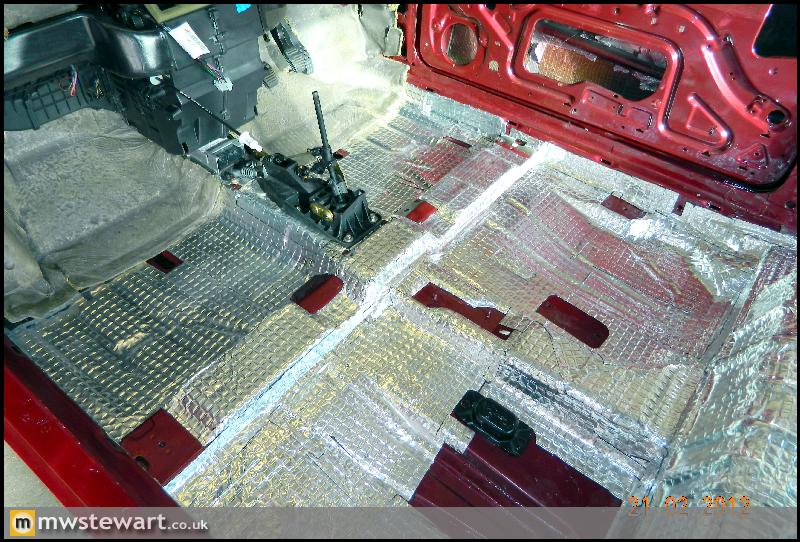
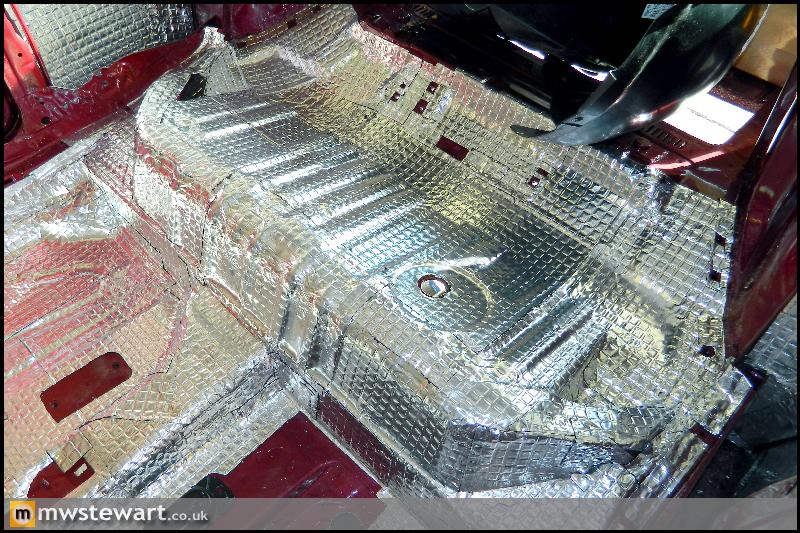
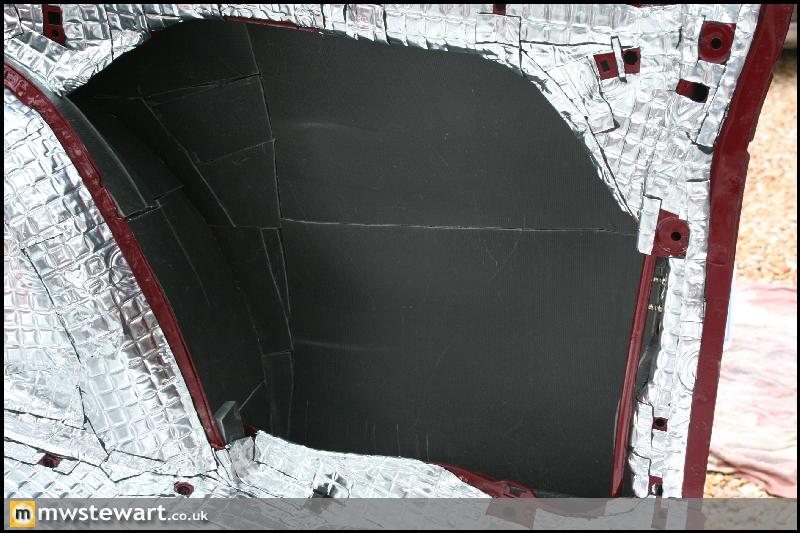
My Dad kindly helped out again by adding vibration damping material to the front floor pan and rear seat area. I ran out of pads which is shy there is a square shaped gap at the bottom of the first photo The other cut outs are for the seat mounts and handbrake.
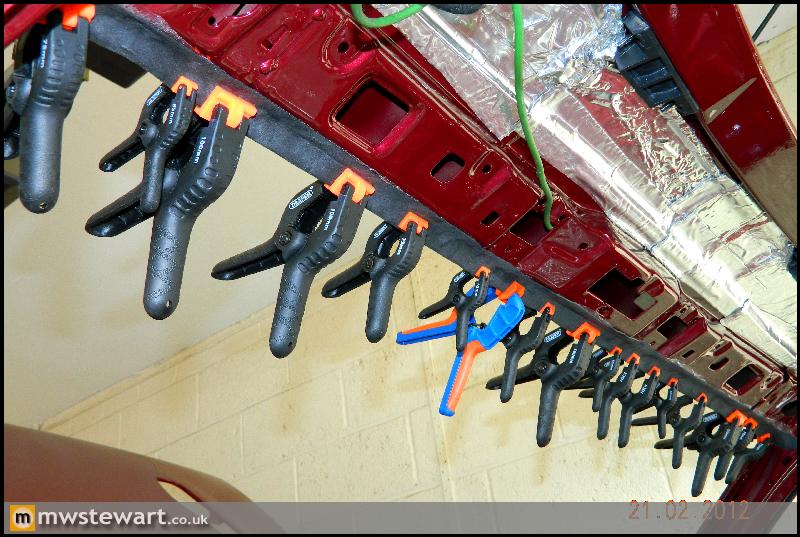
The Mk3 Fiesta never came with a bonded windscreen and instead it used the traditional rubber seal arrangement. I'm using a bonded screen because it actually adds to the cars structure and it also looks neater, but the downside to that is the Mk3 headlining doesn't finish flush with the screen; it finishes around 10mm further back to leave room for the standard rubber weather seal. To ensure everything looks neat I had Aldridge send a strip of Alcantara which I've glued to the windscreen aperture, so when the headlining is finally fitted everything will look neat.
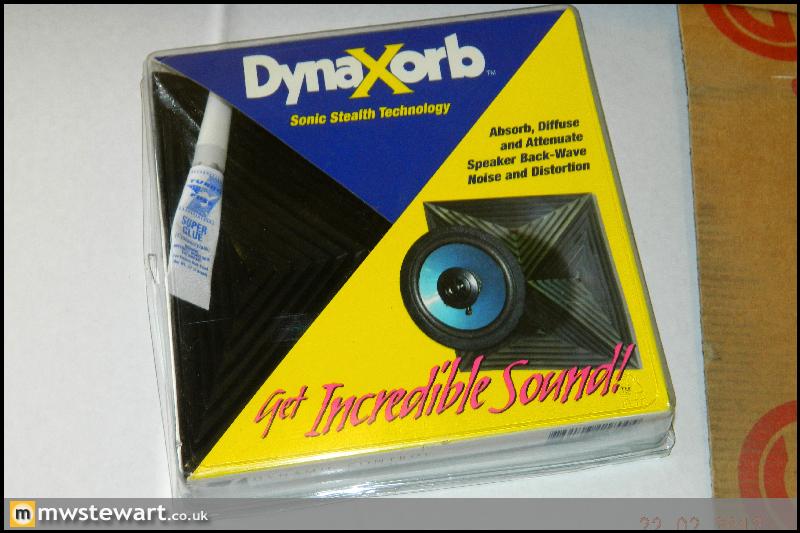
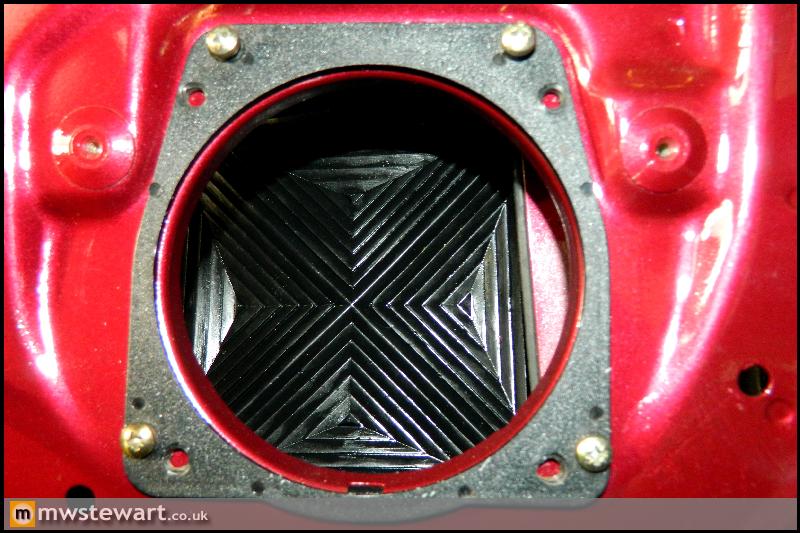
I bought this product from Dynamat. It's supposed to attenuate rear wave from the front midrange drivers (or in fact any speaker you place it behind). Like speaker cable choice it is a fairly subjective thing, but given that many people have said they do make a difference and they aren't expensive, I have fitted a set anyway.
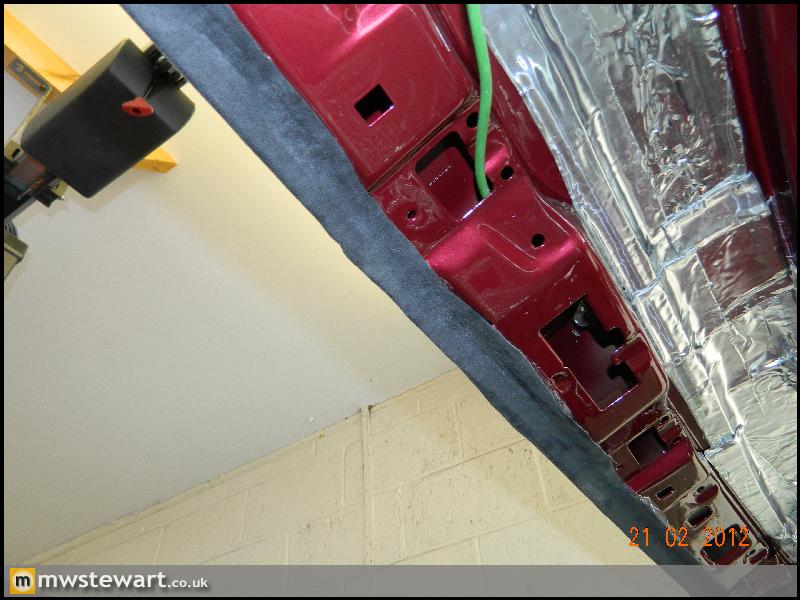
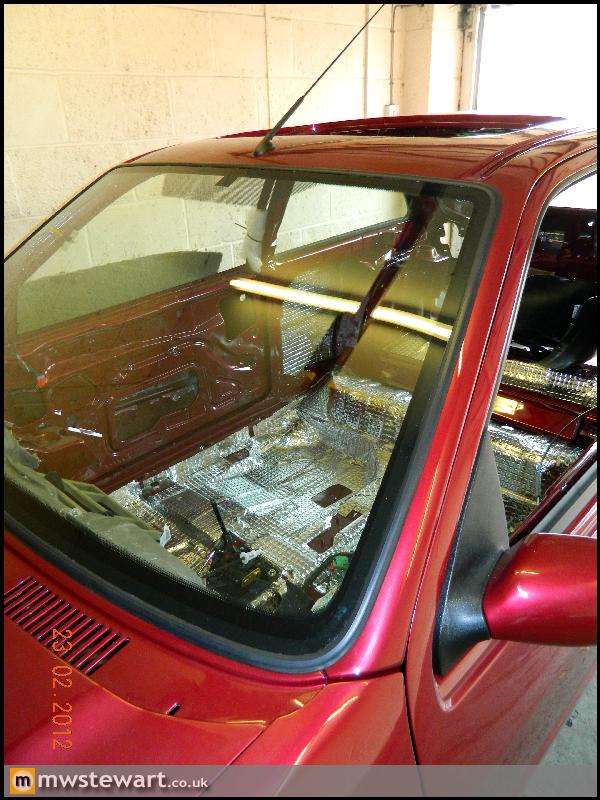
New Ford heated screen bonded in.

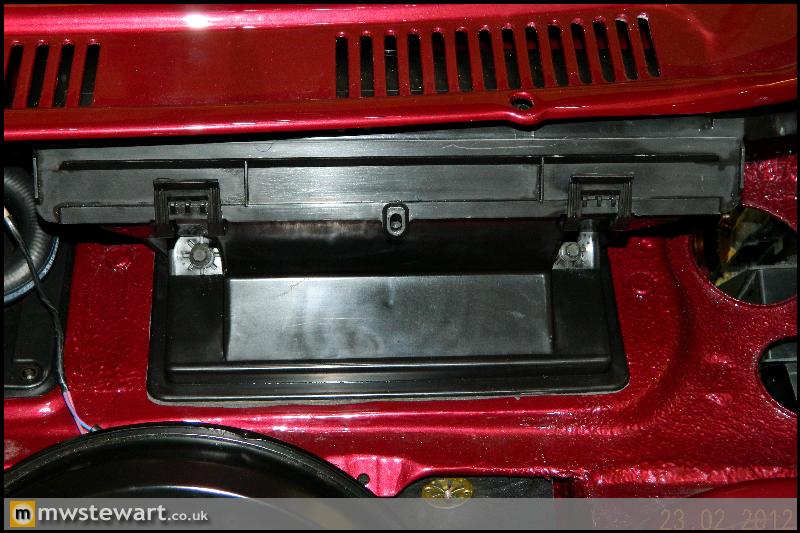
Mk5 Fiesta pollen filter housing and new charcoal filter added.
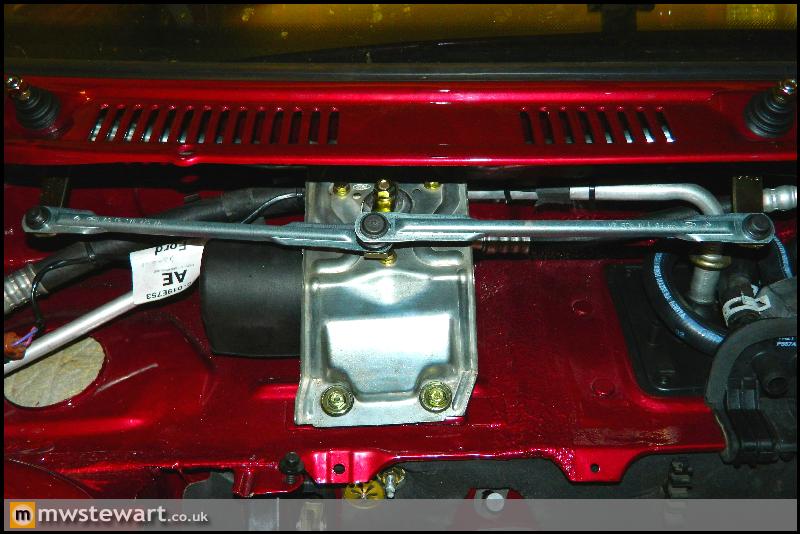
I rebuilt the Mk3 wiper motor and linkage using new Ford parts and some of the old parts that I had Zinc plated. I have new Ford wiper arms and wipers to go on too.
It probably looks more complicated than it actually is!

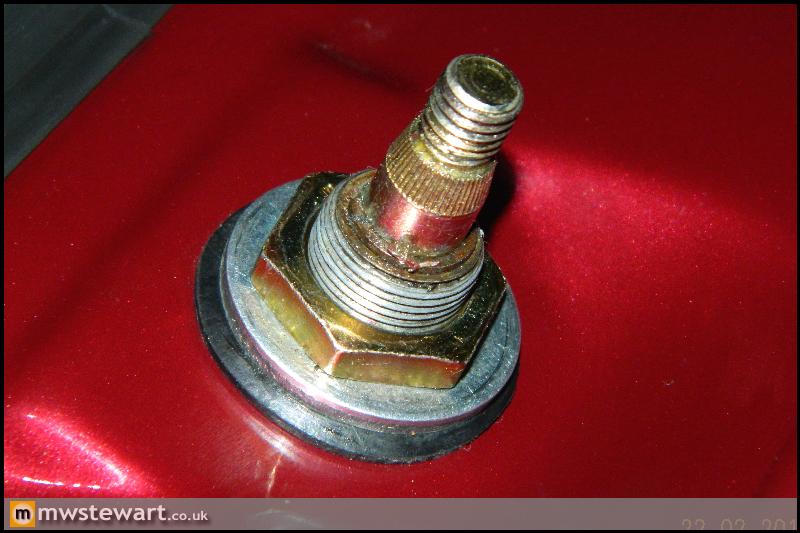
These parts of the spindle usually rot away underneath the outer cosmetic cover, so I have smeared them with grease.
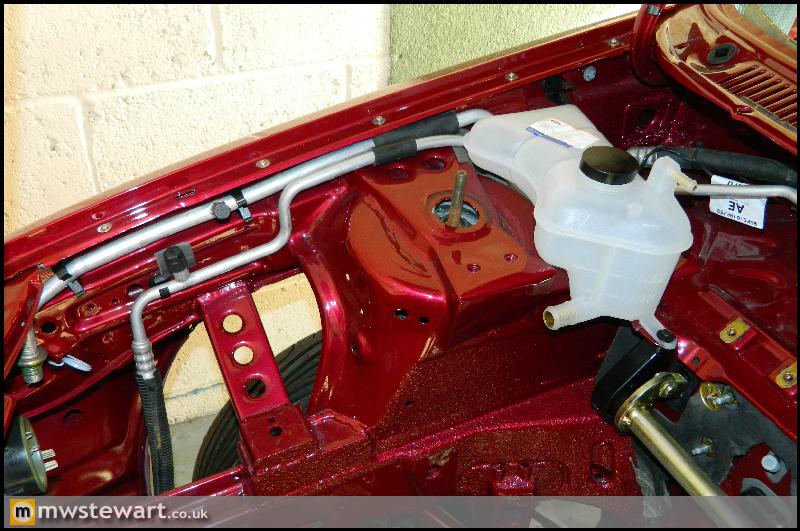
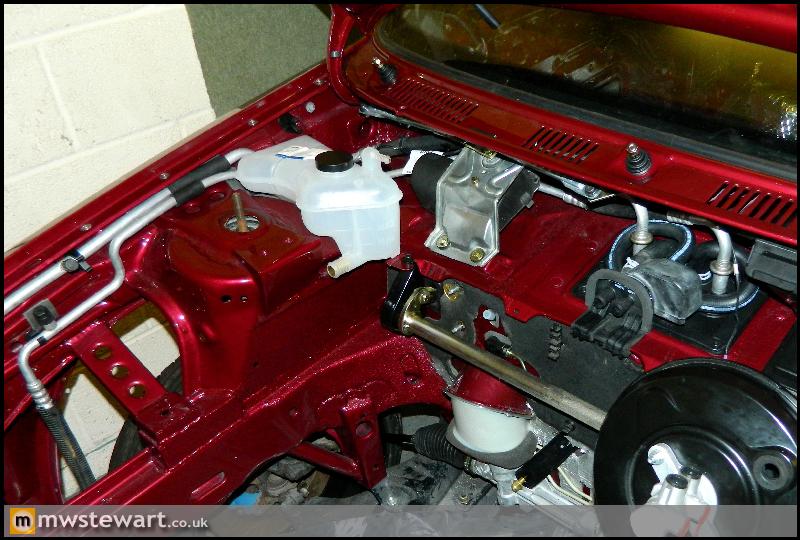
Mk5 heater matrix pipes and Air Con evaporator pipes. I fitted a new Ford heater control valve/solenoid, it's the latest revision which has finally cured a long standing issue with the part which can leave the HVAC either stuck on cold or hot.
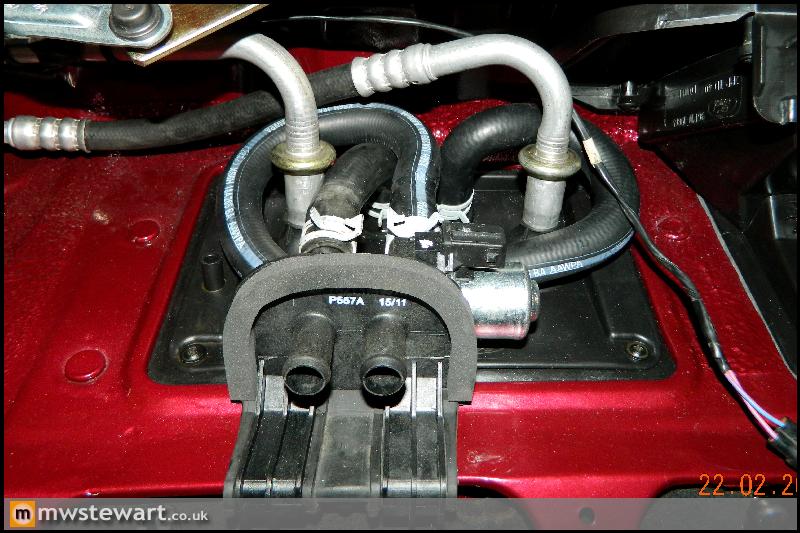
I'm pleased with how the AC pipes have turned out, they look like they were meant to be there.
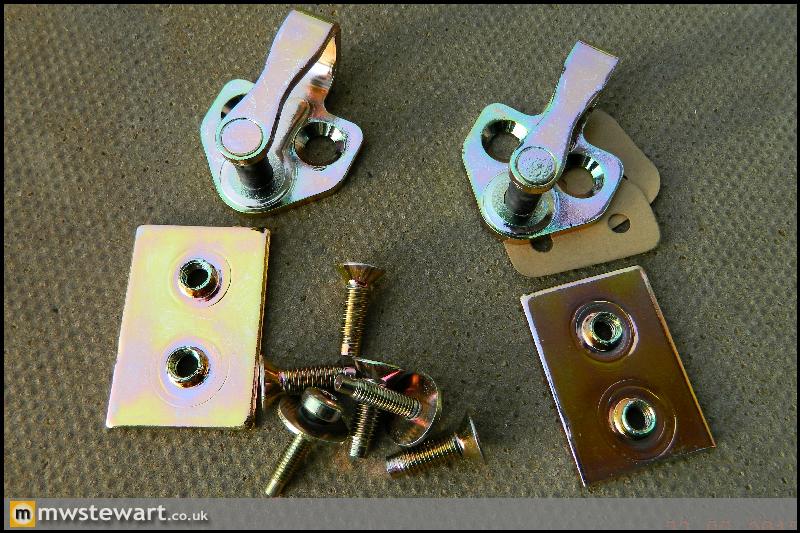
Even though I bought new Ford door catches I've had them re-plated in a thicker coating. They look better now.
Another add on: one touch electric window relays from a Mondeo. I will use three to provide one touch down for the two driver switches and the passenger switch.
I have fitted an ECU bracket from a later Fiesta. I will retain the Ford ECU to control the engine fans, A/C compressor and a few other functions. I'll make use of the existing PATS immobiliser to secure power to the fuel pump and the Pectel ECU I'll use to actually run the engine.
The Mk5 heater box is now in together with the air ducts. The eagle eyed may spot that the sound deadening material around the scuttle now has a grey finish; I found out that some models had a layer of mass loaded vinyl on top of the standard underlay type material (as per the bulkhead below). This arrangement offers improved sound deadening over a layer of foam alone.
My Dad kindly helped out again by adding vibration damping material to the front floor pan and rear seat area. I ran out of pads which is shy there is a square shaped gap at the bottom of the first photo
The other cut outs are for the seat mounts and handbrake.The Mk3 Fiesta never came with a bonded windscreen and instead it used the traditional rubber seal arrangement. I'm using a bonded screen because it actually adds to the cars structure and it also looks neater, but the downside to that is the Mk3 headlining doesn't finish flush with the screen; it finishes around 10mm further back to leave room for the standard rubber weather seal. To ensure everything looks neat I had Aldridge send a strip of Alcantara which I've glued to the windscreen aperture, so when the headlining is finally fitted everything will look neat.
I bought this product from Dynamat. It's supposed to attenuate rear wave from the front midrange drivers (or in fact any speaker you place it behind). Like speaker cable choice it is a fairly subjective thing, but given that many people have said they do make a difference and they aren't expensive, I have fitted a set anyway.
New Ford heated screen bonded in.
Mk5 Fiesta pollen filter housing and new charcoal filter added.
I rebuilt the Mk3 wiper motor and linkage using new Ford parts and some of the old parts that I had Zinc plated. I have new Ford wiper arms and wipers to go on too.
It probably looks more complicated than it actually is!
These parts of the spindle usually rot away underneath the outer cosmetic cover, so I have smeared them with grease.
Mk5 heater matrix pipes and Air Con evaporator pipes. I fitted a new Ford heater control valve/solenoid, it's the latest revision which has finally cured a long standing issue with the part which can leave the HVAC either stuck on cold or hot.
I'm pleased with how the AC pipes have turned out, they look like they were meant to be there.
Even though I bought new Ford door catches I've had them re-plated in a thicker coating. They look better now.
Another add on: one touch electric window relays from a Mondeo. I will use three to provide one touch down for the two driver switches and the passenger switch.
Thanks all 
I've been on holiday hence the lack of updates. The interior will be ready for collection on 23/03 and I plan to get it fitted over the following weekend, so that should be the next big update.
I will indeed attain an engineers report to verify the quality of work, and as I'll insure for an agreed value its also fairly standard procedure to provide a spec list and build log containing photos of the project.
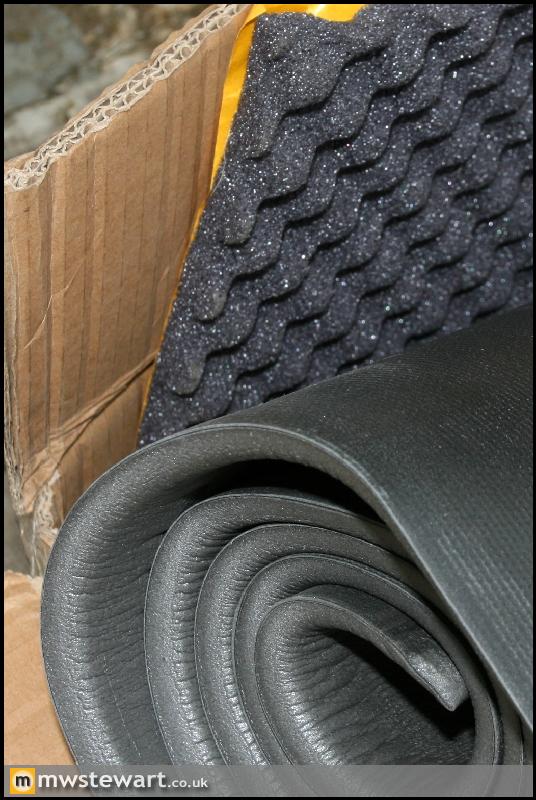
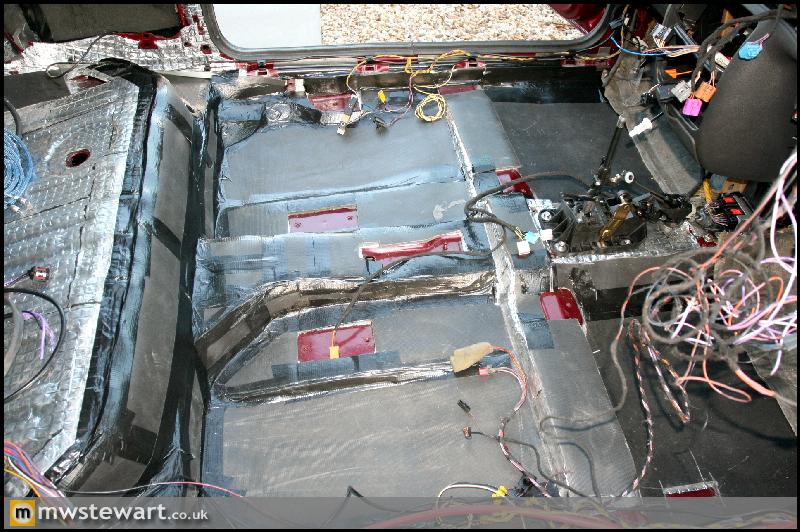
Now that the vibration damping process is well under way the sound deadening work can start. I'm using 'Luxury Liner Pro' made by Second Skin, it is a Mass Loaded Vinyl product that comprises a layer of foam to absorb the various frequencies and a dense Vinyl layer to decouple the foam layer and reflect sound back through the various deadening materials. The egg carton type material in the background is a soft foam product which sticks behind trim to alleviate vibrations and trim rattles.
The rear quarter areas are now vibration damped and sound deadened.
O/S door vibration damped and sound deadened. Thanks to my Dad again for giving up a lot of his time to help with this stage.
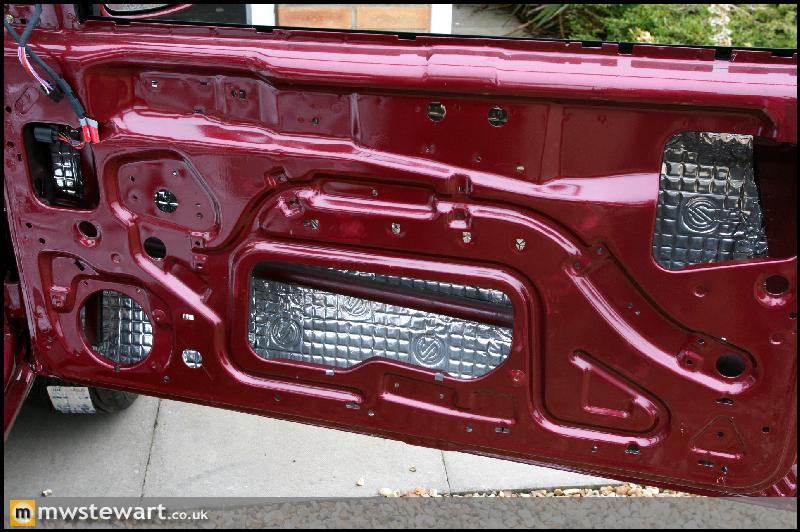
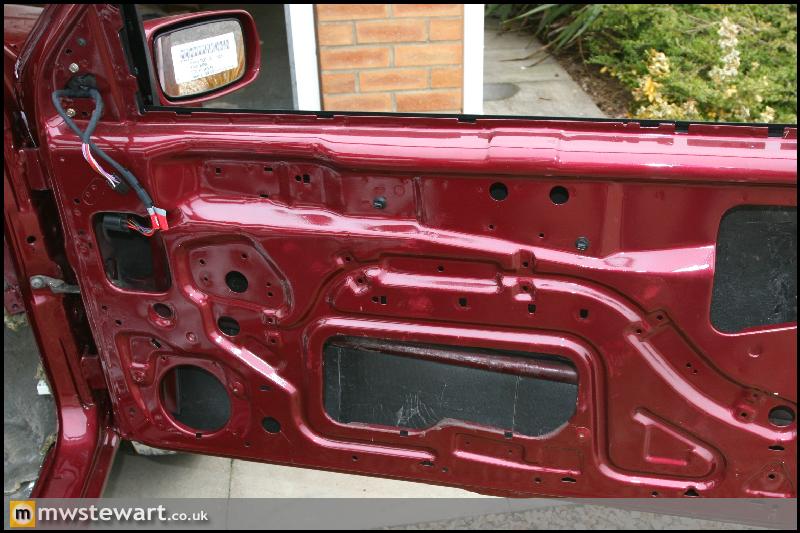
Now the O/S sound work was finished I could build up the rest of the door. The lock barrel and central/deadlocking motor was first.
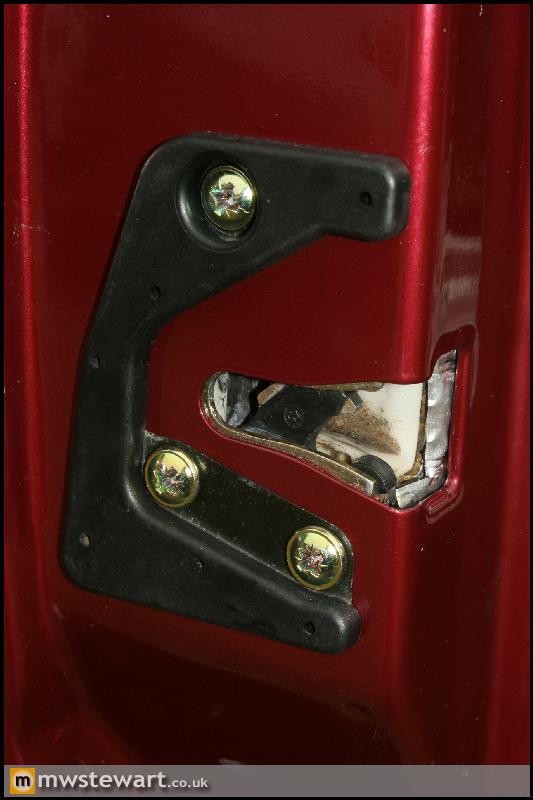
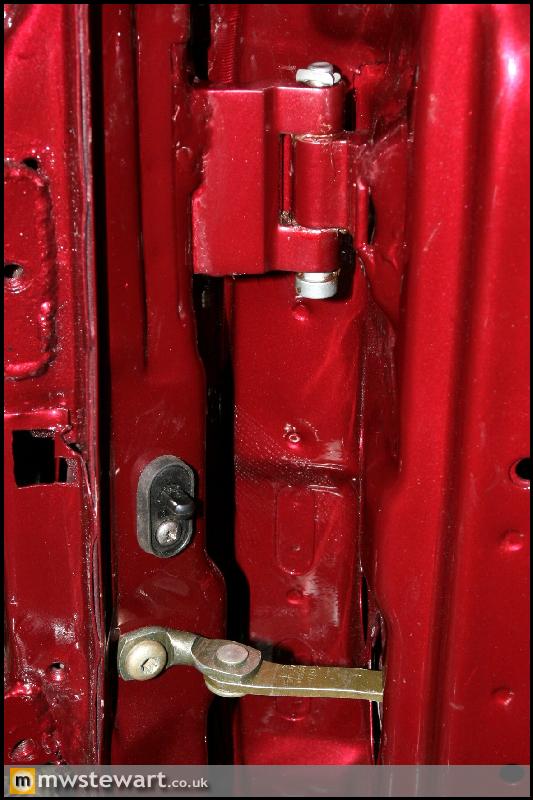
New door pins, check strap and door ajar switch fitted with a stainless screw.
New window motor/regular fitted.
I have these bags of closed cell foam made from recycled car parts, which are used to fill voids in the shell to further reduce noise and drone.
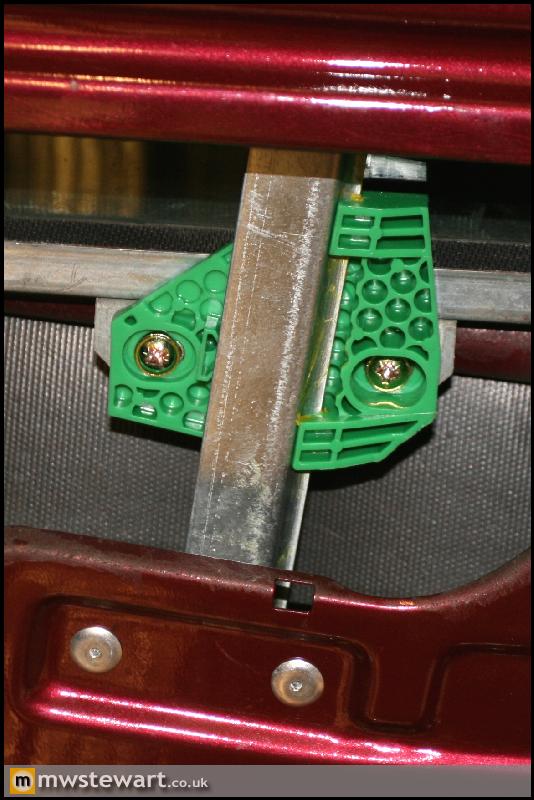
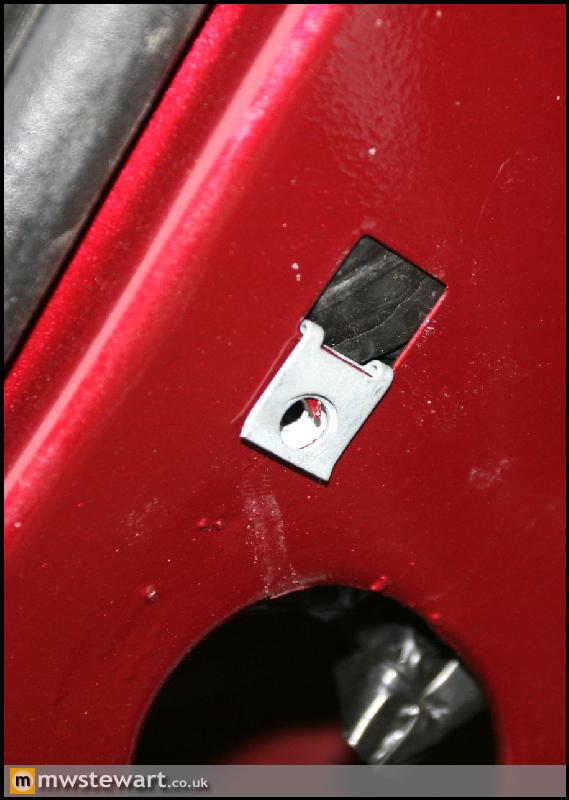
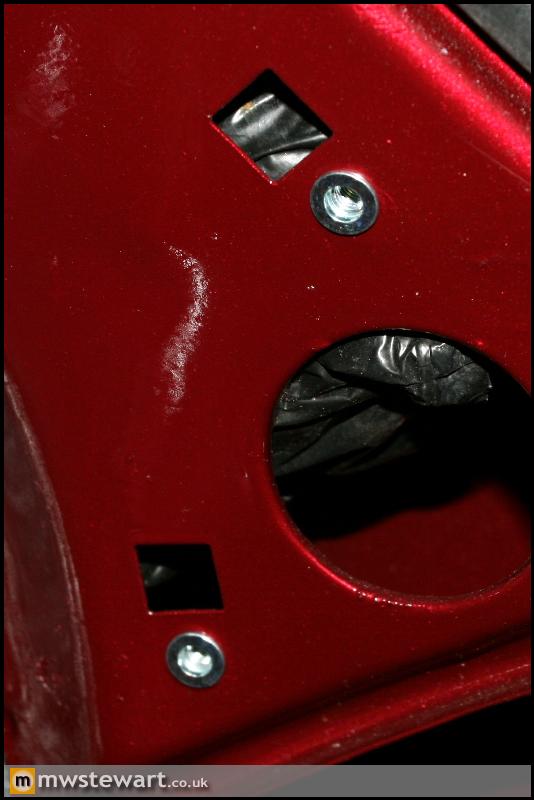
Some trim fastenings in the car make use of spire clips which slot into punched rectangular holes in the shell, and then the screw passes through a circular punched hole. The photos probably make more sense than my explanation! The fastenings aren't great as they mean only around 1mm of material is available for the screw to grip, and so to improve on this I have removed the spire clips altogether and fitted M5 Rivnuts in the circular hole.
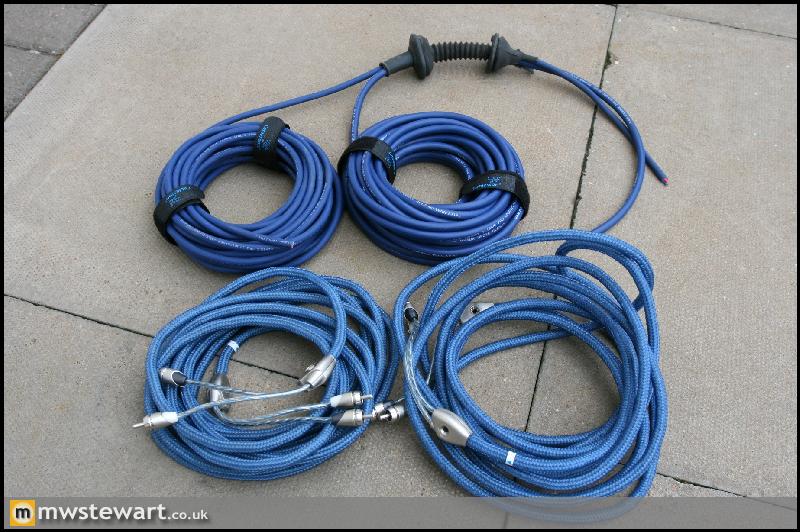
I'm replacing the standard speaker cable with Van Damme Blue Studio Grade cable, and I've chosen Audison Sonus RCA interconnects. Both cables have a good reputation for high sound quality.
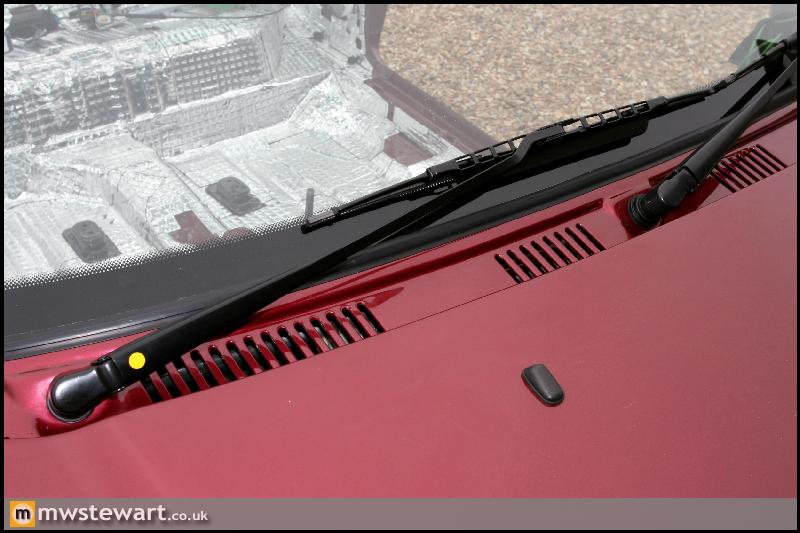
New Wiper arms and Wipers fitted. I'll swap to Bosch Aerotwin blades later on.
I've decided to get another rear bumper painted, this time one with parking sensor holes and a modified exhaust cut out area.I've cut the exhaust area from a scrap bumper which will be used to extend the length of mine so that I can fit a twin tail pipes that are similar in size to the S3 8P.

The rear quarter areas are now vibration damped and sound deadened.
O/S door vibration damped and sound deadened. Thanks to my Dad again for giving up a lot of his time to help with this stage.
Now the O/S sound work was finished I could build up the rest of the door. The lock barrel and central/deadlocking motor was first.
New door pins, check strap and door ajar switch fitted with a stainless screw.
New window motor/regular fitted.
I have these bags of closed cell foam made from recycled car parts, which are used to fill voids in the shell to further reduce noise and drone.
Some trim fastenings in the car make use of spire clips which slot into punched rectangular holes in the shell, and then the screw passes through a circular punched hole. The photos probably make more sense than my explanation! The fastenings aren't great as they mean only around 1mm of material is available for the screw to grip, and so to improve on this I have removed the spire clips altogether and fitted M5 Rivnuts in the circular hole.
I'm replacing the standard speaker cable with Van Damme Blue Studio Grade cable, and I've chosen Audison Sonus RCA interconnects. Both cables have a good reputation for high sound quality.
New Wiper arms and Wipers fitted. I'll swap to Bosch Aerotwin blades later on.
I've decided to get another rear bumper painted, this time one with parking sensor holes and a modified exhaust cut out area.I've cut the exhaust area from a scrap bumper which will be used to extend the length of mine so that I can fit a twin tail pipes that are similar in size to the S3 8P.
Thanks everyone! With the exception of larger wheels which are required to clear the brakes, and twin tail pipes, it will look like a standard Fiesta RS from the outside. I'm concious that it would be very easy to make this kind of car look extremely undesirable. The plan is to keep it as standard as possible but completely transform the way it drives.
280 wouldn't be enough for me 
The management system I'm using (Pectel T6) supports multiple maps, so I can switch between say 200, 350 and 500 from the cabin. Obviously 500 will be a more optimised setting as the engine is built around that figure, but it's a quick way to limit things.
The management system I'm using (Pectel T6) supports multiple maps, so I can switch between say 200, 350 and 500 from the cabin. Obviously 500 will be a more optimised setting as the engine is built around that figure, but it's a quick way to limit things.
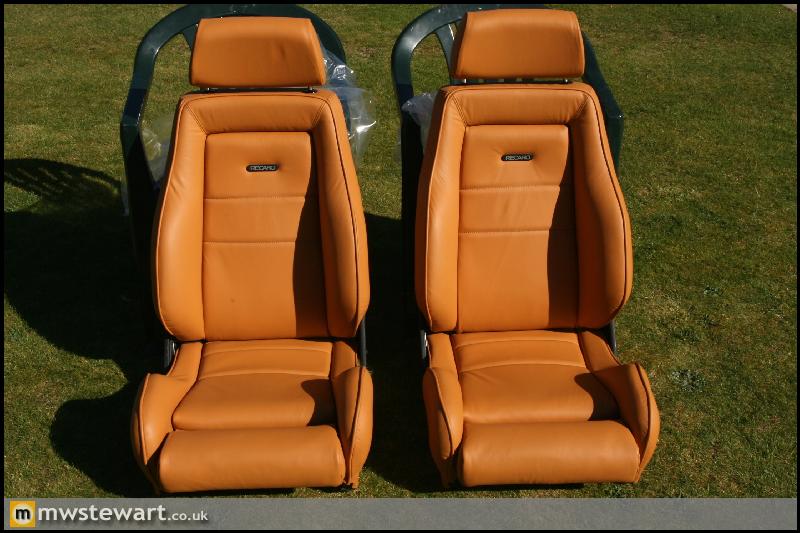
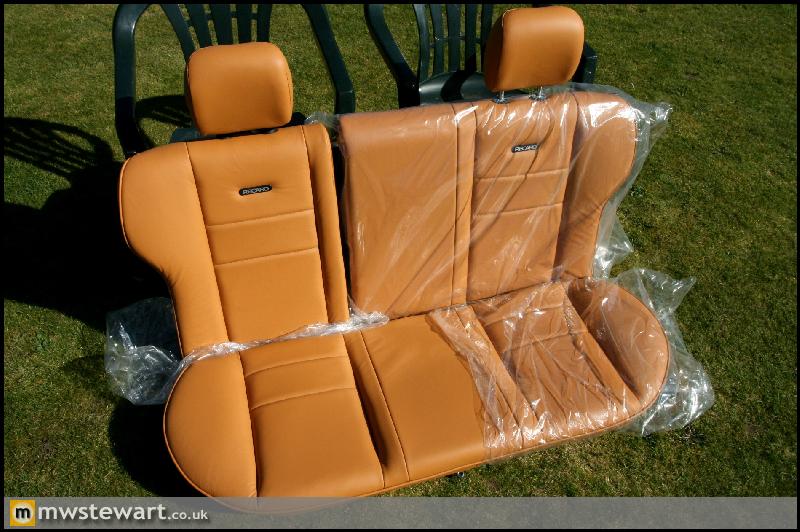
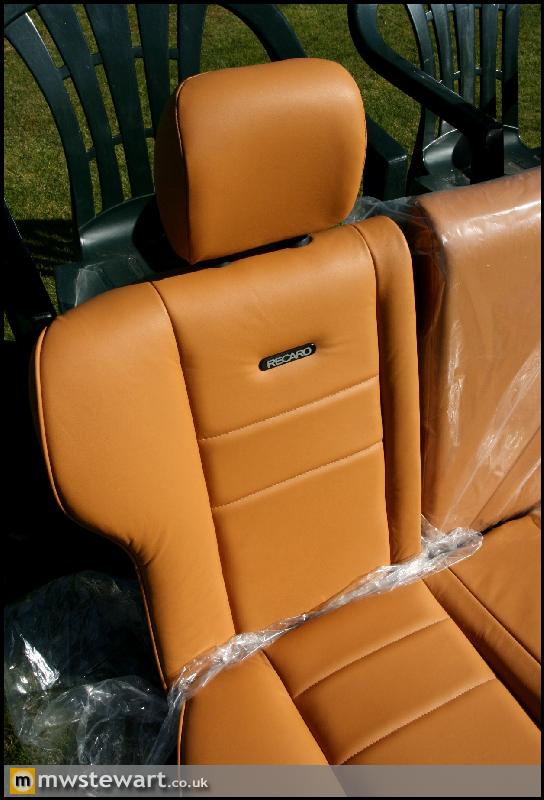
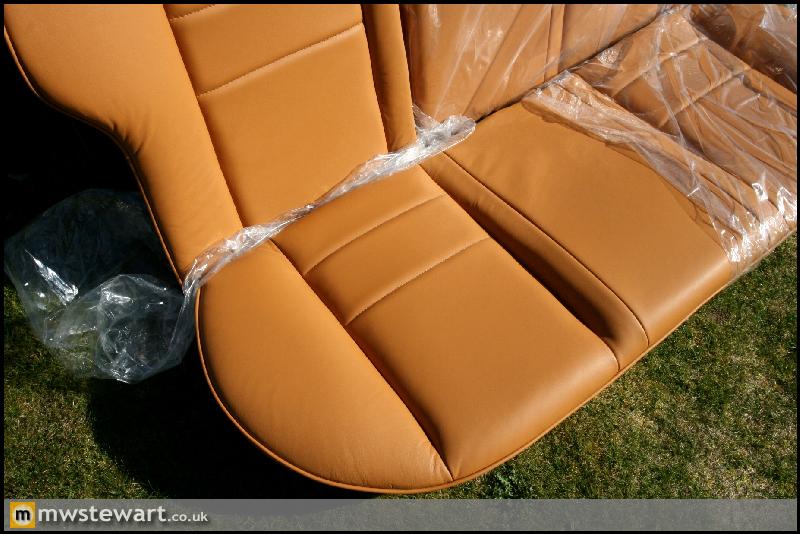
The interior is back from Aldridge and Karen has done a fantastic job. I'm very pleased.
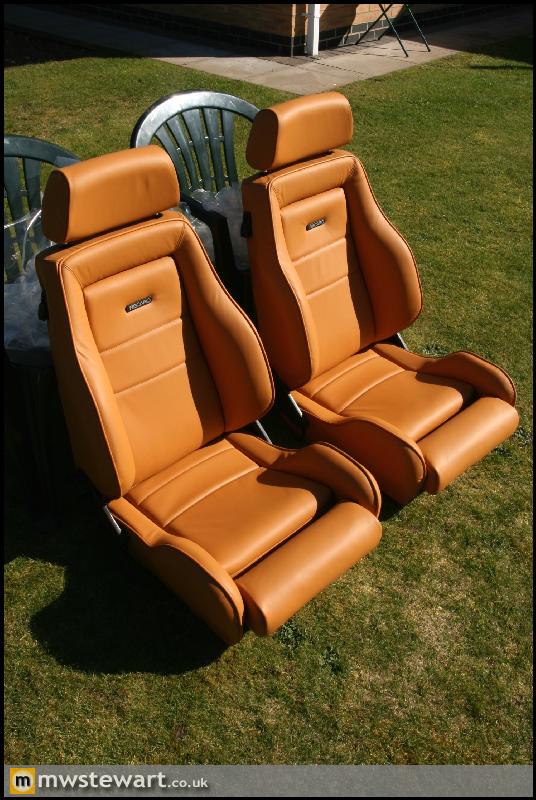
I'm glad I paid extra for the premium Nappa hide, it's very nice.
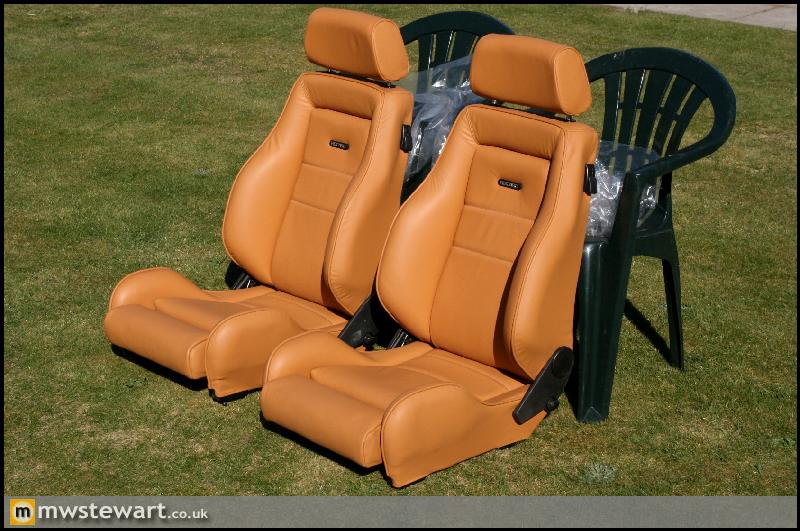
I'm really pleased with the seats, they are a real classic. I won't fit CS now as I'm happy with these.
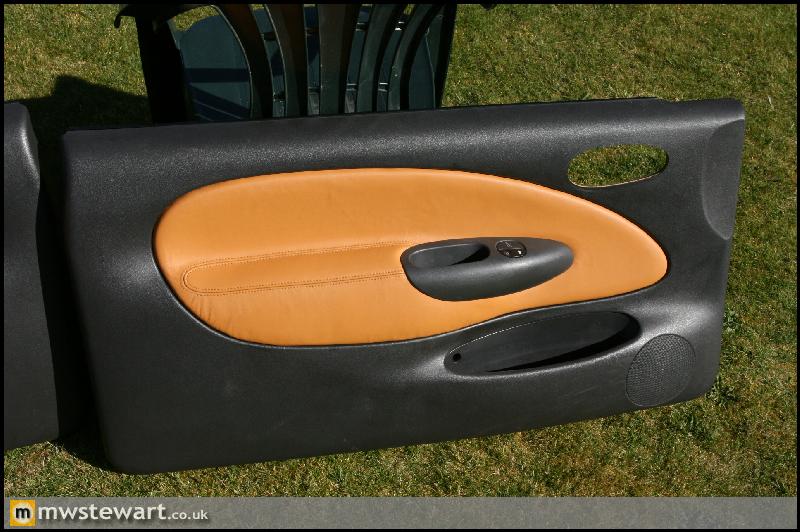
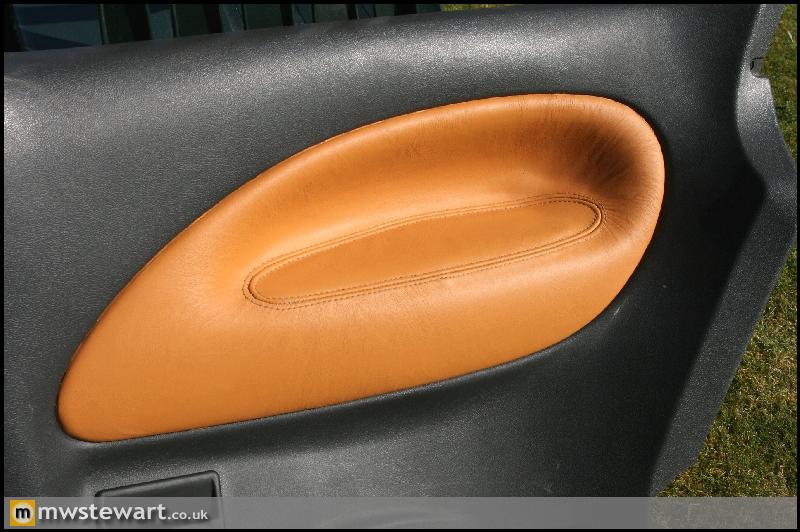
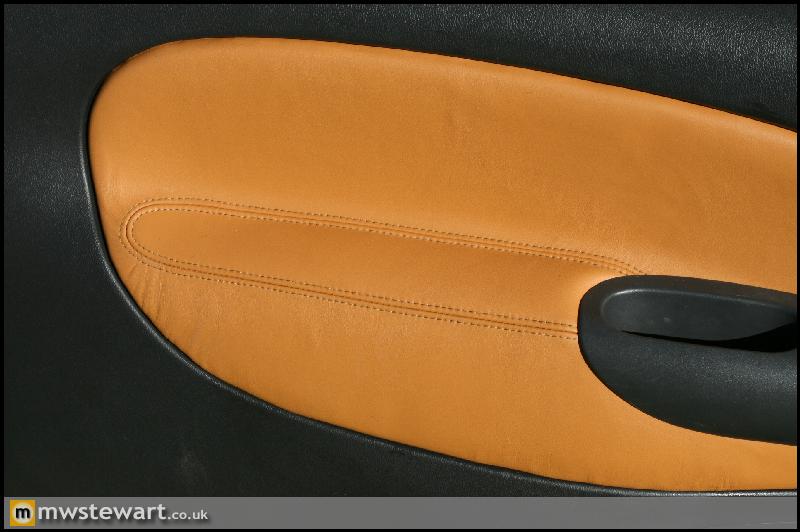
The door cards were a struggle due to the shape, and the fact there is only a shallow groove for the leather to sit in. This is fine for cheaper, thinner leather, but the leather I've chosen is quite thick. The result is perfect though.
I asked for these padded arm rests to be stitched in:
I've rear headrests which were from a later Fiesta. I also had a set of Recaro emblems added the stitching details changed to emulate the front seats.
I asked for the rear to be trimmed in black carpet.

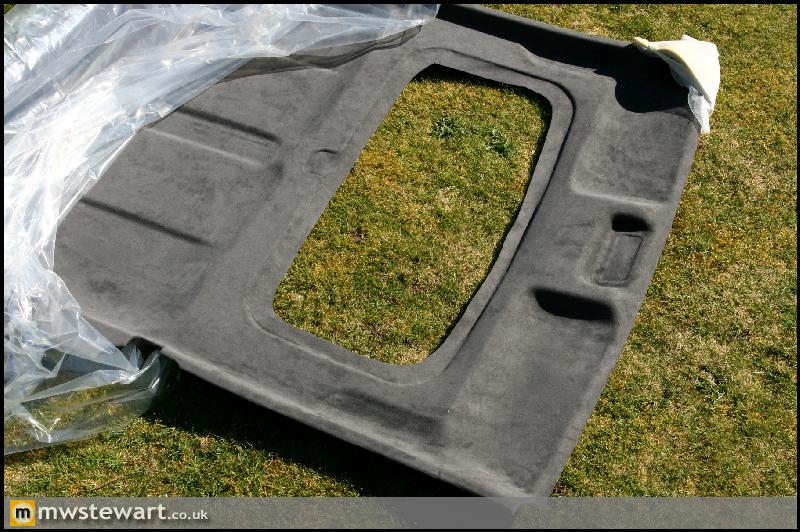
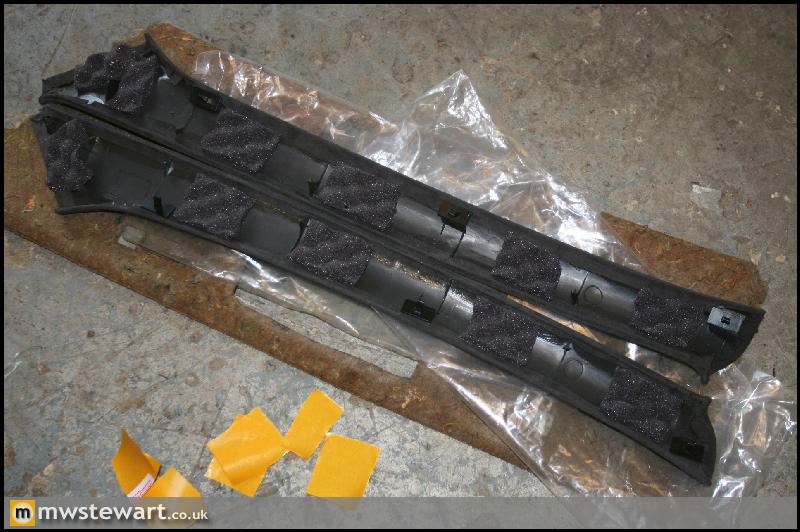
The Alcantara work is perfect. Headlining:
Seat runner covers:
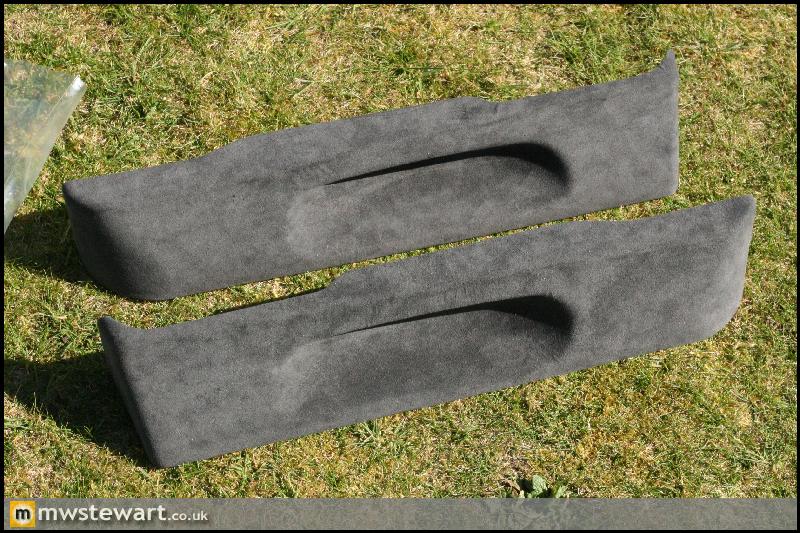
A pillar trims:
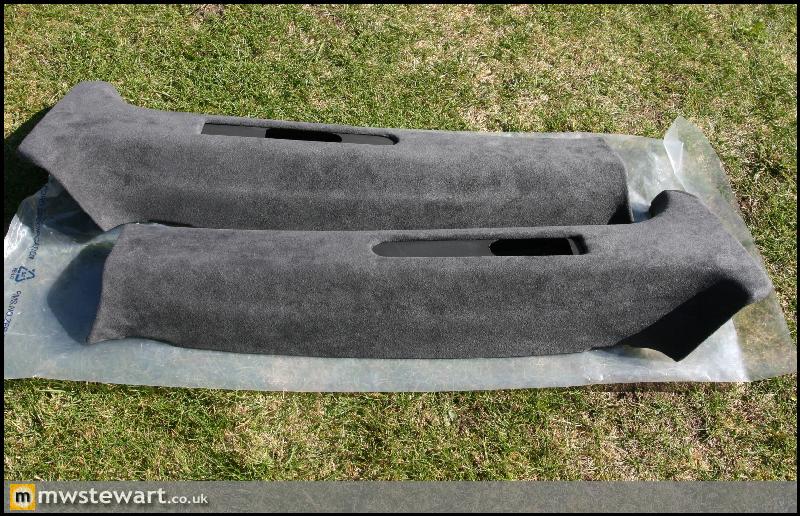
B pillar trims:
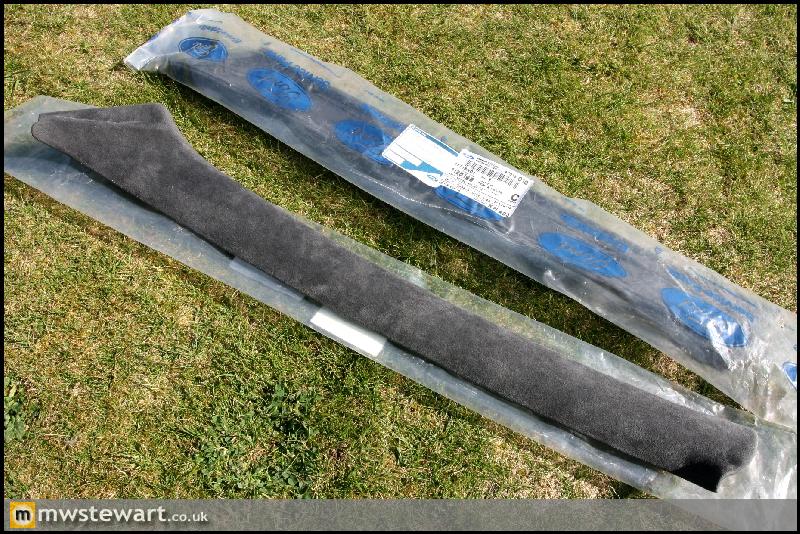
C pillar trims:

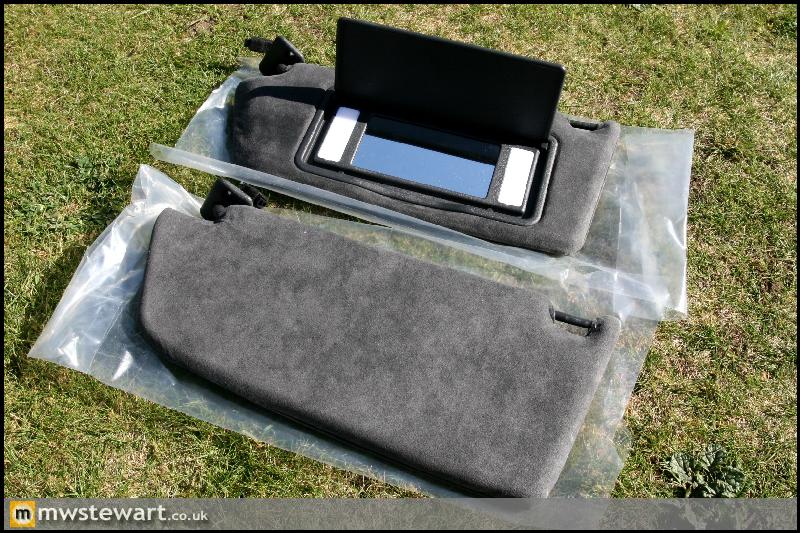
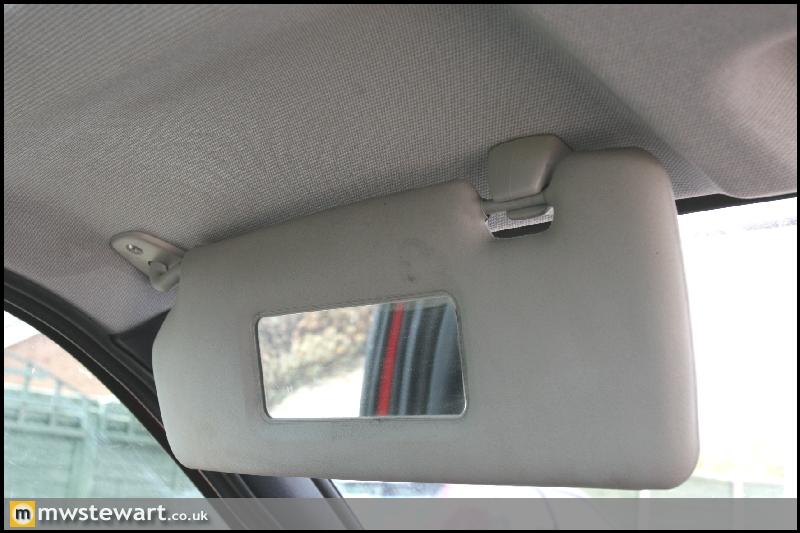
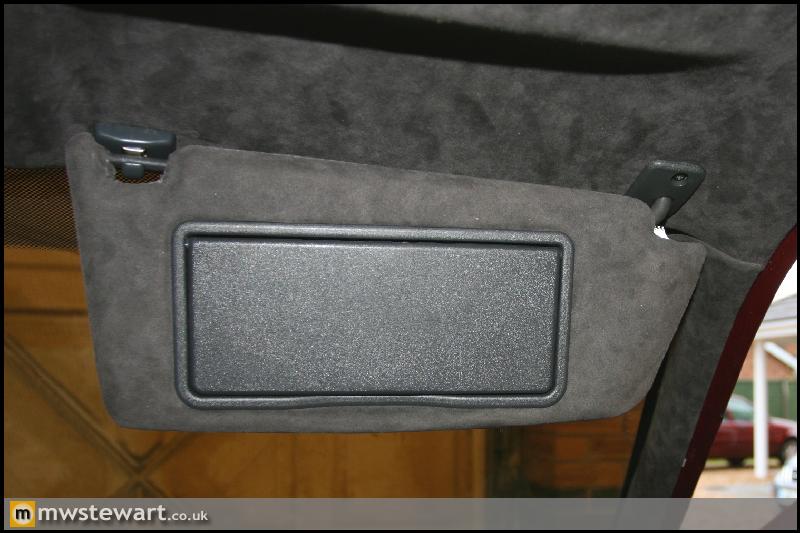
I've converted to sun visors from a Mk4 Astra and had them covered in Alcantara too. They fit the Fiesta headlining perfectly, have integral illuminated vanity mirrors and the plastic parts are a dark grey which matches the rest of my trim.
Now I need a free weekend to fit it!

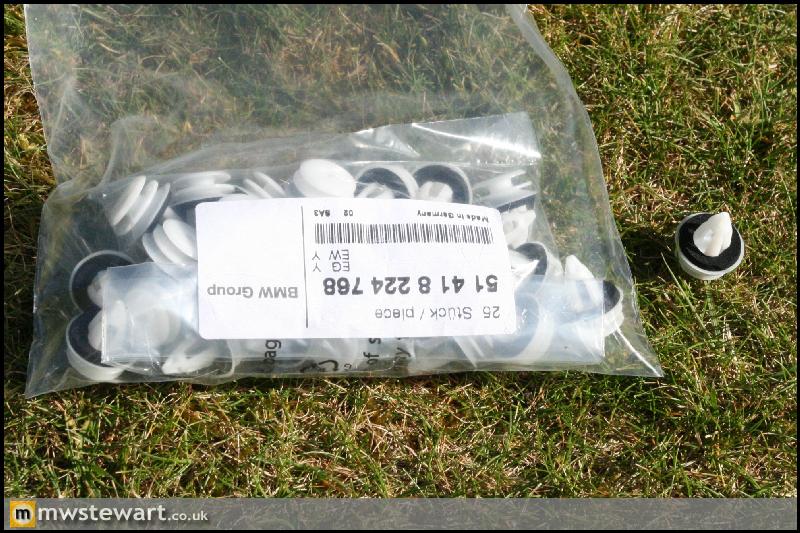
'Fir Tree' trim clips are used by just about all car brands to fit the door cards to the body, and the premium manufacturers like Range Rover and BMW fit a foam ring behind the clips to prevent vibration, so I've bought this type of clip for when my trim goes back in.
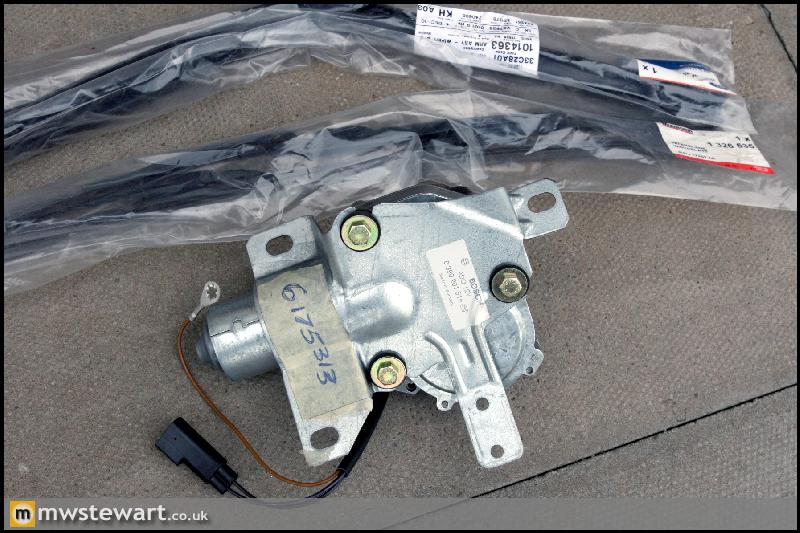
New rear wiper motor, wiper arm and wiper fitted.
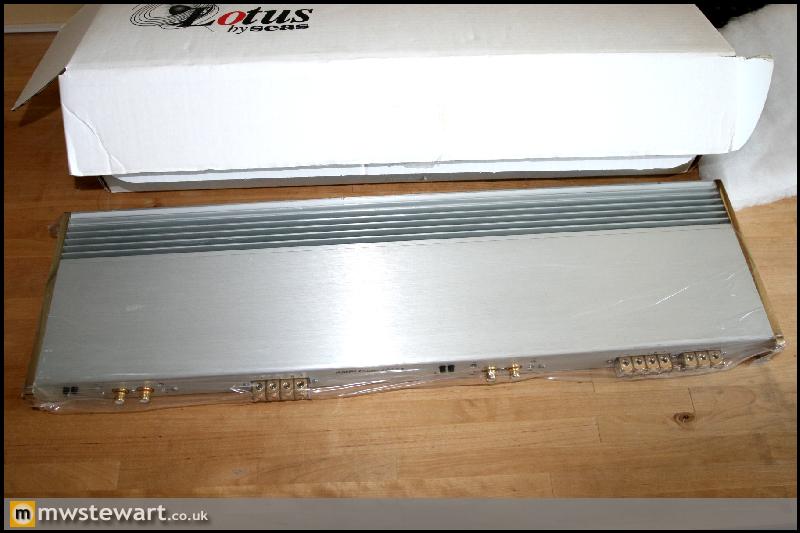
My new Amplifier arrived which is a Sinfoni 120.4x. It has just been serviced and tweaked for even better SQ. Sinfoni are apparently the highest sound quality amplifiers available for a car.
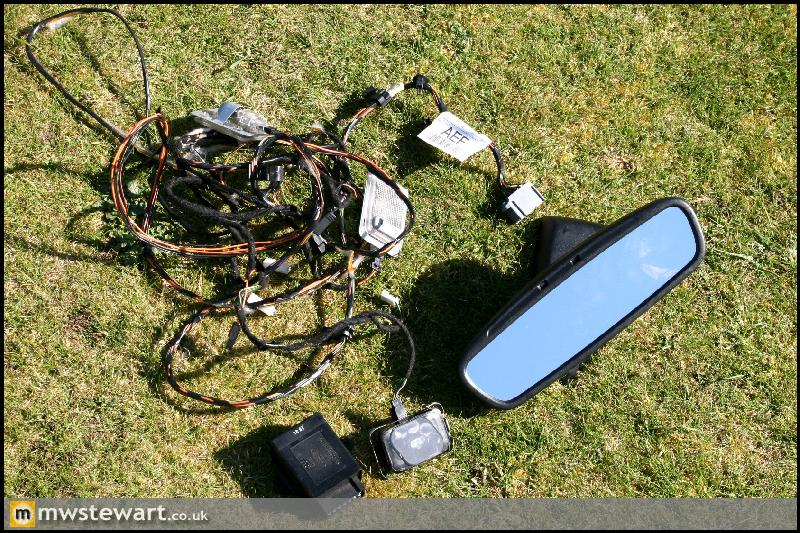
Mk3 Mondeo auto dim rear view mirror, rain/light sensor and auto headlamp/wiper module ready for fitment.
I'm glad I paid extra for the premium Nappa hide, it's very nice.
I'm really pleased with the seats, they are a real classic. I won't fit CS now as I'm happy with these.
The door cards were a struggle due to the shape, and the fact there is only a shallow groove for the leather to sit in. This is fine for cheaper, thinner leather, but the leather I've chosen is quite thick. The result is perfect though.
I asked for these padded arm rests to be stitched in:
I've rear headrests which were from a later Fiesta. I also had a set of Recaro emblems added the stitching details changed to emulate the front seats.
I asked for the rear to be trimmed in black carpet.
The Alcantara work is perfect. Headlining:
Seat runner covers:
A pillar trims:
B pillar trims:
C pillar trims:
I've converted to sun visors from a Mk4 Astra and had them covered in Alcantara too. They fit the Fiesta headlining perfectly, have integral illuminated vanity mirrors and the plastic parts are a dark grey which matches the rest of my trim.
Now I need a free weekend to fit it!
'Fir Tree' trim clips are used by just about all car brands to fit the door cards to the body, and the premium manufacturers like Range Rover and BMW fit a foam ring behind the clips to prevent vibration, so I've bought this type of clip for when my trim goes back in.
New rear wiper motor, wiper arm and wiper fitted.
My new Amplifier arrived which is a Sinfoni 120.4x. It has just been serviced and tweaked for even better SQ. Sinfoni are apparently the highest sound quality amplifiers available for a car.
Mk3 Mondeo auto dim rear view mirror, rain/light sensor and auto headlamp/wiper module ready for fitment.
k-ink said:
Seats are looking good.
I do hope you put the correct dash back in there. The curvy dash is hideous and just not right in an Si.
Thanks. I like the earlier dash too but it's very flimsy: the later dash is constructed like most modern dash boards with a structural reinforcement piece that actually stiffens the scuttle. The earlier dash suffers badly from rattles and it would be harder for me to the integrate A/C system and amount of extra wiring I now have.I do hope you put the correct dash back in there. The curvy dash is hideous and just not right in an Si.
I may look in to it later on but I've actually grown to like the later dash now

Thanks again. I haven't thought about a magazine feature actually, probably because I don't really read the Ford magazines. I like Evo, but this probably isn't on that kind of level
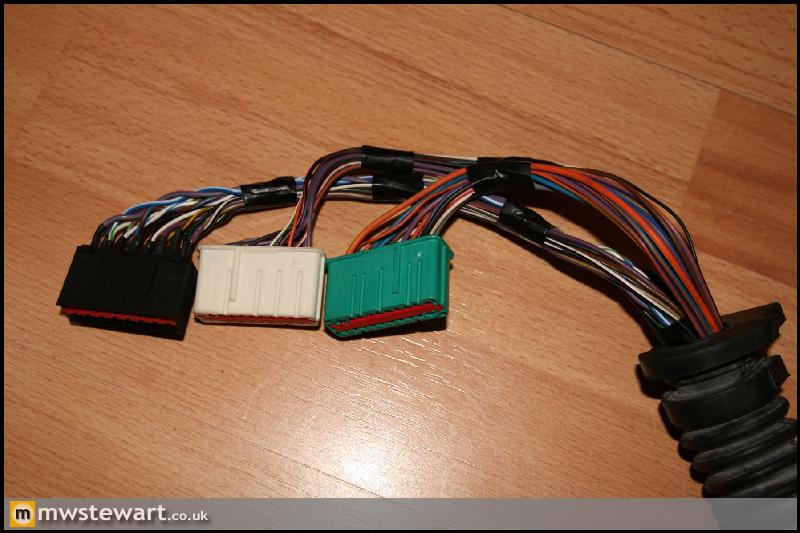
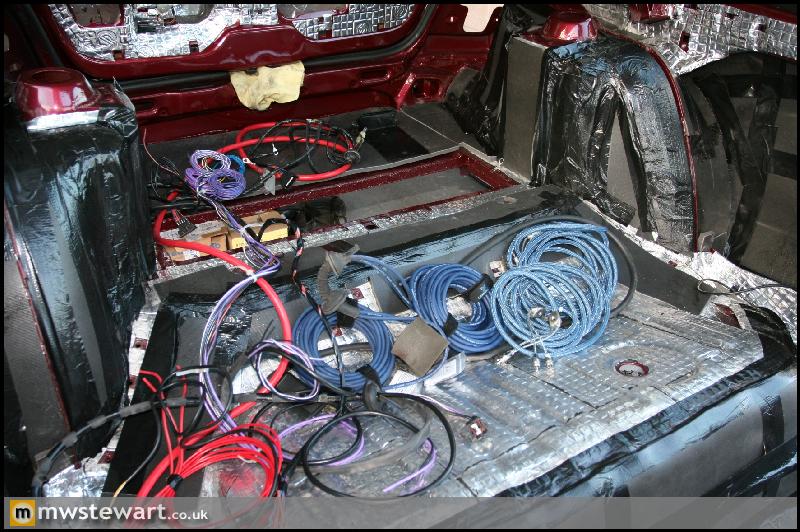
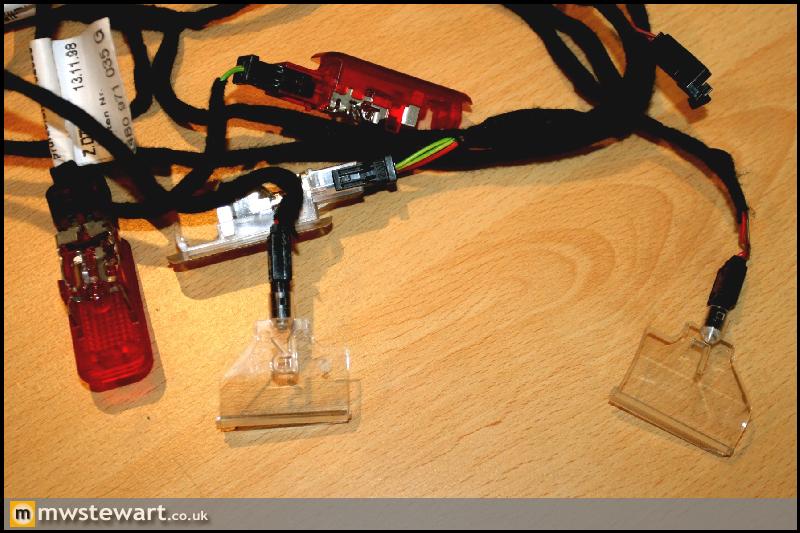
I've finally finished the interior wiring loom, which took a lot longer than I expected it to. The result to the untrained eye is something that looks like a factory loom; I followed the factory colour schema and used factory connectors to extend or add functionality. I've added 25 new features but to cover each would make for pretty dull reading, so I'll cover just one as an example:
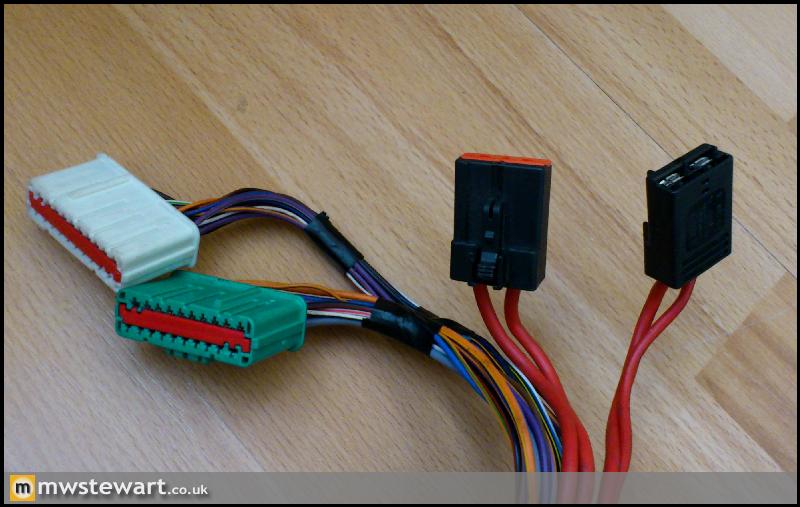
Here's the standard set of multi plugs to join the interior loom to the engine bay loom. The four thicker red cables feed power from the engine bay fuse/relay box to the in car fuse/relay box...
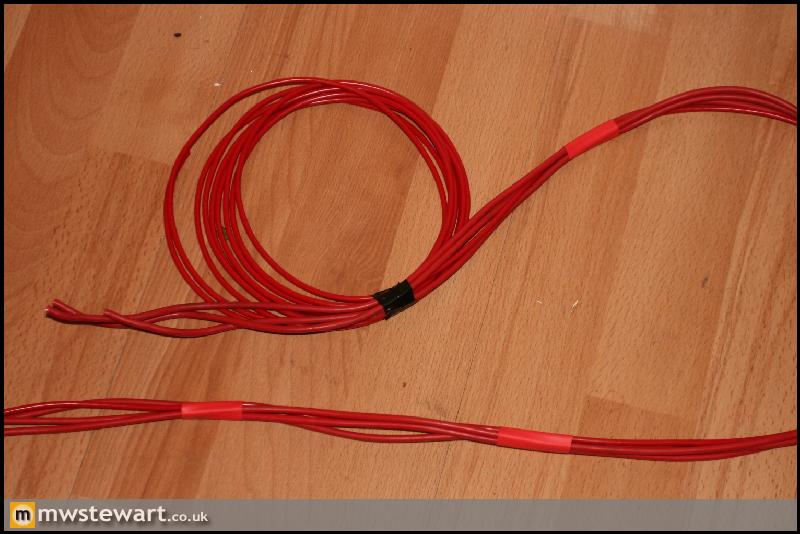
As I'm moving the battery to the boot it would mean these wires unnecessarily feed into to the engine bay then back to the battery in the boot, so I stripped them out and ran them back to the boot instead.
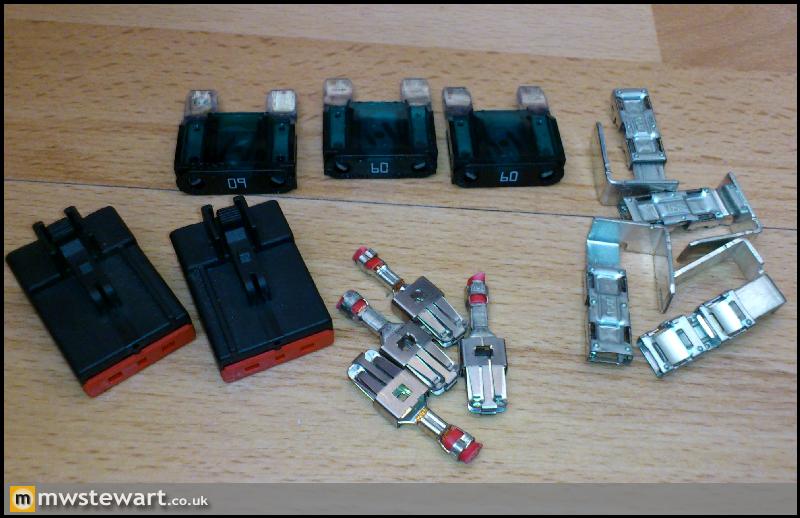
I also removed the fuses and terminals from the engine bay fuse box so it's obvious that nothing should plug there. I've actually created a document which details all changes made to the loom so it's easy to maintain the car going forward.
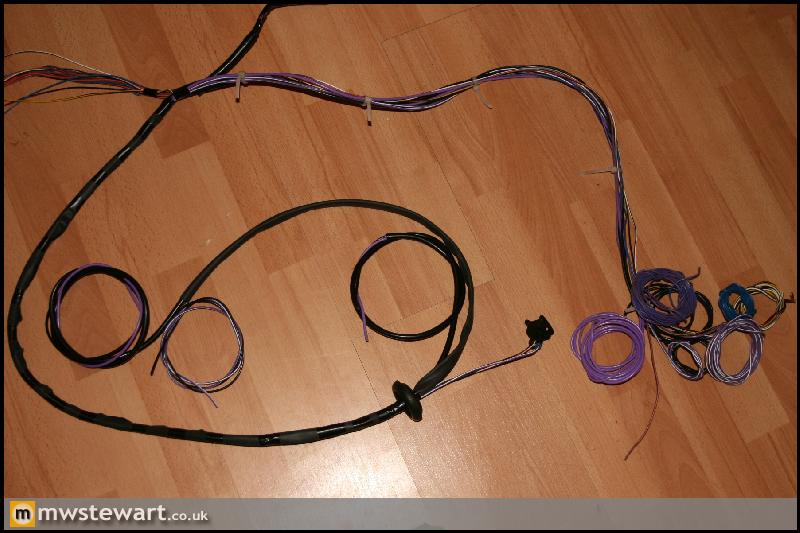
Here's the finished result. The new black multiplug is from an earlier Fiesta and all its wires are for new functions. I created twisted pairs for any data lines in order to minimize RFI.
Wiring for four fuel pumps. I've used the existing grommet under the seat and run the new cables through and split them into two sets and covered with PVC sheath. There will be two lift pumps in tank, and two Bosch 044s mounted to the side of the tank, fed from an internal swirl pot. I don't need two 044's - the second is just for resilience. The looped wires to the right of the photo will be run to a dedicated fuse & relay board in the boot.
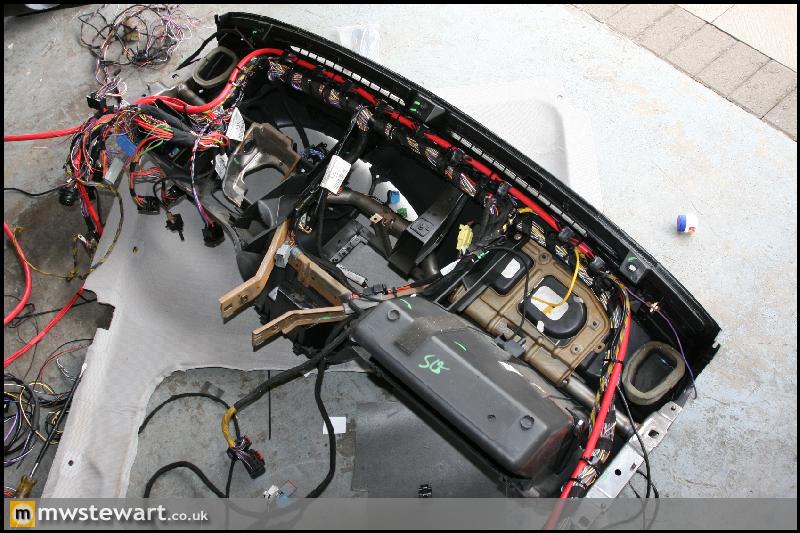
The wiring in place behind the dashboard. The thick red cable runs from the engine bay, across the dash, and down the right hand side of the car. I've used this route so that there aren't any 12v lines on the left hand side of the car that could possibly induce interference in the audio RCA cables that will be run on that side.
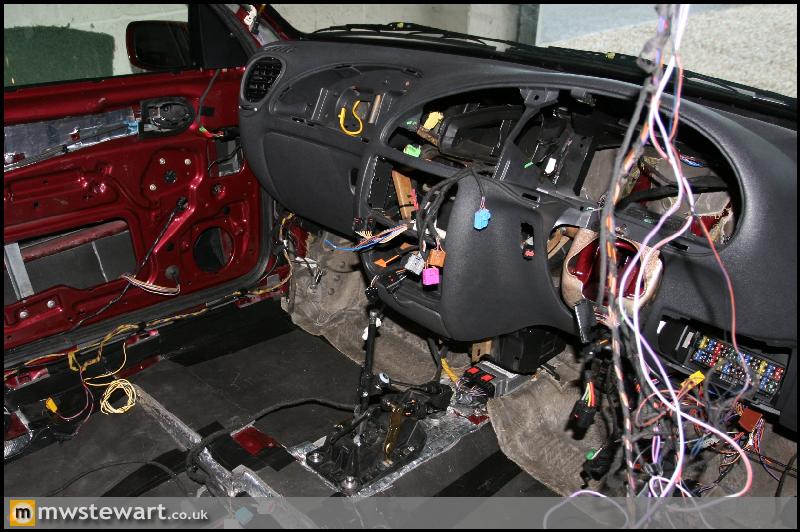
Here's the dashboard in place. I've now got to retrofit a passenger airbag and fit the HVAC controls.
There's now a layer of Luxury Liner Pro on all of the lower panels. Thanks to my Dad again for that!
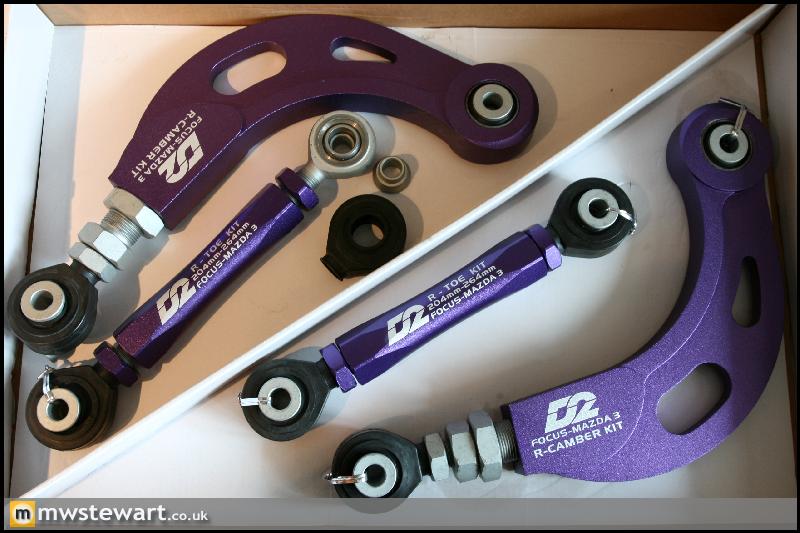
The first new components for the rear suspension arrived and these new adjustable alloy arms replace two of the three standard arms on each side. They are currently fitted with spherical joints but I'm having them modified to accept Focus RS bushes, which are still a considerable upgrade for a Fiesta. The third arm on each side will be replaced with a billet 7075 pieces made to my specification, and I'm also having the rear hubs copied in billet 7075 together with some disc bells, and brackets specifically for the AP calipers. Everything will be anodised in Gold.
I've finally finished the interior wiring loom, which took a lot longer than I expected it to. The result to the untrained eye is something that looks like a factory loom; I followed the factory colour schema and used factory connectors to extend or add functionality. I've added 25 new features but to cover each would make for pretty dull reading, so I'll cover just one as an example:
Here's the standard set of multi plugs to join the interior loom to the engine bay loom. The four thicker red cables feed power from the engine bay fuse/relay box to the in car fuse/relay box...
As I'm moving the battery to the boot it would mean these wires unnecessarily feed into to the engine bay then back to the battery in the boot, so I stripped them out and ran them back to the boot instead.
I also removed the fuses and terminals from the engine bay fuse box so it's obvious that nothing should plug there. I've actually created a document which details all changes made to the loom so it's easy to maintain the car going forward.
Here's the finished result. The new black multiplug is from an earlier Fiesta and all its wires are for new functions. I created twisted pairs for any data lines in order to minimize RFI.
Wiring for four fuel pumps. I've used the existing grommet under the seat and run the new cables through and split them into two sets and covered with PVC sheath. There will be two lift pumps in tank, and two Bosch 044s mounted to the side of the tank, fed from an internal swirl pot. I don't need two 044's - the second is just for resilience. The looped wires to the right of the photo will be run to a dedicated fuse & relay board in the boot.
The wiring in place behind the dashboard. The thick red cable runs from the engine bay, across the dash, and down the right hand side of the car. I've used this route so that there aren't any 12v lines on the left hand side of the car that could possibly induce interference in the audio RCA cables that will be run on that side.
Here's the dashboard in place. I've now got to retrofit a passenger airbag and fit the HVAC controls.
There's now a layer of Luxury Liner Pro on all of the lower panels. Thanks to my Dad again for that!
The first new components for the rear suspension arrived and these new adjustable alloy arms replace two of the three standard arms on each side. They are currently fitted with spherical joints but I'm having them modified to accept Focus RS bushes, which are still a considerable upgrade for a Fiesta. The third arm on each side will be replaced with a billet 7075 pieces made to my specification, and I'm also having the rear hubs copied in billet 7075 together with some disc bells, and brackets specifically for the AP calipers. Everything will be anodised in Gold.
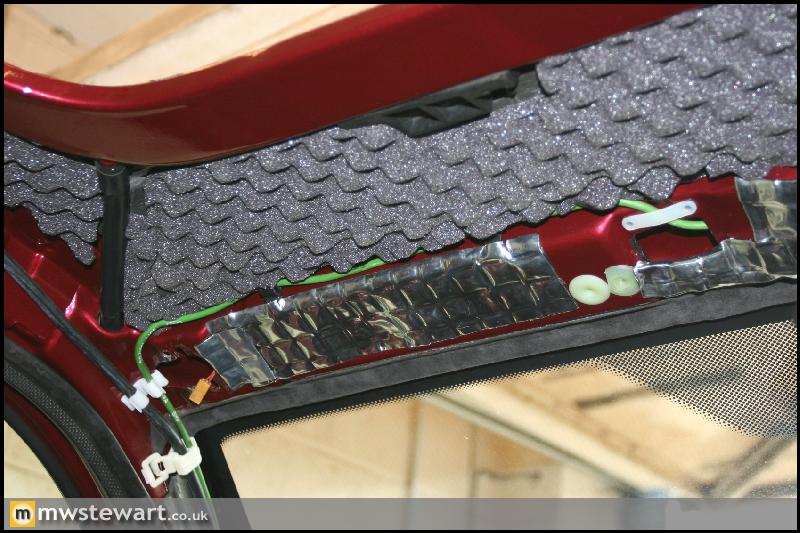
The sound deadening and vibration damping is now complete. There were some voids between the roof skin and headlining so they have been covered with a layer of Silent Coat Sound Absorber 15 over Silent Coat Noise Isolator 8. The base is RAAMmat BXT II which covers the entire roof skin.
Rear section complete.
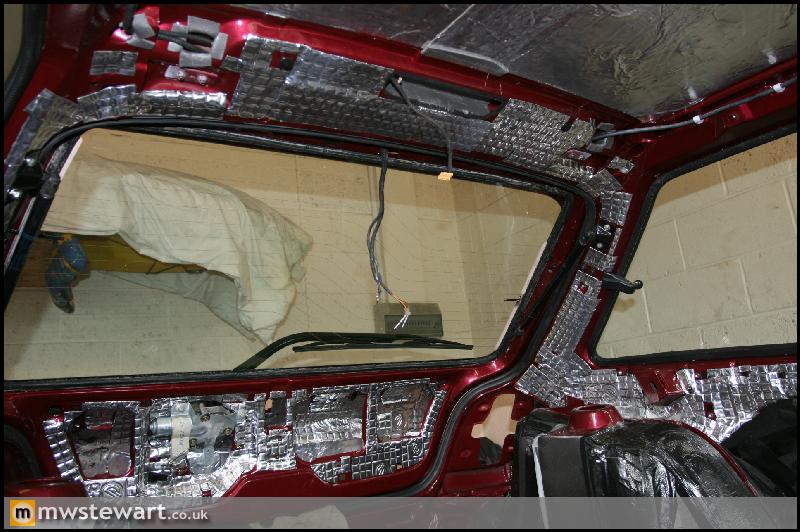
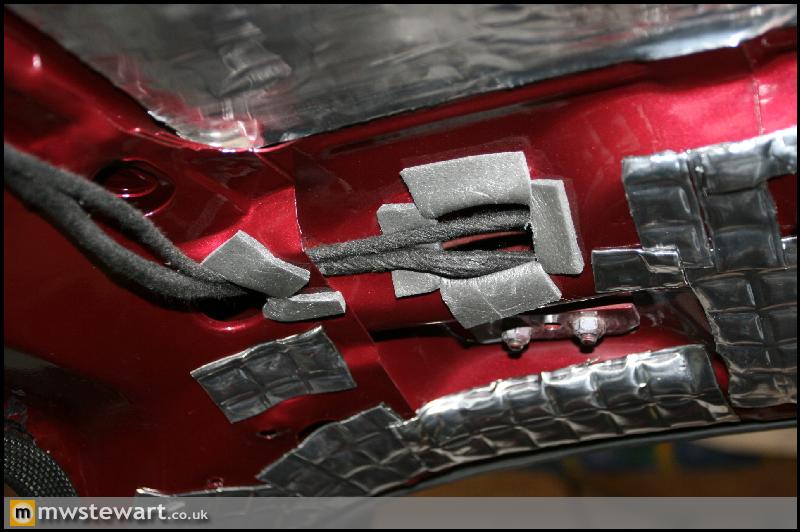
I've used Silent Coat Noise Isolator 4 on edges of any apertures in order to protect against chaffing.
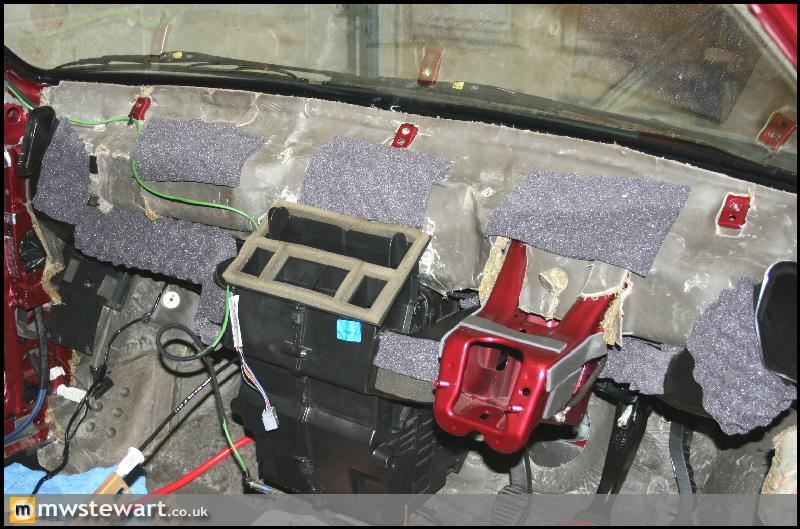
I removed the dashboard again in order to apply Silent Coat Sound Absorber 15 to any surfaces which were in close proximity. The material is great for preventing any squeaks or groans, not that there are many from the very solid Mk5 dashboard.
Next I moved onto the roof furniture. I was originally going to spray the original accessories to match the new headlining, but as time went on I decided that they weren't special enough.
So, I went out and purchased some accessories from an Audi B5 A4 Facelift 'Sport' model which included new interior lights and a section of the surrounding headlining, then using some spare Fiesta headlinings, I figured out how to modify and mount the parts.
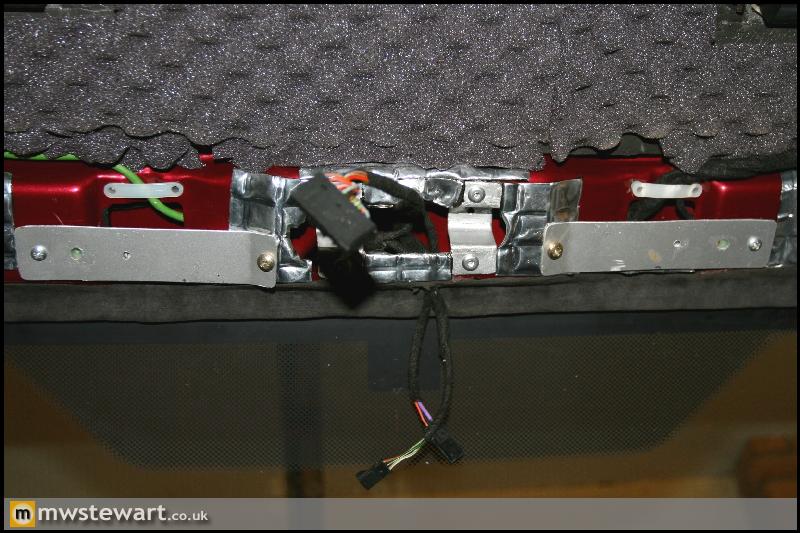
The position of the fixed mount on the Astra sun visors is different to where it was on the Fiesta, which wouldn't have been an issue except one of the screw holes in the new position fell over a recess and punched hole in the overhead chassis box. I made a couple of removable brackets up to get around this as I wasn't happy securing something with only one screw when it should have two. The connectors in focus are for the auto dim mirror and rain/light sensor.
I have fitted the re trimmed headlining and A pillar trims. I used pads of Silent Coat Sound Absorber 15 behind all trim to prevent any minor squeaks etc.
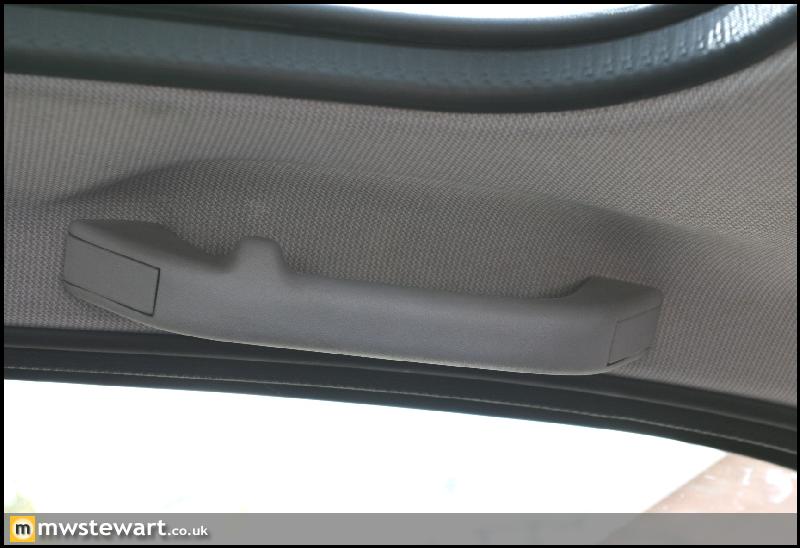
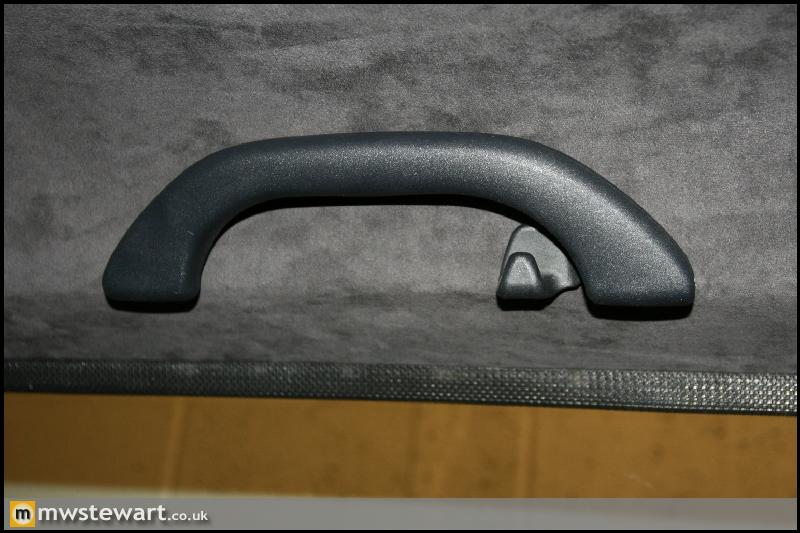
A4 roof handles modified to fit. They are silicone damped.
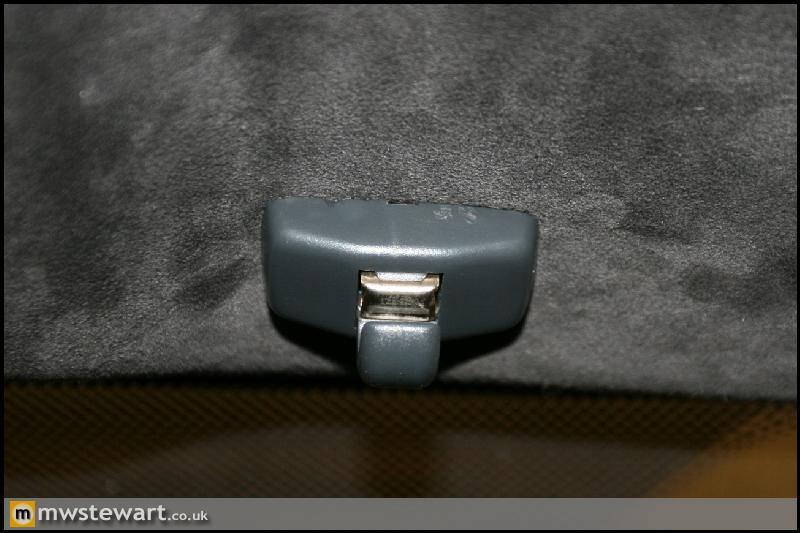
A4 Sun Visor clips fitted.
Re-trimmed Astra VXR Sun visors fitted.

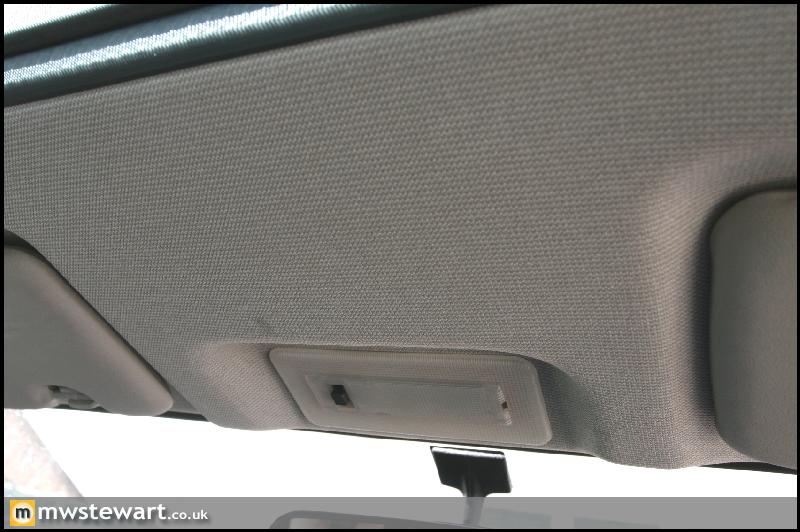
A4 Rear interior light fitted.
I had to tweak the A Pillars slightly to get the Mk4/5 trims on. I'm pleased with the fit.
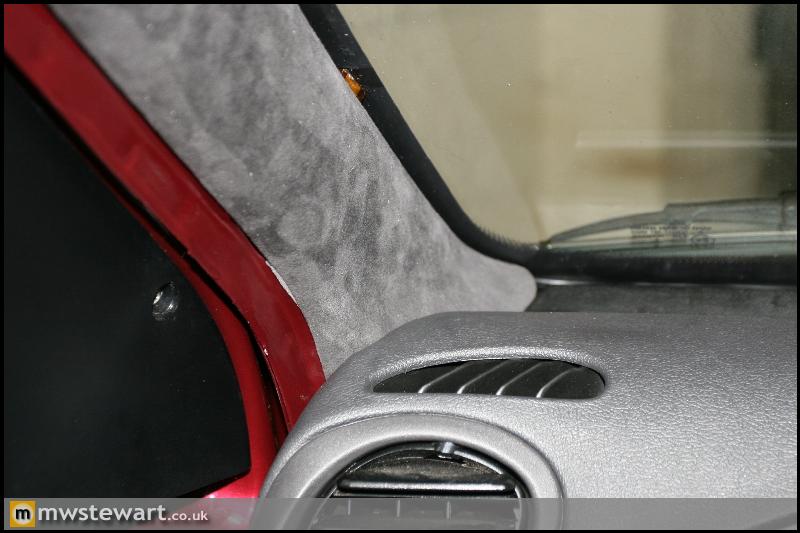
Here's the cut-out ready for the Audi front light which I shall cover later in this post. I haven't fitted the door seals yet which is why exterior paint is visible. I have a set of new original door seals but before they go on I'm going to investigate if any of the velour finished door seals from Audi/BMW/Mercedes etc. will fit.
I've purchased a set of door looms from an Audi A6 that was equipped with the 'interior light pack'; the clear objects in the front of the photo are lenses to direct LED light into the interior door handle reveals. I will incorporate these looms into my doors together with the A6 puddle lights and door marker lights. I had already got Peugeot courtesy/puddle lights but the quality and design is, as to be expected, not a match for the Audi parts.
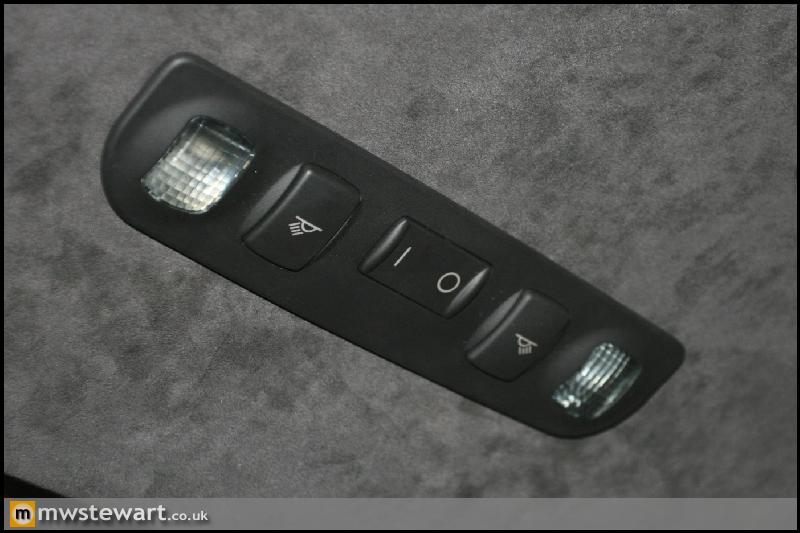
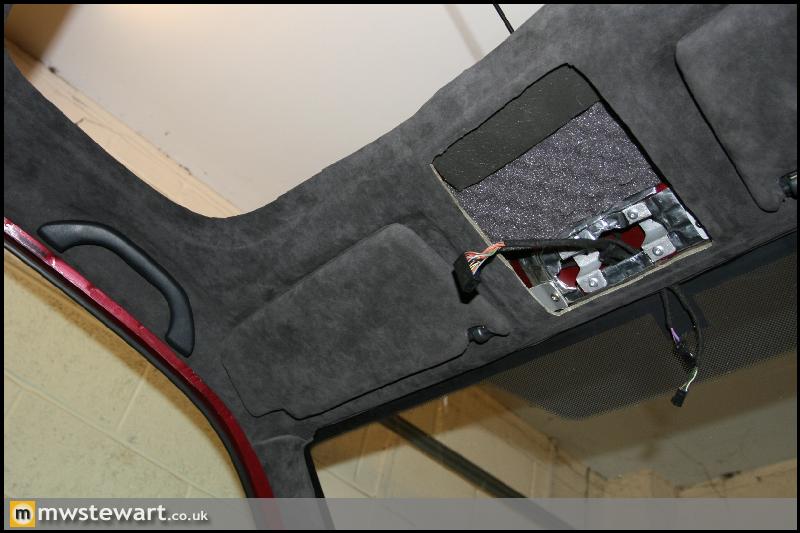
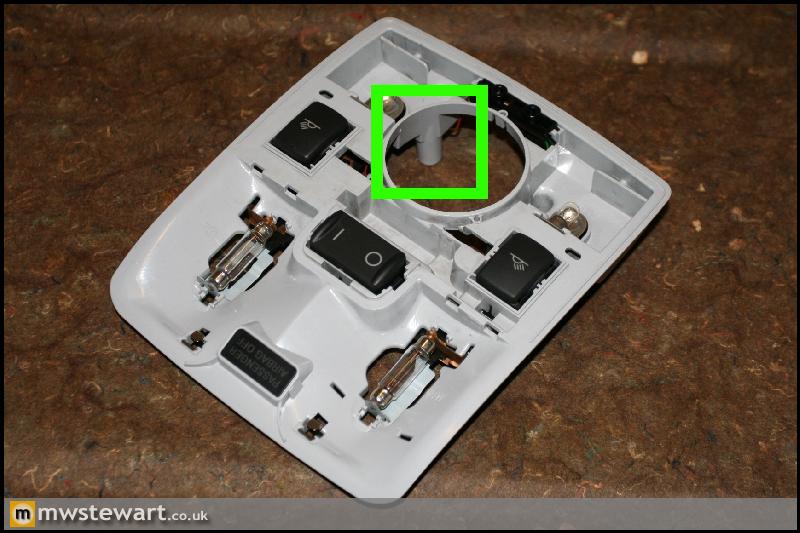
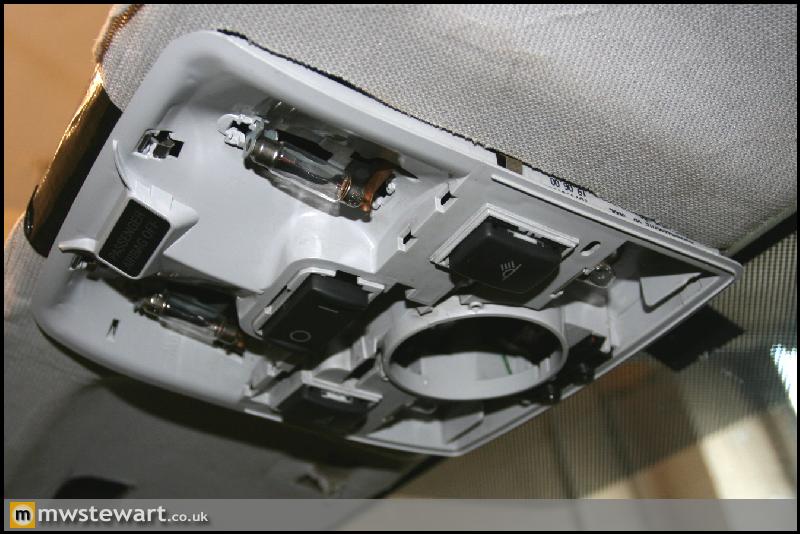
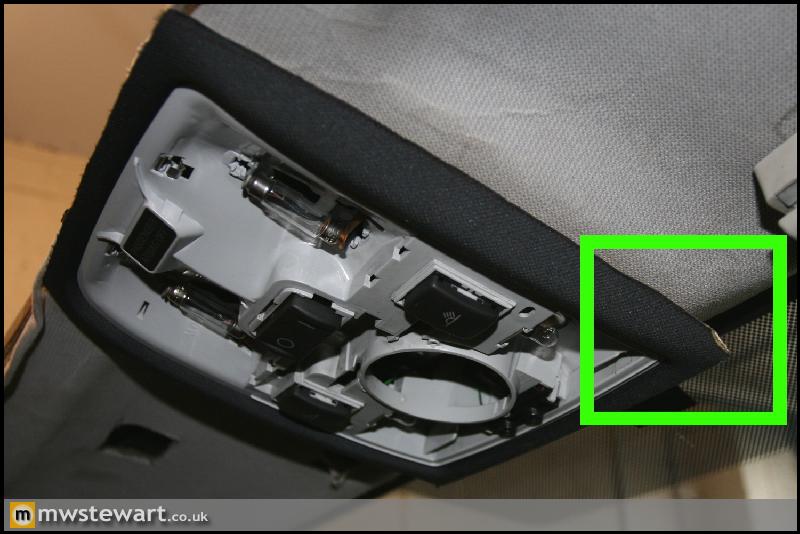
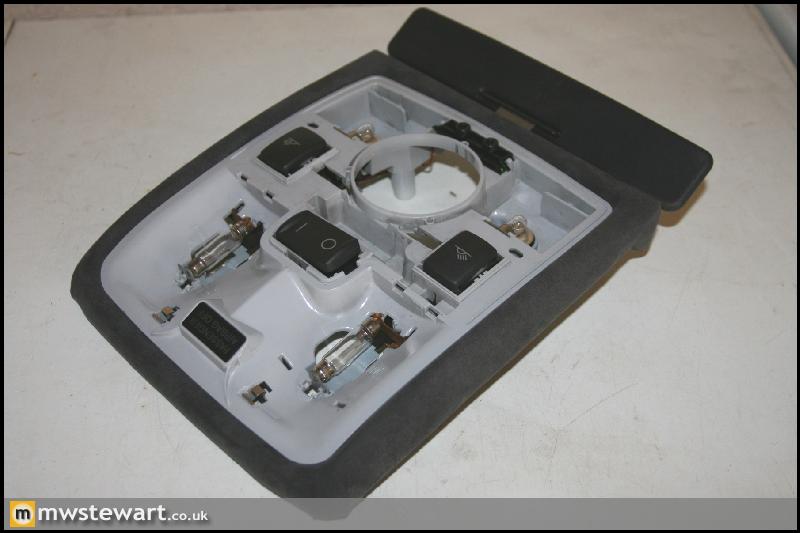
Here's the new front interior light which is actually more of a multifunction console than a light; it is from a well specified model so has LED based submarine lighting, map lights, and provision for a Telephone Microphone. The on/off switch is dual pole so has dedicated control of the rear light i.e. the rear light comes on with the front light in position 1 (that isn't as straight forward to achieve as sounds). The unit mounts by two screws through the lugs outlined in the photo:
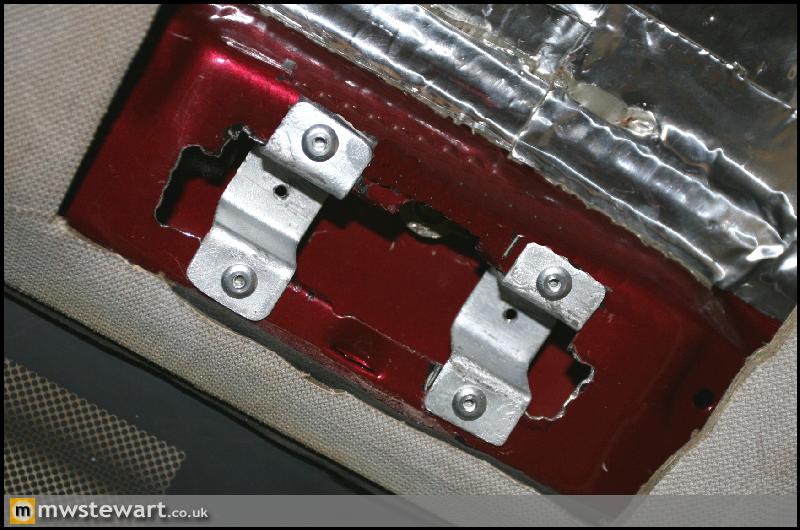
I enlarged the original Fiesta light recess and fabricated the two Top Hat shaped brackets to secure the new light.
The first test fit in a scrap headlining.
I carefully cut the original Audi headlining and mounted it to the Fiesta attached to the light. I got the sides to fit perfectly but the front and rear edges were a problem, particularly the front as highlighted in the second photo.
I fabricated a metal part to fill the gap.
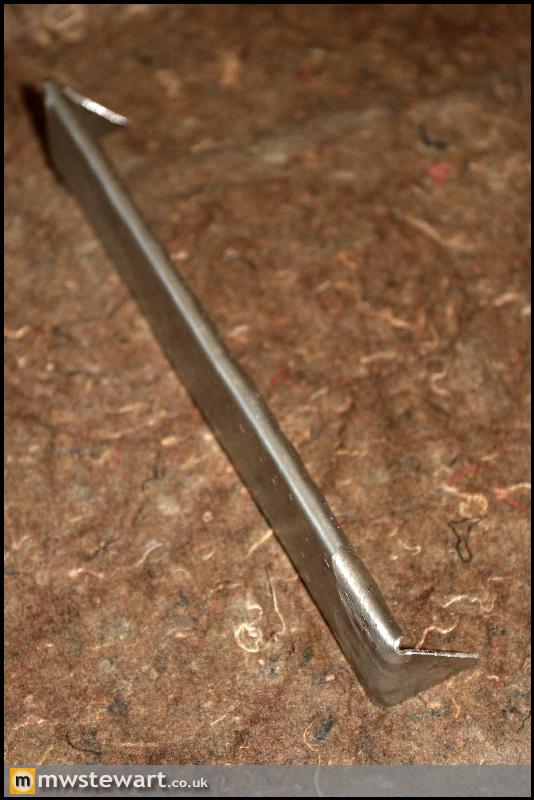
Next I welded the infill piece to the light mount frame, and then used Epoxy to reshape the outer edges of the headlining.
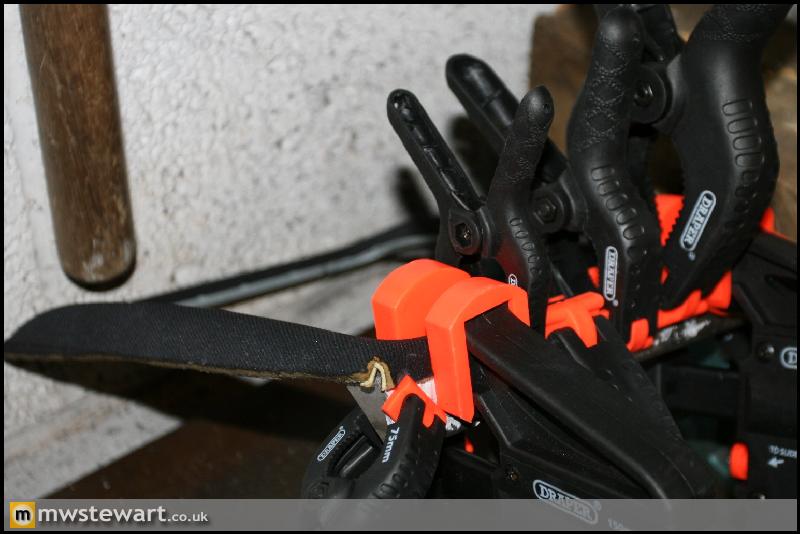
It doesn't look like much, but I've used a combination epoxy, adhesive foam and finally fabric tape to reshape the Audi headlining to fit perfectly against the Fiesta headlining. The next step is to cover it in Alcantara.
Rear section complete.
I've used Silent Coat Noise Isolator 4 on edges of any apertures in order to protect against chaffing.
I removed the dashboard again in order to apply Silent Coat Sound Absorber 15 to any surfaces which were in close proximity. The material is great for preventing any squeaks or groans, not that there are many from the very solid Mk5 dashboard.
Next I moved onto the roof furniture. I was originally going to spray the original accessories to match the new headlining, but as time went on I decided that they weren't special enough.
So, I went out and purchased some accessories from an Audi B5 A4 Facelift 'Sport' model which included new interior lights and a section of the surrounding headlining, then using some spare Fiesta headlinings, I figured out how to modify and mount the parts.
The position of the fixed mount on the Astra sun visors is different to where it was on the Fiesta, which wouldn't have been an issue except one of the screw holes in the new position fell over a recess and punched hole in the overhead chassis box. I made a couple of removable brackets up to get around this as I wasn't happy securing something with only one screw when it should have two. The connectors in focus are for the auto dim mirror and rain/light sensor.
I have fitted the re trimmed headlining and A pillar trims. I used pads of Silent Coat Sound Absorber 15 behind all trim to prevent any minor squeaks etc.
A4 roof handles modified to fit. They are silicone damped.
A4 Sun Visor clips fitted.
Re-trimmed Astra VXR Sun visors fitted.
A4 Rear interior light fitted.
I had to tweak the A Pillars slightly to get the Mk4/5 trims on. I'm pleased with the fit.
Here's the cut-out ready for the Audi front light which I shall cover later in this post. I haven't fitted the door seals yet which is why exterior paint is visible. I have a set of new original door seals but before they go on I'm going to investigate if any of the velour finished door seals from Audi/BMW/Mercedes etc. will fit.
I've purchased a set of door looms from an Audi A6 that was equipped with the 'interior light pack'; the clear objects in the front of the photo are lenses to direct LED light into the interior door handle reveals. I will incorporate these looms into my doors together with the A6 puddle lights and door marker lights. I had already got Peugeot courtesy/puddle lights but the quality and design is, as to be expected, not a match for the Audi parts.
Here's the new front interior light which is actually more of a multifunction console than a light; it is from a well specified model so has LED based submarine lighting, map lights, and provision for a Telephone Microphone. The on/off switch is dual pole so has dedicated control of the rear light i.e. the rear light comes on with the front light in position 1 (that isn't as straight forward to achieve as sounds). The unit mounts by two screws through the lugs outlined in the photo:
I enlarged the original Fiesta light recess and fabricated the two Top Hat shaped brackets to secure the new light.
The first test fit in a scrap headlining.
I carefully cut the original Audi headlining and mounted it to the Fiesta attached to the light. I got the sides to fit perfectly but the front and rear edges were a problem, particularly the front as highlighted in the second photo.
I fabricated a metal part to fill the gap.
Next I welded the infill piece to the light mount frame, and then used Epoxy to reshape the outer edges of the headlining.
It doesn't look like much, but I've used a combination epoxy, adhesive foam and finally fabric tape to reshape the Audi headlining to fit perfectly against the Fiesta headlining. The next step is to cover it in Alcantara.
Thanks gents!
This will be the last car project I do for a while. I have been lusting after an E-Type restoration project but my next priority is learning to fly next and getting a license.
In terms of suspension set up my starting point will be a full geometry and corner weighting session based on some safe and conservative settings. I'm going for KW Variant 3 Coilovers, so those combined with the custom suspension parts equals way more adjustment than I have experienced before in a car. I'm looking forward to getting to grips with it and dialling it all to my taste, but when the time comes I will be asking for professional advice in that area.
Cheers,
Mark
aww999 said:
Given how many extra bits you've bought (eg how little of the original car is left apart from the shell), would it have been any more expensive to start with an old E-type, 240Z, E30 M3, MkII Escort etc in the first place? I know Mk3 Fiestas are your "thing" and I'm not trying to knock that, but I guess that the cost of the base car is about 5% of the project budget!
I just did a quick calculation, and the base car is 1.35% of the project cost to date 
Financially this project makes no sense, the whole thing is probably British eccentricity at its best, but I simply can't put a price on the amount of satisfaction it's giving me to build and undoubtedly will do to drive. I think I take more pleasure from transforming/improving/integrating, so starting with a Fiesta gives more scope than say an E-Type or E30, both of which I'd feel inclined to keep standard. The project isn't completely senseless however as I know there is great potential in there despite the models humble beginnings.
Ultimately I hope the car will be be a breath of fresh air, and almost a novelty compared to my daily cars. Whenever I finish it that is
Thanks chaps. This will no longer be passed on to my girlfriend
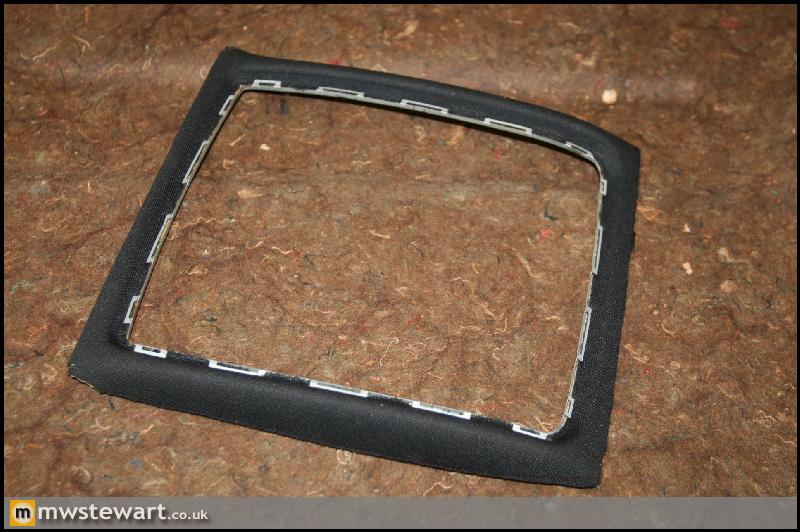
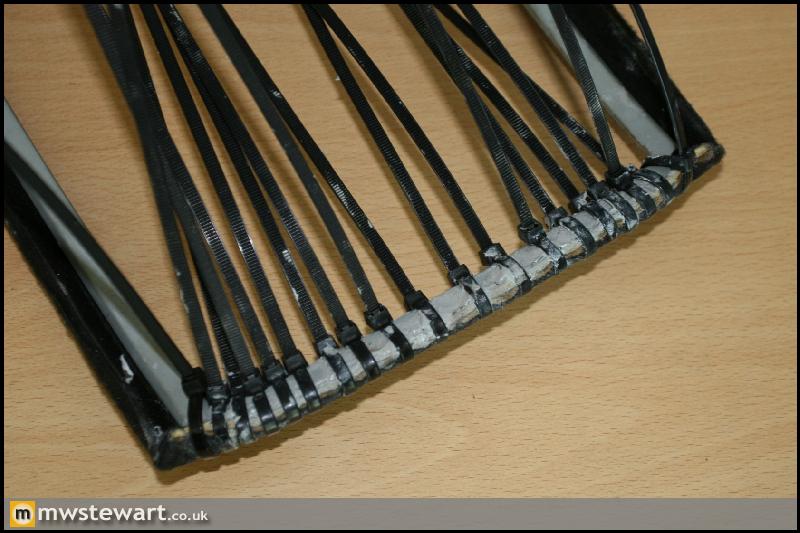
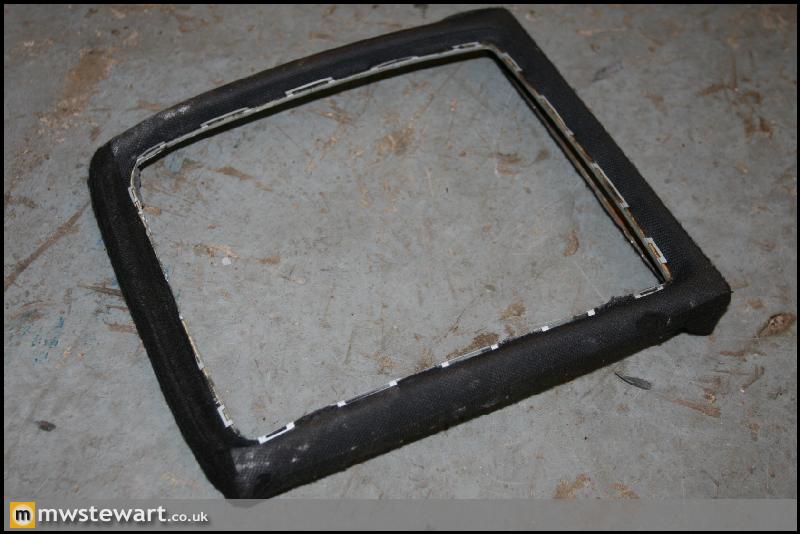
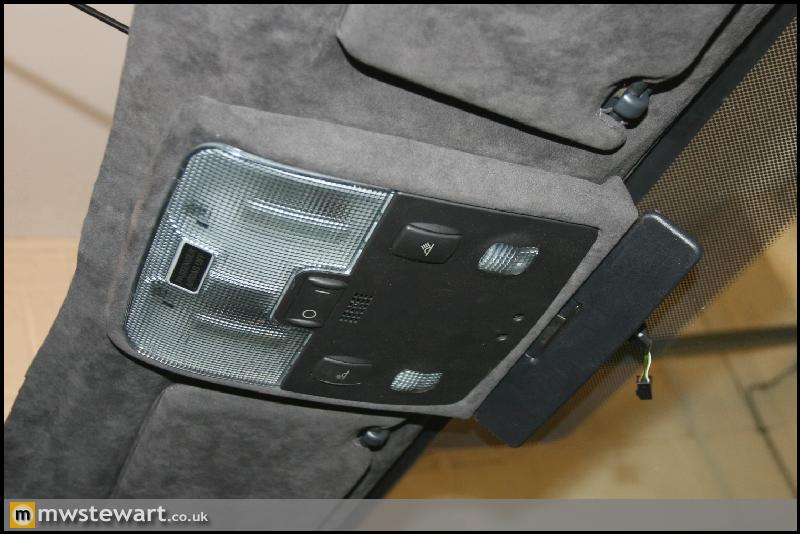
The sheet of Alcantara I ordered from Aldridge has arrived, so today I set about trimming the front interior light bezel. I used some heavy duty fabric adhesive adhesive from Dunelm and some Loctite 401 to secure the edges. It was a bit of a fiddly job to ensure there weren't any creases around the corners, but I achieved an acceptable result in time.
It's now obvious why I left a flat face at the front of the light: I've mounted the A4's 3rd sun visor.
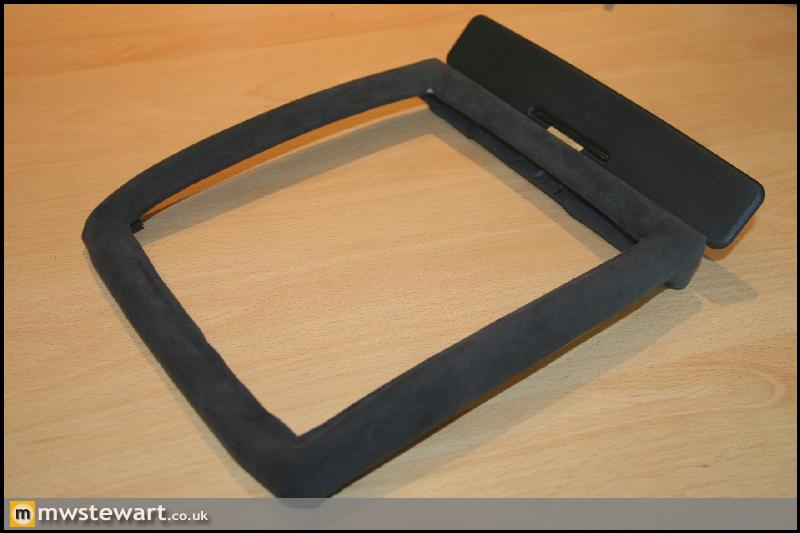
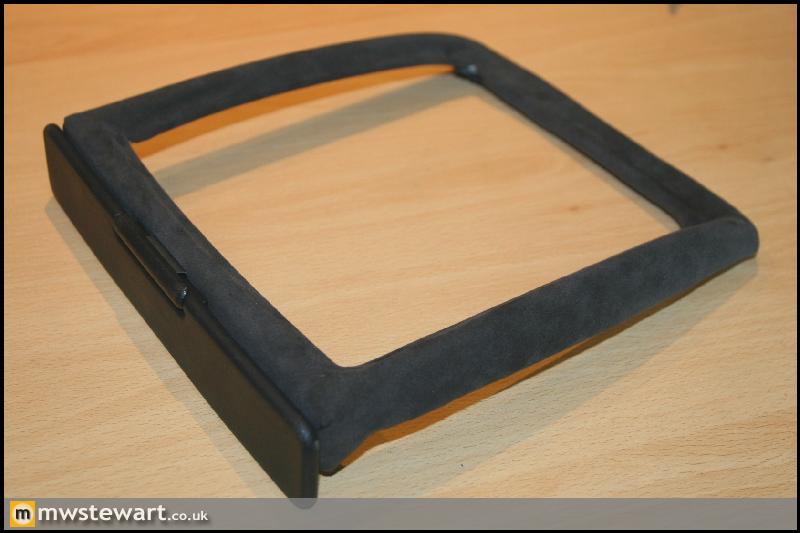
The light unit fits snugly.
I'm really pleased with the result, it's definitely been one of the more satisfying jobs so far.

The sheet of Alcantara I ordered from Aldridge has arrived, so today I set about trimming the front interior light bezel. I used some heavy duty fabric adhesive adhesive from Dunelm and some Loctite 401 to secure the edges. It was a bit of a fiddly job to ensure there weren't any creases around the corners, but I achieved an acceptable result in time.
It's now obvious why I left a flat face at the front of the light: I've mounted the A4's 3rd sun visor.
The light unit fits snugly.
I'm really pleased with the result, it's definitely been one of the more satisfying jobs so far.
Gassing Station | Readers' Cars | Top of Page | What's New | My Stuff