I'll AX this only once... though there is an Echo in here
Discussion


Plan A vote here . Head gasket leaking at front left hand side as you stand in front of the car? Seem to recall it was an easy enough job. Learnt from experience fitting a 'similar' engine can be a PITA- in a Fiat ended up with head, block and crank-everything else was not quite right.
Jam upside down 2l Coke bottle with bottom cut off in rad to fill system - one bleed on heater hose ( looks like tyre valve cap or knurled plastic screw ) and 5mm allen key bleed on thermostat housing maybe.
Mine got water in the passenger side from the wiring harness-to-floor clips in the front wheel arch ( under the sound deadening) - think you need a friendly windscreen man.
Thought they were a fun car ,and as you say spiritual successor to 2CV - brings back memories . Pleased to see you got new driveshafts - we changed the gaiters and got needle rollers all over the yard.
Good luck.
Thanks all, I'm coming down in favour of plan A, the known good* engine with a new head gasket.

The 1.4 waterways and head gasket were in a much worse state than the original. Good job I didn't pursue the oh so simple 'just put the other engine in' (yeah right) strategy,it wouldn't have lasted 5 minutes. I should point out this is no fault of the seller, it a cheap engine for a reason - it had sat around for 4 years and they recommended a thorough inspection before installation.

The head has gone to be skimmed and I hope to make more progress this weekend when I return armed with a coke bottle (bleeding it last time was a pig, I hope I've learned my lesson).
- apart from the leaking sump, head gasket (at the left hand side) and crankshaft oil seals.
The 1.4 waterways and head gasket were in a much worse state than the original. Good job I didn't pursue the oh so simple 'just put the other engine in' (yeah right) strategy,it wouldn't have lasted 5 minutes. I should point out this is no fault of the seller, it a cheap engine for a reason - it had sat around for 4 years and they recommended a thorough inspection before installation.
The head has gone to be skimmed and I hope to make more progress this weekend when I return armed with a coke bottle (bleeding it last time was a pig, I hope I've learned my lesson).
Plan A looks like the way to go for all the factors you've uncovered. Better the devil you know in this circumstance - with the G60 (and its stand ins!) off its best to get the plan underway for this one and limit the number of variables.
Good luck with the skimming, and check the 1.4 can't be broken any further to make up some of the costs!
Good luck with the skimming, and check the 1.4 can't be broken any further to make up some of the costs!
I had an AX GT while at University - Two memories:
1. Lifting groceries out the back seat with hands full, I decided to shut the driver's door by 'hip-bumping' the door to close it. The door didn't move, and I just put a large dent in the door.
2. Everytime I tried to adjust or use any plastic item it just broke off in my hand.
I frikin loved that car.
Brother D I'd agree with you on both counts. The plastics are flimsy... and the time and effort I'm putting into this car are ridiculous considering its worth. Not going to stop me any time soon though!
The plan is underway. The head has been skimmed and looks lovely, so I can just put it back on the block, right?

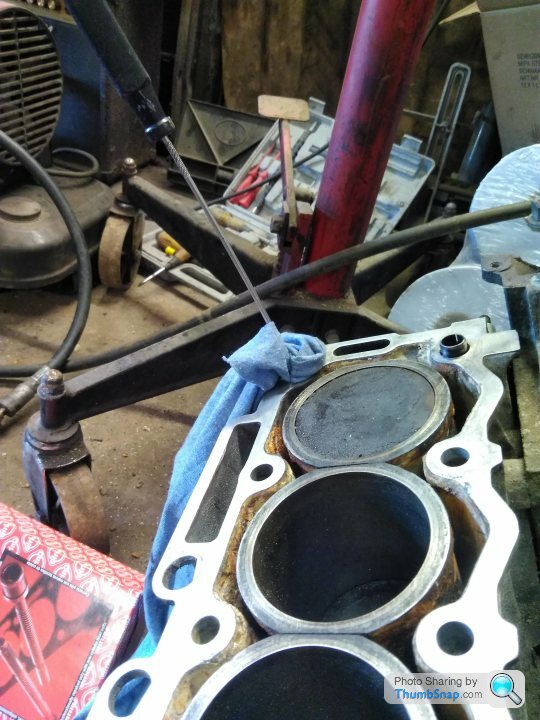
No, not if I'm going to do this properly (and given the effort spent so far, that seems sensible). Head on the bench and valves out, and then a gentle decarbonisation of the combustion chambers and valves with a wire wheel.

There then followed a therapeutic session with a suckered stick and some paste.
 [url]
[url]
 |https://thumbsnap.com/XiMK3ozW[/url]
Until finally, at the end of the day, the head and valves seats looked like this:


Reassembly starts next Friday.. . .
As an aside, for anyone interested in the development of the TU engine in the 90s, at some point Citroën changed the design of their rocker arms from solid to roller (or that may just be in the bigger displacement engine).

The plan is underway. The head has been skimmed and looks lovely, so I can just put it back on the block, right?
No, not if I'm going to do this properly (and given the effort spent so far, that seems sensible). Head on the bench and valves out, and then a gentle decarbonisation of the combustion chambers and valves with a wire wheel.
There then followed a therapeutic session with a suckered stick and some paste.
[url]|https://thumbsnap.com/XiMK3ozW[/url]Until finally, at the end of the day, the head and valves seats looked like this:
Reassembly starts next Friday.. . .
As an aside, for anyone interested in the development of the TU engine in the 90s, at some point Citroën changed the design of their rocker arms from solid to roller (or that may just be in the bigger displacement engine).
Back to the garage today for more engine work.
Set the valve stem seals soaking in oil, then got them installed using a socket to tap them into place without touching the soft rubber

Then put all the valves in:

Realised I'd been an idiot, and took them all out again (bar one) making sure to keep them in the correct order. Then broke out the spring compressors.

All valves successfully back in the head, put the camshaft back in (torquing that to 80Nm was fun).

Then on with the thermostat housing :

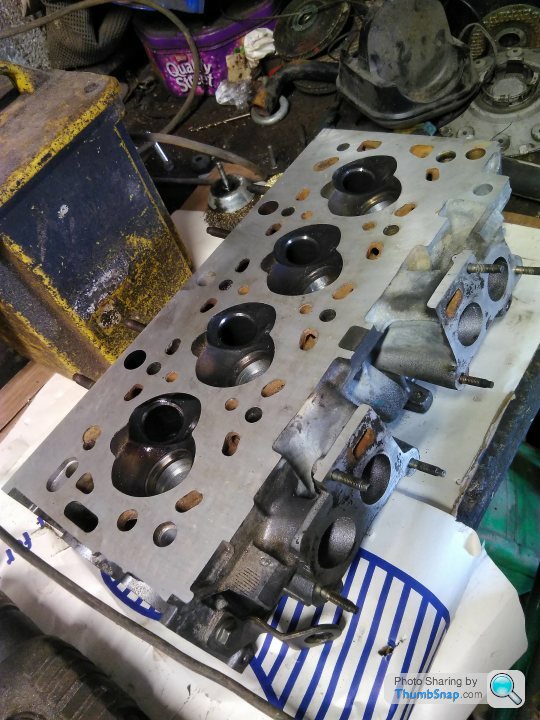
Followed by the inlet manifold. There's a lot of space for increasing the sizes in the head, which I'm assuming is what they did in other iterations of the TU engine.


Will hope to get the belt on and get the engine timed up tomorrow ready to go back in here....

Set the valve stem seals soaking in oil, then got them installed using a socket to tap them into place without touching the soft rubber
Then put all the valves in:
Realised I'd been an idiot, and took them all out again (bar one) making sure to keep them in the correct order. Then broke out the spring compressors.
All valves successfully back in the head, put the camshaft back in (torquing that to 80Nm was fun).
Then on with the thermostat housing :
Followed by the inlet manifold. There's a lot of space for increasing the sizes in the head, which I'm assuming is what they did in other iterations of the TU engine.
Will hope to get the belt on and get the engine timed up tomorrow ready to go back in here....
More re-assembly work on the engine today, but first I cleaned up the top of the bottom end and all of the holes where the new head bolts were going to go. I left cleaning the piston crowns as the procedure for supporting the liners is quite involved:

Then gasket on, head on (it went straight onto the dowels, lovely) and bolts in for torquing up. They are of course male torx heads, so I Was paranoid about the socket slipping, but all went well. 3 stage tightening - 20Nm, then 120 degrees, then another 120 degrees. Glad Mick had the degree tool as it wasn't something I'd used before.


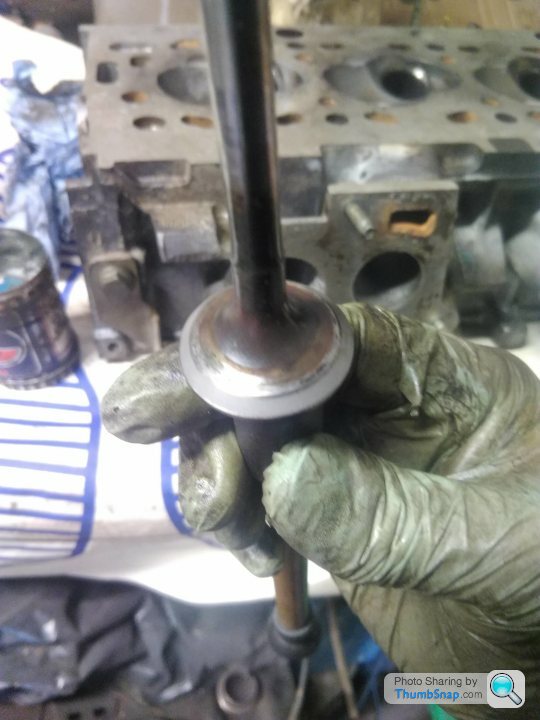
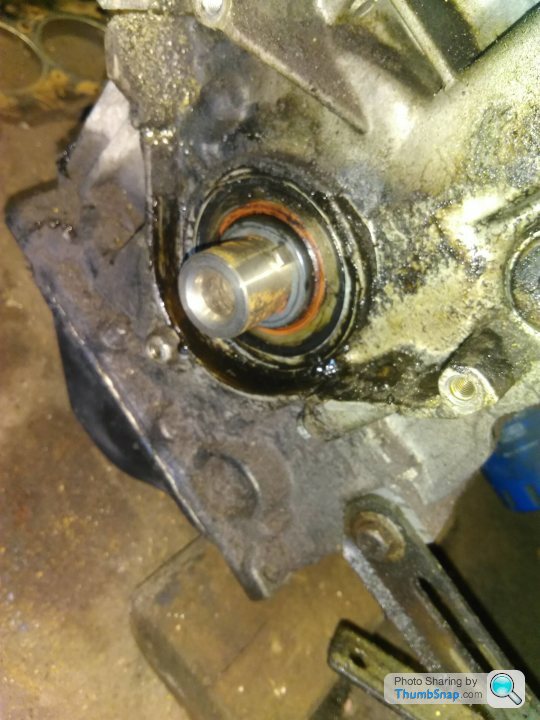
With the head on, it looked more like an engine, but the ambitions of getting the belt on had to wait as I'd conveniently forgotten the crankshaft oil seal replacement. The reason the car came in so many weeks ago!
110Nm for the bolt holding the sprocket in....then a puller to get it off (due to surface rust on the inside as it turned out)

Old oil seal actually looked in decent nick, but was changed having got this far!

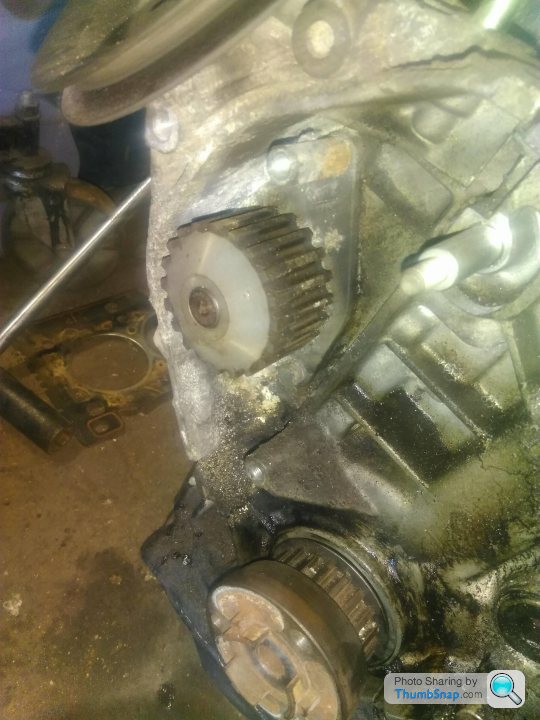
Sprocket back on having cleaned up the inside and lightly smeared oil over the mating surfaces. Then onto the water pump, which unsurprisingly was pretty gunked up inside, presumably from the engine having stood:


More progress next weekend I hope. This wasn't supposed to turn into quite the project, but I'm learning a lot as I go, and if it works, I'll be very happy to have rebuilt it!
Then gasket on, head on (it went straight onto the dowels, lovely) and bolts in for torquing up. They are of course male torx heads, so I Was paranoid about the socket slipping, but all went well. 3 stage tightening - 20Nm, then 120 degrees, then another 120 degrees. Glad Mick had the degree tool as it wasn't something I'd used before.
With the head on, it looked more like an engine, but the ambitions of getting the belt on had to wait as I'd conveniently forgotten the crankshaft oil seal replacement. The reason the car came in so many weeks ago!
110Nm for the bolt holding the sprocket in....then a puller to get it off (due to surface rust on the inside as it turned out)
Old oil seal actually looked in decent nick, but was changed having got this far!
Sprocket back on having cleaned up the inside and lightly smeared oil over the mating surfaces. Then onto the water pump, which unsurprisingly was pretty gunked up inside, presumably from the engine having stood:
More progress next weekend I hope. This wasn't supposed to turn into quite the project, but I'm learning a lot as I go, and if it works, I'll be very happy to have rebuilt it!
Thanks for the positive comments all, I'm back to it this Saturday....
However, a small update arrived in the post today. I'll start by saying that this wasn't part of the original plan, but after the original cast iron manifold snapped the heat shield bolts, then started disintegrating when they were forcibly extracted, then snapped off a tap...well you can see where this is going, right?

Oh dear, I appear to have accidentally purchased a 4-2-1 stainless exhaust manifold.
In my defence, second hand, equally tatty original manifolds are £30 + postage on ebay. This is lighter too thereby fitting in with the AX philosophy. Erm....no that's it. It was shiny...?

Yes, shiny.
Most importantly (as this project has taught me), is that the space between the bolt holes for the studs matches the existing head.

For anyone interested in the approximate dimensions in mm bergen the studs in a TU1 head, there you go. The exhaust is actually for a 1.4 8v Saxo (TU3), but before ordering, I checked that the 1.1 original manifold fitted on a 1.4 head that I happened to have lying around....
Let's see what Saturday brings!
However, a small update arrived in the post today. I'll start by saying that this wasn't part of the original plan, but after the original cast iron manifold snapped the heat shield bolts, then started disintegrating when they were forcibly extracted, then snapped off a tap...well you can see where this is going, right?
Oh dear, I appear to have accidentally purchased a 4-2-1 stainless exhaust manifold.
In my defence, second hand, equally tatty original manifolds are £30 + postage on ebay. This is lighter too thereby fitting in with the AX philosophy. Erm....no that's it. It was shiny...?
Yes, shiny.
Most importantly (as this project has taught me), is that the space between the bolt holes for the studs matches the existing head.
For anyone interested in the approximate dimensions in mm bergen the studs in a TU1 head, there you go. The exhaust is actually for a 1.4 8v Saxo (TU3), but before ordering, I checked that the 1.1 original manifold fitted on a 1.4 head that I happened to have lying around....
Let's see what Saturday brings!
A little more progress yesterday, although none of it exhaust related unfortunately (although I did line it up by eye and its looking hopeful) .
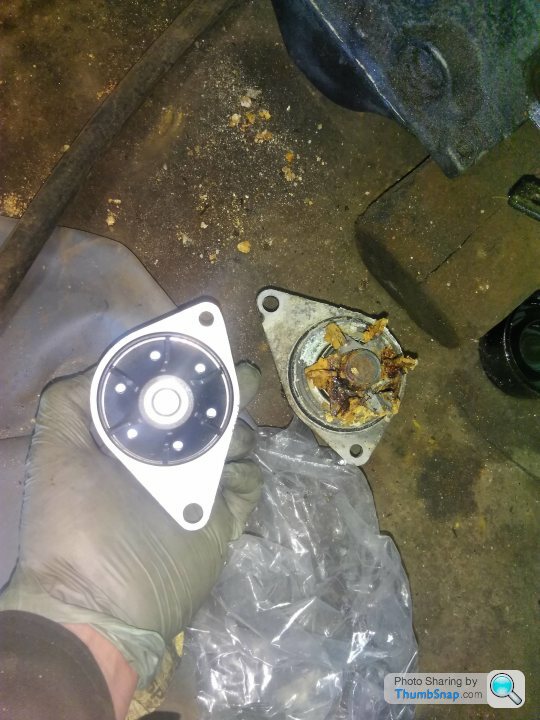
Instead, it was picking up where I left off and cleaning up the water pump aperture, before fitting the new one:

Having done that, I went to put the timing belt on...and it was too short. There then followed a tooth counting session on the water pump and top and bottom sprockets (all the same), then the belt. The old belt has 108 teeth, the new one 104.
Blast.
By this point, the factors were closed, so the new belt will have to wait, and any thoughts of engine installation yesterday vanished.
Ah well, I put the old belt on, tensioned it up and then (with some trepidation) turned it over using a socket in the bottom pulley. Having done some revolutions with no valve/piston clash, I pinned it up again...and it all lined up! Marvellous.
When the new belt turns up, I'll put that on (the old one actually looks OK, but it would be stupid not to).
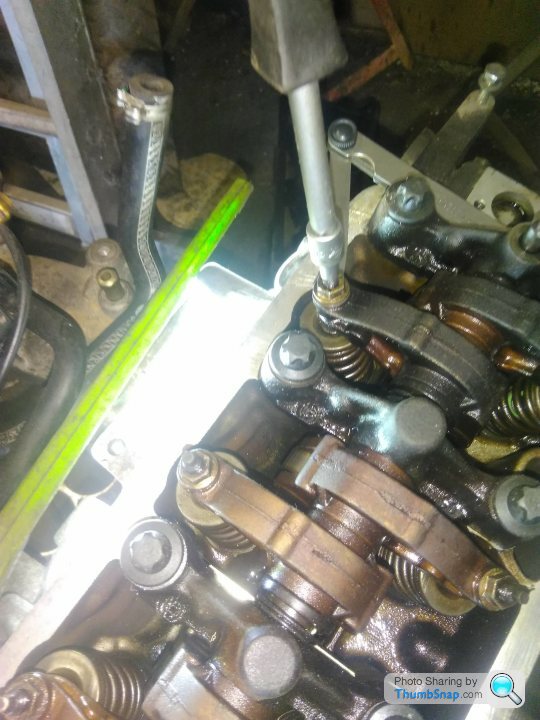
As it was all turning over, I then spent a good amount of time setting and checking the valve clearances.
To the sound of bagpipes.

He's a mate of the chap who runs the garage, and comes by to practice out of deference to his neighbours.
Anyway, 0.20mm for the inlets, 0.40mm for the exhaust valves. 4mm socket to adjust the clearance and a 10mm lock nut to hold it in place.

Then onto THE REASON THE CAR WAS IN HERE IN THE FIRST PLACE!
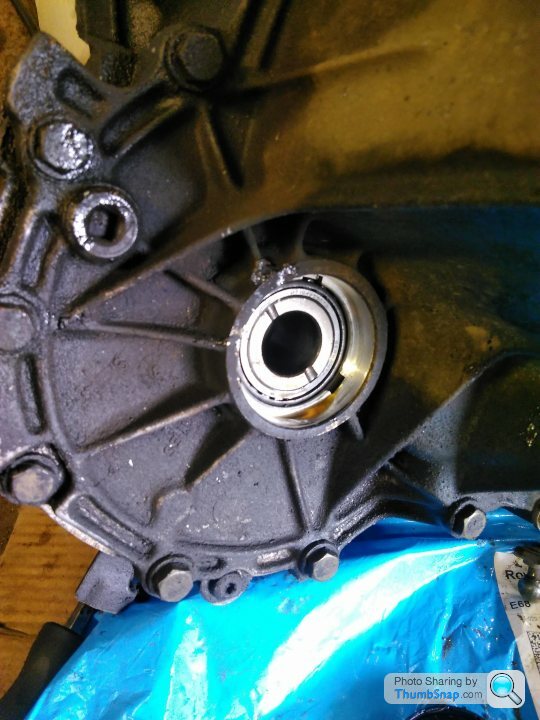
Flywheel off and change the crankshaft oil seal :


Its a good size, and I'm glad it comes with a device for slipping it over, as I suspect its easy to damage, and that would get frustrating quite quickly....
Flywheel back on with new 17mm bolts (which despite there being 6 of... come in packs of 5).

...and bloody hell, it's starting to look like an engine again.

New belt next week, then clutch, gearbox, driveshafts etc. Sounds so simple when I say it quickly!
Instead, it was picking up where I left off and cleaning up the water pump aperture, before fitting the new one:
Having done that, I went to put the timing belt on...and it was too short. There then followed a tooth counting session on the water pump and top and bottom sprockets (all the same), then the belt. The old belt has 108 teeth, the new one 104.
Blast.
By this point, the factors were closed, so the new belt will have to wait, and any thoughts of engine installation yesterday vanished.
Ah well, I put the old belt on, tensioned it up and then (with some trepidation) turned it over using a socket in the bottom pulley. Having done some revolutions with no valve/piston clash, I pinned it up again...and it all lined up! Marvellous.
When the new belt turns up, I'll put that on (the old one actually looks OK, but it would be stupid not to).
As it was all turning over, I then spent a good amount of time setting and checking the valve clearances.
To the sound of bagpipes.
He's a mate of the chap who runs the garage, and comes by to practice out of deference to his neighbours.
Anyway, 0.20mm for the inlets, 0.40mm for the exhaust valves. 4mm socket to adjust the clearance and a 10mm lock nut to hold it in place.
Then onto THE REASON THE CAR WAS IN HERE IN THE FIRST PLACE!
Flywheel off and change the crankshaft oil seal :
Its a good size, and I'm glad it comes with a device for slipping it over, as I suspect its easy to damage, and that would get frustrating quite quickly....
Flywheel back on with new 17mm bolts (which despite there being 6 of... come in packs of 5).
...and bloody hell, it's starting to look like an engine again.
New belt next week, then clutch, gearbox, driveshafts etc. Sounds so simple when I say it quickly!
Time for the regular Saturday update...
The correct timing belt with 108 teeth had been delivered, so that was fitted. Un-pinned the engine and turned it over 10 rotations as recommended, then pinned it back up, released the tension, fettled the belt and repeated.
All seemed well, so I did the final tension and tightened up the tensioner bolt to 23Nm.
Engine finally timed up with a new belt, other things needed sorting!
A little premature, but I replaced the driveshaft oil seals.
Today's main event, was the clutch though.


New kit fitted and aligned by eye (quite pleased by that as it went straight on)...and crikey, suddenly it looks a lot more complete! There was some shuffling required to get it all lined up against the block, but it came good after that!

After this, I have started putting the wiring loom back on, and as part of that, cracked the lambada sensor in the exhaust.

I'll get the loom back on this Friday as I have a day off, and then we'll see about getting the engine back in the car!
The correct timing belt with 108 teeth had been delivered, so that was fitted. Un-pinned the engine and turned it over 10 rotations as recommended, then pinned it back up, released the tension, fettled the belt and repeated.
All seemed well, so I did the final tension and tightened up the tensioner bolt to 23Nm.
Engine finally timed up with a new belt, other things needed sorting!
A little premature, but I replaced the driveshaft oil seals.
Today's main event, was the clutch though.
New kit fitted and aligned by eye (quite pleased by that as it went straight on)...and crikey, suddenly it looks a lot more complete! There was some shuffling required to get it all lined up against the block, but it came good after that!
After this, I have started putting the wiring loom back on, and as part of that, cracked the lambada sensor in the exhaust.
I'll get the loom back on this Friday as I have a day off, and then we'll see about getting the engine back in the car!
Edited by darkyoung1000 on Sunday 18th April 08:12
Sufficient progress has been made that is was time to play the - 'how many connectors in the loom, where do they go, did this really come out of here?' game
Bearing in mind, I didn't take the engine and box out, there was some test fitting and reassembling to try and work out what should go back where...

I still haven't worked out where this goes, for example!

However, today there was a 4 post lift and an engine crane added to to party with some positive results.


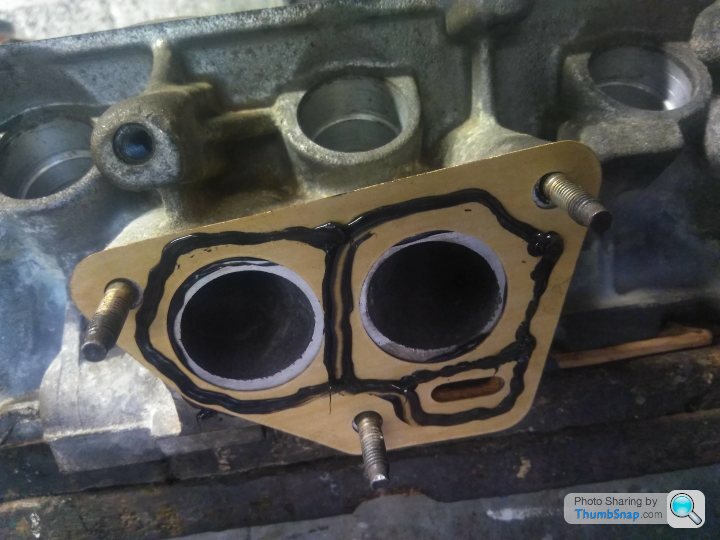
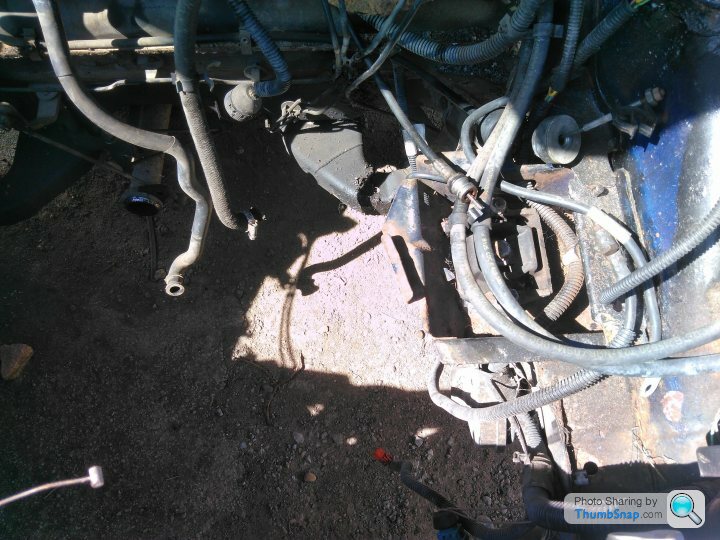
The manifold, as well as being shiny, is a perfect fit! Brilliant!
It turns out that you need to put the rear engine mount in before you bolt up the exhaust though. This I now know....

However, its in, it fits, the gear linkages and loom are all connected, and maybe, just maybe, next week it will fire...
Bearing in mind, I didn't take the engine and box out, there was some test fitting and reassembling to try and work out what should go back where...
I still haven't worked out where this goes, for example!
However, today there was a 4 post lift and an engine crane added to to party with some positive results.
The manifold, as well as being shiny, is a perfect fit! Brilliant!
It turns out that you need to put the rear engine mount in before you bolt up the exhaust though. This I now know....
However, its in, it fits, the gear linkages and loom are all connected, and maybe, just maybe, next week it will fire...
Gassing Station | Readers' Cars | Top of Page | What's New | My Stuff