Alfa Romeo 164 Twinspark Super
Discussion


Cambs_Stuart said:
Would Hayward and Scott be able to fabricate something? They knocked up a center pipe for my JDM legacy while I waited and had a good look at Chris Evan's bull nose ford transit camper.
Thanks! Will add them to the shortlist. From what I can tell its all down to the fabricator and materials - franchises and so forth vary wildly in reviews.carinaman said:
Thanks for the Auto Italia photos.
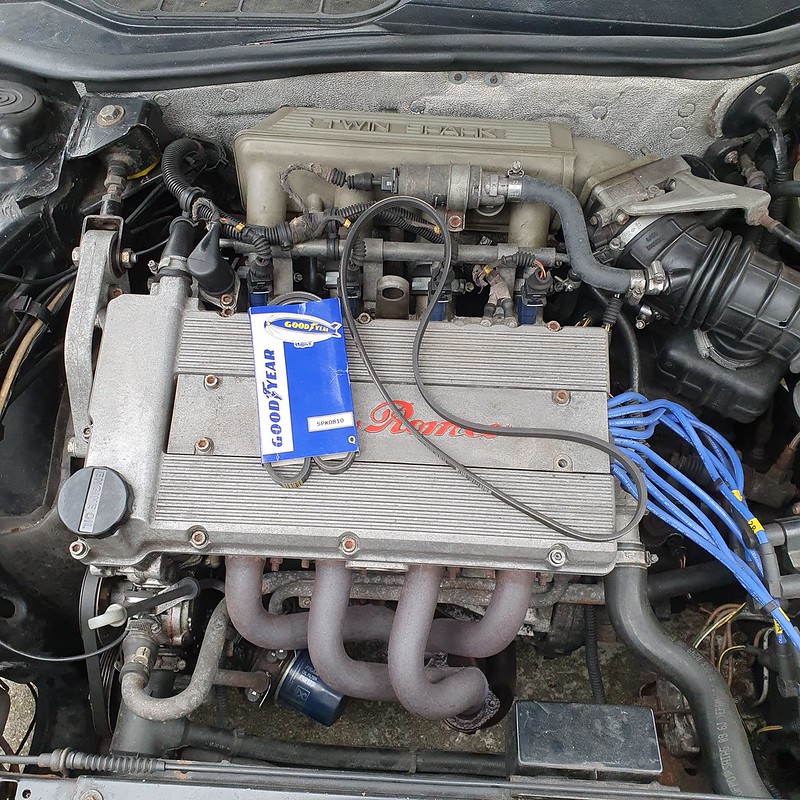
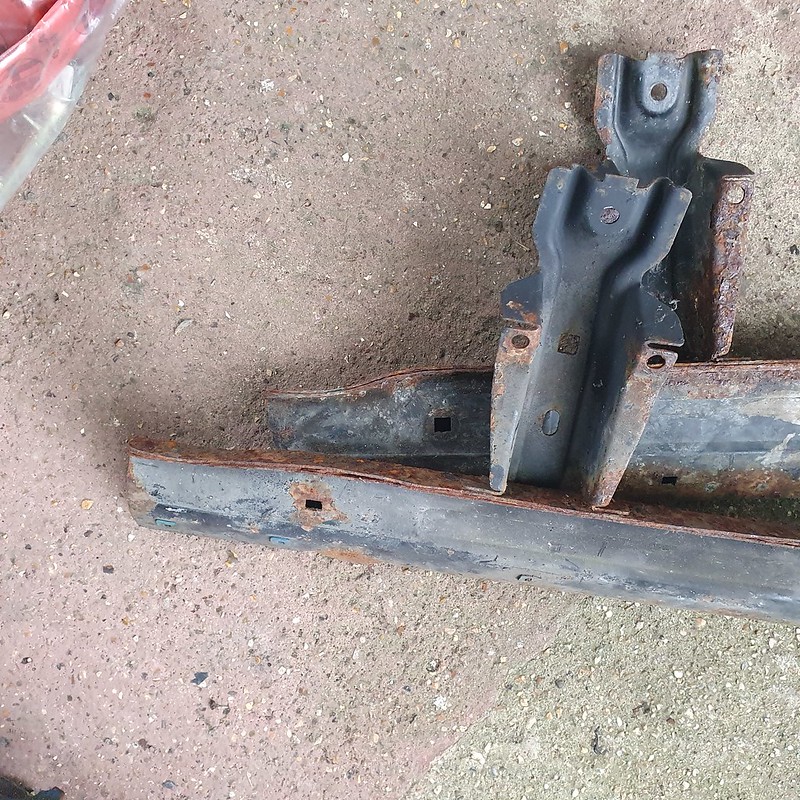
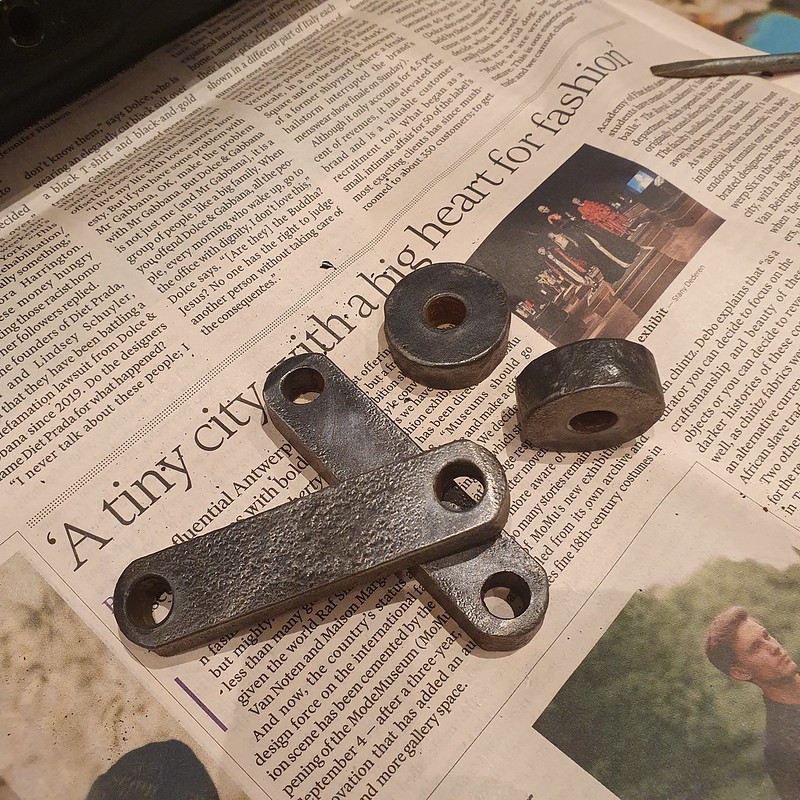
Annual pilgrimage for me - sad to see the number of 164s dropping with each visit, but an excellent day out (as long as you bring your own hot food and coffee - those queues/prices are legendarily bad on-site).A candlelit journey into the stores yielded the NOS front exhaust section donated by Phil at Alfacraft many years ago, still bearing all tags and wrapping.
 [
[I have been especially lucky - the bracket that had rusted through is included on this piece! I won't need to fabricate a new one or have to end up contacting the handful of 164 owners for a spare. Excellent! Time to count the pennies for the exhaust...

Before the 164 goes in for its exhaust at Redhill Classics I decided to give all the bolts a pre-treatment with PlusGas, and take a good look around the car to ensure nothing was amiss or would disrupt the operation.
I had forgotten the radiator was leaking...

Caught it just before it went below the tank minumim marker, but I think the radiator replacement is going to have to be reprioritised on the schedule, especially as there is evidence of some leaks now at the top of the radiator...

Topped off with some wintery bluejuice, and then I saw the alternator belt was showing signs of decay. I checked my stores and unfurled a new alternator and power steering duo.
This was one of the first jobs I completed on the car 8 years ago. I remember driving the car 'home' to my slightly dodgy old council flat and plenty of head scratching and trips to Halfords to locate a stubby rachet set. This time rounds, I had a good cup of tea, a complete toolset and a photo history.
PS belt requires removal of the pulley, three 10mm bolts and off it slides.

The alternator is a little trickier - at the business end the cam sensor is in the way, so I cleaned the area up and loosened one bolt, removed the other and 'hinged' it back for access. No point taking both bolts out and fumbling later on!

Alternator is in an awkward position, but with careful deployment of the stubby set bought 8 years ago and some needlessly expensive ratchet spanners, the reclusive generator moved just enought to tease the belt off.

Before replacing the belts I decided to remove the dessicated sound deadening on the wing and dose the area in Gunk. A cup of tea later and it cleaned up neatly.

Right. What did I actually start doing? Oh yes, the exhaust.
I coated the bolts for the downpipe and gave them an enthusiastic wire brushing to ensure they were still hexagonal.

I also managed to order two replacement gaskets for this downpipe connection, so that's another useful addition to the parts bin.
It appears the reason the front bracket became loose was the failure of a bush that secures it - the bolt had worked itself out of the centre. I attempted to get the size today but will have to retry tomorrow with trolley jack and Vernier calipers in daylight. If I can order this bush the team at Redhill should be able to replace it all in one go.

I'll keep recoating the bolts in PlusGas and perhaps try taking some other brackets off tomorrow. If I can derust and paint them, I'll have checked they won't hamper the operation and prevent them being an eyesore once the new item is fitted. If only I had the time to paint/power coat the manifold... oh well...
I had forgotten the radiator was leaking...
Caught it just before it went below the tank minumim marker, but I think the radiator replacement is going to have to be reprioritised on the schedule, especially as there is evidence of some leaks now at the top of the radiator...
Topped off with some wintery bluejuice, and then I saw the alternator belt was showing signs of decay. I checked my stores and unfurled a new alternator and power steering duo.
This was one of the first jobs I completed on the car 8 years ago. I remember driving the car 'home' to my slightly dodgy old council flat and plenty of head scratching and trips to Halfords to locate a stubby rachet set. This time rounds, I had a good cup of tea, a complete toolset and a photo history.
PS belt requires removal of the pulley, three 10mm bolts and off it slides.
The alternator is a little trickier - at the business end the cam sensor is in the way, so I cleaned the area up and loosened one bolt, removed the other and 'hinged' it back for access. No point taking both bolts out and fumbling later on!
Alternator is in an awkward position, but with careful deployment of the stubby set bought 8 years ago and some needlessly expensive ratchet spanners, the reclusive generator moved just enought to tease the belt off.
Before replacing the belts I decided to remove the dessicated sound deadening on the wing and dose the area in Gunk. A cup of tea later and it cleaned up neatly.
Right. What did I actually start doing? Oh yes, the exhaust.
I coated the bolts for the downpipe and gave them an enthusiastic wire brushing to ensure they were still hexagonal.
I also managed to order two replacement gaskets for this downpipe connection, so that's another useful addition to the parts bin.
It appears the reason the front bracket became loose was the failure of a bush that secures it - the bolt had worked itself out of the centre. I attempted to get the size today but will have to retry tomorrow with trolley jack and Vernier calipers in daylight. If I can order this bush the team at Redhill should be able to replace it all in one go.
I'll keep recoating the bolts in PlusGas and perhaps try taking some other brackets off tomorrow. If I can derust and paint them, I'll have checked they won't hamper the operation and prevent them being an eyesore once the new item is fitted. If only I had the time to paint/power coat the manifold... oh well...
Edited by Spinakerr on Sunday 21st November 17:52
Part 2 this morning of exhaust bracket preparation - I put the car as high as I dared on the stands and managed to get the 17mm socket on the side of the gearbox.

A few awkward maneuvers and the two nuts mercifully came loosened without drama, and the front bracket was removed, Gunked and inspected.

A 45mm OD, 8mm ID, 16mm OL, 21mm IL bush? I'm not sure where to start with this. ANyone know who I can call to track it down?

A few awkward maneuvers and the two nuts mercifully came loosened without drama, and the front bracket was removed, Gunked and inspected.
A 45mm OD, 8mm ID, 16mm OL, 21mm IL bush? I'm not sure where to start with this. ANyone know who I can call to track it down?
Edited by Spinakerr on Sunday 21st November 17:53
Thank you both - I have added a poly kit, should be an enjoyable little project for this weekend! I can also do it in situ, no need for a press.
The Shore rating is a little high om my choice of kit, but I can perhaps insert some air gaps with a tube during the process. I like to experiment.
The Shore rating is a little high om my choice of kit, but I can perhaps insert some air gaps with a tube during the process. I like to experiment.
Successful little morning while the weatehr is miserable - poured my first polyurethane bush.
Thanks to the suggestions above I sourced a realtively cheap two part kit, setup my workstation as below.

First task was to take a reference of the existing bush central metal location - dead centre, and fortunately flush on onside with the oter ring. This makes pouring easier with a single flat surface.
Original bush rubber extracted with a variety of tools - saws, hammer, sandpaper and so forth. Keying the metal surafces is key to good adhesion.

Having watched a number of videos and followed forum posts on the process, it was apparant simple cardboard and wood can bond annoyingly to the poured liquid. Examining the kit I had ordered and a quick check of plastics available, I used a simple mailing envelope as a non-bonding base. Liquid was mixed 1:1 on a scale, and poured in.
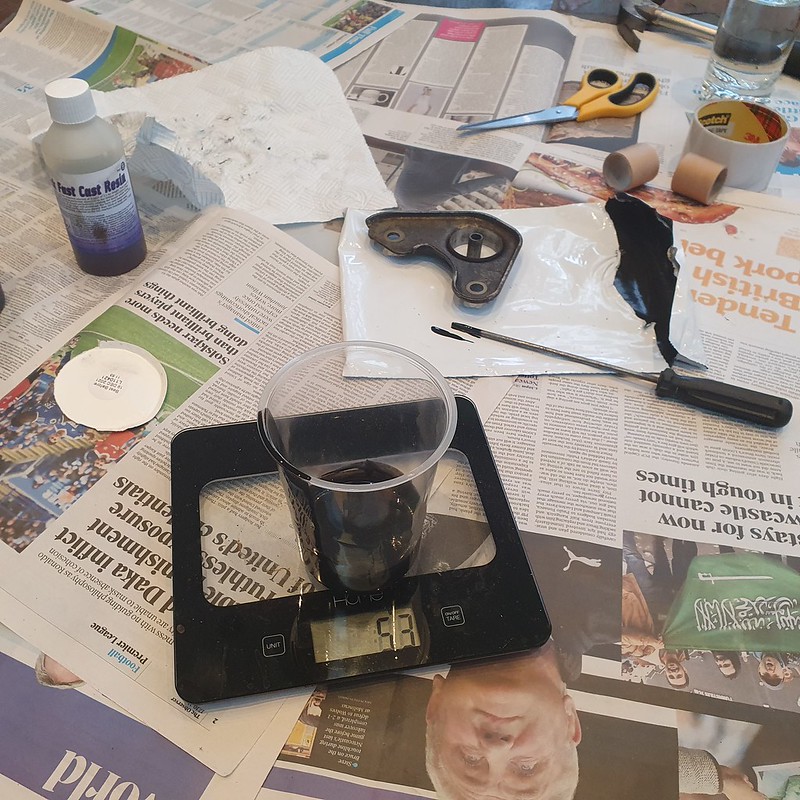

Thirty minutes later, a scalpel and careful fingers peeled away the envelope. It needs further curing but very pleased with my first attempt - hopefully its Shore rating will hold up!

Thanks to the suggestions above I sourced a realtively cheap two part kit, setup my workstation as below.
First task was to take a reference of the existing bush central metal location - dead centre, and fortunately flush on onside with the oter ring. This makes pouring easier with a single flat surface.
Original bush rubber extracted with a variety of tools - saws, hammer, sandpaper and so forth. Keying the metal surafces is key to good adhesion.
Having watched a number of videos and followed forum posts on the process, it was apparant simple cardboard and wood can bond annoyingly to the poured liquid. Examining the kit I had ordered and a quick check of plastics available, I used a simple mailing envelope as a non-bonding base. Liquid was mixed 1:1 on a scale, and poured in.
Thirty minutes later, a scalpel and careful fingers peeled away the envelope. It needs further curing but very pleased with my first attempt - hopefully its Shore rating will hold up!
Thanks all - would not have attempted without your suggestions, so very much appreciate the input!
Shore rating is quoted at 90A... tougher than the original rubber, which looks like it started at 60A and became, well, 0A when the sorry mess detached itself.
As this a single 45mm bush at the back of the gearbox solely for hanging one of the exhaust mounts, I'm hoping the fact that it is simply there will be enough. My experience with polybush engine mounts has been... poor... in that the induced teeth-chattering and mandatory massage-seats quickly lost their allure.
I can always drill a hole or two in it if the new exhaust generates some vibration, but I think the only fair test will be once all the engine mounts have been replaced too. A job for 2022.
Edited by Spinakerr on Sunday 28th November 12:16
For the first time in my ownership, and probably a little longer, the Alfa has a complete exhaust system!

It was a long day - pre 6am start in the first real frost, but thankfully no really issues other than frost on the inside of the winscreen too... Heated seats kept me snug on the dawn drive to Redhill Classics.


I then trudged to Redhill train station for a 07:30 line to London, with an arduous day brightened by a call at 4pm from Dave at Redhill to let me know everything had gone to plan!
Much later... I again trudged from a cold train to a frozen 164, the only outward appearance being the shiny new tip, selected after many searches as a stainless simulucrum of the original. Engine on... windows down... glorious! No rattles, no broken hangers, no vibrations or drooping heatshields. Phew.
A good poke in daylight revealed excellent craftsmanship, wonderful attention to detail on the downpipe and hangers, and a few adjustment to heatshields and fitting to ensure everything was straight and well away from any potential knocking points.


The sound is OEM - CAT is still in(for the moment), the 8V chain driven twinspark having a lavely chainsaw rasp but nothing to drone at speed or be too shouty.
Fortunately my home-made bush has neither generated new vibrations nor made a bid for escape.
Very happy indeed.
It was a long day - pre 6am start in the first real frost, but thankfully no really issues other than frost on the inside of the winscreen too... Heated seats kept me snug on the dawn drive to Redhill Classics.
I then trudged to Redhill train station for a 07:30 line to London, with an arduous day brightened by a call at 4pm from Dave at Redhill to let me know everything had gone to plan!
Much later... I again trudged from a cold train to a frozen 164, the only outward appearance being the shiny new tip, selected after many searches as a stainless simulucrum of the original. Engine on... windows down... glorious! No rattles, no broken hangers, no vibrations or drooping heatshields. Phew.
A good poke in daylight revealed excellent craftsmanship, wonderful attention to detail on the downpipe and hangers, and a few adjustment to heatshields and fitting to ensure everything was straight and well away from any potential knocking points.
The sound is OEM - CAT is still in(for the moment), the 8V chain driven twinspark having a lavely chainsaw rasp but nothing to drone at speed or be too shouty.
Fortunately my home-made bush has neither generated new vibrations nor made a bid for escape.
Very happy indeed.
Just two more to go yes, and I've booked the Saab in for Redhill too. They have demonstrated they do excellent work, as described, for a fair price.
Very happy with the subtle change to stainless with the mesh interior for the tip - just a hint of the work under the skin!
I decided to make an initial investigation of the radiator today - it has been detiorating steadily without drama but I don't want any surprises over the holiday season.
Relatively easy to access - slam panel is four 10mm bolts, a few electrical connectors and then the pipework.

Expansion tank hose is clipped underneath slam panel:

The radiator in place is not original - its about the right size, but the presence of cable ties on the fan shroud has always bothered me!
Top hose off and folded away carefully, coolant caught in receptacle... almost...

Ah yes. The 'Raise The Titanic' vibes are strong in this area of the car...

I spared the belts and pumps as best I could from the antifreeze tsunami...

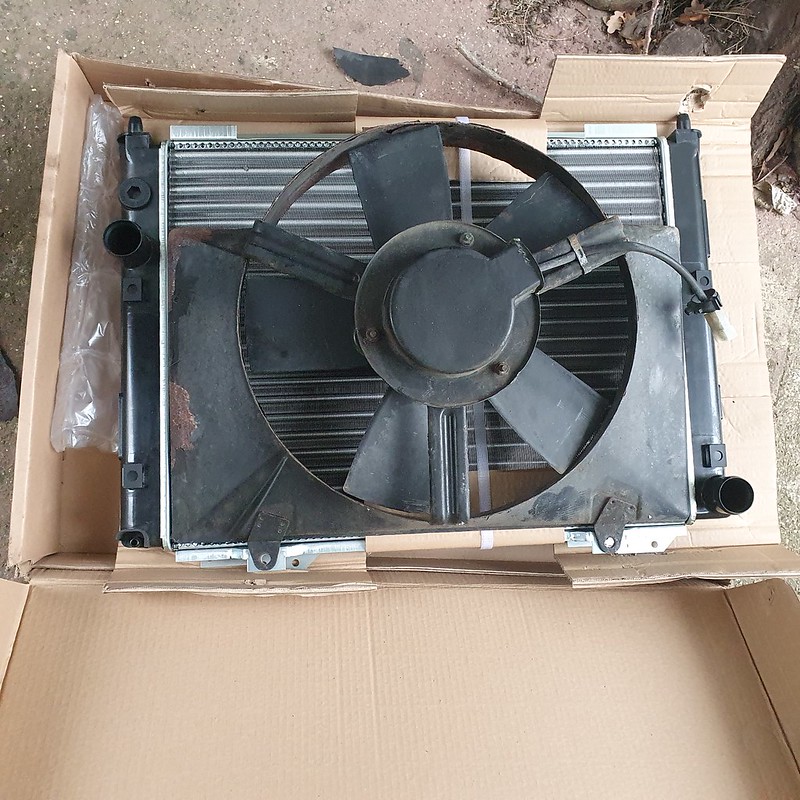
Radiator and fan out, the true extent of detioration is apparent.
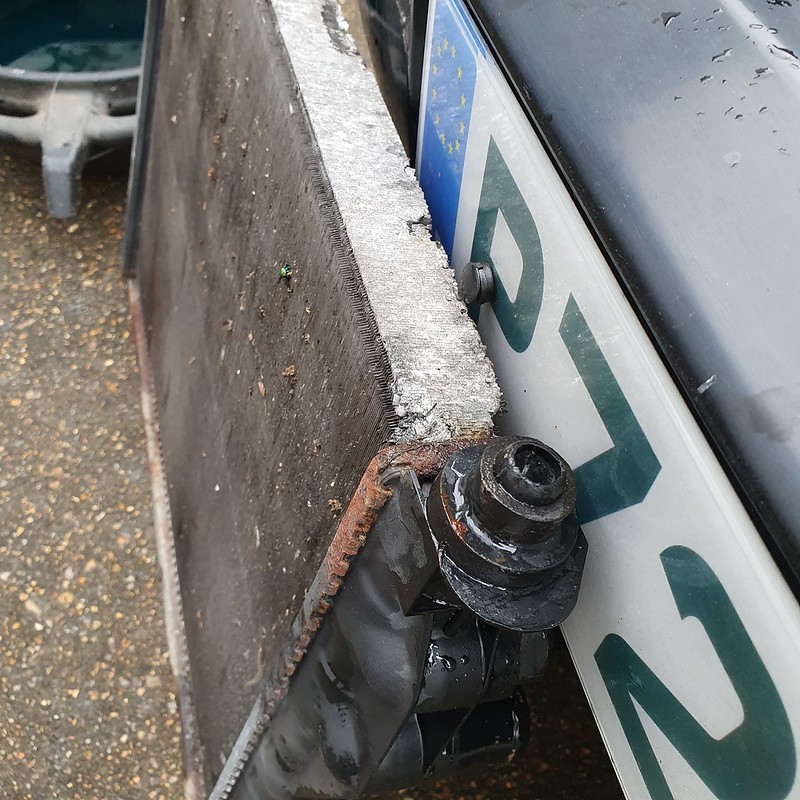

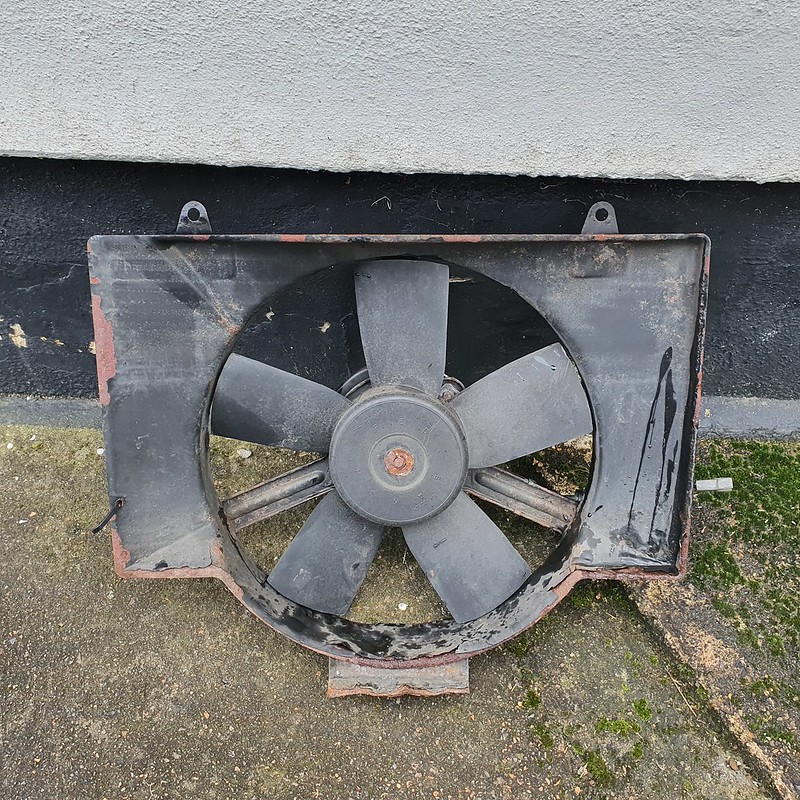
Sadly the fan shroud is much worse than expected in unseen areas. I was hoping to save this with some BiltHamber products but I think I'll have to make a few calls and tranfers the fan & motor over.

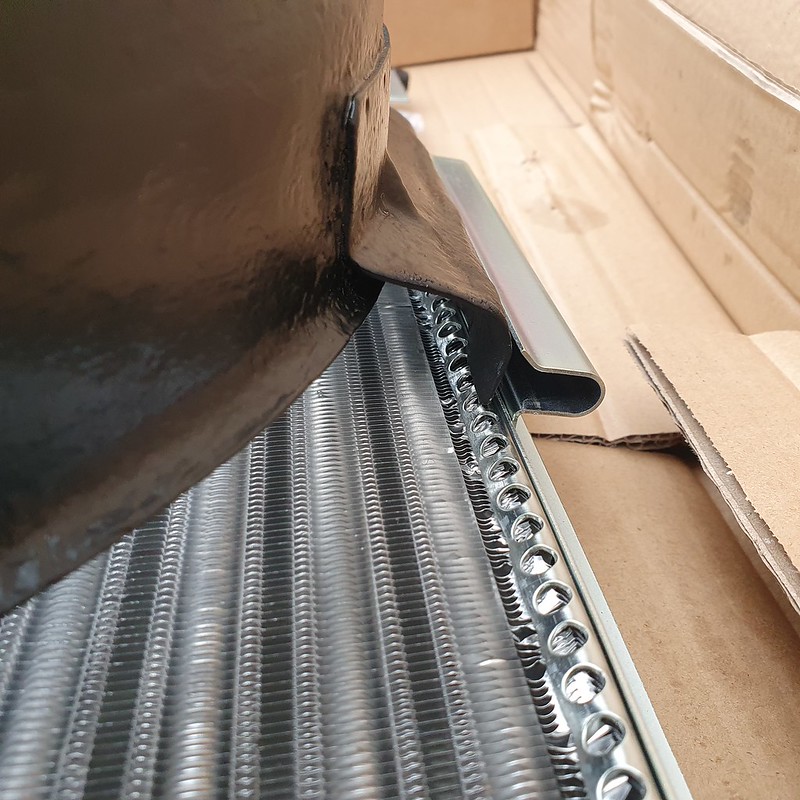
29mm spanner saved the fan switch, and the end rubbers for the feet. As the radiator is wrong for the car, one of the feet is deformed and will need some coaxing to fit correctly back.

The new radiator is the correct size, thankfully - 59.5cm from foot to foot.


I sealed off all hoses, rinsed everything down with fresh water to prevent any blue fuzziness upon my return, and scurried inside out of the rain to plot the week of purchases.
I know putting a sparkling new radiator back on a bracket that looks like it was dragged from the wreck of the Maria Doria is slightly strange, but needs must.

In the spirit of true scope creep, it would be the ideal time to give the manifold a coat of black VHT...

Very happy with the subtle change to stainless with the mesh interior for the tip - just a hint of the work under the skin!
I decided to make an initial investigation of the radiator today - it has been detiorating steadily without drama but I don't want any surprises over the holiday season.
Relatively easy to access - slam panel is four 10mm bolts, a few electrical connectors and then the pipework.
Expansion tank hose is clipped underneath slam panel:
The radiator in place is not original - its about the right size, but the presence of cable ties on the fan shroud has always bothered me!
Top hose off and folded away carefully, coolant caught in receptacle... almost...
Ah yes. The 'Raise The Titanic' vibes are strong in this area of the car...
I spared the belts and pumps as best I could from the antifreeze tsunami...
Radiator and fan out, the true extent of detioration is apparent.
Sadly the fan shroud is much worse than expected in unseen areas. I was hoping to save this with some BiltHamber products but I think I'll have to make a few calls and tranfers the fan & motor over.
29mm spanner saved the fan switch, and the end rubbers for the feet. As the radiator is wrong for the car, one of the feet is deformed and will need some coaxing to fit correctly back.
The new radiator is the correct size, thankfully - 59.5cm from foot to foot.
I sealed off all hoses, rinsed everything down with fresh water to prevent any blue fuzziness upon my return, and scurried inside out of the rain to plot the week of purchases.
I know putting a sparkling new radiator back on a bracket that looks like it was dragged from the wreck of the Maria Doria is slightly strange, but needs must.
In the spirit of true scope creep, it would be the ideal time to give the manifold a coat of black VHT...
Thank you both - I've actually managed to secure a replacement power steering hose, NOS, I just remembered I need to pick that up from a very remote location. Christmas road trip!
The shroud is toast - I'm currently awaiting a call back from a fellow 164 driver who may have one in the shed... fingers crossed.
Probably a good time to check the ABS pump and brake lines too, right...oh blast...
The shroud is toast - I'm currently awaiting a call back from a fellow 164 driver who may have one in the shed... fingers crossed.
Probably a good time to check the ABS pump and brake lines too, right...oh blast...
Thanks all for the words of support - good to this little sub-annex to the giant warehouse of PH is of interest.
I went fishing in the shed today and found the power steering hose, which is unique to the 164 twinspark, much to my relief. No idea when I bought this:


I also found the two radiator supports I appropriated from Mick at VintageAlfa last year in preparation for this job. Both are roughly at the same level of corrosion, and both significantly better than my current hobnob-resembling construction.

I think I'll select one to attach now, with some cursory rust treatment and painting, then keep the other for a more in-depth treatment and affixing to the new subframe when that project kicks off. Both have some level of crumbliness splitting the seams, which always concerns me. More prodding required.
The old shroud perfectly fits the new radiator, and having failed to track a replacement down I amy decide to just roll up the sleeves, Deox this little blighter into submission and continue to keep a lookout for a replacement.
This is probably a good time to do the expansion tank too - right?
rxe said:
The rad support looks very similar to the 166 one - yours seems to be doing rather better than the one on my 2004 166 that disintegrated as I tried to remove the radiator. It may actually be the same part! They unbolt and you can get them somewhere convenient for rust treatment. I also did the crusty brake pipes on the 166, whatever steel they use is .... poor. It's an easy job if you have the right tools.
Just had another look today and it needs to go, even if I'm tackling the subframe and suspension another day. Best to remove the truly crusty, even if its technically only half the job.I went fishing in the shed today and found the power steering hose, which is unique to the 164 twinspark, much to my relief. No idea when I bought this:
I also found the two radiator supports I appropriated from Mick at VintageAlfa last year in preparation for this job. Both are roughly at the same level of corrosion, and both significantly better than my current hobnob-resembling construction.
I think I'll select one to attach now, with some cursory rust treatment and painting, then keep the other for a more in-depth treatment and affixing to the new subframe when that project kicks off. Both have some level of crumbliness splitting the seams, which always concerns me. More prodding required.
The old shroud perfectly fits the new radiator, and having failed to track a replacement down I amy decide to just roll up the sleeves, Deox this little blighter into submission and continue to keep a lookout for a replacement.
This is probably a good time to do the expansion tank too - right?
Some careful progress today in the failing light - I wanted to remove the old power steering hose and the radiator support bracket.
The rust was the main issue here - all bolts have been subsumed by crusty flakiness, all nuts a vaguely hexagonal memory and everything else taking on the frilly appearance of extravogant pastry experiments. I roped in a brown Anglepoise I rescued during lockdown for assistance.

Power steering and water lines run the length of the support. I Plusgassed the entire area and dug out two 19mm spanners to try the nearside power steering nut... success after gentle persuasion...


Let those drain for a bit and tried the banjo bolt with a 22mm... also successful...

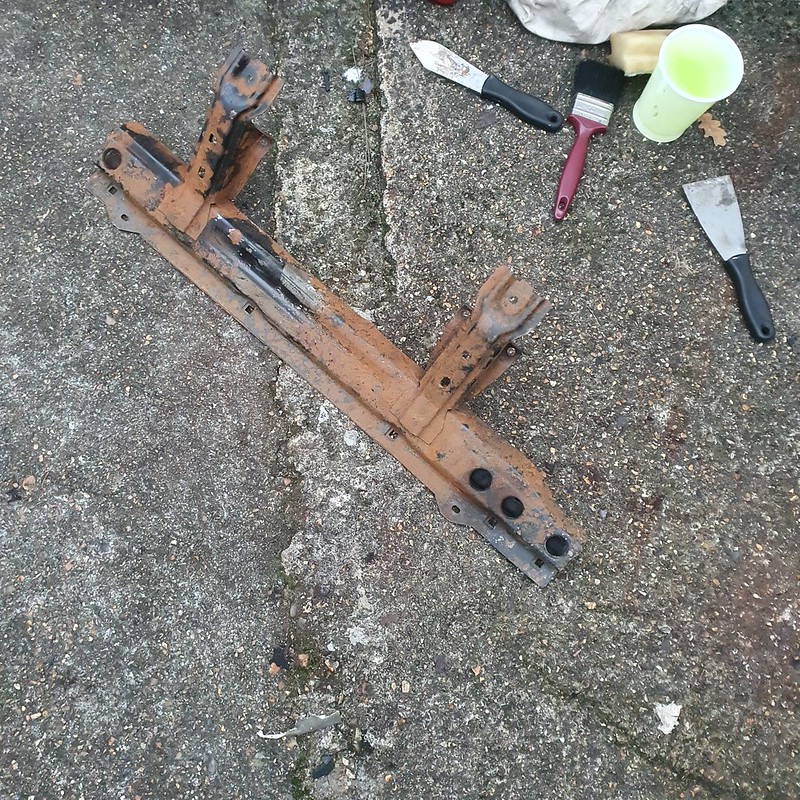
Traditional #old and new photo - you can't fully appreciate the level of rust from this photo, but you get the gist.


Next up - attempting to remove the brackets and front support. This was just 4 10mm bolts and two 13mm nuts, but in reality it was a Time Team level of excavation with a retired screwdriver to scrape them back to hexagonal, plenty of PlusGas and then a tense effort of hammering sockets over them before attempting a loosen. With patience and a little luck, everthing came apart without a single bolt shearing. Phew.


Test fitted the new hose as I was on a roll - all ok, and fitted it up to seal the system overnight. Tomorrow derusting begins with a vengance!

The rust was the main issue here - all bolts have been subsumed by crusty flakiness, all nuts a vaguely hexagonal memory and everything else taking on the frilly appearance of extravogant pastry experiments. I roped in a brown Anglepoise I rescued during lockdown for assistance.
Power steering and water lines run the length of the support. I Plusgassed the entire area and dug out two 19mm spanners to try the nearside power steering nut... success after gentle persuasion...
Let those drain for a bit and tried the banjo bolt with a 22mm... also successful...
Traditional #old and new photo - you can't fully appreciate the level of rust from this photo, but you get the gist.
Next up - attempting to remove the brackets and front support. This was just 4 10mm bolts and two 13mm nuts, but in reality it was a Time Team level of excavation with a retired screwdriver to scrape them back to hexagonal, plenty of PlusGas and then a tense effort of hammering sockets over them before attempting a loosen. With patience and a little luck, everthing came apart without a single bolt shearing. Phew.
Test fitted the new hose as I was on a roll - all ok, and fitted it up to seal the system overnight. Tomorrow derusting begins with a vengance!
Edited by Spinakerr on Saturday 18th December 18:49
Its a dingy job for sure.
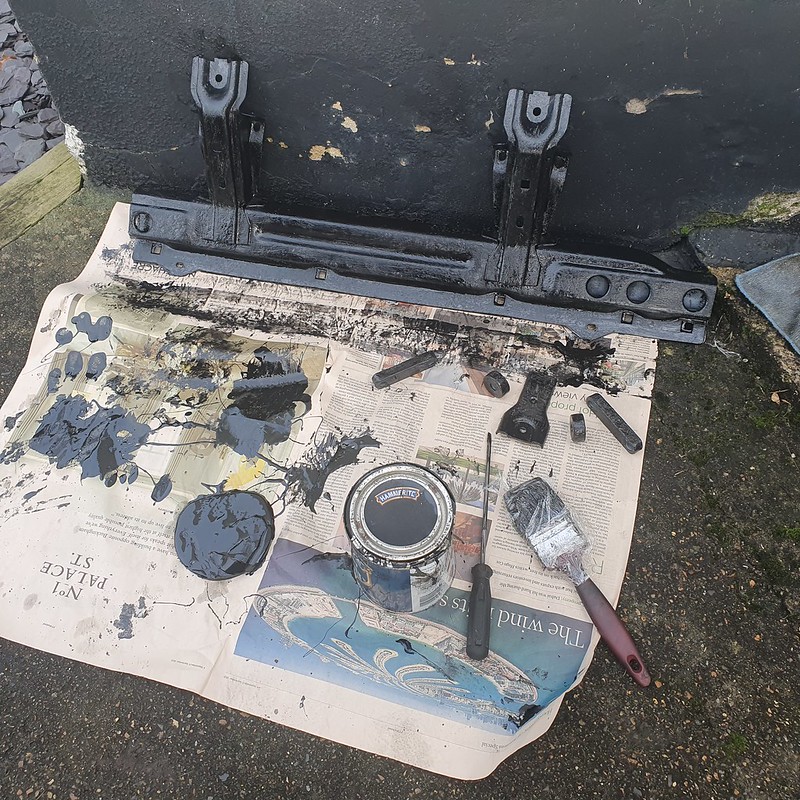
Managed to tackle most of the subframe yesterday and get the first few products on after plenty of wire brushing. Actually not as bad as I thought.


Of course I broke ut the finger sander for some of the areas around the headlights and front frame, plus some tiny bubbling I wanted ot address while cleaning the expansion tank.


Hammerite is the next stage, just to keep everything nasty at bay.
The best rad support, after much deliberation, has come up ok after initial chiselling. While blasting and powder coating might be preferrable, no one is picking up the phone or replying to emails, and I want ot get this done over Christmas period. This will be subjected to a vat of noxious products after some more brushing.
The fan shroud needs more power tools. I'm not even touching the sides with hand stuff, so contemplating rotating dervishes.
Managed to tackle most of the subframe yesterday and get the first few products on after plenty of wire brushing. Actually not as bad as I thought.
Of course I broke ut the finger sander for some of the areas around the headlights and front frame, plus some tiny bubbling I wanted ot address while cleaning the expansion tank.
Hammerite is the next stage, just to keep everything nasty at bay.
The best rad support, after much deliberation, has come up ok after initial chiselling. While blasting and powder coating might be preferrable, no one is picking up the phone or replying to emails, and I want ot get this done over Christmas period. This will be subjected to a vat of noxious products after some more brushing.
The fan shroud needs more power tools. I'm not even touching the sides with hand stuff, so contemplating rotating dervishes.
Thanks - inevitably, I ended up doing the same!
To ensure proper family time this christmas I took various rust bits with me on holiday, alongside all the various tools and chemicals to keep me occupied.
The knotted wire 'cup' was a revalation - I'm am very impressed by the level of rust and paint removal it achieves without deforming the original metal.
Before:

After:


Very satisfying. Plus sparks. I also hammered out a dent in the bottom of the rad support using my dad's bench vice.

I coated everything in Bilt Hamber Hydrate-80 and lugged it back home.

The slam panel I examined in daylight and just thought it needed more care and attention... too many small rust bubbled that I might see whenever the bonnet was opened. So I took it back again, this time with a sander.


The support 'spacers' also got a knotted wheel session in a vice and came up brilliantly.
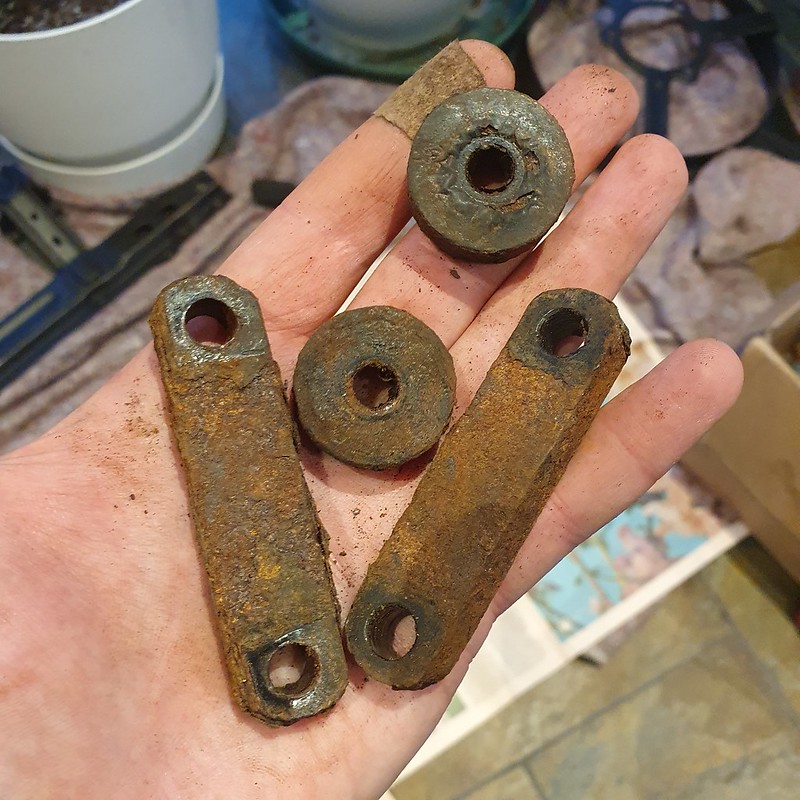
Fresh layers of Bilt Hamber and I'm ready for some wire wool, sugar soap and painting time to kick off 2022!

To ensure proper family time this christmas I took various rust bits with me on holiday, alongside all the various tools and chemicals to keep me occupied.
The knotted wire 'cup' was a revalation - I'm am very impressed by the level of rust and paint removal it achieves without deforming the original metal.
Before:
After:
Very satisfying. Plus sparks. I also hammered out a dent in the bottom of the rad support using my dad's bench vice.
I coated everything in Bilt Hamber Hydrate-80 and lugged it back home.
The slam panel I examined in daylight and just thought it needed more care and attention... too many small rust bubbled that I might see whenever the bonnet was opened. So I took it back again, this time with a sander.
The support 'spacers' also got a knotted wheel session in a vice and came up brilliantly.
Fresh layers of Bilt Hamber and I'm ready for some wire wool, sugar soap and painting time to kick off 2022!
Cambs_Stuart said:
Looks good. What did you attach the "knotted cup" to? Drill, angle grinder or dremel?
Its a DeWalt D28111 angle grinder I picked up used a little while ago for veyr little. Mains powered, works a treat. Recommended!rm36house said:
Very good job Sir! 
After Bilt Hamber Hydrate 80 what do you use next before painting with top coat(color)?
Thanks! Getting there... no such thing as 'throw away and order new one form main dealer' on this car.After Bilt Hamber Hydrate 80 what do you use next before painting with top coat(color)?
Next will be a keying with fine grade paper all round, Isopron 182 Zinc primer for everthing. Layers of Hammerite by brush on the support, brackets and subframe followed by a stonechip layer or two. The shroud and slam panel will have a careful 4-5 layers of satin black to try and give it a more eyeball-friendly appearance.
Then its time to bolt everything back together, renew all the nasty clips, put in the new power steering hose, pour in some antifreeze & Dexron III!
Edited by Spinakerr on Friday 31st December 11:22
With Brooklands New Years meet cancelled I started 2022 as I mean to go on - proper schedule of work on the Alfa after scowling at my coffee for an hour.
First up, keying all surfaces, including the aluminium fan motor cover I had forgotten about in the boot. Strange paint bubbling given the alu surfaces, but various scabs removed and sanded. All other items sanded a touch with 800 grit, sugar soaped and setup for Isopon 182 zinc primer.


After primer cured correctly, I divided the carts into the Hammerites and the Satin, and orchestrated a turf war.
No that's just nonsense - just two groups for two different paints. Ont he Hammerite site, sadly the enamally stuff didnt want to stick convincingly to the primer. Its a very old tin that may have been exposed to the elements, and as you can see by the amount of orc blood spilled was a general pain to apply.
Far more civilised on the Satin side of town, with 6 layers going on through the day.

Found a fresh tin of Hammerite and went for the subframe. Far better.

Rummaging after lunch revealed a fresh can of spray Hammerite, which went on a treat.

With light fading I made prep for the ressembly - rescuing the clips and screws from the old bracket and ensuraing all bolts were respectably derusted.

In some cases, replacements were sourced.

I also checked my stores for fresh antifreeze and power steering liqueur. Right, all set for the rebuild!
First up, keying all surfaces, including the aluminium fan motor cover I had forgotten about in the boot. Strange paint bubbling given the alu surfaces, but various scabs removed and sanded. All other items sanded a touch with 800 grit, sugar soaped and setup for Isopon 182 zinc primer.
After primer cured correctly, I divided the carts into the Hammerites and the Satin, and orchestrated a turf war.
No that's just nonsense - just two groups for two different paints. Ont he Hammerite site, sadly the enamally stuff didnt want to stick convincingly to the primer. Its a very old tin that may have been exposed to the elements, and as you can see by the amount of orc blood spilled was a general pain to apply.
Far more civilised on the Satin side of town, with 6 layers going on through the day.
Found a fresh tin of Hammerite and went for the subframe. Far better.
Rummaging after lunch revealed a fresh can of spray Hammerite, which went on a treat.
With light fading I made prep for the ressembly - rescuing the clips and screws from the old bracket and ensuraing all bolts were respectably derusted.
In some cases, replacements were sourced.
I also checked my stores for fresh antifreeze and power steering liqueur. Right, all set for the rebuild!
Thanks! Rest of the car is agreeable at floorpan/sill level - the 'main body'. Main bits left to tackle are on consumables/detachables - springs, wishbones, and of course the infamous rear crossmember.
The Alfa all went back together today - after dodging rain and other commitements over the weekend the Bank Holiday was most welcome to tackle the 164.
I built the fan up Sunday evening, renewing fitting, bolts and clips where necessary. A big improvement!


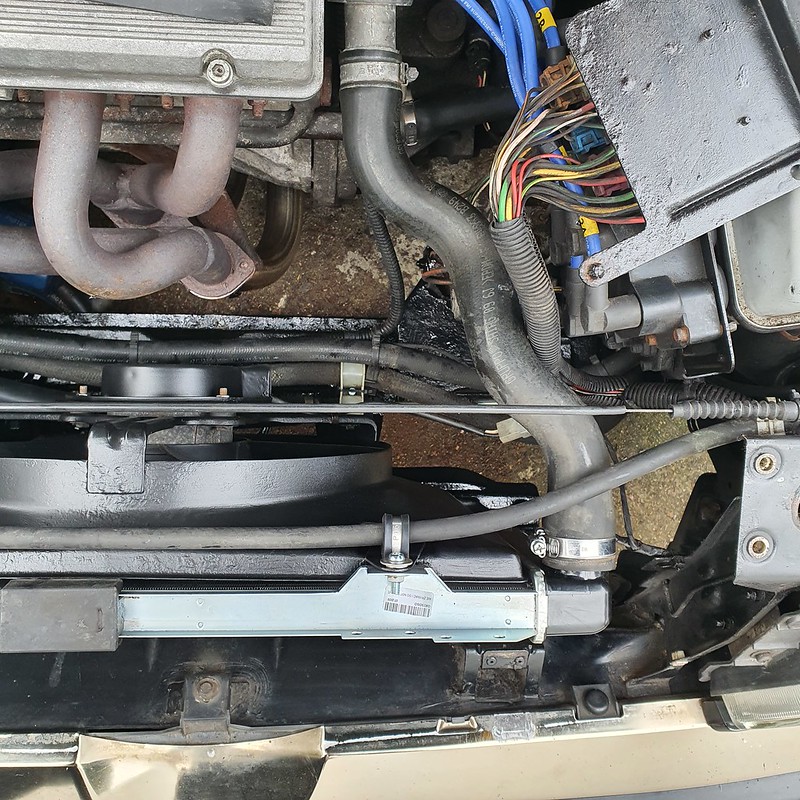
Radiator support back together too...

The rad support slotted in with its 'spacers' and all cleaned up bolts without issue. I aligned up the power steering hose with the banjo bolt and twin 19mm spanners, and rearranged a few items for order in the lower reaches. I also checked a few inaccessible areas - there are some brake pipes showing their age at the ABS pump so that's added to the list.

The expansion tank came up nicely after some of the standard internet-advised concoctions recently. Not back to bright white but I'd rather keep the original tank than change it for an unknown pattern part.

One of the radiator rubber mounts was permanently deformed from the older, incorrect radiator. Fortunately I had one from the previous 'haul' in a random bag of odments. Result! Fan sensor cleaned up with a file on the contacts and electrical paste.


First obstacle - the fan shoud did sit at the bottom in the rad's slot. I decided to bend the metal out flat, repaint with Hammerite and seat in a strip of rubber to get a close fit. It actually now hugs the radiator perfectly after also tweaking the top tabs.


Rad in and piped up, new Mikalor clamps added, hoses and wires reconnected in a neatened fashion (a few new P clips and ties).

Fresh coolant in the tank (and as much of the rad as I could get to) and Dexron 3 in the resevior.... quick check of all connections and clamps... deep breath...

Engine fires beautifully, and the power steering noises settled down after a few gentle turns. Once the engine warmed up the thermostat opened and the level dropped to the amount I had taken out (yes, I did measure what came out on both steering and coolant!).

Once warmed up a few turns to full lock and the bubbles in the power steering resevoir calmed down.

No leaks at all. I was quite chuffed with that, as something always leaks! I gingerly settled my pristine slam panel down and added the final bits of trim (which now fit, for the first time, as the radiator is the correct shape).

Very happy. I hope 2022 goes this well!
The Alfa all went back together today - after dodging rain and other commitements over the weekend the Bank Holiday was most welcome to tackle the 164.
I built the fan up Sunday evening, renewing fitting, bolts and clips where necessary. A big improvement!
Radiator support back together too...
The rad support slotted in with its 'spacers' and all cleaned up bolts without issue. I aligned up the power steering hose with the banjo bolt and twin 19mm spanners, and rearranged a few items for order in the lower reaches. I also checked a few inaccessible areas - there are some brake pipes showing their age at the ABS pump so that's added to the list.
The expansion tank came up nicely after some of the standard internet-advised concoctions recently. Not back to bright white but I'd rather keep the original tank than change it for an unknown pattern part.
One of the radiator rubber mounts was permanently deformed from the older, incorrect radiator. Fortunately I had one from the previous 'haul' in a random bag of odments. Result! Fan sensor cleaned up with a file on the contacts and electrical paste.
First obstacle - the fan shoud did sit at the bottom in the rad's slot. I decided to bend the metal out flat, repaint with Hammerite and seat in a strip of rubber to get a close fit. It actually now hugs the radiator perfectly after also tweaking the top tabs.
Rad in and piped up, new Mikalor clamps added, hoses and wires reconnected in a neatened fashion (a few new P clips and ties).
Fresh coolant in the tank (and as much of the rad as I could get to) and Dexron 3 in the resevior.... quick check of all connections and clamps... deep breath...
Engine fires beautifully, and the power steering noises settled down after a few gentle turns. Once the engine warmed up the thermostat opened and the level dropped to the amount I had taken out (yes, I did measure what came out on both steering and coolant!).
Once warmed up a few turns to full lock and the bubbles in the power steering resevoir calmed down.
No leaks at all. I was quite chuffed with that, as something always leaks! I gingerly settled my pristine slam panel down and added the final bits of trim (which now fit, for the first time, as the radiator is the correct shape).
Very happy. I hope 2022 goes this well!
Edited by Spinakerr on Monday 3rd January 19:13
Thank you both!
Next up is a big choice on suspension component purchases, then I am prepping front and rear subframes for full derustification and Epoxy/Waxoyl treatment of the entire car in spring. Can't wait... (sigh)...
I also need to treat the leather seats, then get two new front tyres. But otherwise the car is ready to march onward, and aiming for Auto Italia on the 30th April.
Here's a photo opportunity I couldn't resist down at the boatyards:

I still absolutely love how this car looks.
Next up is a big choice on suspension component purchases, then I am prepping front and rear subframes for full derustification and Epoxy/Waxoyl treatment of the entire car in spring. Can't wait... (sigh)...
I also need to treat the leather seats, then get two new front tyres. But otherwise the car is ready to march onward, and aiming for Auto Italia on the 30th April.
Here's a photo opportunity I couldn't resist down at the boatyards:
I still absolutely love how this car looks.
shalmaneser said:
Was thinking the same! Two suspiciously well dressed men dropping things off the end of the pier in the middle of the night...
Ha! Let's hope they were dropping off springs and struts as I desperately need them... I have an Italian friend who said whenever his family were in large towns you were taught as a kid to avoid the black 164s and 166s.
2Btoo said:
Do you have a link to the product you used? And I notice that the bush you poured was to support an exhaust - do you think it would be suitable for a bush which bears more weight such as a suspension or engine mount bush?
Sent you a PM - it worked for my purpose but I would be little hesitant using for more 'significant' mounts...Gassing Station | Readers' Cars | Top of Page | What's New | My Stuff