1954 Daimler Ferret armoured car
Discussion


Back again after a long break on this thread. Ferret still soldiering on as ever but the list of many small niggles was culminating into a big job. It was getting to the point where I felt it was owed a bit of TLC as relatively speaking aside from basic maintenance it hasn't had a lot of love in 20 years or so.
The nearside front and rear tyres were looking rather sad and getting bald so with two good known spares in the shed I've bought two new inner tubes and flaps to go on with the new rubber.
Handbrake works but is ridiculous difficult to pull on and requires a kick to knock it off, so there's that to sort.
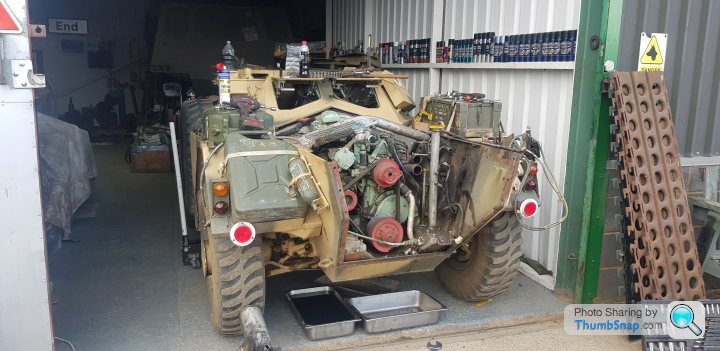
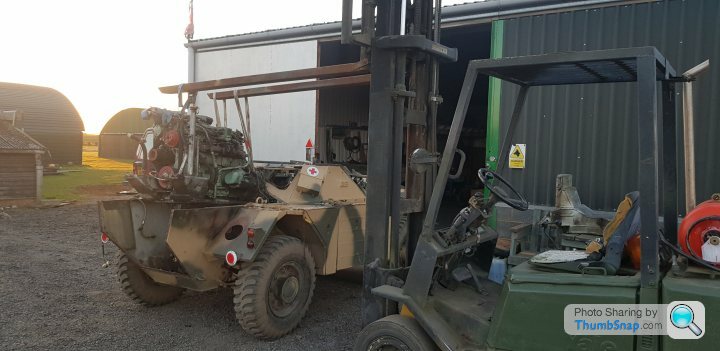
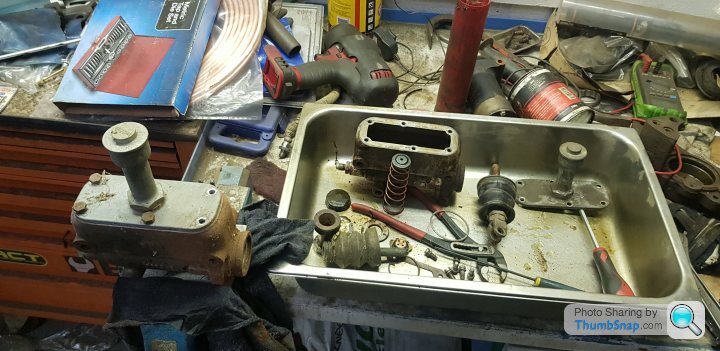
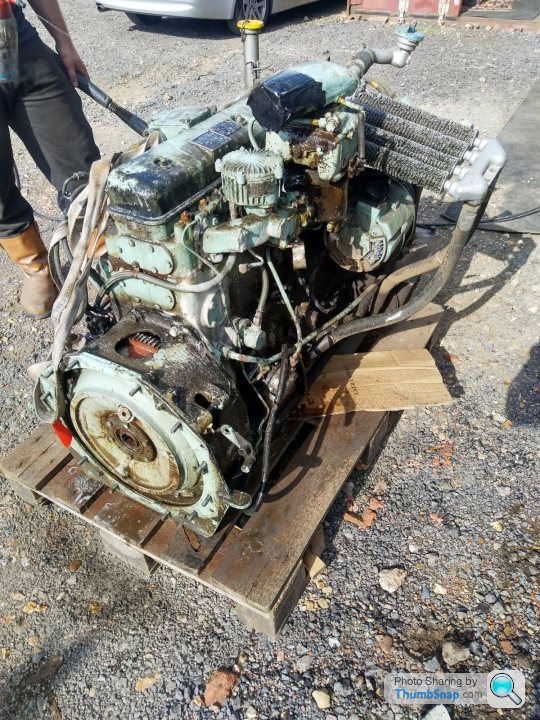
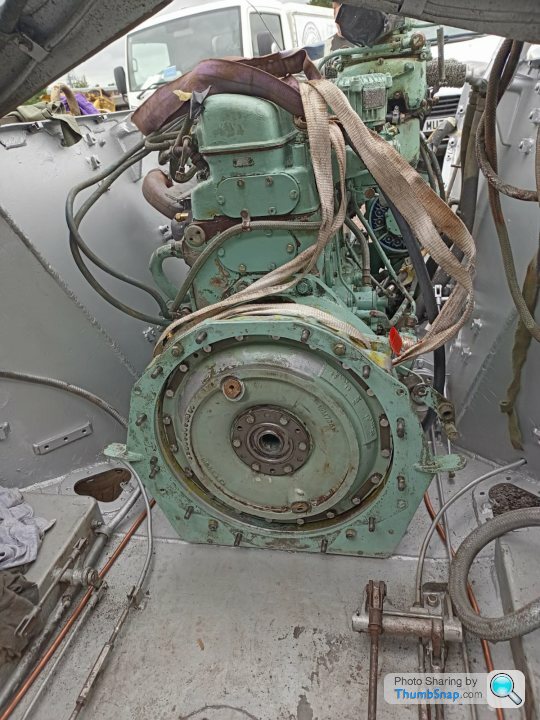
I took it for a drive a couple of weeks back and the brakes were appallingly bad, so I've decided to go through the system completely including replacing all the brake pipes inside the hull etc. These are notoriously difficult to get to as they are directly underneath the fuel tank and engine, so with that we started work yesterday taking the engine and gearbox out
The aim is to have it ready for the first show of the season on Fathers Day, we shall see
The nearside front and rear tyres were looking rather sad and getting bald so with two good known spares in the shed I've bought two new inner tubes and flaps to go on with the new rubber.
Handbrake works but is ridiculous difficult to pull on and requires a kick to knock it off, so there's that to sort.
I took it for a drive a couple of weeks back and the brakes were appallingly bad, so I've decided to go through the system completely including replacing all the brake pipes inside the hull etc. These are notoriously difficult to get to as they are directly underneath the fuel tank and engine, so with that we started work yesterday taking the engine and gearbox out
The aim is to have it ready for the first show of the season on Fathers Day, we shall see
Fuel tank drained this evening and several small brackets etc removed from the fuel tank so hopefully tomorrow results in that being lifted out.
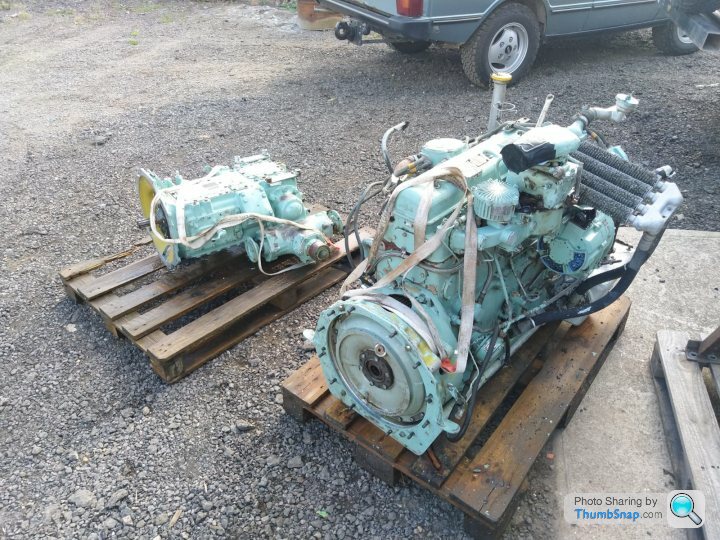
Once the big bits are off access is actually fairly reasonable, some aspects surprise you how fiddly they are considering this could potentially have been done 'in the field'. Some are also quite well thought out, so the engine being dry sump is removed with its oil tank etc still attached, pretty much all ignition connections plumb in on a single plug into the ignition junction box, starter cables are similar to a sleeved battery terminal so you undo the screw and slide them off, throttle linkage is on a butterfly clip and exhaust is only four big bolts. Removing all the internal tin panels to get to the gearbox is what takes the time really, then it's simply a case of two clevis pins one for the gear selection and the other for the gear change. There's just a lot of stuff packed into not a lot of space
That's the one aiming for Shuttleworth, dad has his 52 Chevy booked in so ideally I want to take this. If you look closely in the pic above you can still see the Stolly just peering out of the darkness in the back of the shed. I went and got a good parts haul for her last week and need to return in the Landy to pick up a crated wheel station assembly, as that was a bit heavy to go putting in a Skoda. Sadly my wallet is a lot lighter for it however

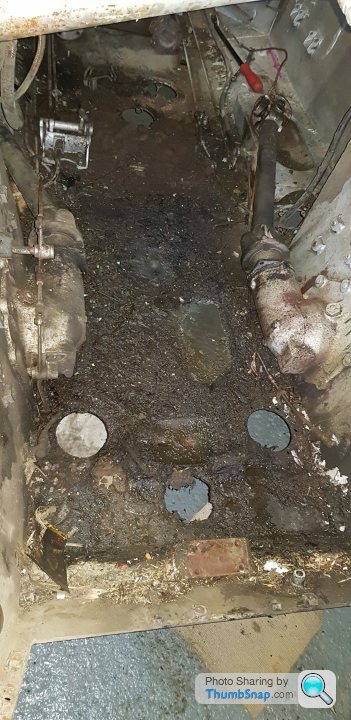
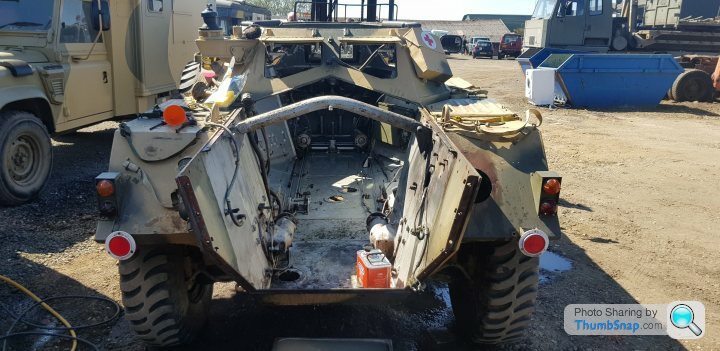
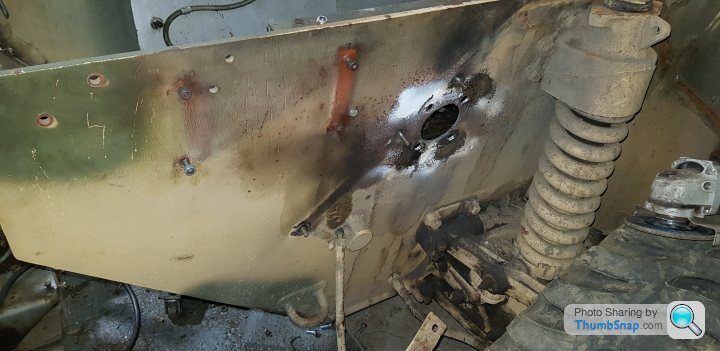
Removed props today and scraped out decades of dirt and oil from the hull, sadly all I found was several nuts, bolts and washers in the bottom, nothing interesting like bullets etc
I gave it a good scrape out and hoovering, then moved it over to the pressure washer. We put the front wheels up on some sleepers so all the water would run to the back flowing out through the access plates on her belly. Ready to start the repairs now
Small progress this afternoon, removed a wheel and brake drum for a look at the shoes/general condition inside, removed a few internal brackets, rusted brake pipes and the handbrake lever assembly.
The rear armour is normally held on with square nuts on the inner lip held from spinning in small folded tab cages, after nearly 70 years these are mostly rusted solid so I've cut them off and sanded clean ready to simply weld nuts directly on, with plenty of copper slip applied it should be OK for the foreseeable future and assist with easier removal in future if need be.
The master cylinder will also be taken out as speaking to Dad he said he put a new set of seals in it when we first bought it and the bore condition inside was poor then, thankfully in his wisdom he bought a new old stock spare that's still sat in the shed so I can put that on instead. Getting there slowly
Took a leisurely jaunt down to East Sussex on Saturday to pick up a wheel station for the Stolly and some gaskets, seals etc for the Ferret.
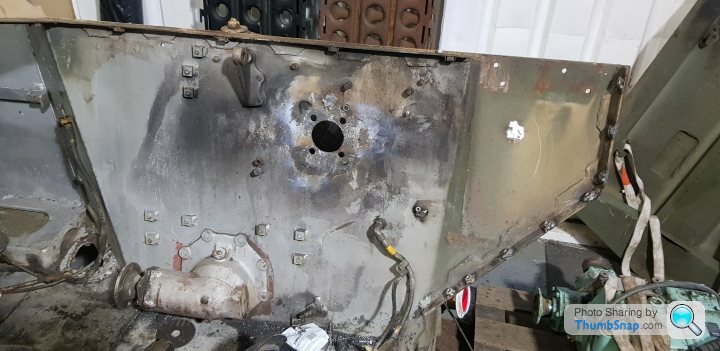
During the week I welded the captive nuts on for the rear armour panels and some hairline cracks in the hull around the exhaust outlet were also ground out and welded up, so that's a pretty pants job sorted. Unfortunately to get access I had to take the offside rear wing off and that snapped the majority of the mounting studs so one step forward and two back on that front
Yesterday I cleaned up the shoes and adjuster then stripped the expander unit and slave cylinder, thankfully I did as they were full of greasy mud and s te, all back together with fresh grease now and handbrake cable thoroughly oiled. Bolted all that back on and fitted one of the new brake flexis
[url]
 |https://thumbsnap.com/7dzteCh2[/url]
Today I made a start on drilling the broken studs out, what a pig of a job, in the end I only managed to get 2 finished as all my drill bits are blunt. Armour is hard believe it or not.
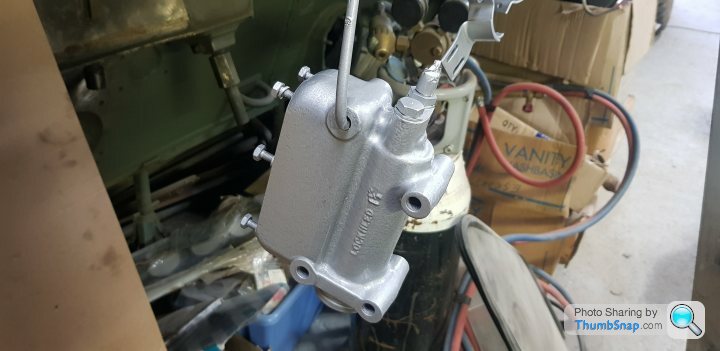
Defeated for now with that I removed the master cylinder and stripped that down for inspection, there was some pitting in the bore so I dug the spare out of the shed only to find it seized up, once it was freed off I removed the piston and the bore was pure red flaky rust so looks like we'll have to go with the original for now!
And with a nice coat of finest Hammerite silver to freshen it up a bit
During the week I welded the captive nuts on for the rear armour panels and some hairline cracks in the hull around the exhaust outlet were also ground out and welded up, so that's a pretty pants job sorted. Unfortunately to get access I had to take the offside rear wing off and that snapped the majority of the mounting studs so one step forward and two back on that front
Yesterday I cleaned up the shoes and adjuster then stripped the expander unit and slave cylinder, thankfully I did as they were full of greasy mud and s
te, all back together with fresh grease now and handbrake cable thoroughly oiled. Bolted all that back on and fitted one of the new brake flexis[url]
|https://thumbsnap.com/7dzteCh2[/url]Today I made a start on drilling the broken studs out, what a pig of a job, in the end I only managed to get 2 finished as all my drill bits are blunt. Armour is hard believe it or not.
Defeated for now with that I removed the master cylinder and stripped that down for inspection, there was some pitting in the bore so I dug the spare out of the shed only to find it seized up, once it was freed off I removed the piston and the bore was pure red flaky rust so looks like we'll have to go with the original for now!
And with a nice coat of finest Hammerite silver to freshen it up a bit
Edited by LewG on Monday 3rd May 18:07
Yesterday evening with renewed enthusiasm and fresh drill bits I drilled out and welded in several of the studs for the wing, then removed the RH rear wheel and removed the drum and shoes for inspection and a good clean up, this side needs the new handbrake cable and expander fitting as it's damaged, so at least no faffing around stripping and rebuilding that
[url]
 |https://thumbsnap.com/hdDPVYwc[/url]
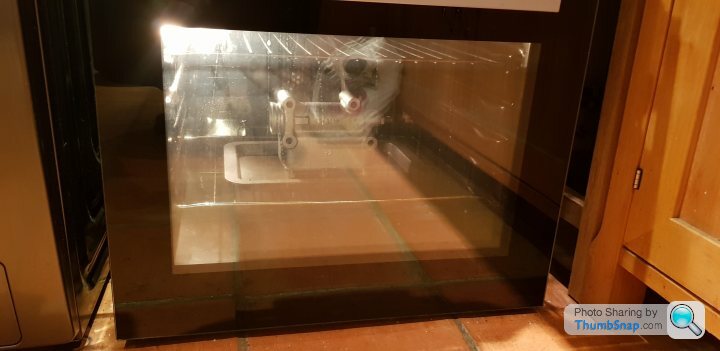
Mrs G was then really happy when I used her nice shiny oven to bake the paint on my master cylinder
[url]
|https://thumbsnap.com/hdDPVYwc[/url]Mrs G was then really happy when I used her nice shiny oven to bake the paint on my master cylinder
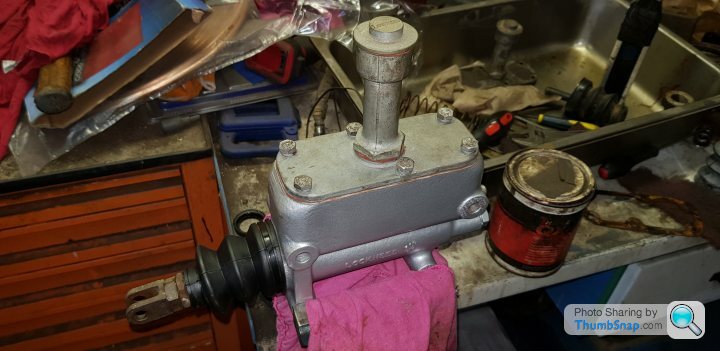
Fairly productive one today. Master cylinder resealed and all back together ready to refit. Lubricated other side brake expander and fitted the new slave and handbrake cable which saved a lot of time stripping and rebuilding the old one as that was really a properly fiddly chore on the other side.
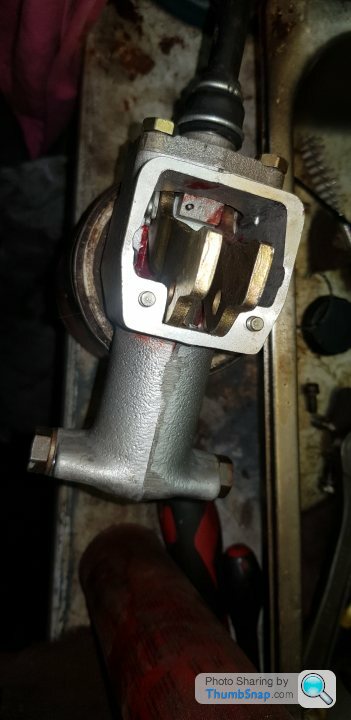
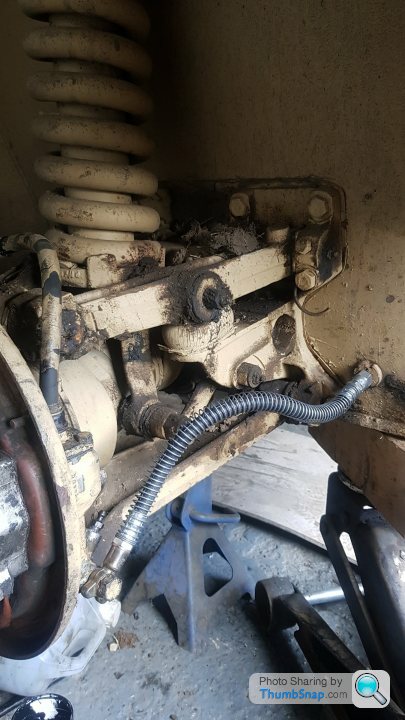
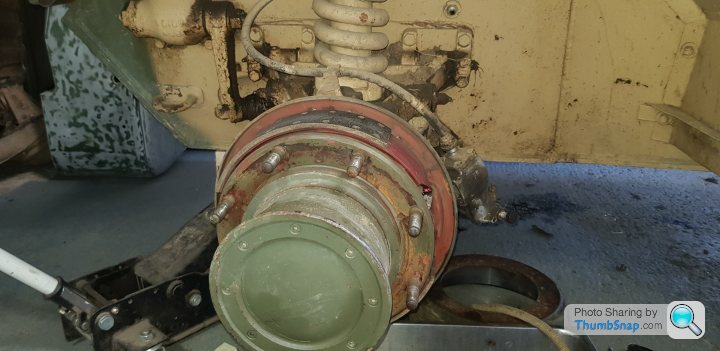
The way this works is slightly odd in that the slave is external to the drum and sits on the rear of the backplate, it's missing in this photo but there's a pair of arms that are pinned together and work as an X pattern so when the piston pushes on them they both push in opposite directions, which then pushes two small followers inside the drum pushing the brake shoes out. Quite clever in its own way as the hub design is pretty complicated so for any major brake surgery at the wheel station it means stripping it down to a stub axle first.
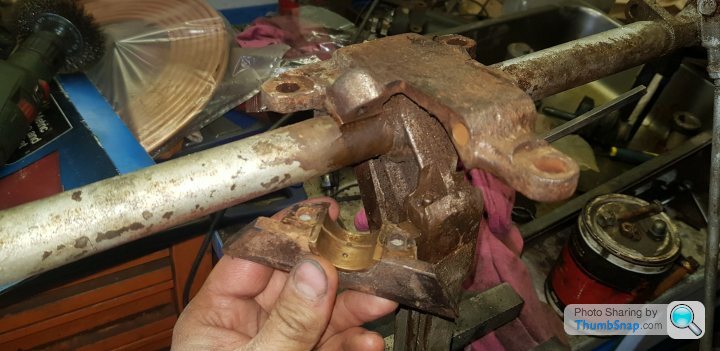
Next job was work out why the handbrake pivot was so tight, it must be the most over engineered handbrake in history with little bronze shell bearings inside and scrollings for oil lubrication, the clearance is even determined between the two halves by small pieces of shim brass
Over the years rust on the steel part had set in and started to bind on the shells, they were clearly dry and nasty and hadn't seen an oil can in years so for a good clean up and fresh grease it should be like it was 68 years ago hopefully.
It then received a good coat of paint, so that should look a bit nicer when reinstalled
The list of jobs inside the hull is definitely getting smaller. I believe it's just brake solid lines to do (not looking forward to that), paint some of the driver's floor and the engine bay itself, a couple more snapped studs to sort and repair some dodgy wiring that's been bugging me for a while. The wiring can be a pain as it's all the same colour and indicated with little yellow printed tags as to what's what, unfortunately after 60 odd years those tags have faded away pretty much to nothing so some guesswork is involved!
Edited by LewG on Saturday 8th May 22:52
That's the one YJ, they are horrible old things but do seem to have a strange allure at the same time.
Handbrake assembly built up tonight and shimmed up with fresh grease, the action is just perfect, it's up there with a Lee Enfield rifle bolt for mechanical clunky satisfaction
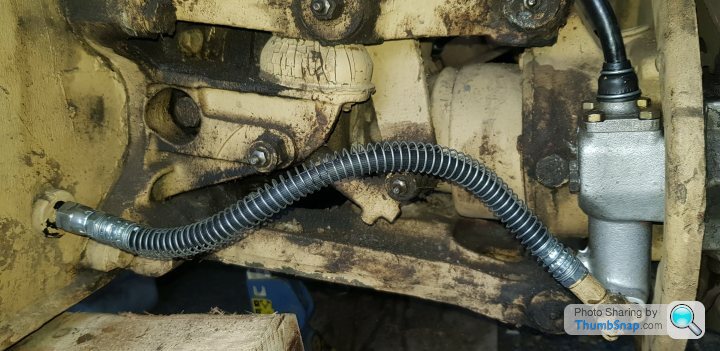
Removed a few more bits and removed the front brake pipe so that can be renewed now, a bit awkward but came out without too much drama. Next step hoover, clean and paint the engine bay
Handbrake assembly built up tonight and shimmed up with fresh grease, the action is just perfect, it's up there with a Lee Enfield rifle bolt for mechanical clunky satisfaction
Removed a few more bits and removed the front brake pipe so that can be renewed now, a bit awkward but came out without too much drama. Next step hoover, clean and paint the engine bay
That's proper, I'd love to have a go with a Bren, as you say more of an accurate fast firing rifle of sorts rather than a buzz away at everything machine gun. You do get some impression of the sort of punching power it'd have just by cocking the bolt back and pulling the trigger.
I cleaned out the engine bay as best I could last night and rubbed it down, then got a few coats of paint on it all. Looks rather nice compared to how it once did!
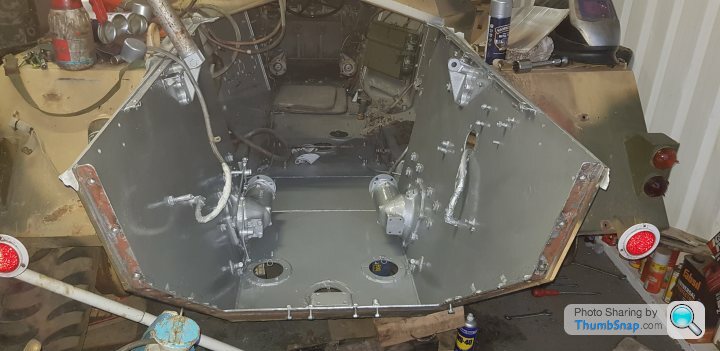
I cleaned out the engine bay as best I could last night and rubbed it down, then got a few coats of paint on it all. Looks rather nice compared to how it once did!
Edited by LewG on Friday 21st May 09:37
Tidied up some damaged threads on the rear hub studs today and refitted the rear wheels for now, removed a front wheel and drum to check over the brakes, all in lovely condition and just need a clean off and adjust then they'll be good to go
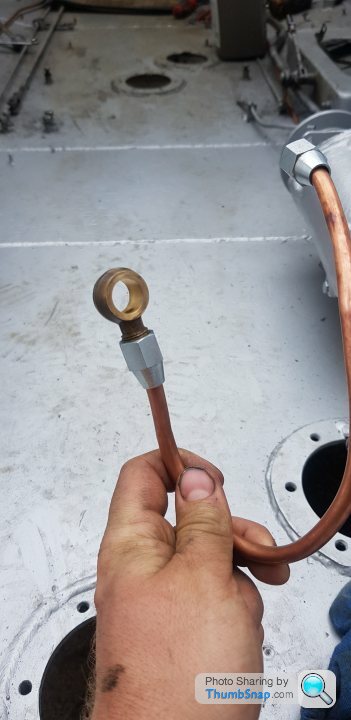
Then moved into the hull and made and fitted the front solid line, just the two rears to get sorted now
The master cylinder was then refitted along with linkages etc, some of these were a bit tight so I drifted the little pins out of the clevises and cleaned them up.

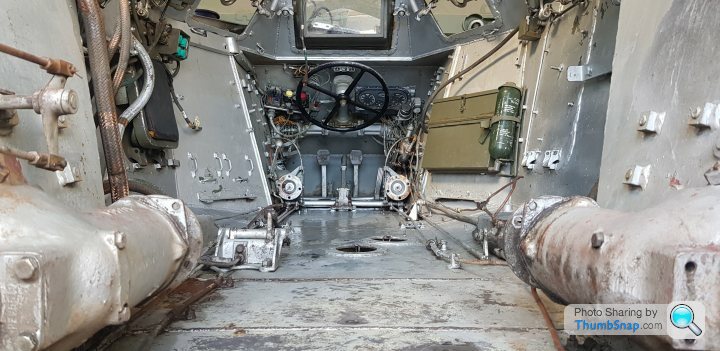
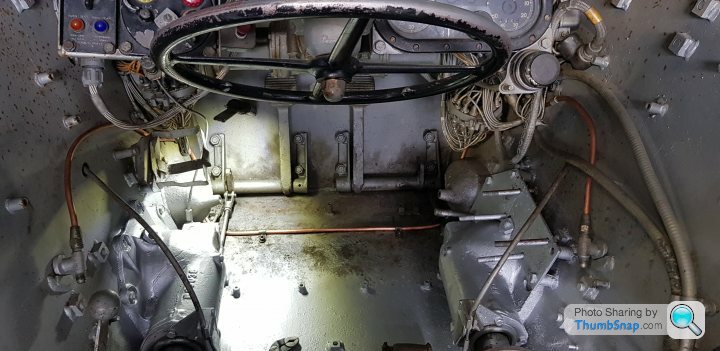
What a luxurious interior to sit in and enjoy
Then moved into the hull and made and fitted the front solid line, just the two rears to get sorted now
The master cylinder was then refitted along with linkages etc, some of these were a bit tight so I drifted the little pins out of the clevises and cleaned them up.
What a luxurious interior to sit in and enjoy
Unfortunately I made a big cock up on the brake lines getting the flares wrong, then on my last line the reel of pipe was about a foot too short to finish. Bloody annoying but had to strip the panels out and remake all lines with a couple of new reels of pipe so lost some days there.
Good steps in the right direction today however. I filled the master cylinder with fluid and started leak finding as I knew I'd have some to contend with. A couple of loose fittings here and there nipped up, then once bled out I could build the pressure in the system. The banjo bolt and fitting into the back of the master forms part of the brake light switch, this kept on weeping even with fresh copper washers and cleaned up. I took it off and to my dismay thought I'd found a hairline crack on it, fortunately the sealing face was just slightly deformed so I refaced both sides with some fine emery paper and my Landy side window worked a treat once all bolted up.
Then refitted handbrake rods and adjusted all those, it felt good so thought we'd try the brakes out round the yard by towing it with my mate's Classic Rangey and trying to stop. They appear to work really well and all joints look dry so hopefully we're onto a winner!
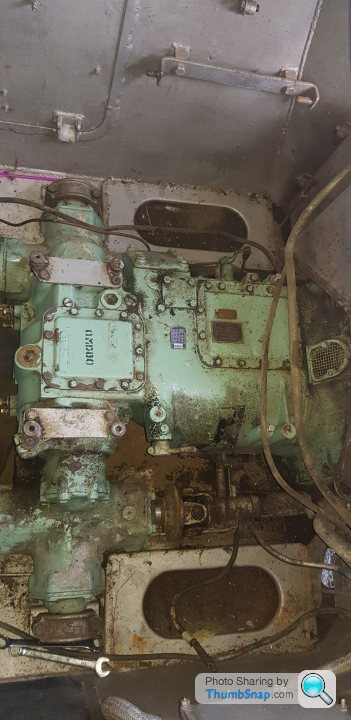
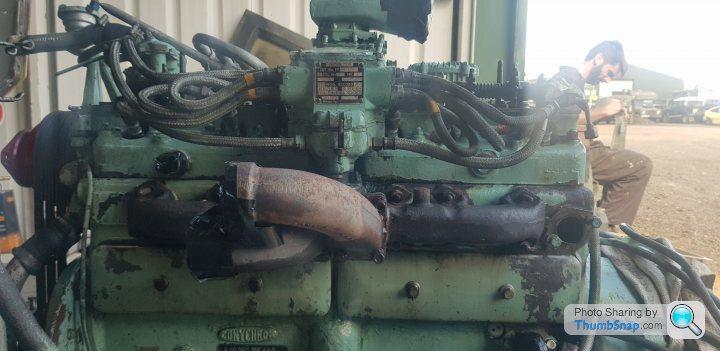
Engine and box then received a good bath ready for work, the difference is night and day

Good steps in the right direction today however. I filled the master cylinder with fluid and started leak finding as I knew I'd have some to contend with. A couple of loose fittings here and there nipped up, then once bled out I could build the pressure in the system. The banjo bolt and fitting into the back of the master forms part of the brake light switch, this kept on weeping even with fresh copper washers and cleaned up. I took it off and to my dismay thought I'd found a hairline crack on it, fortunately the sealing face was just slightly deformed so I refaced both sides with some fine emery paper and my Landy side window
worked a treat once all bolted up. Then refitted handbrake rods and adjusted all those, it felt good so thought we'd try the brakes out round the yard by towing it with my mate's Classic Rangey and trying to stop. They appear to work really well and all joints look dry so hopefully we're onto a winner!
Engine and box then received a good bath ready for work, the difference is night and day
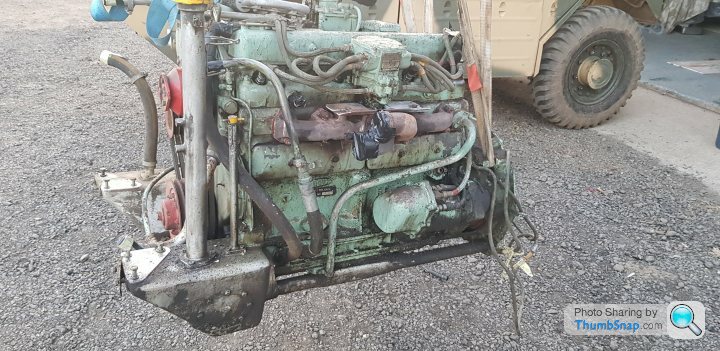
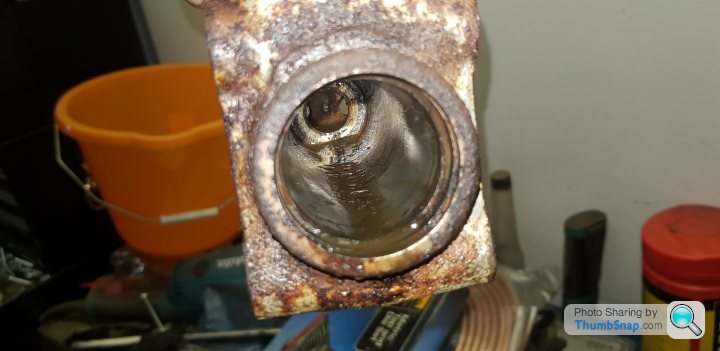
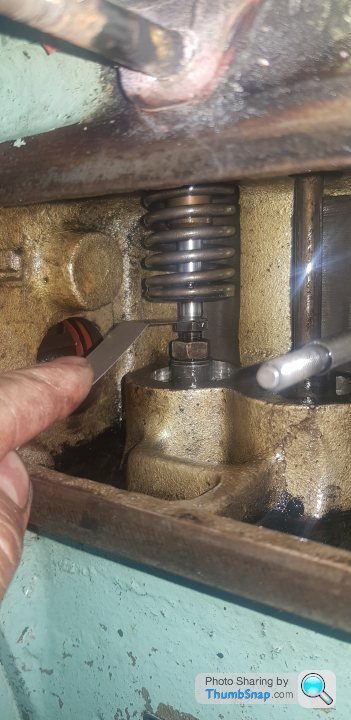
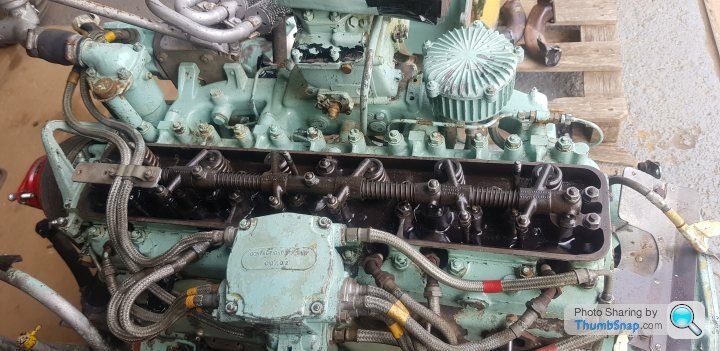
Removed rocker cover, exhaust manifolds and side plates this evening. It was surprisingly clean inside which was nice to see, the manifolds were a bugger to remove needing heat on the nuts etc despite the fact I changed the studs probably only a year or two ago. Fair to say it gets bloody hot in there on a good run!
I started to look at how to set the valve clearances, I admit I've done several standard overhead valve engines but never set anything with side exhaust valves. On this engine the exhausts are set to 15 thou and inlets to 10. Thankfully reading the manual it's all a pretty straightforward process, turn the engine until whichever valve is fully open, then set the opposite valve, pretty much just as you would any other engine.
Depending on how long this all takes it's not looking good for hitting my deadline of 20th June, not too bothered about that but just very much looking forward to driving her again

Valve clearances all set now. Next step replace exhaust manifold gaskets as it's an easy job with the engine out. Had to replace the studs again as the nuts had rusted solid onto some of them and ended up stripping the threads. To add insult to injury the studs turned up and were the wrong thread due to them being made incorrectly
all sorted now however.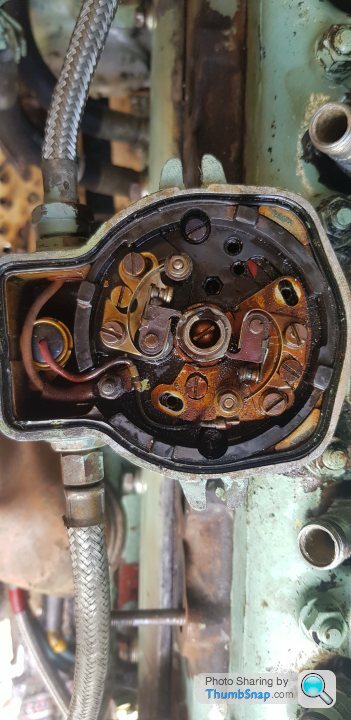
Had a look inside the distributor after that to make sure all was well. You have two sets of points with a 3 sided cam so basically one set does 3 cylinders and the other also does 3 cylinders making up the full 6. They are to be synchronised properly but apparently this is rather difficult to do, I just cleaned everything up and set the gaps, then had a best guess at the synchronisation, if I need to adjust it that can be done when it's running again.
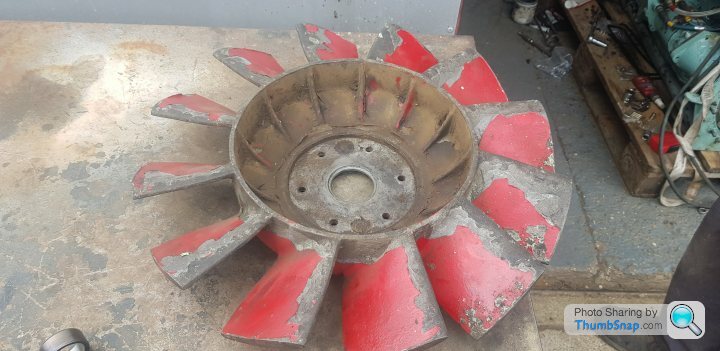
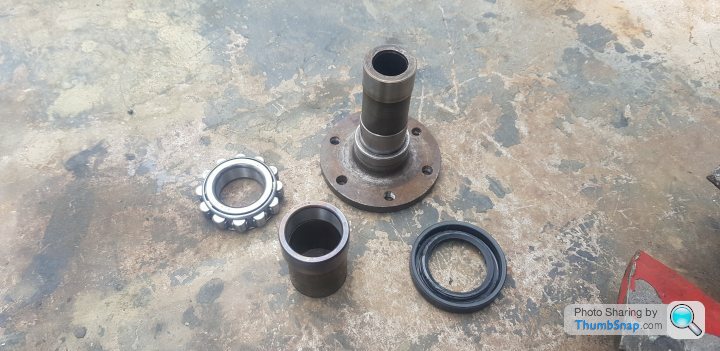
The fan bearings have always made a 'chuffing' noise at idle so to satisfy my curiosity I stripped it down to check it. They don't look too bad, a bit worn but still packed with clean grease. Very kindly a pal took them over to our local bearing shop today and ordered two new bearings and a seal for it so that should be dandy once it's all back together. It got a good clean up and paint today and is looking far better.

Not much left to do now before the big bits go back in
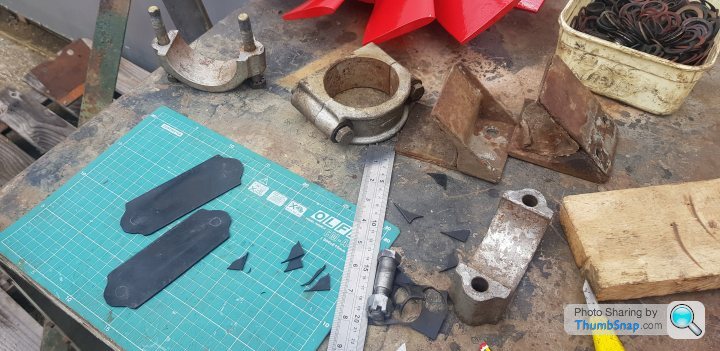
Some good progress today, made some rubber gaskets to go under the gearbox saddle mounts partly for shimming but partly to add an element of damping too.
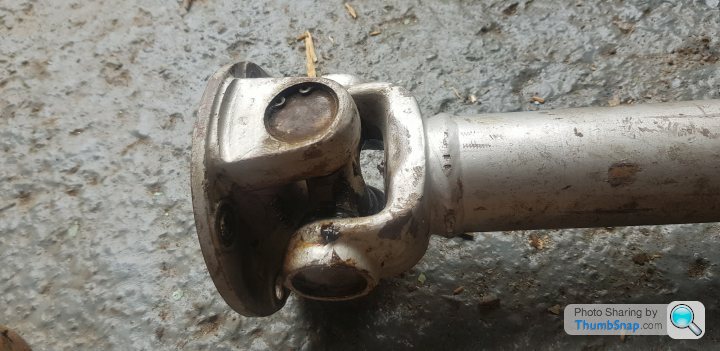
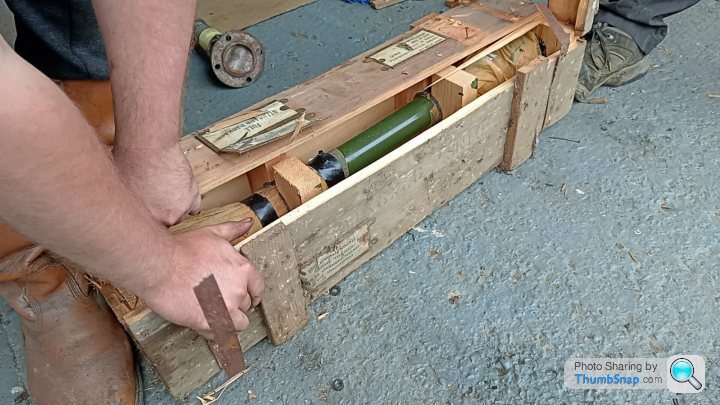
Rear driveshafts were then cleaned up and inspected, unfortunately some of the UJs were a bit on the notchy side so I'll have them done by our local driveshaft place. They are pretty much completely inaccessible once everything is in so worth doing now and forgetting about it. I did open a crate we had in the shed with a new driveshaft (packaged 1974) in but sods law said it had to be a front one
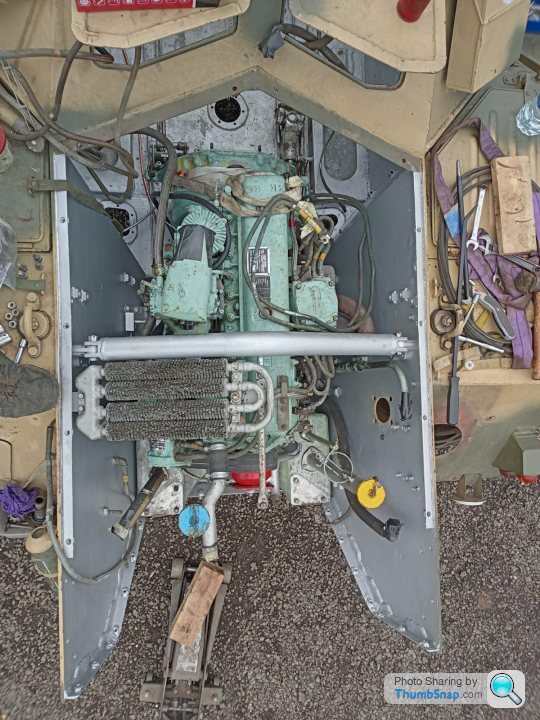
Then came big progress time, firstly a bit of forklift fixing as the damp had got to the ignition, then a spot of engine fittage. A piece of cake at this point as there's only the rear mount to locate on 4 bolt holes, the gearbox we'll fit separately after rear shafts are sorted.
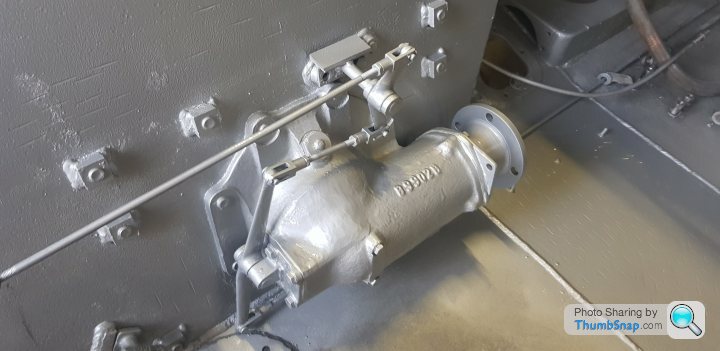
Topped it all off by wire brushing down and painting a few exhaust bits and the silencer etc. Really looking forward to the first fire up now

Edited by LewG on Saturday 19th June 20:19

Gassing Station | Readers' Cars | Top of Page | What's New | My Stuff