500+bhp Mk3 Fiesta Project
Discussion


Ug_lee - Thank you. That's really interesting, I guess that's the compound that comes to the surface of some plastic trim when it gets really hot. I think I should be OK as the only place that would have bitten me was the softer vinyl type sun visors, but Aldridge made covers for those rather than gluing them on. Good luck with the retrim.
95 fiesta si - Cheers. Yours looks clean, I bet you got noticed in that .
.
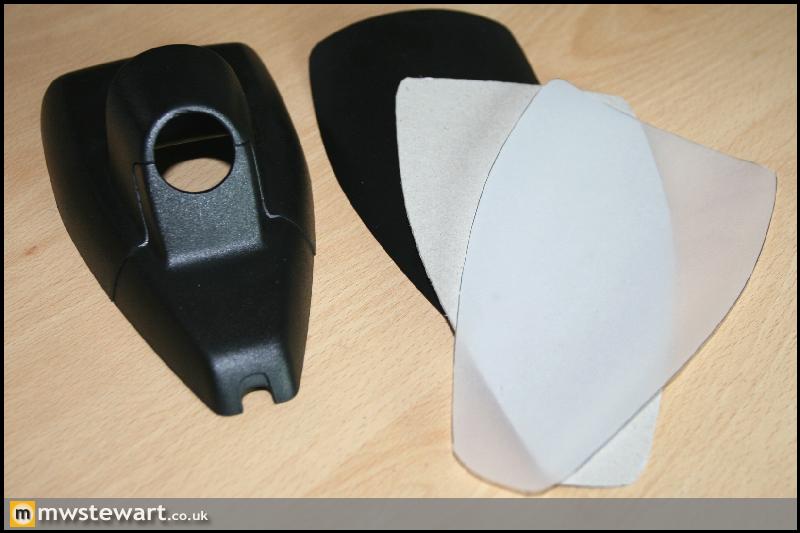
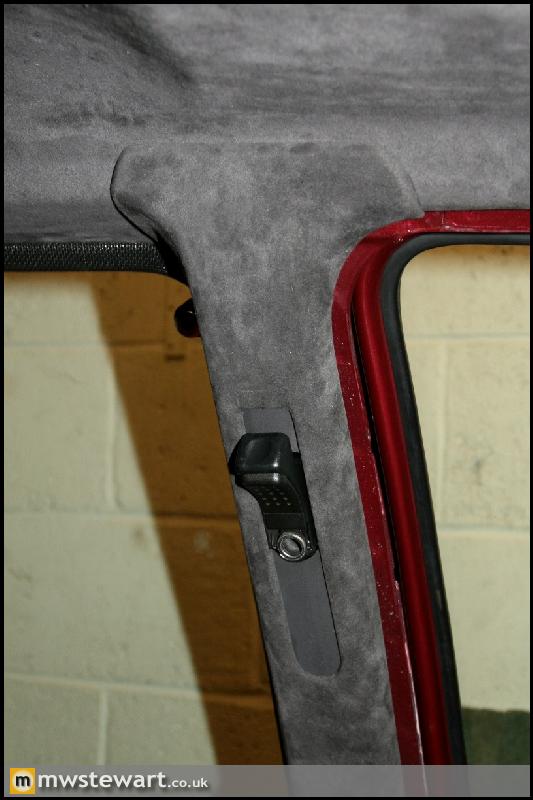
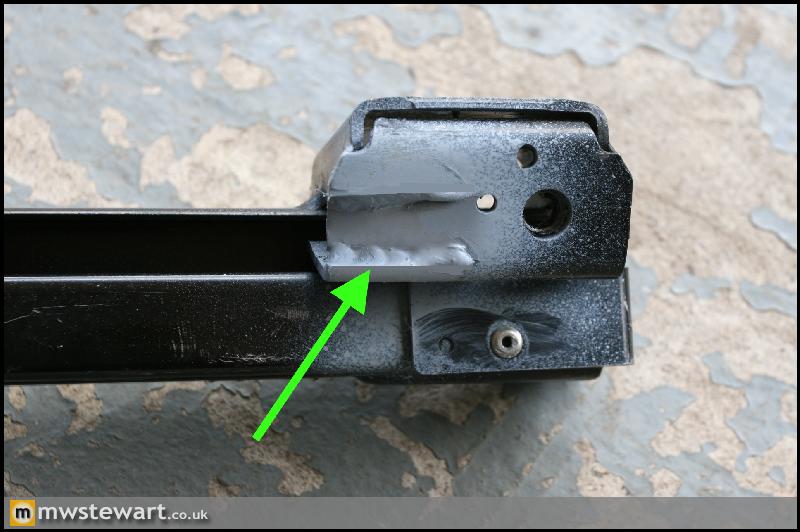
Time to fit the rear view mirror. The Mondeo mirror base surround has a large footprint in order to hide the rain/light sensor, my Fiesta obviously pre-dates any of that technology so lacks the corresponding area of black ceramic coating: it just has a small rectangle to hide a small self adhesive pad. I've mimicked the Mondeo windscreen by making a template from sign writers vinyl, which has strong adhesive and should be UV resistant for the life of the screen. I also made a card template to help accurately locate the mirror mounting button.
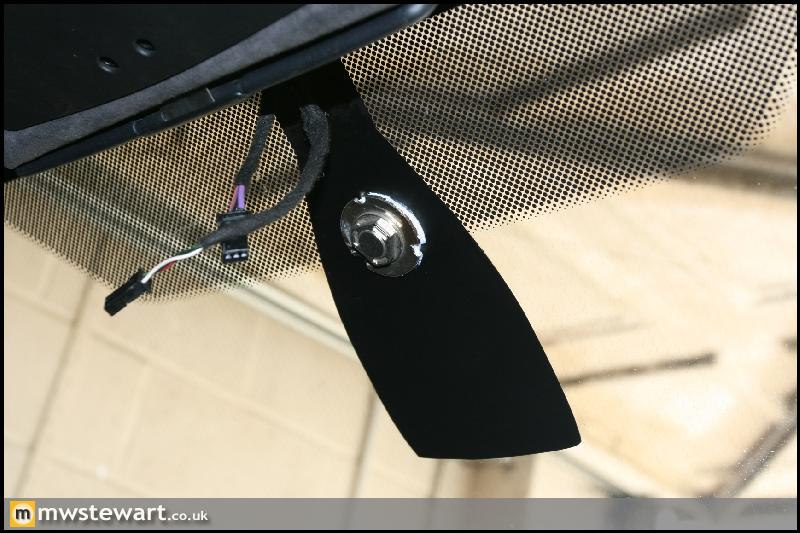
Vinyl applied and mirror button bonded on. The button is actually from an E46, but is the same as the Ford item which I didn't have.
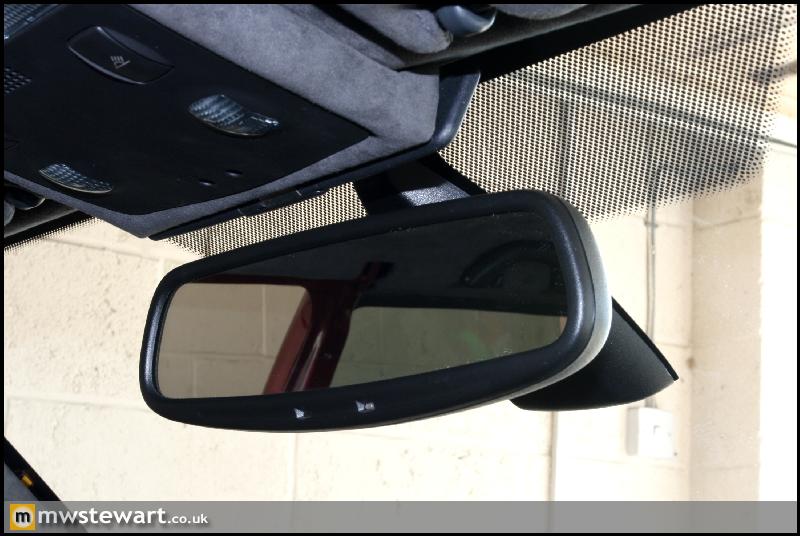
Mirror mounted.
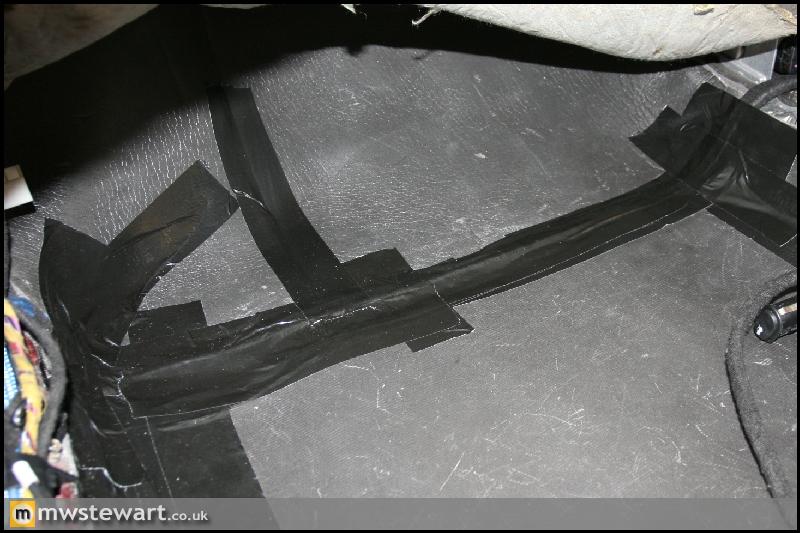
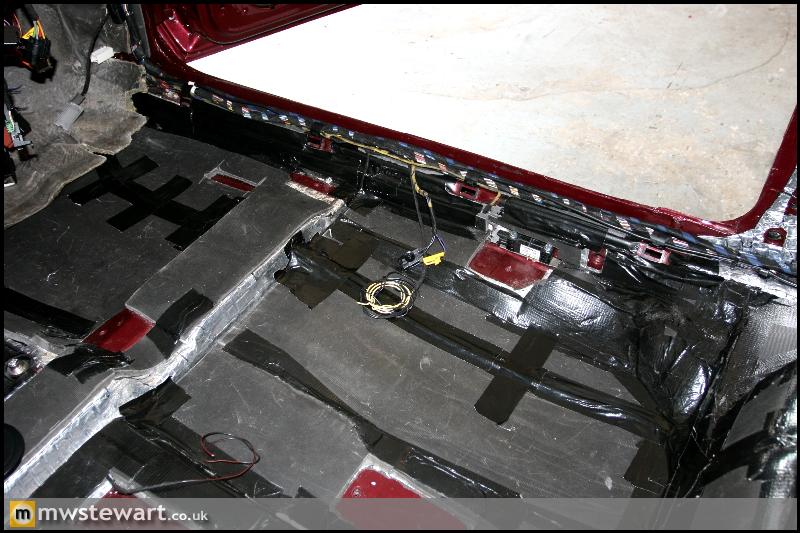
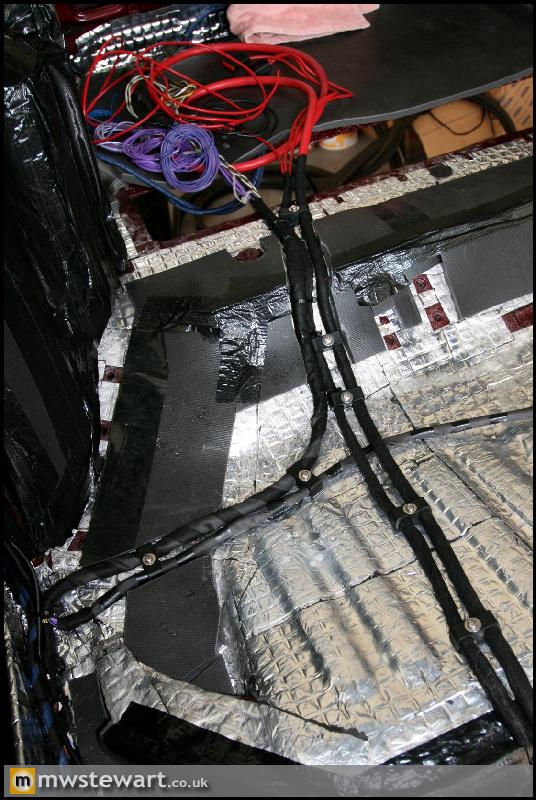
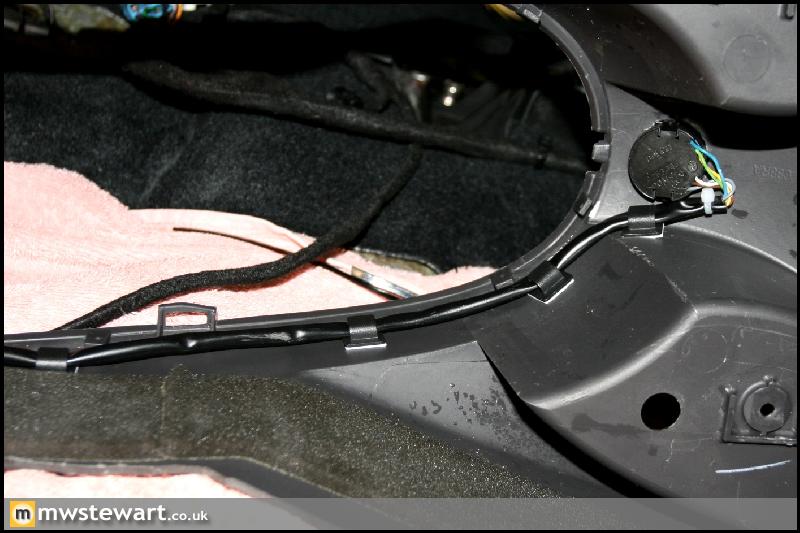
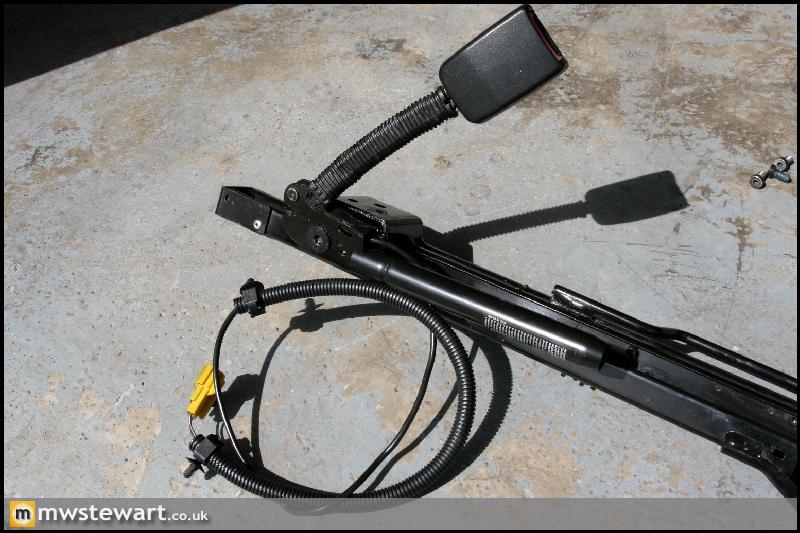
Next I turned to the wiring in preparation for fitting the carpet. It soon became obvious that the new power calbes would not fit in the standard cable management along the sills, so I re-routed them along the floor pan. I cut a channel in the new sound deadening so they sat flush.
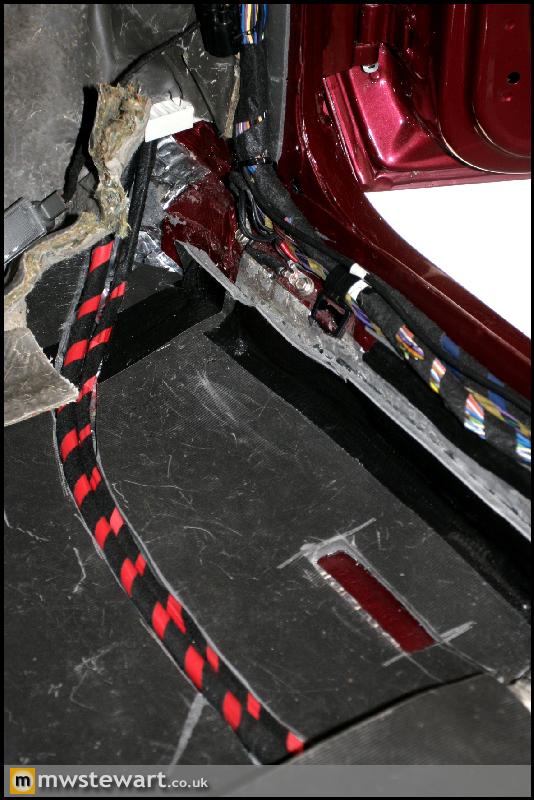
I re-taped the rest of the loom in fleece tape and fitted new cable clips everywhere.
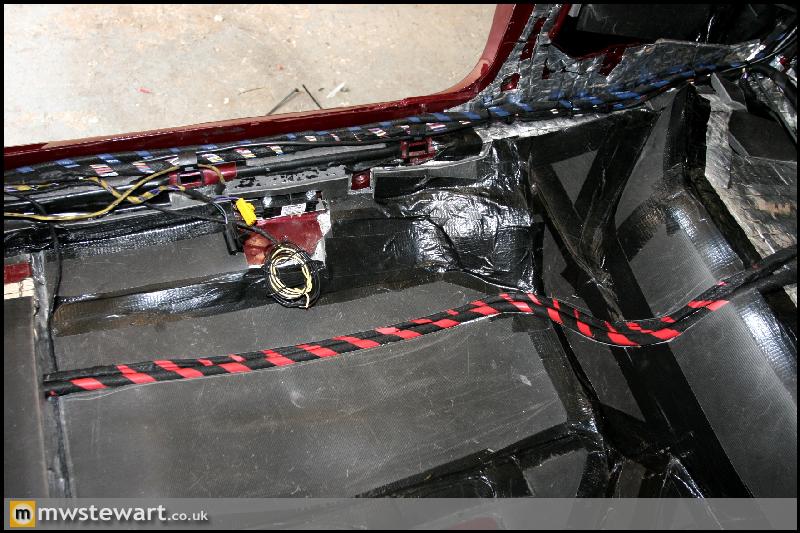
The Audison Sonus RCA cables run along the left hand sill and across the passenger foot well, and up the centre of the dashboard.
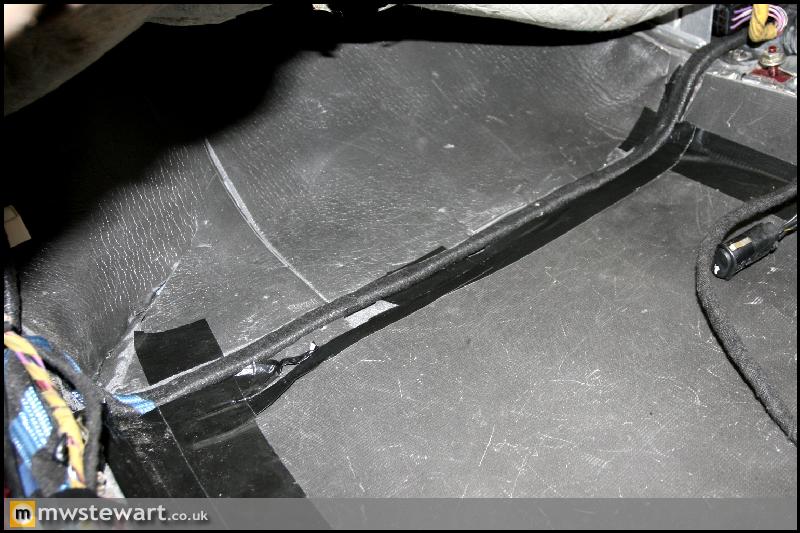
I covered the new floor pan cable runs with Duct Tape.
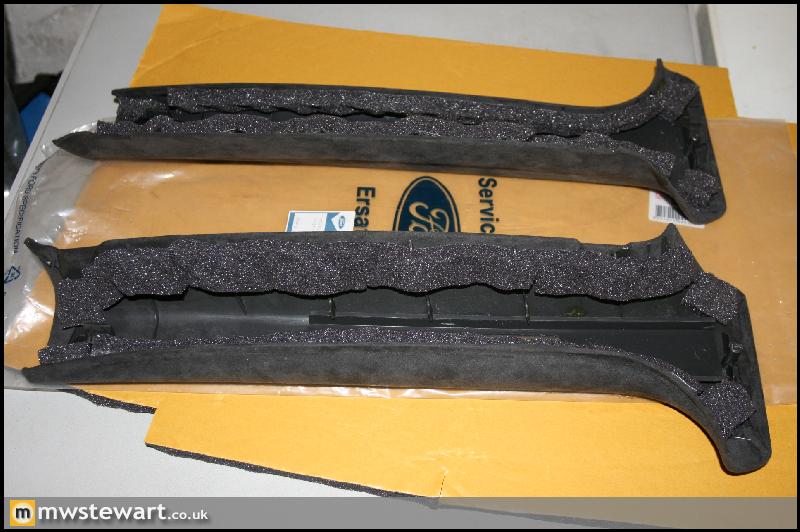
Again Sound Absorber 15 pads were added to the rear of new trim, this time the C Pillar trims.
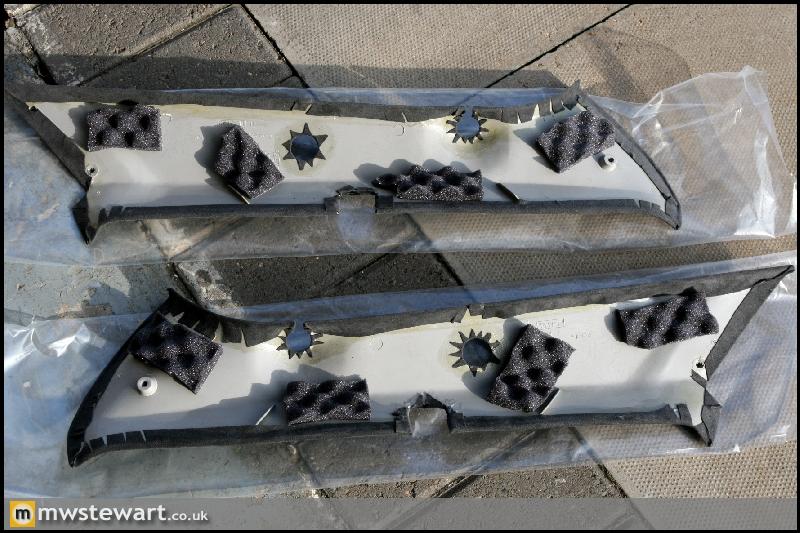
C Pillar trims fitted.
95 fiesta si - Cheers. Yours looks clean, I bet you got noticed in that
.Time to fit the rear view mirror. The Mondeo mirror base surround has a large footprint in order to hide the rain/light sensor, my Fiesta obviously pre-dates any of that technology so lacks the corresponding area of black ceramic coating: it just has a small rectangle to hide a small self adhesive pad. I've mimicked the Mondeo windscreen by making a template from sign writers vinyl, which has strong adhesive and should be UV resistant for the life of the screen. I also made a card template to help accurately locate the mirror mounting button.
Vinyl applied and mirror button bonded on. The button is actually from an E46, but is the same as the Ford item which I didn't have.
Mirror mounted.
Next I turned to the wiring in preparation for fitting the carpet. It soon became obvious that the new power calbes would not fit in the standard cable management along the sills, so I re-routed them along the floor pan. I cut a channel in the new sound deadening so they sat flush.
I re-taped the rest of the loom in fleece tape and fitted new cable clips everywhere.
The Audison Sonus RCA cables run along the left hand sill and across the passenger foot well, and up the centre of the dashboard.
I covered the new floor pan cable runs with Duct Tape.
Again Sound Absorber 15 pads were added to the rear of new trim, this time the C Pillar trims.
C Pillar trims fitted.
BigTom85 said:
So the interior is nearly there, suspension and brakes won't take long...
When's the engine going in?
Rear suspension is next When's the engine going in?
I need to get some engine photos organised. Current status is that a CNC adapter plate is being machined for the WRC inlet manifold, and my engine builder is figuring out how to mount a dry sump pump and keep A/C - the two don't usually go together
The engine itself has been built since March, but I'm not really pushing for the engine because of the slow pace of the project, but it should be on the Dyno in August 
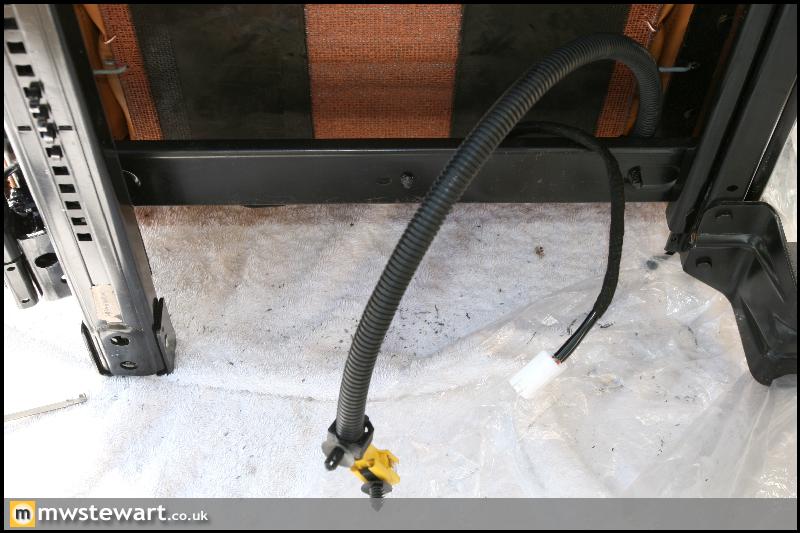
I have finished off the cable management under the rear seats, which ensures the new fuel pump and battery wiring is kept clear of any trim. I used 12mm cable clamps secured by stainless set screws into Stainless Rivnuts.
The parcel shelf support trims were fitted after Noise Isolator 15 pads were applied.
I found these Dashboard mounting bolt covers on the Ford parts system. I've not come across these on a UK car before so I assume that like the air conditioned glove box they were another part that suffered at the hands of bean counters during the models' life.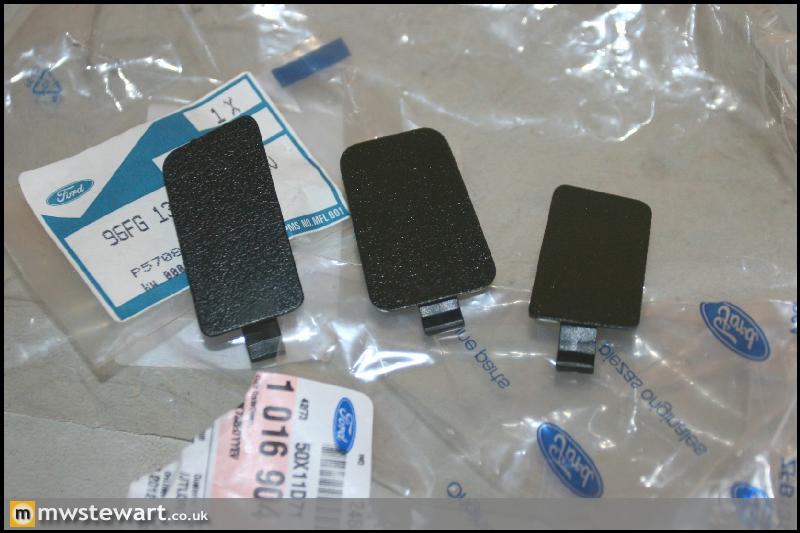
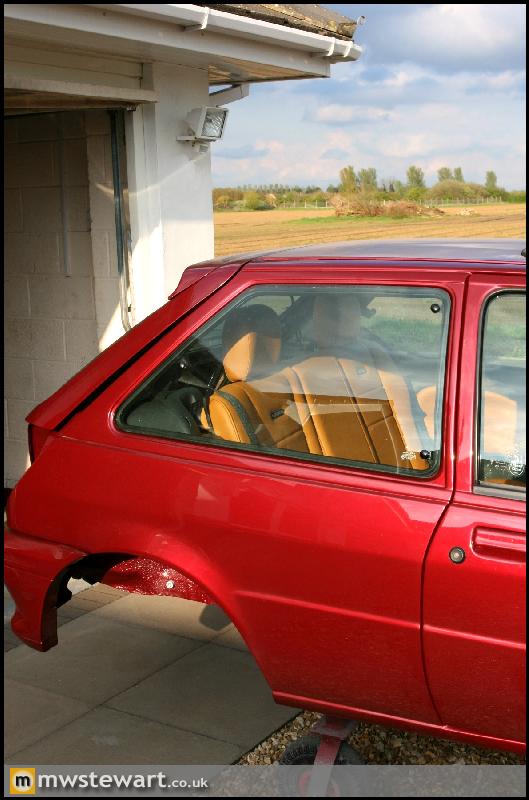
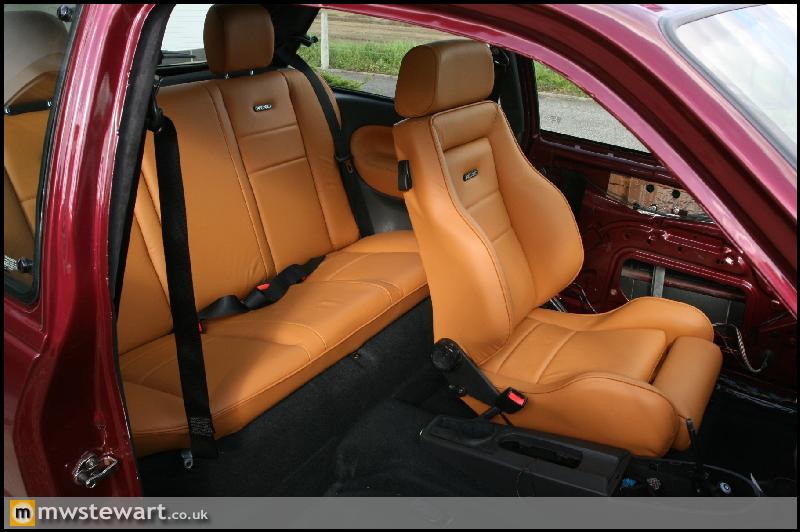
I found a set of seat belts from a very low mileage car, these were fully extended and shampooed before being fitted. I also stuck the original Ford sound deadening back on the rear quarters, though the difference it makes is probably negligible!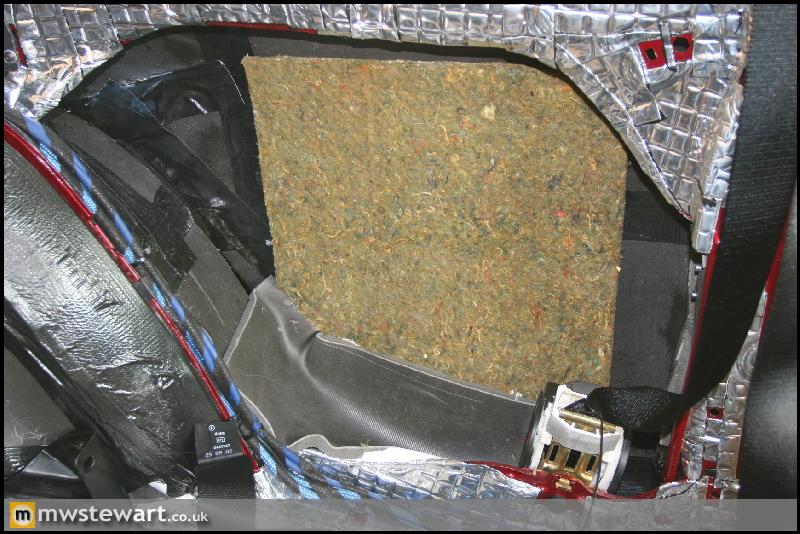
New Ford Underlay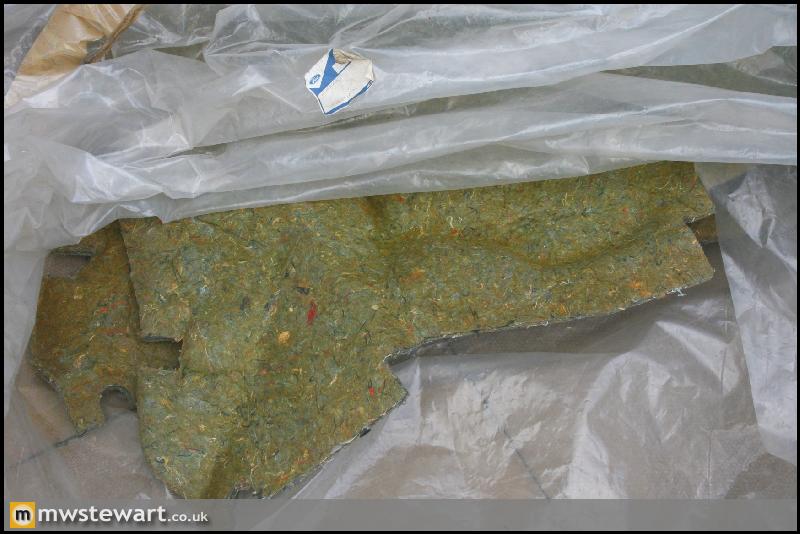

New Ford Carpet. I've gone for a dark charcoal colour as it's more in harmony with the Alcantara. I didn't want a matching grey as it would have been too much, and black was a bit severe against the grey.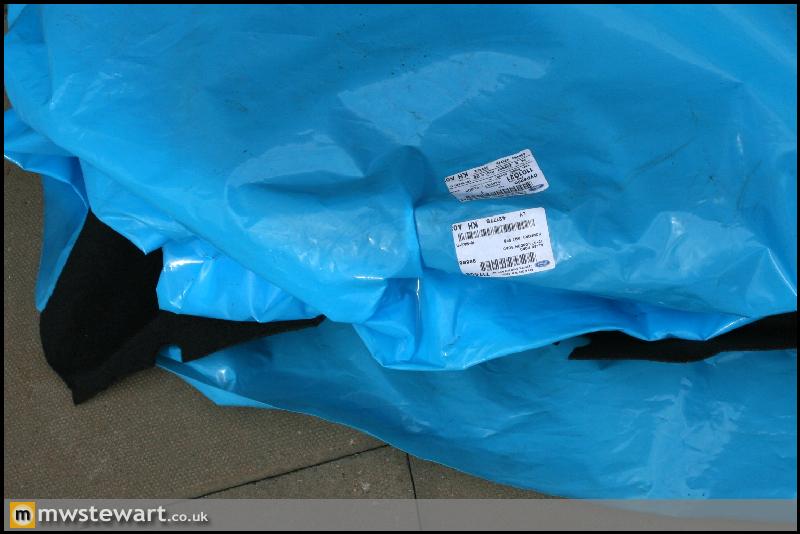

Rear Quarter Trims were fitted next, and again Noise Isolator 15 was applied to the rear. I also covered the edges in fleece tape to further prevent squeaks/rattles.

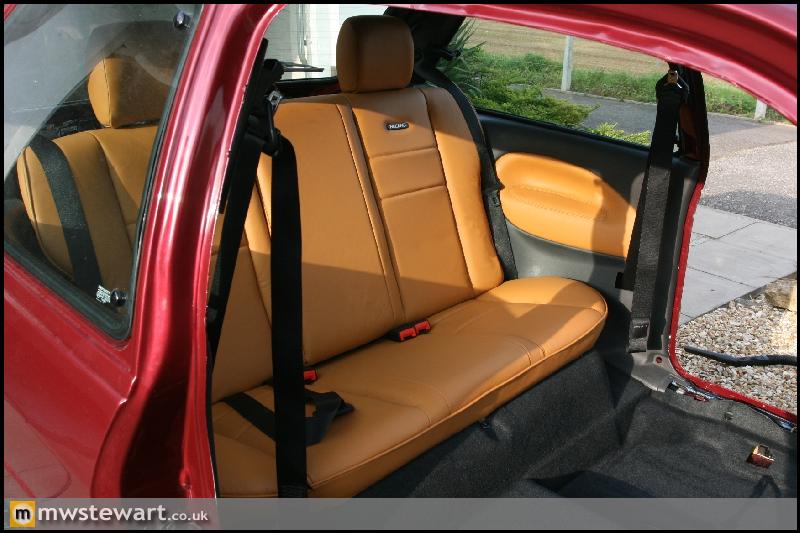
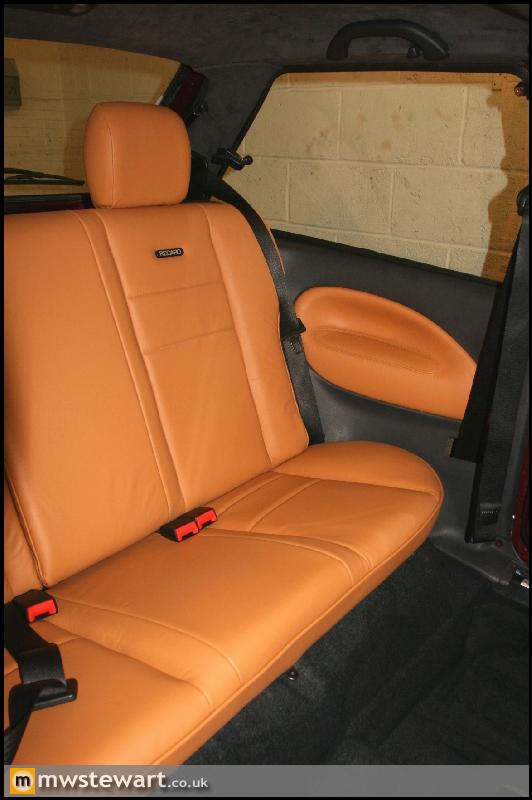
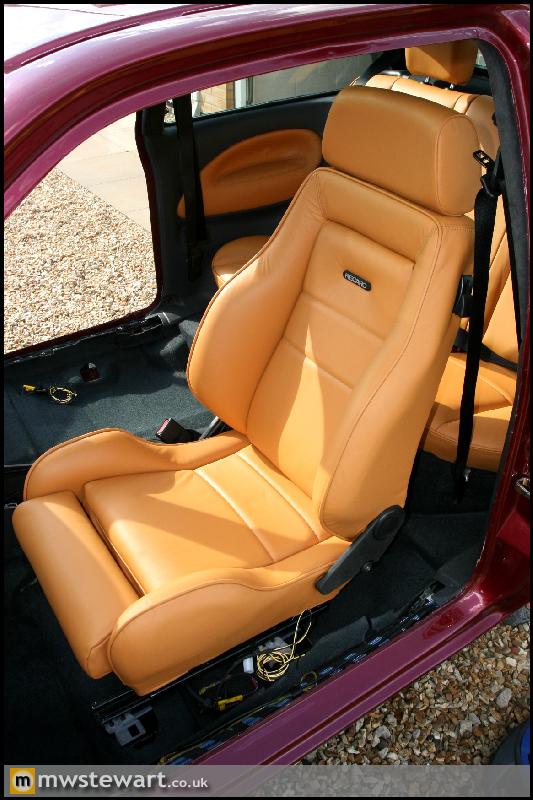
The rear seats in! I'm extremely pleased with the colour scheme as it's exactly what I wanted to achieve. The only thing I'd change would be to add rear seat heating, but given the seat covers are removable and the battery is in the boot it will be easy enough to achieve later on.
The parcel shelf support trims were fitted after Noise Isolator 15 pads were applied.
I found these Dashboard mounting bolt covers on the Ford parts system. I've not come across these on a UK car before so I assume that like the air conditioned glove box they were another part that suffered at the hands of bean counters during the models' life.
I found a set of seat belts from a very low mileage car, these were fully extended and shampooed before being fitted. I also stuck the original Ford sound deadening back on the rear quarters, though the difference it makes is probably negligible!
New Ford Underlay
New Ford Carpet. I've gone for a dark charcoal colour as it's more in harmony with the Alcantara. I didn't want a matching grey as it would have been too much, and black was a bit severe against the grey.
Rear Quarter Trims were fitted next, and again Noise Isolator 15 was applied to the rear. I also covered the edges in fleece tape to further prevent squeaks/rattles.
The rear seats in! I'm extremely pleased with the colour scheme as it's exactly what I wanted to achieve. The only thing I'd change would be to add rear seat heating, but given the seat covers are removable and the battery is in the boot it will be easy enough to achieve later on.
Thanks everyone! 
Cheers
olly22n said:
Love the project, I maybe have an idea for the future, my E34 had the seat belts sockets built into the seats..maybe something the you could incorporate?
Ahh! I'd forgotten about that. I think some of my previous BMWs had it too, a recess in the rear seats which housed the buckles when they aren't in use. It's a neat idea.RenPug said:
Send me an email and let me know what year the mirror casing and sensor is for and I'll try and source a bracket for you. When we replace a screen with one on I'll cut it off the old glass and put it in the post.
Thank you! That's really appreciated.Lampredi said:
Hi mate ... i've been following this topic for months now... you're having new job proposals for sure
I've just registered to ask you ... wouldn't it be easier to achieve that amount of power using LPG instead of petrol? LPG is a less dense fuel, allowing higher boost!
Greetings from Portugal
Thanks. LPG isn't a consideration at the moment as I'm not sure what availability is like around some of the quieter areas of Europe, as I intend to take the car on a big Euro Trip once it's complete. 500+ on the Zetec is a fairly well trodden path so I'll stick to petrol for now as I know it works I've just registered to ask you ... wouldn't it be easier to achieve that amount of power using LPG instead of petrol? LPG is a less dense fuel, allowing higher boost!
Greetings from Portugal
pthelazyjourno said:
How much do you think it will weigh??
Amazing watching all the rattle proofing you've done - but then again the later dashboard you've installed really is quite decent anyway. Our Fiesta 1.25 has done 90,000 miles and it genuinely doesn't make a squeak, rattle or noise.
Surprised the hell out of me - feels really solid considering.
Richard Parry-Jones had a hand in the later Fiestas (the ones based on the chassis I'm using) and lots of things were over-engineered to aid handling and increase perceived quality in the model. Weight wise, I'm not sure, but I view the added weight as a benefit as with the power I'm going for it will help with traction.Amazing watching all the rattle proofing you've done - but then again the later dashboard you've installed really is quite decent anyway. Our Fiesta 1.25 has done 90,000 miles and it genuinely doesn't make a squeak, rattle or noise.
Surprised the hell out of me - feels really solid considering.
Cheers

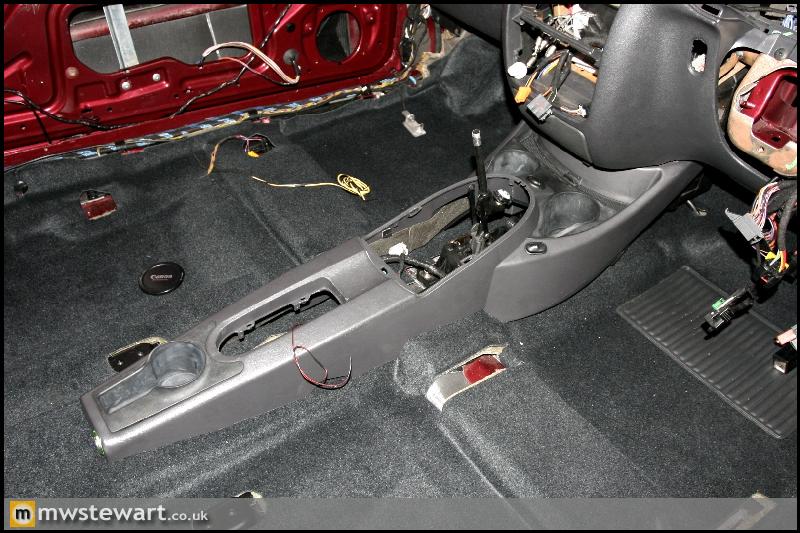
Focus Centre Console
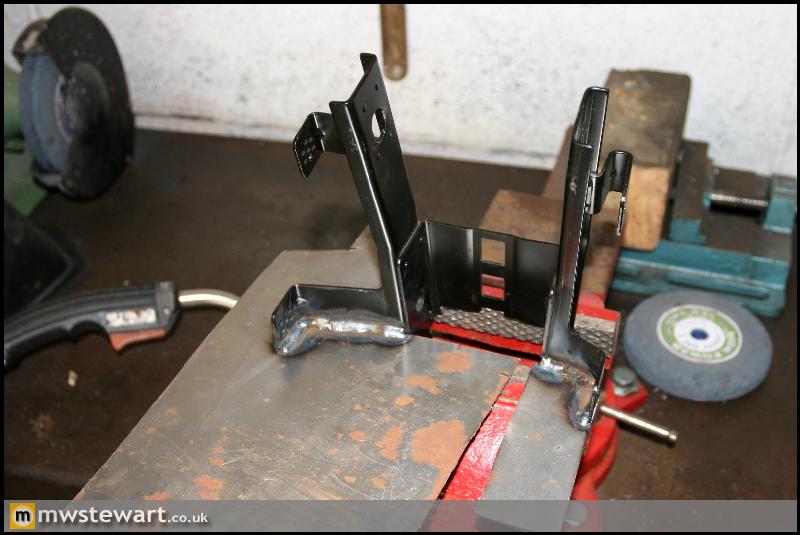
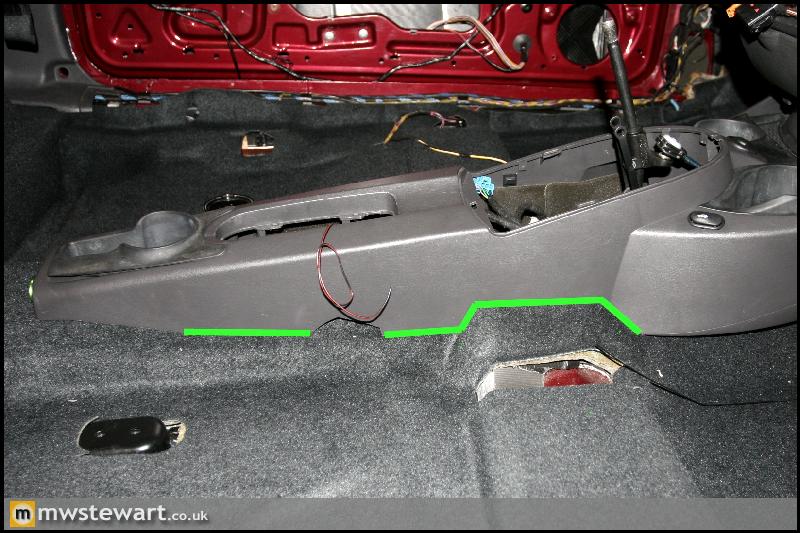
The Focus console is secured by two screws under the forward cup holders and one screw under the rear cup holder. To help me determine what needed to be done I first secured the rear console fixing by installing a stainless Rivnut in the shell. Then, once the console was reasonably secure I could plan how to attack the rest.
The black powder coated object in the vice is a standard Mk4 Fiesta centre console front mount, which I had already modified my floor pan to accept as it acts as a stiffening brace for the Mk4/5/Puma dashboard by securing it to the floor. I modified the Fiesta bracket in order to create something that would be compatible with my dashboard, my floor pan, and also the Focus console.
After a couple of test fits of the console I wasn't happy with how far it encroached into the front foot wells, so I fabricated some U sections which the edge of the console could sit into, in order to pinch the width at the base and restore foot well space.

Here's the finished bracket. I added a strengthening rib on the lower edge.
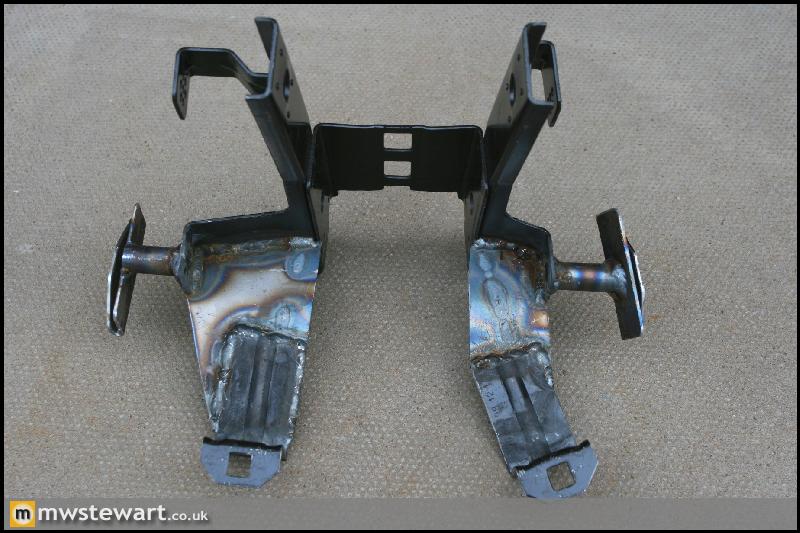
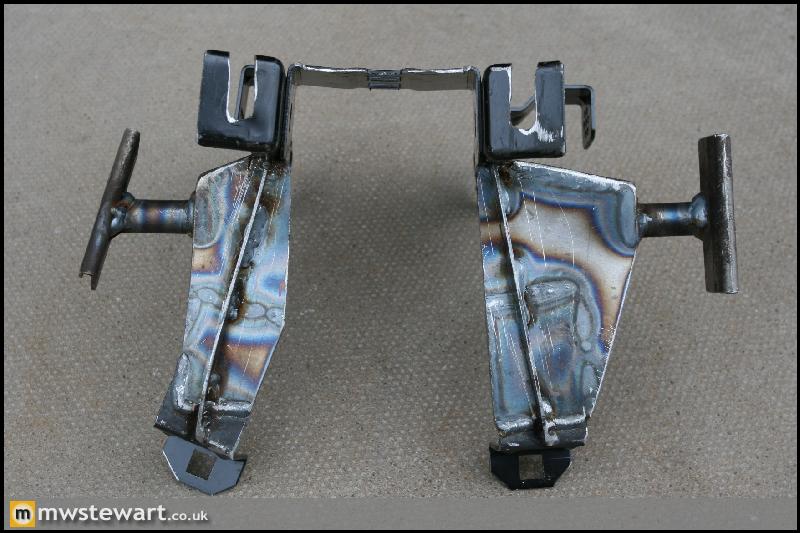
The bracket was finished in etch primer and satin black. It clears everything it needs to and is a lot sturdier than a standard Focus bracket. The two out of focus white objects in the foreground are plastic captive fittings I installed to take the securing screws.
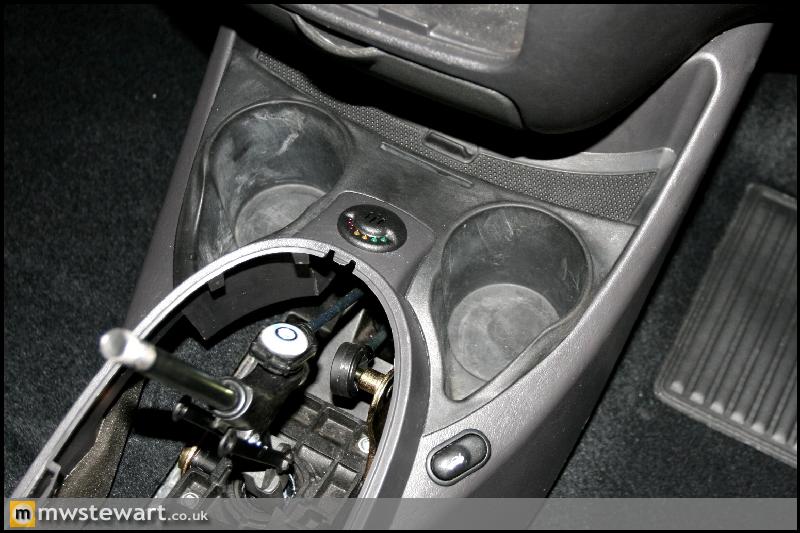
Next I made holes in the console for the Bosch Park Pilot display and buzzer, and the Fiesta tailgate release button.
I used some trim clips from ebay to secure the Parkpilot display harness. I was a bit sceptical about them but the adhesive is very good.
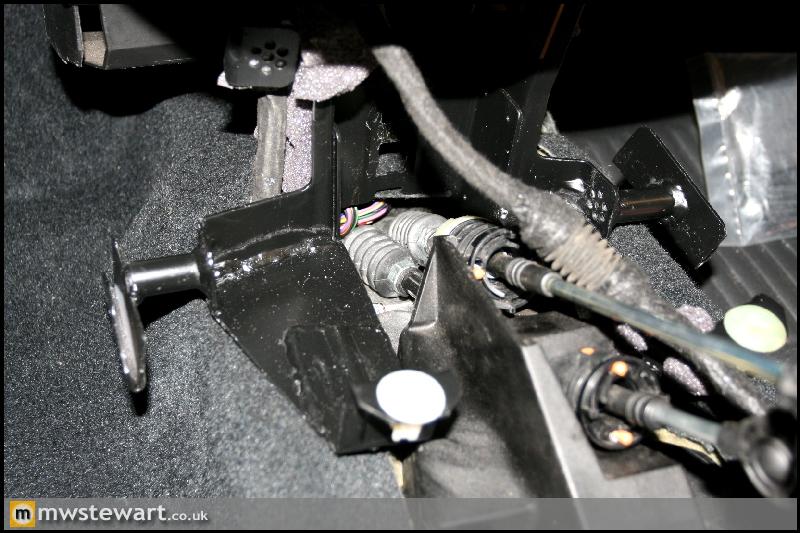
Here's how far the console encroached into the passenger foot well:
When clipped in to my edge brackets, the console is pulled in and its base width becomes close to that of the original console:
This photo shows where I have cut the Focus console to suit the Fiesta floor pan.
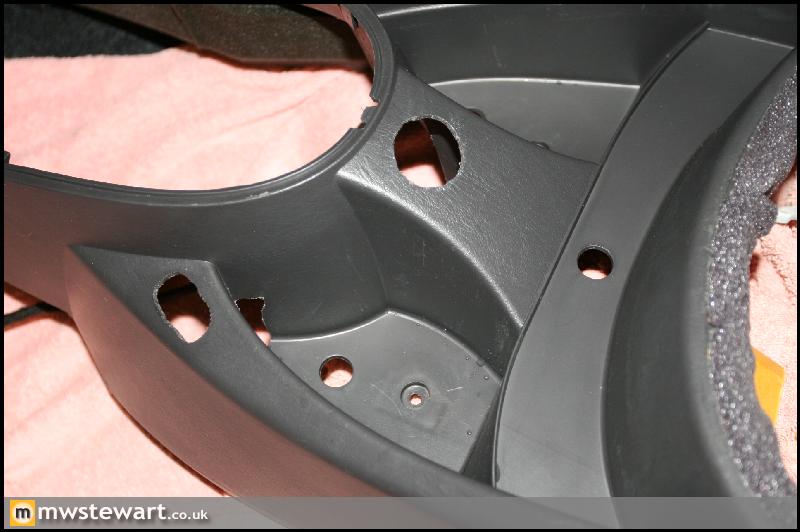
Here's the finished result. Incidentally it is mounted far more securely than in the Focus
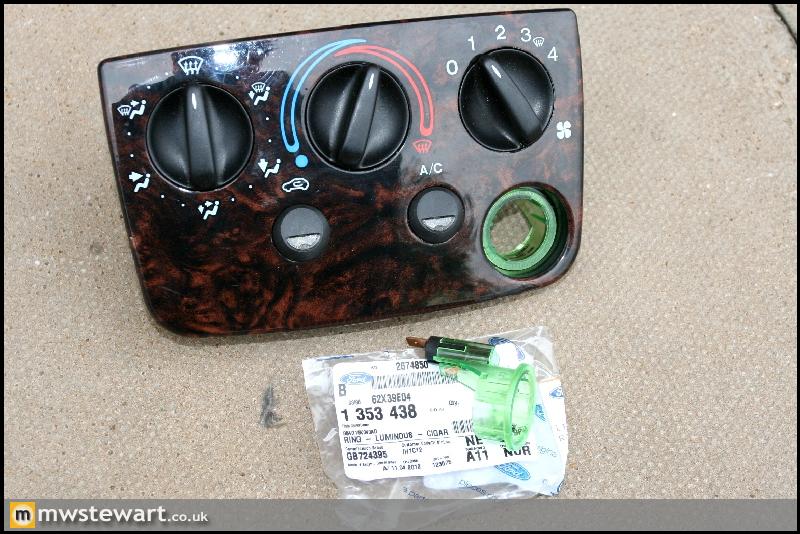
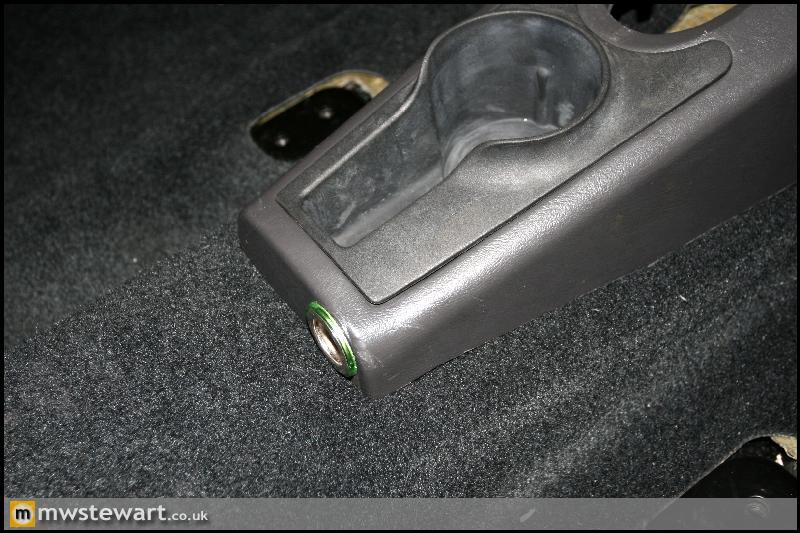
Illuminated Cigarette Lighter Rings
A lot of Ford models came with illuminated Cigarette lighter sockets, so I ordered a pair and fitted them to my HVAC controls and the Focus centre console. I appreciate that most people hate the fake wood, but it works for me in the context of this build
Focus RS Gear Lever Adjustment
Following a test fit I decided that I wasn't happy with the position of the new gear lever: it was too far forward. The lever assembly was already as far back on the floor pan as it could go, so I stripped down the mechanism to see what could be done; it soon became evident that the RS lever has a very shallow rake compared to the original Fiesta lever.
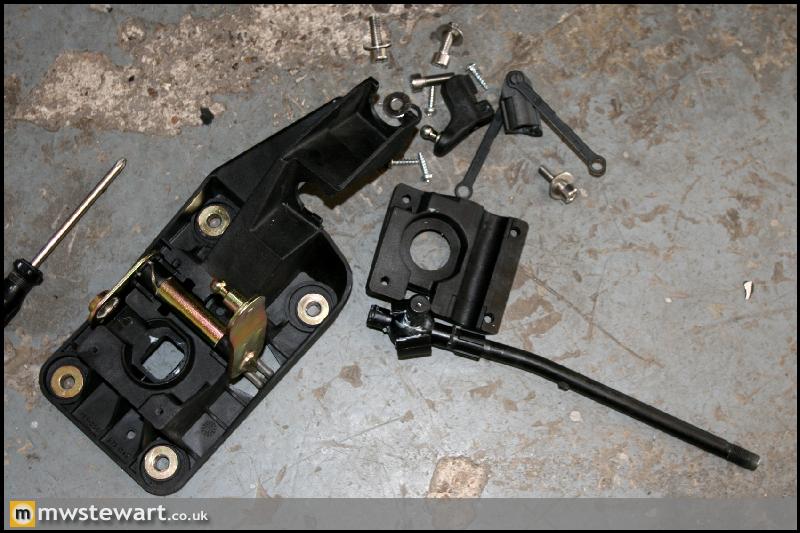
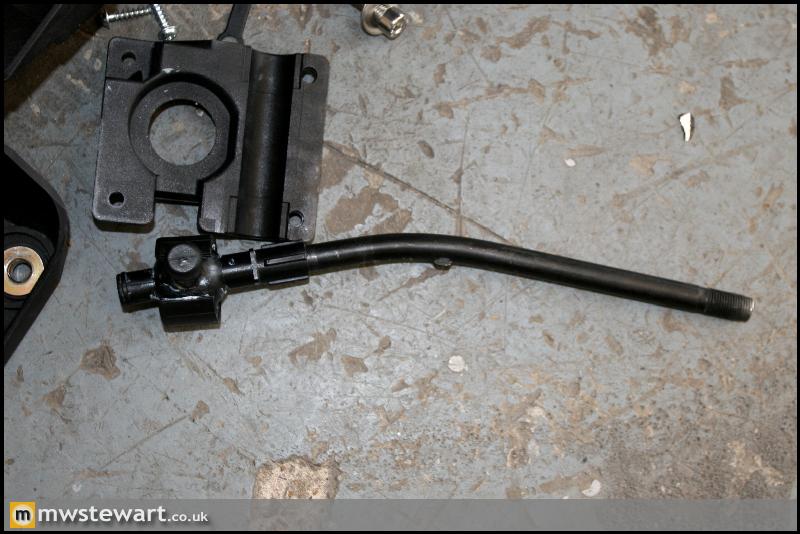
I bent the RS lever to match the original Fiesta lever, and the gear knob now sits perfectly to hand.
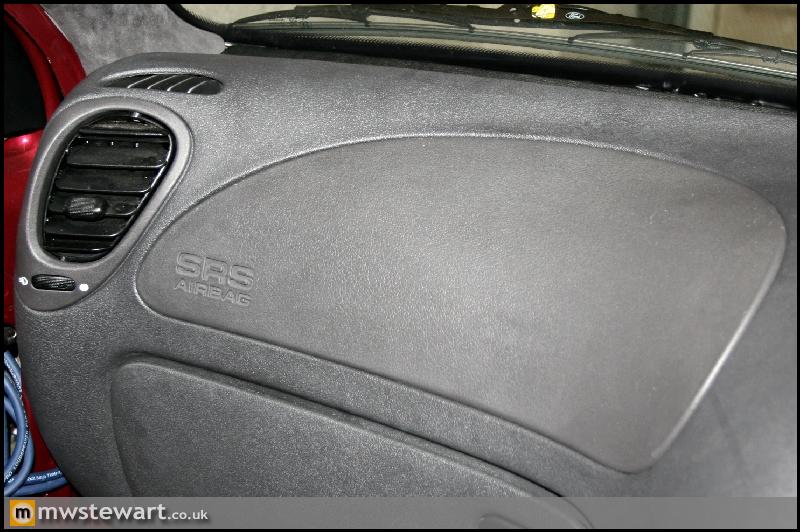
Passenger Airbag Retrofit
The passenger Airbag is a straight forward fit now the wiring is in place.
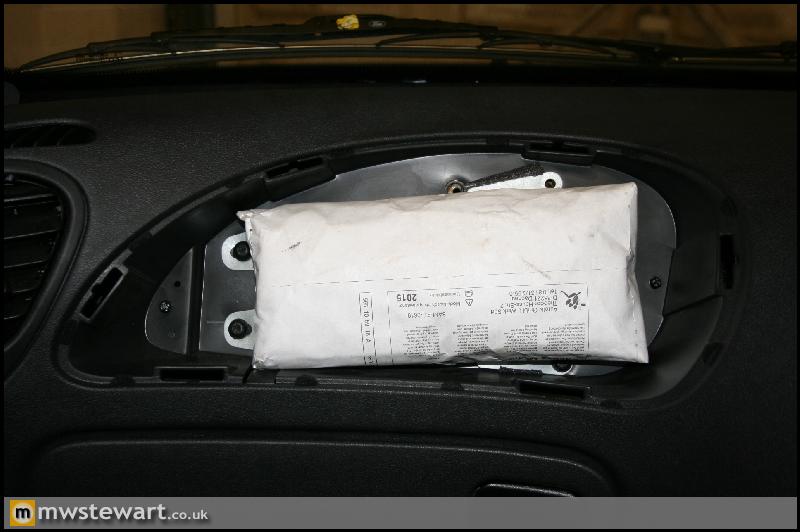
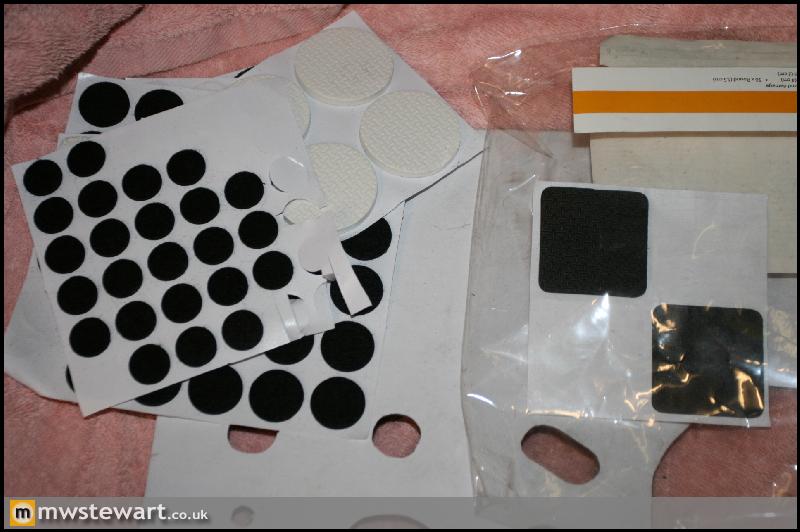
I used adhesive felt pads around the circumference of the Airbag cover, to minimise any trim noise. They can just about be made out in the above photo.
Cover in place.
B-Pillar Trim Fitted
New B Pillar trims fitted with Sound Absorber 15 pads and new trim clips.
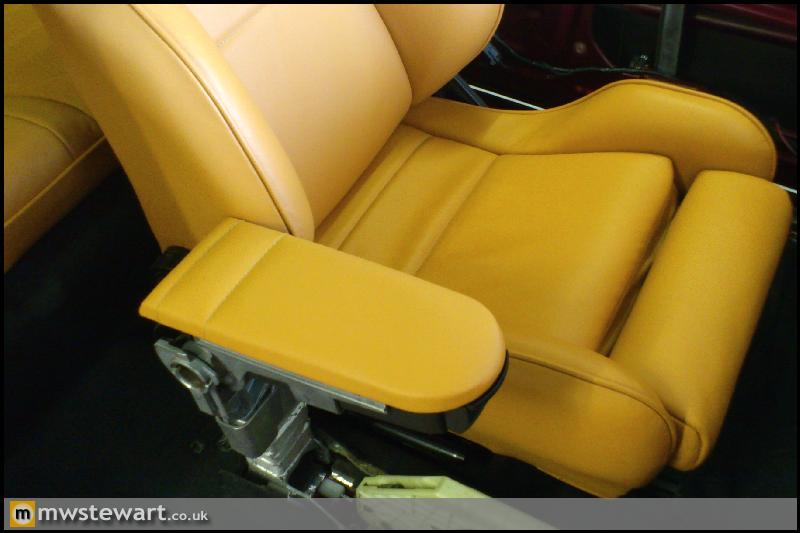
Front Passenger Seat Fitted
I'm using a pair of front seat belt pre-tensioners from a later Ford to compliment the new Airbag and restraints system that is now wired in. A quick test fit showed that the tensioners would bolt in place of the original buckles, but the gas chamber shroud fouled the seat runner.
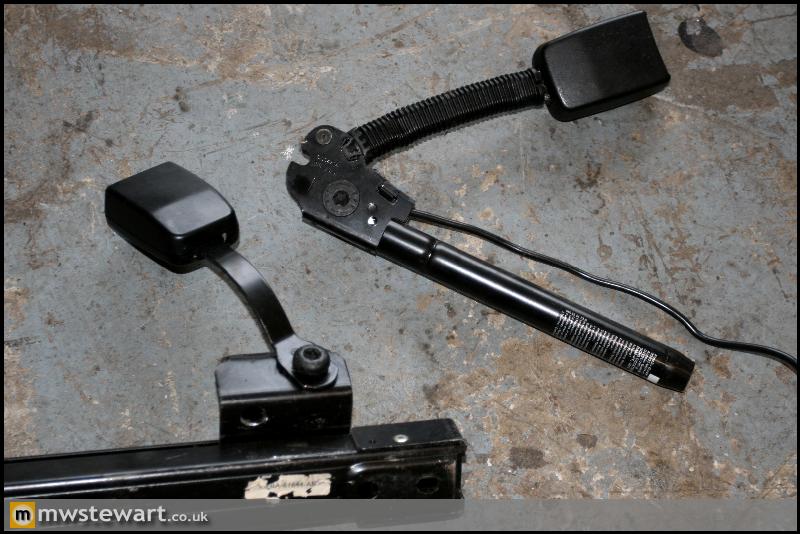
So, I notched both inside seat runners to allow the pre-tensioners to fit.
The affected area on each seat runner was refinished in gloss black, and the pre-tensioners fitted perfectly into place.
I drilled three small holes in the seat cross brace to allow fitment of some cable clips to keep the pre-tensioner and heating element cables away from the runners.
Here's the passenger seat fitted.
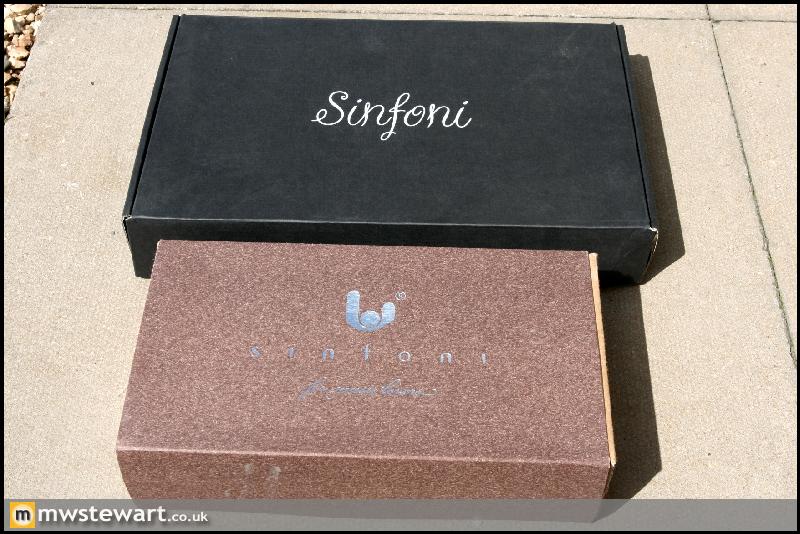
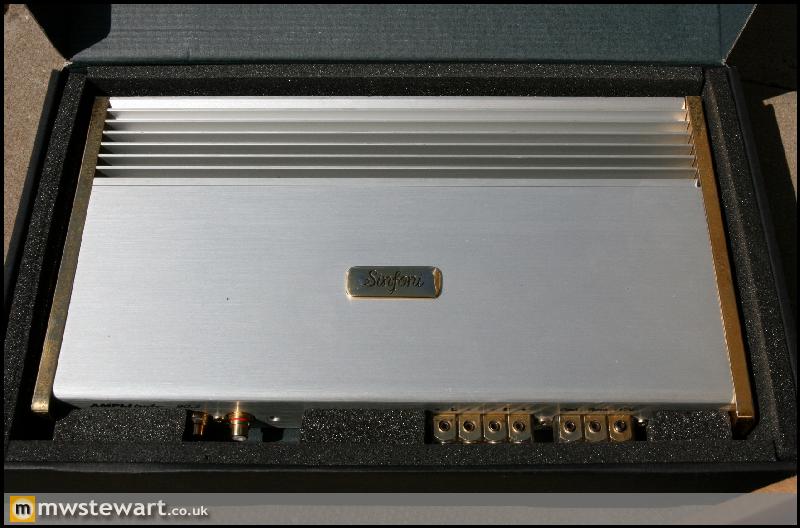
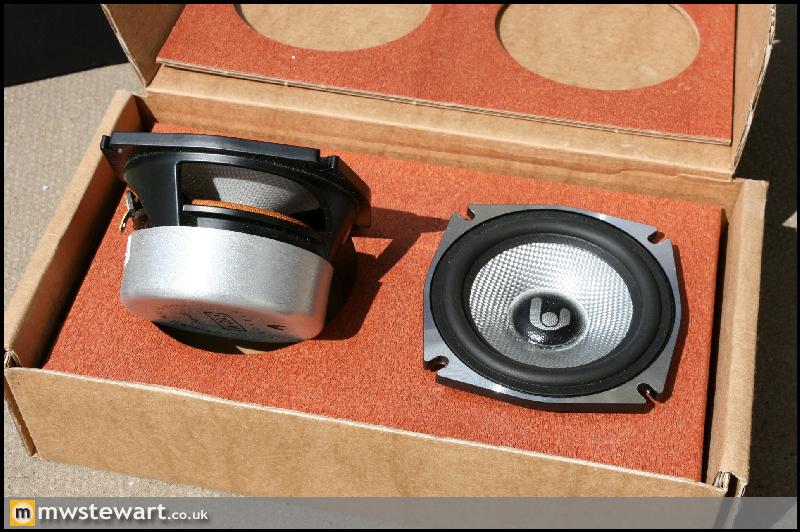
Rear Speakers and Amplifier - Sinfoni
I decided that I couldn't live without some rear speakers, or 'fill' as its known. New components are Sinfoni 90.2x Amplifier and some S100 speakers, which are the same side as the Ford originals.
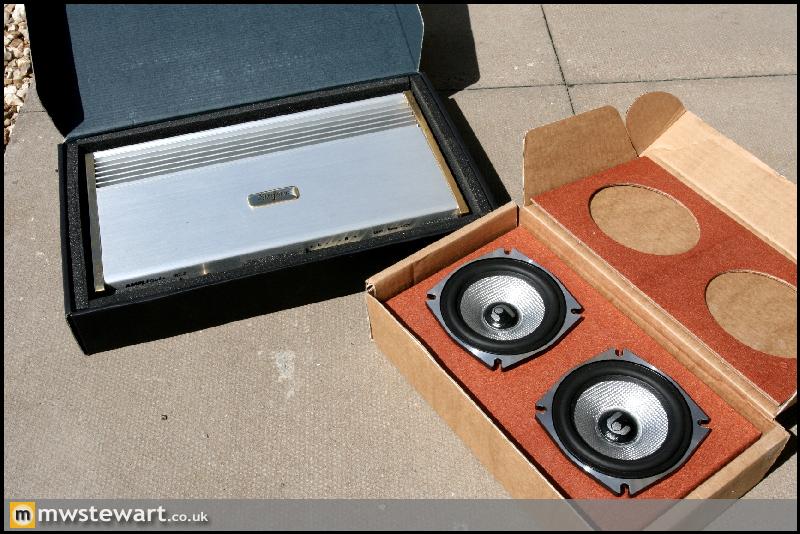
Sinfoni build quality certainly matches the sound.
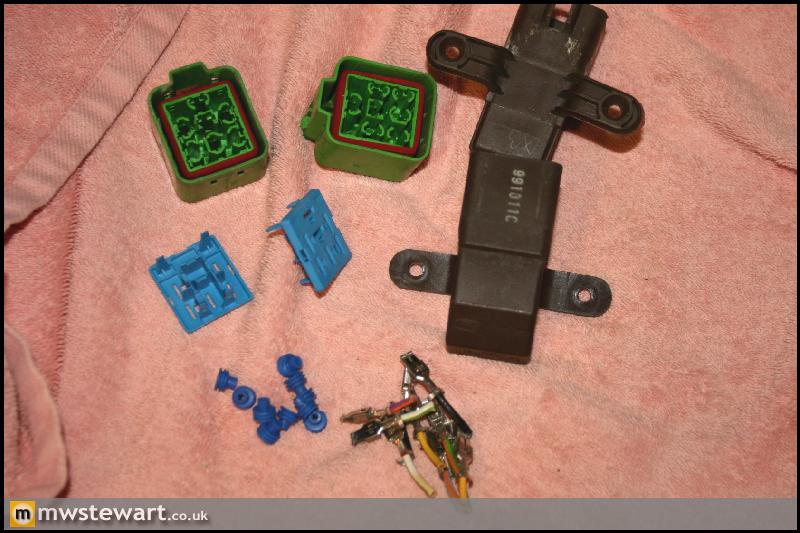
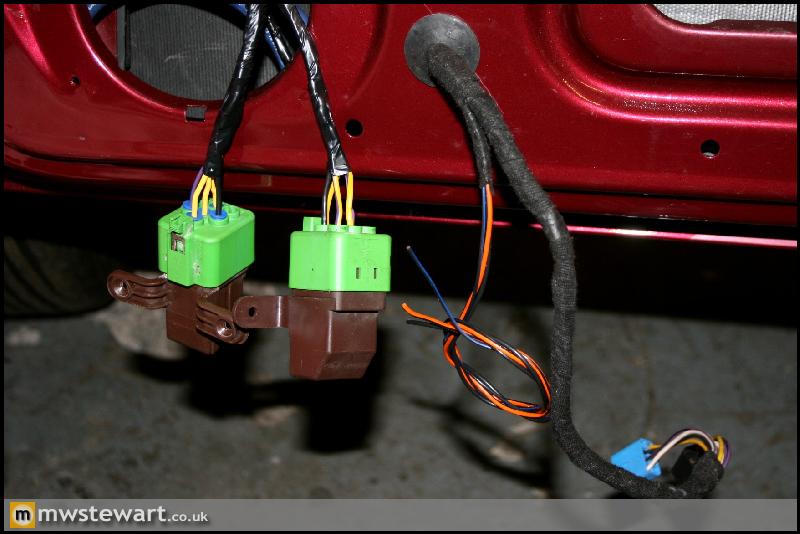
One Touch Window Relays Fitted
I stripped down the Mondeo relay connectors to their component parts, as that way I could solder my new wires directly to the pins in order to maintain the correct wiring colour scheme.
Completed. The Orange, Black and Blue wires are for the Audi puddle and door handle lights I mentioned in a previous update.
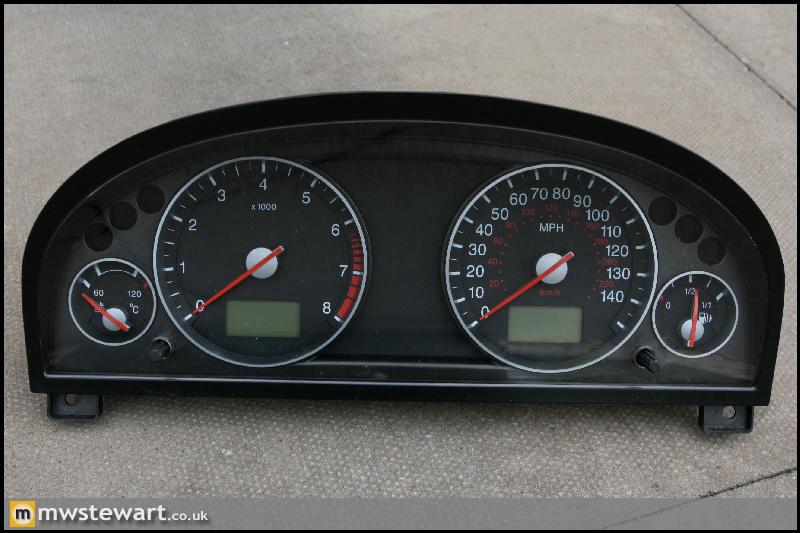
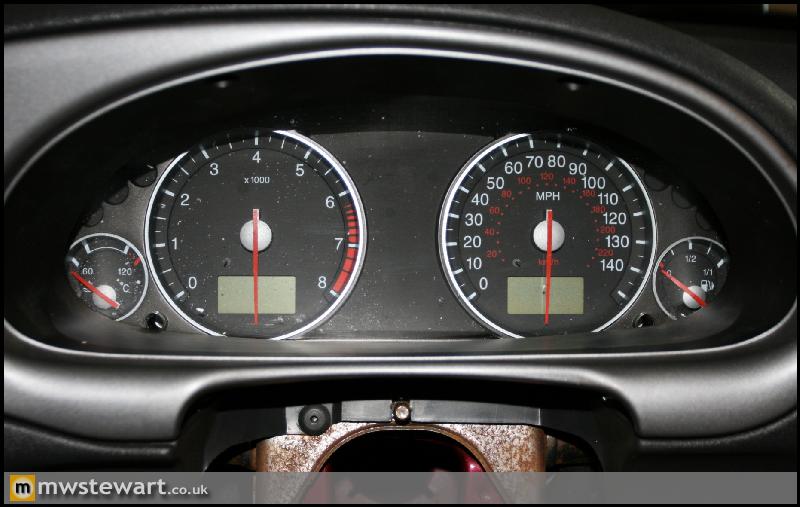
Mondeo Instrument Cluster
I have always planned to upgrade the instrument cluster in the car, the criteria being something that offered increased features but at the same time wouldn't require drastic loom changes. I settled on the 2004-2008 Mondeo cluster which in visual terms it's not a huge step up from the Mk5 Fiesta cluster, but it is back lit and comes with a trip/fuel computer, temperature display, and ice warning, which definitely are an upgrade over the front lit and relatively simple Fiesta cluster.

The majority of information used by the cluster is read over the CAN Bus, so in order to use it in something as old as my Fiesta there is a requirement for both new data lines and a suitable ECU. You may recall I already integrated new twisted pair data lines with the interior loom in anticipation for an instrument upgrade, so that just leaves the ECU.
The Mk3 Fiesta used 'EECIV' Engine management which is now basic by today's standards and doesn't offer anything of use for my project, so that system and loom was cast aside and replaced with a modified loom from a later Fiesta, which gave me 'EECV'. This is a much more advanced Powertain management system that was in use up to 2008 and is actually available in two architectures: the more basic 60pin and a more advanced 104pin, which includes CAN bus amongst other things. The problem was that to my knowledge, the Fiesta only ever came with the cheaper/simpler 60 pin version of EECV so I fully anticipated I'd have to modified the engine bay loom to suit! This however wasn't a problem to me as the engine bay loom is separate entity and I hadn't yet started work on it: if I had, I wouldn't have attempted to fit this cluster. It was by chance that I stumbled across a Mk5 Fiesta 1.8 Turbo Diesel and noticed it used the 104 pin management, so I've since purchased the engine bay loom from that model which gives me basically plug-and-play pre-wiring for the 104 pin management. There are quite a few modifications I'll do to the engine loom but that will be covered in a later post.
Physically fitting the new cluster was actually quite easy even though it is larger then the original. My aim was to keep the dashboard standard and to modify the cluster, as it can be removed very easily if required.
I first stripped the cluster to determine if I could safely remove material in the necessary areas, and also inspect the PCB which also required a slight trim. All was well and the PCB wasn't printed in the areas I had to trim. Any cut areas will be made good with new plastic glued into place and I will also bond on some new mounting lugs, as the Mondeo lugs were in the way.
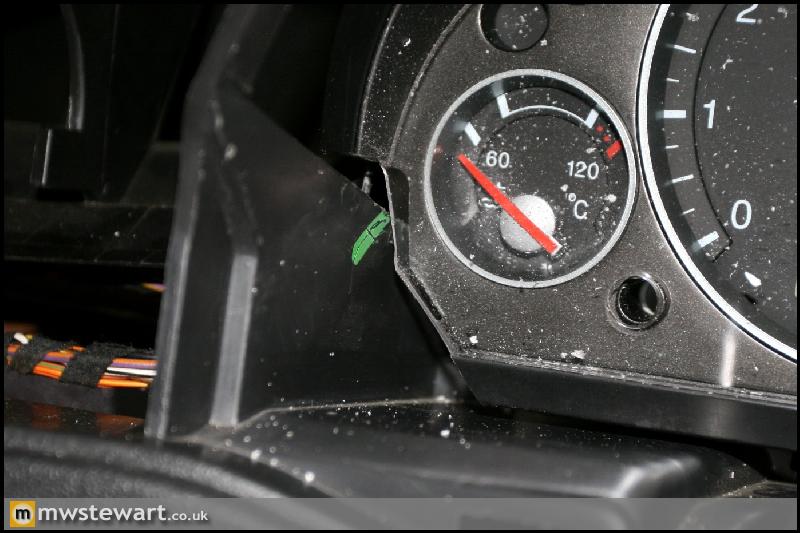
The Fiesta bezel shrouds the new instruments somewhat, so it will be removed, reshaped to suit and then repainted.
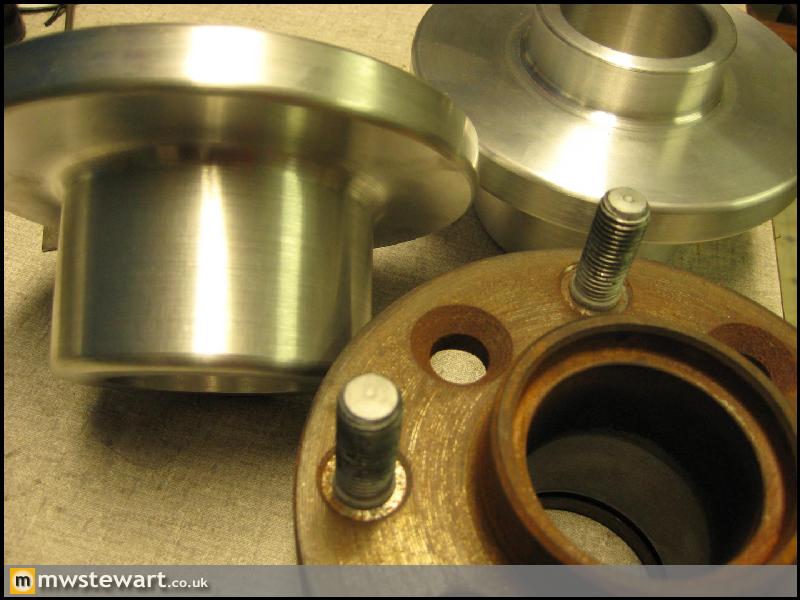
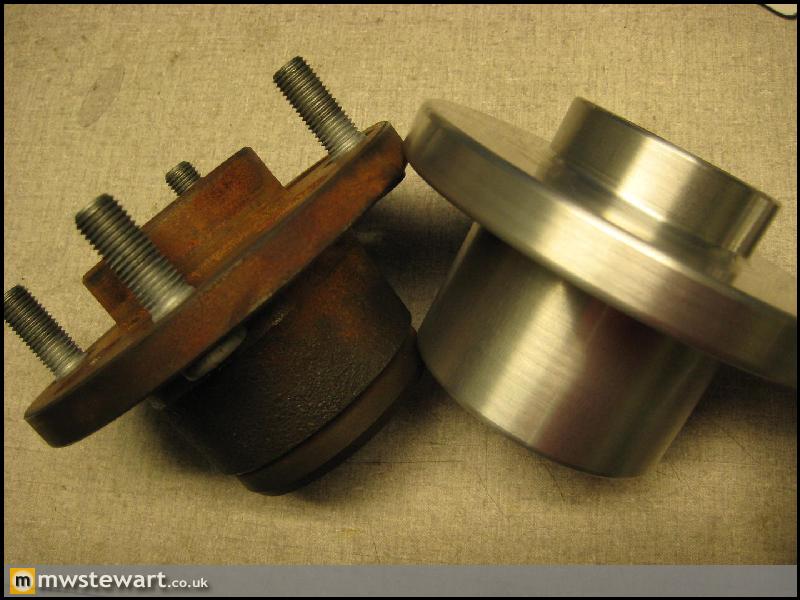
Billet 7075 Rear Hubs
Here's the first of many bespoke billet components for the suspension: Billet 7075 Focus rear hubs. The hub flange and body is thicker for increased strength yet there is still an overall weight saving over the original. The finishing touches will be a machined lip to mount the standard ABS ring, a groove to allow fitment of the standard bearing dust cap, and finally gold anodising.


Later Steering Column
I'm using the steering column from a later Fiesta because it came with a three piece steering shaft, which seems like it would be far safer in frontal impact than my original two piece shaft would be. The later column is also far sturdier around the mounting point which serves to improve location of the steering wheel.
The later column (top) is an evolution of the original steering rack and isn't a million miles away from the original, the main difference is that its smaller in diameter. To get around this I'm having an aluminium spacer turned which will allow the original rack locating bush to fit the later rack, which in turn suits my steering column mount in the shell.
The Focus console is secured by two screws under the forward cup holders and one screw under the rear cup holder. To help me determine what needed to be done I first secured the rear console fixing by installing a stainless Rivnut in the shell. Then, once the console was reasonably secure I could plan how to attack the rest.
The black powder coated object in the vice is a standard Mk4 Fiesta centre console front mount, which I had already modified my floor pan to accept as it acts as a stiffening brace for the Mk4/5/Puma dashboard by securing it to the floor. I modified the Fiesta bracket in order to create something that would be compatible with my dashboard, my floor pan, and also the Focus console.
After a couple of test fits of the console I wasn't happy with how far it encroached into the front foot wells, so I fabricated some U sections which the edge of the console could sit into, in order to pinch the width at the base and restore foot well space.
Here's the finished bracket. I added a strengthening rib on the lower edge.
The bracket was finished in etch primer and satin black. It clears everything it needs to and is a lot sturdier than a standard Focus bracket. The two out of focus white objects in the foreground are plastic captive fittings I installed to take the securing screws.
Next I made holes in the console for the Bosch Park Pilot display and buzzer, and the Fiesta tailgate release button.
I used some trim clips from ebay to secure the Parkpilot display harness. I was a bit sceptical about them but the adhesive is very good.
Here's how far the console encroached into the passenger foot well:
When clipped in to my edge brackets, the console is pulled in and its base width becomes close to that of the original console:
This photo shows where I have cut the Focus console to suit the Fiesta floor pan.
Here's the finished result. Incidentally it is mounted far more securely than in the Focus
Illuminated Cigarette Lighter Rings
A lot of Ford models came with illuminated Cigarette lighter sockets, so I ordered a pair and fitted them to my HVAC controls and the Focus centre console. I appreciate that most people hate the fake wood, but it works for me in the context of this build
Focus RS Gear Lever Adjustment
Following a test fit I decided that I wasn't happy with the position of the new gear lever: it was too far forward. The lever assembly was already as far back on the floor pan as it could go, so I stripped down the mechanism to see what could be done; it soon became evident that the RS lever has a very shallow rake compared to the original Fiesta lever.
I bent the RS lever to match the original Fiesta lever, and the gear knob now sits perfectly to hand.
Passenger Airbag Retrofit
The passenger Airbag is a straight forward fit now the wiring is in place.
I used adhesive felt pads around the circumference of the Airbag cover, to minimise any trim noise. They can just about be made out in the above photo.
Cover in place.
B-Pillar Trim Fitted
New B Pillar trims fitted with Sound Absorber 15 pads and new trim clips.
Front Passenger Seat Fitted
I'm using a pair of front seat belt pre-tensioners from a later Ford to compliment the new Airbag and restraints system that is now wired in. A quick test fit showed that the tensioners would bolt in place of the original buckles, but the gas chamber shroud fouled the seat runner.
So, I notched both inside seat runners to allow the pre-tensioners to fit.
The affected area on each seat runner was refinished in gloss black, and the pre-tensioners fitted perfectly into place.
I drilled three small holes in the seat cross brace to allow fitment of some cable clips to keep the pre-tensioner and heating element cables away from the runners.
Here's the passenger seat fitted.
Rear Speakers and Amplifier - Sinfoni
I decided that I couldn't live without some rear speakers, or 'fill' as its known. New components are Sinfoni 90.2x Amplifier and some S100 speakers, which are the same side as the Ford originals.
Sinfoni build quality certainly matches the sound.
One Touch Window Relays Fitted
I stripped down the Mondeo relay connectors to their component parts, as that way I could solder my new wires directly to the pins in order to maintain the correct wiring colour scheme.
Completed. The Orange, Black and Blue wires are for the Audi puddle and door handle lights I mentioned in a previous update.
Mondeo Instrument Cluster
I have always planned to upgrade the instrument cluster in the car, the criteria being something that offered increased features but at the same time wouldn't require drastic loom changes. I settled on the 2004-2008 Mondeo cluster which in visual terms it's not a huge step up from the Mk5 Fiesta cluster, but it is back lit and comes with a trip/fuel computer, temperature display, and ice warning, which definitely are an upgrade over the front lit and relatively simple Fiesta cluster.
The majority of information used by the cluster is read over the CAN Bus, so in order to use it in something as old as my Fiesta there is a requirement for both new data lines and a suitable ECU. You may recall I already integrated new twisted pair data lines with the interior loom in anticipation for an instrument upgrade, so that just leaves the ECU.
The Mk3 Fiesta used 'EECIV' Engine management which is now basic by today's standards and doesn't offer anything of use for my project, so that system and loom was cast aside and replaced with a modified loom from a later Fiesta, which gave me 'EECV'. This is a much more advanced Powertain management system that was in use up to 2008 and is actually available in two architectures: the more basic 60pin and a more advanced 104pin, which includes CAN bus amongst other things. The problem was that to my knowledge, the Fiesta only ever came with the cheaper/simpler 60 pin version of EECV so I fully anticipated I'd have to modified the engine bay loom to suit! This however wasn't a problem to me as the engine bay loom is separate entity and I hadn't yet started work on it: if I had, I wouldn't have attempted to fit this cluster. It was by chance that I stumbled across a Mk5 Fiesta 1.8 Turbo Diesel and noticed it used the 104 pin management, so I've since purchased the engine bay loom from that model which gives me basically plug-and-play pre-wiring for the 104 pin management. There are quite a few modifications I'll do to the engine loom but that will be covered in a later post.
Physically fitting the new cluster was actually quite easy even though it is larger then the original. My aim was to keep the dashboard standard and to modify the cluster, as it can be removed very easily if required.
I first stripped the cluster to determine if I could safely remove material in the necessary areas, and also inspect the PCB which also required a slight trim. All was well and the PCB wasn't printed in the areas I had to trim. Any cut areas will be made good with new plastic glued into place and I will also bond on some new mounting lugs, as the Mondeo lugs were in the way.
The Fiesta bezel shrouds the new instruments somewhat, so it will be removed, reshaped to suit and then repainted.
Billet 7075 Rear Hubs
Here's the first of many bespoke billet components for the suspension: Billet 7075 Focus rear hubs. The hub flange and body is thicker for increased strength yet there is still an overall weight saving over the original. The finishing touches will be a machined lip to mount the standard ABS ring, a groove to allow fitment of the standard bearing dust cap, and finally gold anodising.
Later Steering Column
I'm using the steering column from a later Fiesta because it came with a three piece steering shaft, which seems like it would be far safer in frontal impact than my original two piece shaft would be. The later column is also far sturdier around the mounting point which serves to improve location of the steering wheel.
The later column (top) is an evolution of the original steering rack and isn't a million miles away from the original, the main difference is that its smaller in diameter. To get around this I'm having an aluminium spacer turned which will allow the original rack locating bush to fit the later rack, which in turn suits my steering column mount in the shell.
Thanks guys!
Porkie, Cheers! I'm not sure about 184, but on page 3 I mentioned Paul J's 179.8.
I finished another couple of small jobs tonight. The alloy spacer for the new steering column is complete. I had a lip added to the rear face to prevent the nylon bush sliding off, and the alloy spacer itself has a tapered bore to prevent it moving on the shaft. I had to sweat the spacer on to the column so it's certainly secure.
The new column fits perfectly!

A very minor job on the rear quarter trims. The plastic covers for the seat belt aperture weren't a very good fit and could have caused a small rattle, so I've put some felt tape around the aperture. The covers (not pictured here) are now a very snug fit.

Porkie, Cheers! I'm not sure about 184, but on page 3 I mentioned Paul J's 179.8.
I finished another couple of small jobs tonight. The alloy spacer for the new steering column is complete. I had a lip added to the rear face to prevent the nylon bush sliding off, and the alloy spacer itself has a tapered bore to prevent it moving on the shaft. I had to sweat the spacer on to the column so it's certainly secure.
The new column fits perfectly!
A very minor job on the rear quarter trims. The plastic covers for the seat belt aperture weren't a very good fit and could have caused a small rattle, so I've put some felt tape around the aperture. The covers (not pictured here) are now a very snug fit.

Ha, sorry all I'm very busy with work at the moment so I haven't had chance to devote a great deal of time to the car, but here's a small update. All the following photos were taken on my mobile, so please excuse the poor quality.
Alcantara Roof Fittings
I've trimmed in Alcantara the sunroof mounting bracket and also two 'buttons' which secure the rear roof lining. They were previously a pale grey.
Poor photo, but the buttons are just visible either side of the rear light.
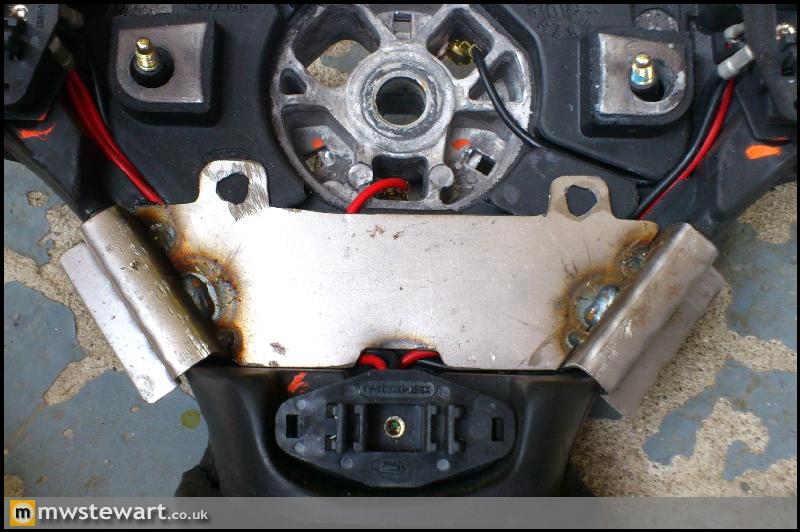
Cruise Control
I mentioned way back in the thread that cruise control was on my 'to do' list, although it was one modification I wasn't entirely sure would be possible, so now the steering column is mounted it seemed like a good time to find out. It's not the technicalities of the system itself that are the issue as I have a good understanding of how it all works, it's the Fiesta airbag clock spring that may prevent the retrofit. The clock spring is mounted behind the steering wheel and provides a way to continue the wiring loom through to the steering wheel mounted electronics. In the Mk3, Mk4, and Mk5 Fiesta there were only ever two wires to connect the drivers airbag, but if I am to integrate cruise control then I will need more to support the steering wheel mounted controls.
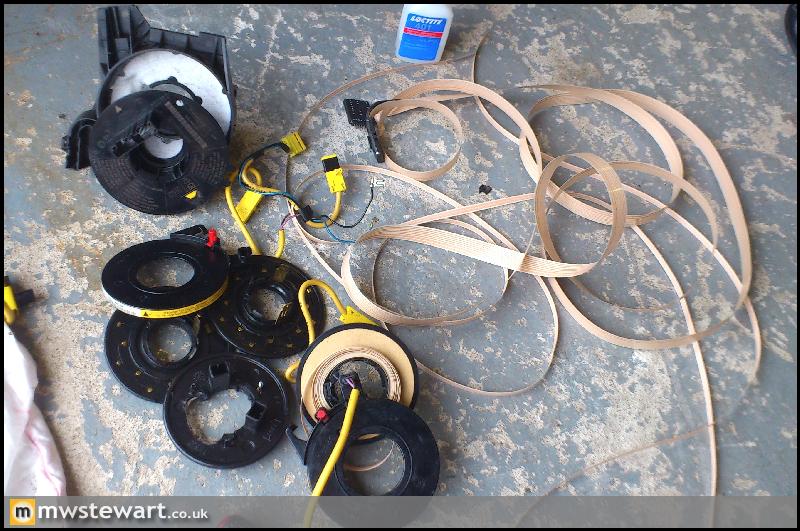
The Cruise Control system I've chosen is from a Mk1 Focus and requires three additional conductors in the clock spring. To start investigations I bought a clock spring from a Focus equipped with CC and stripped it down to find the extruded flat cable had nine conductors, the additional being for Focus specific features including a dual stage airbag. The Fiesta cable is on the left for comparison, and note that the thicker tracks are always for the airbag.
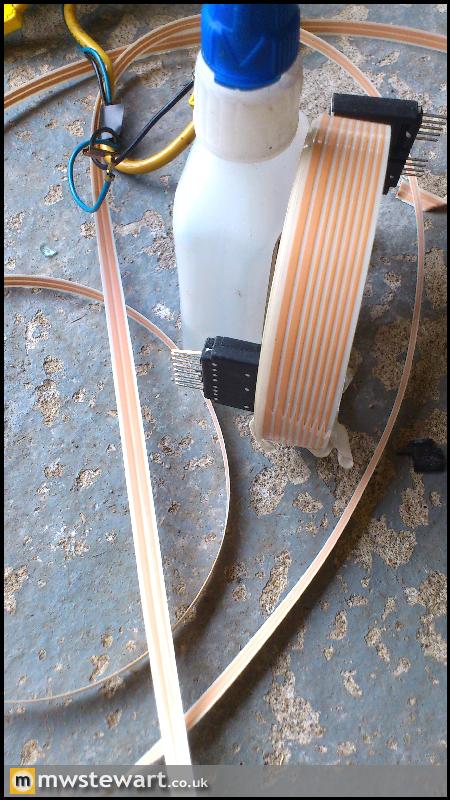
The clock spring is sandwiched between the column stalks/switches and steering wheel; moving the column switches was not possible, spacing the steering wheel was not a safe option and would leave an unsightly gap around the column trim, and I had ruled out machining of the steering wheel due to lack of material. The problem at this point then was how I could add tracks, but do so within the confines of the Fiesta clock spring housing. I tried several things and settled on including a cut down version of the Focus cable within the Fiesta housing together with the original Fiesta cable. This approach meant that I could leave the Fiesta airbag cable and terminations completely untouched, but the downside was that space in the housing was limited.
I produced a proof of concept build to test the theory and noted that the standard 6.5 turn capability of the Fiesta spring was reduced to 4.5 turns. The PAS rack in my car is 2.4 turns lock to lock which leaves 2.1 turns of excess in the spring. I knew that the same clock spring was used on all model variants and some came with a manual rack at 4.5 turns LtL, which gave an excess of 2 turns. This was slightly less than the excess I had with the PAS rack therefore I was happy that the concept was safe and had been proven.
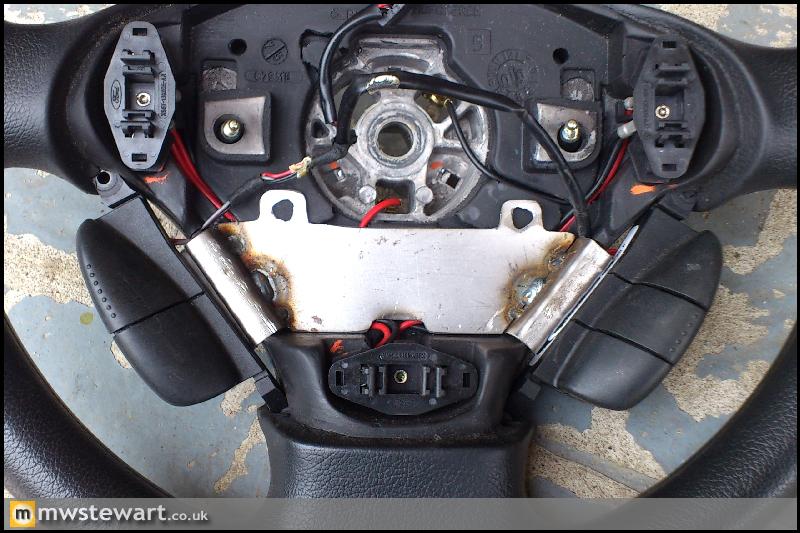
Now I knew the conversion was possible I looked to perfect the steering wheel controls. I bought some Focus cruise control switches and a base model fiesta steering wheel and deployed airbag to work on. The donor Focus was well worn so all the white text on the buttons had worn off!
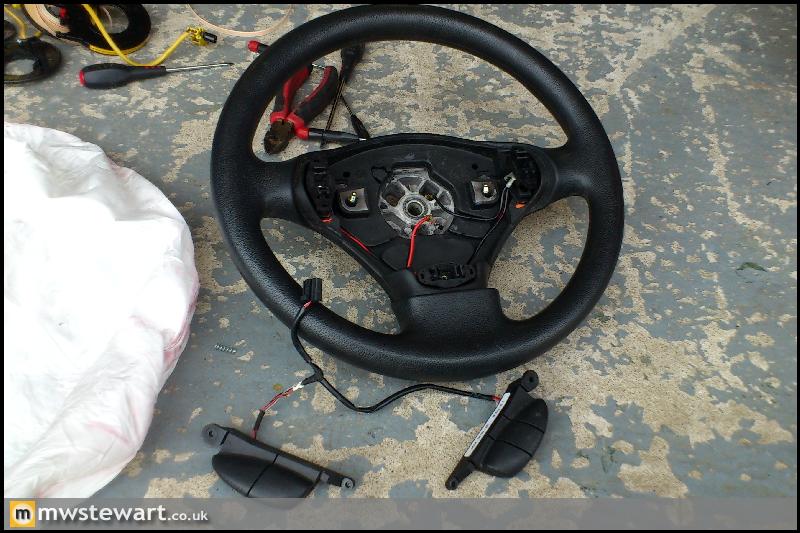
After a bit of trimming of both Fiesta airbag and Focus controls I had the controls sitting where I wanted them, and fabricated this bracket to mount them to the Fiesta steering wheel.
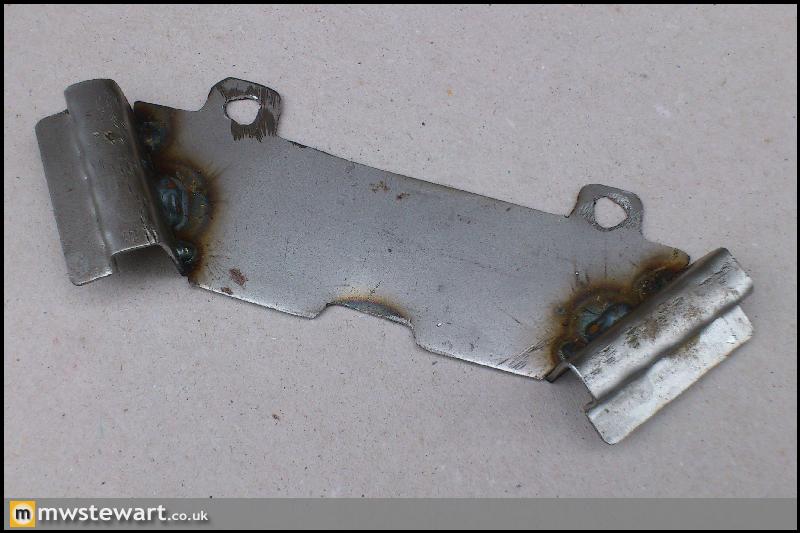
It fits snugly in the steering wheel and will be secured by 'fir tree' type trim clips through the two holes.
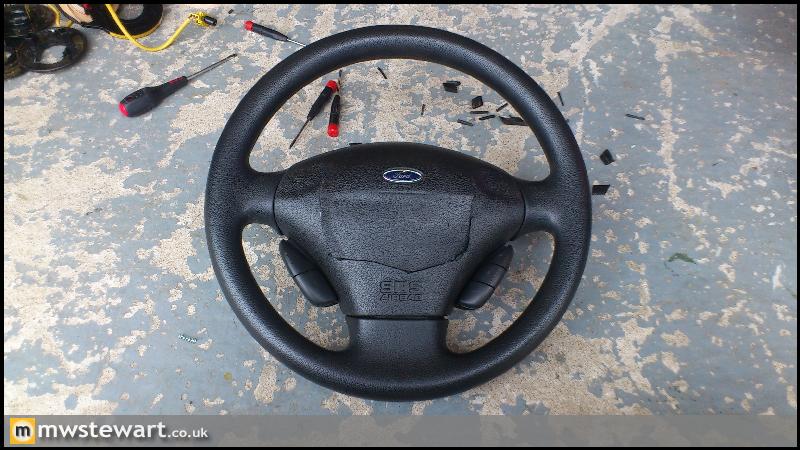
Controls screwed on.
Looks reasonable from the rear.

Complete. They're not the greatest looking switches in the world, but will fulfil a useful purpose.
Alcantara Roof Fittings
I've trimmed in Alcantara the sunroof mounting bracket and also two 'buttons' which secure the rear roof lining. They were previously a pale grey.
Poor photo, but the buttons are just visible either side of the rear light.
Cruise Control
I mentioned way back in the thread that cruise control was on my 'to do' list, although it was one modification I wasn't entirely sure would be possible, so now the steering column is mounted it seemed like a good time to find out. It's not the technicalities of the system itself that are the issue as I have a good understanding of how it all works, it's the Fiesta airbag clock spring that may prevent the retrofit. The clock spring is mounted behind the steering wheel and provides a way to continue the wiring loom through to the steering wheel mounted electronics. In the Mk3, Mk4, and Mk5 Fiesta there were only ever two wires to connect the drivers airbag, but if I am to integrate cruise control then I will need more to support the steering wheel mounted controls.
The Cruise Control system I've chosen is from a Mk1 Focus and requires three additional conductors in the clock spring. To start investigations I bought a clock spring from a Focus equipped with CC and stripped it down to find the extruded flat cable had nine conductors, the additional being for Focus specific features including a dual stage airbag. The Fiesta cable is on the left for comparison, and note that the thicker tracks are always for the airbag.
The clock spring is sandwiched between the column stalks/switches and steering wheel; moving the column switches was not possible, spacing the steering wheel was not a safe option and would leave an unsightly gap around the column trim, and I had ruled out machining of the steering wheel due to lack of material. The problem at this point then was how I could add tracks, but do so within the confines of the Fiesta clock spring housing. I tried several things and settled on including a cut down version of the Focus cable within the Fiesta housing together with the original Fiesta cable. This approach meant that I could leave the Fiesta airbag cable and terminations completely untouched, but the downside was that space in the housing was limited.
I produced a proof of concept build to test the theory and noted that the standard 6.5 turn capability of the Fiesta spring was reduced to 4.5 turns. The PAS rack in my car is 2.4 turns lock to lock which leaves 2.1 turns of excess in the spring. I knew that the same clock spring was used on all model variants and some came with a manual rack at 4.5 turns LtL, which gave an excess of 2 turns. This was slightly less than the excess I had with the PAS rack therefore I was happy that the concept was safe and had been proven.
Now I knew the conversion was possible I looked to perfect the steering wheel controls. I bought some Focus cruise control switches and a base model fiesta steering wheel and deployed airbag to work on. The donor Focus was well worn so all the white text on the buttons had worn off!
After a bit of trimming of both Fiesta airbag and Focus controls I had the controls sitting where I wanted them, and fabricated this bracket to mount them to the Fiesta steering wheel.
It fits snugly in the steering wheel and will be secured by 'fir tree' type trim clips through the two holes.
Controls screwed on.
Looks reasonable from the rear.
Complete. They're not the greatest looking switches in the world, but will fulfil a useful purpose.

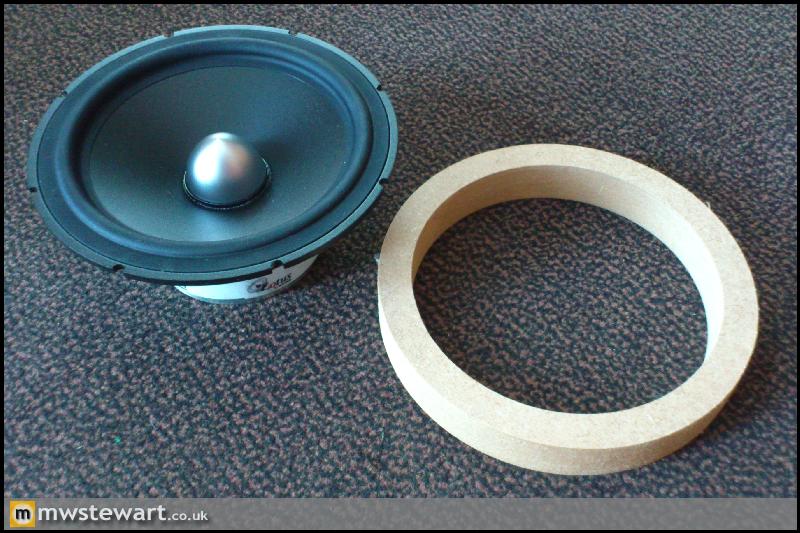
Front Midbass Driver Installation
The standard Fiesta front speakers are 13cm which is really too small for a mid range speaker. The Lotus replacements I've chosen are 16.5cm, so there's a bit of work to be done. I've bought a pair of pre-made MDF rings which are 25mm deep to give plenty of depth to keep the larger speakers away from the window glass inside the door, and also to sculpt the rings around the various protrusions on the inner door skin.
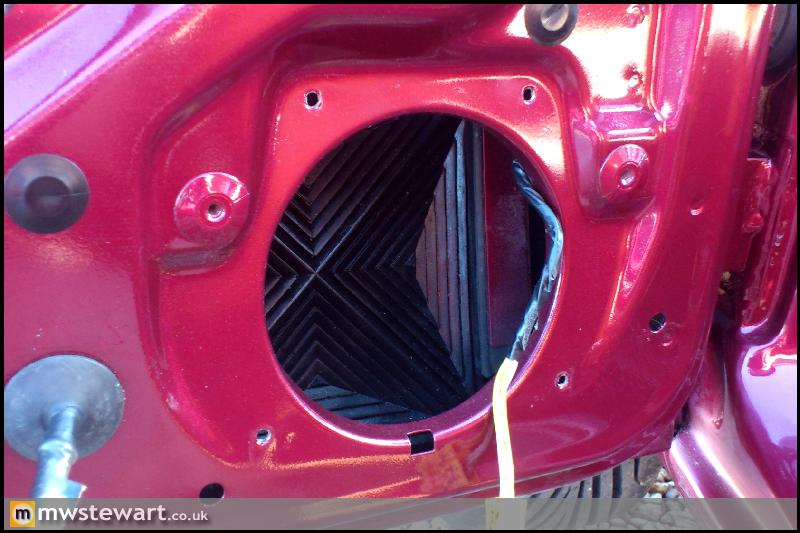
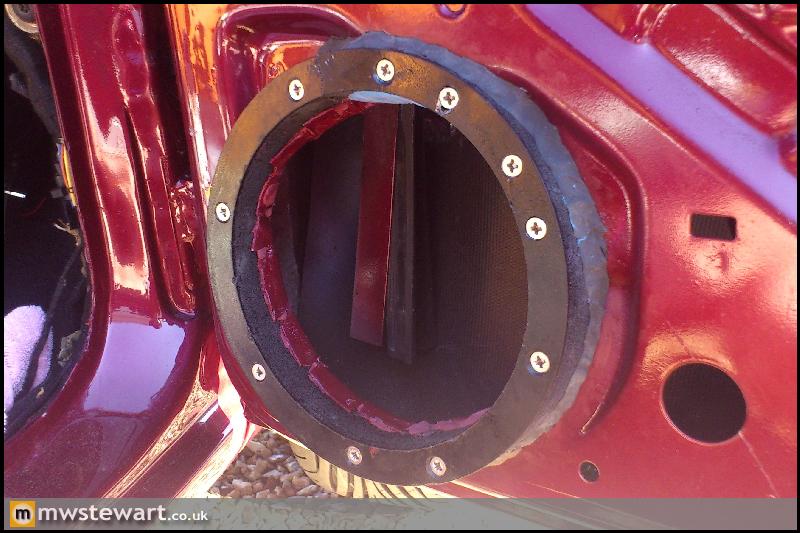
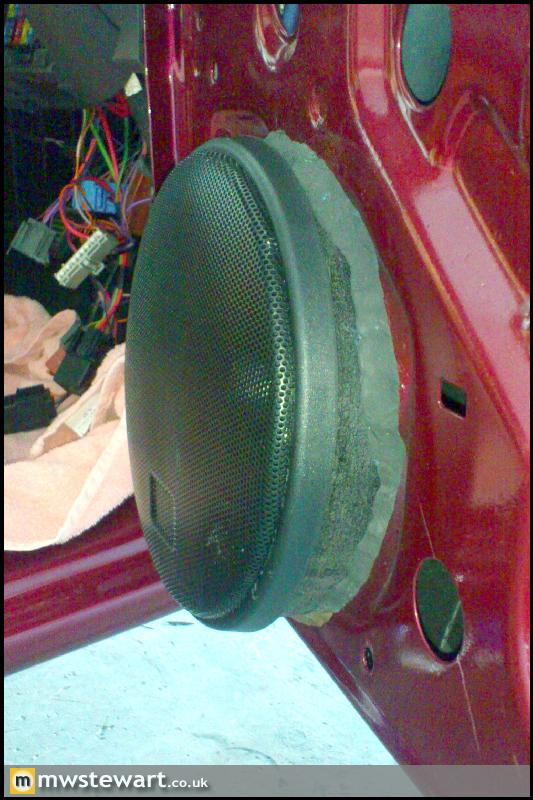
Standard Fiesta speaker aperture on the passenger side.
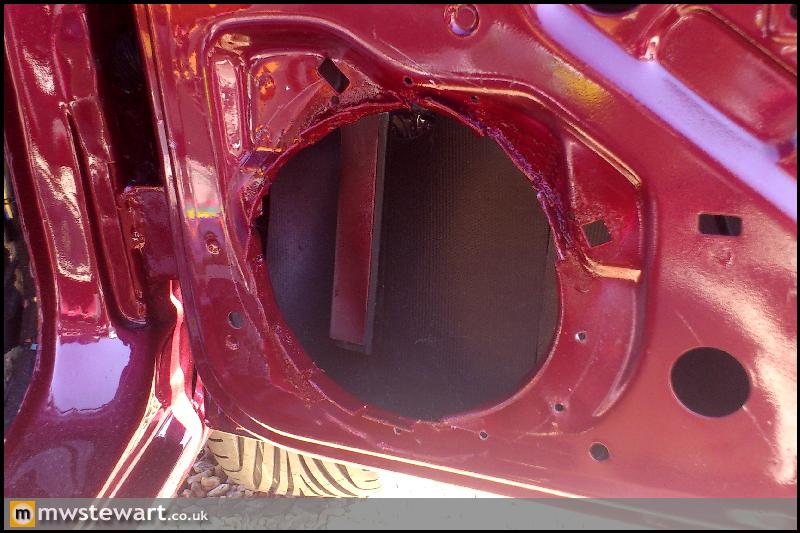
Here's the drivers door aperture enlarged for new speakers. I opened the aperture using Aviation shears, and bent the excess metal outwards to create 'fingers' to help seat the MDF ring, and any excess was cut off. I etch primed and sprayed in Noveau Red to finish. At this point I had already sculpted the MDF ring and test fitted it to ensure the new speaker had sufficient clearance around the edges of the door card.
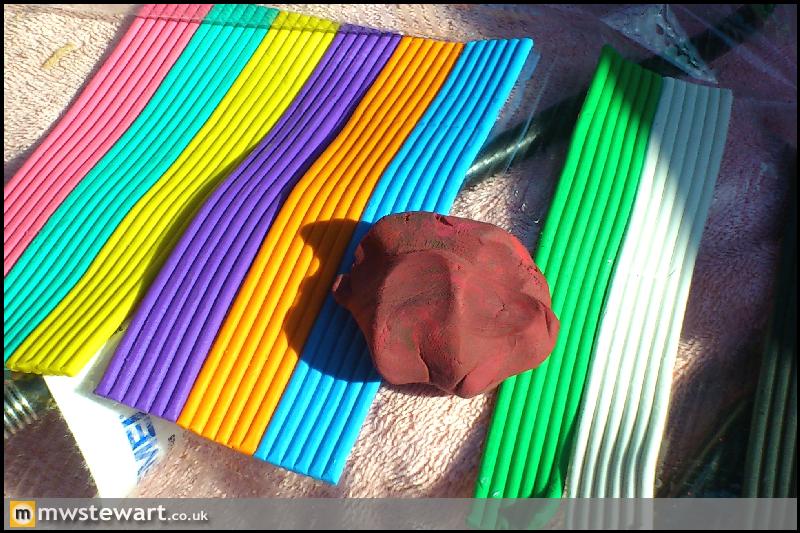
The first use of modelling clay on the project I did some quick research and it seems the material of choice to dampen vibrations and fill any gaps between the MDF ring and door. I wanted all black but could only find these multi packs, so I mixed a few colours to match the cars paint.
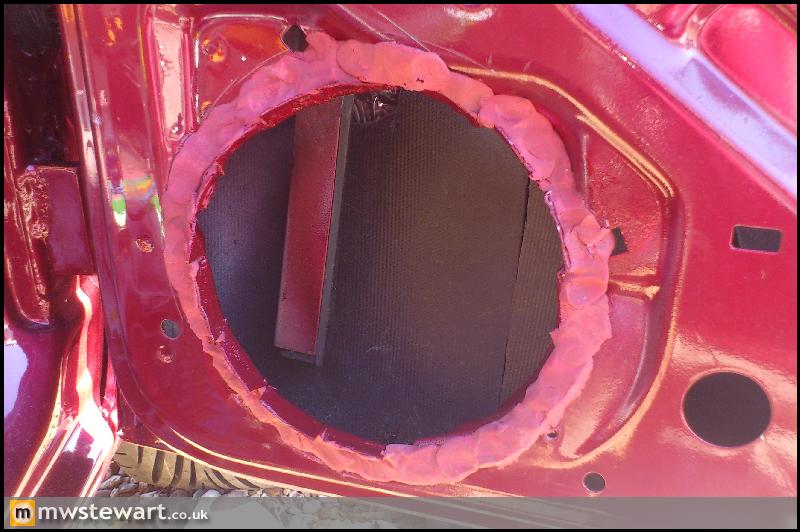
Clay applied around the speaker aperture and on the outside edge of the fingers.
I primed and painted the MDF rings and mounted them with stainless screws. There was one strip of black clay in each pack so I used that to seal the outer edge of the rings.
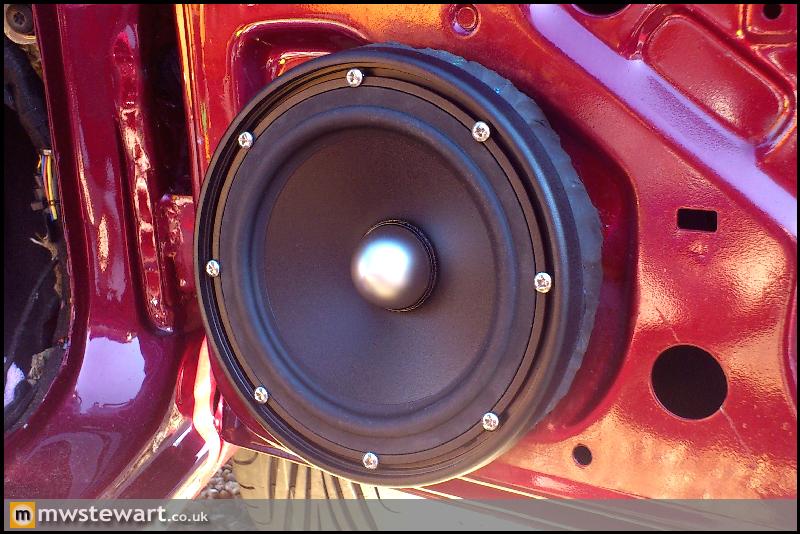
Seas driver mounted with stainless screws.
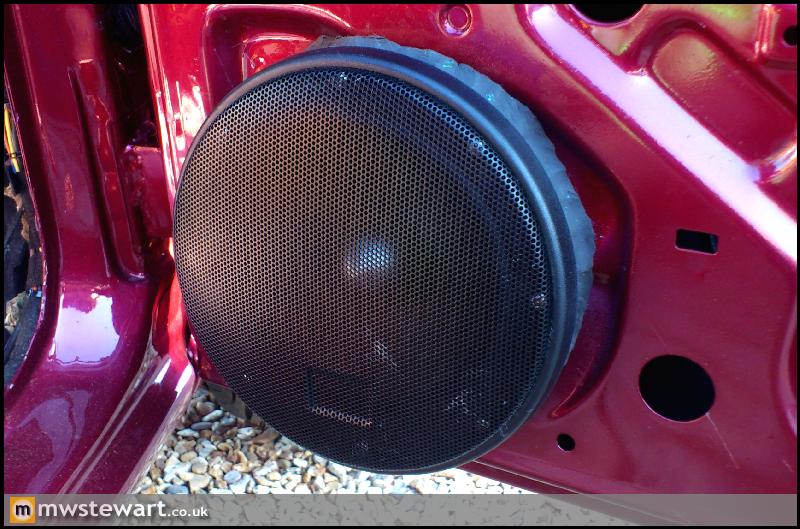
I put some metal covers on to protect the drivers for now. I'm still deciding what approach to take with the door cards; I can choose a stealth approach which leaves the door card mostly unmodified with the downside being some shrouding of the driver, or alternatively I can cut the door card and loose the standard look but ultimately ensure the driver can perform at its best.
This photo shows how I angled the mounts upwards and rearwards.
The standard Fiesta front speakers are 13cm which is really too small for a mid range speaker. The Lotus replacements I've chosen are 16.5cm, so there's a bit of work to be done. I've bought a pair of pre-made MDF rings which are 25mm deep to give plenty of depth to keep the larger speakers away from the window glass inside the door, and also to sculpt the rings around the various protrusions on the inner door skin.
Standard Fiesta speaker aperture on the passenger side.
Here's the drivers door aperture enlarged for new speakers. I opened the aperture using Aviation shears, and bent the excess metal outwards to create 'fingers' to help seat the MDF ring, and any excess was cut off. I etch primed and sprayed in Noveau Red to finish. At this point I had already sculpted the MDF ring and test fitted it to ensure the new speaker had sufficient clearance around the edges of the door card.
The first use of modelling clay on the project
I did some quick research and it seems the material of choice to dampen vibrations and fill any gaps between the MDF ring and door. I wanted all black but could only find these multi packs, so I mixed a few colours to match the cars paint.Clay applied around the speaker aperture and on the outside edge of the fingers.
I primed and painted the MDF rings and mounted them with stainless screws. There was one strip of black clay in each pack so I used that to seal the outer edge of the rings.
Seas driver mounted with stainless screws.
I put some metal covers on to protect the drivers for now. I'm still deciding what approach to take with the door cards; I can choose a stealth approach which leaves the door card mostly unmodified with the downside being some shrouding of the driver, or alternatively I can cut the door card and loose the standard look but ultimately ensure the driver can perform at its best.
This photo shows how I angled the mounts upwards and rearwards.
k-ink said:
You should add inner door deadening, then add a suitable protective foam cover over the entire back of the drivers. The inner door WILL get wet and destroy your speakers over time. The way to do this is push the large (over size) foam square into the hole, then screw the baffle on top, remove excess foam around the baffle, then mount the driver. That way no element of the driver is directly exposed to the inner door. But air will still breath through the foam.
Thank you. The inner doors will be sealed and vibration damped with a layer of deadening felt on top. I must admit I was a little concerned about moisture on the back of the speakers so I will take your advice.warmfuzzies said:
I suspect these like many doors are what they call the wet type, meaning water is allowed into the shell, and drained at the bottom. To make a door fully water proof, costs money, so felt seals etc are purposefully allowed to let a little water by, and a door membrane keeps the inner shell dry, that's how your speakers could be damaged, better to add a deflector, and keep then from getting wet.
K
Thanks K. You are right: they are wet doors. I have some new membranes to go back on once the inner door has been vibration damped, and for the speakers I just found these on eBay:K

I think I will cut off the bottom half to leave a hood for the speakers.
k-ink said:
You should leave the back on! That is the point. The material should allow the air the vent through it yet remain largely splash proof.
The material is closed cell foam unfortunately, so the drivers won't work correctly if it is left uncut. I might see if I can compromise somehow.I've riveted the one touch relays to the inside of the doors. I'm now about finished with the doors so can look to getting the cards back on.
Boot Floor Battery Box
My Dad put his Architectural skills to good use by drawing up a template and creating this card model of the boot battery box.
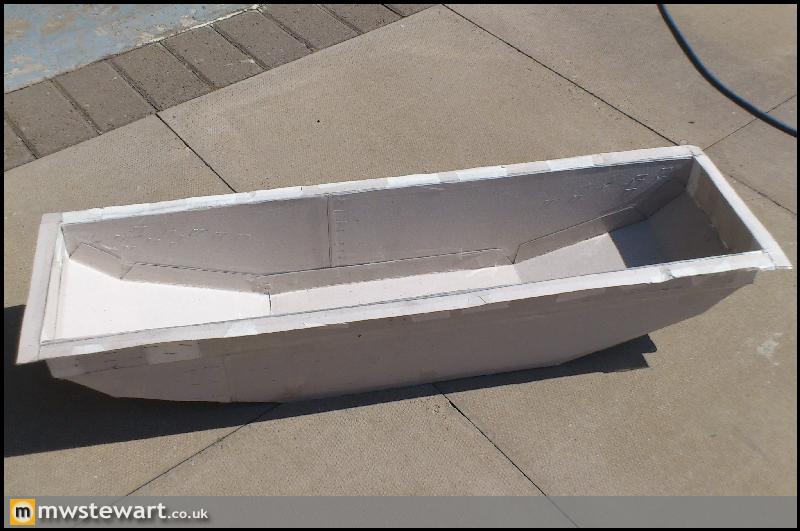
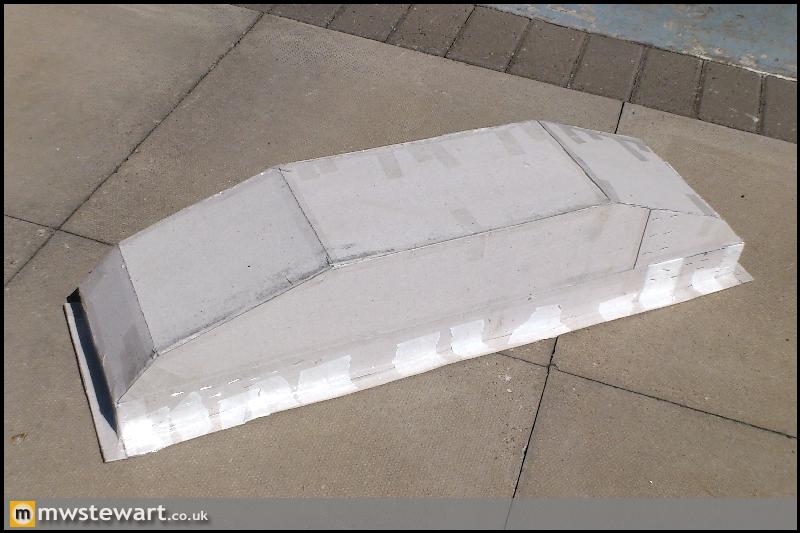
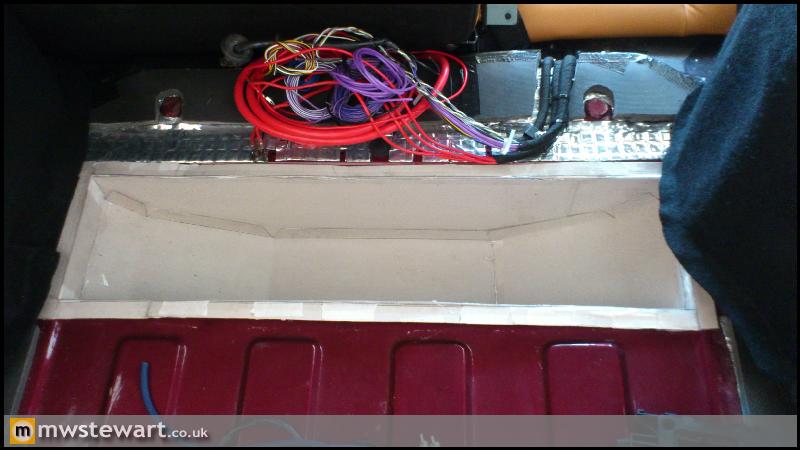
In situ. I can now de-construct the model to create a cutting template for Aluminium sheet.
Golf Armrest
I wanted an armrest of some kind because I'm both used to them and because they are good places for an iPod dock. I looked at several armrests from the VAG range of cars as I like their designs the most, and eventually settled on the Golf Mk4 item which was dimensionally most suited to the Fiesta.

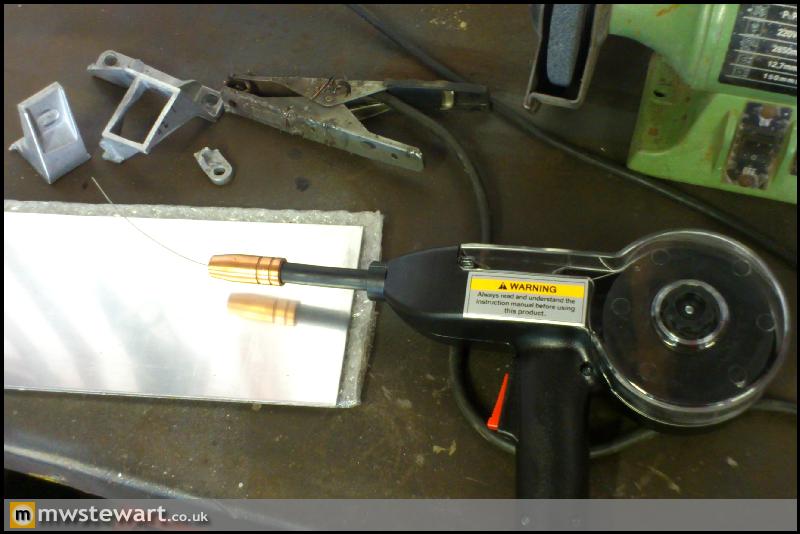
The first step was to modify the armrest bracket to suit the Fiesta. This was to be the first time I'd welded alloy, so it was pure Argon at the ready together with a spool gun for my MIG welder.

This photo shows the spool gun, and in the top left hand corner is the Golf lower bracket which I cut up to begin modifying.
This was the best I came up with. I think it's OK given this is a MIG welder and the base alloy is cast, so has impurities, and I was also using 5356 wire when ideally I should have used 4043 to match the silicone content in the Golf bracket.
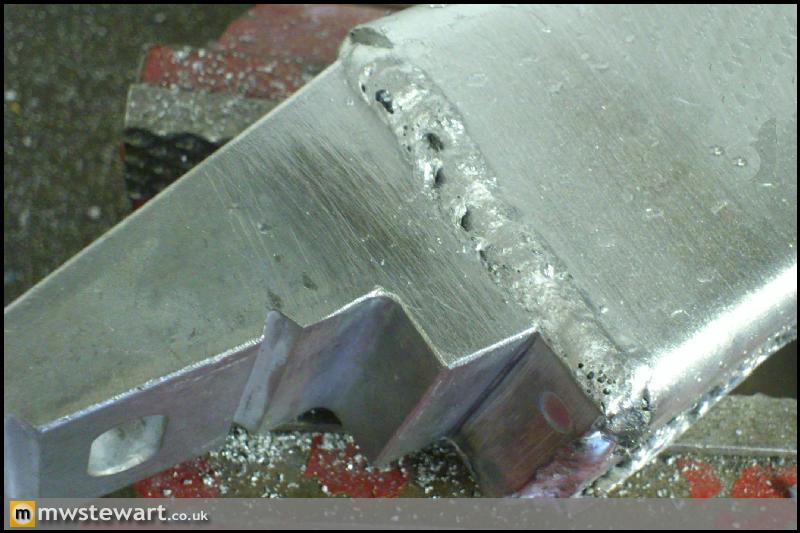
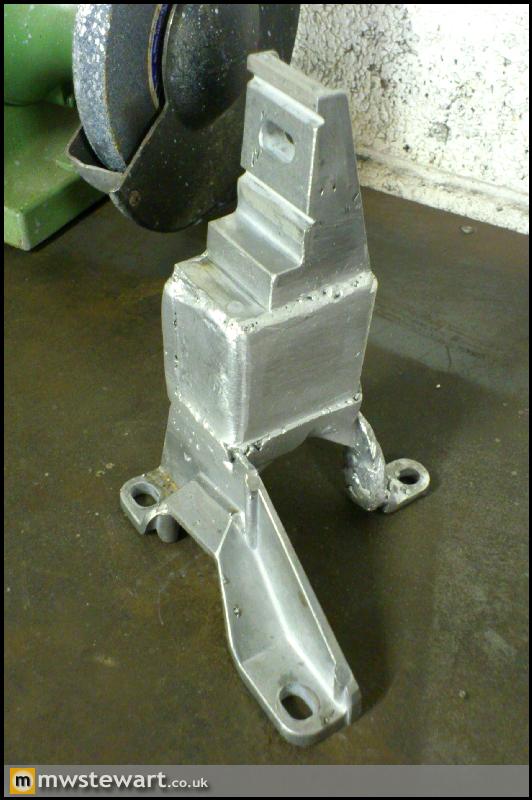
I cleaned up the worst welds with a file, and here's the finished result. Increased height and a smaller footprint to match the Fiesta exhaust tunnel.
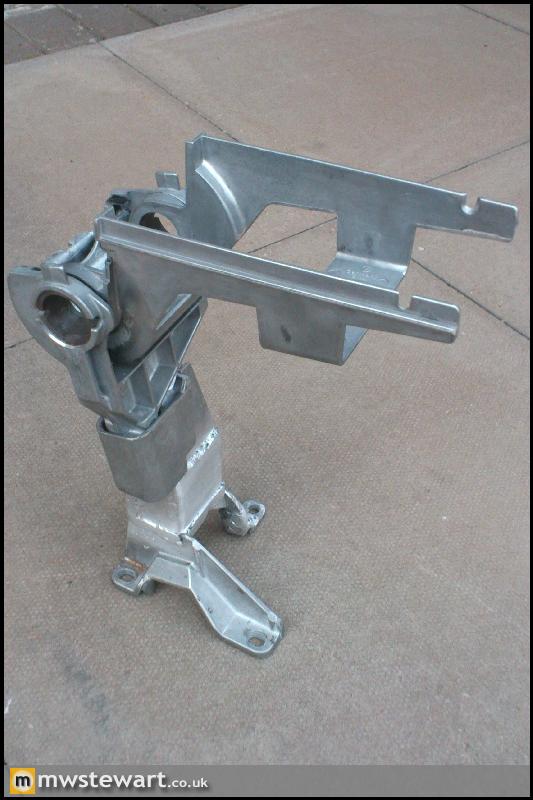
Armrest carcass test fit.
I sent the lid to Aldridge to be covered in matching leather. I also drew a small diagram to illustrate some stitching detail that matches all of the seat bases, and Karen copied it perfectly.

Test fit and I'm happy. I shall tweak the inside seat bolsters slightly to provide a little more clearance for the armrest.
NB White balance is out in the above photo thanks to mobile phone camera. I keep forgetting to take my SLR when I work on the car.
The closest plastic colour trim in the Golf is black, so I've ordered some specialist trim paint from America which is colour matched to the 'Midnight Black' trim in the Fiesta. I can then build up the armrest and create a filler piece for the Focus centre console.
Boot Floor Battery Box
My Dad put his Architectural skills to good use
by drawing up a template and creating this card model of the boot battery box.In situ. I can now de-construct the model to create a cutting template for Aluminium sheet.
Golf Armrest
I wanted an armrest of some kind because I'm both used to them and because they are good places for an iPod dock. I looked at several armrests from the VAG range of cars as I like their designs the most, and eventually settled on the Golf Mk4 item which was dimensionally most suited to the Fiesta.
The first step was to modify the armrest bracket to suit the Fiesta. This was to be the first time I'd welded alloy, so it was pure Argon at the ready together with a spool gun for my MIG welder.
This photo shows the spool gun, and in the top left hand corner is the Golf lower bracket which I cut up to begin modifying.
This was the best I came up with. I think it's OK given this is a MIG welder and the base alloy is cast, so has impurities, and I was also using 5356 wire when ideally I should have used 4043 to match the silicone content in the Golf bracket.
I cleaned up the worst welds with a file, and here's the finished result. Increased height and a smaller footprint to match the Fiesta exhaust tunnel.
Armrest carcass test fit.
I sent the lid to Aldridge to be covered in matching leather. I also drew a small diagram to illustrate some stitching detail that matches all of the seat bases, and Karen copied it perfectly.
Test fit and I'm happy. I shall tweak the inside seat bolsters slightly to provide a little more clearance for the armrest.
NB White balance is out in the above photo thanks to mobile phone camera. I keep forgetting to take my SLR when I work on the car.
The closest plastic colour trim in the Golf is black, so I've ordered some specialist trim paint from America which is colour matched to the 'Midnight Black' trim in the Fiesta. I can then build up the armrest and create a filler piece for the Focus centre console.
Gassing Station | Readers' Cars | Top of Page | What's New | My Stuff