Pembleton mkII - Tin Tub
Discussion


Thanks guys, I'm quite pleased with how its turning out.
Another day off work (holiday) another day in the garage
I finished wire beading the edge today. Same technique as used on my test pieces, but with the addition of pliers to finnish wrapping round. This does damage the surface of the aluminium slightly, but once tickled with some sandpaper comes up okay.
Wire inserted and staked every 4" or so.

Then I worked around.

Finished, tidied and wiped down with an abrasive pad.


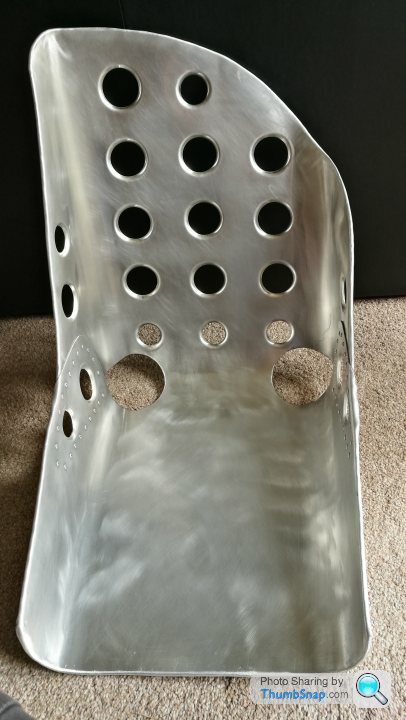

If you're wondering why it looks like there's a dink in the upper left side/back that's because there is... to clear the upper chassis rail as it wraps around.
Another day off work (holiday) another day in the garage
I finished wire beading the edge today. Same technique as used on my test pieces, but with the addition of pliers to finnish wrapping round. This does damage the surface of the aluminium slightly, but once tickled with some sandpaper comes up okay.
Wire inserted and staked every 4" or so.
Then I worked around.
Finished, tidied and wiped down with an abrasive pad.
If you're wondering why it looks like there's a dink in the upper left side/back that's because there is... to clear the upper chassis rail as it wraps around.
Astacus said:
You can’t be far off that point where you can actually sit in it with the steering wheel attached and make “broom broom” noises 
I've already (sort of) done that.I say on the floor, with steering wheel in hand (not attached).
We are another step closer though! I've welded the QR to my steering column. I did 4x8mm plug welds and then seamed along the perimeter at the top. The actual QR is quite tight to the weld on boss, so I had to linish the welds back.


Pro tip - when you're using power tools use the correct PPE. I usually laugh in the face of health and safety (safety third) but I learnt the hard way today.
I was there, angle grinding away (with the guard removed - obviously) and it snagged on my workpiece and ran away from me.... over the knuckles of three of my fingers on my left hand...
My ring finger took the brunt of the damage, and I wont show any detailed images of that, but yeah...
My fingers are all still attached but it could've been much worse, boy are they throbbing now! After about half an hour under the cold tap, then washed, then about another half hour of pressure it stopped gushing with blood and I made a classic garage bandage and went back to work.
Makes me cringe whenever i see someone using an angle grinder with the shield taken off . ..i recently had to notch my crank on the rear engine to key the hub on there to stop it spinning , and to get clearance i had to take off the shield ,i think i magically made my arms twice as long to try to be out of the potential flight path .
ivanhoew said:
Makes me cringe whenever i see someone using an angle grinder with the shield taken off . ..i recently had to notch my crank on the rear engine to key the hub on there to stop it spinning , and to get clearance i had to take off the shield ,i think i magically made my arms twice as long to try to be out of the potential flight path .
Yeah, I only took it off because I accidentally bought a whole load of disks cheap that were the next size up and wouldn't quite fit under the guard... Ambleton said:
Yeah, I only took it off because I accidentally bought a whole load of disks cheap that were the next size up and wouldn't quite fit under the guard...
I did the same thing with some Lidl flap discs, gave them to a friend who is much less concerned by these things than me 
Ouch, that looks sore. Still, all worth it in the name of making progress - that seat truly is a thing of beauty!
As I have to live, breathe and sing safety at work, you'd think If do the same in the garage.... not entirely the case, although I do wear goggles gloves and a mask when grinding I admit!
As I have to live, breathe and sing safety at work, you'd think If do the same in the garage.... not entirely the case, although I do wear goggles gloves and a mask when grinding I admit!
Thank you, it has turned out quite well. I surprise even myself sometimes! 
I've bonded and riveted the bulkhead top in tonight and started making the glovebox. The standard pattern for the glovebox stowage makes it really large and deep. So I'm planning on changing it quite a bit (obviously).
About 80mm will be dedicated to an engine breather box I'm going to make to match the shape.
160mm will be for some electrics - ignition and voltage regulator as a minimum. Maybe some other things too.
180mm will go for the glovebox. This is still plenty big enough to stow goggles, gloves, hats etc.
I'm out of the garage tomorrow as I got a pretty serious b king tonight off the wife claiming she's a, garage widow blah blah...
More updates friday night or saturday.
I've bonded and riveted the bulkhead top in tonight and started making the glovebox. The standard pattern for the glovebox stowage makes it really large and deep. So I'm planning on changing it quite a bit (obviously).
About 80mm will be dedicated to an engine breather box I'm going to make to match the shape.
160mm will be for some electrics - ignition and voltage regulator as a minimum. Maybe some other things too.
180mm will go for the glovebox. This is still plenty big enough to stow goggles, gloves, hats etc.
I'm out of the garage tomorrow as I got a pretty serious b
king tonight off the wife claiming she's a, garage widow blah blah...More updates friday night or saturday.
Astacus said:
Don’t let your wife give my wife any ideas.......
Good news is I'm home alone this weekend as she's off for one of her friends "girls only" birthday parties. No doubt it'll include copious amounts of prosecco, a stty rom-com, onesies and face masks. Meanwhile I'll be in the garage the whole time, covering everything in sight with aluminium trimmings and offcuts...The main shape of the glove box has now been made.
The forward portion will house the Volrage regulator and the electronic ignition as a mimimum. I may portion off another section for the fuel pump to hide it away. I still need to make the hatch, I have some hinges and latches on order.
Forward if this, I will make a dedicated baffled engine breather box.
my gearbox has been take away for a rebuild tonight, I will be getting a "hybrid" long box.
I've also been really struggling stamping my chassis number. So I contacted a few local companies to get a chassis plate laser cut. It was ready this afternoon for collection?

I welded it to my chassis and dressed the welds to neaten it up.

This evening I started to make an engine oil catch tank/breather unit.
I made two identical end caps using a dolly and hammer to knock the edge round. It took a little time to work around and remove the creases. I've decided to make external seams to make it easier to ensure its oil tight. It won't be under any pressure, but will hold a small amount of oil.
I've bought some sealed blind rivets too. These are really nice and seem to work well. Even so, I limited the use of the rivets. More holes means more potential leak paths!
The in/out are half inch flange fittings from a water butt. The drain is an 8mm barb m8 thread.
I have made some internal baffles to take as much of the energy out as possible and plenty of surface area. Hopefully this will be enough to condense most of the oil in the vapour.


I've also been really struggling stamping my chassis number. So I contacted a few local companies to get a chassis plate laser cut. It was ready this afternoon for collection?
I welded it to my chassis and dressed the welds to neaten it up.
This evening I started to make an engine oil catch tank/breather unit.
I made two identical end caps using a dolly and hammer to knock the edge round. It took a little time to work around and remove the creases. I've decided to make external seams to make it easier to ensure its oil tight. It won't be under any pressure, but will hold a small amount of oil.
I've bought some sealed blind rivets too. These are really nice and seem to work well. Even so, I limited the use of the rivets. More holes means more potential leak paths!
The in/out are half inch flange fittings from a water butt. The drain is an 8mm barb m8 thread.
I have made some internal baffles to take as much of the energy out as possible and plenty of surface area. Hopefully this will be enough to condense most of the oil in the vapour.
Gassing Station | Readers' Cars | Top of Page | What's New | My Stuff