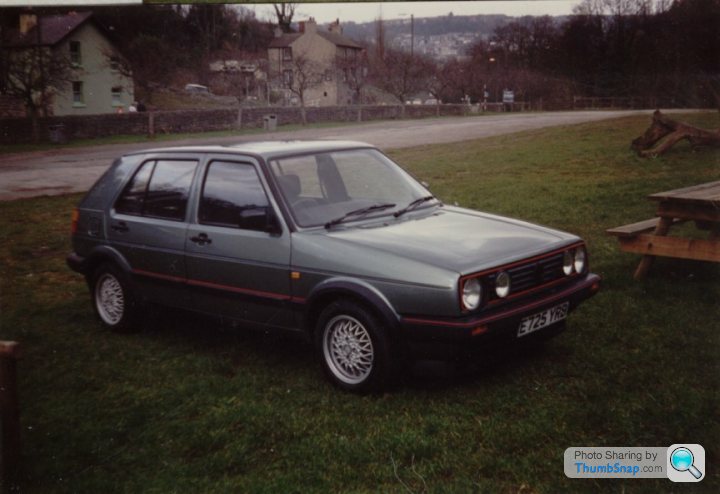
Jade green Mk2 Golf GTI 16v - project
Discussion


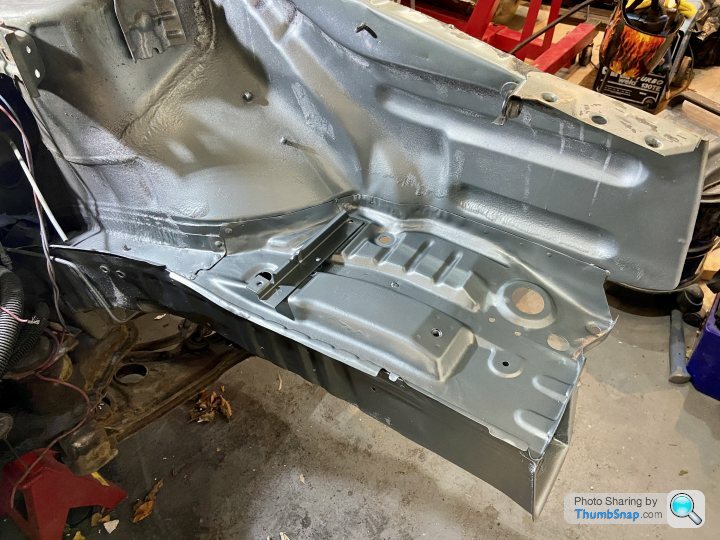
Posting from my mobile it's easier to upload a single picture per post, but as you can see the new battery tray is welded in. I'm quite happy with the welds, managed to get decent penetration and they seem plenty strong enough. The fit is pretty bang on, I won't need half as much seam sealer as the factory had used originally!!
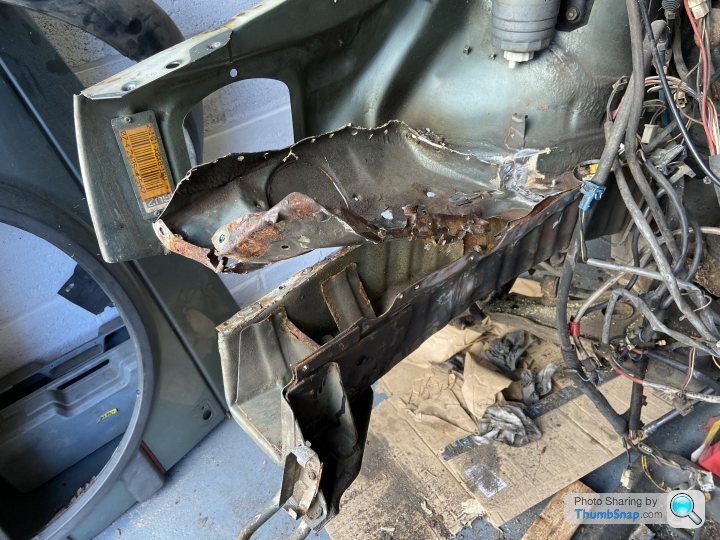
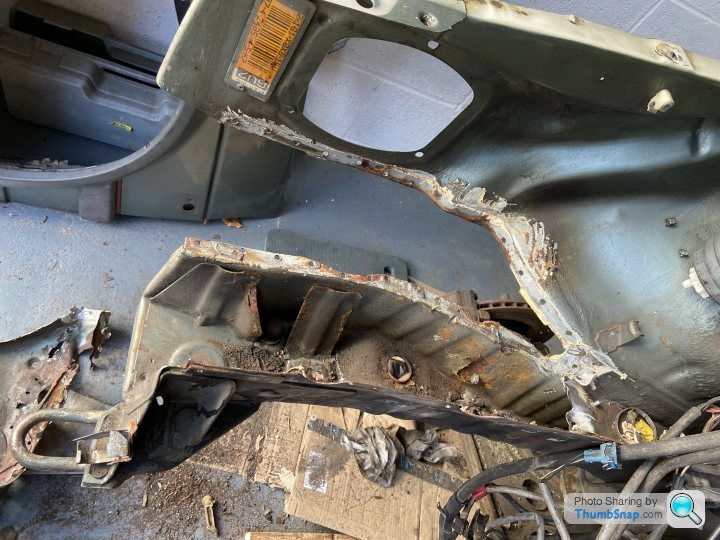
Passenger side next, that might be a little more complex as I think the whole chassis leg top might need replacing. But, it's just metal so shouldn't be too hard.
Passenger side next, that might be a little more complex as I think the whole chassis leg top might need replacing. But, it's just metal so shouldn't be too hard.
_Mja_ said:
Nice fabrication work 
I've recently acquired a 16v big bumper with an ABF engine and KR fuelling. I'm working on it as well but plan to take it to Stealth eventually once I am up and running. Very knowledgeable and reasonable prices on KJet and VR6 work.
One observation about the ABF block is exhaust manifold choice. The ABF block is 16mm taller than the 9A and the original KR. You probably don't have the original KR exhaust manifold, and if you do it may well be cracked as they all seem to crack, so are probably looking aftermarket.
Generally the KR 4 branch exhaust manifolds hit the bulkhead when mated to the ABF.
TSR make one for the ABF in the mk2 however it's £420. Or you could find a KR exhaust manifold which will clear the bulkhead when mated to an ABF.
I've recently seen someone made their own used a mk3 LHD half exhaust manifold then made a custom section to mate to the rest of the exhaust. This is probably the best option for both sound and performance - 4 branches can be very raspy on a 16v.
Of course with the 9A you'll not have all of the hassle but I believe the ABF engine is superior in design to the 9A.
I've just checked out that TSR manifold, it looks like a pretty neat solution. I've bookmarked that for the future, I feel like engine fitting is a way off yet.I've recently acquired a 16v big bumper with an ABF engine and KR fuelling. I'm working on it as well but plan to take it to Stealth eventually once I am up and running. Very knowledgeable and reasonable prices on KJet and VR6 work.
One observation about the ABF block is exhaust manifold choice. The ABF block is 16mm taller than the 9A and the original KR. You probably don't have the original KR exhaust manifold, and if you do it may well be cracked as they all seem to crack, so are probably looking aftermarket.
Generally the KR 4 branch exhaust manifolds hit the bulkhead when mated to the ABF.
TSR make one for the ABF in the mk2 however it's £420. Or you could find a KR exhaust manifold which will clear the bulkhead when mated to an ABF.
I've recently seen someone made their own used a mk3 LHD half exhaust manifold then made a custom section to mate to the rest of the exhaust. This is probably the best option for both sound and performance - 4 branches can be very raspy on a 16v.
Of course with the 9A you'll not have all of the hassle but I believe the ABF engine is superior in design to the 9A.
I had a tin of LN6V Jade Green paint mixed up a month or so ago and it’s nowhere near the shade of my car. It’s a nice colour, but not the colour of my car. Anyhoo, I figure it’s fine for throwing on new panels to make them look nice before the whole car gets painted in the future.
I’ll give that a brush of seam sealer tomorrow and then paint over it.
I’ll give that a brush of seam sealer tomorrow and then paint over it.

gary71 said:
Is it worth bolting up the subframe or slam panel to make sure the longits are the right distance apart before welding it up?
Just out of shot to the right is the slam panel. That’s exactly what I’ve been doing. But also, metal bends. The tolerances in the factory metal I’ve seen so far makes me think these cars aren’t built to McLaren levels of accuracy. The bolt holes are about right so far.Retro_Jim said:
I've just been catching up, I love the early Mk2 over the big bumpers - it's the only car I ever regret selling!
You're doing excellent work with the repairs and it'll be great seeing the mk2 going back on the road!
Thanks Jim. Taking my time and learning as I go. Hopefully this means I get it right first time and won’t need to undo any of my work.You're doing excellent work with the repairs and it'll be great seeing the mk2 going back on the road!
Remember when car radios used to be wired in like this? It’s fair to assume this car has had its fair share of amateur ICE installs! So far I’ve removed an amp wiring kit, RCA leads and a CD changer control cable. The 18 year old in me wants to wire them back in properly and hear all the interior trim panels buzz and rattle!

missing the VR6 said:
Do it!! I miss those days and still have a load of my old amps in the loft awaiting a suitable car.
As a bare minimum I'll upgrade the factory fit speakers and the wiring. Might run a small amp plus something to make a bit of extra bass but I barely listen to music when I drive as it it. I'm definitely fitting a retro 90's headunit though.

I had the day off work so I spent a few hours on the car today. Removing the windscreen makes it really easy to get at the front speakers!!

I should probably fix this while the windscreen is out.

On a positive note, the cost per use of my windscreen wiper arm removal tool has improved!

I should probably fix this while the windscreen is out.
On a positive note, the cost per use of my windscreen wiper arm removal tool has improved!
PistonBroker said:
Yup. I sold my 170k miles 89G Jade Green 8v for £100 when it failed its MOT in 2002 and bought an 90H 405 GRDT instead. The Golf cost me £725 six months earlier.
Alas, looks to have been off the road over a decade now.
Ah well, we can't keep them all!
Ah you should have mentioned it, I'd have given you £200!! Haha. These things were pretty disposable for a while. I traded a black Mk2 in for a Satin Red poverty spec 1.8 LS Vectra! I ended up owning about 6 or 7 Vectras over the years and had plenty of fun at events and club runs all over the UK and Europe, but it was still a stupid decision!Alas, looks to have been off the road over a decade now.
Ah well, we can't keep them all!

Getting the shell stripped down ready to go on a rollover jig. Managed to get every bolt cleanly out of the rear beam. I’ll replace them all but I wanted to avoid cutting and/or drilling bolts out. The passenger side pivot joint bolt snapped but it just meant I could push it out.

Spent a minute tidying the rust off the floor and having a sit down.

Getting there slowly. Doing it the right way rather than rushing it.
The rear beam seems okay. I’ll send that off to the blasters and see what it comes back like. Still a long way from bolting shiny bits back on.
Spent a minute tidying the rust off the floor and having a sit down.
Getting there slowly. Doing it the right way rather than rushing it.
The rear beam seems okay. I’ll send that off to the blasters and see what it comes back like. Still a long way from bolting shiny bits back on.
Time to see just how good this Kurust really is. I’m expecting that to be all good steel next time I open the garage door. That’s how it works, right?


I’ll make the outer piece before chopping the inner skin out and knocking that up. I’m a bit wary of cutting them both out at the same time in case the window frame droops. Not that there’s any good metal keeping it together I suppose.
I’ll make the outer piece before chopping the inner skin out and knocking that up. I’m a bit wary of cutting them both out at the same time in case the window frame droops. Not that there’s any good metal keeping it together I suppose.
Had an hour in the garage so started to mock up the patch panels for the inner and outer window frame. For a first go in 1.2mm steel that’s looking ok. Definitely workable I think.
I’m going to buy some 1.0mm steel, maybe 0.9mm and see if it’s a closer match for the original panel.


I got a shrinker/stretcher for Xmas to make some curved pieces but I managed to snap it on the first try.
I’m going to buy some 1.0mm steel, maybe 0.9mm and see if it’s a closer match for the original panel.
I got a shrinker/stretcher for Xmas to make some curved pieces but I managed to snap it on the first try.


Julian Thompson said:
Great work.
Might i introduce you to the wonders of “evaporust”.
It’s a non toxic, non acid product that you can bath parts in. It doesn’t turn the rust to oxide like Kurust. It actually dissolves the rust. Depending on how much rust is there it can take a few days, but here is an example. This part had NO treatment or buffing - straight out of the bath.


And this disc, again, straight soak:


That stuff does look the business. I follow Hand Tool Rescue on YouTube so I’ve seen it in action a lot! Definitely going to order a big tub of it.Might i introduce you to the wonders of “evaporust”.
It’s a non toxic, non acid product that you can bath parts in. It doesn’t turn the rust to oxide like Kurust. It actually dissolves the rust. Depending on how much rust is there it can take a few days, but here is an example. This part had NO treatment or buffing - straight out of the bath.
And this disc, again, straight soak:
Another hour lost to the garage time machine!!
I’m really enjoying the slow progress needed when bashing metal. I just wish I got more time to sit there doing it, I’ve got rather a lot of patches to make.


Considering buying a lead loading kit to see how smooth I can get the metal before whacking a skim of filler over it all.
I’m really enjoying the slow progress needed when bashing metal. I just wish I got more time to sit there doing it, I’ve got rather a lot of patches to make.
Considering buying a lead loading kit to see how smooth I can get the metal before whacking a skim of filler over it all.
Gassing Station | Readers' Cars | Top of Page | What's New | My Stuff