My mighty MX5 - 'Ring Nail
Discussion


Pictures sorted 
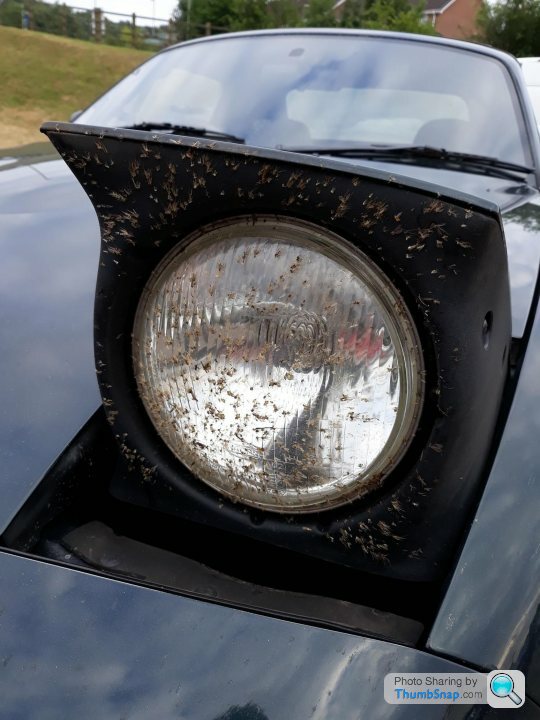
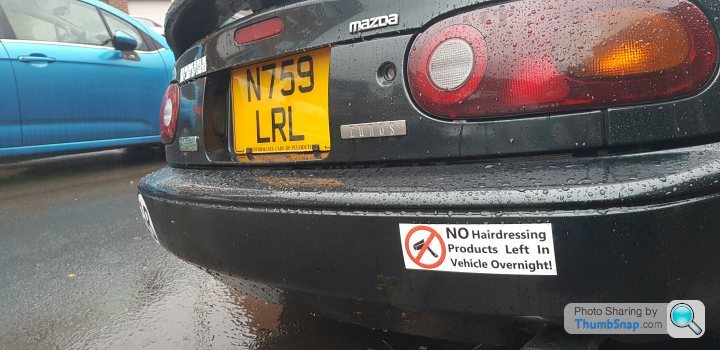
In other news, I collected a bargain decat pipe for £20 last night, which I'll fit today along with the rest of my stainless rear section and Scorpion back box. It needs some more braps . Although driving back in the dark was like driving through the snow, with the amount of midges and bugs about
I've noticed there is a lot of vibration between 70-80mph so will change the wheels for some known good ones later and see if that fixes it.
In other news, I collected a bargain decat pipe for £20 last night, which I'll fit today along with the rest of my stainless rear section and Scorpion back box. It needs some more braps
. Although driving back in the dark was like driving through the snow, with the amount of midges and bugs about I've noticed there is a lot of vibration between 70-80mph so will change the wheels for some known good ones later and see if that fixes it.
Update since getting the VR Ltd up and running, both a lot and not-a-lot has happened in the last month or so.
My last update I mentioned what it was like driving through the blizzard of bugs. Well, this was my lights the morning after. Mass murderer of midges!
I also mentioned my super cheap de-cat that I'd bought new second-hand
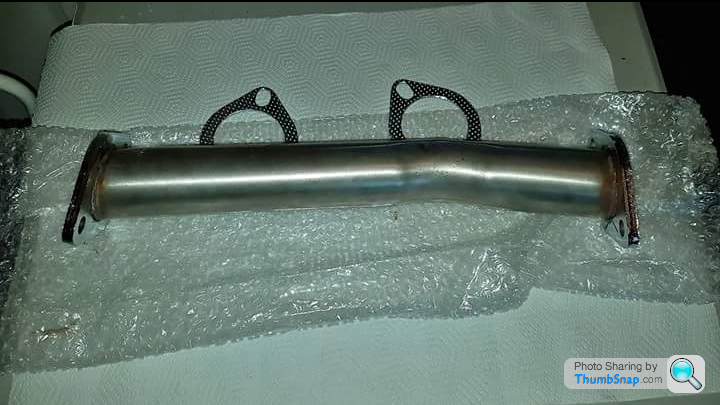
Well, in my infinite wisdom and after my usual level of research which involves reading google like Johnny 5, it inevitably didn't bloody fit. It's a 440mm decat and all JDM MX5s were fitted with the 370mm until after 1997. Excellent. So, after encountering a rounded bolt and having to resort to a spark maker to get the cat off, I was left with a shiny stainless system that I couldn't use because there was no cat or decat. I did have a decat on the red nail, so I removed that and set about trying to plug the 206870510 tiny leaks it had from my woeful welding skills.
One rounded bolt led me straight to the power tools:
Anyway, I got the colander style decat fitted with copious amounts of chemical weld and hoped for the best. It appeared I didn't hope hard enough as the car gods blessed me with a a car that sounded like a novelty fart machine. Great. No pictures of this through sheer embarrassment. I hope to address it properly with a 421 manifold but that's way down my priority list, but for now, it seems quiet with no leaks, so out of sight and out of mind.
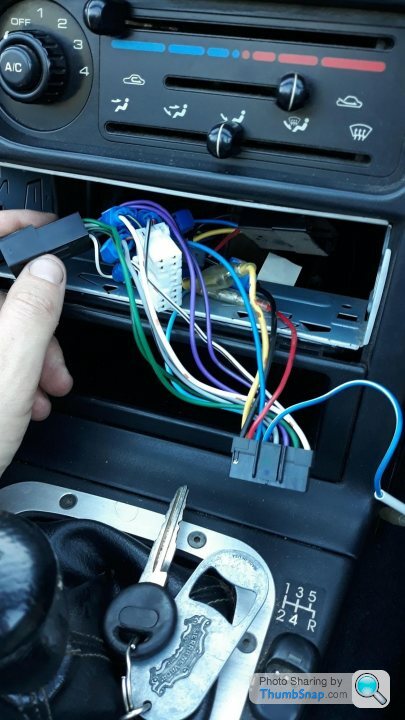
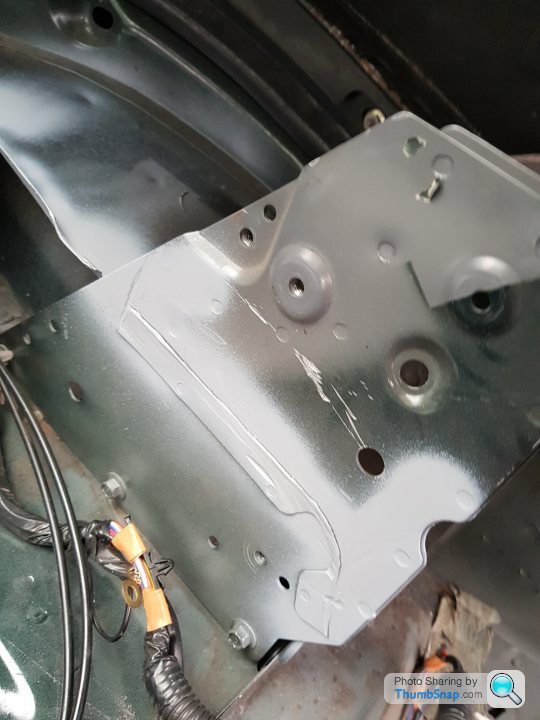
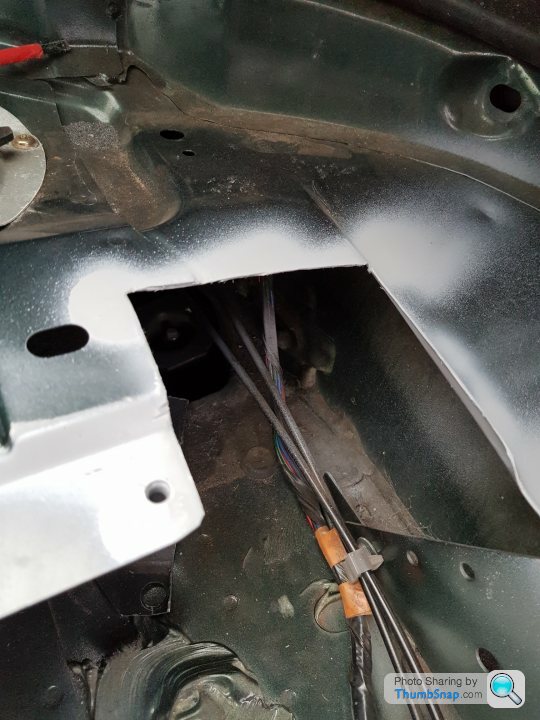
After getting myself covered in chemical metal, I fancied doing something a little cleaner. The stereo in the car was old and s t. And old. Oh, and st. It was the star of the noughties that was the Sony Xplod. I'd thought this was the reason that the headrest speakers didn't work. So I started to swap it out and what greeted me was the sight of nightmares. Scotch locks. Whoever invented these little fkers needs to be tortured by attaching their own invention to their knob and and a car battery. After spending what seemed like an entire lifetime and wearing my fingers down to my elbows, I'd unpicked the scotch lock "loom" and got to see the standard loom. Interestingly, the ISO connector for the rear headrests was tucked away. This will explain why they're not working. Or so I thought. Once I'd installed a mechless JVC bluetooth unit I had lying around, they still didn't work. A quick unzip of the rear headrests revealed a disappointing void where they should have been. The connector under the seat remained. Unconnected. Looking lost. I had planned at that stage to retrofit the units from the red nail. But as I'll be fitting my Sparco seat for the ring, it'd be largely pointless. So I left it with just the 2 front speakers for now.
The noughties special Sony Xplod at the helm:
THE HORROR!!
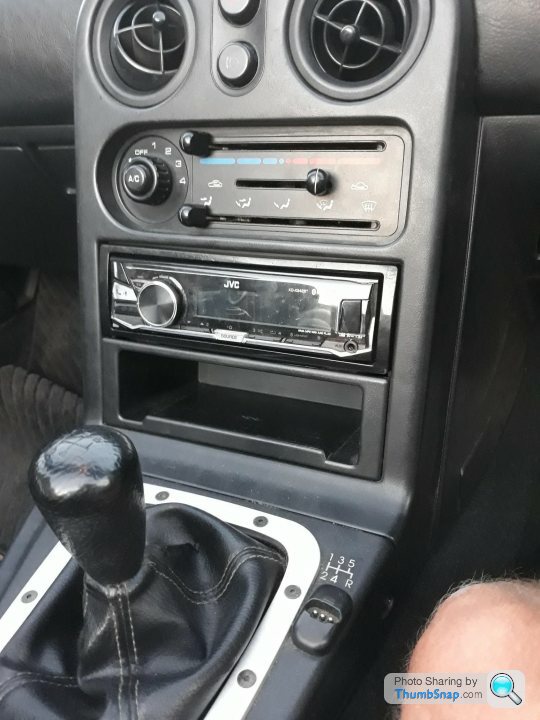
Better. The one thing about the VR Ltd is that the Stereo surround (aka the tombstone) was fitted with standard DIN sized hole. Which means a standard stereo will sit flush. In earlier/other models, the opening is slightly smalled to fit the standard stereo Mazda fitted. Which meant an up to date stereo wouldn't sit flush and would stick out by a few cm.
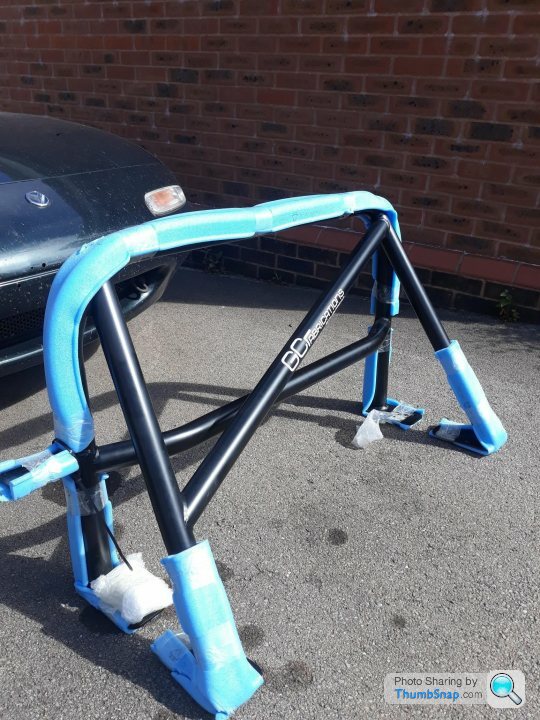
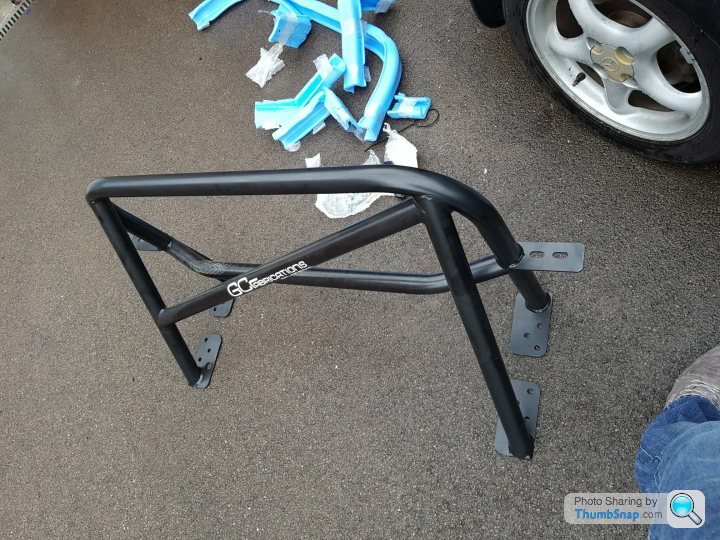
A couple of weekends ago, I struck a deal wih a very nice chap on Facebook selling a GC Fabrications GC1 roll cage. I was going to get one of these anyway, new. But there is a 2-4 week lead time on them and they're £300 delivered. I'd manage to find one for sale, second hand, but brand new and never fitted, still in the box for £200. Only "issue" was it was in Portsmouth and I live in South Wales. Cue a subtle recommendation to the OH that we should take the kids away for the day. There's a really good Historic Dockyard in Portsmouth and I've just found a really good Groupon deal to go and see it. Oh and while we're there I might as well shoehorn this roll cage in the boot, yeah?
All in all, it was a lovely day visiting HMS Victory and HMS Warrior and the kiddos loved it. Got the cage back and it's awaiting fitting.
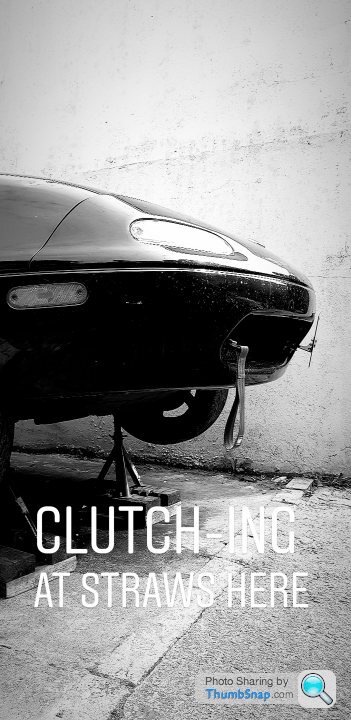
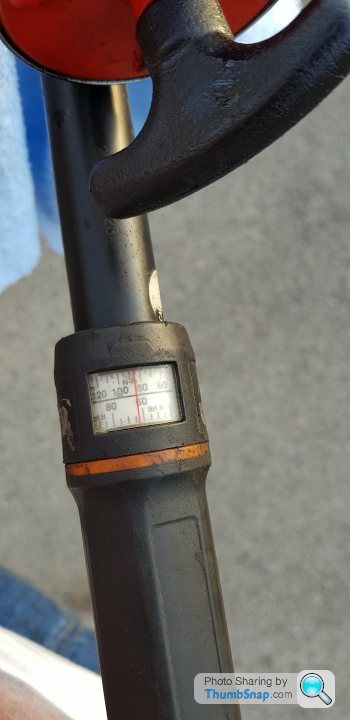
I'd been driving it fairly regularly and noticed in the hot weather that the clutch was starting to slip when giving it a good seeing to. The pedal was also fairly high and I'd budgeted for an IL Motorsport clutch from MX5 parts at about £100. Luckily, I found someone selling their sub 1k mile LUK clutch on Facebook as they were upgrading following boosting their 5. £30 later and the clutch was on its way to me. I'd also dome some research on replacing the spigot bearing. MX5 Parts wanted about £9 for one. Well, absolutely not. That's Alan Sugar money! So I found out the spec of the bearing and went to SimplyBearings. Delivered next day for £3. Excellent. This is a budget trip, don't forget .
.
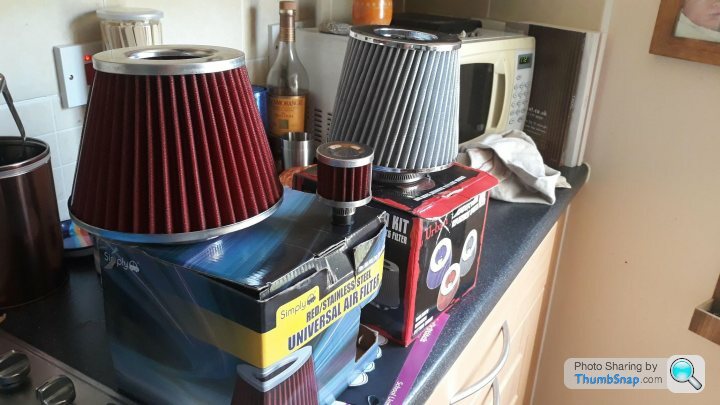
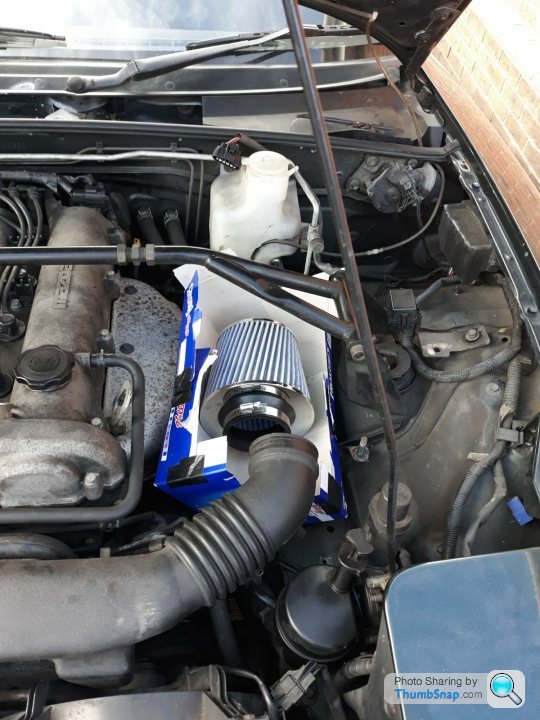
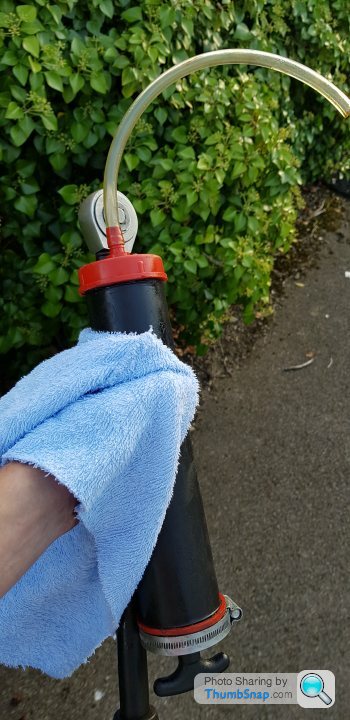
I'd been running the standard airbox with a K&N panel filter and, while no dount, the performance was probably improved. I was missing the induction noise. So, being the sensible, performance orientated motor enthusiast I am, proceeded to purchase a £5 second hand cheapo cone filter I could find (actually, I bought 2 as they were both 5 mins away from my house). Mick (Wunderbolf) will be having one for extra VTEC Yo! on his Accord.
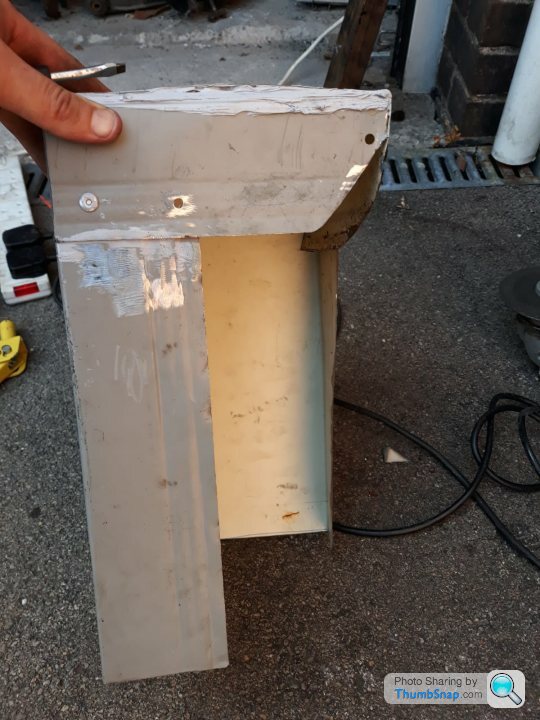
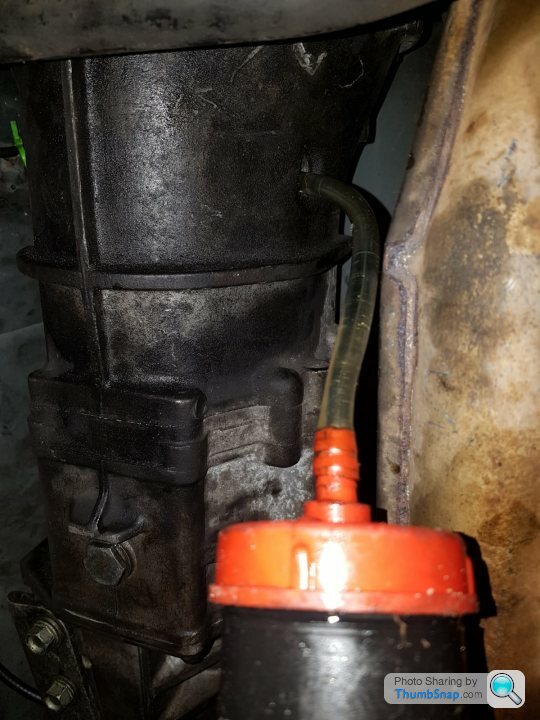
I was accutely aware, after the previous owner of my red nail had decided to attach the cone filter directly to the exhaust manifold, that this would suffer from drawing in hot air. So I thought I would fabricate (using that word in the loosest possible fashion) a heat shield from an old metal shed door. What else would one use?
So, decided on positioning and used a cherished Frosties box as a template.
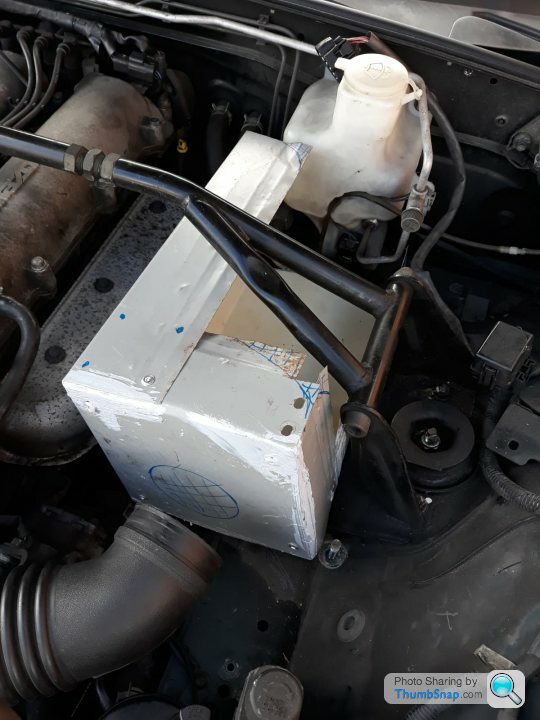
Then started to build from the sheet metal I had:
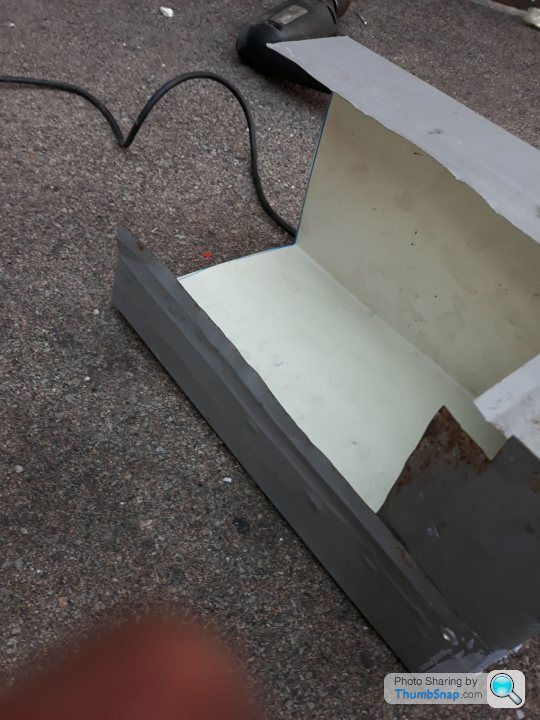
Using a combination of rivets and chemical weld (because I ran out of rivets)
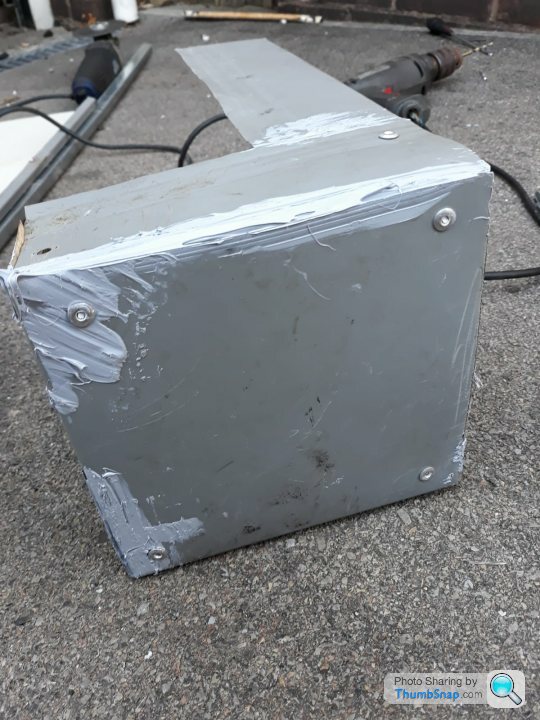
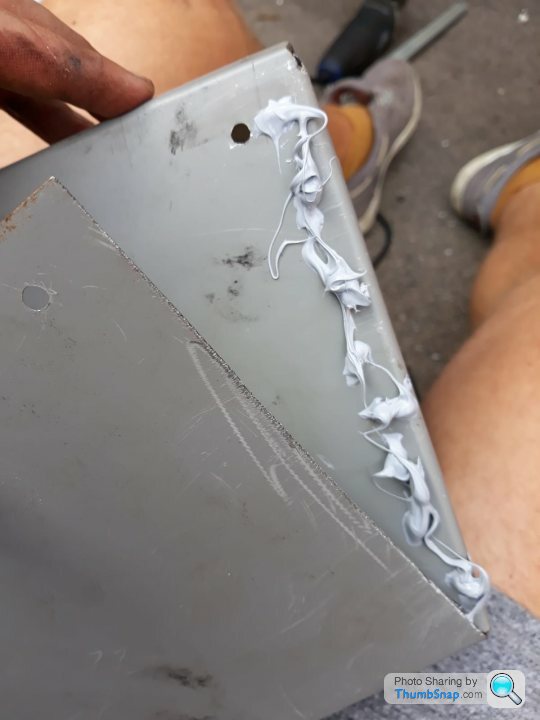
Positioning and fine tuning:
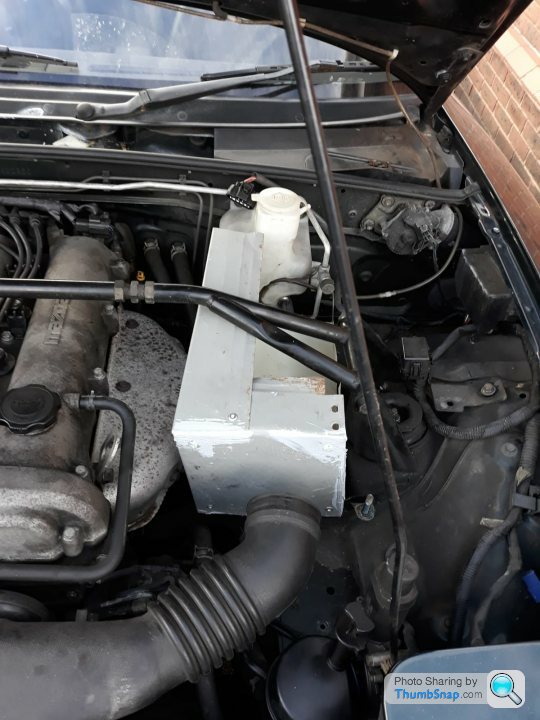
All that's left is to spray it in some high temp paint, cut the hole for the filter and to fit some mounting brackets. Should work a treat. Probably won't.
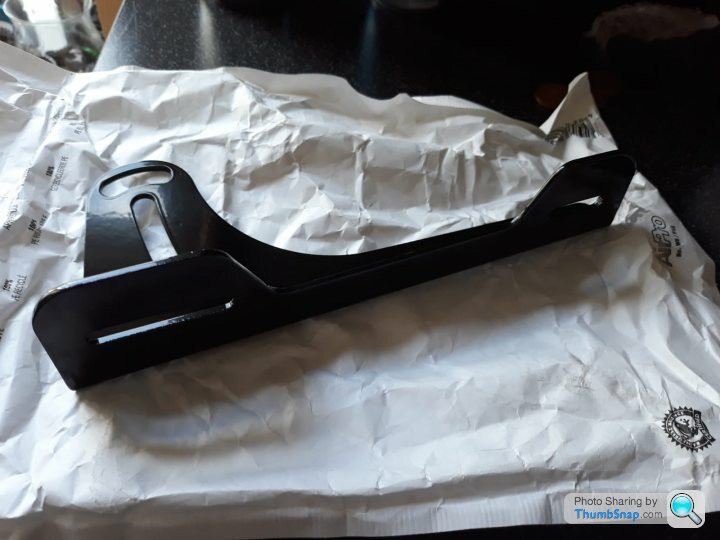
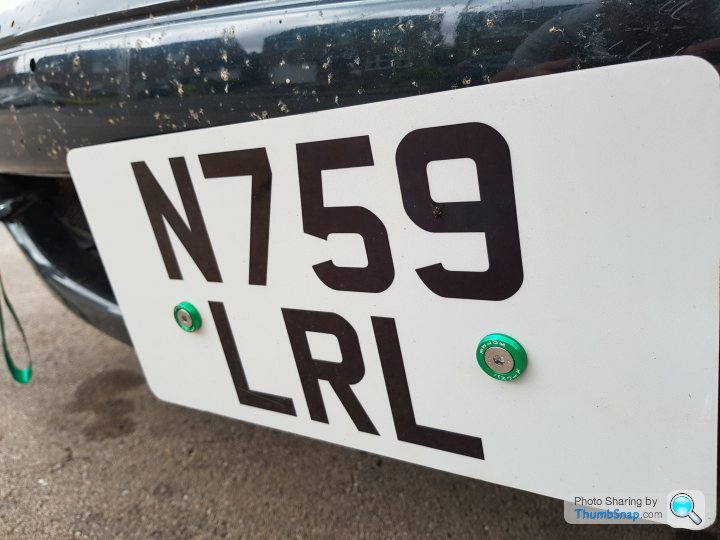
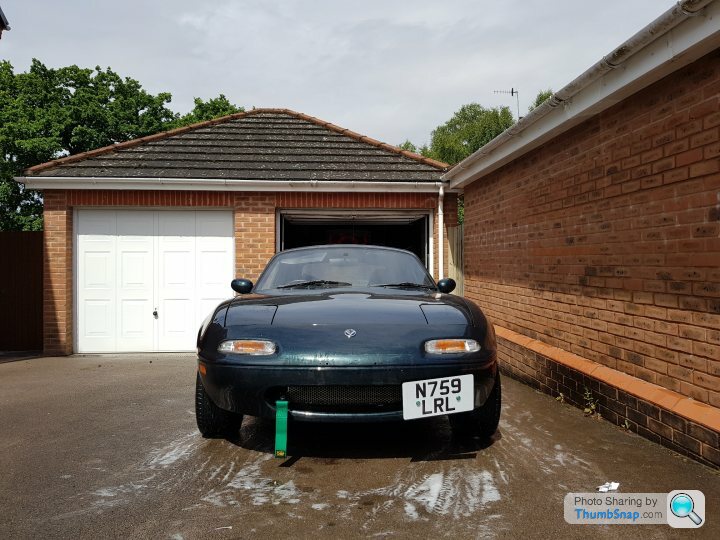
I also treated the front to a nice new number plate to replace the UK spec one and a Jass Performance Ally side mount, with some funky green anodised mounting washers:
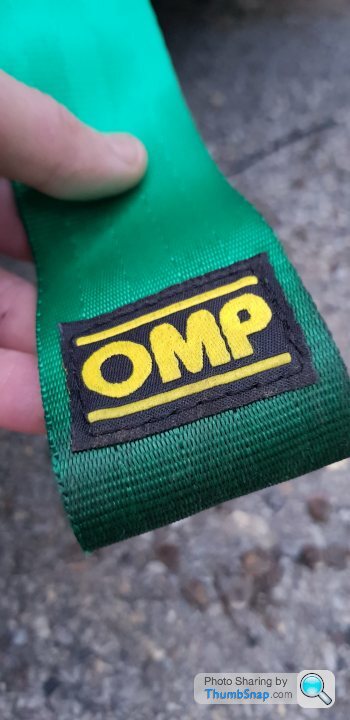
Also fitted a green OMP (probably isn't OMP) tow strap. Front end starting to come together:
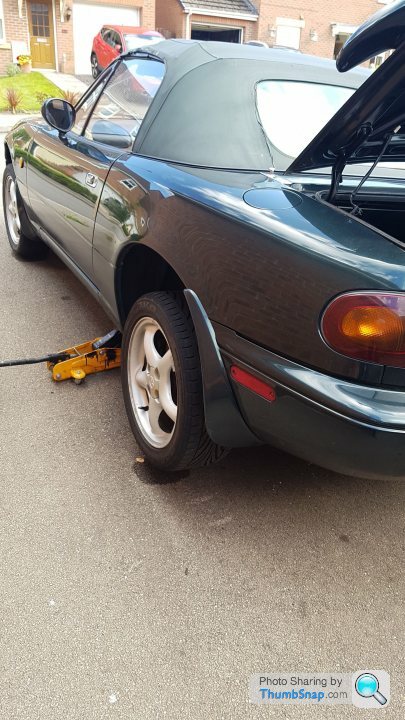
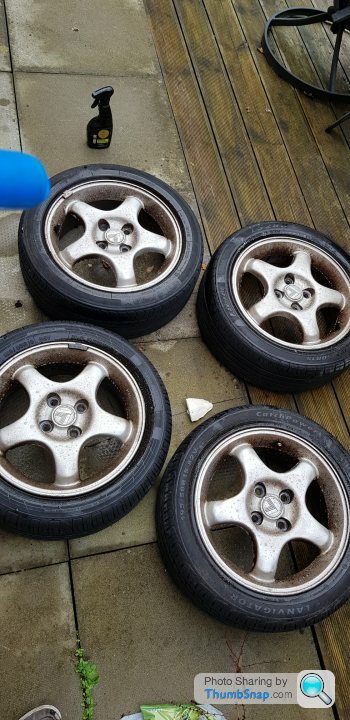
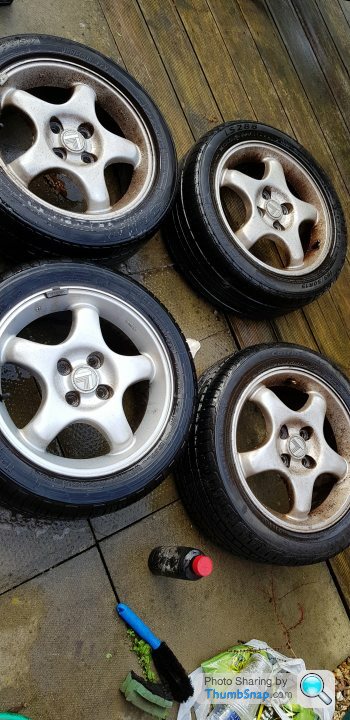
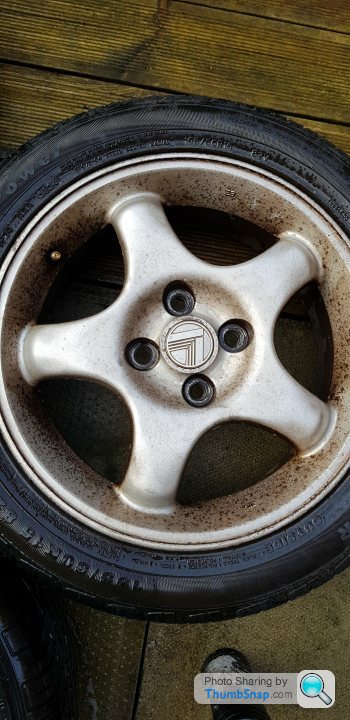
I'd also previously mentioned the car did try and shake my bones out my arse at about 70. I thought (and was hoping) it was down to the wheels, so swapped them for the wheels from the red nail. Luckily, this did the trick. Shame as I liked the wheels as they were specific the VR Ltd range. I do plan to get some decent rubber for the 'Ring, so may wrap the correct wheels in new rubber. My worry is they're buckled or not true so will have to wait and see.
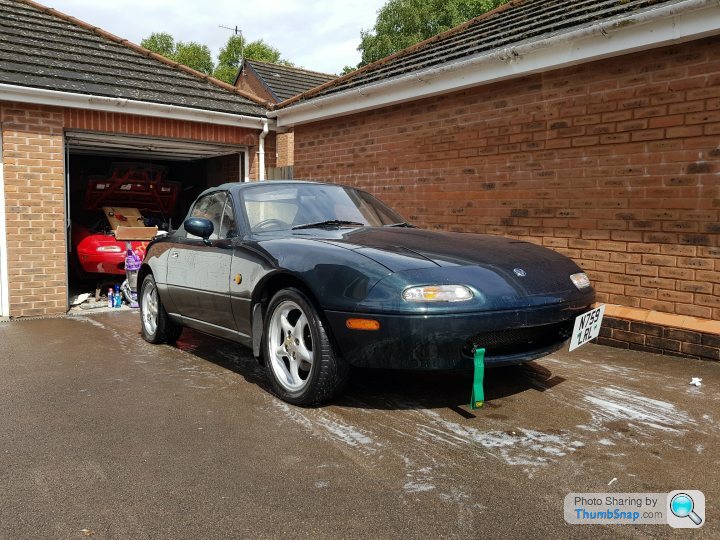
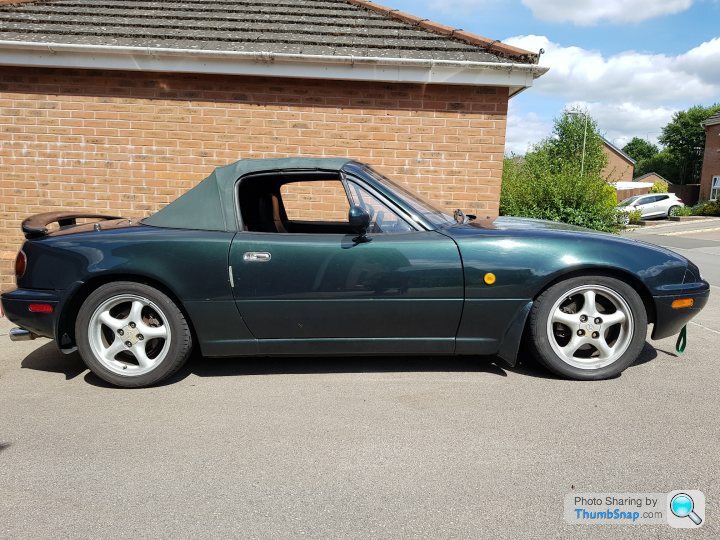
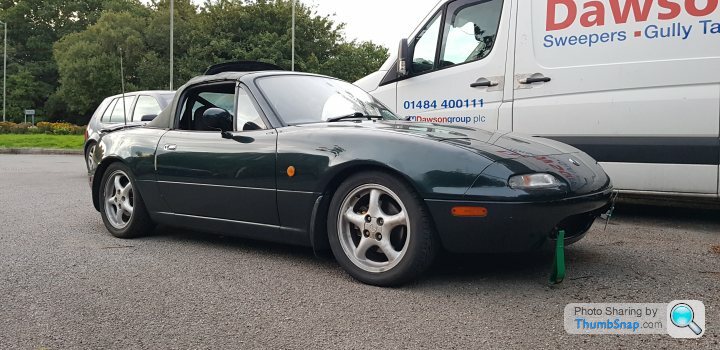
How she currently stands, with the red nail enviously peering out:
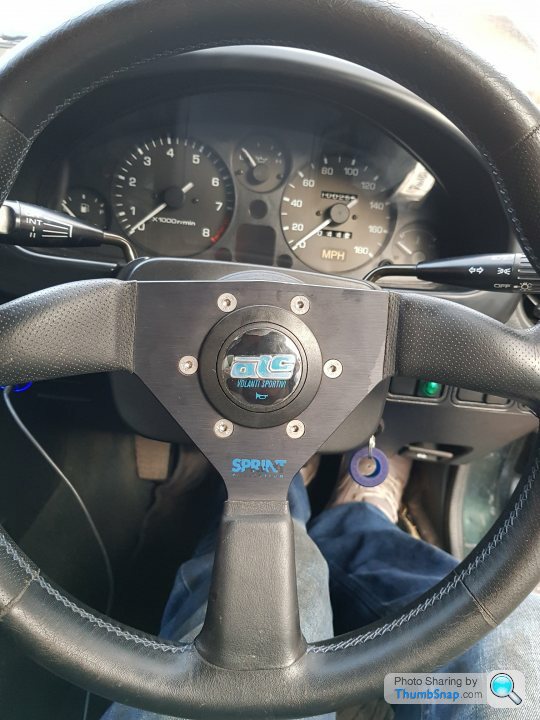
Lastly, I swapped the Momo wheel which is also specific to special edition versions with the ATC one from the red nail. The standard wheel was nice to touch, but it was far too big. Even at my modest 5'9" stature, I was catching my hands on my legs when steering. The ATC wheel is a nicer size, but is no good as it's sat too close to the wiper and indicator stalks meaning a catch my hands on those instead. I'll be keeping an eye out for a cheap dished wheel. Preferably a 320-330mm one. Instead, I fitted some shiny new stainless bolts to fit it:
Old wheel:

New wheel with old bolts. I'm not really a fan of this wheel. Just the size:
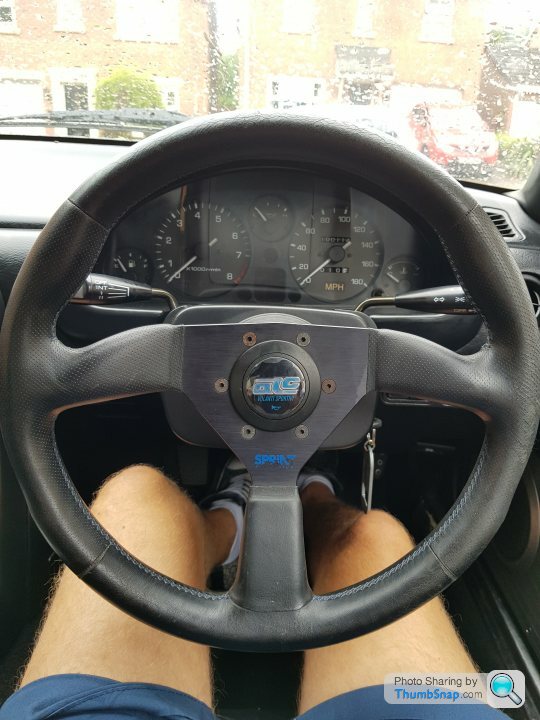
New wheel, new bolts:
My last update I mentioned what it was like driving through the blizzard of bugs. Well, this was my lights the morning after. Mass murderer of midges!
I also mentioned my super cheap de-cat that I'd bought new second-hand
Well, in my infinite wisdom and after my usual level of research which involves reading google like Johnny 5, it inevitably didn't bloody fit. It's a 440mm decat and all JDM MX5s were fitted with the 370mm until after 1997. Excellent. So, after encountering a rounded bolt and having to resort to a spark maker to get the cat off, I was left with a shiny stainless system that I couldn't use because there was no cat or decat. I did have a decat on the red nail, so I removed that and set about trying to plug the 206870510 tiny leaks it had from my woeful welding skills.
One rounded bolt led me straight to the power tools:
Anyway, I got the colander style decat fitted with copious amounts of chemical weld and hoped for the best. It appeared I didn't hope hard enough as the car gods blessed me with a a car that sounded like a novelty fart machine. Great. No pictures of this through sheer embarrassment. I hope to address it properly with a 421 manifold but that's way down my priority list, but for now, it seems quiet with no leaks, so out of sight and out of mind.
After getting myself covered in chemical metal, I fancied doing something a little cleaner. The stereo in the car was old and s
t. And old. Oh, and st. It was the star of the noughties that was the Sony Xplod. I'd thought this was the reason that the headrest speakers didn't work. So I started to swap it out and what greeted me was the sight of nightmares. Scotch locks. Whoever invented these little fkers needs to be tortured by attaching their own invention to their knob and and a car battery. After spending what seemed like an entire lifetime and wearing my fingers down to my elbows, I'd unpicked the scotch lock "loom" and got to see the standard loom. Interestingly, the ISO connector for the rear headrests was tucked away. This will explain why they're not working. Or so I thought. Once I'd installed a mechless JVC bluetooth unit I had lying around, they still didn't work. A quick unzip of the rear headrests revealed a disappointing void where they should have been. The connector under the seat remained. Unconnected. Looking lost. I had planned at that stage to retrofit the units from the red nail. But as I'll be fitting my Sparco seat for the ring, it'd be largely pointless. So I left it with just the 2 front speakers for now. The noughties special Sony Xplod at the helm:
THE HORROR!!
Better. The one thing about the VR Ltd is that the Stereo surround (aka the tombstone) was fitted with standard DIN sized hole. Which means a standard stereo will sit flush. In earlier/other models, the opening is slightly smalled to fit the standard stereo Mazda fitted. Which meant an up to date stereo wouldn't sit flush and would stick out by a few cm.
A couple of weekends ago, I struck a deal wih a very nice chap on Facebook selling a GC Fabrications GC1 roll cage. I was going to get one of these anyway, new. But there is a 2-4 week lead time on them and they're £300 delivered. I'd manage to find one for sale, second hand, but brand new and never fitted, still in the box for £200. Only "issue" was it was in Portsmouth and I live in South Wales. Cue a subtle recommendation to the OH that we should take the kids away for the day. There's a really good Historic Dockyard in Portsmouth and I've just found a really good Groupon deal to go and see it. Oh and while we're there I might as well shoehorn this roll cage in the boot, yeah?
All in all, it was a lovely day visiting HMS Victory and HMS Warrior and the kiddos loved it. Got the cage back and it's awaiting fitting.
I'd been driving it fairly regularly and noticed in the hot weather that the clutch was starting to slip when giving it a good seeing to. The pedal was also fairly high and I'd budgeted for an IL Motorsport clutch from MX5 parts at about £100. Luckily, I found someone selling their sub 1k mile LUK clutch on Facebook as they were upgrading following boosting their 5. £30 later and the clutch was on its way to me. I'd also dome some research on replacing the spigot bearing. MX5 Parts wanted about £9 for one. Well, absolutely not. That's Alan Sugar money! So I found out the spec of the bearing and went to SimplyBearings. Delivered next day for £3. Excellent. This is a budget trip, don't forget
.I'd been running the standard airbox with a K&N panel filter and, while no dount, the performance was probably improved. I was missing the induction noise. So, being the sensible, performance orientated motor enthusiast I am, proceeded to purchase a £5 second hand cheapo cone filter I could find (actually, I bought 2 as they were both 5 mins away from my house). Mick (Wunderbolf) will be having one for extra VTEC Yo! on his Accord.
I was accutely aware, after the previous owner of my red nail had decided to attach the cone filter directly to the exhaust manifold, that this would suffer from drawing in hot air. So I thought I would fabricate (using that word in the loosest possible fashion) a heat shield from an old metal shed door. What else would one use?
So, decided on positioning and used a cherished Frosties box as a template.
Then started to build from the sheet metal I had:
Using a combination of rivets and chemical weld (because I ran out of rivets)
Positioning and fine tuning:
All that's left is to spray it in some high temp paint, cut the hole for the filter and to fit some mounting brackets. Should work a treat. Probably won't.
I also treated the front to a nice new number plate to replace the UK spec one and a Jass Performance Ally side mount, with some funky green anodised mounting washers:
Also fitted a green OMP (probably isn't OMP) tow strap. Front end starting to come together:
I'd also previously mentioned the car did try and shake my bones out my arse at about 70. I thought (and was hoping) it was down to the wheels, so swapped them for the wheels from the red nail. Luckily, this did the trick. Shame as I liked the wheels as they were specific the VR Ltd range. I do plan to get some decent rubber for the 'Ring, so may wrap the correct wheels in new rubber. My worry is they're buckled or not true so will have to wait and see.
How she currently stands, with the red nail enviously peering out:
Lastly, I swapped the Momo wheel which is also specific to special edition versions with the ATC one from the red nail. The standard wheel was nice to touch, but it was far too big. Even at my modest 5'9" stature, I was catching my hands on my legs when steering. The ATC wheel is a nicer size, but is no good as it's sat too close to the wiper and indicator stalks meaning a catch my hands on those instead. I'll be keeping an eye out for a cheap dished wheel. Preferably a 320-330mm one. Instead, I fitted some shiny new stainless bolts to fit it:
Old wheel:
New wheel with old bolts. I'm not really a fan of this wheel. Just the size:
New wheel, new bolts:
[Columbo mode] Oh there is.... just.... one more..... thing [/Columbo mode]
I've forgotten a few things. Maybe more has happened than I thought in the last month. Or maybe I've still got so much to do it pales into insignificant. I'd leaning towards the latter.
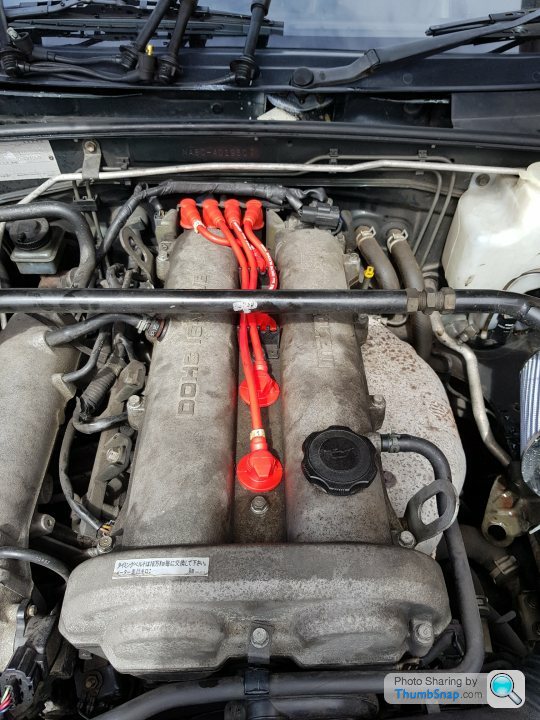
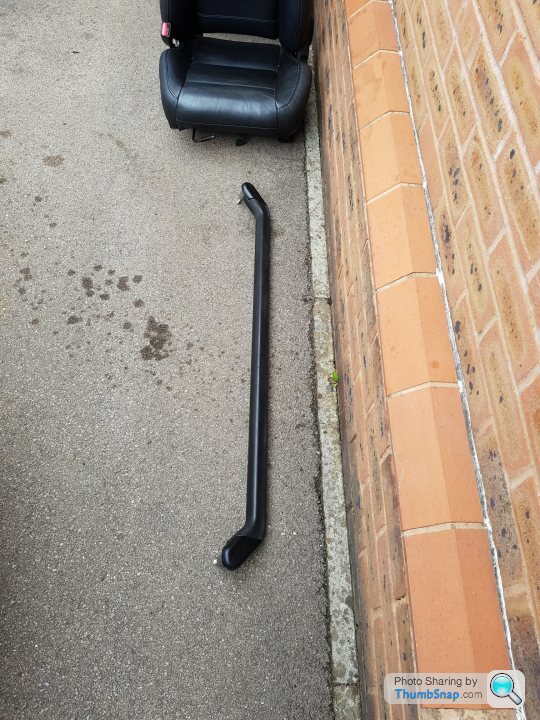
The red nail has some nice chunky red HT leads, so I swapped them onto the VR Ltd as the existing ones were looking a little crusty. I plan to change the plugs also so that should see to the ignition being nice and fresh:
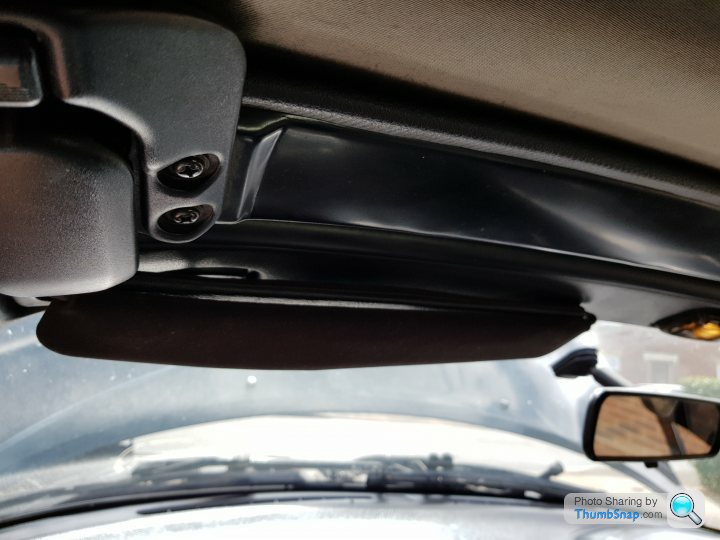
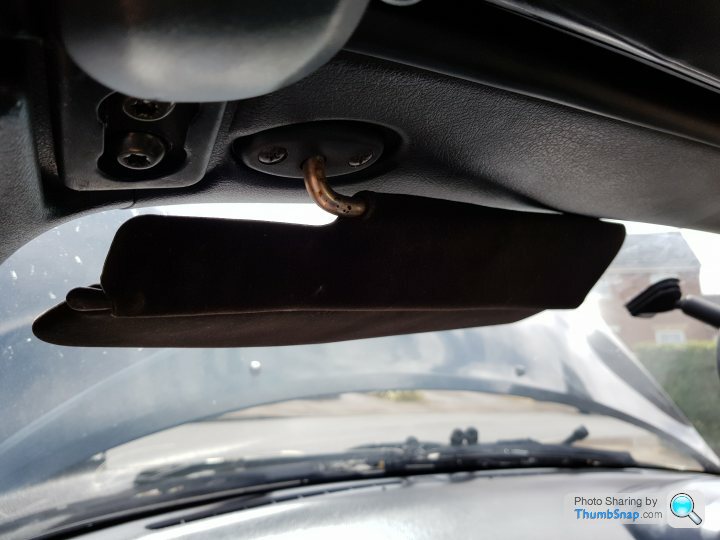
The VR Ltd was specced from the factory with a hardtop, so it was fitted with non-folding sun visors. Which, in a first-world-problem kinda way is bloody annoying as you have to put the visor down to get to the folding roof clamps. So, I invested some time (about 9.36985 minutes) in swapping the folding ones from the red nail. Much better now and no annoyance when putting the roof up or down:
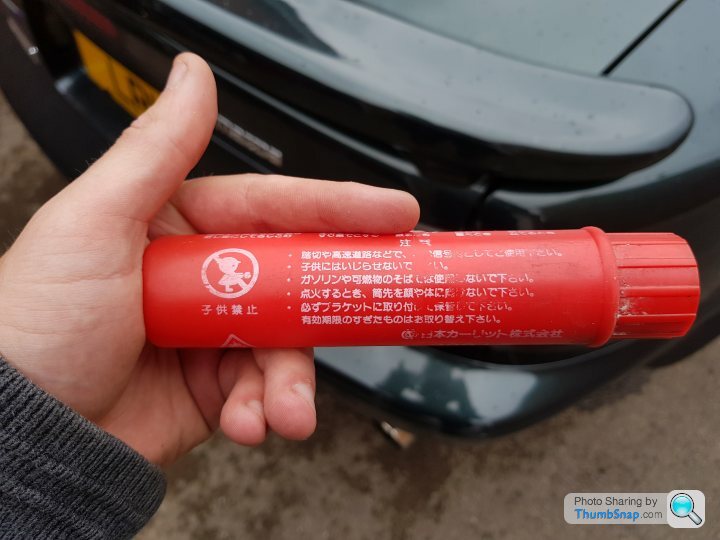
Whilst rummaging around in the plethora of old MX5 bits I have lying around, I found an original JDM flare. For those that might not know, it's law in Japan for cars to be fitted with an emergency flare. Having one in your import scores you at least a bloidsabillion JDM scene points Yo!
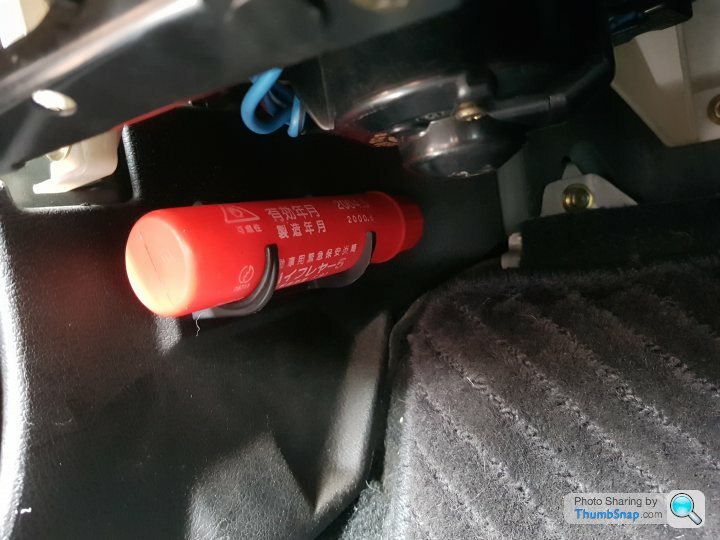
The mounting brackets were their ready to receive the JDM Scene winner:
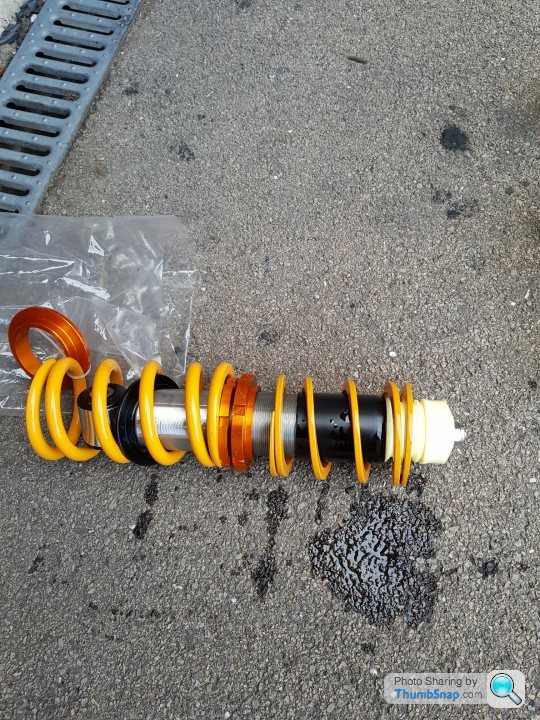
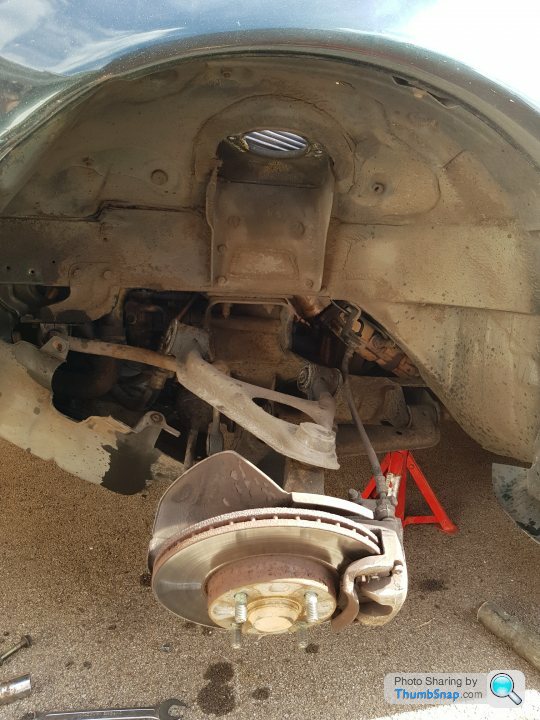
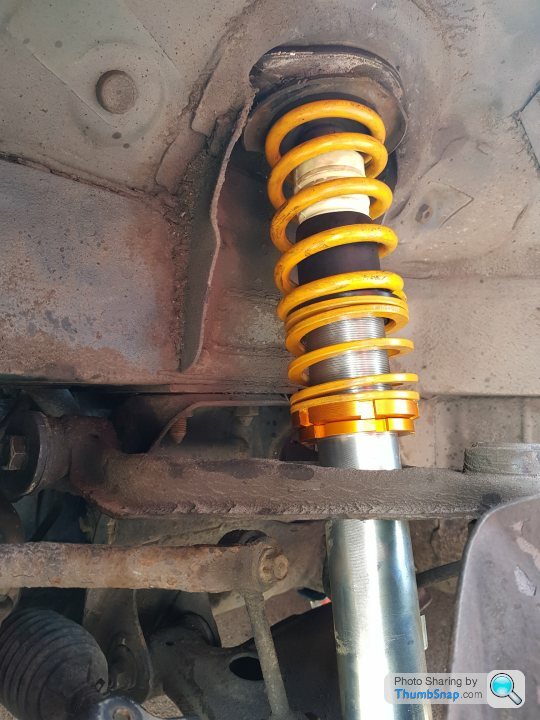
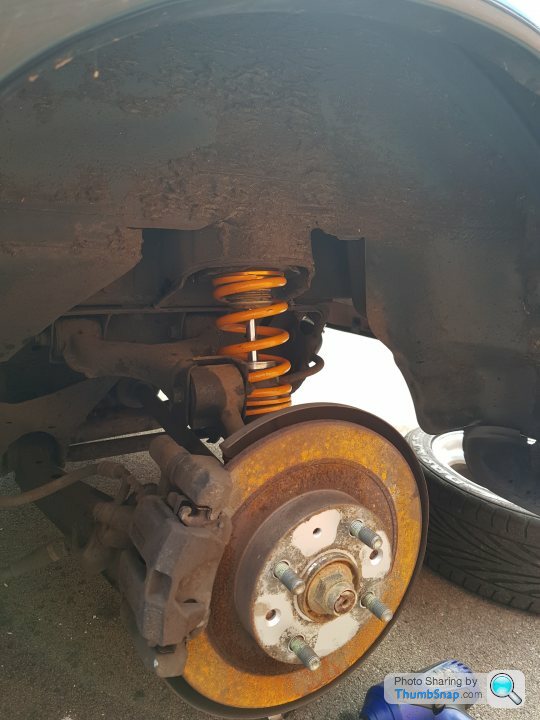
I'd also managed to get my hands on some very high quality, top of the range nameless coilovers for the princely sum of £80. They were new and unused so I had some high hopes of replacing my mismatched, leaking shocks with some cheap lows. I was under no illusion that the ride quality would be awful and it probably wouldn't give me any advantage of a stock set up. But, they looked pretty and my shocks were on their way anyway. Disappointingly, the VR Ltd would have been fitted with Bilstein shocks and springs from the factory. I guess somewhere in its 22 year lifespan, they were knackered and someone replaced them with the cheapest possible units, one by one.
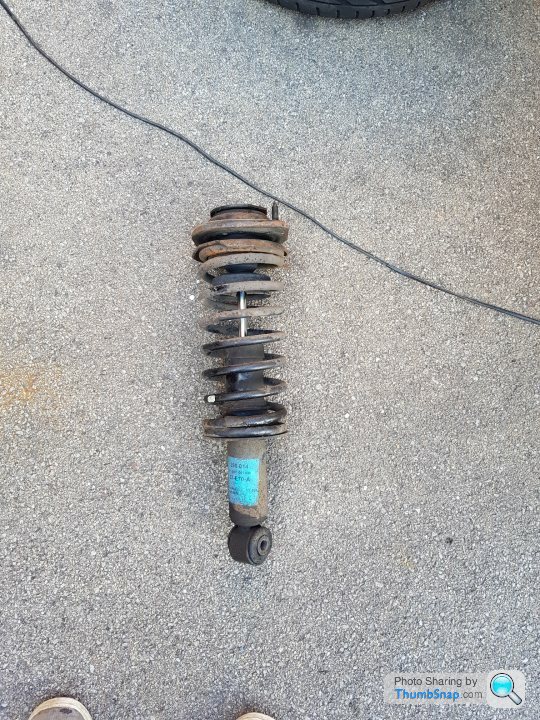
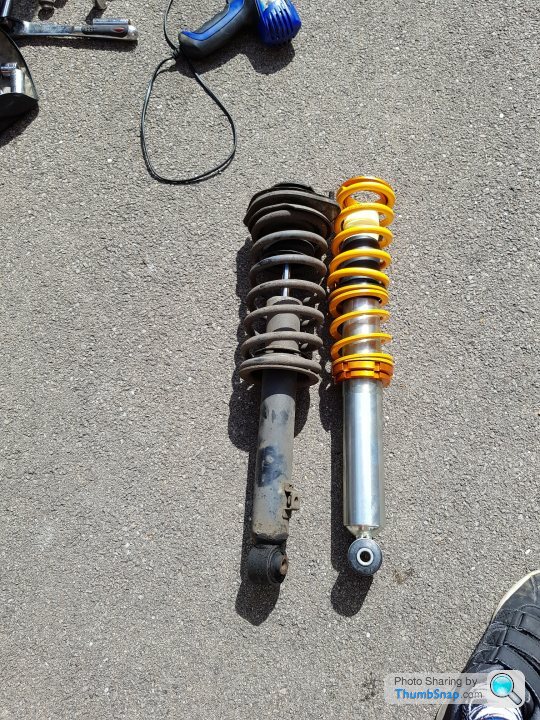
I successfully fitted one side on the rear. Old shock out. This is a Sachs unit, so not awful quality.
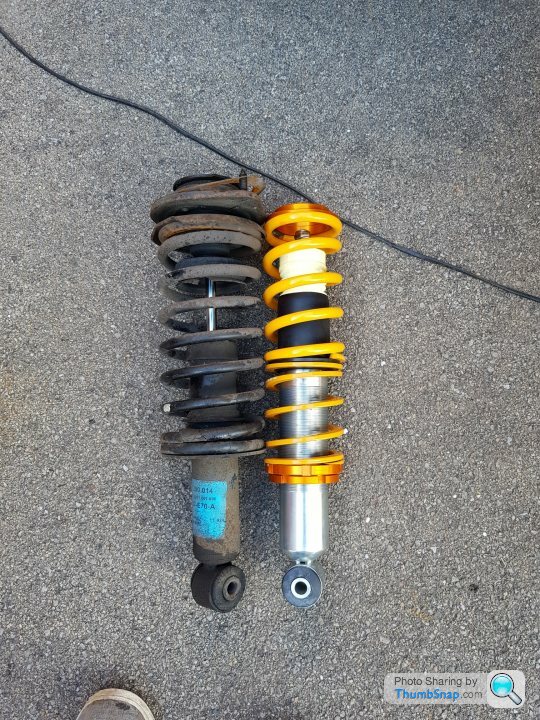
New one alongside:
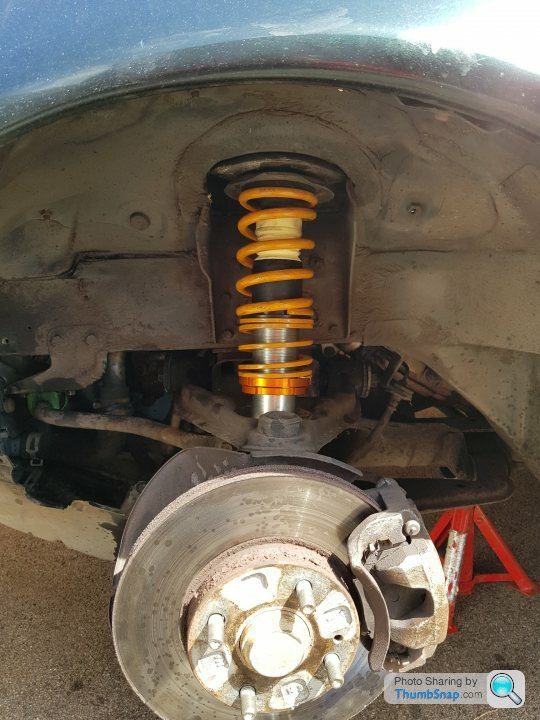
New one to go in here:
Fitted and lowered back onto the wheel:
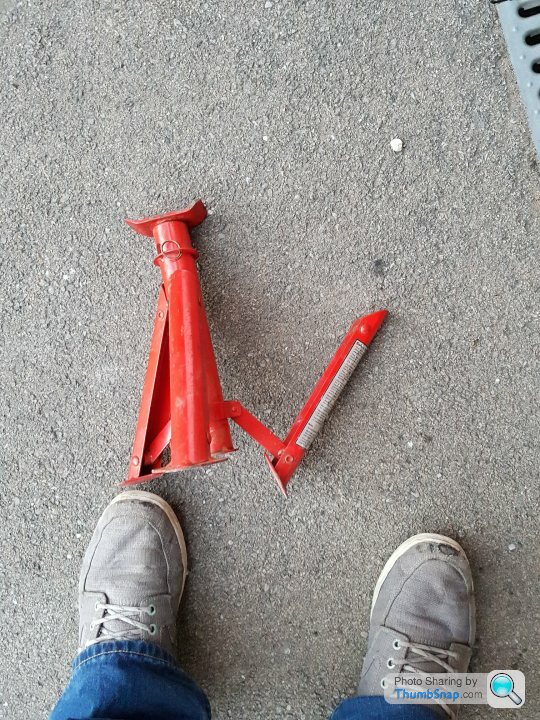
Oh - just a reminder, check your axle stands kids! Luckily this happened when I removed it from the car!
After I'd jacked the other side up and taken the wheel off, but before I'd disassembled the strut, I thought I'd get the other rear strut out in readiness. I was greeted with a lovely looking strut that appeared to be well lubricated... in its own fking oil. 
Cheapo coilover leaking oil SHOCKKKKKK! I was very frustrated, but cracked on with the fronts. As of today, the seller has maintained good communication and is trying to source me a replacement.
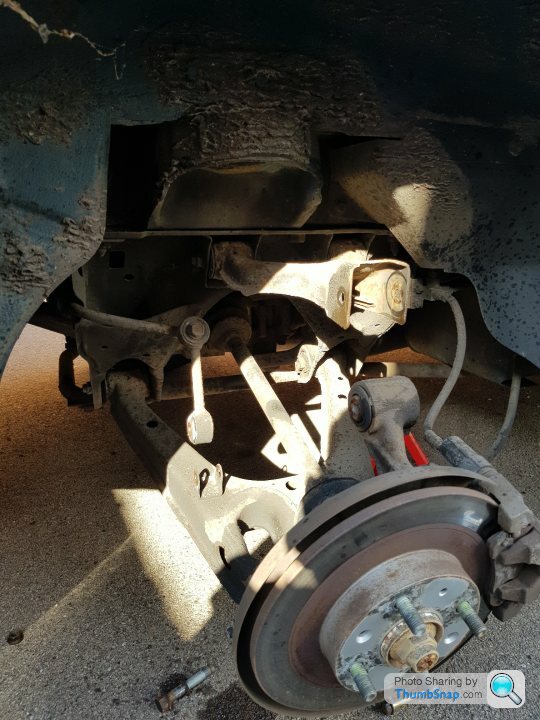
So, onto the fronts, these were a little more difficult as it requires you to remove the long, upper wishbone bolt which is about 25cm long. I was very nervous about this step after hearing stories of snapped and/or seized bolts. After much application of lubrication, it was onto the liberation. Luckily, both sides came of relatively easy. Phew!
Front disassembled
Old vs New:
Fitted
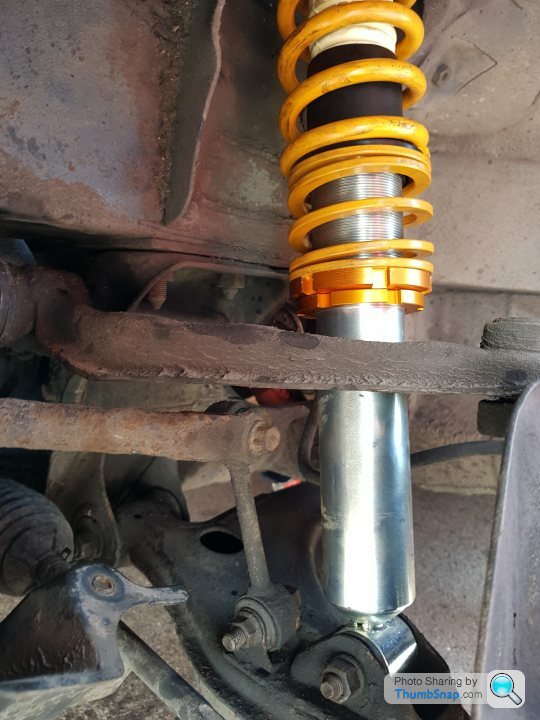
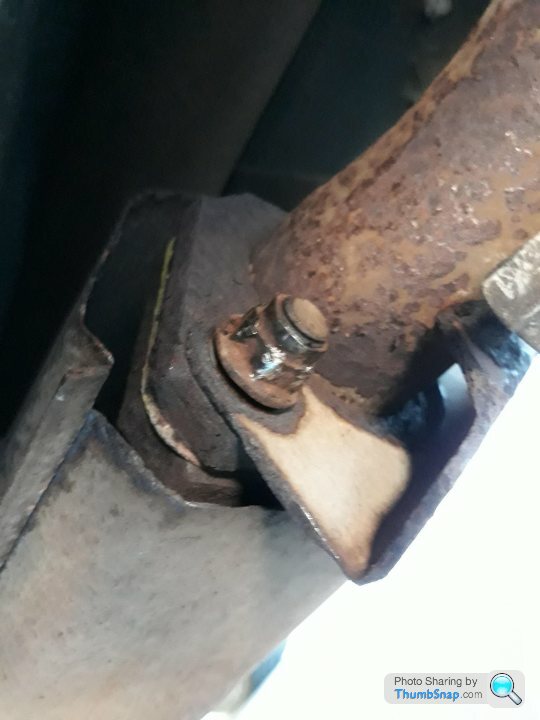
As I'd had to remove the ARB bushes, I used the opportunity to replace with the polybush kit I had lying about from the red nail:
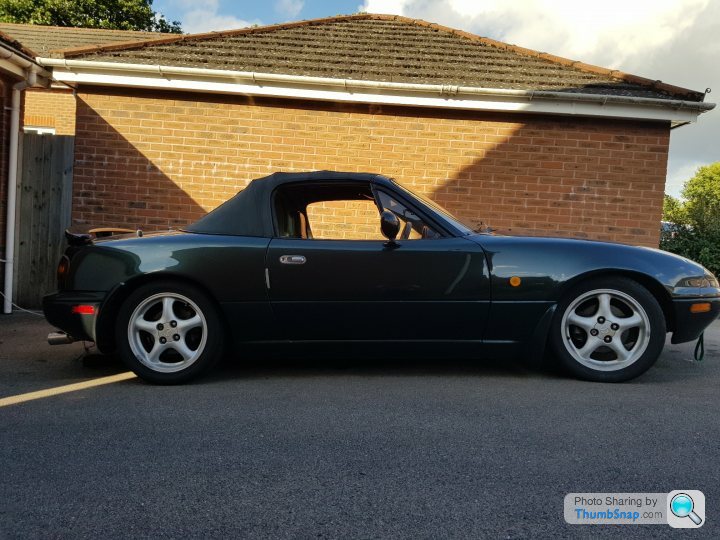
And back on its wheels. Albeit a little dog-legged as the one side on the rear is still on a standard strut. It's standing similar to how most teens pose for pictures on the balcony in Marbella babezzzz.
Next steps for me now include:
I've forgotten a few things. Maybe more has happened than I thought in the last month. Or maybe I've still got so much to do it pales into insignificant. I'd leaning towards the latter.
The red nail has some nice chunky red HT leads, so I swapped them onto the VR Ltd as the existing ones were looking a little crusty. I plan to change the plugs also so that should see to the ignition being nice and fresh:
The VR Ltd was specced from the factory with a hardtop, so it was fitted with non-folding sun visors. Which, in a first-world-problem kinda way is bloody annoying as you have to put the visor down to get to the folding roof clamps. So, I invested some time (about 9.36985 minutes) in swapping the folding ones from the red nail. Much better now and no annoyance when putting the roof up or down:
Whilst rummaging around in the plethora of old MX5 bits I have lying around, I found an original JDM flare. For those that might not know, it's law in Japan for cars to be fitted with an emergency flare. Having one in your import scores you at least a bloidsabillion JDM scene points Yo!
The mounting brackets were their ready to receive the JDM Scene winner:
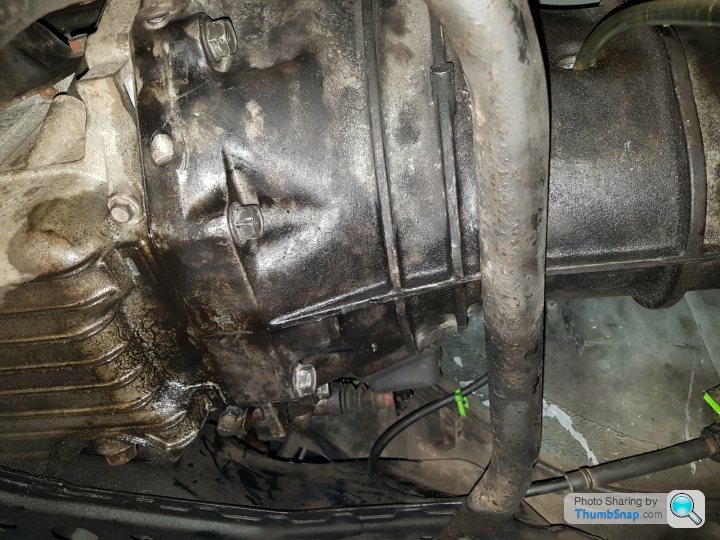
I'd also managed to get my hands on some very high quality, top of the range nameless coilovers for the princely sum of £80. They were new and unused so I had some high hopes of replacing my mismatched, leaking shocks with some cheap lows. I was under no illusion that the ride quality would be awful and it probably wouldn't give me any advantage of a stock set up. But, they looked pretty and my shocks were on their way anyway. Disappointingly, the VR Ltd would have been fitted with Bilstein shocks and springs from the factory. I guess somewhere in its 22 year lifespan, they were knackered and someone replaced them with the cheapest possible units, one by one.
I successfully fitted one side on the rear. Old shock out. This is a Sachs unit, so not awful quality.
New one alongside:
New one to go in here:
Fitted and lowered back onto the wheel:
Oh - just a reminder, check your axle stands kids! Luckily this happened when I removed it from the car!
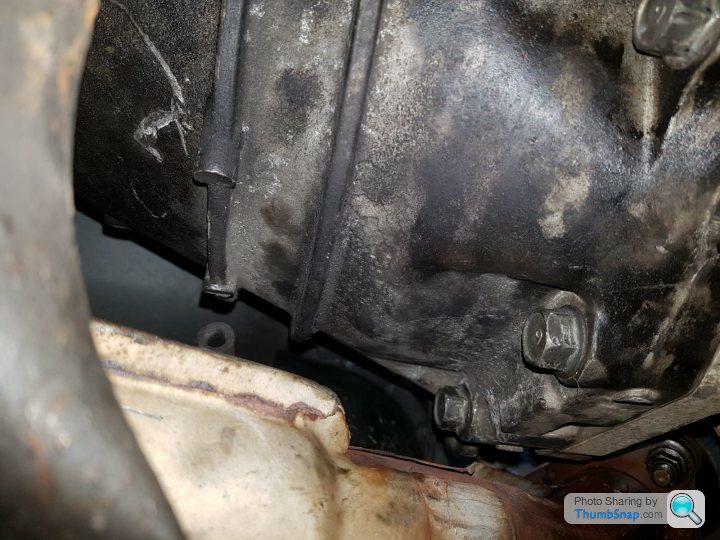
After I'd jacked the other side up and taken the wheel off, but before I'd disassembled the strut, I thought I'd get the other rear strut out in readiness. I was greeted with a lovely looking strut that appeared to be well lubricated... in its own f
king oil. Cheapo coilover leaking oil SHOCKKKKKK! I was very frustrated, but cracked on with the fronts. As of today, the seller has maintained good communication and is trying to source me a replacement.
So, onto the fronts, these were a little more difficult as it requires you to remove the long, upper wishbone bolt which is about 25cm long. I was very nervous about this step after hearing stories of snapped and/or seized bolts. After much application of lubrication, it was onto the liberation. Luckily, both sides came of relatively easy. Phew!
Front disassembled
Old vs New:
Fitted
As I'd had to remove the ARB bushes, I used the opportunity to replace with the polybush kit I had lying about from the red nail:
And back on its wheels. Albeit a little dog-legged as the one side on the rear is still on a standard strut. It's standing similar to how most teens pose for pictures on the balcony in Marbella babezzzz.
Next steps for me now include:
- Get and fit a replacement coilover on the rear
- Fit the roll cage
- Find a dished steering wheel
- Decent pads and possibly discs, although they look ok
- Decent rubber (tyres, that is)
- Fit replacement clutch and spigot bearing
- Service (engine and box fluids, oil and fuel filters, plugs etc.)
- Loads of other stuff I'll no doubt decide to do
Jimbo NW said:
I really enjoyed reading through that, great writing style.
Look forward to more beer infused updates
Thanks Look forward to more beer infused updates
I've managed to source another rear coilover (second hand) which should be with me and fitted on Thursday. Let's hope this one doesn't arrive bathing it it's own internals.
Minor update.
I'd managed to fight off the temptation to splurge hundreds of quids on a nice set of Meister R's or similar and sourced a replacement Coilover for the cheapo eBay special that vomited it's internals all over my drive. Luckily, the replacement, although second hand, was exactly the same make/model as the broken one. This was a result as not only would it have driven me insane knowing there were different components on the same axle, but now it ensures that both sides are the same, shocking (bahahah) quality
After getting home from work, I got the car up on the air and started removing bits:
25 minutes after this photo, I'd removed the old strut, adjusted the new coilover to the same height as the other side (the lowest it would go, to start off with) and fitted it. Progress!
Back on the deck and after a quick test drive:
First impressions are, well, it's ok. It's low. Probably too low. The colander-esque decat (which is still fecking leaking btw) scraped over the smalled of speed bumps, of which there are many on my estate! So I think I will need to raise the back by about 20mm to make some room. Especially if we're going to try and get these things on a ferry!
Handling wise, it's definitely better than the standard, aftermarket, tired items that were on there previously. It's a bit washy on the front end, resulting in understeer but considering this will be the first time on the 'Ring, I'm happy with a bit more of a forgiving set up. Although I might change my mind on the basis that, if I'm going to stack it, do I want to see it coming?
This weekend will hopefully see the fitting of the Roll Bar
Another (lengthy - grab a cuppa) Update.
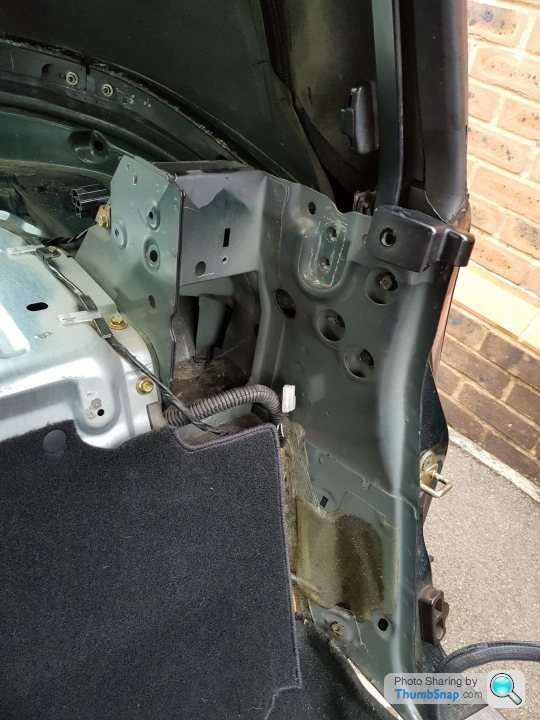
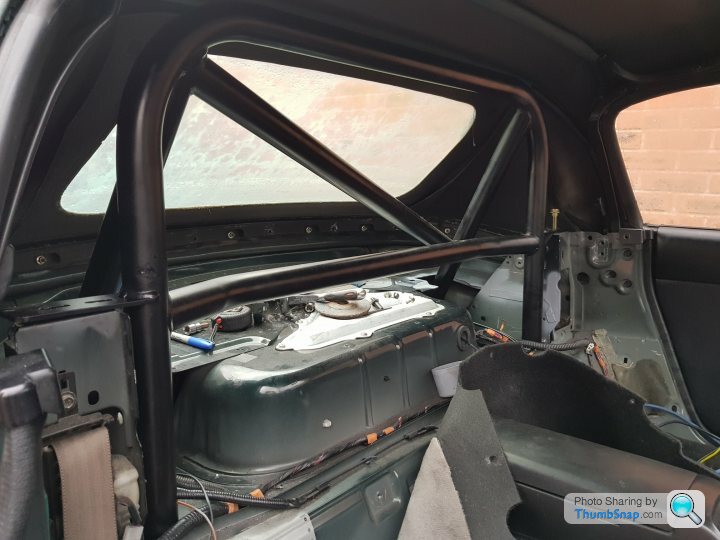
The time came, this weekend, for me to install the GC Fabrications roll bar. I’d been putting this task off for a while as it looked like an absolute ball ache. But was I wrong! Totally wrong! It wasn’t a ball ache at all. I would have been happy with a ball ache. This was a ball ache coupled with someone hammering your Gooch with a meet tenderiser whilst someone performing a prostate exam with a glove covered in Deep Heat!
It doesn’t look too imposing does it?
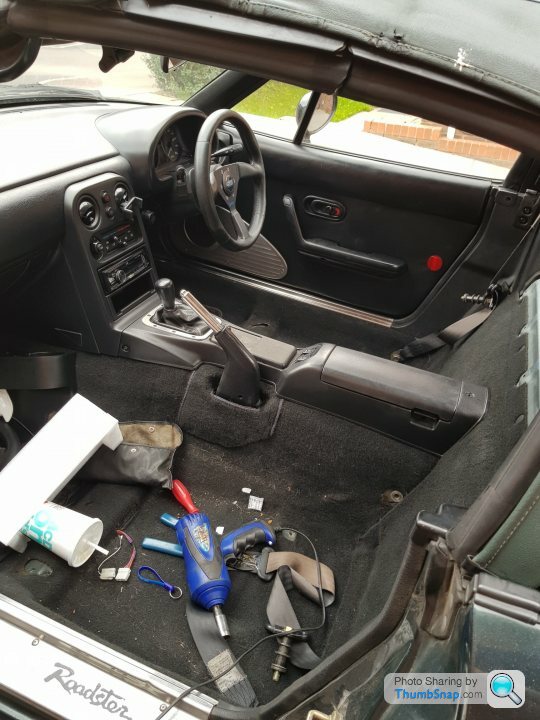
I started off with removing the seats. This is very easy, they’re held in with just 4 bolts but care needs to be taken as they’re easily rounded. I then took out the upper strut brace held in with 2 bolts, one on each seat belt tower:
The red nail still looking out enviously at all the care and attention. Her turn will be next year!
Seats out, it was time to turn my attention to the trim around the seat belt towers. I’d zip tied the passenger seat belt in place as it was broken and I didn’t want it to retract and not be retrievable again:
A couple of 10mm bolts to remove and then some T40 torx screws holding in the hard top clamps
Once the trim was removed it was off with the parcel shelf carpet, held in by approximately 2604089 billion plastic plug cap thingys.
This reveals the parcel shelf panel, held on by yet another 83892 trillion 10mm bolts.
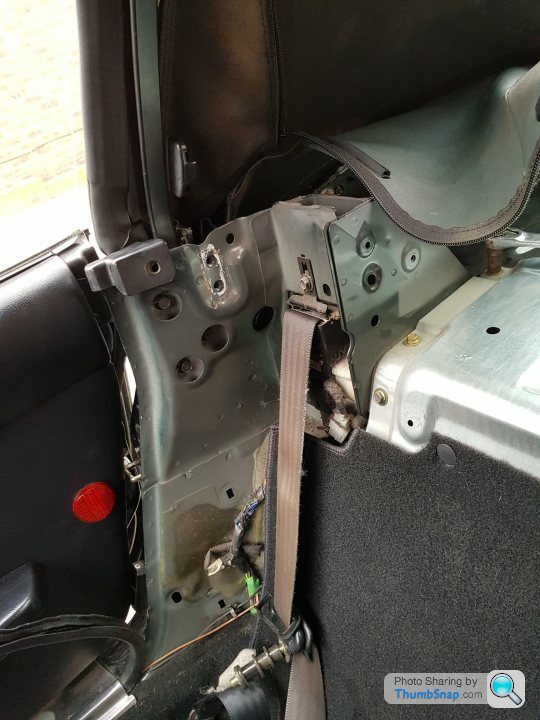
Broken passenger side seat belt removed:
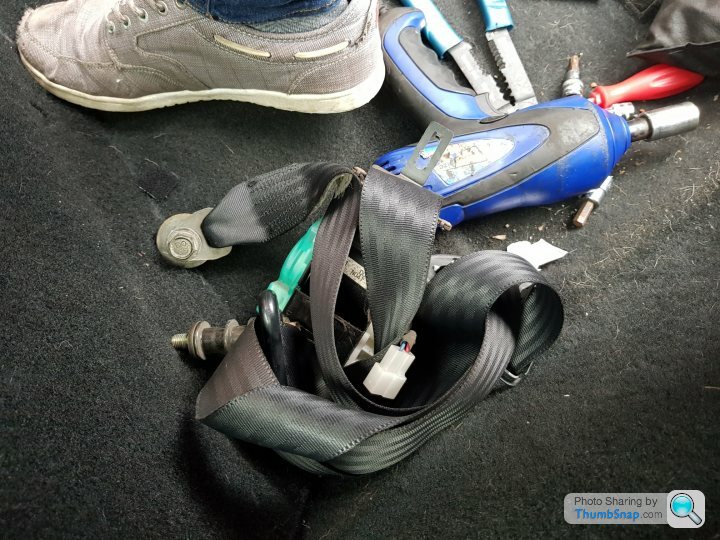
Drivers side belt to be removed. This will replace the broken seat belt as I’ll be fitting a harness on the driver’s side:
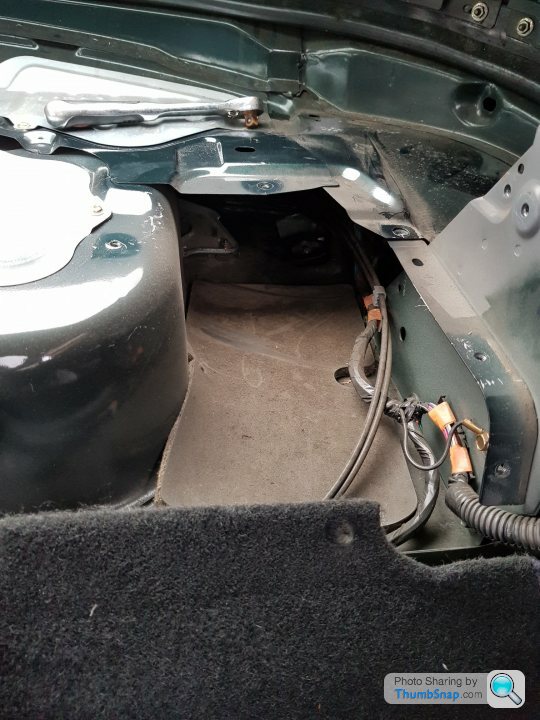
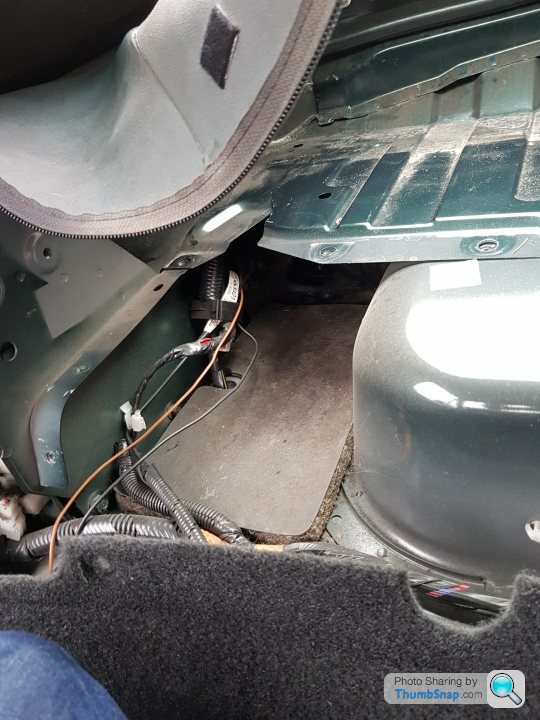
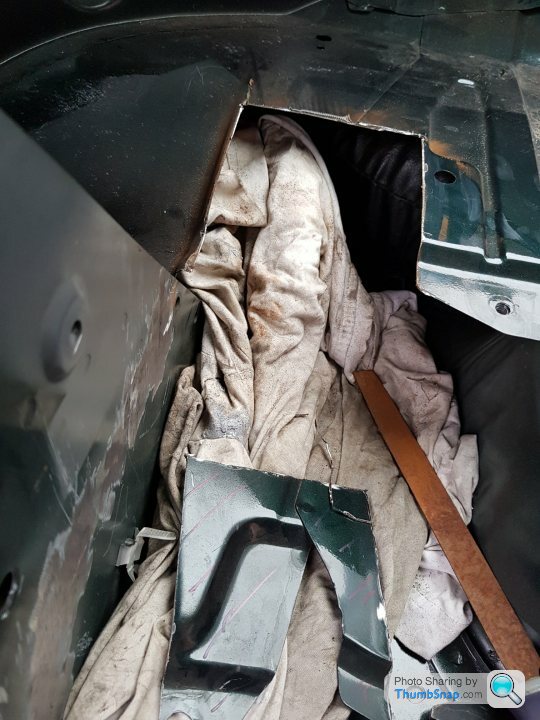
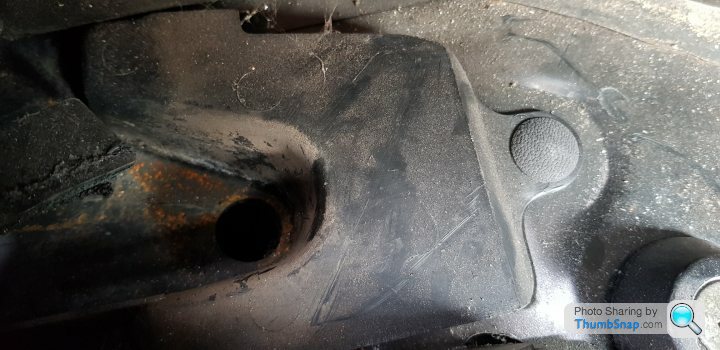
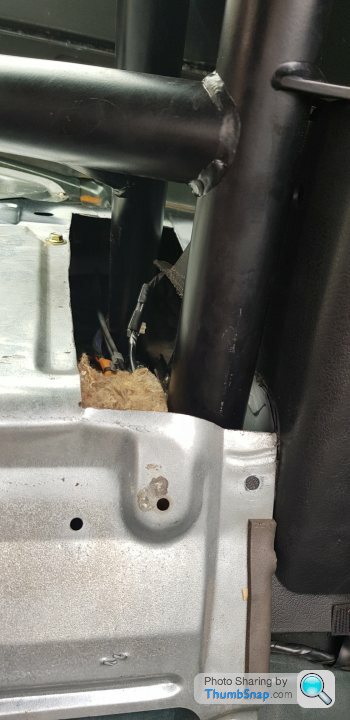
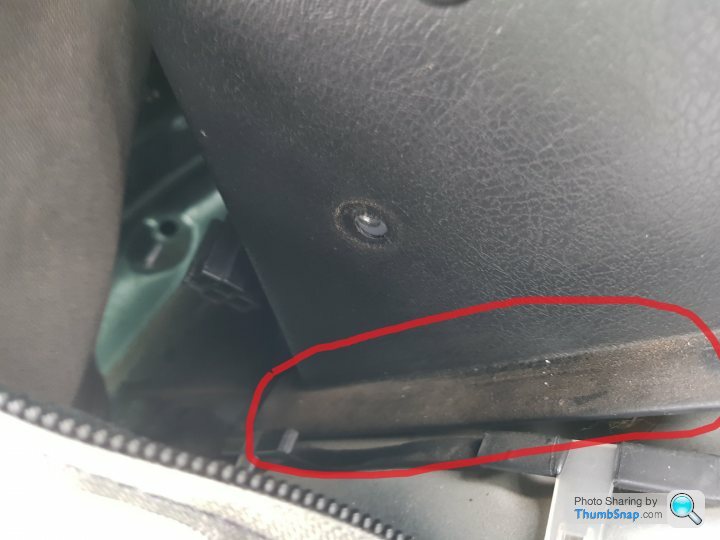
After removing all of the bolts ever made in the world ever, the parcel shelf can be removed, revealing 2 channels into the boot, where the total extent of Mazda’s sound deadening efforts can be revealed. In the form of two 6” by 10” pieces of shredded… well… stuff.
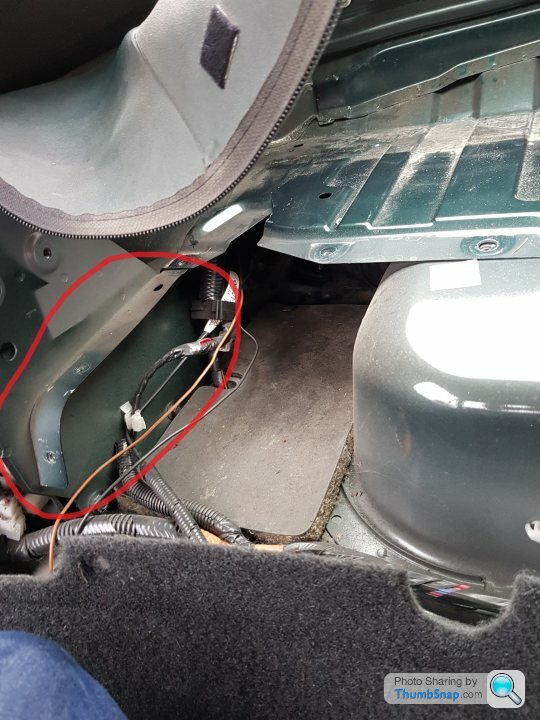
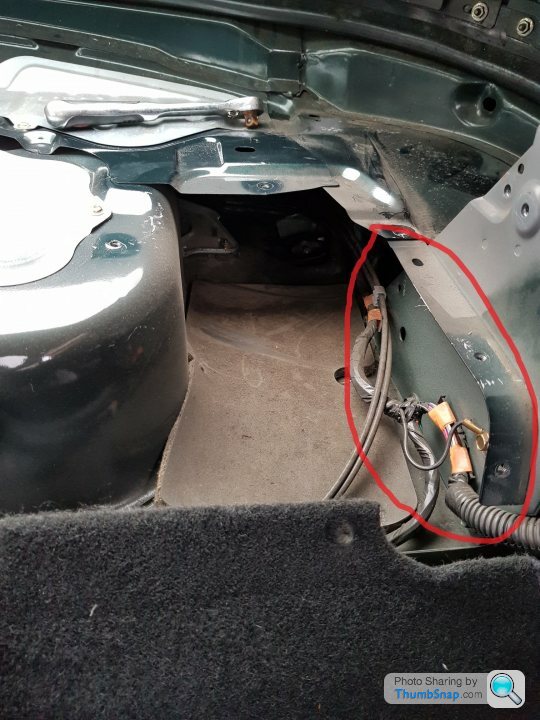
The supports for the parcel shelf, circled in red below, needed to be removed either by cutting them back, or by removing them completely.
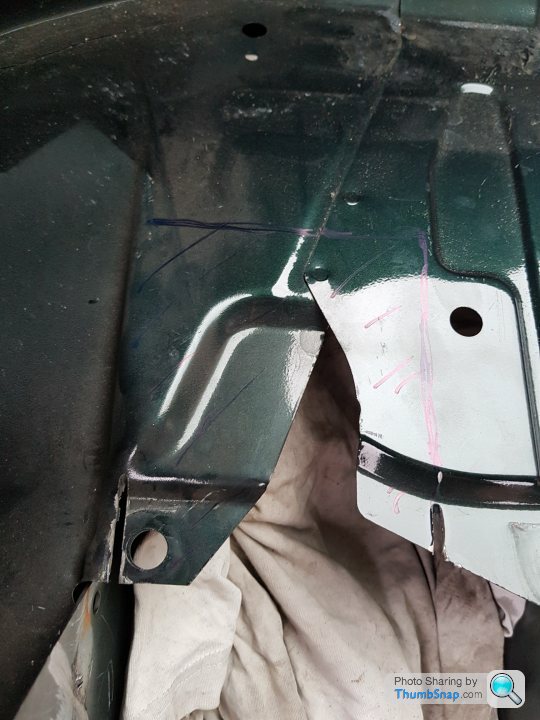
I tackled the driver’s side first, and decided that drilling out the spot welds would be easiest. I was wrong. I couldn’t get enough purchase on the drill to get enough of a bite through the welds. So with a combination of drilling, grinding, ,swearing and performing a Maori War Dance, it all came off. I marked up the area that needed to be cut for the rear legs, cut that out and ground down the area so it was flush:
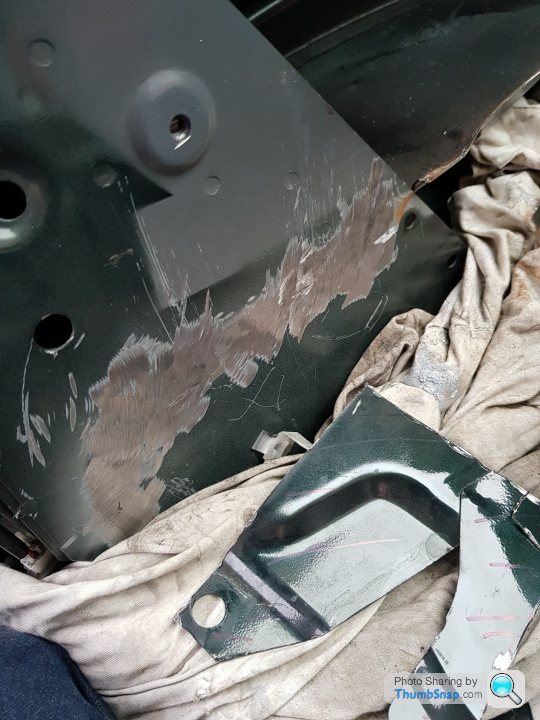
I then applied a few coats of primer to protect the exposed metal. It’s not pretty, but will do the trick:
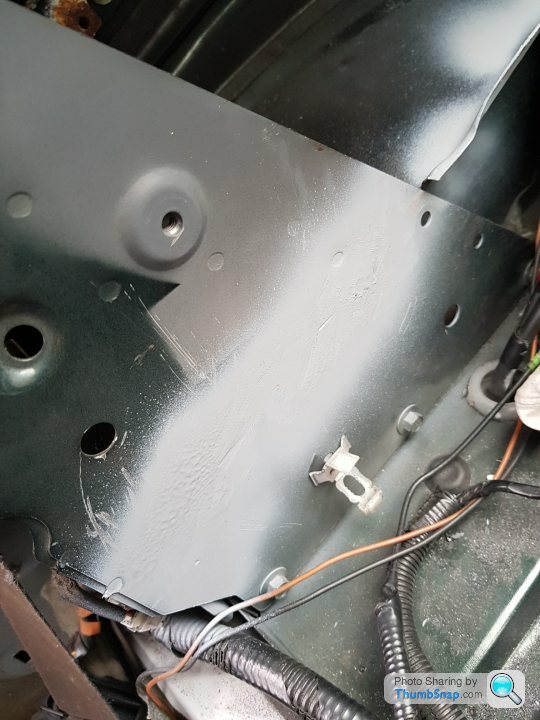
For the passenger side, I decided against the Maori War Dance, as fun as it was, and just cut off the lip, leaving the spot welds in situ. Again, covered with a few coats of primer for protection:
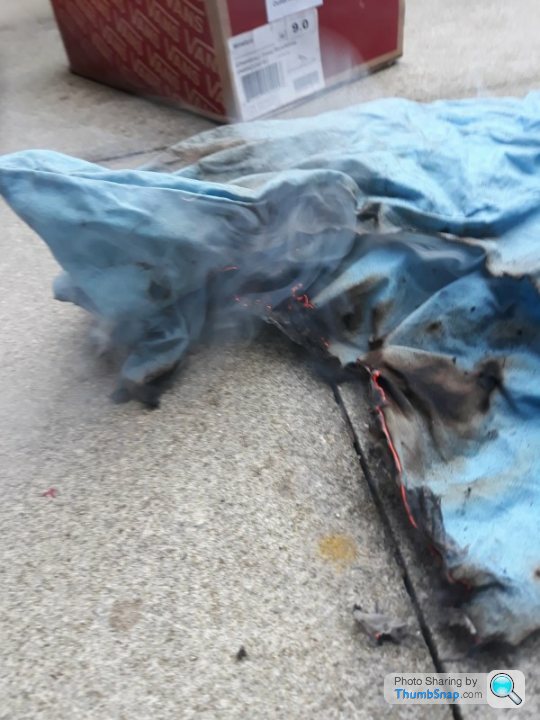
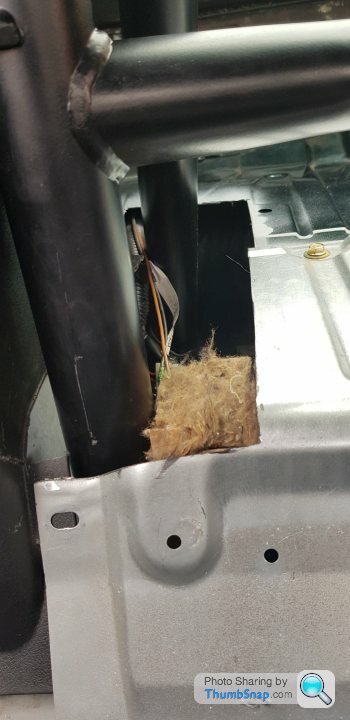
During this grinding and drilling stage, particularly the grinding stage, there were a lot of sparks. I’d been using an old pillow case to prevent the interior from getting showered in red hot metal shards. Well, it worked… Better this than the car though eh!
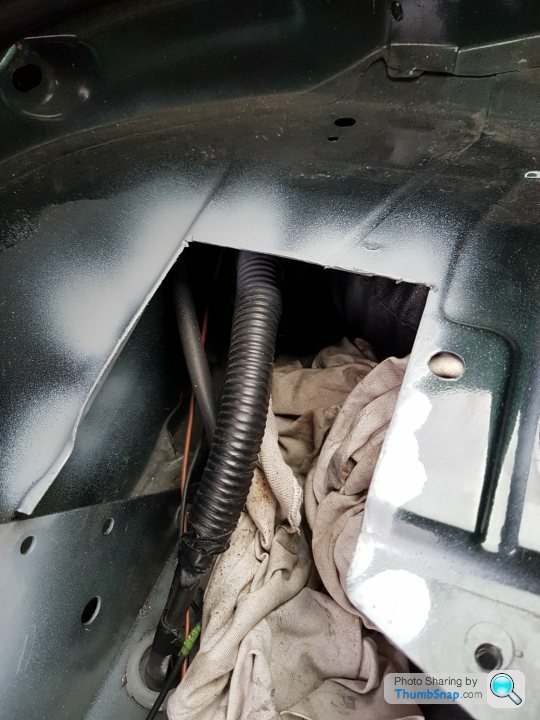
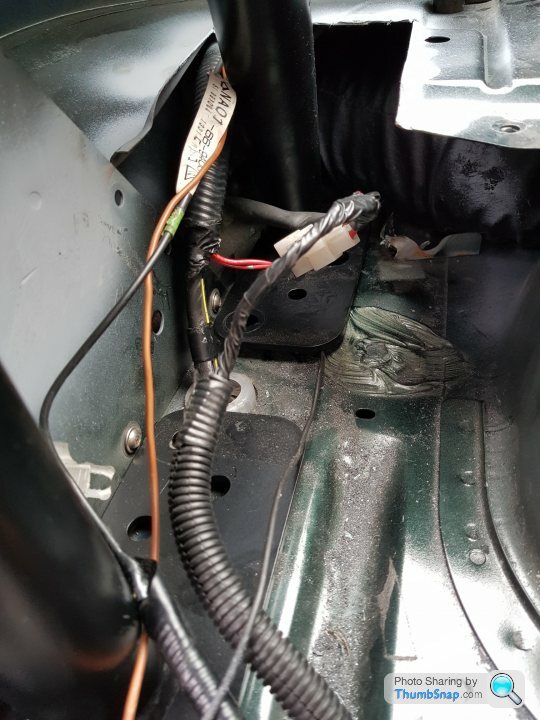
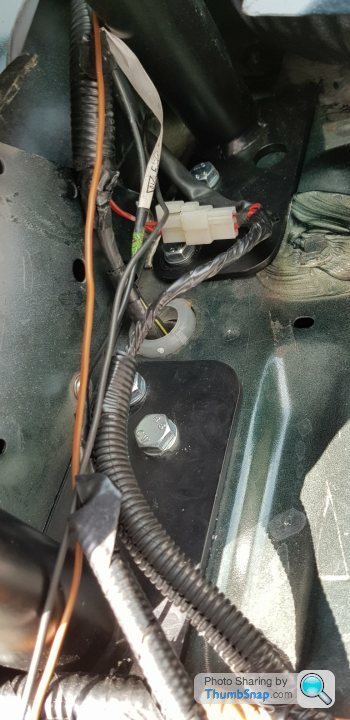
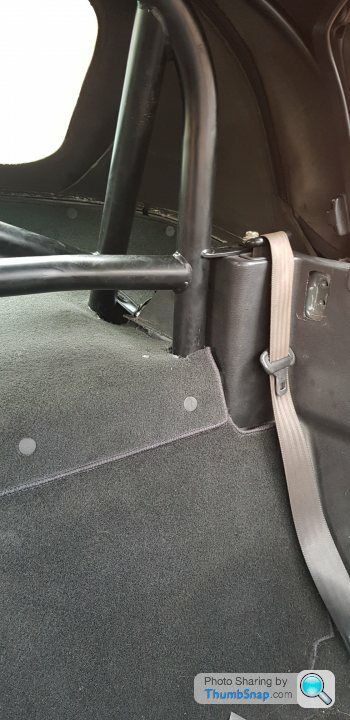
Now all the holes had been cut, it was time for a test fit. There were a few wired that needed moving, but it slotted in beautifully:
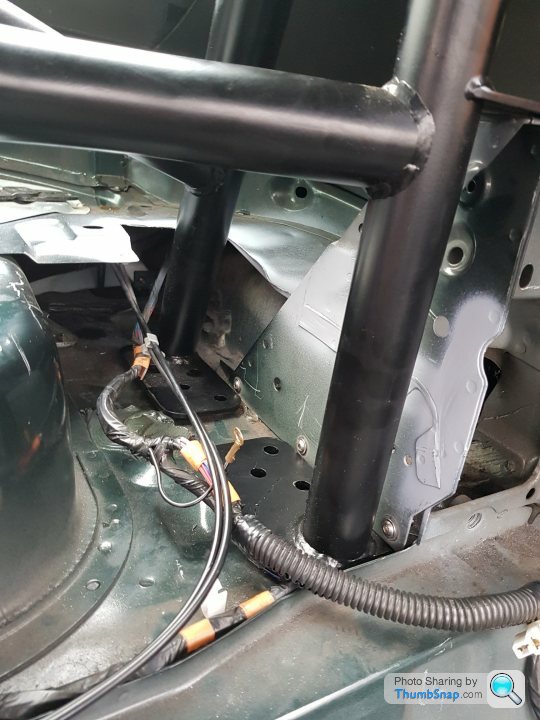
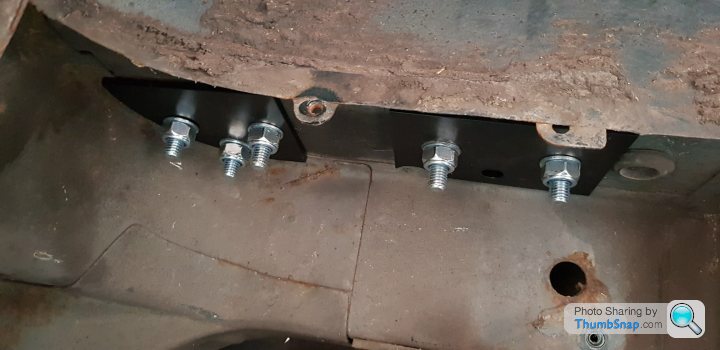
Once it was in position, I replaced the seat belt bolts which located through tabs either side of the roll cage to ensure it was in the right position. I then marked up the holes in the feet of the cage. I can’t seem to find any pictures of this stage. Can’t remember why. Oh, wait. I remember. It was because it was the most infuriatingly, frustrating and pain in the rectum job of the whole task.
After marking the holes in the feet, whilst it was in position with the seat belt bolts, I’d removed the cage and, with drill in hand, confidently smashed some 5mm pilot holes in. Then, purposefully loaded my 10mm bit and widened the pilot holes ready to receive their bolts. After de-burring the holes I replaced the cage, replaced the seat belt bolts and set about inserting the feet bolts. fk. Why the fk don’t these holes line up? It was in this position literally 15 minutes ago (there’s no adjustment in the seat belt bolt tabs either). For fks sake! One or 2 bolts went in ok, but the others were too far out.
I needed to get under the car, removed the wheels and remove the wheel arch lining anyway. So after I did that, and revealed my inch un-perfect holes I used them as a guide to drill up from the bottom. After a lot of swearing ( at the Maori God of War for not upholding my dancing), the sandwich plates were bolted up on the passenger side. I’d run a bead of sealant around the plates to prevent water getting to the newly drilled holes. Preventative maintenance is not my strong point, so I patted myself on the back after this!
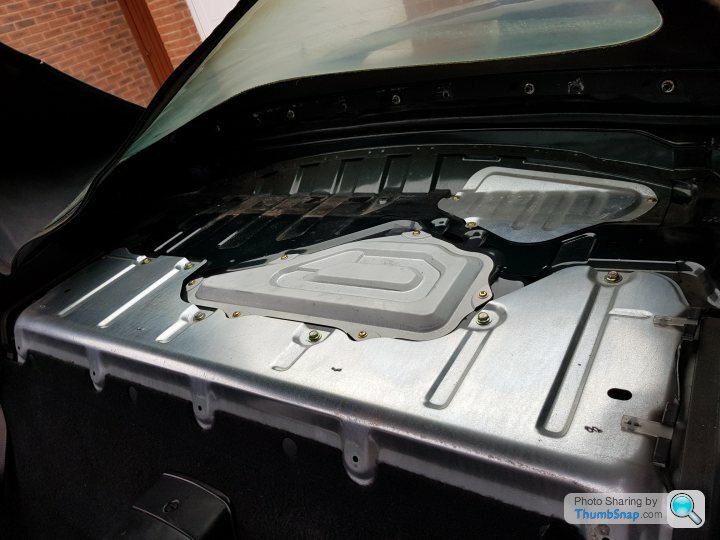
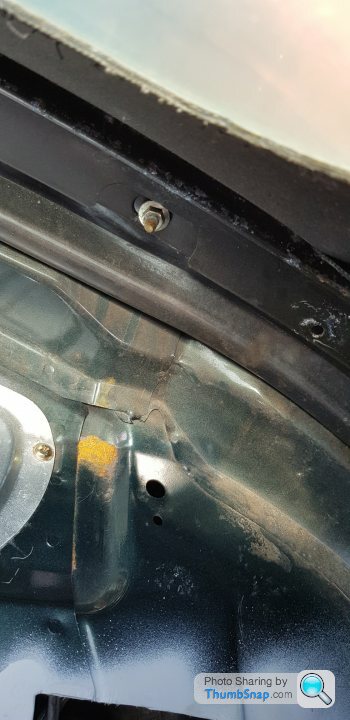
It rained over the weekend and when I returned to the car on Sunday morning, I’d noticed that there was little pools of water where it was getting through the roof rain rail. The rain rail holds the bottom part of the folding roof to the car and acts as a gulley to drain away water. There are 13 bolts holding the rain rail in place and they require tightening in a specific order and to a specific torque.
That’s not surface rust, it’s the swarf from all the grinding that’s rusted in the newly formed puddle of water. I’d guess that the carpet had previously soaked up this small leak until now:
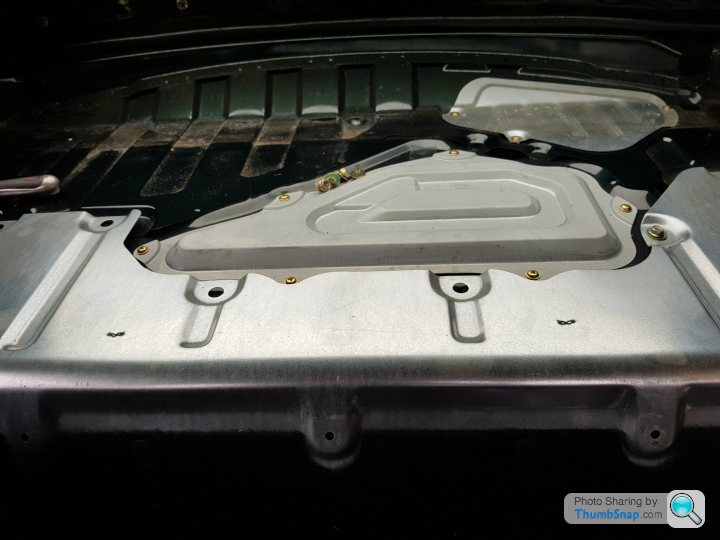
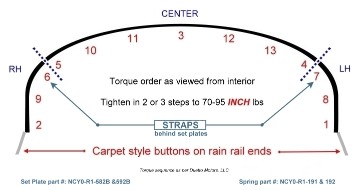
The below diagram is the sequence in which they need to be tightened. I was able to tighten some of them a good half a turn to get the required torque, so a worthwhile job:
All cleaned up:
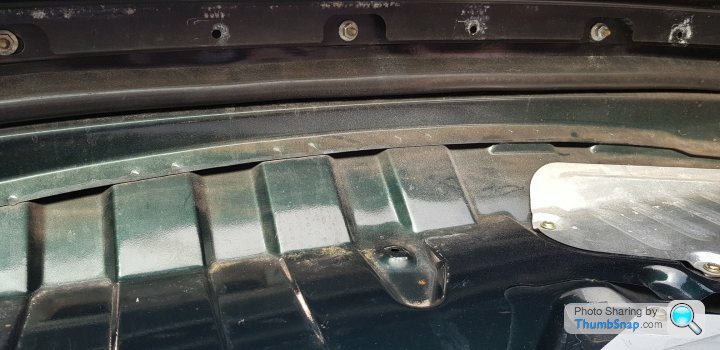
I also took the opportunity to ensure the drain tubes weren’t blocked as this can lead to all sort of issues and is one of the main contributing factors to MX5s ending up as brown piles of dust on the floor of the garage. An easy job, they’re located right behind the seat belt turrets and the job was made even easier using the areal from the Red Nail
All bolted down from the top:
It was then time to trim the parcel shelf and the plastic trim around the seat belt turrets to fit around the legs of the cage. A 4” strip needed to be cut out from the back of the parcel shelf, down to the low part of the bend. For the plastic trim, the lip needed to be cut away to about 3” down after where it bends:
Then refit the carpet and very badly trim around the legs:

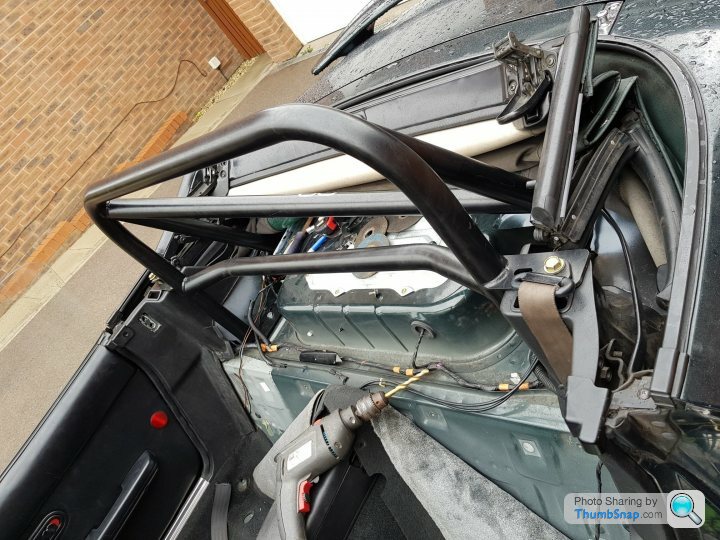
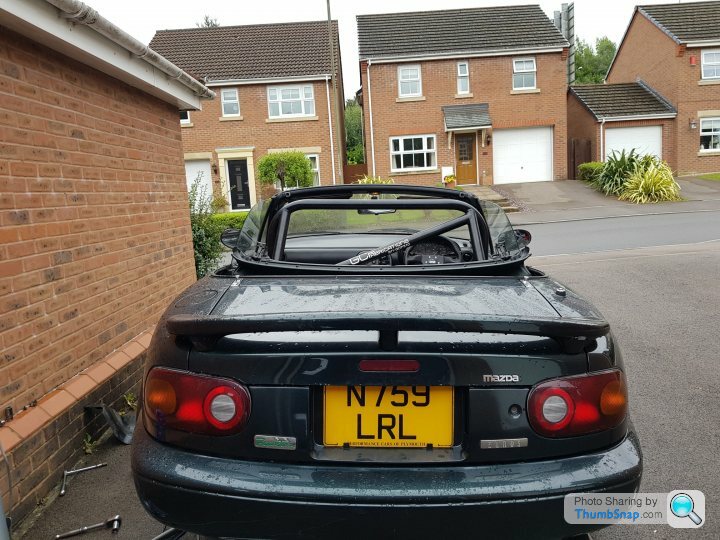
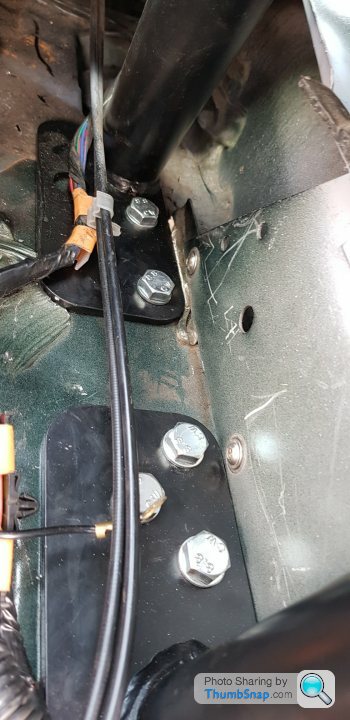
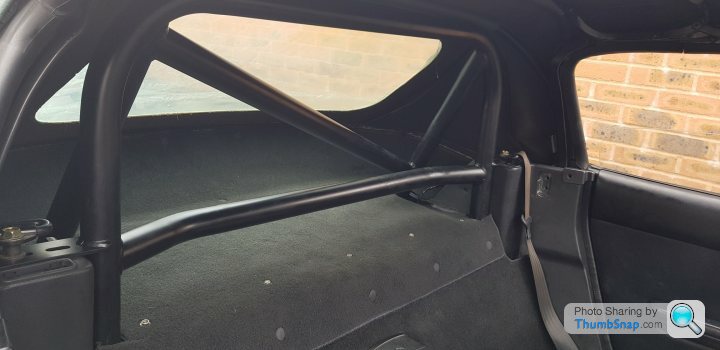
All fitted
So once the cage was finished, I picked myself up off the floor and did a little victory dance. But then it was onto the seats.
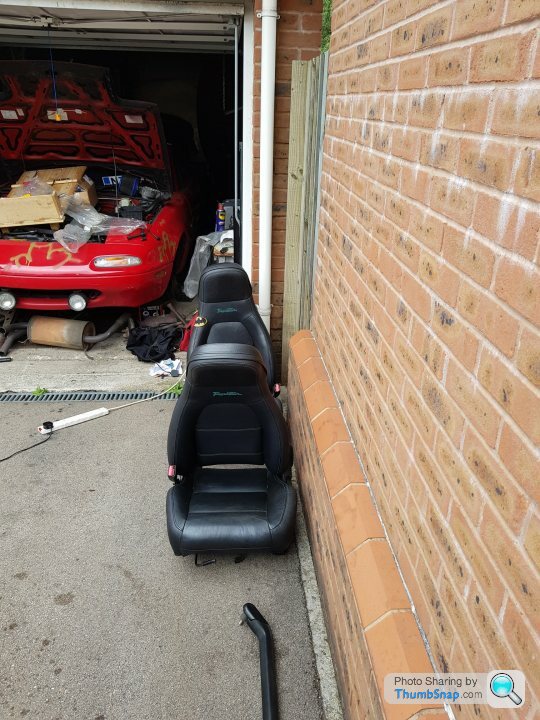
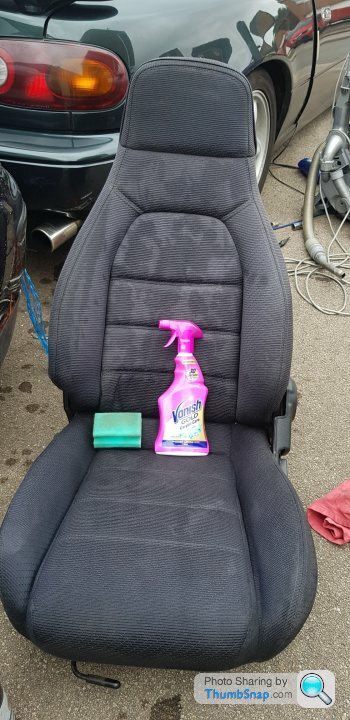
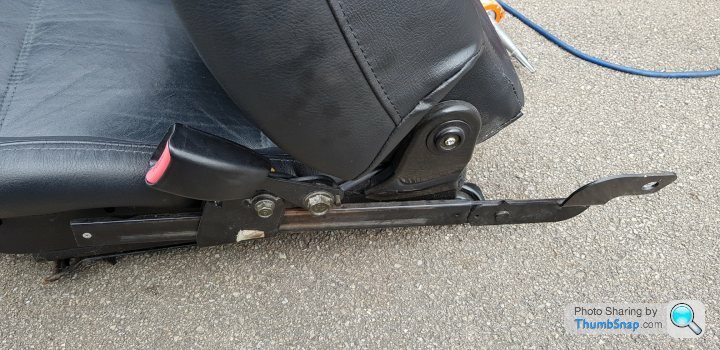
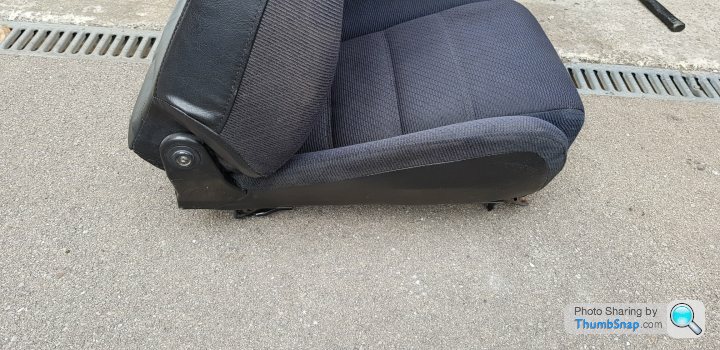
The VR Limited cars come standard with very lovely, black leather seat with the “Roadster” emblem embroidered into the headrest. What I’d noticed though is, as lovely as they look, they’re god awful seats to have in a zippy roadster. Slippery, with very little back or bolster support it’s a mission to not fall out of the entire car when manoeuvring even the slightest of bends. They also sit very high up which, coupled with a standard steering wheel inspired by the wheel from HMS Victory, made it a very awkward driving position. This is not something I experienced in the Red Nail. Quite the opposite in fact. Therefore, I decided that I would reinstate the old, cloth seat’s position at the helm. After rescuing them from their tomb in the footwell of the Red Nail, a good hoover and a healthy dose of Vanish carpet cleaner saw them clean up very well! After a quick test fit, I noticed they didn’t bloody fit. But soon realised I was trying to fit the passenger seat in the driver’s side! But I won’t go too much into that!
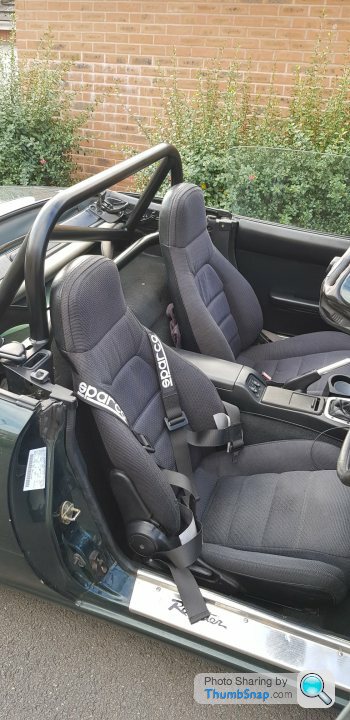
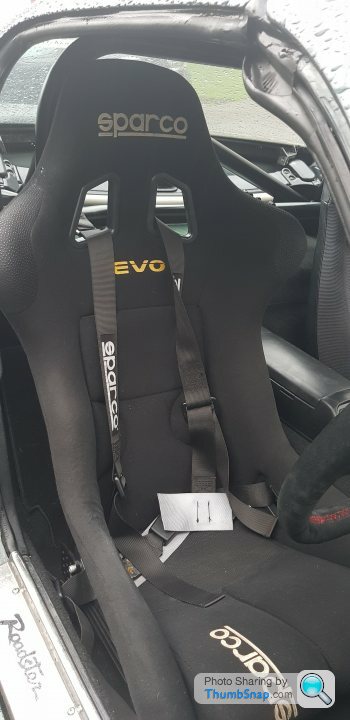
Before I fitted the seat for good, I had a nice Sparco harness (donated by Craig AKA Superchickenn) to fit. Having not fitted a harness before, but thinking “how hard can it be” I proceeded, very confidently, to entirely fk it up, as you can see from the below photo. This has since been rectified.
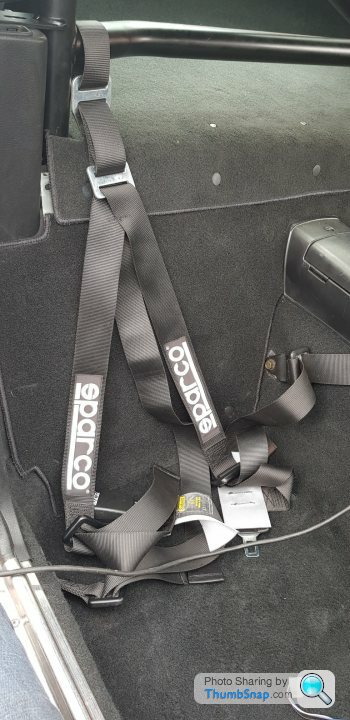
As you can see, this is a 3 point harness which isn’t ideal for this setup due to the harness bar being so close to the seat. However, it came at the right price and seems to be doing ok so far.
After a quick (1 hour) hoover as the previous owner appears to have actually been a dog of some kind, the carpet was looking fresh:
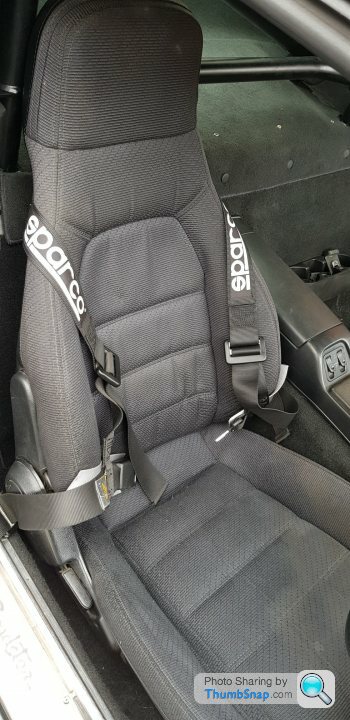
Seat fitted with harness. This will be replaced with the Sparco seat I have once I manage to find a cheap set of side mounts to fit the 5:
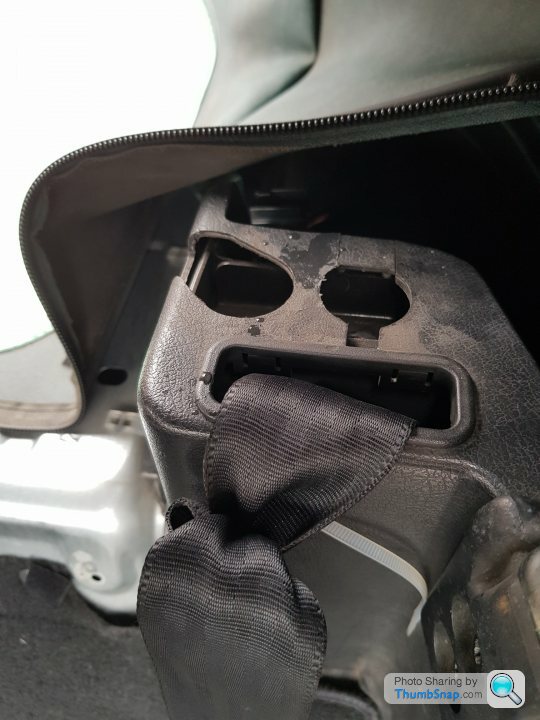
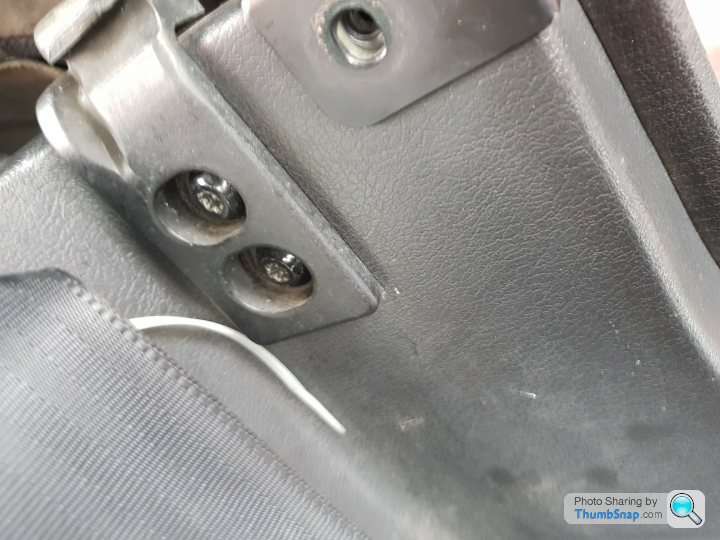
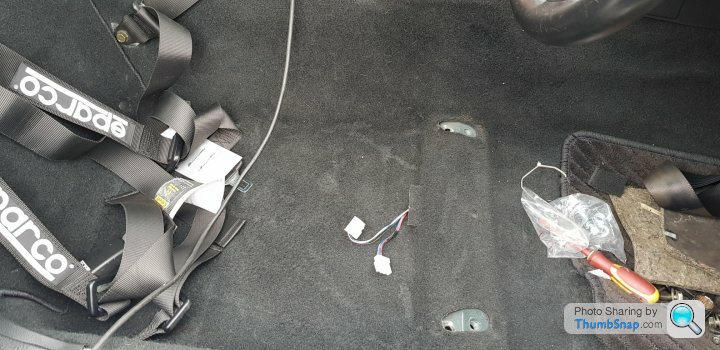
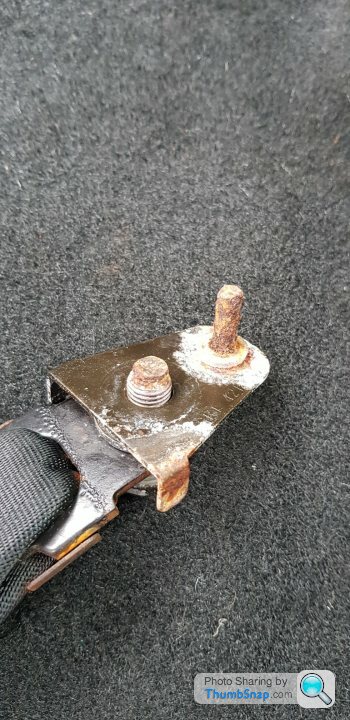
Once the driver’s side seat was in, it was onto the passenger side. What I’d noticed is that the seat belt clip on the old seats were very different to the leather ones as you can see below. I can only assume this is due to the geometry of the seats being different. Also, the newer seats have a loom to detect if the belts are plugged in or not.
Leather seats:
Cloth seats:
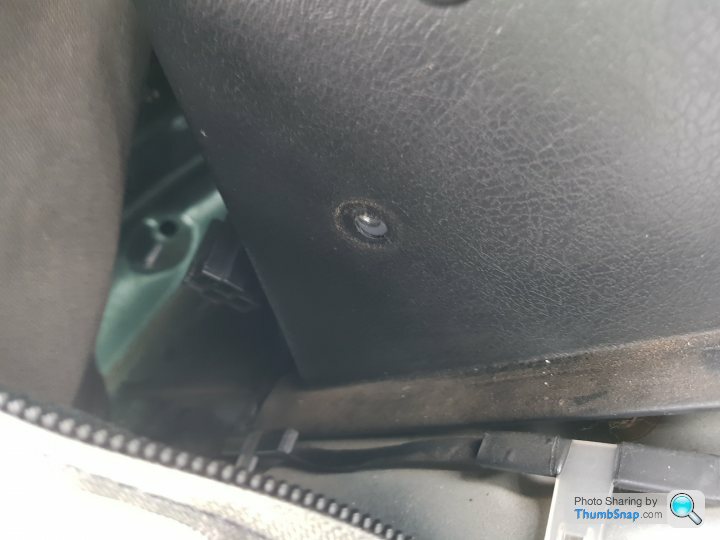
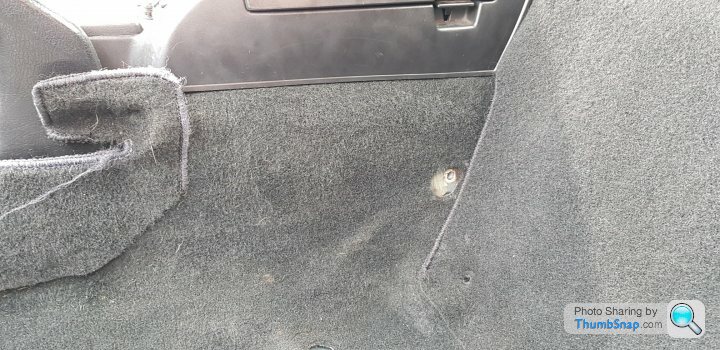
I had a quick look around in the Red Nail and noticed there are 2 sets of holes and, depending on which seats you run, one of the holes is plugged with a grommet. Below is the existing hold for the seat belt bolt:
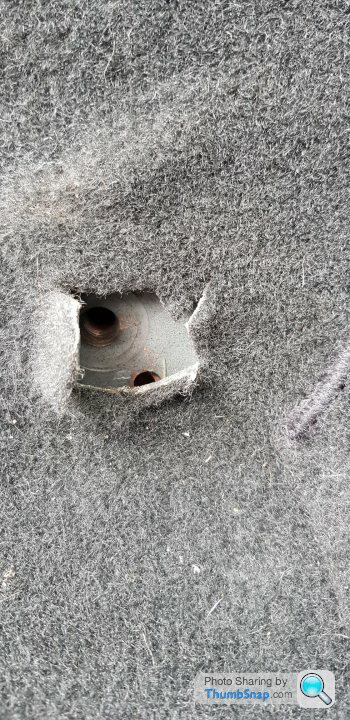
After a quick rummage around, I’d located the other hole (FNARRRRRR) and made a precise (not precise) incision in the carpet:
I recovered the old seat belt clip from the Red Nail. Crustiness galore.
Installed:
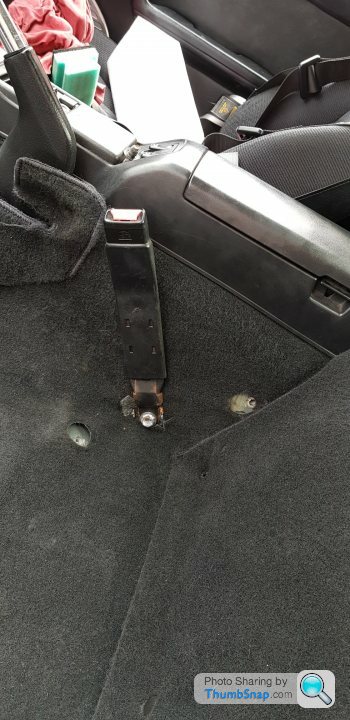
I’d then plugged the old hole (oh god) to prevent any liquids seeping through (must stop) to the delicate insides.
Interior complete!
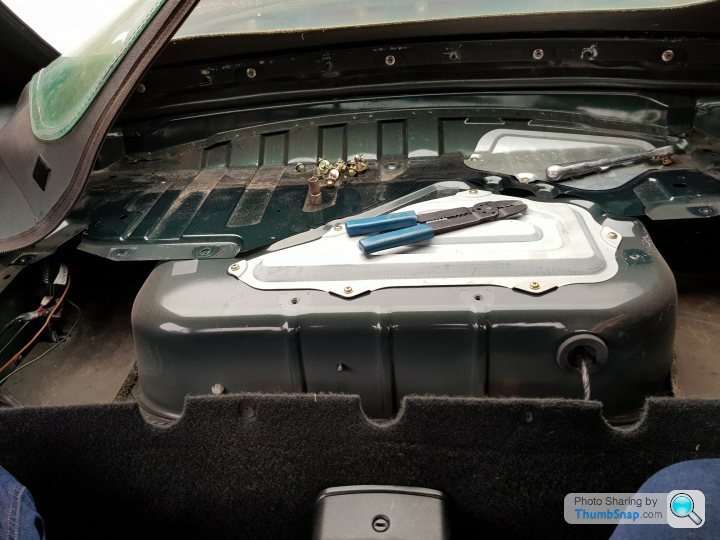
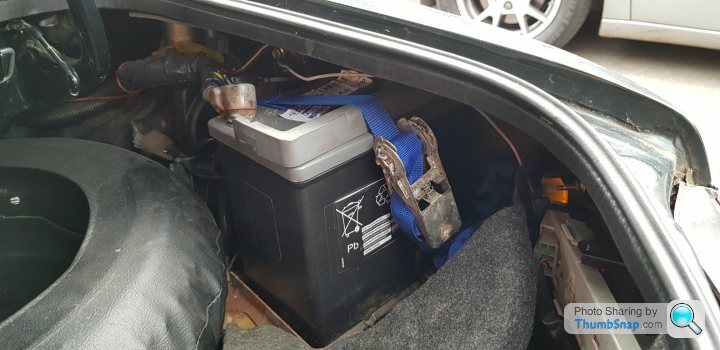
To reward myself for such a good job, well done I, well, carried on working on other bits. First was the battery. The mighty zip ties that had been used to secure it in place had failed (RIP ZIP TIES 2K18) so I replaced them with something a little more, err, robust:
I also fitted some Ultra Brilliance bulbs (again, robbed from the Red Nail) and cleaned the throttle body with some carb cleaner which has helped with my low idle.
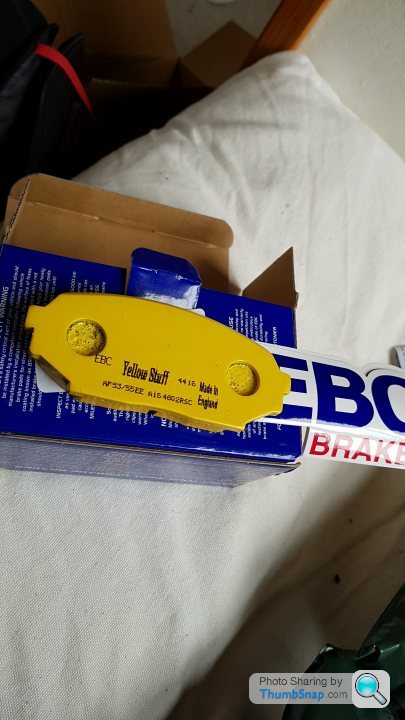
Between finishing the above and writing this update, I'd also received by EBC Yellow Stuff pads and have secured a good, used set of Nankank NS2R tyres that I'll be picking up on Friday.
Next steps now include:
The time came, this weekend, for me to install the GC Fabrications roll bar. I’d been putting this task off for a while as it looked like an absolute ball ache. But was I wrong! Totally wrong! It wasn’t a ball ache at all. I would have been happy with a ball ache. This was a ball ache coupled with someone hammering your Gooch with a meet tenderiser whilst someone performing a prostate exam with a glove covered in Deep Heat!
It doesn’t look too imposing does it?
I started off with removing the seats. This is very easy, they’re held in with just 4 bolts but care needs to be taken as they’re easily rounded. I then took out the upper strut brace held in with 2 bolts, one on each seat belt tower:
The red nail still looking out enviously at all the care and attention. Her turn will be next year!
Seats out, it was time to turn my attention to the trim around the seat belt towers. I’d zip tied the passenger seat belt in place as it was broken and I didn’t want it to retract and not be retrievable again:
A couple of 10mm bolts to remove and then some T40 torx screws holding in the hard top clamps
Once the trim was removed it was off with the parcel shelf carpet, held in by approximately 2604089 billion plastic plug cap thingys.
This reveals the parcel shelf panel, held on by yet another 83892 trillion 10mm bolts.
Broken passenger side seat belt removed:
Drivers side belt to be removed. This will replace the broken seat belt as I’ll be fitting a harness on the driver’s side:
After removing all of the bolts ever made in the world ever, the parcel shelf can be removed, revealing 2 channels into the boot, where the total extent of Mazda’s sound deadening efforts can be revealed. In the form of two 6” by 10” pieces of shredded… well… stuff.
The supports for the parcel shelf, circled in red below, needed to be removed either by cutting them back, or by removing them completely.
I tackled the driver’s side first, and decided that drilling out the spot welds would be easiest. I was wrong. I couldn’t get enough purchase on the drill to get enough of a bite through the welds. So with a combination of drilling, grinding, ,swearing and performing a Maori War Dance, it all came off. I marked up the area that needed to be cut for the rear legs, cut that out and ground down the area so it was flush:
I then applied a few coats of primer to protect the exposed metal. It’s not pretty, but will do the trick:
For the passenger side, I decided against the Maori War Dance, as fun as it was, and just cut off the lip, leaving the spot welds in situ. Again, covered with a few coats of primer for protection:
During this grinding and drilling stage, particularly the grinding stage, there were a lot of sparks. I’d been using an old pillow case to prevent the interior from getting showered in red hot metal shards. Well, it worked
… Better this than the car though eh! Now all the holes had been cut, it was time for a test fit. There were a few wired that needed moving, but it slotted in beautifully:
Once it was in position, I replaced the seat belt bolts which located through tabs either side of the roll cage to ensure it was in the right position. I then marked up the holes in the feet of the cage. I can’t seem to find any pictures of this stage. Can’t remember why. Oh, wait. I remember. It was because it was the most infuriatingly, frustrating and pain in the rectum job of the whole task.
After marking the holes in the feet, whilst it was in position with the seat belt bolts, I’d removed the cage and, with drill in hand, confidently smashed some 5mm pilot holes in. Then, purposefully loaded my 10mm bit and widened the pilot holes ready to receive their bolts. After de-burring the holes I replaced the cage, replaced the seat belt bolts and set about inserting the feet bolts. f
k. Why the fk don’t these holes line up? It was in this position literally 15 minutes ago (there’s no adjustment in the seat belt bolt tabs either). For fks sake! One or 2 bolts went in ok, but the others were too far out. I needed to get under the car, removed the wheels and remove the wheel arch lining anyway. So after I did that, and revealed my inch un-perfect holes I used them as a guide to drill up from the bottom. After a lot of swearing ( at the Maori God of War for not upholding my dancing), the sandwich plates were bolted up on the passenger side. I’d run a bead of sealant around the plates to prevent water getting to the newly drilled holes. Preventative maintenance is not my strong point, so I patted myself on the back after this!
It rained over the weekend and when I returned to the car on Sunday morning, I’d noticed that there was little pools of water where it was getting through the roof rain rail. The rain rail holds the bottom part of the folding roof to the car and acts as a gulley to drain away water. There are 13 bolts holding the rain rail in place and they require tightening in a specific order and to a specific torque.
That’s not surface rust, it’s the swarf from all the grinding that’s rusted in the newly formed puddle of water. I’d guess that the carpet had previously soaked up this small leak until now:
The below diagram is the sequence in which they need to be tightened. I was able to tighten some of them a good half a turn to get the required torque, so a worthwhile job:
All cleaned up:
I also took the opportunity to ensure the drain tubes weren’t blocked as this can lead to all sort of issues and is one of the main contributing factors to MX5s ending up as brown piles of dust on the floor of the garage. An easy job, they’re located right behind the seat belt turrets and the job was made even easier using the areal from the Red Nail
All bolted down from the top:
It was then time to trim the parcel shelf and the plastic trim around the seat belt turrets to fit around the legs of the cage. A 4” strip needed to be cut out from the back of the parcel shelf, down to the low part of the bend. For the plastic trim, the lip needed to be cut away to about 3” down after where it bends:
Then refit the carpet and very badly trim around the legs:
All fitted
So once the cage was finished, I picked myself up off the floor and did a little victory dance. But then it was onto the seats.
The VR Limited cars come standard with very lovely, black leather seat with the “Roadster” emblem embroidered into the headrest. What I’d noticed though is, as lovely as they look, they’re god awful seats to have in a zippy roadster. Slippery, with very little back or bolster support it’s a mission to not fall out of the entire car when manoeuvring even the slightest of bends. They also sit very high up which, coupled with a standard steering wheel inspired by the wheel from HMS Victory, made it a very awkward driving position. This is not something I experienced in the Red Nail. Quite the opposite in fact. Therefore, I decided that I would reinstate the old, cloth seat’s position at the helm. After rescuing them from their tomb in the footwell of the Red Nail, a good hoover and a healthy dose of Vanish carpet cleaner saw them clean up very well! After a quick test fit, I noticed they didn’t bloody fit. But soon realised I was trying to fit the passenger seat in the driver’s side!
But I won’t go too much into that! Before I fitted the seat for good, I had a nice Sparco harness (donated by Craig AKA Superchickenn) to fit. Having not fitted a harness before, but thinking “how hard can it be” I proceeded, very confidently, to entirely f
k it up, as you can see from the below photo. This has since been rectified. As you can see, this is a 3 point harness which isn’t ideal for this setup due to the harness bar being so close to the seat. However, it came at the right price and seems to be doing ok so far.
After a quick (1 hour) hoover as the previous owner appears to have actually been a dog of some kind, the carpet was looking fresh:
Seat fitted with harness. This will be replaced with the Sparco seat I have once I manage to find a cheap set of side mounts to fit the 5:
Once the driver’s side seat was in, it was onto the passenger side. What I’d noticed is that the seat belt clip on the old seats were very different to the leather ones as you can see below. I can only assume this is due to the geometry of the seats being different. Also, the newer seats have a loom to detect if the belts are plugged in or not.
Leather seats:
Cloth seats:
I had a quick look around in the Red Nail and noticed there are 2 sets of holes and, depending on which seats you run, one of the holes is plugged with a grommet. Below is the existing hold for the seat belt bolt:
After a quick rummage around, I’d located the other hole (FNARRRRRR) and made a precise (not precise) incision in the carpet:
I recovered the old seat belt clip from the Red Nail. Crustiness galore.
Installed:
I’d then plugged the old hole (oh god) to prevent any liquids seeping through (must stop) to the delicate insides.
Interior complete!
To reward myself for such a good job, well done I, well, carried on working on other bits. First was the battery. The mighty zip ties that had been used to secure it in place had failed (RIP ZIP TIES 2K18) so I replaced them with something a little more, err, robust:
I also fitted some Ultra Brilliance bulbs (again, robbed from the Red Nail) and cleaned the throttle body with some carb cleaner which has helped with my low idle.
Between finishing the above and writing this update, I'd also received by EBC Yellow Stuff pads and have secured a good, used set of Nankank NS2R tyres that I'll be picking up on Friday.
Next steps now include:
- find some cheap(ish) seat mounts to fit my side mounted Sparco seat.
- Fit Sparco
- Drink beer
- Install new Steering Wheel (on order)
- Fit Yellow Stuff Pads
- Fit NS2R
- 4 wheel laser alignment
- Rob bank
- Drink beer
Small update this time – no cuppa required. Unless you already have one. In which case .
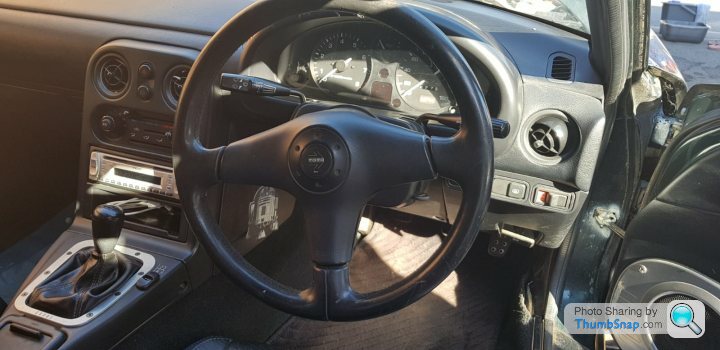
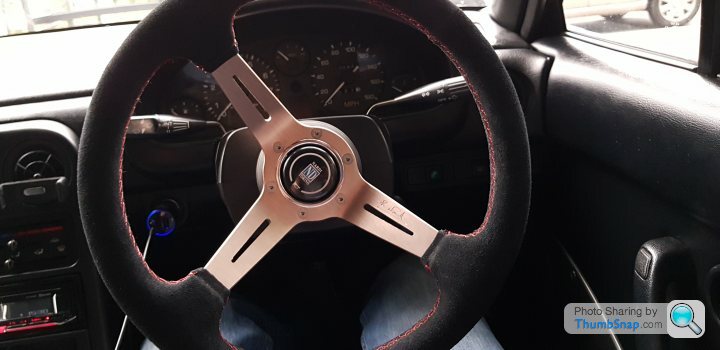
I had my new steering wheel delivered and am very pleased with it. It’s a genuine copy Nardi wheel with a horn button encompassing all the quality of a Happy Shopper paper bag. But, it looks much, much better and more importantly, fits my driving position! I’m no longer turning my wipers on every time I turn left!
It’s a 350mm suede wheel (I was hoping to get a 330mm) with about a 50mm dish:

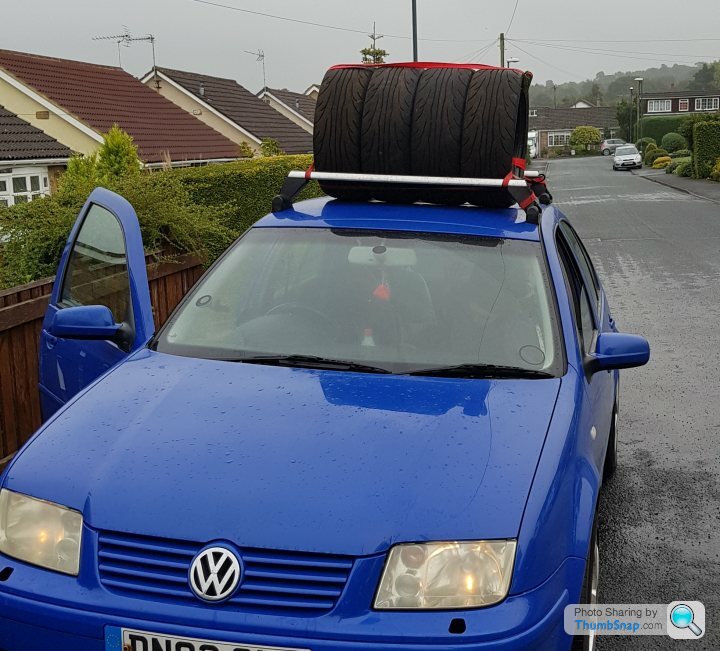
I also collected my Nankang NS2R tyres from a nice chap in Harrogate when I was visiting Hull for the weekend. A car full of the OH and her brothers meant they had to travel in first class on the way home. I tried her brothers first, but were getting some funny looks. Goes without saying this absolutely RUINED my MPG on the 240 mile trip back to South Wales.
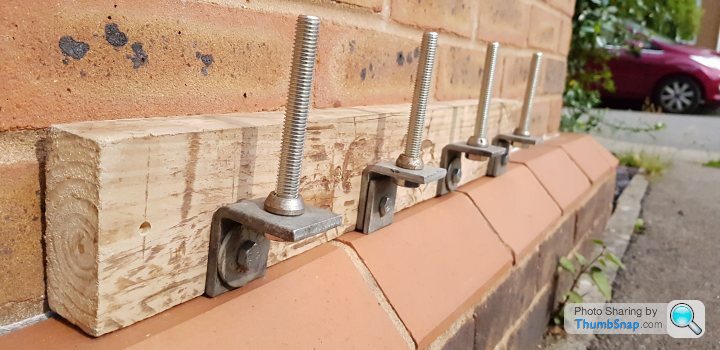
I took some time out from spannering the car as the OH wanted a coat rack for under the stairs. Be fked if I was paying £40 for a cardboard one from Ikea. So, some spare wood and fixings I had laying around in the garden saw me knock up this absolute masterpiece!
This weekend I’ll tackle the clutch, brakes and get an alignment done.
This time in 3 weeks, we’ll hopefully be in Amsterdam.
I had my new steering wheel delivered and am very pleased with it. It’s a genuine copy Nardi wheel with a horn button encompassing all the quality of a Happy Shopper paper bag. But, it looks much, much better and more importantly, fits my driving position! I’m no longer turning my wipers on every time I turn left!
It’s a 350mm suede wheel (I was hoping to get a 330mm) with about a 50mm dish:
I also collected my Nankang NS2R tyres from a nice chap in Harrogate when I was visiting Hull for the weekend. A car full of the OH and her brothers meant they had to travel in first class on the way home. I tried her brothers first, but were getting some funny looks. Goes without saying this absolutely RUINED my MPG on the 240 mile trip back to South Wales.
I took some time out from spannering the car as the OH wanted a coat rack for under the stairs. Be f
ked if I was paying £40 for a cardboard one from Ikea. So, some spare wood and fixings I had laying around in the garden saw me knock up this absolute masterpiece! This weekend I’ll tackle the clutch, brakes and get an alignment done.
This time in 3 weeks, we’ll hopefully be in Amsterdam.
Well, what a ball-ache of job that was! But, the clutch is finally done! Not a job I want to be doing anytime soon. In fact, I’d rather st in my hands and clap that do it again any time soon.
Not a lot of pictures unfortunately, due to being covered in the worlds WD40 reserves, gearbox oil and whatever other secretions the 5 could throw at me. That, coupled with having to contort myself into shaped that should only be seen in tangled headphones and a plate of spaghetti, meant pics were the last thing on my mind.
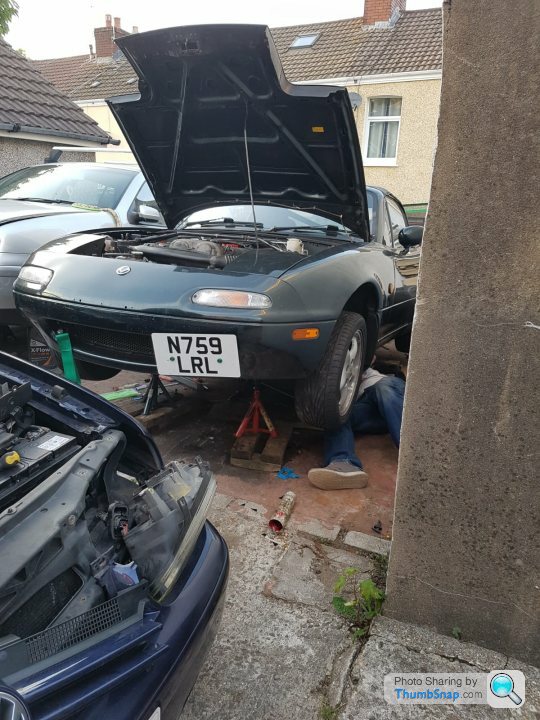
So the first thing I did was to get the car up on axle stands as far as I could. Using some wooden blocks, got it a good foot and a half in the air. Excellent. Still bloody scary getting under a car that high, when perched precariously on some foldable axle stands! A few good shakes and it didn’t budge, so all good there.
First item to be removed was the clutch slave cylinder. From memory (so highly likely I’m talking bks), 2 x 12mm bolts hold this one. Easy. Then to get the starter motor bolts out. 1 x 14mm nut and bolt and 1 x 12mm bolt coupled up as both bell housing bolts and to secure the starter motor to the fly wheel. A 10mm bolt holding a bracket for the clutch lines came out and another 10mm bolt holding another bracket for some loom on closer to the bulkhead came out.
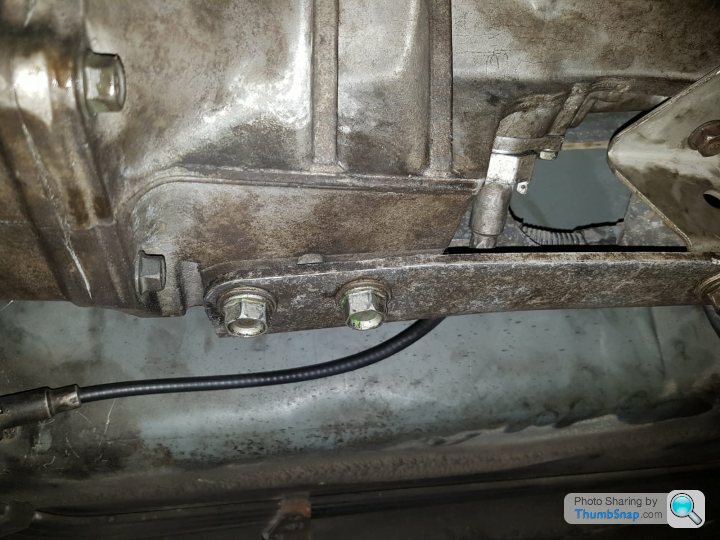
I cracked the bolts for the PPF at the gearbox end and removed them 90% of the way, as well as removed the bracket closest to the tail of the box. All came off relatively easy (thank the rust gods for sparing these bolts)! Next up was to remove the speed sensor. This was one 10mm bolt and it came off. For anyone doing this, the speed sensor won’t fit back through the hole in the PPF at this point, but leave it there for now as when you separate the PPF from the box, it’ll then get to the right angle to remove easily.
I then set about removing the prop shaft with the help of my glamourous assistant Craig (Superchickenn) who kindly sat topside put the box in and out of gear and applying the handbrake for me to crack the nuts off at the diff flange. Now, I REALLY didn’t want to remove the exhaust if at all possible. Mainly because when I fitted it, it was such a bodge I can’t be bothered to re-bodge it. So with some clever use of a pry bar, I managed to remove the prop shaft from the box and out the rear end. Like some really long, hangover st after drinking many pints of Guinness. It was a hard squeeze, that came out in small sections at a time . Oh, and remember folks – drain the gearbox of its oil before removing the prop shaft
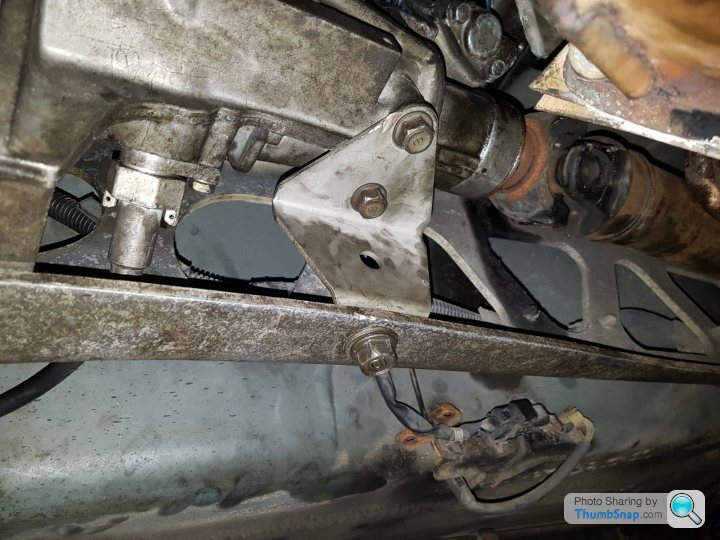
With the prop removed, it was onto the bell housing bolts. I think there were 8 x 17mm bolts altogether. 2 at the bottom, 4 in the middle and 2 at the top. The bottom 6 were easy to remove with an extension and a UJ. The top bolts were a massive pain. In the end, for the driver’s side, a breaker bar with a swivel head, accessing the bolt from the engine bay, with me underneath guiding Craig into the promised land. Once he cracked off, I was able to get to the rest with my fingers . For the passenger side, we used approximately 62 miles of extension bars and a UJ coupled to a 4ft breaker bar and accessed it from underneath. With lots of swearing, sweating and toys thrown out of the pram, it finally went. Cracking! Again, as soon as the initial tension was released, it came out only finger tight.
Once all the bellhousing bolts are loose, it’s time to remove the centre console (5 Phillips screws) to reveal the turret. There’s then 4 x 10mm bolts holding the rubber boot over the shifter. These need to be removed to remove the boot. If you are in the special 1% of MX5 owners whose shifter boots are in one piece, this step needs to be done or the shifter won’t drop from the transmission tunnel. If, like me, your shifter boot is in a million pieces, this step isn’t really necessary. I chose not to remove my shifter from the turret. Primarily because of laziness, but also because there’s oil in the shifter turret and I was already saturated in the stuff anyway! From the top of the trans tunnel, you can now access the loom attached to the top of the box and under the reverse sensor and what looks like some sort of secondary speed sensor? Not entirely sure what these wires did. Top tip, colour code the wires you’re unplugging for ease of re-assembly.

Once that’s all done, remove the PPF bolts all the way and give the box a wiggle and it should un-mate from the block. Should. Mine took some persuading but it eventually broke free. Now, like I said previously I was trying very hard not to remove the exhaust. Some people say you must, others disagree. I’ve not doubt it would be easier with it removed, but I can 100% say it comes out with it in situ. Lots of heaving and hoe-ing and it was out and on the floor! Huzzah!
Old clutch removed and it was clear it had seen better days. Seems to be some meat left on it, but clear glazing where it had obviously been slipped a lot in a previous life. Flywheel cleaned up and replacement LUK friction plate and Exedy pressure plate installed. As per Haynes manual, refit is same in reverse.
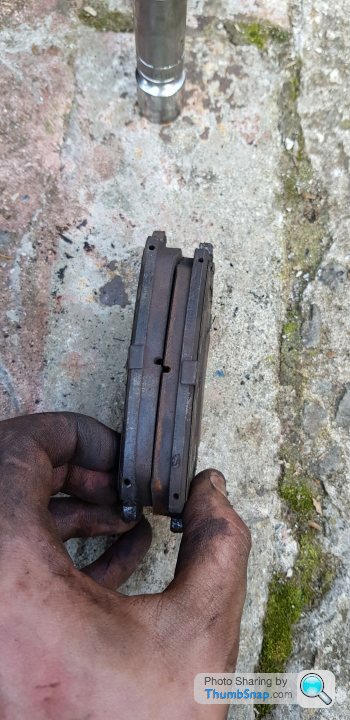
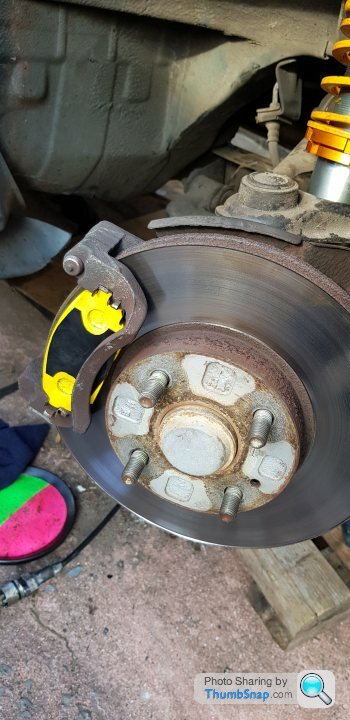
At this stage, I was fed up of gearboxes and so were my companions as they’d both fked off. So at this stage I decided to fit my Yellow Stuff pads. I’d decided on retaining my original discs as they were in really good shape. Must have been recently replaced prior to my ownership as the old pads were still very healthy. I’d also read that Yellow Stuff pads take a lot longer to break in with new discs. Not sure how true this is, but given I’ve only a couple of weeks before I leave, it did play a part in retaining the old discs. That and laziness. Oh, and because I’m skint
Off with the old, in with the new shiny stuff!
It took two of us to get the box back in using a very high lift jack. But was easier than I thought it was going to be. Bell housing on the jack and using the jack “plate” which had some steps in it, hooked it onto a lip on the box and kept jacking. We’d pulled the PPF as far to the driver’s side as possible and tied it to something with a ratchet strap (dodgy!) This allowed loads of room to lift the bell housing up over the subframe and exhaust and then drag the jack towards the front of the car. Then lifted the tailshaft and it slotted into position. Put 3 or 4 bolts in to secure it and job was, indeed, jobbed! It was just then a simple case of torqueing up the bellhousing bolts (I actually used a torque wrench for this too, as opposed to 2 or 3 ugga duggas on the impact gun!), reattaching the PPF and prop shaft, topping up fluids and we were good to go!
A massive syringe helps to get the oil into the box and diff!

The MX5 has a separate chamber for “turret oil” which gives that bolt action rifle style gear change. It’s very rarely changed as part of regular servicing, but makes a massive difference. So, as I was topping up the gearbox oil, I replaced the turret oil too. Whilst the box is in the car, the 3 bolts holding the shifter in need to be removed, the shifter then pulls out revealing the oil. At this point, check the nylon shifter cup for any signs of unusual wear as it may need to be replaced. I left mine. The old oil needs to be syringed out using a turkey baster or similar. Then top up until full. Another job jobbed.
To finish, I replaced the rear diff oil and the engine oil and took her out for a light drive to bed in both the clutch and the new brakes. Clutch life is good again!
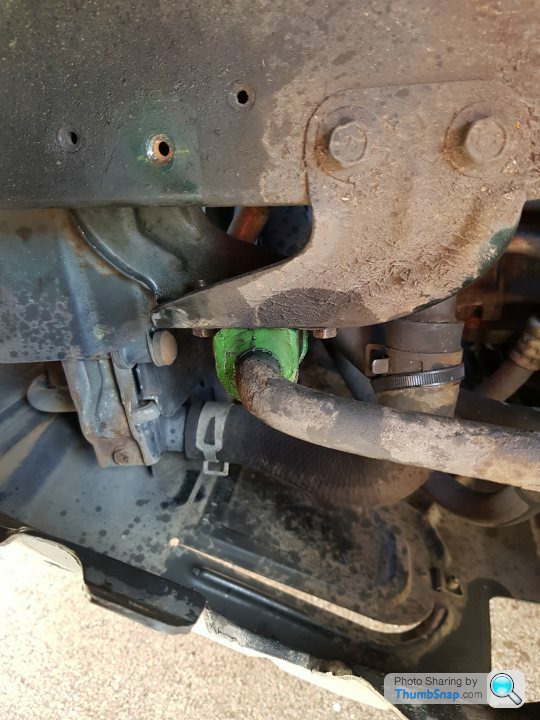
Just try to be careful with your full pan of used engine oil as you carefully dip your brand new, green tow strap into it
Only 11 days until we leave and I’ve still got my Sparco seat to go in. I’ve ordered some JB Fab side mounts off eBay for it to be fitted. I’ve also got to get my tyres fitted and some EU driving regs stuff to do like beam deflectors, GB sticker etc.
Getting there
t in my hands and clap that do it again any time soon. Not a lot of pictures unfortunately, due to being covered in the worlds WD40 reserves, gearbox oil and whatever other secretions the 5 could throw at me. That, coupled with having to contort myself into shaped that should only be seen in tangled headphones and a plate of spaghetti, meant pics were the last thing on my mind.
So the first thing I did was to get the car up on axle stands as far as I could. Using some wooden blocks, got it a good foot and a half in the air. Excellent. Still bloody scary getting under a car that high, when perched precariously on some foldable axle stands!
A few good shakes and it didn’t budge, so all good there. First item to be removed was the clutch slave cylinder. From memory (so highly likely I’m talking b
ks), 2 x 12mm bolts hold this one. Easy. Then to get the starter motor bolts out. 1 x 14mm nut and bolt and 1 x 12mm bolt coupled up as both bell housing bolts and to secure the starter motor to the fly wheel. A 10mm bolt holding a bracket for the clutch lines came out and another 10mm bolt holding another bracket for some loom on closer to the bulkhead came out. I cracked the bolts for the PPF at the gearbox end and removed them 90% of the way, as well as removed the bracket closest to the tail of the box. All came off relatively easy (thank the rust gods for sparing these bolts)! Next up was to remove the speed sensor. This was one 10mm bolt and it came off. For anyone doing this, the speed sensor won’t fit back through the hole in the PPF at this point, but leave it there for now as when you separate the PPF from the box, it’ll then get to the right angle to remove easily.
I then set about removing the prop shaft with the help of my glamourous assistant Craig (Superchickenn) who kindly sat topside put the box in and out of gear and applying the handbrake for me to crack the nuts off at the diff flange. Now, I REALLY didn’t want to remove the exhaust if at all possible. Mainly because when I fitted it, it was such a bodge I can’t be bothered to re-bodge it. So with some clever use of a pry bar, I managed to remove the prop shaft from the box and out the rear end. Like some really long, hangover s
t after drinking many pints of Guinness. It was a hard squeeze, that came out in small sections at a time . Oh, and remember folks – drain the gearbox of its oil before removing the prop shaft With the prop removed, it was onto the bell housing bolts. I think there were 8 x 17mm bolts altogether. 2 at the bottom, 4 in the middle and 2 at the top. The bottom 6 were easy to remove with an extension and a UJ. The top bolts were a massive pain. In the end, for the driver’s side, a breaker bar with a swivel head, accessing the bolt from the engine bay, with me underneath guiding Craig into the promised land. Once he cracked off, I was able to get to the rest with my fingers
. For the passenger side, we used approximately 62 miles of extension bars and a UJ coupled to a 4ft breaker bar and accessed it from underneath. With lots of swearing, sweating and toys thrown out of the pram, it finally went. Cracking! Again, as soon as the initial tension was released, it came out only finger tight. Once all the bellhousing bolts are loose, it’s time to remove the centre console (5 Phillips screws) to reveal the turret. There’s then 4 x 10mm bolts holding the rubber boot over the shifter. These need to be removed to remove the boot. If you are in the special 1% of MX5 owners whose shifter boots are in one piece, this step needs to be done or the shifter won’t drop from the transmission tunnel. If, like me, your shifter boot is in a million pieces, this step isn’t really necessary. I chose not to remove my shifter from the turret. Primarily because of laziness, but also because there’s oil in the shifter turret and I was already saturated in the stuff anyway! From the top of the trans tunnel, you can now access the loom attached to the top of the box and under the reverse sensor and what looks like some sort of secondary speed sensor? Not entirely sure what these wires did. Top tip, colour code the wires you’re unplugging for ease of re-assembly.
Once that’s all done, remove the PPF bolts all the way and give the box a wiggle and it should un-mate from the block. Should. Mine took some persuading but it eventually broke free. Now, like I said previously I was trying very hard not to remove the exhaust. Some people say you must, others disagree. I’ve not doubt it would be easier with it removed, but I can 100% say it comes out with it in situ. Lots of heaving and hoe-ing and it was out and on the floor! Huzzah!
Old clutch removed and it was clear it had seen better days. Seems to be some meat left on it, but clear glazing where it had obviously been slipped a lot in a previous life. Flywheel cleaned up and replacement LUK friction plate and Exedy pressure plate installed. As per Haynes manual, refit is same in reverse.
At this stage, I was fed up of gearboxes and so were my companions as they’d both f
ked off. So at this stage I decided to fit my Yellow Stuff pads. I’d decided on retaining my original discs as they were in really good shape. Must have been recently replaced prior to my ownership as the old pads were still very healthy. I’d also read that Yellow Stuff pads take a lot longer to break in with new discs. Not sure how true this is, but given I’ve only a couple of weeks before I leave, it did play a part in retaining the old discs. That and laziness. Oh, and because I’m skint Off with the old, in with the new shiny stuff!
It took two of us to get the box back in using a very high lift jack. But was easier than I thought it was going to be. Bell housing on the jack and using the jack “plate” which had some steps in it, hooked it onto a lip on the box and kept jacking. We’d pulled the PPF as far to the driver’s side as possible and tied it to something with a ratchet strap (dodgy!) This allowed loads of room to lift the bell housing up over the subframe and exhaust and then drag the jack towards the front of the car. Then lifted the tailshaft and it slotted into position. Put 3 or 4 bolts in to secure it and job was, indeed, jobbed! It was just then a simple case of torqueing up the bellhousing bolts (I actually used a torque wrench for this too, as opposed to 2 or 3 ugga duggas on the impact gun!), reattaching the PPF and prop shaft, topping up fluids and we were good to go!
A massive syringe helps to get the oil into the box and diff!
The MX5 has a separate chamber for “turret oil” which gives that bolt action rifle style gear change. It’s very rarely changed as part of regular servicing, but makes a massive difference. So, as I was topping up the gearbox oil, I replaced the turret oil too. Whilst the box is in the car, the 3 bolts holding the shifter in need to be removed, the shifter then pulls out revealing the oil. At this point, check the nylon shifter cup for any signs of unusual wear as it may need to be replaced. I left mine. The old oil needs to be syringed out using a turkey baster or similar. Then top up until full. Another job jobbed.
To finish, I replaced the rear diff oil and the engine oil and took her out for a light drive to bed in both the clutch and the new brakes. Clutch life is good again!
Just try to be careful with your full pan of used engine oil as you carefully dip your brand new, green tow strap into it
Only 11 days until we leave and I’ve still got my Sparco seat to go in. I’ve ordered some JB Fab side mounts off eBay for it to be fitted. I’ve also got to get my tyres fitted and some EU driving regs stuff to do like beam deflectors, GB sticker etc.
Getting there
Jonesy1972 said:
After a st day at work, you continue to allow me some escapism with your brilliantly funny updates. Please keep them coming, bud.
Jonesy
Thanks Jonesy - happy to see people are reading and enjoying t day at work, you continue to allow me some escapism with your brilliantly funny updates. Please keep them coming, bud. Jonesy
Superchickenn said:
Wait.... no mention of my little finger which got stabbed multiple times by the home made exhaust gasket of death or the fact it was crushed in-between the gearbox and ppf ... ??
God it's all about you isn't it 
So it's about 2 and a half hours until we leave for the ferry and today was spent making some final touches.
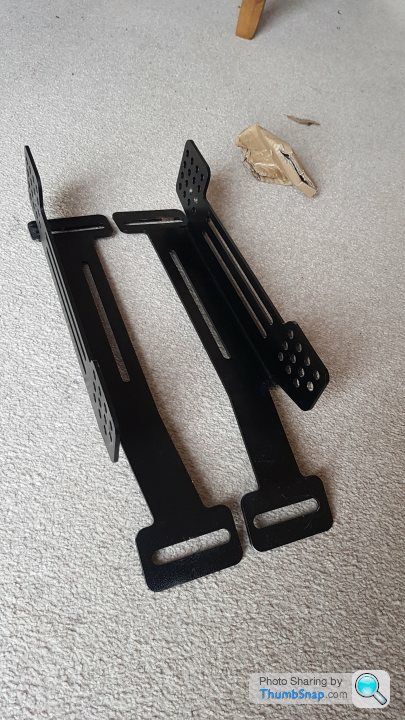
I'd finally got the JB Fab side mounts delivered so I could fit my sparco seat. These are a nice piece of kit and I got them relatively cheap secondhand. However, they're still expensive for what they are, IMO.
Seat and harnesses in. Ballache of a job with about as much room as a badgers ahole to get the bolts in and harness straps fed through. I could only manage about a 1/540840 of a turn so it took me approximately 12 lightyears to get them tightened. The shoulders of the seat foul on the door card and with the door closed, it moves the seat a couple of mm. Not a big deal in my view, but not ideal and will do for now. The fit is super snug. But gone are the days of "hopping in" the 5 for a quick spin. By the time I've got in, preflight checks, wrestled with the harness and wedged myself in, it's time to go back fking home.
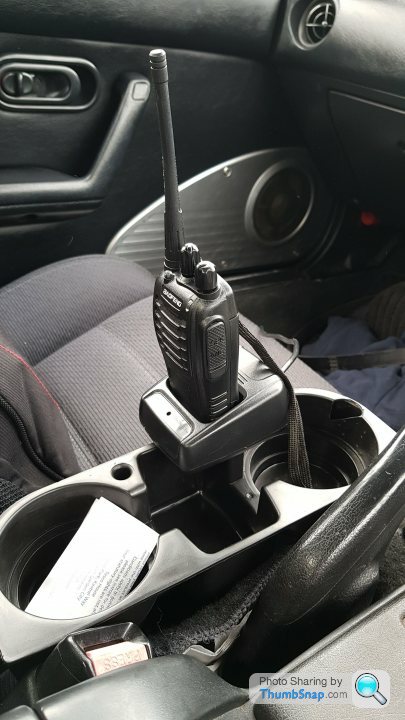
I'd found a spot to mount my walkie talkie on top of my super high tech, super expensive luxury cupholder. A big GoPro sticky pad secured it
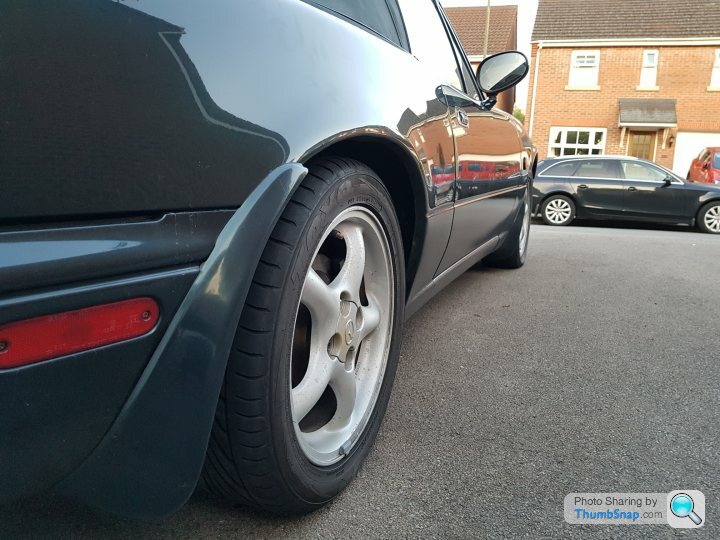
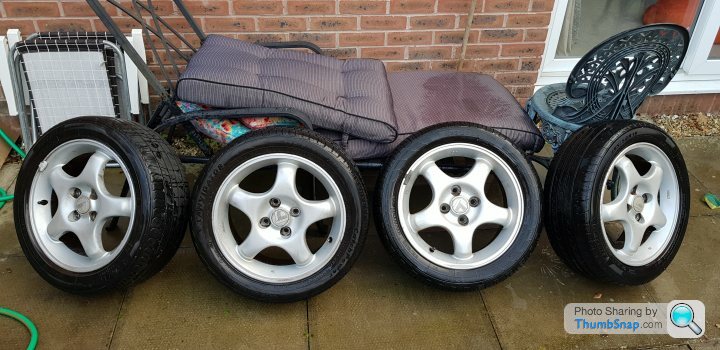
For those of you who remember when I collected the car, the VR Ltd have a unique Enkei wheel. They're lovely wheels and lightweight too. But the ones I had were a bit knackered in terms of appearance. Almost bronze with brake dust and grime. So I set about giving them a good going over. Using some pretty harsh alloy wheel cleaner and Poundland's entire backstock of scourers, I attacked them with all mu gusto. Which wasn't much. I hate cleaning stuff. But they didn't turn out too bad:
Before:
One cleaned up to a semi-acceptable standard:
Before and after:

All done:
Off down the local tyre place to get my Nankang NS2R's fitted. Who said 5s weren't practical?
Fitted. Just in time for the lovely dry, warm weather
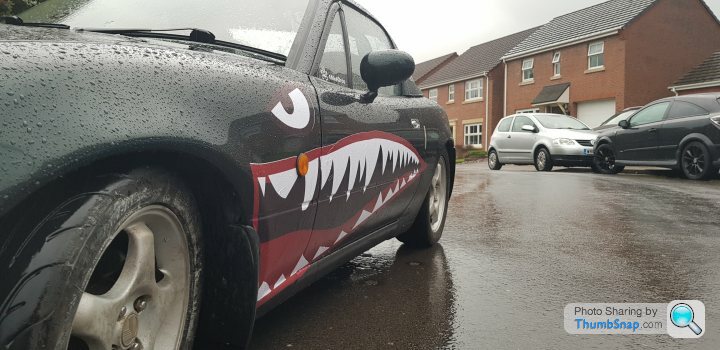
I'd also finally got around to fitting the decorations A full, fighter pilot style shark mouth vinyl. I'm not the most patient of people. I think I'd get impatient of my own impending doom. But, I set about doing the one side on my own, armed with the OH's hairdryer, a cloth and a blunt stanley knife. What could go wrong right? I'd waited for the optimal weather conditions. Dusk, hurricane gusts and rain. Perfect. As you can imagine, the results were somewhat dubious. I think an armless Stevie Wonder could have done a better job. Whilst being electrocuted in the perineum. But, it looks awesome. In a "they're your kids you have to like them" kinda way. This is the "better" side. Which the OH helped me with. She's better with a hairdryer than me, that's for sure.
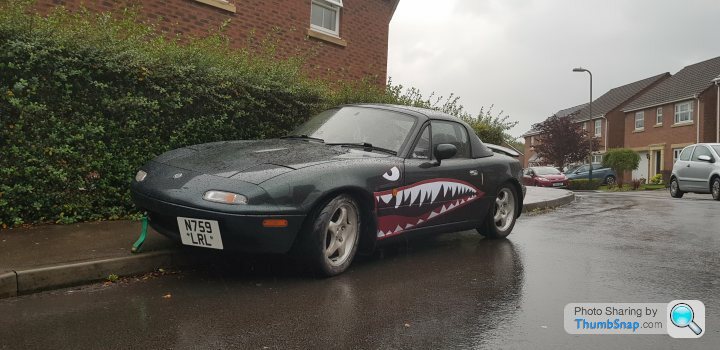
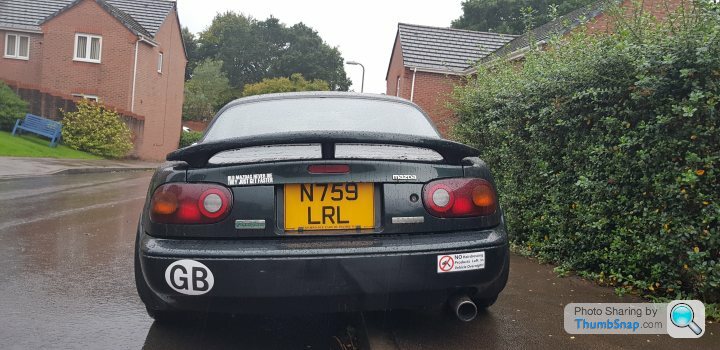
GB stickers and others fitted
And that was that. I'm ready to go. Tonight we're heading for the ferry in Dover from South Wales. Our ferry isn't booked until 8am but we're going to try and chance it on an earlier one, if there's space. We'll get to Dunkirk and head to Rotterdam and spend the day/night in Amsterdam. From there, we're going to head to Spa where there's some LMP1s qualifying for a 4 hour event. Then we'll head into Germany to the Nurburgring where the track is open between 6pm and 7pm. We'll crack on with a few sighting laps and find a local for a pint. Then the Sunday is going to spent all day at the Ring. Home Monday via Luxemburg, because, well, why not!?
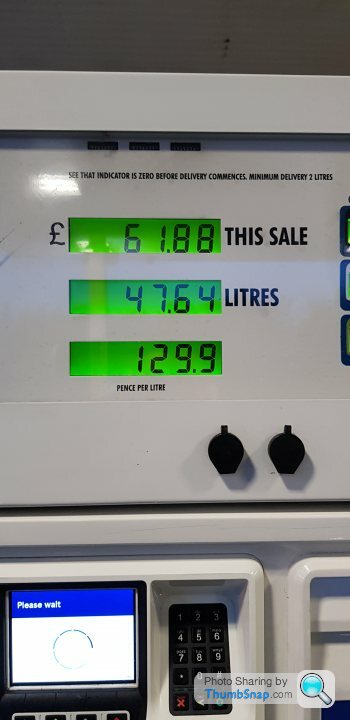
Final fill up before I leave. Interestingly, the MX5 is listed as having a 45 litre tank
I'd finally got the JB Fab side mounts delivered so I could fit my sparco seat. These are a nice piece of kit and I got them relatively cheap secondhand. However, they're still expensive for what they are, IMO.
Seat and harnesses in. Ballache of a job with about as much room as a badgers a
hole to get the bolts in and harness straps fed through. I could only manage about a 1/540840 of a turn so it took me approximately 12 lightyears to get them tightened. The shoulders of the seat foul on the door card and with the door closed, it moves the seat a couple of mm. Not a big deal in my view, but not ideal and will do for now. The fit is super snug. But gone are the days of "hopping in" the 5 for a quick spin. By the time I've got in, preflight checks, wrestled with the harness and wedged myself in, it's time to go back fking home. I'd found a spot to mount my walkie talkie on top of my super high tech, super expensive luxury cupholder. A big GoPro sticky pad secured it
For those of you who remember when I collected the car, the VR Ltd have a unique Enkei wheel. They're lovely wheels and lightweight too. But the ones I had were a bit knackered in terms of appearance. Almost bronze with brake dust and grime. So I set about giving them a good going over. Using some pretty harsh alloy wheel cleaner and Poundland's entire backstock of scourers, I attacked them with all mu gusto. Which wasn't much. I hate cleaning stuff. But they didn't turn out too bad:
Before:
One cleaned up to a semi-acceptable standard:
Before and after:
All done:
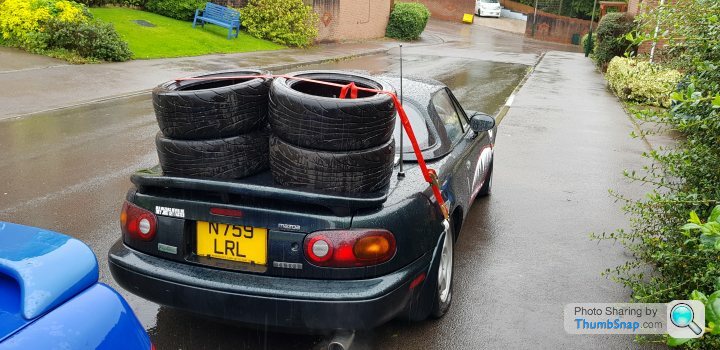
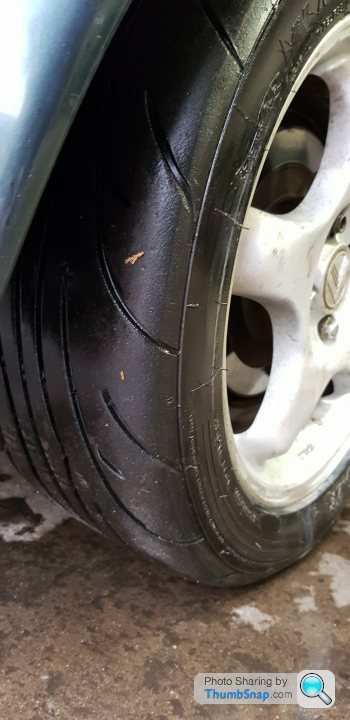
Off down the local tyre place to get my Nankang NS2R's fitted. Who said 5s weren't practical?
Fitted. Just in time for the lovely dry, warm weather
I'd also finally got around to fitting the decorations
A full, fighter pilot style shark mouth vinyl. I'm not the most patient of people. I think I'd get impatient of my own impending doom. But, I set about doing the one side on my own, armed with the OH's hairdryer, a cloth and a blunt stanley knife. What could go wrong right? I'd waited for the optimal weather conditions. Dusk, hurricane gusts and rain. Perfect. As you can imagine, the results were somewhat dubious. I think an armless Stevie Wonder could have done a better job. Whilst being electrocuted in the perineum. But, it looks awesome. In a "they're your kids you have to like them" kinda way. This is the "better" side. Which the OH helped me with. She's better with a hairdryer than me, that's for sure. GB stickers and others fitted
And that was that. I'm ready to go. Tonight we're heading for the ferry in Dover from South Wales. Our ferry isn't booked until 8am but we're going to try and chance it on an earlier one, if there's space. We'll get to Dunkirk and head to Rotterdam and spend the day/night in Amsterdam. From there, we're going to head to Spa where there's some LMP1s qualifying for a 4 hour event. Then we'll head into Germany to the Nurburgring where the track is open between 6pm and 7pm. We'll crack on with a few sighting laps and find a local for a pint. Then the Sunday is going to spent all day at the Ring
. Home Monday via Luxemburg, because, well, why not!? Final fill up before I leave. Interestingly, the MX5 is listed as having a 45 litre tank
Sf_Manta said:
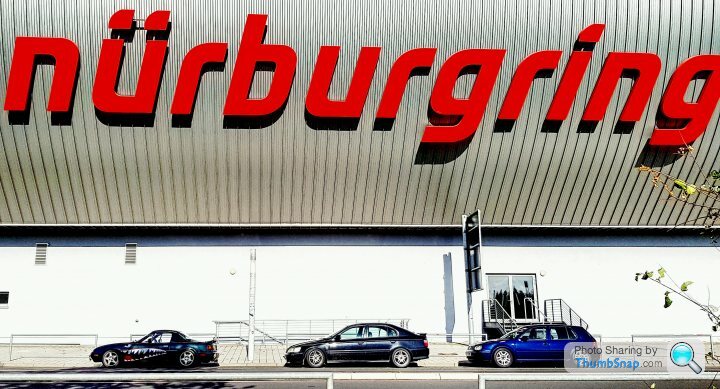
I wondered whether someone would spot it In a nutshell, it was an amazing trip! I'll get started on the write up and get some pics uploaded! But here's one for now
MikeDrop said:
Sf_Manta said:
I wondered whether someone would spot it In a nutshell, it was an amazing trip! I'll get started on the write up and get some pics uploaded! But here's one for now

Thought I would write a quick blog on how our trip went. I’m not planning on this being a long post, but then again, I never do and they all end up worthy of being a fecking tapestry! The pics I’ve added are the ones I’ve taken. Mick (Wunderbolf) and Craig (Superchickenn) took a lot more and will hopefully add them to the thread.
Day 0 – Thursday
The longest day in work, excited like a kid at Christmas knowing that we were leaving for our trip later in the evening. My previous post described my daily antics of getting some last minute checks done; tyres fitted, walkie talkie positioned, chargers plugged in, fuelled up etc. Work finished and now was the waiting game.
We decided to meet at a local Tesco Extra to get some supplies such as numerous energy drinks, cans of coke, sweets and anything that we thought would help us stay awake and focussed on the night drive to Dover. I’d realised that I’d forgotten a high vis to comply with most European driving laws. So managed to pick one up in Tesco. A childs cycling one. In pink. With a giant picture of a cartoon fox on the back. That’ll do perfectly!

With the cars loaded up with supplies and fuel, one quick pic beforw we hit the road for Dover!


Our first leg of the trip was a 3hr 30m trip from South Wales to Dover. ETA – 03:21. Tunes blasting and much banter of the walkie’s saw us make good progress for the forst couple of hours. The weather was atrocious so we tootled along at 60mph in the name of preserving fuel, and not crashing on our way to where we hope not to crash!

Craig “nano-bladder” Superchickenn needed to stop for a piss, unsurprisingly!

And then for another one
Found the perfect clothing garments advertised in the Gents this time though!

Eventually, we arrived at Dover


Our ferry was booked for 08:00 but as we arrived early, they booked us on the 06:00 ferry instead. This meant we could get some shuteye in the cars before being loaded. The passenger seat in my MX5 was full of the aforementioned sugar related beverages and snacks, so I hopped in with Craig to have a kip. Luckily, we’d set an alarm. Oh wait, no we didn’t. I was awoken by the brake lights of the car in front and then noticed we were the only cars left in the front, holding up lots of people behind us! Doh! A quick dig to Craig’s ribs to wake him up, ran to my car whilst banging on Mick’s window to wake him up and we were being loaded whist still 79% asleep


Nice cuppa and a Muffin and chill for the 2 hour ferry journey:

We managed to upgrade to the luxury suite for a kip. Little did we know the luxury suite was a 10sqft spit under some stairs (That’s Craig’s ugly mug)

We arrived at Dunkrik, unloaded and headed to the nearest Café. Well, we parked the cars and using Mick’s fluent Irish-Francais, bungled our way to a pastry shop for some Croissants and Swiss Rolls. We were hoping for a full English and a cuppa but we fell at the first European cuisine shaped hurdle:

Day 1 to follow
Day 0 – Thursday
The longest day in work, excited like a kid at Christmas knowing that we were leaving for our trip later in the evening. My previous post described my daily antics of getting some last minute checks done; tyres fitted, walkie talkie positioned, chargers plugged in, fuelled up etc. Work finished and now was the waiting game.
We decided to meet at a local Tesco Extra to get some supplies such as numerous energy drinks, cans of coke, sweets and anything that we thought would help us stay awake and focussed on the night drive to Dover. I’d realised that I’d forgotten a high vis to comply with most European driving laws. So managed to pick one up in Tesco. A childs cycling one. In pink. With a giant picture of a cartoon fox on the back. That’ll do perfectly!
With the cars loaded up with supplies and fuel, one quick pic beforw we hit the road for Dover!
Our first leg of the trip was a 3hr 30m trip from South Wales to Dover. ETA – 03:21. Tunes blasting and much banter of the walkie’s saw us make good progress for the forst couple of hours. The weather was atrocious so we tootled along at 60mph in the name of preserving fuel, and not crashing on our way to where we hope not to crash!
Craig “nano-bladder” Superchickenn needed to stop for a piss, unsurprisingly!
And then for another one
Found the perfect clothing garments advertised in the Gents this time though!
Eventually, we arrived at Dover
Our ferry was booked for 08:00 but as we arrived early, they booked us on the 06:00 ferry instead. This meant we could get some shuteye in the cars before being loaded. The passenger seat in my MX5 was full of the aforementioned sugar related beverages and snacks, so I hopped in with Craig to have a kip. Luckily, we’d set an alarm. Oh wait, no we didn’t. I was awoken by the brake lights of the car in front and then noticed we were the only cars left in the front, holding up lots of people behind us! Doh! A quick dig to Craig’s ribs to wake him up, ran to my car whilst banging on Mick’s window to wake him up and we were being loaded whist still 79% asleep
Nice cuppa and a Muffin and chill for the 2 hour ferry journey:
We managed to upgrade to the luxury suite for a kip. Little did we know the luxury suite was a 10sqft spit under some stairs
(That’s Craig’s ugly mug)We arrived at Dunkrik, unloaded and headed to the nearest Café. Well, we parked the cars and using Mick’s fluent Irish-Francais, bungled our way to a pastry shop for some Croissants and Swiss Rolls. We were hoping for a full English and a cuppa but we fell at the first European cuisine shaped hurdle:
Day 1 to follow
Edited by MikeDrop on Friday 28th September 11:07
Gassing Station | Readers' Cars | Top of Page | What's New | My Stuff