Discussion


A fairly productive week on the MCS. Brembo calipers stripped as far as I can, I have 2 stuck pistons in each caliper and without a compressor, this would be a pain. I need to find some time to call to the garage that I trust. Still unsure what colour to get the calipers powder coated, maybe black to be subtle or red to stand out. Either way, a high temp Alfa Romeo sticker will be going back on them.
I have a few more pieces to powder coated at the same time, an OMP lower brace and I'm toying with the idea of taking my TD wheels too. There are another few pieces I could probably add to the list but I'd rather save the money for functional items, not aesthetics.
I also managed to get a great deal on 2 local and very good condition OMP TRS-e bucket seats in blue.
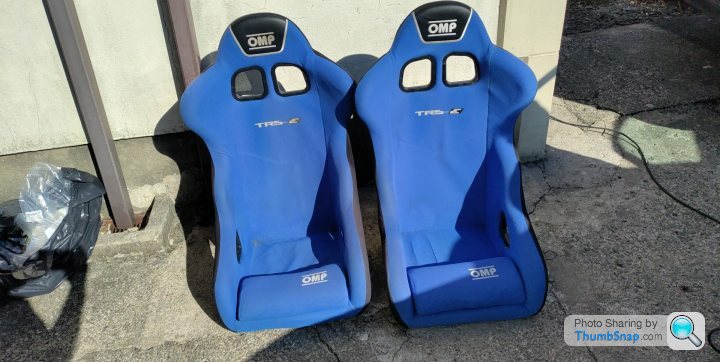
A quick vacuum and they were looking as good as new, there is slight fading on the back of the seats but for the price I paid I can live with it. Need to source some mounting brackets to get these in place, I already have the harness but I will be waiting until I have a roll cage to fit the seats.
I have ordered all the bushing inserts by Powerflex for the engine and gearbox from Orranje Performance. Oli was very helpful, as always! This will be a job for my Easter break from university, I'm hoping these should make a noticeable improved, the review I have read are promising.
I know I mentioned the exhaust in the previous post and that is still on my mind, some low-cost items like braided lines, adjustable top mounts for the front suspension and adjustable rear arms might be ordered over the next few days.
I have a few more pieces to powder coated at the same time, an OMP lower brace and I'm toying with the idea of taking my TD wheels too. There are another few pieces I could probably add to the list but I'd rather save the money for functional items, not aesthetics.
I also managed to get a great deal on 2 local and very good condition OMP TRS-e bucket seats in blue.
A quick vacuum and they were looking as good as new, there is slight fading on the back of the seats but for the price I paid I can live with it. Need to source some mounting brackets to get these in place, I already have the harness but I will be waiting until I have a roll cage to fit the seats.
I have ordered all the bushing inserts by Powerflex for the engine and gearbox from Orranje Performance. Oli was very helpful, as always! This will be a job for my Easter break from university, I'm hoping these should make a noticeable improved, the review I have read are promising.
I know I mentioned the exhaust in the previous post and that is still on my mind, some low-cost items like braided lines, adjustable top mounts for the front suspension and adjustable rear arms might be ordered over the next few days.
Couldn't wait until Easter to fit the Powerflex kit. The weather was too good to spend inside yesterday afternoon and with a deadline submitted this was a nice reward for it.
The Powerflex bushing inserts arrived in 2 days, Orranje Performance sets the bar high for delivery times.
The following is a brief write up on how to swap the mounts for those interested. Support the engine was a jack or axle stand!
I started on what I thought would be the easiest bushes - the lower engine mounts. With the car up on some drive-up ramps access was easy. 2 x 16mm bolts and 4 x 13mm bolts to remove the complete assembly. I found removing the engine mounting bracket helped remove the component that housed the bushes.
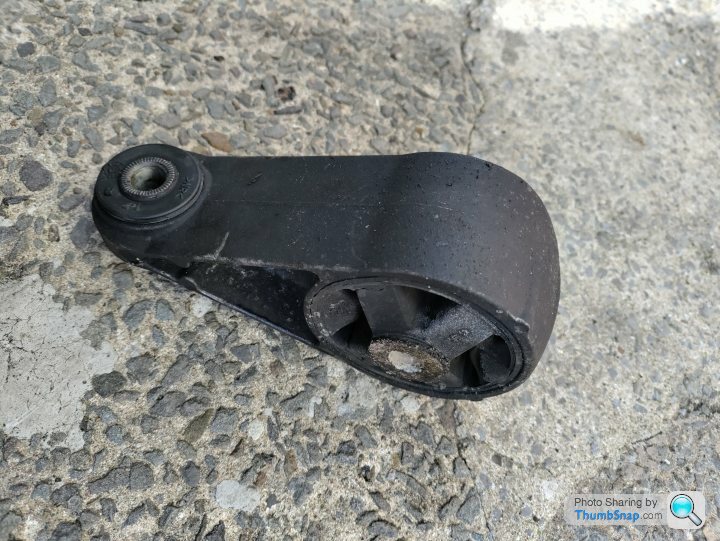
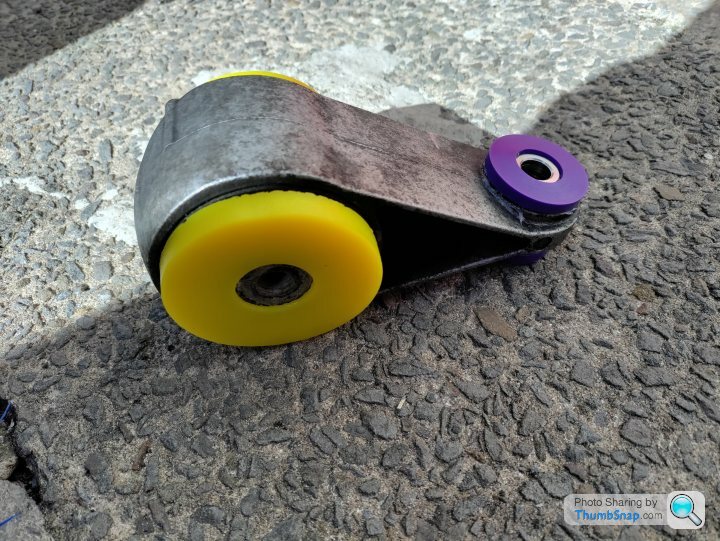
The component was pretty dirty so a quick degrease and clean removed most of the accumulated dirt. To remove the smaller bushing I cut around the end of the bushing off and knocked the old bush out with an appropriately sized bolt and washer. I did have a bearing puller as a backup. The bush came out without much resistance.
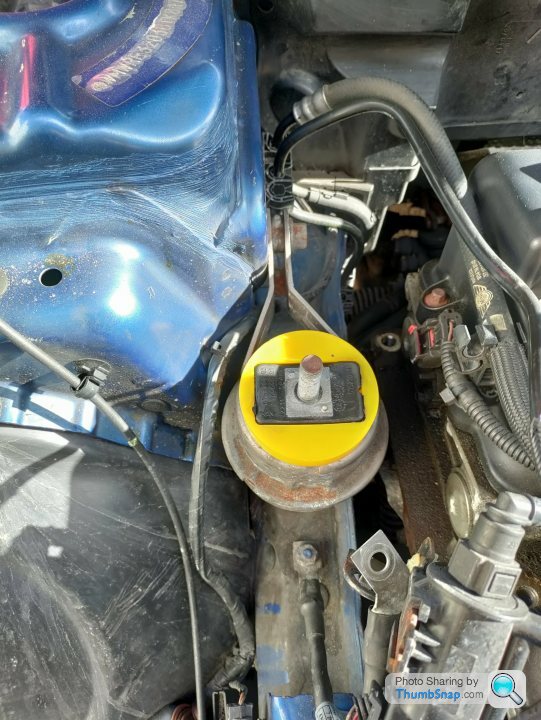
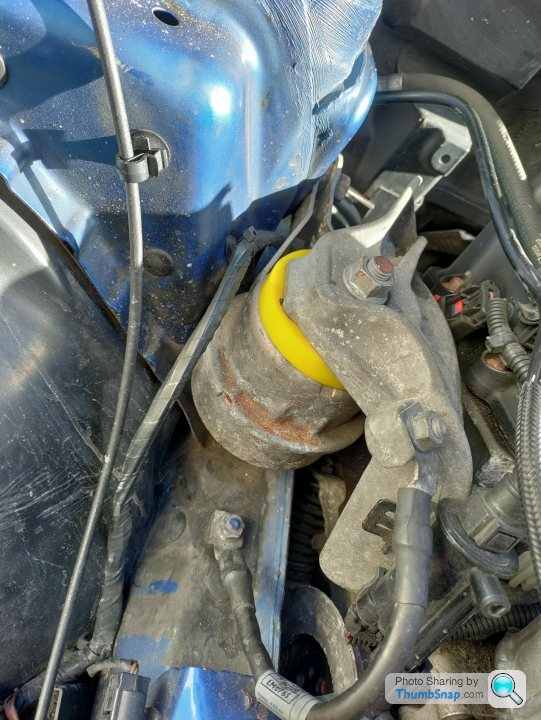
The next bush (left side of the engine bay), which the instructions said a vice was required, was next. 4 x 16mm, 1 x 18mm and 1 x 13mm (I think) for the ground. Be careful not to catch any of the wires by the supercharger inlet.

Leaving the mount connected to the car meant there was no need for a vice. This was by far the easiest bush of the kit to install.
Bracket back on. Make sure the ground is tightened correctly, mine was slightly loose and wouldn't start afterwards. Had bad earth connection on my mk1 Mx5 so this was the first part I checked.
The final bracket is more involved but not anything particularly difficult. (no photos for this one sorry, had to work quickly for a meeting I had scheduled). Disconnect the battery, remove the airbox and ECU, undo the fuse box, and remove the intake pipe from the radiator pack. with the engine still supported remove the top bracket connecting the bush to the car.
Note the direction of the black triangles on the outside of the bush and remove the green plastic insert in the bush. Refit is the reverse of removal. Raising the engine on a jack should help align the 16mm bolt through the bush.
Initial opinions
NVH is definitely increased, no shock. The car feels more direct and has a more positive gearshift. Less movement in the engine but this, again, is not a shock. The car feels tighter and I believe it to be a worthwhile improvement.
The Powerflex bushing inserts arrived in 2 days, Orranje Performance sets the bar high for delivery times.
The following is a brief write up on how to swap the mounts for those interested. Support the engine was a jack or axle stand!
I started on what I thought would be the easiest bushes - the lower engine mounts. With the car up on some drive-up ramps access was easy. 2 x 16mm bolts and 4 x 13mm bolts to remove the complete assembly. I found removing the engine mounting bracket helped remove the component that housed the bushes.
The component was pretty dirty so a quick degrease and clean removed most of the accumulated dirt. To remove the smaller bushing I cut around the end of the bushing off and knocked the old bush out with an appropriately sized bolt and washer. I did have a bearing puller as a backup. The bush came out without much resistance.
The next bush (left side of the engine bay), which the instructions said a vice was required, was next. 4 x 16mm, 1 x 18mm and 1 x 13mm (I think) for the ground. Be careful not to catch any of the wires by the supercharger inlet.
Leaving the mount connected to the car meant there was no need for a vice. This was by far the easiest bush of the kit to install.
Bracket back on. Make sure the ground is tightened correctly, mine was slightly loose and wouldn't start afterwards. Had bad earth connection on my mk1 Mx5 so this was the first part I checked.
The final bracket is more involved but not anything particularly difficult. (no photos for this one sorry, had to work quickly for a meeting I had scheduled). Disconnect the battery, remove the airbox and ECU, undo the fuse box, and remove the intake pipe from the radiator pack. with the engine still supported remove the top bracket connecting the bush to the car.
Note the direction of the black triangles on the outside of the bush and remove the green plastic insert in the bush. Refit is the reverse of removal. Raising the engine on a jack should help align the 16mm bolt through the bush.
Initial opinions
NVH is definitely increased, no shock. The car feels more direct and has a more positive gearshift. Less movement in the engine but this, again, is not a shock. The car feels tighter and I believe it to be a worthwhile improvement.
The seat mounts along with some RBF 600 brake fluid arrived on Friday.
These were the mounts I ordered from Demon Tweeks
https://www.demon-tweeks.com/uk/race-safety-access...
I ordered these mounts because they allow the seat position to be changed relatively quickly should I need to accommodate another driver. Upon further research, I found the equivalent product on Motamec £20 cheaper. I will order the Motamec mounts for the passenger seat when I need to fit that.
Despite not having the correct bolts to permanently mount the seat to the mounts I removed the driver's seat taking care not to damage the wires for the airbag and pretentioner. With the driver's seat removed I gave the whole area a vacuum and a clean. It was pretty satisfying to clean the areas that are almost impossible to get access to with the seats in.
I have ordered some 12.9 spec bolts from Rally Nuts which should be arriving tomorrow.
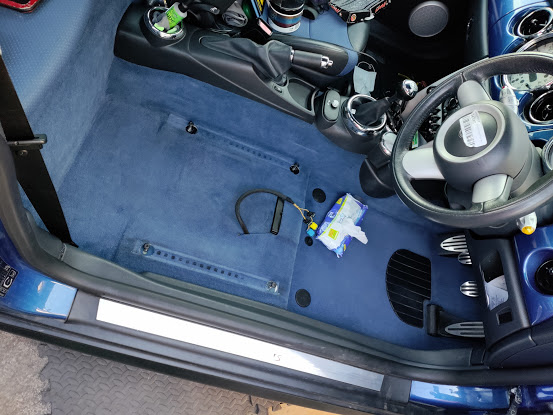
With the driver side clean, I mounted the seat in what I thought would be the correct position. The slots on the seat mounts make this task a lot easier.
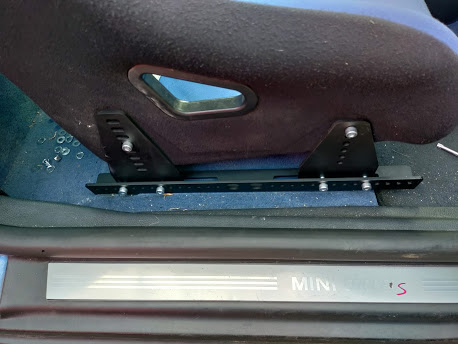
The seatbelt was left unaltered since the seat would not be a permanent fixture. The aim is to fit the seat with the pretensioner attached to the mounts until the roll cage gets fitted, I'll hopefully get this done this week.
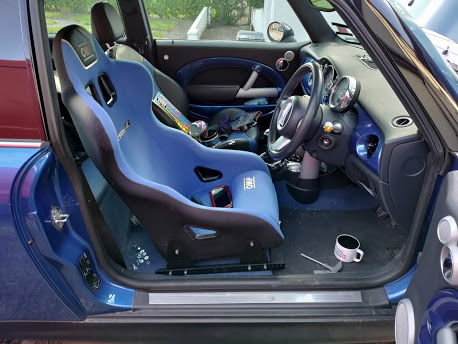
I am really happy with the fitment of the seat, in the right position for me there was no contact with any of the other interior pieces.
These were the mounts I ordered from Demon Tweeks
https://www.demon-tweeks.com/uk/race-safety-access...
I ordered these mounts because they allow the seat position to be changed relatively quickly should I need to accommodate another driver. Upon further research, I found the equivalent product on Motamec £20 cheaper. I will order the Motamec mounts for the passenger seat when I need to fit that.
Despite not having the correct bolts to permanently mount the seat to the mounts I removed the driver's seat taking care not to damage the wires for the airbag and pretentioner. With the driver's seat removed I gave the whole area a vacuum and a clean. It was pretty satisfying to clean the areas that are almost impossible to get access to with the seats in.
I have ordered some 12.9 spec bolts from Rally Nuts which should be arriving tomorrow.
With the driver side clean, I mounted the seat in what I thought would be the correct position. The slots on the seat mounts make this task a lot easier.
The seatbelt was left unaltered since the seat would not be a permanent fixture. The aim is to fit the seat with the pretensioner attached to the mounts until the roll cage gets fitted, I'll hopefully get this done this week.
I am really happy with the fitment of the seat, in the right position for me there was no contact with any of the other interior pieces.
Edited by jordmcd151 on Monday 8th March 14:04
The MCS has progressed quickly.
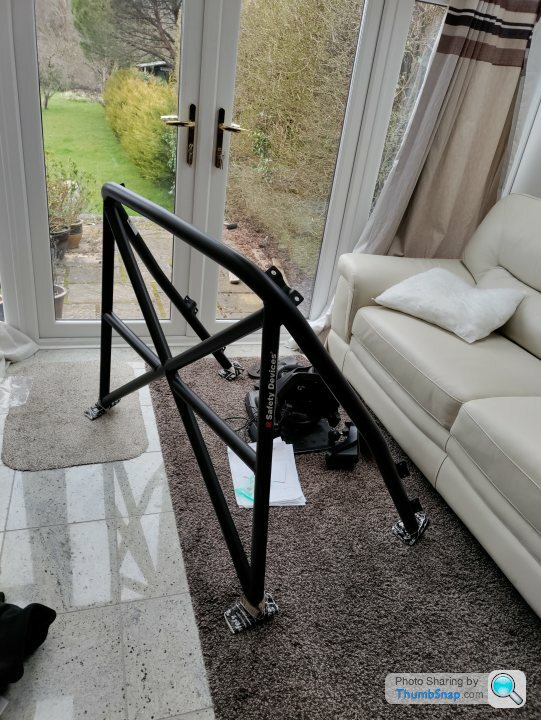
After much thought using the factory pretensioners would not be the optimal set up for the Mini and it would be better to do it once and do it correctly. I bought a half cage by Safety Devices from Lohen. Lohen are a mini specialist for those who don't know.
The cage should be delivered by Friday 19th and I have already booked the car into Bennett Built Motorsport to have the cage brackets and harness mountings welded correctly. This will be done on March 25th, they said it won't be a long job and I can wait around at the shop and they'll have it done in a few hours.
Fingers crossed they allow me to take some pictures of their work as they go through it.
To save as much money as I could I pulled out the interior by myself, surprisingly the car came apart with no real issues and most importantly no clips were broken during the removal of pretty much everything inside the car excluding the dash and front door cards. The biggest pain was removing the accelerator pedal and the resting pedal.
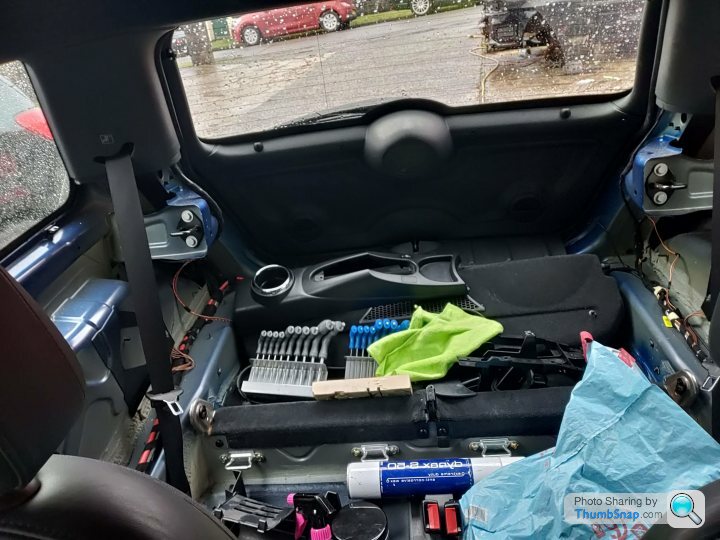
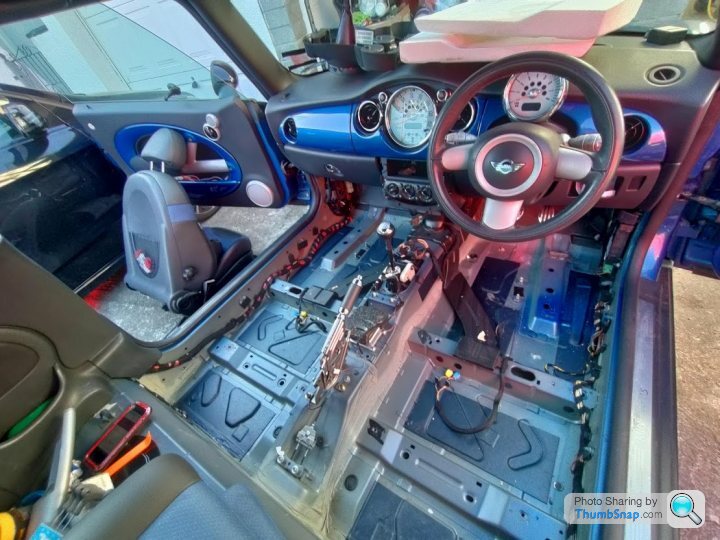
For the journey up to Bennett Built Motorsport I have added in a couple of trim pieces such as the controls for the windows, stereo, the shifter surround and the handbrake surround.
As soon as the cage is fitted I will be adding the harnesses and bucket seat for the driver's side.
After much thought using the factory pretensioners would not be the optimal set up for the Mini and it would be better to do it once and do it correctly. I bought a half cage by Safety Devices from Lohen. Lohen are a mini specialist for those who don't know.
The cage should be delivered by Friday 19th and I have already booked the car into Bennett Built Motorsport to have the cage brackets and harness mountings welded correctly. This will be done on March 25th, they said it won't be a long job and I can wait around at the shop and they'll have it done in a few hours.
Fingers crossed they allow me to take some pictures of their work as they go through it.
To save as much money as I could I pulled out the interior by myself, surprisingly the car came apart with no real issues and most importantly no clips were broken during the removal of pretty much everything inside the car excluding the dash and front door cards. The biggest pain was removing the accelerator pedal and the resting pedal.
For the journey up to Bennett Built Motorsport I have added in a couple of trim pieces such as the controls for the windows, stereo, the shifter surround and the handbrake surround.
As soon as the cage is fitted I will be adding the harnesses and bucket seat for the driver's side.
Another long week for the MCS
I had an absolute nightmare with the roll cage delivery. The roll cage was ordered from Lohen on the 15th March and was due to be collected by TNT on the 17th and delivered on the 18th.
Checking for updates on the 17th the item was still awaiting collecting by TNT, I checked again on the 18th and the same message appeared when I checked the order status, the parcel was due to be delivered any time until 6pm. I gave them the benefit of doubt and waited for the delivery, nothing showed up. I called TNT on Friday to ask what was going on with the order and what the new dates would be, I was told an IT error was the reason the parcel wasn't collected and they stated they'd have someone to collect it that day for delivery Monday. I spoke to Lohen and they were apologetic and happy for this to happen.
Monday 22nd, still no update on the online tracker for my order. I called TNT again where they advised me yet again no one had gone to Lohen to collect my roll cage. The employee I spoke to assured me it would be collected but delivery may not be until Wednesday. It would be cutting it too close for the fitting on Thursday so I called Lohen to give them an update, they called me back an hour later after speaking to TNT. I told Lohen I would be driving up to collect it. Not the Monday I had planned for myself.
The short notice 6 hour round trip was far from ideal but at least I would have the roll cage and I could relax knowing I didn't need to deal with TNT again. Lohen were apologetic and told me they had been having issues with pallet collection. I was given a free t-shirt and air freshener plus the £75 delivery fee was refunded.
Tuesday 23rd
I tested the roll cage fitment and it was lucky I did. You cannot run a standard seatbelt with the Safety Devices cage, the plates to mount the front 'legs' of the roll cage block the hole on the bolt to attach the seatbelt, I will get add a photo of this after this post. A simple solution for this was to remove the passenger seat and fit the bucket seat and swap these over after the roll cage was fitted and a harness was installed.
Thursday 25th
How anyone drives their car with no interior for long distances I will never know, the 2 hour drive to Bennett Built Motorsport (BBM) was not the most pleasant, but it is very easy to get to. I am glad I didn’t need to drive much further. When arriving at BBM I was greeted by company owner Graham, a true petrolhead who has a huge passion for motorsport. I waited in the reception area whilst Graham’s staff started working on the car. Whilst waiting in the reception area I got speaking to Graham and his daughter who both compete in off road racing. You can tell they both love what they do and always have time for a talk about any and everything car-related.
The welding work completed by BBM looks great and I hope I never need to test out the weld strength but if I did, I’d feel safe. The chassis BBM produce are far more complex than a simple prefabricated cage install. Graham even provided me with some ear plugs for the drive home.
If I need any more welding work complete, I would not be looking anywhere else. Thanks again BBM!!
The drive home was much better with earplugs.
This is my first car that has bucket seats with harnesses. It took some getting used to but after a bit of time and once the harness was correctly adjusted, they were comfortable. The NVH was increased with the bucket seat, as expected given the lack of foam compared to the stock seat. I cannot wait to be able to drive the car at Silverstone, I know it is stating the obvious but the difference between the 2 seat set-ups is night and day. Getting in and out of the vehicle is more difficult but it is undoubtedly worth the benefit once you are in the seat.
Xcore said:
Nice progress! Picked up a cheap r53 afew months ago, good fun to drive but my example is a complete money pit! Good job they are relatively simple to work on diy.
Thank you. I've been lucky nothing has gone wrong so far and it had all the major work done to it already, what needed work on yours? Yes, they are easy to work on, the 'service mode' makes relatively big jobs far simpler.
jordmcd151 said:
Thank you. I've been lucky nothing has gone wrong so far and it had all the major work done to it already, what needed work on yours?
Yes, they are easy to work on, the 'service mode' makes relatively big jobs far simpler.
I took a gamble on mine which didn’t pay off, so within the last 2 months Iv chucked on a timing chain kit, new sump gasket, exhaust manifold, aux tensioner and idler, rad fan and some oil and assorted filters! Yes, they are easy to work on, the 'service mode' makes relatively big jobs far simpler.
Xcore said:
I took a gamble on mine which didn’t pay off, so within the last 2 months Iv chucked on a timing chain kit, new sump gasket, exhaust manifold, aux tensioner and idler, rad fan and some oil and assorted filters!
Ahh damn, risk doesn't always pay off. At least you know the car should be reliable moving forward. The previous owner had the timing chain done but I did need to swap the fan resistor on mine.
That reminds me I need to drop my oil before my next track day.
MDifficult said:
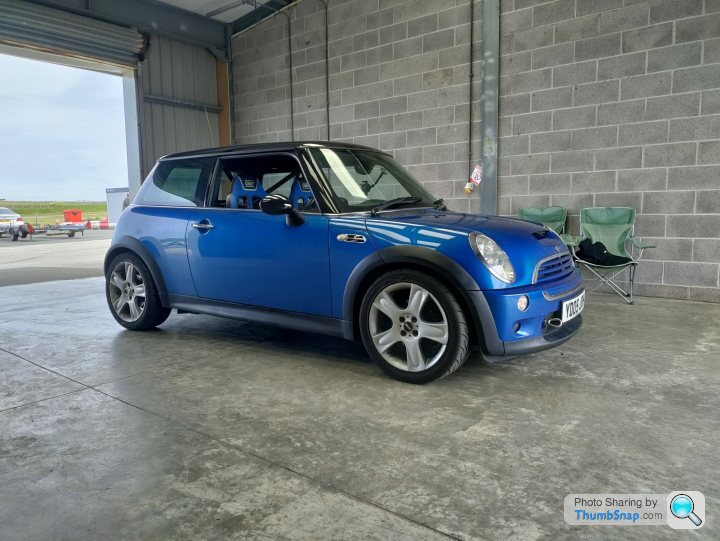
This looks great - my favourite colour for an R53.
I ‘cheated’ and bought a car with most of the mods already done but it means I can definitely say ‘keep going!’. When these little things have been tinkered with they absolutely fly
Thank you! I've always liked blue cars, dark grey was another option I considered. I ‘cheated’ and bought a car with most of the mods already done but it means I can definitely say ‘keep going!’. When these little things have been tinkered with they absolutely fly
What mods do you have? I totally agree, the supercharger whine is addictive too
jordmcd151 said:
Thank you! I've always liked blue cars, dark grey was another option I considered.
What mods do you have? I totally agree, the supercharger whine is addictive too
Here’s my thread - the R53 only arrived recently:What mods do you have? I totally agree, the supercharger whine is addictive too
https://www.pistonheads.com/gassing/topic.asp?h=0&...
The car’s pretty much got all the typical mods without going full ‘racecar’. I really want it to be reliable so not planning to push it much more. Can heartily recommend the coolerworx shifter - absolute game-changer

Good luck with the car
MDifficult said:
Here’s my thread - the R53 only arrived recently:
https://www.pistonheads.com/gassing/topic.asp?h=0&...
The car’s pretty much got all the typical mods without going full ‘racecar’. I really want it to be reliable so not planning to push it much more. Can heartily recommend the coolerworx shifter - absolute game-changer
Good luck with the car
Thanks for the link. It looks a wicked car, must be great on track. 220bhp at the wheels is plenty https://www.pistonheads.com/gassing/topic.asp?h=0&...
The car’s pretty much got all the typical mods without going full ‘racecar’. I really want it to be reliable so not planning to push it much more. Can heartily recommend the coolerworx shifter - absolute game-changer
Good luck with the car
I definitely want to visit 1320 after reading your write up on it.I'd love a coolerworx shifter but I cant make the man maths add up at the moment, its on my wish list.
Thank you

Update
With a track day looming and no interior in, this was the next job I needed to tackle.
First job - give the inside a good vacuum, the interior was full of dust from BBM removing the seam sealer and paint.
After a damn good vacuum, I started to clean the welds and prep the surface ready for a couple of high zinc primer to keep the rust away as long as possible.
The next job was to fit the carpet, ughhh, I was not looking forward to this job. Under the centre of the dash proved difficult, I cut a slot in the carpet to make my life easier, this slot would not be seen when the carpet was fitted and definitely aided installation. I am not happy with how much material I removed behind the seat. I took too much off one side, not that it really matters but I think it will be something I address at a later date. With the carpet back in the rest of the interior could begin to go back into place. To save me struggling to find the correct fasteners I always place the screws and bolts back in the part or into the vehicle body.
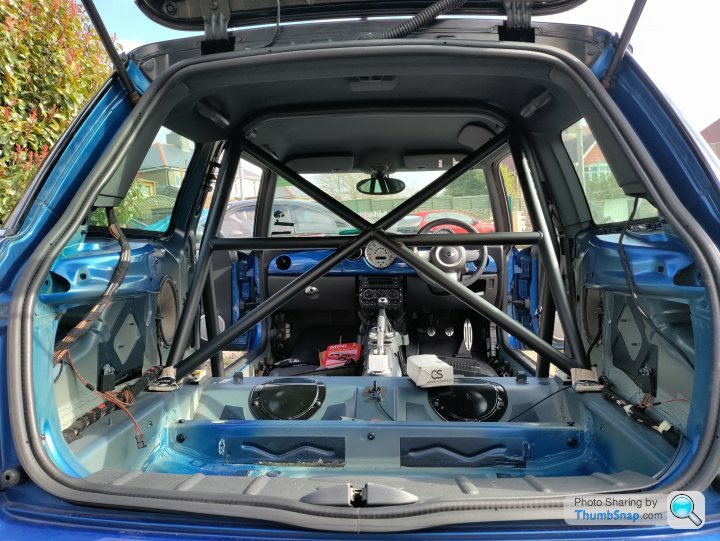
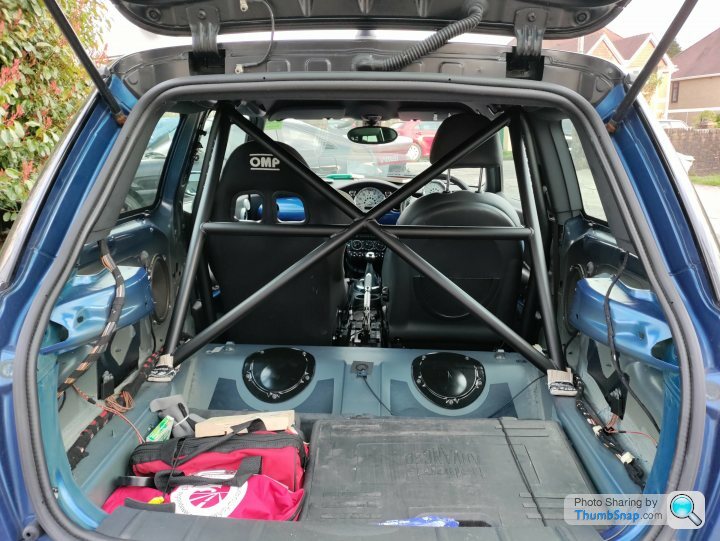
With the front of the car beginning to look a bit more normal I turned my attention to the rear plastics. the plastic panels would need to be cut to fit the roll cage. Handily the rear plastics have a perfect area to neatly cut (circled below).
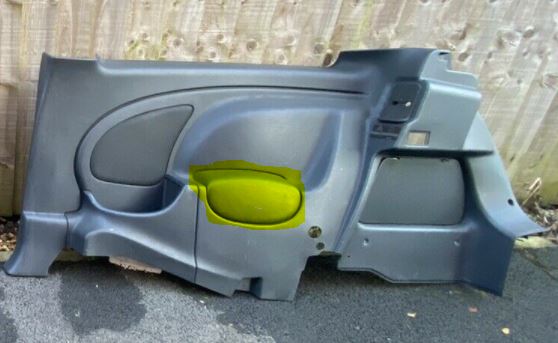
A Dremel with an appropriate cutting disc made short work of the plastics. With the interior plastics cut to fit the roll cage the nightmare task of fitting them in with the roll cage could begin. Doing this by myself was a challenge, after wrestling with the plastics and the roll cage I finally got them into place and only a few cut knuckles. Why must interior plastics be so sharp?? I installed the lower section of the rear seats to make the car feel a bit more complete and help reduce the road noise when driving.
With the interior complete excluding the seats complete I was really happy with how the car felt and looked despite being a bit too scissor happy on the carpet by the roll cage plates.
The front seats were mounted on universal mounts and slotted into place after a bit of fettling to get the correct seating position. The OMP seats have proved comfortable on some longer drives and have made a night and day difference to the car feels to drive, much more race-caresque. The harnesses I have are from TRS, their Clubman 4 point specifically. A 4 point harness should be more than suitable for what I have planned for the car....for now
Fast forward to yesterday, a quick oil change with a new filter should cover me for the three track days booked this year and the driving to track. The queue for the filter at Euro Car Parts took longer than the actual oil change haha. The oil filter did leave a bit of a mess when removing despite dropping as much oil as possible out of the sump. a quick spray with some brake cleaner sorted out the spills.
With a track day looming and no interior in, this was the next job I needed to tackle.
First job - give the inside a good vacuum, the interior was full of dust from BBM removing the seam sealer and paint.
After a damn good vacuum, I started to clean the welds and prep the surface ready for a couple of high zinc primer to keep the rust away as long as possible.
The next job was to fit the carpet, ughhh, I was not looking forward to this job. Under the centre of the dash proved difficult, I cut a slot in the carpet to make my life easier, this slot would not be seen when the carpet was fitted and definitely aided installation. I am not happy with how much material I removed behind the seat. I took too much off one side, not that it really matters but I think it will be something I address at a later date. With the carpet back in the rest of the interior could begin to go back into place. To save me struggling to find the correct fasteners I always place the screws and bolts back in the part or into the vehicle body.
With the front of the car beginning to look a bit more normal I turned my attention to the rear plastics. the plastic panels would need to be cut to fit the roll cage. Handily the rear plastics have a perfect area to neatly cut (circled below).
A Dremel with an appropriate cutting disc made short work of the plastics. With the interior plastics cut to fit the roll cage the nightmare task of fitting them in with the roll cage could begin. Doing this by myself was a challenge, after wrestling with the plastics and the roll cage I finally got them into place and only a few cut knuckles. Why must interior plastics be so sharp?? I installed the lower section of the rear seats to make the car feel a bit more complete and help reduce the road noise when driving.
With the interior complete excluding the seats complete I was really happy with how the car felt and looked despite being a bit too scissor happy on the carpet by the roll cage plates.
The front seats were mounted on universal mounts and slotted into place after a bit of fettling to get the correct seating position. The OMP seats have proved comfortable on some longer drives and have made a night and day difference to the car feels to drive, much more race-caresque. The harnesses I have are from TRS, their Clubman 4 point specifically. A 4 point harness should be more than suitable for what I have planned for the car....for now
Fast forward to yesterday, a quick oil change with a new filter should cover me for the three track days booked this year and the driving to track. The queue for the filter at Euro Car Parts took longer than the actual oil change haha. The oil filter did leave a bit of a mess when removing despite dropping as much oil as possible out of the sump. a quick spray with some brake cleaner sorted out the spills.
A lot has happened since the last update
The mini even with a roll cage is surprisingly spacious in the rear. I comfortably packed all my track day essentials, including my electric rachet, 200 piece Halfords too kit, low profile jack, 2 axle stand, spare wheel, 5L oil, 5L deionised water, brake fluid, 2 helmets and overnight bags, plus the necessary box of cable ties, duct tape and RGV (this was critical later on).
The drive up to Silverstone started without a problem, traffic was quiet and the weather was sunny, with a full tank of fuel me and my friend left my house. We made good progress and about 2.5 hours in we stopped at a service station for a quick bit of food and check the car to ensure everything was as it should be. It was not, a quick look under the car revealed a puddle of oil coming from the oil cooler housing, a quick wipe around the area to check our initial thoughts for the leak turned out to be true. The small leak at the housing had allowed the oil to travel down the whole length of the underside of the driver’s side leading to drips down the length of the car. When the engine was turned on the car would slowly leak oil out of the filter housing, with a service station close by I bought some oil and topped up to the maximum. Without the correct sized socket, 36mm, I would not be able to fix the leak. I used some RGV around the filter housing to limit the oil losses. Keeping calm, we found a local Halfords on google maps and quickly packed up the car and made our way to said Halfords. We got there 10 minutes before they closed with no nasty low oil sounds on the journey. Armed with an oil pan, more oil, many microfibres towels and the correct socket we jacked the car up after letting it cool down. I did check for a new filter and o ring but they would have needed to order them. Those who don’t know the oil filter housing is metal and gets bloody hot when the car has been driving, it’s also located near the exhaust on the back of the engine. The oil level was near the minimum level on the dipstick. With the oil filter housing removed it was clear the o-ring has split, having completed many oil changes on a variety of cars I have never pinched an o-ring before, always liberally applying oil to the o-ring and cleaning the housing prior to installation.
With a temporary fix completed we carried on driving to the hotel, the journey had taken about 5 hours, a normal issue free drive would be under 3 hours. Not ideal!! When we got to the hotel the first thing I needed to do was find the closest euro car parts and order spare filters. With new filters ordered and dinner made we went back to the Mini, after allowing the car to cool we removed the oil filter housing and made a more permanent solution. The previous efforts with the RGV wasn’t as good as we hoped, we didn’t have a lot time to allow the RGV to fully set. To give the RGV the best chance of sealing we added a thick bead of RGV and allowed it to set overnight.
Friday 9th April
The local Euro Car Parts was a 20 minute drive away, we left the hotel at 7:30, allowing us to get to ECP before they opened and hopefully be first in line to limit the loss of track day time. I called Circuit Days to let them know the situation, they were really understanding and told me there was no need to rush to the track. Finally a bit of luck, no other customers were present. With the new filters bought, I had 2 just to be safe. I jacked the car up and changed the oil filter, this time cleaning the housing and applying excessive oil to the o-ring, not wanting to pinch another. The Mini was covered in oil, aerodynamics had caused the leaked oil to cover the rear of the car, no issue I thought, I’ll just go to a local DIY jet wash and quickly clean the car. How wrong was I… 5 different locations were closed. Satisfied the leak was fully fixed we drove to Tesco to grab some food and cleaning supplies (kitchen roll, general spray cleaner and a glass cleaner). We used all the kitchen roll and over half a bottle of glass cleaner to bring the Mini back to a presentable state.
With a clean car and fixed oil leak I was feeling positive for the day, the previous day was long, and I had doubts for the track day the following day. With the sat nav set to the circuit our excitement grew, I had prebooked a garage so there was no need to rush for a first come first serve garage slot. By the time we arrived at the track we had missed the sighting laps, this wasn’t an issue since I had covered over 50 laps on Project Cars using basic simulator set up. My friend had watched on-boards from other drivers for the circuit s understood the layout too.
The organiser, Circuit Days, were welcoming and the event was well organised.
Conditions were great when we arrived, blue skies and a dry track. After removing everything that wasn’t bolted down from the car, I plugged in my OBD Bluetooth adapter and connected to my phone mounted on the dash, the main gauges I had on the display were water temperature, boost pressure and intake air temperature. Once connected we gave the fluids a final check and made sure they were all near their maximum.
At last, I could enjoy the track day I had booked months ago, Silverstone has always been a bucket list track for me, having watched the touring cars there for the last few years. I had goosebumps going onto the track, taking it easy for the first few laps to get everything up to temperature and getting closer to the racing line adding speed with every few laps. I really need to get my big brake kit fitted, this was definitely a priority for the next few weeks. After the tyres started to let go, still on my first sets of AD08RS, I had one cooldown lap and pulled into the pits. Each stint lasted about 15 minutes letting the car cool down for 45 minutes before going again.
The first thing I check was underneath the car, no leaks, such a relief!
The Mini was one of the slowest cars on the track but this didn’t matter to me, being Silverstone I expected many high-end cars. The pits were dominated by Porsches (GT3s, Caymans GT4s, Boxsters), BMWs (M2, M3 and M4) and a few race-prepped cars such as civics, MX5s and a Seat Leon.
Here are a couple of pictures from the day by the Circuit Days photographer, photo links are given for free, a nice touch.

I had set up a GoPro pointing towards the rear of the car and another phone to record the front view. I wish I had done a trial run for the recording set-up. The audio was dreadful, and I don’t think it is worth posting it. Lesson learnt, never mind! An external mic is on the shopping list.
The car drove faultlessly throughout the day with no issues at all, a great relief after the previous day. The brake fluid was changed during the lunch break. A job I had wanted to do the evening before but the oil filter housing issue prevented that. The drive home was uneventful, a massive relief, instead of driving on the motorway I took a few B roads to stretch the car's legs and make the drive home more enjoyable. The following day I changed the oil and checked all the vital fluids, everything was where it should be and no puddles of anything underneath the car.
Fast forward a week and more issues, I cannot catch a break ☹
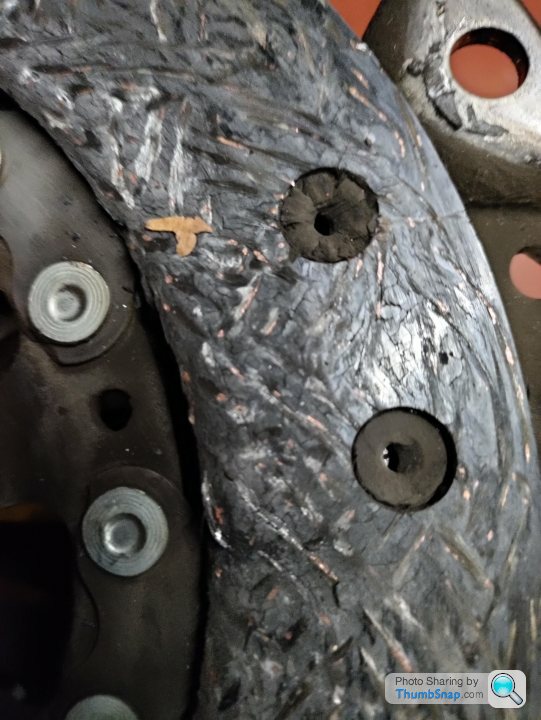
White smoke started to pour out of the back of the car, suspecting a head gasket I immediately pulled over, about half a mile from home. This really isn’t what I needed, my next track day is less than 5 weeks away at this point. I checked the oil filler cap for any milky residue and it was clean, however, the coolant reservoir had oil inside it.
After phoning the breakdown service, I was told the wait would be approximately 1 hour, no problem I'd just head home and head back to the car just before they arrived. When I got back to the car the company who provide the breakdown cover said the vehicle that would be collecting me has broken down…typical, just my luck, another hour wait. I headed back home, hoping the next vehicle wouldn’t break.
Must have been about 10PM when I was collected, and I had the vehicle transport to my girlfriend’s relative’s house where I would be able to work on the car in a garage if it started to rain.
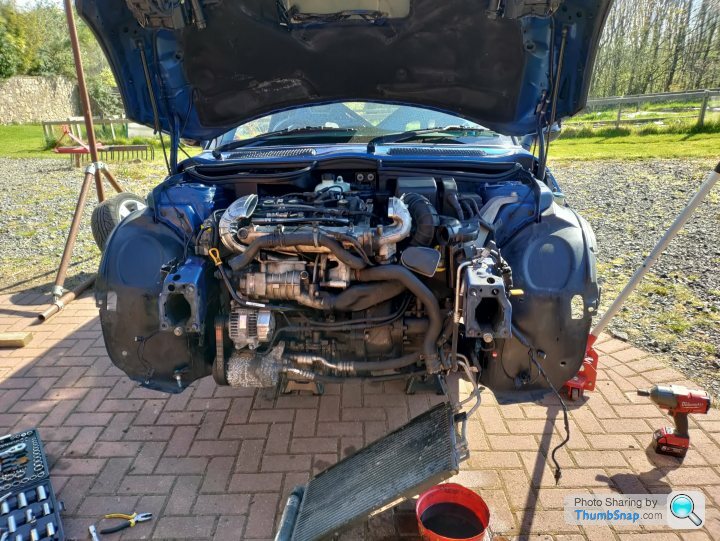
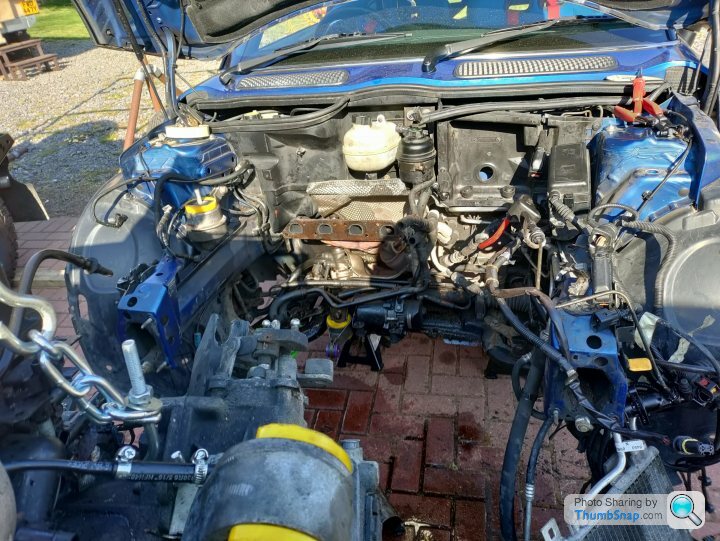
The following morning was spent researching possible causes of the white smoke. I called 1320 to ask for their advice for ordering parts and they said it was probably the oil cooler that had broken since I didn’t have any coolant in my oil, just oil in my coolant. Taking their expert opinion onboard I went ahead and ordered a new aftermarket oil cooler, Nissen, from eBay. An OEM part was over £100, the Nissen item cost £60. The oil cooler can be replaced with the engine in but a few oil leaks around the sump, a clutch that was beginning to slip and a few other gaskets in hard to reach places meant the engine was coming out. After another call with 1320 to ensure I had all the gaskets I needed I quickly placed an order for next day delivery from 1320.
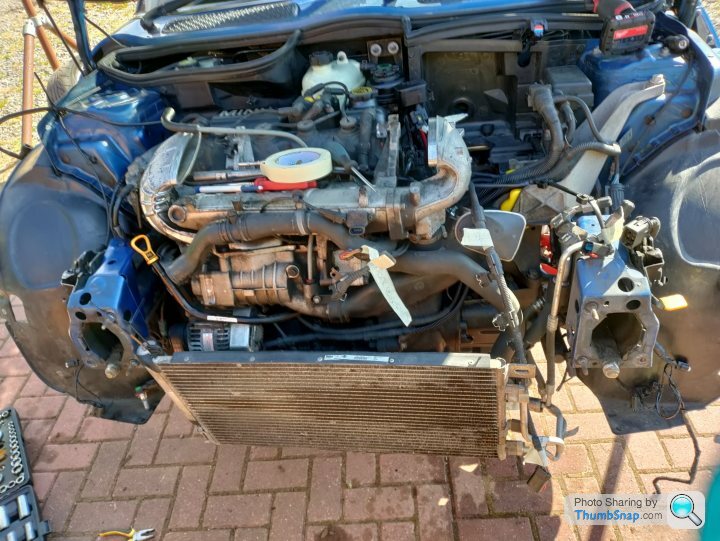
Engine out time. There are many videos on YouTube on taking the R53 engine out. I haven’t found a written up version of the videos so here it goes
• Jack up car
• disconnect battery
• drain coolant (remove cap and bleed valve)
• drain oil • remove earth on drivers side
• remove front bumper - remember ambient temp sensor and lights
• remove crash bar • remove crash tubes
• disconnect radiator fan wiring
• remove upper radiator hose
• remove AC radiator
• remove radiator pack
• drain gear oil - 8mm hex
• remove air box
• disconnect ecu
• remove intercooler
• disconnect wires under intercooler - 2 plugs
• move fuse box
• disconnect fuel line
• remove vacuum lines on left side of engine
• remove coil pack wiring
• remove injector wiring
• disconnect cam sensor - Driver's side
• remove this arm of the loom from the engine
• remove throttle to intake hose
• disconnect boost sensor and thermostat sensor
• remove brake boost connecting line
• remove aux belt
• remove AC motor - 2 on front 1 on side - 13mm
• unplug alternator
• disconnect crank position sensor
• remove clutch slave cylinder
• disconnect shift linkage
• remove exhaust head shield - awkward 10mm bolt/nut
• remove wheels
• disconnect outer ball joints and steering tie rods
• remove axle 32mm - left side just pops out
• drivers axle - remove engine mount, power steering fan (2 bolts and plug) and bearing carrier bracket
• disconnect power steering wiring
• move heat shield and disconnect starter motor wiring - 13mm and 10mm
• remove oil cooler pipes
• disconnect exhaust manifold bolts 10mm bolts
• remove 10mm holding oil cooler pipes (under exhaust)
• remove thermostat housing
• disconnect heater hose connection
• remove throttle body
• transmission connection passenger side
• loom can be removed to the side
• move clutch master cylinder
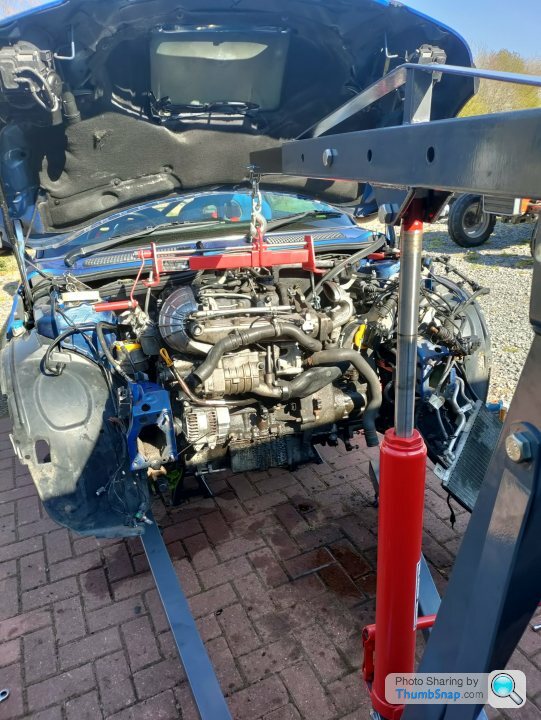
• connect engine crane
• remove engine mounts

Everything was going well until I needed to remove the passenger lower outer ball joint.
NOTHING AND I MEAN NOTHING, was getting the ball joint to release. Without wasting hours of my time I proceeded to get the grinder and cut the top off the ball joint, allowing me to carry on with the engine removal.
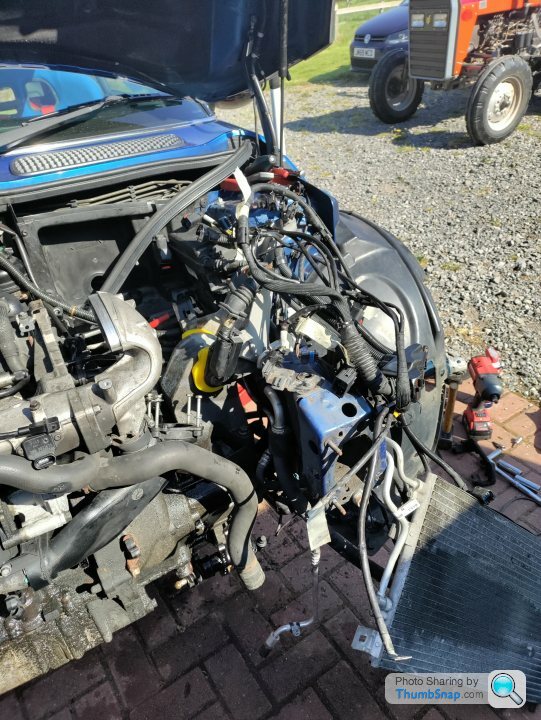
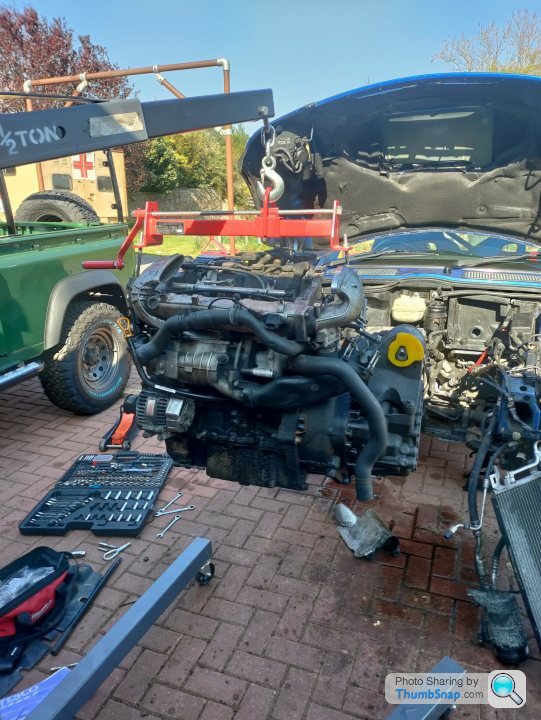
Removing the engine was not too difficult, I took about 5-6 hours from start to finish, far from a record. Plenty of tea breaks and every electrical connection was labelled up to help with refitting. With the engine removed from the car, the next step was to mount it on an engine stand. With the gearbox removed the clutch was inspected.
With the engine out and mounted on a stand, I took another look at the ball joint
Step 1 *grabs the biggest hammer I could find* *bashes lumps out of the suspension arm* nothing budged…
Step 2 - Buy a blow torch, heat up and repeat step 1, nothing budged again. FML
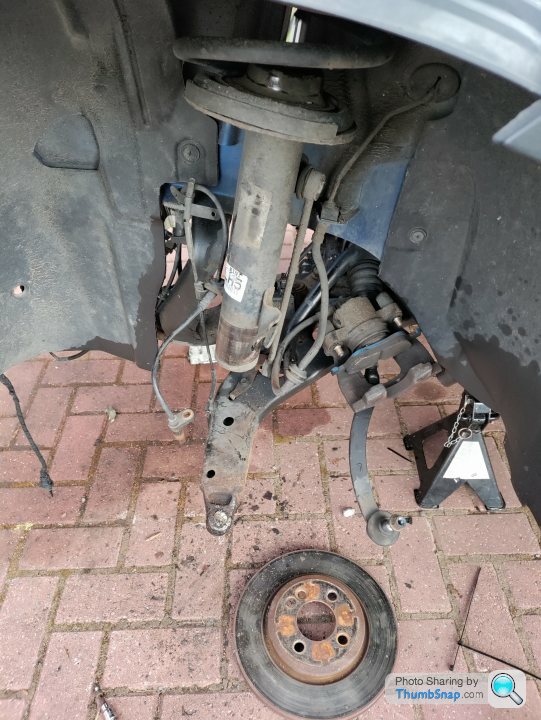
Step 3 remove the engine arm, which involves dropping the subframe, not a big issue with the engine removed but the ARB mount has 2 bolts and one is a bloody nightmare for access.


With the ball joint taking more effort than what it was worth I bought a new arm with inner and outer ball joints. The amount of force id put into the old arm couldn’t have helped the longevity.
Back to the engine…..
With the engine remove and on a stand, I started to clean down all the surfaces to prep them ready for paint, I had bought some aerosol paint but decided against this after the nozzle was broken. I quickly ordered some metallic silver engine enamel.
With a freshly painted engine, I turned my attention to the rear main seal. What a nightmare, this seal would not come out at all, ongoing theme with this car, after a quick tactic rethink the old seal finally gave up. The new seal went in easily, the clutch soon followed as did the gearbox.
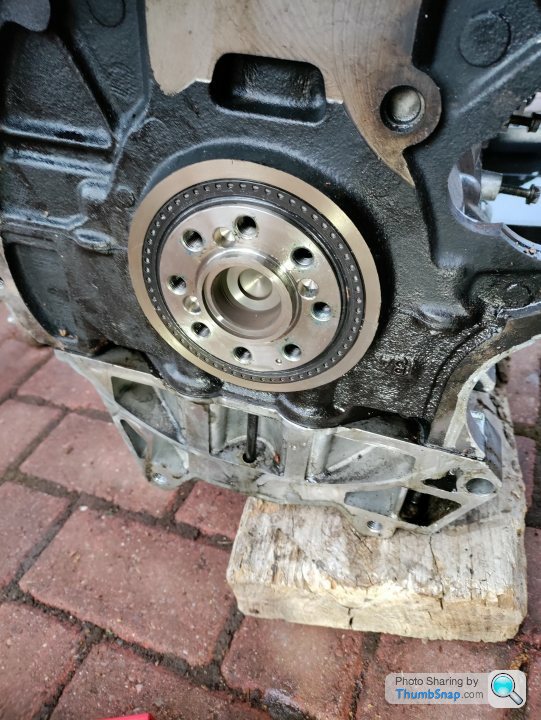
As Haynes say refit is the opposite of removal, the engine and sensors went back together without any issue, topped up the fluids and the engine started first time. A bit of a relief after all the s**t the car had thrown at me during the last however many weeks.
With the engine back in my next job was to bleed the clutch, upon closer inspection the original line had seen better days so a replacement braided line was ordered. Removing the old line was easy, multiple cuts along the metal pipe were all that was needed. To my surprise, fitting the new braided line was very easy and didn’t take long at all, I used all the original hose clamps where possible.
Last job before I could drive the car, bleed the clutch slave cylinder. Having googled this beforehand I knew it could be a pain. I tried the usual method using a one-man bleed kit, with the slave cylinder compressed but this did not work, I then called 1320 for their advice, they repeated what I had been doing. I tried back bleeding the system by using the brake caliper but that did not work either. I must have spent 4 hours trying to bleed the slave cylinder. With a track day the following day, I was devastated. Admitting defeat, I booked the Mini into Summerhayes Garage, a BMW/Mini specialist in Abertillery, they acknowledged the painful bleeding procedure that sometimes happens.
Summerhayes garage fixed the issue in one day, I collected the car on Friday and with some apprehension drove home. I had not driven the car for weeks at this point. The garage gave the car a quick ‘once-over’ stating everything looked good, major relief. The drive home was difficult to enjoy, not wanting to find potential issues I didn’t drive the car hard, I needn’t have worried, the following few days the car drove superbly!
TLDR: suspected head gasket was an oil cooler, multiple FU moments from the car. Mini now runs perfectly!
The mini even with a roll cage is surprisingly spacious in the rear. I comfortably packed all my track day essentials, including my electric rachet, 200 piece Halfords too kit, low profile jack, 2 axle stand, spare wheel, 5L oil, 5L deionised water, brake fluid, 2 helmets and overnight bags, plus the necessary box of cable ties, duct tape and RGV (this was critical later on).
The drive up to Silverstone started without a problem, traffic was quiet and the weather was sunny, with a full tank of fuel me and my friend left my house. We made good progress and about 2.5 hours in we stopped at a service station for a quick bit of food and check the car to ensure everything was as it should be. It was not, a quick look under the car revealed a puddle of oil coming from the oil cooler housing, a quick wipe around the area to check our initial thoughts for the leak turned out to be true. The small leak at the housing had allowed the oil to travel down the whole length of the underside of the driver’s side leading to drips down the length of the car. When the engine was turned on the car would slowly leak oil out of the filter housing, with a service station close by I bought some oil and topped up to the maximum. Without the correct sized socket, 36mm, I would not be able to fix the leak. I used some RGV around the filter housing to limit the oil losses. Keeping calm, we found a local Halfords on google maps and quickly packed up the car and made our way to said Halfords. We got there 10 minutes before they closed with no nasty low oil sounds on the journey. Armed with an oil pan, more oil, many microfibres towels and the correct socket we jacked the car up after letting it cool down. I did check for a new filter and o ring but they would have needed to order them. Those who don’t know the oil filter housing is metal and gets bloody hot when the car has been driving, it’s also located near the exhaust on the back of the engine. The oil level was near the minimum level on the dipstick. With the oil filter housing removed it was clear the o-ring has split, having completed many oil changes on a variety of cars I have never pinched an o-ring before, always liberally applying oil to the o-ring and cleaning the housing prior to installation.
With a temporary fix completed we carried on driving to the hotel, the journey had taken about 5 hours, a normal issue free drive would be under 3 hours. Not ideal!! When we got to the hotel the first thing I needed to do was find the closest euro car parts and order spare filters. With new filters ordered and dinner made we went back to the Mini, after allowing the car to cool we removed the oil filter housing and made a more permanent solution. The previous efforts with the RGV wasn’t as good as we hoped, we didn’t have a lot time to allow the RGV to fully set. To give the RGV the best chance of sealing we added a thick bead of RGV and allowed it to set overnight.
Friday 9th April
The local Euro Car Parts was a 20 minute drive away, we left the hotel at 7:30, allowing us to get to ECP before they opened and hopefully be first in line to limit the loss of track day time. I called Circuit Days to let them know the situation, they were really understanding and told me there was no need to rush to the track. Finally a bit of luck, no other customers were present. With the new filters bought, I had 2 just to be safe. I jacked the car up and changed the oil filter, this time cleaning the housing and applying excessive oil to the o-ring, not wanting to pinch another. The Mini was covered in oil, aerodynamics had caused the leaked oil to cover the rear of the car, no issue I thought, I’ll just go to a local DIY jet wash and quickly clean the car. How wrong was I… 5 different locations were closed. Satisfied the leak was fully fixed we drove to Tesco to grab some food and cleaning supplies (kitchen roll, general spray cleaner and a glass cleaner). We used all the kitchen roll and over half a bottle of glass cleaner to bring the Mini back to a presentable state.
With a clean car and fixed oil leak I was feeling positive for the day, the previous day was long, and I had doubts for the track day the following day. With the sat nav set to the circuit our excitement grew, I had prebooked a garage so there was no need to rush for a first come first serve garage slot. By the time we arrived at the track we had missed the sighting laps, this wasn’t an issue since I had covered over 50 laps on Project Cars using basic simulator set up. My friend had watched on-boards from other drivers for the circuit s understood the layout too.
The organiser, Circuit Days, were welcoming and the event was well organised.
Conditions were great when we arrived, blue skies and a dry track. After removing everything that wasn’t bolted down from the car, I plugged in my OBD Bluetooth adapter and connected to my phone mounted on the dash, the main gauges I had on the display were water temperature, boost pressure and intake air temperature. Once connected we gave the fluids a final check and made sure they were all near their maximum.
At last, I could enjoy the track day I had booked months ago, Silverstone has always been a bucket list track for me, having watched the touring cars there for the last few years. I had goosebumps going onto the track, taking it easy for the first few laps to get everything up to temperature and getting closer to the racing line adding speed with every few laps. I really need to get my big brake kit fitted, this was definitely a priority for the next few weeks. After the tyres started to let go, still on my first sets of AD08RS, I had one cooldown lap and pulled into the pits. Each stint lasted about 15 minutes letting the car cool down for 45 minutes before going again.
The first thing I check was underneath the car, no leaks, such a relief!
The Mini was one of the slowest cars on the track but this didn’t matter to me, being Silverstone I expected many high-end cars. The pits were dominated by Porsches (GT3s, Caymans GT4s, Boxsters), BMWs (M2, M3 and M4) and a few race-prepped cars such as civics, MX5s and a Seat Leon.
Here are a couple of pictures from the day by the Circuit Days photographer, photo links are given for free, a nice touch.
I had set up a GoPro pointing towards the rear of the car and another phone to record the front view. I wish I had done a trial run for the recording set-up. The audio was dreadful, and I don’t think it is worth posting it. Lesson learnt, never mind! An external mic is on the shopping list.
The car drove faultlessly throughout the day with no issues at all, a great relief after the previous day. The brake fluid was changed during the lunch break. A job I had wanted to do the evening before but the oil filter housing issue prevented that. The drive home was uneventful, a massive relief, instead of driving on the motorway I took a few B roads to stretch the car's legs and make the drive home more enjoyable. The following day I changed the oil and checked all the vital fluids, everything was where it should be and no puddles of anything underneath the car.
Fast forward a week and more issues, I cannot catch a break ☹
White smoke started to pour out of the back of the car, suspecting a head gasket I immediately pulled over, about half a mile from home. This really isn’t what I needed, my next track day is less than 5 weeks away at this point. I checked the oil filler cap for any milky residue and it was clean, however, the coolant reservoir had oil inside it.
After phoning the breakdown service, I was told the wait would be approximately 1 hour, no problem I'd just head home and head back to the car just before they arrived. When I got back to the car the company who provide the breakdown cover said the vehicle that would be collecting me has broken down…typical, just my luck, another hour wait. I headed back home, hoping the next vehicle wouldn’t break.
Must have been about 10PM when I was collected, and I had the vehicle transport to my girlfriend’s relative’s house where I would be able to work on the car in a garage if it started to rain.
The following morning was spent researching possible causes of the white smoke. I called 1320 to ask for their advice for ordering parts and they said it was probably the oil cooler that had broken since I didn’t have any coolant in my oil, just oil in my coolant. Taking their expert opinion onboard I went ahead and ordered a new aftermarket oil cooler, Nissen, from eBay. An OEM part was over £100, the Nissen item cost £60. The oil cooler can be replaced with the engine in but a few oil leaks around the sump, a clutch that was beginning to slip and a few other gaskets in hard to reach places meant the engine was coming out. After another call with 1320 to ensure I had all the gaskets I needed I quickly placed an order for next day delivery from 1320.
Engine out time. There are many videos on YouTube on taking the R53 engine out. I haven’t found a written up version of the videos so here it goes
• Jack up car
• disconnect battery
• drain coolant (remove cap and bleed valve)
• drain oil • remove earth on drivers side
• remove front bumper - remember ambient temp sensor and lights
• remove crash bar • remove crash tubes
• disconnect radiator fan wiring
• remove upper radiator hose
• remove AC radiator
• remove radiator pack
• drain gear oil - 8mm hex
• remove air box
• disconnect ecu
• remove intercooler
• disconnect wires under intercooler - 2 plugs
• move fuse box
• disconnect fuel line
• remove vacuum lines on left side of engine
• remove coil pack wiring
• remove injector wiring
• disconnect cam sensor - Driver's side
• remove this arm of the loom from the engine
• remove throttle to intake hose
• disconnect boost sensor and thermostat sensor
• remove brake boost connecting line
• remove aux belt
• remove AC motor - 2 on front 1 on side - 13mm
• unplug alternator
• disconnect crank position sensor
• remove clutch slave cylinder
• disconnect shift linkage
• remove exhaust head shield - awkward 10mm bolt/nut
• remove wheels
• disconnect outer ball joints and steering tie rods
• remove axle 32mm - left side just pops out
• drivers axle - remove engine mount, power steering fan (2 bolts and plug) and bearing carrier bracket
• disconnect power steering wiring
• move heat shield and disconnect starter motor wiring - 13mm and 10mm
• remove oil cooler pipes
• disconnect exhaust manifold bolts 10mm bolts
• remove 10mm holding oil cooler pipes (under exhaust)
• remove thermostat housing
• disconnect heater hose connection
• remove throttle body
• transmission connection passenger side
• loom can be removed to the side
• move clutch master cylinder
• connect engine crane
• remove engine mounts
Everything was going well until I needed to remove the passenger lower outer ball joint.
NOTHING AND I MEAN NOTHING, was getting the ball joint to release. Without wasting hours of my time I proceeded to get the grinder and cut the top off the ball joint, allowing me to carry on with the engine removal.
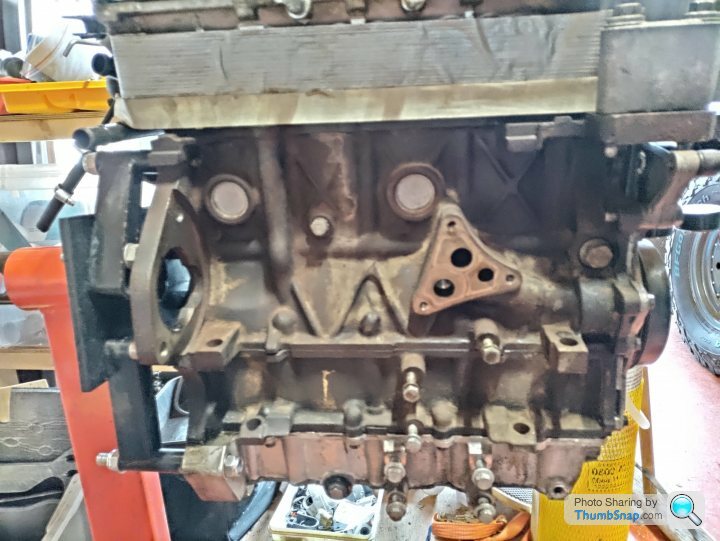
Removing the engine was not too difficult, I took about 5-6 hours from start to finish, far from a record. Plenty of tea breaks and every electrical connection was labelled up to help with refitting. With the engine removed from the car, the next step was to mount it on an engine stand. With the gearbox removed the clutch was inspected.
With the engine out and mounted on a stand, I took another look at the ball joint
Step 1 *grabs the biggest hammer I could find* *bashes lumps out of the suspension arm* nothing budged…
Step 2 - Buy a blow torch, heat up and repeat step 1, nothing budged again. FML
Step 3 remove the engine arm, which involves dropping the subframe, not a big issue with the engine removed but the ARB mount has 2 bolts and one is a bloody nightmare for access.
With the ball joint taking more effort than what it was worth I bought a new arm with inner and outer ball joints. The amount of force id put into the old arm couldn’t have helped the longevity.
Back to the engine…..
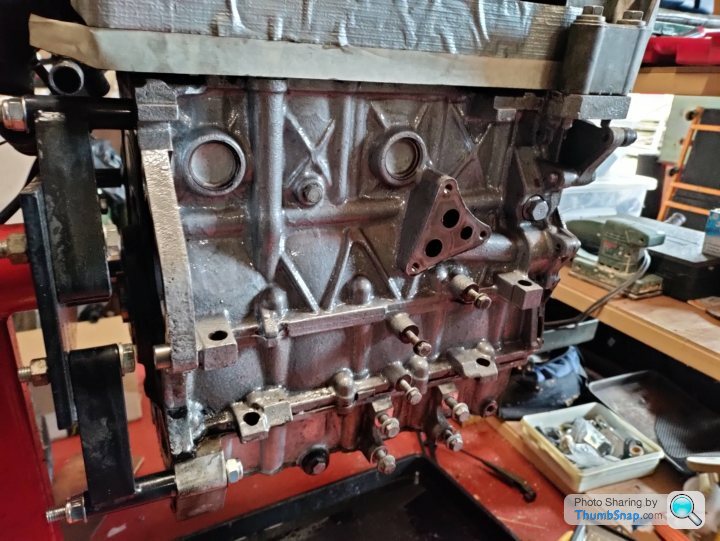
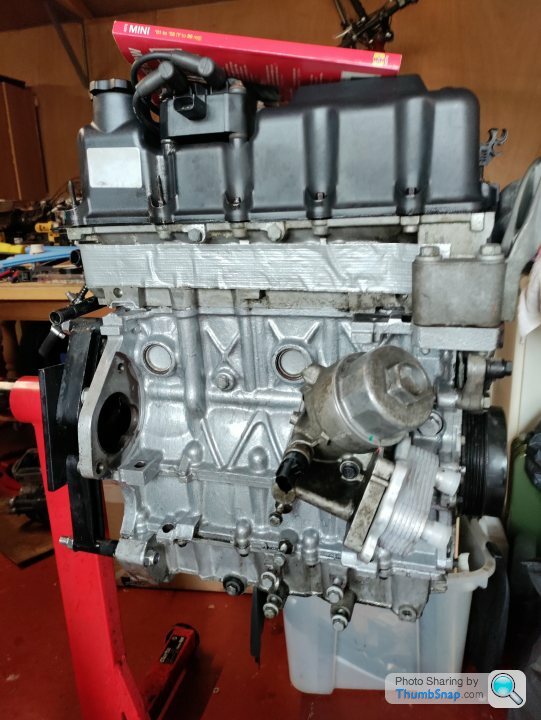
With the engine remove and on a stand, I started to clean down all the surfaces to prep them ready for paint, I had bought some aerosol paint but decided against this after the nozzle was broken. I quickly ordered some metallic silver engine enamel.
With a freshly painted engine, I turned my attention to the rear main seal. What a nightmare, this seal would not come out at all, ongoing theme with this car, after a quick tactic rethink the old seal finally gave up. The new seal went in easily, the clutch soon followed as did the gearbox.
As Haynes say refit is the opposite of removal, the engine and sensors went back together without any issue, topped up the fluids and the engine started first time. A bit of a relief after all the s**t the car had thrown at me during the last however many weeks.
With the engine back in my next job was to bleed the clutch, upon closer inspection the original line had seen better days so a replacement braided line was ordered. Removing the old line was easy, multiple cuts along the metal pipe were all that was needed. To my surprise, fitting the new braided line was very easy and didn’t take long at all, I used all the original hose clamps where possible.
Last job before I could drive the car, bleed the clutch slave cylinder. Having googled this beforehand I knew it could be a pain. I tried the usual method using a one-man bleed kit, with the slave cylinder compressed but this did not work, I then called 1320 for their advice, they repeated what I had been doing. I tried back bleeding the system by using the brake caliper but that did not work either. I must have spent 4 hours trying to bleed the slave cylinder. With a track day the following day, I was devastated. Admitting defeat, I booked the Mini into Summerhayes Garage, a BMW/Mini specialist in Abertillery, they acknowledged the painful bleeding procedure that sometimes happens.
Summerhayes garage fixed the issue in one day, I collected the car on Friday and with some apprehension drove home. I had not driven the car for weeks at this point. The garage gave the car a quick ‘once-over’ stating everything looked good, major relief. The drive home was difficult to enjoy, not wanting to find potential issues I didn’t drive the car hard, I needn’t have worried, the following few days the car drove superbly!
TLDR: suspected head gasket was an oil cooler, multiple FU moments from the car. Mini now runs perfectly!
Wow. That was one hell of an update!
I can’t quite believe it started with a dicky oil filter o-ring, then a fun track day, then suddenly it’s engine out!!
I have total admiration for your spannering skills - both the problem solving and taking on a clutch change. I wish I had 5% of that ability.
Your point about external mic is a great one - I had exactly the same issue. I’ve been doing a lot of testing on mine since. If you’re using the native GoPro input then you can only have one input (at least that’s how it is on my Hero 3+ Black), so you have to choose a mic by the exhaust (awesome) or one under the bonnet (supercharger baby!) which is a shame. But once I have external audio I can’t also run permanent power without a costly adapter. So stupid!
Fingers crossed you’ve got the trouble behind you and you can get back to enjoying it. Got my next track day on Wednesday so lets see if I’ve made the right move on the GoPro
MDifficult said:
Wow. That was one hell of an update!
I can’t quite believe it started with a dicky oil filter o-ring, then a fun track day, then suddenly it’s engine out!!
I have total admiration for your spannering skills - both the problem solving and taking on a clutch change. I wish I had 5% of that ability.
Your point about external mic is a great one - I had exactly the same issue. I’ve been doing a lot of testing on mine since. If you’re using the native GoPro input then you can only have one input (at least that’s how it is on my Hero 3+ Black), so you have to choose a mic by the exhaust (awesome) or one under the bonnet (supercharger baby!) which is a shame. But once I have external audio I can’t also run permanent power without a costly adapter. So stupid!
Fingers crossed you’ve got the trouble behind you and you can get back to enjoying it. Got my next track day on Wednesday so lets see if I’ve made the right move on the GoPro
It took me a long time to type up haha between starting a new job and balancing it with my MSc. I can’t quite believe it started with a dicky oil filter o-ring, then a fun track day, then suddenly it’s engine out!!
I have total admiration for your spannering skills - both the problem solving and taking on a clutch change. I wish I had 5% of that ability.
Your point about external mic is a great one - I had exactly the same issue. I’ve been doing a lot of testing on mine since. If you’re using the native GoPro input then you can only have one input (at least that’s how it is on my Hero 3+ Black), so you have to choose a mic by the exhaust (awesome) or one under the bonnet (supercharger baby!) which is a shame. But once I have external audio I can’t also run permanent power without a costly adapter. So stupid!
Fingers crossed you’ve got the trouble behind you and you can get back to enjoying it. Got my next track day on Wednesday so lets see if I’ve made the right move on the GoPro
Nor me, one cheap o-ring! The engine could have stayed in for the oil cooler but a few of the jobs it just made sense to pull it out and give it a once over.
Thank you, did have me scratching my head at many points, my student budget made it a DIY job through necessity hahah.
Yes, the mic or charger choice is a nightmare, I run a hero 4 black, ended up cutting the plastic casing to fit my charger and help the mic pick up a bit more sound. I am debating a newer version but £300+ on a new one seems a waste for how much I'd use it.
Well, it was gone....next update I will share what happened on the way to Anglesey last weekend.
Good luck! hope you have a trouble-free day!
6 months since my last update, I knew it had been a long time but not this long. Long story short, finished an MSc, started a new job
Anglesey Track Day 6/6/2021
I have always wanted to drive at Anglesey circuit, it has always featured on many of the videos I have watched on YouTube and the view from Corkscrew is spectacular….I did get a photo of the car here.
Sunday
This track day would be different to the others I have been on, my girlfriend would be joining me. We booked a couple nights away in North Wales before and after the track day. With the car fully loaded we started the drive up north around 10AM on a lovely summer Sunday, perfect weather for a road trip. If only the rest of the day was as good as the weather.
30 minutes into the journey the car started to misbehave, signs of low voltage were clear. Firstly the radio started to turn off and then back on, the electric powersteering started cutting out and then finally a misfire with a total loss of power.
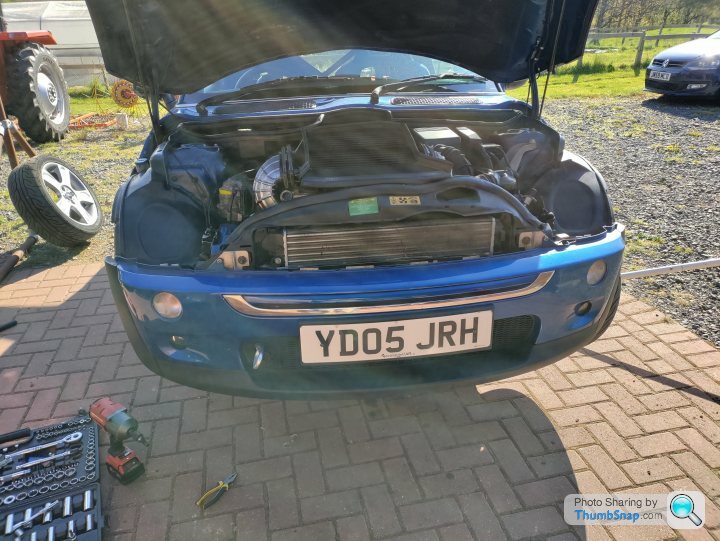
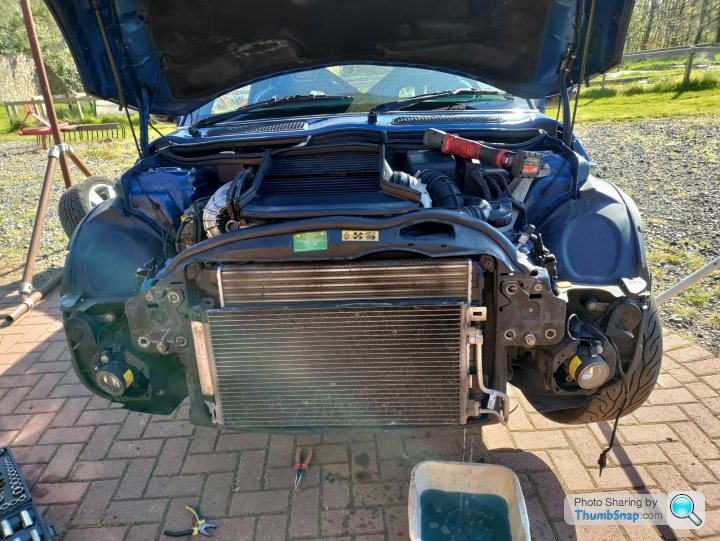
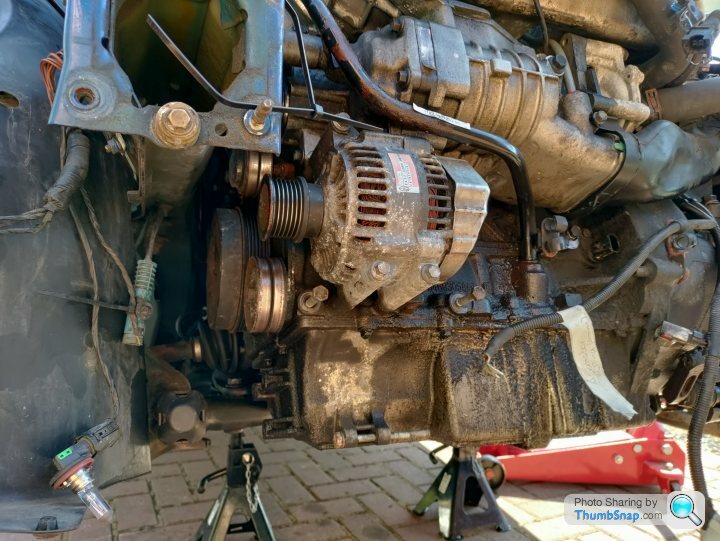
Thankfully I always overpack for track days and with a full set of tools in the back of the car I began to check my initial diagnosis. I was correct, low battery voltage. I quickly jacked up the car, which I had now parked on an entrance to a farmers field just north of Carmarthen. Bumper off and the first item to check would be the alternator, the terminal was not in a good state.
Sunday, is not the best day to have a breakdown. After confirming the alternator was knackered, I reserved one in Euro Car Parts in Swansea. I hoped one of friends or someone in my family could drive to get the part and drop it off to me. Thankfully my brother come to the rescue, not wanting to ruin the weekend I made plans for him to drop my girlfriend back to her house after dropping off the part so she could grab her car to drive us up for the weekend away if the Mini would not behave after a new alternator.
The next paragraph isn’t really car relevant but it was a nice moment. The weather was ridiculously warm for the UK, many cars passed by without stopping until a Fiat 500 XL stopped. It was a local nurse asking if everything was alright, I gave a nod and told him I was waiting for parts. He drove off, we continued to wait for the parts, my brother had about a 90 minute drive to get the parts from his house and then drive to my broken down car. About 60 minutes after the nurse left us the 500 XL passed us again and pulled in. The nurse got out of his car and gave us some cold bottles of water. It was a lovely gesture and we really appreciated it. I never got his name, but thank you very much!
Right, back to the car, parts in hand and my girlfriend on her way back to get her A3 I hammered out the rebuild in short time. I know this car well enough, also the alternator is right at the front of the engine and the access is great with the bumper removed and the car in service mode. With everything crossed I started the car (thank you NOCCO starter), checked the voltage with my obd reader and then again with a multimeter.
SUCCESS!
My girlfriend arrived in her car as I was putting the final tools into the Mini. I assured her the car would be fine for the rest of the journey, worst case we would park it somewhere safe and get the car recovered a few days later. Apprehensively she followed me to North Wales and…..no breakdowns for the Mini, the journey took us about 8 hours if my memory is right, what a long day!
The Track Day
Forgetting about the troubles from the drive up I was excited to get to the track, unpack and get some laps in. The track day was run by Track Obsession, very impressed and I would definitely do another event with them. Small little touches like the free bottles of water, keyring and sticker (straight on my laptop). Unknown to my girlfriend I had purchased a driver ticket for her not a passenger, she wasn’t overly keen on the idea of a track day so the chance to drive the car changed that, even if it made me nervous haha.
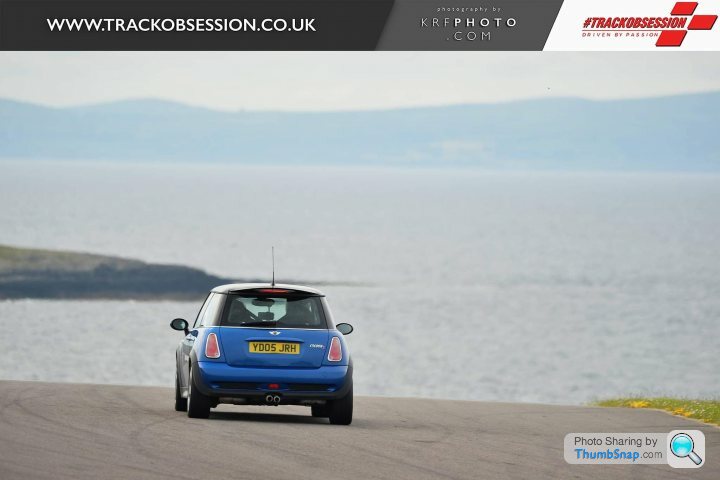
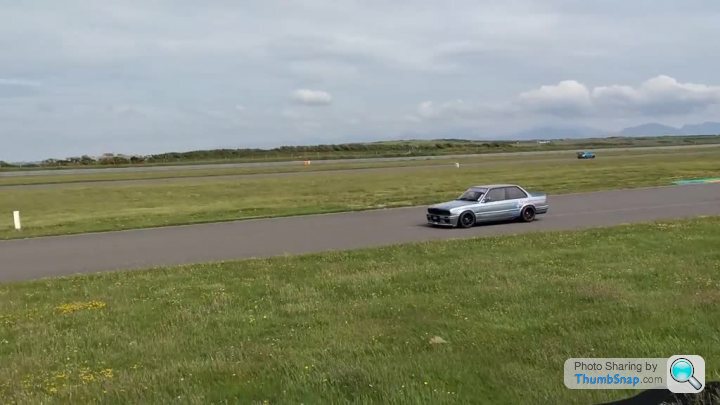
One highlight car for me was a turbocharged BMW, video below and an R1 powered classic Mini Cooper.
The car performed well, no problems at all. To say I was relieved was a bit of an understatement. The brakes haven’t been upgraded, a job I am still working on, predictably they were the limiting factor on the track but it didn’t dampen the enjoyment.
The only ‘moment’ on track was when my girlfriend drove the car, I provided some ‘coaching’ on braking points and where she should be pointing the car. After a few laps I went quiet and let her get on with it. Everything was great until the braking zone for Rocket, sensing we were coming in hot and she hadn’t hit the brakes.. “brakes” I shouted, she quickly hit the anchors and the car started to understeer, in a panic she added more lock which caused the car to jerk when it regained grip. Spooked by the understeer she drove back to the pits where we had a laugh. A story that would later be told to friends and family who would also laugh about it.
The rest of the trip was fantastic, superb views, quarry carts at ZipWorld, competitive side come out here and some tasty meals.
Next update wont be as long but it’ll cover some of the trips ive done in the car over the last few months.
Anglesey Track Day 6/6/2021
I have always wanted to drive at Anglesey circuit, it has always featured on many of the videos I have watched on YouTube and the view from Corkscrew is spectacular….I did get a photo of the car here.
Sunday
This track day would be different to the others I have been on, my girlfriend would be joining me. We booked a couple nights away in North Wales before and after the track day. With the car fully loaded we started the drive up north around 10AM on a lovely summer Sunday, perfect weather for a road trip. If only the rest of the day was as good as the weather.
30 minutes into the journey the car started to misbehave, signs of low voltage were clear. Firstly the radio started to turn off and then back on, the electric powersteering started cutting out and then finally a misfire with a total loss of power.
Thankfully I always overpack for track days and with a full set of tools in the back of the car I began to check my initial diagnosis. I was correct, low battery voltage. I quickly jacked up the car, which I had now parked on an entrance to a farmers field just north of Carmarthen. Bumper off and the first item to check would be the alternator, the terminal was not in a good state.
Sunday, is not the best day to have a breakdown. After confirming the alternator was knackered, I reserved one in Euro Car Parts in Swansea. I hoped one of friends or someone in my family could drive to get the part and drop it off to me. Thankfully my brother come to the rescue, not wanting to ruin the weekend I made plans for him to drop my girlfriend back to her house after dropping off the part so she could grab her car to drive us up for the weekend away if the Mini would not behave after a new alternator.
The next paragraph isn’t really car relevant but it was a nice moment. The weather was ridiculously warm for the UK, many cars passed by without stopping until a Fiat 500 XL stopped. It was a local nurse asking if everything was alright, I gave a nod and told him I was waiting for parts. He drove off, we continued to wait for the parts, my brother had about a 90 minute drive to get the parts from his house and then drive to my broken down car. About 60 minutes after the nurse left us the 500 XL passed us again and pulled in. The nurse got out of his car and gave us some cold bottles of water. It was a lovely gesture and we really appreciated it. I never got his name, but thank you very much!
Right, back to the car, parts in hand and my girlfriend on her way back to get her A3 I hammered out the rebuild in short time. I know this car well enough, also the alternator is right at the front of the engine and the access is great with the bumper removed and the car in service mode. With everything crossed I started the car (thank you NOCCO starter), checked the voltage with my obd reader and then again with a multimeter.
SUCCESS!
My girlfriend arrived in her car as I was putting the final tools into the Mini. I assured her the car would be fine for the rest of the journey, worst case we would park it somewhere safe and get the car recovered a few days later. Apprehensively she followed me to North Wales and…..no breakdowns for the Mini, the journey took us about 8 hours if my memory is right, what a long day!
The Track Day
Forgetting about the troubles from the drive up I was excited to get to the track, unpack and get some laps in. The track day was run by Track Obsession, very impressed and I would definitely do another event with them. Small little touches like the free bottles of water, keyring and sticker (straight on my laptop). Unknown to my girlfriend I had purchased a driver ticket for her not a passenger, she wasn’t overly keen on the idea of a track day so the chance to drive the car changed that, even if it made me nervous haha.
One highlight car for me was a turbocharged BMW, video below and an R1 powered classic Mini Cooper.
The car performed well, no problems at all. To say I was relieved was a bit of an understatement. The brakes haven’t been upgraded, a job I am still working on, predictably they were the limiting factor on the track but it didn’t dampen the enjoyment.
The only ‘moment’ on track was when my girlfriend drove the car, I provided some ‘coaching’ on braking points and where she should be pointing the car. After a few laps I went quiet and let her get on with it. Everything was great until the braking zone for Rocket, sensing we were coming in hot and she hadn’t hit the brakes.. “brakes” I shouted, she quickly hit the anchors and the car started to understeer, in a panic she added more lock which caused the car to jerk when it regained grip. Spooked by the understeer she drove back to the pits where we had a laugh. A story that would later be told to friends and family who would also laugh about it.
The rest of the trip was fantastic, superb views, quarry carts at ZipWorld, competitive side come out here and some tasty meals.
Next update wont be as long but it’ll cover some of the trips ive done in the car over the last few months.
Edited by jordmcd151 on Saturday 1st January 16:43
Well a poor effort on my part for keeping this forum up to date on my mini...
A fair amount of work has happened over the last 12 months mainly the Alfa bBembo kit and BC Racing coilovers.
The Alfa Romeo (159) brake kit has made a big improvement to the braking performance despite having standard brembo road pads. When I get around to booking a trackday I will look for a more suitable track pad. Fitting the brakes was easy, R53OC adapter brackets with the necessary bolts, done in a couple of hours. The calipers needed new lines so I ordered a set of HEL braided lines in the clear blue colour to match the car.
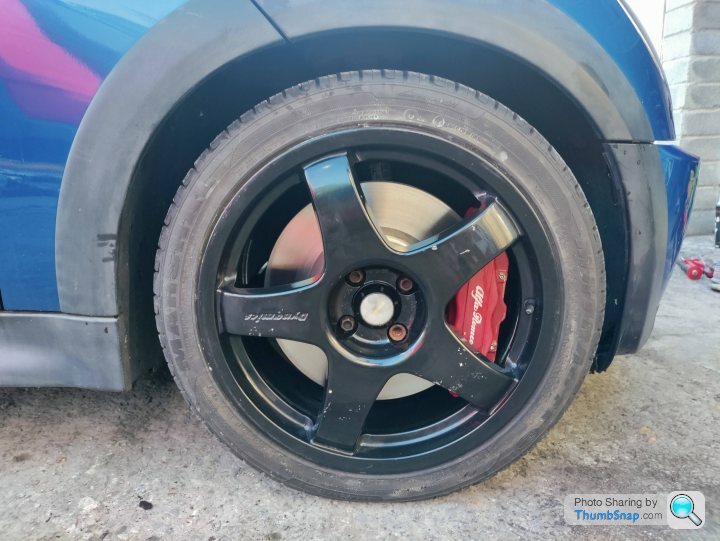
Not the prettiest and could do with a refurb but function over form for me. The only drawback with the brakes is the standard 'bullet' wheels no longer fit.
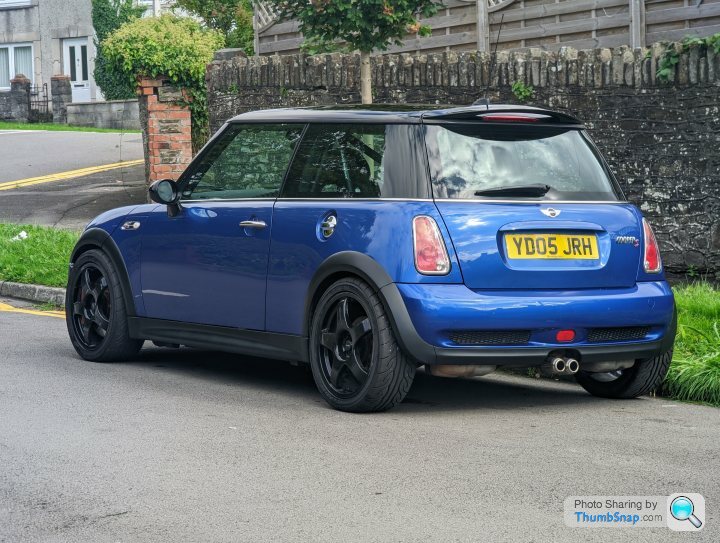
The BC Racing coilovers were fitted in October, I haven't driven many miles in the car since the coilovers were fitted. MOT run out and being 130 miles from the car isn't ideal. The car looks far better in my eyes, not slammed but lower and more purposeful I think.
Couple of photos from some trips this year Pistonheads event at the Morgan Factory. A really good day out and will definitely go back.
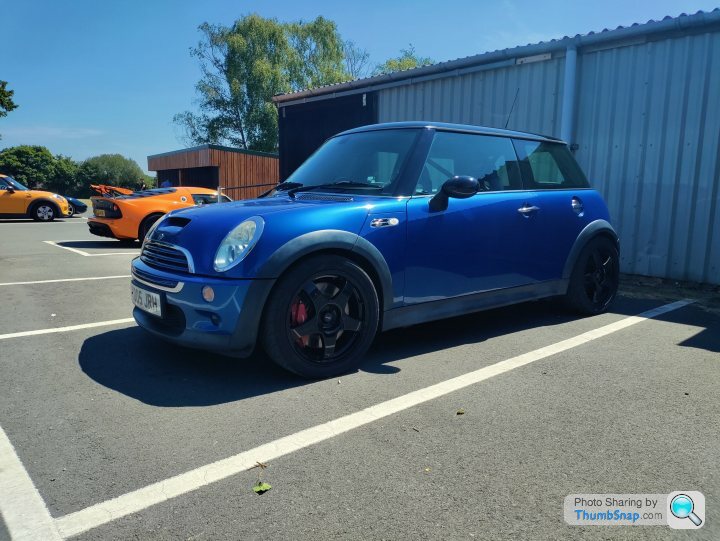
BC Racing coilovers not fitted
Popped along to a Caffeine and Machine event, some great roads on the way there. The supercharger sound is addictive!

BC Racing coilovers not fitted
I have a couple of jobs to complete over Christmas, matching braided lines for the rear of the car and a full check over before the MOT. Once its passed the MOT, its time for a 4 wheel alignment after I've fitted the cast real trailing arms I have for the car. Its a bolt on mod from the next gen cooper's. Saves a couple kilos in unsprung mass. I need to make more of an effort with this car over the next 12 months, this may be difficult with the latest project car... An Evo 4.. what have I done haha
A fair amount of work has happened over the last 12 months mainly the Alfa bBembo kit and BC Racing coilovers.
The Alfa Romeo (159) brake kit has made a big improvement to the braking performance despite having standard brembo road pads. When I get around to booking a trackday I will look for a more suitable track pad. Fitting the brakes was easy, R53OC adapter brackets with the necessary bolts, done in a couple of hours. The calipers needed new lines so I ordered a set of HEL braided lines in the clear blue colour to match the car.
Not the prettiest and could do with a refurb but function over form for me. The only drawback with the brakes is the standard 'bullet' wheels no longer fit.
The BC Racing coilovers were fitted in October, I haven't driven many miles in the car since the coilovers were fitted. MOT run out and being 130 miles from the car isn't ideal. The car looks far better in my eyes, not slammed but lower and more purposeful I think.
Couple of photos from some trips this year Pistonheads event at the Morgan Factory. A really good day out and will definitely go back.
BC Racing coilovers not fitted
Popped along to a Caffeine and Machine event, some great roads on the way there. The supercharger sound is addictive!
BC Racing coilovers not fitted
I have a couple of jobs to complete over Christmas, matching braided lines for the rear of the car and a full check over before the MOT. Once its passed the MOT, its time for a 4 wheel alignment after I've fitted the cast real trailing arms I have for the car. Its a bolt on mod from the next gen cooper's. Saves a couple kilos in unsprung mass. I need to make more of an effort with this car over the next 12 months, this may be difficult with the latest project car... An Evo 4.. what have I done haha
Good thread, enjoyed reading your experiences.
Nice to see some some of the older Mini write-ups since the recent rash of new ones………mine included!
I’ve never got the track bug so won’t be going hardcore like yours. Do Like a b road thrash though so won’t be staying completely standard.
Like the colour of yours.
Nice to see some some of the older Mini write-ups since the recent rash of new ones………mine included!
I’ve never got the track bug so won’t be going hardcore like yours. Do Like a b road thrash though so won’t be staying completely standard.
Like the colour of yours.
Edited by ballans on Saturday 31st December 10:39
ballans said:
Good thread, enjoyed reading your experiences.
Nice to see some some of the older Mini write-ups since the recent rash of new ones………mine included!
I’ve never got the track bug so won’t be going hardcore like yours. Do Like a b road thrash though so won’t be staying completely standard.
Like the colour of yours.
Thank you. Glad you've enjoyed it. The supercharger is what makes the car, if a newer model or another hatch had one might have be a different story. Nice to see some some of the older Mini write-ups since the recent rash of new ones………mine included!
I’ve never got the track bug so won’t be going hardcore like yours. Do Like a b road thrash though so won’t be staying completely standard.
Like the colour of yours.
Edited by ballans on Saturday 31st December 10:39
It's a great car for B roads!
Gassing Station | Readers' Cars | Top of Page | What's New | My Stuff