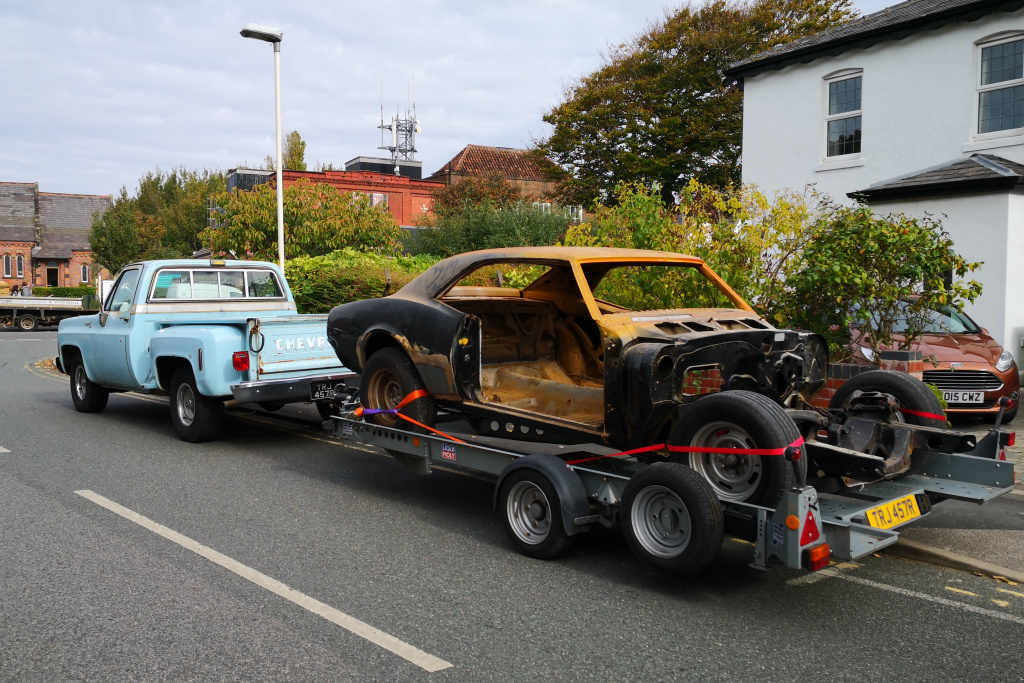
'67 Camaro RS/SS - saved from the scrapman
Discussion


99t said:
Cheers, I do have a relation who is a media blaster as it happens, however I'm a bit reluctant to have the body blasted, seen it go wrong too many times but may well have the floors and boot and any bits too big for my blast cabinet done by him.
This chap is as gentle as anything so don't worry. He does antiques and such like, not just Bailey bridges.Reader’s Cars seems to be increasingly filled with humdrum modern cars, so I don’t visit very often these days, but I’m glad I did on this occasion!
I love the looks of the first generation cars. I don’t know if you’re into motorsport, but by strange coincidence I’m mid way through Mark Donohue’s book ‘The unfair advantage’. It has plenty of ‘in period’ Camaro content & is entertainingly written. Well worth a look if you’re ever in need of a little inspiration.
Good luck with the build, I look forward to the updates!
I always like reading your threads 99t, I used to have a Monaro and I have an itch for an Elk which will have to be scratched one day. On top of that a close friend is muttering about a truck like yours which means I'll get to play with that too!
What's the story with the Monaro becoming the donor - rust too far gone now?
What's the story with the Monaro becoming the donor - rust too far gone now?
CAPP0 said:
I always like reading your threads 99t, I used to have a Monaro and I have an itch for an Elk which will have to be scratched one day. On top of that a close friend is muttering about a truck like yours which means I'll get to play with that too!
What's the story with the Monaro becoming the donor - rust too far gone now?
Cheers, appreciate the kind words.What's the story with the Monaro becoming the donor - rust too far gone now?
When I bought the Monaro, it was always with an eye towards being a drivetrain donor at some point, albeit one that could provide plenty of entertainment along the way.
For that reason I bought the cheapest roadworthy one in the country and then steadfastly refused to spend money on anything that wasn't related to maintaining drivetrain health or general safety.
The net effect of this is that whilst it still runs perfectly, after eight and half years of neglect, almost everything else on the car has deteriorated to the point where it is no longer enjoyable to drive.
The final nail in the coffin was after passing the MOT in 2020, yet another power steering line rotted through in a fairly inaccessible place and I just couldn't find the will to fix it, so it has been parked up, fizzing gently, ever since...
Blue 7 said:
... I don’t know if you’re into motorsport, but by strange coincidence I’m mid way through Mark Donohue’s book ‘The unfair advantage’. It has plenty of ‘in period’ Camaro content & is entertainingly written. Well worth a look if you’re ever in need of a little inspiration.
Good luck with the build, I look forward to the updates!
Funny enough I'm sitting here looking at a rather lovely 1/18 GMP model of his '67 racecar! I'll have to look for a copy of the book, cheers. Good luck with the build, I look forward to the updates!
Slowly collecting parts that will be needed.
The rear "deck" filler panel (between rear screen and bootlid) arrived in perfect condition and looks a superb pressing from AMD, lovely tight radii on the folds. Nice and heavy gauge too.


Of course for every piece of good fortune encountered, a little pestilence must be endured - I give you today's delivery, courtesy of Herpes...


It is only the thin, pressed stainless trim for around the front screen, I'm sure it'll be fine...


The rear "deck" filler panel (between rear screen and bootlid) arrived in perfect condition and looks a superb pressing from AMD, lovely tight radii on the folds. Nice and heavy gauge too.
Of course for every piece of good fortune encountered, a little pestilence must be endured - I give you today's delivery, courtesy of Herpes...
It is only the thin, pressed stainless trim for around the front screen, I'm sure it'll be fine...
Somehow, and I'm not sure how, four out of five pieces in the box were undamaged!
The other one has a small dent which I duly photographed and sent to ebay along with pictures of the boxes - 24 hours later, a full refund (from ebay, not the seller under their Global Shipping Programme guarantee) and keep the parts!
The other one has a small dent which I duly photographed and sent to ebay along with pictures of the boxes - 24 hours later, a full refund (from ebay, not the seller under their Global Shipping Programme guarantee) and keep the parts!
99t said:
Somehow, and I'm not sure how, four out of five pieces in the box were undamaged!
The other one has a small dent which I duly photographed and sent to ebay along with pictures of the boxes - 24 hours later, a full refund (from ebay, not the seller under their Global Shipping Programme guarantee) and keep the parts!
That's a result! Touch wood, so far all of the (many) bits bought from the US for my Firebird have arrived safely. Looking forward to the progress on this. The other one has a small dent which I duly photographed and sent to ebay along with pictures of the boxes - 24 hours later, a full refund (from ebay, not the seller under their Global Shipping Programme guarantee) and keep the parts!
I have one too, a really early one, late 66 build, with steel seat backs and the chrome trim up over the headlining sides, red deluxe interior, 350 4 bolt and a TH350 trans, lsd and Corvette Rallye wheels, going to be black.
Mines on a jig, in many pieces and has had a lot of new panels from AMD and Ground up.
Project has stalled because of life but I'm trying to get it back up and doing soon honest.
I have a vast file with build pics and data and the car was on the road here so at least i don't have to do any paperwork faff, just build it and mot it and use it.
Have you been on the CRG (Camaro research group) yet and decoded the trim tag ?
Not the one in my profile pic, thats my other one.
Thanks all, I will try to keep up a steady rate of progress on this one, although initially updates may be few and far between since I'm sure there can only be so much interest in "here is a piece of rusty metal looking less rusty, just like the one I posted yesterday"... 
So far so good though, I'm doing something in the garage almost every day which is an improvement on my usual (lack of) winter productivity.
@Getragdogleg - one of the benefits of owing something / procrastinating for so long is that I've had plenty of time to do my homework on what I actually have here.
For those unfamiliar, a '67 Camaro like this should have two metal plates attached to the body - a vin tag in the door jamb with the chassis number and other details on, and a "cowl tag" from Fisher Autobody, who built the shells for GM, with a build sequence number on, and in 1967 only, various option codes.
The car, as collected, came with a cowl tag but no vin plate - the friend that I purchased it from, assured me that he had removed it to keep safe "somewhere" and would let me have it - well it never materialized.
Due to the somewhat frantic nature of the cars initial collection, doing due diligence wasn't high on my list of priorities since I knew the vendor and he had previously talked long and loudly about how he had researched the car prior to purchase and confirmed its provenance and originality.
Unfortunately it was all bullst, one of a number of reasons why we are no longer in contact.
Other than on the vin tag, the chassis number is stamped in two places on the cowl / firewall. Neither are easily read when the car is fully assembled. The chassis number and cowl tag body sequence number won't be the same, they aren't meant to be, BUT they should be similar. A gap of a few hundred is fine, a thousand or so isn't unheard of. But they should be in the same ballpark.
On my car, there is a gap of seventeen thousand between them. The stamped chassis numbers do not appear to have been tampered with, so the only logical conclusion is that the cowl tag is not original to the car.
This is a shame, and will impact the ultimate value of the car, but since I'm building it to drive not to sell it is unlikely to be an issue any time soon. Plus it removes any guilt I might feel about building it "my way" rather than being a stickler for originality.
The car has been registered in the UK since around 1970, using the numbers that still appear on the car, so I don't anticipate any issues in that respect.
For what it is worth then, the cowl tag decodes as follows:
12E - assembled last week of December '66
NOR - Norwood plant - most were.
67-12437 - Chevrolet Camaro V8 coupe '67
760-Y - standard bucket seats with optional headrest (long gone)
Y-Y - Butternut Yellow paint
(2)LG - four speed floor shift and centre console (both long gone although the car has a clutch pedal and the location of the speedo cable hole suggests a Muncie 4-speed box).
(3)L - Rally Sport package (present)
(4)P - Traction bar, 12 bolt rear end = SuperSport in conjunction with the evidence of Muncie box (traction bar gone but mounting plate remains, axle is a 12-bolt but non original, some SS trim remains e.g. gas cap
(5)C - shoulder harnesses (not present)
In summary, '67 RS/SS 4-speed manual.
So far so good though, I'm doing something in the garage almost every day which is an improvement on my usual (lack of) winter productivity.
@Getragdogleg - one of the benefits of owing something / procrastinating for so long is that I've had plenty of time to do my homework on what I actually have here.
For those unfamiliar, a '67 Camaro like this should have two metal plates attached to the body - a vin tag in the door jamb with the chassis number and other details on, and a "cowl tag" from Fisher Autobody, who built the shells for GM, with a build sequence number on, and in 1967 only, various option codes.
The car, as collected, came with a cowl tag but no vin plate - the friend that I purchased it from, assured me that he had removed it to keep safe "somewhere" and would let me have it - well it never materialized.
Due to the somewhat frantic nature of the cars initial collection, doing due diligence wasn't high on my list of priorities since I knew the vendor and he had previously talked long and loudly about how he had researched the car prior to purchase and confirmed its provenance and originality.
Unfortunately it was all bulls
t, one of a number of reasons why we are no longer in contact.Other than on the vin tag, the chassis number is stamped in two places on the cowl / firewall. Neither are easily read when the car is fully assembled. The chassis number and cowl tag body sequence number won't be the same, they aren't meant to be, BUT they should be similar. A gap of a few hundred is fine, a thousand or so isn't unheard of. But they should be in the same ballpark.
On my car, there is a gap of seventeen thousand between them. The stamped chassis numbers do not appear to have been tampered with, so the only logical conclusion is that the cowl tag is not original to the car.
This is a shame, and will impact the ultimate value of the car, but since I'm building it to drive not to sell it is unlikely to be an issue any time soon. Plus it removes any guilt I might feel about building it "my way" rather than being a stickler for originality.
The car has been registered in the UK since around 1970, using the numbers that still appear on the car, so I don't anticipate any issues in that respect.
For what it is worth then, the cowl tag decodes as follows:
12E - assembled last week of December '66
NOR - Norwood plant - most were.
67-12437 - Chevrolet Camaro V8 coupe '67
760-Y - standard bucket seats with optional headrest (long gone)
Y-Y - Butternut Yellow paint
(2)LG - four speed floor shift and centre console (both long gone although the car has a clutch pedal and the location of the speedo cable hole suggests a Muncie 4-speed box).
(3)L - Rally Sport package (present)
(4)P - Traction bar, 12 bolt rear end = SuperSport in conjunction with the evidence of Muncie box (traction bar gone but mounting plate remains, axle is a 12-bolt but non original, some SS trim remains e.g. gas cap
(5)C - shoulder harnesses (not present)
In summary, '67 RS/SS 4-speed manual.
Excellent anoraking !
The hidden vins are a godsend, there's one on the diagonal behind the rear seat back too.
Mine was gold, 327, no options except the headliner trim and two speed auto from new and is a Van Nuys CA car but ended up as a drag car in Florida with all original features gone.
When I took it apart I found timing slips from sunshine raceway.
It then ended up here outside in Birmingham in the wet.
Then I bought it.
I have a full write up somewhere, mines been a project for over 10 years and I've owned others in between.
I said:
I'm sure there can only be so much interest in "here is a piece of rusty metal looking less rusty, just like the one I posted yesterday"
So here is a piece of rusty metal looking less rusty...
Since this was taken I have worked my way forward, de-rusting the rear pillar and outer 12" or so of the roof on both sides. Although I have removed some deep pitting, only one spot about 2mm across turned into a pinhole so far. Easy enough to weld up.
I've still got the centre section of the roof to treat, but quite confident now that the roof panel is worth saving.
The rear screen channels are another matter though, the closer I look at them, the worse they get! The upper section (top of the rear window) is ok but the offside needs 90% replacing and the nearside perhaps 30-40%.
On the offside, splitting the rusted upper layer away from the structure below is complicated because there are many places where previous rust has been "repaired" by filling the rust holes with mig until they are covered, those welds have, of course, stuck to the layer I want to keep.

The nearside is less bodged and the metal is far too thin to clean up - in some places I started drilling out the spot welds to separate the upper layer from the structure underneath, and after a few minutes ended up using pliers to roll the upper skin back like opening a tin of corned beef, so thin was the metal that it just ripped around the welds.

I had initially hoped not to have to replace the "deck panel" between the rear screen and boot lid as it is mostly ok, however on closer inspection the lower screen channel is utterly shot - unsurprising as this is where water must sit the longest.
Replacement presents a problem though - I'm fairly certain that when the shell was built, the deck panel was welded into place before the rear quarters were fitted, and the majority of restorers would probably remove the rear quarters if rebuilding to the point of replacing the deck panel. However I don't intend to remove them as they are in very good shape.
Long story short, with the rear quarters in place, access to at least 60% of the side flanges is somewhere between nightmarish and non-existent.
From inside the boot you can sort of see what I mean - the flange runs the length of the oval highlight. The boot hinge structure also supports the inner body structure at the rear - removing those both sides might give better access, but the body would need bracing to ensure it didn't flex.

Since I didn't fancy the idea of hacking away large parts of the internal structure, I came up with a Plan B (for bodge!)
Namely, remove the deck panel, except for the outer edges, leaving the factory flange welds in place and trimming the replacement panel to butt weld to the remains of the old panel (which is in good, solid condition)
In theory this should be fine, the welds are close to the panel edge so shouldn't cause distortion, there is access from underneath the welds to allow them to be dressed and sealed, and none of the above prevents me from replacing the bits that are shot.
With this plan in mind, I started slowly and carefully cutting away the deck panel, leaving the outer couple of centimeters intact.

Found some more interesting repairs to the lower channel as I cut it away!

Getting there. Will do final trimming to the ends when I've cut the new panel enough to lay it over the top. And of course, plenty of rust treatment needed on the previously hidden metal too...

Hopefully when fitted, the factory seams will still be mostly intact and there will be minimal evidence that the panel has been replaced...

Slow but steady progress on the rear screen area, been trying to do an hour every night with about an 80% success rate I would estimate.
De-rusting the inner rear deck section before fitting the new deck panel - it doesn't need to be perfect as hidden when complete and was clearly bare metal from the factory, so anything I do must improve it!
My usual process, small section at a time, mechanical cleaning to remove the worst, soak and agitate in dilute phosphoric for an hour or so. Dry off and apply Hydrate 80 followed by Electrox.

Also completed fine trimming the new panel to fit

Bearing in mind this is only clamped at the bottom and just resting in place otherwise, I think it should be ok

Inner deck panel fully de-rusted

Including into the corners and nooks and crannies that will never be more accessible than they are now

Trimmed the screen channel repair section to fit

And then did a full dry assembly before welding properly. Amazing how a piece of glass makes it look more like a car, albeit briefly!

Made sure that the gaps between glass and body were all nice and even


Then welded in the screen channel repair sections, ground back the welds and primed

Rear deck panel fitting next...
De-rusting the inner rear deck section before fitting the new deck panel - it doesn't need to be perfect as hidden when complete and was clearly bare metal from the factory, so anything I do must improve it!
My usual process, small section at a time, mechanical cleaning to remove the worst, soak and agitate in dilute phosphoric for an hour or so. Dry off and apply Hydrate 80 followed by Electrox.
Also completed fine trimming the new panel to fit
Bearing in mind this is only clamped at the bottom and just resting in place otherwise, I think it should be ok
Inner deck panel fully de-rusted
Including into the corners and nooks and crannies that will never be more accessible than they are now
Trimmed the screen channel repair section to fit
And then did a full dry assembly before welding properly. Amazing how a piece of glass makes it look more like a car, albeit briefly!
Made sure that the gaps between glass and body were all nice and even
Then welded in the screen channel repair sections, ground back the welds and primed
Rear deck panel fitting next...

Gassing Station | Readers' Cars | Top of Page | What's New | My Stuff