1969 Lotus Elan S4 SE Basket case revival
Discussion


While looking at the wiring, the mystery unmarked rocker switch was connected to a flasher unit and turned out to be the hazard warning switch - probably a late addition by Lotus to meet new regulations.
Before the car went I popped the dash back on and measured the clearance behind the radio which was much more than 20cm, this allowed me to order the radio. I went with a Classic Caliber unit: https://www.calibereurope.com/en/product/RMD120BT-... with BT USB SD card and FW. I chose it as it delivered 35W rms per channel. Much better than the cheap chinese option which when checking the specced power amp only gave 6W per channel into 4 channels!
While doing a last tidy up of the body - I found a couple of odd plates on the outside of the body behind the seats. No mention of them in either the parts list or the workshop manual. Possibly a sketchy mount for a harness? I checked with the Elan facebook group and no-one else with a 69 Elan has anything like it. I removed them and will get the holes patched.

I also pulled out the pedals and throttle cable. And the car was booked for pickup and departed on Friday. The dolly wheelbase was a bit narrow for the ramps so Steve and I lifted the body manually onto the trailer, it really is very light once everything is removed!

So a tidy up of the garage and then move on to the chassis.
Next step was to get the diff out for a refurb. The left hand side of the rear suspension needed to come off for the diff to slide out (Ha!) and unfortunately I rounded off the forward bolt - it has stuck fast into the aluminium hub. I soaked it in plusgas and took off the off side strut and wishbone. As the near side wishbone bolt was not going to shift, I removed the chassis bolts istead and removed the whole assembly. I will try soaking the corner in cola to see if it helps to free it.
The diff was a pig to get out, someone in the past has jacked the car up on the diff carrier so the hole is smaller than the diff! Even removing the strengthening plate on top of the diff which was very tricky to do behind the chassis plate did not do it. So a combination of crowbar, block of wood and mallet finally birthed it!

Next up was to clean up the diff and gearbox before I drop them off. The gearbox is going for a straightforward refurb, whereas the diff will get refurbed plus a Quaife automatic torque biassing diff and billet drive shafts. I am taking a risk with the gearbox, but I know of two standard Elan/Cortina boxes coping with the Hyper9 at full power so far, and I am not planning to race the car. If it fails I will have to look at a different box.
I cleaned the diff and gearbox with de-greaser and then attacked them with wire brushes and finally cleaned off with white spirit. I finished off with a bit of Curust as you could see the rust blooming in real time! The cases will get painted during the refurbs.

Unfortunately the dealer could not find the keys to the car so he has agreed to get his locksmith to cut some new ones so the starter lock and the boot lock got a quick clean up and posted to him. The door locks did not survive removal and the glove box does still have a key.

So a big road trip tomorrow to visit the paint shop and to drop off the gearbox and diff.
Before the car went I popped the dash back on and measured the clearance behind the radio which was much more than 20cm, this allowed me to order the radio. I went with a Classic Caliber unit: https://www.calibereurope.com/en/product/RMD120BT-... with BT USB SD card and FW. I chose it as it delivered 35W rms per channel. Much better than the cheap chinese option which when checking the specced power amp only gave 6W per channel into 4 channels!
While doing a last tidy up of the body - I found a couple of odd plates on the outside of the body behind the seats. No mention of them in either the parts list or the workshop manual. Possibly a sketchy mount for a harness? I checked with the Elan facebook group and no-one else with a 69 Elan has anything like it. I removed them and will get the holes patched.
I also pulled out the pedals and throttle cable. And the car was booked for pickup and departed on Friday. The dolly wheelbase was a bit narrow for the ramps so Steve and I lifted the body manually onto the trailer, it really is very light once everything is removed!
So a tidy up of the garage and then move on to the chassis.
Next step was to get the diff out for a refurb. The left hand side of the rear suspension needed to come off for the diff to slide out (Ha!) and unfortunately I rounded off the forward bolt - it has stuck fast into the aluminium hub. I soaked it in plusgas and took off the off side strut and wishbone. As the near side wishbone bolt was not going to shift, I removed the chassis bolts istead and removed the whole assembly. I will try soaking the corner in cola to see if it helps to free it.
The diff was a pig to get out, someone in the past has jacked the car up on the diff carrier so the hole is smaller than the diff! Even removing the strengthening plate on top of the diff which was very tricky to do behind the chassis plate did not do it. So a combination of crowbar, block of wood and mallet finally birthed it!
Next up was to clean up the diff and gearbox before I drop them off. The gearbox is going for a straightforward refurb, whereas the diff will get refurbed plus a Quaife automatic torque biassing diff and billet drive shafts. I am taking a risk with the gearbox, but I know of two standard Elan/Cortina boxes coping with the Hyper9 at full power so far, and I am not planning to race the car. If it fails I will have to look at a different box.
I cleaned the diff and gearbox with de-greaser and then attacked them with wire brushes and finally cleaned off with white spirit. I finished off with a bit of Curust as you could see the rust blooming in real time! The cases will get painted during the refurbs.
Unfortunately the dealer could not find the keys to the car so he has agreed to get his locksmith to cut some new ones so the starter lock and the boot lock got a quick clean up and posted to him. The door locks did not survive removal and the glove box does still have a key.
So a big road trip tomorrow to visit the paint shop and to drop off the gearbox and diff.
I made a 550 mile road trip to visit the guys who are sorting out the Elan bodywork in Norfolk and the guy rebuilding the gearbox in Mansfield.
Both meetings were very helpful and great to meet the guys doing the work and go through the things to be done. On the bodywork side I have ordered a Tony Thompson rollover bar for safety which will be delivered direct to the Bodywork shop.
The Gearbox guy helpfully noted that I should check the motor mount for the flywheel as there are 2 different flywheels, a 4-bolt and 6-bolt one which are very different! He will also grind some spare meat off the tail of the diff to make it easier to get back in the car. He also noted that the gearbox is not original and is of 1972 vintage. Damn, so it’s not a matching numbers car!
The gearbox internals have shown it is a low mileage box but water has got in and the main shaft is pretty badly corroded so I have asked Al to replace the main shaft with the good one shown in the picture below:

The input shaft is also pitted

The input shaft is trickier as none of the available ones run quietly with my gear set. So we are looking to add a bronze bush to use instead of the roller bearing on the clutch side.
The diff is not looking too happy either one ear which attaches to the torque rods (2 of the 4 gearbox mounts) is worn:

This is going to get re-welded and re-machined.
And the crown wheel is borked.

I have ordered a new crown wheel and pinion set from Burton, with the same ratio or match the original (which was not OEM anyway).
Things the took a bit of a halt for family holidays followed by a nasty bout of Covid which I have just tested negative for after being positive and feeling pretty sorry for myself for 10 days!
So carrying on stripping the chassis, one of the nuts into the rear Chapman strut has seized and I have rounded the bolt head, it is now sitting in a bath of coke hoping that will help.

After a lot of swearing the chassis is now stripped which feels like my 2nd major milestone completed!.

There were a couple of bent bits:

I had a go at it with some mole grips and it is better and having seen Father Ted decided to stop there:

Next up was the wishbone bushes. I thought I was being clever making up a tool with some M10 studding, some nuts, some washers and some old 1/2 inch sockets, and did manage to get one bush out. Then this happened:

At this point I will take the wishbones to the local garage and get them to press them out with grown ups tools.
I will also call up the powder coaters to come and pick up the chassis for blasting, inspection and hopefully powder coating.
Both meetings were very helpful and great to meet the guys doing the work and go through the things to be done. On the bodywork side I have ordered a Tony Thompson rollover bar for safety which will be delivered direct to the Bodywork shop.
The Gearbox guy helpfully noted that I should check the motor mount for the flywheel as there are 2 different flywheels, a 4-bolt and 6-bolt one which are very different! He will also grind some spare meat off the tail of the diff to make it easier to get back in the car. He also noted that the gearbox is not original and is of 1972 vintage. Damn, so it’s not a matching numbers car!
The gearbox internals have shown it is a low mileage box but water has got in and the main shaft is pretty badly corroded so I have asked Al to replace the main shaft with the good one shown in the picture below:
The input shaft is also pitted
The input shaft is trickier as none of the available ones run quietly with my gear set. So we are looking to add a bronze bush to use instead of the roller bearing on the clutch side.
The diff is not looking too happy either one ear which attaches to the torque rods (2 of the 4 gearbox mounts) is worn:
This is going to get re-welded and re-machined.
And the crown wheel is borked.
I have ordered a new crown wheel and pinion set from Burton, with the same ratio or match the original (which was not OEM anyway).
Things the took a bit of a halt for family holidays followed by a nasty bout of Covid which I have just tested negative for after being positive and feeling pretty sorry for myself for 10 days!
So carrying on stripping the chassis, one of the nuts into the rear Chapman strut has seized and I have rounded the bolt head, it is now sitting in a bath of coke hoping that will help.
After a lot of swearing the chassis is now stripped which feels like my 2nd major milestone completed!.
There were a couple of bent bits:
I had a go at it with some mole grips and it is better and having seen Father Ted decided to stop there:
Next up was the wishbone bushes. I thought I was being clever making up a tool with some M10 studding, some nuts, some washers and some old 1/2 inch sockets, and did manage to get one bush out. Then this happened:
At this point I will take the wishbones to the local garage and get them to press them out with grown ups tools.
I will also call up the powder coaters to come and pick up the chassis for blasting, inspection and hopefully powder coating.
Edited by Spunagain on Monday 18th July 08:23

Great work and excellent progress.
I made a similar bush puller once, tended to get one 'pull' out of a length of studding, then shuffle the whole contraption up to the next section of thread.... If you can get an old-school style spring compressor 'bolt' through the bush those are a good bit stronger, obviously they are much wider though.
Looking forward to the next update when things start going back together!
It may be a bit late to say this, but if you still have any parts that are not marketable, they still might have value.
Clearing my garage one day, I found a box of surplus bits from my 1972 Europa Twincam which were not in a great state. I took them to Susan Miller (Mick's widow) and offered them for free if they were of any use, as her and Mick had given me some useful advice when searching for a Europa.
She reckoned some bits could be used as templates to manufacture new ones; that might have been to humour me and they got skipped once I had gone, but I like to think they were not complete junk.
Good luck with the project, it's better to still see an Elan on the road with a leccy engine than not at all.
An interesting project ...!
I owned an Elan S4SE DHC for about 12 years, It had been restored completely by my late Uncle.
It had with a new Lotus galvanised chassis.: some of the earlier Elans were not protected...!!!
It was a Stromberg one and I did a lot of 'improvements'...like a roll 'cage' with the extra side bars that fit around the footwell, and solid drive shafts that are better ( IMHO) than the rubber donuts ( which are not as long lasting these days apparently as the manufacturing process is different )
You may already know this...but if that is the original chassis I would have it checked over carefully : the front 'towers' used to rust out IIRC.
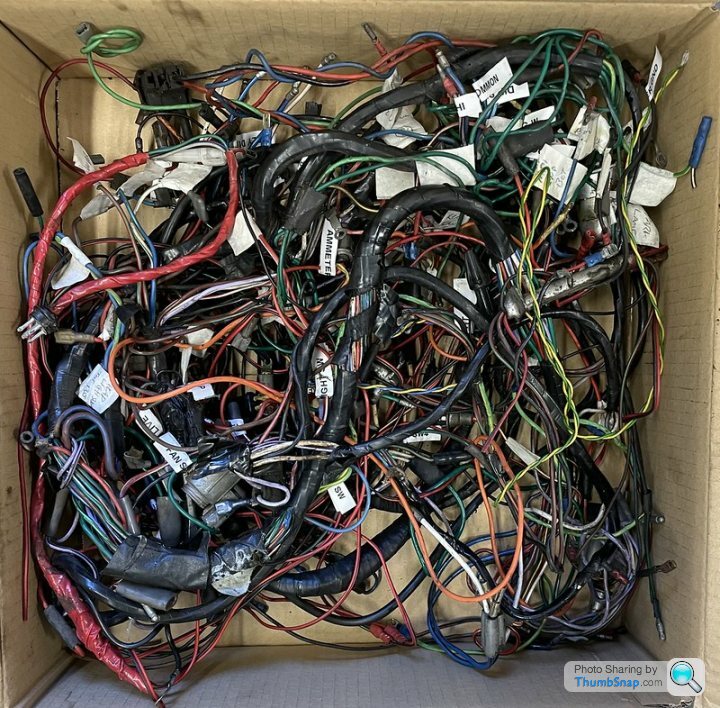
And that wiring loom.... ! Would it be an idea to get a new one perhaps ...?
Spyder Engineering tubular wishbones etc are thought by some to be a useful improvement over the OEM Triumph folded steel ones...
the list goes on !!
It will be interesting to follow this thread and good luck with it all !
I owned an Elan S4SE DHC for about 12 years, It had been restored completely by my late Uncle.
It had with a new Lotus galvanised chassis.: some of the earlier Elans were not protected...!!!
It was a Stromberg one and I did a lot of 'improvements'...like a roll 'cage' with the extra side bars that fit around the footwell, and solid drive shafts that are better ( IMHO) than the rubber donuts ( which are not as long lasting these days apparently as the manufacturing process is different )
You may already know this...but if that is the original chassis I would have it checked over carefully : the front 'towers' used to rust out IIRC.
And that wiring loom.... ! Would it be an idea to get a new one perhaps ...?
Spyder Engineering tubular wishbones etc are thought by some to be a useful improvement over the OEM Triumph folded steel ones...
the list goes on !!
It will be interesting to follow this thread and good luck with it all !
I’ve got a spare galvanised spyder chassis with all suspension components, which will one day go up for sale.
Was purchased ready to do a full chassis swap on one of our Elans. Decided to keep it original and re-use the original chassis.
Then again, now I’ve thought about it, might be quite good fun to build a 26R replica with it
Was purchased ready to do a full chassis swap on one of our Elans. Decided to keep it original and re-use the original chassis.
Then again, now I’ve thought about it, might be quite good fun to build a 26R replica with it
Edited by Rene Souffle on Monday 25th July 22:41
Thanks for all the support! I am coming to the obviously a bit slow realisation that I am building a car from scratch which when you say it out loud is a bit scary! It may tickle some of you to hear there has been some pain for this progress. I have been kneeling on the garage floor to pull a lot of the stuff out of the car and my knee has swelled up - my GP rather too gleefully diagnosed it as housemaids knee. You may spot the cushioned kneeler my daughter bought me in the photos!
Expensive update!
So the Chassis got picked up on Wednesday 20th. It is super light and easily picked up by just two of us to load onto the truck. I also stripped the brake callipers and sent them off to Kelvedon Lotus for refurb. And the wheels are back from the powder coater's and Uniroyal Rain Expert tyres put on ( a balance between road noise and grip), the wheels came up so well we did not need inner tubes!
The Chassis was back 6 days later all naked for me to check over:
The Powder coater felt we had got to the chassis just in time. Any more rust and pitting and we would have been in new chassis territory.
After checking over, the powder coater then picked it up again for powder coating with a layer of Zinc powder part baked to bond to the chassis followed by a coat of white powder fully baked to bond the zinc to the colour coat.
In the mean time got a call from Al the diff man to let me know that the rear diff casing mounts for the output bearings are also shagged so I have ordered a new one from Tony Thompons, who also recommended that I added billet steel hub shafts to avoid my wheels from falling off! But on 1st glance it looks like I already have them
The wishbone bearings also defeated my stainless studding and I dropped them off at my local garage who also got the wishbone separated from the rear hub without knackering it. Another 2 hours of garage labour extracted from my wallet.
So onto preparing the various hubs.
I split the ball joints off the front hubs with much hammering.
Next step is to splitting the hubs so I could clean them up and paint them and brake shields ready for the new wheel bearings handbrake discs. Urghh more bushes on the trunnions to remove!
I have also ordered a UNF/UNC tap and die set to clean up the chassis threaded holes for the body mounting and seat belt mounting points. I have also got some brake pipe straightening pliers to make a nice job of routing the new copper brake pipes.
Edited by Spunagain on Tuesday 31st January 13:44
The chassis arrived back a couple of weeks ago along with a big box of powder coated chassis bits.

Getting near the end of disassembling and cleaning - I have split the front hubs and of course one of the brake disc bolts rounded…but I was helped out again by my local Speen Garage who have some special grippy sockets for these eventualities. Thankfully the bolt did not snap and I ordered more from Tony Thompson.
Front brake discs seem to be on back-order so I took the old ones for skimming at a machine shop in Maidenhead near work, there is loads of meat on them (around 12mm and the minimum spec 8 ana bit mm!)
I have scraped, wirebushed, sanded, Ku-rusted and hammerited all the bits apart from the brake shields which I got the same treatment but finished with very high temperature paint. I tapped all of the crud out of the holes and reassembled them with the new brake discs bolts.
Knowing my limits I asked my local garage to swap over the new wheel bearings on the front hubs and press in the 8 wishbone bushes and the 2 trunnion bushes. The rear A-frame ones were easy for me to do as the bushes were split. I then assembled front hubs with new wheel bearings bolts and brake discs. Just as I finished the battle with the split pins I realised I had forgotten to fit the trunnions so it all needs to come apart again.

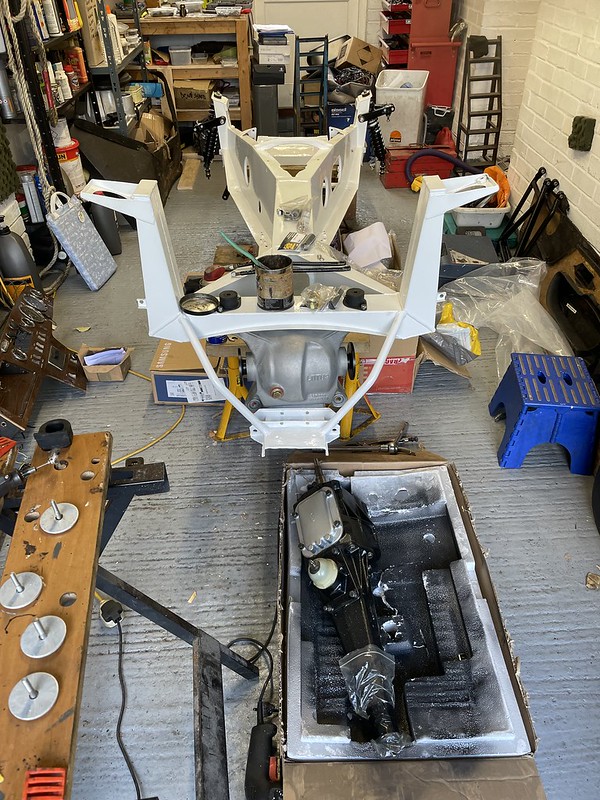
I also popped up to Sheffield and picked up the gearbox and helped with the final assembly of the diff.
Nice new diff with ATB and new crown and pinion gears.

Al needed to use 2 blowlamps to heat the bearing carrier enough to sizzle water off if and then tapped in the frozen bearings which were already on the drive shafts. They went in pretty easily, but the circlips were a pig to fit with the 4 bolt drive shafts as there is very poor access under the driveshaft flange to the circlips.
Here is the nice refurbished diff with ATB and new crown and pinion gear now nestling in the chassis waiting for the mounting washers to dry after a quick coat of hammerite.
However another issue arisen… I am missing a some of the bits to connect the speedo drive into the gearbox. Adding up just the cost of bits I can find so far and a new speedo cable will cost over £230 to get it up and running, and it won’t ever be accurate as the CWP is not standard and will probably leak oil from the gearbox.
Or for a “bit” more I have ordered Smiths part no. SN6207-10CB, a GPS sender and a gearbox blanking plug to give me an accurate and reliable speedo without the oil leaks.

Looks pretty good to me and I am not exactly going for perfect originality! I have also ordered a gauge for battery temperature - it’s an electronic 52mm Smiths -10 to 60°C air temperature gauge and sender with custom text.
Next I had a look at the steering rack, cleaned it up cleaned the threads with a die, greased it up and fitted new boots, but while there is no play in the steering arms they are floppy where they should take the weight of a spanner without drooping, so they are off for a rebuild at Kiley - Clinton Engineering in Birmingham. - Floppy dirty rack:

In the hot weather I have been doing some indoors work and thinking about wiring. I have decided to make my own looms as I am making so many changes, buying a new Elan one would be an expensive mistake. To make maintenance easier, I am making the dashboard a wired standalone unit with a smallish number of Universal MATE-N-LOK https://www.te.com/usa-en/products/brands/mate-n-l... connectors:
Left door
Right door
Rear 12V loom
Rear Drive loom
Steering column
Wiper motor
Heater fan
Engine bay 12V loom
Engine bay drive loom
In this way I can easily unplug and remove the dashboard for maintenance, repairs and upgrades. Note for high current connections I will use multiple pins. Still deciding whether to put the 12V fuse and relay boxes in the glove box or on the firewall under the bonnet. But the fuse box from the XK8 looks like a good donor. It has 2 sets of fuses one from the battery supply and one from a big relay switched by the ignition switch.
I have also chosen and ordered the SimpBMS battery management system (to look after the 5 Tesla drive battery packs) from here: https://www.secondlife-evbatteries.com/products/si...
I chose it as it will let me choose charge current (10A or 32A) so I can charge from a 3 pin 13 Amp plug or by using a 32Amp Type 2 charger. It is easy to implement as it piggybacks off the existing battery control boards fitted to the Tesla battery modules and simply daisy chains off Can bus connections, power and ground between each cell and avoids the need to route individual high voltage wires for each cell voltage around the car. I also got its sister SimpCharge board which links the charge socket to the car and tells the car it is connected (and also disable drive) and allows charging to start when a powered charger is connected.
I also ordered a 3.2” touch screen display which will go in the ashtray space on the dash and a simple bezel, and then I ordered another custom one which was made symmetrical to cure my itching teeth.

As a slight aside I have been thinking about my dashboard. My original plan was to modify my existing dash, fill in some of the holes and re-veneer it myself. But adding cost of veneer glue and time and my general cack handedness I have decided to get the grown ups involved (again). I contacted a wooden dashboard specialist with a diagram showing what I wanted different from their standard S4 Dashboard, and Ian suggested I pop over to look at options. I popped over with my dash and came up with a nice compromise of Olive Ash Burr. It is much less gloomy than the standard one but not so light that it is jarringly unoriginal. It also works with the original white lettering and has some nice detail in the grain.

The specialist knows his Elans and my dash is a strange mix of S4 sprint and US designs. The last decision I need to make is whether to keep the bonnet release on the dashboard.
Getting near the end of disassembling and cleaning - I have split the front hubs and of course one of the brake disc bolts rounded…but I was helped out again by my local Speen Garage who have some special grippy sockets for these eventualities. Thankfully the bolt did not snap and I ordered more from Tony Thompson.
Front brake discs seem to be on back-order so I took the old ones for skimming at a machine shop in Maidenhead near work, there is loads of meat on them (around 12mm and the minimum spec 8 ana bit mm!)
I have scraped, wirebushed, sanded, Ku-rusted and hammerited all the bits apart from the brake shields which I got the same treatment but finished with very high temperature paint. I tapped all of the crud out of the holes and reassembled them with the new brake discs bolts.
Knowing my limits I asked my local garage to swap over the new wheel bearings on the front hubs and press in the 8 wishbone bushes and the 2 trunnion bushes. The rear A-frame ones were easy for me to do as the bushes were split. I then assembled front hubs with new wheel bearings bolts and brake discs. Just as I finished the battle with the split pins I realised I had forgotten to fit the trunnions so it all needs to come apart again.
I also popped up to Sheffield and picked up the gearbox and helped with the final assembly of the diff.
Nice new diff with ATB and new crown and pinion gears.
Al needed to use 2 blowlamps to heat the bearing carrier enough to sizzle water off if and then tapped in the frozen bearings which were already on the drive shafts. They went in pretty easily, but the circlips were a pig to fit with the 4 bolt drive shafts as there is very poor access under the driveshaft flange to the circlips.
Here is the nice refurbished diff with ATB and new crown and pinion gear now nestling in the chassis waiting for the mounting washers to dry after a quick coat of hammerite.
However another issue arisen… I am missing a some of the bits to connect the speedo drive into the gearbox. Adding up just the cost of bits I can find so far and a new speedo cable will cost over £230 to get it up and running, and it won’t ever be accurate as the CWP is not standard and will probably leak oil from the gearbox.
Or for a “bit” more I have ordered Smiths part no. SN6207-10CB, a GPS sender and a gearbox blanking plug to give me an accurate and reliable speedo without the oil leaks.
Looks pretty good to me and I am not exactly going for perfect originality! I have also ordered a gauge for battery temperature - it’s an electronic 52mm Smiths -10 to 60°C air temperature gauge and sender with custom text.
Next I had a look at the steering rack, cleaned it up cleaned the threads with a die, greased it up and fitted new boots, but while there is no play in the steering arms they are floppy where they should take the weight of a spanner without drooping, so they are off for a rebuild at Kiley - Clinton Engineering in Birmingham. - Floppy dirty rack:
In the hot weather I have been doing some indoors work and thinking about wiring. I have decided to make my own looms as I am making so many changes, buying a new Elan one would be an expensive mistake. To make maintenance easier, I am making the dashboard a wired standalone unit with a smallish number of Universal MATE-N-LOK https://www.te.com/usa-en/products/brands/mate-n-l... connectors:
Left door
Right door
Rear 12V loom
Rear Drive loom
Steering column
Wiper motor
Heater fan
Engine bay 12V loom
Engine bay drive loom
In this way I can easily unplug and remove the dashboard for maintenance, repairs and upgrades. Note for high current connections I will use multiple pins. Still deciding whether to put the 12V fuse and relay boxes in the glove box or on the firewall under the bonnet. But the fuse box from the XK8 looks like a good donor. It has 2 sets of fuses one from the battery supply and one from a big relay switched by the ignition switch.
I have also chosen and ordered the SimpBMS battery management system (to look after the 5 Tesla drive battery packs) from here: https://www.secondlife-evbatteries.com/products/si...
I chose it as it will let me choose charge current (10A or 32A) so I can charge from a 3 pin 13 Amp plug or by using a 32Amp Type 2 charger. It is easy to implement as it piggybacks off the existing battery control boards fitted to the Tesla battery modules and simply daisy chains off Can bus connections, power and ground between each cell and avoids the need to route individual high voltage wires for each cell voltage around the car. I also got its sister SimpCharge board which links the charge socket to the car and tells the car it is connected (and also disable drive) and allows charging to start when a powered charger is connected.
I also ordered a 3.2” touch screen display which will go in the ashtray space on the dash and a simple bezel, and then I ordered another custom one which was made symmetrical to cure my itching teeth.
As a slight aside I have been thinking about my dashboard. My original plan was to modify my existing dash, fill in some of the holes and re-veneer it myself. But adding cost of veneer glue and time and my general cack handedness I have decided to get the grown ups involved (again). I contacted a wooden dashboard specialist with a diagram showing what I wanted different from their standard S4 Dashboard, and Ian suggested I pop over to look at options. I popped over with my dash and came up with a nice compromise of Olive Ash Burr. It is much less gloomy than the standard one but not so light that it is jarringly unoriginal. It also works with the original white lettering and has some nice detail in the grain.
The specialist knows his Elans and my dash is a strange mix of S4 sprint and US designs. The last decision I need to make is whether to keep the bonnet release on the dashboard.
Edited by Spunagain on Friday 5th May 09:13
Gassing Station | Readers' Cars | Top of Page | What's New | My Stuff