Knackered old Porsche with loads of miles - 996 content
Discussion


ATM said:
I also really like the standard 997 seats over anything from the 996 era. Been there done that so ... I'm currently experimenting with some proper big boy buckets.
I do love a proper bucket! I had GT3 carbon ones in my old C2 but that was more of a toy and for the mileage I've done in this car they were just too much - 10 hours + is beyond my tolerance  No doubt they look incredible though!
How do you find the CSR? I've never tried one despite having driven a lot of modified 996 and 997s over the years.
ATM said:
The CSR came to me with Pole Positions but I've decided to put them in my 986 for now. I'm not sure if the CSR is good or great. I already had another 996 and the suspension setup on that car is rock hard with KW Clubsport and various other mods - all done before I got the car. But it is a bit too stiff for road use and that's probably made worse because the adjusters on the front shocks are seized. Is it the compression knob on the bottom of a KW - I can't soften this. The rears were set very stiff and I softened those a few clicks but i suspect the fronts are still super stiff.
Top choice for the 986!  The 996 will be crazy stiff because the Clubsport spring rates are utterly mental for UK roads, circa 190N/MM rear and 70N/MM front! For reference mine are 40N/MM prime, 47N/MM option front and 80N/MM prime, 100N/MM option rear. Go down to 50N/MM front and 120N/MM rear as a starting point and you'll find it far more useful on UK roads..... although freeing off the compression adjusters would be useful for this. I think Clubsports are Germany only for service too unfortunately
ATM said:
So I had been toying with the idea of a few mods for this rock hard 996 and some tinkering - as you do - and then I saw the CSR for sale and thought I should just buy that.
When I got it the alignment was all over the place - toeing out. Once sorted it started to feel better. The suspension setup is softer than my rock hard 996 which is one of the main reasons I like it. But the steering feel is nowhere near as good - not sure why - which is one of the reasons i still have my rock hard 996.
The most obvious feature of the CSR is the LWFW and racey clutch. It's a bit on and off but it will slip a lot If you rev it too much. So you need to concentrate a bit getting off the line and considering most of my driving is urban crawl you can see how it can get tiresome. But it makes you feel like a racing driver when you're just nipping to Asda.
Maybe when I get the car back together, I'm currently in the middle of changing the ignition switch, the seats and it needs an MOT, we can have a little meet up.
A bit of race car is never a bad thing for making a car an event! I wonder if the steering feel is just less aggressive geometry on the front? It would be rare to fit Clubsports and not go all race car with the setup and the steering feel is quite tuneable via geo on the 996 because the front is so light.When I got it the alignment was all over the place - toeing out. Once sorted it started to feel better. The suspension setup is softer than my rock hard 996 which is one of the main reasons I like it. But the steering feel is nowhere near as good - not sure why - which is one of the reasons i still have my rock hard 996.
The most obvious feature of the CSR is the LWFW and racey clutch. It's a bit on and off but it will slip a lot If you rev it too much. So you need to concentrate a bit getting off the line and considering most of my driving is urban crawl you can see how it can get tiresome. But it makes you feel like a racing driver when you're just nipping to Asda.
Maybe when I get the car back together, I'm currently in the middle of changing the ignition switch, the seats and it needs an MOT, we can have a little meet up.
Maybe we should get a PH 996 owners meet up on the cards? Definitely a summer day for that one so gives us all plenty of time to put them back together and to plan somewhere convenient and central for the majority of us? I'd love the opportunity to have a look at your CSR.
ferrisbueller said:
What are the specs on your Ohlins please? Assume you've got a good road biased set up.
Early R&T setup with (currently) 47N front springs and 100N rear springs (so 13 - 20% softer than standard), 10mm preload front and rear, 10 clicks front, 14 clicks rear. It's on H&R bars with the fronts full soft and the rears medium. Slippydiff said:
And ... if you don’t mind me asking, where did you purchase the adjustable rear toe links from ? Or did you make them yourself ?
Gravity Performance - on the advice of a friend who has one of those very sideways smoke generating cars. They're actually pretty good in terms of quality and I'm impressed with the fully sealed inner joint which is beefy! Previously I've run the cup car derived female rose joint inboard with a threaded adaptor to a standard front track rod end, these work very well but the inner rose joint lasts about 6 months of UK road use (even with an expensive, posh rose joint). These are heavier but likely have a much longer life (TBC). The only problem is the inner joints are sized for the standard Porsche eccentric bolt which is an M12 thread but with a larger unthreaded section to suit the standard track rod as such you can't easily delete the eccentric adjusters when using these with a couple of plates and an M12 bolt but given this isn't a track car that's unlikely to be a problem.
VeeReihenmotor6 said:
ahhh PPBB the penny has dropped - those quick jacks - are they the ones you bought off me? I enjoyed our Porsche chat and remember the high mileage & 3.7 so I am pretty sure this is you. The 996 has held up remarkably well - I can't see any rot on the car. I am wasting my money welding rusty old VWs that is for sure but am making moves to sell off 2 of them and get myself a 996 (pref with aero kit but has to be an early car as i prefer the lights) later this year / next year.
They are! They've had a bit of a birthday since and came up a treat - was very happy you decided to sell those, finding some 240V ones had been nigh on impossible until yours popped up 
996s do seem to hold up well, mine has done 19 winters of use and not exactly been a garage queen. The front wings are just starting to bubble and it has a small amount just starting on the leading edge of the rear arches which is pretty common. Both an easy fix although I'm going to carbon front wings. Structural rot on them is very rare - most common around the front of the engine bay and strut top mounts but even then I've never seen it more than crusty surface rust. The odd one gets it inside the rear arches behind the arch liners but this is a flat'ish area and again an easy fix. Excellent galvanising, good quality steel and PU underseal seems to work well for keeping them pretty ship shape.
I can't not recommend a 996
you'll have to decide C2 or C4 but at that age - personally I'd go C4 even if you want a RWD car as it's a days job to convert a C4 to RWD and you get the advantage of the stiffer shell around the front uprights in return (GT3 and Carerra Cup car used the C4 shell). You won't regret taking the plunge Fast Bug said:
therealsamdailly said:
ATM said:
poppopbangbang said:
Maybe we should get a PH 996 owners meet up on the cards? Definitely a summer day for that one so gives us all plenty of time to put them back together and to plan somewhere convenient and central for the majority of us? I'd love the opportunity to have a look at your CSR.
Good idea yesSlippydiff said:
Many thanks for such an indepth response. Am I right in thinking the inability to delete the eccentric inner bolt isn't a deal-breaker as if you set the bolt to it's minimum (inboard) toe setting it's unlikely to/can't shift if you should drop a wheel down into pothole ?
I'm in two minds as to if the eccentric can really shift on a road car as the eccentric washers are hex/key way fit and retained into the recess in the subframe then the whole lot is under A LOT of clamp. I know on the race cars it was a problem punching the edge off the subframe so moving to a larger flat plate to lock it out increased the contact surface on the subframe recess. I think it's also entirely possible to run the lock out plates on a coffin arm eccentric bolt which is longer and would provide room for the lock out plates. I'll let you know how mine goes and if I break a chunk off the sub frame
Slippydiff said:
My car was supplied with the same seats as yours, they're in stunning condition, but they are sooo uncomfortable (too much lumbar support and those "wings" force your shoulders forward and inwards) add in a steering column that doesn't extend out far enough (I'm six feet tall, but with short legs and long torso _ AKA a freak) and driving the car for even 20 minutes gave me back and neck ache the likes of which I've never experienced in any other car.
Normally Porsche are brilliant at the ergonomic stuff, but those seats are some of the worst they've ever produced (for my frame anyway).
Some of my racing snake friends think they are incredible for road car seats but if you are more rugby player stature than racing driver then the wings pinch a bit too much! I don't remember them being that bad but I think having my weight on them for a few hundred K has resulted in them sagging and compressing to the point where it's now not comfortable. Normally Porsche are brilliant at the ergonomic stuff, but those seats are some of the worst they've ever produced (for my frame anyway).
Slippydiff said:

I was hoping to lose a chunk of weight with the fitment of the Sparco, the stock seat is 18kg, and whilst the Sparco is light (6.9kg) thanks to their QRT moulding process. The BBi floor adaptor, steel side mounts AND steel runners, meant the loss was less than 3kg
Your car should drive beautifully with all the new/overhauled suspension components
As many others have said above side mounts straight to rails is the way to go to get the weight off. The ones I used for the buckets in my old C2 came from D911 and acted as adaptors from the standard seat runner hard points to a standard side mount. braddo said:
That's interesting about converting a C4 to RWD. Presumably there is still a small weight penalty and slightly different steering feel?
I love reading about your car and the application of your skills to it. My car is 'high miles' at a massive 77k
Couple of KGs really..... or essentially zero if you go to C2/GT3 front suspension as all that's left is the prop output on the front of the gearbox vs a C2 box. I love reading about your car and the application of your skills to it.
My car is 'high miles' at a massive 77k It really is an easy job, remove the prop then the centre viscous and front diff comes out as one unit, use the CV cups off the standard drive shafts as stub axles and you're done (you can even drop the shafts out the CV cups on the car without undoing the hub nuts if you want).
You can retain all the front suspension or swap the uprights to C2/Boxster to allow the use of a C2 damper assembly..... or fit GT3 uprights if you want to do a brake upgrade at the same time. It's all just Lego
Steering feel will be the same as a C2/GT3 if you set it up the same.
Slippydiff said:
Would these be the Design 911 items ?

If they are the ones you utilised, did they require much in the way of drilling/welding etc to make them fit ?
Those look like the ones to me! If they are the ones you utilised, did they require much in the way of drilling/welding etc to make them fit ?
They just bolted in, no welding or fab required. The silver adaptors you can see under the rails bolt to the standard seat hard points and have studs to take the rail. The rail then bolts to the side mount and that assembly nuts down to the adaptor accordingly.
I remember mine didn't come with fasteners so I just used a variety of 12.9 cap heads accordingly.
And a quick update on the actual car
Snuck an hour in today to refit the RARB then built up and fitted the drop links

Just need some rear dampers now and the corners overhaul is complete!
Also unboxed the replacement fans and checked them over- these are no name "OEM" replacements but the last set did 150K miles without much issue and they 25% of the cost for a pair from Porsche. A bearing in the LH one has gone noisy so a planned maintenance replacement rather than a failure replacement.

Hoping I have time tomorrow to get the front and rear bumpers off and make a start sorting out the rough looking bits underneath - rad hangers need cleaning and painting and the rear heat shields / cages need sorting as the heat shields are no longer attached
Snuck an hour in today to refit the RARB then built up and fitted the drop links
Just need some rear dampers now and the corners overhaul is complete!
Also unboxed the replacement fans and checked them over- these are no name "OEM" replacements but the last set did 150K miles without much issue and they 25% of the cost for a pair from Porsche. A bearing in the LH one has gone noisy so a planned maintenance replacement rather than a failure replacement.
Hoping I have time tomorrow to get the front and rear bumpers off and make a start sorting out the rough looking bits underneath - rad hangers need cleaning and painting and the rear heat shields / cages need sorting as the heat shields are no longer attached
ATM said:
Please let us know in here as I don't follow the events section.
As requested Attention all interested parties, I have now created a thread in the Events section so we can work out numbers and how much parking we will need. It's here: https://www.pistonheads.com/gassing/topic.asp?h=0&...
Looking forward to a chat about all things broken or not broken on our selection of decades old Pork
Amazing day today, it wasn't raining, I had a fry up for breakfast and I got the entire day in the garage . As such a load of odd jobs etc. got done.
First off heat shields, both of mine were rattling well! It's very common than the heat shields fatigue/fail around the mountings and end up rattling in the carriers. So first job was rear bumper off and shields off - whilst it was all exposed it seemed rude not to give it a wipe over, the silencers cleaned up really well!

I love the view with the rear bumper off, they look so "rear engined" like this
Always nice to see its birthday too!:

Heat shields repaired with a penny washer and nut and bolted rather than riveted with an M6 and a half nut - blob of blue loctite optional but suggested!

Look pretty good now! These are both original to the car:

And back on:

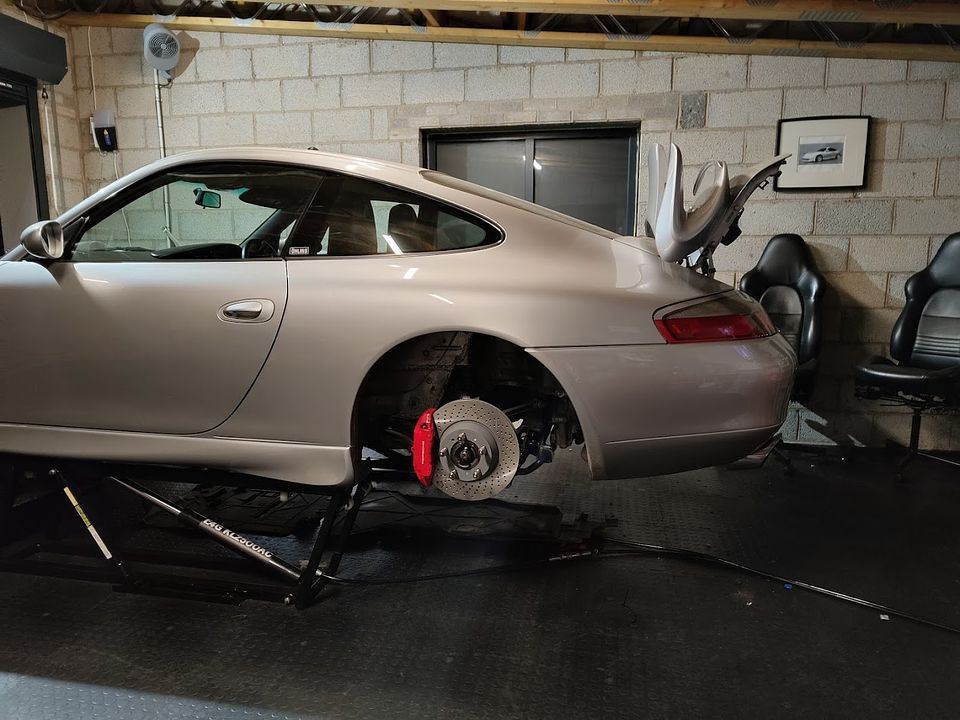
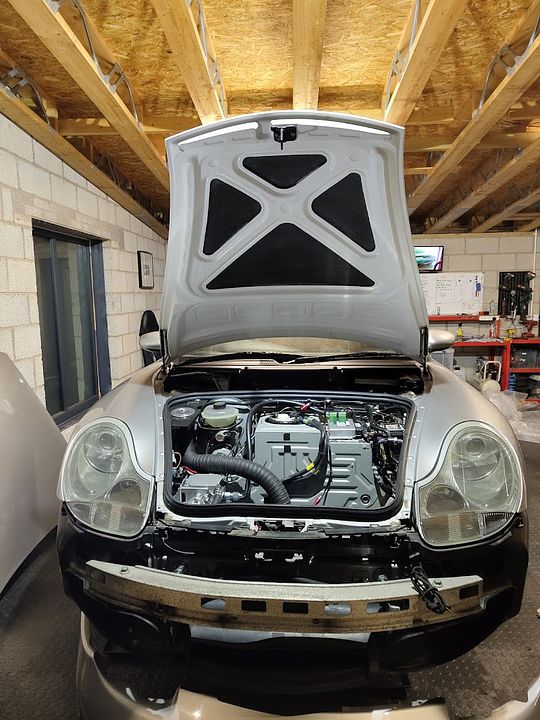
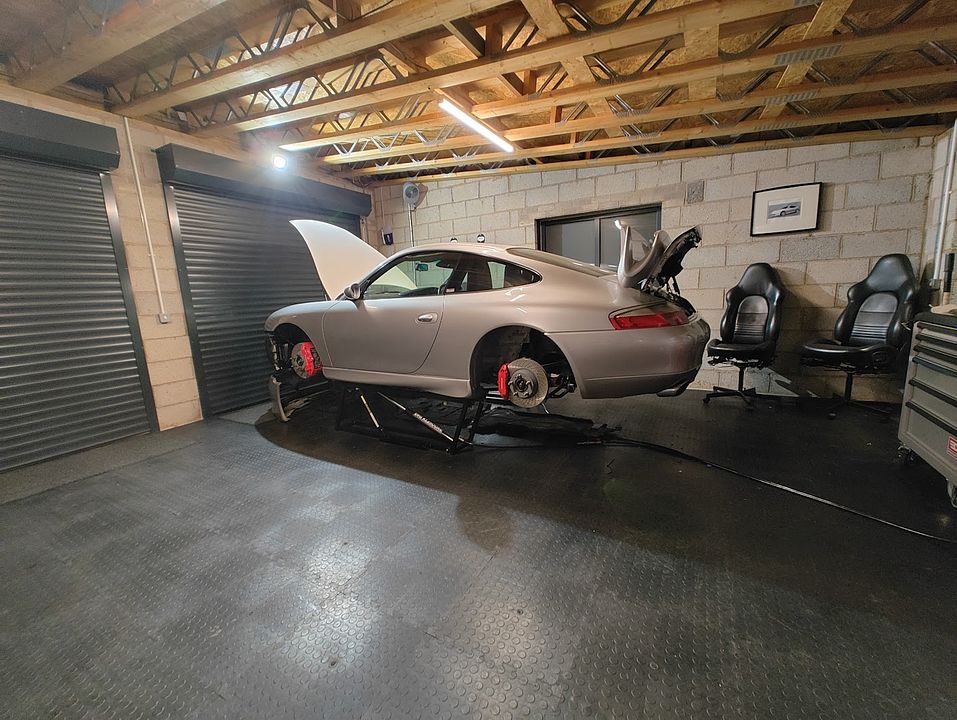
Following that it was onto the front end, specifically sorting out the rad fans and rad mounts, so front bumper off:

This won't be going back on for a little while as I've got to fit the carbon front wings which I am expecting to be an utter "bar steward" as CF panels always are! Good shot of the single air con rad too and the very none standard refrigerant lines to the electric aircon compressor.
All the ducts were in good order and the rads absolutely outstanding, these have done over 100K miles and aside from being grubby with the odd bent fin are like new, absolutely fair play CSF - standard plastic end tank ones you'd be looking to change at that mileage:

The rad mounts less so but then that was part of the reason for pulling it apart These sit right at the front of the car and are powder coated steel so take a kicking especially on winter used cars as they sit in moisture for most of the time. Good news is they're good quality steel and I've yet to see one that won't clean up well. You can see the state of one of them in this pile of bits photo:

Wire brush on the drill and a go over with the magic rattle can and they come up pretty good - 24 hours dry time stopped play there on this though so I'll have to wait until later in the week to refit them:

The new rad fans are designed to fit to the original fan carriers, self tapping screws are evil so these got tapped to take an M5 like the OE fans do:

Fitted to the original frame which also had a bit of a birthday:

Both done and ready to refit:

So that's a lot of grunt work done, rad packs will go back together on the car quickly once the mounts are dry which means at the end of this week it will be pretty much mechanically done bar rear dampers which are ETA end of the month! This means from here on out we're into bodywork which is always a dick, not enjoyable and involves an overly excessive amount of dust, swearing and generally feeling disappointed with how much effort is needed for a small amount of work to be achieved..... bodywork people I salute you I really do! In the mean time I'm going to have a beer and ponder how much I care about panel gaps and if I could just Plastidip the whole thing
. As such a load of odd jobs etc. got done.First off heat shields, both of mine were rattling well! It's very common than the heat shields fatigue/fail around the mountings and end up rattling in the carriers. So first job was rear bumper off and shields off - whilst it was all exposed it seemed rude not to give it a wipe over, the silencers cleaned up really well!
I love the view with the rear bumper off, they look so "rear engined" like this
Always nice to see its birthday too!:
Heat shields repaired with a penny washer and nut and bolted rather than riveted with an M6 and a half nut - blob of blue loctite optional but suggested!
Look pretty good now! These are both original to the car:
And back on:
Following that it was onto the front end, specifically sorting out the rad fans and rad mounts, so front bumper off:
This won't be going back on for a little while as I've got to fit the carbon front wings which I am expecting to be an utter "bar steward" as CF panels always are! Good shot of the single air con rad too and the very none standard refrigerant lines to the electric aircon compressor.
All the ducts were in good order and the rads absolutely outstanding, these have done over 100K miles and aside from being grubby with the odd bent fin are like new, absolutely fair play CSF - standard plastic end tank ones you'd be looking to change at that mileage:
The rad mounts less so but then that was part of the reason for pulling it apart
These sit right at the front of the car and are powder coated steel so take a kicking especially on winter used cars as they sit in moisture for most of the time. Good news is they're good quality steel and I've yet to see one that won't clean up well. You can see the state of one of them in this pile of bits photo:Wire brush on the drill and a go over with the magic rattle can and they come up pretty good - 24 hours dry time stopped play there on this though so I'll have to wait until later in the week to refit them:
The new rad fans are designed to fit to the original fan carriers, self tapping screws are evil so these got tapped to take an M5 like the OE fans do:
Fitted to the original frame which also had a bit of a birthday:
Both done and ready to refit:
So that's a lot of grunt work done, rad packs will go back together on the car quickly once the mounts are dry which means at the end of this week it will be pretty much mechanically done bar rear dampers which are ETA end of the month! This means from here on out we're into bodywork which is always a dick, not enjoyable and involves an overly excessive amount of dust, swearing and generally feeling disappointed with how much effort is needed for a small amount of work to be achieved..... bodywork people I salute you I really do! In the mean time I'm going to have a beer and ponder how much I care about panel gaps and if I could just Plastidip the whole thing
It has a Sony double din Android Auto head unit (with associated double din conversion) and some focal front speakers. I do have a 997 Bose rear shelf sub but it's rarely in there - I might refit this as part of the current works as it is meant to be going more GT car.
For the most part noise cancelling head phones are where it's at for comms and music on long drives, you shift on the lights anyway when pressing on so it's not like you need to hear a lot.
For the most part noise cancelling head phones are where it's at for comms and music on long drives, you shift on the lights anyway when pressing on so it's not like you need to hear a lot.
A small update from an afternoon well spent.
Rads, ducts, fans etc. all back on:

Rad carriers look a lot better for a wire brushing and a repaint!

Rads had a good blow out whilst all the ducts were off, there was A LOT of debris / dead flies in them
Next job is to fit the carbon bonnet and then onto front wings..... unless I find something else to put that job off with first
Rads, ducts, fans etc. all back on:
Rad carriers look a lot better for a wire brushing and a repaint!
Rads had a good blow out whilst all the ducts were off, there was A LOT of debris / dead flies in them
Next job is to fit the carbon bonnet and then onto front wings..... unless I find something else to put that job off with first
The spinner of plates said:
Long time follower of this thread!
You’re often running the car at speed over distance, presumably often through the night.
Have you done anything to upgrade the headlights?
I’ve a similar vintage 986S and find the candles a real weak link vs the modern daily drivers.
Originally it had Cree LEDs in the standard halogen housings with the reflectors trimmed to sort the beam pattern. I then swapped those for Litronics (HIDs) which are projector lenses etc. and upgraded them with new slightly sportier HID bulbs and ballasts and set them up manually to be MOT legal for beam height etc. They are good enough to be useful.You’re often running the car at speed over distance, presumably often through the night.
Have you done anything to upgrade the headlights?
I’ve a similar vintage 986S and find the candles a real weak link vs the modern daily drivers.
My 986 also has Litronics but these are standard and in comparison far worse than the 996 in terms of brightness so maybe worth look at an upgrade, if you have headlight wash and auto level you can go current car levels of bulb brightness but the 996 is fixed and none wash so I have erred on the side of caution there with only a mild upspec beyond standard.
nebpor said:
Ah that’s interesting about litronics - sounds like my 996 turbo, with washers and auto-level can be upgraded … I didn’t realise that, I’ll go do some research
The bulb is a standard D2S package in Litronics and the 996 had very low rating bulbs in from new, although if memory serves the wash version had slightly brighter ones. D2S is available in quite a few lumen outputs and colour ranges and there are LED D2S replacements now which may also be worth a look - something I want to experiment with.Worth noting as well that HID bulbs life out over many years with the brightness getting progressively dimmer. A new set of standard bulbs can sometimes make a good difference, especially on our stuff which is probably 20 years old by now.
Slippydiff said:
This is Retrofitlab’s basic repair/replacement the kit for the Mk 2 996. I’d be really interested to hear PPBB’s views on it :
https://retrofitlab.com/collections/porsche-911-99...
These kits are fantastic! I've fitted a couple for friends and the difference vs knackered reflectors is huge (for obvious reasons) and it's only 15 minutes / 5 screws a head light to fit it - rather than use the splitter supplied to wire the solenoid for the reflector drive I just depin the H7 connector and recrimp it with the solenoid drive wires which keeps the interior of the light much neater. https://retrofitlab.com/collections/porsche-911-99...
Couple of things to note though is that whilst the projector appears to be the same the .1 cars don't seem to suffer the same as the .2 does with the reflectors failing. This may be because nearly all .2 had projectors whereas Litronic on .1 was a pretty rare option so there are less of them to fail, or that .1 had a different OE bulb that ran cooler. Also if the standard reflectors are still in very good condition this won't make any difference to total light output bar at full beam where the solenoid driven reflector adjuster lifts the beam throw at full beam.
If the standard reflectors are failing though this is a must do mod and one that will go into mine if/when they start to fail. If they're in good condition just stick a new set of bulbs in and you'll likely see a big improvement.
Slippydiff said:
That's great info, many thanks.
I'm knocking on a bit now (59) and my night vision has deteriorated markedly over the past 3 years, the 996's lights are pretty poor compared with that of my daily driver. So ...
Are the Osram and Philips bulb upgrades they offer worthwhile ? If so do you have a preference for the Osram or Philips HID/Xenon bulb options they offer ? I'm not looking for increased "cool blueness" btw.
Any benefits (in light output) to the LED high beam bulb option they offer ?
I've always used Osram with good results, H7 LEDs are generally pretty bloody good but cooling them in an OE enclosure not designed for them can be problematic - I'd just run a good halogen in the high beam. I'm knocking on a bit now (59) and my night vision has deteriorated markedly over the past 3 years, the 996's lights are pretty poor compared with that of my daily driver. So ...
Are the Osram and Philips bulb upgrades they offer worthwhile ? If so do you have a preference for the Osram or Philips HID/Xenon bulb options they offer ? I'm not looking for increased "cool blueness" btw.
Any benefits (in light output) to the LED high beam bulb option they offer ?
Slippydiff said:
I note they state this in their sales pitch :
Is it worthwhile uprating the ballasts as they've suggested ? Especially as they don't look to be particularly expensive.
I don't think so as the OE ballasts are absolutely fine and also tightly integrated to the back of the headlight unit. To run different ones will need a bit of chopping of wiring etc. as (to be fair) they make clear in their description. Is it worthwhile uprating the ballasts as they've suggested ? Especially as they don't look to be particularly expensive.
Slippydiff said:
And so to other matters. Nice to see your replacement brake pipe ends have been given a good coating of wax/protectant where they screw into the connector block
My car failed it's MOT just before Christmas when it ruptured a brake pipe whilst on the brake rollers. Initially I was somewhat fed up they'd "broken" the car whilst testing it, but as the day wore on, I realised I just dodged the mother of all bullets ...
I'd be really interested to hear your take on this failure, as you'll no doubt recognise the location, which is behind the arch liner AND the washer bottle, and thus as can be seen from the pipes and the area generally, it's both clean and dry. All of which points to the brake pipe rotting from the inside out ...
It's usually a defect in the coating or it's been caught/rubbed by something else. It's hard to say if it could be inside to outside without seeing a cross section further up/down but if it was you'd have a lot of other grotty/failing brake components as the brake fluid would have a lot of water content! My car failed it's MOT just before Christmas when it ruptured a brake pipe whilst on the brake rollers. Initially I was somewhat fed up they'd "broken" the car whilst testing it, but as the day wore on, I realised I just dodged the mother of all bullets ...
I'd be really interested to hear your take on this failure, as you'll no doubt recognise the location, which is behind the arch liner AND the washer bottle, and thus as can be seen from the pipes and the area generally, it's both clean and dry. All of which points to the brake pipe rotting from the inside out ...
At the age these cars are now there will always be the odd bit that 20 years ago had a nick or scratch during fitting that turns into this two decades later.
You can replaced them all with new steel lines (although the one over the engine is a pain in the arse!) or make up copper-nickel lines (which I have done), copper-nickel is a great material as it resists corrosion almost permanently and has a very high burst pressure but is also soft as cheese so can be easily damaged by poor lifting of the car or impact........
Slippydiff said:
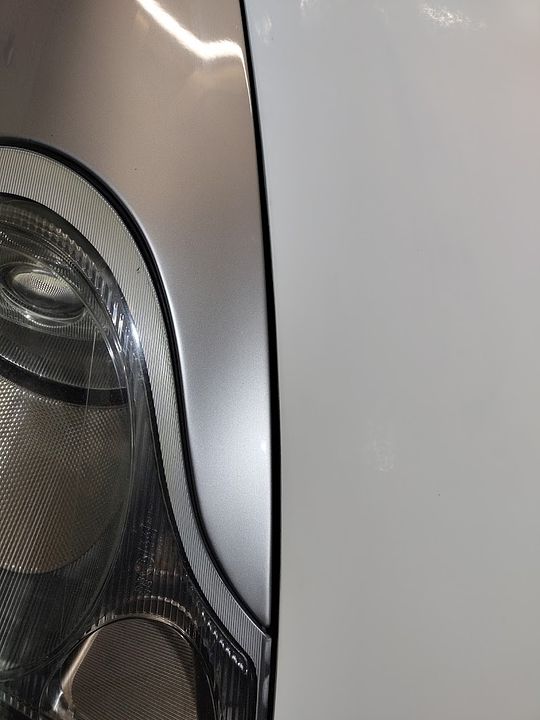
Any reason for the carbon fibre front wings ? Weight saving, corrosion resistance or something else ?
Both, the weight saving isn't massive but it's there. The bigger reason is that at 23 years and 20 winters the front wings have lost a lot of their galvanising (it is sacrificial after all) around areas of heavy stone chipping so even if repaired and repainted they'll never last as long again. Carbon however lasts forever, unless you set it on fire Firstly a big thank you, I'm really very touched that people enjoy my cocking around with an old 911! So without further ado the latest update - in full disclosure I've been a bit busy recently with general life stuff but progress is still..... progressing
So first off the inner heat shields were unrecoverable and new ones have a lead time so having had a good work out what they're actually protecting I've replaced them with some genuine race car stick on gold which should stop the rear light clusters melting!
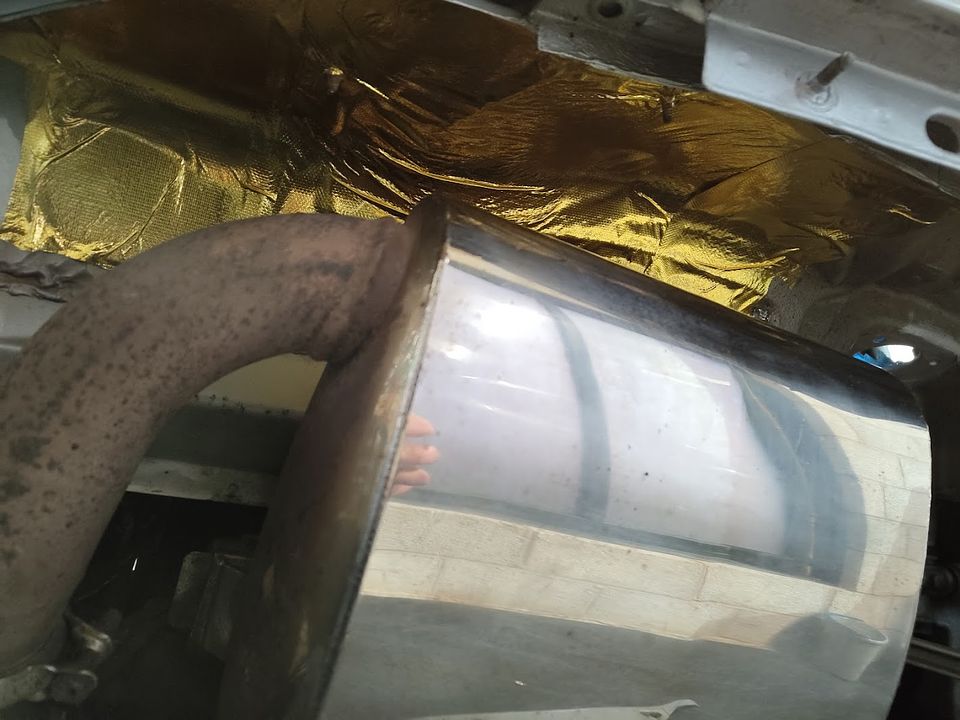
I wouldn't try this on a 996 turbo as the surface temps etc. are way higher in the exhaust but for mine where it's only really dealing with radiated heat from the exhaust cans this should do the trick, especially as one has been completely missing since a Monaco rally in 2018
With both sides done the rear bumper went back on with new captive thread plates where required:
It'll need to come back off for paint but at the very least I can make sure all the fittings are present, correct and useable at this point!
I'd dragged all the carbon bits out of storage before Xmas so as I couldn't find anything else to delay the inevitable I unwrapped them all and wiped them down:
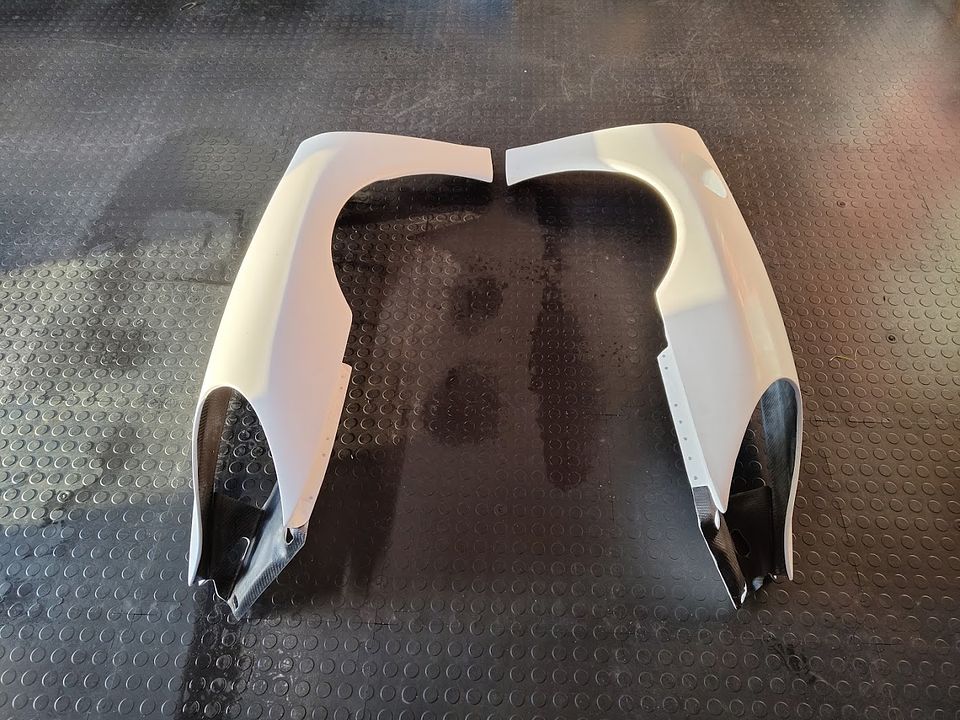
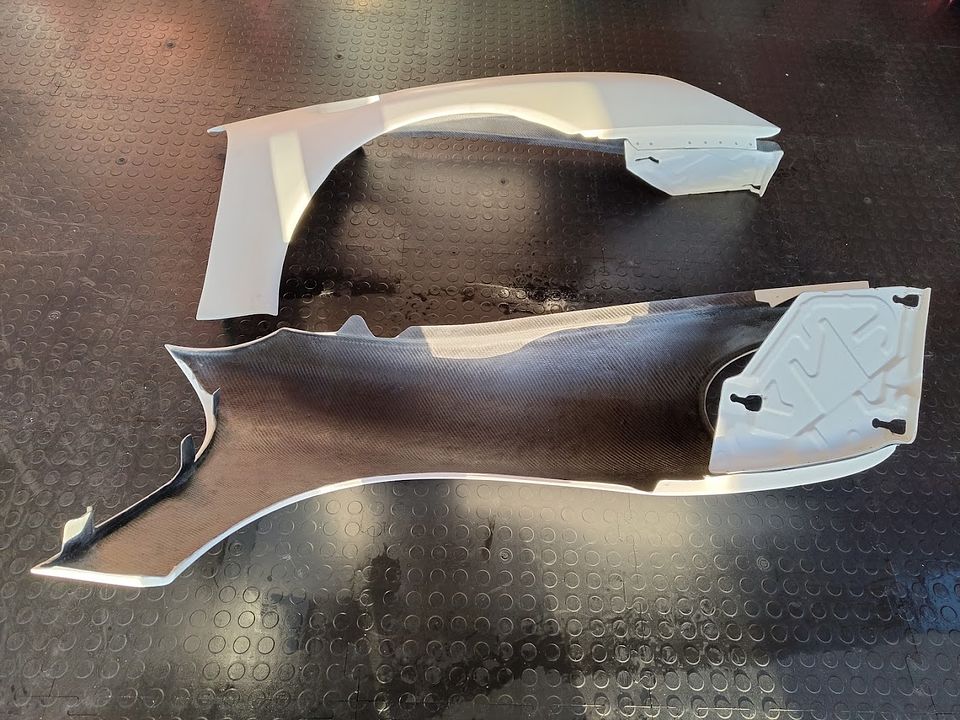
These are very much rally car parts designed to be stronger and lighter than the originals but not with the ultimate level of weight saving in mind..... although the combination of wings and bonnet are many kilos lighter than the originals! They're produced from splash moulds of the original parts so some cutting out required but they're as accurate as anything off that sort of tooling could possibly be, to the point I'm quite impressed despite my function over form approach.
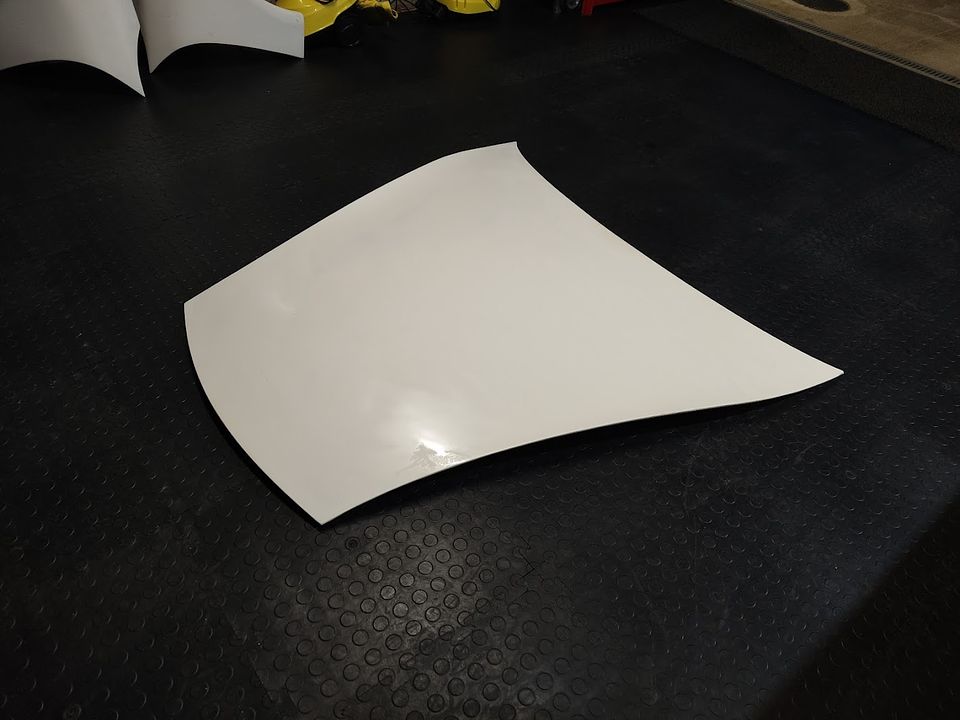
First job was to fit the bonnet and gap check against the original front wings. I made a template off the original bonnet to set the gap, in the end it was a super easy fit:

The bonnet is produced from two pieces bonded together to replicate the original upper and lower surfaces. As such it goes on with all the original hardware including the bonnet catch. It was a key thing for me that this didn't look carbon from outside and that the bonnet still secured off the original catch etc. (although I will run a limit strap on it just in case) as bonnet pins are for racing cars! Very pleased with the initial fit, the sizing is pretty spot on (not a given with composite!) and the panel gap against the original wings was good enough in terms of consistency of gap without having to mess about too much - if it still is on the composite ones we'll find out in due course
In a push to avoid having to start on the wings I decided to change the brake master which was well out of life by that point:
Came apart easily:
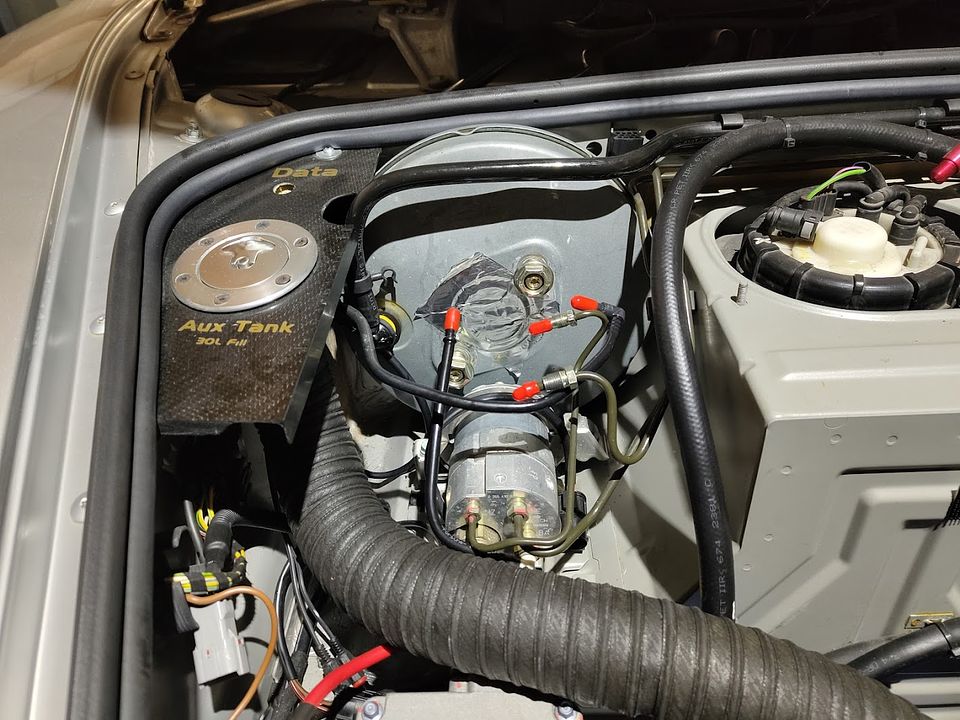
But the master had been weeping into the servo very slightly, in fact just enough to create the slightest mist of brake fluid under the servo.... just enough to bubble the paint so that meant the rest had to come out:
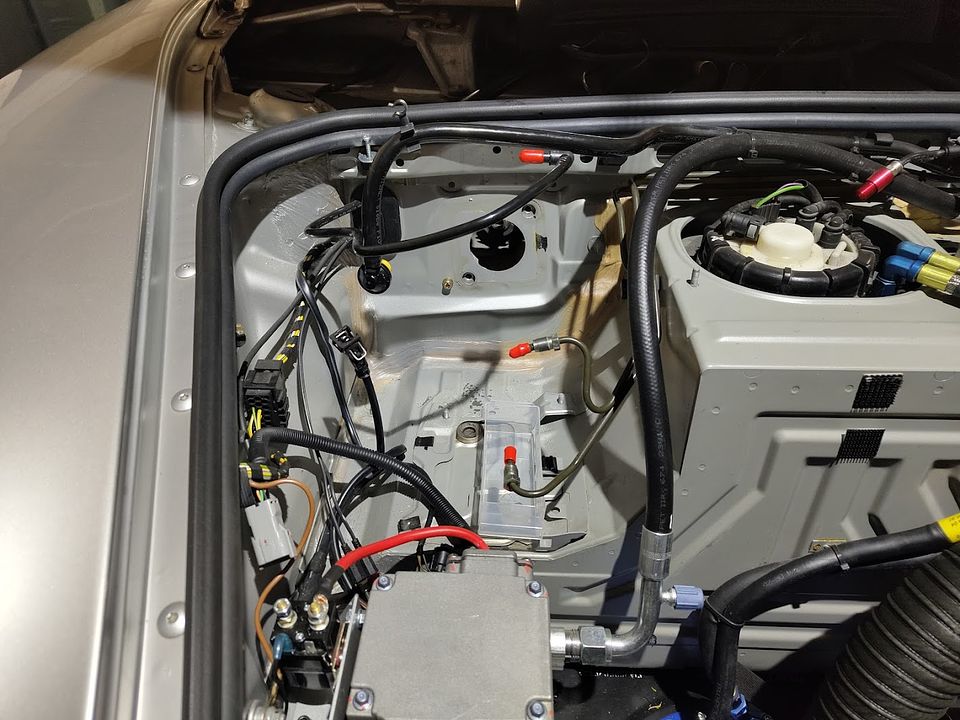
You can see the darker silver flecks where the brake fluid has done a mega job of stripping the paint. So now I'm waiting for some paint to arrive so I can make a reasonable repair as there's no excuse for leaving it to rust and I need some replacement long servo bolts as they are single use.
Still means I don't have to start on the wings just yet! Which is good because having properly assessed what I need to do to get them on I'm even less keen Some highlights are getting the head light trays to fit properly, creating a mounting location for the fuel flap mechanism (not sure if I am going to salvage the metal one from the original wing and bolt in...) along with a stop for said flap and cutting in all the mounting holes etc. function over form though, right?
So first off the inner heat shields were unrecoverable and new ones have a lead time so having had a good work out what they're actually protecting I've replaced them with some genuine race car stick on gold which should stop the rear light clusters melting!
I wouldn't try this on a 996 turbo as the surface temps etc. are way higher in the exhaust but for mine where it's only really dealing with radiated heat from the exhaust cans this should do the trick, especially as one has been completely missing since a Monaco rally in 2018
With both sides done the rear bumper went back on with new captive thread plates where required:
It'll need to come back off for paint but at the very least I can make sure all the fittings are present, correct and useable at this point!
I'd dragged all the carbon bits out of storage before Xmas so as I couldn't find anything else to delay the inevitable I unwrapped them all and wiped them down:
These are very much rally car parts designed to be stronger and lighter than the originals but not with the ultimate level of weight saving in mind..... although the combination of wings and bonnet are many kilos lighter than the originals! They're produced from splash moulds of the original parts so some cutting out required but they're as accurate as anything off that sort of tooling could possibly be, to the point I'm quite impressed despite my function over form approach.
First job was to fit the bonnet and gap check against the original front wings. I made a template off the original bonnet to set the gap, in the end it was a super easy fit:
The bonnet is produced from two pieces bonded together to replicate the original upper and lower surfaces. As such it goes on with all the original hardware including the bonnet catch. It was a key thing for me that this didn't look carbon from outside and that the bonnet still secured off the original catch etc. (although I will run a limit strap on it just in case) as bonnet pins are for racing cars! Very pleased with the initial fit, the sizing is pretty spot on (not a given with composite!) and the panel gap against the original wings was good enough in terms of consistency of gap without having to mess about too much - if it still is on the composite ones we'll find out in due course
In a push to avoid having to start on the wings I decided to change the brake master which was well out of life by that point:
Came apart easily:
But the master had been weeping into the servo very slightly, in fact just enough to create the slightest mist of brake fluid under the servo.... just enough to bubble the paint
so that meant the rest had to come out:You can see the darker silver flecks where the brake fluid has done a mega job of stripping the paint. So now I'm waiting for some paint to arrive so I can make a reasonable repair as there's no excuse for leaving it to rust and I need some replacement long servo bolts as they are single use.
Still means I don't have to start on the wings just yet!
Which is good because having properly assessed what I need to do to get them on I'm even less keen Some highlights are getting the head light trays to fit properly, creating a mounting location for the fuel flap mechanism (not sure if I am going to salvage the metal one from the original wing and bolt in...) along with a stop for said flap and cutting in all the mounting holes etc. function over form though, right? Gassing Station | Readers' Cars | Top of Page | What's New | My Stuff