Yet another rescued E36 328i M Sport project...
Discussion


Have a mini update on the bodywork.
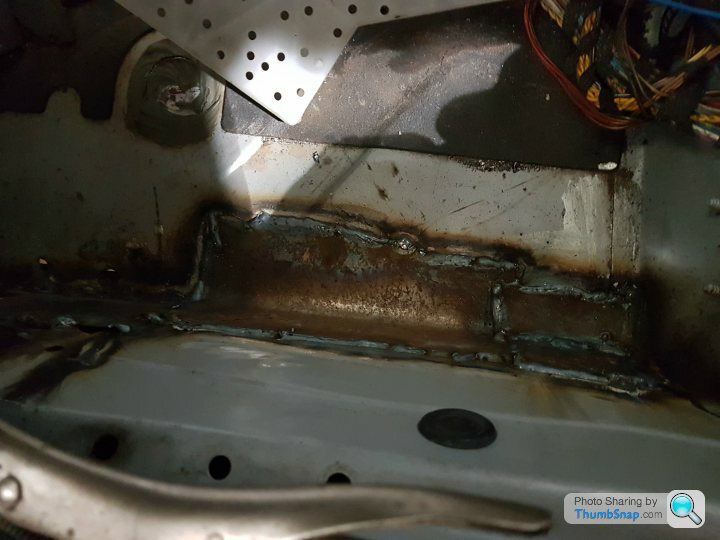
The passenger side sill has now been welded up.
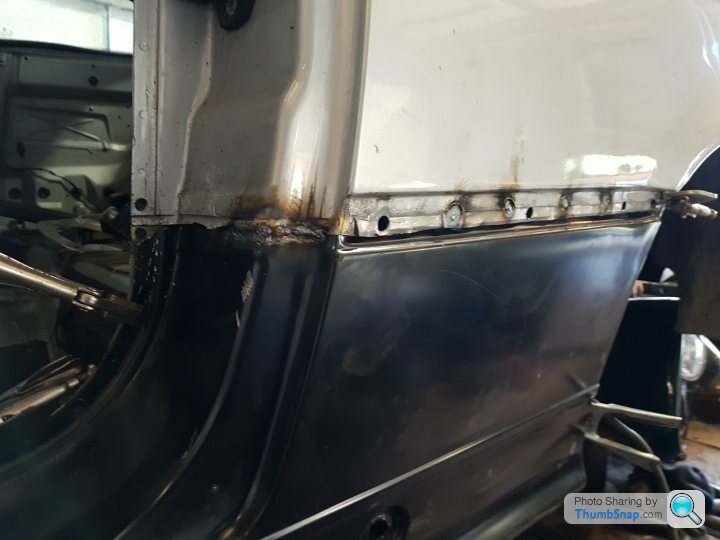
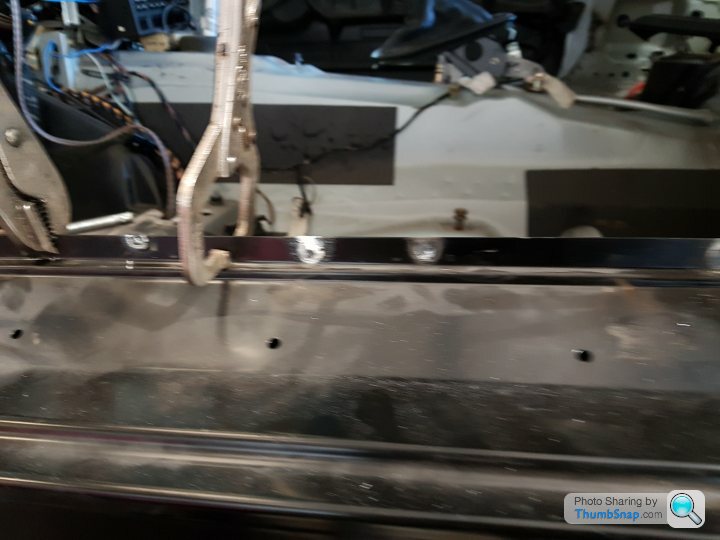

And the holes in the inner sill / floor have been repaired.
Once the rear suspension has been rebuilt, next weekend after the parts get back from the powder coaters, the car will be going off to the spray shop to get painted. Can then look at getting the interior put back in.
The passenger side sill has now been welded up.
And the holes in the inner sill / floor have been repaired.
Once the rear suspension has been rebuilt, next weekend after the parts get back from the powder coaters, the car will be going off to the spray shop to get painted. Can then look at getting the interior put back in.
Have bought the remainder of the rear suspension bushes, bearings, rose joints etc in preparation for the suspension rebuild.
The rear brake calipers, carriers and rear disc protection plates arrived back from the powder coaters this week. Have also bought a refurb kit for the calipers - forgot to take a pic though...
Bought the last of the Powerflex bushings for the diff, trailing arms, upper arm spring carriers and lower arms. And you'll notice the complimentary packet of Haribos that was sent with the order...
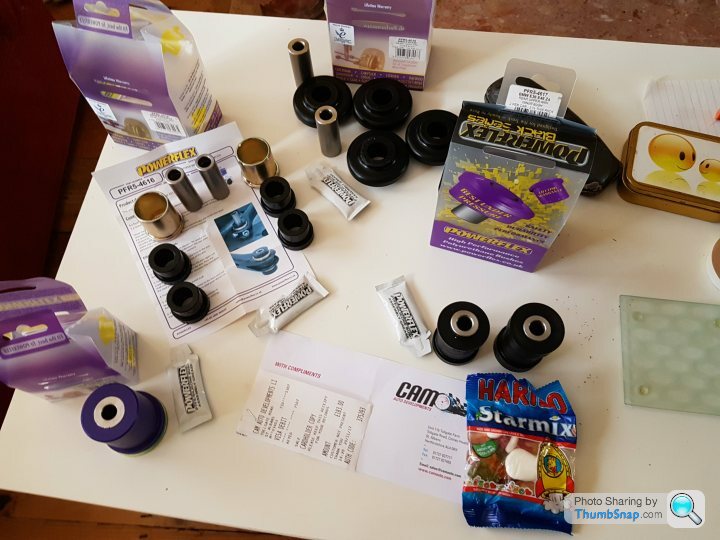
Withe these, the whole of the rear suspension set up will be poly bushed... The previous order that I received for the subframe, anti roll bar and rear trailing arm bushings.
That little lot cost around another £380 for all of the bushings....
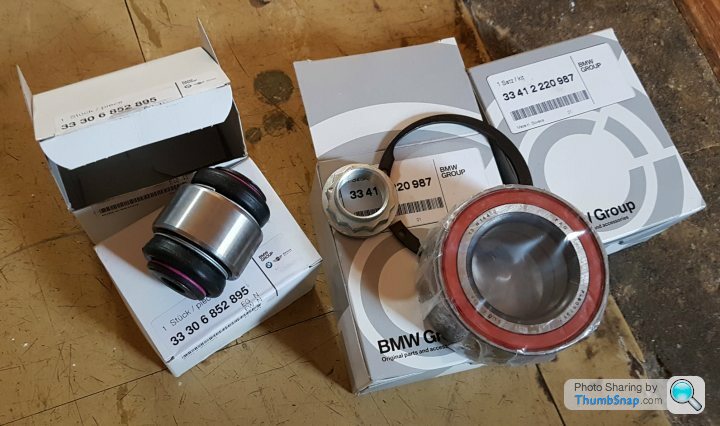
Collected the new rear trailing arm / drive shaft bearings and top mount rose joints from BMW.
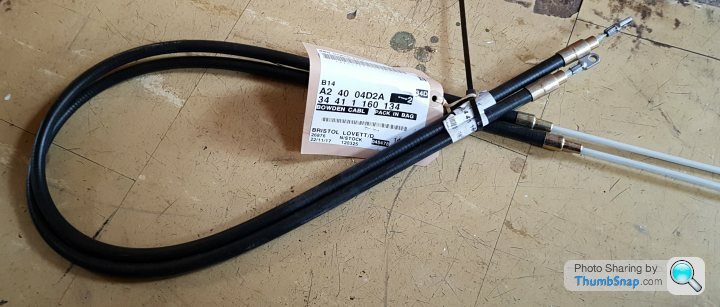
And the new replacement handbrake cables.
Got the new drop links for the front anti roll bar. They're meant for the track, I'm sure they'll just add to the ride 'stiffness'...

The next update will come next weekend, when the rear suspension unit and the brakes get reassembled and fitted to the car.
The rear brake calipers, carriers and rear disc protection plates arrived back from the powder coaters this week. Have also bought a refurb kit for the calipers - forgot to take a pic though...
Bought the last of the Powerflex bushings for the diff, trailing arms, upper arm spring carriers and lower arms. And you'll notice the complimentary packet of Haribos that was sent with the order...
Withe these, the whole of the rear suspension set up will be poly bushed... The previous order that I received for the subframe, anti roll bar and rear trailing arm bushings.
That little lot cost around another £380 for all of the bushings....
Collected the new rear trailing arm / drive shaft bearings and top mount rose joints from BMW.
And the new replacement handbrake cables.
Got the new drop links for the front anti roll bar. They're meant for the track, I'm sure they'll just add to the ride 'stiffness'...
The next update will come next weekend, when the rear suspension unit and the brakes get reassembled and fitted to the car.
helix402 said:
On the E46 you have an upper ball joint on the rear susp and a solid lower one. The M3 E46 runs ball joints top and bottom, not sure if this works on the E36 but may be worth considering.
On any E46 you can run ball joints top and bottom.
Not bothered about that really. The lower and upper arm bushings are all Powerflex black series, so I'm sure the setup will be fine...On any E46 you can run ball joints top and bottom.
helix402 said:
All the best with your car. I shall refrain from offering helpful suggestions.
???  I didn't mean to rebuff you or your comments. Just that I've bought all the parts for the rear end now. And to be honest, I just want to get this project over the finish line now. Not planning on using it regularly on a track. The odd day at Castle Combe will probably do me. Anyway, thanks and appreciation for your continued interest in my project. I'm certainly not against timely suggestions going forward.
You could say that. My mechanic had to move his workshop to a new unit over Christmas. Six weeks down the line, and we're continuing work on the car today! I've even taken an extended holiday to get things going again. Should have loads of pics of the lovely powder coated rear suspension, polybushes and new brakes over the next few days...
RickBristol said:
helix402 said:
On the E46 you have an upper ball joint on the rear susp and a solid lower one. The M3 E46 runs ball joints top and bottom, not sure if this works on the E36 but may be worth considering.
On any E46 you can run ball joints top and bottom.
Not bothered about that really. The lower and upper arm bushings are all Powerflex black series, so I'm sure the setup will be fine...On any E46 you can run ball joints top and bottom.
Got them fitted to the trailing arms.
However, when it came to fitting the upper, and especially the lower control arms, we decided that for better suspension movement, that it would be better to fit rose joints for the lower control arms too...

Once done, the difference in how the lower control arm moved, without any twisting of the separate control arm leafs, and how much easier they were to fit, made us feel a lot happier for going the extra mile.

If anyone wants a set of Powerflex black series lower control arm bushings, let me know...
Have a big update for the body shell rear suspension area clean-up, treating and suspension refit coming - maybe - tomorrow. Bit tpp tiered to do that tonight...
BGarside said:
Sorry to butt in on this thread but I'm interested in the bushing fitment for my own 328. Is the lower control arm you refer to the camber control arm attached to the bottom of the hub assembly?
Also what is the rose joint part details you used to replace the original bushing?
I aim to gradually improve the suspension on my car as bits wear out.
Cheers
Ben
Yes they are mate. Go to your local BTW dealer, give them your car's reg/VIN number and ask for the top mount rose joints. On the 328 it doesn't have bottom mount rose joints, but they fit. You need to do the tops too. They cost around £45 each.Also what is the rose joint part details you used to replace the original bushing?
I aim to gradually improve the suspension on my car as bits wear out.
Cheers
Ben
Well, I got a bit ahead of myself with my last post.
It was now time to clean up the underside of the bodywork where the rear suspension subframe mounts onto the car.
After removing the fuel tank, the bodywork was found to be on good condition, apart from some surface rust and a little flaky seam sealant.
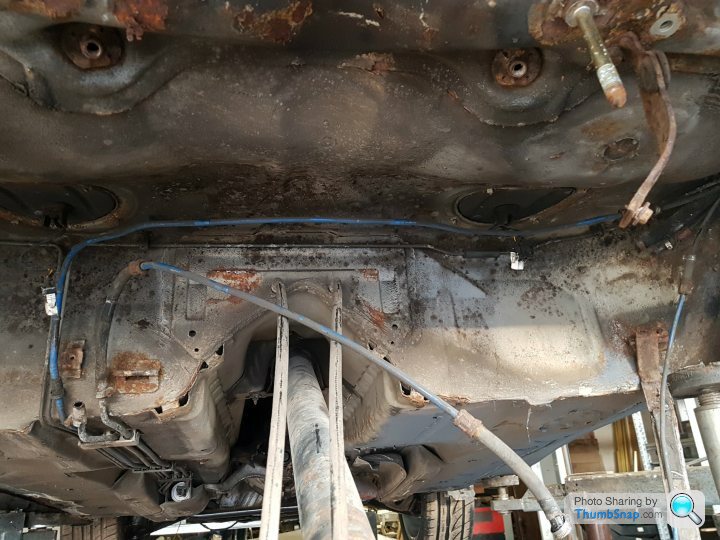

Here you can see that the brake lines were almost rusted through. Why do BMW even use steel brake lines?
We are going to replace all the brake lines and fittings with cupra nickel (kunifer), which is guaranteed against weather and road salt, so will last the (remaining) life of the car. The cost against steel is negligible too...

Here I am using a needle gun to remove the worst of the rust from the trailing arm mounts.

And the result.
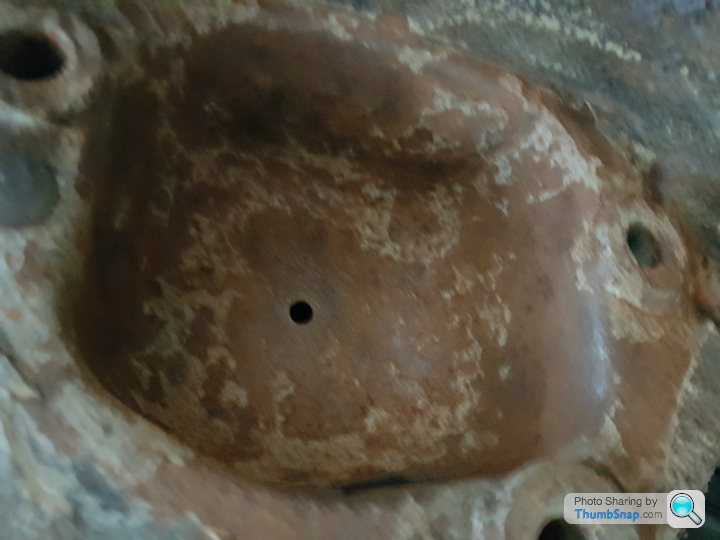
The result of my efforts...

We then applied two coats of Schutz to the area.
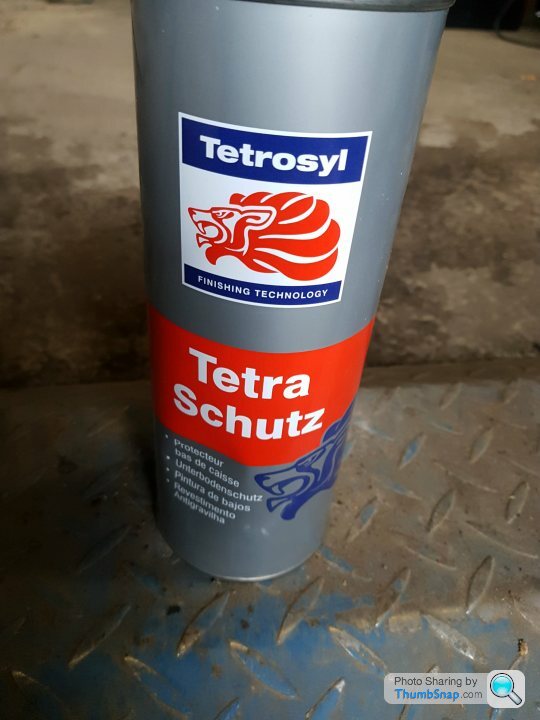
The result was very good.


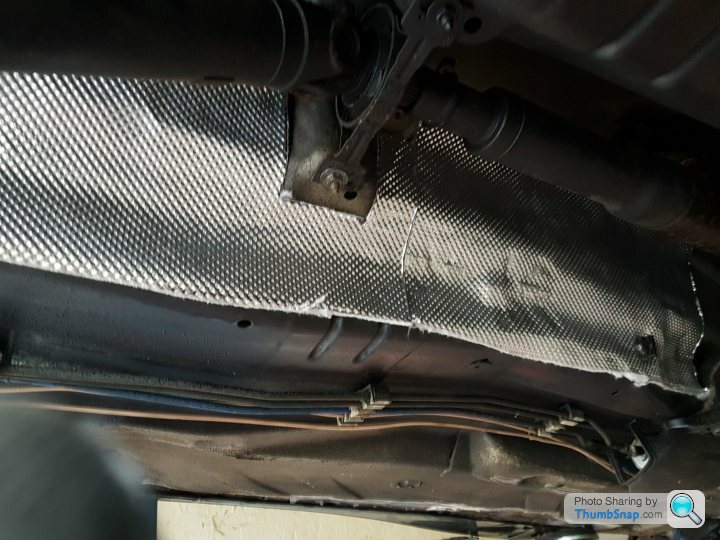
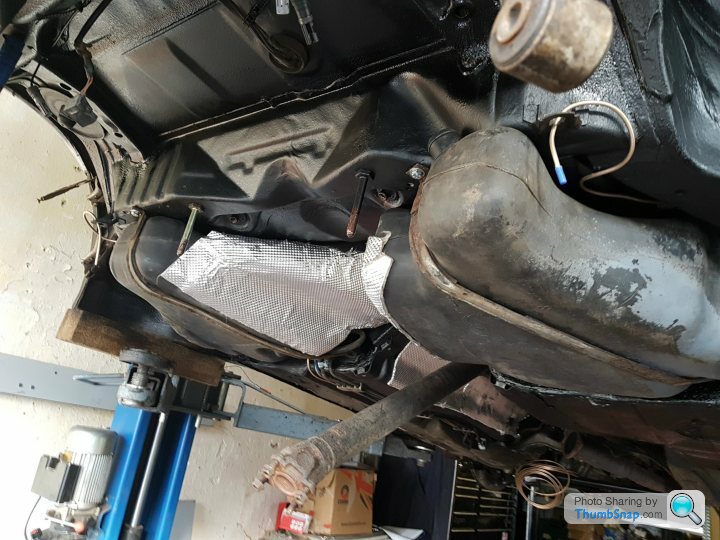
The next job was to clean the fuel tank before fitting the new heat shield material.

The new heat shield material was bought from Agrimech, at a cost of £88!, and was used as the original heat shield was broken and beyond reasonable repair.

Fitted to the fuel tank.

I had enough of the material left to replace the knackered transmission tunnel heat shield too. This material also provides up to 50% sound proofing, so will help keep the noise down from the exhaust.
Here you can see the new kunifer brake lines that we are fitting to the car.

We then refitted the fuel tank.
Next up comes the suspension rebuild and refit.
It was now time to clean up the underside of the bodywork where the rear suspension subframe mounts onto the car.
After removing the fuel tank, the bodywork was found to be on good condition, apart from some surface rust and a little flaky seam sealant.
Here you can see that the brake lines were almost rusted through. Why do BMW even use steel brake lines?
We are going to replace all the brake lines and fittings with cupra nickel (kunifer), which is guaranteed against weather and road salt, so will last the (remaining) life of the car. The cost against steel is negligible too...
Here I am using a needle gun to remove the worst of the rust from the trailing arm mounts.
And the result.
The result of my efforts...
We then applied two coats of Schutz to the area.
The result was very good.
The next job was to clean the fuel tank before fitting the new heat shield material.
The new heat shield material was bought from Agrimech, at a cost of £88!, and was used as the original heat shield was broken and beyond reasonable repair.
Fitted to the fuel tank.
I had enough of the material left to replace the knackered transmission tunnel heat shield too. This material also provides up to 50% sound proofing, so will help keep the noise down from the exhaust.
Here you can see the new kunifer brake lines that we are fitting to the car.
We then refitted the fuel tank.
Next up comes the suspension rebuild and refit.
Edited by RickBristol on Sunday 4th February 14:46
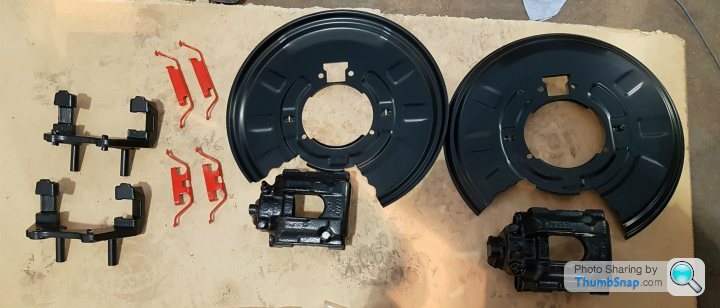
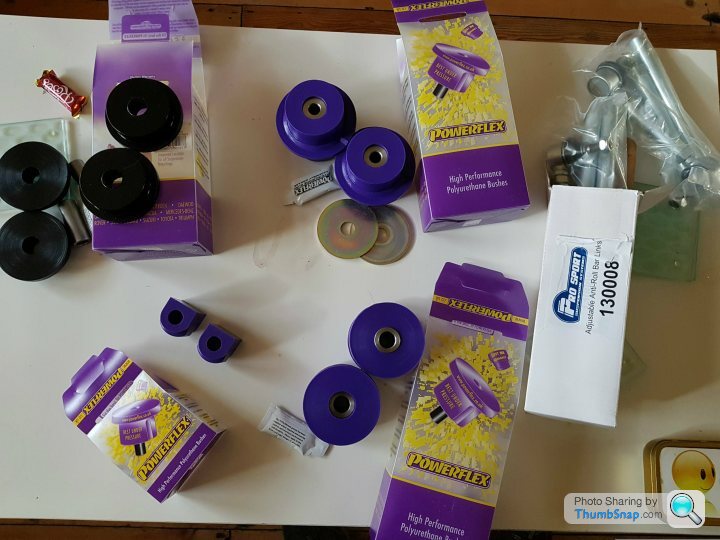
The various parts that make up the rear suspension came back from the powder coater's.
The trailing arm brackets.

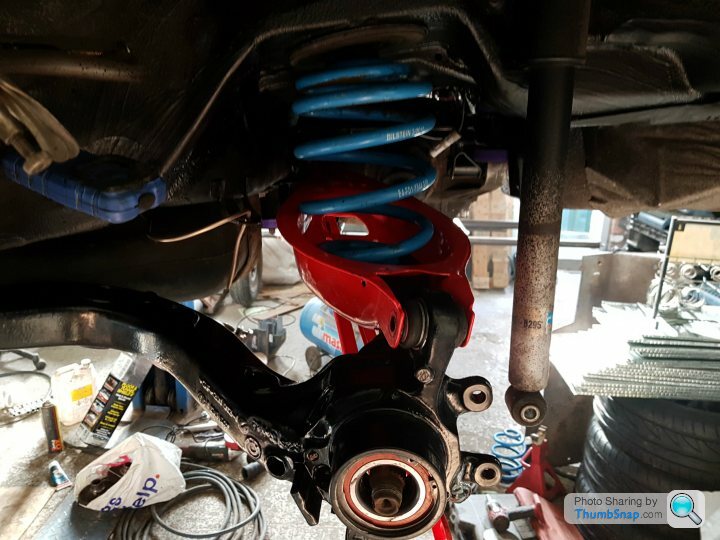
The upper control arm spring carriers - here with the new black series Powerflex bushings fitted.

The diff subframe - here with the new purple series Powerflex mounting bushes fitted.

The trailing arms with the new BMW rose joints (£45 each), new BMW main bearings (£53 each) and new black series Powerflex trailing arm bushings fitted.
And here all together with the rear lower control arms and front and back anti roll bars.

In order to fit the newly powder coated bushing sleeves into the rear lower control arms, I first had to remove the powder coating.

The bushing sleeves could then be fitted without damaging them. Here you can see that we used a couple of nuts to maintain the correct spacing when fitting the sleeves so that the ends of the arms were not distorted.

If you look back a couple of my posts ago, you'll notice that we made the decision to use rose joints for both top and bottom control arm suspension mounts - and why we did it...
A shot of the suspension parts being built up on the car.

The rear control arms connected to the trailing arm itself.
And the springs after fitting.
Next up will be fitting the new brake discs, calipers etc.
The trailing arm brackets.
The upper control arm spring carriers - here with the new black series Powerflex bushings fitted.
The diff subframe - here with the new purple series Powerflex mounting bushes fitted.
The trailing arms with the new BMW rose joints (£45 each), new BMW main bearings (£53 each) and new black series Powerflex trailing arm bushings fitted.
And here all together with the rear lower control arms and front and back anti roll bars.
In order to fit the newly powder coated bushing sleeves into the rear lower control arms, I first had to remove the powder coating.
The bushing sleeves could then be fitted without damaging them. Here you can see that we used a couple of nuts to maintain the correct spacing when fitting the sleeves so that the ends of the arms were not distorted.
If you look back a couple of my posts ago, you'll notice that we made the decision to use rose joints for both top and bottom control arm suspension mounts - and why we did it...
A shot of the suspension parts being built up on the car.
The rear control arms connected to the trailing arm itself.
And the springs after fitting.
Next up will be fitting the new brake discs, calipers etc.
Edited by RickBristol on Sunday 4th February 14:51
Leptons said:
RickBristol said:
Got the new drop links for the front anti roll bar. They're meant for the track, I'm sure they'll just add to the ride 'stiffness'...
The next update will come next weekend, when the rear suspension unit and the brakes get reassembled and fitted to the car.
Those are thing of beauty! Where are they from? My standard ones never seem to last long on track.The next update will come next weekend, when the rear suspension unit and the brakes get reassembled and fitted to the car.
https://www.ebay.co.uk/itm/BMW-E36-ARB-adjustable-...
They are £69 for the pair. Enjoy... 😊
I have another update (the third) in a little less than a week. After what felt like eons in the wilderness, over the last few months... 
Now it's time for the new brakes...
After all the time and effort on the rear suspension, we eventually managed to get the new M-Tech drilled and grooved brakes fitted to the car. I bought new E46 330 front discs and Mintex pads, and also bought a set of second hand E46 330 front calipers and carriers, which I got sand blasted, powder coated and had rebuilt with new seals and pistons.


They look amazing on the car - a shot from underneath - with the new Lemforder E30 wishbones, Myle HD track rod ends and purple tag rack... Back plate delete for extra cooling.

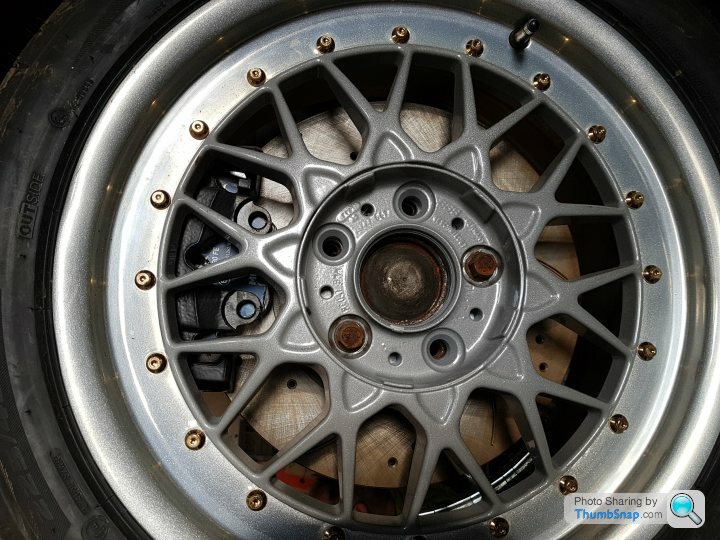
They pretty much fill the 17" RC041 wheels...
I also did the same for the rears, with E46 330 M-Tech drilled and grooved discs, refurbed E46 330 calipers, carriers, back plates and Mintex pads. BUT... They wouldn't fit as the rear trailing arm casting prevented the correct fitment of the hand brake cable, shoes and back plates.... Massive bummer! Take this as good advice if you are thinking of the big brake upgrade for your E36 328 - E46 330 = fronts ONLY.
However, I bit the bullet and bought a set of new M-Tech drilled and grooved E36 328 discs, new back plates, powder coated the original calipers and carriers and rebuilt them with new seals and pistons.
Having then spoken to a local BMW performance specialist about brake imbalance, was informed that if I fitted a set of medium grade disc pads for the rear brakes, that this would help balance things out.
And here they are fitted to the car. A little less impressive/satisfying to look at as the E46 330 brakes but...
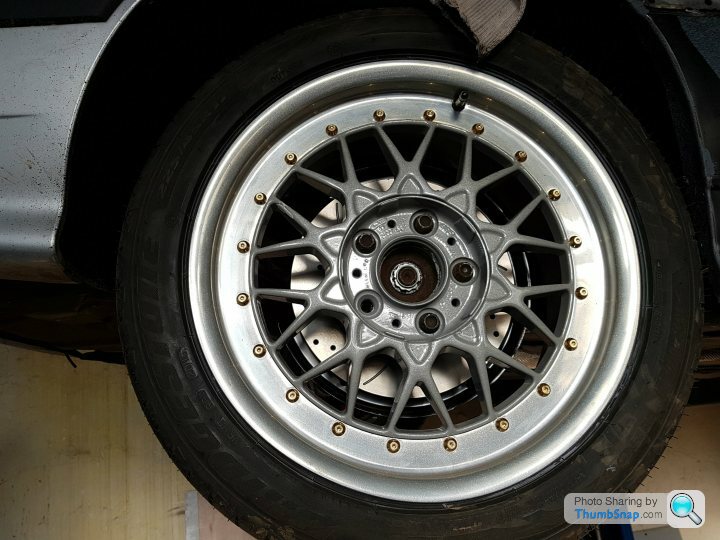
A shot from underneath - with the newly powder coated suspension components, new hand brake cables and wheels.

A nice shot of the rebuilt rear suspension, brakes and wheels.

And finally, for this installment, a shot of the underside of the car.

At least the car is now back on all four wheels and can now be shipped off to the paint shop to finish the bodywork....
After what felt like eons in the wilderness, over the last few months... Now it's time for the new brakes...
After all the time and effort on the rear suspension, we eventually managed to get the new M-Tech drilled and grooved brakes fitted to the car. I bought new E46 330 front discs and Mintex pads, and also bought a set of second hand E46 330 front calipers and carriers, which I got sand blasted, powder coated and had rebuilt with new seals and pistons.
They look amazing on the car - a shot from underneath - with the new Lemforder E30 wishbones, Myle HD track rod ends and purple tag rack... Back plate delete for extra cooling.
They pretty much fill the 17" RC041 wheels...
I also did the same for the rears, with E46 330 M-Tech drilled and grooved discs, refurbed E46 330 calipers, carriers, back plates and Mintex pads. BUT... They wouldn't fit as the rear trailing arm casting prevented the correct fitment of the hand brake cable, shoes and back plates.... Massive bummer!
Take this as good advice if you are thinking of the big brake upgrade for your E36 328 - E46 330 = fronts ONLY.However, I bit the bullet and bought a set of new M-Tech drilled and grooved E36 328 discs, new back plates, powder coated the original calipers and carriers and rebuilt them with new seals and pistons.
Having then spoken to a local BMW performance specialist about brake imbalance, was informed that if I fitted a set of medium grade disc pads for the rear brakes, that this would help balance things out.
And here they are fitted to the car. A little less impressive/satisfying to look at as the E46 330 brakes but...
A shot from underneath - with the newly powder coated suspension components, new hand brake cables and wheels.
A nice shot of the rebuilt rear suspension, brakes and wheels.
And finally, for this installment, a shot of the underside of the car.
At least the car is now back on all four wheels and can now be shipped off to the paint shop to finish the bodywork....
Edited by RickBristol on Monday 5th February 22:55
skylarking808 said:
Great build as always.
Really itching for that first road test now.
Hope the last hurdles are as smooth as those six cylinders!
You and me both mate. Next hurdle will be the interior refit. I'm doing that myself, so should be done quite quickly, once the car comes back from the paint shop. Really itching for that first road test now.
Hope the last hurdles are as smooth as those six cylinders!
Mini update teaser...
The car is now - at effing last - in the spray shop.....
The new front wings are being prepped ready for two part priming before the car gets painted.
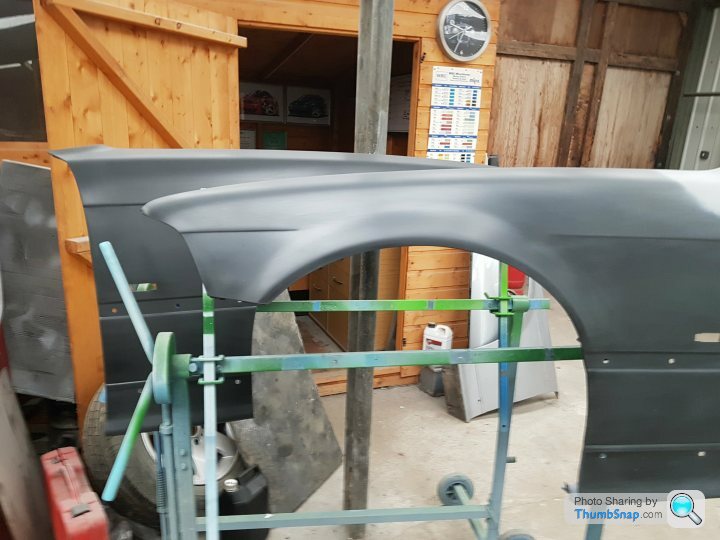
The insides of the wings have been stone chipped for extra protection and longevity.


And the bonnet has been prepped, including sorting a couple of minor dents, ready for priming.


Can at last start getting excited about this car being finished and back on the road....
The car is now - at effing last - in the spray shop.....
The new front wings are being prepped ready for two part priming before the car gets painted.
The insides of the wings have been stone chipped for extra protection and longevity.
And the bonnet has been prepped, including sorting a couple of minor dents, ready for priming.
Can at last start getting excited about this car being finished and back on the road....
C70R said:
Are they pattern or OEM parts?
I bought a pattern wing for my E46 a few months back, and my mechanic had one helluva time lining it up properly. It was £100 painted, so I'm quite happy to have a tiny compromise on quality of fit, tbh.
Euro parts platinum range. £80 each, £140 for the pair. OEM were £240 each!... I bought a pattern wing for my E46 a few months back, and my mechanic had one helluva time lining it up properly. It was £100 painted, so I'm quite happy to have a tiny compromise on quality of fit, tbh.
Day 120 million in the life and times of my car restoration project....
The front bumper has now been prepped ready for priming.

The front wings have now been primed.


The car has been cleaned, ready for the main bodywork prep.


The welding has been completed and is ready to be ground back and will then be ready to prep and prime.
Driver's side.


Passenger side.


The rear bumber has been removed and will be repainted as we found a couple of scratches and marks on it.

Have cleaned the bodywork under the scuttle.


I have even cleaned the inner wing areas where the welding for the sill replacements was done so that these areas can be stonechipped and painted.


I also thoroughly cleaned around the boot seal area.


And the rear lights.


I'll go back to the paint shop in a couple of days, when the main bodywork should be in the process of being primed...
The front bumper has now been prepped ready for priming.
The front wings have now been primed.
The car has been cleaned, ready for the main bodywork prep.
The welding has been completed and is ready to be ground back and will then be ready to prep and prime.
Driver's side.
Passenger side.
The rear bumber has been removed and will be repainted as we found a couple of scratches and marks on it.
Have cleaned the bodywork under the scuttle.
I have even cleaned the inner wing areas where the welding for the sill replacements was done so that these areas can be stonechipped and painted.
I also thoroughly cleaned around the boot seal area.
And the rear lights.
I'll go back to the paint shop in a couple of days, when the main bodywork should be in the process of being primed...
LanceRS said:
It looks like you are missing the protective rubber sleeve that covers the wires into the boot Lid?
Make sure that they are protected and not rubbing. Even inside the cover, mine wore through and caused all sorts of interesting issues.
Have already been through the pain of the OBC giving a list of errors, and the central locking not working for the boot, as the wiring is damaged. I went through all the trouble of soldering the damaged wires and insulating them only to find that all my efforts made no difference whatsoever... Make sure that they are protected and not rubbing. Even inside the cover, mine wore through and caused all sorts of interesting issues.
Might consider getting one of those repair kits from Schmeidmans and see if it solves the issues...
Things are now coming along nicely in the spray shop.
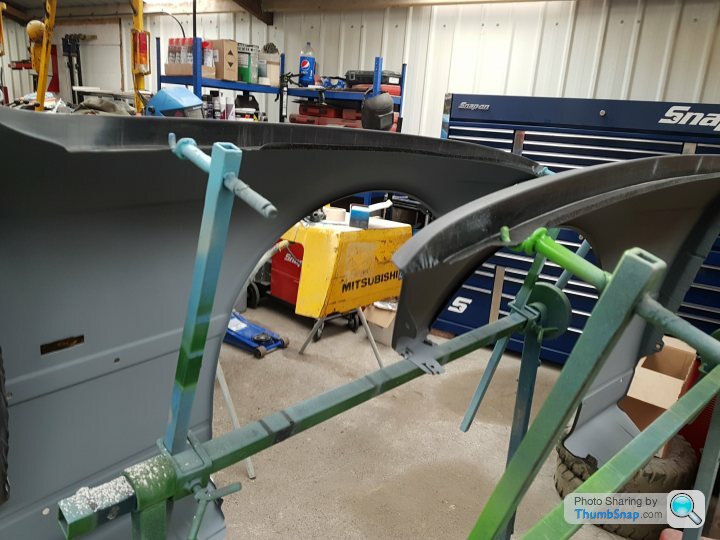
The welds on the inner wing struts have been ground back and stone chipped.


Had a minor bit of surface rust on the back bottom edge of the passenger door. This was sand blasted, treated, had the seam seal replaced and was then epoxy primed.


The new wings have been fitted - with all new proprietary fittings from BMW.


The fit of the Euro parts platinum range wings were perfect and needed no faffing to get them to fit correctly. Happy days!


The door shuts have turned out really well.


That ass!

And now ready to be masked-up and primed...

The welds on the inner wing struts have been ground back and stone chipped.
Had a minor bit of surface rust on the back bottom edge of the passenger door. This was sand blasted, treated, had the seam seal replaced and was then epoxy primed.
The new wings have been fitted - with all new proprietary fittings from BMW.
The fit of the Euro parts platinum range wings were perfect and needed no faffing to get them to fit correctly. Happy days!
The door shuts have turned out really well.
That ass!
And now ready to be masked-up and primed...
As if by magic! - Mr Ben quote, for those of you old enough...

The car is all masked-up.

Rob has done an excellent job on grinding back and filling the welds.


The boot is not being painted - still perfect - so has been masked up as well.

Love the attention to detail.

Masking in place ready to stone chip under the sills.

And the doors have been completed.


The car and the doors, bonnet, front and rear bumpers are all ready to be two-part epoxy primed, before the final painting....
The car is all masked-up.
Rob has done an excellent job on grinding back and filling the welds.
The boot is not being painted - still perfect - so has been masked up as well.
Love the attention to detail.
Masking in place ready to stone chip under the sills.
And the doors have been completed.
The car and the doors, bonnet, front and rear bumpers are all ready to be two-part epoxy primed, before the final painting....
Gassing Station | Readers' Cars | Top of Page | What's New | My Stuff