Mx5 Rocketeer V6 Conversion Project
Discussion


Another update... This is quite a large one in terms of size, but for what is really a very small mod. But for once I took pictures all the way through the process.
As it was bonus month, I thought I'd treat myself to a couple of purely visual mods. Given the current situation, it seemed frivolous somehow to go out buying piles of hobby bits; but equally getting a couple of items to keep myself busy sounded like a good idea. So I bought a Jass Performance gauge bezel – the idea being that this was maximum hours needed for pounds spent!
The Mx5 interior is a bit dull for me, and over time I’d like to make it a bit less black and plasticky. It will never be a luxurious place to be, and that’s missing the point (although I have seen some very cool custom interiors on these cars – and some horrors too!). But some visual interest seemed good.
The normal gauges look like this on my car:
 IMG_20200324_110950 by Jon Fellows, on Flickr
Functional and clear doubtless, but boring. So the gauge pod has to come out.
 IMG_20200324_111311 by Jon Fellows, on Flickr
 IMG_20200324_112534 by Jon Fellows, on Flickr
You then split the gauges away from the bezel and glass which is nice and easy. Then you have to split the glass from the bezel. This is not easy as its glued and breaking something is a real danger. Patience is key here, but you then get this:
 IMG_20200325_110157 by Jon Fellows, on Flickr
The gauge rings then are gently prised off, and the stainless bezel can be fitted.
 IMG_20200325_114858 by Jon Fellows, on Flickr
You then glue the gauge rings back on.
 2020-03-26_09-36-46 by Jon Fellows, on Flickr
 2020-03-26_03-25-37 by Jon Fellows, on Flickr
While this is going on, you also have to take the rev and speedo gauge needles off, to allow a gauge plate to be fitted to each. Teaspoons are the weapon of choice here!
 IMG_20200325_085042 by Jon Fellows, on Flickr
The plates just screw on, and the needles replaced. I also bought some aluminium needle caps and clipped these on at this point.
The glass is then reglued to the bezel, and the whole glass assembly clipped back to the gauges.
 2020-03-28_09-41-15 by Jon Fellows, on Flickr
Then install the whole lot back into the car. The glory job!
 IMG_20200328_144440 by Jon Fellows, on Flickr
And a quick before and after shot for reference…
Before:
 IMG_20200324_111005 by Jon Fellows, on Flickr
After:
 IMG_20200328_144447 by Jon Fellows, on Flickr
Overall, I’m pleased how it looks, for what is a pretty cheap mod. It does look a bit out of place in my car at the moment, but over time hopefully some more judicious changes will begin to tie it all together without going too mad. That’s the plan anyway!
As it was bonus month, I thought I'd treat myself to a couple of purely visual mods. Given the current situation, it seemed frivolous somehow to go out buying piles of hobby bits; but equally getting a couple of items to keep myself busy sounded like a good idea. So I bought a Jass Performance gauge bezel – the idea being that this was maximum hours needed for pounds spent!
The Mx5 interior is a bit dull for me, and over time I’d like to make it a bit less black and plasticky. It will never be a luxurious place to be, and that’s missing the point (although I have seen some very cool custom interiors on these cars – and some horrors too!). But some visual interest seemed good.
The normal gauges look like this on my car:
IMG_20200324_110950 by Jon Fellows, on FlickrFunctional and clear doubtless, but boring. So the gauge pod has to come out.
IMG_20200324_111311 by Jon Fellows, on FlickrIMG_20200324_112534 by Jon Fellows, on FlickrYou then split the gauges away from the bezel and glass which is nice and easy. Then you have to split the glass from the bezel. This is not easy as its glued and breaking something is a real danger. Patience is key here, but you then get this:
IMG_20200325_110157 by Jon Fellows, on FlickrThe gauge rings then are gently prised off, and the stainless bezel can be fitted.
IMG_20200325_114858 by Jon Fellows, on FlickrYou then glue the gauge rings back on.
2020-03-26_09-36-46 by Jon Fellows, on Flickr2020-03-26_03-25-37 by Jon Fellows, on FlickrWhile this is going on, you also have to take the rev and speedo gauge needles off, to allow a gauge plate to be fitted to each. Teaspoons are the weapon of choice here!
IMG_20200325_085042 by Jon Fellows, on FlickrThe plates just screw on, and the needles replaced. I also bought some aluminium needle caps and clipped these on at this point.
The glass is then reglued to the bezel, and the whole glass assembly clipped back to the gauges.
2020-03-28_09-41-15 by Jon Fellows, on FlickrThen install the whole lot back into the car. The glory job!
IMG_20200328_144440 by Jon Fellows, on FlickrAnd a quick before and after shot for reference…
Before:
IMG_20200324_111005 by Jon Fellows, on FlickrAfter:
IMG_20200328_144447 by Jon Fellows, on FlickrOverall, I’m pleased how it looks, for what is a pretty cheap mod. It does look a bit out of place in my car at the moment, but over time hopefully some more judicious changes will begin to tie it all together without going too mad. That’s the plan anyway!
Cheers for the kind comments. I'm really pleased with it actually. For such a simple and cheap mod,I think it looks very smart.
Jass Performance do a more complete look which replaces the warning lights and all of the gauge numbers too, but this was significantly more pricey and while I'm sure it would suit some builds I felt it was a bit too fancy for me. I like the stainless to lift the look, but still keeping the nice easy read numbers.
Jass Performance do a more complete look which replaces the warning lights and all of the gauge numbers too, but this was significantly more pricey and while I'm sure it would suit some builds I felt it was a bit too fancy for me. I like the stainless to lift the look, but still keeping the nice easy read numbers.
Another very minor update, but little details should hopefully add up over time.
Firstly, I fitted a new Yuasa battery. The old random one did work, but this is higher spec and actually fits in the boot compartment. However, no pictures of that - try and imagine what changing a battery might look like and you'll be there!
I also bought stainless vent rings from Jass Performance at the same time as my gauge plates etc. However, before fitting them, I wanted to fix my droopy vents (very common on Mx5's...) which involves removing the vent assemblies and taking them apart. The eyeball vent is only stopped from moving by some felt on the vent 'socket' which has ceased to offer any friction over the last 20+ years.
This is the vent split apart:
 2020-04-07_10-02-36 by Jon Fellows, on Flickr
And with the felt replaced inside the socket:
 20200403_162649 by Jon Fellows, on Flickr
Sadly, I went a bit mad and decided to wash the plastics as they were a bit grubby. So I gently washed them in warm soapy water which had the effect of turning all the eyeballs a mottled grey. I have no picture of this, but it meant having to repaint the eyeballs satin black... This is why you shouldn't wash...
However, with the vents back together and stainless rings in place, the cabin now looks like this (forgive the heavily filtered picture - my phone wasn't happy taking pictured into the sun and this was the best quick way of making it visible!):
 2020-04-07_01-04-22 by Jon Fellows, on Flickr
I have also changed the door handle on the drivers side to an armrest. A lot of owners take the armrests off, but I like having somewhere to put my arm on motorways etc, so have fitted one to see how I get on with it. I have fitted it very poorly, but as I want to change the doorcards anyway this was just an exercise in seeing what type of doorpull to go for. So far, I quite like the armrest, so it will probably stay (but fitted to a doorcard that works with it), although it is also cracked so I'll need to source another drivers side one which is a trifle vexing!
 20200407_113055 by Jon Fellows, on Flickr
 20200407_113028 by Jon Fellows, on Flickr
Again, a small update but progress still...
Firstly, I fitted a new Yuasa battery. The old random one did work, but this is higher spec and actually fits in the boot compartment. However, no pictures of that - try and imagine what changing a battery might look like and you'll be there!
I also bought stainless vent rings from Jass Performance at the same time as my gauge plates etc. However, before fitting them, I wanted to fix my droopy vents (very common on Mx5's...) which involves removing the vent assemblies and taking them apart. The eyeball vent is only stopped from moving by some felt on the vent 'socket' which has ceased to offer any friction over the last 20+ years.
This is the vent split apart:
2020-04-07_10-02-36 by Jon Fellows, on FlickrAnd with the felt replaced inside the socket:
20200403_162649 by Jon Fellows, on FlickrSadly, I went a bit mad and decided to wash the plastics as they were a bit grubby. So I gently washed them in warm soapy water which had the effect of turning all the eyeballs a mottled grey. I have no picture of this, but it meant having to repaint the eyeballs satin black... This is why you shouldn't wash...
However, with the vents back together and stainless rings in place, the cabin now looks like this (forgive the heavily filtered picture - my phone wasn't happy taking pictured into the sun and this was the best quick way of making it visible!):
2020-04-07_01-04-22 by Jon Fellows, on FlickrI have also changed the door handle on the drivers side to an armrest. A lot of owners take the armrests off, but I like having somewhere to put my arm on motorways etc, so have fitted one to see how I get on with it. I have fitted it very poorly, but as I want to change the doorcards anyway this was just an exercise in seeing what type of doorpull to go for. So far, I quite like the armrest, so it will probably stay (but fitted to a doorcard that works with it), although it is also cracked so I'll need to source another drivers side one which is a trifle vexing!
20200407_113055 by Jon Fellows, on Flickr20200407_113028 by Jon Fellows, on FlickrAgain, a small update but progress still...
sassthathoopie said:
Thanks for your comprehensive thread.
Back in 2016 Wheels in Motion fitted BC Racing coilovers to my 1992 V-Special, together with a new set of OEM bushes, and their 'fast road' alignment. The car has been absolutely fantastic to drive ever since - the best ~£1000 I've ever spent on a car.
Six months back I swapped some reasonably light 15x7" JDM wheels fitted with 195/50/15 tyres for a set of super light 14" magnesium Bridgestone Super RAPs with 185/60/14. The combination of the new wheels and the suspension is sensational. Two of my MX5 owning mates have driven the car and are in agreement.
Best of luck with it.
BC or Meister R once funds allow!

Hi, cheers for the kind words and tbe feedback. Back in 2016 Wheels in Motion fitted BC Racing coilovers to my 1992 V-Special, together with a new set of OEM bushes, and their 'fast road' alignment. The car has been absolutely fantastic to drive ever since - the best ~£1000 I've ever spent on a car.
Six months back I swapped some reasonably light 15x7" JDM wheels fitted with 195/50/15 tyres for a set of super light 14" magnesium Bridgestone Super RAPs with 185/60/14. The combination of the new wheels and the suspension is sensational. Two of my MX5 owning mates have driven the car and are in agreement.
Best of luck with it.
BC or Meister R once funds allow!
I was talking to a dealer of Intrax suspension which I liked the look of as it looked fairly reasonably priced but is custom valved etc for your car. However, they have no measurements for a mk1 mx5 so that would need a trip to Holland!
I haven't definitely ruled it out, as it would be quite cool, but especially now that plan would have to be put right off... One for the future perhaps.
FNG said:
I know you've painted the eyeball vents now, but a tip anyway if you find you've got greyed plastics.
Apply a bit of oil - groundnut oil is ideal as it's odourless, it's also why some people recommend using peanut butter - it replaces the lost oils in the plastic and can often bring them back to black.
Can get a decent amount for well under a quid, lasts ages, also refreshes rubbers and bumpers etc if they're fading and brings the correct finish back, which paint or silicon based back-to-black type treatments don't.
Had I but known, that could have saved a lot of grief!Apply a bit of oil - groundnut oil is ideal as it's odourless, it's also why some people recommend using peanut butter - it replaces the lost oils in the plastic and can often bring them back to black.
Can get a decent amount for well under a quid, lasts ages, also refreshes rubbers and bumpers etc if they're fading and brings the correct finish back, which paint or silicon based back-to-black type treatments don't.
Not an update as such, but just some photos of the car as I realise I have very few pictures of just the car. Just lots of close up shots of random bits of it...!
I am no photographer I should say, as you can doubtless tell. But this is my best effort with a new phone!
 20200410_081850 by Jon Fellows, on Flickr
 20200409_230953 by Jon Fellows, on Flickr
 20200410_225449 by Jon Fellows, on Flickr
 20200409_111617 by Jon Fellows, on Flickr
I am no photographer I should say, as you can doubtless tell. But this is my best effort with a new phone!
20200410_081850 by Jon Fellows, on Flickr20200409_230953 by Jon Fellows, on Flickr20200410_225449 by Jon Fellows, on Flickr20200409_111617 by Jon Fellows, on FlickrThanks for the positive comments.
I really like the wheels too, and they are (relatively) light for the money, though not as light as some. I steered away from these originally as they are used a lot on mx5s and I fancied something different. But now they're on, I really like them even if they are common!
I really like the wheels too, and they are (relatively) light for the money, though not as light as some. I steered away from these originally as they are used a lot on mx5s and I fancied something different. But now they're on, I really like them even if they are common!
A small update (at least small in terms of work I have carried out – a big bit of work for those who carried it out!).
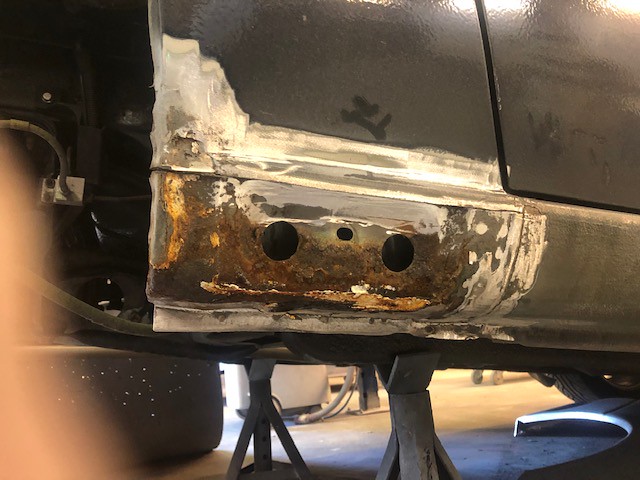
I have finally got the sills sorted on the Mx5. This was a big job, despite them having been done expertly before I bought the car – they were an absolute state and needed to be done properly. While I do own a welder, there is no world in which I could have repaired these so I handed it over to the professionals – and these are the pictures!
I asked for the sills to be repaired (of course), but more than that I also had the black underseal stripped off the length of the sills, replaced without a step and then painted body coloured.
Filler in the sills is always a good start.
 thumbnail_IMG_0228 by Jon Fellows, on Flickr
If the outer sills on these are showing rust, then the inners will be bad:
 thumbnail_IMG_0227 by Jon Fellows, on Flickr
Plate made up.
 thumbnail_IMG_0230 by Jon Fellows, on Flickr
And fitted.
 thumbnail_IMG_0231 by Jon Fellows, on Flickr
 thumbnail_IMG_0232 by Jon Fellows, on Flickr
 thumbnail_IMG_0233 by Jon Fellows, on Flickr
 thumbnail_IMG_0292 by Jon Fellows, on Flickr
The other side is much the same:
 thumbnail_IMG_0276 by Jon Fellows, on Flickr
Even more filth cut out of this side…
 thumbnail_IMG_0277 by Jon Fellows, on Flickr
 thumbnail_IMG_0278 by Jon Fellows, on Flickr
 thumbnail_IMG_0280 by Jon Fellows, on Flickr
 thumbnail_IMG_0281 by Jon Fellows, on Flickr
 thumbnail_IMG_0282 by Jon Fellows, on Flickr
 thumbnail_IMG_0284 by Jon Fellows, on Flickr
thumbnail_IMG_0284 by Jon Fellows, on Flickr
I need to take a photo of it all finished up now, but this is the majority of the work covered. I’m very pleased to finally have it all buttoned up and solid for what (hopefully) will be years to come. That’s the plan anyway!
I have finally got the sills sorted on the Mx5. This was a big job, despite them having been done expertly before I bought the car – they were an absolute state and needed to be done properly. While I do own a welder, there is no world in which I could have repaired these so I handed it over to the professionals – and these are the pictures!
I asked for the sills to be repaired (of course), but more than that I also had the black underseal stripped off the length of the sills, replaced without a step and then painted body coloured.
Filler in the sills is always a good start.
thumbnail_IMG_0228 by Jon Fellows, on FlickrIf the outer sills on these are showing rust, then the inners will be bad:
thumbnail_IMG_0227 by Jon Fellows, on FlickrPlate made up.
thumbnail_IMG_0230 by Jon Fellows, on FlickrAnd fitted.
thumbnail_IMG_0231 by Jon Fellows, on Flickrthumbnail_IMG_0232 by Jon Fellows, on Flickrthumbnail_IMG_0233 by Jon Fellows, on Flickrthumbnail_IMG_0292 by Jon Fellows, on FlickrThe other side is much the same:
thumbnail_IMG_0276 by Jon Fellows, on FlickrEven more filth cut out of this side…
thumbnail_IMG_0277 by Jon Fellows, on Flickrthumbnail_IMG_0278 by Jon Fellows, on Flickrthumbnail_IMG_0280 by Jon Fellows, on Flickrthumbnail_IMG_0281 by Jon Fellows, on Flickrthumbnail_IMG_0282 by Jon Fellows, on Flickrthumbnail_IMG_0284 by Jon Fellows, on Flickrthumbnail_IMG_0284 by Jon Fellows, on FlickrI need to take a photo of it all finished up now, but this is the majority of the work covered. I’m very pleased to finally have it all buttoned up and solid for what (hopefully) will be years to come. That’s the plan anyway!
Quick couple of pics I have just taken of the painted sills to complete this post... Forgive the less than clean state of the car!
 20200602_132220 by Jon Fellows, on Flickr
 20200602_132208 by Jon Fellows, on Flickr
20200602_132220 by Jon Fellows, on Flickr20200602_132208 by Jon Fellows, on FlickrHughG said:
Great that the car is structurally sound now and top marks for commitment to it. Is there stonechip, or similar, beneath the paint giving that orange peel look?
Cheers, I'm pleased its all sound again now.You're quite right, its stonechip up until the crease midway up the door and then painted. That's the original finish which has just been matched.
crossie said:
you stripping the jag for a spare engine/gearbox?
No, the jag has a 4.0 V8 and wouldn't fit I suspect! The V6 is generally out of an s-type. The jag is another summer project: https://www.pistonheads.com/gassing/topic.asp?h=0&...
Another very small update.
For a while I've been using my old Alpine single DIN headunit for music and such. However, I fancied a double DIN unit as a) I've never had a car that can fit one b) double DIN fills the gap better and looks more cohesive and c) Android Auto etc brings maps and nav etc into the car nice and easily rather than having phones and cables dangling around the place.
Happily I found the headunit I was interested in going secondhand but almost new on an extremely well know auction site so managed to save myself some money there.
I removed the tombstone (centre console) and removed the old headunit.
 20200607_120235 by Jon Fellows, on Flickr
I then fitted my new one - this is purely as a trial to check functionality etc... This is not how it will remain! But so far I'm pleased with it. I've ordered a fitting kit for a double DIN unit among a few other little bits so hopefully the upgrade of the interior should continue soon.
 20200607_121934 by Jon Fellows, on Flickr
For a while I've been using my old Alpine single DIN headunit for music and such. However, I fancied a double DIN unit as a) I've never had a car that can fit one b) double DIN fills the gap better and looks more cohesive and c) Android Auto etc brings maps and nav etc into the car nice and easily rather than having phones and cables dangling around the place.
Happily I found the headunit I was interested in going secondhand but almost new on an extremely well know auction site so managed to save myself some money there.
I removed the tombstone (centre console) and removed the old headunit.
20200607_120235 by Jon Fellows, on FlickrI then fitted my new one - this is purely as a trial to check functionality etc... This is not how it will remain! But so far I'm pleased with it. I've ordered a fitting kit for a double DIN unit among a few other little bits so hopefully the upgrade of the interior should continue soon.
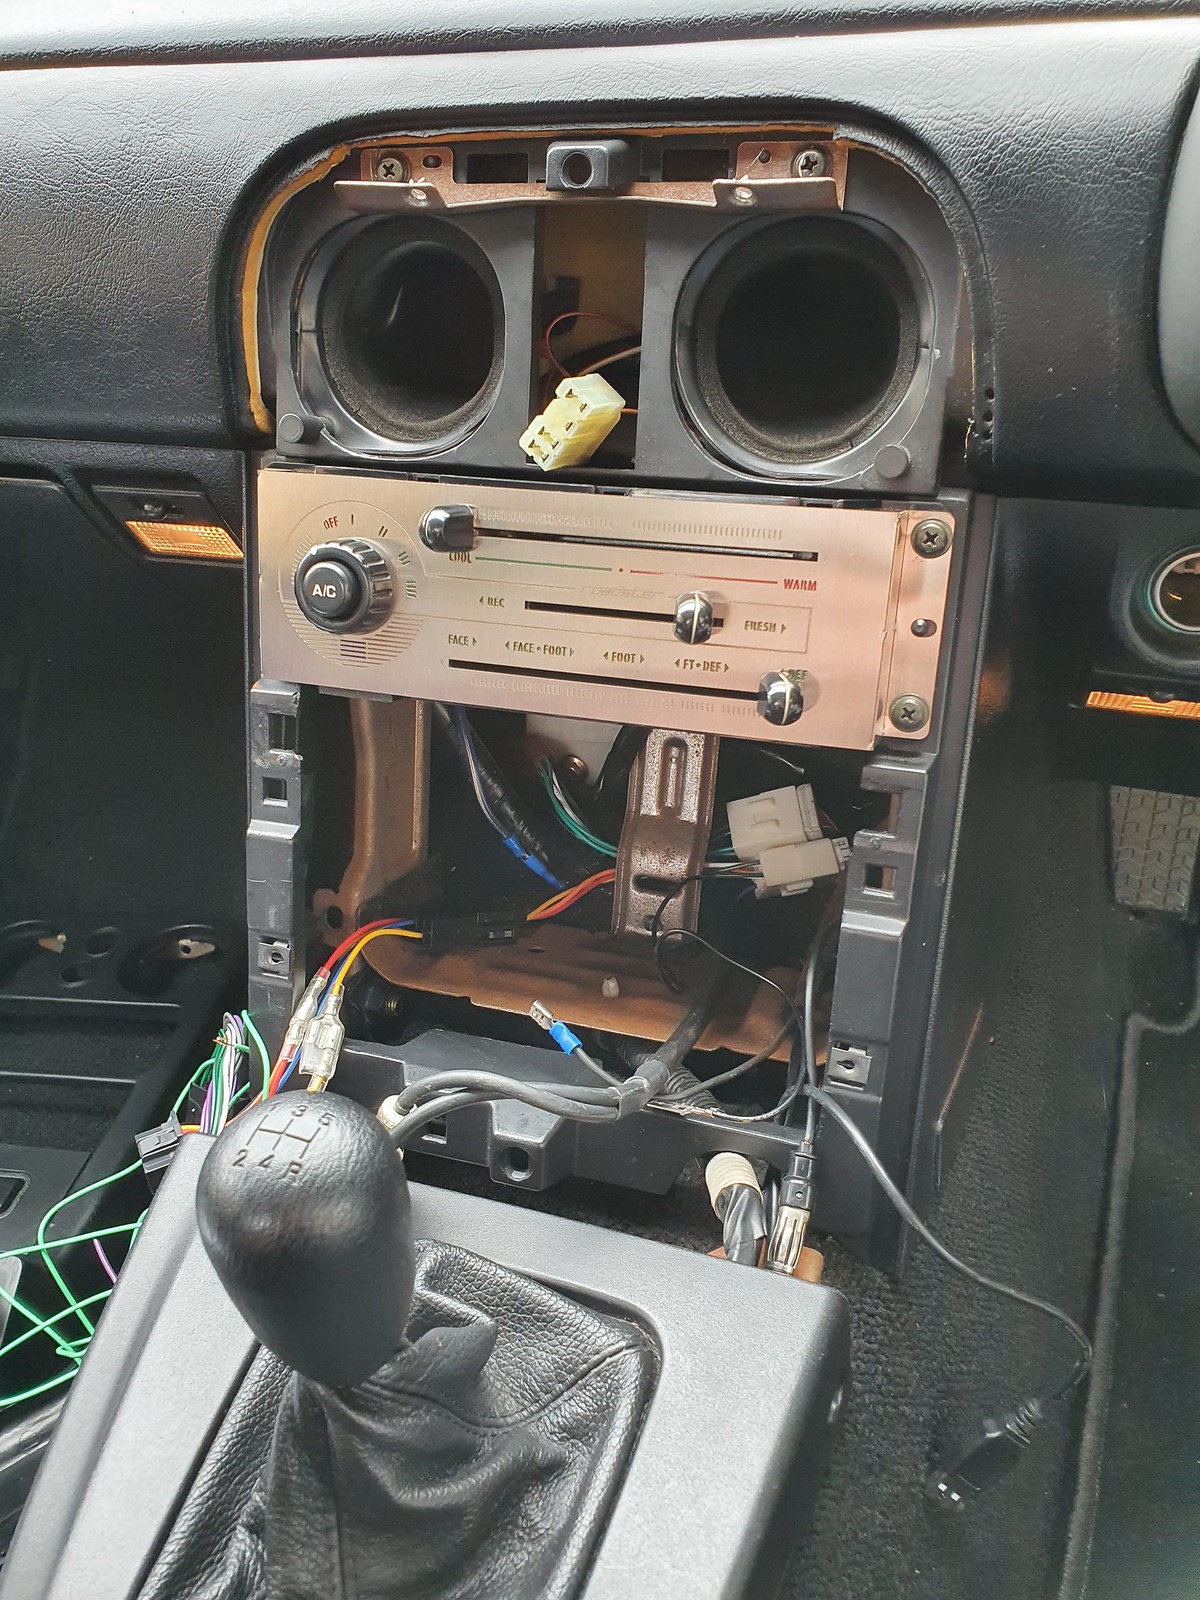
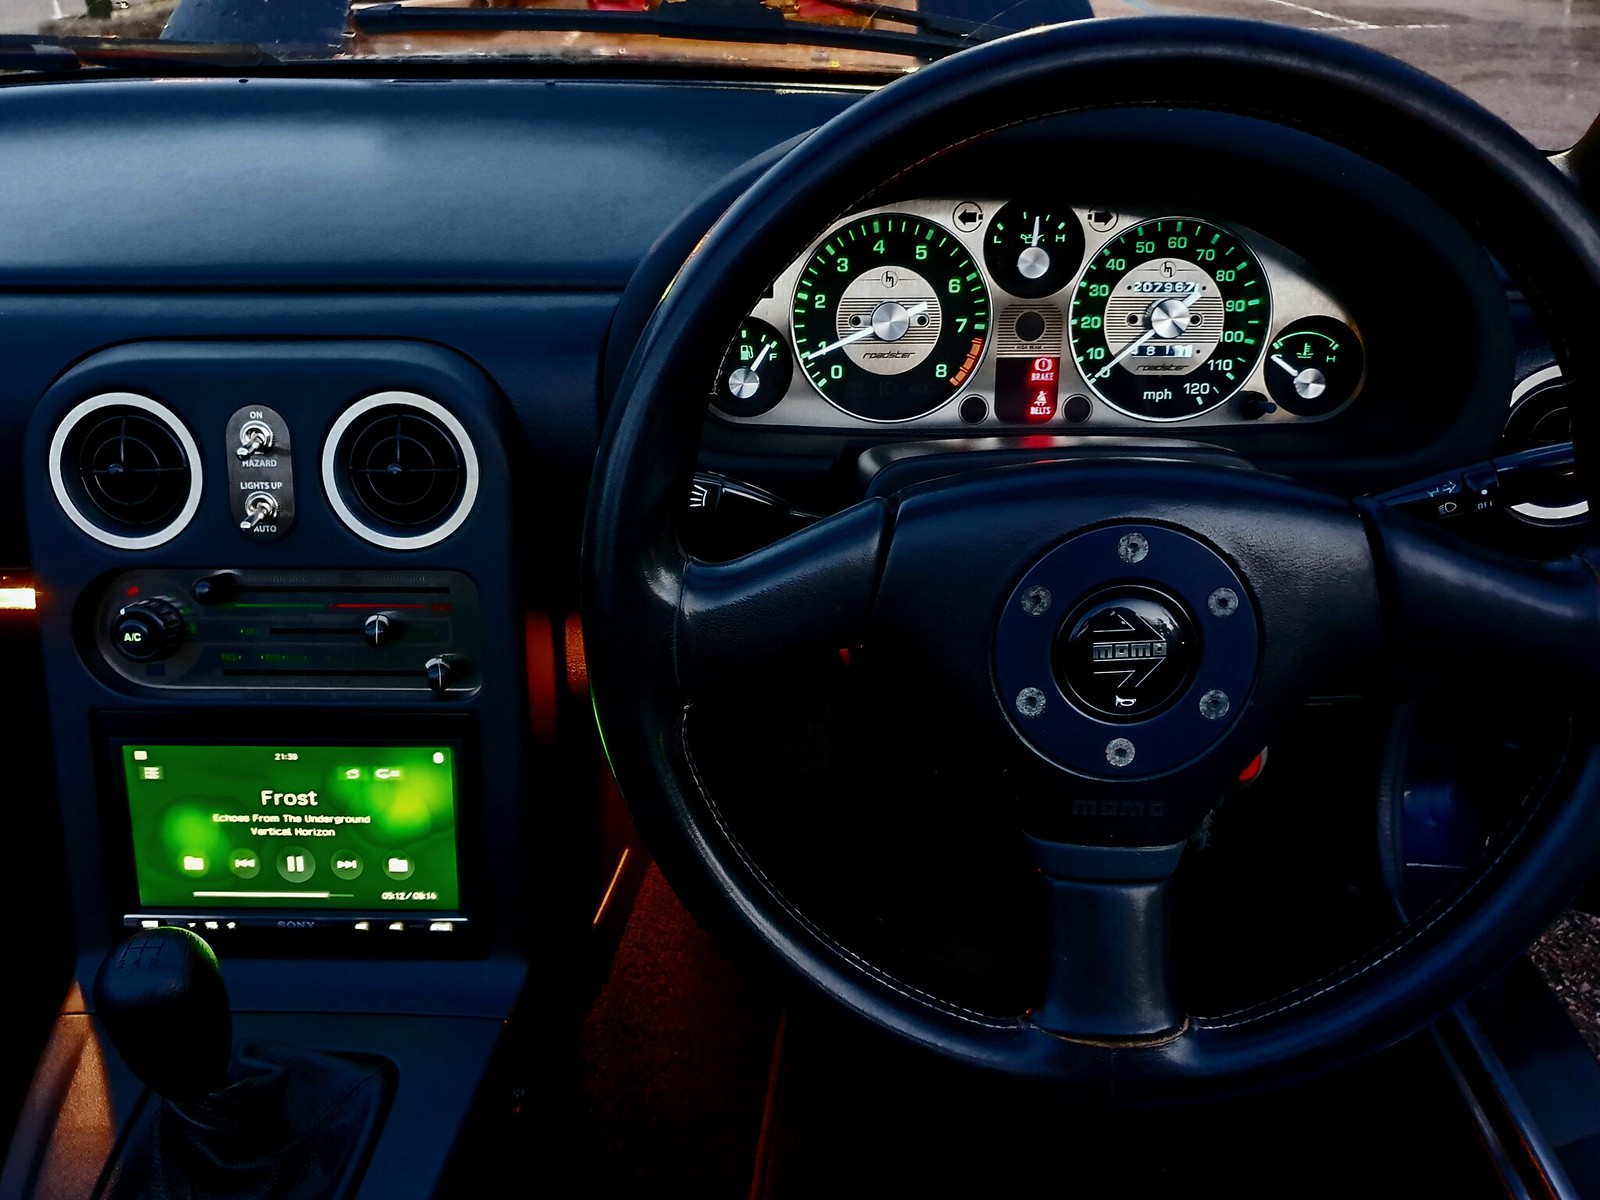
20200607_121934 by Jon Fellows, on FlickrAnother minor update as I start making the interior a bit less tatty and slightly less plasticky.
Last time I had roughly fitted my new headunit just to check it all worked, which happily it did. However, to get it fitting nice and flush with the centre console face I bought a fitting cage which gives adjustability. I also bought a new centre console as some fool in the past had tried screwing some screws into the back of it that were too long and had raised bumps in the surface!
As all this was apart, I also decided to fit a new stainless HVAC panel to replace the yellowing item in my car, as well as new switches for the hazard lights and pop-up healights. It made sense to do this all in one go.
So to start, the HVAC face plate needed to come apart.
 20200612_162200 by Jon Fellows, on Flickr
The new stainless plate is then fitted over the top and the sliders replaced.
 20200612_171101 by Jon Fellows, on Flickr
This done, the tombstone (centre console) can be fitted which I had already attached the headunit and new switches to (no photos as I totally forgot to take any alas!).
 20200615_133812 by Jon Fellows, on Flickr
 20200615_133805 by Jon Fellows, on Flickr
There is still a way to go but I’m pleased that it has neatened up the dash area and got rid of somem yellowing plastic bits. I also tried to take a shot at night for the illumination but this didn’t some out particularly well. However, I’ll post it anyway!
 20200616_074748 by Jon Fellows, on Flickr
Last time I had roughly fitted my new headunit just to check it all worked, which happily it did. However, to get it fitting nice and flush with the centre console face I bought a fitting cage which gives adjustability. I also bought a new centre console as some fool in the past had tried screwing some screws into the back of it that were too long and had raised bumps in the surface!
As all this was apart, I also decided to fit a new stainless HVAC panel to replace the yellowing item in my car, as well as new switches for the hazard lights and pop-up healights. It made sense to do this all in one go.
So to start, the HVAC face plate needed to come apart.
20200612_162200 by Jon Fellows, on FlickrThe new stainless plate is then fitted over the top and the sliders replaced.
20200612_171101 by Jon Fellows, on FlickrThis done, the tombstone (centre console) can be fitted which I had already attached the headunit and new switches to (no photos as I totally forgot to take any alas!).
20200615_133812 by Jon Fellows, on Flickr20200615_133805 by Jon Fellows, on FlickrThere is still a way to go but I’m pleased that it has neatened up the dash area and got rid of somem yellowing plastic bits. I also tried to take a shot at night for the illumination but this didn’t some out particularly well. However, I’ll post it anyway!
20200616_074748 by Jon Fellows, on FlickrSway said:
Because for many the mk2 is a better drive...
Improved rear suspension, stiffened shell, much more livable interior.
I've had both NA and NB MX5s as dailys, covered more than 30k in each.
If I were buying again, it'd be a NB for a daily, and a NA for an occasional use fun car.
My NB was a dream, the new owner has boosted the engine to over 400bhp for his track car. He also transferred all the suspension over, and it rides better than his E Class estate whilst handling like a scalded cat.
I quite like NBs. Personally I think most standard Mx5s look a bit weak, but with only a few little mods I like all generations of them. Improved rear suspension, stiffened shell, much more livable interior.
I've had both NA and NB MX5s as dailys, covered more than 30k in each.
If I were buying again, it'd be a NB for a daily, and a NA for an occasional use fun car.
My NB was a dream, the new owner has boosted the engine to over 400bhp for his track car. He also transferred all the suspension over, and it rides better than his E Class estate whilst handling like a scalded cat.
NBs have there advantages for sure, though interestingly the Rocketeer kit uses NB suspension geometry for the replacement front suffrage.
Gassing Station | Readers' Cars | Top of Page | What's New | My Stuff