Hoodedreeper's MX5 (Purple Project)
Discussion


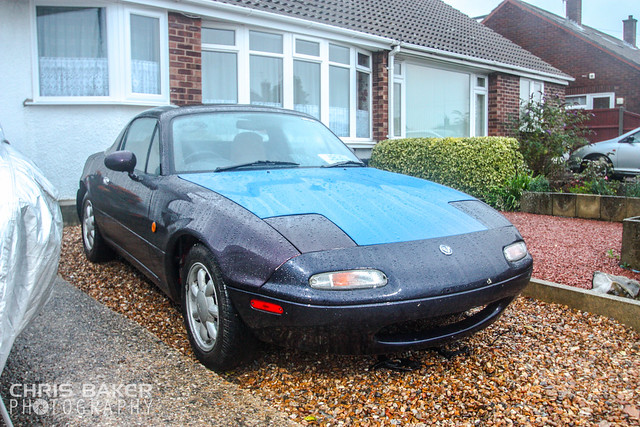
So its been awhile since my last update,i'm used to updating this pretty much every couple of days.
First up,casting back to the end of July i caught a question on Facebook with regards to aftermarket bumpers,and a fella on there said he had one. So i sent him a cheeky message asking for photos. Payment was taken and me and the girlfriend embarked on a 400 mile round trip. Google Maps said it would take 3 1/2 hrs each way. But with how the London M25 is and local road works,it ended up being a nice 10hr round trip (and her BMW E36 323i only used 1/2 tank in total!)
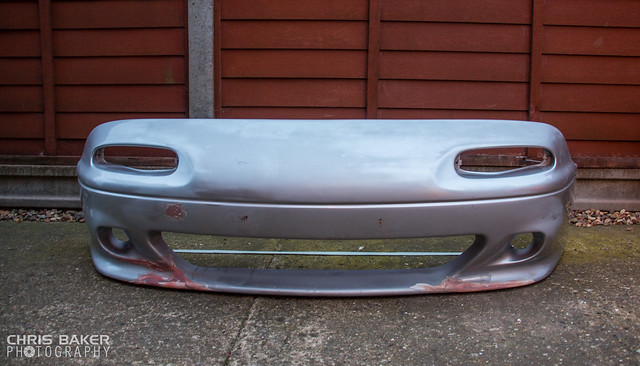
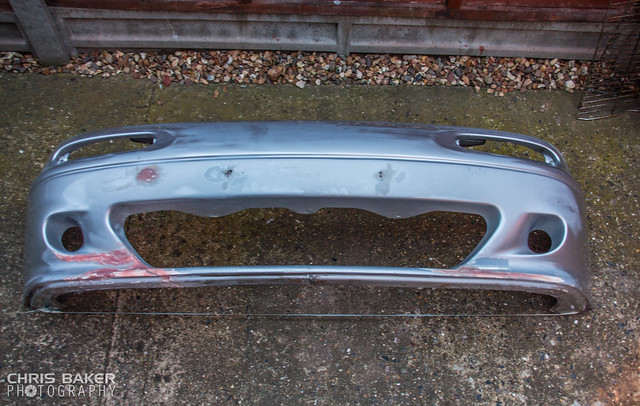
As you can see its been repaired and just needs finishing. This will be booked into the Body Shop for winter time along with some other bits and pieces being painted.
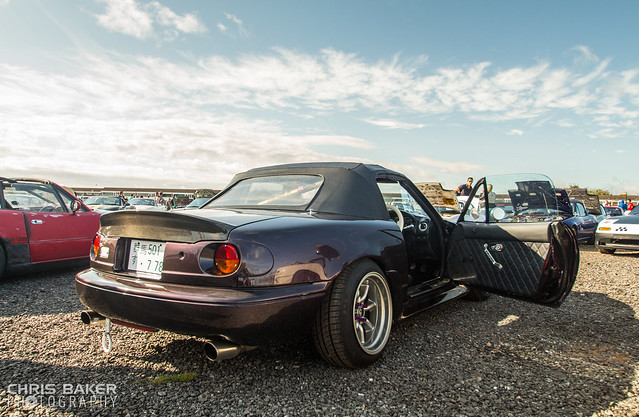
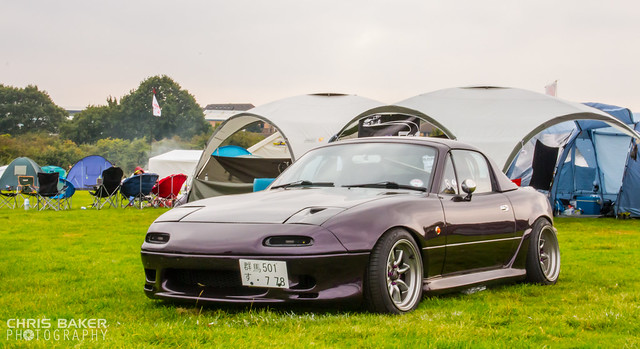
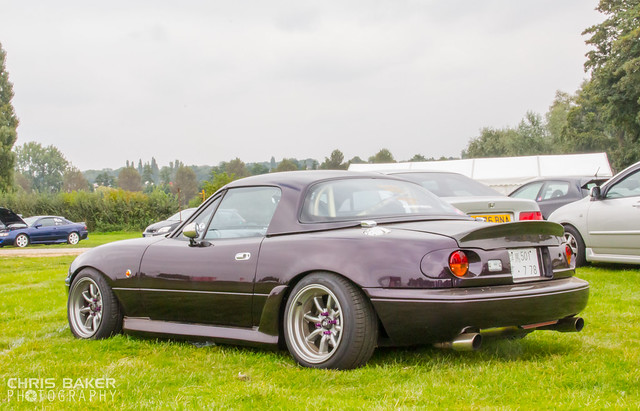
After speaking to the original owner (Richard) of the Purple Monster and looking back on some old photos,coupled with watching some Initial D,i wanted to 'try' and go down a slightly different route. The car has a (what i think) a USDM look,but i wanted to go down the Import look. Now after doing some searching it seems the MX5s in Japan are either near stock looking,or they're all out with big body kits,spoilers etc etc
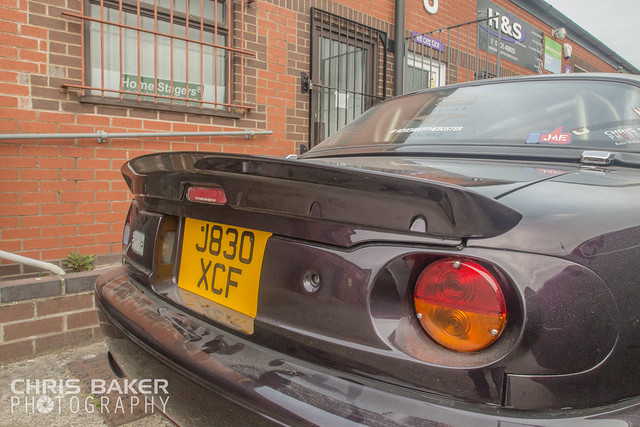
Now this is gonna be difficult as i've already got the body work how i wanted it. So i set to start making some small changes. The first one being some new Show Plates. The current show plates are some California plates with REAPER embossed. I thought it would be awesome to replicate the licence plate the Monster had while it was in Japan. So i came up with this:
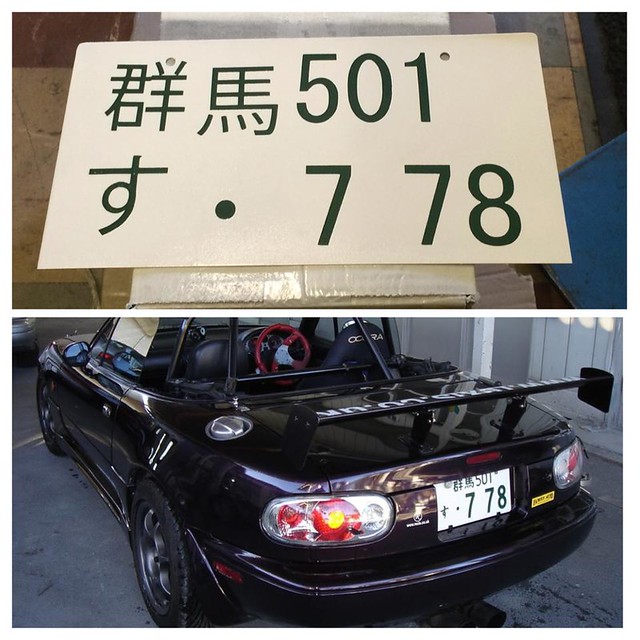
I know its not exactly the same,but for a DIY job it didnt come out too bad (considering a pressed Import Plate to me made is £28.00! (nearly $47 each for those in the US))
Next up was Japfest 2 at Donington Park. MX5Nutz had an incredible club stand of 120+ MX5s on display ranging from stock,to modified,to drift,to race. There was certainly something for everyone. Sketchy (who did an amazing job organising the show and day) had kindly asked me to join the display cars at the front,which circled Ron's Damm'd MX5. It was an emotional day for most and i know Ron was looking down smiling and laughing. I really hope we done him proud
The following Weekend was the RPM Live Show at North Weald Airfield in Essex. This is a new Show for the calender and it a very good day out. A big selection and variation of cars on display,and it was good to see the local drifters putting on a display too.


On the way home from the show i stopped off at the Essex Fives' first Monthly meet,would have been rude not to say hi

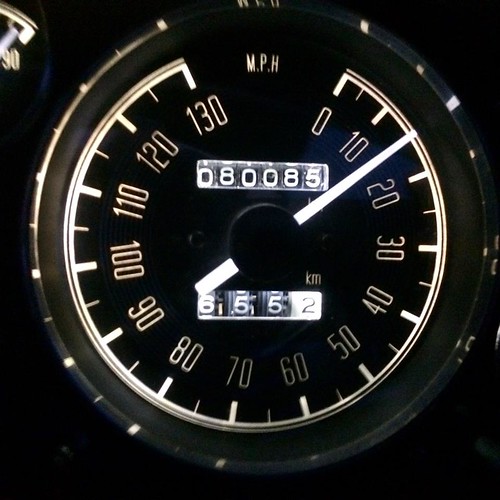
This brings me to Yesterday (Wednesday 27th August). The car was in for it's MOT first thing in the morning,and she passed with flying colours! Thats a relief off my shoulders for another 12 months! Also that day i taxed her,it was quite an expensive day!
Just before the MOT the Monster hit a pretty funny Mileage count
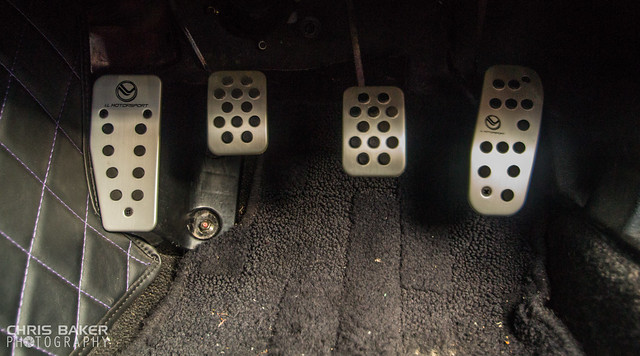
During the Bank Holiday Weekend MX5Parts had 10% off everything,so it would have been rude not to place an order :P In amongst the goodies was a set of I.L Motorsport Pedal Covers. I luckily found a how-to guide on MX5Nutz written by 2bfrank,it can be found here: http://www.mx5nutz.com/forum/index.php?showtopic=1...
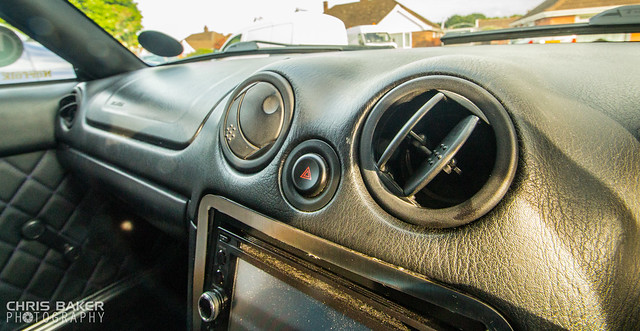
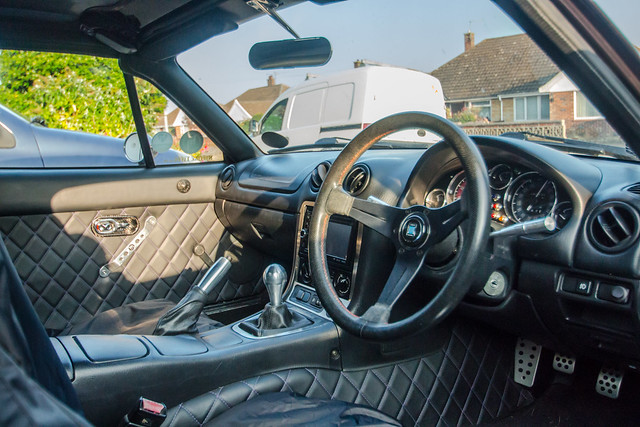
Awhile ago i was browing Club Roadster and came across a photo of a Mk2/NB dashboard with this strange looking air vents. So i did some reading into it and the vents were from a Mitsubishi Eclipse 00-05 (from memory). So i trawled through Ebay.com and managed to find a seller with them for a reasonable price. A 2 week wait later and they arrived on my door step. Fitting was straight forward and incredibly easy,and they finish the dash off nicely
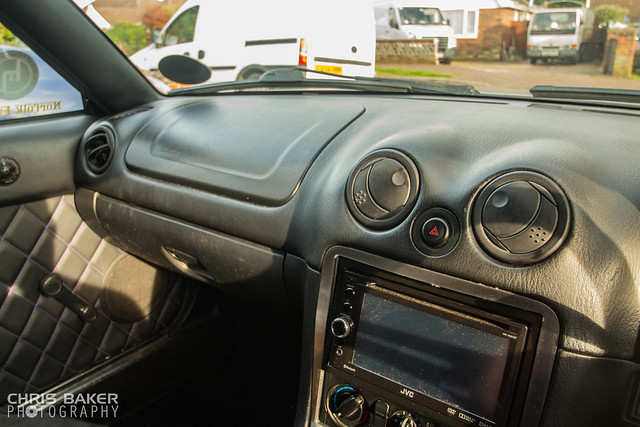
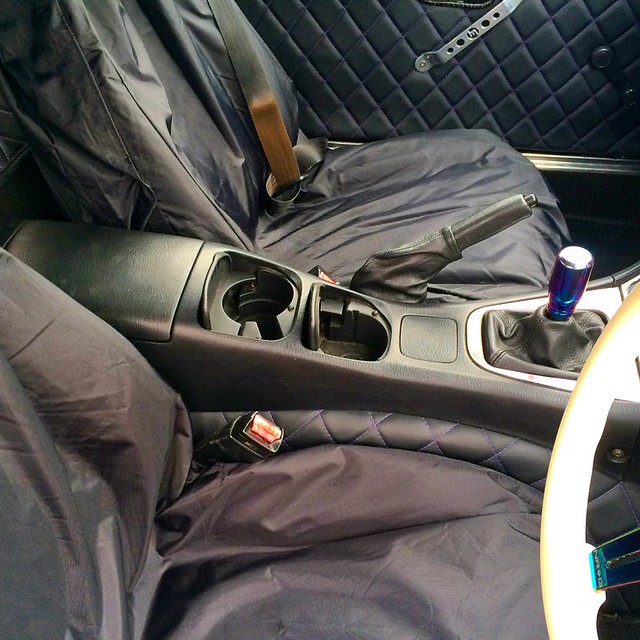
Along with these i fitted a Mk2.5 centre arm rest as i prefered the cup holders on this one (small creature comforts like this makes things so much easier)
So it seems alot has happened in the past month,and i apologize for the lengthy read. Lets see what the next installment brings
First up,casting back to the end of July i caught a question on Facebook with regards to aftermarket bumpers,and a fella on there said he had one. So i sent him a cheeky message asking for photos. Payment was taken and me and the girlfriend embarked on a 400 mile round trip. Google Maps said it would take 3 1/2 hrs each way. But with how the London M25 is and local road works,it ended up being a nice 10hr round trip (and her BMW E36 323i only used 1/2 tank in total!)
As you can see its been repaired and just needs finishing. This will be booked into the Body Shop for winter time along with some other bits and pieces being painted.
After speaking to the original owner (Richard) of the Purple Monster and looking back on some old photos,coupled with watching some Initial D,i wanted to 'try' and go down a slightly different route. The car has a (what i think) a USDM look,but i wanted to go down the Import look. Now after doing some searching it seems the MX5s in Japan are either near stock looking,or they're all out with big body kits,spoilers etc etc
Now this is gonna be difficult as i've already got the body work how i wanted it. So i set to start making some small changes. The first one being some new Show Plates. The current show plates are some California plates with REAPER embossed. I thought it would be awesome to replicate the licence plate the Monster had while it was in Japan. So i came up with this:
I know its not exactly the same,but for a DIY job it didnt come out too bad (considering a pressed Import Plate to me made is £28.00! (nearly $47 each for those in the US))
Next up was Japfest 2 at Donington Park. MX5Nutz had an incredible club stand of 120+ MX5s on display ranging from stock,to modified,to drift,to race. There was certainly something for everyone. Sketchy (who did an amazing job organising the show and day) had kindly asked me to join the display cars at the front,which circled Ron's Damm'd MX5. It was an emotional day for most and i know Ron was looking down smiling and laughing. I really hope we done him proud
The following Weekend was the RPM Live Show at North Weald Airfield in Essex. This is a new Show for the calender and it a very good day out. A big selection and variation of cars on display,and it was good to see the local drifters putting on a display too.
On the way home from the show i stopped off at the Essex Fives' first Monthly meet,would have been rude not to say hi
This brings me to Yesterday (Wednesday 27th August). The car was in for it's MOT first thing in the morning,and she passed with flying colours! Thats a relief off my shoulders for another 12 months! Also that day i taxed her,it was quite an expensive day!
Just before the MOT the Monster hit a pretty funny Mileage count
During the Bank Holiday Weekend MX5Parts had 10% off everything,so it would have been rude not to place an order :P In amongst the goodies was a set of I.L Motorsport Pedal Covers. I luckily found a how-to guide on MX5Nutz written by 2bfrank,it can be found here: http://www.mx5nutz.com/forum/index.php?showtopic=1...
Awhile ago i was browing Club Roadster and came across a photo of a Mk2/NB dashboard with this strange looking air vents. So i did some reading into it and the vents were from a Mitsubishi Eclipse 00-05 (from memory). So i trawled through Ebay.com and managed to find a seller with them for a reasonable price. A 2 week wait later and they arrived on my door step. Fitting was straight forward and incredibly easy,and they finish the dash off nicely
Along with these i fitted a Mk2.5 centre arm rest as i prefered the cup holders on this one (small creature comforts like this makes things so much easier)
So it seems alot has happened in the past month,and i apologize for the lengthy read. Lets see what the next installment brings
Small update
So it was that time of year again where the UK's finest Japanese vehicles would come together for one show,and that is JAE (Japanese Auto Extravaganza). Situated in the heart of Kettering at Wicksteed Park,the 4 day event is certainly one not to be missed!
It was great being back after the unfortunate loss of my previous MX5,i enjoyed the show a lot more having missed out. The event seemed quieter from my previous visit,but that didn't put a downer on the weekend. Plenty of cars to look at and drool over,and was great seeing so many familiar faces and having a well deserved catch up.
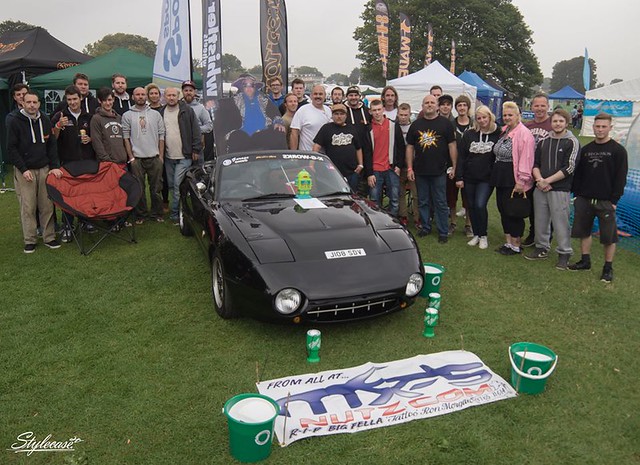
On the Saturday evening,MX5Nutz had special agreements with the Pyrotechnics of the show and they set off a 60 shot firework with some of the ashes of the legend Ron 'Tattoo Ron' Morgan,who sadly lost the fight to cancer a couple of months ago. The entire park shared a minutes silence,until the remainder of the fireworks display had continued.
It was a very emotional weekend for most,but we're all glad that Ron had the greatest send off,and it was what he wanted
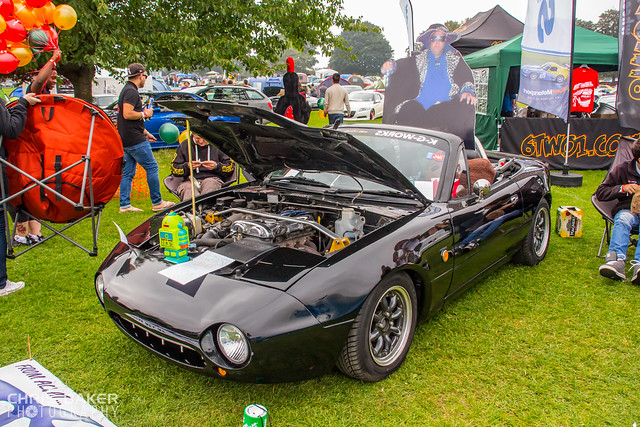
Photo Courtesy of Style Case
Here is a video taken by a GTOUK member who was next to the Nutz Stand https://www.youtube.com/watch?v=EV87KexH0Lw&fe...
My photos from JAE can be seen here >> CLICK HERE <<
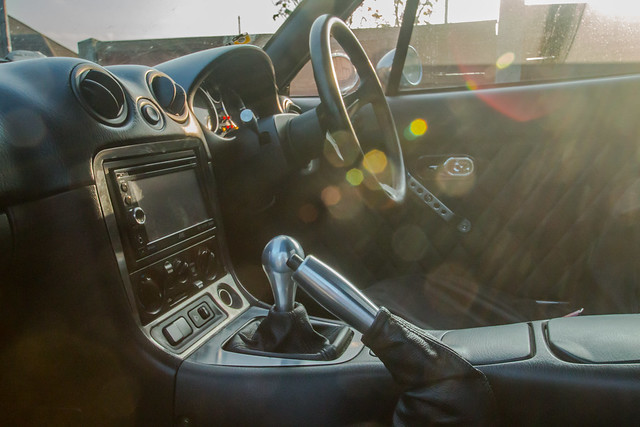
I recently won a Nardi Deep Corn steering wheel and boss on eBay,which was promptly fitted once I got home. I also received my Jass Performance Sport Gear Knob and Handbrake Lever too
It was exactly one year today that I took delivery of the Purple Monster,oh how this year has flown by!
So it was that time of year again where the UK's finest Japanese vehicles would come together for one show,and that is JAE (Japanese Auto Extravaganza). Situated in the heart of Kettering at Wicksteed Park,the 4 day event is certainly one not to be missed!
It was great being back after the unfortunate loss of my previous MX5,i enjoyed the show a lot more having missed out. The event seemed quieter from my previous visit,but that didn't put a downer on the weekend. Plenty of cars to look at and drool over,and was great seeing so many familiar faces and having a well deserved catch up.
On the Saturday evening,MX5Nutz had special agreements with the Pyrotechnics of the show and they set off a 60 shot firework with some of the ashes of the legend Ron 'Tattoo Ron' Morgan,who sadly lost the fight to cancer a couple of months ago. The entire park shared a minutes silence,until the remainder of the fireworks display had continued.
It was a very emotional weekend for most,but we're all glad that Ron had the greatest send off,and it was what he wanted
Photo Courtesy of Style Case
Here is a video taken by a GTOUK member who was next to the Nutz Stand https://www.youtube.com/watch?v=EV87KexH0Lw&fe...
My photos from JAE can be seen here >> CLICK HERE <<
I recently won a Nardi Deep Corn steering wheel and boss on eBay,which was promptly fitted once I got home. I also received my Jass Performance Sport Gear Knob and Handbrake Lever too
It was exactly one year today that I took delivery of the Purple Monster,oh how this year has flown by!
I recently sold the Carbon Headlight Covers and fitted a stock and vented cover which have been colour coded.
I also sold the Carbon bootlid and got my old Bootlid with KG Works Spoiler painted and fitted (the car is still covered in Dust from the bodyshop)
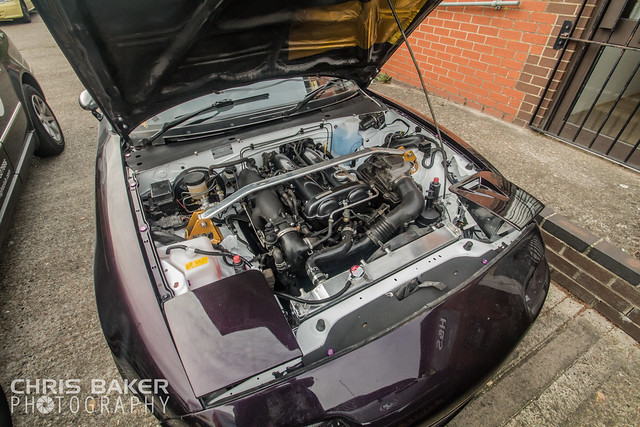
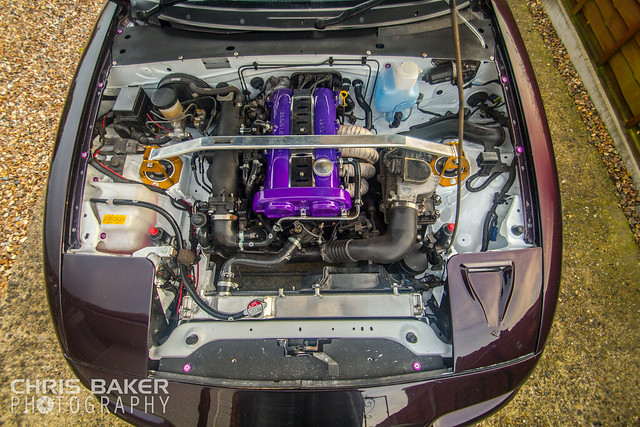
The car got dropped off at H&S Performance and the engine was pulled out. The car was then dropped off at AutoDoc Bodyshop for the main work to begin. While the car was in the bodyshop,the guys at H&S Performance did a full service of the engine while it was out.
Spark Plugs
Oil/Oil Filter/Sump Plug
Cambelt & tensioners
Waterpump
Clutch
Thermostat & Coolant Sensor
Painted Upper and Lower Thermostat Housings
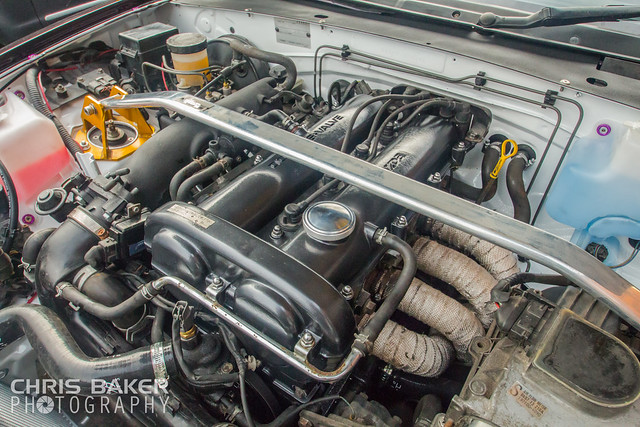
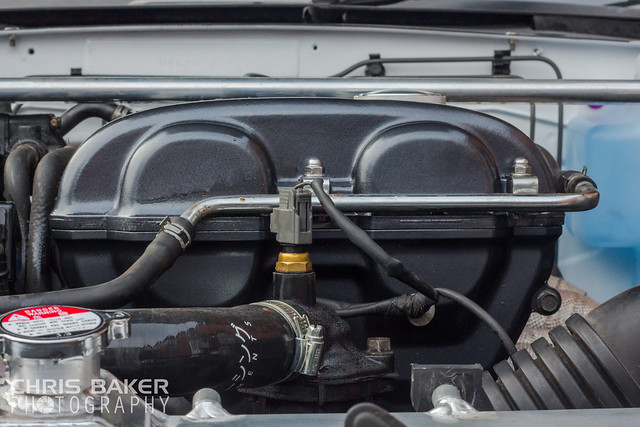
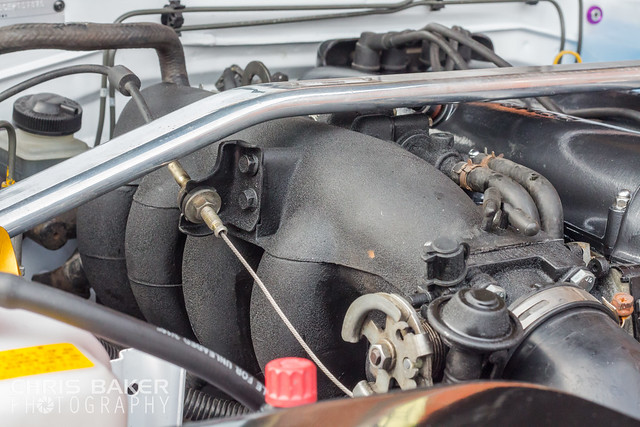
Painted Inlet Manifold with Throttle Body
Painted Rocker Cover
Painted Cambelt Cover
Engine Block Painted
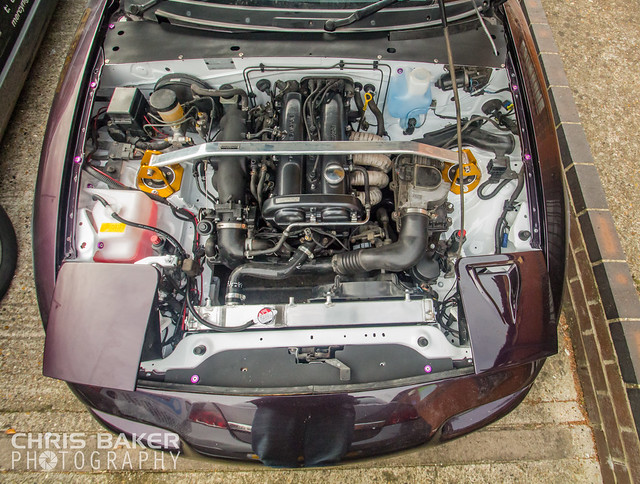
The car was finished and dropped back off at H&S where more parts were fitted along side the re-fitting of the engine.
Clutch Slave Cylinder
Alloy Radiator
Eunos Racing Development Silicone Radiator Hoses
New Expansion Bottle
New Washer Bottle
Polished Oil Cap
Polished Plug Cover
Stainless Fusebox Cover
Painted Radiator Panel cover
Painted Scuttle Panel Cover
Countersunk Purple Washers and Bolts
Its far from finished,there's still alot to fit/change but the main bulk of changes have been made
I was torn between painting the bay Purple or White. White was a big gamble but I think I've pulled it off well
I also sold the Carbon bootlid and got my old Bootlid with KG Works Spoiler painted and fitted (the car is still covered in Dust from the bodyshop)
The car got dropped off at H&S Performance and the engine was pulled out. The car was then dropped off at AutoDoc Bodyshop for the main work to begin. While the car was in the bodyshop,the guys at H&S Performance did a full service of the engine while it was out.
Spark Plugs
Oil/Oil Filter/Sump Plug
Cambelt & tensioners
Waterpump
Clutch
Thermostat & Coolant Sensor
Painted Upper and Lower Thermostat Housings
Painted Inlet Manifold with Throttle Body
Painted Rocker Cover
Painted Cambelt Cover
Engine Block Painted
The car was finished and dropped back off at H&S where more parts were fitted along side the re-fitting of the engine.
Clutch Slave Cylinder
Alloy Radiator
Eunos Racing Development Silicone Radiator Hoses
New Expansion Bottle
New Washer Bottle
Polished Oil Cap
Polished Plug Cover
Stainless Fusebox Cover
Painted Radiator Panel cover
Painted Scuttle Panel Cover
Countersunk Purple Washers and Bolts
Its far from finished,there's still alot to fit/change but the main bulk of changes have been made
I was torn between painting the bay Purple or White. White was a big gamble but I think I've pulled it off well

A small update
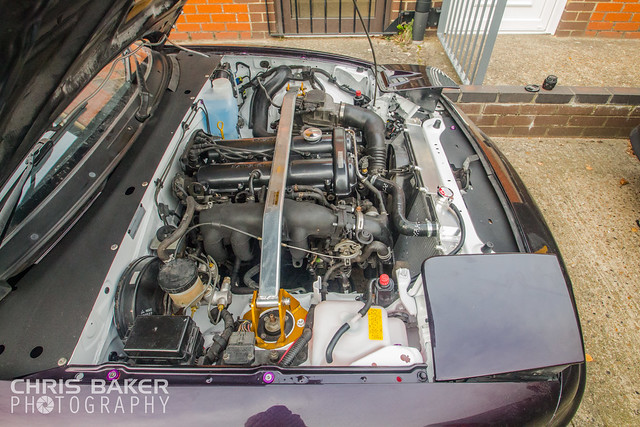
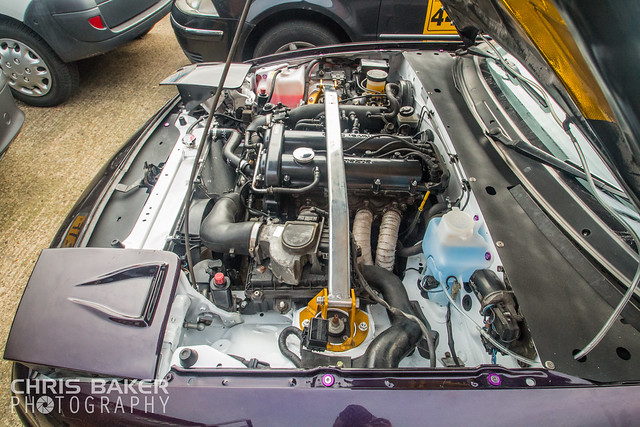
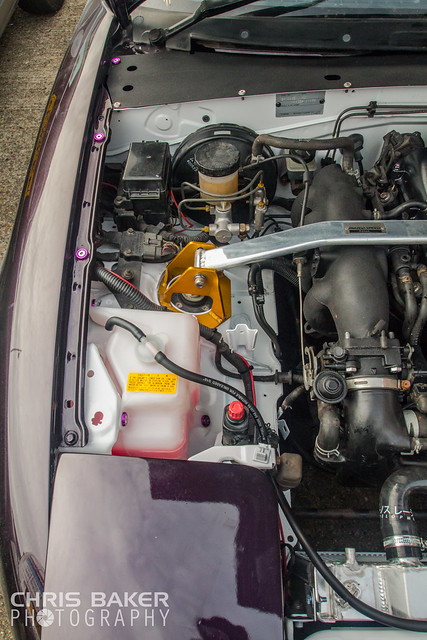
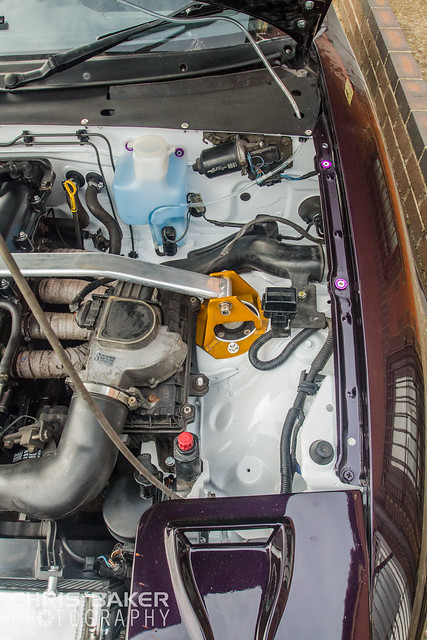
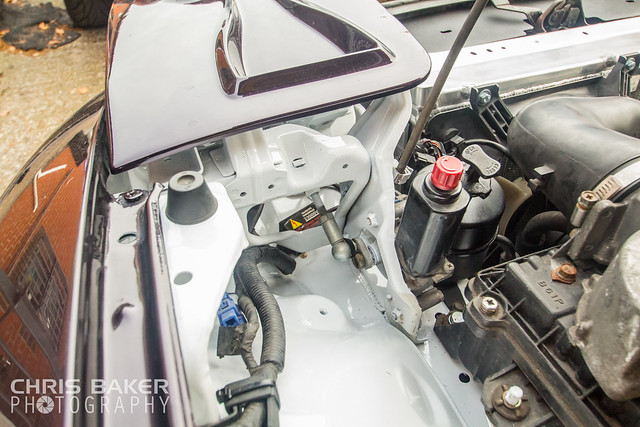
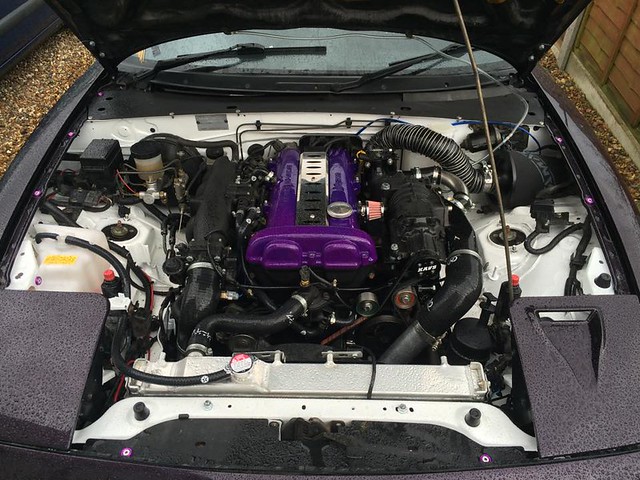
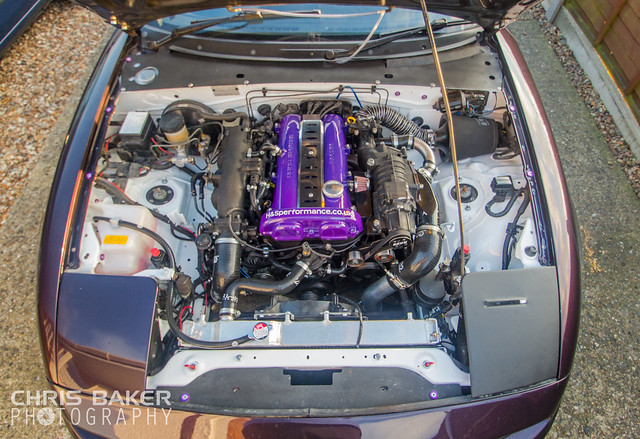
I wasn't too keen on the BMW Sparkling Graphite painted rocker cover,it looked too dark against the black Inlet Manifold and the front cross over pipe for the air box. So I sent the spare over to a local Powder Coaters. I got it back at the beginning of the week and fitted it today
I also fitted a Polished Plug Cover,both work really well I also took a visit back down to H&S Performance who helped me fit a Stoney Racing Ancillary Hose Kit. These guys have been incredible the past couple of months and I cant thank them enough.
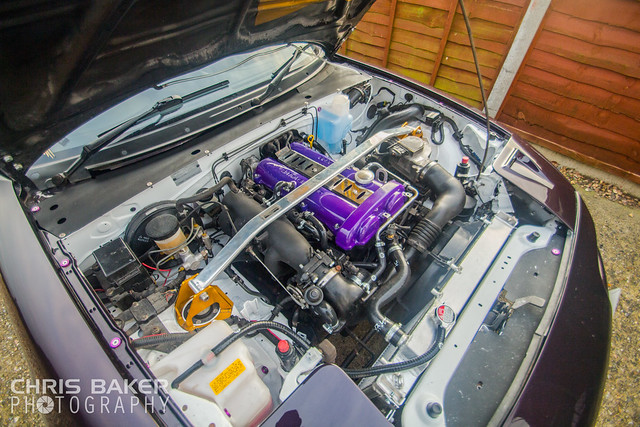
I have absolutely no idea what the colour of the purple is. I originally asked for Candy Purple (but they only do basic Candy colours). He said he can do Cadbury's Purple,but this looks very pearlescent in direct light.
Noobie error,i forgot to clean the threads for the front oil breather hose and Coil Pack,so those aren't currently bolted down
I wasn't too keen on the BMW Sparkling Graphite painted rocker cover,it looked too dark against the black Inlet Manifold and the front cross over pipe for the air box. So I sent the spare over to a local Powder Coaters. I got it back at the beginning of the week and fitted it today
I also fitted a Polished Plug Cover,both work really well
I also took a visit back down to H&S Performance who helped me fit a Stoney Racing Ancillary Hose Kit. These guys have been incredible the past couple of months and I cant thank them enough.I have absolutely no idea what the colour of the purple is. I originally asked for Candy Purple (but they only do basic Candy colours). He said he can do Cadbury's Purple,but this looks very pearlescent in direct light.
Noobie error,i forgot to clean the threads for the front oil breather hose and Coil Pack,so those aren't currently bolted down
Heres a little video for you (PLEASE WATCH)
https://www.youtube.com/watch?v=NUHq21QhaNE
This has been extremely difficult to keep secret for the past 11 months!!
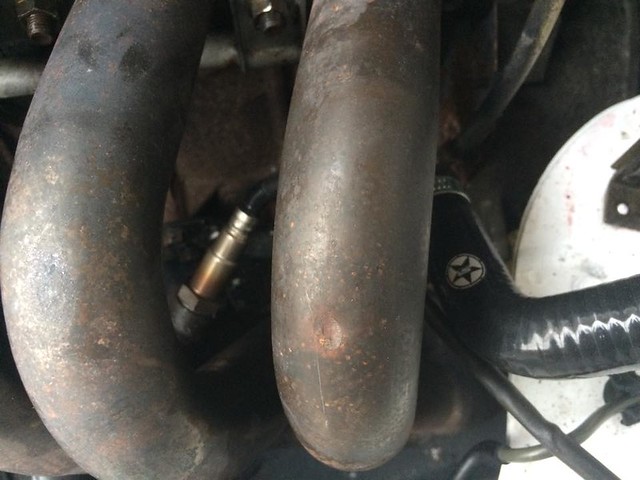
It all started back in January when i was at Autosport International. I was surrounded by Forced Induction on the MX5Nutz Club Stand,staring at the display of Turbo and Supercharged cars for 3 days started the urge.
At the time,the Interior was booked in to be done in March,and aesthetically the car was pretty much done which only left the engine bay. Having gone the Turbo route with the previous MX5,i thought i'd head down the other path and try out a Supercharger.
So it seems the Eaton M45 from a Mini Cooper S was the popular choice to fit,so the search for one began. Having just missed one on eBay that had covered 25k and being the later generation with teflon blades,it went for £450 delivered. At least i knew this was the kind of money region i was looking at for a unit.
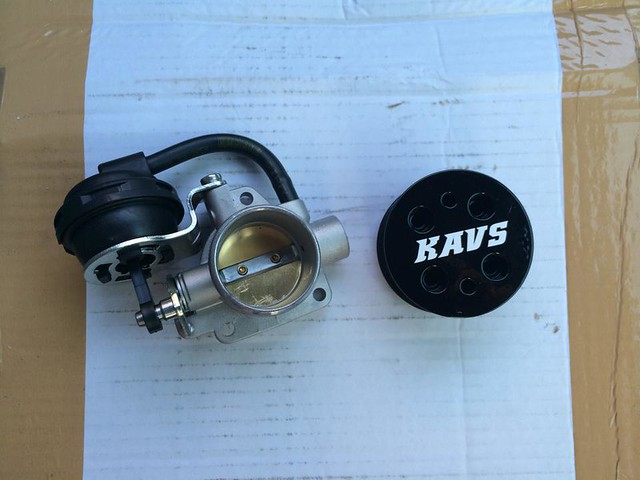
Then i happened to stumble across a For Sale advert on Facebook for one. I dont think i could have sent a message to the seller quick enough! After a few messages back and forth,i had managed to secure myself a Charger that had only covered 19 delivery miles (yes,you did read that correct). It was removed due to a damaged pulley,which by looking at the photos was some-what repairable anyway. Included was a second throttle body with blanking plates and dual cable throttle wheel,all for the sum of £140.00 delivered!


Amongst the vast amount of research i found Aran and Taffylude's build threads on Nutz,who both kindly documentated everything including where to buy it and the costs. This was the perfect Guide for a novice like myself! Massive thanks to them both!
So i took the Charger to work to give it a good clean,removing the PTO and making a blanking plate. At this point i also cut the mounting lug off and blanked the breather port next to it.
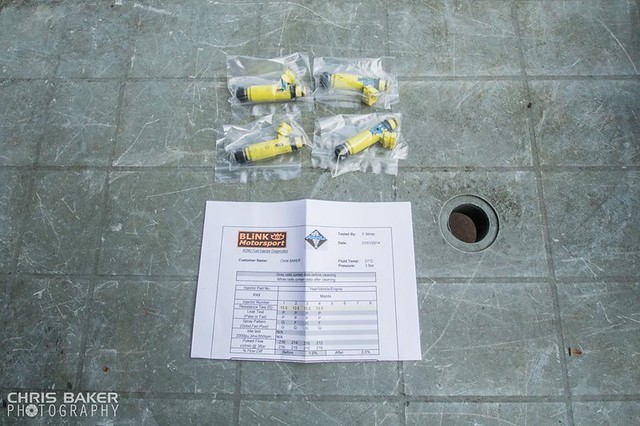
RX8 420cc Injectors purchased,these worked great on the turbo build and will help give me some extra ponies. These were sent off to BLiNK Motorsport to be cleaned/flow tested/new seals. They did an incredible job and had a very fast turn around,highly recommend them!
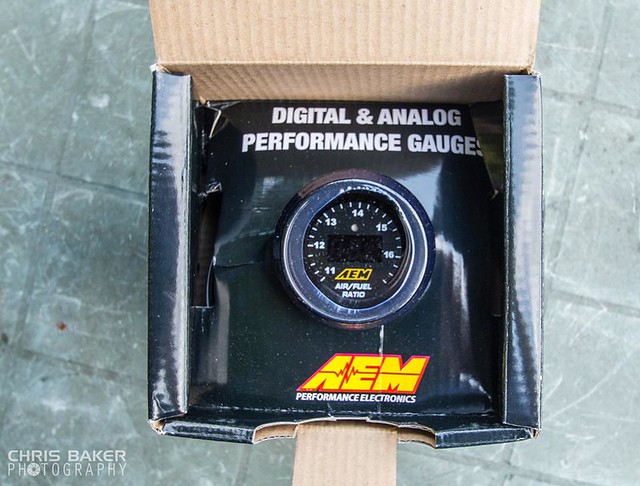
AEM Wideband from Dan at Fast5
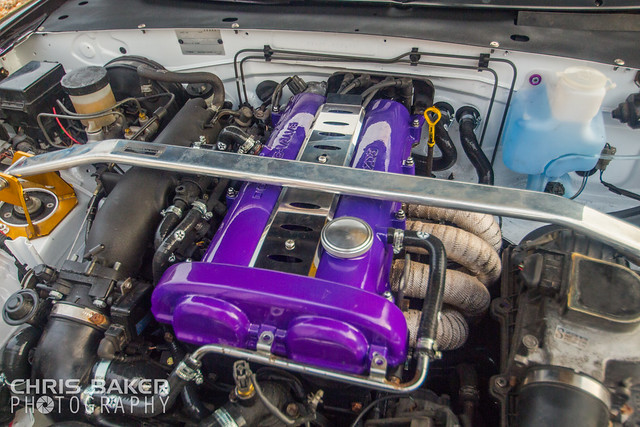
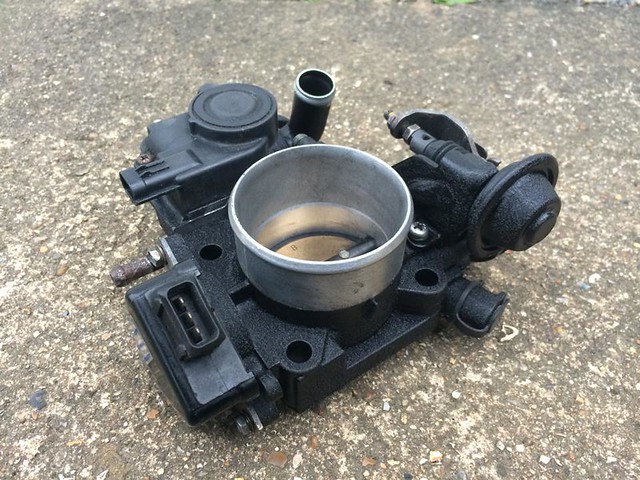
As the weather was good,i got some painting done. I wanted a pretty basic looking engine bay,almost OEM,so i went for the classic Wrinkle Black finish. I ended up painting the Inlet Manifold,both Throttle Bodies,Radiator Slam Panel,Wiper Scuttle Panel and Thermostat Housing. Sadly i've only got a photo of the Throttle Body at the time (the rest can be seen in the engine bay photos above)
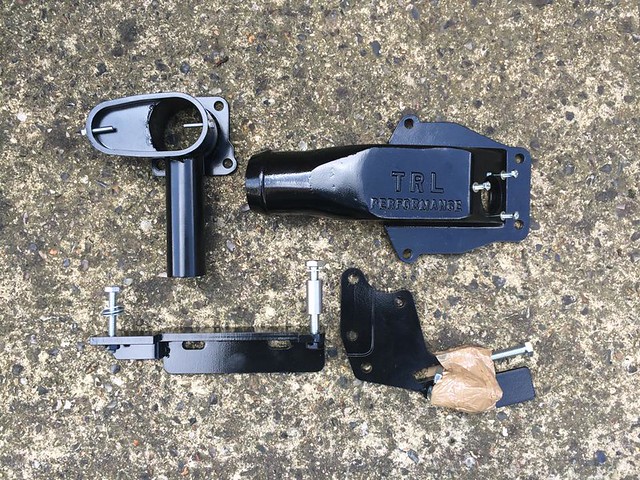
TR Lane Kit ordered,this was one of the most expensive items and took approx 6 weeks to be made.
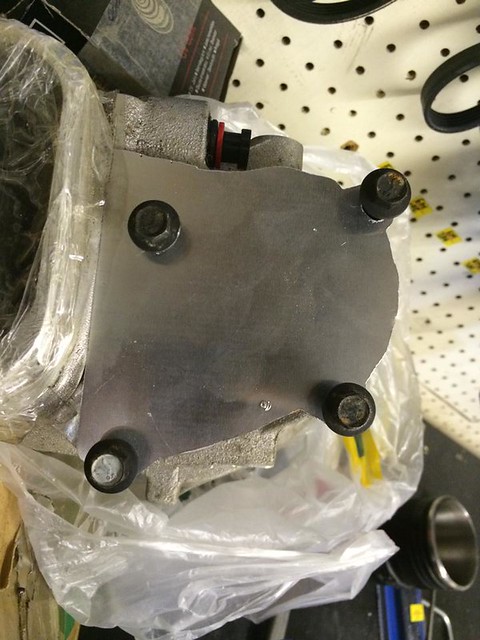
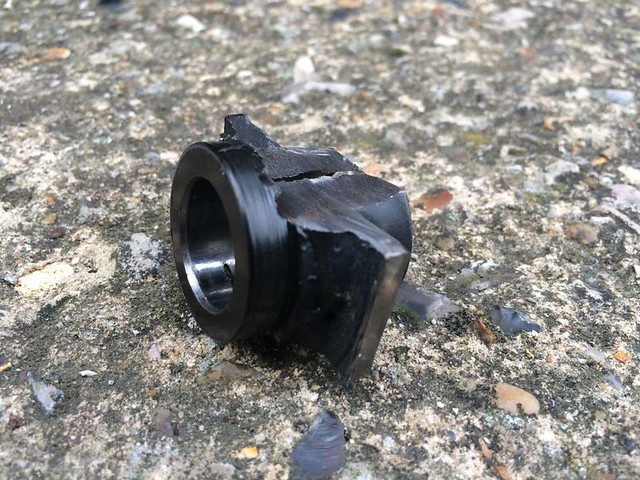
It didnt matter that the original pulley was damaged as it was being replaced with a smaller one. I went for a 15% reduction as i wanted it reliable and i had read smaller pulleys could lead to potential belt slip. I ordered one along with a modified By-Pass Valve from 1320.co.uk
I knew removing the pulley was going to be a major task,so i left that in the capable hands of an Engineering company around the corner from mine. It took them a few days to do,but it came off clean which is the main thing
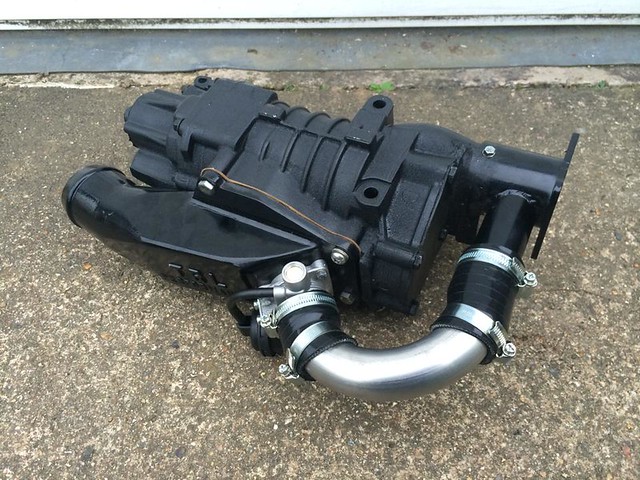
I made some gaskets for the TR Lane inlet and outlet and bolted them together. The charger received a coat of Wrinkle Black paint too
https://www.youtube.com/watch?v=NUHq21QhaNE
This has been extremely difficult to keep secret for the past 11 months!!
It all started back in January when i was at Autosport International. I was surrounded by Forced Induction on the MX5Nutz Club Stand,staring at the display of Turbo and Supercharged cars for 3 days started the urge.
At the time,the Interior was booked in to be done in March,and aesthetically the car was pretty much done which only left the engine bay. Having gone the Turbo route with the previous MX5,i thought i'd head down the other path and try out a Supercharger.
So it seems the Eaton M45 from a Mini Cooper S was the popular choice to fit,so the search for one began. Having just missed one on eBay that had covered 25k and being the later generation with teflon blades,it went for £450 delivered. At least i knew this was the kind of money region i was looking at for a unit.
Then i happened to stumble across a For Sale advert on Facebook for one. I dont think i could have sent a message to the seller quick enough! After a few messages back and forth,i had managed to secure myself a Charger that had only covered 19 delivery miles (yes,you did read that correct). It was removed due to a damaged pulley,which by looking at the photos was some-what repairable anyway. Included was a second throttle body with blanking plates and dual cable throttle wheel,all for the sum of £140.00 delivered!
Amongst the vast amount of research i found Aran and Taffylude's build threads on Nutz,who both kindly documentated everything including where to buy it and the costs. This was the perfect Guide for a novice like myself! Massive thanks to them both!
So i took the Charger to work to give it a good clean,removing the PTO and making a blanking plate. At this point i also cut the mounting lug off and blanked the breather port next to it.
RX8 420cc Injectors purchased,these worked great on the turbo build and will help give me some extra ponies. These were sent off to BLiNK Motorsport to be cleaned/flow tested/new seals. They did an incredible job and had a very fast turn around,highly recommend them!
AEM Wideband from Dan at Fast5
As the weather was good,i got some painting done. I wanted a pretty basic looking engine bay,almost OEM,so i went for the classic Wrinkle Black finish. I ended up painting the Inlet Manifold,both Throttle Bodies,Radiator Slam Panel,Wiper Scuttle Panel and Thermostat Housing. Sadly i've only got a photo of the Throttle Body at the time (the rest can be seen in the engine bay photos above)
TR Lane Kit ordered,this was one of the most expensive items and took approx 6 weeks to be made.
It didnt matter that the original pulley was damaged as it was being replaced with a smaller one. I went for a 15% reduction as i wanted it reliable and i had read smaller pulleys could lead to potential belt slip. I ordered one along with a modified By-Pass Valve from 1320.co.uk
I knew removing the pulley was going to be a major task,so i left that in the capable hands of an Engineering company around the corner from mine. It took them a few days to do,but it came off clean which is the main thing
I made some gaskets for the TR Lane inlet and outlet and bolted them together. The charger received a coat of Wrinkle Black paint too
In the mean time i was getting ready for the engine bay work to be done,which saw alot of new gaskets and bits and pieces ordered,aswell as new nuts,bolts and washers for various things for the build. Luckily i got majority of the parts from MX5 Parts when they had their discount on!
This then brings me to last week,i had booked the week off so i could fit it. With the turbo build i had to get alot of help from various people as i was pretty clueless with what to do and how to fit it.
I managed to fit the kit on my own! Doesn't sound alot to most,but its pretty achievable on my part (yes,i admit i had to get a second opinion on a few bits,but i'd rather be 100% sure!)
Here are some various photos from the fitting stage:
Radiator Fan moved into the centre,brackets made and the fan wiring extended

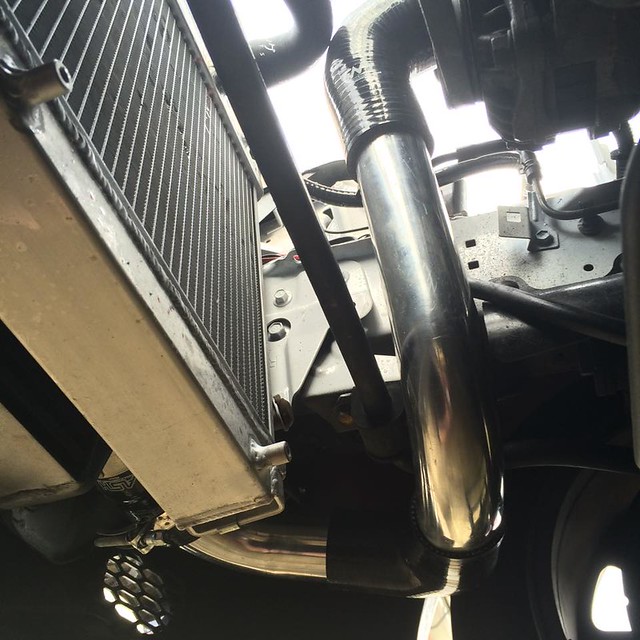
Intercooler Pipework Mock Up (Driver's Side)
Manifold removed to fit the Wideband Sensor (its at a stupid place and was easier to remove the Manifold)
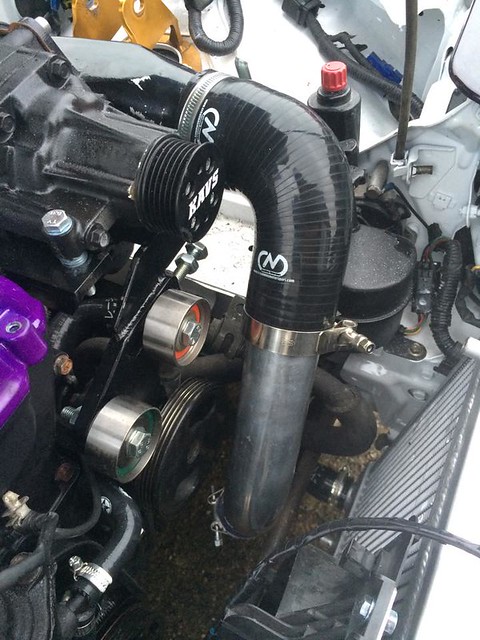
I got the Charger mounted in the Engine Bay (knowing it would need adjusting at a later date). Also got the Tensioner Bracket on and the Intercooler all plumbed in


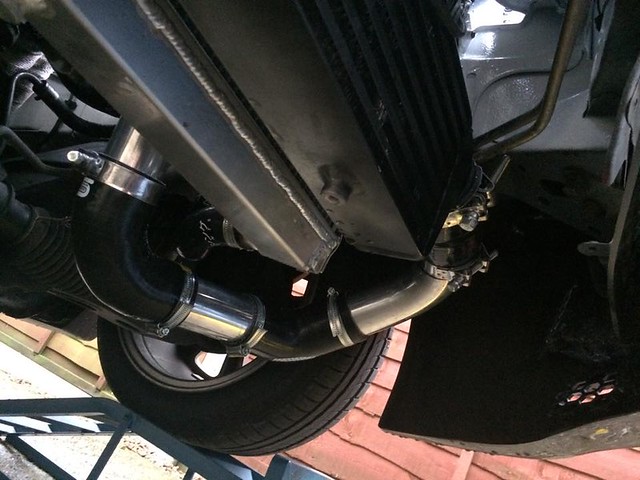
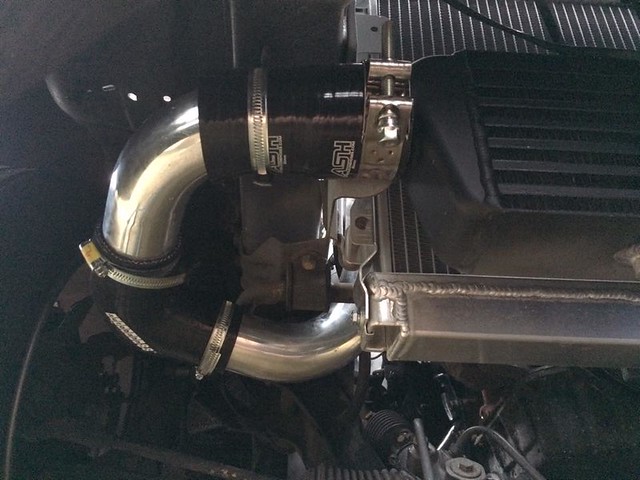
Nice and Stealthy!

This then brings me to last week,i had booked the week off so i could fit it. With the turbo build i had to get alot of help from various people as i was pretty clueless with what to do and how to fit it.
I managed to fit the kit on my own! Doesn't sound alot to most,but its pretty achievable on my part (yes,i admit i had to get a second opinion on a few bits,but i'd rather be 100% sure!)
Here are some various photos from the fitting stage:
Radiator Fan moved into the centre,brackets made and the fan wiring extended
Intercooler Pipework Mock Up (Driver's Side)
Manifold removed to fit the Wideband Sensor (its at a stupid place and was easier to remove the Manifold)
I got the Charger mounted in the Engine Bay (knowing it would need adjusting at a later date). Also got the Tensioner Bracket on and the Intercooler all plumbed in
Nice and Stealthy!
IAT and Idle Speed Valve hose fitted to the Intake hose
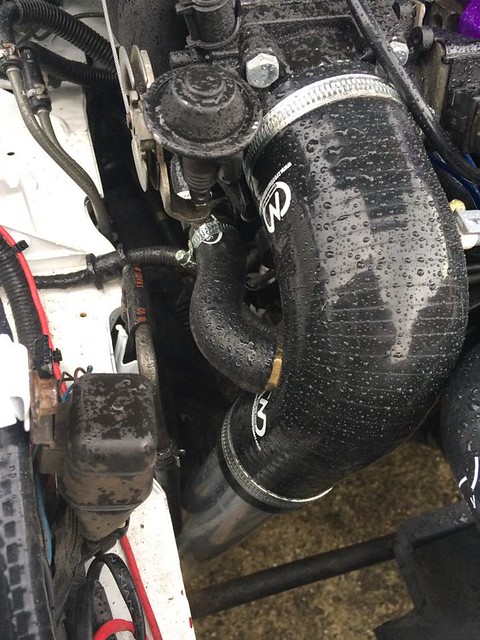
RX8 Injectors Fitted (after several issues with a crushed O-Ring!)

Belt fitted and tensioned. Air ducting and Pipercross Foam Filter fitted too. Megasquirt 2 V3 had also arrived and was fitted
And there we have it! Supercharged in 7 days
RX8 Injectors Fitted (after several issues with a crushed O-Ring!)
Belt fitted and tensioned. Air ducting and Pipercross Foam Filter fitted too. Megasquirt 2 V3 had also arrived and was fitted
And there we have it! Supercharged in 7 days
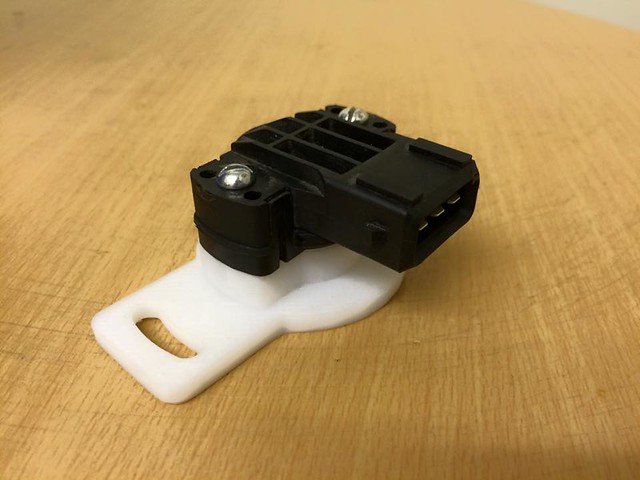
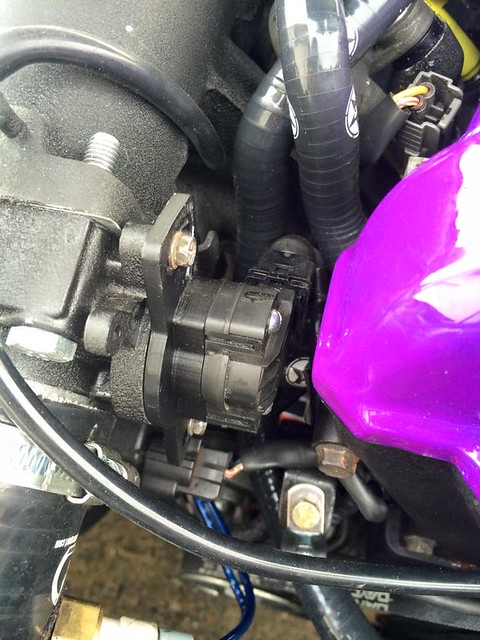
BMW E36 Variable TPS and the adaptor plate from Cerberus
Fitted some Purple LEDs to the RevLimiter Stirling Gauges

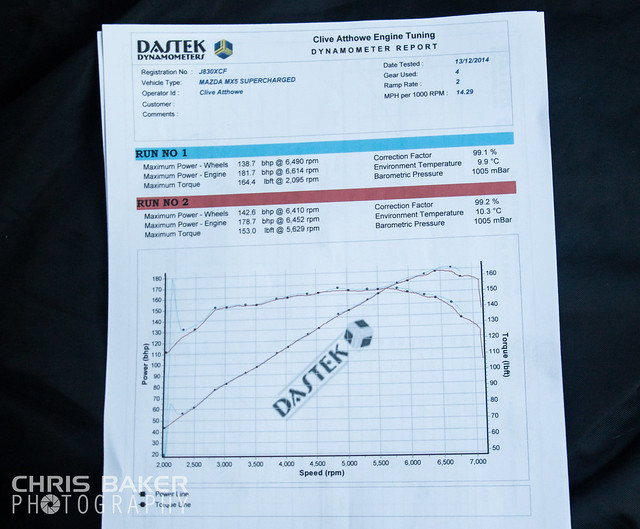
I took the car to have a Power Run to see what she's producing


Here is a short video i put together
https://www.youtube.com/watch?v=xEg6vRTBcTs
181.7bhp
164.4lbft
Hoping to get some more mapping done early 2015 to smoothen out the AFR,hopefully should see a increase in power too
Fitted some Purple LEDs to the RevLimiter Stirling Gauges
I took the car to have a Power Run to see what she's producing
Here is a short video i put together
https://www.youtube.com/watch?v=xEg6vRTBcTs
181.7bhp
164.4lbft
Hoping to get some more mapping done early 2015 to smoothen out the AFR,hopefully should see a increase in power too
Update!
Got the BMW VTPS fitted and calibrated,me and Law managed to squeeze in some quick road tuning too
Saw a photo on Facebook of a airbag turned into a Gauge Pod,so I started to make my own. I've never used filler/fiberglass so I don't have much hope this will turn out any good.


Since those photos,the pods have had two layers of fine surface filler and have been rubbed down. Shape is pretty much done,just some minor areas to finish
Ordered some Aerocatch Bonnet Pins,once the initial drilling into the Carbon Bonnet was over,i overcome the fear of cocking it up.

1.8 Dimpled & Grooved Discs,Ferodo Pads and HEL Stainless Hoses fitted (just need to get the rears fitted)

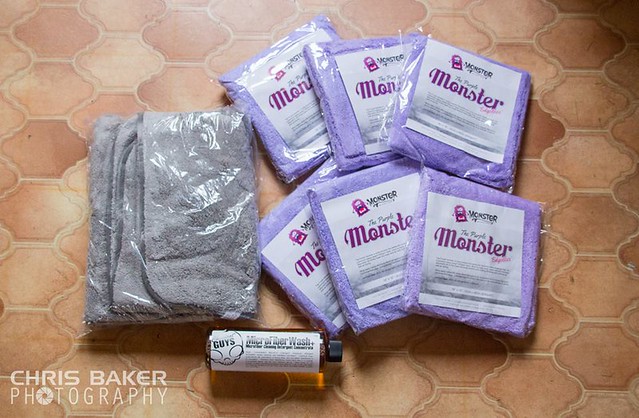
While shopping for some cleaning products,i saw these and couldn't resist ordering some!
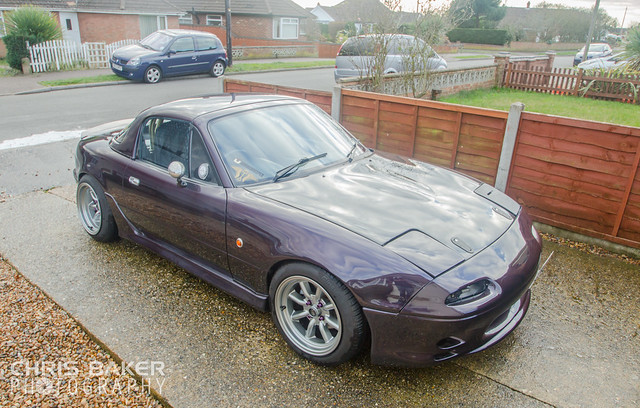
Gave the 'ol Gal a clean (she hasn't been washed since September,oops!)

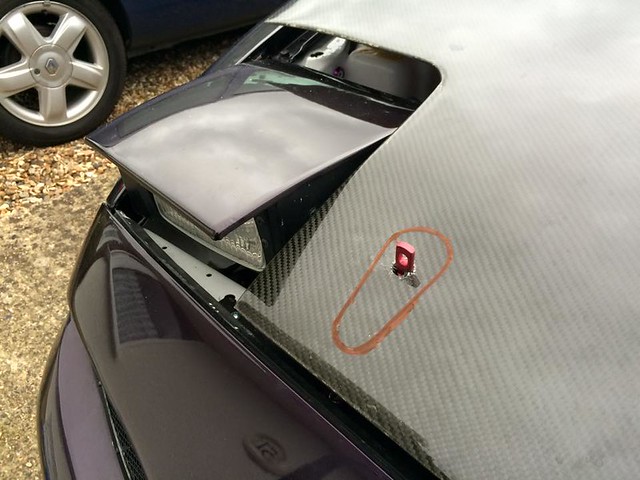
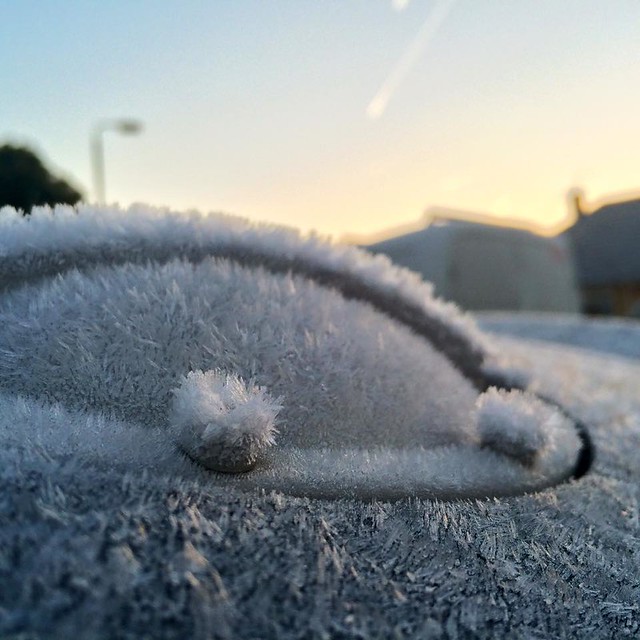
Managed to grab this photo of the Runabout Type II fuel lid covered in frost from the other morning
Got the BMW VTPS fitted and calibrated,me and Law managed to squeeze in some quick road tuning too
Saw a photo on Facebook of a airbag turned into a Gauge Pod,so I started to make my own. I've never used filler/fiberglass so I don't have much hope this will turn out any good.
Since those photos,the pods have had two layers of fine surface filler and have been rubbed down. Shape is pretty much done,just some minor areas to finish
Ordered some Aerocatch Bonnet Pins,once the initial drilling into the Carbon Bonnet was over,i overcome the fear of cocking it up.
1.8 Dimpled & Grooved Discs,Ferodo Pads and HEL Stainless Hoses fitted (just need to get the rears fitted)
While shopping for some cleaning products,i saw these and couldn't resist ordering some!
Gave the 'ol Gal a clean (she hasn't been washed since September,oops!)
Managed to grab this photo of the Runabout Type II fuel lid covered in frost from the other morning
Small Update:
Finally got round to getting the hose take off and IAT bung welded onto the Intercooler pipe

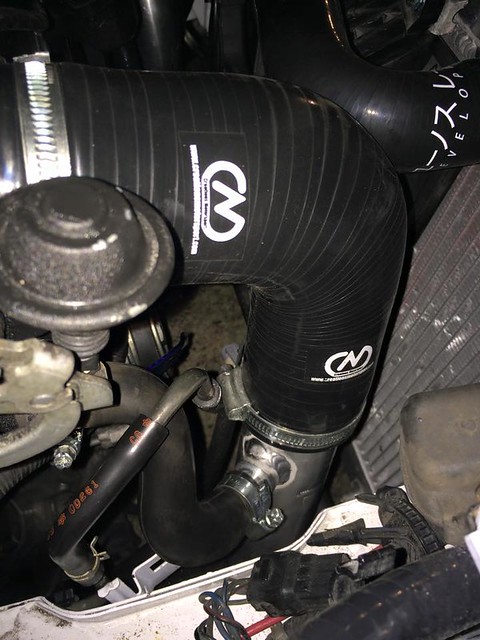
Which resulted in the IAT wires breaking off at the plug,managed to get around it but potentially made it worse. It'll be fine for now,but at 10:30pm in very cold conditions,i didn't want to be out there for much longer
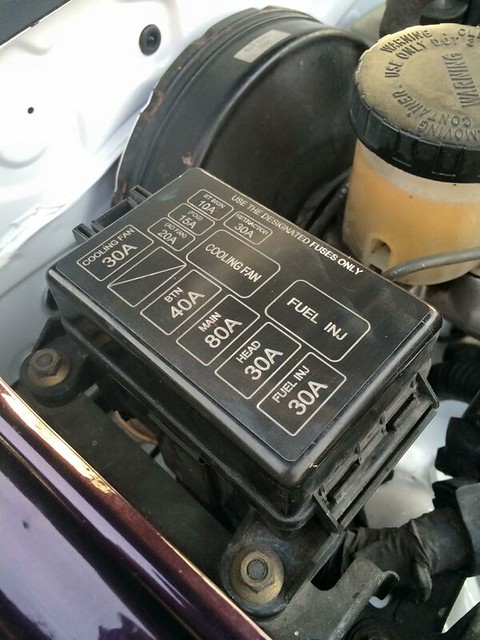
Fitted the stainless Fuse Box cover that's been sitting about for a couple of months
Purchased an Alloy Washer bottle
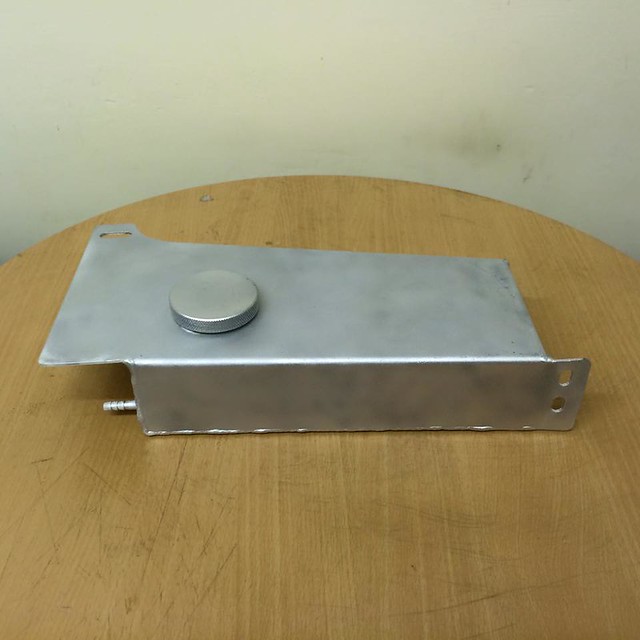
And fitted Got the Alloy Scuttle Panel machined to allow access to the cap
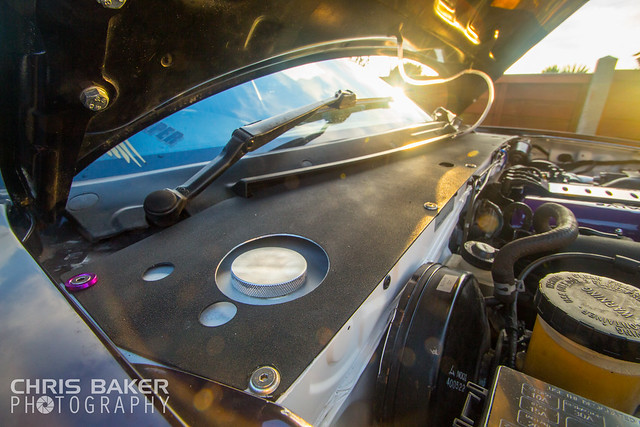
With the original bottle removed,the air ducting was in a much better positioned and shortened

Gave the engine bay a good clean too,as it hadn't been cleaned since it was painted
Finally got round to getting the hose take off and IAT bung welded onto the Intercooler pipe
Which resulted in the IAT wires breaking off at the plug,managed to get around it but potentially made it worse. It'll be fine for now,but at 10:30pm in very cold conditions,i didn't want to be out there for much longer
Fitted the stainless Fuse Box cover that's been sitting about for a couple of months
Purchased an Alloy Washer bottle
And fitted
Got the Alloy Scuttle Panel machined to allow access to the capWith the original bottle removed,the air ducting was in a much better positioned and shortened
Gave the engine bay a good clean too,as it hadn't been cleaned since it was painted
Update time
So this week I embarked on a road trip to go visit Nick at Skuzzle Motorsport to have the car mapped.

Nick worked his magic and was incredibly speedy in mapping her! Thinking it would take all day,infact only took him till Lunch time.
When I had it dyno'd a few weeks after it was charged,it was 142hp @ the wheels and 180hp @ the flywheel.
She's now a healthy 170hp @ the wheels and 204hp @ the flywheel! Its a lot smoother to drive and less punchy,Nick said he can adjust it to bring back some of the punchy-ness,but I'd have to sacrifice some Torque which I didn't want to do. The fueling is a lot better,she doesn't flame any more,but Nick kindly demonstrated how to change that in Tuner Studio. He did adjust it so it pops and burbles nicely at 4000rpm now
Overall,incredibly happy and pleased with the results and the work/service by Nick! Cant recommend him enough!
So me and Mrs Reeper spent another day in the area and then headed home. Needless to say,after a 577 mile round trip,the Monster is in need of a bath now
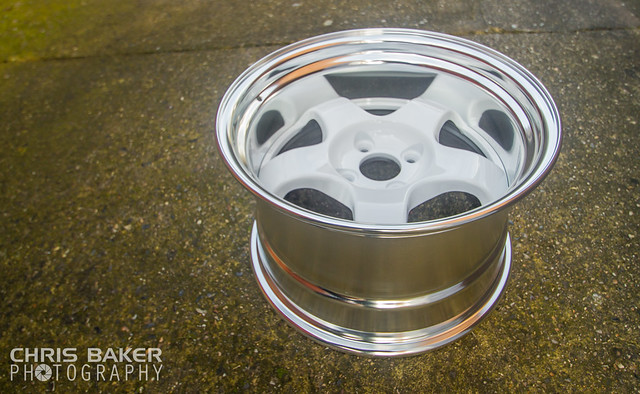
I'm sure everyone on here has dreamt of owning a particular car/car part. Ever since I've been involved with modified cars,i've always fallen in love with one particular alloy wheel.
I promised myself that one day I hope I could be so lucky to own such a wheel. So I bit the bullet and ordered them,knowing they're custom made to order,the waiting time would be an absolute killer and it seemed a lot longer than it actually was.
So after a 12 week wait and numerous emails sent bugging Rich at Driftworks,i finally took delivery of them today!
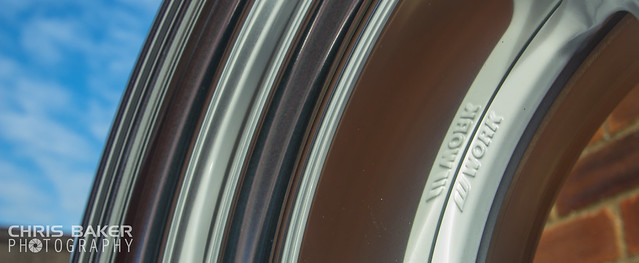
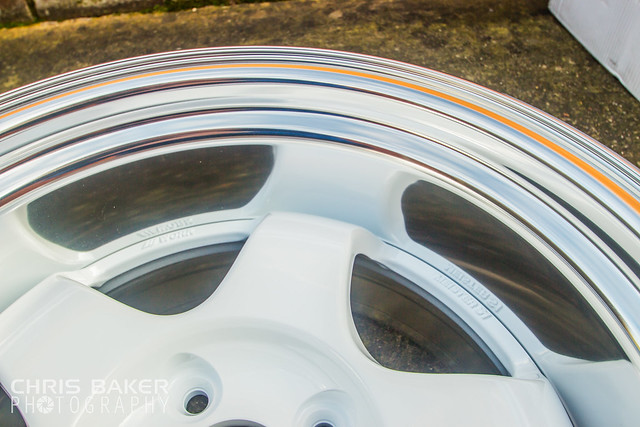
//WORK Meister S12P 15x9j ET0 in Gloss White
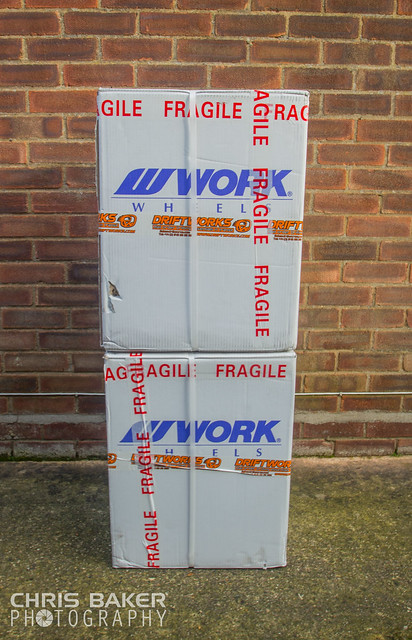


Mrs Reeper bought me some Wide Arches for Christmas. So i'll need to wait to have those fitted before the Works can go on.
I'll be wrapping them in 205/50 Rainsport 3 tyres. They seem to have a very good review and they're pretty good price wise.
So this week I embarked on a road trip to go visit Nick at Skuzzle Motorsport to have the car mapped.
Nick worked his magic and was incredibly speedy in mapping her! Thinking it would take all day,infact only took him till Lunch time.
When I had it dyno'd a few weeks after it was charged,it was 142hp @ the wheels and 180hp @ the flywheel.
She's now a healthy 170hp @ the wheels and 204hp @ the flywheel! Its a lot smoother to drive and less punchy,Nick said he can adjust it to bring back some of the punchy-ness,but I'd have to sacrifice some Torque which I didn't want to do. The fueling is a lot better,she doesn't flame any more,but Nick kindly demonstrated how to change that in Tuner Studio. He did adjust it so it pops and burbles nicely at 4000rpm now
Overall,incredibly happy and pleased with the results and the work/service by Nick! Cant recommend him enough!
So me and Mrs Reeper spent another day in the area and then headed home. Needless to say,after a 577 mile round trip,the Monster is in need of a bath now
I'm sure everyone on here has dreamt of owning a particular car/car part. Ever since I've been involved with modified cars,i've always fallen in love with one particular alloy wheel.
I promised myself that one day I hope I could be so lucky to own such a wheel. So I bit the bullet and ordered them,knowing they're custom made to order,the waiting time would be an absolute killer and it seemed a lot longer than it actually was.
So after a 12 week wait and numerous emails sent bugging Rich at Driftworks,i finally took delivery of them today!
//WORK Meister S12P 15x9j ET0 in Gloss White
Mrs Reeper bought me some Wide Arches for Christmas. So i'll need to wait to have those fitted before the Works can go on.
I'll be wrapping them in 205/50 Rainsport 3 tyres. They seem to have a very good review and they're pretty good price wise.
Funny how you mention stickers...I ordered two smilies last night! 
I was always going to go the Wide Arch route,just a shame I didn't do it when it got resprayed.
To-Do list:
Wide Arches painted and fitted
Bonnet painted
Mazdaspeed Bumper painted and fitted
Roll Cage powder coated
Raise Coilovers and have full Geo set up
Possibly new back box
Theres also a few little bits and pieces I'd like to get round to purchasing like some bonnet lifters for example
Got my very first track day booked at Snetterton for March,this shall be interesting
Yes I'm based in Norwich

Gassing Station | Readers' Cars | Top of Page | What's New | My Stuff