VW Transporter Day Van Conversion
Discussion


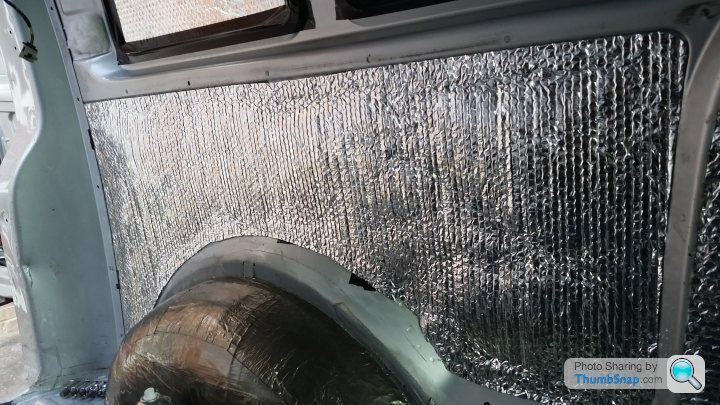
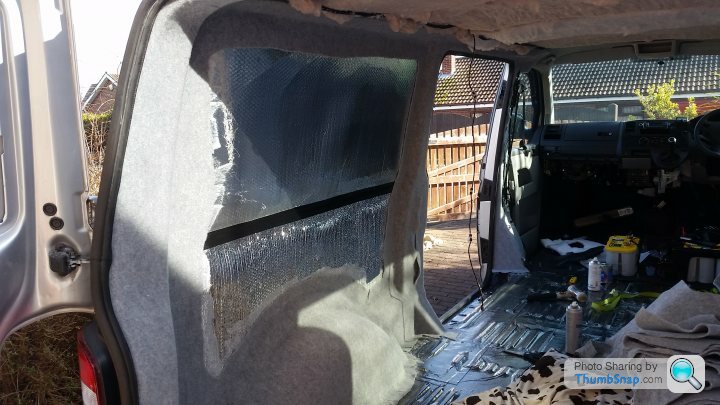
Got some of the insulation in, then ran out, always end up needing more!
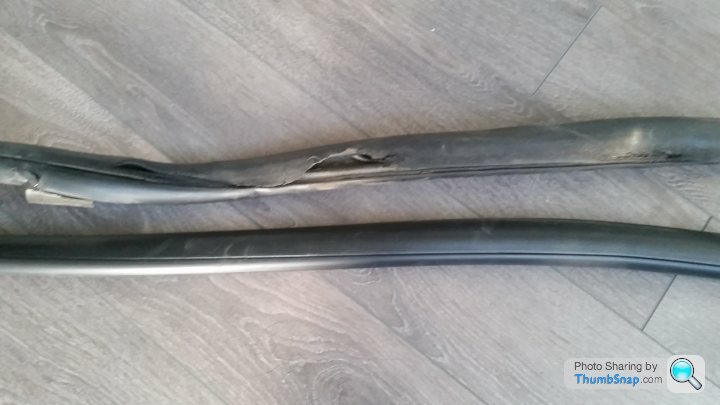
First quick job was replacing the drivers door seal, the previous owner must have stepped on it everytime he got in and out.
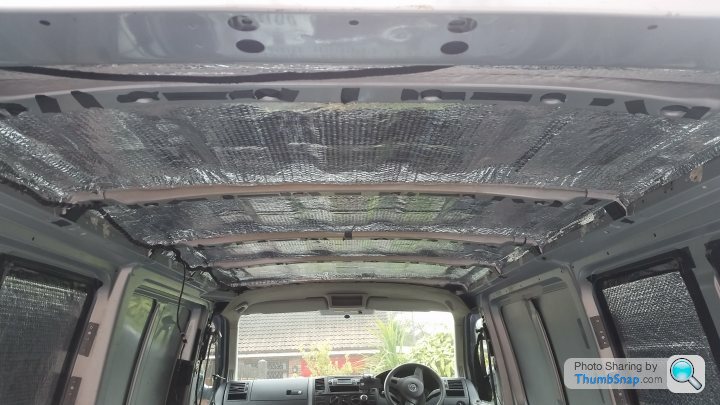
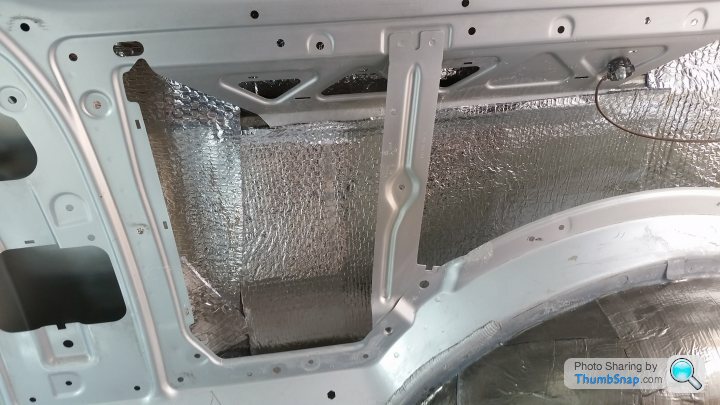
Then onto the insulation.
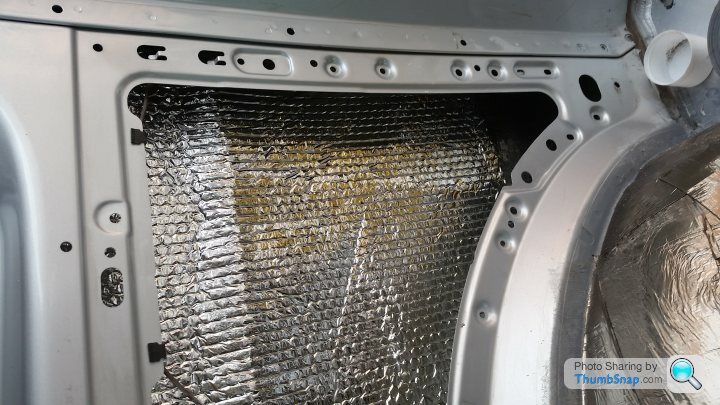
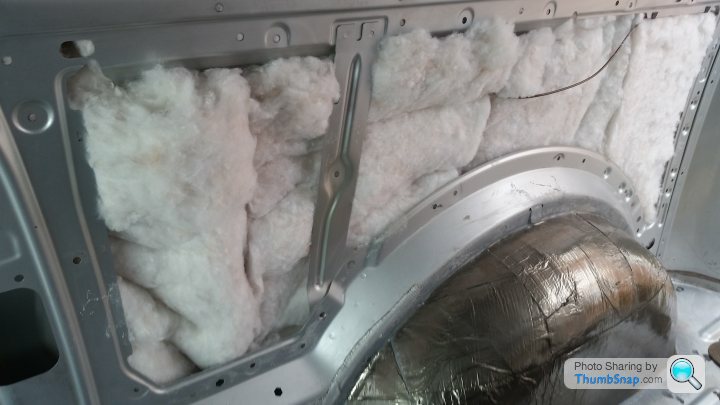
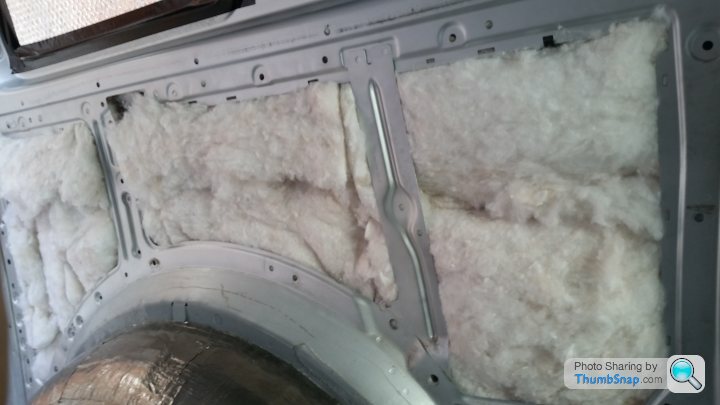
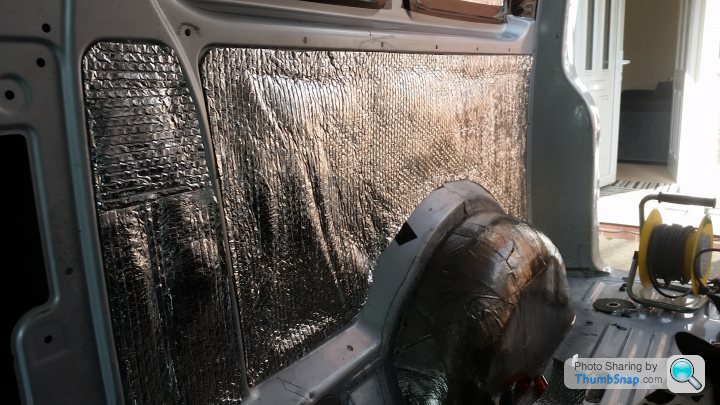
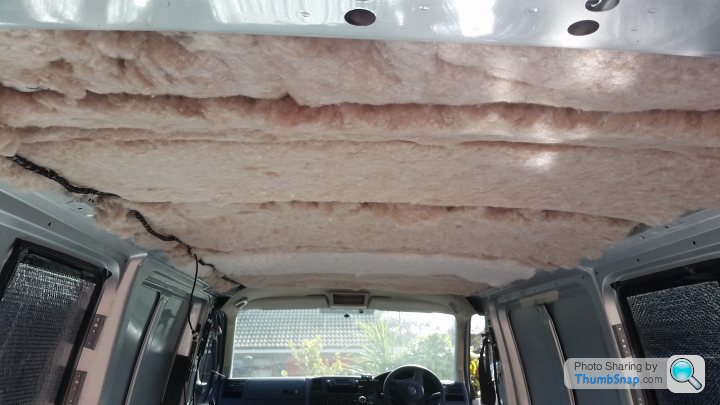
I went for foil, insulation, foil. Where there is only a single skin like the rear window blanks I taped the seams to try and create a vapour barrier thus minimising any condensation that might form against the cold panel.

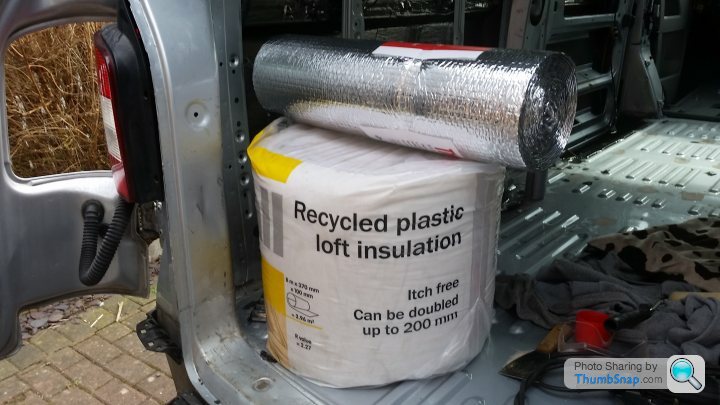
For those who want to know quantities I've used:
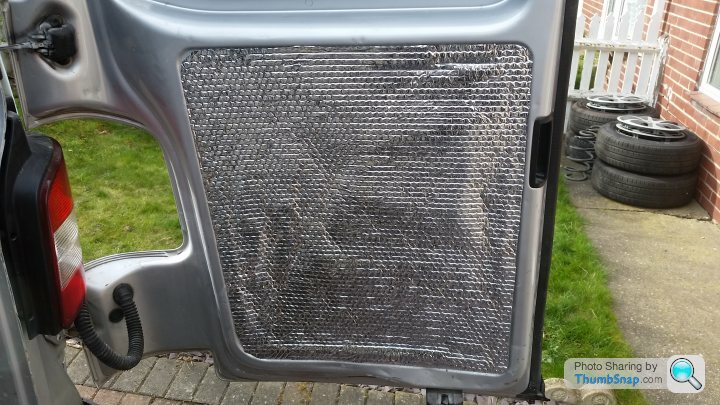
7 rolls of flashing (225mm x 10m). That includes 2 rolls for the floor that haven't gone down yet and a doubling up over the wheel arches.
4 rolls of B and Q foil insulation.
4 rolls of B and Q recycled plastic insulation.
2 aerosols of spray glue and a roll of duck tape plus many hours of hair dyer action.
Total cost of sound deadening and insulation is £210.
First quick job was replacing the drivers door seal, the previous owner must have stepped on it everytime he got in and out.
Then onto the insulation.
I went for foil, insulation, foil. Where there is only a single skin like the rear window blanks I taped the seams to try and create a vapour barrier thus minimising any condensation that might form against the cold panel.
For those who want to know quantities I've used:
7 rolls of flashing (225mm x 10m). That includes 2 rolls for the floor that haven't gone down yet and a doubling up over the wheel arches.
4 rolls of B and Q foil insulation.
4 rolls of B and Q recycled plastic insulation.
2 aerosols of spray glue and a roll of duck tape plus many hours of hair dyer action.
Total cost of sound deadening and insulation is £210.
Edited by ChocolateFrog on Wednesday 15th March 19:10
LeighW said:
ChocolateFrog said:
Yes but I've gone for fixed all round, possibly a mistake although my van doesn't have AC which I'm now thinking is probably a mistake so I've been looking at Truma Saphir AC and heating units in one, would probably fit under the floor.
Heard there are problems with the sliding windows leaking although this might just be genuine ones. My intention would be to open the side door if it got too hot.
It's just the genuine ones that leak. My regret is because it would help to get a bit of a through draught at night when the weather is warm (not that often then...), I like to keep the doors locked when we're asleep! I don't have AC either, and it's not been an issue in three years for me. Heard there are problems with the sliding windows leaking although this might just be genuine ones. My intention would be to open the side door if it got too hot.
Had one of those days where literally everything that could go wrong did go wrong.
Made some progress but had to abandon fitting the window as the adhesive that bonds the panels together didn't go off in time before it got dark.
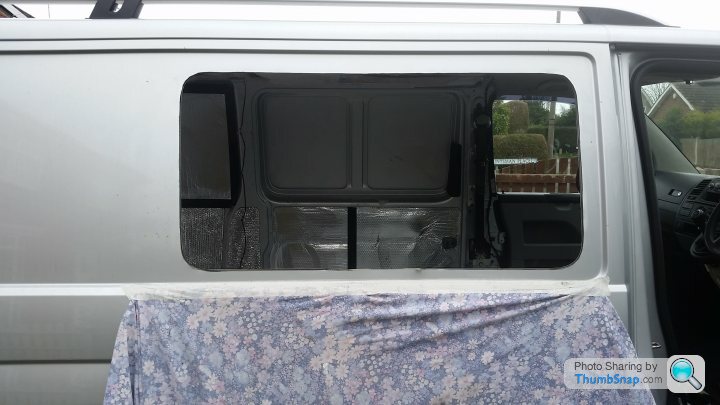
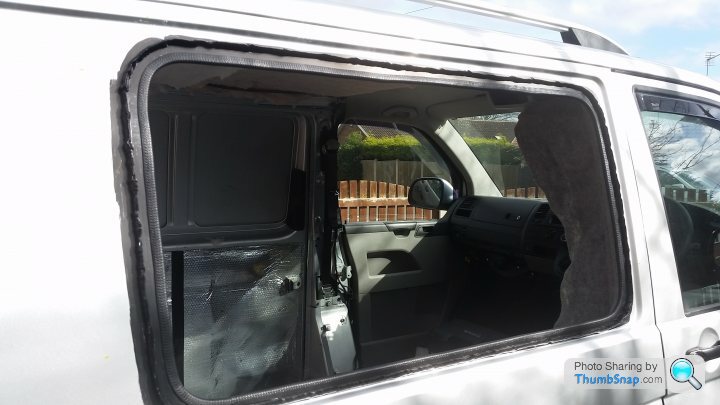
And that's about as far as I got. Started off using a nibbler but couldn't get it in the right place due to the inner lip so resorted to the jigsaw which did a pretty good job.
There's some sealant between the two panels that needs removing. I was led to believe it was like putty and would be easy to remove. Not so, it had the consistency of vulcanised rubber and a limpet like grip on the van. Took 2 hours with a combination of Stanley, chisel knife and scribe to persuade it out.
Time for a beer and regroup.
Made some progress but had to abandon fitting the window as the adhesive that bonds the panels together didn't go off in time before it got dark.
And that's about as far as I got. Started off using a nibbler but couldn't get it in the right place due to the inner lip so resorted to the jigsaw which did a pretty good job.
There's some sealant between the two panels that needs removing. I was led to believe it was like putty and would be easy to remove. Not so, it had the consistency of vulcanised rubber and a limpet like grip on the van. Took 2 hours with a combination of Stanley, chisel knife and scribe to persuade it out.
Time for a beer and regroup.
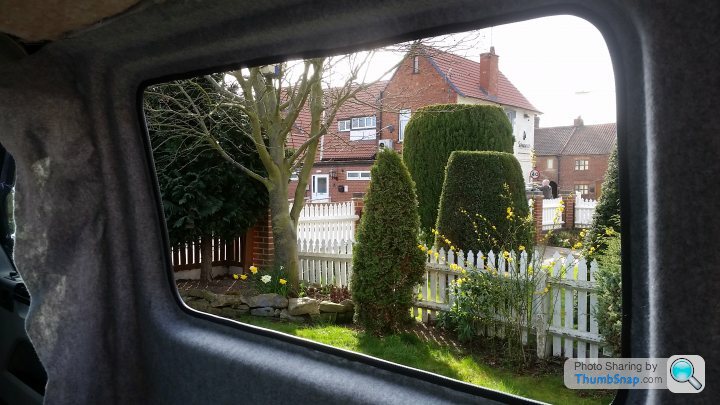
A much better day today. Still took 45 mins to remove the masking tape residue, didn't think it was ever going to come off.
I tidied up the cut out for the window and primed the surface to take the glazing sealant.

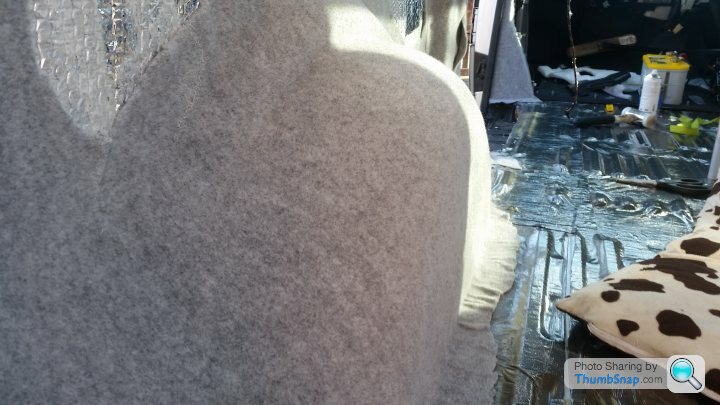
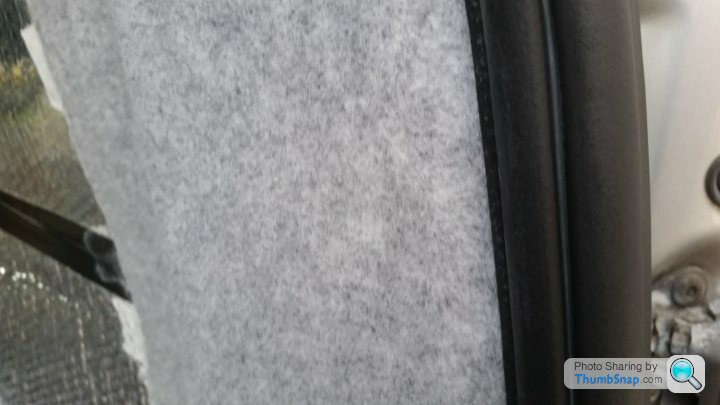
Before fitting the window I fitting the carpet to the the exposed metal areas on the side of the van.
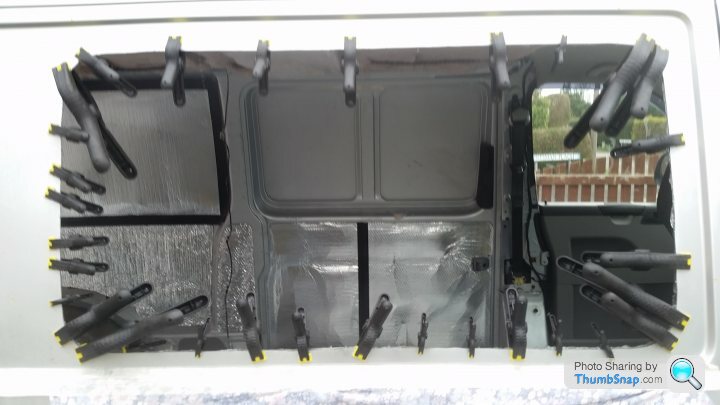
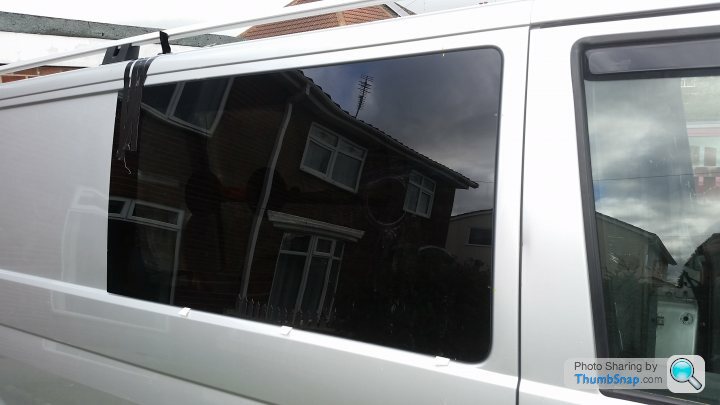
Then it was on with the window. A couple of tips I picked up helped a lot. I used a paint marker pen to roughly align the window to the frame before applying the sealant which means you're not smearing it around to much when you're fitting it for real. The second one was to use a ratchet strap on the inside to apply tension while the glue goes off.
 |http://thumbsnap.com/Kk3NExfZ[/url]
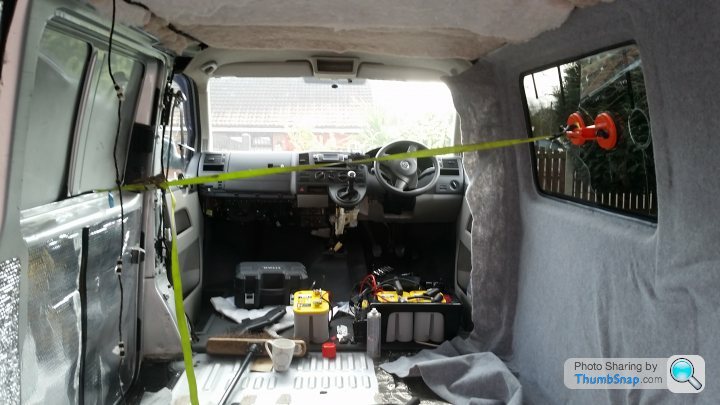
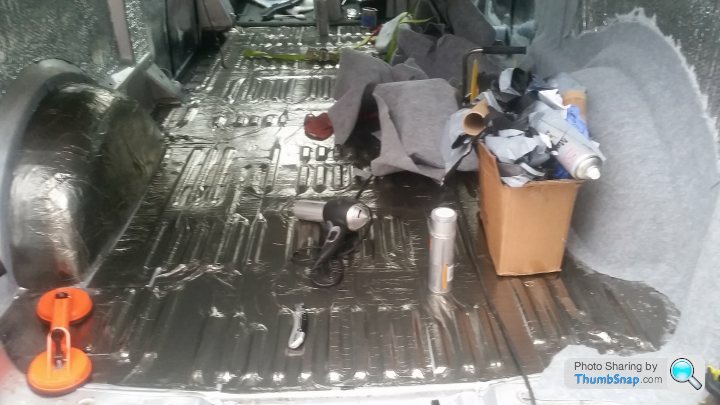
While that was going off I finished sound deadening the floor, ended up with about 20 cm left over, not bad from the 70m I bought.
Excuse the mess, again!
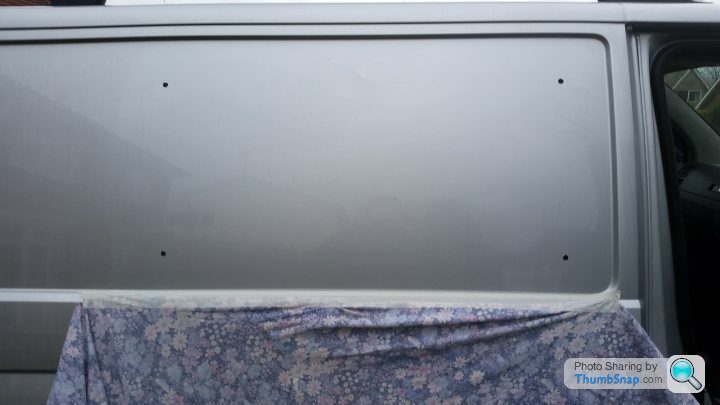
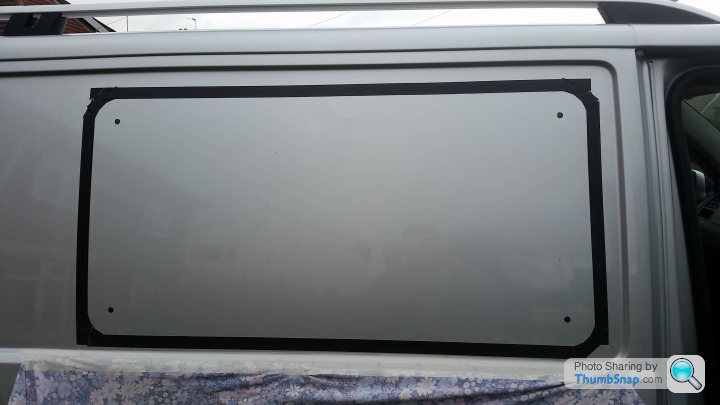
I then fitted the second window. This one is 'fake' i.e. There's no cut out. There are a couple of reasons for this. Firstly, I think it looks better with w windows and fills the recessed area of the van. Secondly, if I cut out the panel it would potentially be obscured if and when I fit units. If you don't fit one it can look slightly homemade as the front window curve doesn't perfectly align with the curve of the van, whether it's manufacturing tolerances or the panel is distorted slightly from joining the inner and outer panels together I don't know, I've seen it on other vans and I didn't like it.
To stop you being able to see the panel underneath I used limo tint on an already tinted window so it's virtually black. I also left a gap in the sealant to avoid any condensation between the panel and window.
 [url]
[url]
I tidied up the cut out for the window and primed the surface to take the glazing sealant.
Before fitting the window I fitting the carpet to the the exposed metal areas on the side of the van.
Then it was on with the window. A couple of tips I picked up helped a lot. I used a paint marker pen to roughly align the window to the frame before applying the sealant which means you're not smearing it around to much when you're fitting it for real. The second one was to use a ratchet strap on the inside to apply tension while the glue goes off.
|http://thumbsnap.com/Kk3NExfZ[/url]While that was going off I finished sound deadening the floor, ended up with about 20 cm left over, not bad from the 70m I bought.
Excuse the mess, again!
I then fitted the second window. This one is 'fake' i.e. There's no cut out. There are a couple of reasons for this. Firstly, I think it looks better with w windows and fills the recessed area of the van. Secondly, if I cut out the panel it would potentially be obscured if and when I fit units. If you don't fit one it can look slightly homemade as the front window curve doesn't perfectly align with the curve of the van, whether it's manufacturing tolerances or the panel is distorted slightly from joining the inner and outer panels together I don't know, I've seen it on other vans and I didn't like it.
To stop you being able to see the panel underneath I used limo tint on an already tinted window so it's virtually black. I also left a gap in the sealant to avoid any condensation between the panel and window.
[url]Took the tape off today and nothing fell off, which is nice.
While the rain was pouring down I decided to trim the A pillars in some faux suade. Before and after.
Then trimmed the frame on the nearside.
Pleased I made the effort to smooth the wheel arches as I think they came out well.
Once the seals have been replaced it really starts to feel like it's coming together.
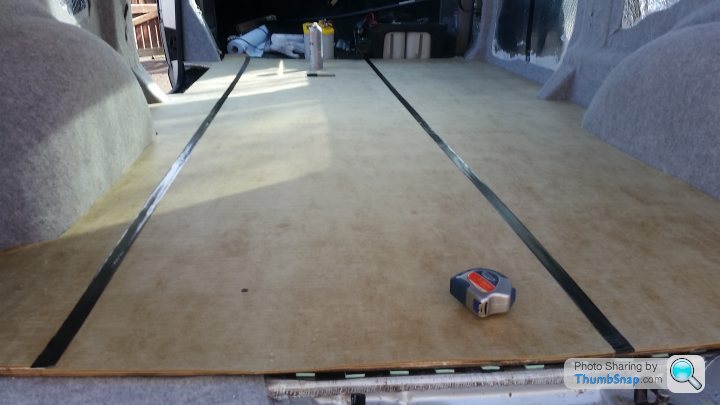
Then moved onto the floor as my knees can't take anymore kneeling on corrugated steel. I used 5 mm insulation to level it. Unfortunately I used contact adhesive which dissolved it quite quickly meaning I had to redo about a third of it, you can just about see it in the picture.

I then replaced the original 12mm ply floor as it was in good condition and fitted well, just gave it a lick of paint.
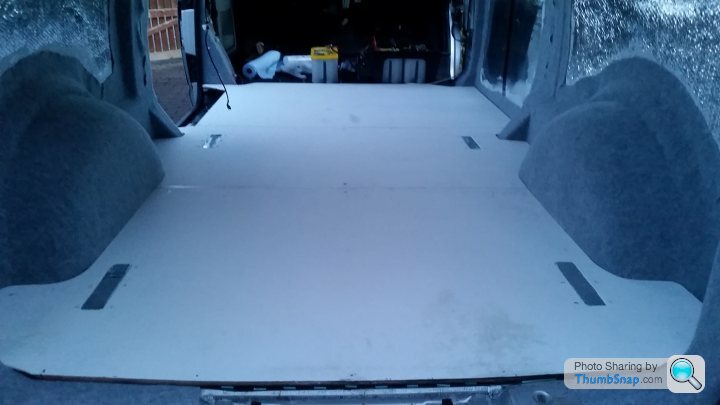
I've laid 3mm underlay on top of that ready for the flooring.
While the rain was pouring down I decided to trim the A pillars in some faux suade. Before and after.
Then trimmed the frame on the nearside.
Pleased I made the effort to smooth the wheel arches as I think they came out well.
Once the seals have been replaced it really starts to feel like it's coming together.
Then moved onto the floor as my knees can't take anymore kneeling on corrugated steel. I used 5 mm insulation to level it. Unfortunately I used contact adhesive which dissolved it quite quickly meaning I had to redo about a third of it, you can just about see it in the picture.
I then replaced the original 12mm ply floor as it was in good condition and fitted well, just gave it a lick of paint.
I've laid 3mm underlay on top of that ready for the flooring.
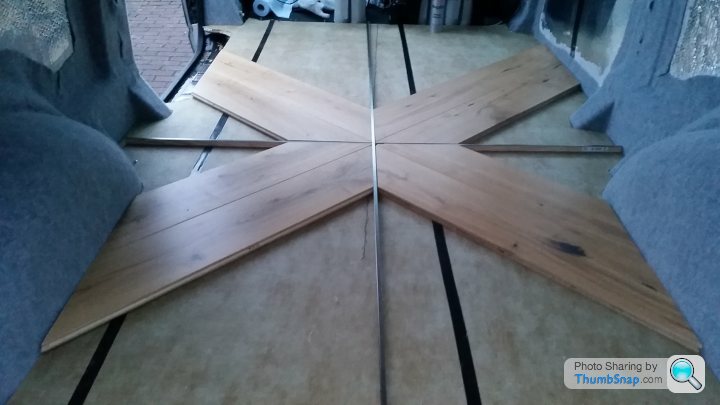
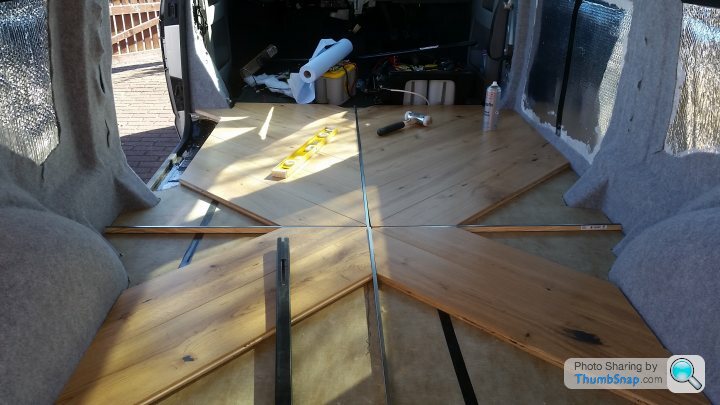
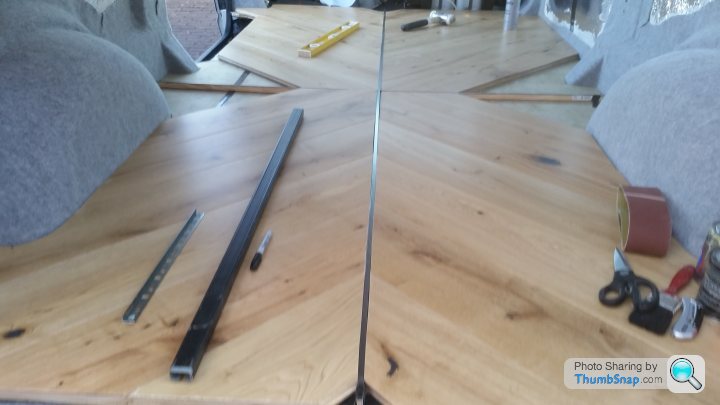
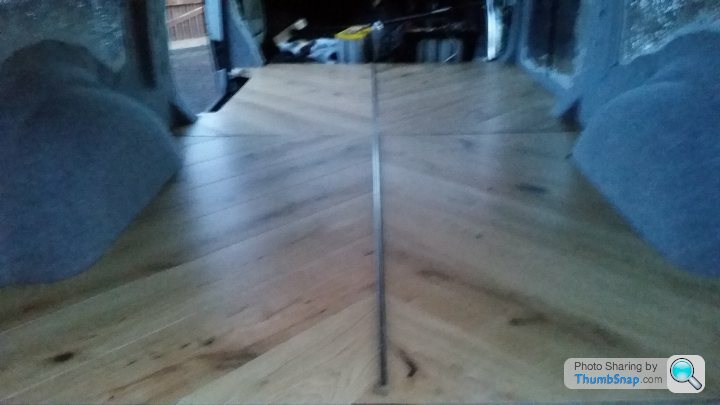
Got a couple of hours in on the flooring this evening. I deliberated long and hard over what to use but in the end I decided to go wood as I had some left over from another project. It's pretty heavy duty engineered oak so is overkill for this job but should look good and last a long time.
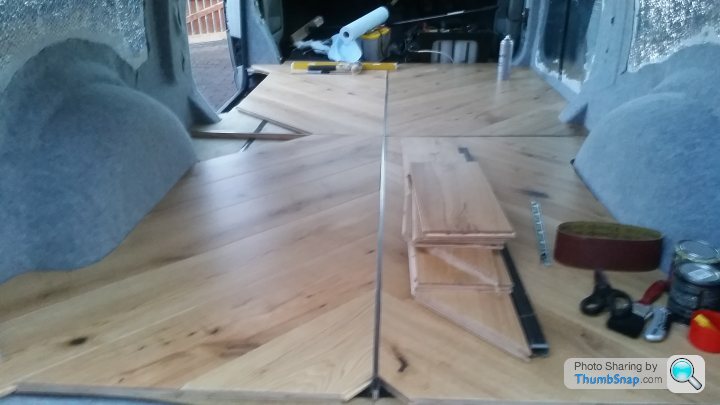
Picture with the underlay down
Not many jobs are 10 minute jobs but that one was. Decided on slightly complicated layout, I may regret that later. Got about a third of the way through and I think it's going to look great.
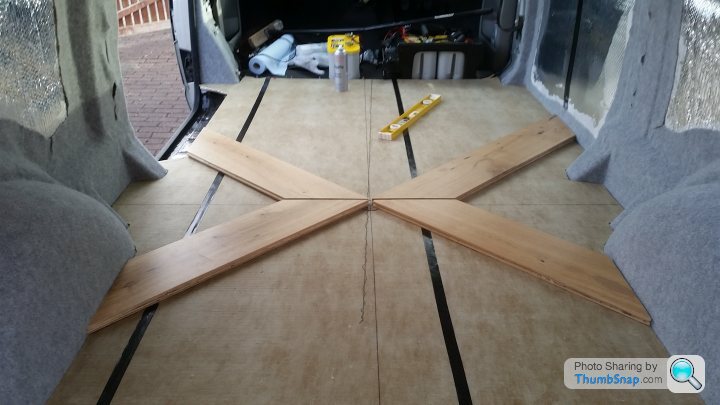

I've got an American forces coin that I was given on Herrick 17 so instead of it living in a drawer never to be seen I'll recess it into the middle and seal it in with some PU resin.

Picture with the underlay down
Not many jobs are 10 minute jobs but that one was. Decided on slightly complicated layout, I may regret that later. Got about a third of the way through and I think it's going to look great.
I've got an American forces coin that I was given on Herrick 17 so instead of it living in a drawer never to be seen I'll recess it into the middle and seal it in with some PU resin.
Barchettaman said:
Bloody hell. Just when I think this build can't get any more impressive, you start laying an oak parquett floor. Top work!
I was going to use silver and navy blue rubber tiles but when I priced them up it was around £250 in materials for the ones i wanted whereas this feels free as the costs were already sunk and for once I ordered too much. Only cost was the underlay and the satin chrome trim dividing the sections.
Mij91 said:
Looking awesome mate, where did you get the Flashbond stuff from? I am going to do my GT4 boot to try and cut down on some of the road noise and it looks like good quality stuff.
I was wondering if you were military after seeing the can of ZX earlier in the thread, I love the idea of recessing the coin.
Haha yes I am, REME so having access to the workshop can be quite handy.I was wondering if you were military after seeing the can of ZX earlier in the thread, I love the idea of recessing the coin.
I got it from ebay, free delivery and was £10 for a 10m x 225mm roll. Needs plenty of heat and doesn't stick well to filler or primer but used spray adhesive on those bits but other than that it works great. Just tapping on the panel and you can hear the difference, it's also not too heavy, around 2kg a roll I think.
I'm away with Mission Motorsport today learning how to vinyl wrap. Wonder what I could do with their very expensive printer.
Mij91 said:
ChocolateFrog said:
Haha yes I am, REME so having access to the workshop can be quite handy.
I got it from ebay, free delivery and was £10 for a 10m x 225mm roll. Needs plenty of heat and doesn't stick well to filler or primer but used spray adhesive on those bits but other than that it works great. Just tapping on the panel and you can hear the difference, it's also not too heavy, around 2kg a roll I think.
I'm away with Mission Motorsport today learning how to vinyl wrap. Wonder what I could do with their very expensive printer.
Awesome, I am recent ex Reme so great to see another of the same ilk on here. I got it from ebay, free delivery and was £10 for a 10m x 225mm roll. Needs plenty of heat and doesn't stick well to filler or primer but used spray adhesive on those bits but other than that it works great. Just tapping on the panel and you can hear the difference, it's also not too heavy, around 2kg a roll I think.
I'm away with Mission Motorsport today learning how to vinyl wrap. Wonder what I could do with their very expensive printer.
I will grab some from there then, I have already used Wickes home brand on my doors but that looks to be better stuff. I am not looking for silence but would just like slightly less cabin noise when commuting above 60 mph.
Happy days, it wasn't something I was aware of when in. Brian has been involved with them at some point I believe and a chap called Jack that I connected with.
Van looks really well done though. I had heard use of loft style insulation was bad for causing condensation? I am assuming because you have covered the metal panels and sealed them before, this shouldn't be an issue?
You can't apply principles of insulating a house to a van which many people seem to do. Condensation in a metal box is always going to be an issue to some extent no matter what you use on a conversion like this.
Ive made an effort to create a vapour barrier on any bits of the body that are only single skin and tried to minimise cold bridges wherever possible. I've also left the drain holes as free as possible so should any moisture condense on the panels it has a way to get out. The rest is just management with enough ventilation when sleeping in it to account for 2 people, easier said than done sometimes.
Edited by ChocolateFrog on Thursday 23 March 16:46
Zetec-S said:
Bookmarked this thread, the van looks awesome so far, well done OP. This along with Leigh's thread from a couple of years ago really makes me want to get my own.
We hired a California a couple of years ago and really enjoyed that, but there's no way I could justify the cost of one. Also, I love the look of the conversions, in some ways I think they look better than the California, and imagine it's even more satisfying to own when you've done it yourself.
Yes part of the fun is doing it yourself and learning about the vehicle as you go. We hired a California a couple of years ago and really enjoyed that, but there's no way I could justify the cost of one. Also, I love the look of the conversions, in some ways I think they look better than the California, and imagine it's even more satisfying to own when you've done it yourself.
Was hoping to get away without replacing the 55 profile tyres until they had worn Down. With a bit of weight back in the van it quickly became apparent this was a no go.
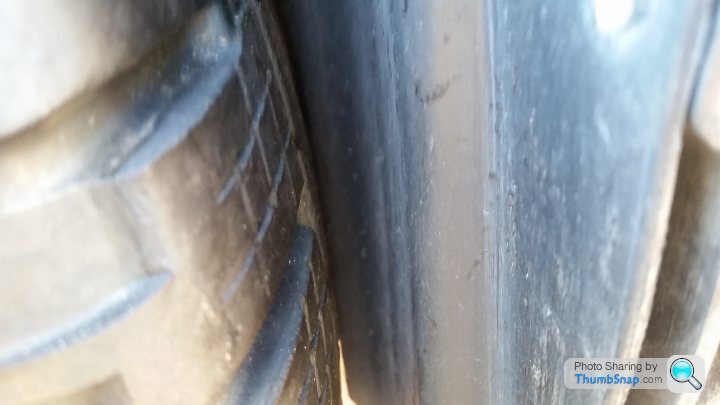
The tyres are just touching the inner wheel arch on the rears.
And as I want to be able to drive it next week these arrived in the post yesterday.
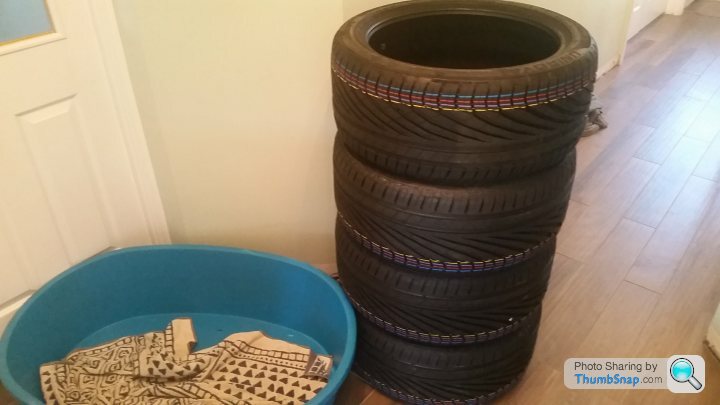
Rainsport 3's in 40 profile. Could have got 45's but these were £10 a tyre cheaper. Hopefully the ride won't be too harsh on them.
The tyres are just touching the inner wheel arch on the rears.
And as I want to be able to drive it next week these arrived in the post yesterday.
Rainsport 3's in 40 profile. Could have got 45's but these were £10 a tyre cheaper. Hopefully the ride won't be too harsh on them.

finlo said:
ChocolateFrog said:
Was hoping to get away without replacing the 55 profile tyres until they had worn Down. With a bit of weight back in the van it quickly became apparent this was a no go.
The tyres are just touching the inner wheel arch on the rears.
And as I want to be able to drive it next week these arrived in the post yesterday.
Rainsport 3's in 40 profile. Could have got 45's but these were £10 a tyre cheaper. Hopefully the ride won't be too harsh on them.
You must have a big letterbox!The tyres are just touching the inner wheel arch on the rears.
And as I want to be able to drive it next week these arrived in the post yesterday.
Rainsport 3's in 40 profile. Could have got 45's but these were £10 a tyre cheaper. Hopefully the ride won't be too harsh on them.
Decided to do a few different bits today.
Got the wheels off, again. Managed to get all wheels and 4 new tyres in the back of the Volvo, well chuffed.
I left the old tyres at the garage in return for fitting the new ones, could have sold them for more but this way I don't have deal with ebay.
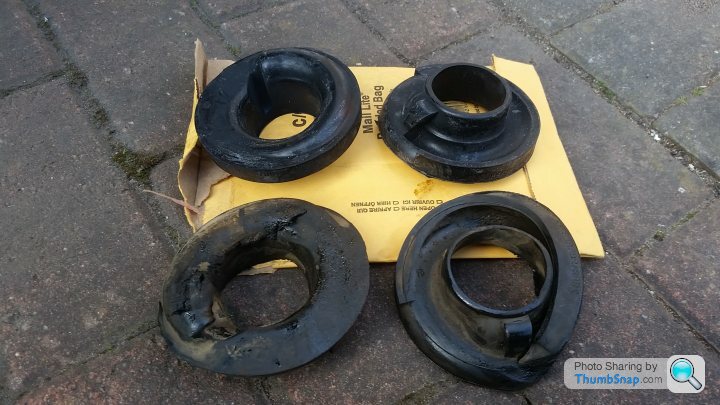
While they were off I changed the rear spring seats which I noticed last time were passed their best.
Literally a 10 minute job with the wheels off and my electric windy gun.
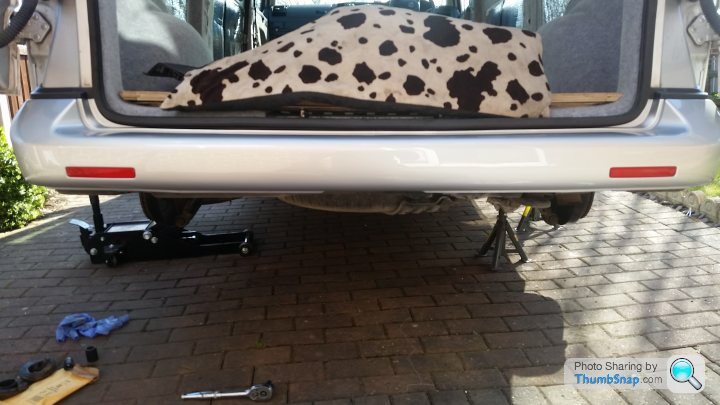
I also couldn't resist fitting the rear bumper, thought it would be less likely to get damaged on the van and the bulk of the heavy work is now done.
Tidied up a couple of other odd jobs too.
Got the wheels off, again. Managed to get all wheels and 4 new tyres in the back of the Volvo, well chuffed.
I left the old tyres at the garage in return for fitting the new ones, could have sold them for more but this way I don't have deal with ebay.
While they were off I changed the rear spring seats which I noticed last time were passed their best.
Literally a 10 minute job with the wheels off and my electric windy gun.
I also couldn't resist fitting the rear bumper, thought it would be less likely to get damaged on the van and the bulk of the heavy work is now done.
Tidied up a couple of other odd jobs too.
Took the van out this evening. It so much quieter. It has pretty much eliminated road noise, can't hear anything from behind me. The loudest noise is the rumble of the engine, had to turn radio 4 down haha.
Went straight to the nearest Hunter machine which happens to be at Kwik-Fit.
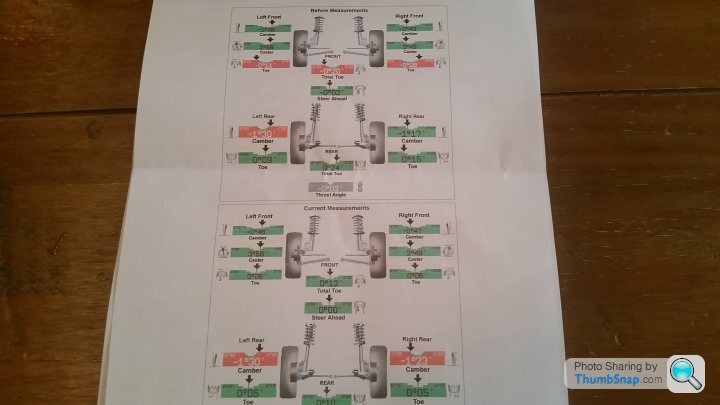
Rear camber is slightly out but there was nothing in the back. Paid a bit extra to get 8 free rechecks within the next 2 years so ill take it back once there's a bit more weight in it.
Went straight to the nearest Hunter machine which happens to be at Kwik-Fit.
Rear camber is slightly out but there was nothing in the back. Paid a bit extra to get 8 free rechecks within the next 2 years so ill take it back once there's a bit more weight in it.
Gassing Station | Readers' Cars | Top of Page | What's New | My Stuff