BMW 330CI E46 Build thread
Discussion


Finished off a few little jobs ready for Cadwell Park.
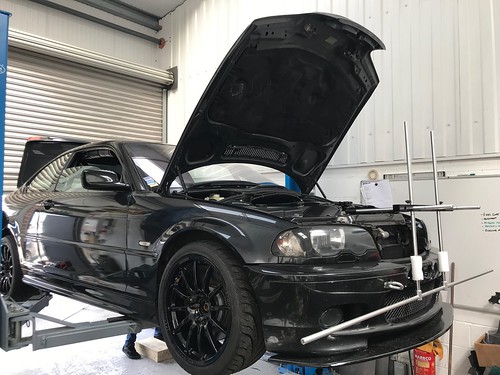
One of the ones I really wanted to do was to remove the splitter and approve its appearance a little bit now I've decided it's staying as it's helping dam the air in through the rad and cooler and well it makes the front end look a little more aggressive too. So I've removed it, numerous coats of filler and flatting to get a reasonable finish and a couple of coats of 2k paint to finish it for a little while. Will be making another at some point with a slightly different shape.
Took a few photos of the car.


Love the new and improved interior, can't wait to get some seat time in it. I have noticed though how loud the fuel pump is even though it's exterior mounted so going to look at adding a bit more rubber between the mount and the chassis but i'm sure I won't notice it with over the sound of the exhaust with ear plugs in.

One of the ones I really wanted to do was to remove the splitter and approve its appearance a little bit now I've decided it's staying as it's helping dam the air in through the rad and cooler and well it makes the front end look a little more aggressive too. So I've removed it, numerous coats of filler and flatting to get a reasonable finish and a couple of coats of 2k paint to finish it for a little while. Will be making another at some point with a slightly different shape.
Took a few photos of the car.
Love the new and improved interior, can't wait to get some seat time in it. I have noticed though how loud the fuel pump is even though it's exterior mounted so going to look at adding a bit more rubber between the mount and the chassis but i'm sure I won't notice it with over the sound of the exhaust with ear plugs in.
Nik Gnashers said:
I don't post very often, but I had to just say what a brilliant effort, and car. Well done sir.
Thanks! Appreciate the comment, feels like I'm on the right track with it, not sure how it's going to progress from here now but just will keep it hopefully as a turn key car and keep using it and getting better at driving it.obscene said:
Car is looking mega, an absolute testament to the amount of hours you've put in. Have had a quick flick through but are you still running standard calipers? Don't know if I missed that you've upgraded them or not. I know a lot of the M3 guys chuck the 996/boxster brembo calipers on which I believe can be done with the 330 with the right size bracket or shimming the caliper.
Thanks! Hopefully the changes with the ABS delete and then again further moving up to RC6 pads should improve the brakes even further but will only know when I get out on track at Cadwell. My friend uses the 996 calipers and I think it will probably be a future modification should I need more braking or more consistent braking by moving away from the one piston calipers. Think this would be the best way to go using OEM calipers like you say and a standard off the shelf disc even is custom brackets are needed. Last time i looked at it there was a company on Ebay selling adaptors for that conversion even if slight modifications are needed I can take care of that.Final bit of prep work before Cadwell Park on Sunday 25th August.
Took the car down to a friends unit along with another mate to look at the alignment on both of our cars. Small gathering of BMW's in the compound... The first one being Chris' Turbo E36 328 build with circa 400bhp

The other car being Jordans TB'd Stroker E36, little snippet of the cars engine bay...

First job on the car was to get it up on the ramp and have a good look over the underside of it, I normally only see it on axle stands on the drive. Nice to see how the underside of the car is looking after 12 months use. I don't clean the underside of the car but it stays nice and clean with it not being driven on the UK roads. Quick check of the wheel bearings and suspension components considering in the past I have been plagued with wheel bearing issues, the FAG bearings seem to be holding up ok so far.

Second job was to get on with the alignment. With changing to softer springs I had to reset the ride height, in the past I've ran a little bit of rake but wanted to drop the rear end down a little so get the car level on all corners and then i could get on with the alignment.
First job was to see where it was sitting after the ride height adjustments and a years worth of track days.
Turns out it was pretty close, camber and toe was a little off on the back left but nothing major. Front end exactly how it was set 12 months ago. Still holding 3 degrees of camber and parallel toe.
Made a few adjustments to the alignment settings on the rear, with dropping the ride height slightly the rear camber is now sitting at 2.2 degrees. This is fine for the rear and is the preferred rear camber between friends with E36/46.
Was previously running 1mm/7' toe in each side which I have pulled back to 0.5mm/3.5'.
In the front leaving the camber a hair over 3 degrees and adding 0.5mm/3.5 degrees of toe out each side to see if it makes a difference to turn in on track.
That's the last jobs done ready to drive over to Cadwell on Saturday. Just got to give it a wash and put it back on the trailer Saturday morning.
Finally if anyone wants to follow the action a little bit more closely, I post as much as I can on here but a lot of it goes on social media now daily, shocking I know! But, thought I'd post a link to it anyway...
Once again, thanks for reading if you've made it this far.
https://www.instagram.com/tommyting1/

Took the car down to a friends unit along with another mate to look at the alignment on both of our cars. Small gathering of BMW's in the compound... The first one being Chris' Turbo E36 328 build with circa 400bhp
The other car being Jordans TB'd Stroker E36, little snippet of the cars engine bay...
First job on the car was to get it up on the ramp and have a good look over the underside of it, I normally only see it on axle stands on the drive. Nice to see how the underside of the car is looking after 12 months use. I don't clean the underside of the car but it stays nice and clean with it not being driven on the UK roads. Quick check of the wheel bearings and suspension components considering in the past I have been plagued with wheel bearing issues, the FAG bearings seem to be holding up ok so far.
Second job was to get on with the alignment. With changing to softer springs I had to reset the ride height, in the past I've ran a little bit of rake but wanted to drop the rear end down a little so get the car level on all corners and then i could get on with the alignment.
First job was to see where it was sitting after the ride height adjustments and a years worth of track days.
Turns out it was pretty close, camber and toe was a little off on the back left but nothing major. Front end exactly how it was set 12 months ago. Still holding 3 degrees of camber and parallel toe.
Made a few adjustments to the alignment settings on the rear, with dropping the ride height slightly the rear camber is now sitting at 2.2 degrees. This is fine for the rear and is the preferred rear camber between friends with E36/46.
Was previously running 1mm/7' toe in each side which I have pulled back to 0.5mm/3.5'.
In the front leaving the camber a hair over 3 degrees and adding 0.5mm/3.5 degrees of toe out each side to see if it makes a difference to turn in on track.
That's the last jobs done ready to drive over to Cadwell on Saturday. Just got to give it a wash and put it back on the trailer Saturday morning.
Finally if anyone wants to follow the action a little bit more closely, I post as much as I can on here but a lot of it goes on social media now daily, shocking I know! But, thought I'd post a link to it anyway...
Once again, thanks for reading if you've made it this far.
https://www.instagram.com/tommyting1/
Cadwell Park - 25th August 2019.
As usual for me the van and trailer were loaded up on the Friday, ready to head over to the circuit on Saturday afternoon, ahead of the track day on the Sunday. It's nice to get to the venue the day before and get unloaded, set up camp for the evening and chill out without having to get up early and get to the circuit first thing.
Car unloaded and the awning set out on the van ready to provide some shade from what was forecast to be a blistering day the following day, at this point I appreciate the fact that I've managed to trailer the car 180 miles and it still be clean!

When the sun came up the next morning there was a slight haze in the sky but it was already warming up. Probably not the best day to be in a totally stripped out black car! Good job I decided to leave in the fan blower pointing at the driver!

Was looking forward to getting out on circuit with the car since the latest rebuild with the fuel system, changes to the brakes and generally the new cockpit with logger and camera set up at Cadwell too.
However sighting laps didn't go so well, short shifting out the holding area through hall bends around to the start finish straight were I went to open her up and nothing, the car completely bogged, let off the throttle and under light throttle it drove fine, thought I would give it half a lap maybe air moving around the new fuel system, hoping for an easy answer I cruised it around following the pack of cars to the back straight and went for full throttle, instantly bogged and no power what so ever. I knew something was up so nursed it around for the remainder of the sighting laps at low revs and partial throttle and came back into the pits at the end of the first lot of sighting laps.
I knew straight away it must be something to do with the fuel system and the fuel rail not having the correct pressure. Jacked up the car and checked all the lines where connected to the correct places and plumbed correctly. No issues to be seen, without wanting to ruin the rest of the day before it had begun I opted to replace the fuel filter with built in regulator and go back to the standard in tank pump and get on with the rest of the day without fault finding.

I think the cause could be something to do with the 255 pump going into the filter/reg and it only being a single ended fuel rail with the return coming back out of the filter. Either the filter hasn't taken the additional pressure and flow well and has failed or the regulator has failed causing loss fuel pressure. Either way I've kept the parts removed and I plan to build it up how it was and investigate the cause. But in the long run i'm going to go back to my original plan which was to run a return fuel rail with a built in reg in the return line off an E36 328.

With the fuel system put back to standard for the time being I was out not long after the second set of sighting laps. Great, the day was off the wobbly start but I was out on track, spent a couple of sessions getting used to the new set up with the softer rear springs. Car felt a lot more planted in the rear, tiny bit of understeer on the limit which disappeared when driving it properly and using the rear end pushing through the corners making for a nice balance. Already I was going faster through Coppice than I've even been before, staying the 4th gear from the start finish straight all the way to the end of Park straight, short shifting after park to 4th for Chris' curve found so much more pace and the car felt so much more balanced. Only issue in these morning sessions was being black flagged due to the fact my indicator had somehow broken it's mounting tab and was handing down the front of the car. Quickly removed and back out again.
It was however to be short lived, just before dinner the car suffered from what is a common problem on the E46's which is the coolant tank exploded entering Coppice. Looking at the logs the coolant temp was 96 degrees at the time so no really that hot... Turns out the tank was the original part from 2003, lots of heat cycled and aged plastic it finally gave up.

Trying my best not to cause too much of a hold up I opted to drive the car to the nearest exit gate on the circuit to save the time getting the car on a recovery truck and then turned the car off ready to be towed back to the paddock. I knew straight away what the problem was and set about removing it, sadly with it being sunday there was no car part stores open but after a few messages back and forth to friends, one of them who lived 20 minutes away from the circuit offered to remove theirs from their car and let me borrow it for the day to keep the car going on track, at this point it was lunch time and the circuit was closed, I set about stripping the coolant tank off while a friend of mine went to collect it.

12:15 comes around and I manage to get a replacement part and fitted just after the green flag went out for the afternoon session. I didn't want to rush out on track and have anymore issues so spent half hour checking the pipes, it was correctly bled and no further leaks.
Double checking everything I was ready to go out on circuit for the afternoon.

Back out on circuit the car felt amazing. The new alignment settings, ride height and springs felt spot on, I had at this point cracked up the damping front and rear and found a really nice balance with the car. Looking back at the data after the track day I had managed to find 3 seconds a lap over last time I was there in april which I was really happy about!
The RC6 brake pads where fantastic and exactly what the car needed to give that bit more bite on the front axle with the proportioning valve and ABS delete I finally had the right balance to be able to get on the brakes properly and the adjustment to be able to lock front or rear tyres. Previously I was constantly being held back by the rears locking up first and not being able to brake as hard as I wanted or should have been able to. The swap from RC5 - RC6 was certainly worth it!

However mid afternoon another problem struck. I had been on circuit for 15 minutes solid lapping without any let up as the track was really quiet with very little traffic, coolant temps were around 100 degrees and oil temps hovering around 105 degrees. Not bad considering the ambient temp on the day was up to 30 degrees. After 7 hard laps setting some really consistent pace I left off on the start finish straight to give the car a good full lap to cool down before coming in. Cruising down the Park Straight in 5th gear no issues, until I turned into Chris' curves, the car cut out, I rolled around to the end of the curves and straight down to Mansfield and tried to start it down the hill but it was just cranking and failed to start, I pulled over at the marshals point there and tried to get the car going again on the flat. Engine cracked and sounded fine, oil and coolant temps all fine, nothing out of the ordinary in the session to make me think something was majorly wrong, fuel gauge still reading 1/3 of a tank. Gave the car a couple of minutes and it decided to start again but struggled to idle and bogged. It was enough to get me pointing back in the right direction. Managed to limp the car back to the start of the pit lane where as soon as it pointed up hill it cut out again. Managed to get it started again and into the paddock area. I was a bit stumped at this point as to the reason behind it. Tried to start it again on a flat surface and it ran bit only just idling. I had a feeling I knew what it was. Pulled out 40L of fuel from the van and filled up the tank, low and behind started first time and ran perfectly. Weird thing is that when it cut out it was still registering 1/3 of a tank of fuel on the gauge, this is probably correct to as I hadn't covered as many miles in the morning. The 1/3 of a tank of fuel was probably stuck in the left hand side of the tank due to the weird shaped tank in the BMWs with the prop and exhaust going through the middle, relying only on the internal siphon to transfer the fuel from one side of the tank to the other.
(More on this at the end of the post)
Only thing left was to go back out and test it. Yes it then ran flawlessly for an half hour session up until right before the chequered flag! Really good to end the day on such a good session, I've put a video link at the end of the thread with some laps from this session unedited.
One final thing I got to test on the day was I have fitted the car with Mobius HD Cameras which are powered via a switch on the dash which is located next to the Arduino Data Logger switch making it nice and easy to start both the data logging and the video at the same time. Certainly made editing the videos from the track day and lot easier and not having to mess with starting and stopping go pro's was so much easier.
Data overlay over the Mobius video footage from inside the car. There is quite a bit of wind noise from having the windows down with it being so warm over the weekend. Something to check next time the car is out.

Video Links
First video is a few good consistent laps edited together including the two fastest laps of the day.
https://youtu.be/y3WLml7sorQ
Second video is a number of good back to back laps from the final session of the day.
https://youtu.be/24LK0CH7plY
Going Forward
From here I don't have anything planned until November at Oulton Park so I have a little bit of time to look at the following.
-A few people have given me things to look at like retro fitting the fuel siphon baffle that was fitted to the e46 M3 tanks but not non M cars.
-I'm going to retro fit a 328 fuel rail which is a return style rail with a regulator in the return line and run this with an inline E36 fuel filter.
-I'm going to test the new fuel pump I have recently bought and if it working correctly refit it and reconnect it with the fuel line.
-Finally to nail the fuel system I am going to look at fitting a second in tank pump in the left side of the tank purely just to pump the fuel back to the right side of the fuel tank for the current pump to then lift it to the swirl pot.
-Luckily with me replacing the cracked expansion tank on the track day that is all sorted and ready to go again.
Made it to the end of the day.


As usual for me the van and trailer were loaded up on the Friday, ready to head over to the circuit on Saturday afternoon, ahead of the track day on the Sunday. It's nice to get to the venue the day before and get unloaded, set up camp for the evening and chill out without having to get up early and get to the circuit first thing.
Car unloaded and the awning set out on the van ready to provide some shade from what was forecast to be a blistering day the following day, at this point I appreciate the fact that I've managed to trailer the car 180 miles and it still be clean!
When the sun came up the next morning there was a slight haze in the sky but it was already warming up. Probably not the best day to be in a totally stripped out black car! Good job I decided to leave in the fan blower pointing at the driver!
Was looking forward to getting out on circuit with the car since the latest rebuild with the fuel system, changes to the brakes and generally the new cockpit with logger and camera set up at Cadwell too.
However sighting laps didn't go so well, short shifting out the holding area through hall bends around to the start finish straight were I went to open her up and nothing, the car completely bogged, let off the throttle and under light throttle it drove fine, thought I would give it half a lap maybe air moving around the new fuel system, hoping for an easy answer I cruised it around following the pack of cars to the back straight and went for full throttle, instantly bogged and no power what so ever. I knew something was up so nursed it around for the remainder of the sighting laps at low revs and partial throttle and came back into the pits at the end of the first lot of sighting laps.
I knew straight away it must be something to do with the fuel system and the fuel rail not having the correct pressure. Jacked up the car and checked all the lines where connected to the correct places and plumbed correctly. No issues to be seen, without wanting to ruin the rest of the day before it had begun I opted to replace the fuel filter with built in regulator and go back to the standard in tank pump and get on with the rest of the day without fault finding.
I think the cause could be something to do with the 255 pump going into the filter/reg and it only being a single ended fuel rail with the return coming back out of the filter. Either the filter hasn't taken the additional pressure and flow well and has failed or the regulator has failed causing loss fuel pressure. Either way I've kept the parts removed and I plan to build it up how it was and investigate the cause. But in the long run i'm going to go back to my original plan which was to run a return fuel rail with a built in reg in the return line off an E36 328.
With the fuel system put back to standard for the time being I was out not long after the second set of sighting laps. Great, the day was off the wobbly start but I was out on track, spent a couple of sessions getting used to the new set up with the softer rear springs. Car felt a lot more planted in the rear, tiny bit of understeer on the limit which disappeared when driving it properly and using the rear end pushing through the corners making for a nice balance. Already I was going faster through Coppice than I've even been before, staying the 4th gear from the start finish straight all the way to the end of Park straight, short shifting after park to 4th for Chris' curve found so much more pace and the car felt so much more balanced. Only issue in these morning sessions was being black flagged due to the fact my indicator had somehow broken it's mounting tab and was handing down the front of the car. Quickly removed and back out again.
It was however to be short lived, just before dinner the car suffered from what is a common problem on the E46's which is the coolant tank exploded entering Coppice. Looking at the logs the coolant temp was 96 degrees at the time so no really that hot... Turns out the tank was the original part from 2003, lots of heat cycled and aged plastic it finally gave up.
Trying my best not to cause too much of a hold up I opted to drive the car to the nearest exit gate on the circuit to save the time getting the car on a recovery truck and then turned the car off ready to be towed back to the paddock. I knew straight away what the problem was and set about removing it, sadly with it being sunday there was no car part stores open but after a few messages back and forth to friends, one of them who lived 20 minutes away from the circuit offered to remove theirs from their car and let me borrow it for the day to keep the car going on track, at this point it was lunch time and the circuit was closed, I set about stripping the coolant tank off while a friend of mine went to collect it.
12:15 comes around and I manage to get a replacement part and fitted just after the green flag went out for the afternoon session. I didn't want to rush out on track and have anymore issues so spent half hour checking the pipes, it was correctly bled and no further leaks.
Double checking everything I was ready to go out on circuit for the afternoon.
Back out on circuit the car felt amazing. The new alignment settings, ride height and springs felt spot on, I had at this point cracked up the damping front and rear and found a really nice balance with the car. Looking back at the data after the track day I had managed to find 3 seconds a lap over last time I was there in april which I was really happy about!
The RC6 brake pads where fantastic and exactly what the car needed to give that bit more bite on the front axle with the proportioning valve and ABS delete I finally had the right balance to be able to get on the brakes properly and the adjustment to be able to lock front or rear tyres. Previously I was constantly being held back by the rears locking up first and not being able to brake as hard as I wanted or should have been able to. The swap from RC5 - RC6 was certainly worth it!
However mid afternoon another problem struck. I had been on circuit for 15 minutes solid lapping without any let up as the track was really quiet with very little traffic, coolant temps were around 100 degrees and oil temps hovering around 105 degrees. Not bad considering the ambient temp on the day was up to 30 degrees. After 7 hard laps setting some really consistent pace I left off on the start finish straight to give the car a good full lap to cool down before coming in. Cruising down the Park Straight in 5th gear no issues, until I turned into Chris' curves, the car cut out, I rolled around to the end of the curves and straight down to Mansfield and tried to start it down the hill but it was just cranking and failed to start, I pulled over at the marshals point there and tried to get the car going again on the flat. Engine cracked and sounded fine, oil and coolant temps all fine, nothing out of the ordinary in the session to make me think something was majorly wrong, fuel gauge still reading 1/3 of a tank. Gave the car a couple of minutes and it decided to start again but struggled to idle and bogged. It was enough to get me pointing back in the right direction. Managed to limp the car back to the start of the pit lane where as soon as it pointed up hill it cut out again. Managed to get it started again and into the paddock area. I was a bit stumped at this point as to the reason behind it. Tried to start it again on a flat surface and it ran bit only just idling. I had a feeling I knew what it was. Pulled out 40L of fuel from the van and filled up the tank, low and behind started first time and ran perfectly. Weird thing is that when it cut out it was still registering 1/3 of a tank of fuel on the gauge, this is probably correct to as I hadn't covered as many miles in the morning. The 1/3 of a tank of fuel was probably stuck in the left hand side of the tank due to the weird shaped tank in the BMWs with the prop and exhaust going through the middle, relying only on the internal siphon to transfer the fuel from one side of the tank to the other.
(More on this at the end of the post)
Only thing left was to go back out and test it. Yes it then ran flawlessly for an half hour session up until right before the chequered flag! Really good to end the day on such a good session, I've put a video link at the end of the thread with some laps from this session unedited.
One final thing I got to test on the day was I have fitted the car with Mobius HD Cameras which are powered via a switch on the dash which is located next to the Arduino Data Logger switch making it nice and easy to start both the data logging and the video at the same time. Certainly made editing the videos from the track day and lot easier and not having to mess with starting and stopping go pro's was so much easier.
Data overlay over the Mobius video footage from inside the car. There is quite a bit of wind noise from having the windows down with it being so warm over the weekend. Something to check next time the car is out.
Video Links
First video is a few good consistent laps edited together including the two fastest laps of the day.
https://youtu.be/y3WLml7sorQ
Second video is a number of good back to back laps from the final session of the day.
https://youtu.be/24LK0CH7plY
Going Forward
From here I don't have anything planned until November at Oulton Park so I have a little bit of time to look at the following.
-A few people have given me things to look at like retro fitting the fuel siphon baffle that was fitted to the e46 M3 tanks but not non M cars.
-I'm going to retro fit a 328 fuel rail which is a return style rail with a regulator in the return line and run this with an inline E36 fuel filter.
-I'm going to test the new fuel pump I have recently bought and if it working correctly refit it and reconnect it with the fuel line.
-Finally to nail the fuel system I am going to look at fitting a second in tank pump in the left side of the tank purely just to pump the fuel back to the right side of the fuel tank for the current pump to then lift it to the swirl pot.
-Luckily with me replacing the cracked expansion tank on the track day that is all sorted and ready to go again.
Made it to the end of the day.
Edited by tombate911 on Wednesday 28th August 20:37
Attended the Piston Heads Saturday Service yesterday at Oulton, was good to put some names to faces as well as chat to few new people.
Got me into thinking I should probably get on here and put an update up with the little things I've been working on.
First job was to do some double checking regarding the few fuel woes I had out on track at Cadwell.
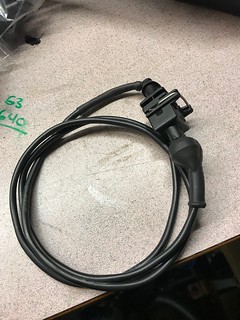
I found it is possible to get the information from both fuel senders in the tank up on the dash so I can monitor it while out on circuit and get a good idea of what is going on and whether I need to look at the option of the second pump or the tank baffle from the M3's that a few people have pointed me towards.
The 227329 in the photo below represents 22.7L in the left side of the tank

The plan is to keep this on the dash when out at Oulton next and see how the values on both sides of the tank go down when I get down to that 1/3 of a tank were I rang out of fuel at Cadwell. Better to find the problem with some data before I start throwing modifications at it.
While I was doing some messing I did some checks regarding fuel pressure in a few set ups
1 - Standard in tank pump into the old return less filter and regulator
2 - Standard in tank pump into a new filter and reg
3 - 225l swirl pot pump into the old filter and reg
4 - 255 swirl pot pump into the new filter and reg.
In every set up there was 55psi at the rail, slightly high but it's a very cheap fuel pressure gauge but every reading across all set ups was exactly the same which is good, just wanted to check everything was functioning as it should.

At Cadwell the highest temps reached on track was 106 degree oil temp and 100 degree coolant temp.
So I've cracked on with a job I've been meaning to do for a while but I've been watching and logging the temps and they've been pretty good at the last few track days. Cadwell being so warm on the day highlighted a little extra heat in the car plus everytime I go out i'm driving harder and harder as I get used to the car and my driving keeps improving.
When I did all the cooling modifications to the car earlier in the year I took a solid 20 degrees out of the coolant and the oil temps by fitting the splitter, drilling some holes and removing the AC condenser. There was always a 70mm gap under the radiator between it's self and the splitter that I was going to come back to filling if it was needed in the future.

First job was to come up with some neat angle brackets on CAD, 60 degree angle from the splitter to push the air upwards with a hex on on the back for a captive nut.


Printed off 3 of them from plastic
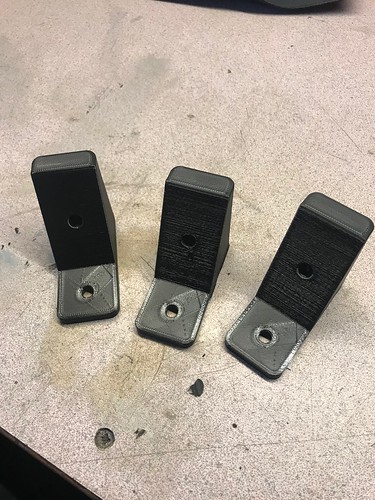
Mounted to the splitter just in front of the bottom edge of the radiator, will see what happens with the data logs with the hole filled in forcing more air through the radiator and coolers.
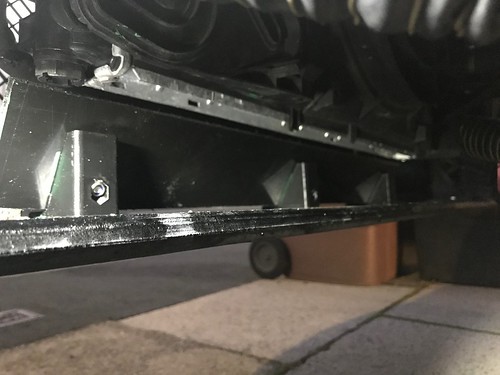
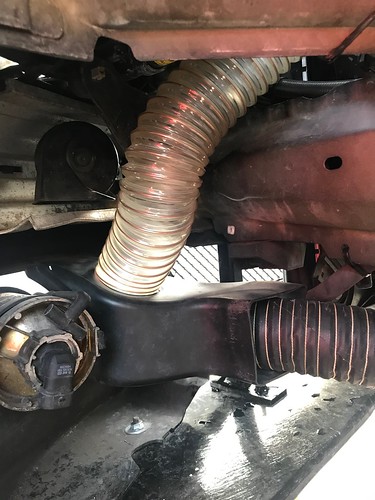
While I was under there messing with the car on axle stands I routed a duct through from the fog light up to the bottom of the air box. More cold air directly into the air box can't be a bad thing, one reason for doing this is the standard intake comes from the top of the kidney grills directly over the top of the radiators and coolers so lots of warm air in that area.
Obviously if I make a change I want to be able to test or log what is going on.
Using the Arduino data logger in the car for all the parameters that are available on the Canbus network. One of the values which is there which I'm not using at the moment is the exterior temperature from a temp sensor being the left fog light so I've relocated the sensor into the bottom of the airbox and now I can log that value as the Intake air temps and see what they are out of interest more than anything, can take the duct out on the next track day and see if it makes any difference with the cold air feed into the box.

Those are just a few of the little jobs I'm always messing with in between track days. Had the car on axle stands since it came back from Cadwell so it's nice and easy to have an hour or so working on it easily
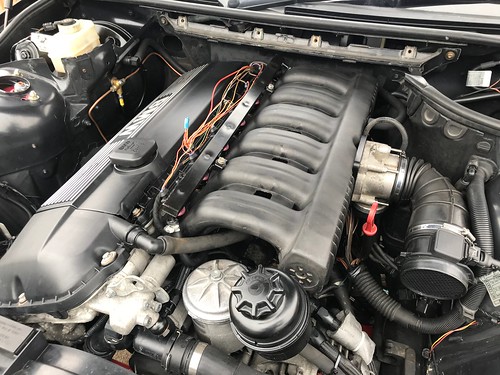
So... one modification I wasn't planning on doing anything with was the engine but one thing led to another from a random thought process and well i'll let the photos do the talking..
12 months ago I took the car to EFI tuning for Chris to run the car on the dyno to get an idea of the power the car made, the AFR and how it makes power across the rev range. Car makes good figures for 140,000 miles engine but with a massive lump or torque from 2500-3500 but then dies off as it goes through the mid range.

I have friends that have or had experience with M52 engines and stroker 3.0's M52 with M54 rotating assembly and inlet cam using an M50 inlet making better mid to top end power at the sacrifice of some of the bottom end torque. I have found very little useful information regarding the M50 inlet on the M54 so going to document it all here as I work through it as this is a working progress rather than an update after it's all worked.
So I've sourced a M50 manfiold for use in this experiment. This is a much simpler manifold without the DISA valve in the M54 which will sacrifice some low down torque but the M50 has much bigger runners and a longer runner length
To go with it I've also sourced some pink top injectors which are the same 250cc but have a straight spay pattern to suit the location in the manifold were the m54 injectors have an angle spray pattern to suit the manifold.
I'm also going to use the fuel rail that fits the M50 manifold which has the regulator built into it and slightly adjust the fuel line routing which should actually make things a little simpler.

Started off by removing the M54 inlet from the engine

It fills a massive hole in the engine bay

Both manifolds sat side by side, the M50 is so much more simpler and lighter! Few more kg's saved here!

Eagle eyed viewers will have noticed the ports in the head vs the manifold are a different shape. Most people I've seen going down this route tend to pull the head off and start porting the head. At the moment in time I don't want to go down that route so I've decided to do something similar to what I've done on the exhaust side.
I've designed a 10mm adaptor that will go from the inlet to the head and used a computer to loft the difference between the two profiles.
(There is a lot of port offset in the drawing - read on later for the reason why)

I based the first version of the adaptor off a drawing I took from someone else's build thread on a BMW forum and 3d printed it in sections to offer it up to the head as a test.

Perfect fit against the manifold side and the holes for the studs to mount it to the head.

However using the drawing someone else had produced for the M54 head there was obvious mistakes when I put the prototypes against the head. I've measured and make some adjustments to the port alignments and written the changes onto the flange ready for redrawing

I then spent the evening adjusting the drawing from the measured modifications required as well as adding tabs to the bottom of the manifold adaptor to blank off some ports in the head which are used by the m54 manifold

While i was at it I've also designed the plate that will adapt the standard electric throttle body onto the m50 manifold.
Both of these can be 3D printed as a final test before being sent for CNC machining.

Last job I was on with this afternoon between showers was the test fitting of everything I've got ready to work out how the throttle body is going to be attached to the standard intake box and MAF

Final job which is on going development at the moment is using Tuner Pro to adjust my current version of the ECU map to suit all the changes with the DISA and Idle Control valve not being used now as I plan to use the original throttle body to control the idle rather than having and idle control valve too.

Got me into thinking I should probably get on here and put an update up with the little things I've been working on.
First job was to do some double checking regarding the few fuel woes I had out on track at Cadwell.
I found it is possible to get the information from both fuel senders in the tank up on the dash so I can monitor it while out on circuit and get a good idea of what is going on and whether I need to look at the option of the second pump or the tank baffle from the M3's that a few people have pointed me towards.
The 227329 in the photo below represents 22.7L in the left side of the tank
The plan is to keep this on the dash when out at Oulton next and see how the values on both sides of the tank go down when I get down to that 1/3 of a tank were I rang out of fuel at Cadwell. Better to find the problem with some data before I start throwing modifications at it.
While I was doing some messing I did some checks regarding fuel pressure in a few set ups
1 - Standard in tank pump into the old return less filter and regulator
2 - Standard in tank pump into a new filter and reg
3 - 225l swirl pot pump into the old filter and reg
4 - 255 swirl pot pump into the new filter and reg.
In every set up there was 55psi at the rail, slightly high but it's a very cheap fuel pressure gauge but every reading across all set ups was exactly the same which is good, just wanted to check everything was functioning as it should.
At Cadwell the highest temps reached on track was 106 degree oil temp and 100 degree coolant temp.
So I've cracked on with a job I've been meaning to do for a while but I've been watching and logging the temps and they've been pretty good at the last few track days. Cadwell being so warm on the day highlighted a little extra heat in the car plus everytime I go out i'm driving harder and harder as I get used to the car and my driving keeps improving.
When I did all the cooling modifications to the car earlier in the year I took a solid 20 degrees out of the coolant and the oil temps by fitting the splitter, drilling some holes and removing the AC condenser. There was always a 70mm gap under the radiator between it's self and the splitter that I was going to come back to filling if it was needed in the future.
First job was to come up with some neat angle brackets on CAD, 60 degree angle from the splitter to push the air upwards with a hex on on the back for a captive nut.
Printed off 3 of them from plastic
Mounted to the splitter just in front of the bottom edge of the radiator, will see what happens with the data logs with the hole filled in forcing more air through the radiator and coolers.
While I was under there messing with the car on axle stands I routed a duct through from the fog light up to the bottom of the air box. More cold air directly into the air box can't be a bad thing, one reason for doing this is the standard intake comes from the top of the kidney grills directly over the top of the radiators and coolers so lots of warm air in that area.
Obviously if I make a change I want to be able to test or log what is going on.
Using the Arduino data logger in the car for all the parameters that are available on the Canbus network. One of the values which is there which I'm not using at the moment is the exterior temperature from a temp sensor being the left fog light so I've relocated the sensor into the bottom of the airbox and now I can log that value as the Intake air temps and see what they are out of interest more than anything, can take the duct out on the next track day and see if it makes any difference with the cold air feed into the box.
Those are just a few of the little jobs I'm always messing with in between track days. Had the car on axle stands since it came back from Cadwell so it's nice and easy to have an hour or so working on it easily
So... one modification I wasn't planning on doing anything with was the engine but one thing led to another from a random thought process and well i'll let the photos do the talking..
12 months ago I took the car to EFI tuning for Chris to run the car on the dyno to get an idea of the power the car made, the AFR and how it makes power across the rev range. Car makes good figures for 140,000 miles engine but with a massive lump or torque from 2500-3500 but then dies off as it goes through the mid range.
I have friends that have or had experience with M52 engines and stroker 3.0's M52 with M54 rotating assembly and inlet cam using an M50 inlet making better mid to top end power at the sacrifice of some of the bottom end torque. I have found very little useful information regarding the M50 inlet on the M54 so going to document it all here as I work through it as this is a working progress rather than an update after it's all worked.
So I've sourced a M50 manfiold for use in this experiment. This is a much simpler manifold without the DISA valve in the M54 which will sacrifice some low down torque but the M50 has much bigger runners and a longer runner length
To go with it I've also sourced some pink top injectors which are the same 250cc but have a straight spay pattern to suit the location in the manifold were the m54 injectors have an angle spray pattern to suit the manifold.
I'm also going to use the fuel rail that fits the M50 manifold which has the regulator built into it and slightly adjust the fuel line routing which should actually make things a little simpler.
Started off by removing the M54 inlet from the engine
It fills a massive hole in the engine bay
Both manifolds sat side by side, the M50 is so much more simpler and lighter! Few more kg's saved here!
Eagle eyed viewers will have noticed the ports in the head vs the manifold are a different shape. Most people I've seen going down this route tend to pull the head off and start porting the head. At the moment in time I don't want to go down that route so I've decided to do something similar to what I've done on the exhaust side.
I've designed a 10mm adaptor that will go from the inlet to the head and used a computer to loft the difference between the two profiles.
(There is a lot of port offset in the drawing - read on later for the reason why)
I based the first version of the adaptor off a drawing I took from someone else's build thread on a BMW forum and 3d printed it in sections to offer it up to the head as a test.
Perfect fit against the manifold side and the holes for the studs to mount it to the head.
However using the drawing someone else had produced for the M54 head there was obvious mistakes when I put the prototypes against the head. I've measured and make some adjustments to the port alignments and written the changes onto the flange ready for redrawing
I then spent the evening adjusting the drawing from the measured modifications required as well as adding tabs to the bottom of the manifold adaptor to blank off some ports in the head which are used by the m54 manifold
While i was at it I've also designed the plate that will adapt the standard electric throttle body onto the m50 manifold.
Both of these can be 3D printed as a final test before being sent for CNC machining.
Last job I was on with this afternoon between showers was the test fitting of everything I've got ready to work out how the throttle body is going to be attached to the standard intake box and MAF
Final job which is on going development at the moment is using Tuner Pro to adjust my current version of the ECU map to suit all the changes with the DISA and Idle Control valve not being used now as I plan to use the original throttle body to control the idle rather than having and idle control valve too.
Edited by tombate911 on Sunday 22 September 20:13
Edited by tombate911 on Sunday 3rd November 16:58
ndg said:
Intake air temp should be available on CAN, it's certainly being measured by the ECU as part of the MAF sensor.
Blocking up the hole under the rad will also improve the performance of the splitter, so win-win.
Yeah it will be available on the Canbus if we knew what was required to request the data. We're only logging the data that is being broadcast all the time, mainly information which is used by the instruments making logging the ambient as the IAT is much easier to do. Yeah will be able to see the effects on the next track but there will be another heap of changes I doubt i'll see any changes but we'll see if it runs even cooler again.Blocking up the hole under the rad will also improve the performance of the splitter, so win-win.
Time for a little more of an update after this weekend. Between a few jobs this weekend I've managed to spend at least half of Saturday and half of today on the car trying to make some progress and see what problems I run into.
First job earlier in the week was to start to test some of the drawings I've done which I plan to use for the adaptors as well as making a gasket between the spacer and the head.
Laser cut some card templates to test the profile of the head.

Testing the laser cut template on the head.

3D printed the adaptor between the throttle body and the manifold, made it to hold some bolts captive to act as studs to bolt the throttle body to the manifold easily.
Test fitting it all together, longer bolts required.

Finished building up the manifold using the original fuel lines with new rubber hoses, fitted another BMW PCV into the location of where the idle control valve normally would be, I am planning on removing the idle control valve and using the throttle body to control the idle.

While I've got all the CAD drawings done myself it seems a bit daft to have someone else make the gaskets for between the aluminium spacer and the head. I bought some high temp and fuel resistant gasket material and laser cut the gasket to perfectly match the profile of the adaptor plate sealing the air pathways in the head too which are no longer used.

Gasket material cut.

With the drawing all tested and checked against the head and the same done for the manifold side, I've combined the drawings to create a path for the laser cutting to remove the maximum amount of material without compromising on either port shape. Laser cut adaptor from 10mm aluminium.
Templates laser cut for the head side as well as the intake manifold to start the porting of the adaptor

Marked out the material removed for the porting.

Removed most of the material to match both profiles using the die grinder.

Roughed out and checked against the template ready for final cleaning up and polishing to take some of the roughness off the surface

Time to start to built it all back up in order.
First job was making new studs to be able to bolt down the now thicker intake assembly and put the gasket on the head.
Followed by the aluminium adaptor

Checking the port matching before bolting the manifold on

All bolted together, yet to finish the wrapping of the wiring loom but wanted to make sure everything is right and running before doing that. Also waiting for some new silicone hoses to arrive so just roughly mounted the maf in place for the time being.
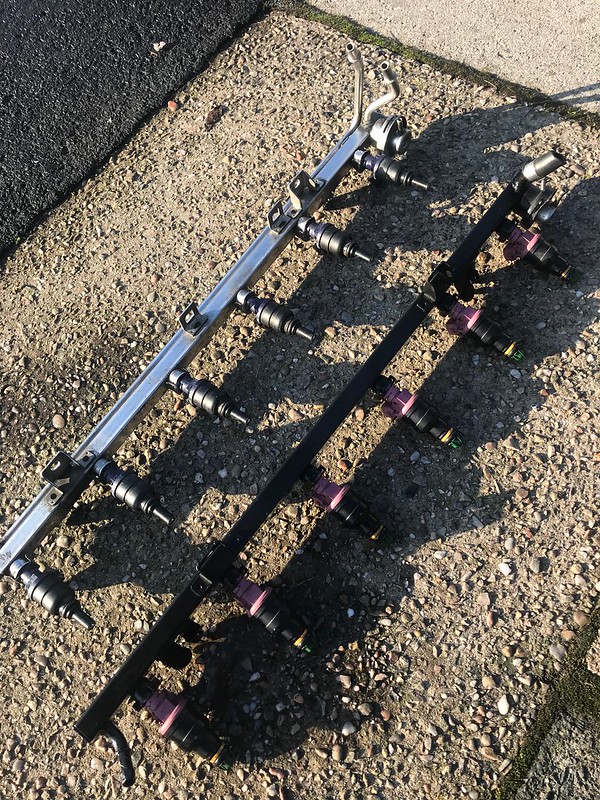
I have also replaced the fuel set up and the plumbing for the swirl pot under the car but didn't take any photos of this now. I'm now running an E36 fuel filter with the M50 rail with built in regulator which then returns directly to the swirl pot in the engine bay.
Finally was the last job to try and get it all running was changing the ECU map to try and get it to idle using only the throttle body having removed the idle control valve.

At this point yesterday the intial map I had prepared with all the changes I wanted to make wouldn't run the car at all. But having made so many changes to the map I started with the basics, checking for fuel, checked the plugs in the engine bay that had been off, multi metering the crank and cam sensors back to the ECU pins to make sure they're correctly connected as a lot of the BMW plugs are not keyed and can be mixed up!
Started with a basic map from when the car ran previously on the M54 inlet and got the car to turn over, run for a second and the cut out. Knowing it was purely just a mapping issue from there I've been building the Idle Control delete map up progressively in stages until I could get it idling well.
Long story short, at least 10 map revisions later I've got it idling and driving without hesitation, throttle feels nice and responsive now and I've removed all the fault codes surrounding the Idle control valve and the DISA Valve which has been removed in the process along with many other ECU changes to get to this point.
No engine lights at the moment, I'm sure there will probably be some at some point when it's driven properly,
ABS Yaw sensor unplugged at the moment as I don't run ESP/ABS but if it's plugged in I've still got the ability to have a clear dash without warning lights.

Next steps on the list is to prepare some base maps to take with me with a space ECU when I get it on the rolling road and experiment with some cam timing combinations to see whats needed to smooth out the power curve using the M50 inlet. The standard timing has some humps and strange moments in it around the DISA change over points to smooth out the power so will remove those as a baseline and take it from there when I get it booked in on the rolling rode and start to develop it from there.
Other jobs on the go:
Need to move to another arduino with more memory to be able to put in some more sensors.
Planning on putting a fuel pressure sensor in the line to the rail and log the fuel pressure.
Also the Oil pressure and temp gauge I've got has a serial output so going to add that to the logger too. Will be interesting to log the oil pressure on circuit, I know it does dip a little bit on long fast corners but nothing too drastic and compare the temp sensor against what the BMW sensor is reading on the Canbus.
Another week passes which brings a little more productivity while I wait to get the car onto the rolling road to see how it actually performs.
One thing I did have to sort out was the intake to the throttle body. I got it running with the MAF just hanging in place, but that was never going to be a good long term solution but I didn't want to just put a cone filter in the engine bay.
The problem to overcome was the offset between the MAF outline and the in of the 90 degree hose when it was cut as long to the bend as possible.

Not only was the off set by 30mm a bit annoying I had to go down from 90mm to 76mm. I was going to try and make it with a step down hose and the elbow but the offset wasn't going in my favour so turned to what I know best. CAD, you've probably noticed this is common theme for me throughout.
Ten minutes messing came up with this.


I smoothed out the transitions a little bit from the CAD drawings above and sent it to the 3D Printer.

Fitted it up in place, perfect solution to the problem

While I was refitting the airbox into position with the IAT for the Data logger. The cold air duct feeding in direction from the fog log I relocated the M54 intake air temp into the airbox. I had messed around with scaling the calibration in the ECU file to suit the sensor from the M50 manifold but wasn't 100% happy with the accuracy of the readings to decided just to use the sensor which the ECU was calibrated for.
Make up a female - male extension to locate it in the bottom of the air box pre-filter.
I wasn't a fan with how the fuel rail was on view along with the injector wiring so decided to make some modifications to the M54 injector cover to make it fit over the M50 fuel rail. Two cuts and it fits perfectly bolting into position, Looks so much better and making the M50 conversion looking a lot more factory with the standard airbox too.
I wonder how many people that don't know will notice?

Another job on the to do list was the fit the second camera I picked up on ebay. Wiring it in the same way to back to the voltage regulator which is powered by a switch on the dash so both cameras start recording at the same time. Updated the firmware on both cameras and configured them to same to record on power on and continue to record for ten seconds after power off.
Can add rear view camera to the video overlays now. With Oulton park coming up I will also throw in the go pro as a passenger reaction camera for good measure too if I have any passengers come out with me

Spent a couple of hours this evening putting together some maps together for experimenting with some Vanos adjustments to go with the M50 manifold now the DISA is removed. Just waiting on an available date to get the car on the dyno to see if it even makes any difference. it's all a bit of an unknown.
One thing I did have to sort out was the intake to the throttle body. I got it running with the MAF just hanging in place, but that was never going to be a good long term solution but I didn't want to just put a cone filter in the engine bay.
The problem to overcome was the offset between the MAF outline and the in of the 90 degree hose when it was cut as long to the bend as possible.
Not only was the off set by 30mm a bit annoying I had to go down from 90mm to 76mm. I was going to try and make it with a step down hose and the elbow but the offset wasn't going in my favour so turned to what I know best. CAD, you've probably noticed this is common theme for me throughout.
Ten minutes messing came up with this.
I smoothed out the transitions a little bit from the CAD drawings above and sent it to the 3D Printer.
Fitted it up in place, perfect solution to the problem
While I was refitting the airbox into position with the IAT for the Data logger. The cold air duct feeding in direction from the fog log I relocated the M54 intake air temp into the airbox. I had messed around with scaling the calibration in the ECU file to suit the sensor from the M50 manifold but wasn't 100% happy with the accuracy of the readings to decided just to use the sensor which the ECU was calibrated for.
Make up a female - male extension to locate it in the bottom of the air box pre-filter.
I wasn't a fan with how the fuel rail was on view along with the injector wiring so decided to make some modifications to the M54 injector cover to make it fit over the M50 fuel rail. Two cuts and it fits perfectly bolting into position, Looks so much better and making the M50 conversion looking a lot more factory with the standard airbox too.
I wonder how many people that don't know will notice?
Another job on the to do list was the fit the second camera I picked up on ebay. Wiring it in the same way to back to the voltage regulator which is powered by a switch on the dash so both cameras start recording at the same time. Updated the firmware on both cameras and configured them to same to record on power on and continue to record for ten seconds after power off.
Can add rear view camera to the video overlays now. With Oulton park coming up I will also throw in the go pro as a passenger reaction camera for good measure too if I have any passengers come out with me
Spent a couple of hours this evening putting together some maps together for experimenting with some Vanos adjustments to go with the M50 manifold now the DISA is removed. Just waiting on an available date to get the car on the dyno to see if it even makes any difference. it's all a bit of an unknown.
Small update from this week. Had a week off work so spent a bit of time working on the car knowing that the next track day is only two weeks away now.
First job was to create a way of adding sensor inputs to the Arduino Logger by adding a terminal board in the layers to be able to connect any analogue sensors. The one I was particularly interested in was fuel pressure with the changes to the system with the new rail and running the swirl pot now and running out of fuel completely at Cadwell. Will be able to view any fuel starvation now on the logs as well as viewing the fuel levels on both sides of the tank.

Second job of the week was getting the trailer out, little bit of maintenance required with some new side markers, jockey wheel and a replacement tyre, all ready for the track day but more importantly ready to take to EFI tuning on the Thursday.
Arrived at EFI tuning around 12:00

The plan for the day was to first of all run the car on the Dyno and just see what it ran like with all the changes and get a feel for the new manifold. I have spent a lot of time adjusting the maps on the MS43 ECU to run the car without the idle control valve only using the electric throttle body for the idle, also removed the DISA valve from the ECU so no warning lights on.
I had already adjusted and smoothed out the Vanos timing because of the manifold design change, with the M54 the cam timing does a lot of backwards and forward movement around the DISA change over to try and prevent a dip in power.

First thing was some lower load and some partial throttle driving checking the AFR's, When i had the exhaust made we put a bung in the exhaust collector so nice and easy to put the wide band sensor for the dyno directly into the exhaust. With the partial throttle looking ok we moved onto some power runs.
First 3 runs we did together the car was making 230ftlb and 235bhp. I was always expecting it to loose some bottom end torque with the manifold change but was expecting it to make more mid range torque than it did at this point.
I took a bit of time to adjust some of the cam timing first of all starting with the inlet cam. Starting with advancing the inlet cam everywhere across the full rev range and doing a dyno run at that. This found a massive chunk of toque in the 3000-5000RPM range but lost a little bit of power at the top, from that I could then take the best bits of both cam timing maps.
Onto the exhaust cam. We didn't think the exhaust timing would make much difference but I went and retarded the exhaust cam across the full RPM range and ran it on the dyno again. It actually found a bit more torque in the middle between 3500 - 5000RPM so was able to factor that into the best combinations of cam timing so far.
At this moment in time the car was now making 243ftlbs @ 4500rpm and 243bhp @5700rpm. But the power after 6k was falling off a little quicker than it had on the previous manifold and it was also leaning out a little bit. We spent a little bit of time adjusting the fueling at the top end, didn't improve on the peak figures but were able to keep the power on a little longer after it makes peak power.
The final run of the day finished off looking like this:

This over layered over the top of the M54 manifold:
You can see where the power have moved around. No longer having a bit chunk of torque that falls off mid range there's a much better spread across the RPM range
I have since noticed that the two dyno graphs are offset by about 100RPM when you look at the rev limiter set at 6816RPM which is set when the car is running on the dyno which makes the graph looks like the power falls off earlier compared with the other trace.

Overall. I'm happy with it and I've found a lot out about along the way, I would be slightly happier if the power stayed up longer to 6500 but I wont know till I drive it on track, I do generally shift about 5800-6200rpm on circuit anyway. I was quietly hoping that with the manifold change that it would make a little bit more power towards to 250's but it appears the gains aren't there to be had without changing other elements of the engine now. Was it worth it? We'll see about that.
The dyno runs compared are 12 months apart on an engine that's done 140,000 miles too.
Pretty much ready to go now for Oulton Park in two weeks time on the 16th November, looking forward to getting out in it again and seeing how it drives with the changes, I've not been to Oulton since we lost some weight too and rebuilt it over the summer.
First job was to create a way of adding sensor inputs to the Arduino Logger by adding a terminal board in the layers to be able to connect any analogue sensors. The one I was particularly interested in was fuel pressure with the changes to the system with the new rail and running the swirl pot now and running out of fuel completely at Cadwell. Will be able to view any fuel starvation now on the logs as well as viewing the fuel levels on both sides of the tank.
Second job of the week was getting the trailer out, little bit of maintenance required with some new side markers, jockey wheel and a replacement tyre, all ready for the track day but more importantly ready to take to EFI tuning on the Thursday.
Arrived at EFI tuning around 12:00
The plan for the day was to first of all run the car on the Dyno and just see what it ran like with all the changes and get a feel for the new manifold. I have spent a lot of time adjusting the maps on the MS43 ECU to run the car without the idle control valve only using the electric throttle body for the idle, also removed the DISA valve from the ECU so no warning lights on.
I had already adjusted and smoothed out the Vanos timing because of the manifold design change, with the M54 the cam timing does a lot of backwards and forward movement around the DISA change over to try and prevent a dip in power.
First thing was some lower load and some partial throttle driving checking the AFR's, When i had the exhaust made we put a bung in the exhaust collector so nice and easy to put the wide band sensor for the dyno directly into the exhaust. With the partial throttle looking ok we moved onto some power runs.
First 3 runs we did together the car was making 230ftlb and 235bhp. I was always expecting it to loose some bottom end torque with the manifold change but was expecting it to make more mid range torque than it did at this point.
I took a bit of time to adjust some of the cam timing first of all starting with the inlet cam. Starting with advancing the inlet cam everywhere across the full rev range and doing a dyno run at that. This found a massive chunk of toque in the 3000-5000RPM range but lost a little bit of power at the top, from that I could then take the best bits of both cam timing maps.
Onto the exhaust cam. We didn't think the exhaust timing would make much difference but I went and retarded the exhaust cam across the full RPM range and ran it on the dyno again. It actually found a bit more torque in the middle between 3500 - 5000RPM so was able to factor that into the best combinations of cam timing so far.
At this moment in time the car was now making 243ftlbs @ 4500rpm and 243bhp @5700rpm. But the power after 6k was falling off a little quicker than it had on the previous manifold and it was also leaning out a little bit. We spent a little bit of time adjusting the fueling at the top end, didn't improve on the peak figures but were able to keep the power on a little longer after it makes peak power.
The final run of the day finished off looking like this:
This over layered over the top of the M54 manifold:
You can see where the power have moved around. No longer having a bit chunk of torque that falls off mid range there's a much better spread across the RPM range
I have since noticed that the two dyno graphs are offset by about 100RPM when you look at the rev limiter set at 6816RPM which is set when the car is running on the dyno which makes the graph looks like the power falls off earlier compared with the other trace.
Overall. I'm happy with it and I've found a lot out about along the way, I would be slightly happier if the power stayed up longer to 6500 but I wont know till I drive it on track, I do generally shift about 5800-6200rpm on circuit anyway. I was quietly hoping that with the manifold change that it would make a little bit more power towards to 250's but it appears the gains aren't there to be had without changing other elements of the engine now. Was it worth it? We'll see about that.
The dyno runs compared are 12 months apart on an engine that's done 140,000 miles too.
Pretty much ready to go now for Oulton Park in two weeks time on the 16th November, looking forward to getting out in it again and seeing how it drives with the changes, I've not been to Oulton since we lost some weight too and rebuilt it over the summer.
Edited by tombate911 on Sunday 3rd November 17:21
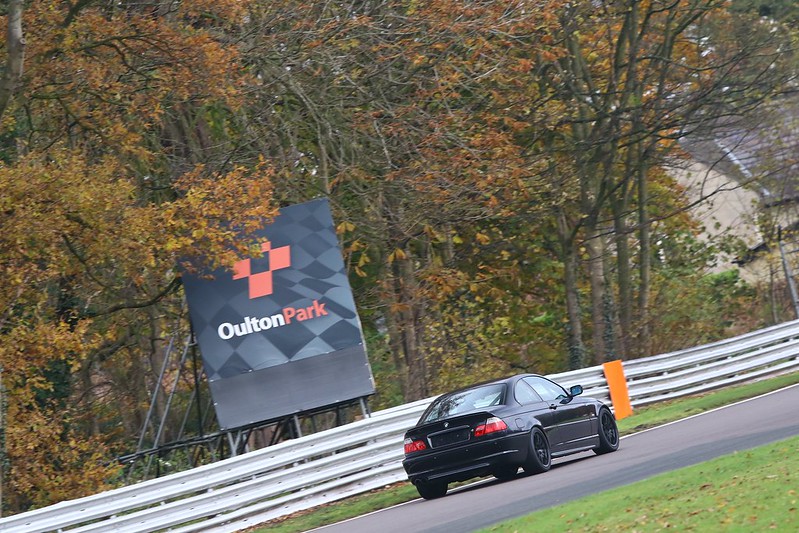
Slightly late update after Oulton Pack at the beginning of November. I've been waiting for a little bit more content to post in an update. I've been productive this weekend so thought I should write an update about Oulton and what I've been doing since.
So as usual I set off about 6am to Oulton, the forecast and conditions were looking perfect. I was one of the first people there and set bout unloading the car from the trailer. Did a little lap of the car park and parked it in the garage. Left the car set up exactly how it was at Cadwell. The track was a little damp during sighting laps but was dry by the first session, I was happy to have made it through sighting laps without any issues, no fueling issues, no limp mode, car felt good, pulled well I was happy! Parked the car in the garage letting the first wave of people go out on track, the car was looking perfect.

The first few sessions were going well, the car felt good and I was getting back into the swing of things having not driven the car since the summer.
Could feel how well it wanted to pull through the mid range but there was a distinct lack off pull at the top end, I was shifting at 6k for the day with a view to sorting it after the track day.
However the day wasn't going to continue going so well on the session just before lunch, I over corrected a little slide at Knickerbrook, as a result I ended up putting my back left wheel on the kerb and the car carried on sliding, when it gripped it just went straight on in the direction it was facing which happened to be off the track on the right hand side. The ground there was soaking wet and not the flattest of ground either.
The result was the car did 2 hops on the grass, before going sideways on the access road, luckily this pushed the car forwards away from the tyres, I managed to keep the car moving in the mud and get back onto the track without causing a red flag.
Link to the video
The video doesn't really show how hard the underside of the car hit the floor multiple times, everywhere you can imagine was full of mud and strips of turf.
Damage..... Ripped off the splitter, broke the V Band clamp off the exhaust, lost the fog light, coolant leak from the bottom of the expansion tank, radiator had come unsteated, broken off half of the PAS pulley
Took me 2.5 hours to get everything sorted and in a fit state to get back out on track, an hour of that time was driving part way home to get two replacement o rings for the bottom of the expansion tank to stop the leak that had formed.
Cracking on with getting it back out on track in the afternoon.

About 2 o'clock I managed to get back out on track. A passenger jumped in with me and we set off to test the car and try and get some more track time, I had the intention of only doing a few laps but the car felt exactly the same as normal so we carried on for a good 20 minutes.
Photograph of it actually out track
In the afternoon the car felt great, besides the hesitation coming out of a few corners and above 6k, but I found my stride again and got back into it. Actually managed to get the lap times down to 2:03 which is a couple of seconds faster than I've gone around Oulton.
Here's a couple of laps from the afternoon sessions:
https://www.youtube.com/watch?v=MSSNJndUGVY
Post track day....
After the track day while sorting out the videos and the data overlays for the speed, RPM and throttle, I added the fuel pressure to the video overlay and the pressure was all over the show, I initially discounted the readings as I knew the pressure sensor I was using wasn't really the correct range for fuel pressure as the sensor range was up to 3000PSI and I was only measuring 0-60PSI of that, as a result it provided me with a very small resolution, However I did a little bit of analysis of the fuel pressure and plotted it against RPM over a full lap and you could see a trend.
Every time the car went above 5000RPM there was a distinct loss of fuel pressure sometimes as low as 15PSI, this obviously ties in with the loss of power at the top end causing me to short shift. Here's part of the log below showing the drop of fuel pressure. Clear to see there was an issue.
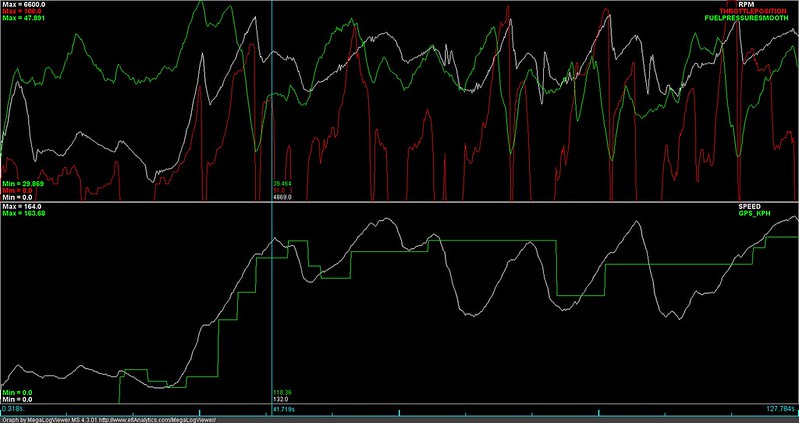
On stripping down the swirl pot and fuel system last weekend I found a restriction in the pipe that was feeding the pump from the swirl pot. no wonder the fuel pump was running so loud when I fitted it and under high loads the fuel pressure couldn't keep the rail pressurised.
While it was all off, I've made a few changes to the fuel set up now which I was already planning on doing. The feed from the swirl pot has been plumbed with a bigger line now going up to 3/8". Changed the fuel pressure sensor for one with a 0-100PSI range to give better resolution for the future.

I've fitted a 328 fuel rail which has enabled me to go back to the M54 injectors which the ECU was originally scaled for. I couldn't run the M54 injectors with the M50 rail I had due to the injector height, with this rail I can run either the M54 injectors or the 328 Pink tops, both are the same size but have different injector spray patterns.
When checking the car over I also spotted that the PAS pulley had taken a hit when I went off the track so that has been replaced with a new part


Other jobs on the list have been to give the car a good service, it's done 5 track days on the current oil and filter.

Fresh set of rear pads. These being cheap I only get two days out of a set but they're good at keeping the braking bias where I want it to be.

The car has also had a complete clean on the underside of the car, removing all the traces of mud and grass,

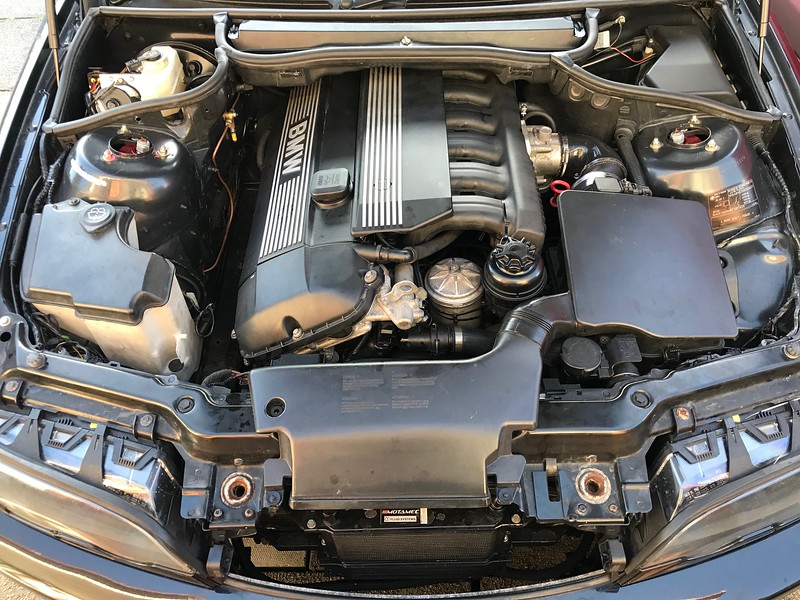
Got the engine bay put back together, now with the aluminium laser cut throttle body adaptor plate

Still needs a final wash but it's been too cold here today to be spraying water around

Pretty much ready to take to EFI tuning again on the 12th to run it on the dyno to check everything is in order now after removing the restriction in the fuel line!
Got a few things to finish off over winter, one being the new splitter for the front end, track down a set of fog lights and i'm going to replace the high pressure power steering hose from the pump to the rack just for peace of mind.
So as usual I set off about 6am to Oulton, the forecast and conditions were looking perfect. I was one of the first people there and set bout unloading the car from the trailer. Did a little lap of the car park and parked it in the garage. Left the car set up exactly how it was at Cadwell. The track was a little damp during sighting laps but was dry by the first session, I was happy to have made it through sighting laps without any issues, no fueling issues, no limp mode, car felt good, pulled well I was happy! Parked the car in the garage letting the first wave of people go out on track, the car was looking perfect.
The first few sessions were going well, the car felt good and I was getting back into the swing of things having not driven the car since the summer.
Could feel how well it wanted to pull through the mid range but there was a distinct lack off pull at the top end, I was shifting at 6k for the day with a view to sorting it after the track day.
However the day wasn't going to continue going so well on the session just before lunch, I over corrected a little slide at Knickerbrook, as a result I ended up putting my back left wheel on the kerb and the car carried on sliding, when it gripped it just went straight on in the direction it was facing which happened to be off the track on the right hand side. The ground there was soaking wet and not the flattest of ground either.
The result was the car did 2 hops on the grass, before going sideways on the access road, luckily this pushed the car forwards away from the tyres, I managed to keep the car moving in the mud and get back onto the track without causing a red flag.
Link to the video
The video doesn't really show how hard the underside of the car hit the floor multiple times, everywhere you can imagine was full of mud and strips of turf.
Damage..... Ripped off the splitter, broke the V Band clamp off the exhaust, lost the fog light, coolant leak from the bottom of the expansion tank, radiator had come unsteated, broken off half of the PAS pulley
Took me 2.5 hours to get everything sorted and in a fit state to get back out on track, an hour of that time was driving part way home to get two replacement o rings for the bottom of the expansion tank to stop the leak that had formed.
Cracking on with getting it back out on track in the afternoon.
About 2 o'clock I managed to get back out on track. A passenger jumped in with me and we set off to test the car and try and get some more track time, I had the intention of only doing a few laps but the car felt exactly the same as normal so we carried on for a good 20 minutes.
Photograph of it actually out track
In the afternoon the car felt great, besides the hesitation coming out of a few corners and above 6k, but I found my stride again and got back into it. Actually managed to get the lap times down to 2:03 which is a couple of seconds faster than I've gone around Oulton.
Here's a couple of laps from the afternoon sessions:
https://www.youtube.com/watch?v=MSSNJndUGVY
Post track day....
After the track day while sorting out the videos and the data overlays for the speed, RPM and throttle, I added the fuel pressure to the video overlay and the pressure was all over the show, I initially discounted the readings as I knew the pressure sensor I was using wasn't really the correct range for fuel pressure as the sensor range was up to 3000PSI and I was only measuring 0-60PSI of that, as a result it provided me with a very small resolution, However I did a little bit of analysis of the fuel pressure and plotted it against RPM over a full lap and you could see a trend.
Every time the car went above 5000RPM there was a distinct loss of fuel pressure sometimes as low as 15PSI, this obviously ties in with the loss of power at the top end causing me to short shift. Here's part of the log below showing the drop of fuel pressure. Clear to see there was an issue.
On stripping down the swirl pot and fuel system last weekend I found a restriction in the pipe that was feeding the pump from the swirl pot. no wonder the fuel pump was running so loud when I fitted it and under high loads the fuel pressure couldn't keep the rail pressurised.
While it was all off, I've made a few changes to the fuel set up now which I was already planning on doing. The feed from the swirl pot has been plumbed with a bigger line now going up to 3/8". Changed the fuel pressure sensor for one with a 0-100PSI range to give better resolution for the future.
I've fitted a 328 fuel rail which has enabled me to go back to the M54 injectors which the ECU was originally scaled for. I couldn't run the M54 injectors with the M50 rail I had due to the injector height, with this rail I can run either the M54 injectors or the 328 Pink tops, both are the same size but have different injector spray patterns.
When checking the car over I also spotted that the PAS pulley had taken a hit when I went off the track so that has been replaced with a new part
Other jobs on the list have been to give the car a good service, it's done 5 track days on the current oil and filter.
Fresh set of rear pads. These being cheap I only get two days out of a set but they're good at keeping the braking bias where I want it to be.
The car has also had a complete clean on the underside of the car, removing all the traces of mud and grass,
Got the engine bay put back together, now with the aluminium laser cut throttle body adaptor plate
Still needs a final wash but it's been too cold here today to be spraying water around
Pretty much ready to take to EFI tuning again on the 12th to run it on the dyno to check everything is in order now after removing the restriction in the fuel line!
Got a few things to finish off over winter, one being the new splitter for the front end, track down a set of fog lights and i'm going to replace the high pressure power steering hose from the pump to the rack just for peace of mind.
Edited by tombate911 on Sunday 1st December 22:13
Little additions to the car continue.
If you've followed the build thread this far you probably know i'm a sucker for 3D Printing.
Due to the change of fuel rail to be more flexible with injectors and have a valve on the end of the rail for checking FP I needed a way to bolt down the rail... I've quickly drawn some brackets to hold it down in place.

These a nice and simple but much nicer than them being made from a piece of metal

One large job I had done back before Oulton but forgot to post about was having a new windscreen fitted. This time it was a heated screen as I no longer have a heater in the car and only cold air blowing at the driver and the windscreen. Hooked up half of the screen to the loom I had already fitted in the car when I rewired it to see it in action

I've given the car a really good clean. Looking a bit strange at the moment without the splitter and fog lights, but they'll be refitted and replaced before the next day out. Hoping to be out mid February in it.

Popped the car down to EFI tuning to run the car again on Thursday evening just for a quick check after noticing the fuel pressure problems at Oulton.

With a little bit of help from a friend with a lot of technical know how I had a slightly different exhaust vano timing to change in the mid range. Running the exhaust much more retarded in the mid range to increase the overlap. This smoothed out the mid range a little more and made a bit more torque.
I've also spotted an area between 5900-6400RPM where the inlet would benefit from being a tad more advanced than where it currently is. I I've got data from a previous dyno run with that which picked it up a few bhp in that area but missed that area when combining all the best vanos maps.
Here's the graph as it stands at the moment. Not bad considering the standard figures at 220ftlb and 230bhp. M50 Manifold giving a much better spread of torque across the mid range too.

Video of the car on the dyno with data overlay 245ftlb 243bhp
https://youtu.be/pNjMQTngtok
Obviously there is more in the pipeline over winter. Started buying and collecting more parts for a few jobs I want to tackle over the new few months. Got a few ideas to make it a little more lively on track.
If you've followed the build thread this far you probably know i'm a sucker for 3D Printing.
Due to the change of fuel rail to be more flexible with injectors and have a valve on the end of the rail for checking FP I needed a way to bolt down the rail... I've quickly drawn some brackets to hold it down in place.
These a nice and simple but much nicer than them being made from a piece of metal
One large job I had done back before Oulton but forgot to post about was having a new windscreen fitted. This time it was a heated screen as I no longer have a heater in the car and only cold air blowing at the driver and the windscreen. Hooked up half of the screen to the loom I had already fitted in the car when I rewired it to see it in action
I've given the car a really good clean. Looking a bit strange at the moment without the splitter and fog lights, but they'll be refitted and replaced before the next day out. Hoping to be out mid February in it.
Popped the car down to EFI tuning to run the car again on Thursday evening just for a quick check after noticing the fuel pressure problems at Oulton.
With a little bit of help from a friend with a lot of technical know how I had a slightly different exhaust vano timing to change in the mid range. Running the exhaust much more retarded in the mid range to increase the overlap. This smoothed out the mid range a little more and made a bit more torque.
I've also spotted an area between 5900-6400RPM where the inlet would benefit from being a tad more advanced than where it currently is. I I've got data from a previous dyno run with that which picked it up a few bhp in that area but missed that area when combining all the best vanos maps.
Here's the graph as it stands at the moment. Not bad considering the standard figures at 220ftlb and 230bhp. M50 Manifold giving a much better spread of torque across the mid range too.
Video of the car on the dyno with data overlay 245ftlb 243bhp
https://youtu.be/pNjMQTngtok
Obviously there is more in the pipeline over winter. Started buying and collecting more parts for a few jobs I want to tackle over the new few months. Got a few ideas to make it a little more lively on track.
It's been very quiet over christmas with slow progress. Motivation to work on the car hasn't been very high so I've only been chipping away at jobs slowly. Also trying to decide what to do with the car from here. Probably finish off these few jobs and just use it though 2020.
One of the jobs that I've been wanting to tackle since I put the car towards was a knock coming from the rear sub frame which I have briefly looked at a few times but not enough to find where it was coming from. I however noticed a witness mark on the top and bottom of the rear sub frame bushes where the bush was obviously moving up and down at the rear depending on the load. Started with stripping down the rear end

On closer inspection I could see the bolt was bottoming out on the inner sleeve and not allowing the two parts of the polybush to clamp up fully against the subframe to prevent it from moving. Easy solution was the cut 3mm of the sleeve and then face it off on a lathe at work to give it a smooth flat surface.

With it cut down slightly you can see the yellow shoulders on the bush are tight up against the sub frame now.

Another reason the rear end of the car was stripped was to remove the diff because I had bought a 3.73 Final drive to see what it would be like to go even shorter. It might be too short considering I'm currently running a 3.38 over the standard 2.93. But only time will tell. Should give me a top speed of 130 MPH @ 6500RPM. My limiter is set at 6800RPM but I rarely rev it that high.

Started off stripping down the current diff with the Quaife and 3.38 FD.

Ordered all fresh seals from BMW, input seals, output seals and crush sleeve for setting the bearing drag on the input shaft

Input shaft assembly read to go back into the diff casing with the new crush sleeve
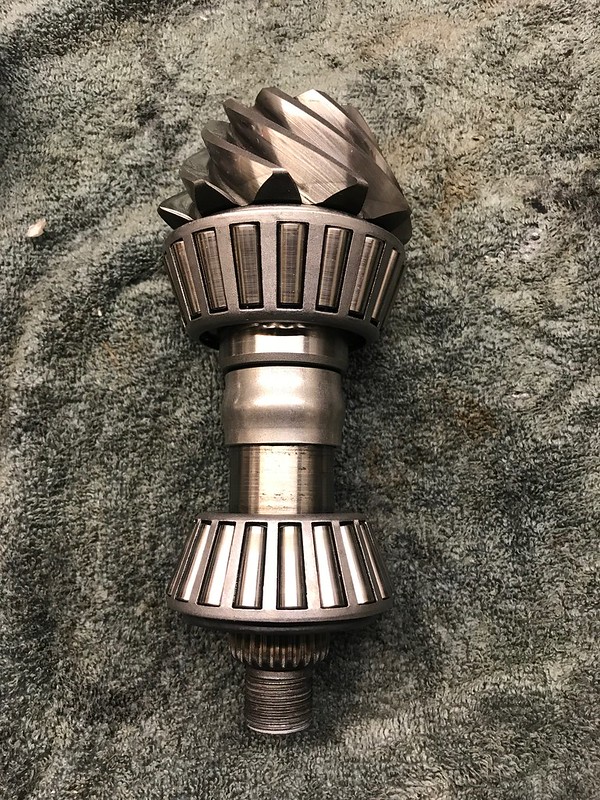
3.38 Crown wheel pressed off the Quaife diff and the 3.73 ready to be heated and refitted

Setting the drag on the input shaft to factory specification

Checked the gear pattern and everything was looking good so far. But upon checking the backlash with the DTI there was double the amount of backlash. I had to take it apart and adjust the side casing shims to reduce the amount of backlash and double check everything.
Finally happy with the gear pattern and the clearances.

Rear cover sealed on, ready to be cleaned up and repainted before refitting. Turns out it's exactly 12 months since I did this job and fitting the Quaife diff.

Other jobs which I've been working on in the new year is the replacement splitter after trashing the last one at Oulton. This time making it larger and running under the car back to the subframe to give better boxing in of the air coming through the front of the car into the coolers and radiator.

Making it out of 18mm plywood bolted straight to the chassis legs and the subframe easily takes my weight bouncing on the front edge of it.

Starting off with a few coats of varnish to seal it, a coat of black paint to cover the whole area before I start covering the front portion in filler primer and flatting it back to get it to a smooth finish the same as version 1. Then i will paint the front portion gloss black so it looks nice a presentable. As everything with this car it has to look as perfect as possible. A satin black spoiler isn't going to cut it.
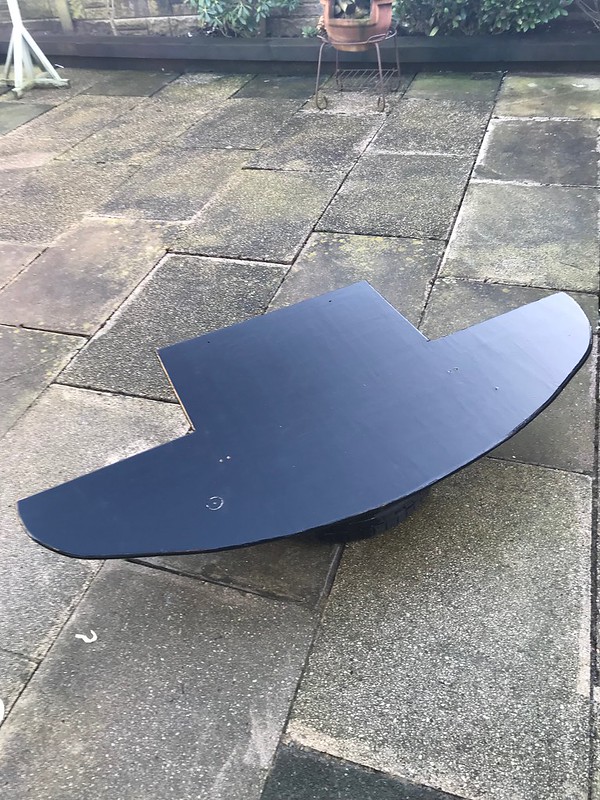
One of the jobs that I've been wanting to tackle since I put the car towards was a knock coming from the rear sub frame which I have briefly looked at a few times but not enough to find where it was coming from. I however noticed a witness mark on the top and bottom of the rear sub frame bushes where the bush was obviously moving up and down at the rear depending on the load. Started with stripping down the rear end
On closer inspection I could see the bolt was bottoming out on the inner sleeve and not allowing the two parts of the polybush to clamp up fully against the subframe to prevent it from moving. Easy solution was the cut 3mm of the sleeve and then face it off on a lathe at work to give it a smooth flat surface.
With it cut down slightly you can see the yellow shoulders on the bush are tight up against the sub frame now.
Another reason the rear end of the car was stripped was to remove the diff because I had bought a 3.73 Final drive to see what it would be like to go even shorter. It might be too short considering I'm currently running a 3.38 over the standard 2.93. But only time will tell. Should give me a top speed of 130 MPH @ 6500RPM. My limiter is set at 6800RPM but I rarely rev it that high.
Started off stripping down the current diff with the Quaife and 3.38 FD.
Ordered all fresh seals from BMW, input seals, output seals and crush sleeve for setting the bearing drag on the input shaft
Input shaft assembly read to go back into the diff casing with the new crush sleeve
3.38 Crown wheel pressed off the Quaife diff and the 3.73 ready to be heated and refitted
Setting the drag on the input shaft to factory specification
Checked the gear pattern and everything was looking good so far. But upon checking the backlash with the DTI there was double the amount of backlash. I had to take it apart and adjust the side casing shims to reduce the amount of backlash and double check everything.
Finally happy with the gear pattern and the clearances.
Rear cover sealed on, ready to be cleaned up and repainted before refitting. Turns out it's exactly 12 months since I did this job and fitting the Quaife diff.
Other jobs which I've been working on in the new year is the replacement splitter after trashing the last one at Oulton. This time making it larger and running under the car back to the subframe to give better boxing in of the air coming through the front of the car into the coolers and radiator.
Making it out of 18mm plywood bolted straight to the chassis legs and the subframe easily takes my weight bouncing on the front edge of it.
Starting off with a few coats of varnish to seal it, a coat of black paint to cover the whole area before I start covering the front portion in filler primer and flatting it back to get it to a smooth finish the same as version 1. Then i will paint the front portion gloss black so it looks nice a presentable. As everything with this car it has to look as perfect as possible. A satin black spoiler isn't going to cut it.
Andrew-b90y3 said:
Good update op,
Gutted to hear about the Oulton park incident, spun my e36 in exactly the same place more than once!
Are you completely remaking a splitter for the car or is the old one salvageable?
Hopefully the above answers your question...Gutted to hear about the Oulton park incident, spun my e36 in exactly the same place more than once!
Are you completely remaking a splitter for the car or is the old one salvageable?
eezeh said:
Not quite sure if this has been mentioned or asked before but what do you print your pieces with?
Looks either ABS or PETG?
The printing is either done in ABS or PLA if it's a prototype or something inside the car.Looks either ABS or PETG?
Progress to finish off the last few jobs...
Waiting for it to stop raining between storms has meant for slow progress but slow progress is better than no progress.
Got the splitter mounted up to the chassis mounts and bolted to the subframe.

Little bit bigger than the previous version, should just be enough clearance to pop it on a trailer with the XL ramps and low Brian James trailer

Fitted a set of replacement front lines I picked up in the sales in the new year. Every line was replaced when the car was built except the front lines as these were already braided lines, but over the last 6 months I've had the niggling feeling I should replace these for peace of mind as their age and previous use it a bit of an unknown

Also replaced the air cooling ducts. This ducting is dual layer, making it a bit thicker and more durable. Ripped both of the front ducts off when I came off at Oulton in December. They ripped cleanly off so I've fitted these in the same way in case the same happens again at some point.
Still a few bits of mud lurking on the car. Will get another wash before it goes out again to remove a couple of bits I've spotted while working on it.

Gave the brakes a bleed before putting the car back on it's wheels and a quick hoover to remove some of the dust off the seats from getting in and out.
Need to get out and test the car somewhere soon. Going to have a look if there is any cheap or weekend days at Anglesey during March. With the aim to get the car reliable again, confident in the new diff and then continue to use it this year.
Not the most exciting of updates but brings the thread up to date.
Waiting for it to stop raining between storms has meant for slow progress but slow progress is better than no progress.
Got the splitter mounted up to the chassis mounts and bolted to the subframe.
Little bit bigger than the previous version, should just be enough clearance to pop it on a trailer with the XL ramps and low Brian James trailer
Fitted a set of replacement front lines I picked up in the sales in the new year. Every line was replaced when the car was built except the front lines as these were already braided lines, but over the last 6 months I've had the niggling feeling I should replace these for peace of mind as their age and previous use it a bit of an unknown
Also replaced the air cooling ducts. This ducting is dual layer, making it a bit thicker and more durable. Ripped both of the front ducts off when I came off at Oulton in December. They ripped cleanly off so I've fitted these in the same way in case the same happens again at some point.
Still a few bits of mud lurking on the car. Will get another wash before it goes out again to remove a couple of bits I've spotted while working on it.
Gave the brakes a bleed before putting the car back on it's wheels and a quick hoover to remove some of the dust off the seats from getting in and out.
Need to get out and test the car somewhere soon. Going to have a look if there is any cheap or weekend days at Anglesey during March. With the aim to get the car reliable again, confident in the new diff and then continue to use it this year.
Not the most exciting of updates but brings the thread up to date.
Another month brings another update.
This time, very little in the way of modifications and actually some use of the car.
Wanted to try and get some miles on the car as it's not been out since the beginning of December. Wanting to find a weekend track day due to the start of the racing season the dates were few and far between, had the option of Oulton Park on the 7th March or Cadwell on the 15th. Decided to go with the local option as it meant I didn't have to drag the car and trailer to the other side of the country being the first test of a few changes as well as the fact Cadwell isn't the best circuit for winter track days.
Before that though I had a couple of jobs I wanted to finish, one being a bit of preventative maintenance, even though this car had a new power steering set of lines and pump in around 2012 from a BMW dealer the lines were looking a little crusty. I had already replaced one of them when I fitted the PAS cooler but the high pressure line from the pump to the rack was looking a bit rusty and would no doubt fail at some point. Replacements from BMW are well over £100 and pushing towards £150 but a new line from a hydraulics place was £35 made with the correct high pressure fittings and lines.
Stuck with the Banjo fitting on the rack which is M14 and fitted a M16 - AN adaptor at the pump end. Nice short and direct hose, hopefully one let thing that can fail in the future.

Saturday 7th March.
Turned up at Oulton as usual about 7 o'clock and set about unloading the car from the trailer and doing a couple of checks to make sure everything is spot on, coolant, oil, power steering fluid all where I wanted them to be. Suspension settings set to where I left them from Oulton in December with the exception of softening off the rear as since i'd moved to softer springs I could see the rear end skipping and bogging on some bumps from the last track day so brought the damping back to match the spring rate. Tyre pressures set at 28PSI cold and the car was ready to go.
Sadly damp roads and a little bit of rain on the way down there on the trailer meant the car was already dirty before it made it out on circuit.

Sighting laps out of the way, I then got the car noise tested, 5000rpm the car was 99db, slightly louder with the pops but they ignored that. Well under the 105db static but the car gets louder each track day as the silencers get more and more use.
First sessions from the morning took a little bit of getting used to, the car felt great, setup felt really balanced, but the shorter final drive at 3.73 took a little bit of getting used to, car felt much more alive to drive with the shorter gearing but it required more changes to 5th on the straights which obviously meant more shifts back down the box for the corners through heavy braking areas. Took a little getting used to. Stuck to doing 20 minute sessions through the day and clocked up 70 miles on track by 12 oclock. I'd been taking it reasonably easy through the morning getting used to the gearing, making a couple of minor suspension tweaks and adjusting tyre pressures but mainly just enjoying lapping and driving the car.

In the afternoon a couple of friends came down the join me and wanted to do some laps in the car as a passenger. Afternoon sessions were a little longer getting towards 30 minute sessions, was able to find a groove and put together some really good back to back consistent laps as the track was so quiet with so few interruptions from red or yellow flags it was perfect, bone dry and quiet track time.
Here's a video from one of the sessions, put together 3 laps back to back all withing 0.5 of a second of each other. plenty of time to be found and improvements to make to my driving but at least they're consistent. Feel like my driving it improving the more time I spend behind the wheel of a RWD car.
https://youtu.be/S4h3sJqDfwI
Second video from the afternoon sessions, mainly showing the MX5 race car which decided to fly up my backside through the first corner after catching me up only due to the fact I'd got caught up behind the Ferarri on the previous straight. Ended up putting himself into the wall, not sure what happened with the car as it exited stage left rapidly, driver error or badly set up car. You can see for yourself.
Had planned on letting him through after the pit exit bleed line as he was pretty quick in the corners.
https://youtu.be/jgKLOUvjsEs
Other points from the day...
Back in the summer I ran out of fuel at Cadwell with 30L in the tank - Managed to run down to the petrol light coming on now with ~11L in the tank without any loss of fuel pressure to the rail. Massive improvement with the swirl pot fitted - Having a fuel pressure at the rail on the logger is really good for monitoring this. I now know i an use a full tank of fuel without issues.
Opted to stick with the softer compression/rebound suspension setting in the rear to compliment the softer spring I am running now. This removed the hopping and skipping which I was finding happening on corner exits which I thought was down to too slow rebound, appears my thoughts on that were correct.
The car has never felt so good and planted coming out of corners, able to get on the power much sooner with more throttle now without it sliding, the car just squats on the rear now and drives you out of the corners with a slight rotation rather than a slide and any smaller slides are much more controlled as you will see from the videos.
Still feel like the brakes are lacking when trying to balance braking and heal toeing. Back in December I did faster lap time breaking into the 2:03's when I was focusing on braking and not rev matching as I could brake later and harder with my foot solely on the brake pedal. Something I'm continuing to work on before the next track day which is slightly adjust the pivot point on the brake pedal to give slightly more force to the master cylinder with the same pedal effort at the sacrifice of a slightly longer pedal, but I can adjust the bite point to be in the same location anyway.
Also planning on fitting pressure sensors to the front and rear circuits of the brakes to be able to log brake pressures front and rear. I'm really interested to see what the line pressures are with the standard MC and brake proportioning valve and see how it's all working. Not too difficult of a job to swap the T pieces over and add a few more lines of code to the Arduino logger.
4:45 - Car all loaded up on the trailer, wet wheels still strapped in the tyre rack thankfully not having to use them this weekend. Really happy with how the car is at the moment, obviously there is more changes in the pipeline. There's no fun in leaving it the same, part of the fun is always looking at new ideas and finding things to develop for next time.
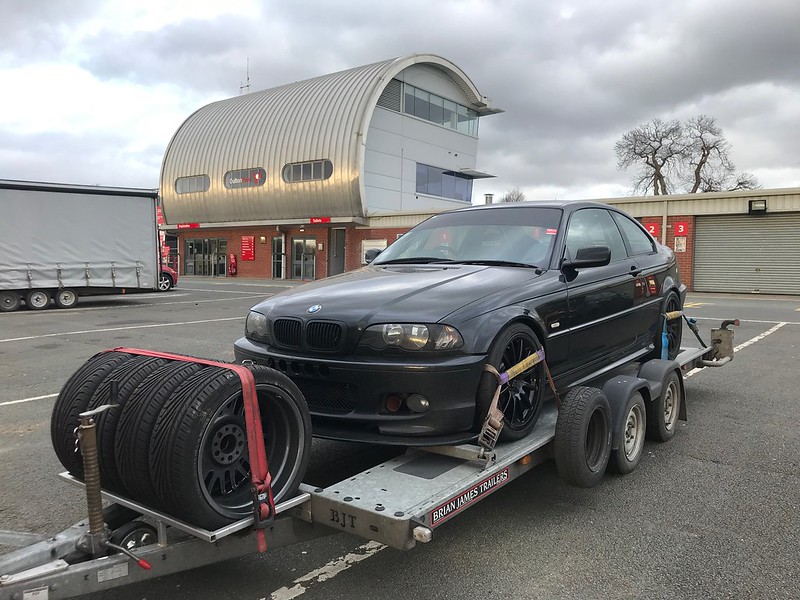
This time, very little in the way of modifications and actually some use of the car.
Wanted to try and get some miles on the car as it's not been out since the beginning of December. Wanting to find a weekend track day due to the start of the racing season the dates were few and far between, had the option of Oulton Park on the 7th March or Cadwell on the 15th. Decided to go with the local option as it meant I didn't have to drag the car and trailer to the other side of the country being the first test of a few changes as well as the fact Cadwell isn't the best circuit for winter track days.
Before that though I had a couple of jobs I wanted to finish, one being a bit of preventative maintenance, even though this car had a new power steering set of lines and pump in around 2012 from a BMW dealer the lines were looking a little crusty. I had already replaced one of them when I fitted the PAS cooler but the high pressure line from the pump to the rack was looking a bit rusty and would no doubt fail at some point. Replacements from BMW are well over £100 and pushing towards £150 but a new line from a hydraulics place was £35 made with the correct high pressure fittings and lines.
Stuck with the Banjo fitting on the rack which is M14 and fitted a M16 - AN adaptor at the pump end. Nice short and direct hose, hopefully one let thing that can fail in the future.
Saturday 7th March.
Turned up at Oulton as usual about 7 o'clock and set about unloading the car from the trailer and doing a couple of checks to make sure everything is spot on, coolant, oil, power steering fluid all where I wanted them to be. Suspension settings set to where I left them from Oulton in December with the exception of softening off the rear as since i'd moved to softer springs I could see the rear end skipping and bogging on some bumps from the last track day so brought the damping back to match the spring rate. Tyre pressures set at 28PSI cold and the car was ready to go.
Sadly damp roads and a little bit of rain on the way down there on the trailer meant the car was already dirty before it made it out on circuit.
Sighting laps out of the way, I then got the car noise tested, 5000rpm the car was 99db, slightly louder with the pops but they ignored that. Well under the 105db static but the car gets louder each track day as the silencers get more and more use.
First sessions from the morning took a little bit of getting used to, the car felt great, setup felt really balanced, but the shorter final drive at 3.73 took a little bit of getting used to, car felt much more alive to drive with the shorter gearing but it required more changes to 5th on the straights which obviously meant more shifts back down the box for the corners through heavy braking areas. Took a little getting used to. Stuck to doing 20 minute sessions through the day and clocked up 70 miles on track by 12 oclock. I'd been taking it reasonably easy through the morning getting used to the gearing, making a couple of minor suspension tweaks and adjusting tyre pressures but mainly just enjoying lapping and driving the car.
In the afternoon a couple of friends came down the join me and wanted to do some laps in the car as a passenger. Afternoon sessions were a little longer getting towards 30 minute sessions, was able to find a groove and put together some really good back to back consistent laps as the track was so quiet with so few interruptions from red or yellow flags it was perfect, bone dry and quiet track time.
Here's a video from one of the sessions, put together 3 laps back to back all withing 0.5 of a second of each other. plenty of time to be found and improvements to make to my driving but at least they're consistent. Feel like my driving it improving the more time I spend behind the wheel of a RWD car.
https://youtu.be/S4h3sJqDfwI
Second video from the afternoon sessions, mainly showing the MX5 race car which decided to fly up my backside through the first corner after catching me up only due to the fact I'd got caught up behind the Ferarri on the previous straight. Ended up putting himself into the wall, not sure what happened with the car as it exited stage left rapidly, driver error or badly set up car. You can see for yourself.
Had planned on letting him through after the pit exit bleed line as he was pretty quick in the corners.
https://youtu.be/jgKLOUvjsEs
Other points from the day...
Back in the summer I ran out of fuel at Cadwell with 30L in the tank - Managed to run down to the petrol light coming on now with ~11L in the tank without any loss of fuel pressure to the rail. Massive improvement with the swirl pot fitted - Having a fuel pressure at the rail on the logger is really good for monitoring this. I now know i an use a full tank of fuel without issues.
Opted to stick with the softer compression/rebound suspension setting in the rear to compliment the softer spring I am running now. This removed the hopping and skipping which I was finding happening on corner exits which I thought was down to too slow rebound, appears my thoughts on that were correct.
The car has never felt so good and planted coming out of corners, able to get on the power much sooner with more throttle now without it sliding, the car just squats on the rear now and drives you out of the corners with a slight rotation rather than a slide and any smaller slides are much more controlled as you will see from the videos.
Still feel like the brakes are lacking when trying to balance braking and heal toeing. Back in December I did faster lap time breaking into the 2:03's when I was focusing on braking and not rev matching as I could brake later and harder with my foot solely on the brake pedal. Something I'm continuing to work on before the next track day which is slightly adjust the pivot point on the brake pedal to give slightly more force to the master cylinder with the same pedal effort at the sacrifice of a slightly longer pedal, but I can adjust the bite point to be in the same location anyway.
Also planning on fitting pressure sensors to the front and rear circuits of the brakes to be able to log brake pressures front and rear. I'm really interested to see what the line pressures are with the standard MC and brake proportioning valve and see how it's all working. Not too difficult of a job to swap the T pieces over and add a few more lines of code to the Arduino logger.
4:45 - Car all loaded up on the trailer, wet wheels still strapped in the tyre rack thankfully not having to use them this weekend. Really happy with how the car is at the moment, obviously there is more changes in the pipeline. There's no fun in leaving it the same, part of the fun is always looking at new ideas and finding things to develop for next time.
helix402 said:
You can read brake pressures from....
Yes, this is correct. However I want to know the line pressure after the proportioning valve so I can see the effects this is having in the system. Should be able to graph the effects of the valve at different settings. I’ve got 2 of the same Bosch brake pressure sensors and plugs i’ve got which are spares so going to put these in the T pieces for the front and rear lines.
Could use the front pressure sensor from the MC to do the front lines at least, i’ve used these sensors before with the logger so already have the scaling for them in the logger code.
Cheers.
Limpet said:
I’ve really enjoyed reading this. I’m a big fan of the E46 and it’s great to see you getting stuck in with such well thought out and carefully planned mods. Very impressive fabrication skills, too.
Getting quicker all the time as well
Cheers Limpet. Appreciate the comments! Glad the thread is interesting to others.Getting quicker all the time as well
Mark Benson said:
tombate911 said:
Second video from the afternoon sessions...
Looks like a steering arm or strut broke as he dropped the wheel off the inner kerb into the mud, when he landed his LH front wheel wasn't pointing straight ahead and..... well, you see the result. Suspect someone forgot he wasn't racing (I say this as a licence holder who sometimes uses trackdays to test but is fed up of the bad feeling caused by inconsiderate racres among regular road-car trackdayers, there's room on track for all of us but egos need to be left in the pits).Love what you've done with this car, methodical and incremental improvements with clearly a lot of thought put into them. Keep up the good work, might even see you on track somewhere this year as I'm starting to take the GT86 on the odd trackday now.
Update - March 2020
I was going to wait a little longer and make some more progress on things before posting the next update. But with half of the world being off work I thought I would post up on here and give people something to look at.
First job on the list at the moment was to add in the sensors I've been threatening to add for a while into the Arduino logger so I can monitor what the brakes are actually doing.
Started off with some Bosch sensors from the master cylinder of an E46 i'd taken from a scapped car last year, I'd cut off the plugs so I could make my own wiring loom to them, these are brake pressure sensors rated to over 3000psi, the plan is to add them into the brake circuits using a 4 way T-piece

Added one of them into the rear circuit in the T piece for the rear lines

I was going to tap into the front lines in the engine bay but decided to utilise the two sensors on the master cylinder which gives me the ability to monitor the brake system in 3 places, Front circuit, Rear circuit prior to the proportioning valve and post proportioning valve.
With the sensors fitted I had to add the additional sensor wires into the car, I've done this by running 3 core cables to all the sensors including the fuel pressure sensor I already had running to the logger, I ran all these sensors from various locations to a box under the dash to keep it nice and tidy and ran a multicore cable from the box to the logger with a common power and ground for the sensors and the signal wires keeping it all tidy inside on piece wire. This goes to the breakout board on top of the arduino and canbus shield with the GPS board sitting on top of this

I was then able to log the pressures pre and post the OBP Proportioning valve to see what effect it was having on the brakes... This graph shows 3 pedal applications with the valve set at 3 different positions... Shows no change from the valve despite it being tested at both ends of it's range
Also looking at the gradient of the line it was only giving a pressure drop in the line of 37% across the proportioning valve

Decided to change the valve and do some more testing. Ordered a Tilton Valve which was a bolt in solution for my lines as well as the mounting bracket I have on the exhaust tunnel

You can see a dramatic drop in the rear line pressure on the graph below comparing the cheap OBP item with the Tilton. At this point I was only testing 3 places in the levers travel, Position 1 - Min rear brake, position 3 and position 7.

I also did some logger of all 7 positions of the Tilton Valve, interesting to see here when comparing the pressure drop across the valve it only appears to effect the initial application of the brake and then all positions go to a fixed proportion of 3:1, this is actually different data to how Tilton explain it in their technical information so I've sent them an email with the data. See what they say.

Anyway with this additional reduction of pressure to the rear brakes I can now run some proper rear pads. i'll be refitted the Carbon Lorraine RC5 rear pads i've had for two years in the spares box and never been able to use them. This was something I need to sort as even though the brakes were good at Oulton due to me running a cheap brembo pad I had chewed through them in a full track day,
More to come on this as I keep working through it.
Big news
I've been doing some online shopping and bought something I never thought I would ever consider never even mind buying!
-M54 CNC Ported and polished head
-Schrick 272 10.9mm lift Inlet cam
-Schrick 256 10.4mm lift ext cam
-Vac Motorsport Dual spring kit, spring and retainers
-Single piece valves
-Exhaust side of the head has been opened up to suit the S50 manifolds I run.
-Exhaust side has been drilled and tapped so no longer need adaptor plates to run the S50 manifolds
The head has been rebuilt in 2019 with paperwork for pressure testing, skimming and rebuilding with new seals.


First job was to take the head apart and give it a good checking over, cams and lifters/tappets removed

The Vac springs and retainers

A couple of lifters had stuck down with the head being sat for a while so they have been pulled open and cleaned up. Back to working fully now
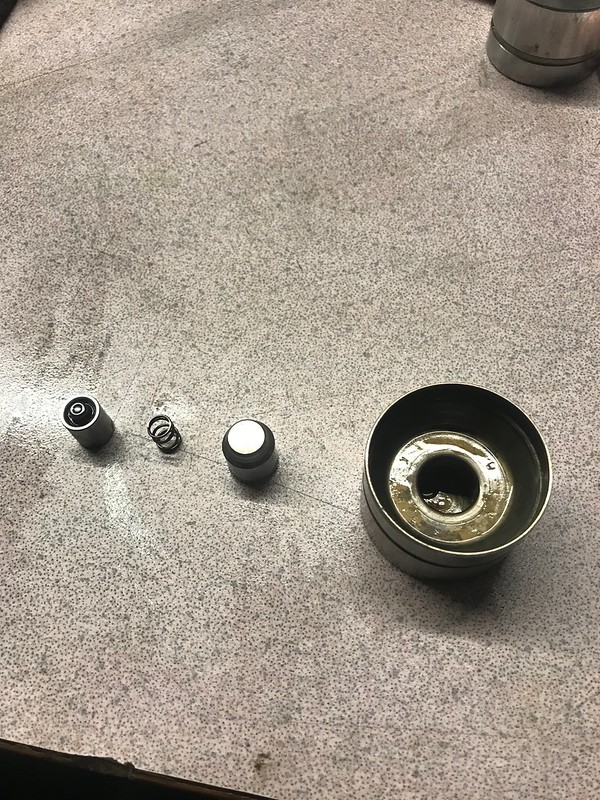
Cam trays removed and put through the parts washing with everything else making sure it's all clean ready to go back together

Waiting on a couple of bits then i'll start to put this together, unsure on how quickly this will progress as i have got a few track days booked between now and June but I don't think any of them will be taking place now. Need to remove the engine at some point and get that stripped, cleaned and machined before rebuilding, I already have a lot of the key parts to put this next engine together, Vac Motorsport oil pump, APR rod bolts, a spare set of King Racing Big end bearings. Planning on using a set of head studs rather then the standard BMW head bolts with the block being aluminium. But for now that's us up to date for the moment.
Fishy Dave said:
I enjoyed reading that, excellent welding skills too. The LSD will make a big difference to your enjoyment and ability to get on the power sooner.
Yes the diff has been in the car for over 12 months now, I had a plated diff in the last car but decided to give the Quaife a shot in the E46. Works well, I know how the find the limit of it though every now and then. But it works really well!d_a_n1979 said:
Such a great build; can't wait to see the results
fastbikes76 said:
Bonkers .... absolutely love it. Top work OP , your attention to detail is superb.
Bookmarked !

Glad to know that you're finding it interesting reading, will be keeping the updates coming, maybe a little less at the moment due to the closure of tracks but the car will be ready to go as soon as we can again.Bookmarked !
Update
So at the moment I'm working from home and have two weeks off as well so plenty of time to do a few little jobs and pass some time too.
First job on the list was to try and tidy up the wheels, they were a mess from the last track day in March, mainly the rears where I was running the cheap brembo pads, between each of the spokes and all the the inner dish of the wheel was covered in metal particles from the brake pads.

My usual wheel cleaner wasn't shifting it so invested in some different wheel cleaner as well as from fall out remover.

Spent Saturday afternoon cleaning the wheels, it took a good two hours of soaking, scrubbing and jet washing to get the wheels back to looking like new again, I then gave them a polished and resealed them ready for when they go back on again, hopefully being able to change the pads with the new proportioning valve will cut down on this as the RC6's aren't too heavy on dust and wear

Gave the wet wheels the same treatment.

Took the steering wheel off to give it a good scrub and a tidy up, It has started to fade in the sun so may look at getting some dye to bring it back to black

While the car was on axle stands for the weekend sorting out the wheels it was a perfect chance to do a few more little jobs.
Swapped the rear brembo pads out for the spare set of RC5's. No fun going through half a set of brembos on a track day and the dust from the cheap pads is terrible. Back to the RC5's now I've got the Tilton proportioning valve in

Dropped the diff oil out of the diff, this was the freshly built diff with the 3.73 final drive in. Wanted to check the oil to give an indication everything was ok.

However the main reason for dropping the diff oil was so that I could fit a temperature sensor, this has been a job that i've wanted to do for ages, I know a few people running diff cooling set ups on E36/E46 and a conversion with company that builds race cars especially E46's said they had experienced high diff temps not only with plated diffs but with helical diffs. Only way to find out is to monitor the diff temp myself.
Diff temperature sensor fitted and the wiring ran up along the diff cradle and into the brake line holders on the underside of the boot floor before entering the cabin with the brake lines.

Did a little more wiring, one wire for the rear diff temp sensor above, another for an additional fuel pressure sensor for the swirl pot so I can keep an eye on what that's doing. Another reason for this Is the current fuel system is running about 64psi at the rail which is about 10psi too high. The standard ECU copes with it fine with the fuel trims and the AFR's are solid on the dyno but it's something i'm looking into at the moment... Pressure in the swirl pot is 10PSI so there's no problem there so will swap the fuel pressure regulator this week and see how it goes from there.
Ended up swapping the fuel rail from a 328 fuel rail to the M50 fuel rail as the regulator from the M50 was a slightly different diameter and with the old seals it wouldn't seal correctly. But with the M50 rail on there 50psi. Going to replace the regulator in the 328 rail as that is pointing towards the higher fuel pressure.

Gave the interior a good clean, blowing out any dust with the compressor and giving it a hoover and wipe down

Hasn't moved off the drive since it was washed after the last track day but I thought it wouldn't harm to be washed again this weekend

Gave the car a coat of wax to try and keep it clean between washes, also moved the splitter back a little and to the side to make sure it was central with the car

That is pretty much it now until it goes out in the future, just need to swap the fuel pressure reg over one evening and test the rail pressure

Last job this week has been to adjust the overlay for the Data logger. Added in some more data fields in the bottom right corner. Merged the dial for the RPM to be part of the speedometer and created front and rear brake pressure bars to be the same as the throttle. Not all the data will be visible on video edits but it's there to be shown If i decide to leave them in.

Edited by tombate911 on Monday 6th April 19:05
Lock down update. Only small things but I thought it was a good chance to sit down on a Friday evening and pass some time writing down a few things i've found and been messing with along the way.
Carrying on from the last update were I was adding in additional sensors, one of the sensors I added in was a pressure sensor into the top of the swirl pot. the idea behind this was to tell me a little more about what was going on in the system. I started this train of thought because ever since I swapped the fuel system to a pot, high pressure pump and return style rail i've had a fuel pressure around 60-65psi with and without vacuum, never really had an issue with it, car ran fine on the dyno with the standard ECU. I thought there might have been some back pressure in the pot potentially but this sensor has told me there is around 8-10psi in the swirl pot which is perfect for feeding the pump for the rail.
Popped out the regulator in the rail for spare i had knocking around and perfect 51psi. Really strange, ordered a new one to replace it with as the history of the spare was unknown. Got to the bottom of that mystery eventually.

With the car going no where soon with the lock down but with a lot of messing with it, the odd start and having the ignition on from time to time i thought it was a good idea to get a trickle charger for it. Nice and simple wiring onto the battery with a plug on it, really easy to get the car on charge now, only takes a minute to plug it into the car.

A week or two into the lock down I found myself stuck at home, nothing to do and facing a couple of weeks off work so decided to play with an idea i've had for a long time but never really started it because I knew it was going to be quite time consuming.
I've already got the Arduino data logger on the exhaust tunnel of the car which collected data from the CANBUS, a handful of analogue sensors as well as GPS data and writes it to an SD card. This is great for looking at information afterwards but real time live data I only really have the coolant temp on the dash and the oil temp gauge which only gives me a rough idea and an alarm set at 120 degrees.
Ordered a couple of bits of Amazon to kick off the ball rolling, starting off with another Arduino Mega and a 3.5" colour and touch screen LCD. Only a cheap one to get me going, can always develop and spend more in the future if it works.

I already had the data available on the logger Arduino so i started off making a couple of screen to display the data on.
Temps which would be nice to be able to see while driving.

Pressures

Another way of viewing oil and fuel pressure min and max over a session out on track

Added a basic alarm functionality to each of the temps for the Oil, Coolant and Diff. The beauty of making this myself is I can make it do what ever I want. At the moment a basic alarm with a flashing red ! mark.
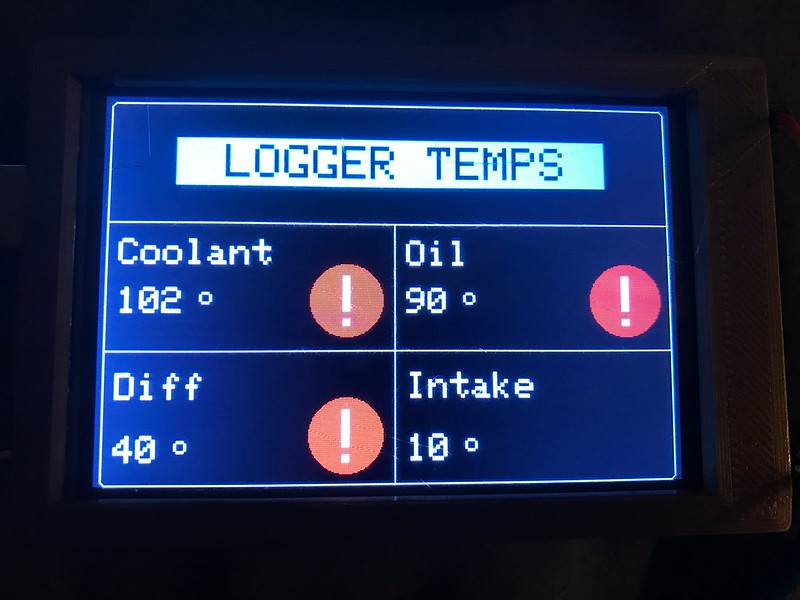
Spent a bit more time developing the casing and the mount for it to bolt into a hole in the exhaust tunnel, mounted it in a black plastic case and powered it through a USB cable so it's nice and tidy.

The beauty of it is that it's connected to the CANBUS of the car which enables it to receive all the data from the ECU but I have modified the code on the logger to broadcast the analogue sensor values that it's reading onto the cars CANBUS so it can be read by the screen and displayed.
Touching the screen enables you to cycle around the 3 different screens of data. Automatically comes on with the ignition

This will probably be something I continue to develop further in the future with more sensors, data, bigger screens with gauges, I've got a few ideas for using this screen more but that's not too difficult to develop now I've got the basic functionality.
Another large parcel turned up in the post for me this afternoon too, another M54B30 complete engine which i'm going to be stripping down and using as a donor for the new engine build, this enables me to get on with the build while still having the car in one piece and being able to use it should I have the chance to get out on track.

Couldn't help getting it on an engine stand this evening and popping off the cam cover for a look inside checking the part numbers on the cams and the block Will have some more photographs of this as I strip it open this week.

Carrying on from the last update were I was adding in additional sensors, one of the sensors I added in was a pressure sensor into the top of the swirl pot. the idea behind this was to tell me a little more about what was going on in the system. I started this train of thought because ever since I swapped the fuel system to a pot, high pressure pump and return style rail i've had a fuel pressure around 60-65psi with and without vacuum, never really had an issue with it, car ran fine on the dyno with the standard ECU. I thought there might have been some back pressure in the pot potentially but this sensor has told me there is around 8-10psi in the swirl pot which is perfect for feeding the pump for the rail.
Popped out the regulator in the rail for spare i had knocking around and perfect 51psi. Really strange, ordered a new one to replace it with as the history of the spare was unknown. Got to the bottom of that mystery eventually.
With the car going no where soon with the lock down but with a lot of messing with it, the odd start and having the ignition on from time to time i thought it was a good idea to get a trickle charger for it. Nice and simple wiring onto the battery with a plug on it, really easy to get the car on charge now, only takes a minute to plug it into the car.
A week or two into the lock down I found myself stuck at home, nothing to do and facing a couple of weeks off work so decided to play with an idea i've had for a long time but never really started it because I knew it was going to be quite time consuming.
I've already got the Arduino data logger on the exhaust tunnel of the car which collected data from the CANBUS, a handful of analogue sensors as well as GPS data and writes it to an SD card. This is great for looking at information afterwards but real time live data I only really have the coolant temp on the dash and the oil temp gauge which only gives me a rough idea and an alarm set at 120 degrees.
Ordered a couple of bits of Amazon to kick off the ball rolling, starting off with another Arduino Mega and a 3.5" colour and touch screen LCD. Only a cheap one to get me going, can always develop and spend more in the future if it works.
I already had the data available on the logger Arduino so i started off making a couple of screen to display the data on.
Temps which would be nice to be able to see while driving.
Pressures
Another way of viewing oil and fuel pressure min and max over a session out on track
Added a basic alarm functionality to each of the temps for the Oil, Coolant and Diff. The beauty of making this myself is I can make it do what ever I want. At the moment a basic alarm with a flashing red ! mark.
Spent a bit more time developing the casing and the mount for it to bolt into a hole in the exhaust tunnel, mounted it in a black plastic case and powered it through a USB cable so it's nice and tidy.
The beauty of it is that it's connected to the CANBUS of the car which enables it to receive all the data from the ECU but I have modified the code on the logger to broadcast the analogue sensor values that it's reading onto the cars CANBUS so it can be read by the screen and displayed.
Touching the screen enables you to cycle around the 3 different screens of data. Automatically comes on with the ignition
This will probably be something I continue to develop further in the future with more sensors, data, bigger screens with gauges, I've got a few ideas for using this screen more but that's not too difficult to develop now I've got the basic functionality.
Another large parcel turned up in the post for me this afternoon too, another M54B30 complete engine which i'm going to be stripping down and using as a donor for the new engine build, this enables me to get on with the build while still having the car in one piece and being able to use it should I have the chance to get out on track.
Couldn't help getting it on an engine stand this evening and popping off the cam cover for a look inside checking the part numbers on the cams and the block Will have some more photographs of this as I strip it open this week.
I was going to save this for one but update but with the amount of photographs and steps I thought I would break it up a little bit and write down some of the progress so far. This obviously isn't every step I've gone through so far just some of the stages I've taken photos of.
Engine strip down
Started by removing a lot of the parts from the engine to get it back to a bare block. Put all these parts in a plastic box out of the way for now, not a lot of these are going to be used on the car so will just be kept for spares

Plugged up any holes and covered the engine in degreaser, lots of scrubbing with a stiff brush and finally jet washing the engine to get rid of 120,000 miles or dirt and oil.

First job was to take the head off complete, I wont be using any of this so I've removed it with the cams in place and put it on ebay for sale.

Oil drained and the sump and oil pump removed, again not something i'm going to be using as I'll be using the oil pump from the current engine with the Vac motorsport shaft and nut kit.

Engine broken down into it's main components

Lots and lots of cleaning and scrubbing to get to this stage, everything will be disassembled and cleaned in the parts washer before reassembly but it's nice to get rid of all the old oil from everything

Old head and new head sat side by side in the garage.

For comeparison here's the different between the intake cam standard vs Shrick 272 with 10.9mm lift
Standard
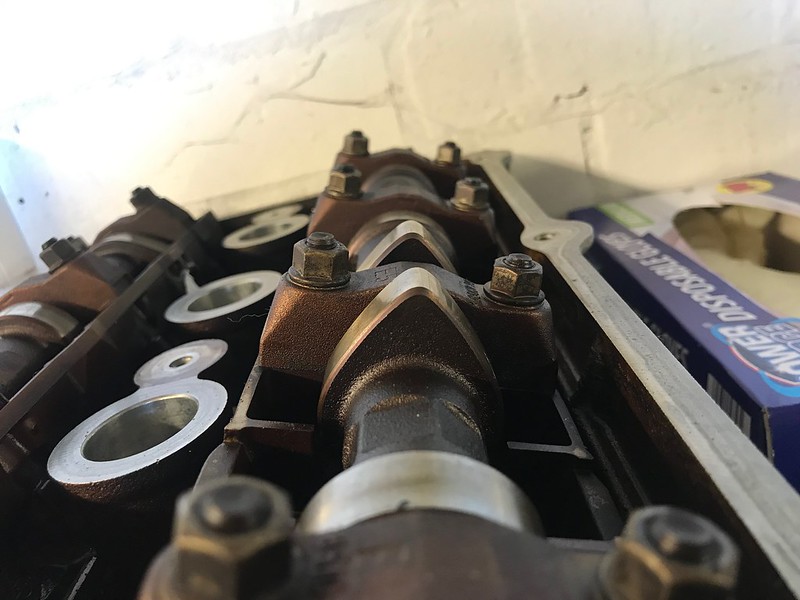
Schrick
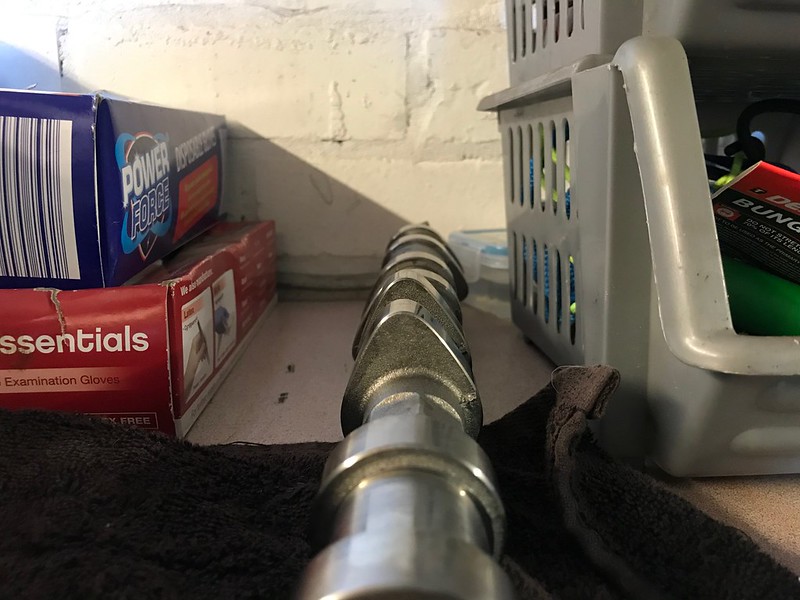
I dropped the block off at the machine shop for machine work doing.
Skimmed the deck and honed the bores to give a nice fresh canvas for the engine build. I know someone will eventually ask what I am doing with the threads in the Aluminium block, I was going to have inserts put into the block but I have since decided to spend the money on ARP headstuds. I've tracked down some ARP studs which are longer than the kit that they sell for the M50 steel blocks which give more thread engagement inside the aluminium block. Main advantage is these can also be reused and transferred to another block should I need to.

Masked up the faces on the block


Painted the block a nice silver, Painted nice and easily after the block had been through the parts washer at the machine shop.

Cleaned out the oil squirters and refitted them back into the block checking the oil galleries in side the block and inside the squirters where cleaned and blown through before refitting

Before refitting the cams to the head or the head to the block I did a quick leak down test with some white spirit to check the valve seats on this head as it if freshly built to make sure everything is as it should be, no issues with leakage just evaporation with the heat yesterday

First few parcels with engine parts started to arrive a the end of last week. First ones being the Vanos rebuild kit

Stripped the unit open and pulled out the seals

Cleaned the pistons in the parts washer and refitted the new seals

Time for reassembly

Done...

Bit of paint to tidy up the tired vanos unit too.

Engine building parts arrived yesterday so I was able to crack on with the first bits of putting the engine together.

Checked the ring gaps in the bores, all checked out ok pretty much in the middle of the BMW tolerances

Piston rings fitted to the pistons

Popping the pistons into the bores with the new rings fitted

6 pistons fitted into the block, even though the bores and the rings are new i've kept everything numbered and orientated throughout the cleaning process. Trying to make the process as simple as possible when rebuilding

Set of King Racing bearings for the rod bearings this time,

King Racing rod bearings and brand new mains bearings fitted ready for the crank to be dropped in

To be continued when the remainder of the parts i'm waiting for arrive.
Engine strip down
Started by removing a lot of the parts from the engine to get it back to a bare block. Put all these parts in a plastic box out of the way for now, not a lot of these are going to be used on the car so will just be kept for spares
Plugged up any holes and covered the engine in degreaser, lots of scrubbing with a stiff brush and finally jet washing the engine to get rid of 120,000 miles or dirt and oil.
First job was to take the head off complete, I wont be using any of this so I've removed it with the cams in place and put it on ebay for sale.
Oil drained and the sump and oil pump removed, again not something i'm going to be using as I'll be using the oil pump from the current engine with the Vac motorsport shaft and nut kit.
Engine broken down into it's main components
Lots and lots of cleaning and scrubbing to get to this stage, everything will be disassembled and cleaned in the parts washer before reassembly but it's nice to get rid of all the old oil from everything
Old head and new head sat side by side in the garage.
For comeparison here's the different between the intake cam standard vs Shrick 272 with 10.9mm lift
Standard
Schrick
I dropped the block off at the machine shop for machine work doing.
Skimmed the deck and honed the bores to give a nice fresh canvas for the engine build. I know someone will eventually ask what I am doing with the threads in the Aluminium block, I was going to have inserts put into the block but I have since decided to spend the money on ARP headstuds. I've tracked down some ARP studs which are longer than the kit that they sell for the M50 steel blocks which give more thread engagement inside the aluminium block. Main advantage is these can also be reused and transferred to another block should I need to.
Masked up the faces on the block
Painted the block a nice silver, Painted nice and easily after the block had been through the parts washer at the machine shop.
Cleaned out the oil squirters and refitted them back into the block checking the oil galleries in side the block and inside the squirters where cleaned and blown through before refitting
Before refitting the cams to the head or the head to the block I did a quick leak down test with some white spirit to check the valve seats on this head as it if freshly built to make sure everything is as it should be, no issues with leakage just evaporation with the heat yesterday
First few parcels with engine parts started to arrive a the end of last week. First ones being the Vanos rebuild kit
Stripped the unit open and pulled out the seals
Cleaned the pistons in the parts washer and refitted the new seals
Time for reassembly
Done...
Bit of paint to tidy up the tired vanos unit too.
Engine building parts arrived yesterday so I was able to crack on with the first bits of putting the engine together.
Checked the ring gaps in the bores, all checked out ok pretty much in the middle of the BMW tolerances
Piston rings fitted to the pistons
Popping the pistons into the bores with the new rings fitted
6 pistons fitted into the block, even though the bores and the rings are new i've kept everything numbered and orientated throughout the cleaning process. Trying to make the process as simple as possible when rebuilding
Set of King Racing bearings for the rod bearings this time,
King Racing rod bearings and brand new mains bearings fitted ready for the crank to be dropped in
To be continued when the remainder of the parts i'm waiting for arrive.
Sf_Manta said:
Looks great with the build so far.
Did you get the block vapour blasted? or just gave it a good scrub? Have heard if you get aluminum items vapour blasted it seals the surface and gives a better surface finish for paint.
The engine block was scrubbed with degreaser before sending it to the machine shop. Once they had finished the machine work they run it through what is basically a large dishwasher/parts washer to ensure it is fully clean, it does a great job of removing all of the oil stains and residue ready for painting, the vapour blasting looks fantastic though for items which are not getting painted.Did you get the block vapour blasted? or just gave it a good scrub? Have heard if you get aluminum items vapour blasted it seals the surface and gives a better surface finish for paint.
garbajkolektor said:
Hello mate,
Did you ever make the m50 intake manifold adapter to use the m54 throttle body?
Is it possible to sell me one or possibly provide me the design files so that I can have it printed please?
My car has been sitting for so long because I need an adapter for the manifold and I haven't seen one that works.
If you can, please help. Thanks mate.
Yes. I had a 3D Printed prototype and then moved to a laser cut aluminium version found below. This has been on the car for months now without issues.Did you ever make the m50 intake manifold adapter to use the m54 throttle body?
Is it possible to sell me one or possibly provide me the design files so that I can have it printed please?
My car has been sitting for so long because I need an adapter for the manifold and I haven't seen one that works.
If you can, please help. Thanks mate.
I can get these laser cut should you require one. Drop me a Private message if you want to discuss.

Engine building continues. I was waiting for the mains bolts to arrive so I was able to start to put the crank in and assemble the bottom end.
While doing this I checked the bearing clearances on the mains and the big end bearings. all of these were right in the middle of the factory tolerances.

Another expensive but worthwhile purchase for this engine build turned up. Set of custom ARP studs and nuts which are loner than the M50 kit ARP sell giving full thread engagement in the block. Decided to go down this route rather than spending the money have timeserts fitted to the block.
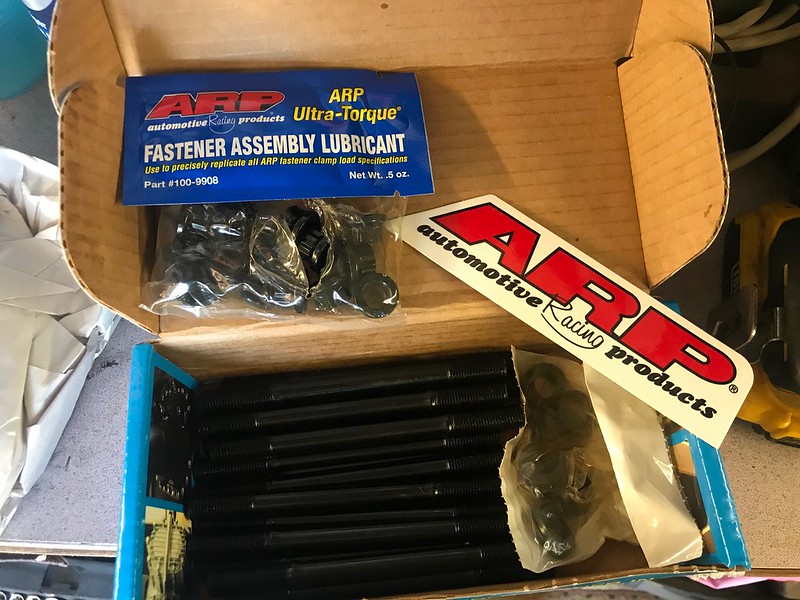
ARP head studs fitted into the block

The new ported head fitted to the block and torqued down. What a stressful job that was getting the head torqued down, still worrying about pulling the threads out of the block but with the longer engagement on these ARP's and only pulling on the threads in the block rather than turning at the same time the head is torqued down and ready to go

Dropped the cam trays, lifters and cams into the head and torqued down the cams

Before I could go any further with finishing off the engine building there was some other jobs which needed tackling first. One being the sump. I was seeing oil pressure as low at 8psi under braking and it was dipping in some corners. No wonder as the sump has zero baffling it. I started by drilling out the little tray that is in there from factory

I drew up some ideas for some basic baffle plates go so inside the sump to stop the sloshing of the oil under braking and cornering, these were cut from card using a laser cutter from the CAD drawing

Test fit in the sump, highlighted a few areas which needed adjustment

Finally made the final version from 2mm aluminium, ready for welding into the sump tomorrow.

Also been busy on the lathe, I looked at the coolant system I'm running and by removing the heater matrix It has become apparent that I have introduced a coolant loop which isn't required now I dont run a heater matrix so wanted a nice soluation to save running the pipes along the block while they're not needed. Aluminium plug made with grooves for orings

Added a plate to the top of it so I can be bolted into place so it doesn't come out of the block due to coolant pressure

While I was waiting on parts I thought I would spend a few hours in the evening this week getting the car ready for removing the engine.

A few hours later it was ready to lift out, found it was nice and easy to bring the engine and gearbox out of the front of the engine back by lowering it down with the subframe and gearbox mount in position

Removed the gearbox to find someone had already fitted a single mass flywheel. I thought someone had but couldn't find proof of it in the service history.
This will be going back in with the new engine

I dropped the sump off as I want to use the oil pump from this engine as it has the uprated oil pump kit in it from Vac Motorsport. I dropped the sump off to find this...

The bolt has also managed to unwind it self half a turn. Luckily due to the design of the bolt not being able to unwind it's self fully due to it hitting the sump this prevents the gear from falling off the shaft and completely losing oil pressure. However what the gear has done is be moving backwards and forwards on the shaft causing it to wear and damage the gear. Luckily the shaft is hardened and the shaft can be reused without issue

I took the oil pump with the Vac Motorsport shaft in it to work with me with a spare gear I had on the shelf and machined the centre of the gear to match the keys on the Vac shaft.
the Vac motorsport kit comes with an ARP left hand bolt which is pre drilled so when this is built up I will be wire locking this from both sides to try and maintain the balance of the shafts.
Amazing the issues that the harmonics of this cranks shaft cause.

Just because I've taken some decent photographs of the porting on the head here's the comparison.
Standard inlet side

Ported inlet side
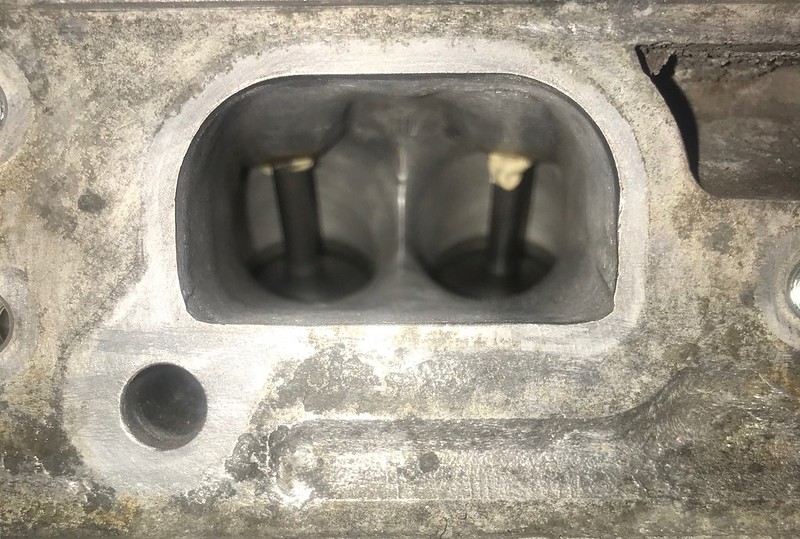
Standard exhaust side

Ported exhaust side (to match the S50 exhaust i'm running)

Engine building continues this weekend, I will be cracking on with wiring in the engine bay as well as finishing off the last jobs on the engine when the sump is back from welding I can finish off the timing of the engine and finish it off.
While doing this I checked the bearing clearances on the mains and the big end bearings. all of these were right in the middle of the factory tolerances.
Another expensive but worthwhile purchase for this engine build turned up. Set of custom ARP studs and nuts which are loner than the M50 kit ARP sell giving full thread engagement in the block. Decided to go down this route rather than spending the money have timeserts fitted to the block.
ARP head studs fitted into the block
The new ported head fitted to the block and torqued down. What a stressful job that was getting the head torqued down, still worrying about pulling the threads out of the block but with the longer engagement on these ARP's and only pulling on the threads in the block rather than turning at the same time the head is torqued down and ready to go
Dropped the cam trays, lifters and cams into the head and torqued down the cams
Before I could go any further with finishing off the engine building there was some other jobs which needed tackling first. One being the sump. I was seeing oil pressure as low at 8psi under braking and it was dipping in some corners. No wonder as the sump has zero baffling it. I started by drilling out the little tray that is in there from factory
I drew up some ideas for some basic baffle plates go so inside the sump to stop the sloshing of the oil under braking and cornering, these were cut from card using a laser cutter from the CAD drawing
Test fit in the sump, highlighted a few areas which needed adjustment
Finally made the final version from 2mm aluminium, ready for welding into the sump tomorrow.
Also been busy on the lathe, I looked at the coolant system I'm running and by removing the heater matrix It has become apparent that I have introduced a coolant loop which isn't required now I dont run a heater matrix so wanted a nice soluation to save running the pipes along the block while they're not needed. Aluminium plug made with grooves for orings
Added a plate to the top of it so I can be bolted into place so it doesn't come out of the block due to coolant pressure
While I was waiting on parts I thought I would spend a few hours in the evening this week getting the car ready for removing the engine.
A few hours later it was ready to lift out, found it was nice and easy to bring the engine and gearbox out of the front of the engine back by lowering it down with the subframe and gearbox mount in position
Removed the gearbox to find someone had already fitted a single mass flywheel. I thought someone had but couldn't find proof of it in the service history.
This will be going back in with the new engine
I dropped the sump off as I want to use the oil pump from this engine as it has the uprated oil pump kit in it from Vac Motorsport. I dropped the sump off to find this...
The bolt has also managed to unwind it self half a turn. Luckily due to the design of the bolt not being able to unwind it's self fully due to it hitting the sump this prevents the gear from falling off the shaft and completely losing oil pressure. However what the gear has done is be moving backwards and forwards on the shaft causing it to wear and damage the gear. Luckily the shaft is hardened and the shaft can be reused without issue
I took the oil pump with the Vac Motorsport shaft in it to work with me with a spare gear I had on the shelf and machined the centre of the gear to match the keys on the Vac shaft.
the Vac motorsport kit comes with an ARP left hand bolt which is pre drilled so when this is built up I will be wire locking this from both sides to try and maintain the balance of the shafts.
Amazing the issues that the harmonics of this cranks shaft cause.
Just because I've taken some decent photographs of the porting on the head here's the comparison.
Standard inlet side
Ported inlet side
Standard exhaust side
Ported exhaust side (to match the S50 exhaust i'm running)
Engine building continues this weekend, I will be cracking on with wiring in the engine bay as well as finishing off the last jobs on the engine when the sump is back from welding I can finish off the timing of the engine and finish it off.
Gassing Station | Readers' Cars | Top of Page | What's New | My Stuff