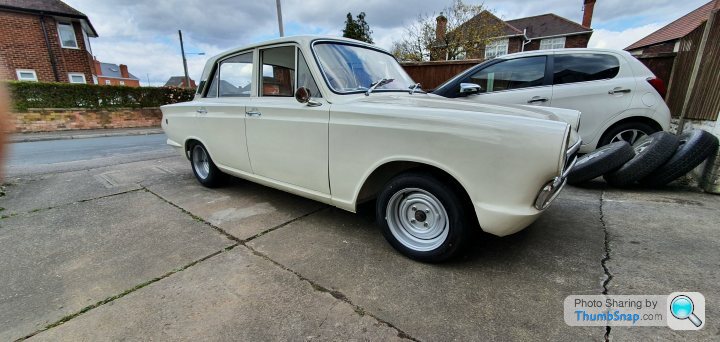
1966 Mk1 Cortina GT
Discussion


Just a quick update on the Cortina, since putting the engine in there have been 2 things I wanted to address;
Firstly is the choke cable, the original has notches on the handle that allow it to be pulled out and stay roughly where you want it without using pegs. unfortunately time has been not been kind to the original cable and outer and are looking a bit ropey to say the least.
When doing the dry build I purchased a replacement cable from the club for £15 I believe thinking this would be ideal - I was wrong...
The handle was too new, too plasticy and just looked off. The notches didn't work either so once pulled out it would recoil lightening fast so cold starting was problematic. Pegs, Pegs are for clothes lines. so that's not happening.
Knowing this I decided that I would try to replace the cable on the original so I get the notched action and authentic handle on something that works, what I did was keep onto this idea for 18 months so I could bugger about with bodywork.
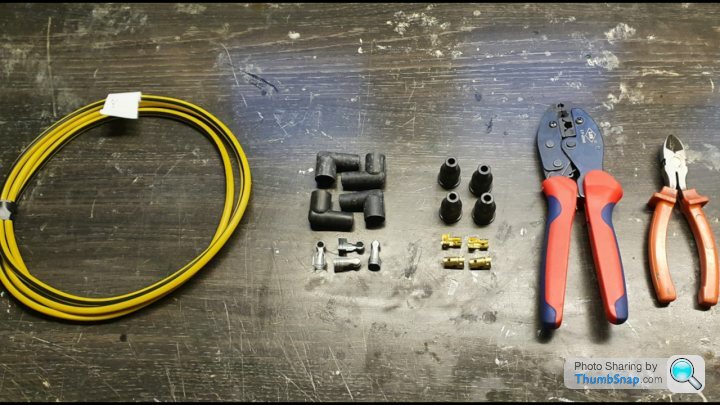
The cable is mountain bike gear cable with and outer core from Halfords that cost me £7, replacing it was as simple as cut the cable at the handle then carefully use a hack saw on the clamped section to release the last of the cable and replace it with the new version, reclaims it using my vice then fit.
It's a simple but cheap repair that nobody will ever notice or care about but to me it's made me rather pleased with myself.
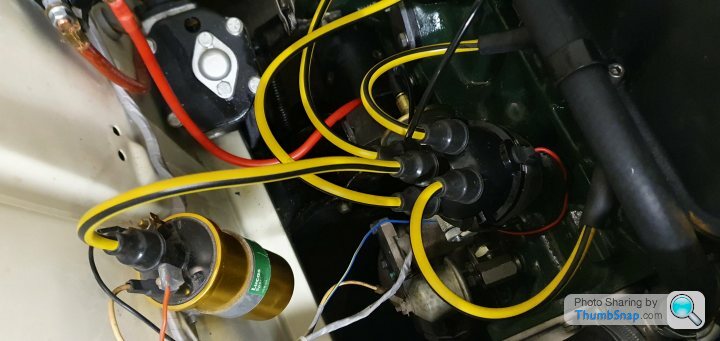
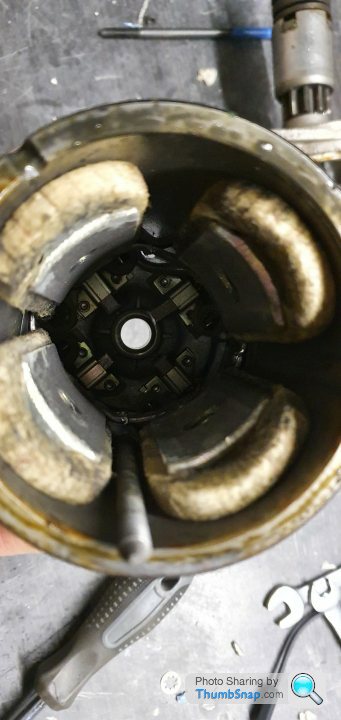
Secondly - those awful HT leads...
Having purchased a set of HT leads for a Mk1 Cortina from a supplier on eBay I wasn't overwhelmed by what I received, again this was a purchase made during the dry build so I was more concerned with a running engine than aesthetic but to say they were long is an understatement.
The dreary grey completes the look of I couldn't care less and is something that I didn't want to live with anymore.
A friend of mine has been making his own HT leads for some time and recommended I give it a go, after all I wanted a set of leads that added a bit of colour and didn't serve a purpose as whips should I fancy a bit of roadside BDSM - not that I'm ruling that out, it certainly beats most car shows.
I had planned on using yellow cotton braided leads with black accents but remembered that this engine isn't exactly oil tight so they'd look a terrible in 6 months time after getting some use so I chose the black and yellow "period correct" PVC type.
The result of this was something again I'm rather proud of but also was an enjoyable job with a decent cup of tea.

To me it just looks neater and the yellow adds a bit of colour, plus it's the colours of the AA so that might inspire said roadside assistance when I'm in a spot of bother!
If you're interested in giving it a go I made short how to video on the subject.
https://www.youtube.com/watch?v=0Sh2XhmBKrw&t=...
Firstly is the choke cable, the original has notches on the handle that allow it to be pulled out and stay roughly where you want it without using pegs. unfortunately time has been not been kind to the original cable and outer and are looking a bit ropey to say the least.
When doing the dry build I purchased a replacement cable from the club for £15 I believe thinking this would be ideal - I was wrong...
The handle was too new, too plasticy and just looked off. The notches didn't work either so once pulled out it would recoil lightening fast so cold starting was problematic. Pegs, Pegs are for clothes lines. so that's not happening.
Knowing this I decided that I would try to replace the cable on the original so I get the notched action and authentic handle on something that works, what I did was keep onto this idea for 18 months so I could bugger about with bodywork.
The cable is mountain bike gear cable with and outer core from Halfords that cost me £7, replacing it was as simple as cut the cable at the handle then carefully use a hack saw on the clamped section to release the last of the cable and replace it with the new version, reclaims it using my vice then fit.
It's a simple but cheap repair that nobody will ever notice or care about but to me it's made me rather pleased with myself.
Secondly - those awful HT leads...
Having purchased a set of HT leads for a Mk1 Cortina from a supplier on eBay I wasn't overwhelmed by what I received, again this was a purchase made during the dry build so I was more concerned with a running engine than aesthetic but to say they were long is an understatement.
The dreary grey completes the look of I couldn't care less and is something that I didn't want to live with anymore.
A friend of mine has been making his own HT leads for some time and recommended I give it a go, after all I wanted a set of leads that added a bit of colour and didn't serve a purpose as whips should I fancy a bit of roadside BDSM - not that I'm ruling that out, it certainly beats most car shows.
I had planned on using yellow cotton braided leads with black accents but remembered that this engine isn't exactly oil tight so they'd look a terrible in 6 months time after getting some use so I chose the black and yellow "period correct" PVC type.
The result of this was something again I'm rather proud of but also was an enjoyable job with a decent cup of tea.
To me it just looks neater and the yellow adds a bit of colour, plus it's the colours of the AA so that might inspire said roadside assistance when I'm in a spot of bother!
If you're interested in giving it a go I made short how to video on the subject.
https://www.youtube.com/watch?v=0Sh2XhmBKrw&t=...
Breadvan72 said:
Continued fabulousness in all respects!
Thank you Breadvan, I feel as thought I'm turning a corner now that I don't need to push the Cortina around anymore.scottos said:
Awesome thread, what youve created is really impressive. I'm sharp realising after reading threads like this that i really need to learn to weld/ fabricate, especially having an early 70's car! I also need more patience it seems!
swisstoni said:
Really wish I had the skills and the facilities to do this.
Must be a great feeling to finally drive the results of all that work.
Must be a great feeling to finally drive the results of all that work.
Breadvan72 said:
I once tried to fix a 70s car. Once. Since then I pay others to fix 70s cars. I admire those who can fix cars, but that ain't me.
It's a fine blend of determination and sheer stubbornness! When I started work on the Cortina I didn't have a clue about welding and fabrication, I bought a 2nd hand Clarke 105EN mig welder for £40. I'd suggest using a rent free gas bottle from SDL Minofern instead of the Clarke small bottles as these tend to leak more gas than you'll use for shielding! I'm not master fabricator but generally I went in with the notion that most things can be fixed if I make bad of a job of it.grumpy52 said:
This thread has certainly evoked memories for me .
The instigator of my motorsport enthusiasm was a family friend who took me to my first race meeting on my 12th birthday in 1967 . Fast forward to 1971 and the same friend took me to join the Silverstone Marshall's club and many trips from where we lived near Bedford were done in his Cortina GT , dark blue with white stripe , wide lotus steels .
To this 15/16 year old the car was fabulous and always driven with enthusiasm.
I still get a flood of excitement whenever I watch a horde of 'Tina's doing their thing on circuit.
That must have been great to watch, I quite like the idea of running wider steels on the Cortina - I have a set of 4.5J which I'd like to keep the front as they are but take the rears out to 6 or 6.5" (albeit by someone who know's what they're doing). Hopefully I'll be able to take the Cortina to Silverstone classic when it's next as I too like seeing them be used, if you're there I'll take you out for a spin The instigator of my motorsport enthusiasm was a family friend who took me to my first race meeting on my 12th birthday in 1967 . Fast forward to 1971 and the same friend took me to join the Silverstone Marshall's club and many trips from where we lived near Bedford were done in his Cortina GT , dark blue with white stripe , wide lotus steels .
To this 15/16 year old the car was fabulous and always driven with enthusiasm.
I still get a flood of excitement whenever I watch a horde of 'Tina's doing their thing on circuit.

They need refurbishing anyway but I couldn't resist a quick photo seeing as though you had mentioned steel wheels!
With the Cortina moving under it's own power I felt a little lost, when I had a focussed goal I knew what to do to get there i.e. fixing the fuel tank or dumping coolant out of the core plug. With that milestone passed - what do I do next?
Lists are good, they're not as good as deadline that make lovely whooshing sounds as the whiz past! With that I wrote a list of what I could see that needed to be done, it's long and there's more to add no doubt but it's got plenty of minutia like painting brackets up to fitting headlining. I figured I'd do the mature thing and hit a load of easy stuff because the list is long and full of difficult stuff - future Jim can deal with that.
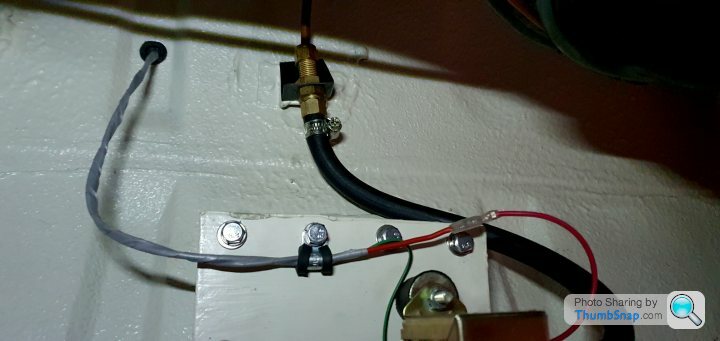
I started with the fuel tank wiring as everything was there but needed sorting, the fuel pump was crudely wired to just function and I had left a decent length of extra wiring for the fuel tank sender till I was sure how I wanted to wire it, this is something nobody will ever see or be that bothered about other than me and the MOT tester. I had some 5mm P clips spare which as it happens is the perfect size for what I needed to secure the fuel wiring and make it look that little bit nicer. The previous wire (fuel sender) has held in position with lashings of underseal - something that won't be happening on my watch!
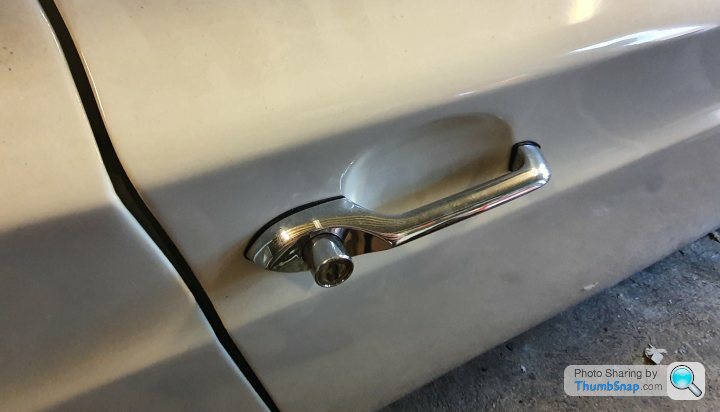
I had held off fitting the door handles because the paint still needs polishing back but that puts me in a catch 22 as I'll need to take the car to be have that done and I can't have the doors fly open whilst I'm doing it plus I'm tired of seeing the handles in a box. I gave them a clean and polish (I recommend the Meguairs wax as it doesn't damage chrome like autosol can plus it smells rather fruity). The Chrome is crazed but not pitted - it's passable for now and I'll look at chroming next year once I've got some miles under my belt and I'm looking at putting the Cortina away for winter.
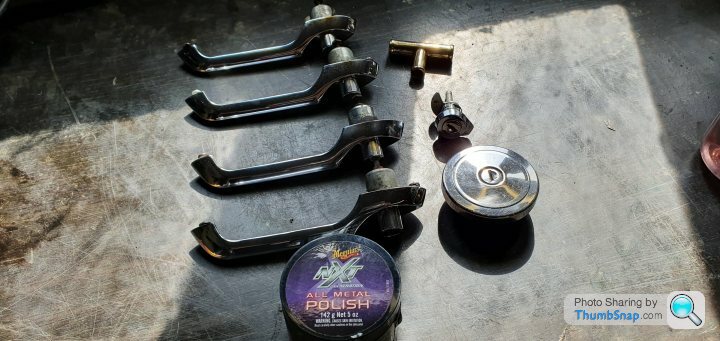
The gaskets could do with a trim but the handles look functional and rather tidy.
The stickers have been cleaned, I was going to polish them too but I think that would look little odd if I'm honest.
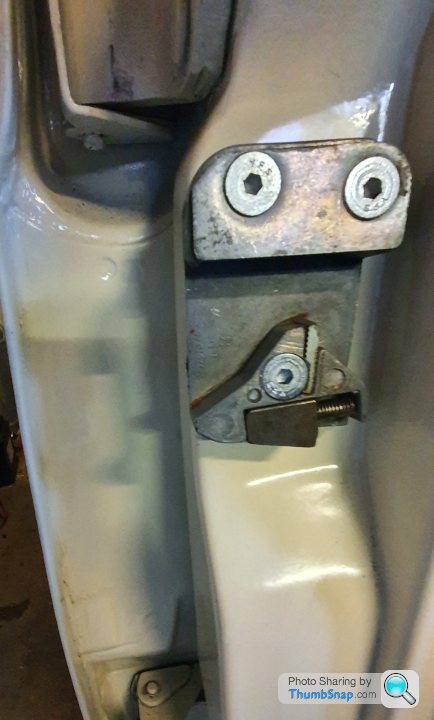
Whilst all this was going off I finally got my passengers side rear door skinned, the body shop I had used decided they couldn't do it after taking my money as part of the respray. I had talked to a few other classic friendly body shops some didn't respond and one in particular agreed to coming to look at the door along with the rest of the Cortina (there are a few assembly chips that need sorting). This quickly escalated to agreeing to the job in principle, viewing the Cortina and taking it on the spot and letting me know how much it'll cost after - this didn't sit right with me, I have no issue with spending money on work to be done but going in with no notion on cost beforehand seems reckless which I questioned the chap about on the phone.
He seemed put out that I dare ask for a quote and agreeing between us what work would be done (this all stems from my fingers being burned by so called professionals). Eventually he agreed and that was the last I heard from him so he's either lost on his way to my house or changed his mind - either way it's a bullet dodged! I found another place via my father who has been in the business 40 years and has skinned many Ford doors who had the door skinned in a week and will take the whole car to finish the fitment, paint the door and fit the door seals at the end of November (if he's still working).
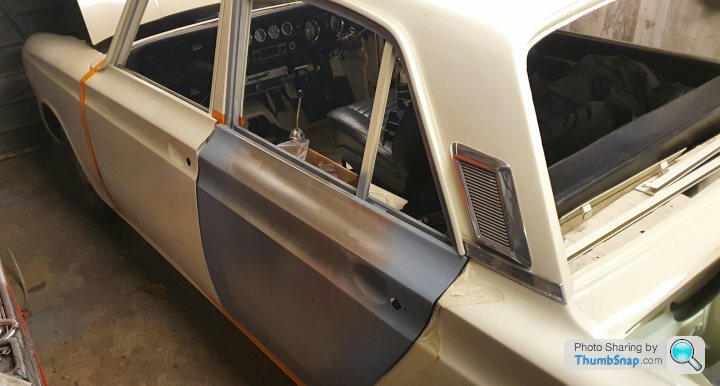
With both sides having full compliment of doors and handles aI turned my attention to the boot seal as I figured I'd attempt at least 1 seal - this was harder than I expected and again panel fitting isn't my forte, this may be a job for the bodywork guy! the seal is new and you currently have to give the boot some welly to shut it which apparently is the done thing in the club, I don't remember having to do this when the cortina was on the road but I'll get a 2nd opinion
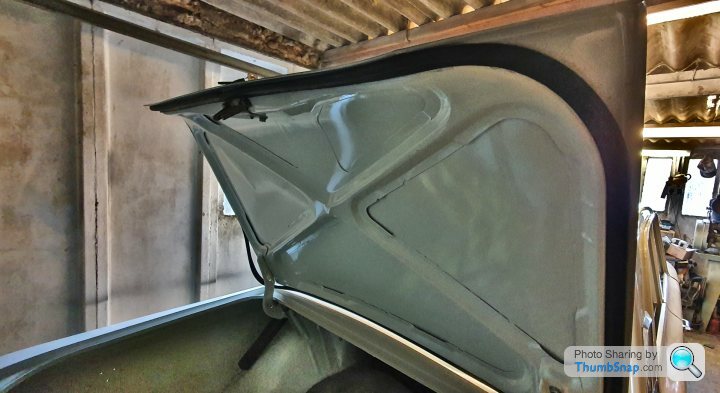
The boot lid is held up using heavy duty springs which do a great job but I was afraid of blowing a gasket when I went to fit them! Fortunately I survived with trousers in tact but it was close!

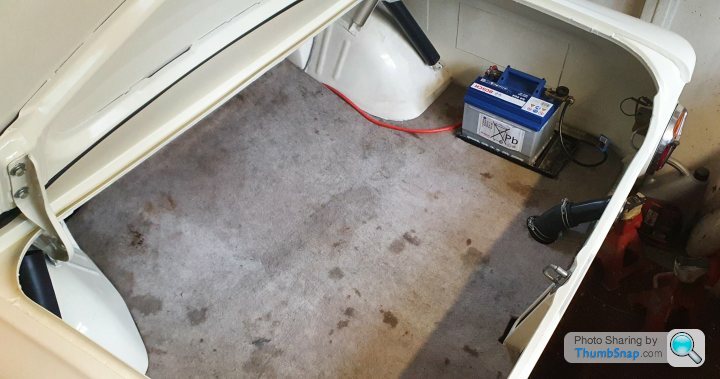
I used this opportunity to trim the old boot sound deadening pad to suit the relocated battery which I need to make a proper enclosure for (a job for future Jim). I have an Idea that I'll draft in CAD before I fabricate just because I can!
Bobberoo99 said:
Enjoying reading this, it's looking really good, please keep up the posting!!!
Thanks Bob, I've got plenty to update with but it all feels like minutia at the moment swisstoni said:
Any more of this and I might have to drag my 1600E out of the lockup it’s been in for the best part of 30 years.
A plan with no draw backs! Come on Toni - restoring a Cortina is like making love to a beautiful woman. It'll break you financially but it does make for an interesting story...Chunkychucky said:
Lovely, so nice to see a GT being restored, sadly a rare sight among the seemingly endless supply of Lotus Cortinas (genuine and replicas).
My dad has a 1966 2 door that didn’t look too bad, back to bare metal now and needless to say, the amount of previous repairs mean you can see daylight through several places.. going to need a lot of work but she’ll be another back on the road at some point!
Please keep your thread updated as it’s an entertaining read - a photo of my dad’s from a couple of weeks ago to remind you it could be worse
Thank you, I have had to defend my reasons for not painting a green stripe - it's not a Lotus! I don't think the stripe looks right on the 4 door either. I wouldn't say no to a Lotus twin cam however, given that the suspension is virtually the same on the Airflow GT and Lotus.My dad has a 1966 2 door that didn’t look too bad, back to bare metal now and needless to say, the amount of previous repairs mean you can see daylight through several places.. going to need a lot of work but she’ll be another back on the road at some point!
Please keep your thread updated as it’s an entertaining read - a photo of my dad’s from a couple of weeks ago to remind you it could be worse
Your Dad's Mk1 looks ok in the photo, did you have it dipped? I'd be interested in seeing more of it, but if you need any bits or advice etc with it just let me know

C70R said:
Indeed. Such a fabulous read, and real dedication.
Thank you. C70R I've tried to steer away from my standard adenoid classic car tone and remembered to not take myself too seriously Mr Tidy said:
It's good to see you are still making some progress, and with everything being done so meticulously.
Somehow I ended up with a couple of 6.5J banded rims on my MK2 Cortina and my mate had the other 2 on his Anglia. Whenever we followed each other you could see they hadn't been welded true, but that was back back in the 70s when we were students.
Personally I think your car would look great with a full set of 5.5J steelies but I'm sure whatever you fit it will look great!
That's interesting apart from the wonky wheel bit, I've spoken to a few firms and they're all around the same price. I'd love a set of 5.5's but the price is a bit daft and the Weller remakes look a little odd without caps.Somehow I ended up with a couple of 6.5J banded rims on my MK2 Cortina and my mate had the other 2 on his Anglia. Whenever we followed each other you could see they hadn't been welded true, but that was back back in the 70s when we were students.
Personally I think your car would look great with a full set of 5.5J steelies but I'm sure whatever you fit it will look great!
Paul S4 said:
Good to see that you are getting close to the finish line !
A couple of thoughts...
Those yellow plug leads look just right....they are even 'Lotus' colours ( ie yellow against the green block)
The battery placement: perhaps that was where they were OEM, but in my Elan I relocated the battery ( in fact fitted a larger one anyway as the standard one was tiny ) and fitted it it the centre of the boot tight up against the rear seat 'bulkhead'.
This was for a couple of reasons... the fibreglass body was showing signs of cracking where the battery was hard up against it, and the mounting was much stronger and kept the weight more central.
But all this was in a much lighter ( ie about 700kg !!) car...
In your car it would also give you more usable boot space, and you could also 'hide' it behind an access panel ( which I did ) : I was never in favour of the exposed battery in the boot area after a incident with the alternator regulator ( that did not regulate !!), and the boot was filled with acid fumes...
Anyway, excellent work and the car will be something special when you get there .
Thanks Paul, I think I made the right choice with the leads I had seen a set used on a twin cam that made the decision final.A couple of thoughts...
Those yellow plug leads look just right....they are even 'Lotus' colours ( ie yellow against the green block)
The battery placement: perhaps that was where they were OEM, but in my Elan I relocated the battery ( in fact fitted a larger one anyway as the standard one was tiny ) and fitted it it the centre of the boot tight up against the rear seat 'bulkhead'.
This was for a couple of reasons... the fibreglass body was showing signs of cracking where the battery was hard up against it, and the mounting was much stronger and kept the weight more central.
But all this was in a much lighter ( ie about 700kg !!) car...
In your car it would also give you more usable boot space, and you could also 'hide' it behind an access panel ( which I did ) : I was never in favour of the exposed battery in the boot area after a incident with the alternator regulator ( that did not regulate !!), and the boot was filled with acid fumes...
Anyway, excellent work and the car will be something special when you get there .
Mr. Tidy is right the battery tray was originally under the engine bay, they rust as had mine but when the engine died I was originally looking at putting a zetec in it's place. I had the engine and a type 9 box sat waiting to go in but as I was about to hack the crossmember up I just couldn't do it. The Kent engine has it's flaws but this is a road car that I may do the occasional B road blast which it loved in the past along with the seldom track day or lap of the ring but it's a 50 year old Cortina, not a super car or a land speed recorder breaker. I think there is potential with this engine that I will look into more (beyond my dissertation on developing that engine) but that's to start once I have an MOT - I have the spares already...
I digress.
The battery tray I have is for the Lotus Cortina as they had it relocated to the boot roughly in the position it's in now. I have an idea for boxing it that I've drafted up of CAD.
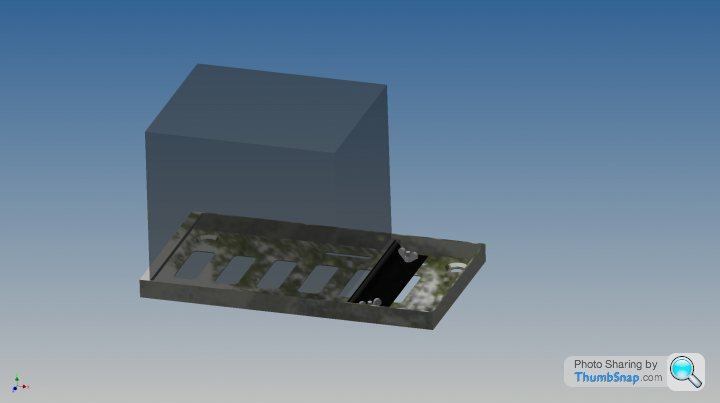
The battery it's needs the posts adding along with the clamps I've used too.
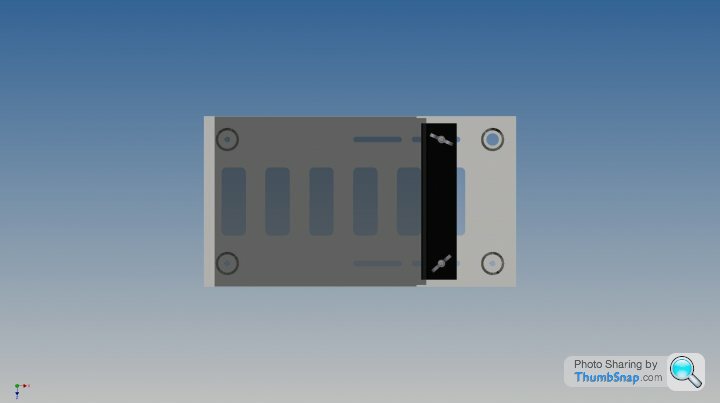
I drilled the top right mount out and used that for earthing - it prevented me drilling extra holes into the shell, when I was prepping the underside for paint I welded captive nuts underneath too so all the mounting and disassembly is done from above by 1 person.
As for acid I'll put a pad under the battery that is designed for this application but venting is something I need to consider. I want to prevent the battery being hit or worse bridged by anything I put in the boot so I have designed the case below that I'll most likely rivet to the tray. I went for a flight case design using 2mm aluminium for the main structure (although this make change to stainless as I can TIG that at work) with GRP with a leatherette cover for the panels to again prevent bridging.
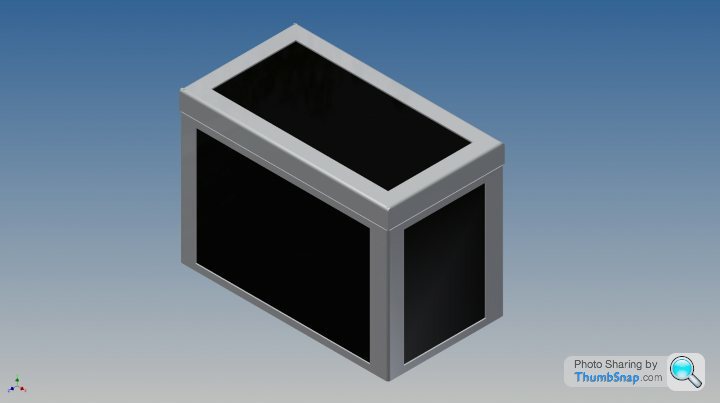
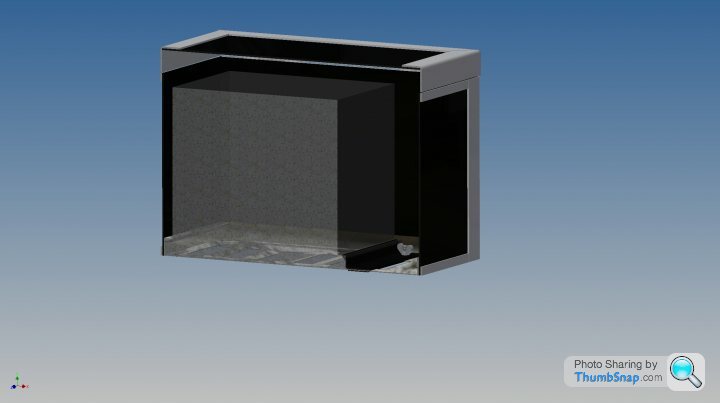
I'll mock something up in cardboard fibre first to test the theory and I'd like to put my EU kit in the right hand side (fuses and bulbs etc)
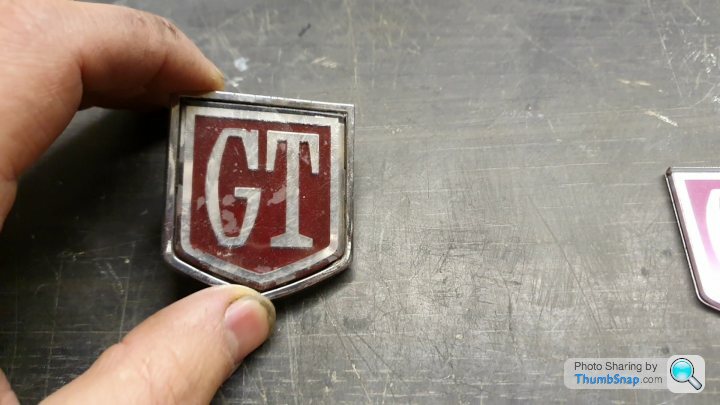
I do CAD stuff for a living so I have also looked at putting the GT shield badges into production but machining is out as the radii are too small (sub 1mm)
I have recently split a badge down and I believe there's potential in making a silicon mould and using 2 pack resin with a UV resistance then painting the red, black and chrome(?) as it was done at the factory.
 [url]
[url]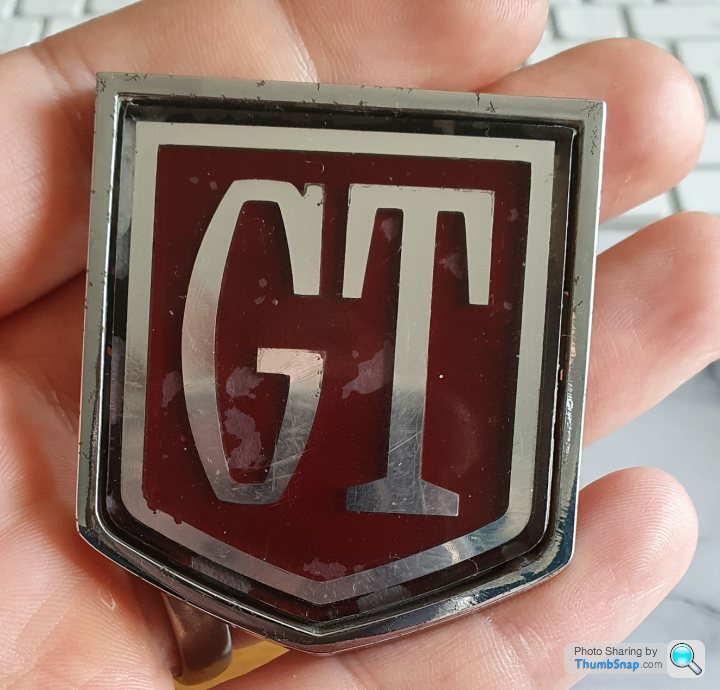 |https://thumbsnap.com/a1BRG93a[/url]
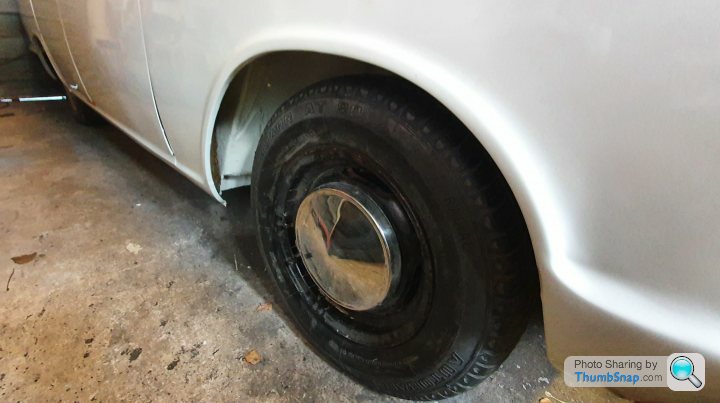
Going back to wheels, I bought the steels on a whim after a friend of mine has recently put a set of original steel wheels and chrome caps on his '73 VW Type 3 Fastback, I have a set of original dunlop D1's that will clean up nicely but the lips need welding and turning which I can't do and I believe 1 has a tiny flat spot.
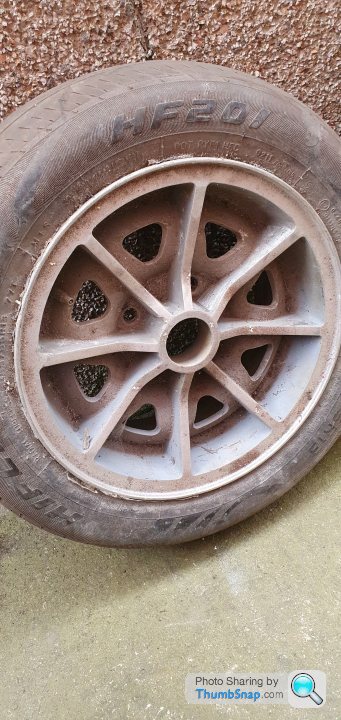
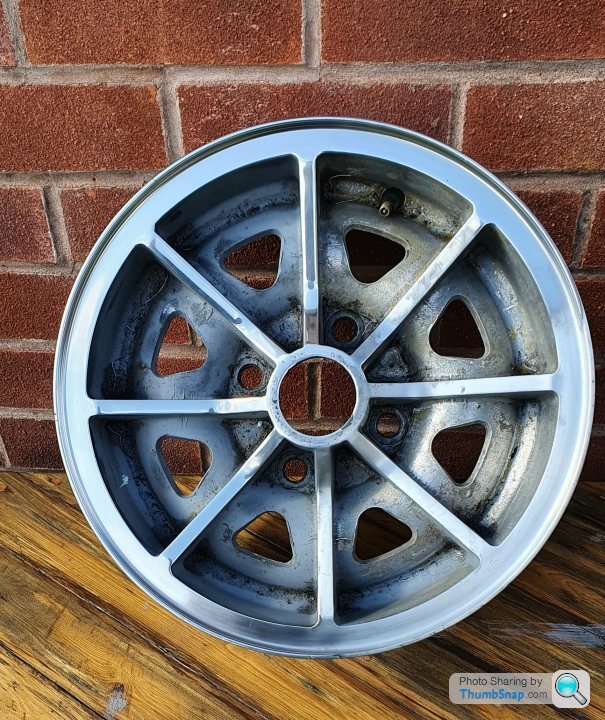
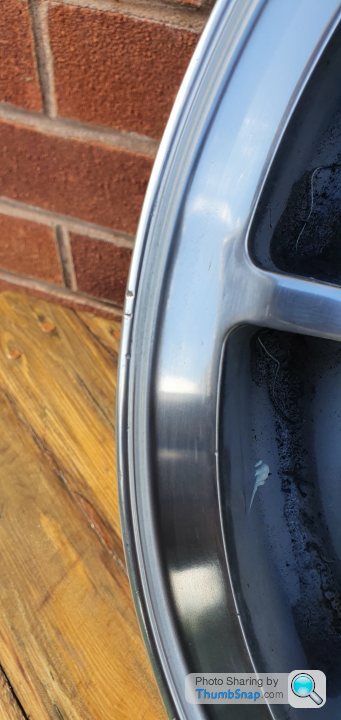
I completely forgot that there are 2 flavour of Ford steel wheels
The Anglia/ none GT spec Cortina's (this one was found on the Titanic)
One's found on the GT
Frustratingly the 4 wheels I bought from Ebay had 3 anglia type and 1 GT, they fit with the disc brakes so that's good but I don't want to commit to wheel refurbs till I have a full set. I'm not losing sleep over all this as I paid £40 for 4 wheels with appalling tyres but I'll need to sort something soonish.
Edited by Retro_Jim on Tuesday 17th November 16:04
I have had the same thought Paul, there are few niggles I need to address with the wiring before I change the battery but I totally agree.
I can get main beam and flash full beam but not switch the full beam on permanently, I think it's the contacts on the indicator stalk but I need to do a bit more investigation. I'm also not charging the battery via the alternator so I need to see whether it's the alternator or my wiring that is at fault here. Once I have that sorted I can be sort the battery and the positive cable/ routing as that is something that was done for function and it's currently loose and longer than required.
As for the wheels the Dunlops need work to get them aesthetically right but before that I was looking at vapour blasting them and giving them a full inspection, since your comment on cracks wasn't something I had considered I've been looking at NDT crack testing using penetrating dyes and it's possible I just need to see how I do it or what the cost of having it done is.
I've had tanks and vessels pressure and leak tested post fabrication for work so I'll see if they are capable to do this.
An unpopular opinion I know but I'm not a fan of mini lights on mk1's (they seem a little bit easy and common wheel choice). With that said so are wider steels but seeing as steel wheels were fitted as standard I can get away with that
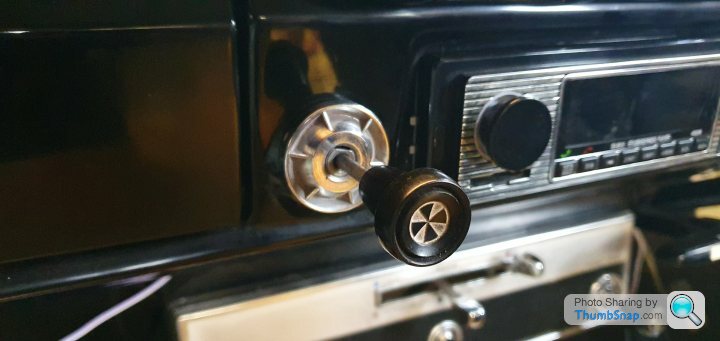
You're right about the look of steel wheels though, with all the work I have done on the Cortina I want it to look as though nothing has been done which is why things like the fuel pump and the electric fan for the radiator have been hidden and blended in. I hope that other than people who have read this post won't notice the modernity I've added unless they really look for it. That is why I think the bluetooth radio I've put in will have a few changes made to it eventually as it looks a little bit too new.
A slight update - the Cortina is off on holiday on Monday to the new bodyshop to get the reskinned door painted, the body polished and doorbells fitted. The hope is once that is done I can crack on with the interior along with getting the Cortina prepped for an MOT
I can get main beam and flash full beam but not switch the full beam on permanently, I think it's the contacts on the indicator stalk but I need to do a bit more investigation. I'm also not charging the battery via the alternator so I need to see whether it's the alternator or my wiring that is at fault here. Once I have that sorted I can be sort the battery and the positive cable/ routing as that is something that was done for function and it's currently loose and longer than required.
As for the wheels the Dunlops need work to get them aesthetically right but before that I was looking at vapour blasting them and giving them a full inspection, since your comment on cracks wasn't something I had considered I've been looking at NDT crack testing using penetrating dyes and it's possible I just need to see how I do it or what the cost of having it done is.
I've had tanks and vessels pressure and leak tested post fabrication for work so I'll see if they are capable to do this.
An unpopular opinion I know but I'm not a fan of mini lights on mk1's (they seem a little bit easy and common wheel choice). With that said so are wider steels but seeing as steel wheels were fitted as standard I can get away with that
You're right about the look of steel wheels though, with all the work I have done on the Cortina I want it to look as though nothing has been done which is why things like the fuel pump and the electric fan for the radiator have been hidden and blended in. I hope that other than people who have read this post won't notice the modernity I've added unless they really look for it. That is why I think the bluetooth radio I've put in will have a few changes made to it eventually as it looks a little bit too new.
A slight update - the Cortina is off on holiday on Monday to the new bodyshop to get the reskinned door painted, the body polished and doorbells fitted. The hope is once that is done I can crack on with the interior along with getting the Cortina prepped for an MOT
That's a fascinating read, I didn't know much about the police spec lotus's (lotii? I'll stop now before I go full Alan Partridge).
I'll come onto the battery cable in due course, it is a larger cable for this application.
Despite being in Lockdown 2" Lock harder the body shop is still open and working, he works on his own and can't exactly work from home and was happy to finish off the Cortina's door fit and paint. As door fitting and panel gaps will be addressed as I had done what can only be described as amateurish.
I had spent a fair few hours hunched over the shut door furiously trying to tighten the nuts without moving the door in what I believed to be the correct position - only for it to either have not moved from it's previous position or worse catch on the body. To me it made sense to pay a little extra and get it right plus he will fit the door seals which will also alter positioning etc.
I had also chipped the paint in a few areas that needed fixing and again seeing as the door is being painted it makes sense to get all this sorted at the same time, paint is being sprayed and mixed to be fair.
The main task was to remove the gumpf in the Cortina, this mainly consisted of parts that I had intended to fit but haven't or rogue washers.
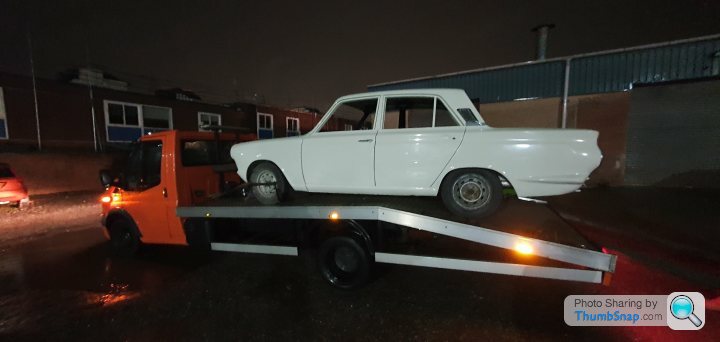
After frantically trying to get a trailer to come and collect the Cortina and deliver it 4 miles away I got one sorted - for a reasonable price, apparently the Cortina being approximately 600Kg was an issue for one company!
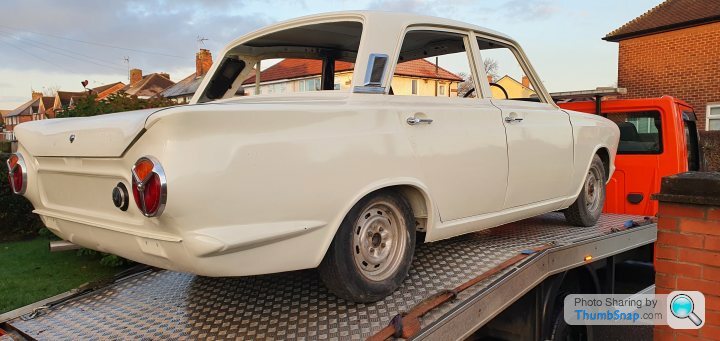
This left me looking/ feeling like Michael Caine at the end of the Italian Job where he is on the verge of ruin but has a great idea - all because I have all this to sort.

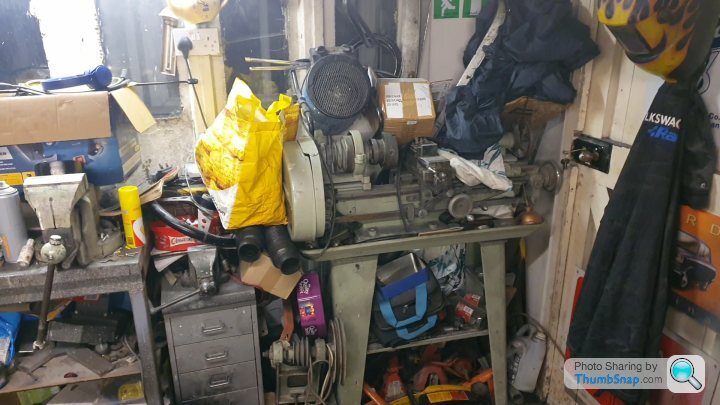
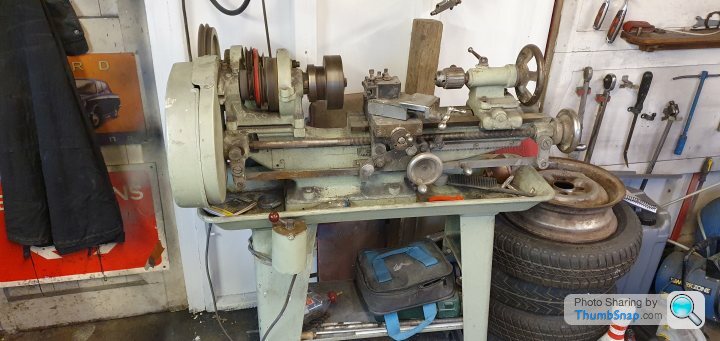
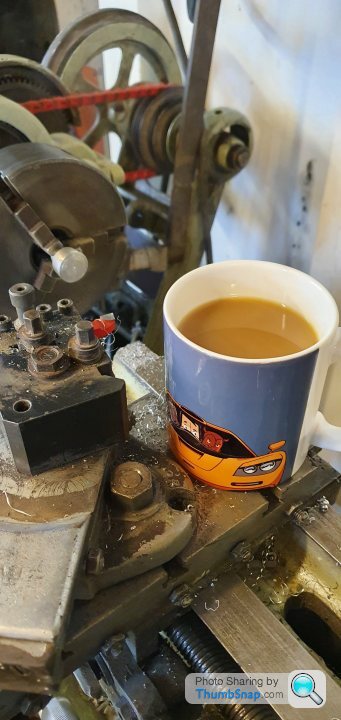
Eagle eyed people might be able to make out there is a lathe in there and something I need to get working again. It's a Myford M type that I have owned for 5 years now and was decommissioned about 3 years ago to make a bit more room whilst doing bodywork etc and never been touched since, the plan is to sort the belts out and refit the belt drive stuff and see if I have enough room to use it and walk between it and the Cortina. It's this sort of issue that keeps me motivated to stay thin!
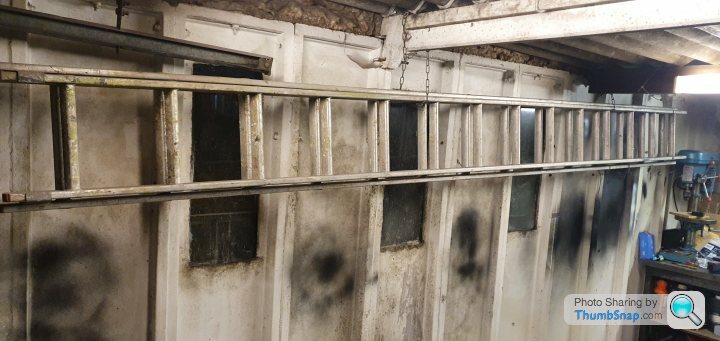
The ladder has been despatched to my father as I haven't used it in the 5 years we've owned the house and was only removed to clean it, I'm tired of hitting my head on the damn thing! If I need it I know where it is.
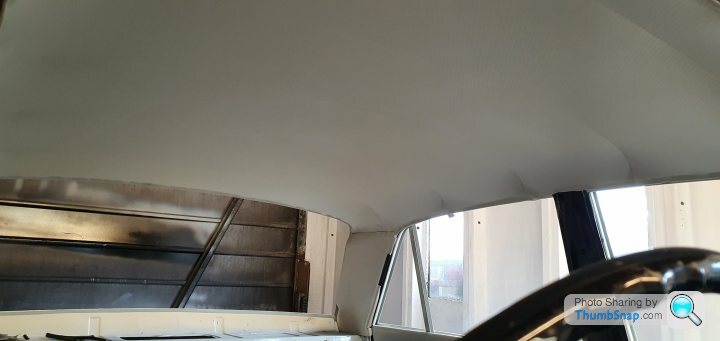
I should have the Cortina back next week all things being well and I can then start doing more permanent jobs like fitting the headlining and glass.
I'll come onto the battery cable in due course, it is a larger cable for this application.
Despite being in Lockdown 2" Lock harder the body shop is still open and working, he works on his own and can't exactly work from home and was happy to finish off the Cortina's door fit and paint. As door fitting and panel gaps will be addressed as I had done what can only be described as amateurish.
I had spent a fair few hours hunched over the shut door furiously trying to tighten the nuts without moving the door in what I believed to be the correct position - only for it to either have not moved from it's previous position or worse catch on the body. To me it made sense to pay a little extra and get it right plus he will fit the door seals which will also alter positioning etc.
I had also chipped the paint in a few areas that needed fixing and again seeing as the door is being painted it makes sense to get all this sorted at the same time, paint is being sprayed and mixed to be fair.
The main task was to remove the gumpf in the Cortina, this mainly consisted of parts that I had intended to fit but haven't or rogue washers.
After frantically trying to get a trailer to come and collect the Cortina and deliver it 4 miles away I got one sorted - for a reasonable price, apparently the Cortina being approximately 600Kg was an issue for one company!
This left me looking/ feeling like Michael Caine at the end of the Italian Job where he is on the verge of ruin but has a great idea - all because I have all this to sort.
Eagle eyed people might be able to make out there is a lathe in there and something I need to get working again. It's a Myford M type that I have owned for 5 years now and was decommissioned about 3 years ago to make a bit more room whilst doing bodywork etc and never been touched since, the plan is to sort the belts out and refit the belt drive stuff and see if I have enough room to use it and walk between it and the Cortina. It's this sort of issue that keeps me motivated to stay thin!
The ladder has been despatched to my father as I haven't used it in the 5 years we've owned the house and was only removed to clean it, I'm tired of hitting my head on the damn thing! If I need it I know where it is.
I should have the Cortina back next week all things being well and I can then start doing more permanent jobs like fitting the headlining and glass.
So much for back next week!
I had been meaning to update this for a few days now but with spending all my time at work behind a computer I needed a break - but enough whining from me!
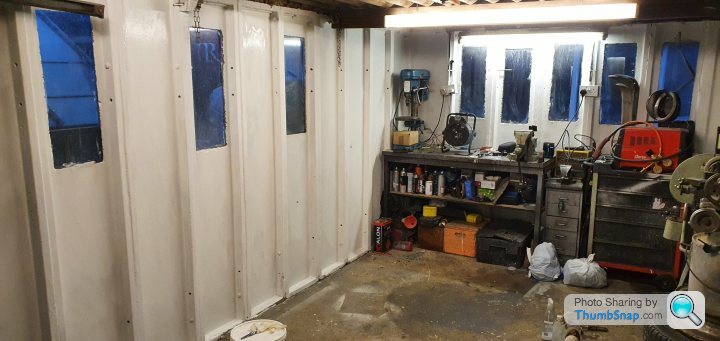
Starting with that mess I spent a few days pulling everything out from under the bench and the lathe before painting the walls again and putting it all back - it's hardly riveting but it does look a lot better for spending the time doing this.
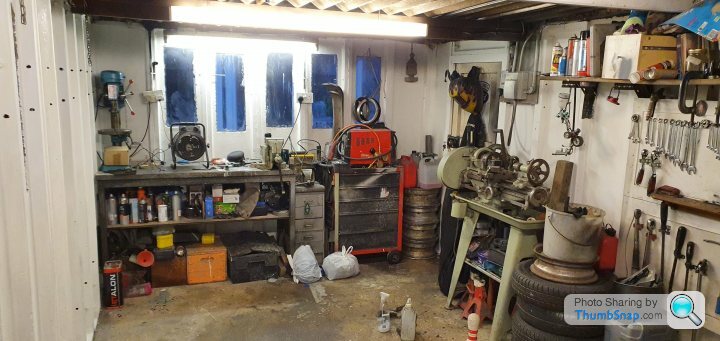
the Myford has been treated to a clean and a new belt so now that runs again I can spend some time learning how to use a lathe as I never really learnt to use it before it was shoved in a corner and used as a shelf
The trim has been cleaned and polished ready to be refit - a job I'm not looking forward to!
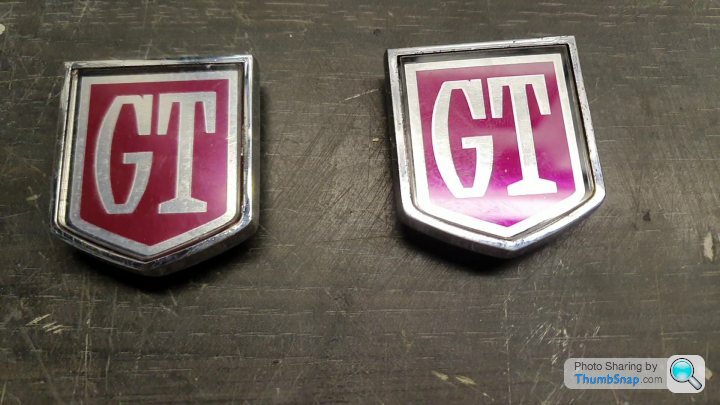
I also spent some time replacing the centres from the GT shields, I have drawn some up a while ago with the intention of making my own but the tight radii meant that getting it done would be costly, fortunately there is someone on Ebay selling stick on replacements which look good. I have kept the original centres as I believe they could be made in clear resin - a project for a rainy day.
I picked the Cortina up last Tuesday and I'm very happy with the work.
It was a wet ride home so the first job was drying everything before - hence the greenhouse heaters inside to dry up anything I had missed
The door gaps are much neater than my many attempts, no doubt the rivet counters will have their rulers out but it's not a concourse car nor will it be used as one.

I'm happy with the seals, they seat well in the body and don't require me to slam the doors to make them shut - it now means I can look at starting the interior. I need a few clips for the head lining so in the meantime I'll have another look at the engine and address a few engine bay issues I have.
I had been meaning to update this for a few days now but with spending all my time at work behind a computer I needed a break - but enough whining from me!
Starting with that mess I spent a few days pulling everything out from under the bench and the lathe before painting the walls again and putting it all back - it's hardly riveting but it does look a lot better for spending the time doing this.
the Myford has been treated to a clean and a new belt so now that runs again I can spend some time learning how to use a lathe as I never really learnt to use it before it was shoved in a corner and used as a shelf
The trim has been cleaned and polished ready to be refit - a job I'm not looking forward to!
I also spent some time replacing the centres from the GT shields, I have drawn some up a while ago with the intention of making my own but the tight radii meant that getting it done would be costly, fortunately there is someone on Ebay selling stick on replacements which look good. I have kept the original centres as I believe they could be made in clear resin - a project for a rainy day.
I picked the Cortina up last Tuesday and I'm very happy with the work.
It was a wet ride home so the first job was drying everything before - hence the greenhouse heaters inside to dry up anything I had missed
The door gaps are much neater than my many attempts, no doubt the rivet counters will have their rulers out but it's not a concourse car nor will it be used as one.
I'm happy with the seals, they seat well in the body and don't require me to slam the doors to make them shut - it now means I can look at starting the interior. I need a few clips for the head lining so in the meantime I'll have another look at the engine and address a few engine bay issues I have.
Bobberoo99 said:
Loving it as always, really nice to see it starting to come together!!
If you need any help with the Myford and using it PM me, 34 yrs in engineering, precision turner as trade and now aerospace 5axis machining center operator.
Thanks Bobbers I will definitely be in touch as it's more to do with setting up and not messing up! I have a few small jobs that I think will be a great way for me to get started - mainly facing and turning down but it gets me a few hours of seat time as it were.If you need any help with the Myford and using it PM me, 34 yrs in engineering, precision turner as trade and now aerospace 5axis machining center operator.
Do I need teal gloves like yours?
Chappo1 said:
What a wonderful and interesting thread.
Thanks Chappo, It's greatly appreciated.CharlesdeGaulle said:
I only discovered this thread today and have read it in a one-er. Great skills, nice car, and an excellent thread. Well done, very impressive.
Thank you CdeG it makes it worthwhile, I'll keep it comingquote=BEAMS 162]Cut my teeth on older Fords in the day,Mk1 cortina has always been on the list of 'want' cars...also heavily into my Jap tin,trust me my old 87 Celica has had its fair share of resto over the near 12 years of ownership,80s Toyotas have a habit of rotting as much as any older car,so enjoying seeing what you're doing with this.And totally get your idea of the concourse quote,you want it done right but useable,got to be enjoyed these old beasts! great work so far,well done!
Mr Tidy said:
It's great to see you are still making progress, even if it is slower than you hoped.
Those photos of your badges really made me laugh!
Back in the late 70s a mate and I used to make frequent visits to an old-fashioned breaker when we need bits for our old Fords. You took some tools in, climbed up the stacked cars, removed what you wanted and paid for it on the way out. Rumour has it some unscrupulous people would hide a few bits in their tool-box or pockets.
Anyway one day we went there and there was a white MK1 GT (2 door I think) on the top of a pile of 3 so I climbed up while the cars were rocking in the wind and removed the badges to fit to my basic MK2 1500, because in my teens it just seemed like the right thing to do!
Hopefully progress will be less painful now the ladder is gone.
thanks Mr. Tidy, have you looked at your Mk2 yet?Those photos of your badges really made me laugh!
Back in the late 70s a mate and I used to make frequent visits to an old-fashioned breaker when we need bits for our old Fords. You took some tools in, climbed up the stacked cars, removed what you wanted and paid for it on the way out. Rumour has it some unscrupulous people would hide a few bits in their tool-box or pockets.
Anyway one day we went there and there was a white MK1 GT (2 door I think) on the top of a pile of 3 so I climbed up while the cars were rocking in the wind and removed the badges to fit to my basic MK2 1500, because in my teens it just seemed like the right thing to do!
Hopefully progress will be less painful now the ladder is gone.
So you're the guy with all the badges! I would have done the same!
I know of a guy who did the same with the eyeball vents - and they chrome is good too but I'm not paying his prices!
chrisr29 said:
Got to love an old Cortina. Here’s one I built into a rally car for a customer. He raced it in the 2019 RAC. The first pic is at scrutineering.
The next pic is towards the end - day 5 I think - she was really suffering by this point. Exhaust blowing badly from a cracked manifold, second gear lost completely and jumping out of fourth, wipers only working on one side, front corner beaten in from a accident.

One it’s class though and had a good overall finishing position.
It’s now back at its owners after having been straightened out, rebuilt box and engine. Needs a few more jobs for the next event but that can wait till the spring.
They’re incredibly tough old things really, many cars failed on that event including far more sophisticated machinery.
That's lovely - you can't have a rally car without a few war wounds, the last one I drove had more hits than Elvis! The next pic is towards the end - day 5 I think - she was really suffering by this point. Exhaust blowing badly from a cracked manifold, second gear lost completely and jumping out of fourth, wipers only working on one side, front corner beaten in from a accident.
One it’s class though and had a good overall finishing position.
It’s now back at its owners after having been straightened out, rebuilt box and engine. Needs a few more jobs for the next event but that can wait till the spring.
They’re incredibly tough old things really, many cars failed on that event including far more sophisticated machinery.
that's the great thing about these cars - they aren't sophisticated, it's a strength and a weakness!
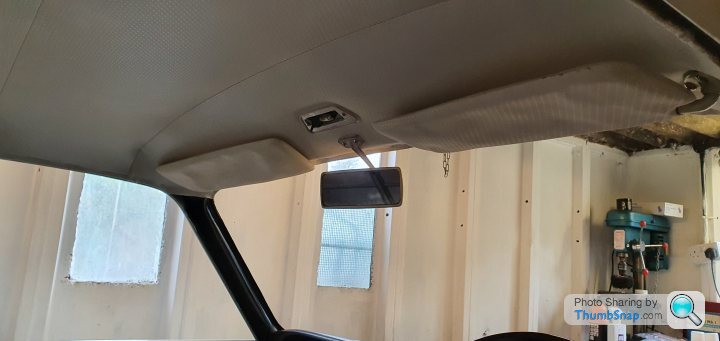
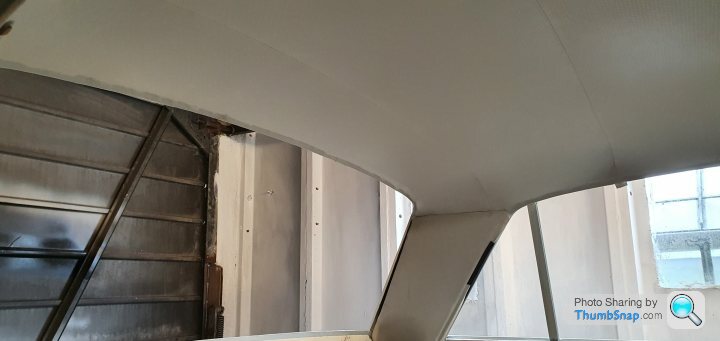
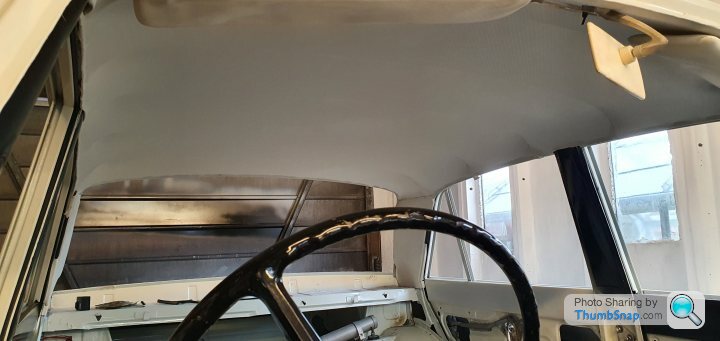
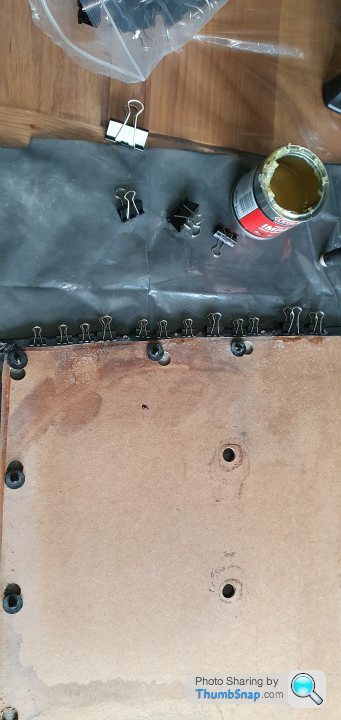
During the christmas break I had a few days to myself as Mrs.Jim was working so I figured I would do a big job - the headlining.
I bought a new headlining back in September because the original looked like a cross between the shroud of turin and a scouts tent, I'm glad I kept the rods in it as I would have really messed that up! A few people gave me pointers like "you'll struggle" you know, the heart warming words to get you motivated get on and do it.
It took a few hours of fettling but I was happy with the fitment
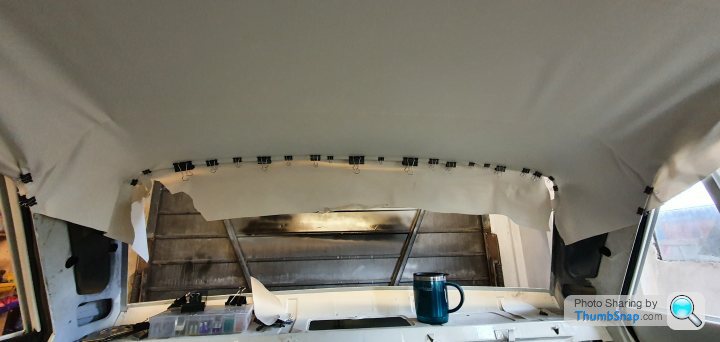
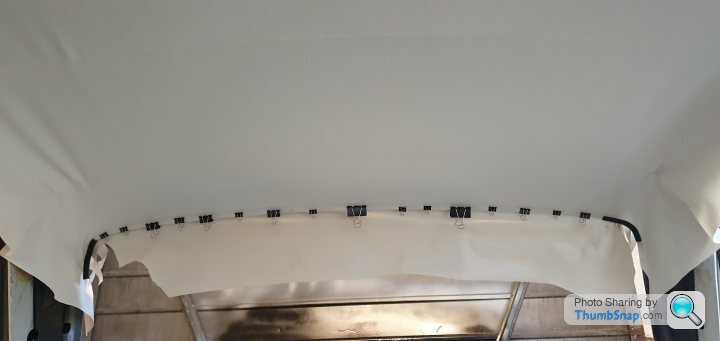
I left it for a few days over Christmas and boxing day and came back to the garage to find nothing had moved - those Amazon bulldog clips were working overtime!
The problem was when you do headlinings you need heat so naturally I picked a day when it snowed! The heaters were on and it was rather nice in the garage but I'm afraid that the police now thing I'm growing "medicinal plants" in the garage.
But I pressed on and started the glueing
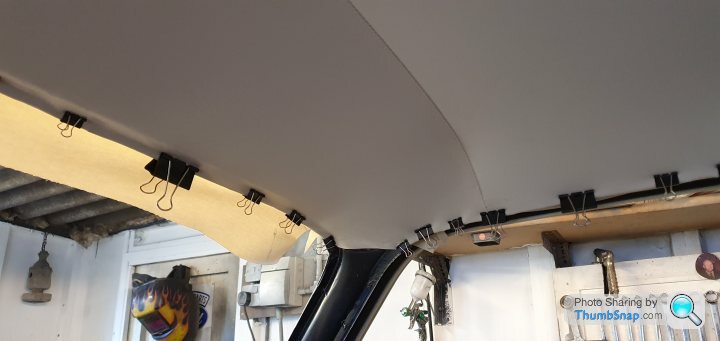
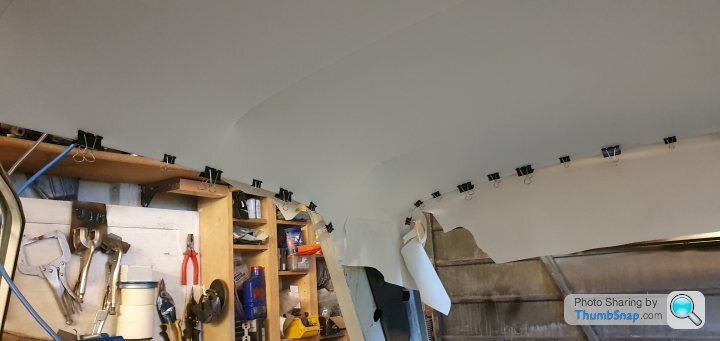
The next day I removed the clips and again it held - but I had a new scary job to do, cut holes in it but fortunately it worked out.
For anyone wanting to attempt this, take your time and heat is your friend. I made a how to video on this if anyone is interested in learning more
I bought a new headlining back in September because the original looked like a cross between the shroud of turin and a scouts tent, I'm glad I kept the rods in it as I would have really messed that up! A few people gave me pointers like "you'll struggle" you know, the heart warming words to get you motivated get on and do it.
It took a few hours of fettling but I was happy with the fitment
I left it for a few days over Christmas and boxing day and came back to the garage to find nothing had moved - those Amazon bulldog clips were working overtime!
The problem was when you do headlinings you need heat so naturally I picked a day when it snowed! The heaters were on and it was rather nice in the garage but I'm afraid that the police now thing I'm growing "medicinal plants" in the garage.
But I pressed on and started the glueing
The next day I removed the clips and again it held - but I had a new scary job to do, cut holes in it but fortunately it worked out.
For anyone wanting to attempt this, take your time and heat is your friend. I made a how to video on this if anyone is interested in learning more
Edited by Retro_Jim on Tuesday 12th January 15:33
Brum_Brum said:
Looking great ,. are you just using those tubular greenhouse heaters in your garage?,. I was thinking about some myself to take the chill off.
,. are you just using those tubular greenhouse heaters in your garage?,. I was thinking about some myself to take the chill off. Thank you, I have for the purpose of heating the interior in case I missed any moisture after it came back from the body shop and when I was fitting the headlining but my garage is a concrete sectional that's not the best insulated for heat so the greenhouse heater struggles to heat the whole garage.
I have a small fan heater that does a decent job - I'm looking at insulating the garage using loft insulation and wood panelling the inside walls plus I can hang more tools on the walls too.
In between doing the headlining and finishing off the christmas break I got a few more jobs done that have been gnawing at me for a while.
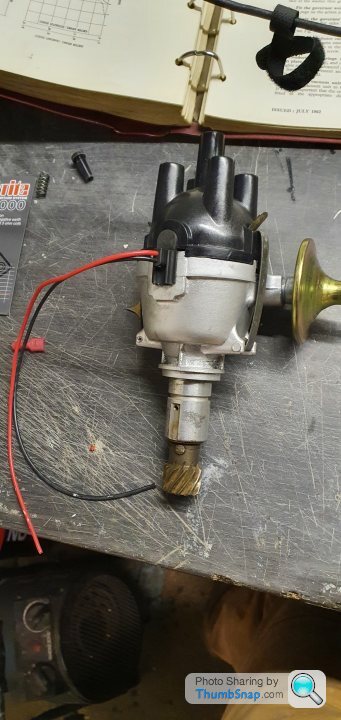
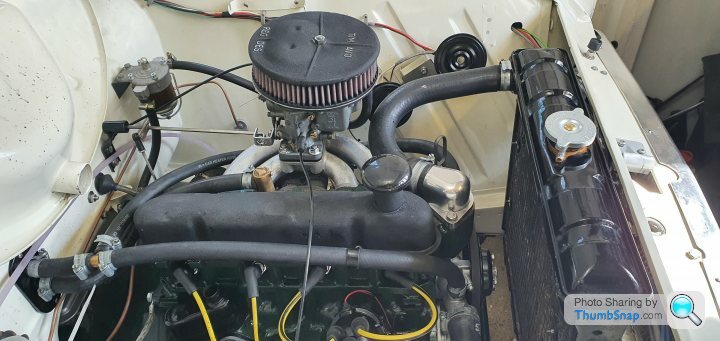
When I put the engine back together (a few years ago) I was working on a bike carb conversion but struggled to get it to run - I like the idea of it and I may go back to it but I was lead to believe that it would be problematic to use a vacuum advance distributor which is similar to when running DCOE's
As I left the bike carbs on the bench and reverted to the original Weber 28/36DCD as it's tuneable and would get me to 100hp with little issue, that doesn't sound like a lot but for a mk1 that's lively - I know I have the supercharger but that's more about torque! I digress, the mechanical advance distributor wasn't right for the level of tune plus when I went back to the supplier to ask about the amount of advance etc they couldn't tell me what it's set to - that's a bit worrying!
Fortunately a quick ebay session yielded an original Lucas 25D for £10, a few days later it arrived and they actually sent me 2! which means I have a spare I could tune further should I decided to push the NA engine.
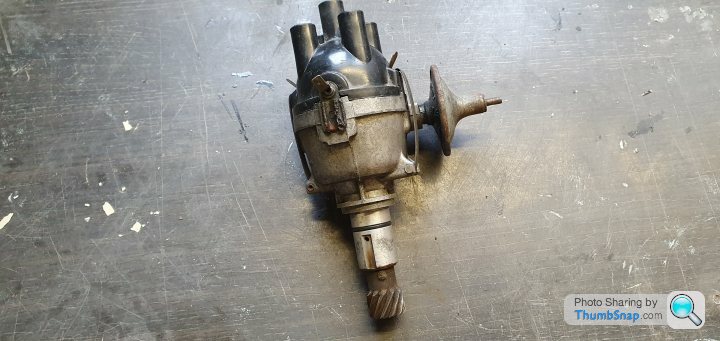
After a strip down and new vacuum advance unit, sparkrite electronic unit, cap and rotor I had this
The engine seems to run smother since I changed distributors so something has improved, the starter however isn't in a great way, it's struggling to turn the engine despite having charge and the earth lead on the engine was toasty - I've checked the windings for resistance and it's a consistent 0.6 Ohms so I'm tempted to get another starter and get the current one a proper rebuild as a spare.
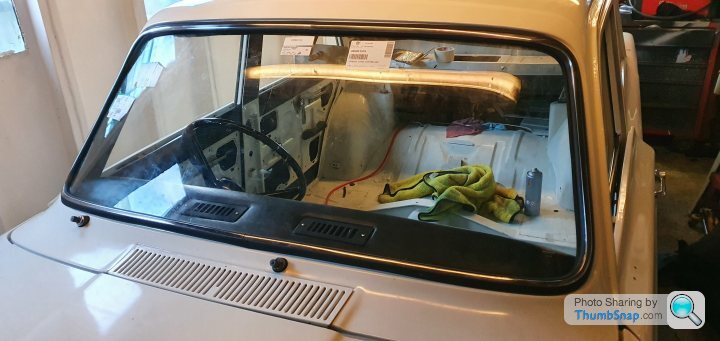
With the headlining in I wanted to fit the front and rear screens, the front had some serious chips or something buried into the glass. I stopped counting at 8 - after a quick call to the insurance company they're willing to replace it for £90 fitted which was actually done yesterday. Going back to new years day - the rear window needed a clean which I was going to do once fitted but I needed to remove the old stickers.
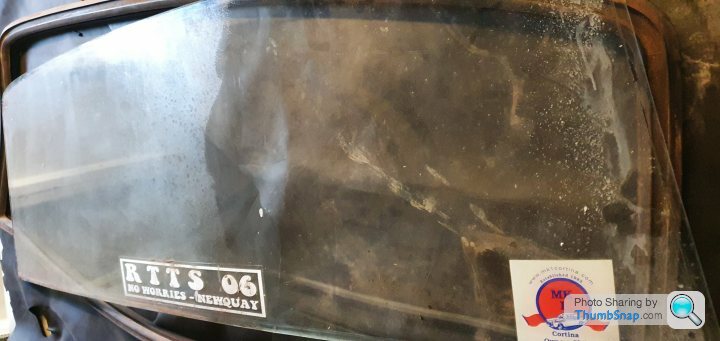
The Mk1 owners club sticker was from a previous owner which I don't dislike it but it's not mine so I may put one on but quite frankly I like the clean look at the moment, RTTS is from run to the sun which is a VW aircooled show in Newquay so naturally a Ford would be the perfect vehicle to go in, it was a fun road trip and part of the engines decline (that and a few goes on the quarter at Santa Pod)
The screen went in with little fuss which was pleasing as I did it solo but if you can get a second pair of hands or a garage wide enough to walk around your car then you're on to a winner!
Just before Christmas I ordered a few parts from the owners club - a few easy wins as I want to get the bulkhead sealed. Knowing the headlining was going in and I was starting on the glass the next logical thing is to seal the rest of the shell so I can get the interior in. The throttle gaiter was straight forward as was the gear stick seal but the handbrake gaiter was a fight! With no help from the owners club I found the best thing was to put it in hot water and pass the clevis through that tiny hole - it'll look like an elephant giving birth but after some deep breaths and a lot of pushing it was sorted!
When I put the engine back together (a few years ago) I was working on a bike carb conversion but struggled to get it to run - I like the idea of it and I may go back to it but I was lead to believe that it would be problematic to use a vacuum advance distributor which is similar to when running DCOE's
As I left the bike carbs on the bench and reverted to the original Weber 28/36DCD as it's tuneable and would get me to 100hp with little issue, that doesn't sound like a lot but for a mk1 that's lively - I know I have the supercharger but that's more about torque! I digress, the mechanical advance distributor wasn't right for the level of tune plus when I went back to the supplier to ask about the amount of advance etc they couldn't tell me what it's set to - that's a bit worrying!
Fortunately a quick ebay session yielded an original Lucas 25D for £10, a few days later it arrived and they actually sent me 2! which means I have a spare I could tune further should I decided to push the NA engine.
After a strip down and new vacuum advance unit, sparkrite electronic unit, cap and rotor I had this
The engine seems to run smother since I changed distributors so something has improved, the starter however isn't in a great way, it's struggling to turn the engine despite having charge and the earth lead on the engine was toasty - I've checked the windings for resistance and it's a consistent 0.6 Ohms so I'm tempted to get another starter and get the current one a proper rebuild as a spare.
With the headlining in I wanted to fit the front and rear screens, the front had some serious chips or something buried into the glass. I stopped counting at 8 - after a quick call to the insurance company they're willing to replace it for £90 fitted which was actually done yesterday. Going back to new years day - the rear window needed a clean which I was going to do once fitted but I needed to remove the old stickers.
The Mk1 owners club sticker was from a previous owner which I don't dislike it but it's not mine so I may put one on but quite frankly I like the clean look at the moment, RTTS is from run to the sun which is a VW aircooled show in Newquay so naturally a Ford would be the perfect vehicle to go in, it was a fun road trip and part of the engines decline (that and a few goes on the quarter at Santa Pod)
The screen went in with little fuss which was pleasing as I did it solo but if you can get a second pair of hands or a garage wide enough to walk around your car then you're on to a winner!
Just before Christmas I ordered a few parts from the owners club - a few easy wins as I want to get the bulkhead sealed. Knowing the headlining was going in and I was starting on the glass the next logical thing is to seal the rest of the shell so I can get the interior in. The throttle gaiter was straight forward as was the gear stick seal but the handbrake gaiter was a fight! With no help from the owners club I found the best thing was to put it in hot water and pass the clevis through that tiny hole - it'll look like an elephant giving birth but after some deep breaths and a lot of pushing it was sorted!
RobXjcoupe said:
Just a thought on your starter motor, check the bearings both ends for wear. It may spin fine off the car but when mounted there may be too much play so it jams within itself, or not enough pressure on the brushes to commutator.
Your car is looking very smart and a very neat rebuild. Are you recovering the seats yourself?
I'm not sure on who will do the seats Rob, the rear is in great shape given its age but the front and more so the drivers seat need retrimming but also the foam as it's like candy floss - it's soft to the ouch but can be almost solid and flaky under pressure but for now I'll put them in and look at a fixing them next winter when I won't be driving the Cortina - for now I'm focussed on getting the MOT!Your car is looking very smart and a very neat rebuild. Are you recovering the seats yourself?
Aluminati said:
Agreed, including checking the engine to chassis earth strap.
Thanks for the advice - the strap needed tightening up but whilst I was working on it I made sure the paint was removed on the strap side but I still had the same issue so it looked as though the bearing had worn as the new starter went in and turned the engine far faster than it had before.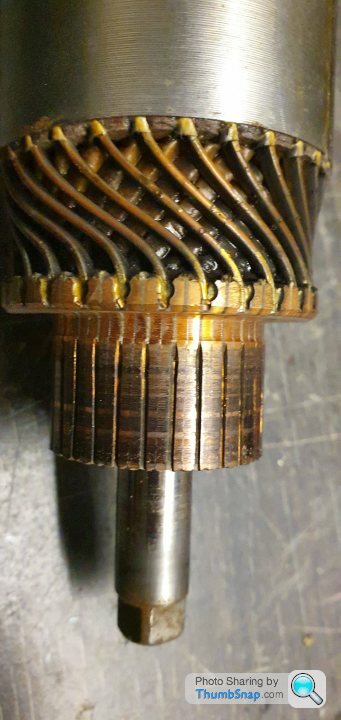
I'll pull the motor apart again and change the bearings so I have a spare should I need to replace the new one.
https://youtu.be/gT1VOshbLKs
The windscreen has been replaced and I'm happy seeing glass going in as it makes the Cortina look less like a shell and more car like. I was impressed how quickly I got the windscreen but it was strange to see that it had been made in Denmark - it came quicker than I get parts from the UK!
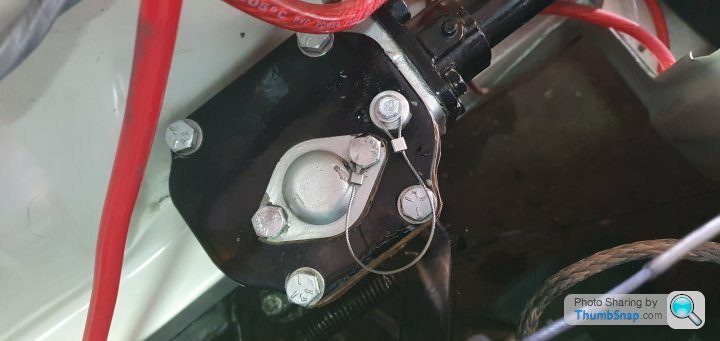
One thing that had frustrated me was how badly the steering box leaked as it appeared to have the flow rate of a sieve! I needed to work on the lid for the filler cap had turned to dust a long time ago but replacements aren't available unless you buy a £70 rebuild kit that I didn't need so I thought I would make one out of aluminium on the lathe - it's almost like I planned this!
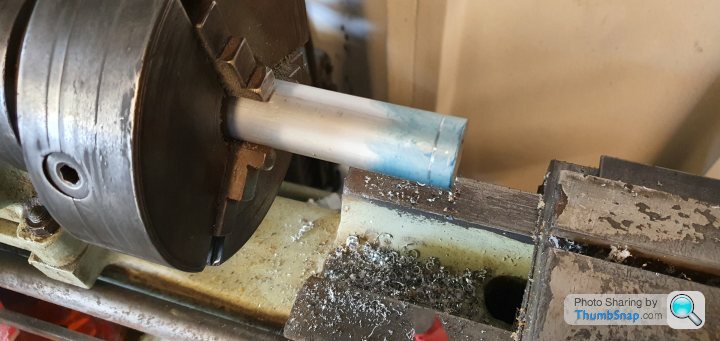
This is the first item I've made that needed more precision, the alternator bracket was more about drilling and tapping so was fairly straightforward. The Myford clearly needs so servicing as it has severe backlash on the cross slide, it's almost 1 rotation on the handle before you get motion so precision turning is difficult hence the engineers blue. I can address this backlash but need to read up on it before I attempt it, I also need to learn more about imperial dials as I'm used to metric - It's a bit like learning a foreign language I suppose but not impossible!
I found that the lever that changes the pitch on the lead screw was popping out so I would lose drive like a slipping clutch mid cut but I think I have found the issue behind that but time will tell. But a few hours later I had the bung finished including drilling and tapping so it could be tethered as I don't want to lose it - plus it looks a bit racey!
I made a set of new gaskets and have used a steering box grease as an alternative to hypoid oil that is recommended for the Burman boxes that leak, so far its remained smooth and no notches or noises but it's only gone as far as the driveway!
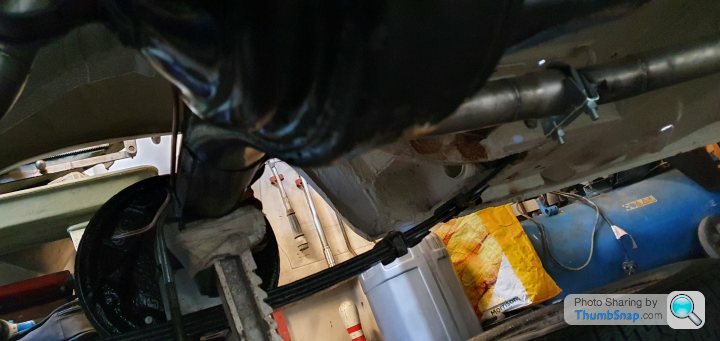
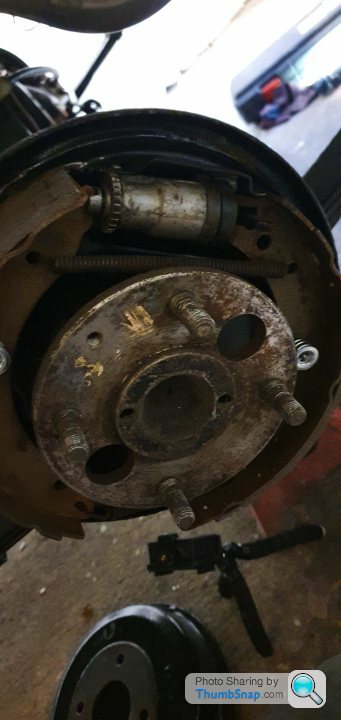
When addressing leaks I had seen a weep coming from the diff that was a little disheartening as this meant the axle had to be stripped down, I don't know why but the off side shaft puts up a fight every time but the nearside is more than willing to get out.
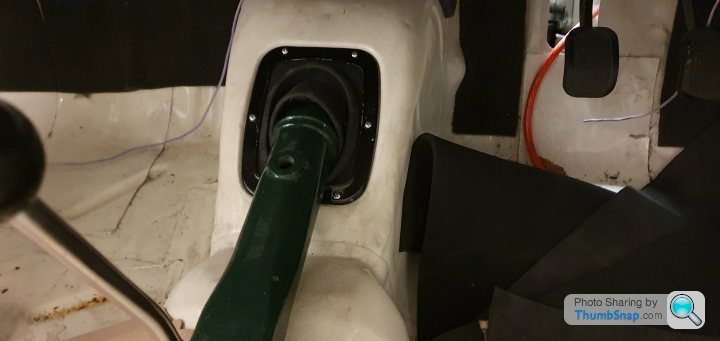
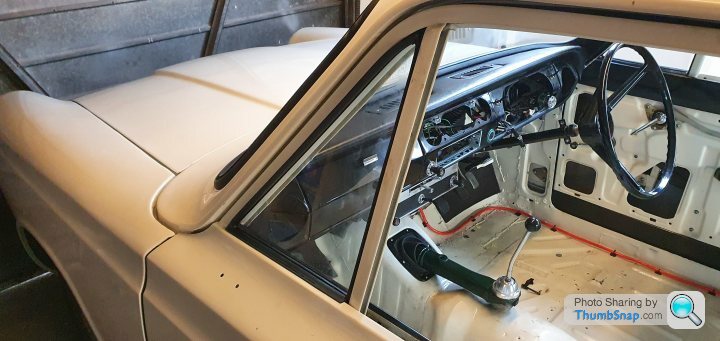
With that out of the way I finished off fitting the handbrake which is one of my favourite things about the Cortina, it's located on the dashboard and works like the game mousetrap - a rod pulls a cable, that pulls a rod, that pulls a cable, that pulls a rod that pushes the shoes into the drums and then you park it in gear because you know it's safer!
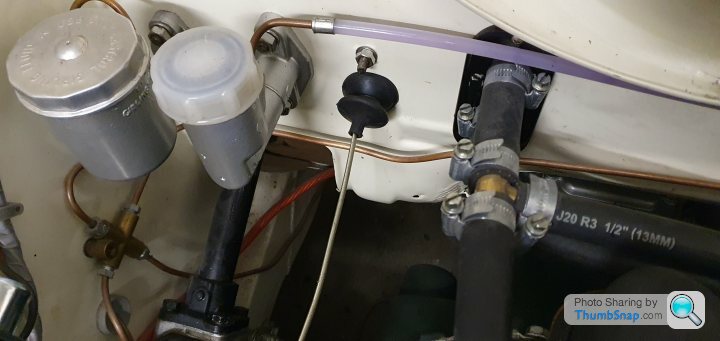
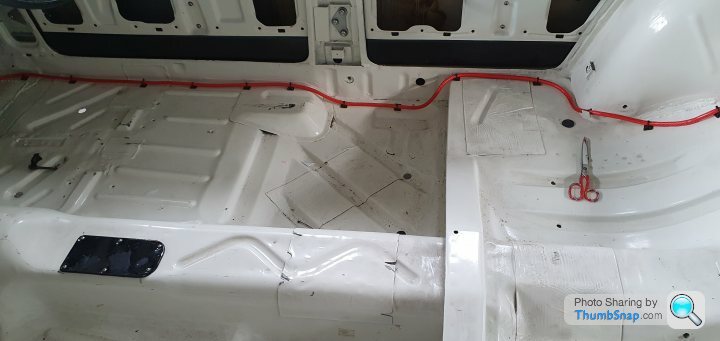
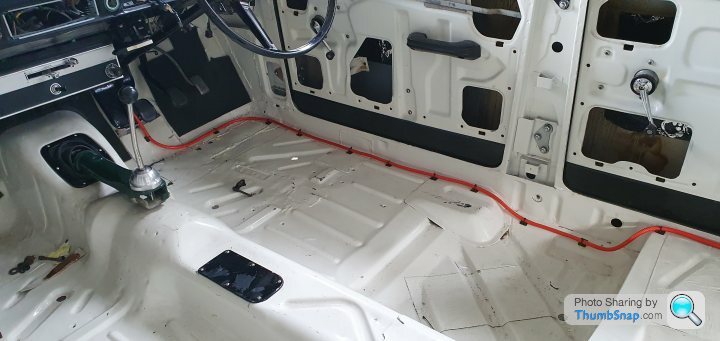
I believe I have a wiring fault on the live circuit as it feeds everything without it being turned on but at the same time I don't get a constant 12v to the coil it's all fed off the same wire as it was from the factory albeit with more things added such as the coolant fan and the fuel pump which are the items that are at fault. The more I look at what I have done with the loom the more I'm considering building a new dash loom with bus bars for permanent live, switched live and more fuses as I haven't any for the ignition and starter but the accessories fuse manages the heater, horn, wipers and radio. I also have a set of original Lucas SLR spotlamps that I haven't accomdated for which would be a nice to fit oneday so why not build a new board that can manage this and potentially more?
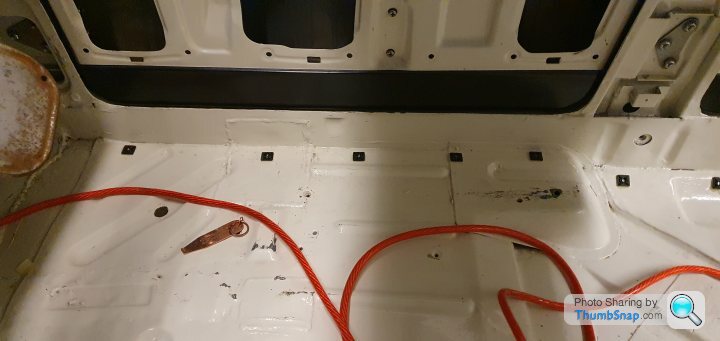
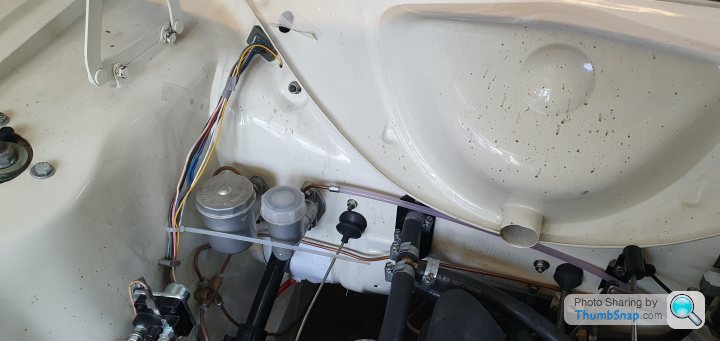
I have talked about the battery relocation before but I hadn't actually sorted the routing for it which would normally be straightforward but I seem to have a penchant for making it complicated so the plan was to follow go around the wheel tub, along the sill and through the bulkhead via the removeable plate that seals the steering column. I decided to use the stick on cable routing pads because I didn't want to drill the body or have huge self tapping screws poking though to the underside of the Cortina if I could help it. Naturally the adhesive on these pads was good for seconds so I gave it a helping hand with some headlining glue. I'm happy with how it turned out.
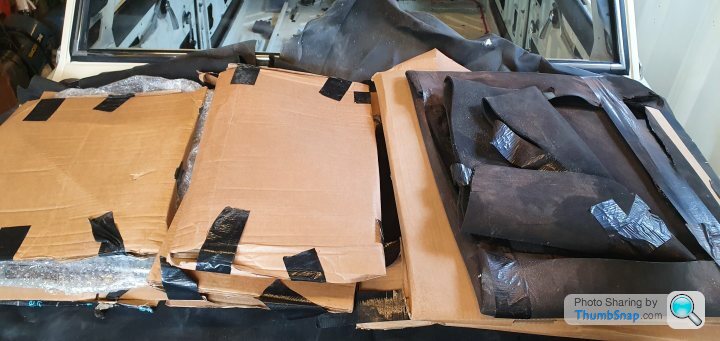
A package arrived from the owners club that I had been looking forward to get as it had all the seals for the door glass - it still hurt financially but a necessary purchase. Mrs. Jim was very happy to see more car parts leave the house and enter the garage to I'll class that as a win.
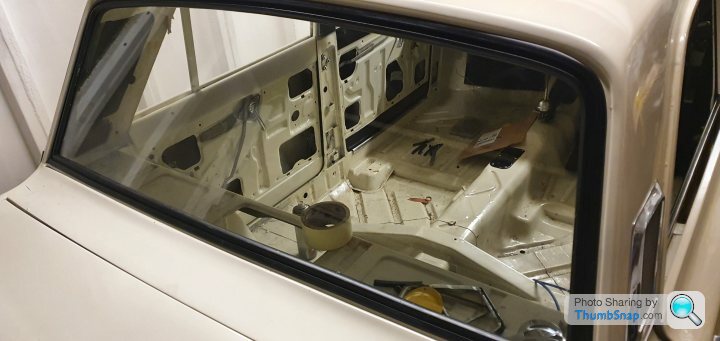
All neatly wrapped in bubble wrap, rubber and then cardboard the glass survived rather well and I was pleased to see in an uncharacteristic use of foresight I stored the quarter glass with in it's rubber making deciphering where they came from much easier!
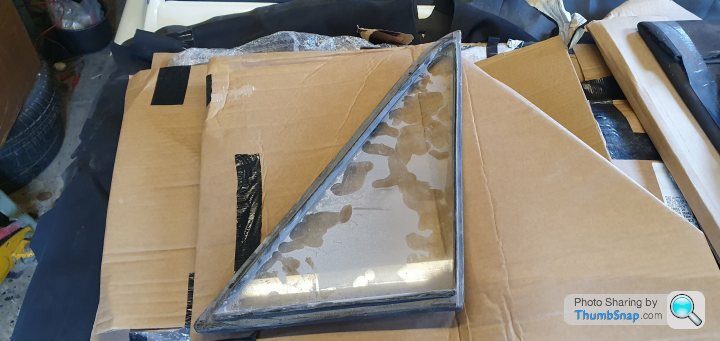
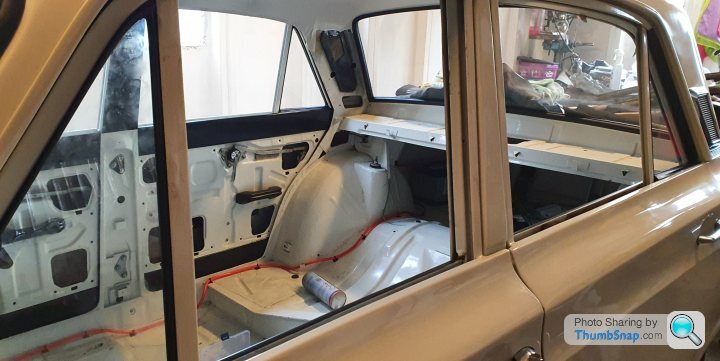
Seeing the door glass going in is a big win for me even though I've only dropped the quarters in and they'll need to be semi removed to fit the other door glass, the main point to fitting it was for look and because the upright that supports the quarter glass is difficult to fit as there are a lot of sharp edges to scrape the paint off - it's a wonderful design!
I didn't realise I hadn't updated this since February! It will appear like a brief catchup of what has happened in the meantime but quite honestly it's been fiddly/tedious jobs that seem to eat time with little to show for it!
I wasn't happy with the wiring loom, I had been getting an inconsistent 12v at the coil. Whilst looking into this issue I had also found that the fuel pump would run randomly despite wired to not, this is when I found I had a bigger issue with the live feeds.
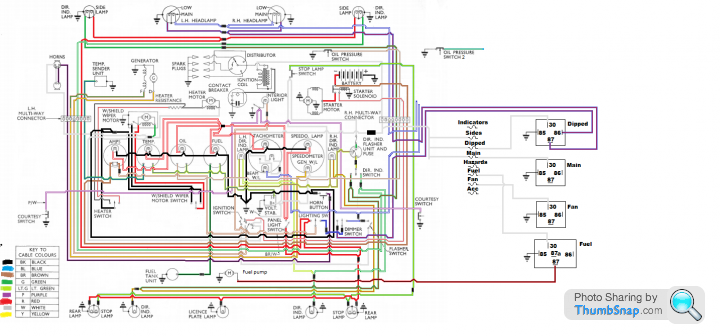
This is the original loom plus the relays I had added, I had coloured this in on paint and then broke the loom down to it's systems; engine, lighting accessories etc

The switched lives are fed by white cable, more specifically 1 white cable that has double joints and branches that go from the ignition switch, across the dash feeding all sorts and then into the bay to power the coil on the drivers side and the horn on the passengers side - needless to say this was the issue.
I didn't like the look of the wiring for the fuse box and relays and decided to fix the issues I had and to make things look neater, after doing some research I came across a modular 12v fuse box that has various interchangeable blocks and can be built as individual items or can be mounted in a 4 or 5 bay holder.
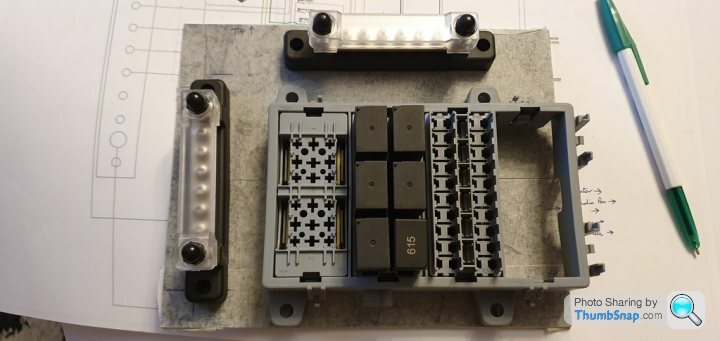
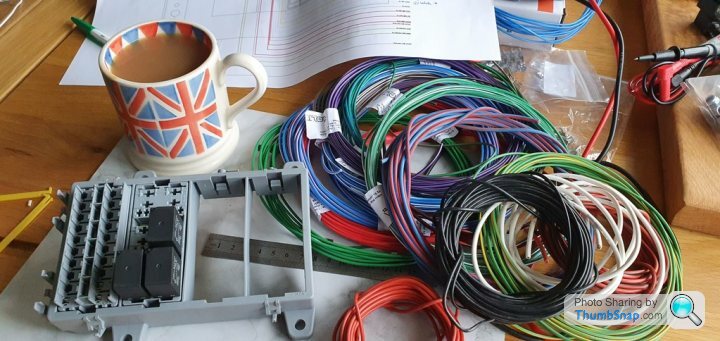
I figured as I was starting afresh I would also give myself some more room to expand and future proof; instead of the 8 fuses of the old box I now have 20 meaning everything has an individual fuse, I have 6 relays instead of the 4 - the 2 additions have been wired and would only need a feed wire running to the item but have been ear marked for fog lamps and reverse lamps, the 3rd bay is for the indicator and hazard relays as they were floating on sky hooks.
After 2 weeks of wiring in the evenings I had it finished

to eliminate the live feed issue the relays and components are fed via a bus bar which reduces the overall wiring and means that should I want to add anything else I don't need to break into existing wiring. the panel is 2mm fibreglass to further isolate it from the body and is plugged into the loom via 4 connector blocks; Indicators/ hazards, lighting, engine and accessories
Before

After
I'm just working on final checks now that the loom is finished and the engine is running (more on that in a moment) but it's been successful so far and looks far neater. In the middle of all that I sent the rev counter away to be repaired as it was positive earth and when the Cortina was positive earth when I first bought it it would idle at 3000rpm (the rev counter not the engine!) I'll get some photos of the dash when I've finally fitted the finished loom.
I wasn't happy with the wiring loom, I had been getting an inconsistent 12v at the coil. Whilst looking into this issue I had also found that the fuel pump would run randomly despite wired to not, this is when I found I had a bigger issue with the live feeds.
This is the original loom plus the relays I had added, I had coloured this in on paint and then broke the loom down to it's systems; engine, lighting accessories etc
The switched lives are fed by white cable, more specifically 1 white cable that has double joints and branches that go from the ignition switch, across the dash feeding all sorts and then into the bay to power the coil on the drivers side and the horn on the passengers side - needless to say this was the issue.
I didn't like the look of the wiring for the fuse box and relays and decided to fix the issues I had and to make things look neater, after doing some research I came across a modular 12v fuse box that has various interchangeable blocks and can be built as individual items or can be mounted in a 4 or 5 bay holder.
I figured as I was starting afresh I would also give myself some more room to expand and future proof; instead of the 8 fuses of the old box I now have 20 meaning everything has an individual fuse, I have 6 relays instead of the 4 - the 2 additions have been wired and would only need a feed wire running to the item but have been ear marked for fog lamps and reverse lamps, the 3rd bay is for the indicator and hazard relays as they were floating on sky hooks.
After 2 weeks of wiring in the evenings I had it finished
to eliminate the live feed issue the relays and components are fed via a bus bar which reduces the overall wiring and means that should I want to add anything else I don't need to break into existing wiring. the panel is 2mm fibreglass to further isolate it from the body and is plugged into the loom via 4 connector blocks; Indicators/ hazards, lighting, engine and accessories
Before
After
I'm just working on final checks now that the loom is finished and the engine is running (more on that in a moment) but it's been successful so far and looks far neater. In the middle of all that I sent the rev counter away to be repaired as it was positive earth and when the Cortina was positive earth when I first bought it it would idle at 3000rpm (the rev counter not the engine!) I'll get some photos of the dash when I've finally fitted the finished loom.
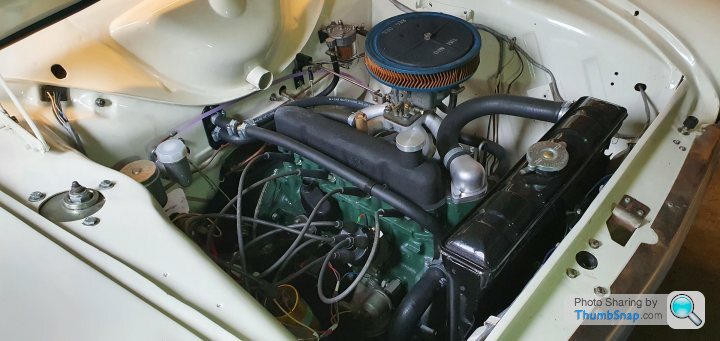
The engine...
I had struggled with starting since Christmas and had put it off whilst I was fitting the headlining etc but before I can commit and start the interior and finishing off of the Cortina I needed it to run.
The loom was back in albeit unwrapped and I now had 12v to the coil but still nothing.
A look at the spark plugs showed I only had 2 wet plugs, a compression test later showed I had consistent pressure which ironically lowered my blood pressure! An inspection of the inlet/exhaust lead me to believe that some of the threads weren't in the best shape so it all came off.
I had to helicoil 3 of the 6 threads but it was a success, a tense success! These threads are 50 years old and are one of the most stressed on the engine because they have considerable weight on them and are temperature cycled (if you can get the bugger to run!)
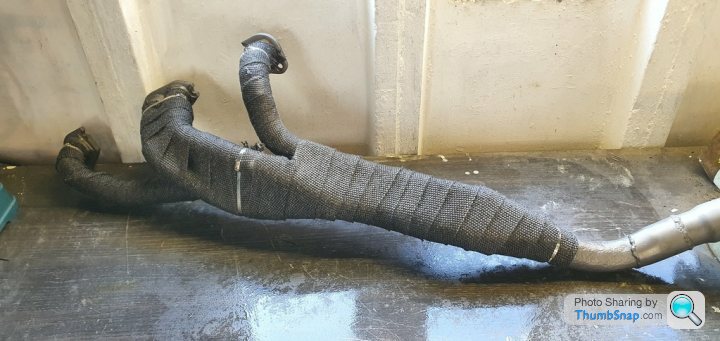
Whilst the exhaust was off I took it upon myself to wrap the exhaust as one of the heater pipes runs close to number 4 runner and the clutch pipe is also close to the lower part of the manifold. I'll try the wrap but have heard mixed reviews so it may come off in favour of heat shielding the pipes that need it.
With the frustration of all this engine work and wiring I figured it was the perfect time to buy a pair of wheels! I was looking at banding the original set of steels but after looking at the JBW lotus replicas I figured it's cheaper to buy them the width I want so I have a pair of 7J's for the rear - yes they are wide, possibly too wide but time will tell!

Ah yes the engine! Over Christmas I had built a Lucas 23D vacuum advance distributor up for the Cortina to swap with the Accuspark non vacuum advance unit I had been using because I'm not going to run twin 40's and I don't think the 28/36DCD likes the vacuum advance take off being blocked. I put it on the engine and timed it up off the pulley but nothing.
2 weeks of fiddling with timing, carb setting, and checking everything else - nothing. It was a good job I don't have hair!
that's when I made one of the many discoveries about my problem - the aftermarket pulley. I bought this 2nd hand as it had a trigger wheel attached (I'd like to go EFI in the future) and whoever had it put multiple timing marks on the pulley. I didn't have anything to go off! I reverted back to the original pulley which hinted at firing but still wouldn't.
It was at this point the lockdown rules had changed and we could meet up outdoors so Easter weekend a friend came over to give me a hand and I stepped back and let him look at it with fresh eyes.
The engine was timed to TDC and the air fuel metering screw was reset (in delirium I kept winding out because more fuel = good). in a few hours it was running but also running the best it ever had!
Just don't run your engine without a rocker cover gasket!
Panic over!
I'm finishing off the loom and water testing the body for leaks so hopefully will have so major steps forward soon!
I had struggled with starting since Christmas and had put it off whilst I was fitting the headlining etc but before I can commit and start the interior and finishing off of the Cortina I needed it to run.
The loom was back in albeit unwrapped and I now had 12v to the coil but still nothing.
A look at the spark plugs showed I only had 2 wet plugs, a compression test later showed I had consistent pressure which ironically lowered my blood pressure! An inspection of the inlet/exhaust lead me to believe that some of the threads weren't in the best shape so it all came off.
I had to helicoil 3 of the 6 threads but it was a success, a tense success! These threads are 50 years old and are one of the most stressed on the engine because they have considerable weight on them and are temperature cycled (if you can get the bugger to run!)
Whilst the exhaust was off I took it upon myself to wrap the exhaust as one of the heater pipes runs close to number 4 runner and the clutch pipe is also close to the lower part of the manifold. I'll try the wrap but have heard mixed reviews so it may come off in favour of heat shielding the pipes that need it.
With the frustration of all this engine work and wiring I figured it was the perfect time to buy a pair of wheels! I was looking at banding the original set of steels but after looking at the JBW lotus replicas I figured it's cheaper to buy them the width I want so I have a pair of 7J's for the rear - yes they are wide, possibly too wide but time will tell!
Ah yes the engine! Over Christmas I had built a Lucas 23D vacuum advance distributor up for the Cortina to swap with the Accuspark non vacuum advance unit I had been using because I'm not going to run twin 40's and I don't think the 28/36DCD likes the vacuum advance take off being blocked. I put it on the engine and timed it up off the pulley but nothing.
2 weeks of fiddling with timing, carb setting, and checking everything else - nothing. It was a good job I don't have hair!
that's when I made one of the many discoveries about my problem - the aftermarket pulley. I bought this 2nd hand as it had a trigger wheel attached (I'd like to go EFI in the future) and whoever had it put multiple timing marks on the pulley. I didn't have anything to go off! I reverted back to the original pulley which hinted at firing but still wouldn't.
It was at this point the lockdown rules had changed and we could meet up outdoors so Easter weekend a friend came over to give me a hand and I stepped back and let him look at it with fresh eyes.
The engine was timed to TDC and the air fuel metering screw was reset (in delirium I kept winding out because more fuel = good). in a few hours it was running but also running the best it ever had!
Just don't run your engine without a rocker cover gasket!
Panic over!
I'm finishing off the loom and water testing the body for leaks so hopefully will have so major steps forward soon!
Edited by Retro_Jim on Tuesday 13th April 10:16
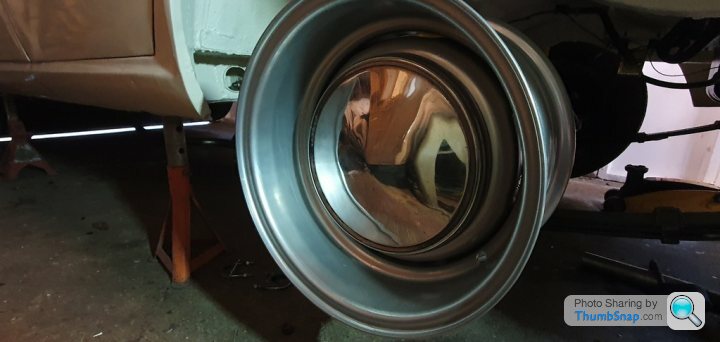
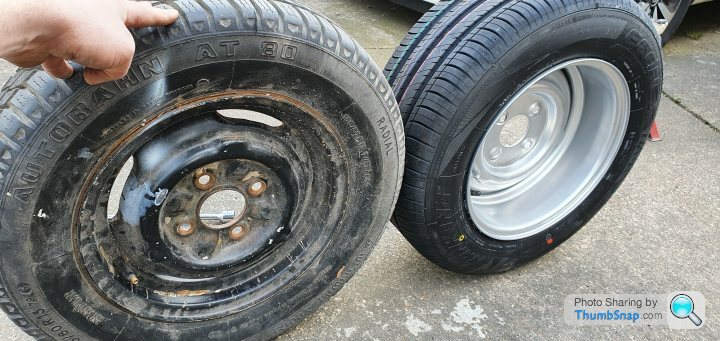
With the engine running and actual progress on the cards I went out (metaphorically) and purchased a pair of 6J front wheels to match the 7's for the rear.
I wanted a staggered set firstly to fill the rear tubs as the 4.5's and 5.5s can look a bit lost and I didn't want to run spacers and secondly 7's are too wide for the front.
As the MOT is looming ever closer and looking at the scabby old stunt wheels I've been using for 1 metric lifetime I thought it was time I made the Cortina look like it could function as a road legal car.
For the front I have 175x60 r13's and 205x60 r13 for the rear. There is a slight height difference but they look proportioned, I was careful to not make them look at tyre at either end. Needless to say I'm happy with the result and once I get some time I'll revisit the Dunlops as a 2nd set of wheels.
A quick comparison with the original 4.5 steel wheel had me concerned I'd gone too big!
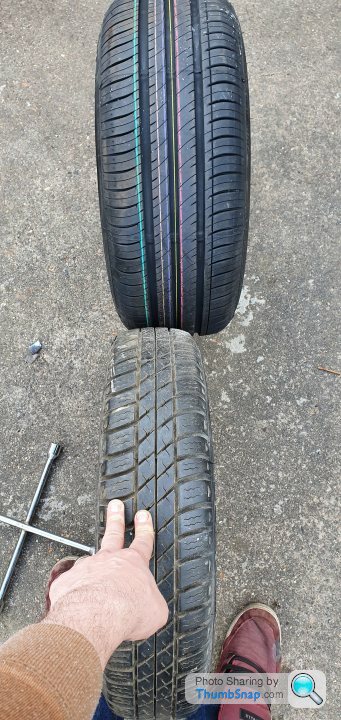
a test fit looked good, a little close to the arch lip but that can be tweaked.

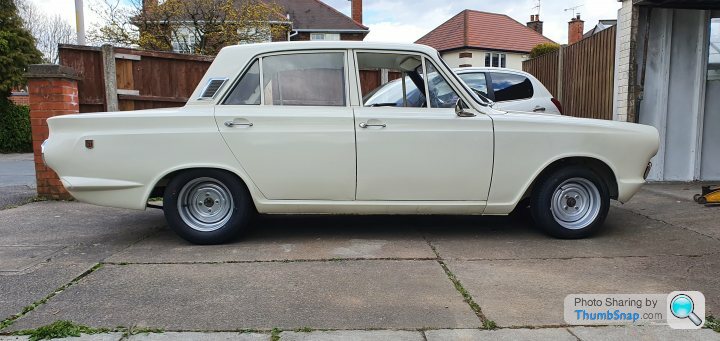
I have tried to keep the body level when lowering and I don't necessarily want to go lower at the rear, the front could but would need helper springs but I have a feeling that would make it awful to drive!
I wanted a staggered set firstly to fill the rear tubs as the 4.5's and 5.5s can look a bit lost and I didn't want to run spacers and secondly 7's are too wide for the front.
As the MOT is looming ever closer and looking at the scabby old stunt wheels I've been using for 1 metric lifetime I thought it was time I made the Cortina look like it could function as a road legal car.
For the front I have 175x60 r13's and 205x60 r13 for the rear. There is a slight height difference but they look proportioned, I was careful to not make them look at tyre at either end. Needless to say I'm happy with the result and once I get some time I'll revisit the Dunlops as a 2nd set of wheels.
A quick comparison with the original 4.5 steel wheel had me concerned I'd gone too big!
a test fit looked good, a little close to the arch lip but that can be tweaked.
I have tried to keep the body level when lowering and I don't necessarily want to go lower at the rear, the front could but would need helper springs but I have a feeling that would make it awful to drive!
Thank you Bobbers, I quite like the half drag look!
Thank you Penelope, it took me a while to get to that but I think it's paid off. I'll have a proper read of that link later with a tea.
I had been putting off testing the seals for the doors and glass because I was concerned that they wouldn't seal - paranoia is a cruel mistress! Arming Mrs. Jim with a hosepipe set to tsunami whilst I sat in the Cortina and tried to stay dry!
Fortunately the seals sealed and Mrs. Jim managed to work out some frustration on me with the hose so we all win! The only water coming in was from under the seals which is from the glass seals that are essentially draft excluders and that's how they are. I tested drainage with success but it seemed odd pouring water into the doors to see if they drain correctly! After drying it all out properly I brush applied cavity wax to the inside of the doors to make sure I hadn't missed any areas when I waxed them about a year ago.
To protect the outside affecting the inside the doors should have a plastic membrane stuck to the inside of it which was an easy thing to do.
the tape was just there to hold it whilst I glued it all down.
Once dried I retested and it passed! So to celebrate I dug all this lot out of the loft!
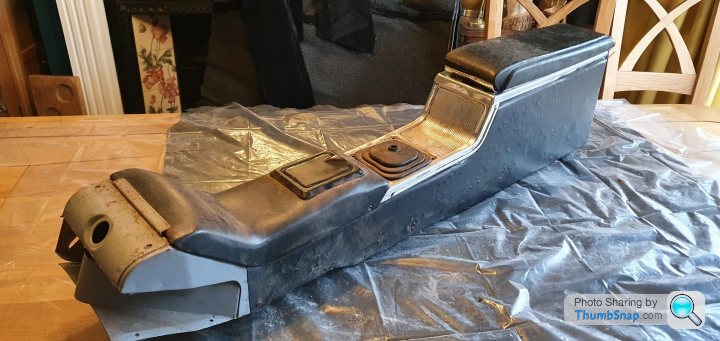
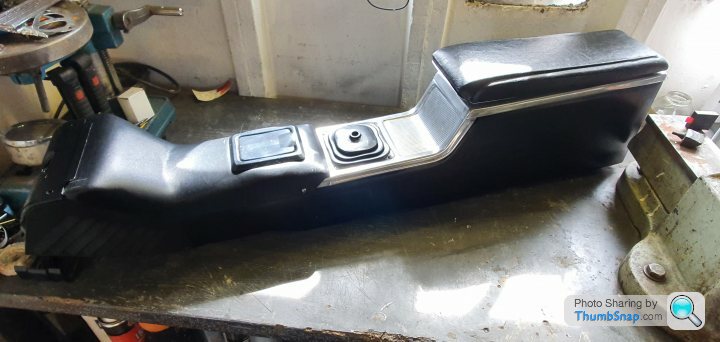
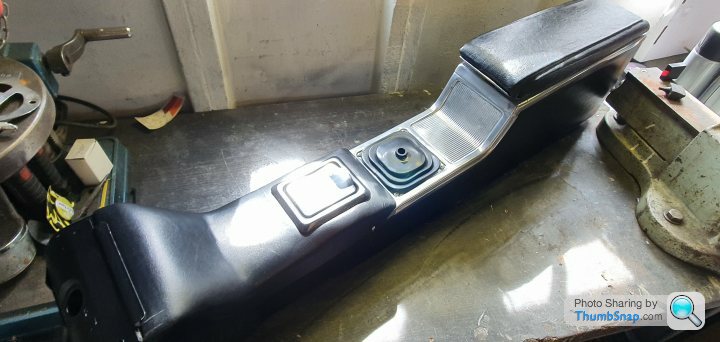
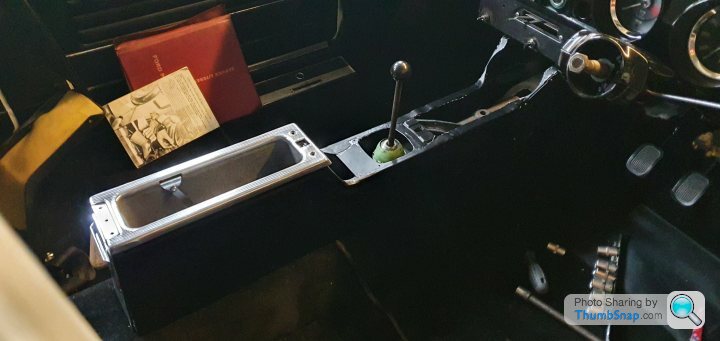
The centre console is one of my favourite parts of the interior, it's got a handy storage bucket, an armrest and front and rear ashtrays so the family can smoke together!
Mine however was showing it's age after being stored in various lofts for several years whilst I did everything else.
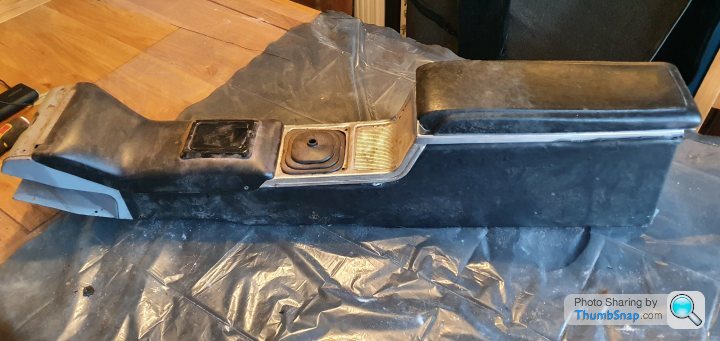
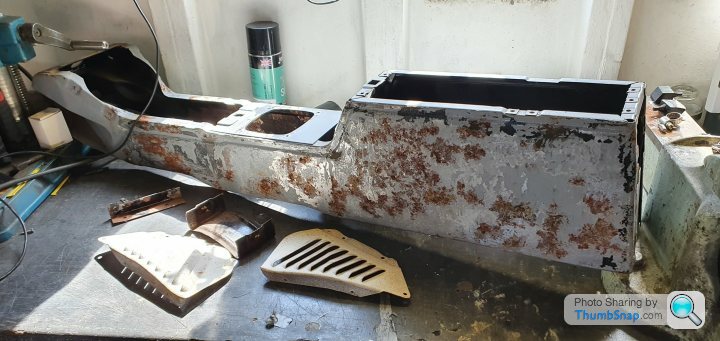
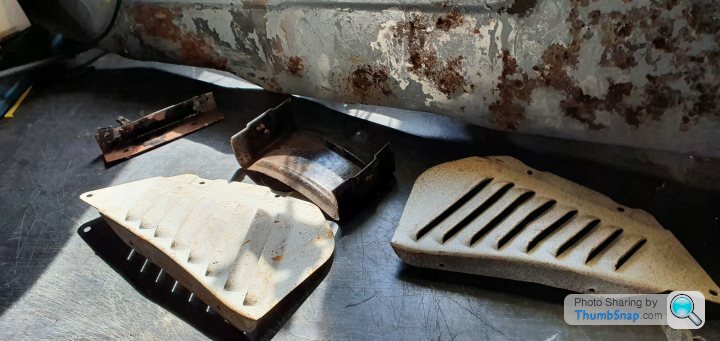
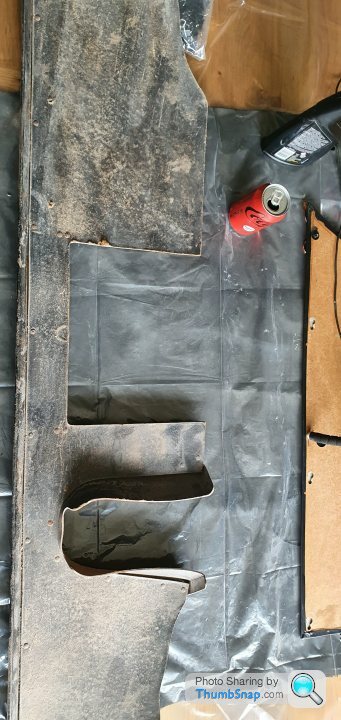
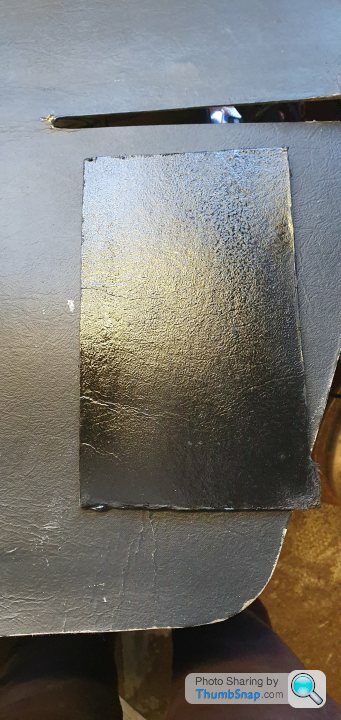
a quick strip down showed I had more work to do than I expected but whilst I was waiting for the new vinyl to arrive I made a start on the trim which I sanded from 120 to 1500 before polishing it. The main body was taken back to bare metal and painted satin black, the side vents were painted in black wrinkle paint as they were from factory and the lid was given a clean.

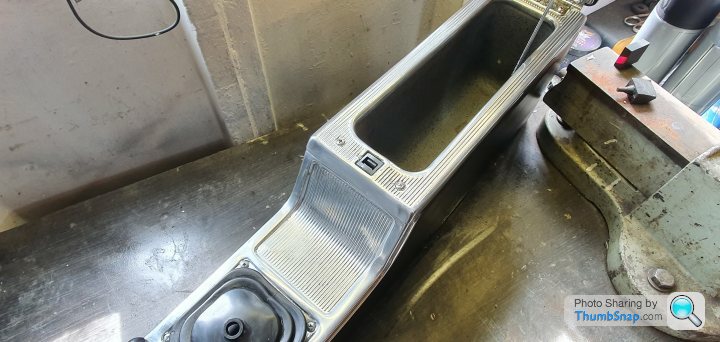
I'm happy with the results - I need to get a wriggle on and sort the rest of the interior out!
Triple Six said:
What a lovely looking car - following!
Must remember to show my old man this thread, he has a Mk2 Crayford Cortina which was his first car and he's managed to keep hold of it ever since.
Thank you! I'd be interested in your dad's Mk2, a Crayford Cortina is a rare beast and to have one as a first car is just plain cool!Must remember to show my old man this thread, he has a Mk2 Crayford Cortina which was his first car and he's managed to keep hold of it ever since.
Penelope Stopit said:
Am sure it has paid off, looks like it's been done by a professional, have kept food on the table playing with car electrics and couldn't have done a better job
You'll make me blush! I'm glad I persevered with making the changes and I'd also recommend that modular kit it has made the building of the fuses and relays much easier and neater for not much more than what I had paid for the old fuse box and relay board.https://www.youtube.com/watch?v=4rYoVmNE6og&t=...
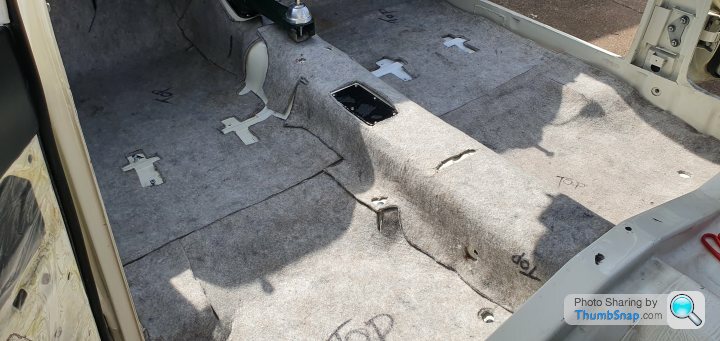
It seemed so easy to just fit the interior but with the car moving over the years, I had half and my parents had the other - I think they have my hornby trainset which might be a fun side project! I digress, with the interior all in one place and many favours and pleas made to Mrs. Jim to let me give the carpets a clean inside before taking them out to the car.
The carpets are relatively new I changed them not long after I bought the Cortina in 2005 but came out in 2006 after it came off the road so factory fresh!
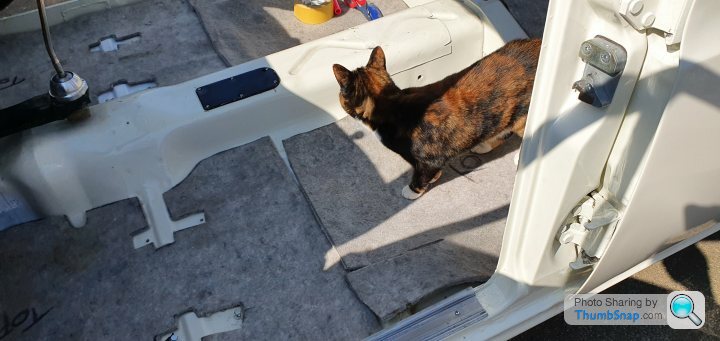
The Cat almost got carpeted!
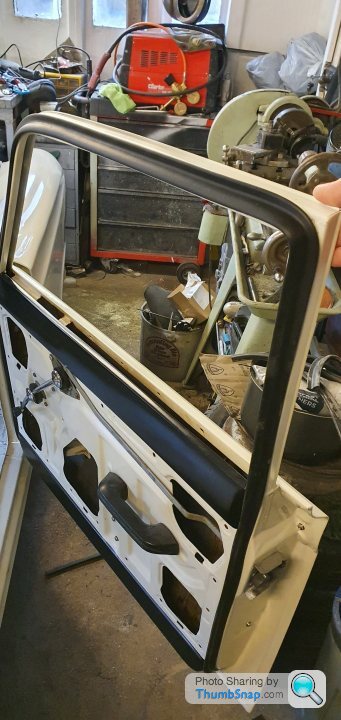
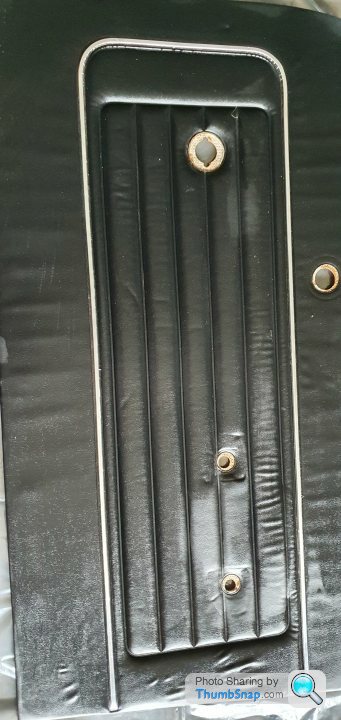
The door cards are oiginal and have just had a clean, the vinyl had lifted off the card so gave it a dab of glue and used some bulldog clips that have been way more useful than I had considered when I bought them a few months ago!

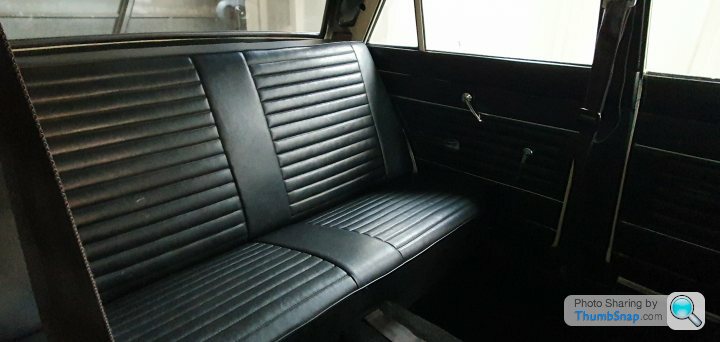
Next up was the rear seat which have again just had a clean, I didn't take a photo of it but I have added lap belts for the rear as a precaution , I would like a 3 point belt but I haven't found one that would work with the rear shelf as it would be below the shoulder.
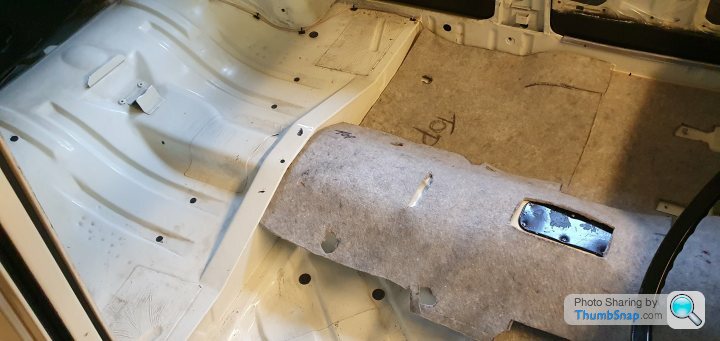
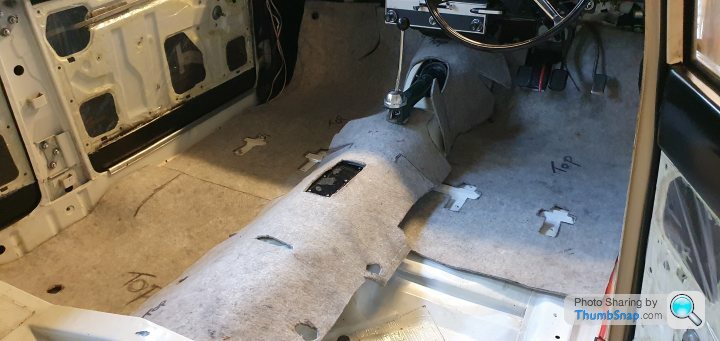
This is when I ran into some trouble! I went to fit the centre console I had retrimmed but it just wouldn't fit, my natural reaction was to have a mental breakdown and check the heater position, engine position and life in general! The console came out of the car as had the heater - a quick google showed me that there are 2 types of GT shifter 116E designed for the Consul Capri and the 118E for the Cortina GT/ Lotus - guess which one I had!
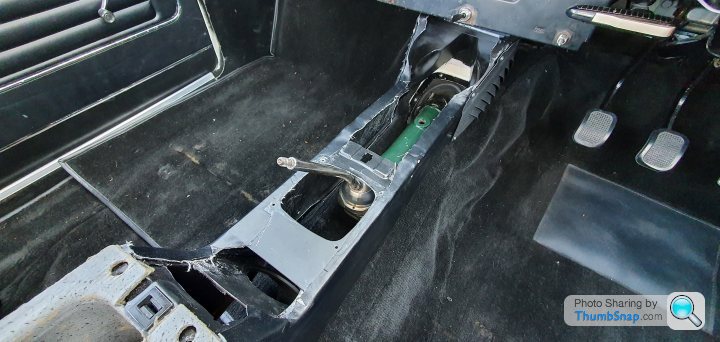
There's about 2" difference in length and they also come at a premium because Lotus tax! Luck was in my favour though as the new shifter had bushes that weren't made of powder so decided to use it as is rather than disturb it - if anyone is after a shifter let me know!
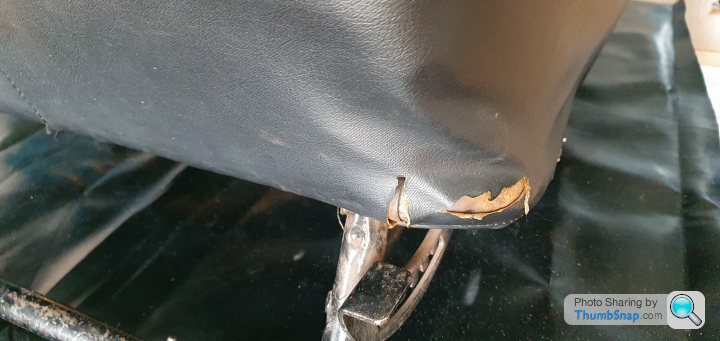
the seats are original and could do with a retrim but my efforts are being put into getting the Cortina back on the road and come back to a few jobs over winters etc
One great thing about the interior is that the parcel shelf is under the dash which makes storage for parcels actually feasible! A quick tip for these cardboard interior parts - you can use satin black paint to revive them.
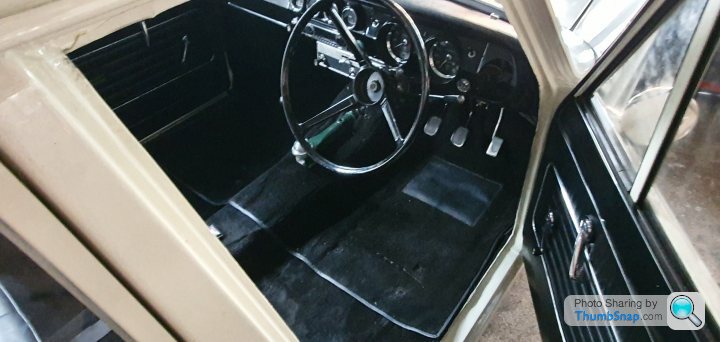
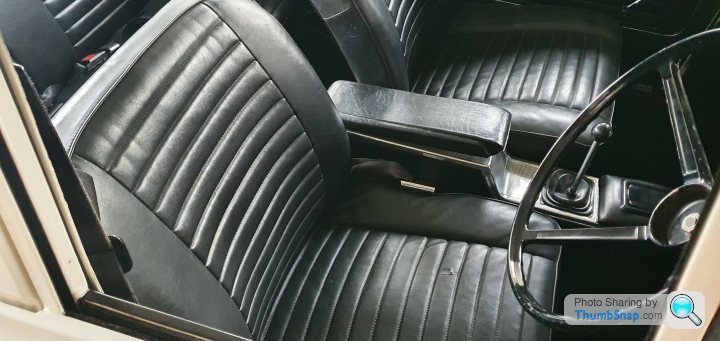
The front seats were the last thing to go in and I can't quite fathom that the Cortina has a proper interior, I still think of it as a shell in progress and now it feels like a car!

Now I'm working on a list of stuff to do for the MOT; hopefully nothing major but mainly bolt check, fix any leaks etc
It seemed so easy to just fit the interior but with the car moving over the years, I had half and my parents had the other - I think they have my hornby trainset which might be a fun side project! I digress, with the interior all in one place and many favours and pleas made to Mrs. Jim to let me give the carpets a clean inside before taking them out to the car.
The carpets are relatively new I changed them not long after I bought the Cortina in 2005 but came out in 2006 after it came off the road so factory fresh!
The Cat almost got carpeted!
The door cards are oiginal and have just had a clean, the vinyl had lifted off the card so gave it a dab of glue and used some bulldog clips that have been way more useful than I had considered when I bought them a few months ago!
Next up was the rear seat which have again just had a clean, I didn't take a photo of it but I have added lap belts for the rear as a precaution , I would like a 3 point belt but I haven't found one that would work with the rear shelf as it would be below the shoulder.
This is when I ran into some trouble! I went to fit the centre console I had retrimmed but it just wouldn't fit, my natural reaction was to have a mental breakdown and check the heater position, engine position and life in general! The console came out of the car as had the heater - a quick google showed me that there are 2 types of GT shifter 116E designed for the Consul Capri and the 118E for the Cortina GT/ Lotus - guess which one I had!
There's about 2" difference in length and they also come at a premium because Lotus tax! Luck was in my favour though as the new shifter had bushes that weren't made of powder so decided to use it as is rather than disturb it - if anyone is after a shifter let me know!
the seats are original and could do with a retrim but my efforts are being put into getting the Cortina back on the road and come back to a few jobs over winters etc
One great thing about the interior is that the parcel shelf is under the dash which makes storage for parcels actually feasible! A quick tip for these cardboard interior parts - you can use satin black paint to revive them.
The front seats were the last thing to go in and I can't quite fathom that the Cortina has a proper interior, I still think of it as a shell in progress and now it feels like a car!
Now I'm working on a list of stuff to do for the MOT; hopefully nothing major but mainly bolt check, fix any leaks etc
Gassing Station | Readers' Cars | Top of Page | What's New | My Stuff