Facebook marketplace Lexus RX400h SE-L, what could go wrong?
Discussion
LincolnLovin said:
I think the key is to find the sweet spot when driving long distance where it can be moved along on battery only. I am used to coasting and finding larger objects (trucks/coaches) to follow, along side driving at 64 ish mph in the left hand lane at all times from my time in the Leaf.
It's going to be weird heading to the Zoo tomorrow and not have to plan charging alternatives.
Sounds like fun. I slipstream, too, when I get bored, I find someone else to slip. Makes long journeys more interesting. It's going to be weird heading to the Zoo tomorrow and not have to plan charging alternatives.

How do you make it mainly use the electric motor, then?
"not have to plan charging alternatives" And that's why I can't be bothered with electric cars. Sounds like too much of a faff.
I still love the Leaf, it's a great car and handles 99% of our driving - we just needed to have a second car with my wife returning to work after having the second.
So I pumped up the tyres and that seems to have reduce the 'shimmy', I might bite the bullet and get all four replaced at the same time.
So I pumped up the tyres and that seems to have reduce the 'shimmy', I might bite the bullet and get all four replaced at the same time.
LincolnLovin said:
I still love the Leaf, it's a great car and handles 99% of our driving - we just needed to have a second car with my wife returning to work after having the second.
So I pumped up the tyres and that seems to have reduce the 'shimmy', I might bite the bullet and get all four replaced at the same time.
I recommend Avon zx7 they are on my 2006 rx350 £109.32 each (fitted blackcircles) 235/55/18So I pumped up the tyres and that seems to have reduce the 'shimmy', I might bite the bullet and get all four replaced at the same time.
Graculus said:
maxwellwd said:
One thing to note from my experience - when I got it I thought as a mater of course change out the front lower arms as the parts are quite cheap and it could do with it as it is on a 100k. However got my friendly mechanic round and he started work on it but came up against the engine and the subframe issue. He then spoke to a Lexus technician who said they book ten hours for this job!!
From what I have heard and read online as well, it is very rare that you actually need to change them (apparently) if you look on the Lexus US forums some say they dont require doing at all, unless you bend one by crashing it.
Would be interested to know personally how you get around this if possible to change in quicker manner.
Around a year ago I bought (practically stole...) an unloved LPG converted RX300 Second Gen. I believe the engine mount / lower control arm layout is the same throughout Second Gen inc RX400h.From what I have heard and read online as well, it is very rare that you actually need to change them (apparently) if you look on the Lexus US forums some say they dont require doing at all, unless you bend one by crashing it.
Would be interested to know personally how you get around this if possible to change in quicker manner.
To change the lower control arms you don't need to drop the subframe nor remove the engine as once stated by Lexus. Access to a lift is strongly recommended as are engine and transmission jacks. It could be done with axle stands and trolley jacks but it would be more difficult. A helper is a distinct advantage.
Take great care as you will be moving some seriously heavy lumps of metal and I can't accept any responsibility for injury of vehicle damage.
First, remove the top engine mount (dog bone) completely and then the top bolt from the front engine mount. Next, raise and secure the vehicle and remove both front wheels. There is a small plastic panel in the drivers side wheel well which must be removed. Now move under the car and remove the plugs in the subframe which allow access to the lower back engine mount securing nuts. Undo these nuts.
If you do not intent to change the lower ball joint you can skip the next stage but it's little extra expense and could save repeating a lot of work at a later date.
Move to the hub and remove the central hub nut. BE SURE to straighten the "dimple" in the nut which is depressed in order to act as a retainer. Failure to do this will destroy the axle threads upon removal. You will require a deep 30mm 12 point socket to remove this nut. Nothing else will fit. This nut will be extremely tight (something like 217nm) and an impact wrench will make life much easier. After removal, tap the axle end to release the cv from the steering knuckle being careful not to damage the threads.
Next undo and separate the ball joint for the track rod end and follow by removing the three bolts which hold the ball joint to the control arm so that you can lever the control arm down and free. This will allow enough movement in the strut to push the cv axle out and you will now have access to the lower ball joint for splitting / removal.
At this stage you can move to each side engine mount and remove the top nuts followed by the lower securing nuts. The drivers side mount requires removal of a bracket attached to the engine. This bracket fits over a stud with a 5mm torx head and removing this stud makes life much easier. Take care not to shear the stud when removing.
You should now be able to support the engine and transmission with jacks, ensuring a good pad between jack and oil pans. Gently raise the engine / trans and you should gain enough clearance to remove both side engine mounts which will allow access to the control arm bolts into the subframe. At this stage it's easy! There is a bracket on the control arm which the bolts pass through which must be removed and fitted to the new arms. Reassembly is the reverse and will be obvious.
Things to note: The split pins in all my ball joints were badly rusted and had to be drilled out adding to the time required. As mentioned before, some bolts will be EXTREMELY tight and are required to be re-tightened to similar levels. You may wish to inspect your engine mounts prior to doing this as it is an excellent opportunity to replace them if required. You may wish to have a wheel alignment performed afterwards.
I hope this makes sense and helps! There are some good (and some less good) guides on youtube. To allow for problems, I'd allow yourself a day to complete both sides but you may well complete it more quickly.
LincolnLovin said:
Me too, the hybrid set up is heavily weighted to kick the engine in at all times rather than rely on the battery.
This means you need to lightest of touches on the accelerator to have battery only. So much so that it won’t really maintain speed on anything else but a flat road.
Oh, I see. I guess it is a small e-motor, and, well, you have a 3.x litre V6. Keen to know how the 4x4 really works in the snow especially if you have a 30 minute commute and the rear wheels are only driven by an e-motor. Will it stop working after 10 minutes once the battery is drained?This means you need to lightest of touches on the accelerator to have battery only. So much so that it won’t really maintain speed on anything else but a flat road.
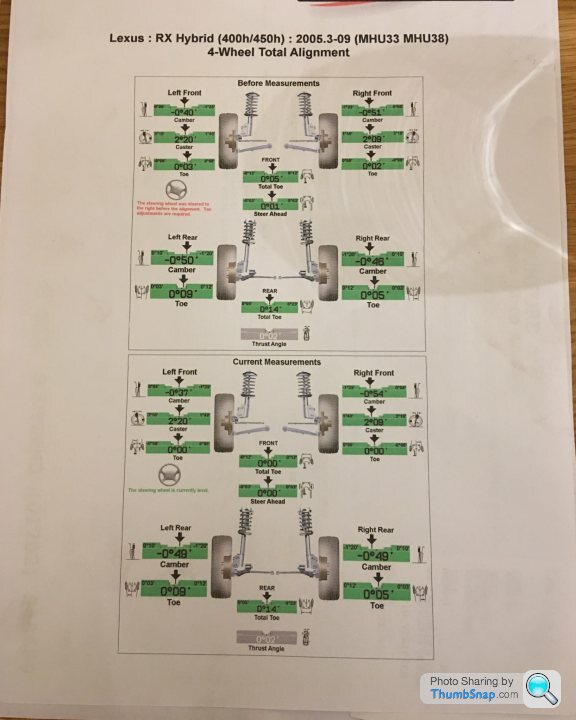
The car on the hunter machine, dead fancy:

The result:

If anyone can translate the above that would be useful
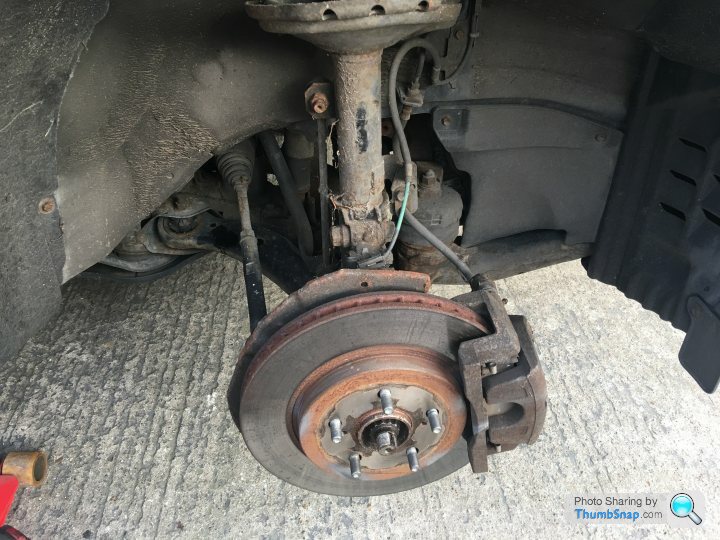
So some photos, first up the discs, a little rusty but nothing hurrendous:

Handy spiders web:

Front engines, the sump on the V6 is tiny.

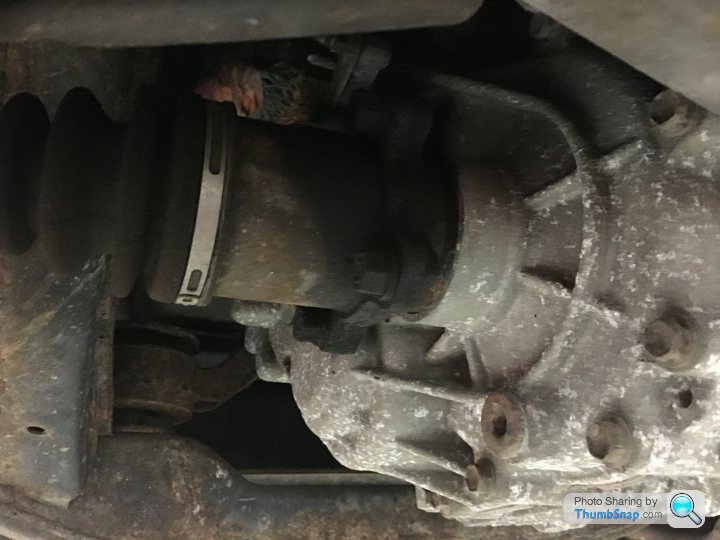
This seems greasier than it should be:

Overall it seems pretty solid for 116k miles, no body rust that I can see.

The result:

If anyone can translate the above that would be useful

So some photos, first up the discs, a little rusty but nothing hurrendous:

Handy spiders web:

Front engines, the sump on the V6 is tiny.

This seems greasier than it should be:

Overall it seems pretty solid for 116k miles, no body rust that I can see.
Edited by LincolnLovin on Tuesday 8th January 20:35
Edited by LincolnLovin on Tuesday 8th January 20:59
Handy spiders web:

Front engines, the sump on the V6 is tiny.

Overall it seems pretty solid for 116k miles, no body rust that I can see.
[/quote]
In the "spiders web" picture, there is some fluid on the lower control arm which may be a power steering leak (assuming the pump is in the same place as an RX300). The lines are prone to leak, apparently.
For the "sump" picture, the ICE V6 sump is the larger pan to the right of the exhaust in your photo. It should have a 14mm hex nut as the drain and will take just under 5L of oil including filter change. The filter is easily accessed towards the front of the vehicle if you remove the lower front plastic "bib" below the bumper.
Regarding rust, they do seem to be very well built (body wise). Now, bear in mind that my RX had been neglected (and used offroad!) but I would strongly recommend that you remove the plastic side skirts (just a couple of screws and several trim clips) to check underneath them. I'm not a fan of plastic trims as they hold moisture and hide damage. Check along the sills and you will find drainage slots. Make sure that these are not blocked. In the same vein, check that your sunroof drains are clear.
I removed my side trims and found the following...
Superficially, everything looked okay except for a small "soft" looking spot.

Following some poking around, this was discovered.

This was the passenger side, the drivers was the same, probably as a result of jacking the vehicle using the sill and also the drains being blocked. Knowing an ex professional fabricator is useful and after a few hours grinding and welding everything was solid once more and I then painted and rustproofed.

The good news was that the remainder or the body was in great condition!
Yours will probably be fine but it's a good opportunity to clean behind the trims, clear the drains and ensure it stays that way.

Front engines, the sump on the V6 is tiny.

Overall it seems pretty solid for 116k miles, no body rust that I can see.
Edited by LincolnLovin on Tuesday 8th January 20:35
Edited by LincolnLovin on Tuesday 8th January 20:59
[/quote]
In the "spiders web" picture, there is some fluid on the lower control arm which may be a power steering leak (assuming the pump is in the same place as an RX300). The lines are prone to leak, apparently.
For the "sump" picture, the ICE V6 sump is the larger pan to the right of the exhaust in your photo. It should have a 14mm hex nut as the drain and will take just under 5L of oil including filter change. The filter is easily accessed towards the front of the vehicle if you remove the lower front plastic "bib" below the bumper.
Regarding rust, they do seem to be very well built (body wise). Now, bear in mind that my RX had been neglected (and used offroad!) but I would strongly recommend that you remove the plastic side skirts (just a couple of screws and several trim clips) to check underneath them. I'm not a fan of plastic trims as they hold moisture and hide damage. Check along the sills and you will find drainage slots. Make sure that these are not blocked. In the same vein, check that your sunroof drains are clear.
I removed my side trims and found the following...
Superficially, everything looked okay except for a small "soft" looking spot.

Following some poking around, this was discovered.

This was the passenger side, the drivers was the same, probably as a result of jacking the vehicle using the sill and also the drains being blocked. Knowing an ex professional fabricator is useful and after a few hours grinding and welding everything was solid once more and I then painted and rustproofed.

The good news was that the remainder or the body was in great condition!
Yours will probably be fine but it's a good opportunity to clean behind the trims, clear the drains and ensure it stays that way.
Gassing Station | Readers' Cars | Top of Page | What's New | My Stuff


