Aston martin V8 Vantage club sport type thing
Discussion


Awesome project, would probably rather have had this than the 996 GT3s mentioned in the opening post anyway 
Also good to read Nigel's name, haven't seen him for years - I still like to chastise my dad for not buying Nigel's Inka Orange 3.0CSL he had in his garage for years... Cracking work so far OP, look forward to further updates!
Also good to read Nigel's name, haven't seen him for years - I still like to chastise my dad for not buying Nigel's Inka Orange 3.0CSL he had in his garage for years... Cracking work so far OP, look forward to further updates!
Chunkychucky said:
Awesome project, would probably rather have had this than the 996 GT3s mentioned in the opening post anyway
Also good to read Nigel's name, haven't seen him for years - I still like to chastise my dad for not buying Nigel's Inka Orange 3.0CSL he had in his garage for years... Cracking work so far OP, look forward to further updates!
Ah, Nigel has had some cool stuff over the years, I wish i had bought his e31 when that was available, but really i was practically sill a foetus and so would have likely ruined it.Also good to read Nigel's name, haven't seen him for years - I still like to chastise my dad for not buying Nigel's Inka Orange 3.0CSL he had in his garage for years... Cracking work so far OP, look forward to further updates!
I am not sure sure my bank account enjoys this choice as I suspect my residual value may be somewhat less appetizing, still means i dont have to wear a porsche hat and park my car in a line in the pits so i can do group photos, every cloud...
Fishy Dave said:
Enjoying this one, nice to see you not afraid to make changes and modifications. When are you hoping to take the car on track? Make sure you post video, we want to hear it.
Very good question, I need to test it more, than i can get away with even on derestricted roads. I was hoping tom get it up to the local track but the 9th of July i think is clashing with my Mrs buggering off and the kids are too young to be left unrestrained in a pit without getting flattened. I have 2 days booked at Spa in Septemebr with RMA, so thats the backstop, but i really would like to get the car out and trouble shot before its throwing up problems in Belgium.
Thanks all for the kind words and encouragement.
Bit long in the tooth for an update really, but i am kind of telling a story here rather than entirely sticking to the chronological order strictly as otherwise it would be loads of "i spent 3 days drawing little pictures of suspension components and thinking about spring rates, or looking at vacuum bagging carbon etc" There is always so much more pricking about thinking about things Vs the time spent actually doing it.
There may be another hiatus for a period on the horizon once its in sort of correct shape as the fact i am constantly working on a gravel driveway on jacks is stupid, and annoying as the green shed i al working next to is a pretty well equipped workshop, welders, hydraulic lift, headed floored etc etc, but has a car that doesn't run in it. so really i need to make that run so i can switch the cars around when i am working on them. Its almost like you should do things in some sort of logical order....
Anyway, seat time
So, there is essentially only one company that does a bolt in kit for these cars, and thats cobra, however the seats they supply are not FIA and as such in my mind not approved. being that i am attached to my spine and the seats will form part of the safety structure (particularly once i can get a harness in) i wanted an FIA seat, and the support that it offered. In no way am i suggesting that the other alternatives are not good enough, but i wanted a classified seat and that was that.
Being that "YOLOing" (i think i have heard that on youtube) can get expensive with seats when you discover they dont fit and never will. I took the easy way initially and through a friend of a friend of a friend ordered the full kit but with FIA Imola's. I also asked for them to have the Aston wings, however Cobra have had their collar felt by the Aston legal department in the past about use of the badge (I do find this pathetic, a brand that constantly tries to associate it's self, embarrassingly in my opinion with James bond then spends it time sending threatening letters to a man for drawing some wings in a seat, I mean, get a grip) so.........they turned up completely blank, which was fine, apart from they looked like something off Aliexpress, which was not quite the look i was aiming at.
I didnt take any pictures of the seats with no logo's, and in all honesty i have done a piss poor job of documenting this change for a number of reasons.
It was a bit of a d1ck
it took ages
i was distracted and there were a lot of pauses for contemplation.
Anyway, having got the seats, i stripped all the covers off (hats off to cobra on this one, they are a doddle to strip down) and ran them down to the local work wear embroidery place who promptly and with no fuss put the wings on in silver and green for £12.75 for the pair, winner.

I then went on to start the install, and really did a bad job with the pictures.
Initially i just went to put the kit in as intended, so base plate, then runners, belt mounts side mounts and finally the seat. Frankly, its a prick, partly because the seats i am using are not intended for the job, and partly because access on the tunnel side is very tight meaning the usual faff of seat fitting where you slowly turn the inside bolts one flat at a time, blind with a tiny spanner. (if you have fitted many bucket seats, this will be familiar, its that moment when your arm is so contorted you want to cry, but you cant because your a f king grown man and it would just be silly.......
Seat out, (i tidied all the crap looking stock wiring up with proper loom tape hence the change in the subsequent pictures)

Base plate in

Base plate, runners, extenders, side mounts etc etc (i an retaining the oeM buckle which allows me the retain the oem seatbelt reminder without fudging it)
at this point, i fitted the seat, jumped in, and hated it, please note, this is not a problem with the kit, this is an issue with me not using the complete kit (ie.e. the wrong seats) and my particular requirements. It wasnt reclined enough, was nice and low but didnt feel quite natural, and i didn't really like the iperation of the sliders or the many layers of bits bolted together to make it all work.
I faffed about with this a few more times moving the seat about and did improve it (i definitely didn't cry when i put the seat in for the 5th time) and it was kind of not bad, but ultimately the high sides of the seats created a fitting issue and the upright nature would be ok for pure track use but not combined duties, but it was probably just about livable.
At this point i went and sat in the shed for a bit, and while looking dejectedly at the oeM Recaro's i found myself thinking that extruded aluminum motorised runner mechanisms were pretty fancy really, and that the way they bolted to the seat was very much like an steel frame base mount, or even, a base plate.
It took some time to summon up the desire to strip down and cut the oem loom, i had vaguely harbored desires to sell the seats and turning them into half a seat would of course fk that right in the bumpipes. Never the less, the more i looked the more i liked it. So allowing a good tail to allow for re-attachment i split the seats and clipped the looms

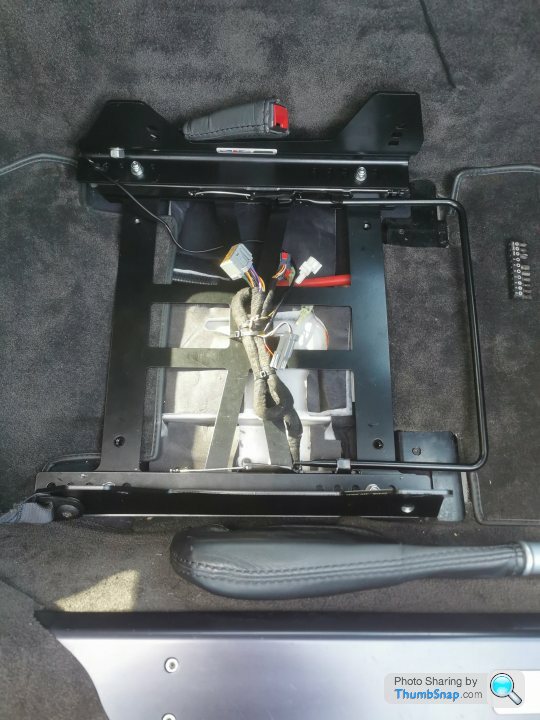
Long story short, with some minor adjustment, (cutting a pair of locating tabs off the seat subframes and drilling a hole extra you can mount a standard racing seat sidemount onto the Vantage electric part alloy sub frame. The frames are light too, so the weight penalty is minimal, if not possibly in your favor.
I took very very few pictures of this process, but did take a picture of it installed so you can get the idea

I dont know why its Hovis bakery sepia toned, it just is. At some point i will remove them again and strip back all the seat loom wiring i am not using and add in some dummy loads for the side airbags so will take some more pictures then if there is any interest in the "how does that work element".
Ultimately, what i now have is fully electric tilting buckets, they do sit a little higher, but i am 182cm and there is still adequate room for my lid, so all good. the seat belt receptacle is tight to the tunnel due to the bolster height, but works well and hopefully future developments will improve that further.
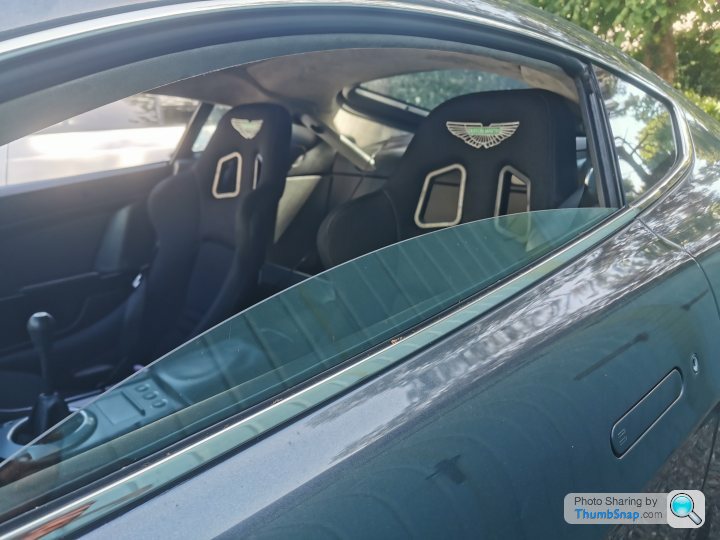


I also as can be seen above replaced my shabby looking door bars with some nice piano black ones (came up cheap on ebay and i have plans for the originals)
Serviced it (with a genuine filter, thank you very much)

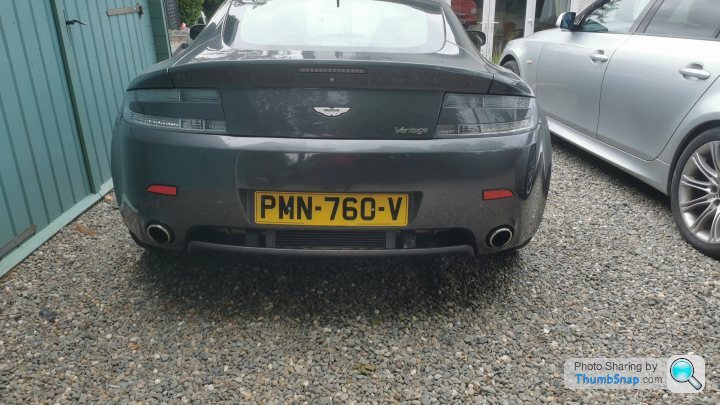
Removed all the rusty rear mesh, (people constantly paint these on the car, which is a st job as it paints the oil cooler and doesn't remove all the rust, as such mine did not look all that fresh . They will be blasted and powdercoated at some point but for now can just be off (weightsaving) To do this requires you to remove the back of the car and the factory manual is quite frankly a joke in terms of its description of the process.
Feels excessive to have to do this to remove some bumper trim really

In doing so i also removed some defunct electronics and cleaned up and greased all the subframe bolts under the liners for when that inevitably comes out at some point.

Then all back together with the mesh removed, looks a bit odd with the v12 exhaust but not outlandish in my opinion
As usual, this job involved lots of duff fasteners needing to be replaced which was a faff, but now at least with all of these replaced and greased, it will be a doddle to get apart should i need to again.
Get used to this type of thing if you have an older vantage....
Bit long in the tooth for an update really, but i am kind of telling a story here rather than entirely sticking to the chronological order strictly as otherwise it would be loads of "i spent 3 days drawing little pictures of suspension components and thinking about spring rates, or looking at vacuum bagging carbon etc" There is always so much more pricking about thinking about things Vs the time spent actually doing it.
There may be another hiatus for a period on the horizon once its in sort of correct shape as the fact i am constantly working on a gravel driveway on jacks is stupid, and annoying as the green shed i al working next to is a pretty well equipped workshop, welders, hydraulic lift, headed floored etc etc, but has a car that doesn't run in it. so really i need to make that run so i can switch the cars around when i am working on them. Its almost like you should do things in some sort of logical order....
Anyway, seat time
So, there is essentially only one company that does a bolt in kit for these cars, and thats cobra, however the seats they supply are not FIA and as such in my mind not approved. being that i am attached to my spine and the seats will form part of the safety structure (particularly once i can get a harness in) i wanted an FIA seat, and the support that it offered. In no way am i suggesting that the other alternatives are not good enough, but i wanted a classified seat and that was that.
Being that "YOLOing" (i think i have heard that on youtube) can get expensive with seats when you discover they dont fit and never will. I took the easy way initially and through a friend of a friend of a friend ordered the full kit but with FIA Imola's. I also asked for them to have the Aston wings, however Cobra have had their collar felt by the Aston legal department in the past about use of the badge (I do find this pathetic, a brand that constantly tries to associate it's self, embarrassingly in my opinion with James bond then spends it time sending threatening letters to a man for drawing some wings in a seat, I mean, get a grip) so.........they turned up completely blank, which was fine, apart from they looked like something off Aliexpress, which was not quite the look i was aiming at.
I didnt take any pictures of the seats with no logo's, and in all honesty i have done a piss poor job of documenting this change for a number of reasons.
It was a bit of a d1ck
it took ages
i was distracted and there were a lot of pauses for contemplation.
Anyway, having got the seats, i stripped all the covers off (hats off to cobra on this one, they are a doddle to strip down) and ran them down to the local work wear embroidery place who promptly and with no fuss put the wings on in silver and green for £12.75 for the pair, winner.
I then went on to start the install, and really did a bad job with the pictures.
Initially i just went to put the kit in as intended, so base plate, then runners, belt mounts side mounts and finally the seat. Frankly, its a prick, partly because the seats i am using are not intended for the job, and partly because access on the tunnel side is very tight meaning the usual faff of seat fitting where you slowly turn the inside bolts one flat at a time, blind with a tiny spanner. (if you have fitted many bucket seats, this will be familiar, its that moment when your arm is so contorted you want to cry, but you cant because your a f
king grown man and it would just be silly.......Seat out, (i tidied all the crap looking stock wiring up with proper loom tape hence the change in the subsequent pictures)
Base plate in
Base plate, runners, extenders, side mounts etc etc (i an retaining the oeM buckle which allows me the retain the oem seatbelt reminder without fudging it)
at this point, i fitted the seat, jumped in, and hated it, please note, this is not a problem with the kit, this is an issue with me not using the complete kit (ie.e. the wrong seats) and my particular requirements. It wasnt reclined enough, was nice and low but didnt feel quite natural, and i didn't really like the iperation of the sliders or the many layers of bits bolted together to make it all work.
I faffed about with this a few more times moving the seat about and did improve it (i definitely didn't cry when i put the seat in for the 5th time) and it was kind of not bad, but ultimately the high sides of the seats created a fitting issue and the upright nature would be ok for pure track use but not combined duties, but it was probably just about livable.
At this point i went and sat in the shed for a bit, and while looking dejectedly at the oeM Recaro's i found myself thinking that extruded aluminum motorised runner mechanisms were pretty fancy really, and that the way they bolted to the seat was very much like an steel frame base mount, or even, a base plate.
It took some time to summon up the desire to strip down and cut the oem loom, i had vaguely harbored desires to sell the seats and turning them into half a seat would of course f
k that right in the bumpipes. Never the less, the more i looked the more i liked it. So allowing a good tail to allow for re-attachment i split the seats and clipped the loomsLong story short, with some minor adjustment, (cutting a pair of locating tabs off the seat subframes and drilling a hole extra you can mount a standard racing seat sidemount onto the Vantage electric part alloy sub frame. The frames are light too, so the weight penalty is minimal, if not possibly in your favor.
I took very very few pictures of this process, but did take a picture of it installed so you can get the idea
I dont know why its Hovis bakery sepia toned, it just is. At some point i will remove them again and strip back all the seat loom wiring i am not using and add in some dummy loads for the side airbags so will take some more pictures then if there is any interest in the "how does that work element".
Ultimately, what i now have is fully electric tilting buckets, they do sit a little higher, but i am 182cm and there is still adequate room for my lid, so all good. the seat belt receptacle is tight to the tunnel due to the bolster height, but works well and hopefully future developments will improve that further.
I also as can be seen above replaced my shabby looking door bars with some nice piano black ones (came up cheap on ebay and i have plans for the originals)
Serviced it (with a genuine filter, thank you very much)
Removed all the rusty rear mesh, (people constantly paint these on the car, which is a s
t job as it paints the oil cooler and doesn't remove all the rust, as such mine did not look all that fresh . They will be blasted and powdercoated at some point but for now can just be off (weightsaving) To do this requires you to remove the back of the car and the factory manual is quite frankly a joke in terms of its description of the process.Feels excessive to have to do this to remove some bumper trim really
In doing so i also removed some defunct electronics and cleaned up and greased all the subframe bolts under the liners for when that inevitably comes out at some point.
Then all back together with the mesh removed, looks a bit odd with the v12 exhaust but not outlandish in my opinion
As usual, this job involved lots of duff fasteners needing to be replaced which was a faff, but now at least with all of these replaced and greased, it will be a doddle to get apart should i need to again.
Get used to this type of thing if you have an older vantage....
Edited by IainWhy on Tuesday 21st June 11:09
BrettMRC said:
I wonder how much extra it would cost to just have good quality stainless fastners on a car?
Back on topic - looking good OP.
Looks like the exhaust trims are part of the bumper then?
Pennies, the bolts themselves are not bad, its the spire clips that are junk, most manufacturers seem to love speed clips and spire clips in these locations despite the fact that they dont last. on the plus side, once drilled out they can be easily replaced. Still as you suggest, a stainless clip would prevent all this faff, as would frankly a bit of grease....Back on topic - looking good OP.
Looks like the exhaust trims are part of the bumper then?
Exhaust finishers are as you suggest mounted to the bumper, though not part of it, the are bolted to a steel place then to some ceramic bobbins and mounted to the bumper. I think i will remove them next time i am in that area and see what it looks like.
IainWhy said:
Long story short, with some minor adjustment, (futting a pair of locating tabs off the seat subframes and drilling a hole extra you can mount a standard racing seat sidemount onto the Vantage electric part alloy sub frame. The frames are light too, so the weight penalty is minimal, if not possibly in your favour.
I took very very few pictures of this process, but did take a picture of it installed so you can get the idea
Really interesting post thank you. I have been looking at the Cobra kit (hence my interest in which seats you'd gone with earlier in the thread) and the idea of retaining the OEM electric mount is great, nice work.I took very very few pictures of this process, but did take a picture of it installed so you can get the idea
Does retaining the OEM electric subframe allow you to retain the original seatbelt buckle mount or did you have to use the seatbelt bracket from the the Cobra kit (as in the Cobra diagram)? Could you complete this without the Cobra Vantage mounting kit and just a pair of bucket seat side mounts and the electric subframe or did you use any other bits from the Cobra kit?

When you say "with some minor adjustment, (fitting a pair of locating tabs off the seat subframes and drilling a hole extra you can mount a standard racing seat sidemount onto the Vantage electric part alloy sub frame", does that mean you took the locating tabs off the Cobra mounts and added them to the electric frame or have I misunderstood?
Is the airbag warning light easy to bypass with a resistor?
Thanks and keep it up, what a cool project.
Edited by olv on Monday 20th June 16:54
olv said:
Really interesting post thank you. I have been looking at the Cobra kit (hence my interest in which seats you'd gone with earlier in the thread) and the idea of retaining the OEM electric mount is great, nice work.
Does retaining the OEM electric subframe allow you to retain the original seatbelt buckle mount or did you have to use the seatbelt bracket from the the Cobra kit (as in the Cobra diagram)? Could you complete this without the Cobra Vantage mounting kit and just a pair of bucket seat side mounts and the electric subframe or did you use any other bits from the Cobra kit?
When you say "with some minor adjustment, (fitting a pair of locating tabs off the seat subframes and drilling a hole extra you can mount a standard racing seat sidemount onto the Vantage electric part alloy sub frame", does that mean you took the locating tabs off the Cobra mounts and added them to the electric frame or have I misunderstood?
Is the airbag warning light easy to bypass with a resistor?
Thanks and keep it up, what a cool project.
So on the first point, yes I used primarily one other part, which was part 7 on the diagram, this is to allow the buckle to sit much higher, all other mounting remain as per oem into the base. i also used the hardware particularly the oblong washers, but this is of course all easy to source. Does retaining the OEM electric subframe allow you to retain the original seatbelt buckle mount or did you have to use the seatbelt bracket from the the Cobra kit (as in the Cobra diagram)? Could you complete this without the Cobra Vantage mounting kit and just a pair of bucket seat side mounts and the electric subframe or did you use any other bits from the Cobra kit?
When you say "with some minor adjustment, (fitting a pair of locating tabs off the seat subframes and drilling a hole extra you can mount a standard racing seat sidemount onto the Vantage electric part alloy sub frame", does that mean you took the locating tabs off the Cobra mounts and added them to the electric frame or have I misunderstood?
Is the airbag warning light easy to bypass with a resistor?
Thanks and keep it up, what a cool project.
Edited by olv on Monday 20th June 16:54
In terms of the second question, i have mislead you with my spakky typing, i cut two alignment pins off the oem mount than added a hole or two to get everything aligned.
Other than that its just the side mounts and the seat. As to if this would work for other depends on how you would like it positioned really.
Air bag wise, not sorted that, i need to look at the wiring diagram and measure the resistance of the bags, but i don't see why this will present an issue, though of course i cant in any way actually substantiate that .
IainWhy said:
So on the first point, yes I used primarily one other part, which was part 7 on the diagram, this is to allow the buckle to sit much higher, all other mounting remain as per oem into the base. i also used the hardware particularly the oblong washers, but this is of course all easy to source.
In terms of the second question, i have mislead you with my spakky typing, i cut two alignment pins off the oem mount than added a hole or two to get everything aligned.
Other than that its just the side mounts and the seat. As to if this would work for other depends on how you would like it positioned really.
Air bag wise, not sorted that, i need to look at the wiring diagram and measure the resistance of the bags, but i don't see why this will present an issue, though of course i cant in any way actually substantiate that .
Excellent, thanks.In terms of the second question, i have mislead you with my spakky typing, i cut two alignment pins off the oem mount than added a hole or two to get everything aligned.
Other than that its just the side mounts and the seat. As to if this would work for other depends on how you would like it positioned really.
Air bag wise, not sorted that, i need to look at the wiring diagram and measure the resistance of the bags, but i don't see why this will present an issue, though of course i cant in any way actually substantiate that .
IainWhy said:
So on the first point, yes I used primarily one other part, which was part 7 on the diagram, this is to allow the buckle to sit much higher, all other mounting remain as per oem into the base. i also used the hardware particularly the oblong washers, but this is of course all easy to source.
In terms of the second question, i have mislead you with my spakky typing, i cut two alignment pins off the oem mount than added a hole or two to get everything aligned.
Other than that its just the side mounts and the seat. As to if this would work for other depends on how you would like it positioned really.
Air bag wise, not sorted that, i need to look at the wiring diagram and measure the resistance of the bags, but i don't see why this will present an issue, though of course i cant in any way actually substantiate that .
I've replaced the seats in my Monaro (and interestingly originally went your way of putting the seats on the factory electronic bases, before ultimately going to manual runners on a proper mounting bracket).In terms of the second question, i have mislead you with my spakky typing, i cut two alignment pins off the oem mount than added a hole or two to get everything aligned.
Other than that its just the side mounts and the seat. As to if this would work for other depends on how you would like it positioned really.
Air bag wise, not sorted that, i need to look at the wiring diagram and measure the resistance of the bags, but i don't see why this will present an issue, though of course i cant in any way actually substantiate that .
Anyway, side airbags, hopefully the Aston service manual or whatever posh equivalent they call it (bespoke preservation compendium?) will be as thorough as the Holden one, whereby it explains what the conditions are to set the various airbag codes. My actual point is, it's quite common as I understand it that the system is looking for a resistance and a capacitance.
In my case, it was 4.7 ohm resistance and 0.47uF capacitance. It was actually a range with those values at the centre of the range, which makes sense.
I was told by quite a few people I'd have a hard time trying to measure capacitance across an airbag, not least because a tool to measure capacitance isn't standard workshop fodder, but also because putting voltage across an airbag has its inherent *bangy* risks...

As you'll no doubt know, but just in case, typically once you 'fix' the airbag fault condition it needs an actual 'clear codes' command sent to it, it won't clear itself.
SturdyHSV said:
I've replaced the seats in my Monaro (and interestingly originally went your way of putting the seats on the factory electronic bases, before ultimately going to manual runners on a proper mounting bracket).
Anyway, side airbags, hopefully the Aston service manual or whatever posh equivalent they call it (bespoke preservation compendium?) will be as thorough as the Holden one, whereby it explains what the conditions are to set the various airbag codes. My actual point is, it's quite common as I understand it that the system is looking for a resistance and a capacitance.
In my case, it was 4.7 ohm resistance and 0.47uF capacitance. It was actually a range with those values at the centre of the range, which makes sense.
I was told by quite a few people I'd have a hard time trying to measure capacitance across an airbag, not least because a tool to measure capacitance isn't standard workshop fodder, but also because putting voltage across an airbag has its inherent *bangy* risks...
As you'll no doubt know, but just in case, typically once you 'fix' the airbag fault condition it needs an actual 'clear codes' command sent to it, it won't clear itself.
Thanks dude, If i am honest i am slightly putting it off, for three reasons.Anyway, side airbags, hopefully the Aston service manual or whatever posh equivalent they call it (bespoke preservation compendium?) will be as thorough as the Holden one, whereby it explains what the conditions are to set the various airbag codes. My actual point is, it's quite common as I understand it that the system is looking for a resistance and a capacitance.
In my case, it was 4.7 ohm resistance and 0.47uF capacitance. It was actually a range with those values at the centre of the range, which makes sense.
I was told by quite a few people I'd have a hard time trying to measure capacitance across an airbag, not least because a tool to measure capacitance isn't standard workshop fodder, but also because putting voltage across an airbag has its inherent *bangy* risks...
As you'll no doubt know, but just in case, typically once you 'fix' the airbag fault condition it needs an actual 'clear codes' command sent to it, it won't clear itself.
1 the aston martin workshop manual is $h1t at wiring diagrams and labeling i.e not only do the diagrams look like something i have drawn but the colour code is stupid and they do things like call the instrument cluster a "DIM" driver information module i mean, wtf
2 i need to ring Aston martin care? could be, cant recall and ask them if they can just turn them off, i am going to see them on my way to Spa to get the egr coded out and a few other items turned off
3 No MOT's over here so no one will care about it other than i have to keep telling the warning to p
s off.I Think i will brave the workshop manual and then shove one of those dummy loads in from ebay and see what happens once i have bought a foxwell (aston martin have two obd ports one for plebs and the other for the initiated, i need to access the private members area.
Nothing that big on this one but i am working on a few more significant changes.
It occured to me that i had given the impression that this car had been more or less plain sailing, well, yea, not so much. I mean all the moaning i am about to do is fairly small beer in real terms, but never the less.
Problems:
1, the car has needed to be repaired at the roadside 3 times in a month. Fortunately Aston martin supply 50p (at best) heyco stubby screwdriver that enabled an effective repair (more below) - Fixed
2. bd thing constantly failed to start as the battery was as flat as an arse - Fixed
3. Passenger side window is going bats hit and is just generally useless (linked to point 2) - not fixed (Sort of fixed by not having passengers)
4. the boot lid started to fall off - fixed
5. doors try and guillotine your legs off - soon to be fixed
So, problem one.
This fked me over a few time, always in an embarrassing way, overtook a van, twang, stuck in 3rd, just about to give a gti a seeing to, twang, stuck in third again.
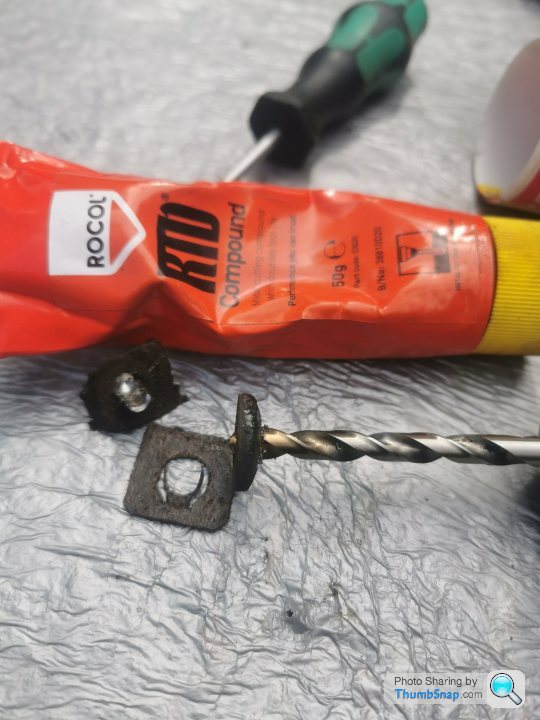
Having nursed it to a B&Q carpark it became apparent that the ball socket had come off the lever, i pushed it back on, and carried on my way, the second time i was able to just shove it back on through the gaiter without stopping but not before losing my stride, it popped off at least once more and was "repaired again" obviously though it was fked. Fortunately Vauxhaull vivaro van also have this issue.so my mate matt gave me a repair clamp, it was way way too big,

But i own an angle grinder, a file and lots of taps. so made this.

Lets see you pop off now you little fker.
I also made up a lever extension, the stock one if both too short (too far away from hand when hand is on wheel not on cigar) and too stiff in action. Making the lever longer solves those issues and i will shorten the throw later in the process if it works nicely


Looks stupid, works brilliantly
anyway took it out for a test spin, fast 3rd to 4th, twang, stuck in 3rd again. FFS!
This time it had sheared off the plastic support that fits through the gearbox fork (it was cracked and noticed during the clutch change but i thought the ziptie would sort it). So i did the thing i had been avoided and chocked out £219.72 for a new selector cable. £200 for a glorified bike brake cable, FML. I also stumped up for two new aston martin door struts which were surprisingly cheap at £21.03 each which will hopefully stop the door trying to kill me.
You can see the missing plastic below

I fitted the brake cable in the dark (1am, because i am super weird) but it was not a challenging job, just tie some string to the old one, then use the string to pull the new one back in.

I then refitted my cable clamp to be sure, and so far, its not all fallen apart of broken
The cable studs are 10mm

So now i know this and have a spare cable, all be it a broken one, i am going to see if i can get something far far more resilient made up as i dont trust this setup at all.
Problems 2,3 & 4 to come when i have the time to write it up
It occured to me that i had given the impression that this car had been more or less plain sailing, well, yea, not so much. I mean all the moaning i am about to do is fairly small beer in real terms, but never the less.
Problems:
1, the car has needed to be repaired at the roadside 3 times in a month. Fortunately Aston martin supply 50p (at best) heyco stubby screwdriver that enabled an effective repair (more below) - Fixed
2. b
d thing constantly failed to start as the battery was as flat as an arse - Fixed3. Passenger side window is going bats hit and is just generally useless (linked to point 2) - not fixed (Sort of fixed by not having passengers)
4. the boot lid started to fall off - fixed
5. doors try and guillotine your legs off - soon to be fixed
So, problem one.
This f
ked me over a few time, always in an embarrassing way, overtook a van, twang, stuck in 3rd, just about to give a gti a seeing to, twang, stuck in third again.Having nursed it to a B&Q carpark it became apparent that the ball socket had come off the lever, i pushed it back on, and carried on my way, the second time i was able to just shove it back on through the gaiter without stopping but not before losing my stride, it popped off at least once more and was "repaired again" obviously though it was f
ked. Fortunately Vauxhaull vivaro van also have this issue.so my mate matt gave me a repair clamp, it was way way too big,But i own an angle grinder, a file and lots of taps. so made this.
Lets see you pop off now you little f
ker.I also made up a lever extension, the stock one if both too short (too far away from hand when hand is on wheel not on cigar) and too stiff in action. Making the lever longer solves those issues and i will shorten the throw later in the process if it works nicely
Looks stupid, works brilliantly
anyway took it out for a test spin, fast 3rd to 4th, twang, stuck in 3rd again. FFS!
This time it had sheared off the plastic support that fits through the gearbox fork (it was cracked and noticed during the clutch change but i thought the ziptie would sort it). So i did the thing i had been avoided and chocked out £219.72 for a new selector cable. £200 for a glorified bike brake cable, FML. I also stumped up for two new aston martin door struts which were surprisingly cheap at £21.03 each which will hopefully stop the door trying to kill me.
You can see the missing plastic below
I fitted the brake cable in the dark (1am, because i am super weird) but it was not a challenging job, just tie some string to the old one, then use the string to pull the new one back in.
I then refitted my cable clamp to be sure, and so far, its not all fallen apart of broken
The cable studs are 10mm
So now i know this and have a spare cable, all be it a broken one, i am going to see if i can get something far far more resilient made up as i dont trust this setup at all.
Problems 2,3 & 4 to come when i have the time to write it up
Edited by IainWhy on Monday 27th June 18:17
Gassing Station | Readers' Cars | Top of Page | What's New | My Stuff