Yet another rescued E36 328i M Sport project...
Discussion


JamesRF said:
Admire the dedication you're putting into this, I'm sure most people would have given up on it a long time ago. Interior is really going to make the car that's for sure!
It does have a very strange MOT history though, was showing 205k miles back in September 2012 and then 2 weeks later it was back at 144k miles which seems a bit dodgy. Also the last one it had shows the mileage as unreadable so presumably the pixels are all scrambled now?
I know you say it's a keeper and you won't ever sell it, but I genuinely don't know if I could stomach sinking the best part of 10k into this particular example. Hopefully the project doesn't throw up any more curve balls and you're able to at least start enjoying it on the road soon!
Well,I am aware that the instrument cluster has been replaced. Only found out after coming across the last but one keeper and talking about his time with the car. That was last year after a lot of this work was already underway/completed. The pixels are all fine and mileage is perfectly readable.It does have a very strange MOT history though, was showing 205k miles back in September 2012 and then 2 weeks later it was back at 144k miles which seems a bit dodgy. Also the last one it had shows the mileage as unreadable so presumably the pixels are all scrambled now?
I know you say it's a keeper and you won't ever sell it, but I genuinely don't know if I could stomach sinking the best part of 10k into this particular example. Hopefully the project doesn't throw up any more curve balls and you're able to at least start enjoying it on the road soon!
As has been the nature of this particular journey, have come across a number of unpleasant/uncomfortable surprises, but when they happen incrementally, over a long period of time, you just get on with what you got to deal with at that moment in time. "It is what it is...." And yes, I certainly wouldn't be where I am now, and certainly not with this particular car. Rather than try and implicate myself for my gross inexperience/ignorance/down-right stupidity, this would better serve as a warning to those out there who are thinking of taking on an old e36, regardless of particular model, and give them a heads-up before venturing into the unknown.
Regardless, it is what it is and has nearly come to completion. Have checked out the rest of the bodywork, in light of the sill rot discovery, and my new garage guy and myself are happy that there shouldn't be any further nasties to jump out at us. The rear sub frame/suspension bodywork area is going to get a fairly comprehensive upgrade. This is to ensure that I don't end up ripping out the rear suspension when driving it hard.
Shall we move on?
I'm keen to see the interior too. Also glad to see the thread move on from all the questions about the car's history and previous condition- all perfectly valid but it's more interesting (and encouraging for you, Rick, I'm sure) to see the work happening and consider the condition it's in now. It has had a pretty thorough going over (as have you here recently, Rick!)
I'm probably saying this because of some of my Alpina B3 experience, also in readers cars. But let's not dwell in that.
I'm probably saying this because of some of my Alpina B3 experience, also in readers cars. But let's not dwell in that.
Polynesian said:
I'm keen to see the interior too. Also glad to see the thread move on from all the questions about the car's history and previous condition- all perfectly valid but it's more interesting (and encouraging for you, Rick, I'm sure) to see the work happening and consider the condition it's in now. It has had a pretty thorough going over (as have you here recently, Rick!)
I'm probably saying this because of some of my Alpina B3 experience, also in readers cars. But let's not dwell in that.
The interior is going to get sorted - properly now! I think that if you put yourself, and your project, up for public scrutiny, you're always going to run the risk of a good 'shoeing'! I've noticed that some of the previous 'detractors' on my thread, have now started to come round, as I'm sure if only out of sympathy, have actually started to appreciate my - sometimes ludicrous - stamina to see this to the end....I'm probably saying this because of some of my Alpina B3 experience, also in readers cars. But let's not dwell in that.
I've learnt lots - even from some of the negative 'support' that I've got, and has helped me to think a lot about where this whole thing has taken me, and driven me to see this thing through. Its not just about money - god knows I've thrown enough at this already, its about making on-the-fly decisions, even if they're not always that well informed, will eventually get the job done! Ufffff! Its about stamina as well.
Spoken to my new mechanic this evening. He's dropped the exhaust off, removed the gearbox, clutch and flywheel and has replaced the badly fitted main engine oil seal with a new OEM part, to fix the leak we found when we got it back to Bristol. Cost me another £150, including the part, but at least it can be run-in now without running the risk of seizing it up! All else with the rebuild seems to be OK.
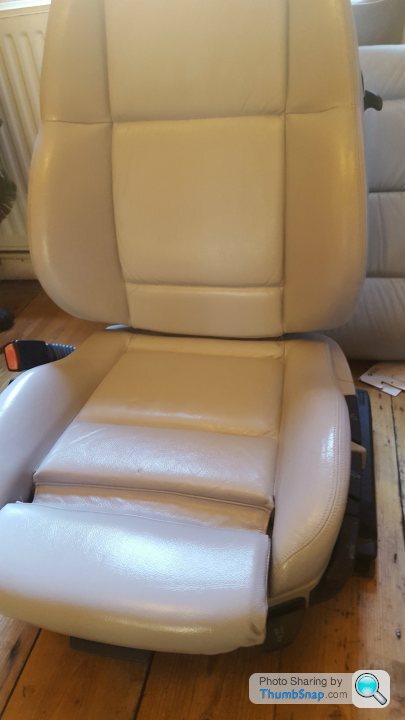
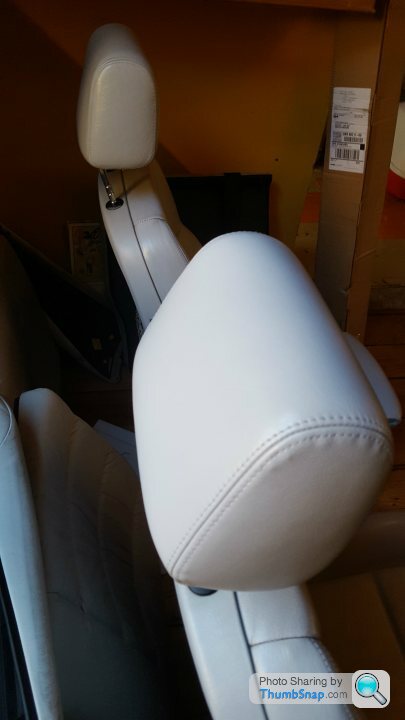
As I said yesterday, I have an update on the interior swap progress. Well, I had the old yucky two tone grey interior replaced, after the guy previously managed to get a rare option black with red leather interior.
These pics aren't from my car, but are an example of what I bought.......
He went on to start refurbishing the tiered leather and assured me that it would come out looking good. However, despite his best efforts, when I collected the car last week it was apparent that at the very least it was going to take a considerable amount of time/effort if there was going to be any chance of restoring it to acceptable condition....
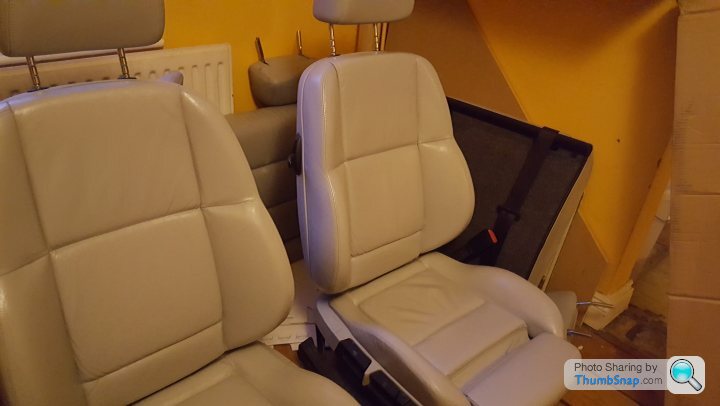
So, I was put in touch with a guy who had a mint condition interior from a low mileage car which was complete, apart from the front seats - will come back to that in a moment.
Now bear with me here. Have replaced the interior with a black carpet and dash, the two biggest jobs AND they are both in very good condition. However, the replacement interior that I just acquired is, wait for it! The same yucky two tone grey as my original.
Door cards.
Mint condition centre arm rest.
Together with rear seats etc.
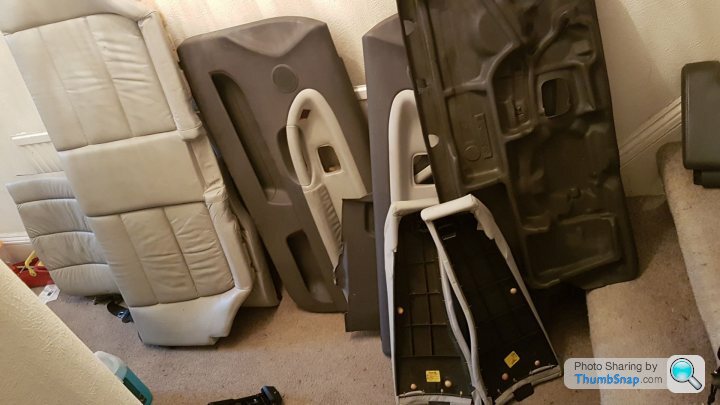
As I'm sure you can appreciate, this interior is in mint condition. At least something has gone my way recently.
Well, what to do about this latest predicament????? That tiered old shagged red and black interior, with blown door card inserts and cracked scuffed seats is definitely NOT staying in my car!
 Eureka! The light grey leather is almost white in tone, AND, if I could finish the rest of the interior in black it would A) Be an extremely rare interior colour option, don't think BMW ever offered that particular combo, B) will look pretty striking/stunning... Don't start on the "matter of taste" thing!
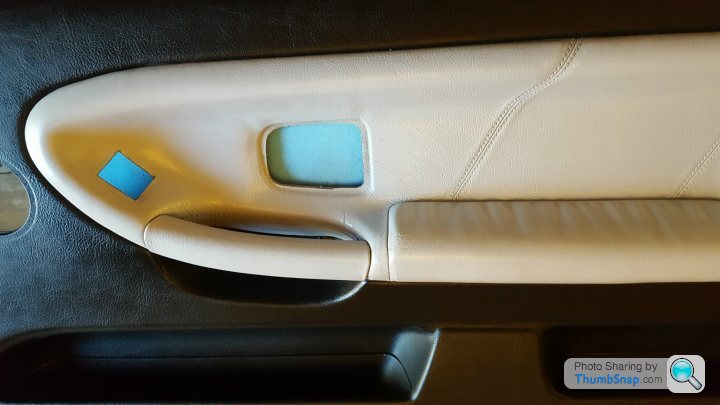
So, the biggest obstacle to realising this latest decision is that the door cards themselves are dark grey. Hmmmmm..... Good old Google, the interneters friend.... After much searching/researching about removing leather inserts/refurbing door cards/changing colour schemes etc. Found that there are companies out there who specialise in doing just this and wasn't long before I came across vinyl colour products for refurbing/change colours....
And this morning this little lot arrived at my door.
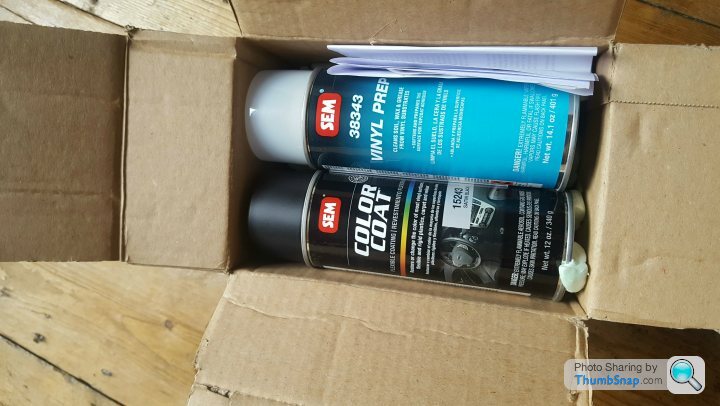
I know that there are many different products types/environmental considerations/blah blah blah. BUT, having done a lot of digging around this subject, found that for the vinyl part of the interior, this was by far one of the best products, as long as you prep thoroughly. There are many people out there that have used this and three/four years later, their interiors haven't faded/cracked/etc. So SEM Color Coat it is!
Found a supplier in the UK - its an American product - discussed with their technical department regarding preparation/application/after care and found them to be really helpful. So here goes....
First up is masking the leather door card inserts.
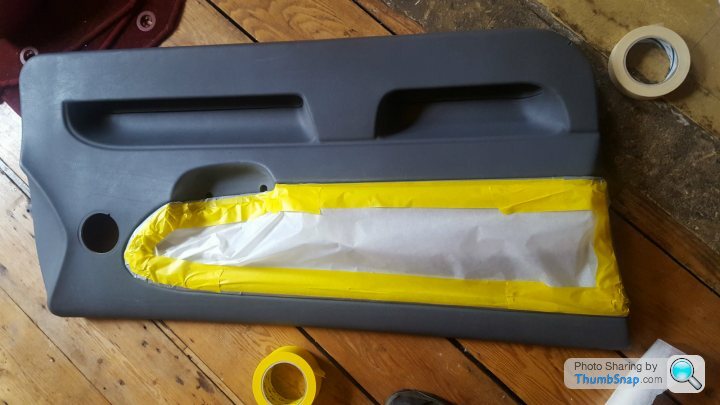
Make no mistake. This was a real b h of a job. I bought some high tack masking tape from a local car paint supplier, but even that wouldn't stick to the leather. I even tried copious cleaning before drying and reapplying the tape - same result.
  I then remembered that I had some duct tape lying around. WHAT! Duct tape on leather? You'll never get it off again! However, it worked AND peeled off afterwards with no problem at all.
I then set about using the vinyl prep spray on the vinyl areas of the door cards. This strips off any greasy finger mark, dirt, polish and any manufacturer applied top coat. I have read that the only time people have had problems with the SEM Color Coat was it failing because the person had not prepped thoroughly enough. So, I applied the vinyl prep spray, wiped it down, rinsed with water and let dry. Just to be on the safe side, I repeated this process a further two times for each card.

I then set about applying the Color Coat. Left it ten minutes between coats - as per the instructions - and repeated this a number of times until I had a really solid even colour over the vinyl surfaces.
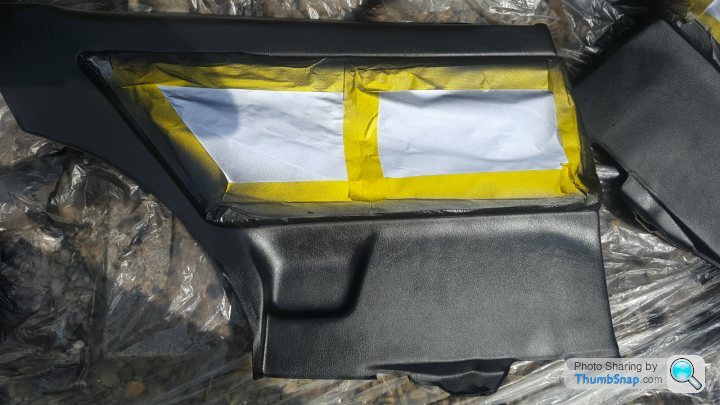
And the final result - looks a bit shiny in these pics. The sheen has started to mellow as it dries back properly.
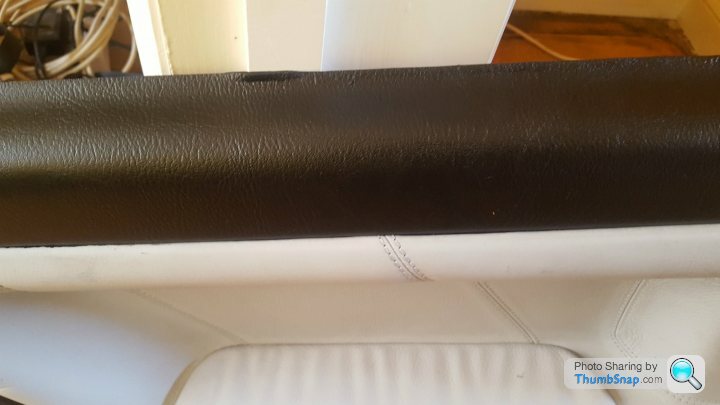
Looks absolutely lovely and I'm really pleased with the result, after all the ball ache to get there.
I really like the contfrast between the light grey - almost white - leather and the black. Its gonna look awesome! Far better than before.....
These pics aren't from my car, but are an example of what I bought.......
He went on to start refurbishing the tiered leather and assured me that it would come out looking good. However, despite his best efforts, when I collected the car last week it was apparent that at the very least it was going to take a considerable amount of time/effort if there was going to be any chance of restoring it to acceptable condition....
So, I was put in touch with a guy who had a mint condition interior from a low mileage car which was complete, apart from the front seats - will come back to that in a moment.
Now bear with me here. Have replaced the interior with a black carpet and dash, the two biggest jobs AND they are both in very good condition. However, the replacement interior that I just acquired is, wait for it! The same yucky two tone grey as my original.
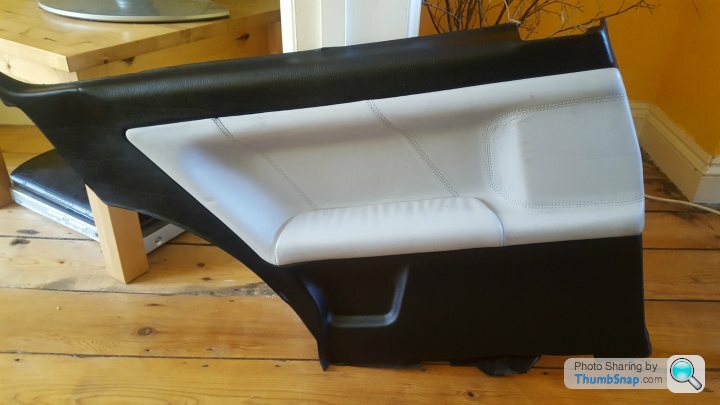
Door cards.
Mint condition centre arm rest.
Together with rear seats etc.
As I'm sure you can appreciate, this interior is in mint condition. At least something has gone my way recently.
Well, what to do about this latest predicament????? That tiered old shagged red and black interior, with blown door card inserts and cracked scuffed seats is definitely NOT staying in my car!
Eureka! The light grey leather is almost white in tone, AND, if I could finish the rest of the interior in black it would A) Be an extremely rare interior colour option, don't think BMW ever offered that particular combo, B) will look pretty striking/stunning... Don't start on the "matter of taste" thing!So, the biggest obstacle to realising this latest decision is that the door cards themselves are dark grey. Hmmmmm..... Good old Google, the interneters friend.... After much searching/researching about removing leather inserts/refurbing door cards/changing colour schemes etc. Found that there are companies out there who specialise in doing just this and wasn't long before I came across vinyl colour products for refurbing/change colours....
And this morning this little lot arrived at my door.
I know that there are many different products types/environmental considerations/blah blah blah. BUT, having done a lot of digging around this subject, found that for the vinyl part of the interior, this was by far one of the best products, as long as you prep thoroughly. There are many people out there that have used this and three/four years later, their interiors haven't faded/cracked/etc. So SEM Color Coat it is!
Found a supplier in the UK - its an American product - discussed with their technical department regarding preparation/application/after care and found them to be really helpful. So here goes....
First up is masking the leather door card inserts.
Make no mistake. This was a real b
h of a job. I bought some high tack masking tape from a local car paint supplier, but even that wouldn't stick to the leather. I even tried copious cleaning before drying and reapplying the tape - same result. I then remembered that I had some duct tape lying around. WHAT! Duct tape on leather? You'll never get it off again! However, it worked AND peeled off afterwards with no problem at all.I then set about using the vinyl prep spray on the vinyl areas of the door cards. This strips off any greasy finger mark, dirt, polish and any manufacturer applied top coat. I have read that the only time people have had problems with the SEM Color Coat was it failing because the person had not prepped thoroughly enough. So, I applied the vinyl prep spray, wiped it down, rinsed with water and let dry. Just to be on the safe side, I repeated this process a further two times for each card.
I then set about applying the Color Coat. Left it ten minutes between coats - as per the instructions - and repeated this a number of times until I had a really solid even colour over the vinyl surfaces.
And the final result - looks a bit shiny in these pics. The sheen has started to mellow as it dries back properly.
Looks absolutely lovely and I'm really pleased with the result, after all the ball ache to get there.
I really like the contfrast between the light grey - almost white - leather and the black. Its gonna look awesome! Far better than before.....
Edited by RickBristol on Thursday 24th August 22:50
I think that combination will work nicely. I always find the grey BMW interiors so ugly- grey leather bad enough, but grey plastics even worse. I think you'll have something striking and smart there. Years back I nearly bought a B3S touring (E46) in alpina blue but it had the grey interior- should have done it and chucked the grey!
Let's see some pictures of it all installed please!
Let's see some pictures of it all installed please!
I was never a fan of the grey interiors either. On the E36 it seemed to be about 50 shades of grey and all very wishy-washy. Had the light grey leather been set against a black interior it would look a million times better. I always fancied an Estoril Blue E36 M3 but so many of them had the grey interior, which really didn't go well with the blue paintwork (in my opinion), that I never got as far as buying one. I wanted one with a black interior which offered a much more attractive contrast and there simply weren't enough around. I did once see one with the lovely "Individual" champagne leather/black interior combo, which looked spectacular, but it was an SMG.
MitchT said:
I was never a fan of the grey interiors either. On the E36 it seemed to be about 50 shades of grey and all very wishy-washy. Had the light grey leather been set against a black interior it would look a million times better. I always fancied an Estoril Blue E36 M3 but so many of them had the grey interior, which really didn't go well with the blue paintwork (in my opinion), that I never got as far as buying one. I wanted one with a black interior which offered a much more attractive contrast and there simply weren't enough around. I did once see one with the lovely "Individual" champagne leather/black interior combo, which looked spectacular, but it was an SMG.
Mine's estoril with black interior, I think it suits the car much more too. Looks a lot more purposeful.
Vincefox said:
My e36 Evo as been ruinously expensive.
People really, REALLY underestimate how expensive these are to keep on top of when they get to this age.
Mine has sat in pieces since I bought it two years ago.... I think if values hadn't soared I'd have given up in all honesty.People really, REALLY underestimate how expensive these are to keep on top of when they get to this age.
Well, here I am again with 'yet another' update.
I have now collected the new sill panels from Dick Lovett BMW in Bristol.
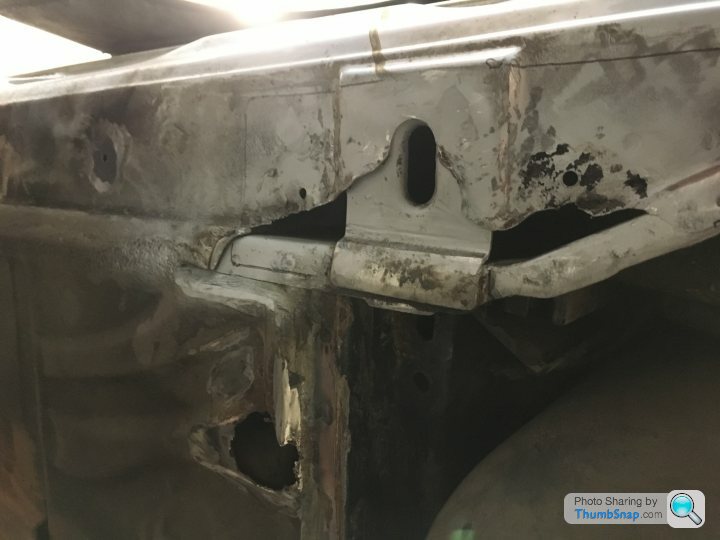
As You will have noticed in a previous post on the the last page, it was found that the front driver's side and rear passenger side jacking points were rusted out, so the side skirts were removed, were we discovered this....


Although the car looks, and generally is, in very good condition, the side skirts hid the fact that the rust had been creeping along the underside of the outer sills. Incidentally, the holes were big enough for us to shine a torch in were we could see that the inner sill panels are unaffected by rust - any that may be found, after cutting the sides of the car off, could be easily, and cheaply plated...
After much digging around on the internet, I found that after market replacement panels for the e36 coupe sills are no longer available. So, off to BMW I go in search of the 'shockingly expensive' replacements.
And a week after ordering them, they duly arrived from BMW in Germany.
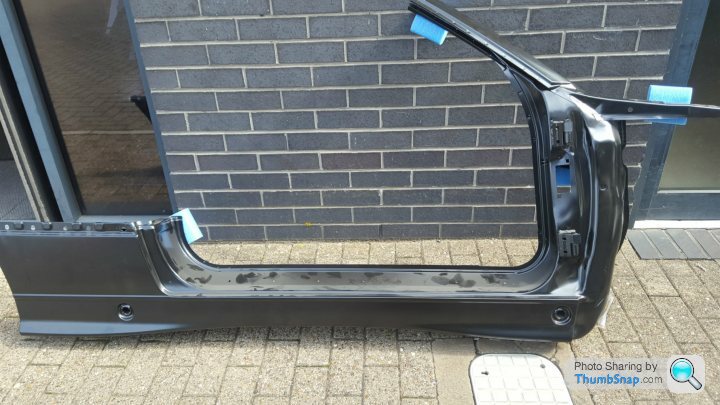
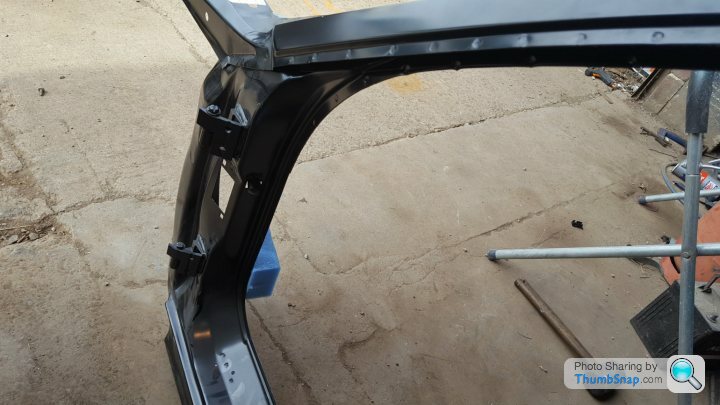
You could be forgiven for thinking that its the whole side of a car, because, basically, that's what it is!!!
After collecting them, and taking them over to the body shop, I took a good look at them, which was when I realised just why they were so expensive. They have the side jacking points built in.
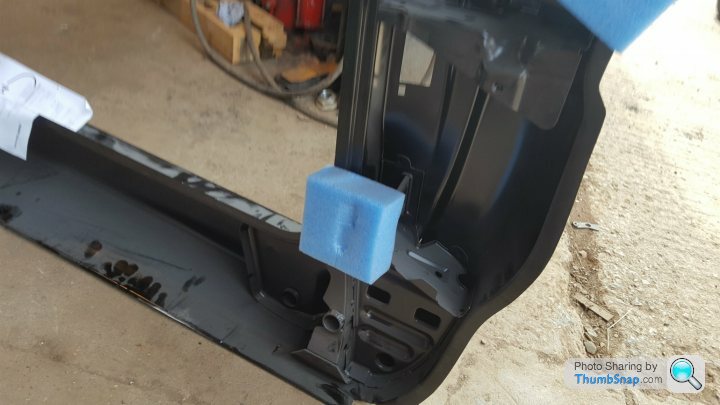
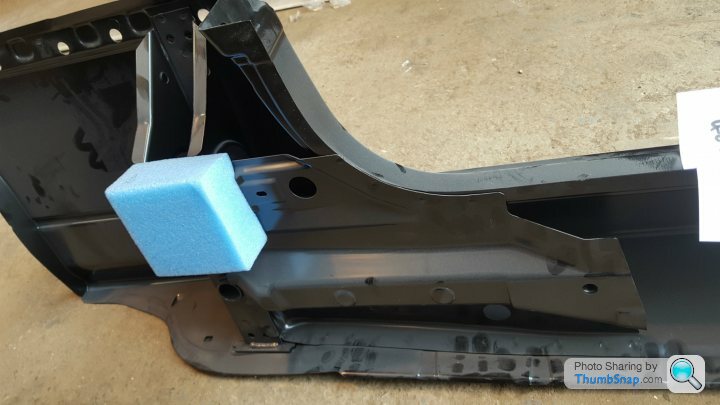
And all the related reinforcements...

They even have the door hinges built in as part of the panel, AND most of the A frame up the side of the windscreen!
As the front wings have to come off as part of the replacement, we noticed that the underside of both wings were also suffering from the dreaded 'rust' lurgy. So I then decided to shell out more cash and get a couple of replacements. Not BMW this time! as I was able to find decent after market replacements for around half the price of the genuine BMW ones. Cost was originally £140 each from the Euro Parts Platinum range, but when it came to paying for them, was informed that I would get an automatic discount for buying the two, which brought the cost down to around £88 each. Happy days!
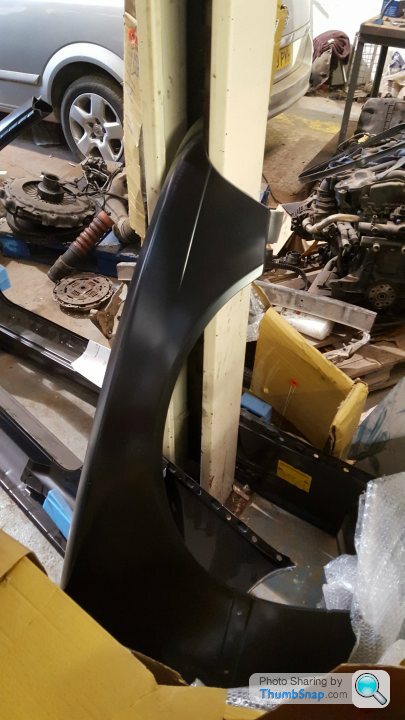
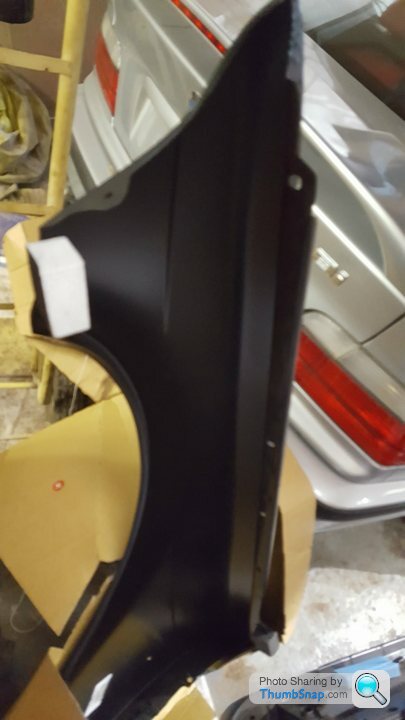
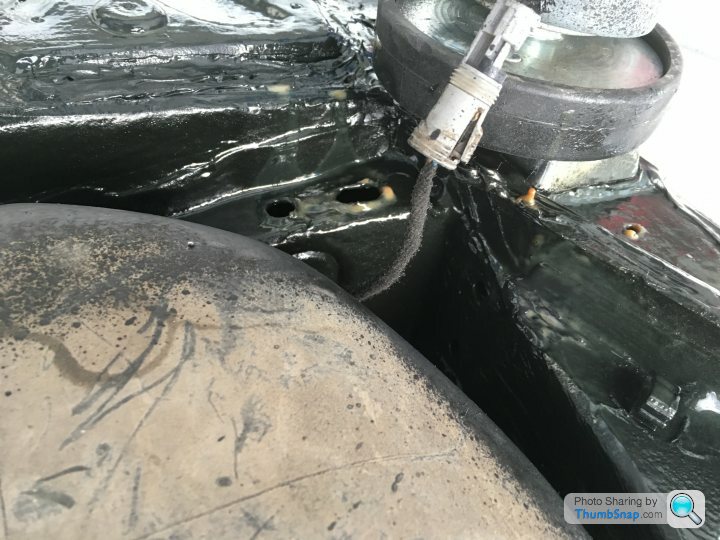
The inside of the new wings will be stone chipped, as will the underside of the sills, after the underside jacking points have had reinforcing plates welded on. The inside of the sills will then be wax oiled before the sides of car then gets painted and blended in. I'll post pics of all this as the work progresses over the next week or so.
If you're thinking of checking behind the side skirts on your pride and joy, take a VERY deep breath before doing so.....
I have now collected the new sill panels from Dick Lovett BMW in Bristol.
As You will have noticed in a previous post on the the last page, it was found that the front driver's side and rear passenger side jacking points were rusted out, so the side skirts were removed, were we discovered this....
Although the car looks, and generally is, in very good condition, the side skirts hid the fact that the rust had been creeping along the underside of the outer sills. Incidentally, the holes were big enough for us to shine a torch in were we could see that the inner sill panels are unaffected by rust - any that may be found, after cutting the sides of the car off, could be easily, and cheaply plated...
After much digging around on the internet, I found that after market replacement panels for the e36 coupe sills are no longer available. So, off to BMW I go in search of the 'shockingly expensive' replacements.
And a week after ordering them, they duly arrived from BMW in Germany.
You could be forgiven for thinking that its the whole side of a car, because, basically, that's what it is!!!
After collecting them, and taking them over to the body shop, I took a good look at them, which was when I realised just why they were so expensive. They have the side jacking points built in.
And all the related reinforcements...
They even have the door hinges built in as part of the panel, AND most of the A frame up the side of the windscreen!
As the front wings have to come off as part of the replacement, we noticed that the underside of both wings were also suffering from the dreaded 'rust' lurgy. So I then decided to shell out more cash and get a couple of replacements. Not BMW this time! as I was able to find decent after market replacements for around half the price of the genuine BMW ones. Cost was originally £140 each from the Euro Parts Platinum range, but when it came to paying for them, was informed that I would get an automatic discount for buying the two, which brought the cost down to around £88 each. Happy days!
The inside of the new wings will be stone chipped, as will the underside of the sills, after the underside jacking points have had reinforcing plates welded on. The inside of the sills will then be wax oiled before the sides of car then gets painted and blended in. I'll post pics of all this as the work progresses over the next week or so.
If you're thinking of checking behind the side skirts on your pride and joy, take a VERY deep breath before doing so.....
Edited by RickBristol on Sunday 24th September 12:05
Next update.
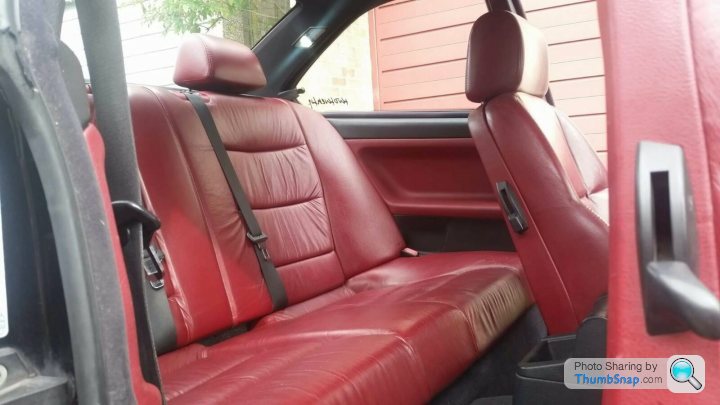
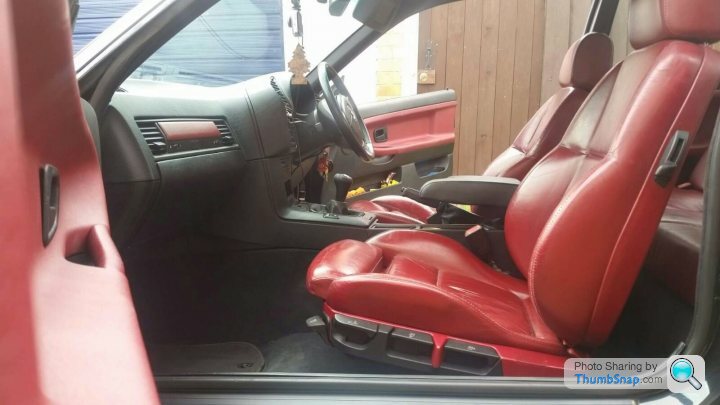
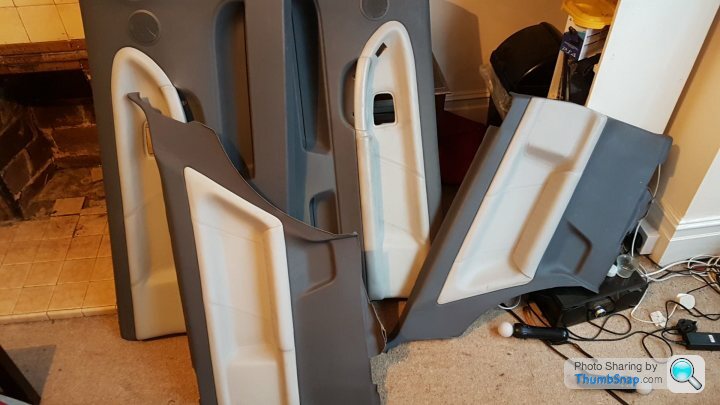
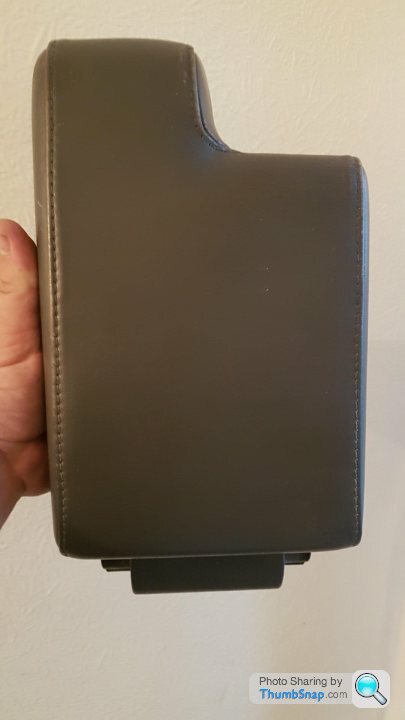
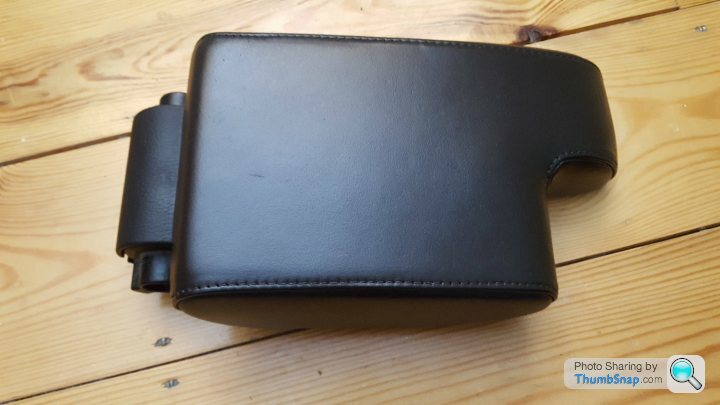
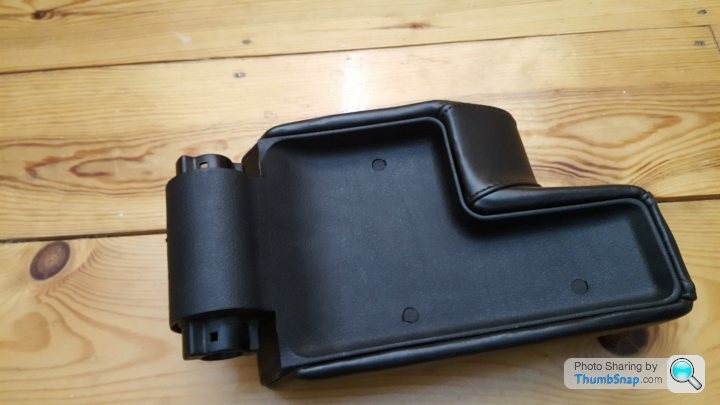
On a 'happier to report' note, I decided after getting the car back to Bristol, to scrap the shonky red/black interior swap due to its poor condition. So I bought the rear bench seeats, rear bolsters, front centre arm rest and door cards from Vsonix - thanks for your efforts mate - which were all in mint condition.
As I had now changed the carpet and dash to decent black replacements, then decided to use the two tone grey replacements and re-colour the dark grey vinyl on the door cards to black, so that I would end up with a black and silver grey leather interior.

However, the problem that I faced was that the new replacement interior didn't come with any front seats... And as my original grey front seats were completely shagged, I had to source another set of silver grey fronts. Vsonix to the rescue, once again! He came up with a pair of silver grey front seats in pretty good condition. Slightly discoloured, with the grain starting to show through on the driver' seat.
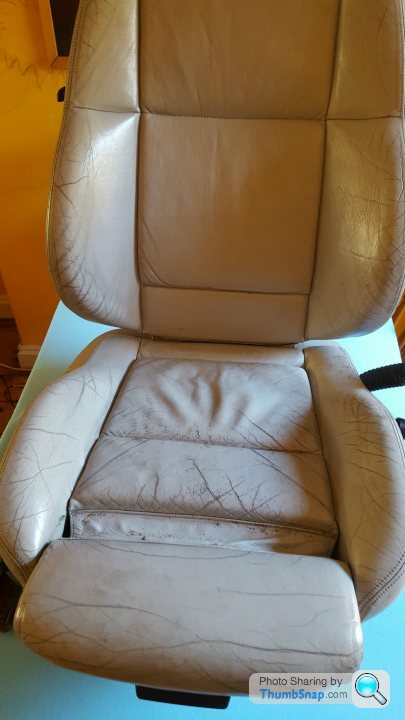
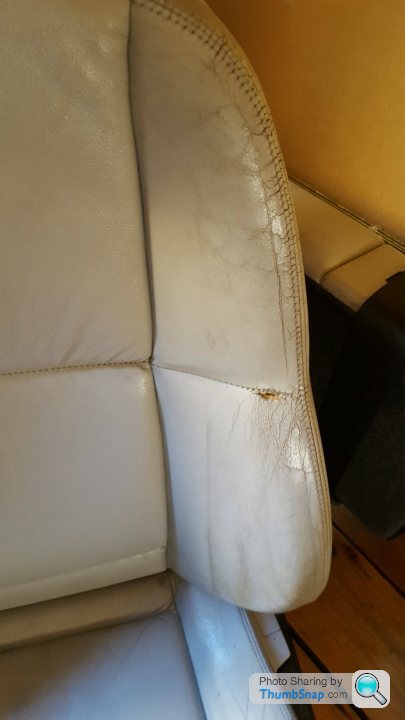
And a small tear on the stitching on the upper bolster on the passenger seat.
After doing some digging around, was recommended a company based in Bristol by a friend who had his shabby leather seats refurbed by them three years ago, and were still in really good condition - CFS Auto Interiors - cfsautointerior.co.uk and spoke to Steve 07506 730538 who said that he would be able to restore the seats with leather dye and lacquer and restitch the passenger seat tear.
A week later they came to my house - they do mobile refurbs and come to you! And spent half a day cleaning, stitching, re-dying and lacquering the seats, all for £300 inc VAT.
And the results?...
The tear in the passenger upper bolster.
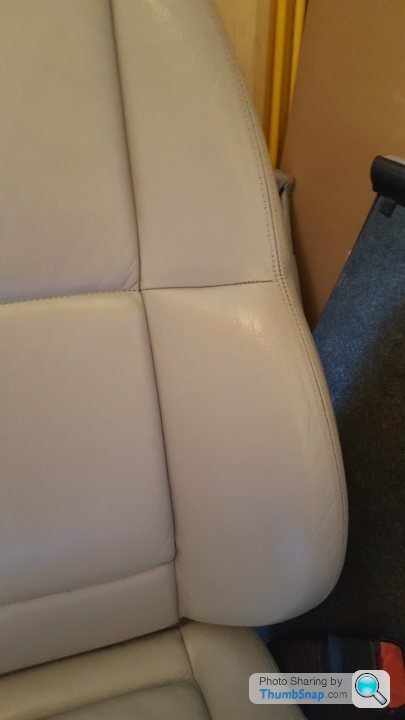
The driver's seat.
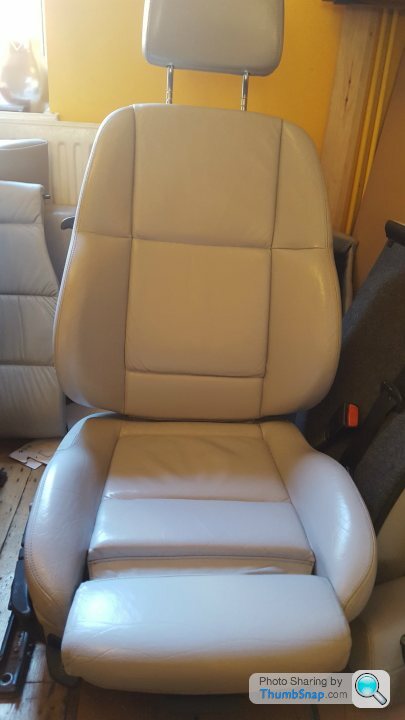
And the passenger seat.
They did a really cracking job, which I'm really pleased with.
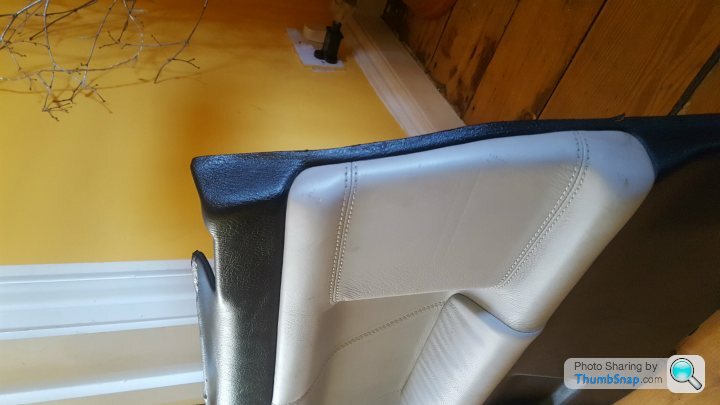
They even took care of the leather on the driver's door card, the only door card showing any slight signs of wear.
And dyed the centre arm rest leather black.
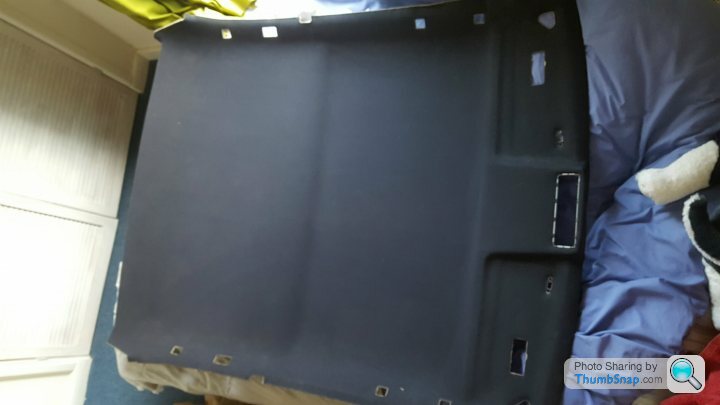
I also found that when I got the car back to Bristol that the headliner had given up the ghost and had sagged....
More internet searching, and found a really good black sport headliner for £80.
So all in all a much happier post than the last....
On a 'happier to report' note, I decided after getting the car back to Bristol, to scrap the shonky red/black interior swap due to its poor condition. So I bought the rear bench seeats, rear bolsters, front centre arm rest and door cards from Vsonix - thanks for your efforts mate - which were all in mint condition.
As I had now changed the carpet and dash to decent black replacements, then decided to use the two tone grey replacements and re-colour the dark grey vinyl on the door cards to black, so that I would end up with a black and silver grey leather interior.
However, the problem that I faced was that the new replacement interior didn't come with any front seats... And as my original grey front seats were completely shagged, I had to source another set of silver grey fronts. Vsonix to the rescue, once again! He came up with a pair of silver grey front seats in pretty good condition. Slightly discoloured, with the grain starting to show through on the driver' seat.
And a small tear on the stitching on the upper bolster on the passenger seat.
After doing some digging around, was recommended a company based in Bristol by a friend who had his shabby leather seats refurbed by them three years ago, and were still in really good condition - CFS Auto Interiors - cfsautointerior.co.uk and spoke to Steve 07506 730538 who said that he would be able to restore the seats with leather dye and lacquer and restitch the passenger seat tear.
A week later they came to my house - they do mobile refurbs and come to you! And spent half a day cleaning, stitching, re-dying and lacquering the seats, all for £300 inc VAT.
And the results?...
The tear in the passenger upper bolster.
The driver's seat.
And the passenger seat.
They did a really cracking job, which I'm really pleased with.
They even took care of the leather on the driver's door card, the only door card showing any slight signs of wear.
And dyed the centre arm rest leather black.
I also found that when I got the car back to Bristol that the headliner had given up the ghost and had sagged....
More internet searching, and found a really good black sport headliner for £80.
So all in all a much happier post than the last....
Edited by RickBristol on Wednesday 27th September 23:03
And now for the last update of the day.
I wanted to change the after market fake M3 wheels - came with the car when I bought it.
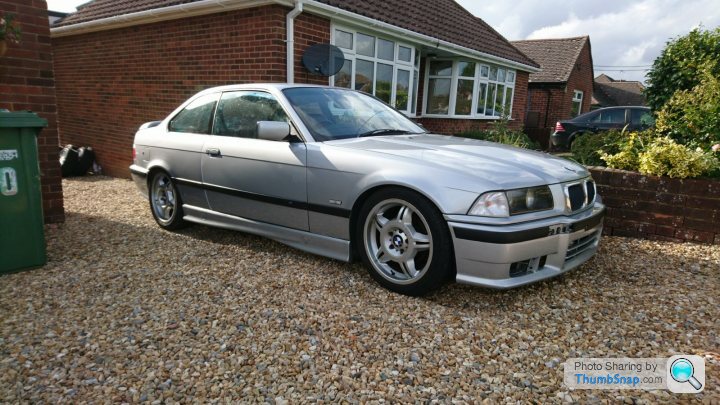
Managed to buy a set of the original RC 041s that the car would have come with when it was new. Had them refurbed - see previous posts - and decided this afternoon to rebuild them, ready to get them put on the car.
Have removed the powder coating from the mating face on the back of the wheel centres, as per advice I was given in a previous post.
Spent a long time getting the gold bolts fitted and the centres tightened to get the wheels finished.
And after a lot of graft managed to get them all ready to send off to the tyre fitter.

Ready to get the Bridgestones fitted and put on the car.
I wanted to change the after market fake M3 wheels - came with the car when I bought it.
Managed to buy a set of the original RC 041s that the car would have come with when it was new. Had them refurbed - see previous posts - and decided this afternoon to rebuild them, ready to get them put on the car.
Have removed the powder coating from the mating face on the back of the wheel centres, as per advice I was given in a previous post.
Spent a long time getting the gold bolts fitted and the centres tightened to get the wheels finished.
And after a lot of graft managed to get them all ready to send off to the tyre fitter.
Ready to get the Bridgestones fitted and put on the car.
Gassing Station | Readers' Cars | Top of Page | What's New | My Stuff