Rover 200 BRM - 1.8 K-Series turbo project
Discussion


Thanks guys. Can't wait to get it all back together and sitting right. Paint man did a cracking job. He had the car for 10 weeks working on its exclusively and I was expecting a much larger bill than I got. It hasn't been baked so I have to be super careful with it for a few weeks! Considering having it ceramic coated before exposing it to the elements.
Yeah the rust repairs were horrific but that's fairly typical for cheap MOT repairs I guess. As the customer all you see when you get it back is splodge of seam sealer!
Yeah the rust repairs were horrific but that's fairly typical for cheap MOT repairs I guess. As the customer all you see when you get it back is splodge of seam sealer!
mk2 24v said:
Where abouts did the paintwork on it? As I need mine respraying at some point in the new year
Was a chap near Staplehurst in Kent. Classic Workshop. Has a long old waiting list now something like several months. Before I remove this engine to fit my shorter con rods, I thought I'd do a leak down test so I had some data to support any visual issues identified during the strip down.
So the engine's done over 3k miles now and my only issues have been excessive blow-by-blow and pressurising the coolant on boost.
The test results:
1: 14%
2: 14%
3: 11 %
4: 14 %
Not great figures for a fairly new build but rather than hinting at a serious problem with one cylinder, suggests more of a general lack of ring sealing. Either I gapped my rings too wide (I knew they were on the large side at the time) or the rings just never bedded in properly. No sign of any air escaping the inlet, exhaust, or coolant system - its all coming out the crankcase. This doesn't explain why I'm pressurising the coolant. My main suspect for that now is the inlet gasket. I doubt I'm lifting the head at 7psi, even with my high cr.
Anyway thought I'd share the result. Now to pull the engine and see what's what...

227bhp said:
Are you going to do a normal compression test hot and cold before disassembly? Might be useful.
Agree it would have been useful and was going to but then couldn't find my compression tester. I figured since I'm completely rebuilding the engine and I had the leak down results I could do without. I'm going to replace the rings so I can gap a bit tighter anyway. Stuballs said:
Before I remove this engine to fit my shorter con rods, I thought I'd do a leak down test so I had some data to support any visual issues identified during the strip down.
So the engine's done over 3k miles now and my only issues have been excessive blow-by-blow and pressurising the coolant on boost.
The test results:
1: 14%
2: 14%
3: 11 %
4: 14 %
Not great figures for a fairly new build but rather than hinting at a serious problem with one cylinder, suggests more of a general lack of ring sealing. Either I gapped my rings too wide (I knew they were on the large side at the time) or the rings just never bedded in properly. No sign of any air escaping the inlet, exhaust, or coolant system - its all coming out the crankcase. This doesn't explain why I'm pressurising the coolant. My main suspect for that now is the inlet gasket. I doubt I'm lifting the head at 7psi, even with my high cr.
Anyway thought I'd share the result. Now to pull the engine and see what's what...
These numbers are not that far off for a Rover K. So the engine's done over 3k miles now and my only issues have been excessive blow-by-blow and pressurising the coolant on boost.
The test results:
1: 14%
2: 14%
3: 11 %
4: 14 %
Not great figures for a fairly new build but rather than hinting at a serious problem with one cylinder, suggests more of a general lack of ring sealing. Either I gapped my rings too wide (I knew they were on the large side at the time) or the rings just never bedded in properly. No sign of any air escaping the inlet, exhaust, or coolant system - its all coming out the crankcase. This doesn't explain why I'm pressurising the coolant. My main suspect for that now is the inlet gasket. I doubt I'm lifting the head at 7psi, even with my high cr.
Anyway thought I'd share the result. Now to pull the engine and see what's what...
Pressurized coolant is 99% head gasket or porosity in the head. The other 1% might be the inlet gasket. I always smear a thin layer of Hylomar around the coolant ports of the inlet gasket.
Rings manufactured for std size liners such as 80mm normally do not need to be gapped. They are set for the std bore size. Measure it before fitment and you'll find they comply to factory specs. For a turbo car, you rather gap them wider.
For anything well above 200HP, you need additional crankcase ventilation. This is normal. All supercharged Rover K folks observed this. Lee, me and others. Even the high powered NA Ks need additional venting. Or they fit a dry sump with scavenging pumps.
Widen the outlets in the valve cover (changes functionality regarding emission) and add a extra big breather to the dipstick mount. This one needs a catch tank as oil is pushed up. In itself the blowby is not an issue. You need to manage it. Doubling HP and torque also doubles volume of blow by.
Edited by Ive on Tuesday 9th January 10:58
Just Massive!
I've been reading all the pages at once for hours!
One and only comment I have to make here! As another member said about less ignition, I don' t know if he refers to Spark Plug Gap! If not I want to ask everyone why you take it so for granted and you don't even mention it! Many S*****id people make fun of it especially the so called professionals that build a two month head gasket! I changed my head gasket 2 years ago, still going perfect!
It doesn't really matter if I write anything else! Try to use an oscilloscope to check the oxygen sensor print in order to avoid too much carbon on your pistons! I red that in turbo setups you need to decrease the spark plug gap in order to catch the rapid rpm!...
Edited by netor1 on Monday 8th January 16:43
Edited by netor1 on Monday 8th January 16:43
Ive said:
These numbers are not that far off for a Rover K.
Pressurized coolant is 99% head gasket or porosity in the head. The other 1% might be the inlet gasket. I always smear a thin layer of Hylomar around the coolant ports of the inlet gasket.
Rings manufactured for std size liners such as 80mm normally do not need to be gapped. They are set for the std bore size. Measure it before fitment and you'll find they comply to factory specs. For a turbo car, you rather gap them wider.
For anything well above 200HP, you need additional crankcase ventilation. This is normal. All supercharged Rover K folks observed this. Lee, me and others. Even the high powered NA Ks need additional venting. Or they fit a dry sump with scavenging pumps.
Widen the outlets in the valve cover (changes functionality regarding emission) and add a extra big breather to the dipstick mount. This one needs a catch tank as oil is pushed up. In itself the blowby is not an issue. You need to manage it. Doubling HP and torque also doubles volume of blow by.
Thanks mate. Hopefully get the engine out and stripped this weekend so will have more of an idea. Porous head is certainly a possibility with the K-series. I did the Hylomar thing with the inlet to add a bit of extra sealing. I run a Ferriby thermal gasket so have an inlet gasket either side of that so maybe there is extra potential for leakage there... Pressurized coolant is 99% head gasket or porosity in the head. The other 1% might be the inlet gasket. I always smear a thin layer of Hylomar around the coolant ports of the inlet gasket.
Rings manufactured for std size liners such as 80mm normally do not need to be gapped. They are set for the std bore size. Measure it before fitment and you'll find they comply to factory specs. For a turbo car, you rather gap them wider.
For anything well above 200HP, you need additional crankcase ventilation. This is normal. All supercharged Rover K folks observed this. Lee, me and others. Even the high powered NA Ks need additional venting. Or they fit a dry sump with scavenging pumps.
Widen the outlets in the valve cover (changes functionality regarding emission) and add a extra big breather to the dipstick mount. This one needs a catch tank as oil is pushed up. In itself the blowby is not an issue. You need to manage it. Doubling HP and torque also doubles volume of blow by.
Edited by Ive on Tuesday 9th January 10:58
Interesting to hear your thoughts on blowby. I run my crankcase ventilation exactly as you suggest based on your previous comments. The dipstick tube breather runs through a large vessel that allows draining back into the sump.
As long as you manage the blow by, it is OK.
If excessive, it blows oil out though the crank seal or even pushes out the crank seal if not bolted in. if the rear main seal seals under boost, you do not have a excessive crankcase pressure issue :-)
Direct port water methanol will transform performance under boost.
You can also just drop CR a lot, but response off boost will be terrible. going from 10.5:1 to 9:1 was already recognisable.
7:1 is OK for a race car, but in a Rover BRM it'll make it very sluggish off the line in traffic with poor fuel efficiency.
With 9:1 you should not have any issues with knock despite decent power. 200 HP is a joke for a build 1.8l turbo K. You should get a healthy 250HP once everything runs even with boost levels of 10-12PSI.
Big update coming soon. Lots has been going on, good and bad! Need to sort all the images out.
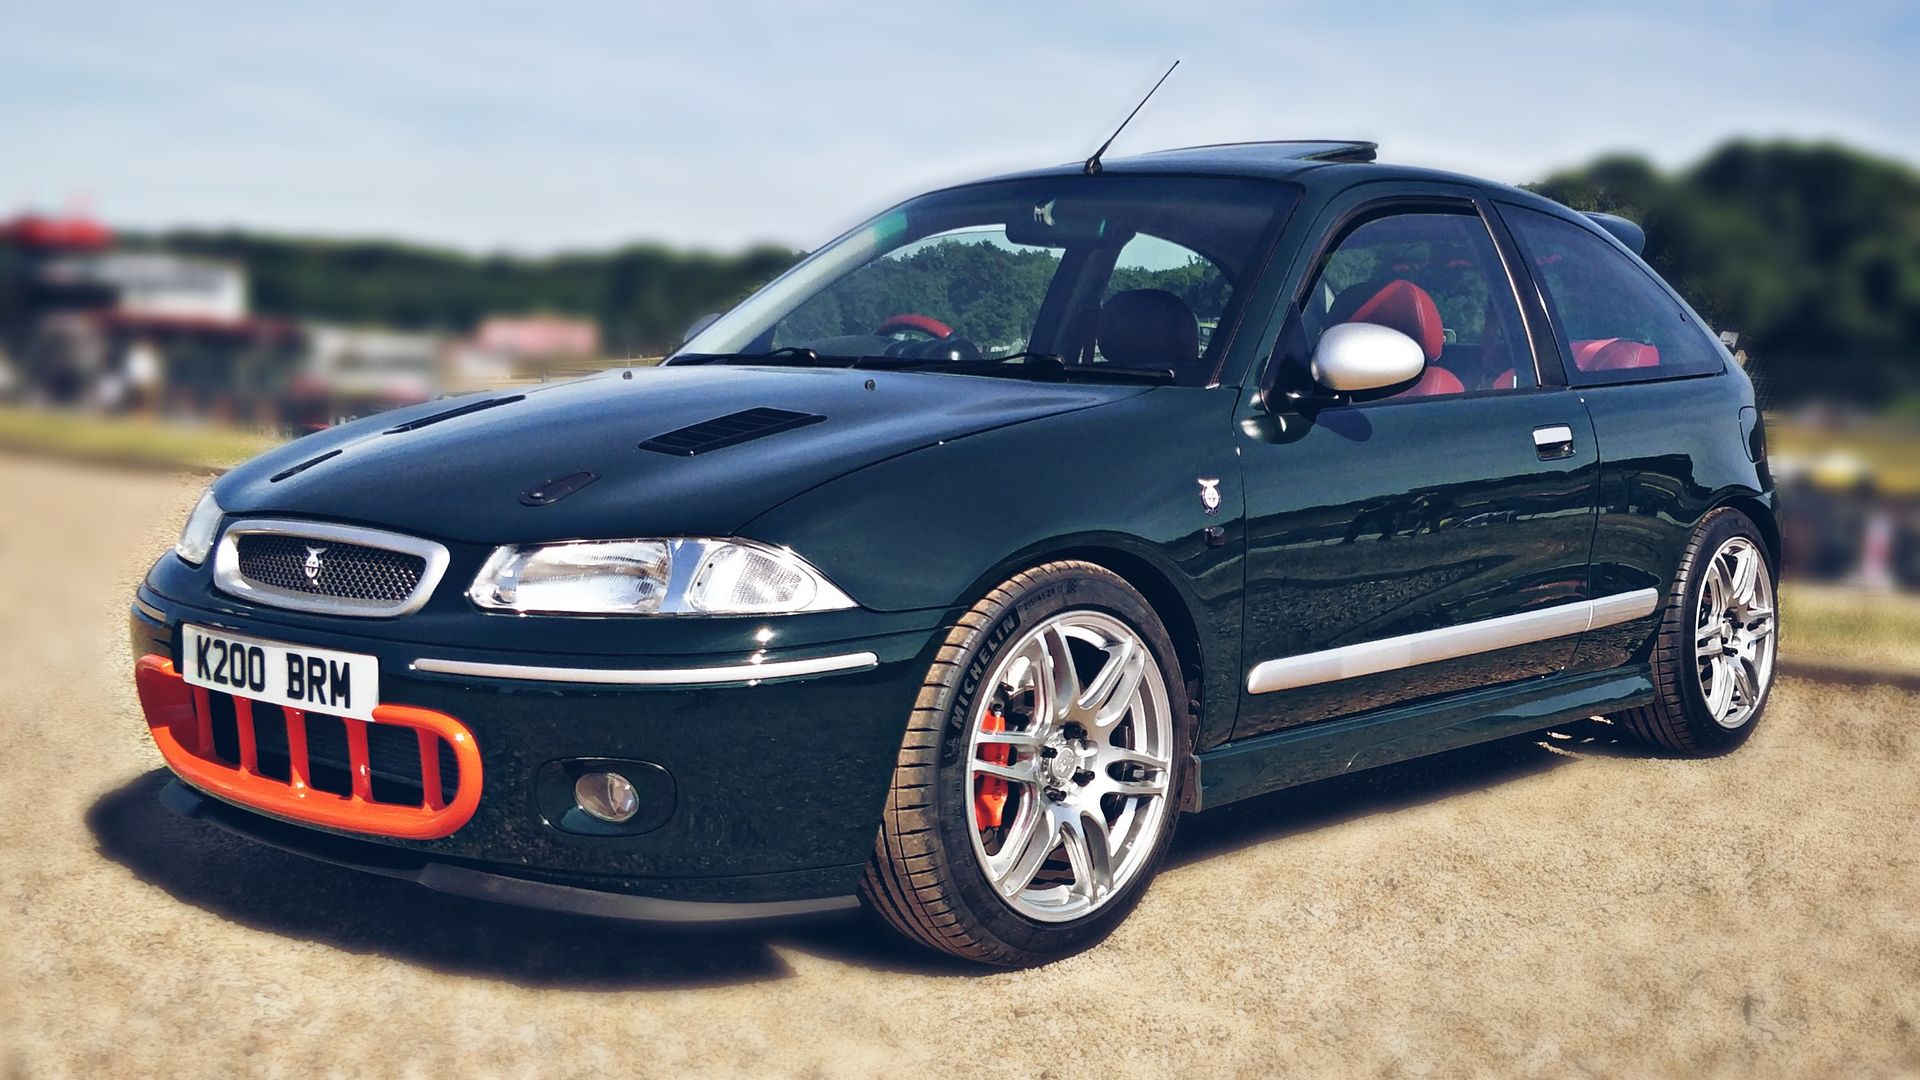
Engine came out to fit shorter rods and discovered excessive bore scoring. Still investigating the cause but I've been focused on getting a stock nasp engine slotted in for now just so I can drive the thing. Bodywork is done (less bonnet for now). ZR steering rack and subframe grafted in for more positive steering. KW variant 2 coilovers on. New wheels,etc.
How she currently sits:

More detail to follow...
Engine came out to fit shorter rods and discovered excessive bore scoring. Still investigating the cause but I've been focused on getting a stock nasp engine slotted in for now just so I can drive the thing. Bodywork is done (less bonnet for now). ZR steering rack and subframe grafted in for more positive steering. KW variant 2 coilovers on. New wheels,etc.
How she currently sits:
More detail to follow...

Time for an update!
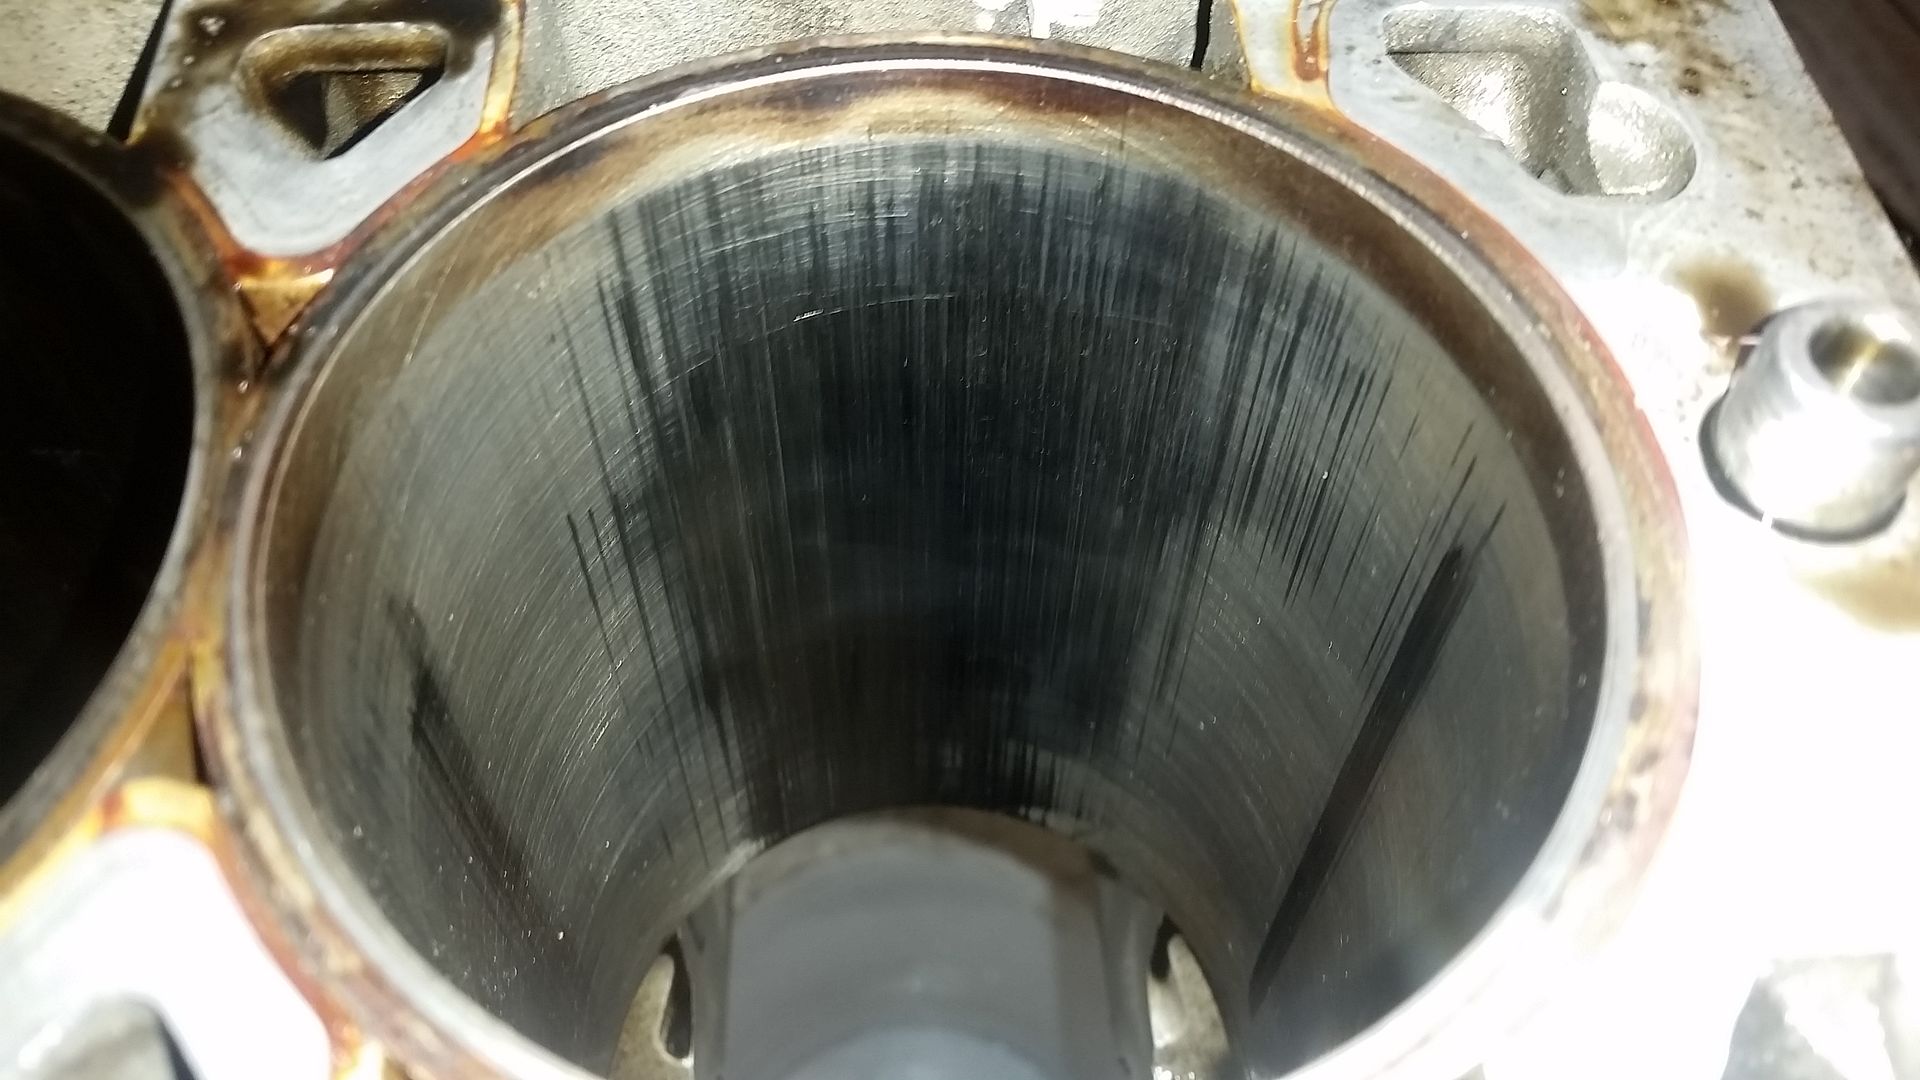
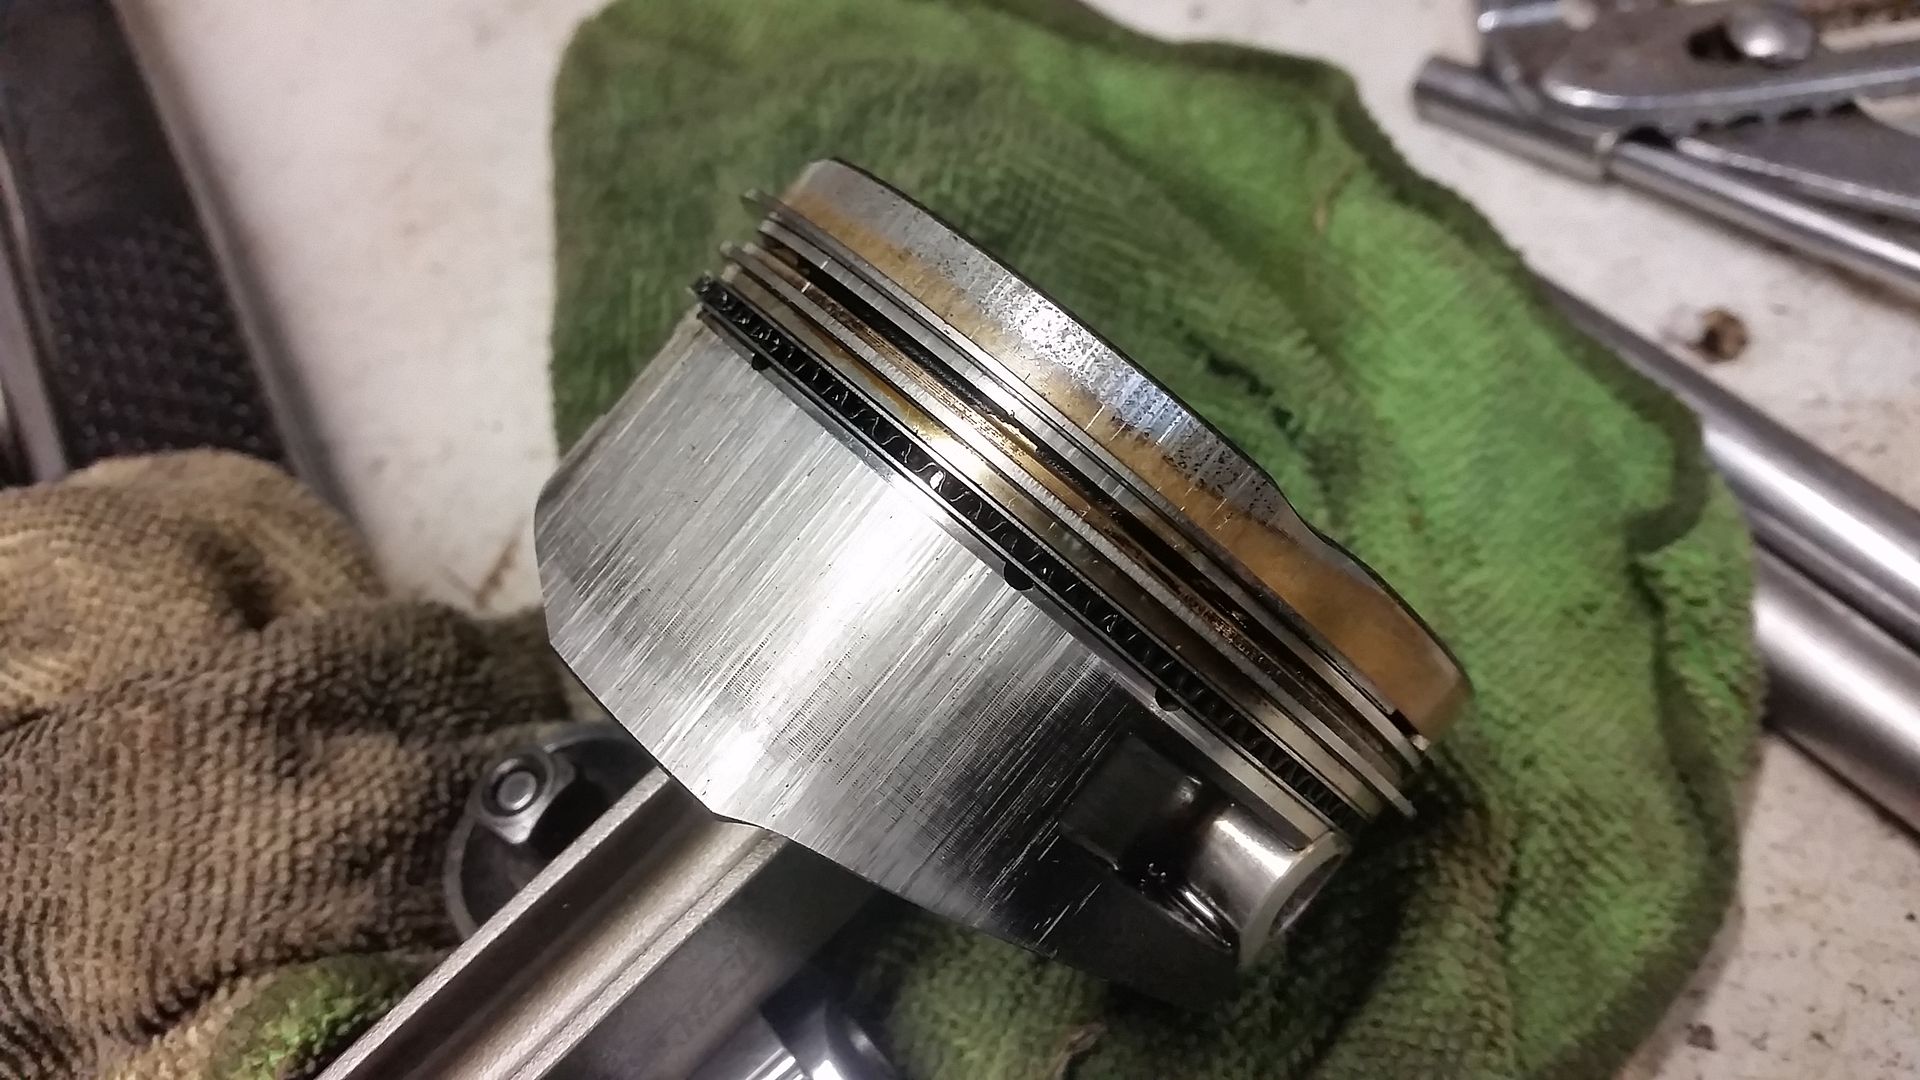
As I alluded to above, my high compression build had issues with excessive blow-by and pressurising coolant and, upon stripping it down to fit shorter conrods, I found severe bore scoring! It's hard to tell because of the damage but seems either the pistons or bores were oval. Pistons and liners are scrap.
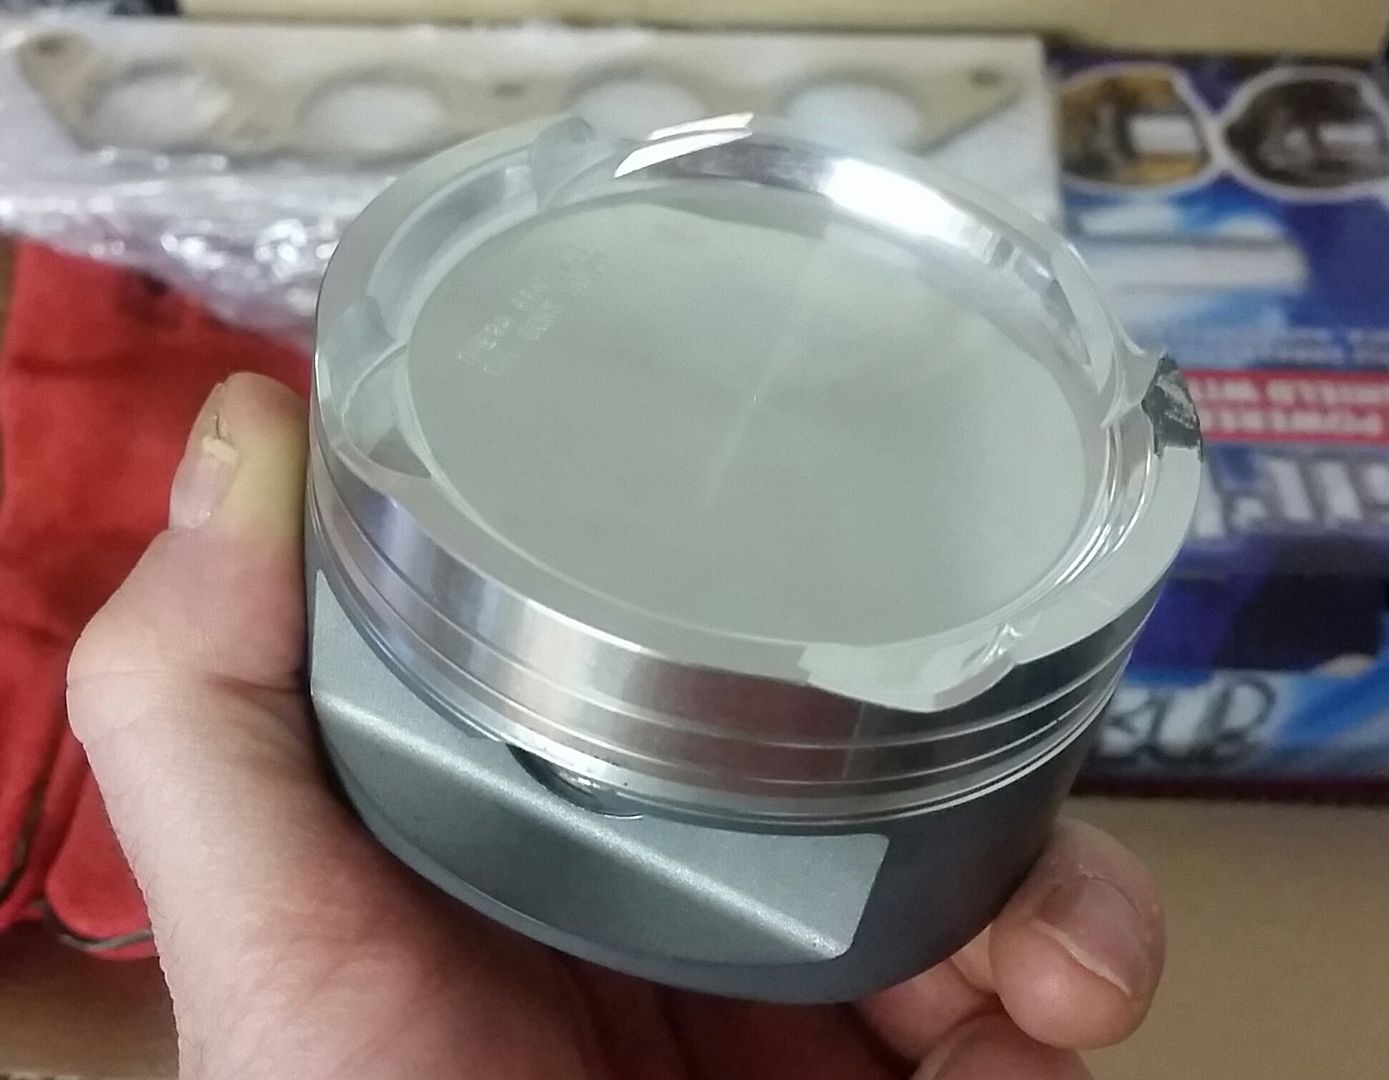
Fear not. I had already sourced a spare set of pistons and liners to bring me back down to an 80mm bore anyway. This time pistons are supplied by Omega, and designed specifically for the Rover K-series turbo running the shorter turbo spec rods. More on that later but here's the piston:
For now, I've just fitted a nasp engine from a ZR160 to keep me mobile.
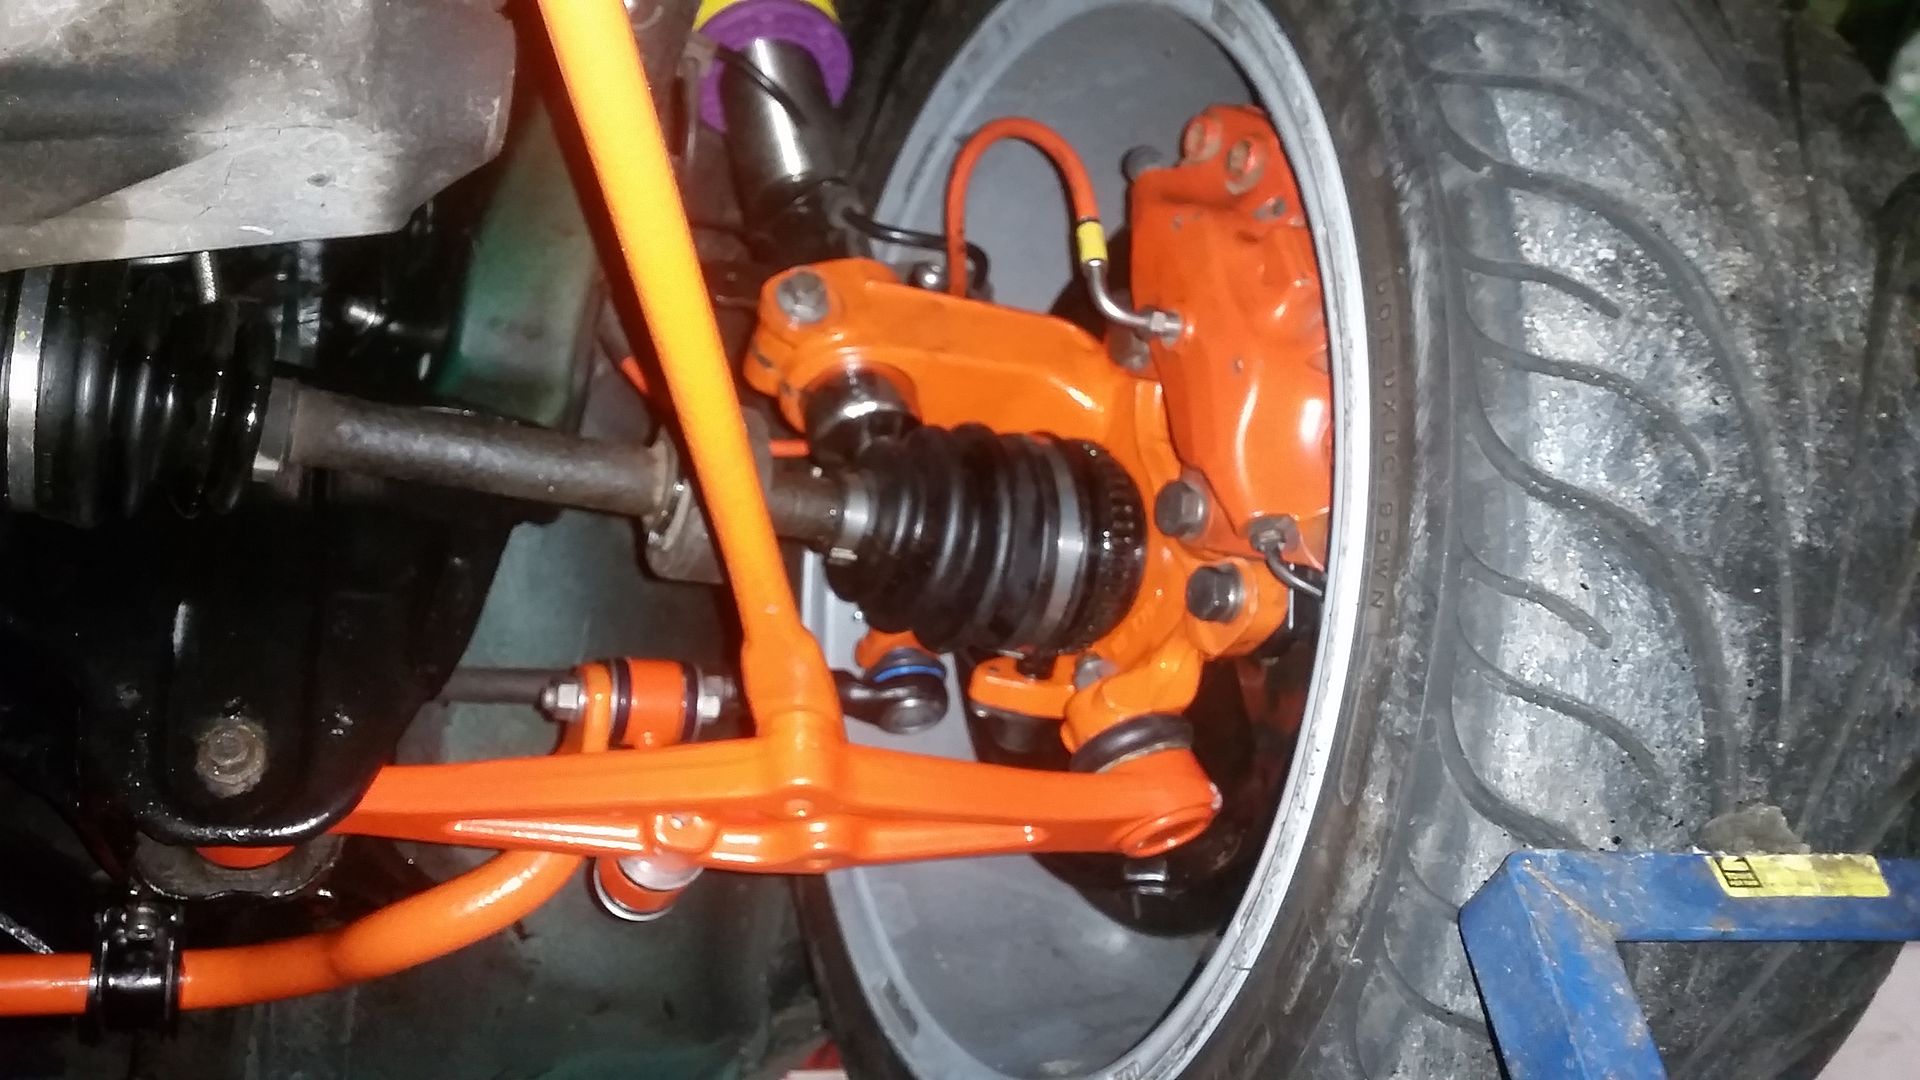
Steering:
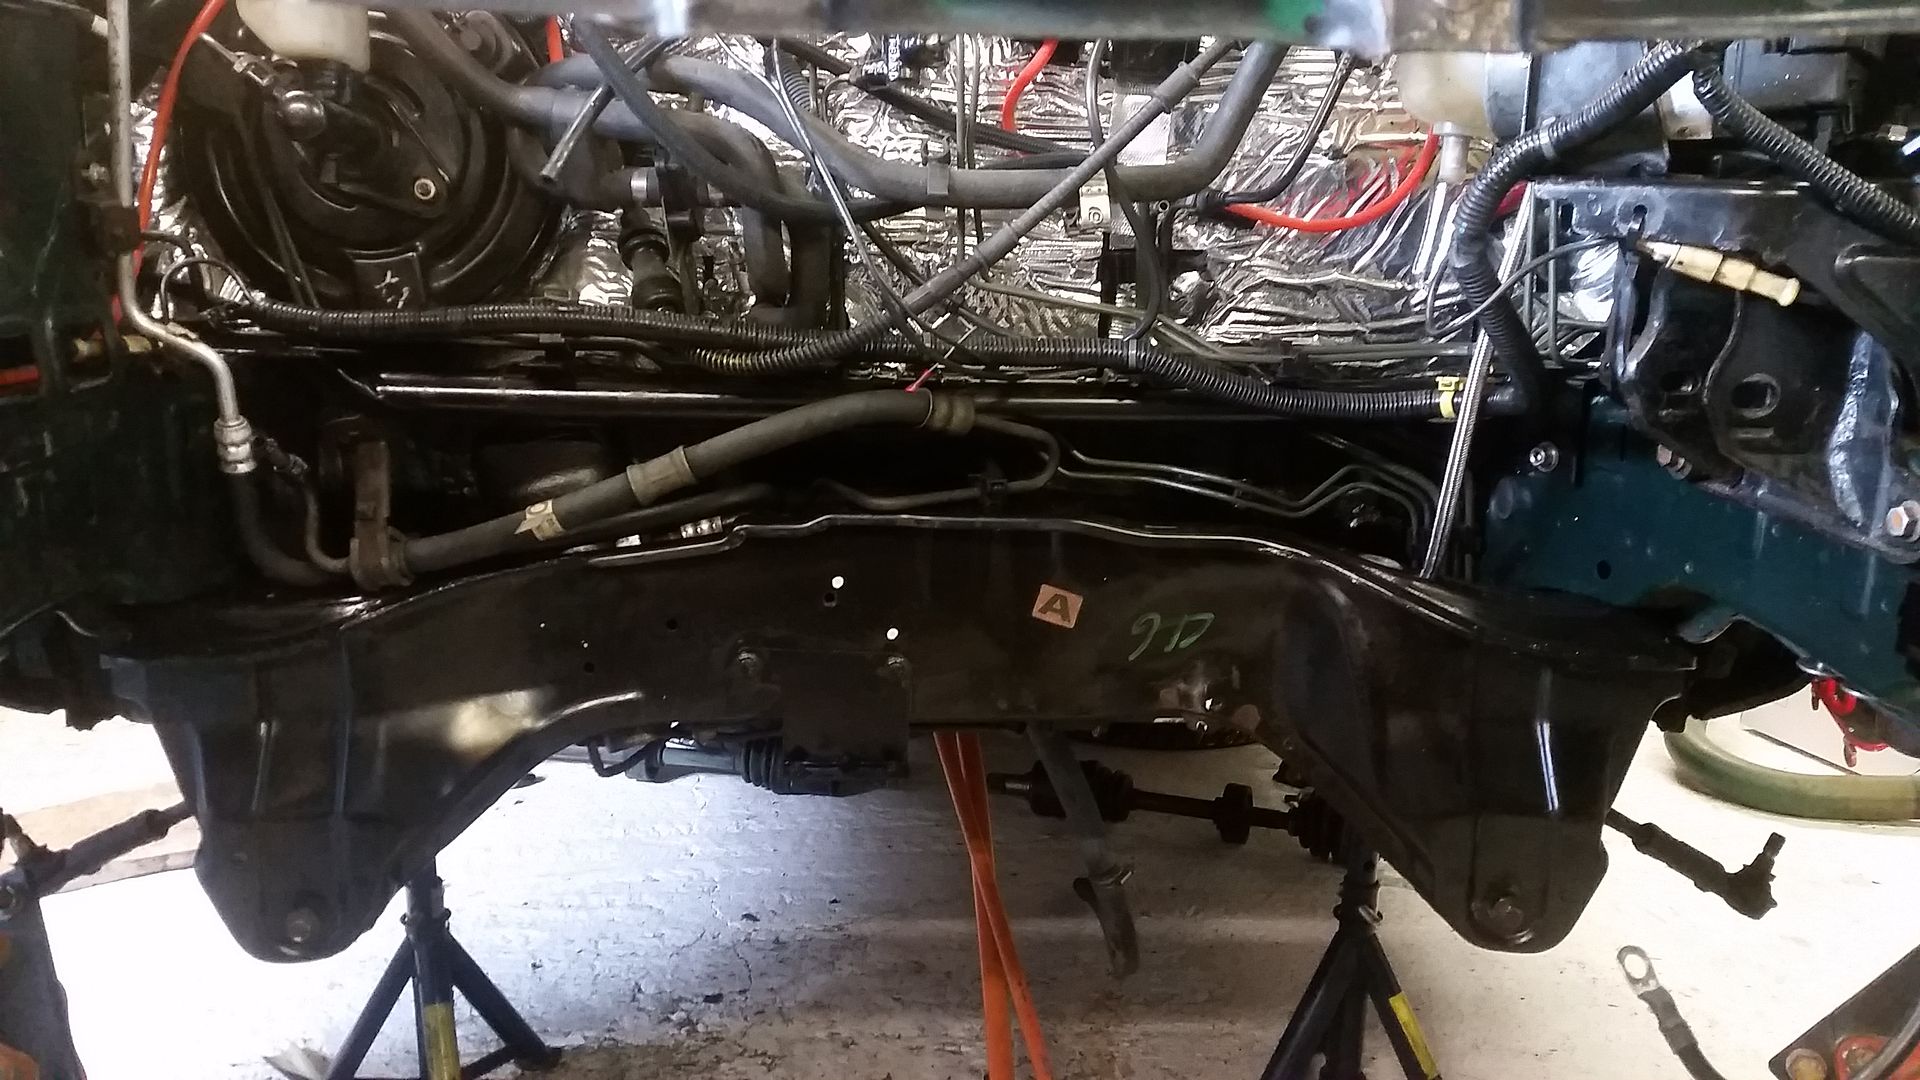
I wanted a more positive setup given the amount of power going through the front wheels. The rack in every Rover 200 I've ever driven felt vague so add big power and the front end just has a mind of its own. Enter MGZR. Less turns lock to lock and supposedly a more more "feelsome" setup. Unfortunately this is not a straight swap, even less so than I thought it would be actually...
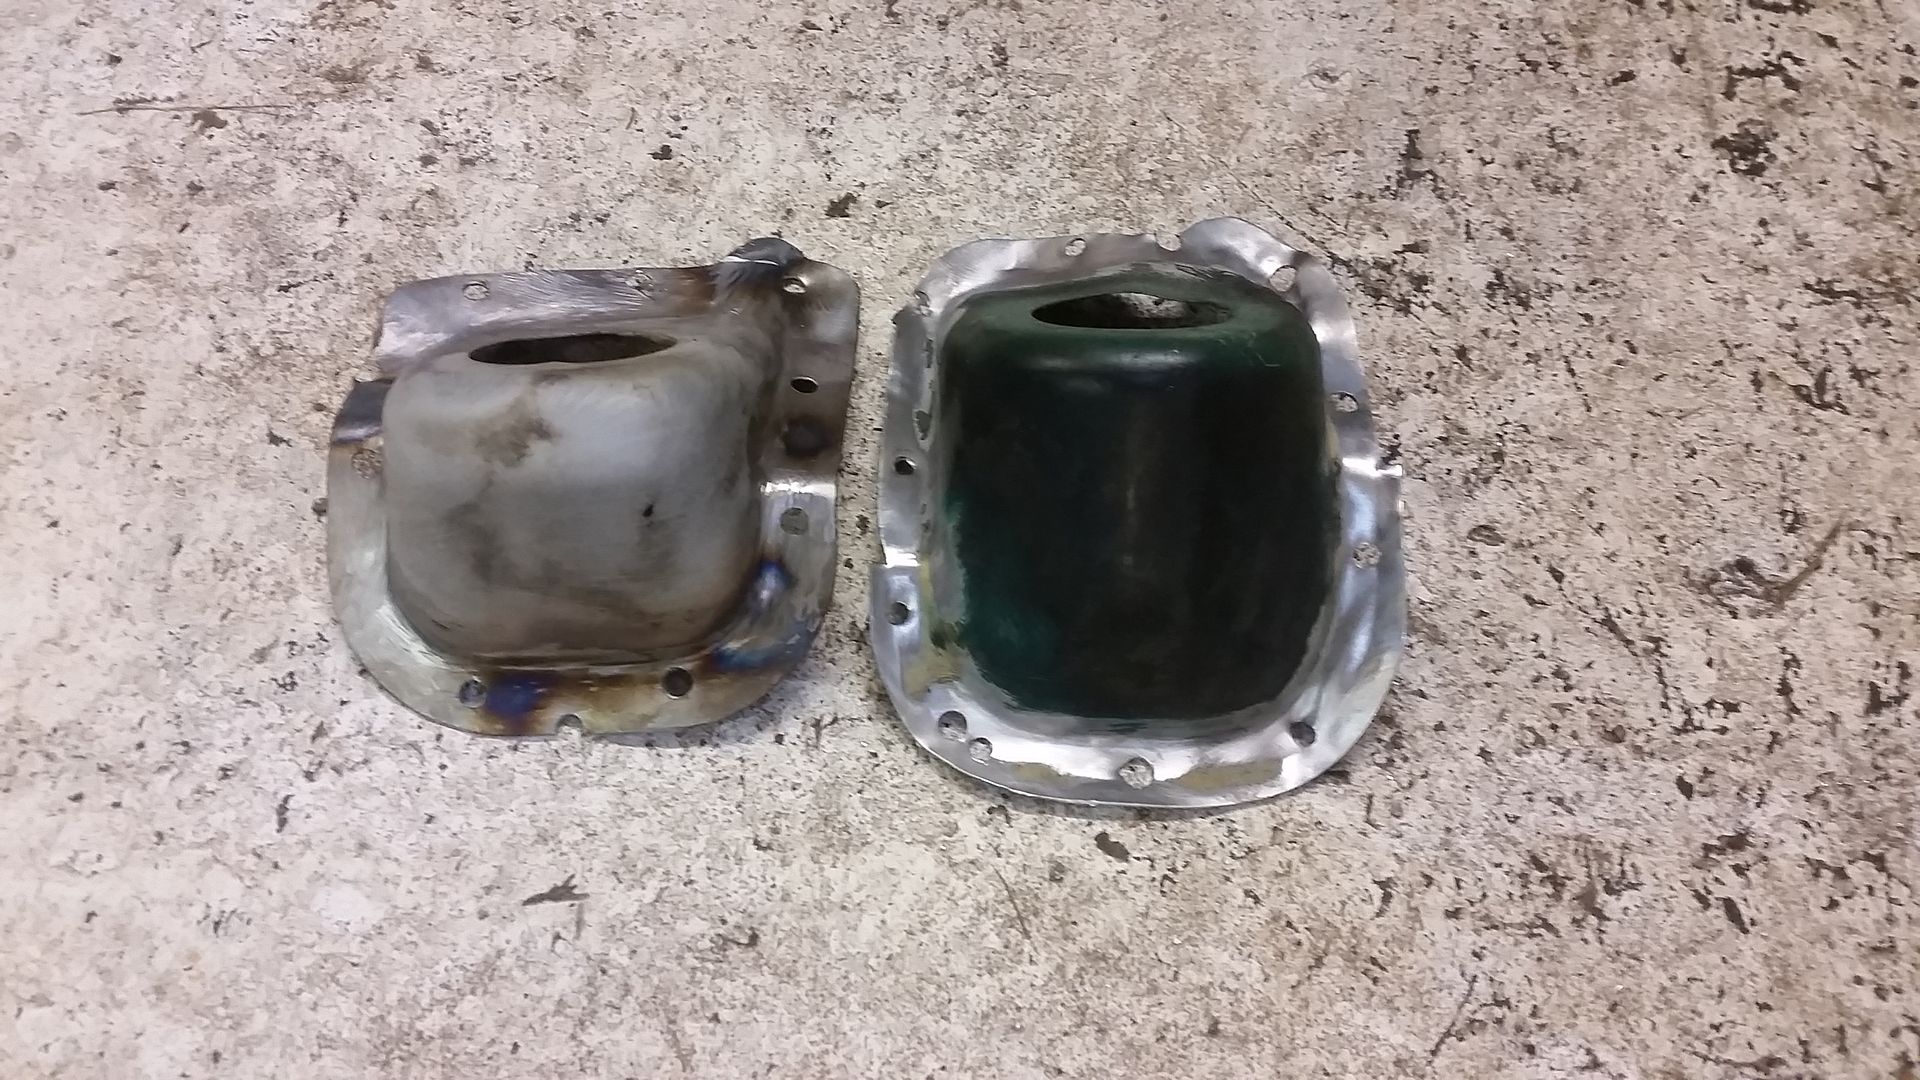
The rack is completely different, as is the subframe:
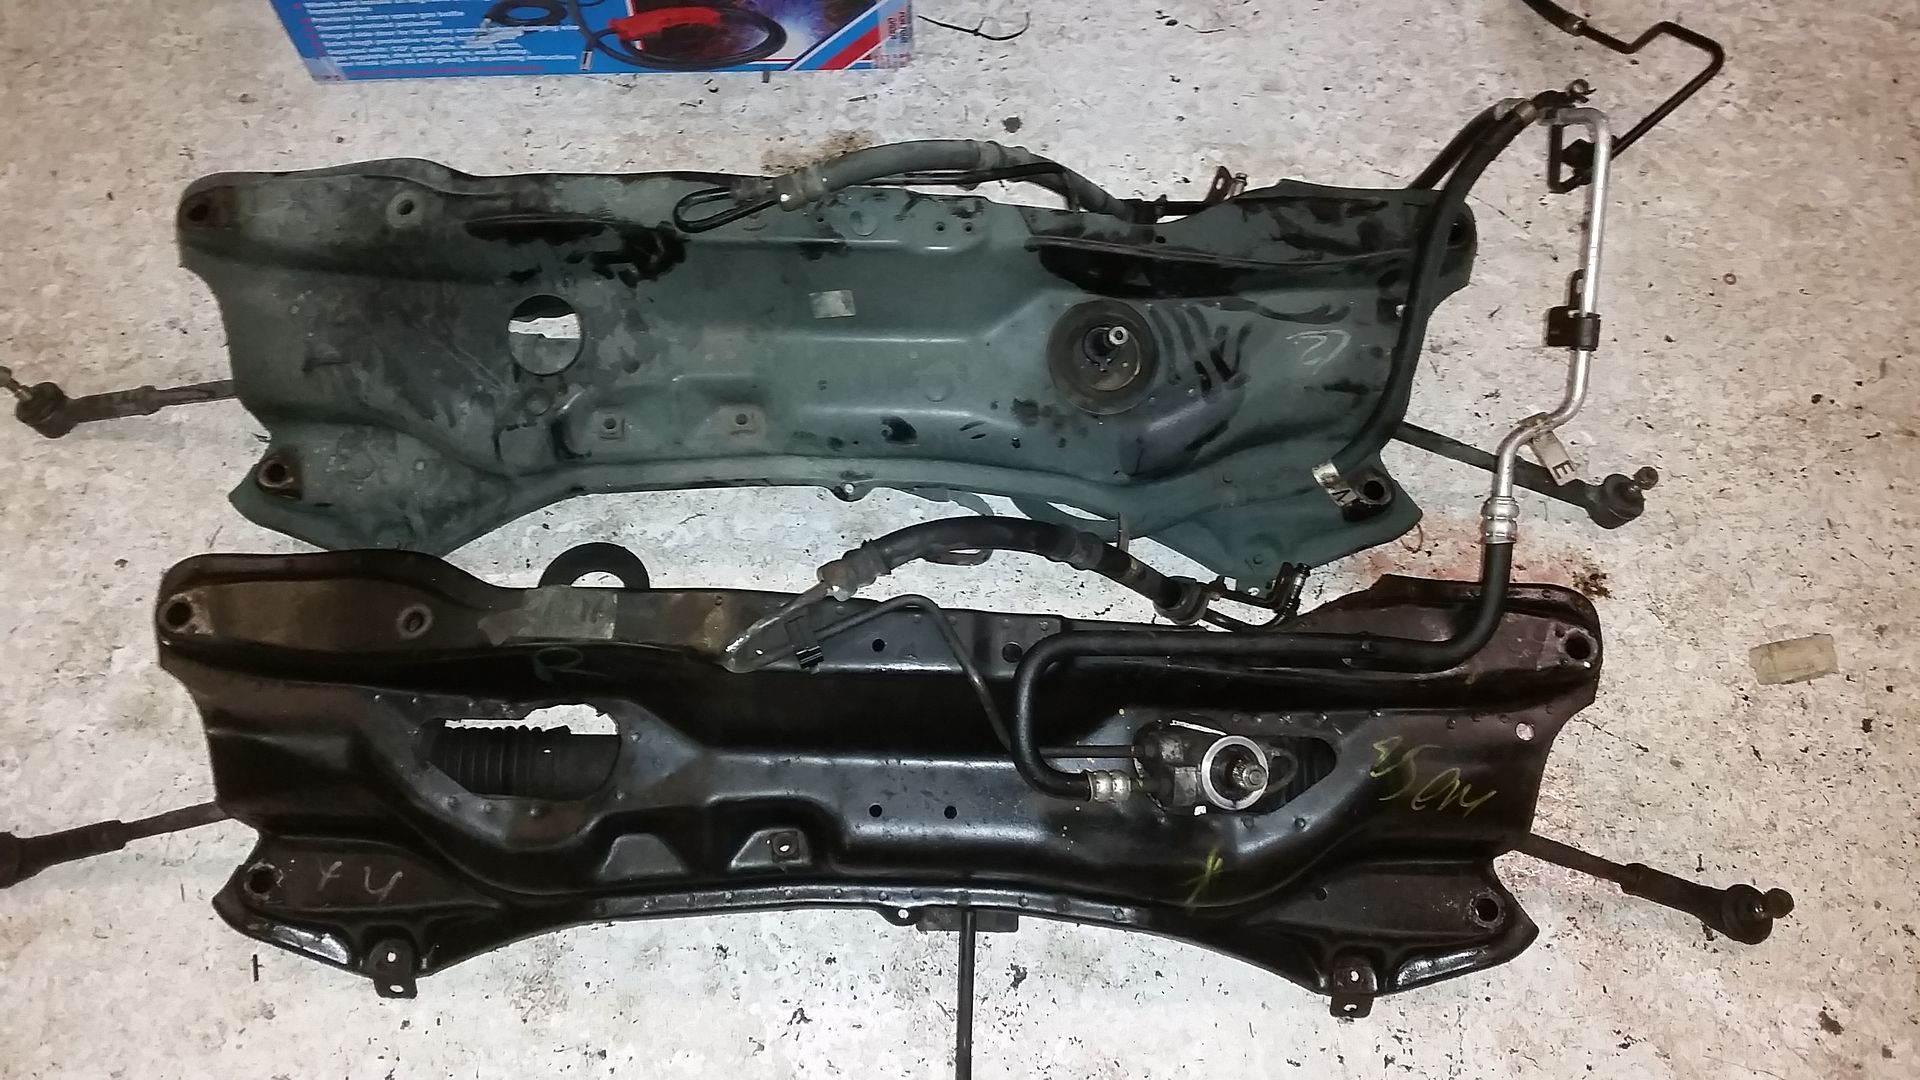

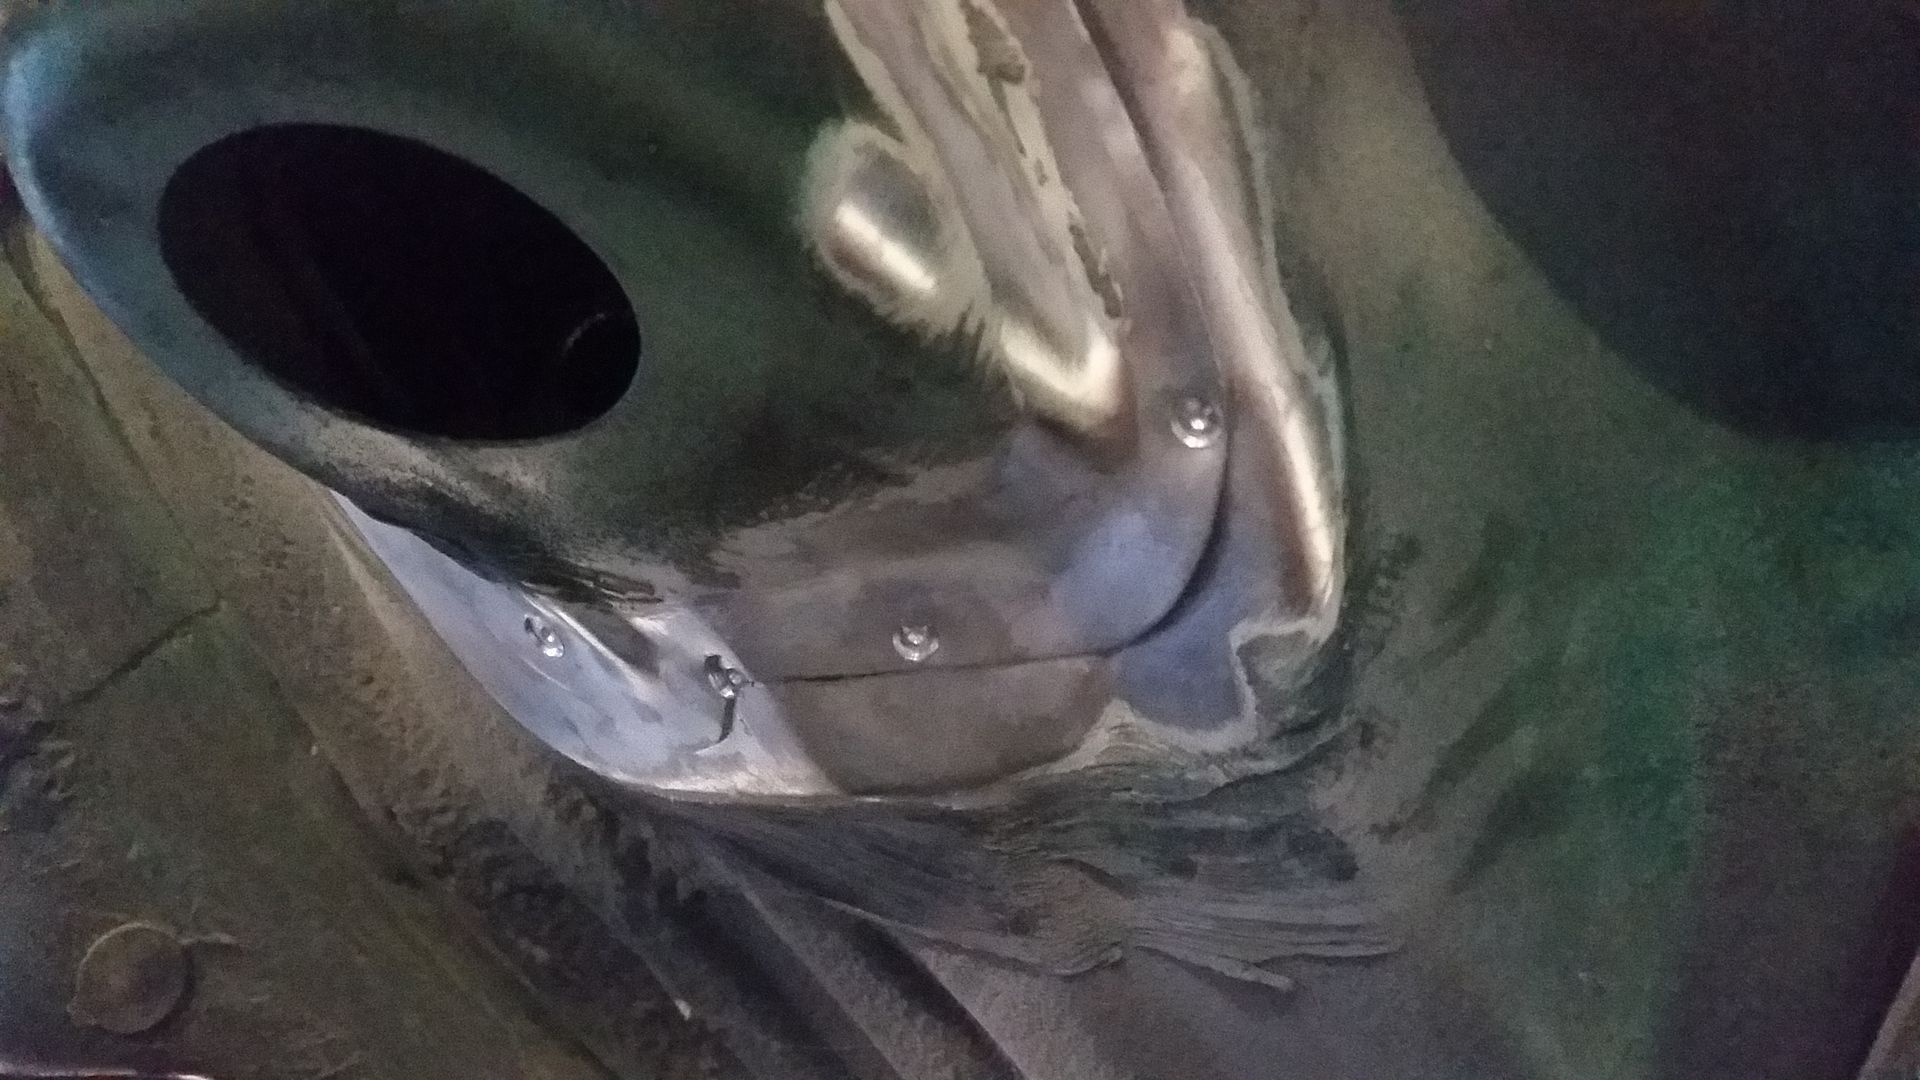
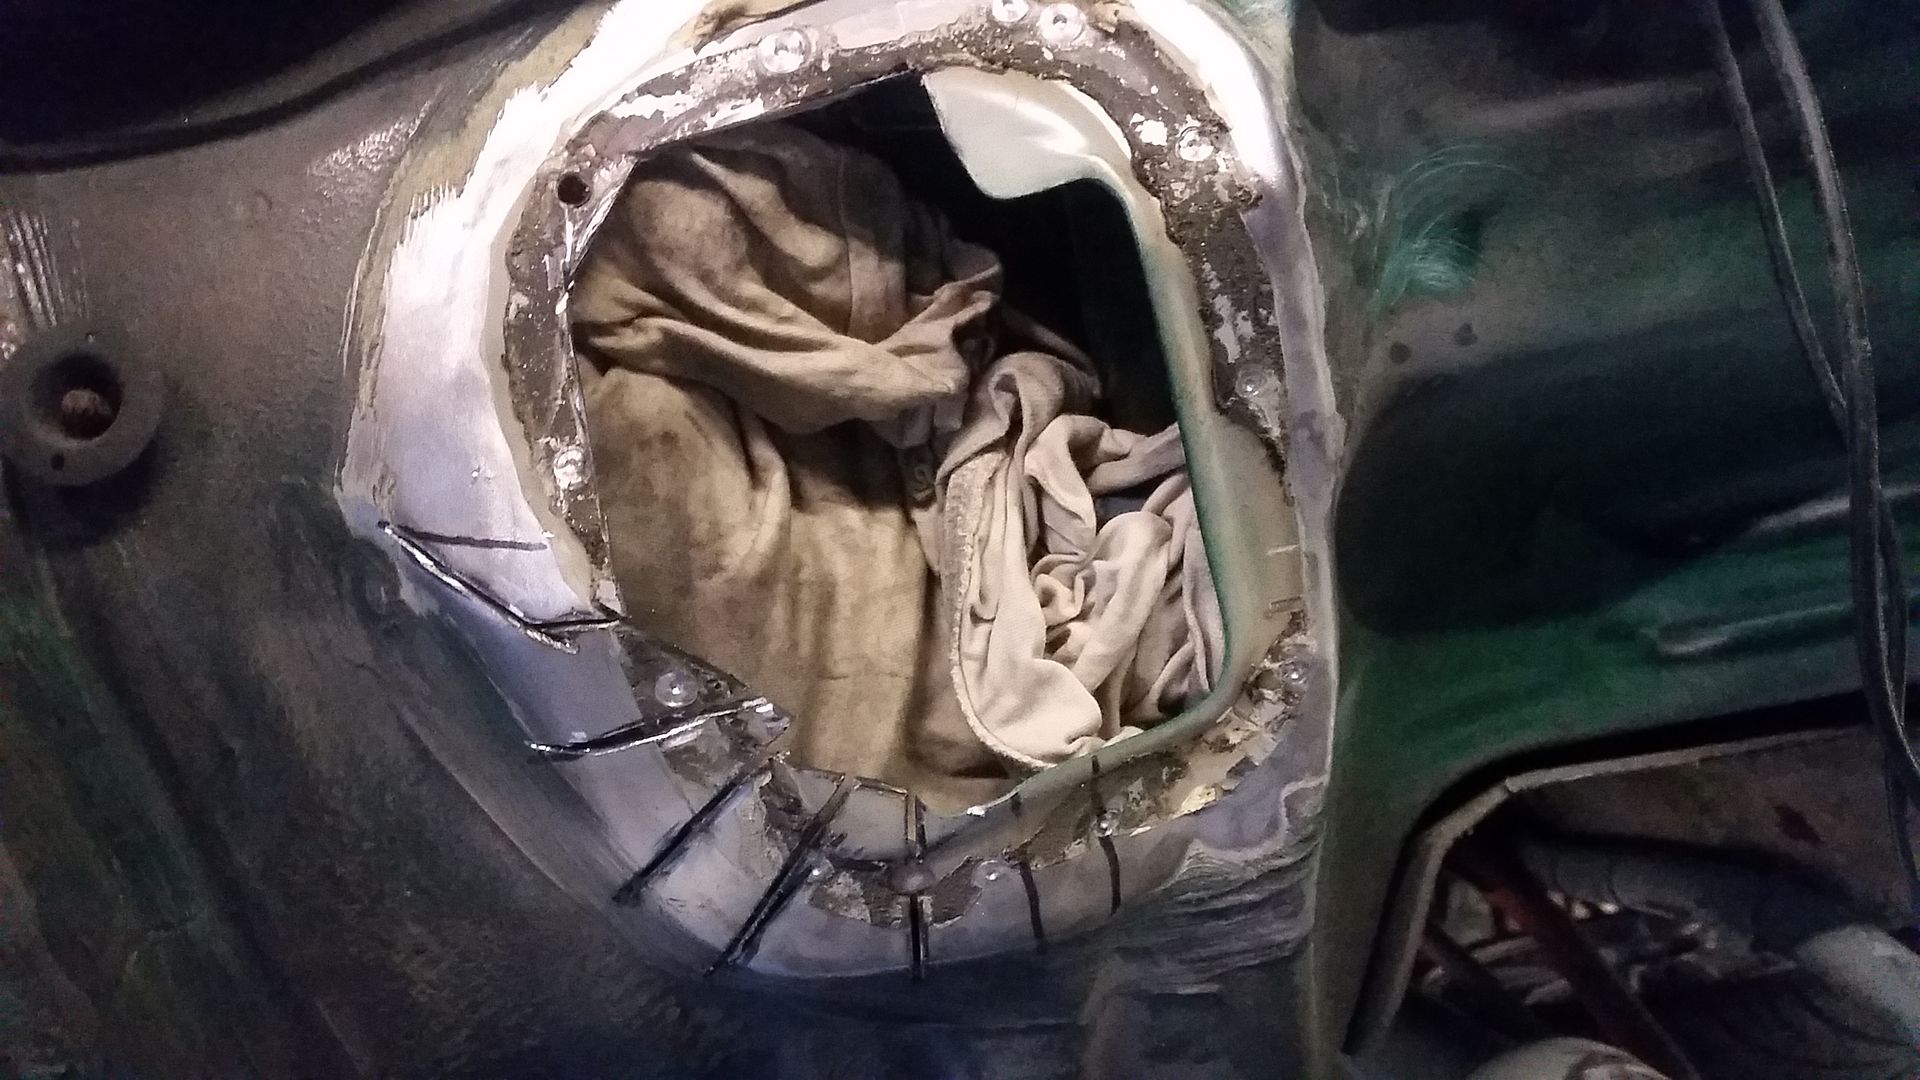
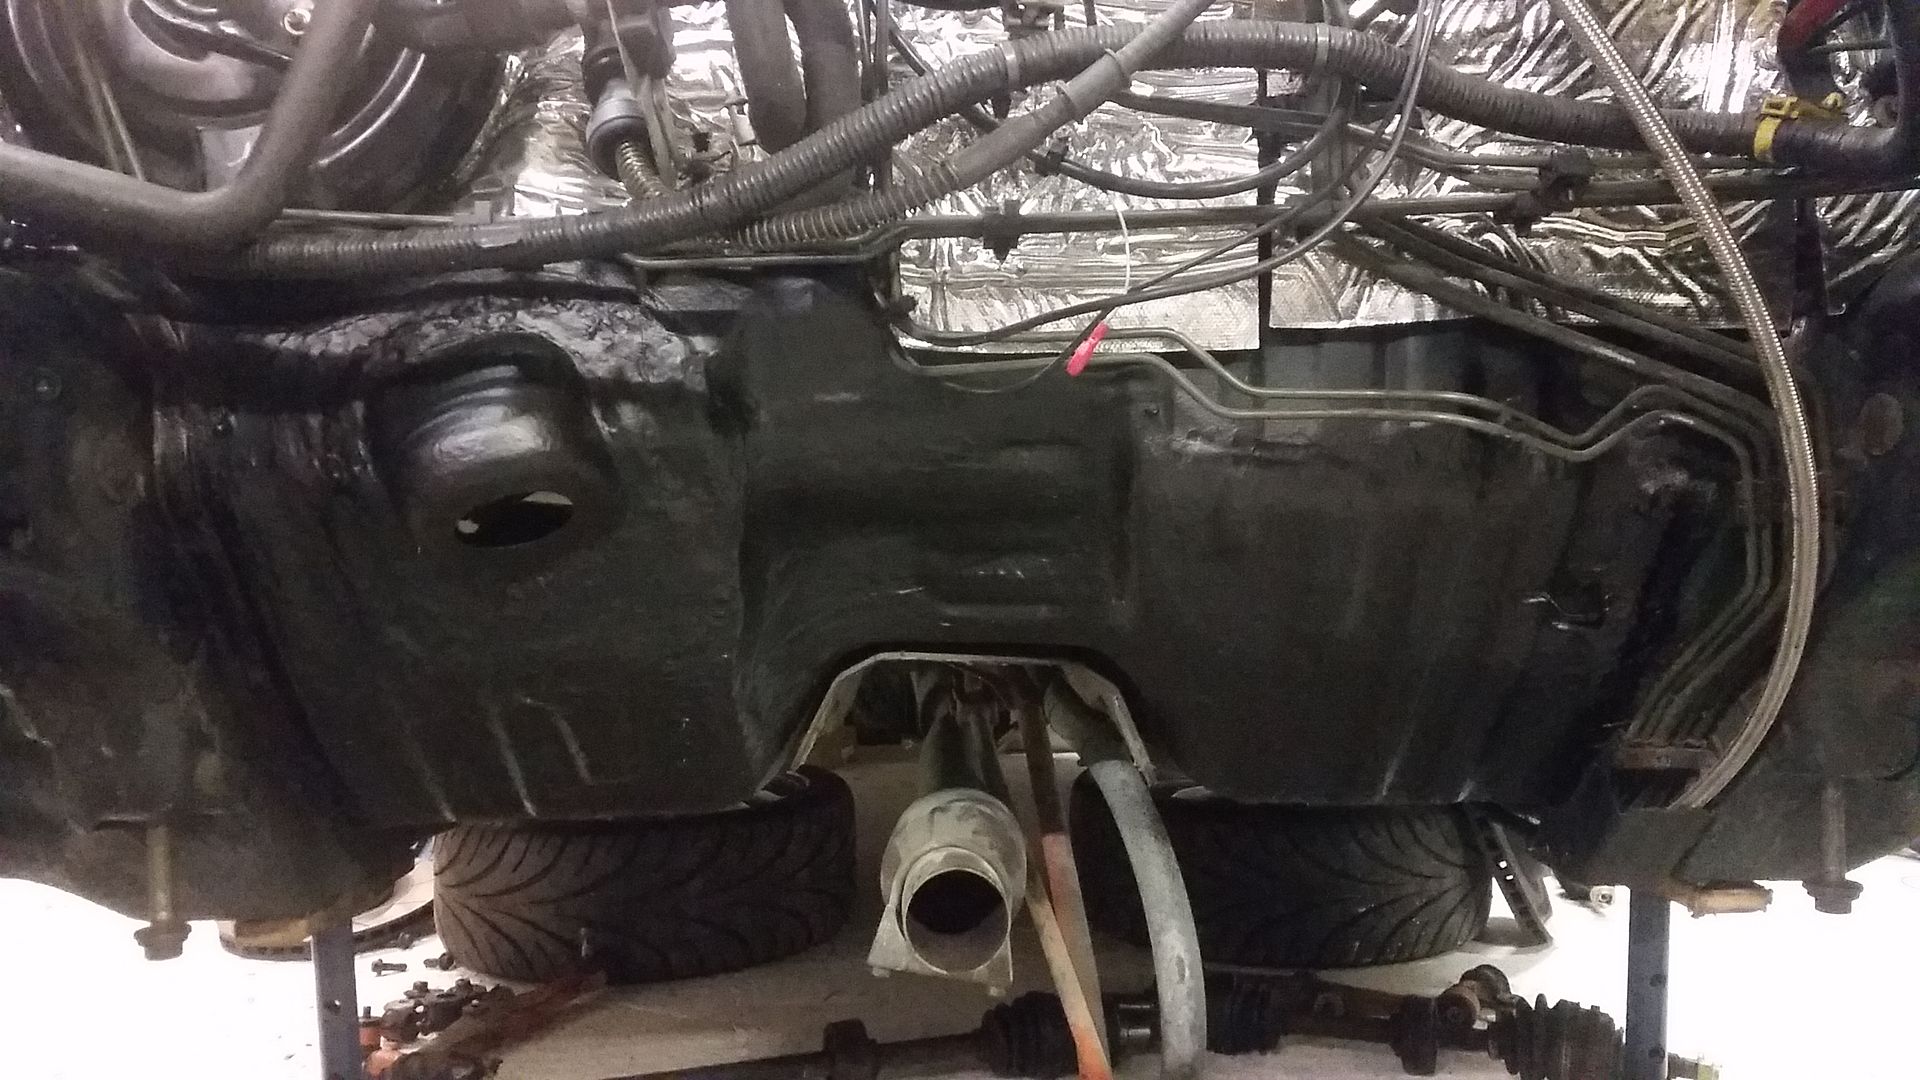
The splined shaft the steering column fixes to is in quite a different position. I thought this would entail a simple swap of the pressed steel pocket on the bulkhead that butts up against the rack. Drill out spot welds. Swap over from zr to brm. Weld. Done. I was wrong
It turns out that whole area of the bulkhead is a different shape between the cars. Long story short, I had to modify the brm firewall a fair bit to make it work. There was a point when I was cutting holes in the brm (having recently got it back from paint I might add) thinking to myself "what am I doing?"!
I had to teach myself how the mig weld for this bit. Not easy when the steel is 0.7mm thick in places. Just kept blowing through. It's not pretty but it's solid enough. Seam sealer saves the day!
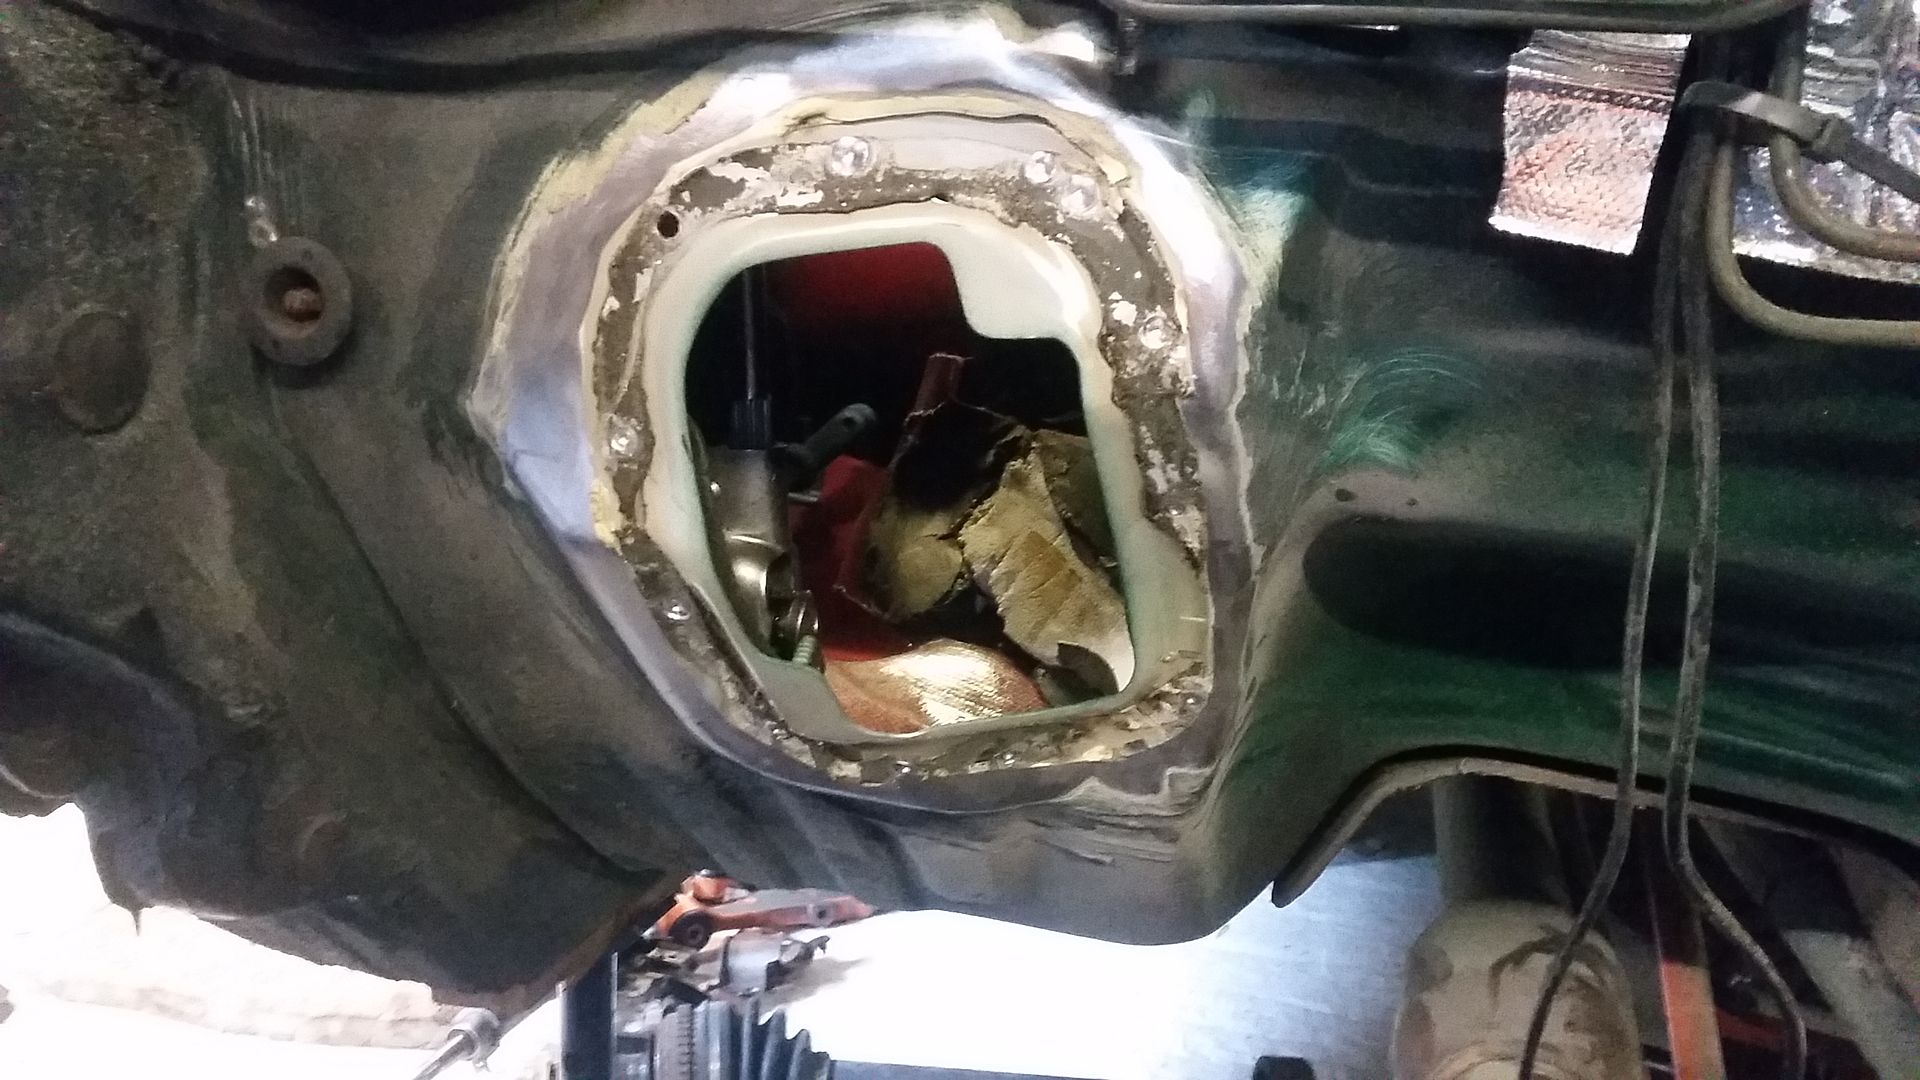
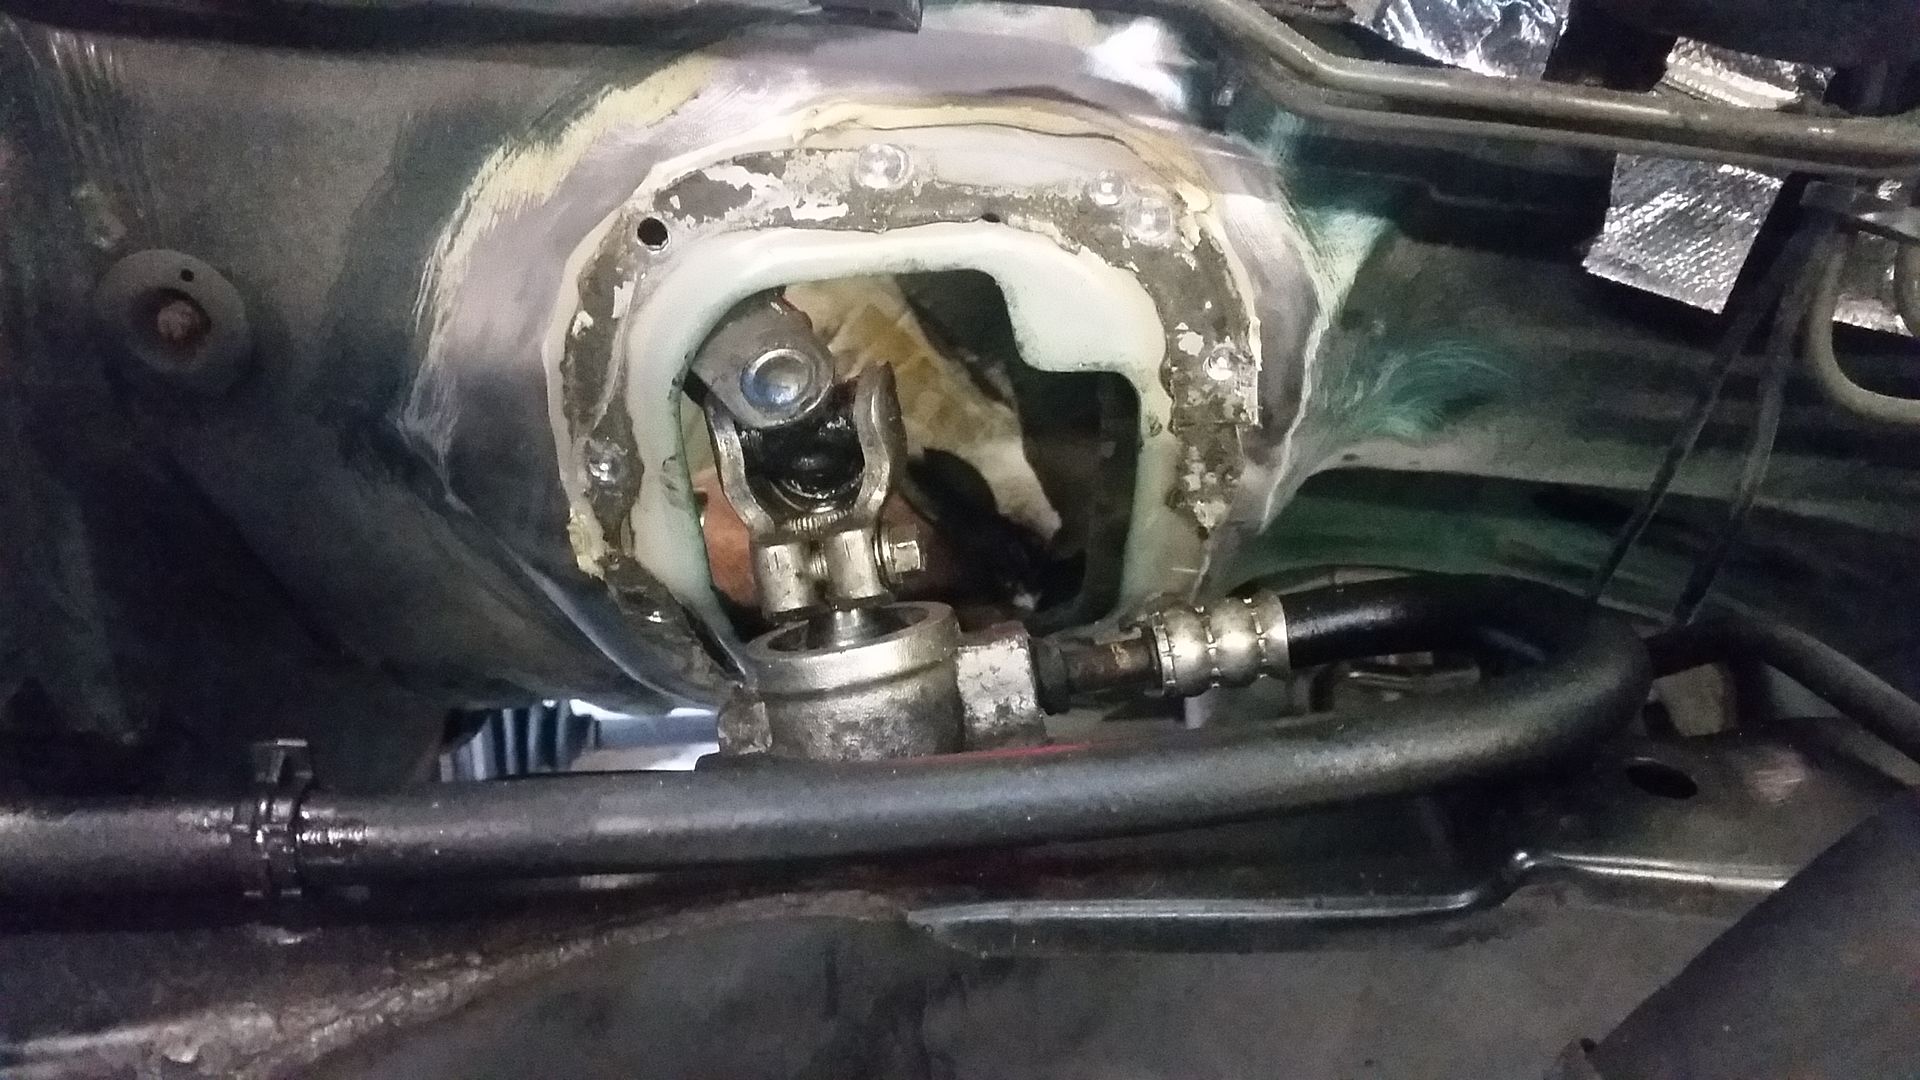
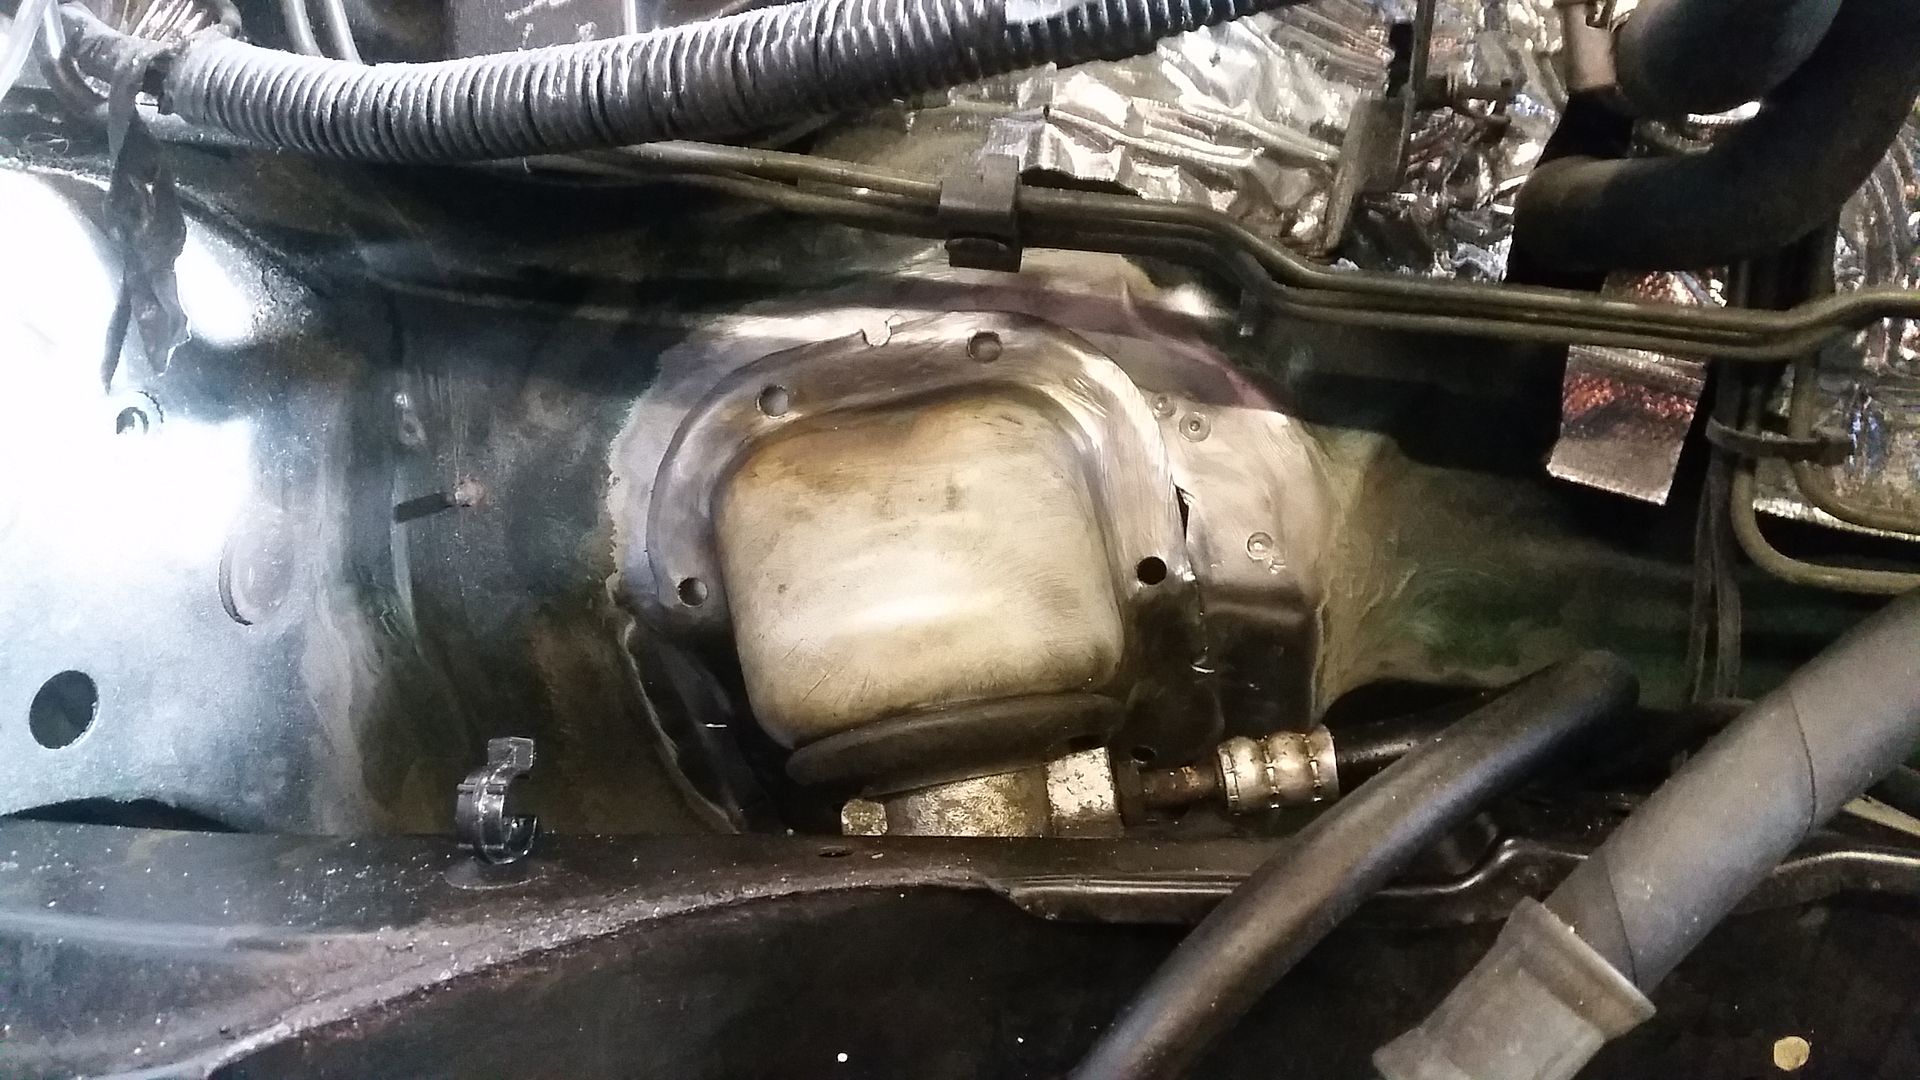
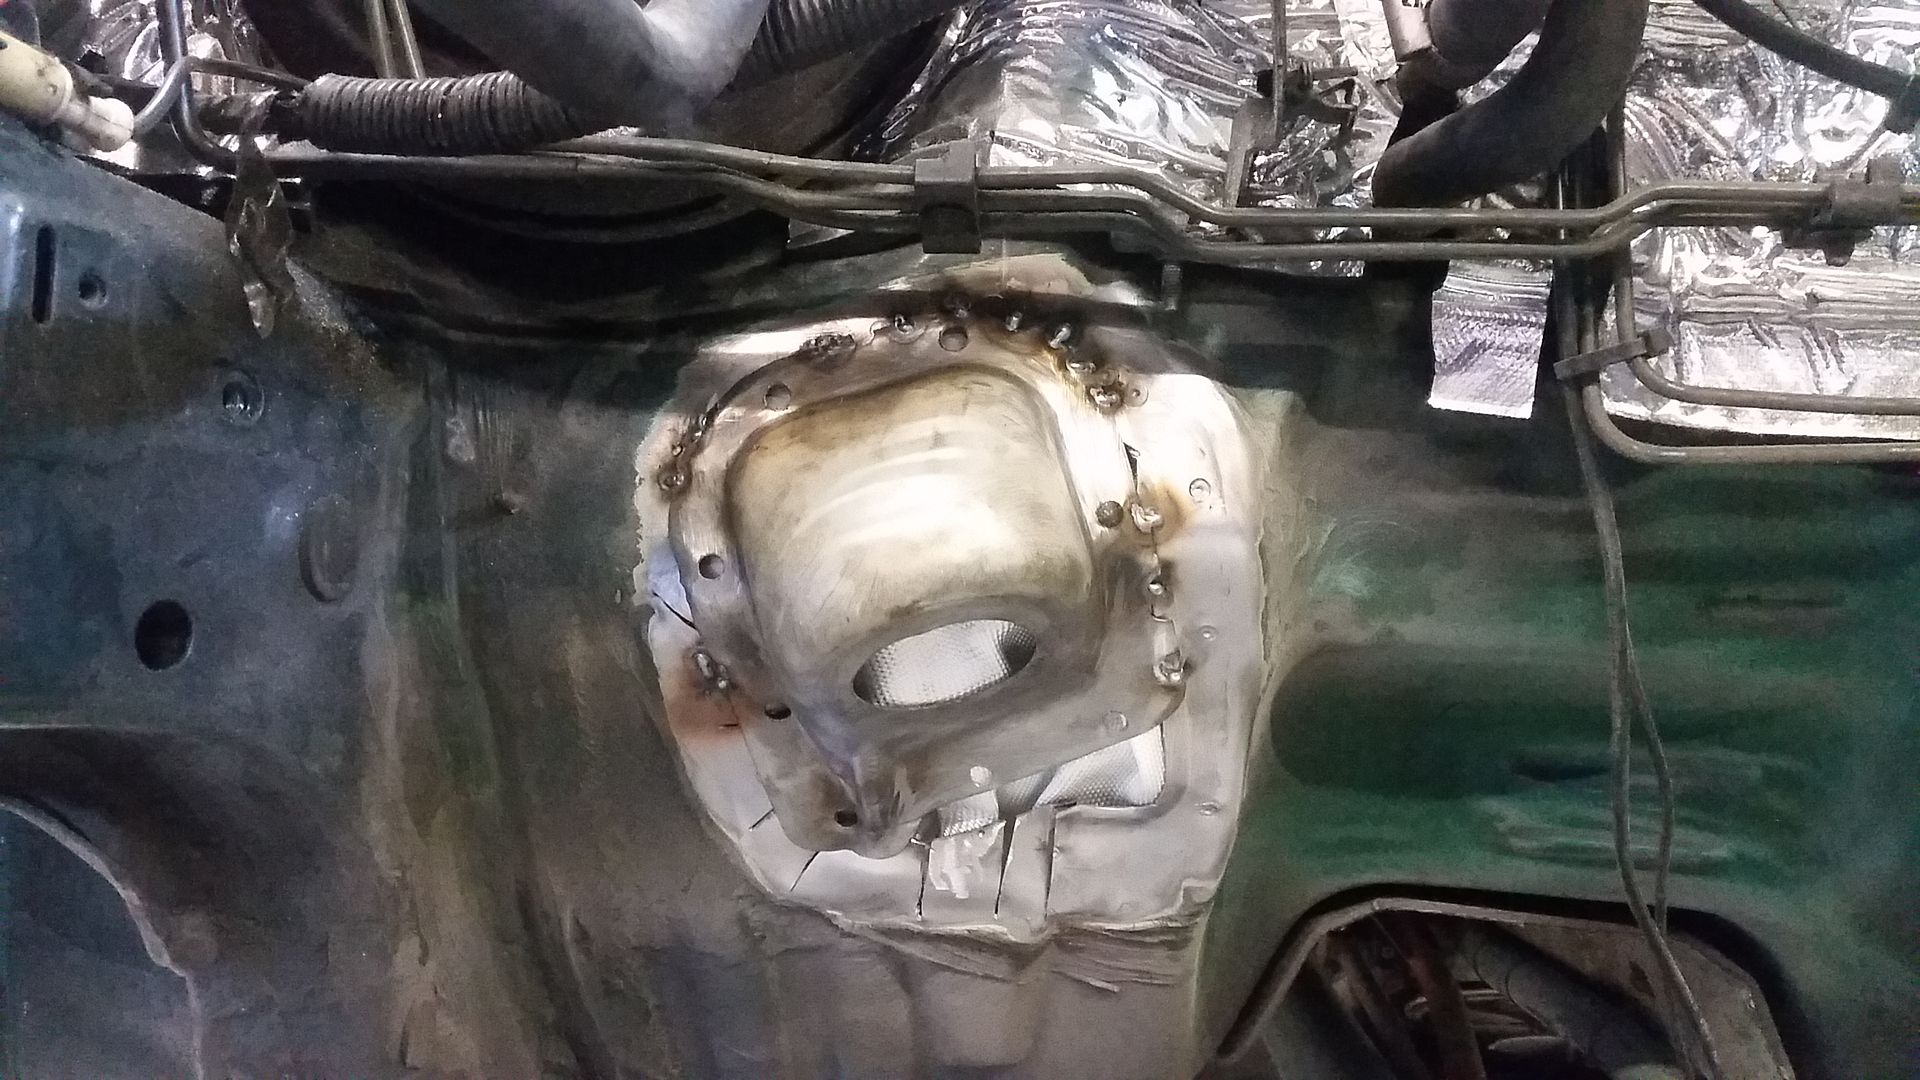
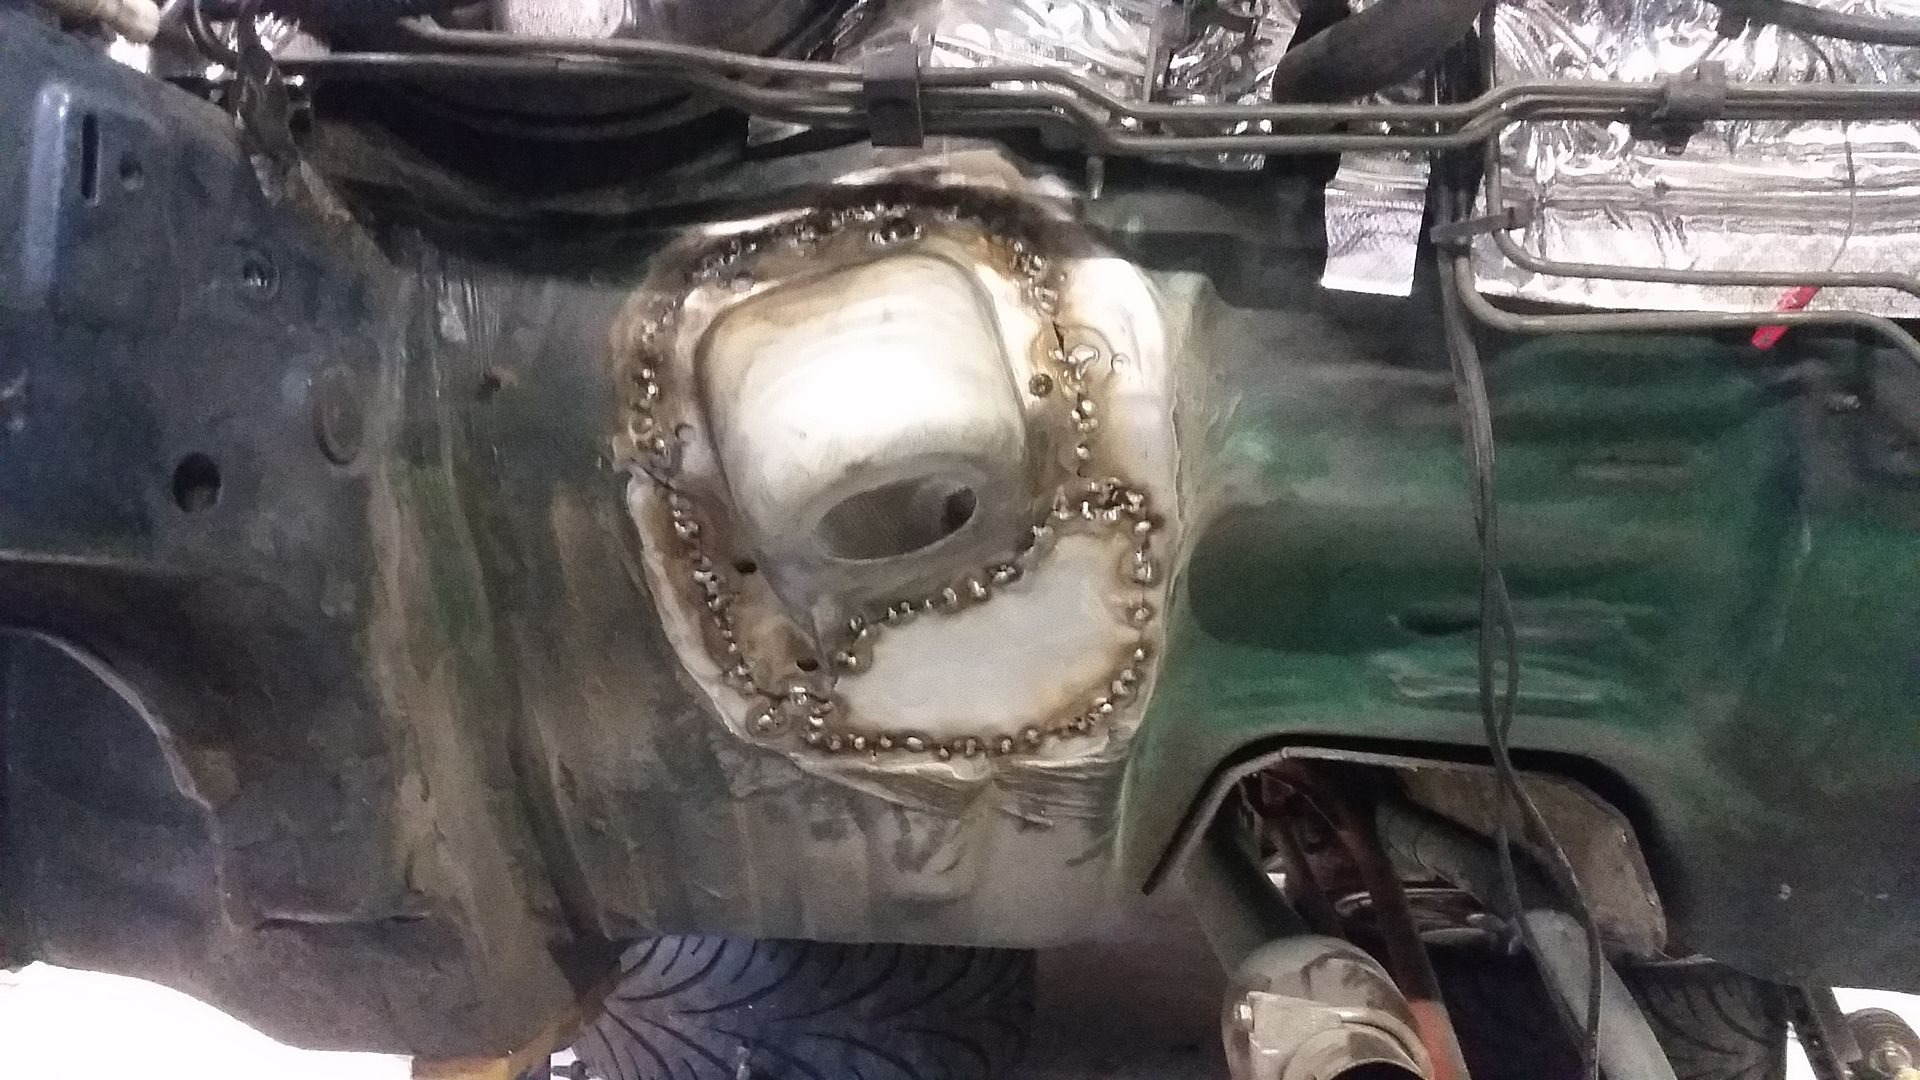
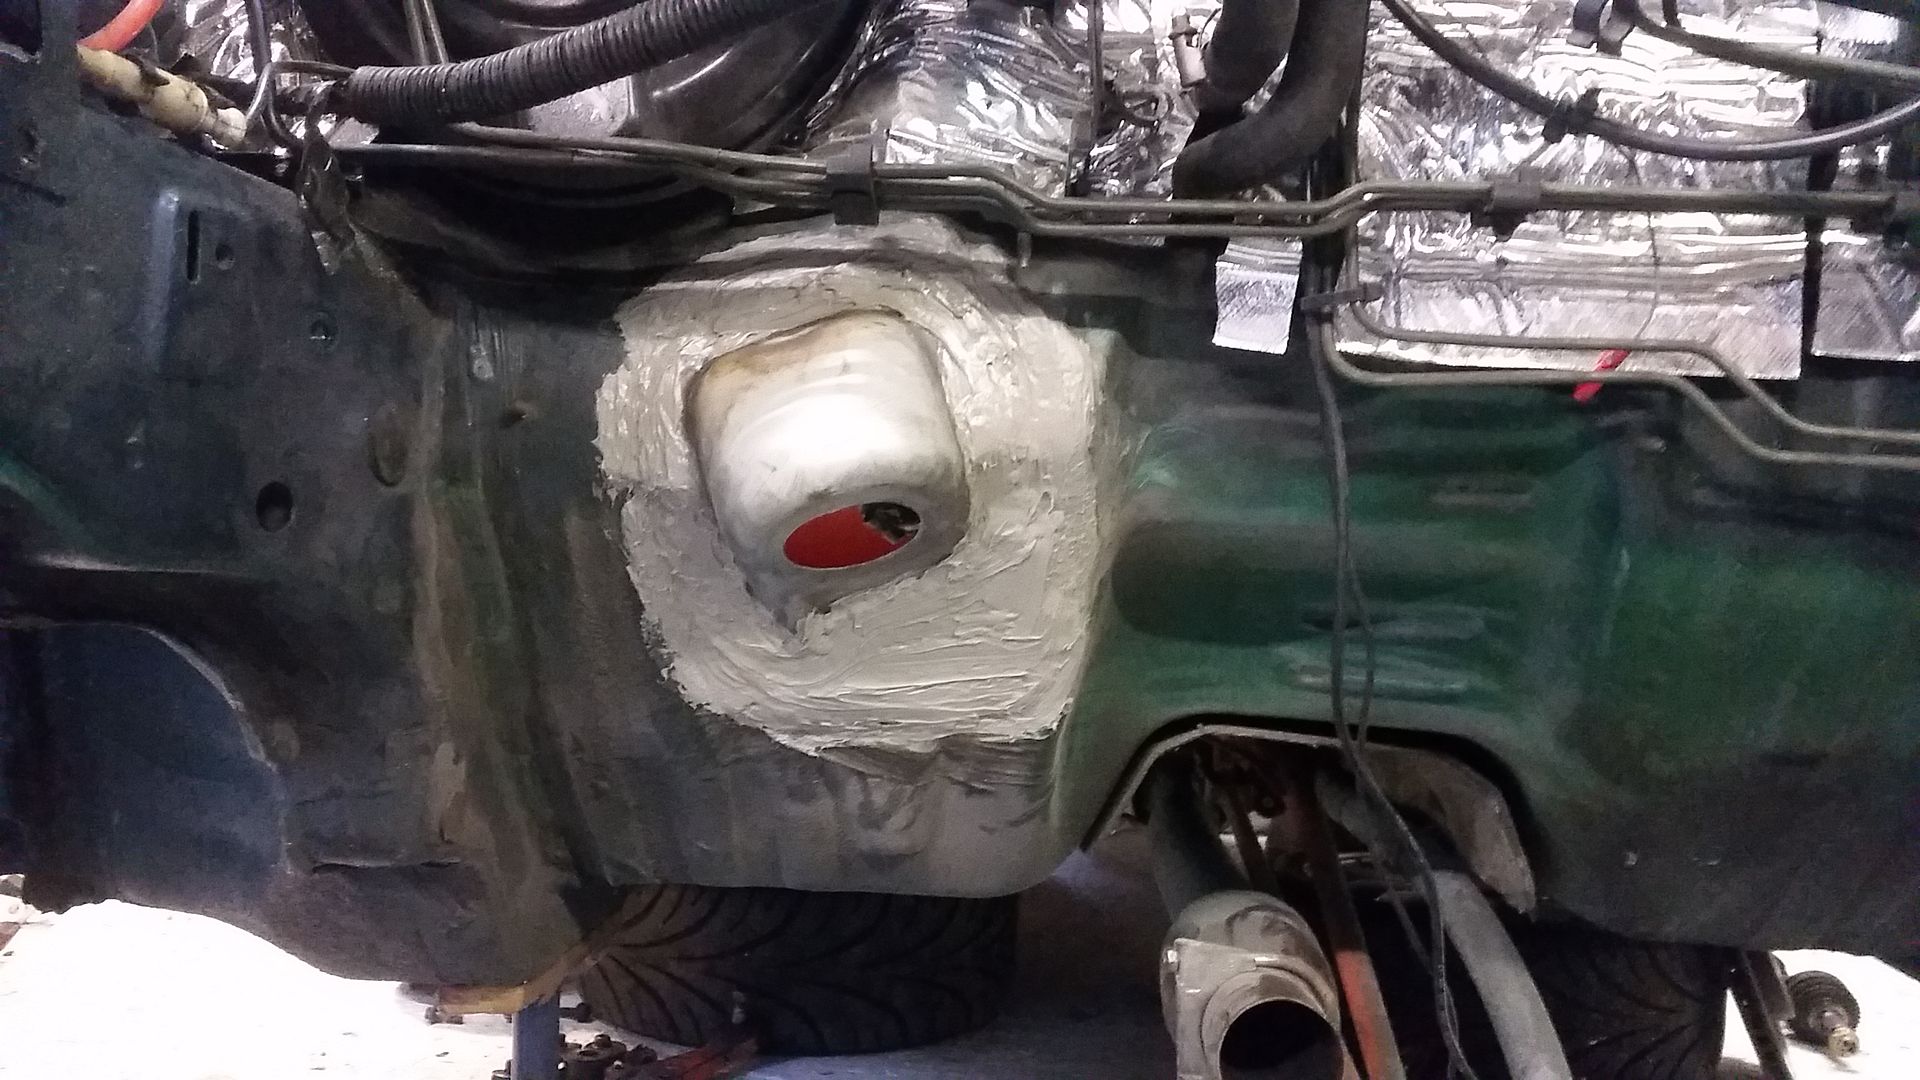
You'd never know!
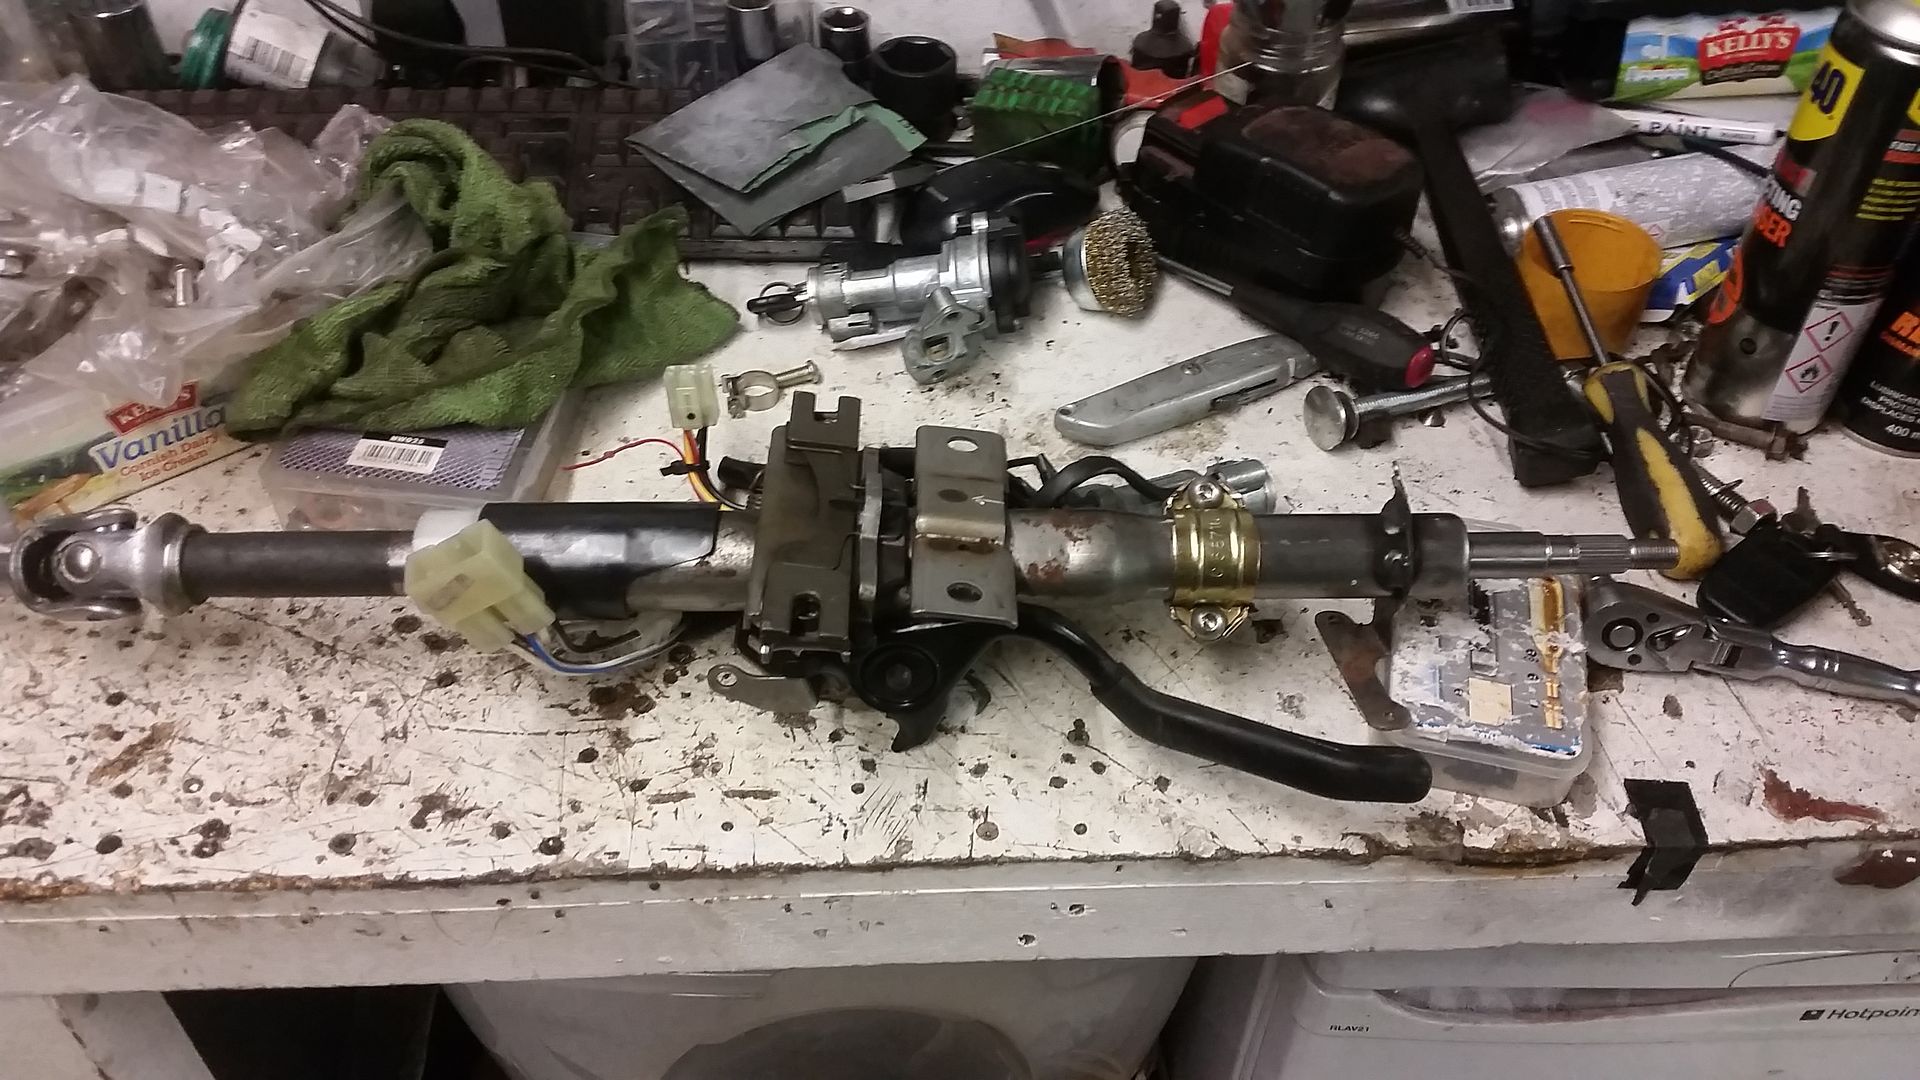
This also meant I had to swap the steering columns. Fiddly job, especial swapping the ignition switches.
I'm pleased to say the effort seems to have been worth it. I've yet to have the steering geometry sorted but it already feels better. Heavier and more direct.
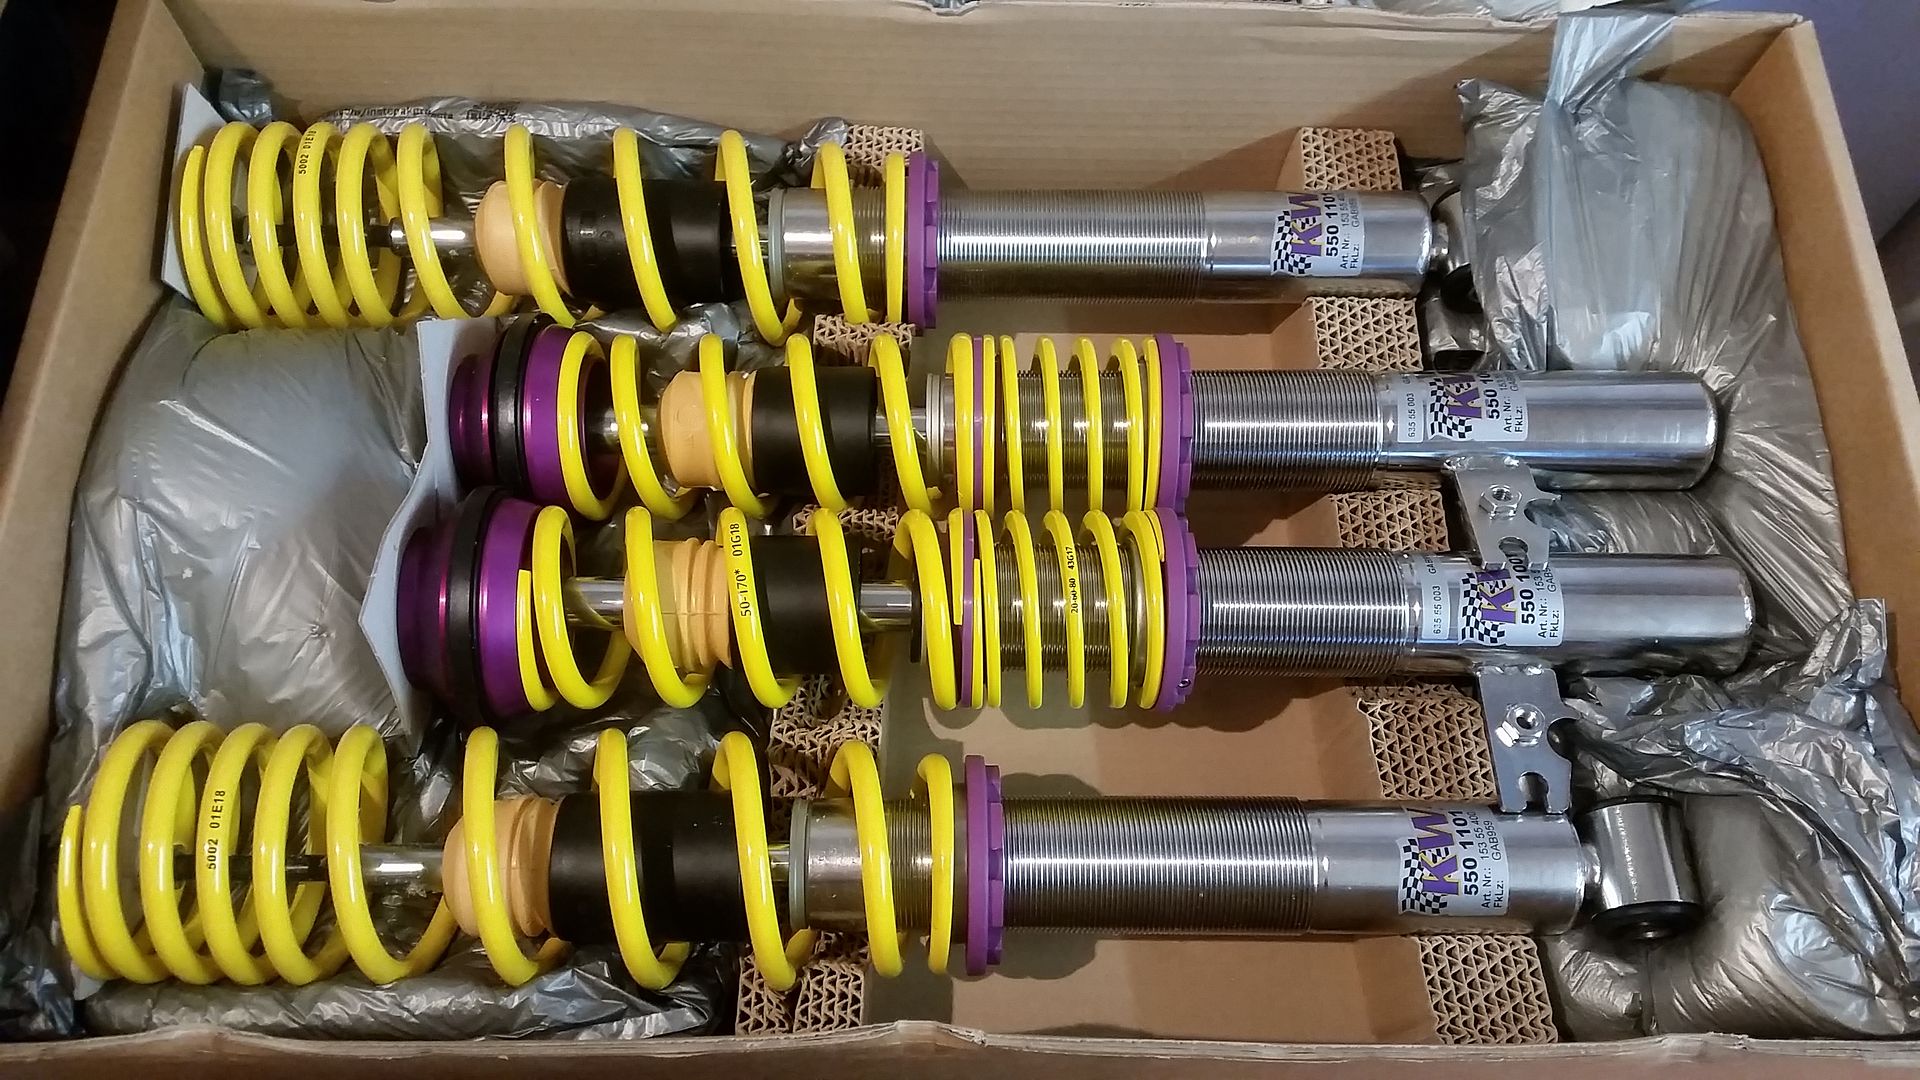
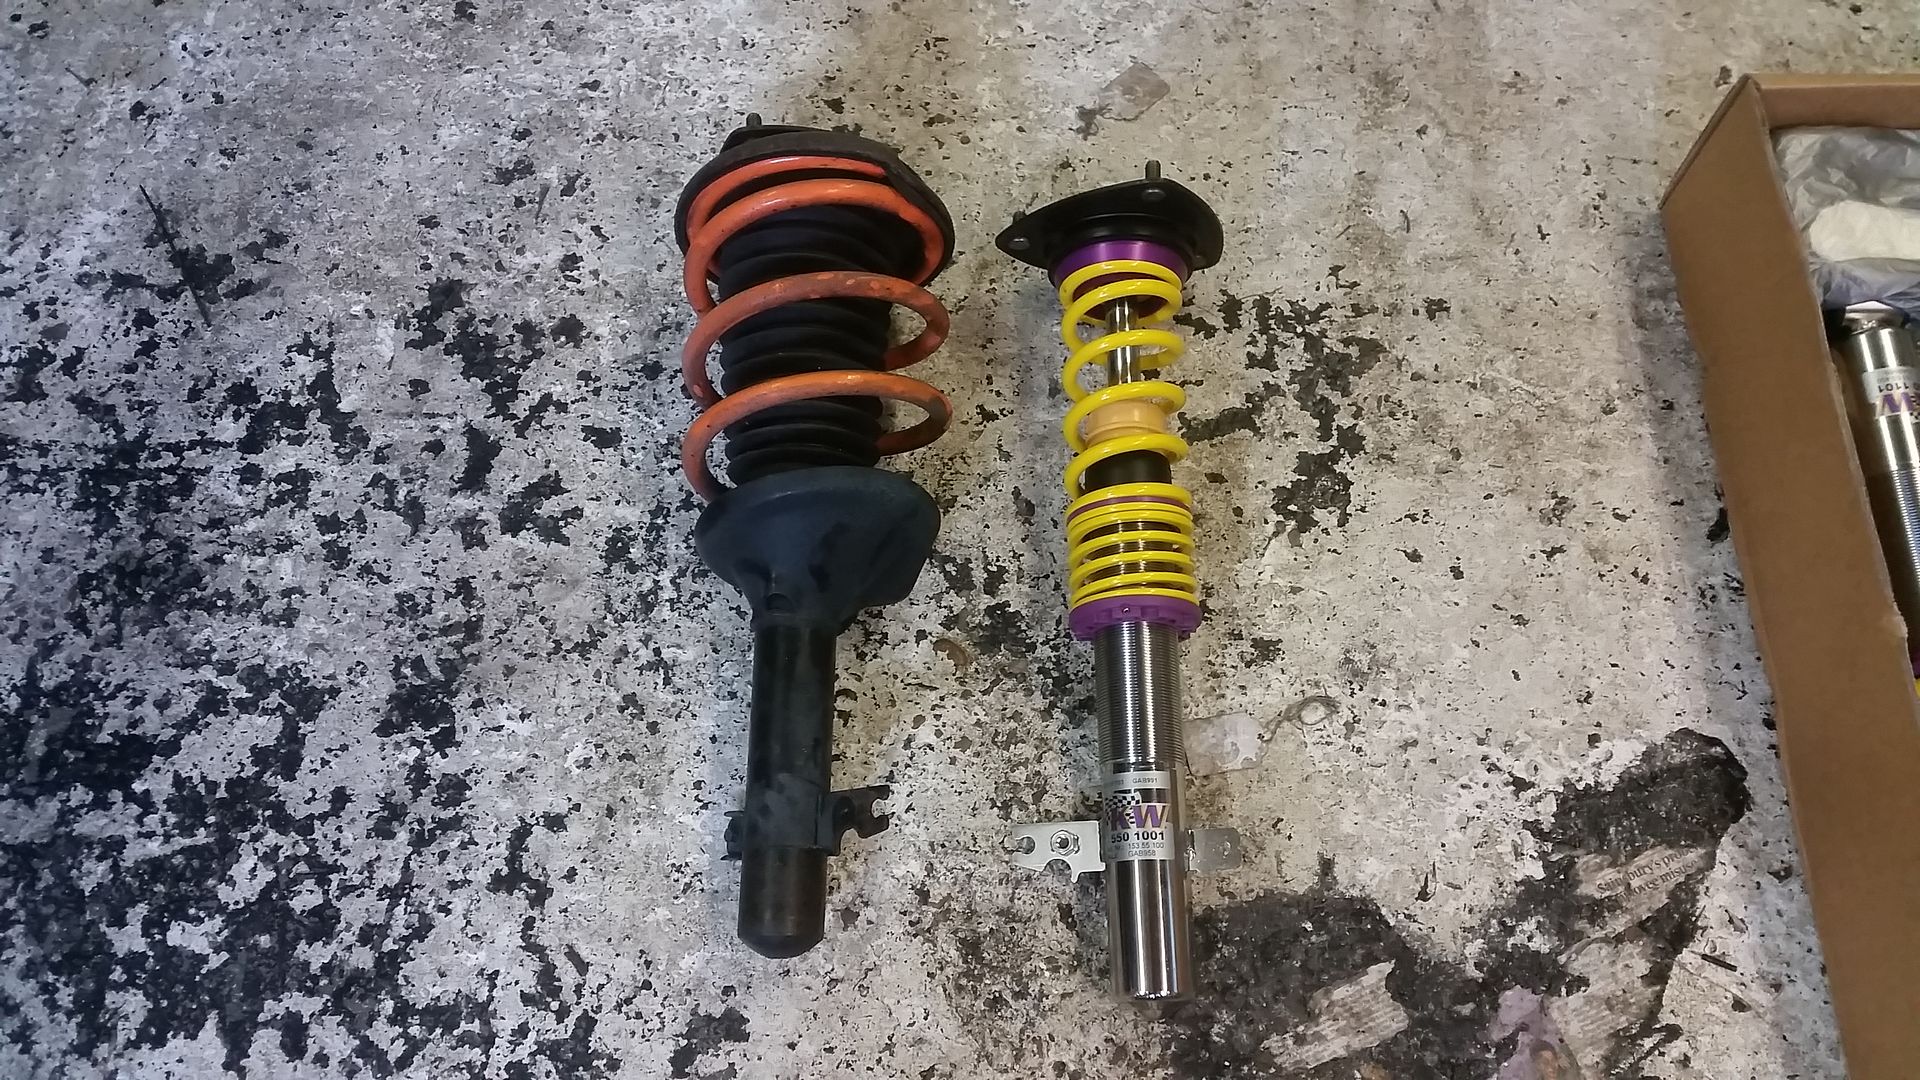
I've also fitted variant 2 KW coilovers. And while I was at it, fitted the beefier (but overall lighter as they are hollow) mg zr hubs. Had everything powder coated while it was off too. Black was a 2-day wait. Orange was same-day. Go figure!

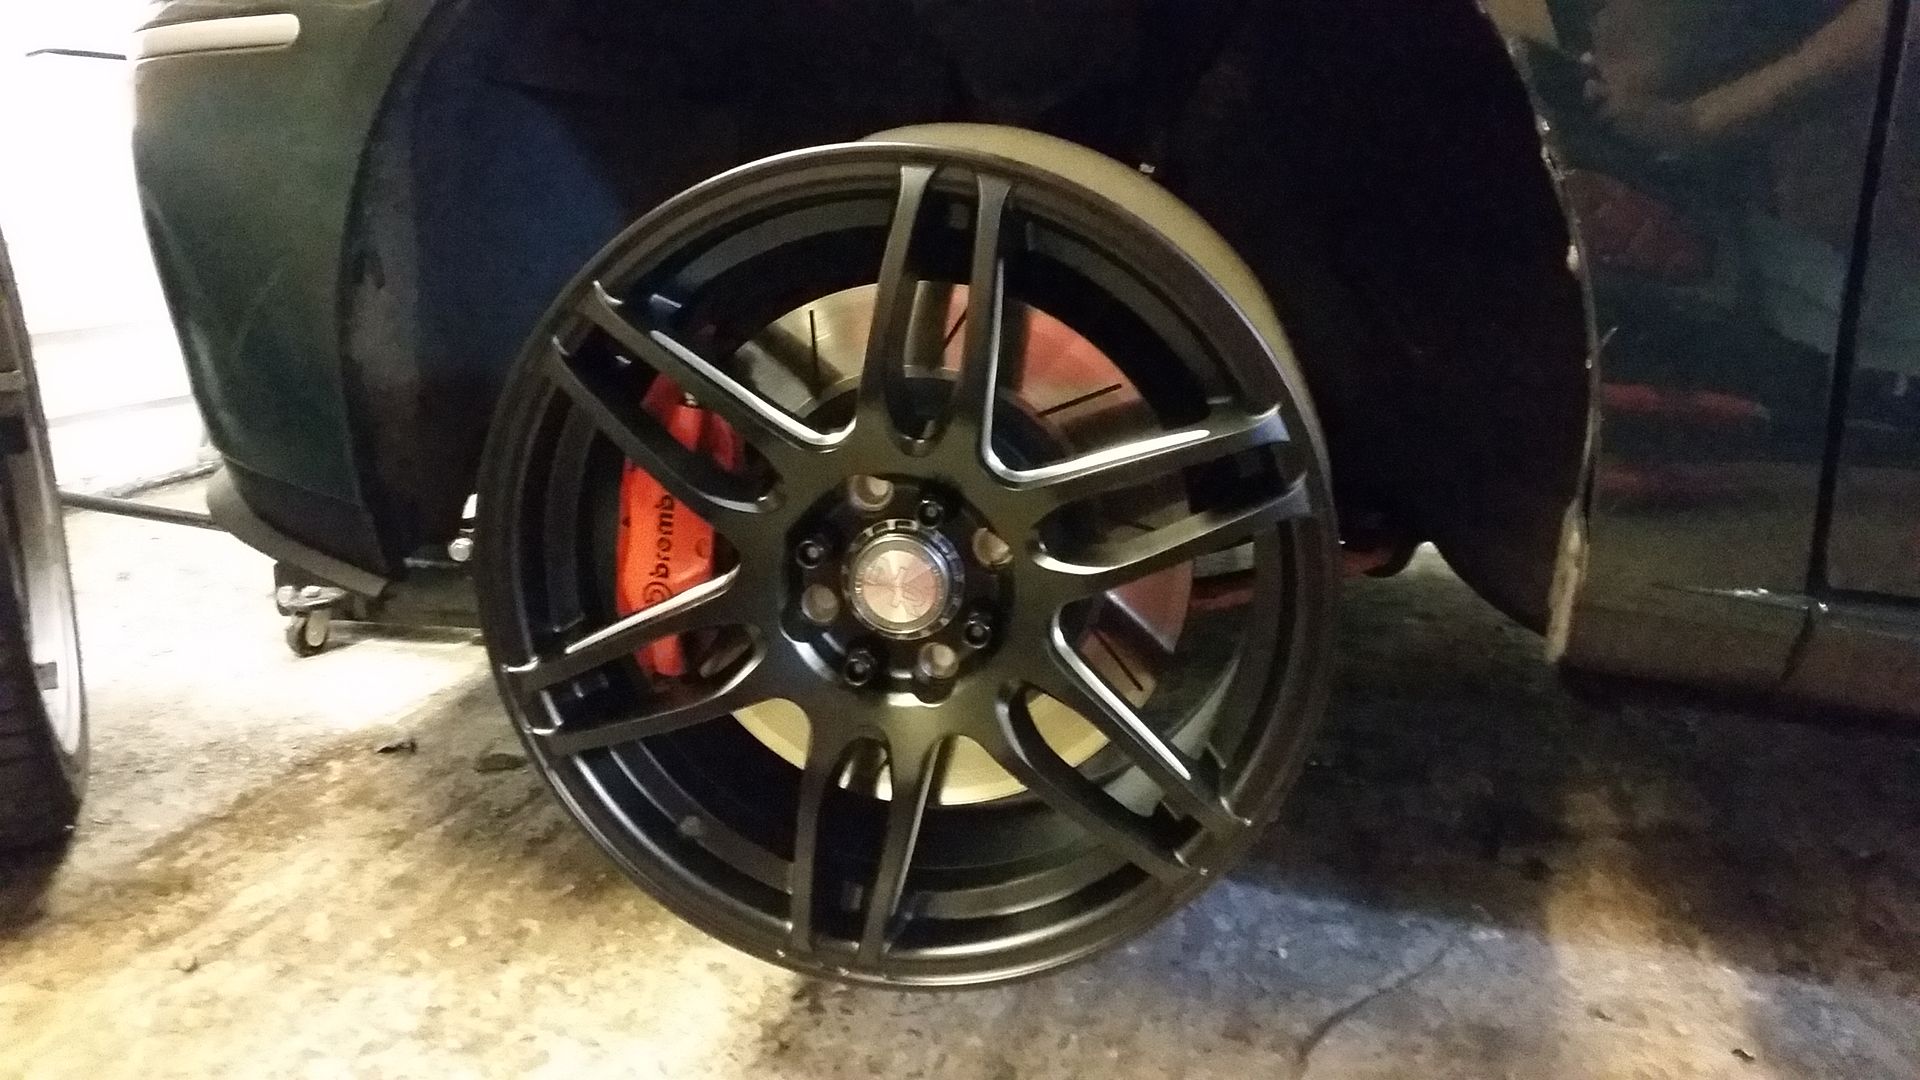
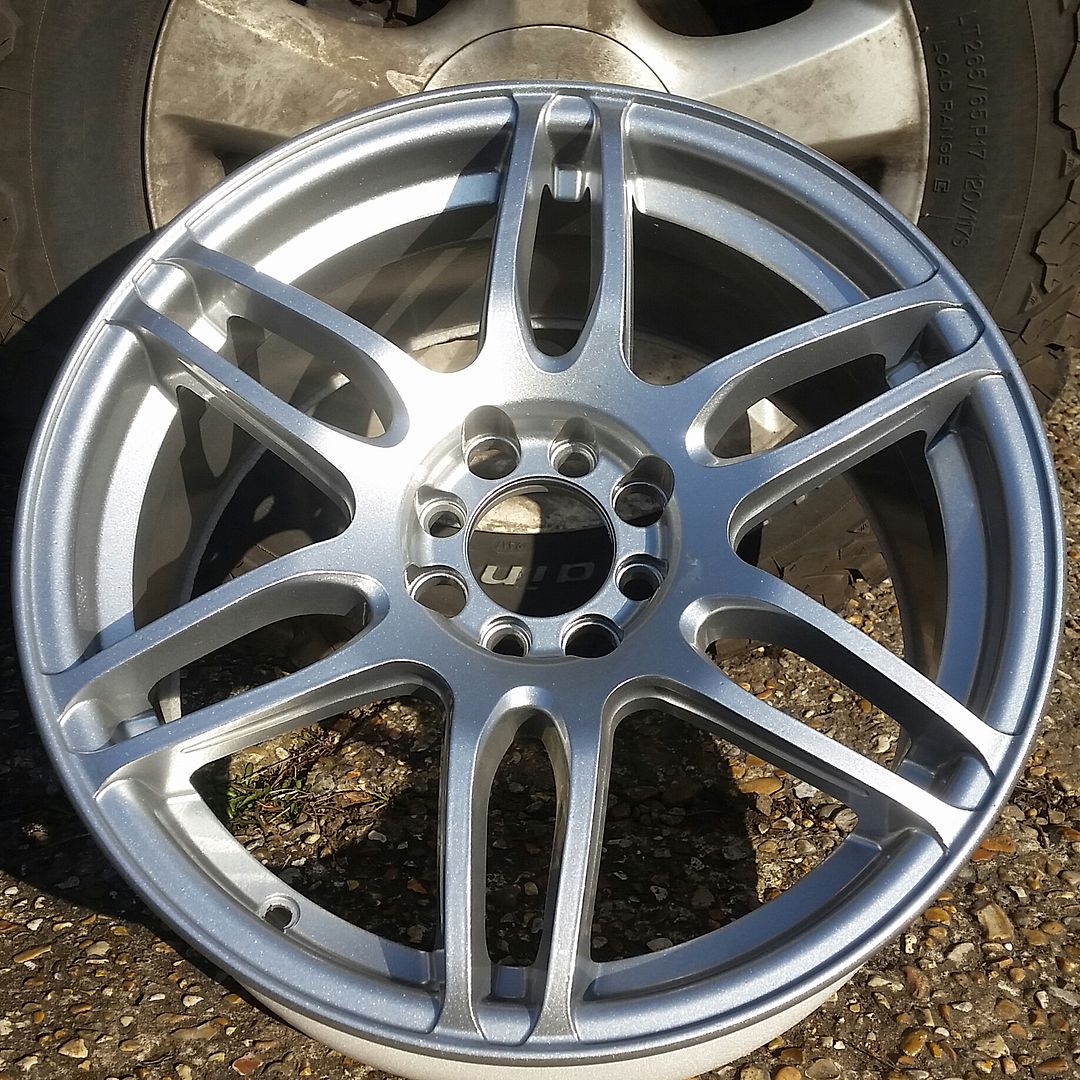
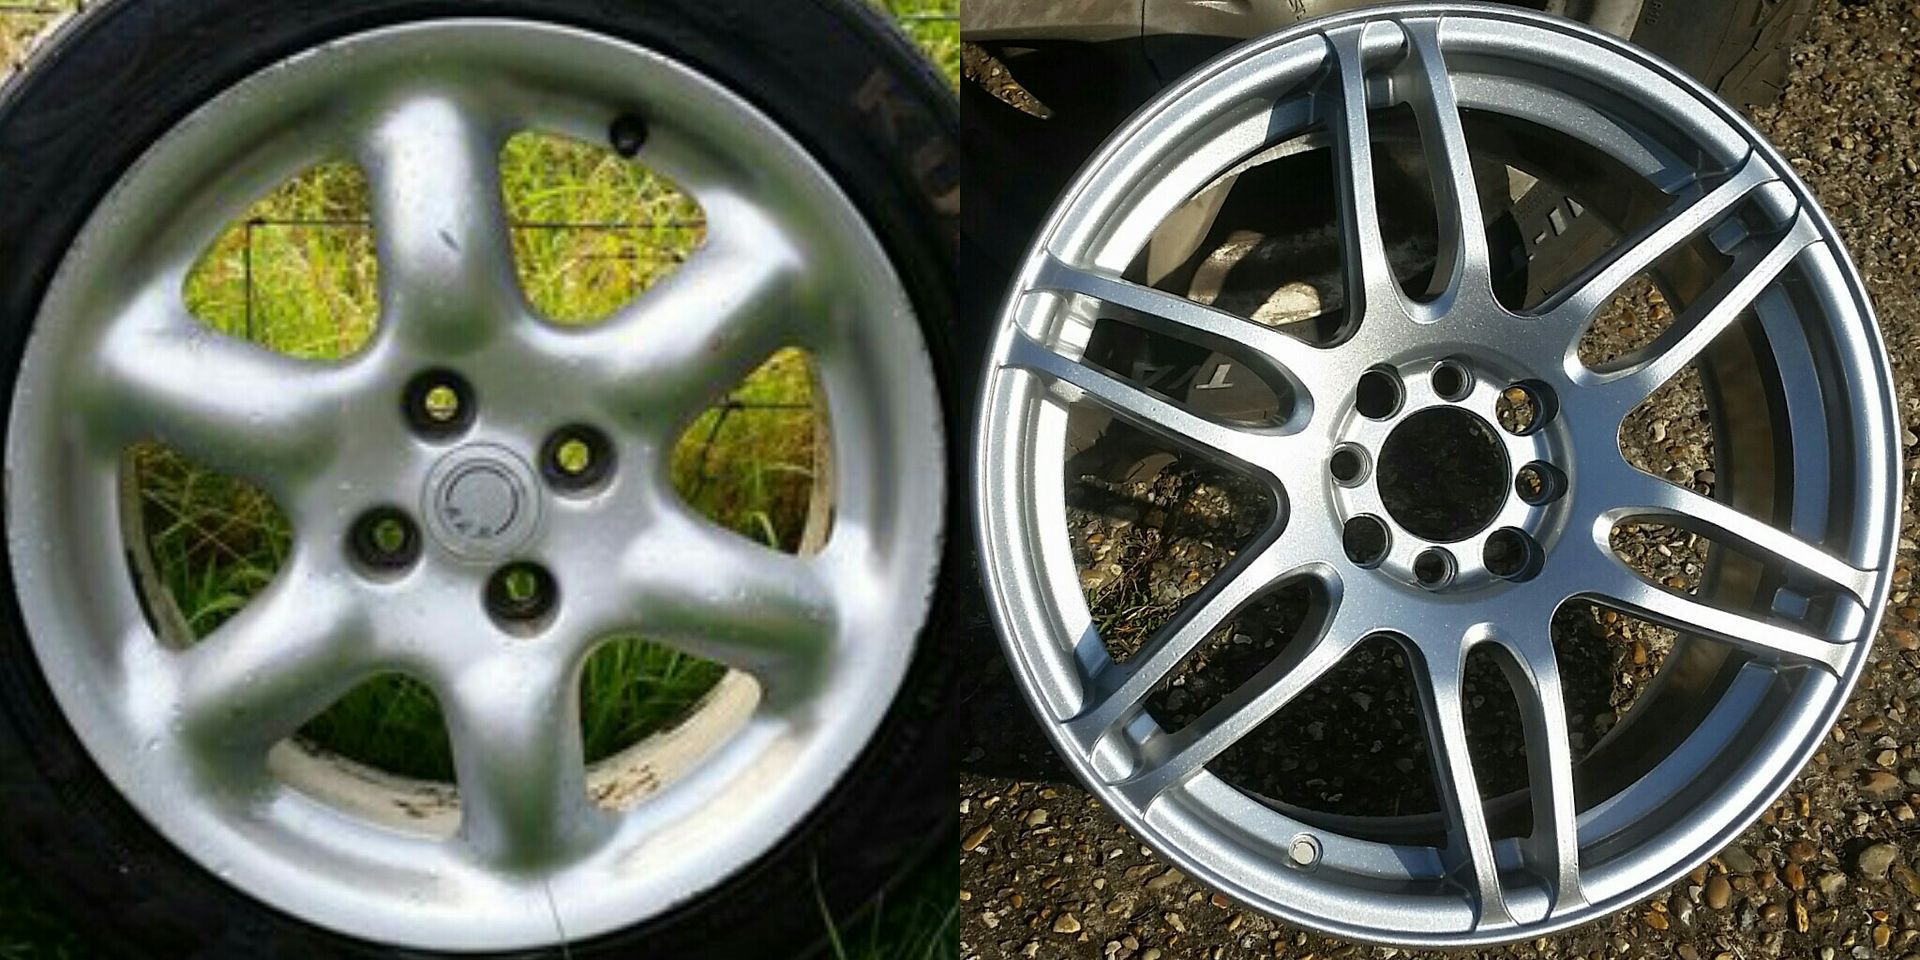
And finally, new wheels!
Ideally I wanted something similar to the original wheels (6-spoke) but with a modern twist and enough room fit my big brakes.
I found these from the the States and loved them although bear little resemblance to the originals. Had them powder coated sparkle silver (as per original cosmos wheels) to match the trim.
She's sitting pretty now. Next job is to build the engine...
I set up a Facebook page for more regular updates on the project but I'll keep this more detailed thread going, of course! Feel free to follow:
https://www.facebook.com/RoverBRM/
As I alluded to above, my high compression build had issues with excessive blow-by and pressurising coolant and, upon stripping it down to fit shorter conrods, I found severe bore scoring! It's hard to tell because of the damage but seems either the pistons or bores were oval. Pistons and liners are scrap.


Fear not. I had already sourced a spare set of pistons and liners to bring me back down to an 80mm bore anyway. This time pistons are supplied by Omega, and designed specifically for the Rover K-series turbo running the shorter turbo spec rods. More on that later but here's the piston:

For now, I've just fitted a nasp engine from a ZR160 to keep me mobile.
Steering:
I wanted a more positive setup given the amount of power going through the front wheels. The rack in every Rover 200 I've ever driven felt vague so add big power and the front end just has a mind of its own. Enter MGZR. Less turns lock to lock and supposedly a more more "feelsome" setup. Unfortunately this is not a straight swap, even less so than I thought it would be actually...
The rack is completely different, as is the subframe:


The splined shaft the steering column fixes to is in quite a different position. I thought this would entail a simple swap of the pressed steel pocket on the bulkhead that butts up against the rack. Drill out spot welds. Swap over from zr to brm. Weld. Done. I was wrong
It turns out that whole area of the bulkhead is a different shape between the cars. Long story short, I had to modify the brm firewall a fair bit to make it work. There was a point when I was cutting holes in the brm (having recently got it back from paint I might add) thinking to myself "what am I doing?"!
I had to teach myself how the mig weld for this bit. Not easy when the steel is 0.7mm thick in places. Just kept blowing through. It's not pretty but it's solid enough. Seam sealer saves the day!


You'd never know!


This also meant I had to swap the steering columns. Fiddly job, especial swapping the ignition switches.

I'm pleased to say the effort seems to have been worth it. I've yet to have the steering geometry sorted but it already feels better. Heavier and more direct.
I've also fitted variant 2 KW coilovers. And while I was at it, fitted the beefier (but overall lighter as they are hollow) mg zr hubs. Had everything powder coated while it was off too. Black was a 2-day wait. Orange was same-day. Go figure!


And finally, new wheels!
Ideally I wanted something similar to the original wheels (6-spoke) but with a modern twist and enough room fit my big brakes.
I found these from the the States and loved them although bear little resemblance to the originals. Had them powder coated sparkle silver (as per original cosmos wheels) to match the trim.


She's sitting pretty now. Next job is to build the engine...

I set up a Facebook page for more regular updates on the project but I'll keep this more detailed thread going, of course! Feel free to follow:
https://www.facebook.com/RoverBRM/
looks like insufficient bore clearance to me. The ovalizing liners won't help either.
If you go back to 80mm, I'd consider the Westwood nodular cast iron liners for the turbo. Mine are still running hard and well with the new owner.
Lee likely gives you an idea about the ring gapping with this particular piston.
Build them loose, only you will know (clappers, little more oil use)
Build them tight, the world will know (engines fails)
Gassing Station | Readers' Cars | Top of Page | What's New | My Stuff