Ferrari F430 Spider
Discussion


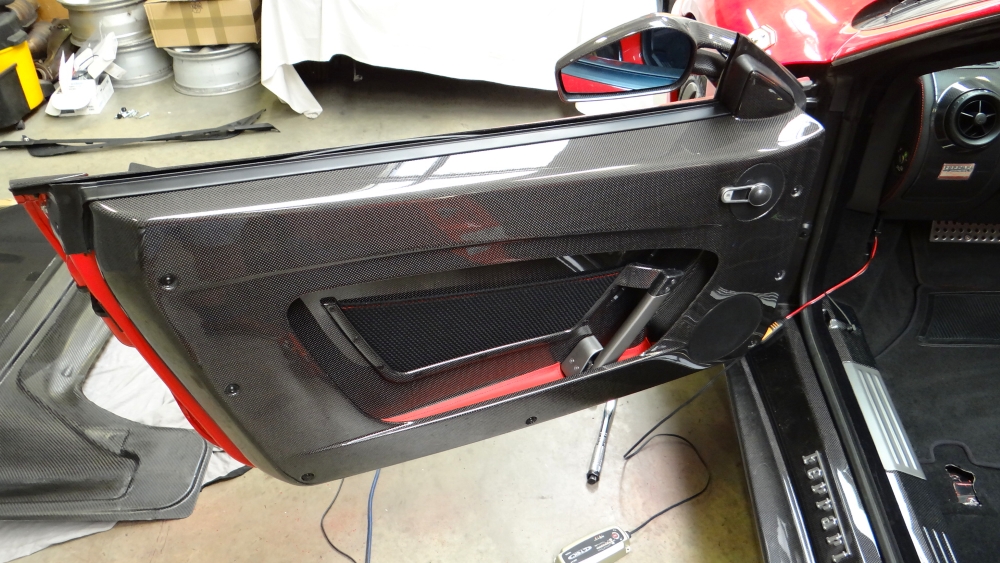
I've been driving the car so I'm now catching up with some old updates. Passenger door panel installed:
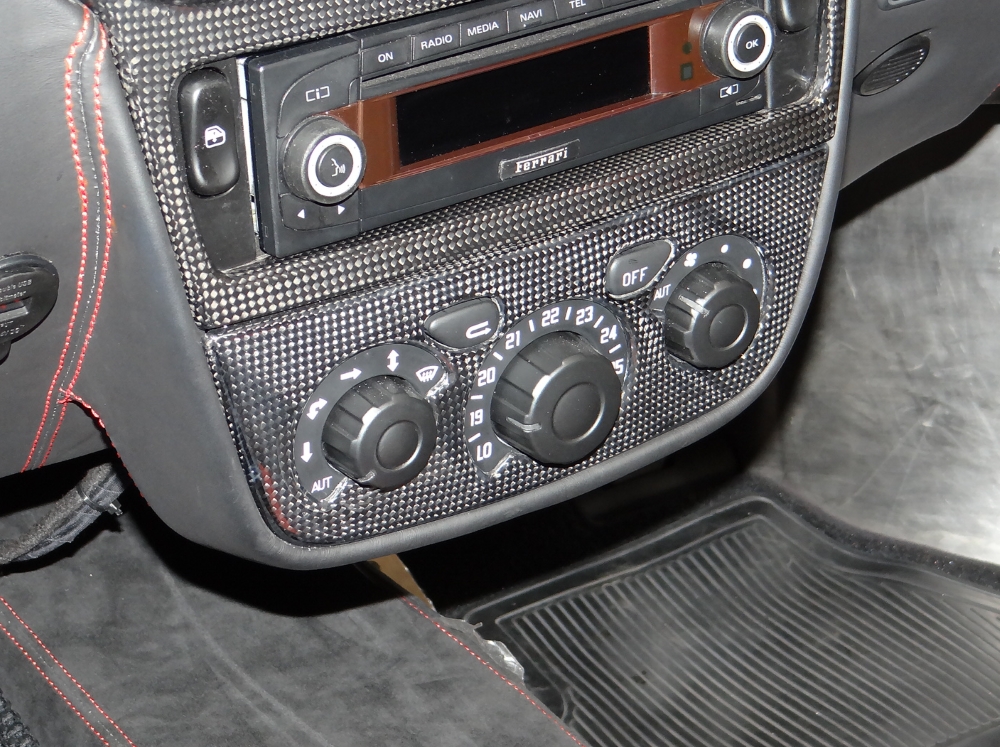
Black HVAC control knobs and new window switches installed (head unit not yet fully seated):
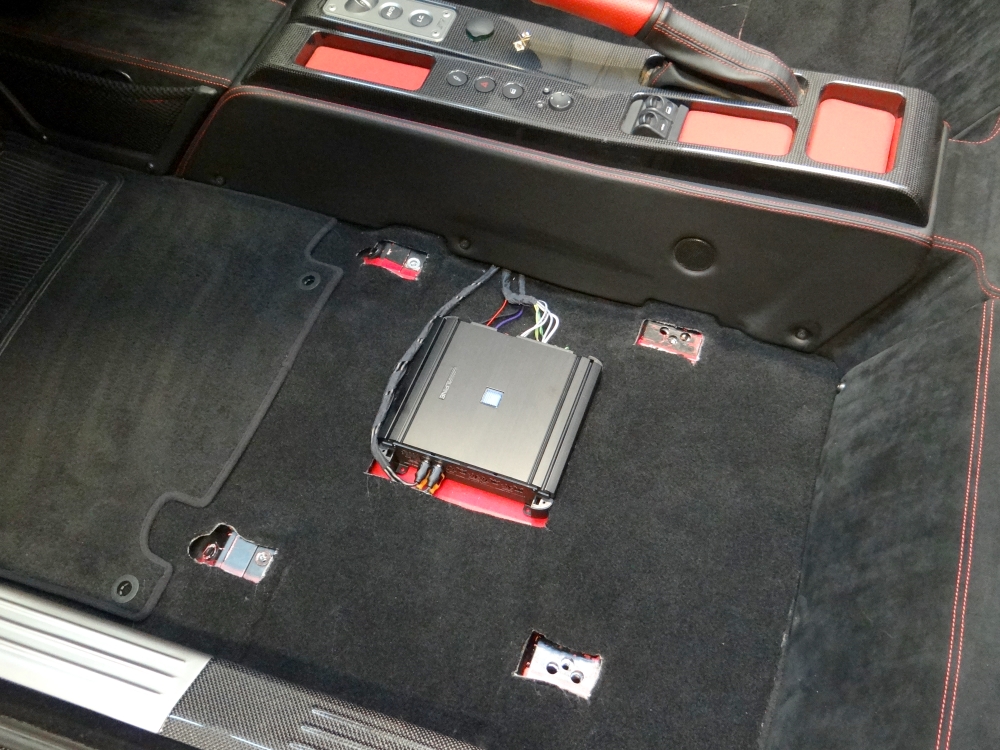
Alpine amplifier installed:
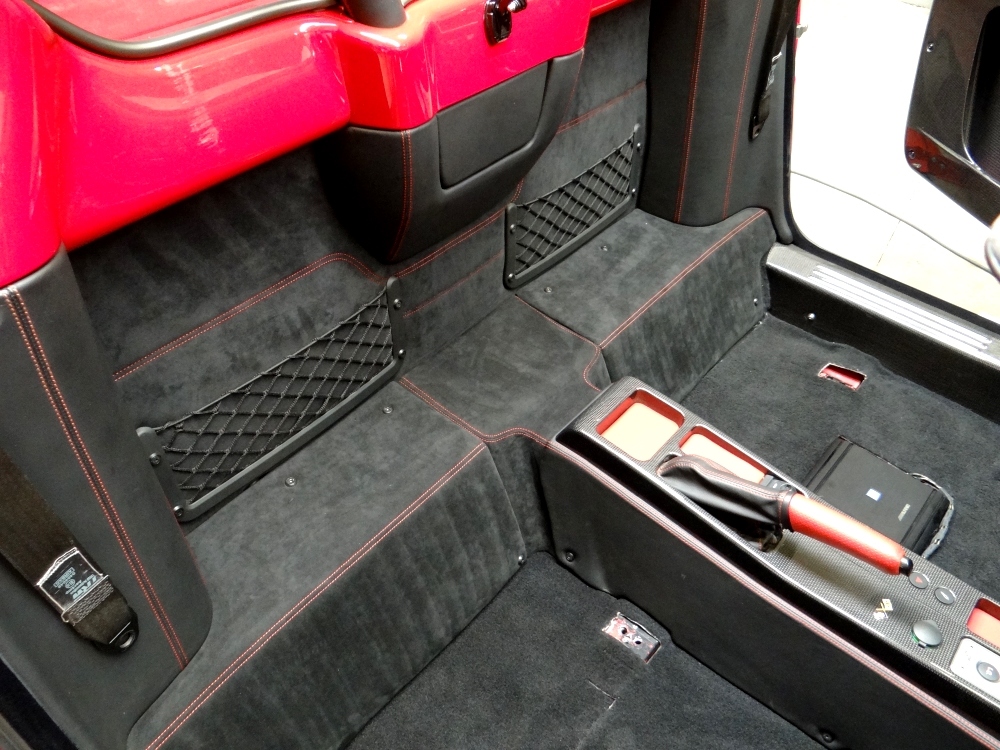
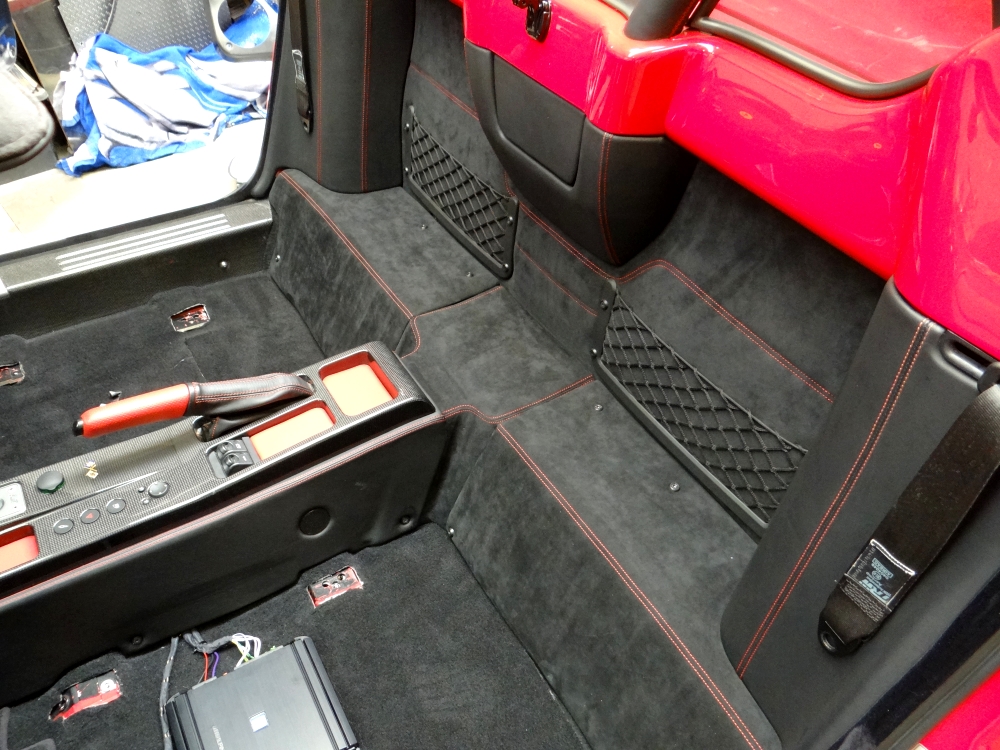
I never did post of my new Alcantara trim installed, so here it is (previously this was all black carpet - no stitching):
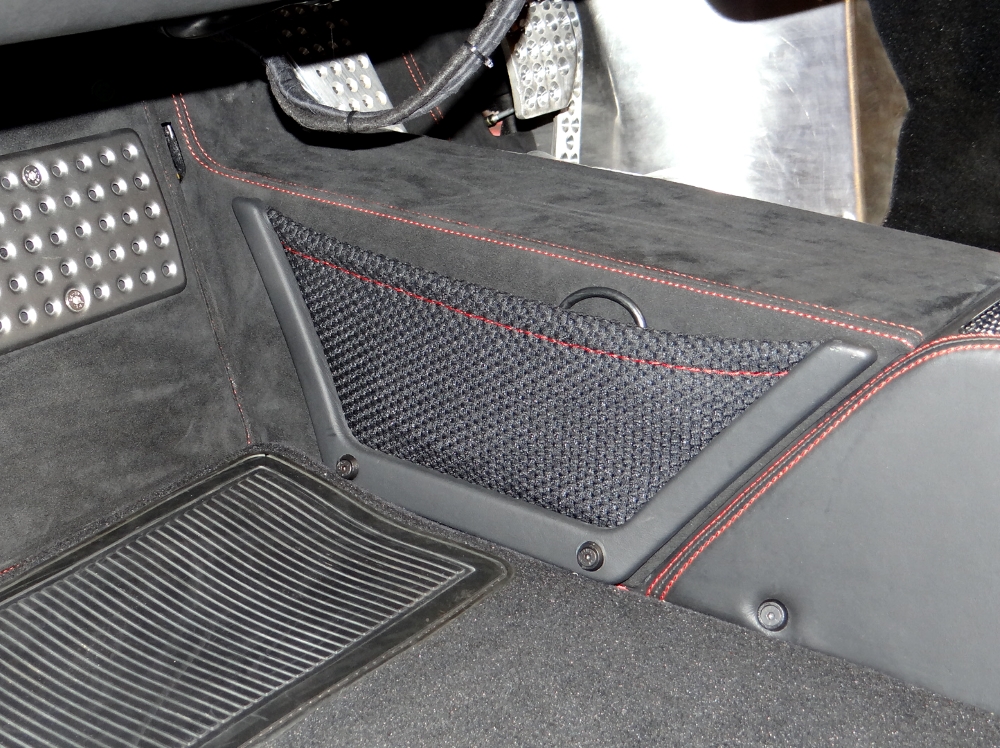
As a present my OH bought for me a Scuderia glove box storage net and iPod interface lead pocket. I had both re-stitched in red (from the factory the iPod pocket is only available with black stitching):
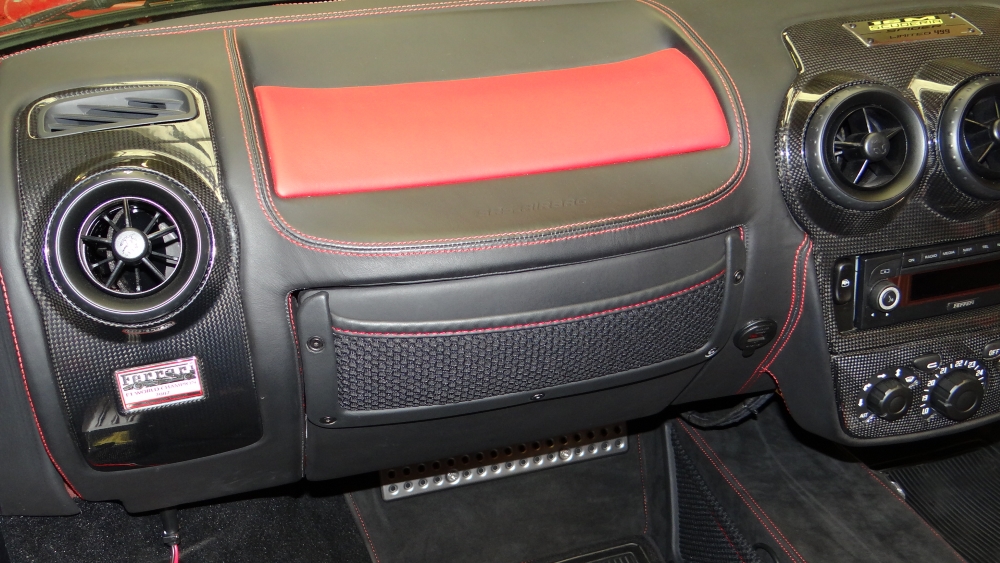
Black HVAC control knobs and new window switches installed (head unit not yet fully seated):
Alpine amplifier installed:
I never did post of my new Alcantara trim installed, so here it is (previously this was all black carpet - no stitching):
As a present my OH bought for me a Scuderia glove box storage net and iPod interface lead pocket. I had both re-stitched in red (from the factory the iPod pocket is only available with black stitching):
I put off a complete suspension arm refresh until next winter with the exception of the front upper bearings/ball joints. I was very fortunate to find a company in France who were selling off their stock of OEM kits (joint and OEM boots/circlips) for £30 each, so I bought the lot. I don't use my car in the wet so the lack of stainless content isn't really an issue.
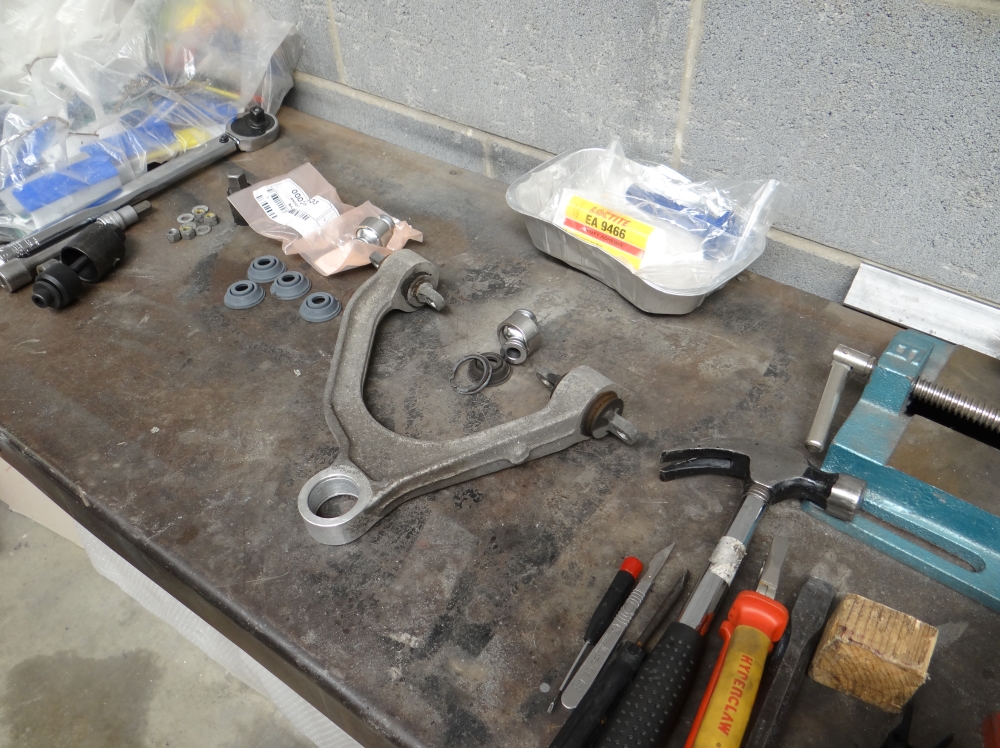
The bearings are held in by circlips with integrated boots but they aren't actually an interference fit within the arm, instead there is clearance for a layer of Expoy, and of course when replacing the joints the residue must be cleaned off. I wasn't about to spend an hour or more carefully removing the old epoxy from a soft alloy wishbone so I used the strongest acid I have in stock that doesn't hurt aluminium within a short time-frame (strong acid softens epoxy).
It was interesting to note that the 2008 cars have the F430 Challenge/599 type upper arms which are stronger around the inner flambloc area - this was originally done for the higher cornering loads possible on Challenge due to their slick tyres and aero.
Synstyp is nasty stuff but ten minutes on the epoxy softened it enough to be removed with a blue Scotch-Brite pad, which had the added benefit of keying up the aluminium (max shear strength quoted on expoxy adhesives is usually with a keyed surface).
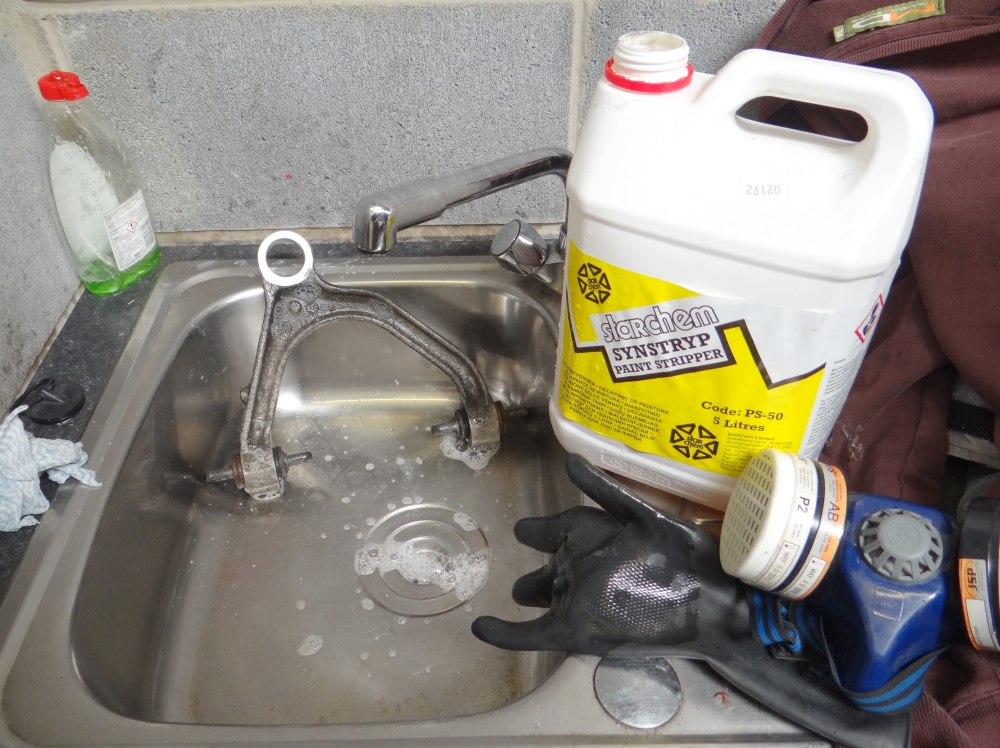
Whilst the Synstryp was working I swapped to working on the other side and I actually managed to have both sides finished and the wheels re-fitted within one hour, though I did leave the car up on axle stands for over 24hrs to enable the glue to fully cure.
The bearings are held in by circlips with integrated boots but they aren't actually an interference fit within the arm, instead there is clearance for a layer of Expoy, and of course when replacing the joints the residue must be cleaned off. I wasn't about to spend an hour or more carefully removing the old epoxy from a soft alloy wishbone so I used the strongest acid I have in stock that doesn't hurt aluminium within a short time-frame (strong acid softens epoxy).
It was interesting to note that the 2008 cars have the F430 Challenge/599 type upper arms which are stronger around the inner flambloc area - this was originally done for the higher cornering loads possible on Challenge due to their slick tyres and aero.
Synstyp is nasty stuff but ten minutes on the epoxy softened it enough to be removed with a blue Scotch-Brite pad, which had the added benefit of keying up the aluminium (max shear strength quoted on expoxy adhesives is usually with a keyed surface).
Whilst the Synstryp was working I swapped to working on the other side and I actually managed to have both sides finished and the wheels re-fitted within one hour, though I did leave the car up on axle stands for over 24hrs to enable the glue to fully cure.
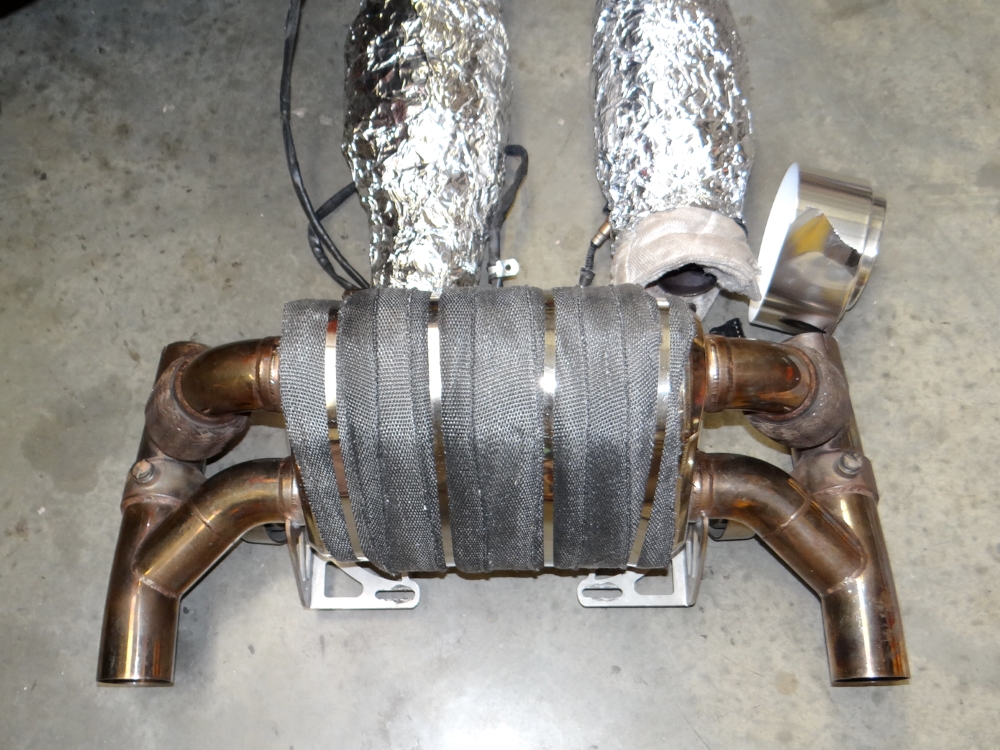
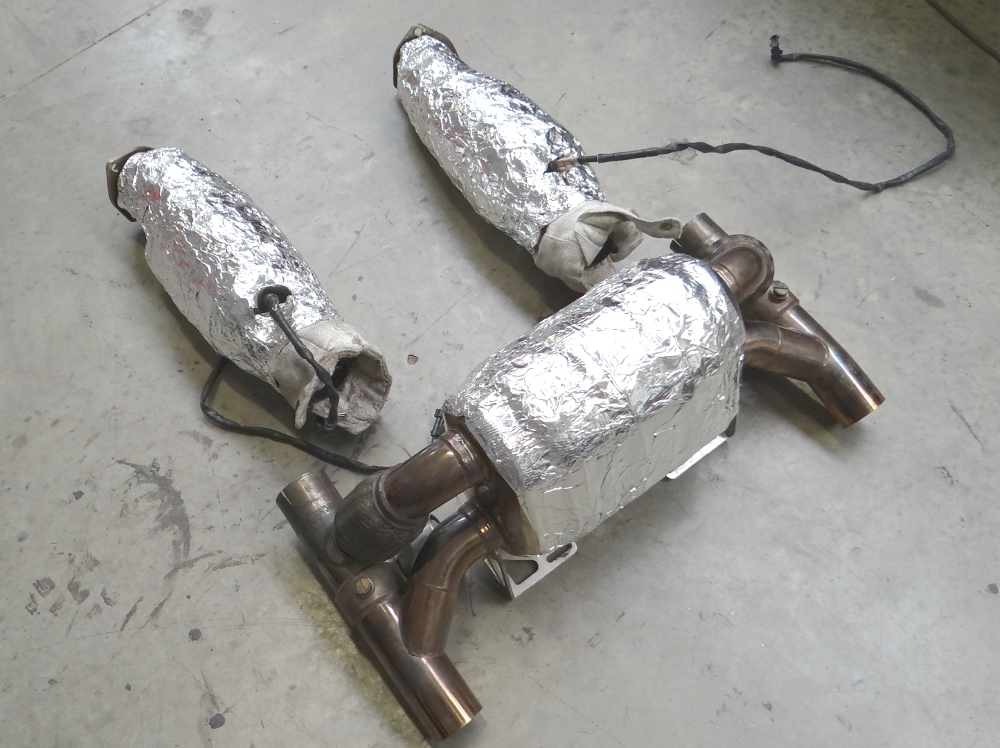
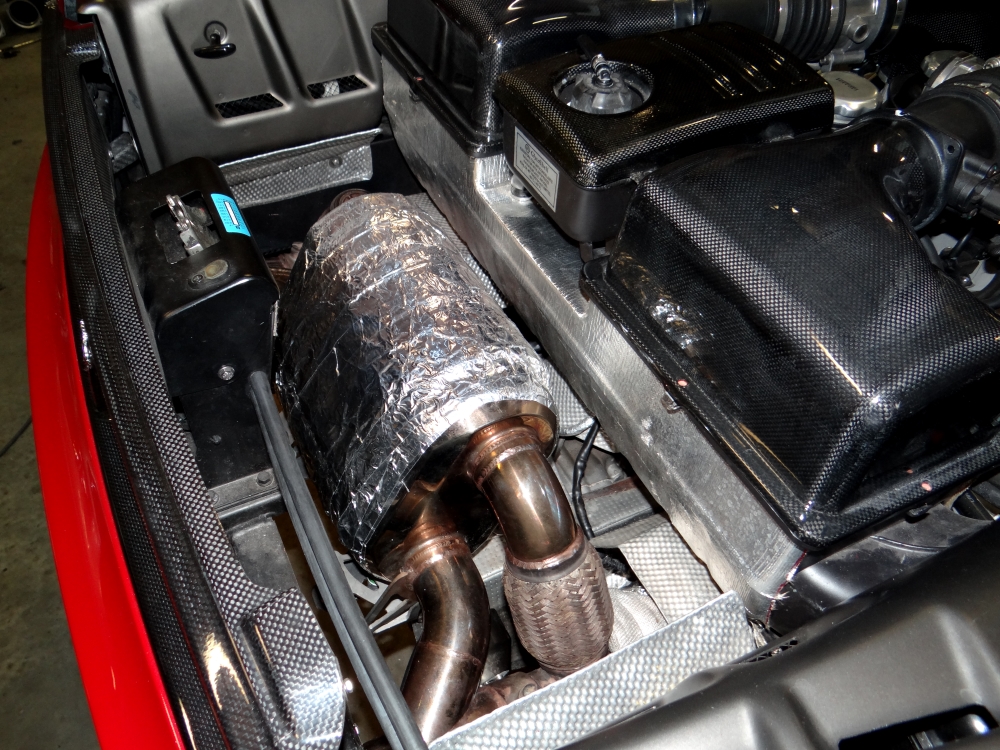
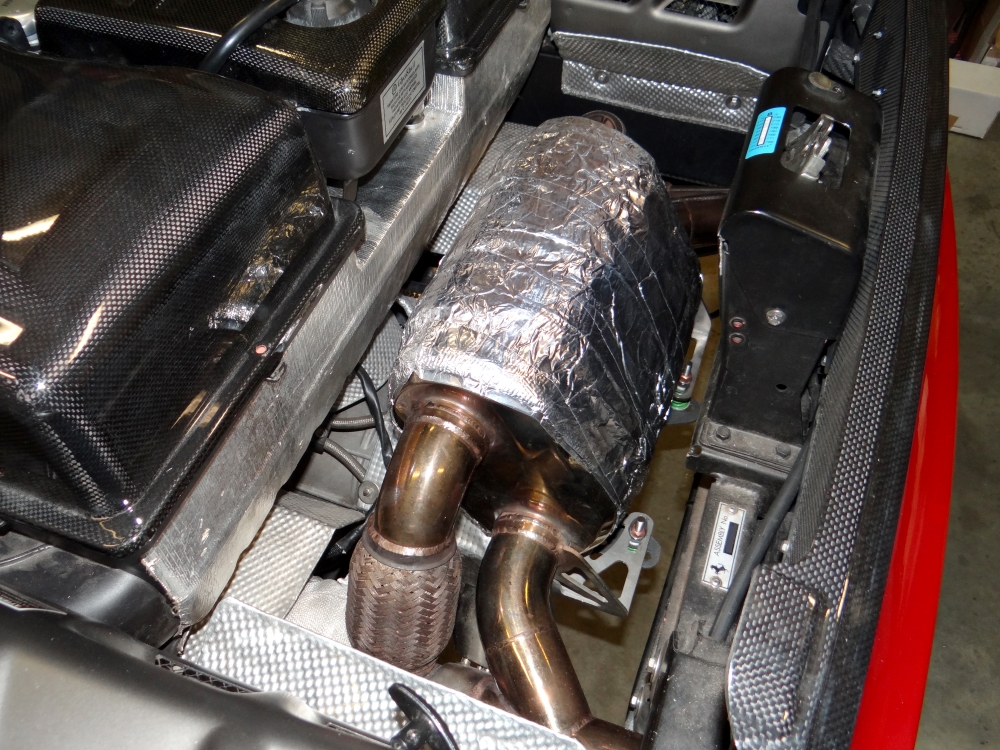
Capristo Scuderia Exhaust and 200 Cell Sports Cats - 02FE 023 03 006
I have the Capristo manifolds on my car and I'm not particularly impressed with them - they are good enough but quite agricultural, however I'm really impressed with the Scuderia exhaust system; the design, build, and fit are excellent.
From experience I've found there isn't really a perfect answer to exhaust heat insulation, at least not within the confines of a car engine bay:
- Capristo blankets wear from the inside out;
- Heat wrap degrades at the high temperatures found on manifolds and cats, is unpleasant to work with (the fibres can't be good for lungs and irritate the skin), and leaves fibres all over the engine bay;
- Ceramic coating doesn't work as well as the Capristo blankets.
As per my previous Capristo cats I've installed the blankets and then wrapped over them with heat wrap secured with stainless ties.
For the rear silencer I've first added two sheets of ceramic wool insulation (the type used in ovens), and then wrapped over the top, again securing with stainless ties. This time I'm trying something new: aluminium tape over the top of the heat wrap. It made installation significantly more pleasant than with the exposed heat wrap and after a couple of long drives it is holding up OK (the heat rating is within spec if installed over other forms of insulation). Let's see how it works out.
Photos to show the various stages of insulation:
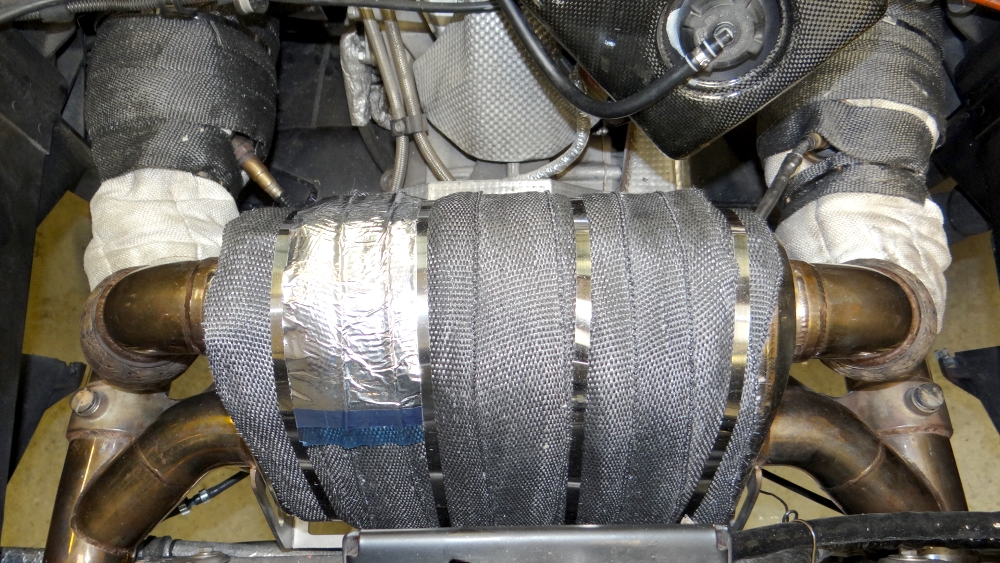
Complete and installed:

I have the Capristo manifolds on my car and I'm not particularly impressed with them - they are good enough but quite agricultural, however I'm really impressed with the Scuderia exhaust system; the design, build, and fit are excellent.
From experience I've found there isn't really a perfect answer to exhaust heat insulation, at least not within the confines of a car engine bay:
- Capristo blankets wear from the inside out;
- Heat wrap degrades at the high temperatures found on manifolds and cats, is unpleasant to work with (the fibres can't be good for lungs and irritate the skin), and leaves fibres all over the engine bay;
- Ceramic coating doesn't work as well as the Capristo blankets.
As per my previous Capristo cats I've installed the blankets and then wrapped over them with heat wrap secured with stainless ties.
For the rear silencer I've first added two sheets of ceramic wool insulation (the type used in ovens), and then wrapped over the top, again securing with stainless ties. This time I'm trying something new: aluminium tape over the top of the heat wrap. It made installation significantly more pleasant than with the exposed heat wrap and after a couple of long drives it is holding up OK (the heat rating is within spec if installed over other forms of insulation). Let's see how it works out.
Photos to show the various stages of insulation:
Complete and installed:
Sound system:
- The Scuderia has a Becker 6112 head unit powering a pair of tweeters which, as is to be expected: terrible;
- The pre-07 F430 has a Becker 6105 powering a two-way paper cone component set. It is a little better than terrible;
- The MY07 onwards F430 has a Becker 6112 powering some slightly beefier paper-cone based two way components. It is 'OK';
- The 16M has a JBL three-way component set: the tweeters driven from the midrange channel via a passive filter and the the midbass drivers are a DVC type driven by two seperate channels. The six channel JBL amplifier has a pre-programmed DSP and is driven by speaker-level inputs. It is good.
The factory systems are marginal in a coupe but 16M aside just don't cut it in a Spider with its roof down. For an A-to-A car it's not really important but on the long road trips we embark on it's an area that warrants some investment.
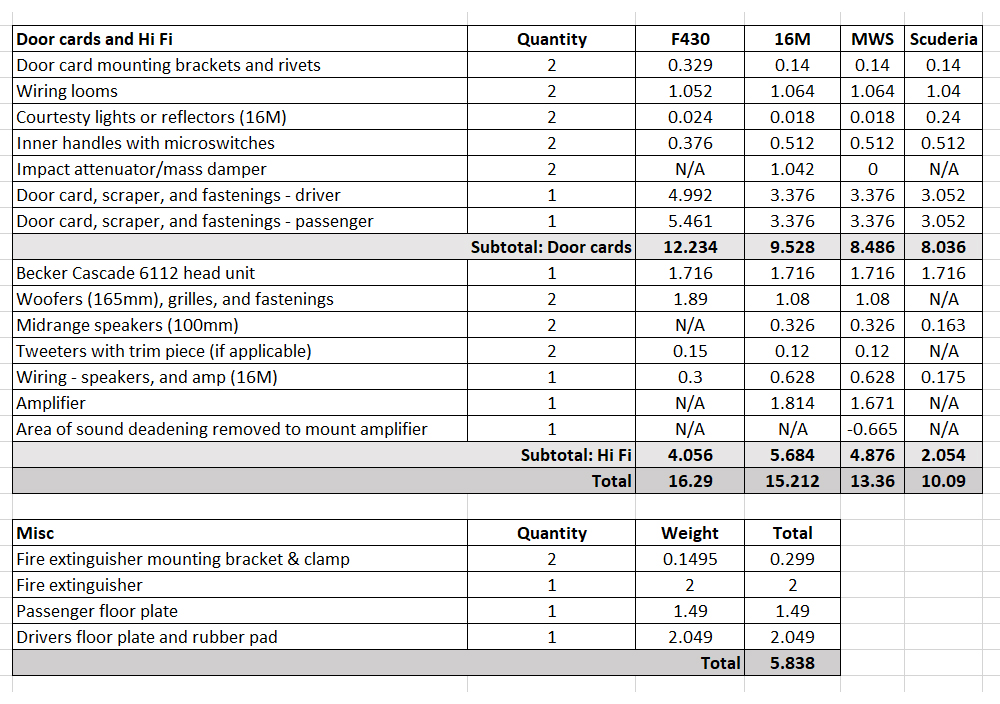
I've gone for the 16M door cards with the 16M JBL three-way component set. I've ditched the OEM amp and gone for a an Alpine four channel with built-in crossovers. I've driven the midrange and tweeters from two amp channels but using a line level input from the head unit front channel, and for the mid-bass I've bridged the third and fourth channels and wired the speakers in parallel and series to create a 2ohm load. I've upgraded the speaker wire from the factory 1.5mm to 2mm.
I posted the weight analysis in a previous post, but basically I'm up on the Scuderia but I've saved 1.852kg over a 16M and 2.93kg over an F430. I'm happy with that compromise.
- The Scuderia has a Becker 6112 head unit powering a pair of tweeters which, as is to be expected: terrible;
- The pre-07 F430 has a Becker 6105 powering a two-way paper cone component set. It is a little better than terrible;
- The MY07 onwards F430 has a Becker 6112 powering some slightly beefier paper-cone based two way components. It is 'OK';
- The 16M has a JBL three-way component set: the tweeters driven from the midrange channel via a passive filter and the the midbass drivers are a DVC type driven by two seperate channels. The six channel JBL amplifier has a pre-programmed DSP and is driven by speaker-level inputs. It is good.
The factory systems are marginal in a coupe but 16M aside just don't cut it in a Spider with its roof down. For an A-to-A car it's not really important but on the long road trips we embark on it's an area that warrants some investment.
I've gone for the 16M door cards with the 16M JBL three-way component set. I've ditched the OEM amp and gone for a an Alpine four channel with built-in crossovers. I've driven the midrange and tweeters from two amp channels but using a line level input from the head unit front channel, and for the mid-bass I've bridged the third and fourth channels and wired the speakers in parallel and series to create a 2ohm load. I've upgraded the speaker wire from the factory 1.5mm to 2mm.
I posted the weight analysis in a previous post, but basically I'm up on the Scuderia but I've saved 1.852kg over a 16M and 2.93kg over an F430. I'm happy with that compromise.
Spider Roof Problem: Warning Light With Roof Down
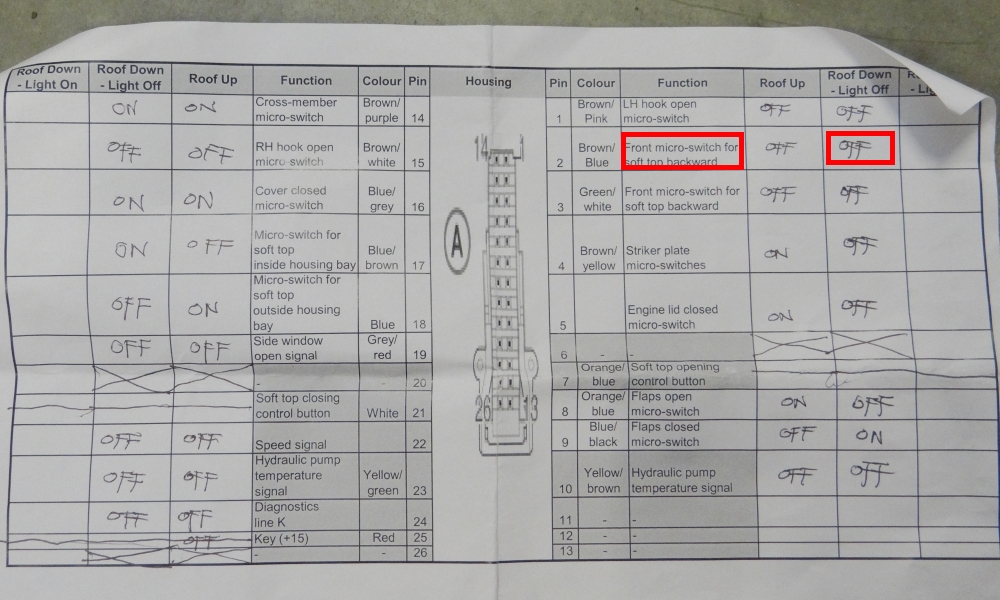
My previous issue persisted: a roof warning light with the hood down. The warning light is triggered if one of the many position-indicating micro-switches provides an unexpected reading for the current roof position. Sadly, my diagnostic device can't read the codes from the roof module so I came up with an alternative approach: I studied the wiring diagrams and noted that all the roof micro-switches simply switch to earth so I made a test chart and used a multimeter to check continuity to ground of the various switches with the roof in up then down positions.
The test revealed that the switch that indicates that the top part of the roof has been folded back was not reading correctly.
In order to access the switch I partially opened the roof and lifted up the top canvass.
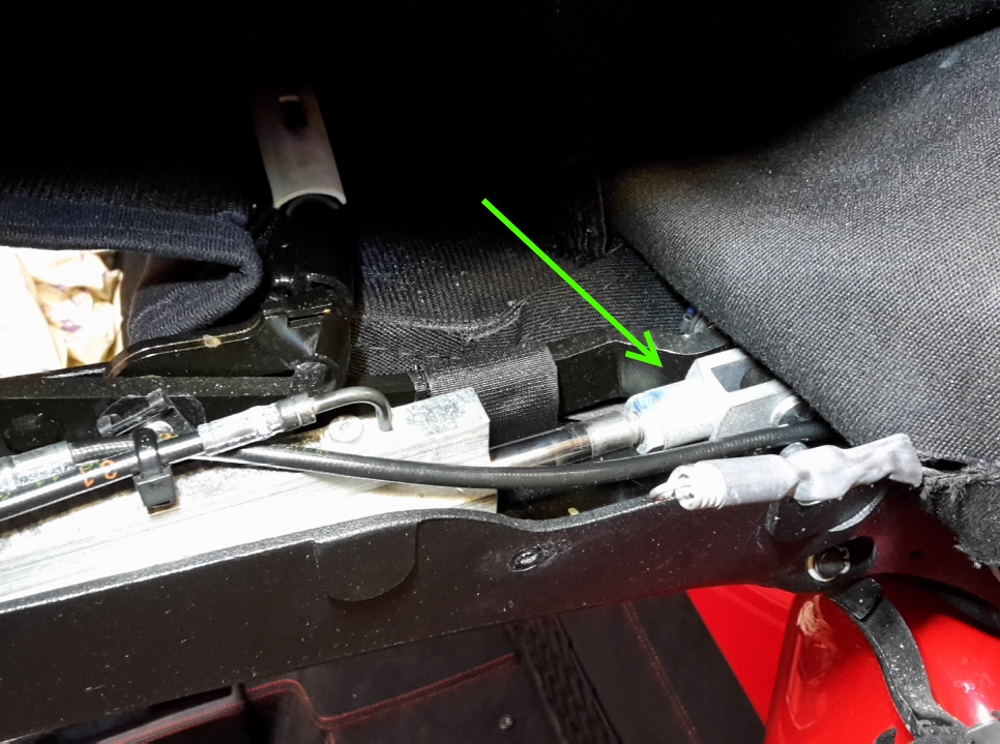
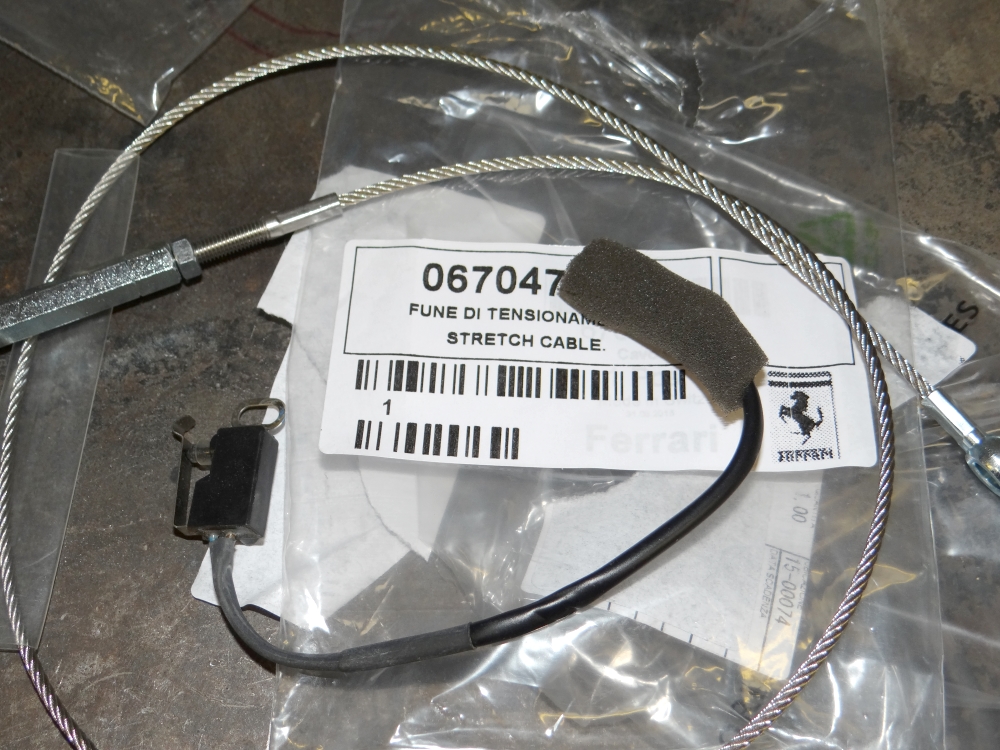
Clearly, the switch was damaged. The actual root cause was not the switch itself but one of the roof tensioning cables was too slack and had fouled the switch as the roof closed. I've ordered a replacement switch and cable.
This particular cable (part #67047300) is actually adjustable behind the rear buttresses, but in my case it was too late.
I will replace the switch and cable myself but the car is booked in with http://www.kbaggstrimming.co.uk for replacement of all of the elastic tensioning straps and a check of the rest of the cables.
I haven't spent any time to-date learning the roof but this incident has promoted me to master it.
Spider Roof Problem: Canvass Chaffing On Roof Tray
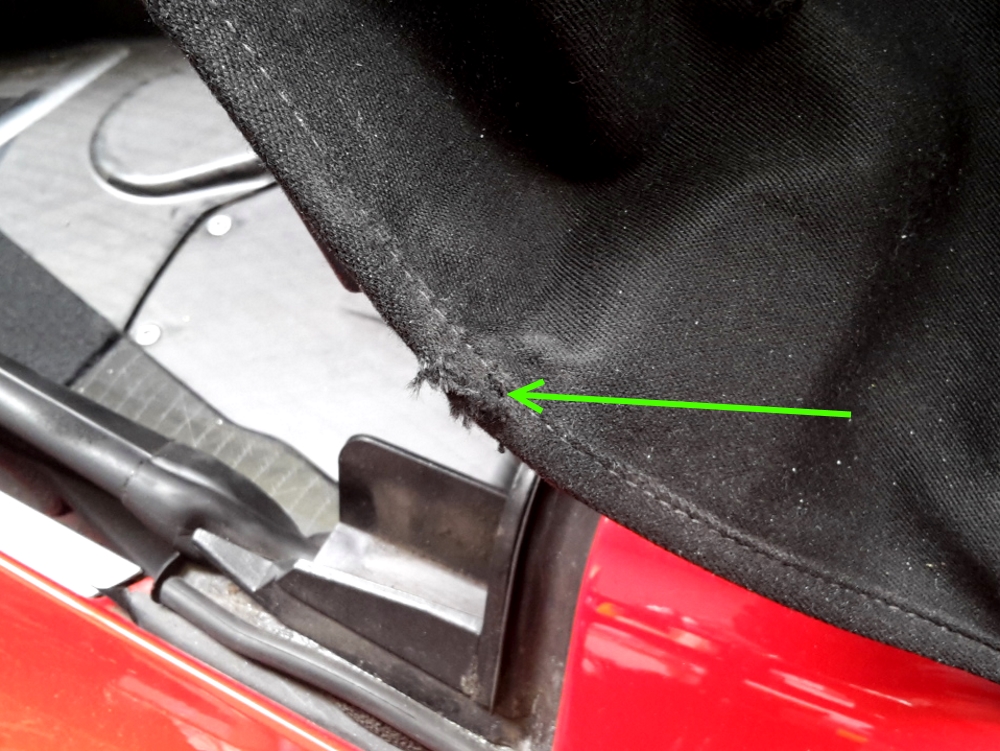
This could happen on either side but on my car the canvass had ceased to fold correctly and was sticking out and brushing on the hood tray as the roof folded away. I really should have attended to this earlier as it had rubbed away some of the seam at the lower part of the hood buttress.
Upon investigation I found that stiff canvass pieces are bonded to rear of the outer fabric but with a small gap in between, which upon lowering the roof coerces the fabric to fold at that specific point to clear the hood tray. On my car these stiffening sections had become to peel away from the outer fabric leaving the hood to fold in a non-ideal way, and foul the edge of the tray.
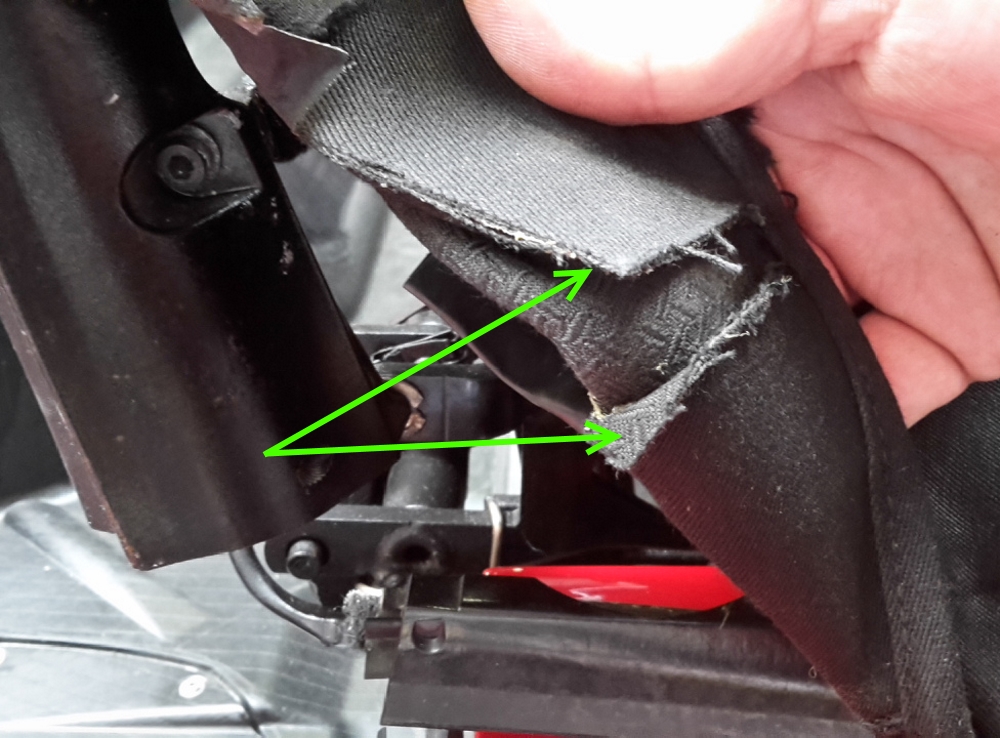
I re-bonded the stiffening fabric with PU adhesive and left overnight secured by clamps. This solved the issue.

I managed to trim off the excess fluff and make good with PU. It's not perfect but it's pretty good.
My previous issue persisted: a roof warning light with the hood down. The warning light is triggered if one of the many position-indicating micro-switches provides an unexpected reading for the current roof position. Sadly, my diagnostic device can't read the codes from the roof module so I came up with an alternative approach: I studied the wiring diagrams and noted that all the roof micro-switches simply switch to earth so I made a test chart and used a multimeter to check continuity to ground of the various switches with the roof in up then down positions.
The test revealed that the switch that indicates that the top part of the roof has been folded back was not reading correctly.
In order to access the switch I partially opened the roof and lifted up the top canvass.
Clearly, the switch was damaged. The actual root cause was not the switch itself but one of the roof tensioning cables was too slack and had fouled the switch as the roof closed. I've ordered a replacement switch and cable.
This particular cable (part #67047300) is actually adjustable behind the rear buttresses, but in my case it was too late.
I will replace the switch and cable myself but the car is booked in with http://www.kbaggstrimming.co.uk for replacement of all of the elastic tensioning straps and a check of the rest of the cables.
I haven't spent any time to-date learning the roof but this incident has promoted me to master it.
Spider Roof Problem: Canvass Chaffing On Roof Tray
This could happen on either side but on my car the canvass had ceased to fold correctly and was sticking out and brushing on the hood tray as the roof folded away. I really should have attended to this earlier as it had rubbed away some of the seam at the lower part of the hood buttress.
Upon investigation I found that stiff canvass pieces are bonded to rear of the outer fabric but with a small gap in between, which upon lowering the roof coerces the fabric to fold at that specific point to clear the hood tray. On my car these stiffening sections had become to peel away from the outer fabric leaving the hood to fold in a non-ideal way, and foul the edge of the tray.
I re-bonded the stiffening fabric with PU adhesive and left overnight secured by clamps. This solved the issue.
I managed to trim off the excess fluff and make good with PU. It's not perfect but it's pretty good.
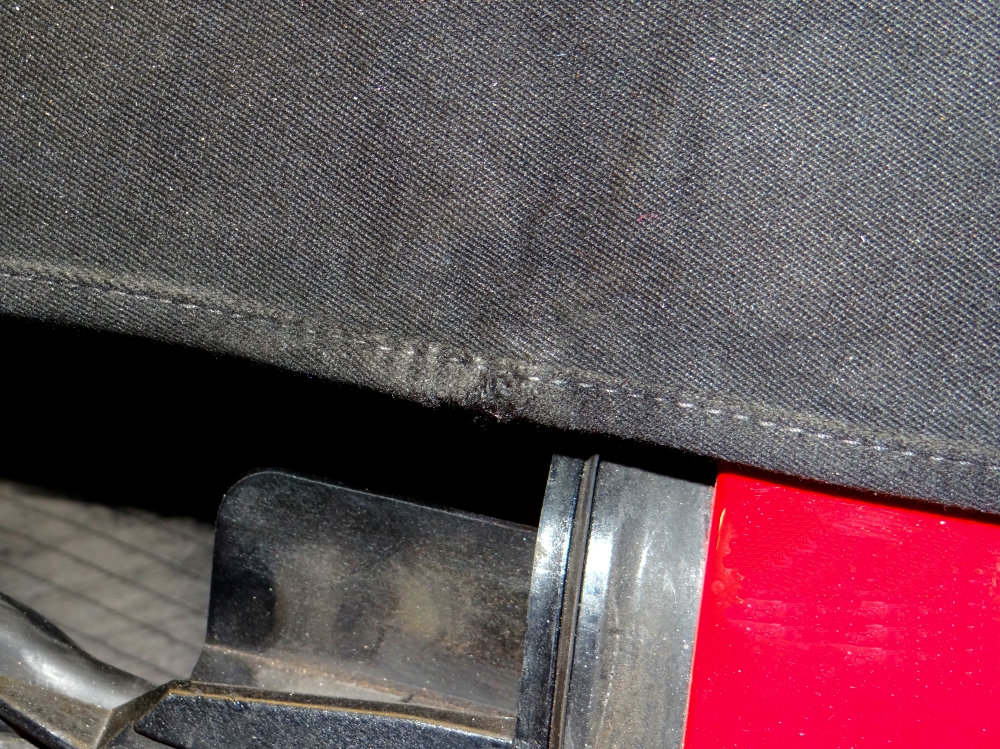
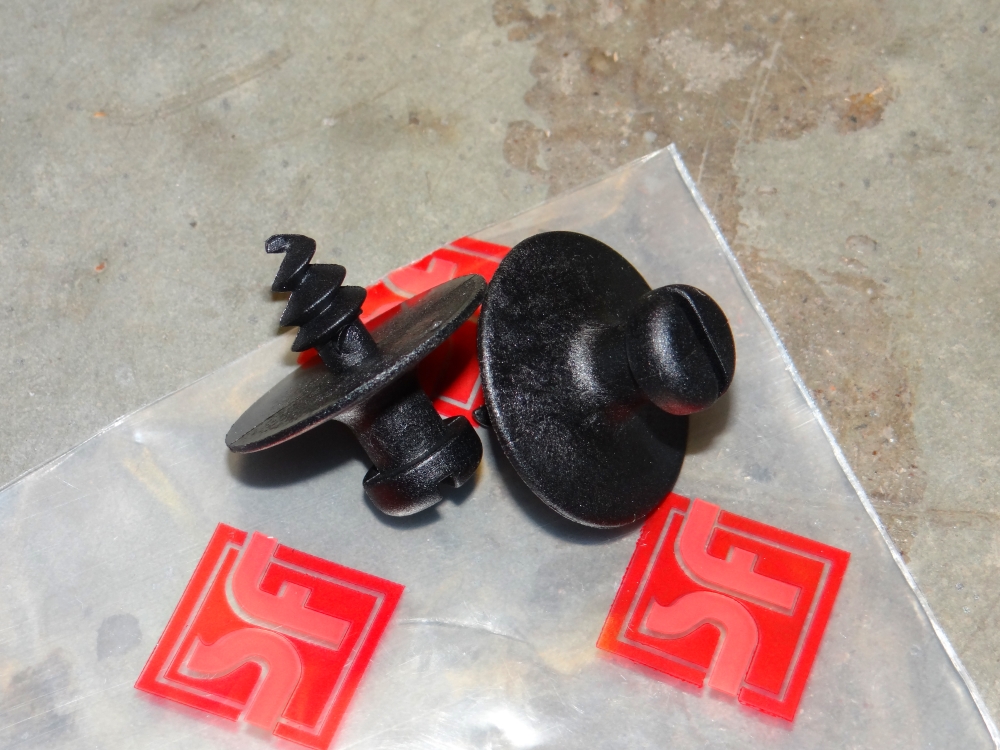
My car was missing the passenger floor mat securing clips and the drivers side never stay put, so I suppose it's not a surprise that that they've been lost. I ordered a new pair but before fitting I put a dab of black PU adhesive on the back of them. So far it seems to have done the trick.
Roof Issue Addressed
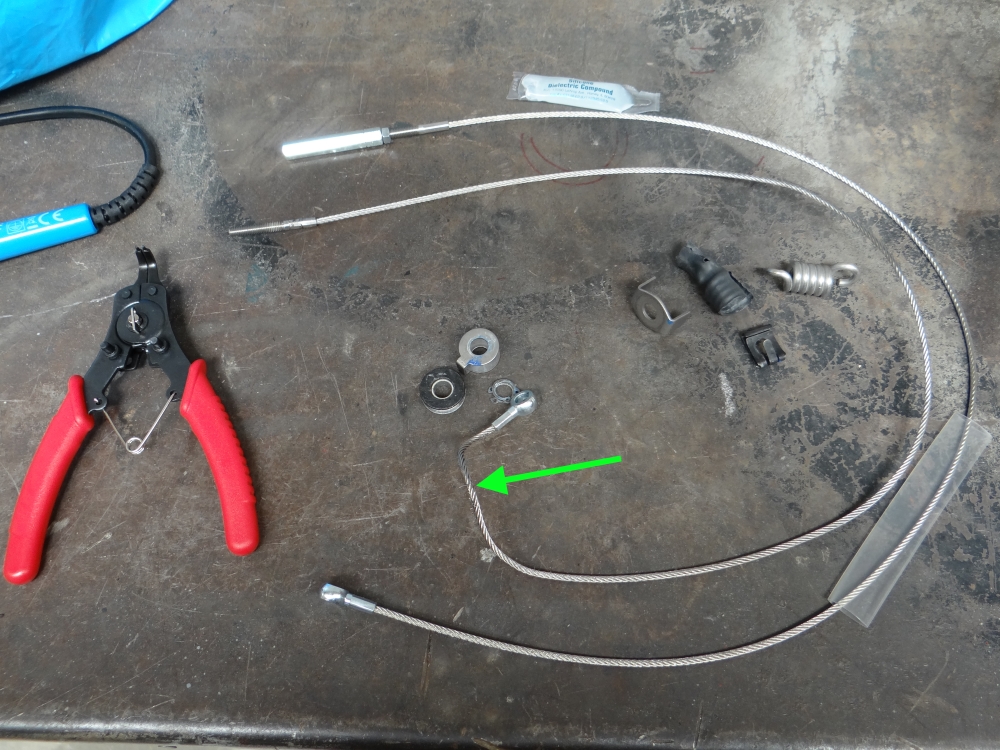
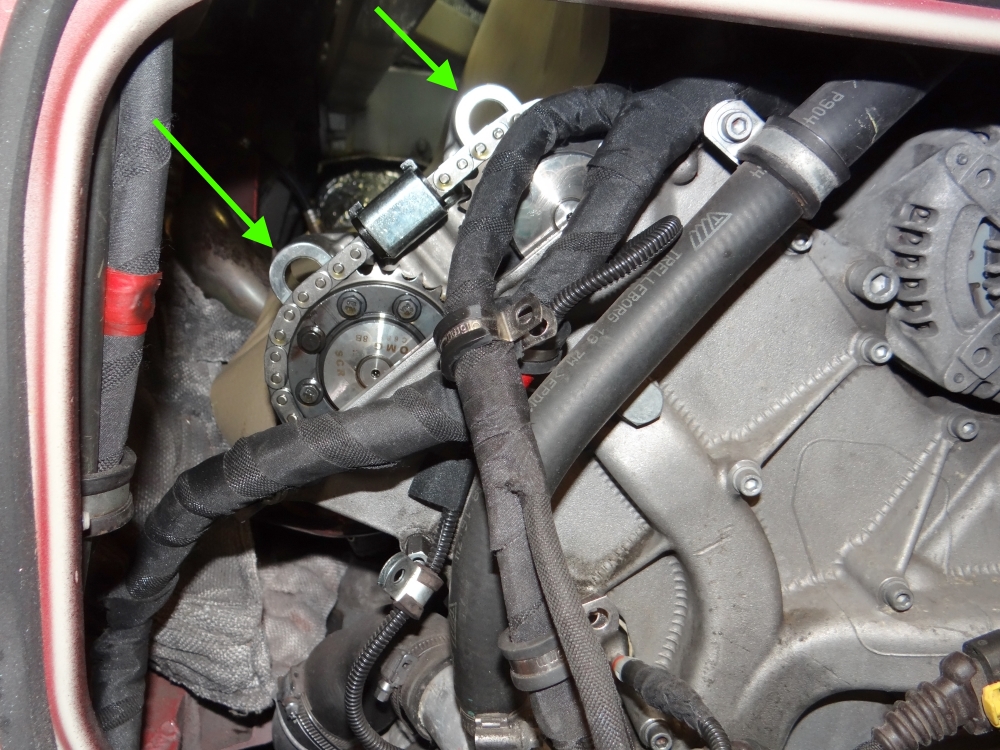
The rew roof cable and micro-switch arrived:
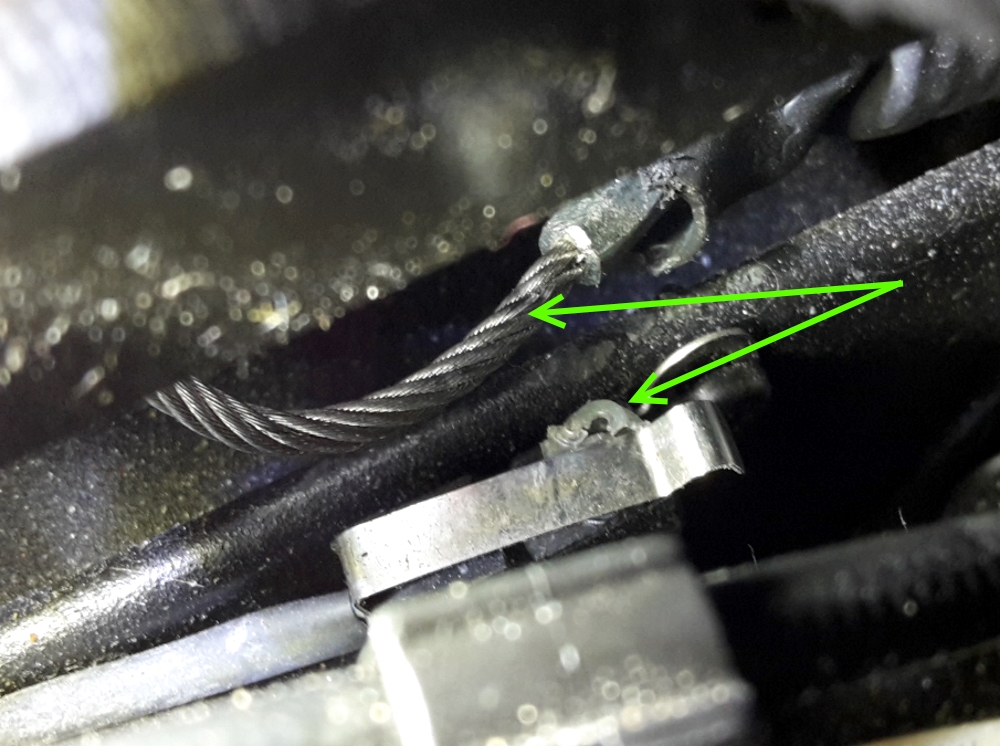
Upon close inspection of my old cable it had started to fray (green arrow).
I didn't have a workshop manual to hand so I had to figure out as I went, however the job wasn't too difficult just fiddly and time consuming.
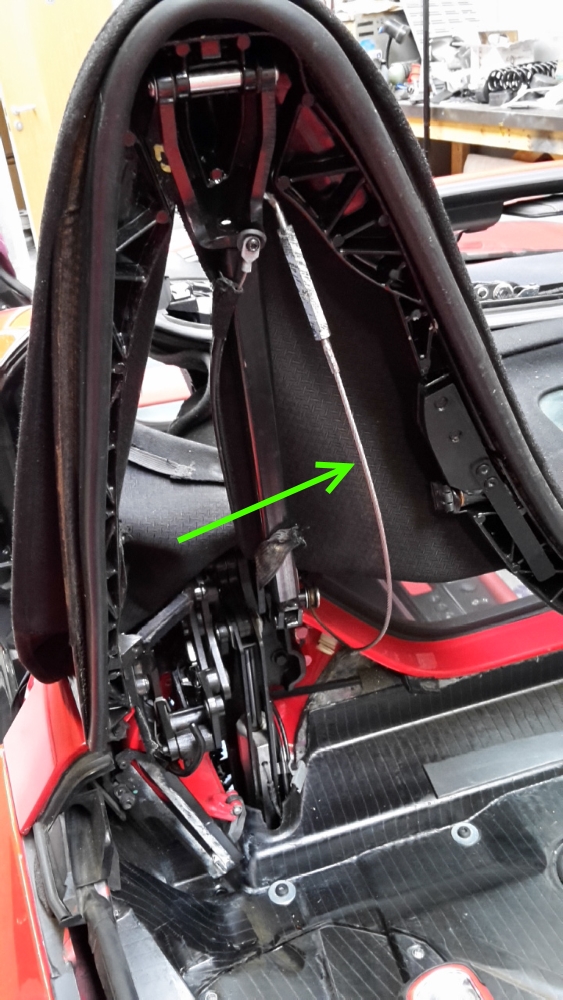
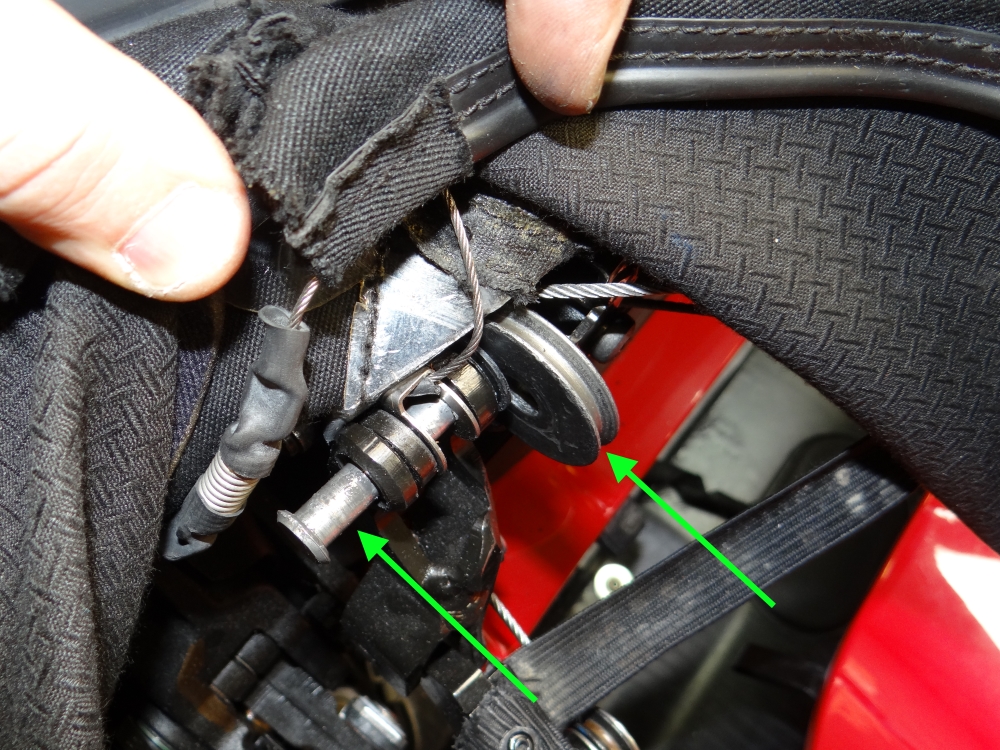
The cable runs from above the passenger headrest to the tip of the rear buttress and there are in total four guide rollers, each having a sheath to hold the cable in place, and these must be removed to withdraw the cable due to the size of the eyelet fitted to the forward end.
he largest of the rollers at the rear of the hood must be removed from its pin which, to my surprise, was made from aluminium, so care must be taken when re-assembling.
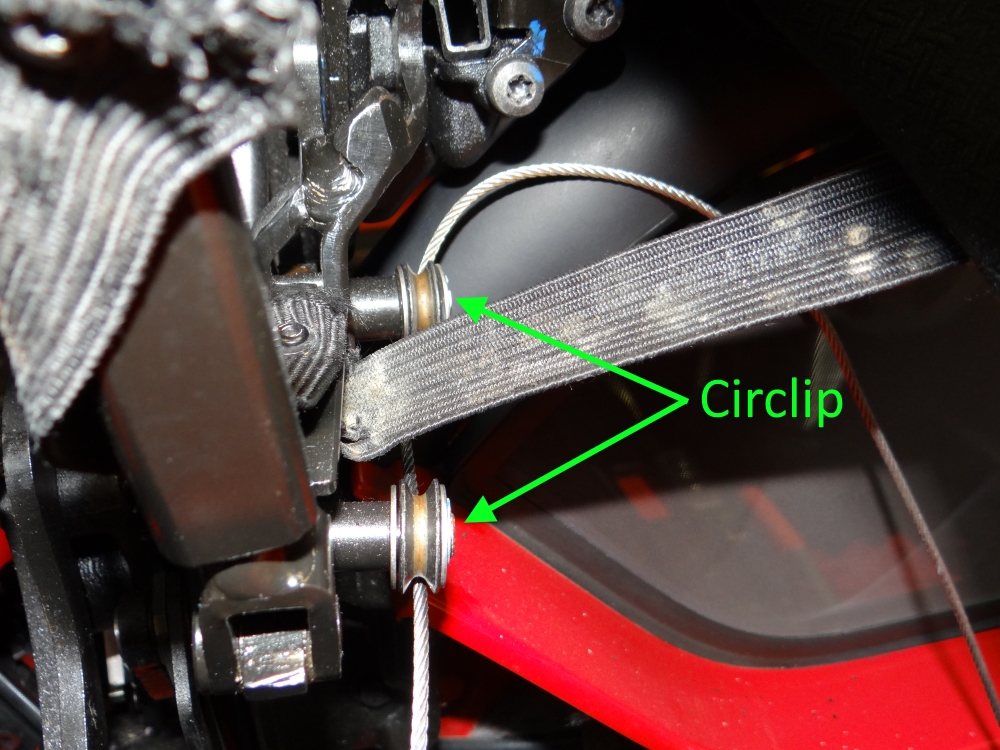
Two guide rollers at the base of the buttress are held in with circlips.
All in it was a couple of hours work, but it has addressed the issue that triggered the fault code. I will leave the roof closed until after my visit to K Baggs for replacement of the elastic straps.
Variator Solenoid Failiure - Again
I must admit this grated on me. It has been only a few thousand miles since I replaced all four solenoids with the later part, due to intermittent failure of one solenoid and oil in the connectors of the other three - a common failure mode. This time around there was a complete open circuit on the right bank inlet cam triggered a P1552, and also the right bank exhaust wiring plug had oil in it. Diagnosis on the failed solenoid revealed a break in the connection between the engine loom plug and the solenoid body.
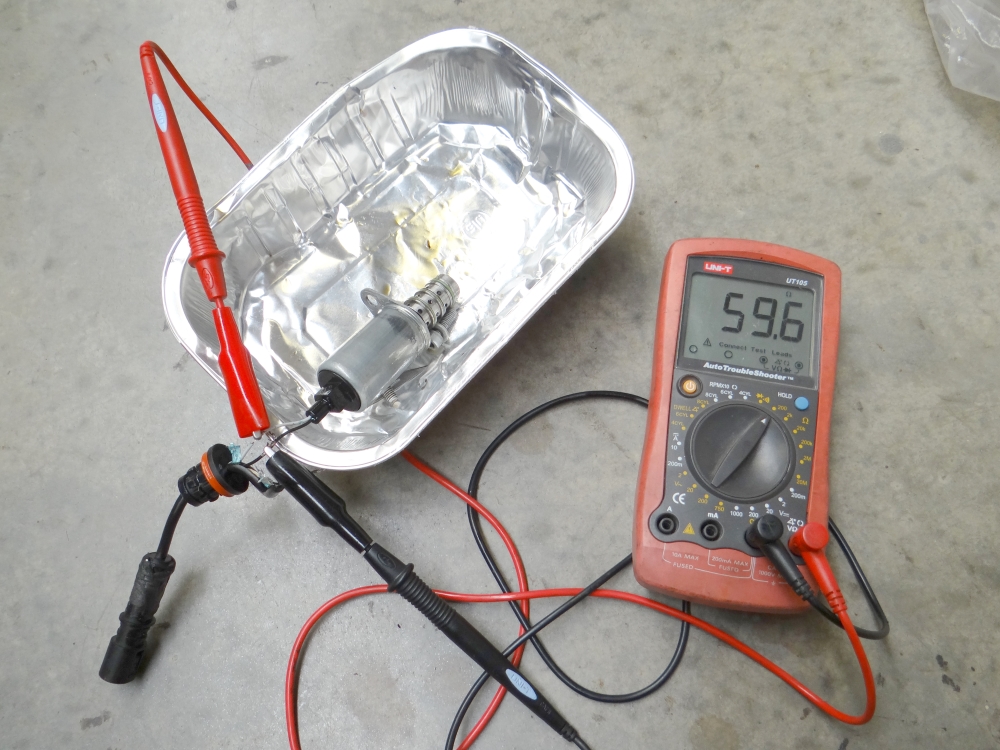
I now have quite a collection of solenoids old and new, so I checked the resistance of them and found that 11 ohms of resistance signifies a healthy coil - in my case the range was from 10.7 to 11.4 ohms. A known bad solenoid measured 37 ohms. What is interesting is that units exhibiting oil in their connector can measure a healthy resistance, so either the presence of oil and internal failure are separate issues, or the oil signifies the onset of internal failure.
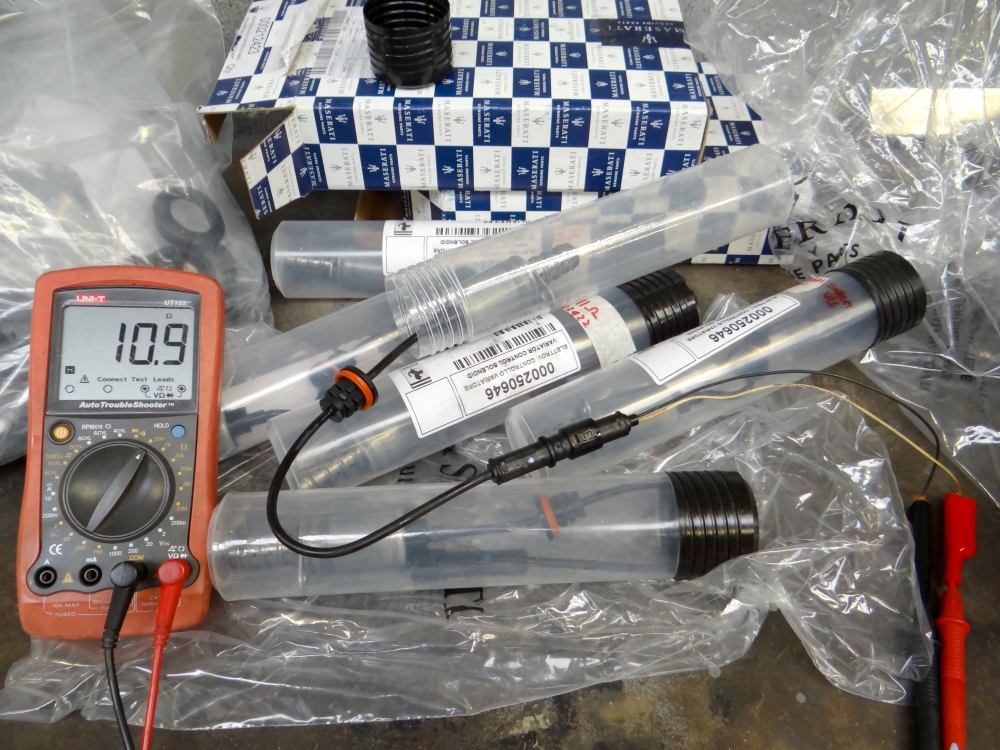
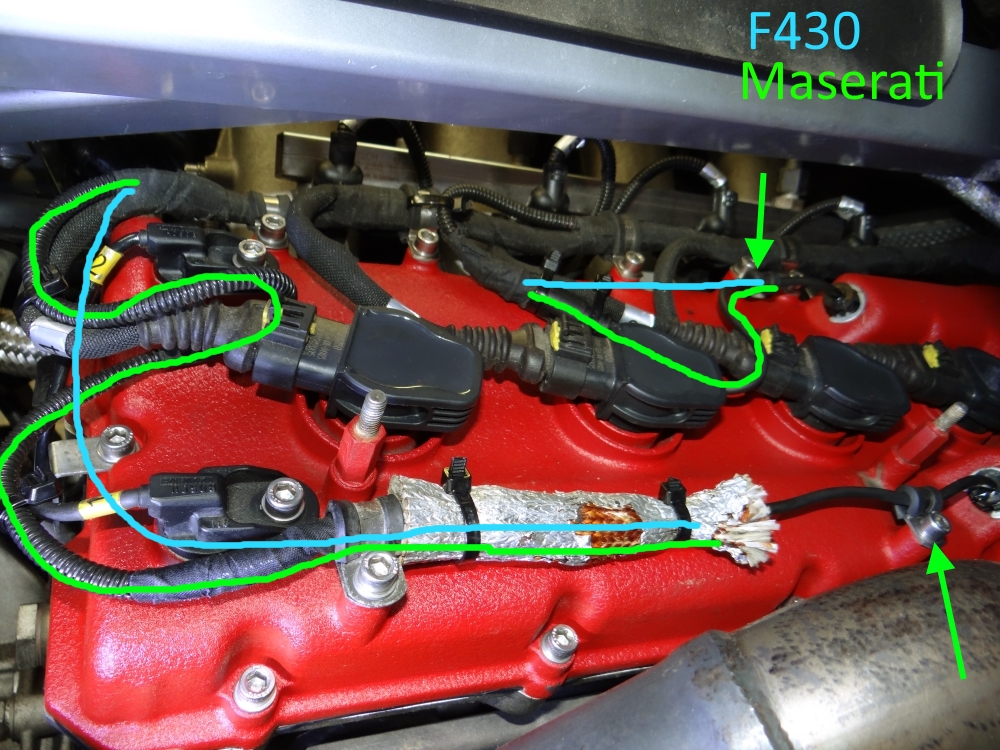
I knew that Maserati's of this era used the same type of solenoid with the only apparent difference being a slightly longer cable. The Maserati version is £376.88 vs the £565.60 I paid for the F430 version, so fully expecting the part to fail again at some point I decided to use the Maserati version.
I did ponder the issue of oil in the solenoid multiplug, which is a problem that other manufacturers have encountered; for example, Mercedes issued an oil break intermediate loom to solve this very issues on one of their engines. Oil must come either from within the solenoid body, or find its way in from the outside then 'wick' its way along the cable. To mitigate the risk of the latter I sealed off the gaps with RTV sealant (the stuff the sump is sealed with).
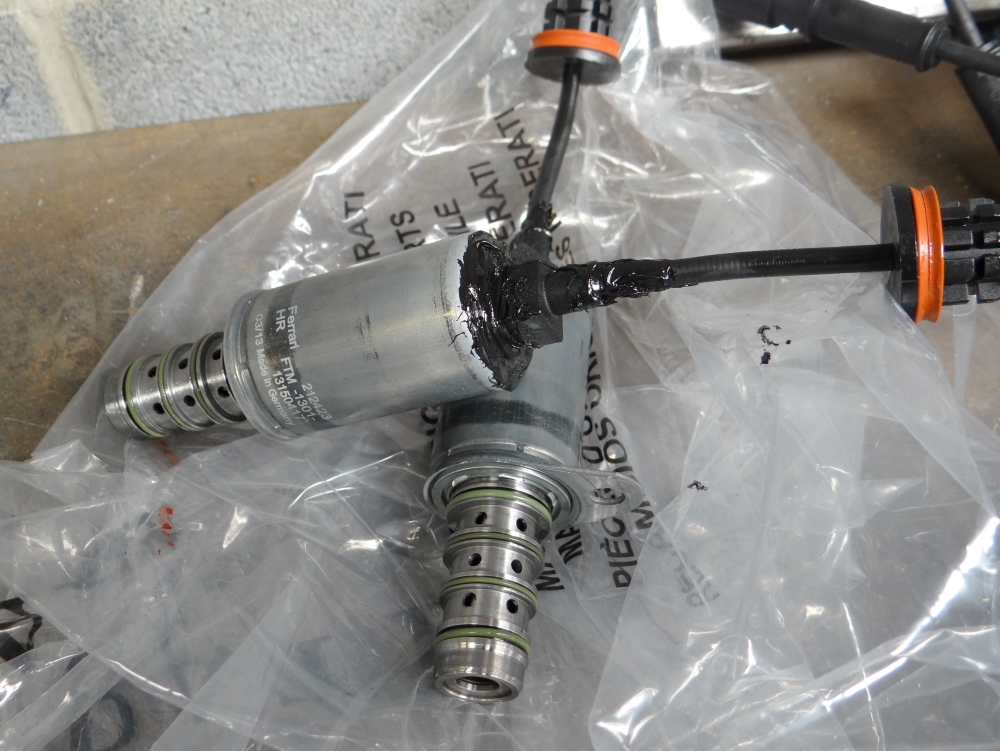
There is an oil restriction valve in the end of the cam cap that houses solenoids, its function is to maintain oil pressure so that the solenoids may immediately react - if the oil leak is in fact internal to the solenoid then another reason may be that the valve causes small oil pressure spikes in some situations, which forces oil past a seal. This is just conjecture - it could of course be simply an inadequately specced part.
On my Spider I found the fastest way to replace the solenoids was to remove the seats, engine bay panel, rear wheel and wheel arch liner. The cam cover can be withdrawn through the wheel arch.
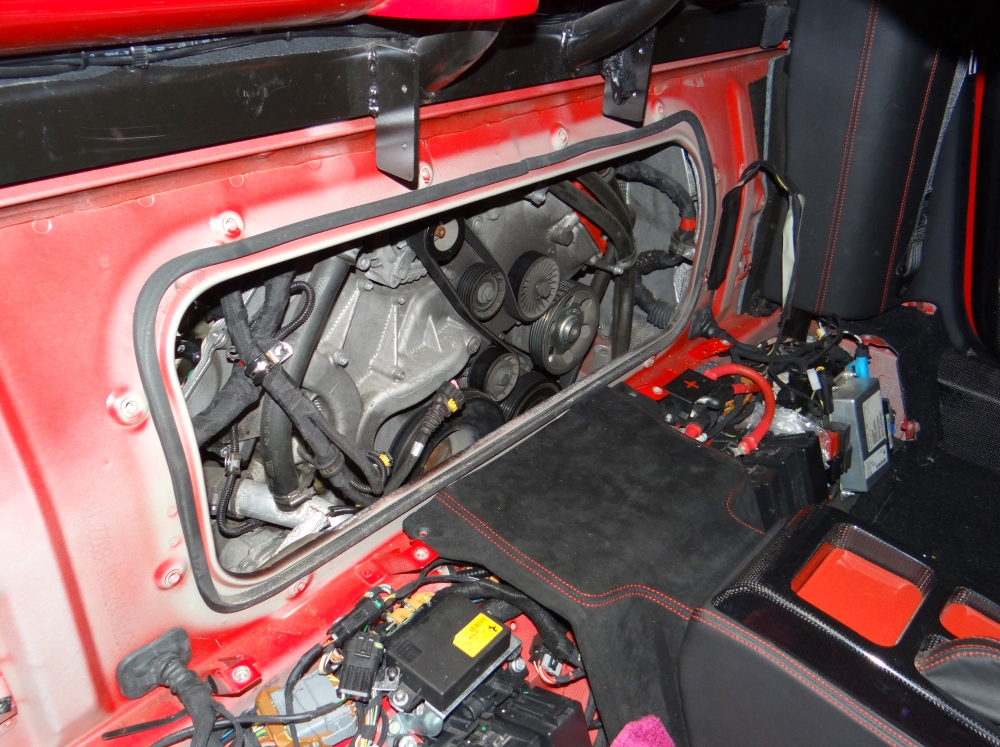
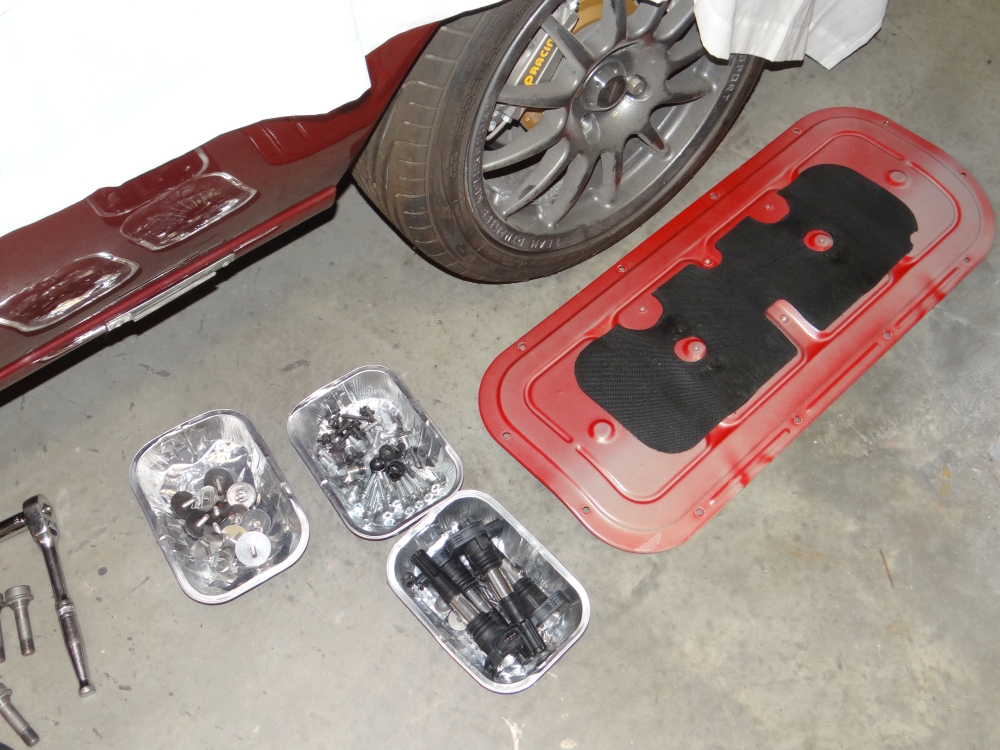
The solenoids can be replaced via the access panel. I laid clean rags over the top of the engine - loosing one of the securing bolts into the engine would cause a significant headache.
Roof Issue Addressed
The rew roof cable and micro-switch arrived:
Upon close inspection of my old cable it had started to fray (green arrow).
I didn't have a workshop manual to hand so I had to figure out as I went, however the job wasn't too difficult just fiddly and time consuming.
The cable runs from above the passenger headrest to the tip of the rear buttress and there are in total four guide rollers, each having a sheath to hold the cable in place, and these must be removed to withdraw the cable due to the size of the eyelet fitted to the forward end.
he largest of the rollers at the rear of the hood must be removed from its pin which, to my surprise, was made from aluminium, so care must be taken when re-assembling.
Two guide rollers at the base of the buttress are held in with circlips.
All in it was a couple of hours work, but it has addressed the issue that triggered the fault code. I will leave the roof closed until after my visit to K Baggs for replacement of the elastic straps.
Variator Solenoid Failiure - Again
I must admit this grated on me. It has been only a few thousand miles since I replaced all four solenoids with the later part, due to intermittent failure of one solenoid and oil in the connectors of the other three - a common failure mode. This time around there was a complete open circuit on the right bank inlet cam triggered a P1552, and also the right bank exhaust wiring plug had oil in it. Diagnosis on the failed solenoid revealed a break in the connection between the engine loom plug and the solenoid body.
I now have quite a collection of solenoids old and new, so I checked the resistance of them and found that 11 ohms of resistance signifies a healthy coil - in my case the range was from 10.7 to 11.4 ohms. A known bad solenoid measured 37 ohms. What is interesting is that units exhibiting oil in their connector can measure a healthy resistance, so either the presence of oil and internal failure are separate issues, or the oil signifies the onset of internal failure.
I knew that Maserati's of this era used the same type of solenoid with the only apparent difference being a slightly longer cable. The Maserati version is £376.88 vs the £565.60 I paid for the F430 version, so fully expecting the part to fail again at some point I decided to use the Maserati version.
I did ponder the issue of oil in the solenoid multiplug, which is a problem that other manufacturers have encountered; for example, Mercedes issued an oil break intermediate loom to solve this very issues on one of their engines. Oil must come either from within the solenoid body, or find its way in from the outside then 'wick' its way along the cable. To mitigate the risk of the latter I sealed off the gaps with RTV sealant (the stuff the sump is sealed with).
There is an oil restriction valve in the end of the cam cap that houses solenoids, its function is to maintain oil pressure so that the solenoids may immediately react - if the oil leak is in fact internal to the solenoid then another reason may be that the valve causes small oil pressure spikes in some situations, which forces oil past a seal. This is just conjecture - it could of course be simply an inadequately specced part.
On my Spider I found the fastest way to replace the solenoids was to remove the seats, engine bay panel, rear wheel and wheel arch liner. The cam cover can be withdrawn through the wheel arch.
The solenoids can be replaced via the access panel. I laid clean rags over the top of the engine - loosing one of the securing bolts into the engine would cause a significant headache.
Variator Solenoids - Complete
A photo to show how I routed the longer cables on the Maserati solenoids. I did pack the solenoid plugs with dielectric grease in an effort to help prevent oil migrating further up the loom.
The back of the cam cover heat shields were looking a bit worn so I've made good with aluminium tape.
I didn't expect any issues but I've tested the car over a couple of days and all is well - the code has not come back. Note: there is not a need to perform further tests because the ECUs have a target cam angle and check actual vs target and will throw an error if there is a discrepancy.
Advice I can pass on to others doing this is to make sure there aren't any kinks in the cable between the solenoid and the oil seal on the cam cover, and generally ensure that all connections and cables are properly supported.
Seat Belt Warning Disabled
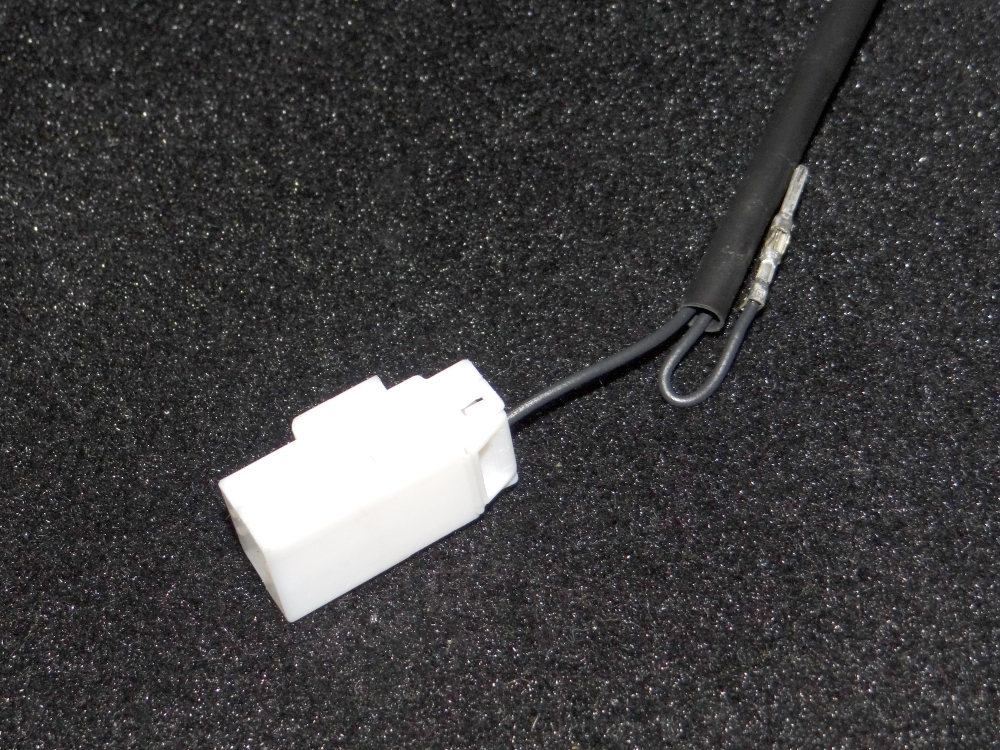
The seat belt warning is annoying: it beeps as soon as the key is turned to position 2. On the 360 and F430 it's prudent to wait for the self check to complete before starting the engine, so the first thing I do is turn the key, then I put on my seat belt whilst the check completes. The buckle sensor completes a circuit when closed so disabling is simply a case of disconnecting the plug under the seat, or remove one of the pins and tape it up in the loom itself - I've taken the latter approach so I can keep the plug connected.
A photo to show how I routed the longer cables on the Maserati solenoids. I did pack the solenoid plugs with dielectric grease in an effort to help prevent oil migrating further up the loom.
The back of the cam cover heat shields were looking a bit worn so I've made good with aluminium tape.
I didn't expect any issues but I've tested the car over a couple of days and all is well - the code has not come back. Note: there is not a need to perform further tests because the ECUs have a target cam angle and check actual vs target and will throw an error if there is a discrepancy.
Advice I can pass on to others doing this is to make sure there aren't any kinks in the cable between the solenoid and the oil seal on the cam cover, and generally ensure that all connections and cables are properly supported.
Seat Belt Warning Disabled
The seat belt warning is annoying: it beeps as soon as the key is turned to position 2. On the 360 and F430 it's prudent to wait for the self check to complete before starting the engine, so the first thing I do is turn the key, then I put on my seat belt whilst the check completes. The buckle sensor completes a circuit when closed so disabling is simply a case of disconnecting the plug under the seat, or remove one of the pins and tape it up in the loom itself - I've taken the latter approach so I can keep the plug connected.
Thanks all. I think the proportions on that kit need some work.
I have some more carbon to add but fundamentally the car is now pretty much there - it's a standard car turned up to 9. In June we're taking it for a three week trip to Italy so I'll take some video and write up a little review.
I have some more carbon to add but fundamentally the car is now pretty much there - it's a standard car turned up to 9. In June we're taking it for a three week trip to Italy so I'll take some video and write up a little review.
I've been asked if I wanted to display the car on the PH 'Icons' stand at the Silverstone Classic, which is great, so you will find the car on the stand in front of the pub! https://www.pistonheads.com/news/motorsport/piston...
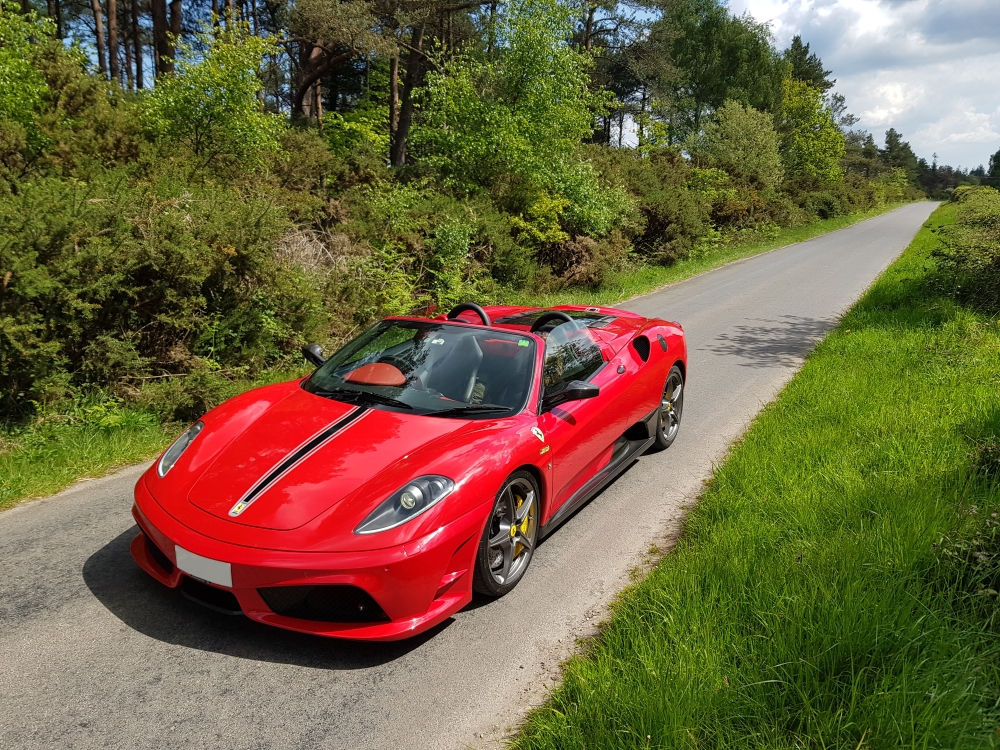
 The luggage compartment on these is surprisingly cavernous - we can fit in the equivalent volume to the boot on a small hatchback.
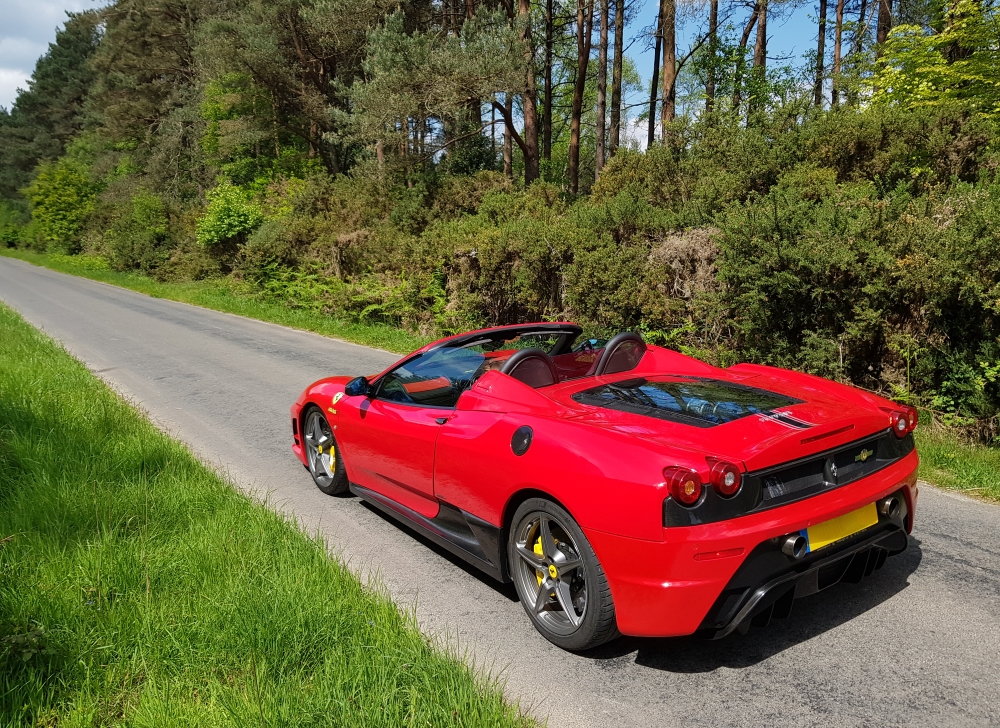
Trying not to detract from an incredible thread, but the first thing that crossed my mind when I saw that picture was the wheel offset and relationship to the arch. Visually they don't look wide enough and as sacrilege as it sounds on a Ferrari, a couple of 10mm spacers might do the trick to fill up those arches!I don’t like the look of wheels close to arches because a wheel should be inset to provide an an aerodynamic advantage. Spacing wheels also affects the scrub radius of the suspension which is detrimental to handling; this is the reason manufacturers design cars to run much less wheel offset on the steering axle.
Nunga said:
You’ve done well to marry a woman who packs light enough to make a continental holiday in an F430 remotely possible. Still love the car and the updates, and as said above it’s nice to see it being driven too.
The luggage compartment on these is surprisingly cavernous - we can fit in the equivalent volume to the boot on a small hatchback.p1stonhead said:
OP - if you were given a warehouse, a manual and every single part of the car laid out individually, reckon you could build a scud from scratch?
Looks like it to me!
Except for the roof and torque settings I’d like to think I could do it without a manual. I could certainly build an E46 M3 or a Mk3 Fiesta without their respective manual Looks like it to me!
GreatGranny said:
My favourite poster on PH :-)
Car looks fantastic and the 3 week tour will be epic.
Cheers.Car looks fantastic and the 3 week tour will be epic.
Mac. said:
Trying not to detract from an incredible thread, but the first thing that crossed my mind when I saw that picture was the wheel offset and relationship to the arch. Visually they don't look wide enough and as sacrilege as it sounds on a Ferrari, a couple of 10mm spacers might do the trick to fill up those arches!
scottos said:
Great to catch up on this thread! I noticed your thermal heat barrier woes on the exhaust, this option sprung to mind:
http://www.thermomet.co.uk/
Might be worth considering for the future, the finish looks great.
Ahh, yes, thanks. I looked at the Inconel version on offer from TurboSource. It’s nice kit. For now what I’ve experimented with has worked really well as I’m seeing only 75 degrees C at the closet point to the rear silencer - with the standard silencer you literally could cook an egg on the engine lid!. What the Inconel stuff would offer is a weight saving so eventually I may well move over to it.http://www.thermomet.co.uk/
Might be worth considering for the future, the finish looks great.
RoverP6B said:
Sorry to be that guy, but will there be any further updates? I see the M3 and CLK are both going/gone and you've said in the CLK thread that you're moving to the Far East... if there's one car here that I'd really like to see finished, it's this! That 4.7 litre engine build has the potential to be quite something - has it been done before?
I've been driving the cars but I haven't worked on any of them in quite a while. On Friday there will be two new body panels ready to collect from paint, so depending on my level of enthusiasm l may have a a very late night (possibly all night - one requires the fastenings/brackets to be fabricated then assembled & aligned with construction epoxy!) to fit them both before the Silverstone Classic.
I won't go ahead with the engine build; I'm moving away from car projects.
RoverP6B said:
Here's hoping you maintain your woeful track record of maintaining promises regarding your 430s, as I really want to see that engine build happen one way or another!
I haven't read the Fiesta thread yet - did that car get finished?
Ha. The Fiesta engine build is in progress.I haven't read the Fiesta thread yet - did that car get finished?
WhisperingWasp said:
Looking good at the Classic mwstewart 
Cheers! It remains my favourite auto event - great racing and plenty to see. Am I the only one who went into the Pie & Piston looking for beer and came out disappointed, or did I completely miss it?  The PH display was good and I hope to see it back next year.
lordf said:
Out of interest why? Thats only if you don't mind sharing and if not cars what else has take your interest?. I've very much enjoyed following your Fiesta, M3 and this.
I'd like to master something new. I'll keep doing 'bits and bobs' but not full-scale projects. I wouldn't rule out motorsport but for now I want to focus on something other than car projects. rainmasterb said:
Mark you promised to sort the boot floor on my M3 before you leave the country! I've moved from opposite the 5 Bells to the Cotswolds now, so at least you can combine your trip to my garage with some sight seeing! ?? All the best
I think that I forgot about that  Very nice - and no doubt a much shorter commute! The same to you.
Catching up with updates...
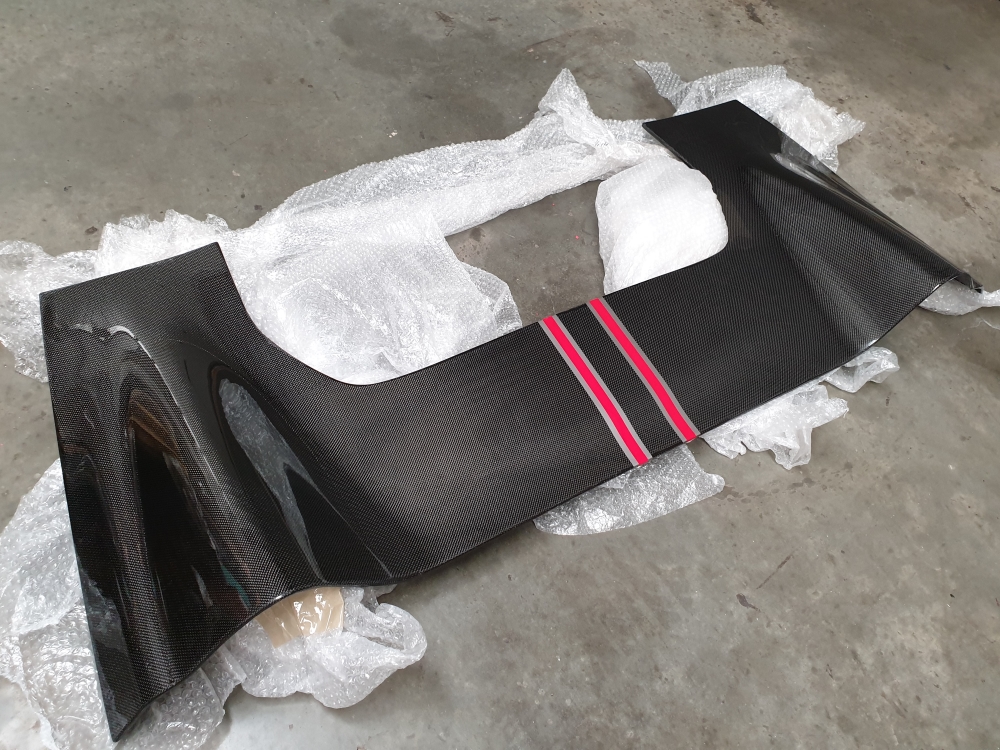
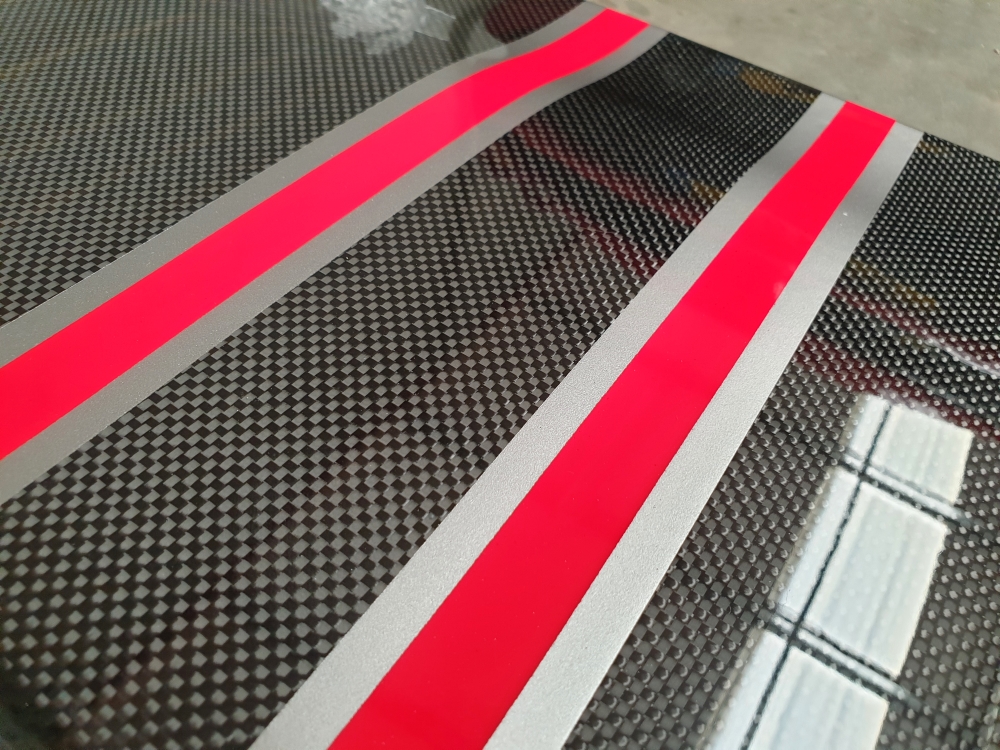
A new one-off carbon part. This piece replaces the heavy (10kg) fibreglass roof compartment cover with a vacuum carbon part, saving just over 7kg. The stripe is painted on using the OEM Ferrari masking kit.
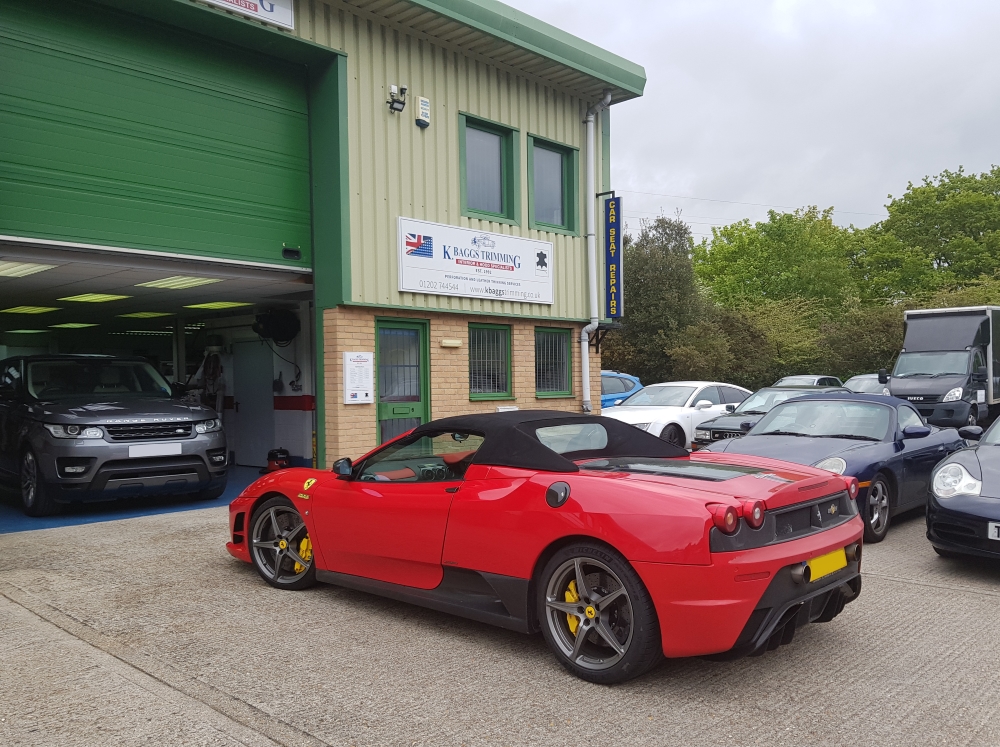
I took the car to K Baggs trimming for a health check of the roof and replacement of the elastic straps as a precautionary measure. Kevin reported that it is all in good order.
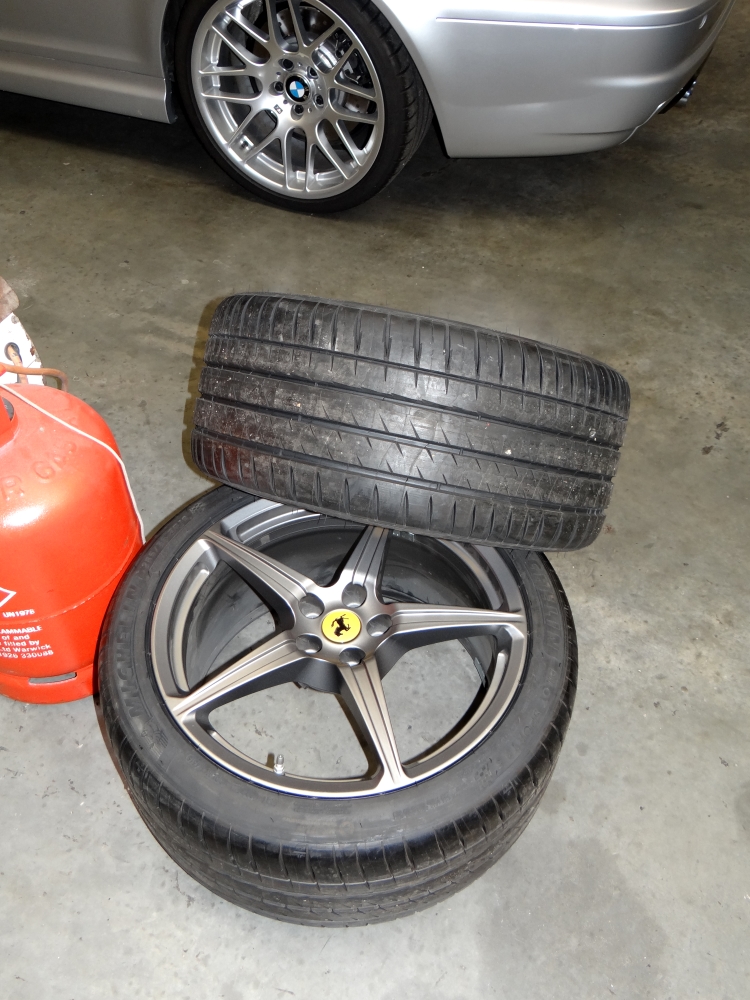
I replaced the ageing Supersports with Pilot Sport 4S. Great tyre for the road.
I've been experimenting with geo and tried some 'fast road' specs out there on the internet, but I'm not happy so work continues. I'll cover this off in more detail in a later update.

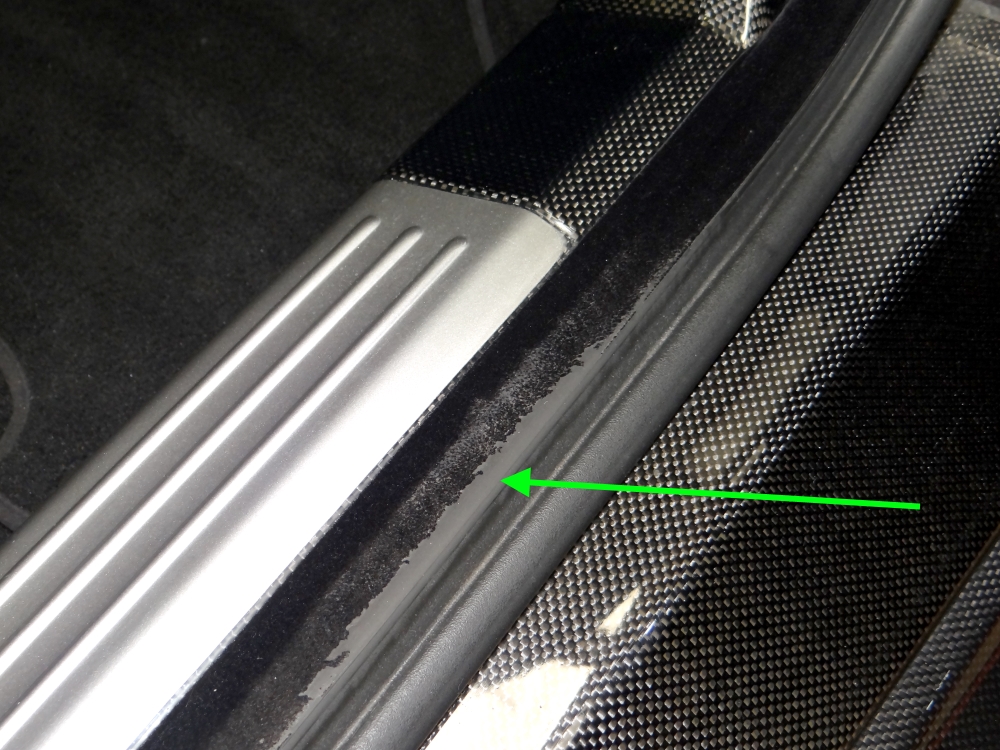
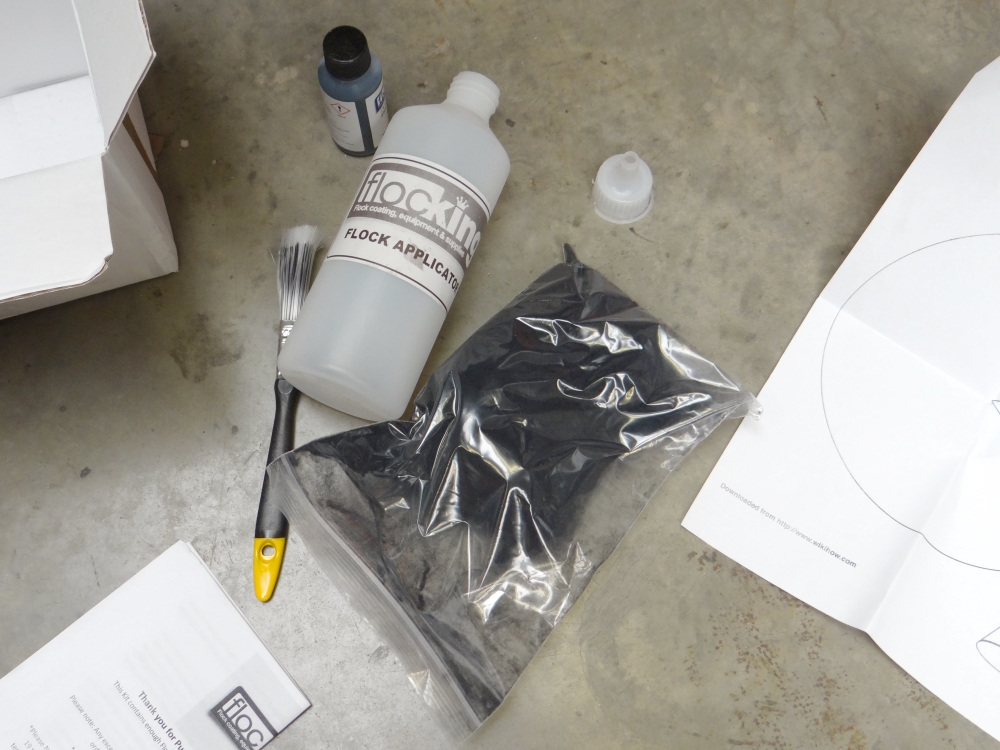
The flocking on the driver's side door trim had worn away so I've repaired it with a flocking fit. I'll report back once I determine how durable in service the repair is.
A new one-off carbon part. This piece replaces the heavy (10kg) fibreglass roof compartment cover with a vacuum carbon part, saving just over 7kg. The stripe is painted on using the OEM Ferrari masking kit.
I took the car to K Baggs trimming for a health check of the roof and replacement of the elastic straps as a precautionary measure. Kevin reported that it is all in good order.
I replaced the ageing Supersports with Pilot Sport 4S. Great tyre for the road.
I've been experimenting with geo and tried some 'fast road' specs out there on the internet, but I'm not happy so work continues. I'll cover this off in more detail in a later update.
The flocking on the driver's side door trim had worn away so I've repaired it with a flocking fit. I'll report back once I determine how durable in service the repair is.
I've been enjoying the car and I haven't spent much time working on it. I can confirm that it is quick: I hit an indicated 205MPH but I had to back off because the engine lid open warning light came on - obviously the air pressure was lifting it off of the catch!
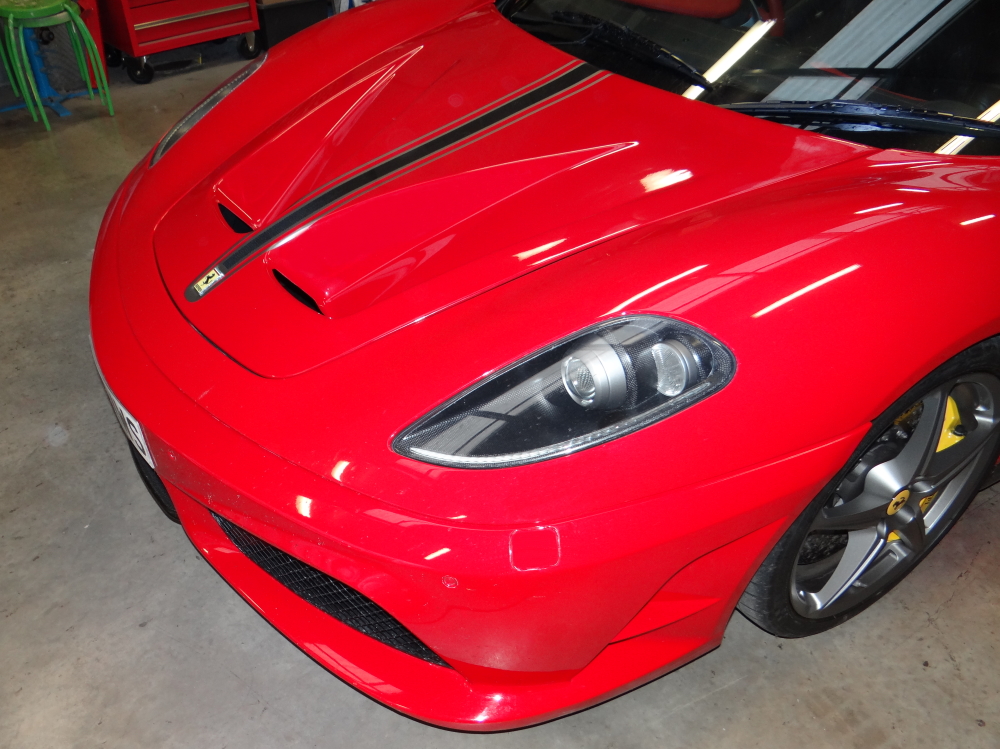
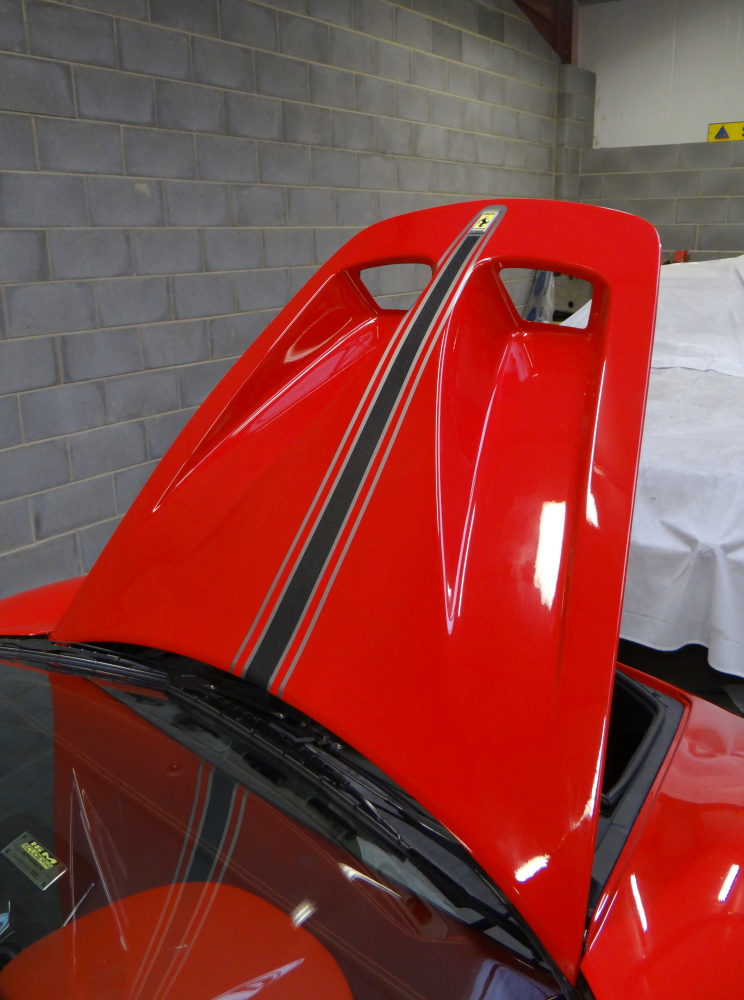
Carbon Bonnet
I'm over the moon with this - it has been months in the making. It takes a not inconsiderable amount of hours in the bodyshop to make custom parts presentable .
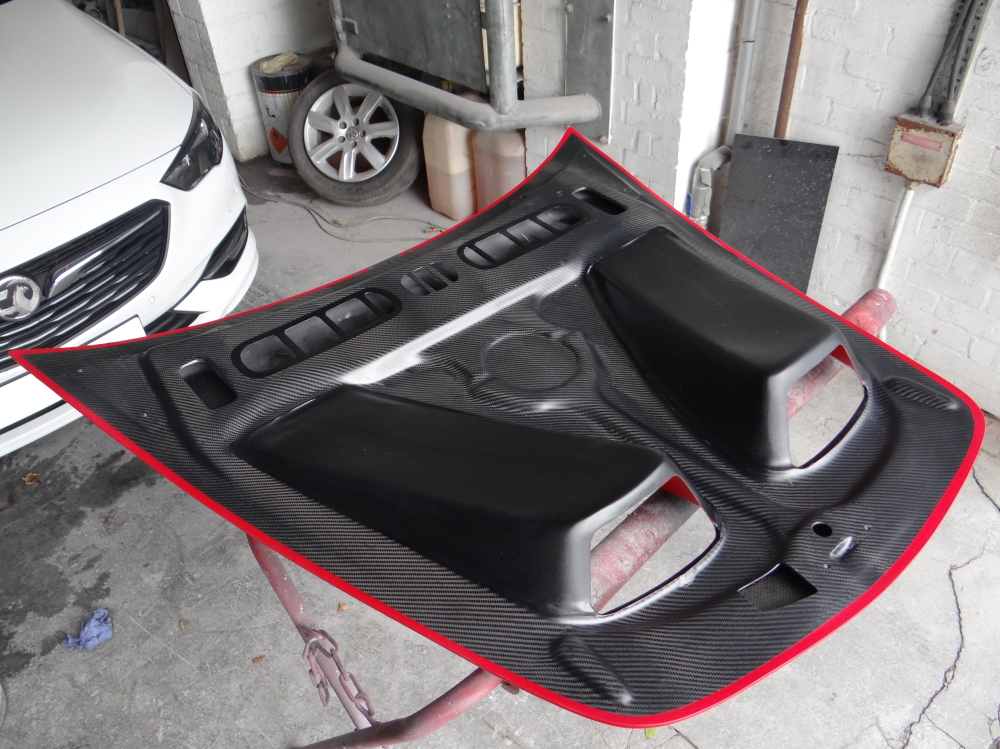
At 6.95kg the original bonnet is actually quite heavy so the hinges are stout to match. The original hinges feature a catch arrangement to prevent the bonnet sliding through the windscreen in the event of a crash.
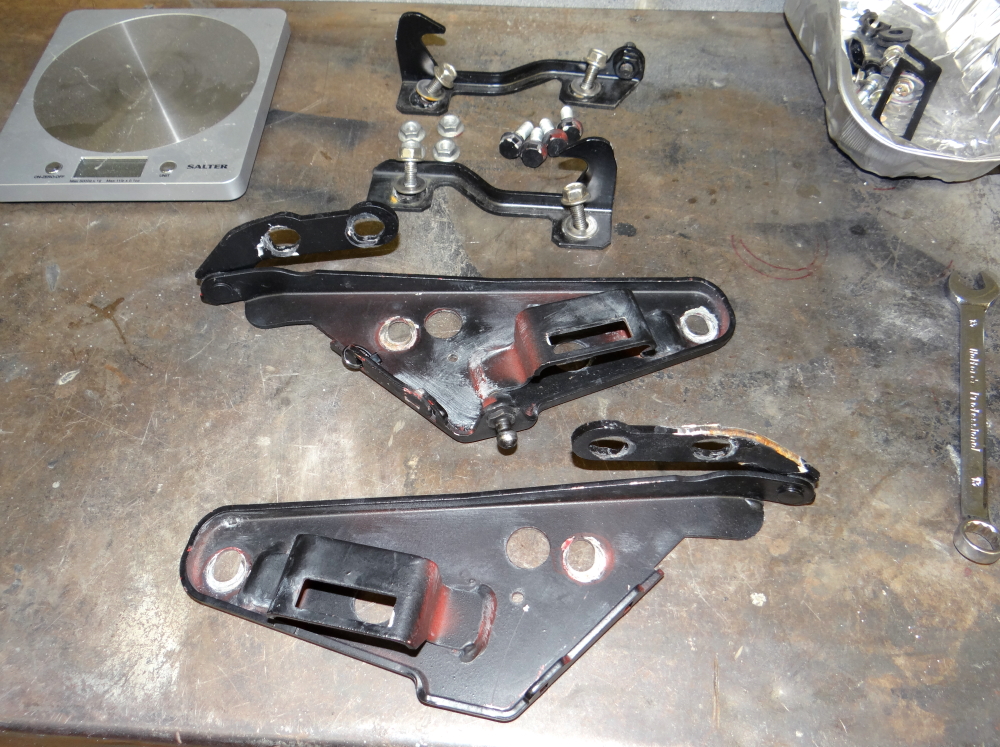
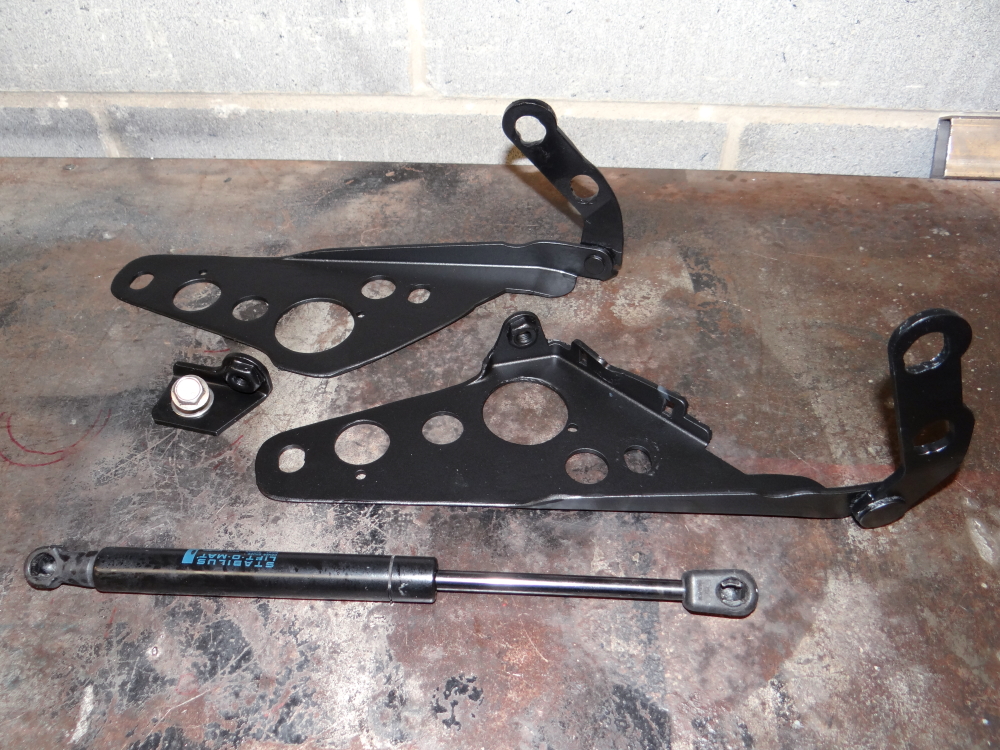
I've swapped to GT3 hinges to suit a carbon bonnet - because carbon simply cracks and crumbles in an impact, the catch arrangement isn't required. I've retained the original strut for convenience - the GT3 cars use a fixed carbon rod. The brackets save over half of a kilogram.

Bonnet mounted. The OEM Ferrari 16M stripe stencil kit was used to paint the stripe, and rather than a plain black centre stripe I've left the carbon exposed. I also had the bodyshop cut out some vent apertures to a template that I proved, so my next job is to fabricate some mesh inserts and some backing plates as a temporary measure until I finish some ducting from the front bumper.

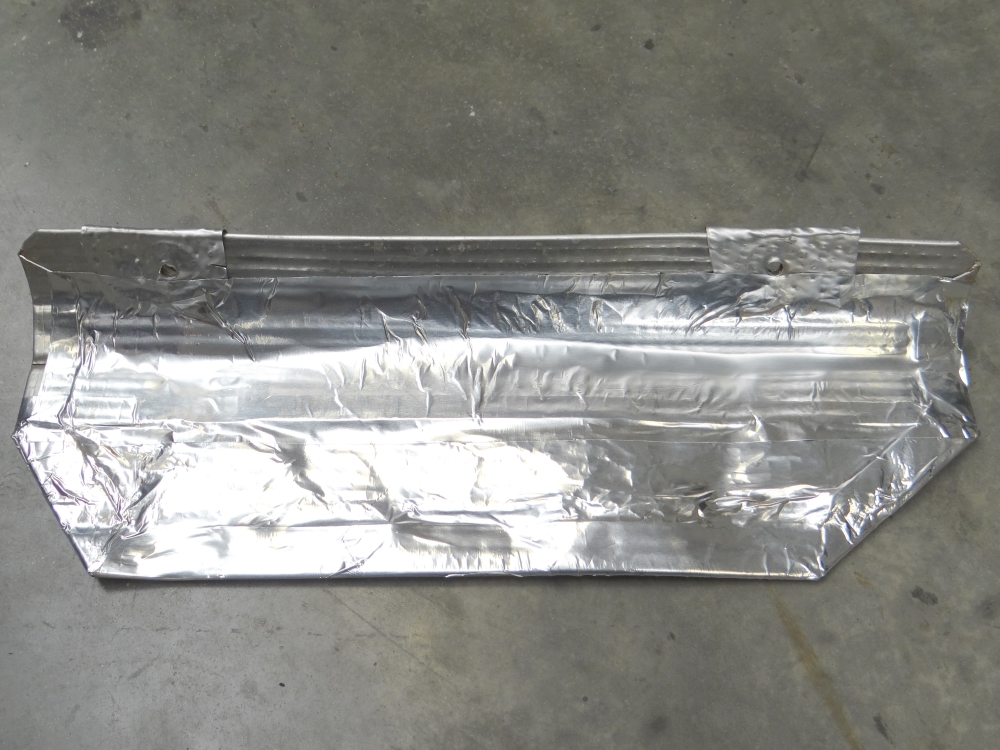
Here's a photo of the new hood tray cover fitted.
Weight saving
Unsprung weight saved: 20.58 kg
Sprung weight saved: 109.41 kg
Total weight saved: 130.00 kg
Carbon Bonnet
I'm over the moon with this - it has been months in the making. It takes a not inconsiderable amount of hours in the bodyshop to make custom parts presentable .
At 6.95kg the original bonnet is actually quite heavy so the hinges are stout to match. The original hinges feature a catch arrangement to prevent the bonnet sliding through the windscreen in the event of a crash.
I've swapped to GT3 hinges to suit a carbon bonnet - because carbon simply cracks and crumbles in an impact, the catch arrangement isn't required. I've retained the original strut for convenience - the GT3 cars use a fixed carbon rod. The brackets save over half of a kilogram.
Bonnet mounted. The OEM Ferrari 16M stripe stencil kit was used to paint the stripe, and rather than a plain black centre stripe I've left the carbon exposed. I also had the bodyshop cut out some vent apertures to a template that I proved, so my next job is to fabricate some mesh inserts and some backing plates as a temporary measure until I finish some ducting from the front bumper.
Here's a photo of the new hood tray cover fitted.
Weight saving
| Original Part | Fitted Quantity | Original Part (kg) | Replacement Part (kg) | Sprung Saving (kg) | Unsprung Saving (kg) | Replacement Part |
|---|---|---|---|---|---|---|
| Pedals - brake | 1 | 0.987 | 0.627 | 0.36 | - | 16M/Scuderia |
| Pedals - brake and clutch height adjuster bracket | 1 | 0.086 | 0 | 0.086 | - | Removed - unused |
| Brakes - ABS/ESP - acceleration sensor | 1 | 0.091 | 0 | 0.091 | - | Removed - function provided by CAN yaw |
| Pedals - Pedals - accelerator assembly | 1 | 0.883 | 0.869 | 0.014 | - | 16M/Scuderia |
| Door hinges | 4 | 0.705 | 0.5005 | 0.818 | - | Machined to reduce weight |
| Dashboard plaque 'F430 Spider' - carbon version | 1 | 0.025 | 0.086 | -0.061 | - | '16M Scuderia Spider - Limited 499' |
| Interior - centre console, complete (carbon driving zone) | 1 | 2.253 | 1.341 | 0.912 | - | 16M (carbon) |
| Windscreen washer tank, pumps, and minimum fluid | 1 | 5.257 | 2.899 | 2.358 | - | 360 non-headlamp wash version adapted |
| Headlamps - standard | 2 | 0.3505 | 0.137 | 0.427 | - | 16M (carbon) |
| Wing mirrors | 1 | 2.11 | 1.431 | 0.679 | - | 16M/Scuderia (carbon) |
| Spider hood tray | 1 | 8.45 | 1.555 | 6.895 | - | Bespoke carbon version |
| F1 paddles | 1 | 0.154 | 0.103 | 0.051 | - | Steering wheel mounted |
| Steering wheel - leather with aluminium trim | 1 | 1.78 | 1.85 | -0.07 | - | 16M/Scuderia (carbon) - leather & alcantara |
| Interior - rear bulkhead (carpet) | 1 | 2.86 | 2.703 | 0.157 | - | Retrimmed in Alcantara |
| Interior - rear bulkhead document nets (untrimmed) | 2 | 0.119 | 0.257 | -0.276 | - | Retrimmed in Alcantara |
| Interior - rear shelf, centre (carpet) | 1 | 0.402 | 0.465 | -0.063 | - | Retrimmed in Alcantara |
| Pedals - drivers footrest 'dead pedal' | 1 | 0.181 | 0.162 | 0.019 | - | Hill Engineering (drilled aluminium) |
| Interior - tunnel trim (carpet) | 1 | 1.177 | 1.041 | 0.136 | - | Retrimmed in Alcantara |
| Interior - drivers footwell trim (carpet) | 1 | 0.305 | 0.316 | -0.011 | - | Retrimmed in Alcantara |
| Interior - rear shelf, LH (carpet) | 1 | 0.822 | 1.039 | -0.217 | - | Retrimmed in Alcantara |
| Interior - rear shelf, RH (carpet) | 1 | 0.98 | 0.91 | 0.07 | - | Retrimmed in Alcantara |
| Interior - passenger footwell trim (carpet) | 1 | 0.229 | 0.371 | -0.142 | - | Retrimmed in Alcantara |
| Bumper - front mounting washers (steel) | 4 | 0.019 | 0.012 | 0.028 | - | Bespoke aluminium spacers |
| Battery change #2 - Optima 'Red Top' 34R | 1 | 18.75 | 16.72 | 2.03 | - | Bosch S5 007 |
| Pedals - passenger footrest | 1 | 0.347 | 0.136 | 0.211 | - | 16M/Scuderia (machined flat and drilled) |
| Doors - door card mounting brackets and rivets | 2 | 0.1645 | 0.14 | 0.049 | - | 16M specific brackets |
| Doors - wiring loom | 2 | 0.526 | 0.532 | -0.012 | - | 16M door loom |
| Doors - inner handle with microswitches | 2 | 0.188 | 0.256 | -0.136 | - | 16M/Scuderia inner handle mechanism |
| Doors - door card, scraper, and fastenings - driver | 1 | 4.992 | 3.376 | 1.616 | - | 16M door card, scraper, and fastenings |
| Doors - door card, scraper, and fastenings - passenger | 1 | 5.461 | 3.376 | 2.085 | - | 16M door card, scraper, and fastenings |
| Hi Fi - woofer, grille, and fastenings | 2 | 0.945 | 0.54 | 0.81 | - | 16M midbass with fastenings |
| Hi Fi - tweeter and trim piece | 2 | 0.075 | 0.06 | 0.03 | - | 16M tweeter & midrange with fastenings |
| Hi Fi - midrange and fastenings | 2 | 0 | 0.163 | -0.326 | - | 16M midrange with fastenings |
| Hi Fi - amplifier | 1 | 0 | 1.671 | -1.671 | - | 16M amplifier |
| Hi Fi - wiring for amplifier and additional speakers | 1 | 0 | 0.628 | -0.628 | - | 16M Hi Fi wiring |
| Undertray, rear | 1 | 9.1 | 5.249 | 3.851 | - | 16M/Scuderia (carbon composite) |
| Capristo exhaust valve controller | 1 | 0 | 0.245 | -0.245 | - | Capristo |
| Door courtesy lights | 2 | 0.012 | 0.009 | 0.006 | - | 16M reflectors |
| Area of sound deadening removed to mount amplifier | 1 | 0.665 | 0 | 0.665 | - | Removed |
| Exhaust #2 - Solenoid valve blanking caps | 2 | 0.003 | 0.078 | -0.15 | - | F430 solenoid valve to exhaust hoses reinstated |
| Exhaust #2 - Capristo F430 Sport catalytic converters | 2 | 3.2 | 3.053 | 0.294 | - | Capristo 16M/Scuderia 02FE 023 03 006 |
| Exhaust #2 - Capristo F430 Sport catalytic converter blankets | 2 | 1.35 | 1.468 | -0.236 | - | Capristo 16M/Scuderia 02FE 023 03 006 |
| Exhaust #2 - F430 Challenge silencer - modified | 1 | 9.65 | 10.7 | -1.05 | - | Capristo 16M/Scuderia 02FE 023 03 006 |
| Exhaust #2 - Bespoke mounting set for exhaust change #1 | 1 | 2.692 | 1.144 | 1.548 | - | Capristo 16M/Scuderia 02FE 023 03 006 |
| Exhaust #2 - Bespoke mount heat shields & fastenings for exhaust #1 | 1 | 0.023 | 0.023 | 0 | - | Removed |
| Exterior - Spider hood cover | 1 | 10 | 3.8 | 6.2 | - | Bespoke carbon version |
| Exterior - Bonnet hinges | 1 | 1.766 | 1.14 | 0.626 | - | F430 GT3 (lightened) |
| Exterior - Bonnet (aluminium) | 1 | 6.95 | 4.521 | 2.429 | - | Bespoke GT3 style (carbon) |
Unsprung weight saved: 20.58 kg
Sprung weight saved: 109.41 kg
Total weight saved: 130.00 kg
Edited by mwstewart on Tuesday 9th November 15:54
Butter Face said:
That’s lovely. Looks super expensive!!
Julian Thompson said:
Looks amazing Mark! Shall you keep this car for good?
Thank you. This and the Fiesta are keepers.markiii said:
any compromise on luggage space with that new bonnet?
Yes, but for a supercar these have a surprising amount of space top begin with.LaurasOtherHalf said:
What’s the functionality of those exits on the nose? Do they work?
Regardless, it’s such an epic build this car-would be great if a video could be made on it-a jay leno’s Garage type feature would be absolutely fantastic.
I wrote about that earlier in the thread: I am seeking some wind tunnel testing and consultation time to make them work effectively.Regardless, it’s such an epic build this car-would be great if a video could be made on it-a jay leno’s Garage type feature would be absolutely fantastic.
Max M4X WW said:
Stunning ideas, execution and installation as always!
Cheers Max.Davie_GLA said:
Brilliant update.
Apologies if I missed it, but you mentioned moving away from cars. What’s next?
Thank you. Boats. I will finish the Fiesta in parallel.Apologies if I missed it, but you mentioned moving away from cars. What’s next?
Gassing Station | Readers' Cars | Top of Page | What's New | My Stuff