Mazda MX6 2.5 V6 manual
Discussion


Thanks Danny.
Well the MX6 was never that common in the UK even when new back in the day, few left now. The road tests from the time generally say that it was a decent all-rounder, but I guess it never really excelled enough to stand out in the crowded 1990's coupe market and capture a lot of sales.
The smaller version you may be thinking of is the MX3 which is a bit like a scaled down MX6 in some ways, they came with a small 1.8L displacement of pretty much the same KL V6 engine, it was the four door Xedos 6 which had a the 2.0 version of this V6 unit...
I've been thinking about body modifications. I've already got tackling rust and paint issues on the agenda but I'm also planning to dabble with some sporty looking appendages, picked up a few cheapy bits recently.
One thing I think the '6 could do with is a front lip, the standard bumper tucks under and is quite shallow, so the car looks a bit chin-less I think. I'm also not a big fan of the standard spoiler, it's quite a bulky/blobby shape, sits quite far forward on the boot lid and is very curved. I've thought about the spoiler delete look but think that's a bit boring, it's fun to have something sitting out back. So I was looking for something a straighter but still with a bit of shape, that would sit near the back edge of the boot lid. Also for a front lip I wanted with an interesting form but not too over-the-top.
After some lunchtime ebay browsing I found and bought these. I grabbed a rear spoiler/wing I liked the shape of, from a mk5 Escort no less (£20). I didn't want to go down the aluminium/carbon bolt-on wing route, but I quite like the race car-wannabe metal brackets, so purchased a used pair for a tenner. I may shave the three pedestals off the wing and mount it with the brackets at the edges, not sure yet. I'd paint the wing body colour and the brackets either black or a gunmetal shade to match the wheels.

The front spoiler/lip is from an MG ZR (£11), thought it could work (but mainly bought it because cheap). It would need some knife and forking to fit, it has an under-tray area that I would need to cut away so that the part was flat and could be bent around to fit the bumper.

Had a quick go at seeing how it would look. I don't like the central pedestal but the outer two could be re-profiled to mount it, would be lower and more subtle than the bracket approach I guess.

One thing I think the '6 could do with is a front lip, the standard bumper tucks under and is quite shallow, so the car looks a bit chin-less I think. I'm also not a big fan of the standard spoiler, it's quite a bulky/blobby shape, sits quite far forward on the boot lid and is very curved. I've thought about the spoiler delete look but think that's a bit boring, it's fun to have something sitting out back. So I was looking for something a straighter but still with a bit of shape, that would sit near the back edge of the boot lid. Also for a front lip I wanted with an interesting form but not too over-the-top.
After some lunchtime ebay browsing I found and bought these. I grabbed a rear spoiler/wing I liked the shape of, from a mk5 Escort no less (£20). I didn't want to go down the aluminium/carbon bolt-on wing route, but I quite like the race car-wannabe metal brackets, so purchased a used pair for a tenner. I may shave the three pedestals off the wing and mount it with the brackets at the edges, not sure yet. I'd paint the wing body colour and the brackets either black or a gunmetal shade to match the wheels.
The front spoiler/lip is from an MG ZR (£11), thought it could work (but mainly bought it because cheap). It would need some knife and forking to fit, it has an under-tray area that I would need to cut away so that the part was flat and could be bent around to fit the bumper.
Had a quick go at seeing how it would look. I don't like the central pedestal but the outer two could be re-profiled to mount it, would be lower and more subtle than the bracket approach I guess.
Just a minor update here, I've not managed to do much work on the MX6 recently due to other projects taking priority. I have been aquiring quite a few new parts, I've finally got all the parts together for the cambelt change on the MX6's KL-DE V6 engine. I'll also be replacing the water pump, two idlers, tensioner, plus the power steering and alternator drive belts. I'm trying to keep the cost of this job down to a minimum as per usual, the prices for the parts including postage were as follows:
Water pump - £19.80
Belt idler - £8.99
Belt idler - £11.11
Belt tensioner - £10.50
Power steering drive belt - £8.39
Alternator drive belt - £5.63
Cambelt - £18.99
So a total cost of £83.41 for this job. While I'm working on the engine I'm planning to do some other work I've been meaning to do including refreshing the cam cover gaskets, replacing the thermostat, and deleting off some of the gubbin in there - EGR, VRIS, ICV, and the carbon canister...

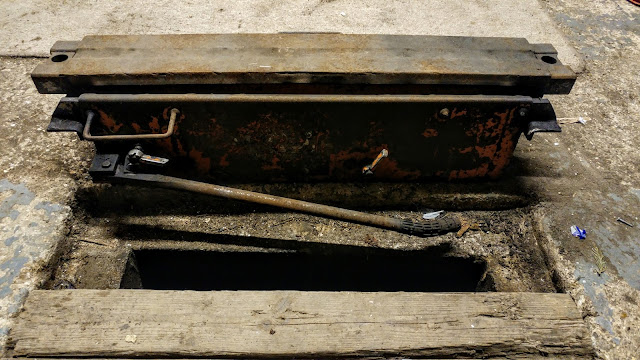
One new toy for the man cave that I'm quite excited about, I've managed to get my hands on a pit jack. My garage is a reasonable size for a single and has an inspection pit so this will be great for raising and lowering the cars in there. It's clearly oldy worldy and needs a bit of a refresh, but only cost £20 from the man in the pub so happy with that. I haven't had much of a chance to play on it or install it yet but I've had a quick go and it works nicely, has a scissor action.

I picked up some side skirts, £30 from ebay. They are fibreglass URAS replicas for a 200SX but I'll be able to knife and fork them to fit. I'm not planning to fit them any time soon as there are too many oily bits to sort out and fettle first, but I'd like to give them a try when I get bored of the OEM look and feel like messing about...


I've been changing brakes over the last couple of weekend, some very corroded Alfa front disc and pads last weekend plus the same on the girlfriends Corsa D the weekend before...

Water pump - £19.80
Belt idler - £8.99
Belt idler - £11.11
Belt tensioner - £10.50
Power steering drive belt - £8.39
Alternator drive belt - £5.63
Cambelt - £18.99
So a total cost of £83.41 for this job. While I'm working on the engine I'm planning to do some other work I've been meaning to do including refreshing the cam cover gaskets, replacing the thermostat, and deleting off some of the gubbin in there - EGR, VRIS, ICV, and the carbon canister...
One new toy for the man cave that I'm quite excited about, I've managed to get my hands on a pit jack. My garage is a reasonable size for a single and has an inspection pit so this will be great for raising and lowering the cars in there. It's clearly oldy worldy and needs a bit of a refresh, but only cost £20 from the man in the pub so happy with that.
I haven't had much of a chance to play on it or install it yet but I've had a quick go and it works nicely, has a scissor action.I picked up some side skirts, £30 from ebay. They are fibreglass URAS replicas for a 200SX but I'll be able to knife and fork them to fit. I'm not planning to fit them any time soon as there are too many oily bits to sort out and fettle first, but I'd like to give them a try when I get bored of the OEM look and feel like messing about...
I've been changing brakes over the last couple of weekend, some very corroded Alfa front disc and pads last weekend plus the same on the girlfriends Corsa D the weekend before...
Edited by MX6 on Friday 9th March 10:21
I've wanted some kind of ebay backbox/zorst/fart cannon since I acquired the car, happy that I've finally procured one now. One of the reasons for buying an MX6 was for the exhaust sound, I really wanted a V6 as opposed to a 4 pot (and the MX6 is probably the cheapest V6 coupe there is if you can find one). When I first got the car it sounded cool, not particularly loud but it had a bit of sound to it. Subsequently I noticed that this was due to a rust hole in the back-box, when I replaced it and the centre section with OEM items it became much too muted and pipe 'n' slippers for my liking.


There are all sorts on ebay but I decided I wanted one in stainless because why not, and with twin tail pipes to reflect the OEM look and fit the cut-away in the rear valance, plus click-and-collect. So I found this one, twin 3" exits and came with an adjustable hanger, adapter pipe and clamp, £54.99. I'm actually very impressed with the quality for the price, it has a completely unmarked finish and the welds all look solid. It's pretty much unrestricted and straight through, there doesn't seem to be anything inside and one can see daylight through it... It should make a proper row so looking foward to waking the neighbours in the middle of the night...


I believe the diameter on the standard exhaust is 2" so I will use the adapter as the inlet of the backbox is 2.25". I may well have to buy a short bit of extension pipe to get it to sit in the correct position but let's see when I offer it up. I may buy another one of these adjustable hangers as the OEM backbox has two, this one is smaller and lighter though...

I've got quite a few parts to fit on the car now, planning to live in the garage and get a load done while my girlfriend is away for a couple of weeks over Easter. I thought I'd make something of a to-do list of work that I want/need to do to the MX6 before I start putting miles on it from spring and over the summer.
Really good clean of engine bay and under-body with pressure washer
Compression test
Cambelt change, including water pump, tensioner, idlers, and drive belts
Cam cover gasket replacement, repainted cam covers
CV boots, all 4 inner and outer boots replaced on front axle
Rust treatment and body underseal
Stainless aftermarket fart pipe fitment
EGR delete
VRIS delete
IAC delete
Carbon canister delete
Xedos 9 ECU, MAF and air temp sensor conversion
Fix rust, fill badge holes and repair paint on body
Battery relocate to boot
There are all sorts on ebay but I decided I wanted one in stainless because why not, and with twin tail pipes to reflect the OEM look and fit the cut-away in the rear valance, plus click-and-collect. So I found this one, twin 3" exits and came with an adjustable hanger, adapter pipe and clamp, £54.99. I'm actually very impressed with the quality for the price, it has a completely unmarked finish and the welds all look solid. It's pretty much unrestricted and straight through, there doesn't seem to be anything inside and one can see daylight through it... It should make a proper row so looking foward to waking the neighbours in the middle of the night...
I believe the diameter on the standard exhaust is 2" so I will use the adapter as the inlet of the backbox is 2.25". I may well have to buy a short bit of extension pipe to get it to sit in the correct position but let's see when I offer it up. I may buy another one of these adjustable hangers as the OEM backbox has two, this one is smaller and lighter though...
I've got quite a few parts to fit on the car now, planning to live in the garage and get a load done while my girlfriend is away for a couple of weeks over Easter. I thought I'd make something of a to-do list of work that I want/need to do to the MX6 before I start putting miles on it from spring and over the summer.
Really good clean of engine bay and under-body with pressure washer
Compression test
Cambelt change, including water pump, tensioner, idlers, and drive belts
Cam cover gasket replacement, repainted cam covers
CV boots, all 4 inner and outer boots replaced on front axle
Rust treatment and body underseal
Stainless aftermarket fart pipe fitment
EGR delete
VRIS delete
IAC delete
Carbon canister delete
Xedos 9 ECU, MAF and air temp sensor conversion
Fix rust, fill badge holes and repair paint on body
Battery relocate to boot
Edited by MX6 on Friday 9th March 11:17
Paul S4 said:
Mycroft Ward said:
I know the 159 is a somewhat bigger and heavier car, the controls feel quite heavy too so that seems to add to the feel of weight. I'm not a big fan of the 'box, it's the flakey GM M32 six speed, has quite a stiff shift to it. I had to have the bearing in it replaced last year as it started to whine, found a guy advertising on ebay up north who did the lot for a cheap price. Clutch pedal is heavy on it too.
Mycroft, thanks for the link to the Halifax M32 gearbox specialist: I took my Punto 1.9 130 there last week to get the bearings done, good job at a good price, and a top guy as well. I now just need to get that minor issue sorted.. re the DMF/clutch !!!Paul S4 said:
This MX6 project seems to be growing into a restoration job....!
Good read by the way, I have always thought that these cars were so understated but a good timeless design with a great engine. Bit like an Alfa 156 , but I would say that !
Ha, yeah it's escalated a bit hasn't it. When I got the MX6 I just planned to get a few bits sorted on it then drive it around, unfortunately there has been more issues than I thought so sorting it has become a bit of a drawn out process. I'm enjoying working on it though and can't afford a different project car at the moment so I'm just going to keep going with it until the broken stuff is gone and it has a few fun upgrades done. I want to have it looking and driving decent by the summer...Good read by the way, I have always thought that these cars were so understated but a good timeless design with a great engine. Bit like an Alfa 156 , but I would say that !
I think the MX6 has a really nice sports car shape, it's the classic berlinetta form really. I like the details like the lights, very clean and simple as was typical of the era, though it can seem a bit bland and '90's jelly mould-ish compared to some cars. I do really like the KL-DE engine, not the most powerful but pulls the car well and sounds good too. The Alfa 156 V6 is a future classic I'm sure...
Edited by MX6 on Friday 9th March 12:53
NorthernSky said:
Would love to hear how that new stainless system sounds - please post a utube link! (-:
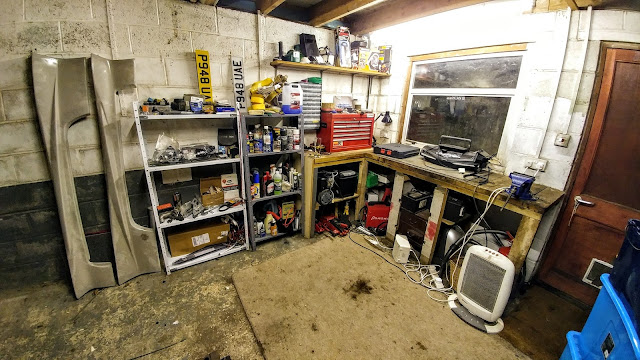
I'm looking forward to getting it on and hearing it too, should be quite aggressive! A Youtube video is a nice idea, I may well give that a go. There are a few MX6 exhaust vid's on there already but not many have good audio quality so I'd like to do a good high fidelity one (I'm actually a qualified sound engineer amongst other things...).Well sadly no progress with the MX6 this week as I've been trying to get the work space into good order. Not fun but it needed to happen before I get into some involved jobs. I've been going through the process of binning off accumulated garage detritus and re-organising the storage. There were asorted boxes that had been placed down the side of the car making it awkward to work on, so they have been disappeared. I also had some lash-up wood shelving down each side of the garage, after getting rid of stuff I was able to remove the shelving from one side, giving me more space to work on motors. The wheelie bins are fully loaded and there is a large tip trip pile patiently awaiting. It's a bit of a humble setup but I'm pleased with my efforts.
I was also having a bit of a shufti at the newly acquired pit jack, it's beast of a thing, weighs a ton. Unfortunately its body is wider than my pit opening so a bit of tea drinking and head scratching will be involved there. I'm thinking that I'll use a masonry grinding disc to cut away a step in the brick of the pit walls so it can sit in the recess created. It would be good to install some steel box section to form rails so that the jack can slide fore and aft. Anyhow the pit jack project waits for another day, I can get the '6 back in there now for some Easter weekend attention, no shortage of work to do on it.
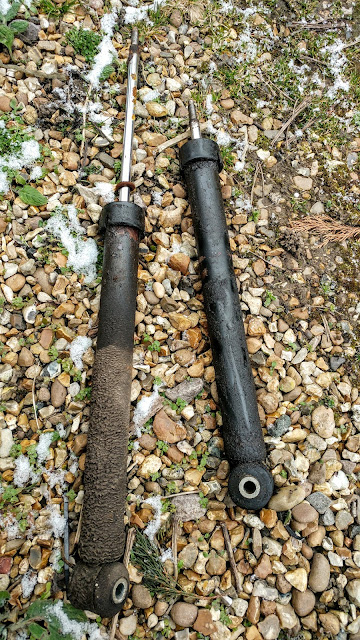
In other news, recently my garage time has been taken over with fixing other peoples cars, such is life. I had my girlfriends friends 56 reg Corsa D over, it had the worst suspension I've experienced on a car, no idea what she'd been doing in it to get it into such a sorry condition! Three of dampers were completely blown and leaking so it was basically just riding on springs, and she wanted it fixed for cheap. I got a couple of rears for £20 a pop plus a used but low miles front strut assembly for £26. I swapped out the black sludge stuff for engine oil while I was at it. Did a full service on my mum's mk5 Fiesta the other week too...

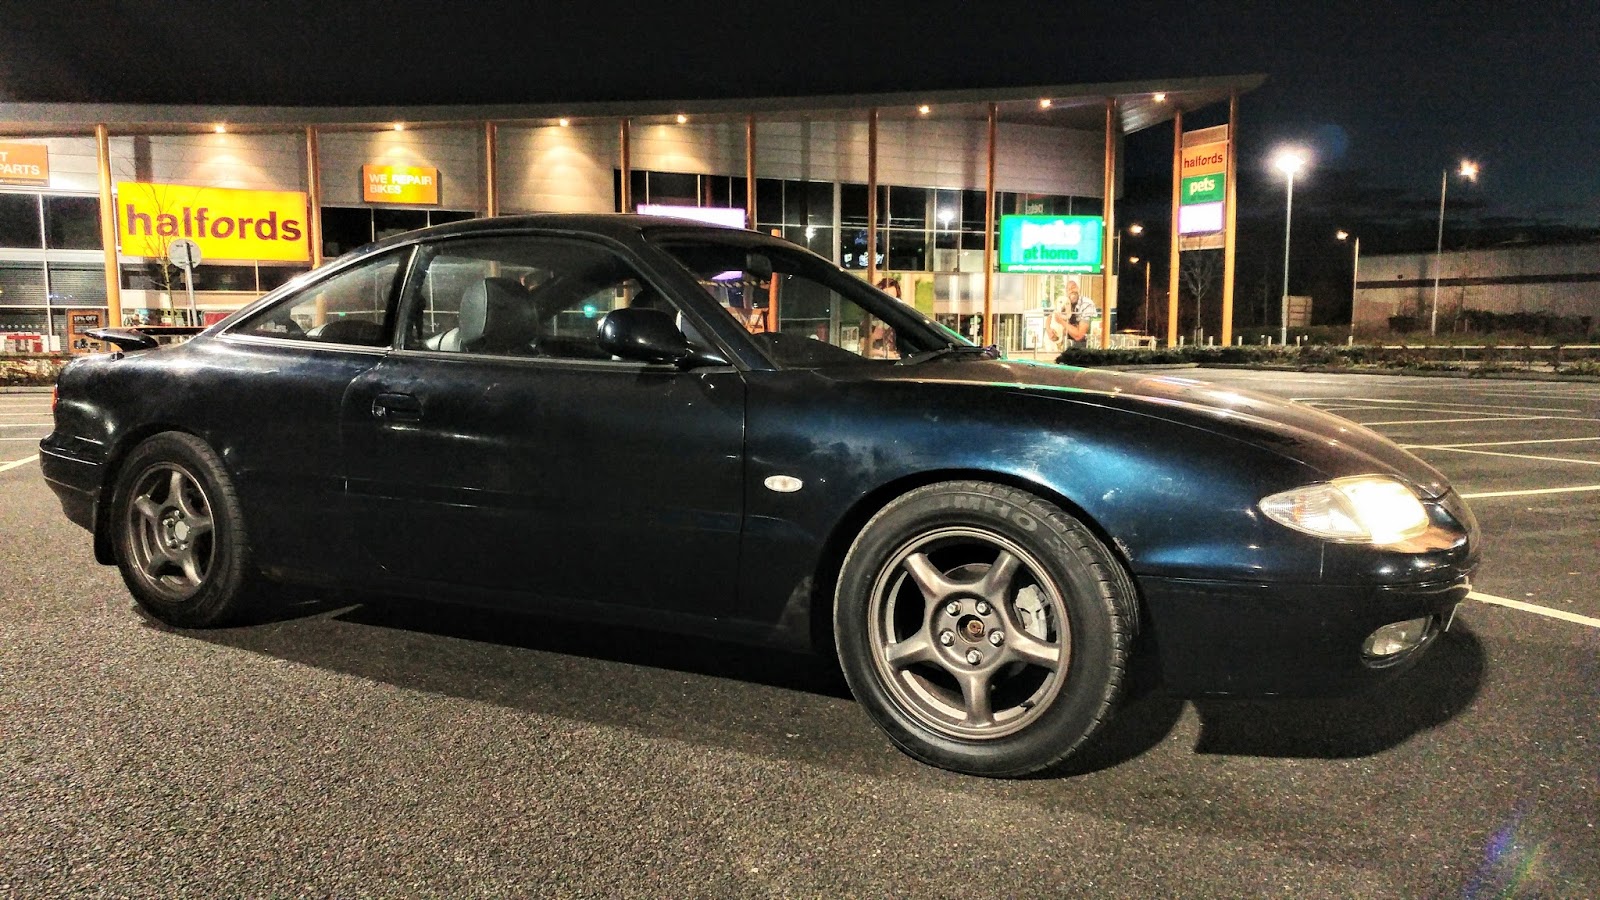
Here's another pic' of the MX6 looking moody, I'm really liking now it looks now with this stance, it's helping with the motivation to get it all sorted.
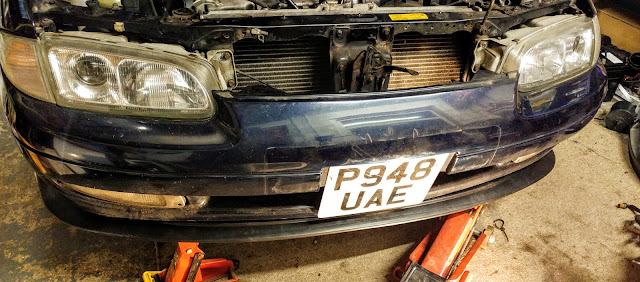
Oh and I've bought a front lip, currently waiting for that to turn up. I think the '6 needs it as it looks a bit chinless as standard. This part is supposedly universal, there isn't any MX6 specific aftermarket part.

The JDM Mazdaspeed version of the car (with the 200 horse KL-ZE motor) has a factory front lip which is a kind of similar shape to this one I've bought, that was the inspiration...

I was also having a bit of a shufti at the newly acquired pit jack, it's beast of a thing, weighs a ton. Unfortunately its body is wider than my pit opening so a bit of tea drinking and head scratching will be involved there. I'm thinking that I'll use a masonry grinding disc to cut away a step in the brick of the pit walls so it can sit in the recess created. It would be good to install some steel box section to form rails so that the jack can slide fore and aft. Anyhow the pit jack project waits for another day, I can get the '6 back in there now for some Easter weekend attention, no shortage of work to do on it.
In other news, recently my garage time has been taken over with fixing other peoples cars, such is life. I had my girlfriends friends 56 reg Corsa D over, it had the worst suspension I've experienced on a car, no idea what she'd been doing in it to get it into such a sorry condition! Three of dampers were completely blown and leaking so it was basically just riding on springs, and she wanted it fixed for cheap. I got a couple of rears for £20 a pop plus a used but low miles front strut assembly for £26. I swapped out the black sludge stuff for engine oil while I was at it. Did a full service on my mum's mk5 Fiesta the other week too...
Here's another pic' of the MX6 looking moody, I'm really liking now it looks now with this stance, it's helping with the motivation to get it all sorted.
Oh and I've bought a front lip, currently waiting for that to turn up. I think the '6 needs it as it looks a bit chinless as standard. This part is supposedly universal, there isn't any MX6 specific aftermarket part.
The JDM Mazdaspeed version of the car (with the 200 horse KL-ZE motor) has a factory front lip which is a kind of similar shape to this one I've bought, that was the inspiration...
Edited by MX6 on Thursday 29th March 12:32
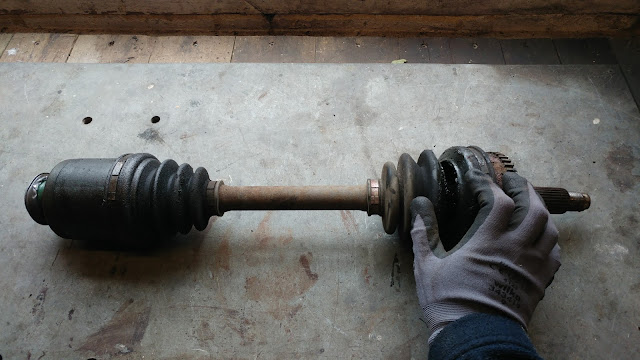
I managed to make some progress over the bank holiday weekend, slow progress but progress none the less. The first thing to get done was remove the off-side driveshaft so that I could replace the knackered CV joint boots.
It proved a pain in the arse to remove from the intermediate shaft, I spent quite considerable amount of time swinging on the end of a pry bar to no avail. I ended up chopping off the hooked end of it so I could sleeve a long metal pipe over it for extra leverage, eventually it gave up and came free. I certainly wouldn't have fancied tackling that without the pit.
I so here's the offending article on the bench, the split in the outer boot had been letting grease escape, plus the other looks to be on its last legs too. I was planning to dis-assemble the driveshaft and refurbish it with new rubber boots that I'd bought, but I decided I can't be bothered. To save time I've ordered a complete new driveshaft assembly (£28.59) that I can just throw straight in, it should turn up tomorrow.
Edited by MX6 on Tuesday 3rd April 13:34
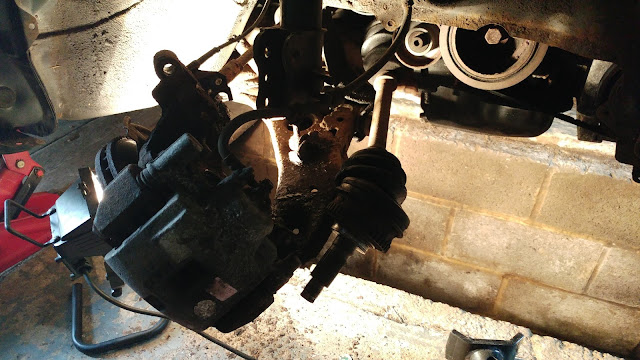
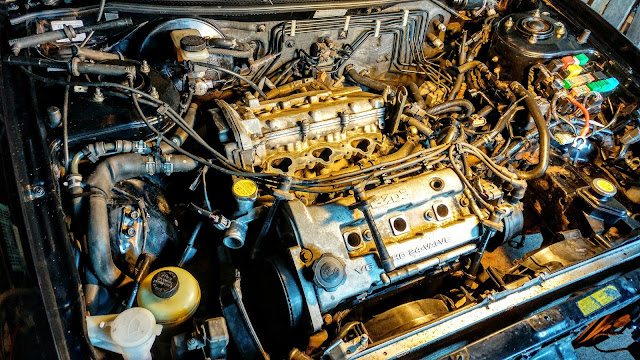
...the next thing to start restoring was the assorted gubbins under the bonnet. There are quite a number of jobs I want to do in here, besides changing old parts for new ones I also want to get things cleaned up and treat some rust in places. Here is a "before" picture of the engine bay. I've already removed some bits and pieces that I don't intend to refit, including parts of the aircon system and some plastic covers.

I began with making a start on the cambelt change. It's quite an awkward and involved job on the MX6, it would probably be easier to take the engine out but I don't have a hoist! As with many other FWD cars the cambelt side of the motor is positioned close to the chassis rail so access is limited. Just to get at the cambelt cover upper retaining bolts I had to first unplug some wiring harness items, remove a coolant hose, the right-side engine mount, the engine mounts mount, and one of the drive belt tensioners. The pic' shows me reaching a small socket wrench down into the depths to remove an unseen 10mm bolt...

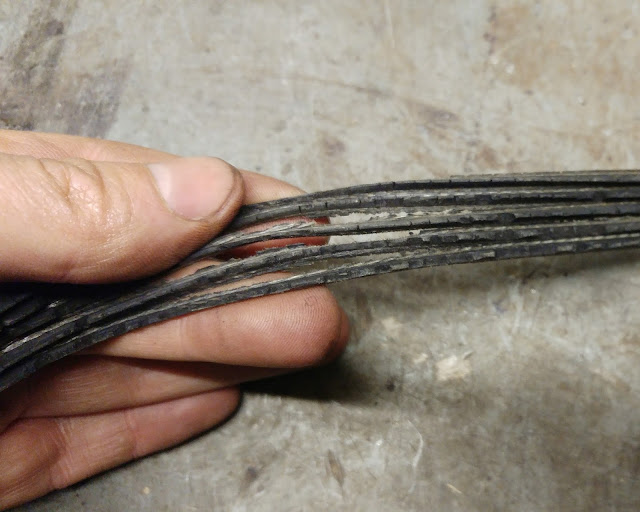
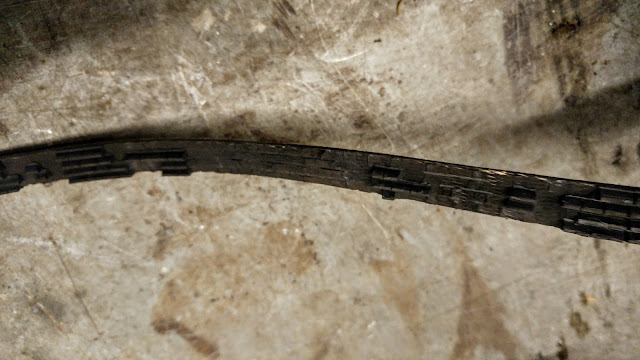
I have the drive belts off and they are in a parlous condition. They must be original or previously replaced early in the 6's life and be the best part of 20 years old, as they are very perished, the rubber has cracked and disintergrated. I haven't been able to remove the cambelt itself yet, but from what I can see it has faired okay despite obvious age. It is shiny but hasn't broken up as the other belts have done, it does seem a little slack though, suggesting that it has maybe stretched or that there is an issue with the belt tensioner...
I began with making a start on the cambelt change. It's quite an awkward and involved job on the MX6, it would probably be easier to take the engine out but I don't have a hoist! As with many other FWD cars the cambelt side of the motor is positioned close to the chassis rail so access is limited. Just to get at the cambelt cover upper retaining bolts I had to first unplug some wiring harness items, remove a coolant hose, the right-side engine mount, the engine mounts mount, and one of the drive belt tensioners. The pic' shows me reaching a small socket wrench down into the depths to remove an unseen 10mm bolt...
I have the drive belts off and they are in a parlous condition. They must be original or previously replaced early in the 6's life and be the best part of 20 years old, as they are very perished, the rubber has cracked and disintergrated. I haven't been able to remove the cambelt itself yet, but from what I can see it has faired okay despite obvious age. It is shiny but hasn't broken up as the other belts have done, it does seem a little slack though, suggesting that it has maybe stretched or that there is an issue with the belt tensioner...
Edited by MX6 on Tuesday 3rd April 13:35
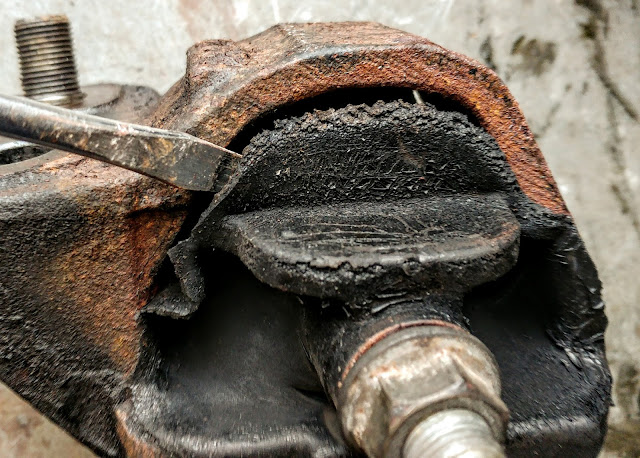
Whilst removing the right side engine mount for the cambelt change I noticed that is knackered. The rubber is perished and has separated from the steel frame, leading to significant movement. I need to either replace this with a new one, or create a DIY polyurethane mount if I feel like making work for myself.
I have deleted the charcoal canister and associated parts. For anyone who doesn't know, this is essentially a filter for fuel tank gases that are drawn through it by intake vacuum. It is just for emissions and not required to run the engine, so I have deemed it superfluous.
I believe I have a vacuum leak which is causing lean running. The KL-DE engine has quite a lot of vacuum line running here, there and everywhere so I'm checking and getting rid of as many as possible, starting with this one that runs to the charcoal canister. The fuel tank will now vent to atmosphere via a PCV valve. I'm also planning to go boosted at some point which will necessitate some changes to the set-up...
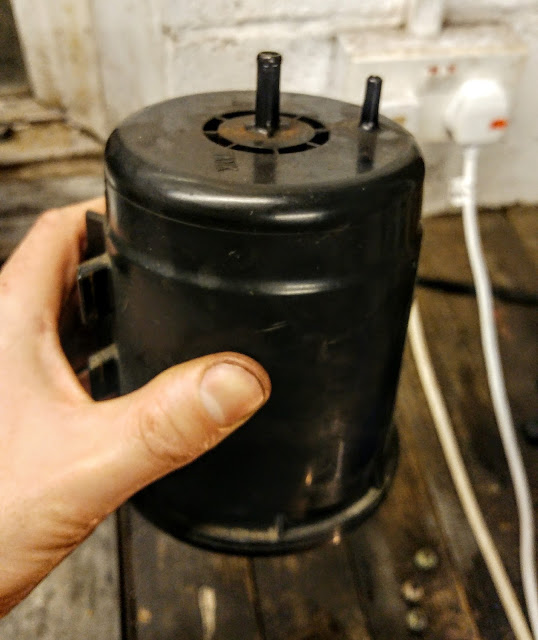
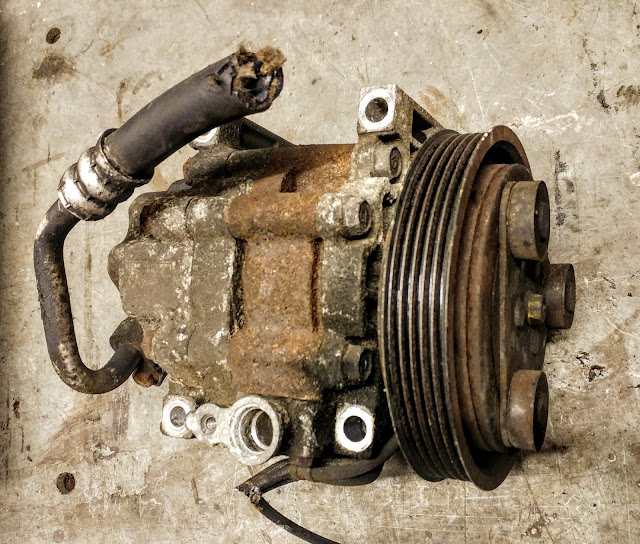
Another deleted part is the air con compressor. The air con system didn't work and already had some parts missing, so I'm removing the rest of it. I should get a tiny bit more power as the motor no longer has to drive this, I've bought a shorter belt that will now just drive the alternator. In addition this is quite a nice weight saving measure and another reduction in unnecessary complexity. There is a bracket that secure it to the block that needs to go as well.
I have deleted the charcoal canister and associated parts. For anyone who doesn't know, this is essentially a filter for fuel tank gases that are drawn through it by intake vacuum. It is just for emissions and not required to run the engine, so I have deemed it superfluous.
I believe I have a vacuum leak which is causing lean running. The KL-DE engine has quite a lot of vacuum line running here, there and everywhere so I'm checking and getting rid of as many as possible, starting with this one that runs to the charcoal canister. The fuel tank will now vent to atmosphere via a PCV valve. I'm also planning to go boosted at some point which will necessitate some changes to the set-up...
Another deleted part is the air con compressor. The air con system didn't work and already had some parts missing, so I'm removing the rest of it. I should get a tiny bit more power as the motor no longer has to drive this, I've bought a shorter belt that will now just drive the alternator. In addition this is quite a nice weight saving measure and another reduction in unnecessary complexity. There is a bracket that secure it to the block that needs to go as well.
Edited by MX6 on Friday 6th April 12:12
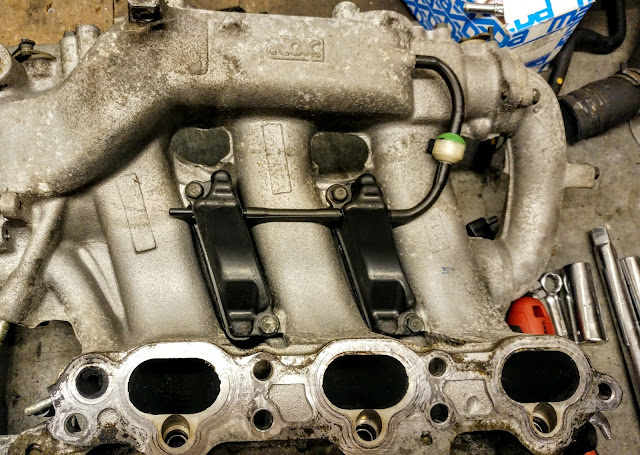
I got the intake manifold plucked off last night, it took some time but it wasn't too difficult. The more tricky items to remove was the vacuum lines and the one securing bolt that are located further down at the back of the manifold, there isn't a lot of space between it and the bulkhead. You can see how grubby the thing looks underneath, over 20 years and 160k miles of grime. I'm not going for a shiny concourse rebuild but I do want to bling it up a bit and will try my best to get it all cleaned up, I'll put new paint on some of the parts. I'm thinking of going for red or maybe orange valve covers.

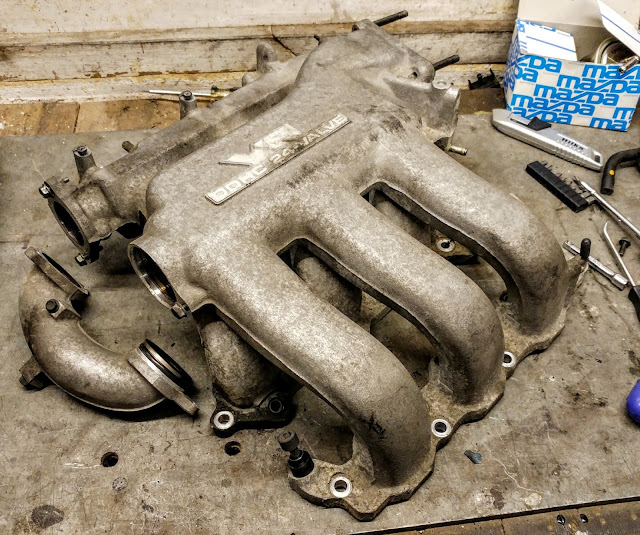
I removed the throttle body from the intake manifold but the injector fuel rails are still attached, I'm thinking I might send the injectors away to be cleaned while they are off the car. I reckon a good clean and some silver paint would smarten the manifold up.
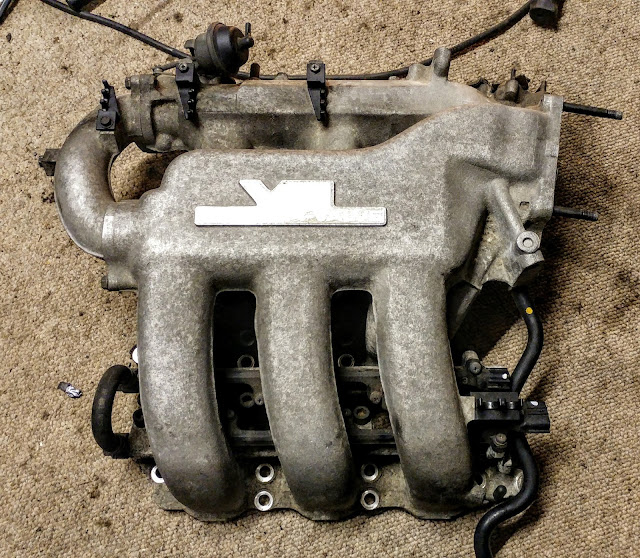
The KL-DE manifold has this VRIS, variable resonance intake system. Basically, it has two vacuum operated actuators that open and close various ports at differing RPM, this apparently changes the effective length of the intake runners to make better power across the rev range. I will be removing this. It seems a clever idea but I'm intending to go forced induction where it won't be under vacuum and will just be an intake restriction, plus it's extra complexity and things to break. In the pic I am pressing down on the sprung actuator to open the port butterflies that are situated behind the throttle body, normally at low rev's these will be closed.

I removed the throttle body from the intake manifold but the injector fuel rails are still attached, I'm thinking I might send the injectors away to be cleaned while they are off the car. I reckon a good clean and some silver paint would smarten the manifold up.
The KL-DE manifold has this VRIS, variable resonance intake system. Basically, it has two vacuum operated actuators that open and close various ports at differing RPM, this apparently changes the effective length of the intake runners to make better power across the rev range. I will be removing this. It seems a clever idea but I'm intending to go forced induction where it won't be under vacuum and will just be an intake restriction, plus it's extra complexity and things to break. In the pic I am pressing down on the sprung actuator to open the port butterflies that are situated behind the throttle body, normally at low rev's these will be closed.
Edited by MX6 on Friday 6th April 12:00
Yeah, I'm resigned to the fact that it's going to be quite a lot of work. I'm going to try and get through it as quickly as I can but I'm not in a rush as such and there is no problem with the car sitting in the garage doing nought.
If you add up the problem areas on this car you'd have to say that the car is beyond economic repair and it's not really worth putting the time and effort into in a sence, even though I'm trying to spend as little as I can on replacement parts. On the other hand I'm enjoying messing about with it, researching fixes and modifications, plus I'm learning some new things about car mechanics and maintance.
If I'd have known about all the problem areas I wouldn't have bought it, but that's old cars for you I guess! I've been here several times before and seem to keep going back for more, heh...
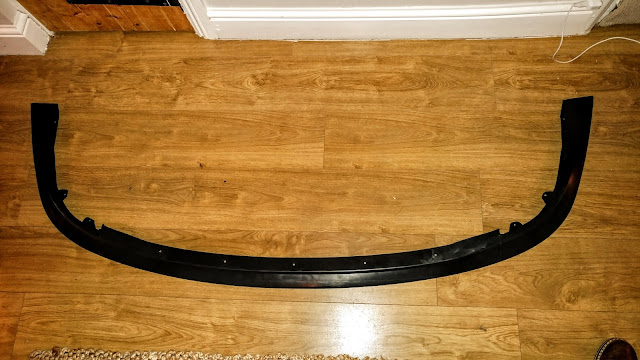
My new front lip/splitter arrived yesterday. As there is no aftermarket MX6 part I had previously looked at parts designed to fit other cars, with early Impreza lips looking a good bet. In the end I went for this PU universal fit item at £88, it seemed about the correct size and I thought the style would work.
I offered it up to the car and as luck would have it, it's close to being a perfect fit. The front is a bit more curved than the MX6 bumper, and the sides are slightly long so will need a trim, but otherwise I think it's going to work well.
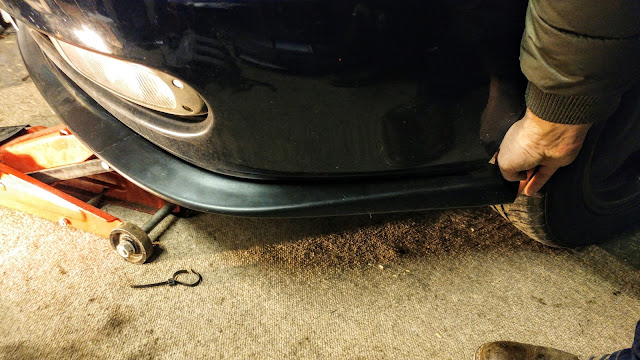
It needs manipulating somewhat as it has become slightly deformed in postage. I generally prefer front lips in body colour, but I think the satin black looks okay on a darker colour car like mine. I think I will just fit it as is for now and maybe look at painting it at a later date. I'm planning to fit it with self tapers.
I'm still thinking of looking at the rear spoiler situation and making a decision about what to run there, but otherwise I don't think the car needs any more cosmetic mod's. Just a really good clean and polish, plus the rust swapped for a splash of new paint here and there.
I offered it up to the car and as luck would have it, it's close to being a perfect fit. The front is a bit more curved than the MX6 bumper, and the sides are slightly long so will need a trim, but otherwise I think it's going to work well.
It needs manipulating somewhat as it has become slightly deformed in postage. I generally prefer front lips in body colour, but I think the satin black looks okay on a darker colour car like mine. I think I will just fit it as is for now and maybe look at painting it at a later date. I'm planning to fit it with self tapers.
I'm still thinking of looking at the rear spoiler situation and making a decision about what to run there, but otherwise I don't think the car needs any more cosmetic mod's. Just a really good clean and polish, plus the rust swapped for a splash of new paint here and there.
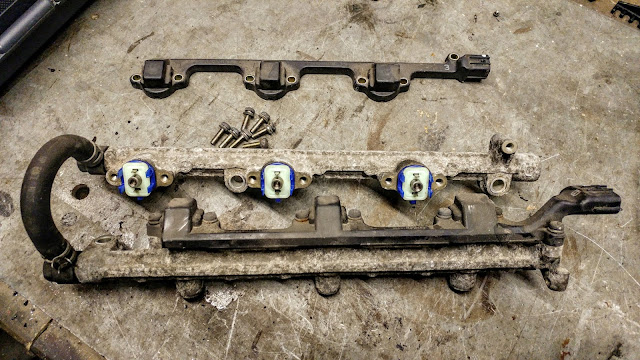
I did some work on the intake manifold, more specifically deleting off the afore mentioned VRIS. I started with removing the two vacuum chambers located on the reverse side of the manifold, with a one-way valve feeding them from a port.
There were two butterfly valves to remove, a double barrel one located behind the throttle body and a single at the opposite end of the manifold where a pipe connects internal plenum chambers.
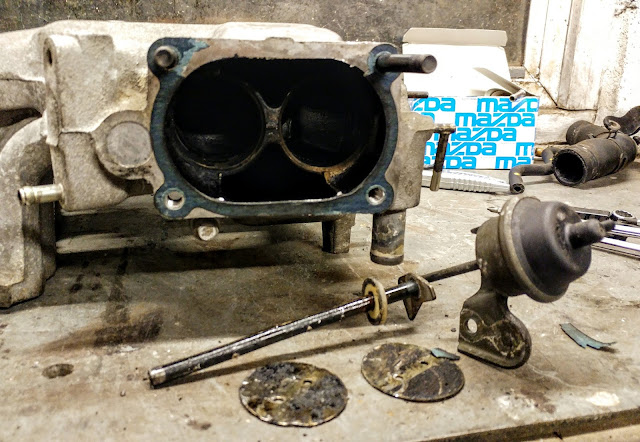

I also pulled off the fuel rails so the manifold is stripped back now. I'll be giving it a clean inside and out, the wire wheel treatment and a lick of engine paint to smarten it up. I also need to plug the holes left but the removed VRIS parts and some of the vacuum ports that I will no longer be using. I think now I will just need vacuum for the brake servo, fuel pressure regular and FMU when I install that. I will no longer have vacuum lines for both VRIS solenoids, IACV, Charcoal canister purge valve, PCV valve and EGR valve...
There were two butterfly valves to remove, a double barrel one located behind the throttle body and a single at the opposite end of the manifold where a pipe connects internal plenum chambers.
I also pulled off the fuel rails so the manifold is stripped back now. I'll be giving it a clean inside and out, the wire wheel treatment and a lick of engine paint to smarten it up. I also need to plug the holes left but the removed VRIS parts and some of the vacuum ports that I will no longer be using. I think now I will just need vacuum for the brake servo, fuel pressure regular and FMU when I install that. I will no longer have vacuum lines for both VRIS solenoids, IACV, Charcoal canister purge valve, PCV valve and EGR valve...
Thanks for the positive comment.
Just thought I'd do a minor update. I got the throttle body removed from the car, I made a start on cleaning it as there was quite a lot of grime built up inside it. With the EGR recirculating unburnt sooty exhaust gases into the intake, and the PCV valve recircutating pressurised oil vapour from the engine block as well, the two combine to create quite a bit of crud. So I will get the TB and manifold cleaned up soon. The lump on the bottom of the TB is the IACV (idle air control valve), these can fail on these engines and cause uneven idle, mine has wandered around somewhat, so I'm deleting it. The idle will then simply be set by the idle adjustment screw (at the top left of the TB above the spring assembly in the pic) more on that soon...
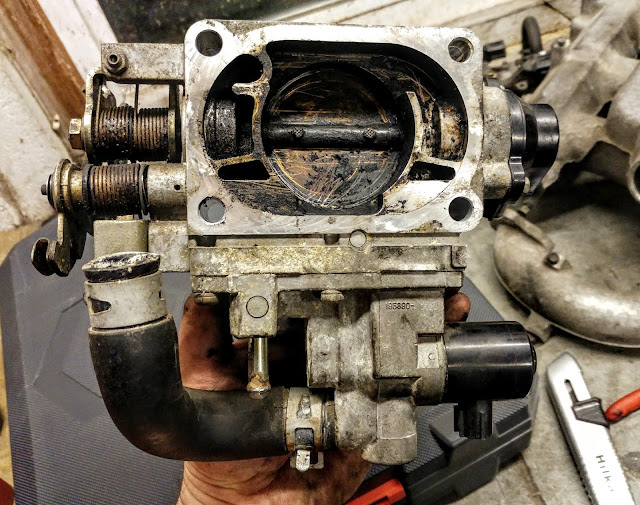
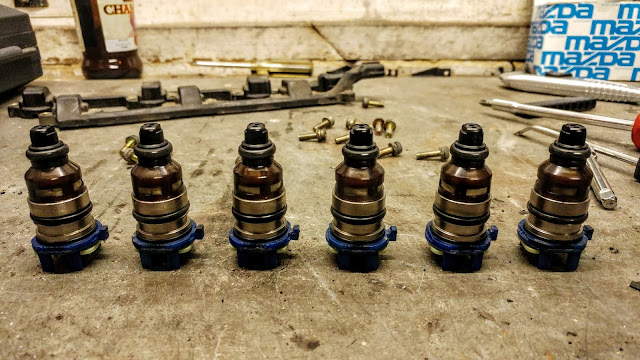
I've dismantled the fuel rails and inspected the injectors while they were off the car. I had considered sending them to be cleaned but the condition looks good and I haven't seen any symptoms to suggest one or more of the injectors are faulty and not fueling correctly, the plugs and valves look decent. So to bling things up I will paint the rails silver and rebuild them ready to go back on. I think I might swap the hose clips for jubilee clips while I'm at it, just because I prefer them and they will look new and shiny...
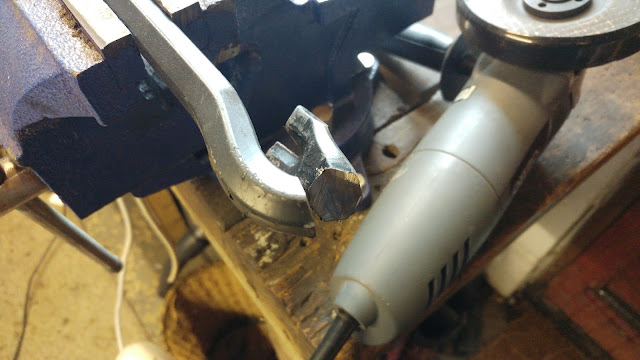
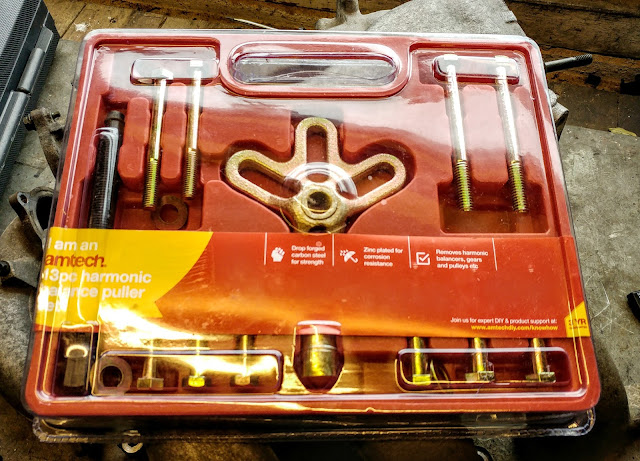
I was waiting on this pulley puller tool to arrive so that I can remove the crank pulley and progress my cambelt change. It was good ol' ebay to the rescue again, £8.05.
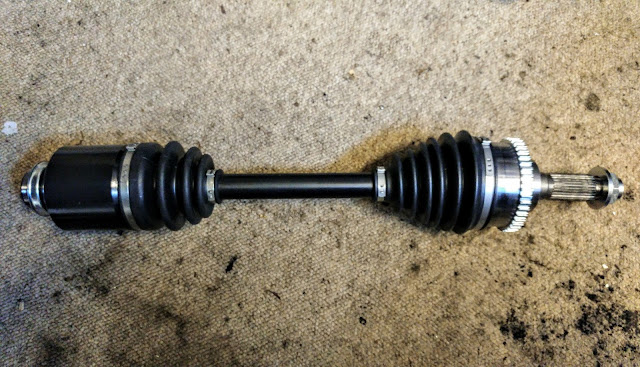
As well as the above tool, my new driveshaft has arrived too so I can now get that job done and dusted. I just want to get the hub area (where the grease came out of the CV boot) and the engine bay as clean as is practically possible before putting these bits and bobs back in the car.
Just thought I'd do a minor update. I got the throttle body removed from the car, I made a start on cleaning it as there was quite a lot of grime built up inside it. With the EGR recirculating unburnt sooty exhaust gases into the intake, and the PCV valve recircutating pressurised oil vapour from the engine block as well, the two combine to create quite a bit of crud. So I will get the TB and manifold cleaned up soon. The lump on the bottom of the TB is the IACV (idle air control valve), these can fail on these engines and cause uneven idle, mine has wandered around somewhat, so I'm deleting it. The idle will then simply be set by the idle adjustment screw (at the top left of the TB above the spring assembly in the pic) more on that soon...
I've dismantled the fuel rails and inspected the injectors while they were off the car. I had considered sending them to be cleaned but the condition looks good and I haven't seen any symptoms to suggest one or more of the injectors are faulty and not fueling correctly, the plugs and valves look decent. So to bling things up I will paint the rails silver and rebuild them ready to go back on. I think I might swap the hose clips for jubilee clips while I'm at it, just because I prefer them and they will look new and shiny...
I was waiting on this pulley puller tool to arrive so that I can remove the crank pulley and progress my cambelt change. It was good ol' ebay to the rescue again, £8.05.
As well as the above tool, my new driveshaft has arrived too so I can now get that job done and dusted. I just want to get the hub area (where the grease came out of the CV boot) and the engine bay as clean as is practically possible before putting these bits and bobs back in the car.
Edited by MX6 on Tuesday 10th April 14:14
I was pretty much thinking along those lines, cleaning/de-greasing as much as I can, wire brushing with a circular wire brush on the end of a drill, and then I fancied finishing off with some silver high-temp engine paint. I saw your 850 thread, hope that's coming along well.
I'm thinking of following this process with the fuel rails, intake manifold, throttle body, camcovers, plus there is metal part of the cooling system that sticks up at the left side of the engine. All these parts are at the top the motor and are the most visible so I'd like to get them looking smart. I decided to go for the classic go-faster red for the valve covers, that should be worth 5-10 horse power.
I've quite a lot of cleaning and de-greasing to do in the engine bay as it's filthy, not really looking forward to it! It needs to happen though, I will feel much better about the car when that is done, always more enjoyable to work on a clean car. I want to tackle it this weekend, hopefully it doesn't rain...
Cookeh said:
Funnily enough I'm looking at doing the same thing, but got some garden renovations to sort first. Not looking forward to cleaning the bay at all, the thought of water around 23 year old water-'proofing' makes me clench!
I would be using the same process though, de-grease and dress the plastics, attack the metal parts with a wire brush and maybe some autosol polish. If you dont have a dressing already I'd recommend CarPro PERL quite highly, lasts a good amount of time, can be diluted to whatever ratio you want, and leaves a nice satin or matt (depending on if you buff it off) finish that doesn't attract dirt.
I'm not sure I can be bothered with masking/removal to paint the metal parts though, don't really like the idea of paint flaking or colour fading in patches due to heat patterns...(or perhaps Im just lazy!). I feel like my valve covers need some treatment too, red will look great on yours for sure!
I've got assorted DIY projects in various stages of completion taking up some of my time so I'm sympathetic towards the renovations. I've looked into engine bay cleaning methods and I think it's good to leave the water until the end of the process. The best way to start is with a vacuum and brush to loosen up and extract what you can, then use a de-greasing spray, wipes and micro-fibre clothes to clean off what you can. When you do start spraying water it's good to insulate the top of the engine and electrical connectors with plastic bags where possible. It's quite a bit of messing about but hopefully once done will be relatively easy to stay on top of.I would be using the same process though, de-grease and dress the plastics, attack the metal parts with a wire brush and maybe some autosol polish. If you dont have a dressing already I'd recommend CarPro PERL quite highly, lasts a good amount of time, can be diluted to whatever ratio you want, and leaves a nice satin or matt (depending on if you buff it off) finish that doesn't attract dirt.
I'm not sure I can be bothered with masking/removal to paint the metal parts though, don't really like the idea of paint flaking or colour fading in patches due to heat patterns...(or perhaps Im just lazy!). I feel like my valve covers need some treatment too, red will look great on yours for sure!
Thanks for the recommendation for the plastic treatment, I will look at getting some as I've no product like that currently. I here what you are saying regarding polishing metal parts as opposed to using paint. I've done it that way in the past but I just fancied trying paint this time, especially since I've all the parts are removed from the car anyway. I've bought some high temp paint and will try prep the parts correctly and apply it well, let's see!
Edited by MX6 on Thursday 12th April 13:06
Some progress with the engine bay cleaning, it's starting to look a bit better in there now. Still some way to go and rust to treat.
I've been scrubing the removed parts with de-greaser and gave them a go with the pressure washer this morning. I think they are ready to be attacked with the wire brushes on the drill now before another and hopefully final round of cleaning.

Some new products have turned up and will see some action soon. Red engine paint for the valve covers, silver for the other bits, some RTV silicone to make the gaskets, plus some JB Weld to secure the required bungs (bolts/screws) in the intake manifold to prevent any vacuum/boost leaks.

I've been scrubing the removed parts with de-greaser and gave them a go with the pressure washer this morning. I think they are ready to be attacked with the wire brushes on the drill now before another and hopefully final round of cleaning.
Some new products have turned up and will see some action soon. Red engine paint for the valve covers, silver for the other bits, some RTV silicone to make the gaskets, plus some JB Weld to secure the required bungs (bolts/screws) in the intake manifold to prevent any vacuum/boost leaks.
Thanks. I think it's a good time to get another one, they can't be any cheaper than they are now! Most people who've owned one seem to think they are unrated cars. Very few left now just a few hundred, it would be good to see more find enthusiast owners as they are getting to that age where many will need minor restoration (like mine).
Another bit of progress, I finished cleaning and wire brushing the valve covers and got them sprayed up in the red engine paint. There was a bit of extra effort involved in doing the prep and paint but I'm quite pleased with the results given it's a cheapo DIY job. I masked off the the bits that didn't want paint and finish up with filing the paint off the lettering to leave it in nautal metal colour.
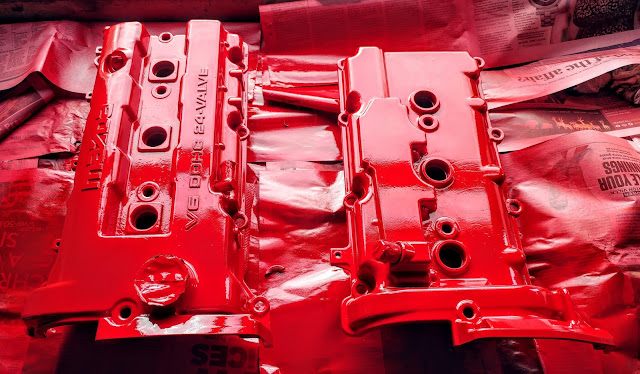
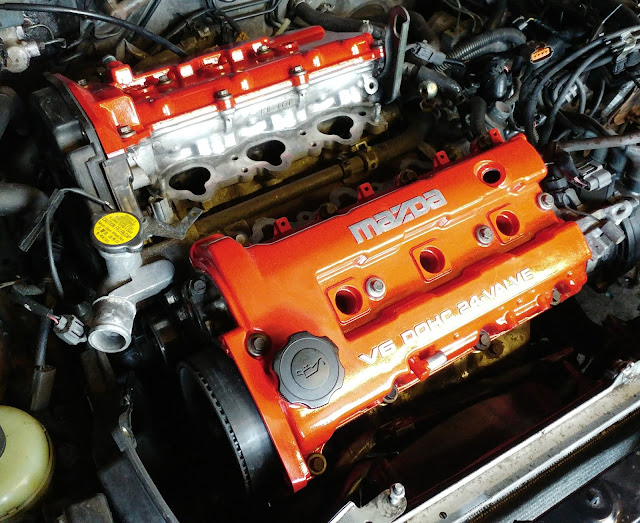
I've refitted them to the KL-DE (got sure why they are looking orange in the pic as they are bright red), using the new gaskets plus a squirt of RTV for good measure. I need to buy a new rubber grommet for the PCV valve hole in the front cover. The next will be doing the same clean up and then silver paint on the intake manifold, throttle body, fuel rail plus a couple of other items.
Another bit of progress, I finished cleaning and wire brushing the valve covers and got them sprayed up in the red engine paint. There was a bit of extra effort involved in doing the prep and paint but I'm quite pleased with the results given it's a cheapo DIY job. I masked off the the bits that didn't want paint and finish up with filing the paint off the lettering to leave it in nautal metal colour.
I've refitted them to the KL-DE (got sure why they are looking orange in the pic as they are bright red), using the new gaskets plus a squirt of RTV for good measure. I need to buy a new rubber grommet for the PCV valve hole in the front cover. The next will be doing the same clean up and then silver paint on the intake manifold, throttle body, fuel rail plus a couple of other items.
Edited by MX6 on Monday 23 April 11:12
Gassing Station | Readers' Cars | Top of Page | What's New | My Stuff