Mx5 Rocketeer V6 Conversion Project
Discussion


MikeDrop said:
I will be attacking the suspension on my Mk1 soon. After some research, I'm praying to the suspension gods that my front upper ball joints are in a n ok state as I've heard they are a massive pain (and not entirely cheap). How were yours? Did you replace them with new? If so, how did you go about that?
Sorry, only just seen your message. I didn’t change the upper ball joints as happily they seemed ok. You can buy IL Performance uppers, but as you say, it seems like a massive pain. Otherwise, new wishbones, which is a bit more coin.
Right, time for another update, even though nothing momentious has happened. Still waiting for the rear caliper to come back so its mainly little jobs I've been doing...
First of which was to flat down the clear coat on the front bumper. Sadly time and weather have meant it's still in this state, but soon it will be polished!
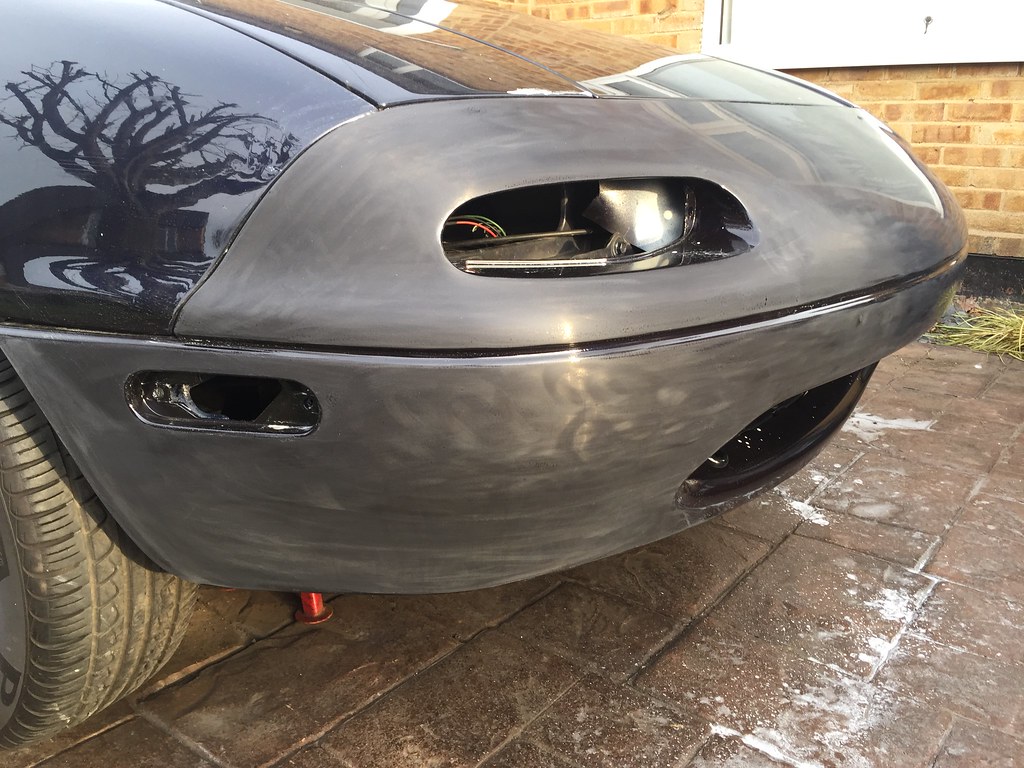 IMG_2851 by Jon Fellows, on Flickr
I've also made a front mount number plate holder. You can buy these quite cheaply, but I have some time and some sheet stainless kicking about so thought I'd make one. I suspect the bought ones have a slightly more polished finish, but it works! My downfall was that my vice-mount metal folder wasn't man enough for the steel, so I had to fall back on vice and hammer...
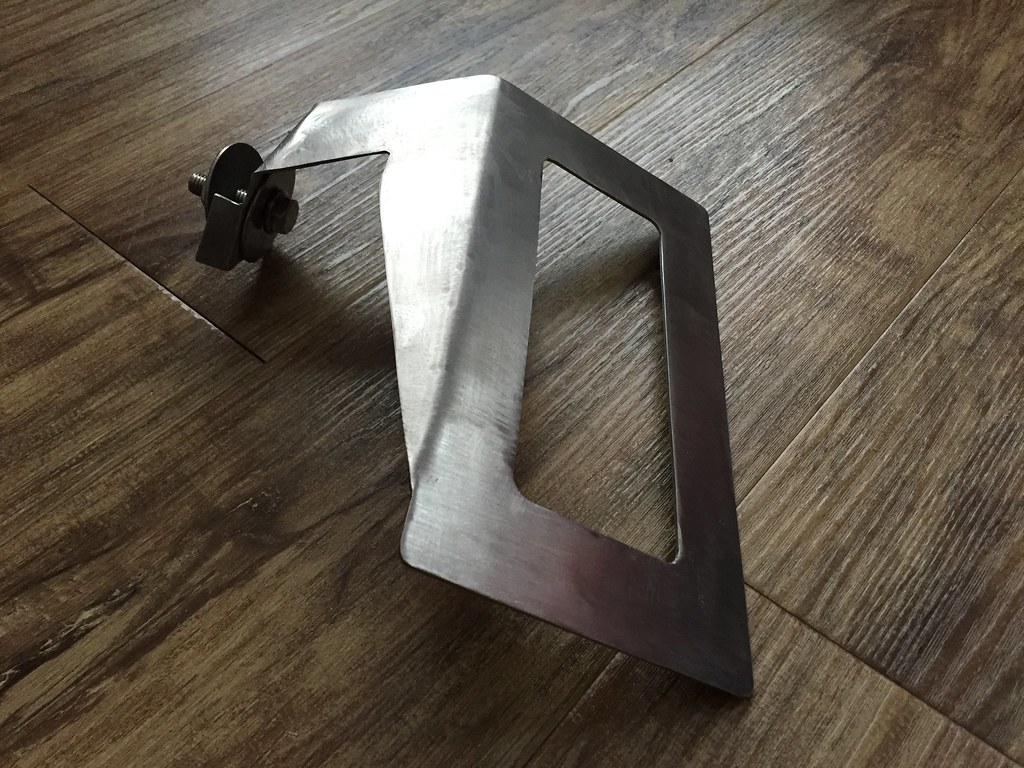 IMG_2847 by Jon Fellows, on Flickr
I've also had to respray the rear number plate plinth, as I ruined the paint trying to get some badge sticky stuff off. It did give the the opportunity to fill a couple of holes in it for locating a badge though, so not all bad.
Foolishly I didn't take many during shots, so this is just the finished article.
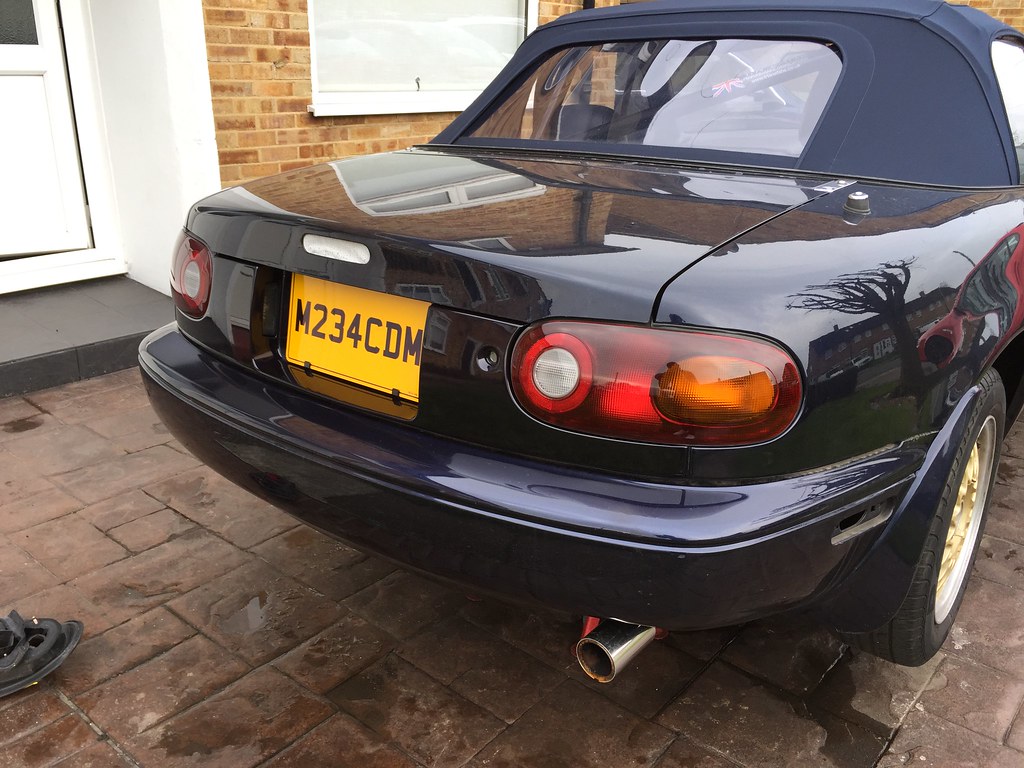 IMG_2857 by Jon Fellows, on Flickr
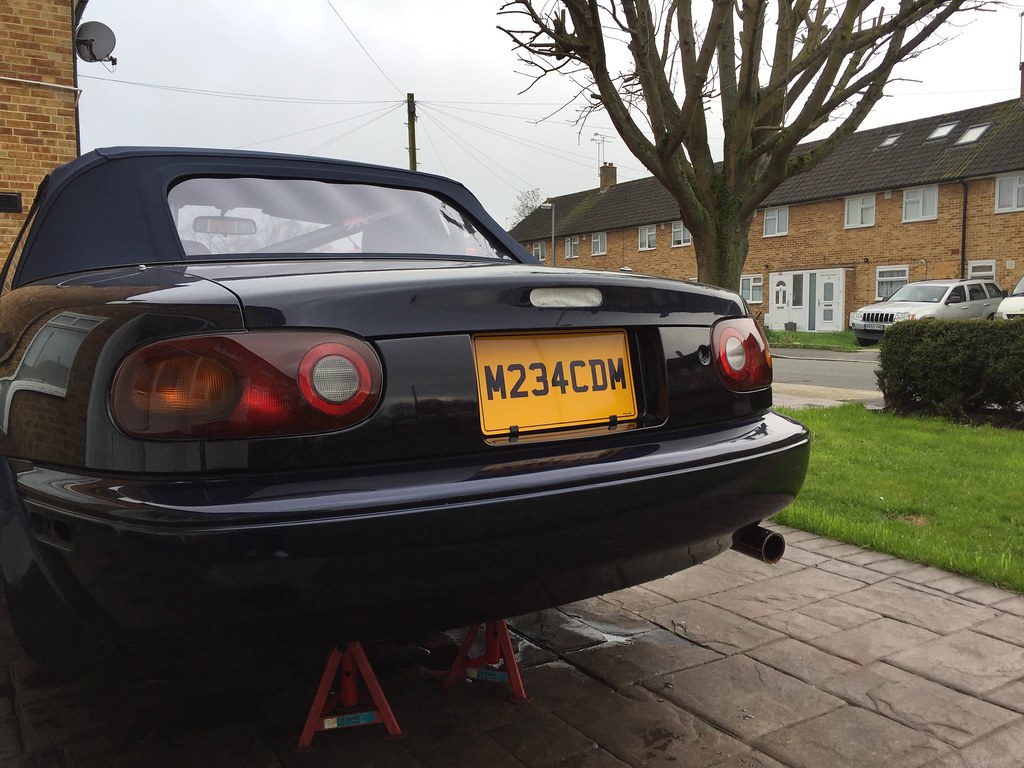 IMG_2859 by Jon Fellows, on Flickr
So that's it for now...
First of which was to flat down the clear coat on the front bumper. Sadly time and weather have meant it's still in this state, but soon it will be polished!
IMG_2851 by Jon Fellows, on FlickrI've also made a front mount number plate holder. You can buy these quite cheaply, but I have some time and some sheet stainless kicking about so thought I'd make one. I suspect the bought ones have a slightly more polished finish, but it works! My downfall was that my vice-mount metal folder wasn't man enough for the steel, so I had to fall back on vice and hammer...
IMG_2847 by Jon Fellows, on FlickrI've also had to respray the rear number plate plinth, as I ruined the paint trying to get some badge sticky stuff off. It did give the the opportunity to fill a couple of holes in it for locating a badge though, so not all bad.
Foolishly I didn't take many during shots, so this is just the finished article.
IMG_2857 by Jon Fellows, on FlickrIMG_2859 by Jon Fellows, on FlickrSo that's it for now...
ECG1000 said:
Nice work! Keep them updates coming.
I like your new wheels but also realy like your old wheels too. Are you keeping them both.
Do you think this will be done in time for early summer?
Cheers, that’s good of you to say.I like your new wheels but also realy like your old wheels too. Are you keeping them both.
Do you think this will be done in time for early summer?
Wheel-wise, the old ones don’t feature very much in my plans I confess. The tyres are properly knackered, and I’m not buying new ones for it. I don’t know whether to keep them as they’re original, but given how much I’m changing, probably not worth it...!
I’m planning on having it driveable in May. I hope. But that’s without the engine swap. Just pure Mazda!
Escy said:
When are you planning on starting the engine swap?
I’m not quite sure. The kit should be being delivered end of the month(ish). But I want to drive it as is for a while and troubleshoot any issues I might have as a result of the refurbishment I’ve just done before starting the engine work. But in answer to your question, I’m thinking maybe late summer. But much depends on how it runs/remedial work it needs (hopefully not much), and how much I enjoy driving it in the sun as standard. Because I’m sure we’ll definitely have loads of sun this summer...!
Edited by Lewis's Friend on Friday 13th April 09:10
I managed to get a bit more done this weekend as the weather was propitious. So I gave the car a good polish.
That may well seem as though I'm putting the cart before the horse somewhat, given that the car can't brake itself yet. But while I'm waiting for the refurbished caliper to come back, I would give it a bit of a tart up. Partly I just want it looking nice, but I also want to go down the agreed valuation insurance route, and taking photos of it under 5 months of crud seemed a bad idea!
So I gave it a bit of a polish up. Mid polish of the flatted front bumper:
 IMG_2862 by Jon Fellows, on Flickr
And with light & reflectors fitted:
 IMG_2863 by Jon Fellows, on Flickr
And some of the rest of the car being dealt with:
 IMG_2865 by Jon Fellows, on Flickr
 IMG_2866 by Jon Fellows, on Flickr
 IMG_2867 by Jon Fellows, on Flickr
Reflections in the paint and everything! That was definitely not possible to see before...
 IMG_2868 by Jon Fellows, on Flickr
Once it was all polished and waxed, I fitted the remaining lights and reflectors, so it's almost a whole car. This picture does show (in my opinion at least), that orange lights and gold wheels is not a harmonious look. Can't wait to fit the new wheels now...
 IMG_2874 by Jon Fellows, on Flickr
I'm finally gettting there. Just need the brakes and a suspension setup, and I should be able to actually drive it!
That may well seem as though I'm putting the cart before the horse somewhat, given that the car can't brake itself yet. But while I'm waiting for the refurbished caliper to come back, I would give it a bit of a tart up. Partly I just want it looking nice, but I also want to go down the agreed valuation insurance route, and taking photos of it under 5 months of crud seemed a bad idea!
So I gave it a bit of a polish up. Mid polish of the flatted front bumper:
IMG_2862 by Jon Fellows, on FlickrAnd with light & reflectors fitted:
IMG_2863 by Jon Fellows, on FlickrAnd some of the rest of the car being dealt with:
IMG_2865 by Jon Fellows, on FlickrIMG_2866 by Jon Fellows, on FlickrIMG_2867 by Jon Fellows, on FlickrReflections in the paint and everything! That was definitely not possible to see before...
IMG_2868 by Jon Fellows, on FlickrOnce it was all polished and waxed, I fitted the remaining lights and reflectors, so it's almost a whole car. This picture does show (in my opinion at least), that orange lights and gold wheels is not a harmonious look. Can't wait to fit the new wheels now...
IMG_2874 by Jon Fellows, on FlickrI'm finally gettting there. Just need the brakes and a suspension setup, and I should be able to actually drive it!
ECG1000 said:
Fair enough, but just saying.....

I know the ride height is a bit "stance/scene/ill" or whatever the word for it is these days, but you get the idea.
This warm weather must be making you itch to get it on the ground and out for a blast.
I do quite like that, but I have to say the gold and blue look on mine wasn't thrilling me - hence the change...I know the ride height is a bit "stance/scene/ill" or whatever the word for it is these days, but you get the idea.
This warm weather must be making you itch to get it on the ground and out for a blast.
More progress has been made, and I'm close to actually getting to drive the car. This is very exciting, as I've only driven it the once, straight down the A1 (which is not its forte), and then in quite a circumspect manner as i wasn't too sure of it - later proved to be a wise decision looking at the state of the tyres and suspension setup it came with! However, I digress...
First job was to fit a Jap Style RS look front splitter. I had heard mixed reports of these, but given that brand new it was £80 delivered against almost £200 for the (admittedly better quality if internet reviews are to be believed) ML Performance item, I thought I'd give it a go. I was pleasantly surprised how well it went on after a little fettling.
I started from the outside, made sure I was happy there, and then worked in.
 Image-1 by Jon Fellows, on Flickr
Mole grips used for temporary fitting
 Image-3 by Jon Fellows, on Flickr
And fitted
 Image-4 by Jon Fellows, on Flickr
I was pleased how it went on, and how it looks, so thats a win!
I finally got my brake back too, so was able to fit that and with the help of my brother, get it bled. With that, I was able to fit the wheels and drop the car to the ground - a very pleasing moment! I was also pleased with the way it looks, which is a relief after all the work and planning, so I'm happy at the moment...!
So a few pictures...
 IMG_2886 by Jon Fellows, on Flickr
 Image-1a by Jon Fellows, on Flickr
 Image-4a by Jon Fellows, on Flickr
 Image-1b by Jon Fellows, on Flickr
 Image-1c by Jon Fellows, on Flickr
First job was to fit a Jap Style RS look front splitter. I had heard mixed reports of these, but given that brand new it was £80 delivered against almost £200 for the (admittedly better quality if internet reviews are to be believed) ML Performance item, I thought I'd give it a go. I was pleasantly surprised how well it went on after a little fettling.
I started from the outside, made sure I was happy there, and then worked in.
Image-1 by Jon Fellows, on FlickrMole grips used for temporary fitting
Image-3 by Jon Fellows, on FlickrAnd fitted
Image-4 by Jon Fellows, on FlickrI was pleased how it went on, and how it looks, so thats a win!
I finally got my brake back too, so was able to fit that and with the help of my brother, get it bled. With that, I was able to fit the wheels and drop the car to the ground - a very pleasing moment! I was also pleased with the way it looks, which is a relief after all the work and planning, so I'm happy at the moment...!
So a few pictures...
IMG_2886 by Jon Fellows, on FlickrImage-1a by Jon Fellows, on FlickrImage-4a by Jon Fellows, on FlickrImage-1b by Jon Fellows, on FlickrImage-1c by Jon Fellows, on FlickrThanks for all the positive comments - they're much appreciated.
You may have noticed in the photos, those of you with an eagle-eye anyway, that the center caps are missing from the rear wheels. This is because the drive shafts stick through just too much to allow the caps to sit in the holes properly...
I've therefore hole-sawed the caps out which will just allow the center caps to locate properly and clear the drive shaft ends. The metal sticker that goes in the middle of the cap will then hide the hole, and no one will be any the wiser - sadly I have to try and order two new stickers as I destroyed the original ones trying to get them off before drilling...
Such are the problems I face!
There haven't been many updates of late. This is partly because I've almost got the car back on the road, but need an alarm fitted for insurance purposes and the nearest date I can get one fitted it 18th May, and partly because of general busyness. So until then, I'm left at a bit of a loose end.
I've therefore decided to address the most important aspect of any small sports car. Speakers!
I quite like my music, but equally I realise an MX5 is not really the perfect soundstage... However, I have some rather pricey Focal component speakers to try and make fit (left over from a few years previously - I confess I would probably not buy these now), so I thought I'd get them in there by hook or by crook. I also have an alpine headunit to go in, and a cheap Vibe amp. The amp lets the show down a little, but will do for now.
So I started pulling the interior apart, and added a little sound deadening in the doors:
 Pic2 by Jon Fellows, on Flickr
 Pic1 by Jon Fellows, on Flickr
Doors suitably sound deadened - there is absolutely none in there from the factory!
 Pic4 by Jon Fellows, on Flickr
I also hid an aux in and USB input on the armrest:
 Pic3 by Jon Fellows, on Flickr
Perhaps more interestingly, I finally unwrapped my Jag V6 and put it on an engine stand with the help of a buddy. I'm quite excited to start cracking on with this now. But first comes getting the car back on the road. Then engine shenanigans!
 Pic5 by Jon Fellows, on Flickr
 Pic7 by Jon Fellows, on Flickr
And a close up of some crustiness I need to deal with and generally make the engine beautiful (and hopefully functional) again. At this early stage though, it seems pretty good - I'm quite pleased with it so far:
 Pic6 by Jon Fellows, on Flickr
So that's where it is for now. I'm hoping the kit will be arriving in the not-too-distant future. I believe they are waiting for the last few bits to be delivered before they are shipped, so I'm looking forward to that.
I've therefore decided to address the most important aspect of any small sports car. Speakers!
I quite like my music, but equally I realise an MX5 is not really the perfect soundstage... However, I have some rather pricey Focal component speakers to try and make fit (left over from a few years previously - I confess I would probably not buy these now), so I thought I'd get them in there by hook or by crook. I also have an alpine headunit to go in, and a cheap Vibe amp. The amp lets the show down a little, but will do for now.
So I started pulling the interior apart, and added a little sound deadening in the doors:
Pic2 by Jon Fellows, on FlickrPic1 by Jon Fellows, on FlickrDoors suitably sound deadened - there is absolutely none in there from the factory!
Pic4 by Jon Fellows, on FlickrI also hid an aux in and USB input on the armrest:
Pic3 by Jon Fellows, on FlickrPerhaps more interestingly, I finally unwrapped my Jag V6 and put it on an engine stand with the help of a buddy. I'm quite excited to start cracking on with this now. But first comes getting the car back on the road. Then engine shenanigans!
Pic5 by Jon Fellows, on FlickrPic7 by Jon Fellows, on FlickrAnd a close up of some crustiness I need to deal with and generally make the engine beautiful (and hopefully functional) again. At this early stage though, it seems pretty good - I'm quite pleased with it so far:
Pic6 by Jon Fellows, on FlickrSo that's where it is for now. I'm hoping the kit will be arriving in the not-too-distant future. I believe they are waiting for the last few bits to be delivered before they are shipped, so I'm looking forward to that.
Chimune said:
Hard to see from pix but is it the checkered silver stuff visible through the speaker hole?
The tinny sound of the door closing bugs me a small amount....:-)
That’s the stuff. You don’t need loads of it (ie, no need to plaster it on every surface). It does make it sound more solid, plus helps with sound quality from the speakers as it helps damp vibrations through the panels. Although how much of an improvement in sound you’ll notice in an Mx5 is debatable...!The tinny sound of the door closing bugs me a small amount....:-)
GravelBen said:
Great project and coming along well. 
I looked into a Mazda KLZE V6 conversion when I had a Mk1 before deciding it would be far more time and effort than I was prepared to put in, and bought another Mk1 with a 250bhp turbo conversion already done instead.
I still love the idea though, I'd probably start with a Mk2.5 because I prefer that shape.
I have to say, as standard the mk1 MX5s don't do a lot for me. But I do like them a little lower, with a cleaned up front end and slightly wider wheels. Then suddenly they're (to my eyes at least) transformed.I looked into a Mazda KLZE V6 conversion when I had a Mk1 before deciding it would be far more time and effort than I was prepared to put in, and bought another Mk1 with a 250bhp turbo conversion already done instead.
I still love the idea though, I'd probably start with a Mk2.5 because I prefer that shape.
jumare said:
A really great project even without the engine change, there have been some great write ups on the conversion.
A couple of questions though, why the big number-plates I want to go as small as possible with mine. On the wheels, personally I prefer the cross spokes with the new wheels the multi-hole fitment would put me off. I'll be fitting clear bumper reflectors with lights in mine, at some point, and maybe deleting the side repeaters.
The plain front bumper looks great.
Looking forward to seeing this progress.
Cheers for the kind comment.A couple of questions though, why the big number-plates I want to go as small as possible with mine. On the wheels, personally I prefer the cross spokes with the new wheels the multi-hole fitment would put me off. I'll be fitting clear bumper reflectors with lights in mine, at some point, and maybe deleting the side repeaters.
The plain front bumper looks great.
Looking forward to seeing this progress.
The rear plate is just the same size as came off of it - it just fills the appature, so I left it as that size. The front, I know people do go for smaller plates, but I haven't as
a) I think plates can be too small on cars (I think the half-way house between a normal plate and no plate can look a bit odd - all in my opinion of course)
b) I'm trying to minimise the chance of being pulled over!
c) I don't mind how it looks now really. Given how little the car is, you're always looking down at it. Probably my pictures from a low angle have given a false perspective and made the plate dominate its face.
The wheels I didn't love, and were too small and I didn't like the fitment, so they had to go. I did think about clear reflectors etc but then decided to have a blue and orange theme (which sounds hideous when said like that!) so just kept them. I even changed the rear red ones to orange, thus losing precious JDM points!
A small update, and not very good in terms of pretty pictures. But important nevertheless! I finally drove the car...
I didn't drive very far, and I must say it was terrifying as the wheel alignment was so bad! So I limped it to get a Cobra alarm and immobiliser fitted, then took it straight to get a 4 wheel alignment carried out.
Out in the wild...
 1 by Jon Fellows, on Flickr
Not surprisingly, all the suspension geo was well out so took a while to adjust it all. Though not rusty bolts etc must have helped (I like to think so anyway).
The evidence of what putting all the camber bolts to dead centre does to your suspension...!
 2 by Jon Fellows, on Flickr
Sadly, I then just drove it home and left it there as the rear wheels are rubbing slightly on the arch lip under compression and I didn't fancy driving around like that. So a mild wheel arch role is required. The tool has been ordered.
That's the only show stopper, although some other points to be addressed as time goes on are (in no real order):
- New seat that holds one in place, and sits lower (probably requiring the removal of seat runners).
- Gear shifter rebuild, and possibly look at clutch master/slave cylinder as 1st and 2nd aren't great.
- Speedo under reads. I suspect the gauge face is in MPH and the needle in KPH!
I didn't drive very far, and I must say it was terrifying as the wheel alignment was so bad! So I limped it to get a Cobra alarm and immobiliser fitted, then took it straight to get a 4 wheel alignment carried out.
Out in the wild...
1 by Jon Fellows, on FlickrNot surprisingly, all the suspension geo was well out so took a while to adjust it all. Though not rusty bolts etc must have helped (I like to think so anyway).
The evidence of what putting all the camber bolts to dead centre does to your suspension...!
2 by Jon Fellows, on FlickrSadly, I then just drove it home and left it there as the rear wheels are rubbing slightly on the arch lip under compression and I didn't fancy driving around like that. So a mild wheel arch role is required. The tool has been ordered.
That's the only show stopper, although some other points to be addressed as time goes on are (in no real order):
- New seat that holds one in place, and sits lower (probably requiring the removal of seat runners).
- Gear shifter rebuild, and possibly look at clutch master/slave cylinder as 1st and 2nd aren't great.
- Speedo under reads. I suspect the gauge face is in MPH and the needle in KPH!
GravelBen said:
I used to run a lot more negative camber than that on my MX5s, IIRC it was -1.2 F / -1.5 R for a sharper than standard but stable and predictable road setup. Just a suggestion for next time you get an alignment (or get an MX5 specialist to set it up to their recommendation instead of factory spec).
That's a good suggestion. To be honest, I just took it to the nearest place as it was dangerous to drive...! (or get an MX5 specialist to set it up to their recommendation instead of factory spec).I think they just took it to standard settings, but that is fine for now. I can actually drive it! When the engine conversion is done, this will mess the front setup again anyway, so when I address that I hope to get a more focussed setup done.
Yesterday I decided to roll my rear wheel arches, as the drivers side was rubbing slightly under compression. This went OK....
I read about how to do it, and bought an eBay special tool (£28 - not too bad really). However, it only just fitted in the arch at all. My visions of perfectly aligning the roller to gently fold back the lip went out the window quite quickly. So with a little trepidation I started putting a little pressure on the arch lip and waited for disaster! It actually went OK in terms of rolling the lip back. However, the paint on the lip fell straight off... You are supposed to warm the paint with a hot air gun to stop this, which I tried. It did not help! That said, (and while poor technique could well be to blame) The paint was a bit flakey and there was evidence of water getting in there, so dealing with it is probably no bad thing.
So, the wheel arch mid role.
 IMG_20180526_094533_resized_20180527_021755661 by Jon Fellows, on Flickr
The drivers side was a lot tougher strangely. There appeared to be a couple of factory (looking anyway) spot welds on the lip that did not want to rolled at all. Totally confused as to why one side was different to the other, given it didn't look like a repair job, but hey! I got there.
I then had to sand back all the dodgy paint, kurust, prime, paint and lacquer. Then underseal the inner sides again for safety. It looks OK, and frankly you'll never see it unlss you stick your head in the wheel arch, but one day I'd like all of these minor body things addressed with a respray. Maybe one day...!
Mid paint:
 IMG_20180526_142249_resized_20180527_021757197 by Jon Fellows, on Flickr
The good news with all this is there is now no rubbing, so it was all worth it!
I read about how to do it, and bought an eBay special tool (£28 - not too bad really). However, it only just fitted in the arch at all. My visions of perfectly aligning the roller to gently fold back the lip went out the window quite quickly. So with a little trepidation I started putting a little pressure on the arch lip and waited for disaster! It actually went OK in terms of rolling the lip back. However, the paint on the lip fell straight off... You are supposed to warm the paint with a hot air gun to stop this, which I tried. It did not help! That said, (and while poor technique could well be to blame) The paint was a bit flakey and there was evidence of water getting in there, so dealing with it is probably no bad thing.
So, the wheel arch mid role.
IMG_20180526_094533_resized_20180527_021755661 by Jon Fellows, on FlickrThe drivers side was a lot tougher strangely. There appeared to be a couple of factory (looking anyway) spot welds on the lip that did not want to rolled at all. Totally confused as to why one side was different to the other, given it didn't look like a repair job, but hey! I got there.
I then had to sand back all the dodgy paint, kurust, prime, paint and lacquer. Then underseal the inner sides again for safety. It looks OK, and frankly you'll never see it unlss you stick your head in the wheel arch, but one day I'd like all of these minor body things addressed with a respray. Maybe one day...!
Mid paint:
IMG_20180526_142249_resized_20180527_021757197 by Jon Fellows, on FlickrThe good news with all this is there is now no rubbing, so it was all worth it!

So I've been carrying on with driving around and trying to put some miles on the car. I initially was not a fan of the steering feel, which was a surprise, but having dropped the tire pressures from Kwik Fit pressures (who didn't know what car the wheels were for) to 25psi it feels a lot better. Though I think a proper geo setup will help too further down the line.
I have also been carrying on with fitting the sound system. This has been, without doubt, the most difficult thing I have done on the car so far! It fought me every step of the way.
Firstly the mid range speakers wouldn't fit, despite being the normal size for the car. I finally got them in after some struggle, only to find the crossovers couldn't really go in the doors without getting wet. So inboard they came, and I had to find hidey-holes for them under the dash. Then the tweeters would not fit as they were far deeper then the factory ones. So I had to make up some MDF spacers and try to make them look like they weren't MDF! I finally got there, but what should have been a simple job took days!
Not in many ways a very interesting update, but it took so long I feel the need to share the steps...
Mid range speaker finally fitted and wired in.
 IMG_20180602_093927 by Jon Fellows, on Flickr
Tweeter spacers made - these were ordered from a very helpful website for a reasonable price I thought. £10 delivered for 4, made to my design. I then had to profile the back of the spacers to match the curve of the door card.
 IMG_20180602_134253 by Jon Fellows, on Flickr
 IMG_20180602_134305 by Jon Fellows, on Flickr
I then trial fitted it all, and everything worked. Relief. But then is the challenge of making it look like it isn't made of MDF... So 4 coats of MDF primer, then lots of filler primer, with suitable sanding in between.
 IMG_20180605_175140 by Jon Fellows, on Flickr
Painted, 2K lacquered and installed.
 IMG_20180606_192521 by Jon Fellows, on Flickr
 IMG_20180606_192541 by Jon Fellows, on Flickr
 IMG_20180606_192505 by Jon Fellows, on Flickr
So that's it for now. I just have to actually setup the sound, and at some point upgrade the amp to one that can actually drive the speakers properly!
I have also been carrying on with fitting the sound system. This has been, without doubt, the most difficult thing I have done on the car so far! It fought me every step of the way.
Firstly the mid range speakers wouldn't fit, despite being the normal size for the car. I finally got them in after some struggle, only to find the crossovers couldn't really go in the doors without getting wet. So inboard they came, and I had to find hidey-holes for them under the dash. Then the tweeters would not fit as they were far deeper then the factory ones. So I had to make up some MDF spacers and try to make them look like they weren't MDF! I finally got there, but what should have been a simple job took days!
Not in many ways a very interesting update, but it took so long I feel the need to share the steps...
Mid range speaker finally fitted and wired in.
IMG_20180602_093927 by Jon Fellows, on FlickrTweeter spacers made - these were ordered from a very helpful website for a reasonable price I thought. £10 delivered for 4, made to my design. I then had to profile the back of the spacers to match the curve of the door card.
IMG_20180602_134253 by Jon Fellows, on FlickrIMG_20180602_134305 by Jon Fellows, on FlickrI then trial fitted it all, and everything worked. Relief. But then is the challenge of making it look like it isn't made of MDF... So 4 coats of MDF primer, then lots of filler primer, with suitable sanding in between.
IMG_20180605_175140 by Jon Fellows, on FlickrPainted, 2K lacquered and installed.
IMG_20180606_192521 by Jon Fellows, on FlickrIMG_20180606_192541 by Jon Fellows, on FlickrIMG_20180606_192505 by Jon Fellows, on FlickrSo that's it for now. I just have to actually setup the sound, and at some point upgrade the amp to one that can actually drive the speakers properly!
Gassing Station | Readers' Cars | Top of Page | What's New | My Stuff