500+bhp Mk3 Fiesta Project
Discussion


Andy - Thank you. I will now make Gearbox oil cooling part of the final spec 
Mouse - Thanks, nice 500!
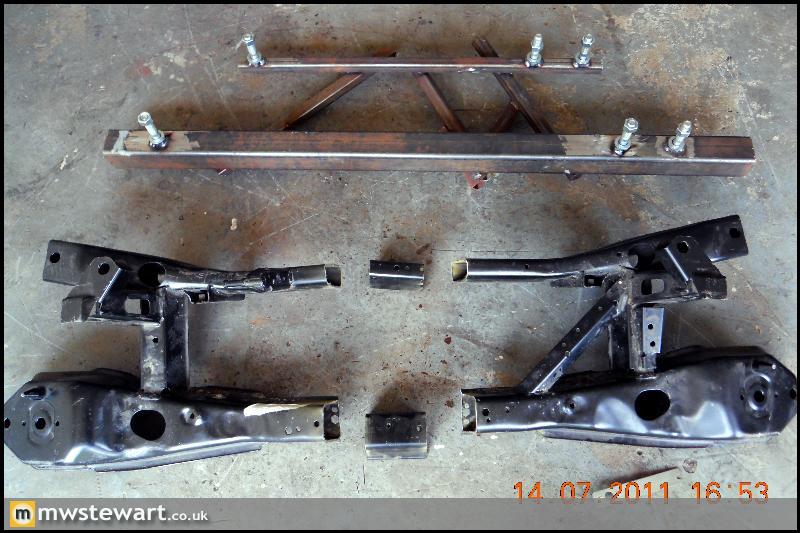
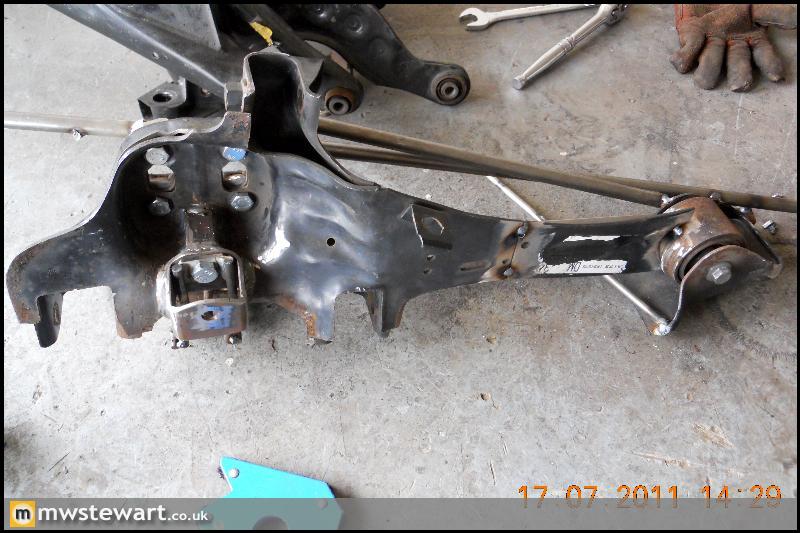
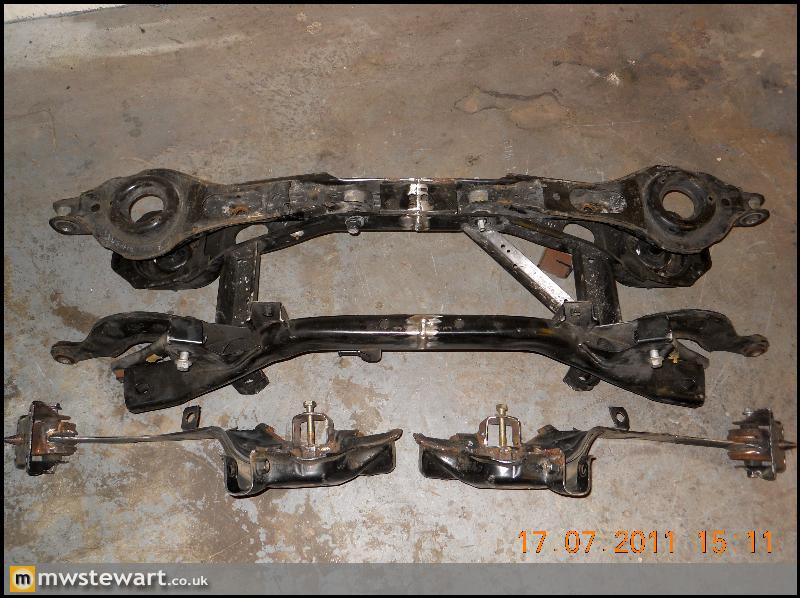
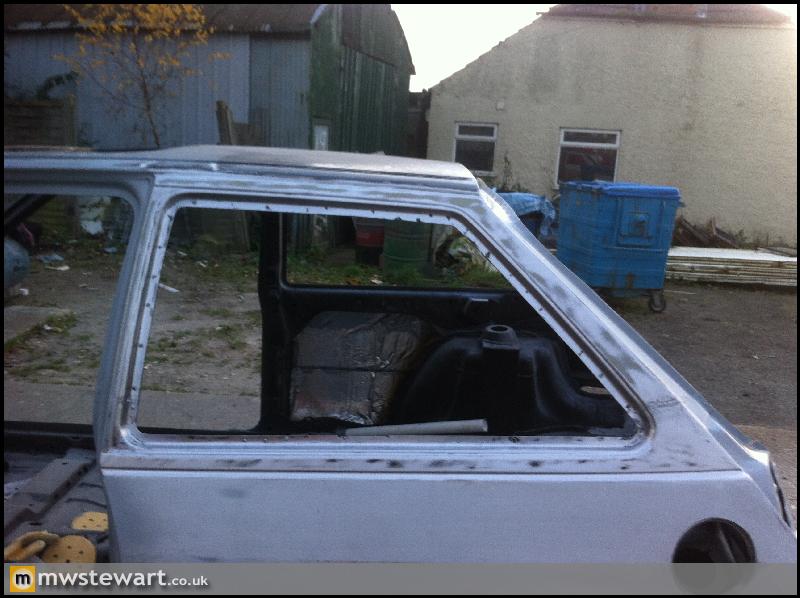
Independent rear suspension, Part 1 – Modification of Focus components
My own requirements were that the Fiesta McPherson struts would remain as would the forward mounting points for a Fiesta rear beam, this way I would not be forced to mix and match suspension and as contingency I could bolt up a Fiesta beam should I ever need to. I started by gathering data for the key dimensions of Fiesta and Focus rear suspension so measurements such as distance between trailing arms, strut mounting points, chassis legs, subframe mounts etc. Based on this data I decided that the best way forward would be to modify the Focus suspension to provide standard Fiesta track width, and to achieve this Focus subframe and knuckle/trailing arm assemblies would be modified to suit the Fiesta struts and forward beam mounts.
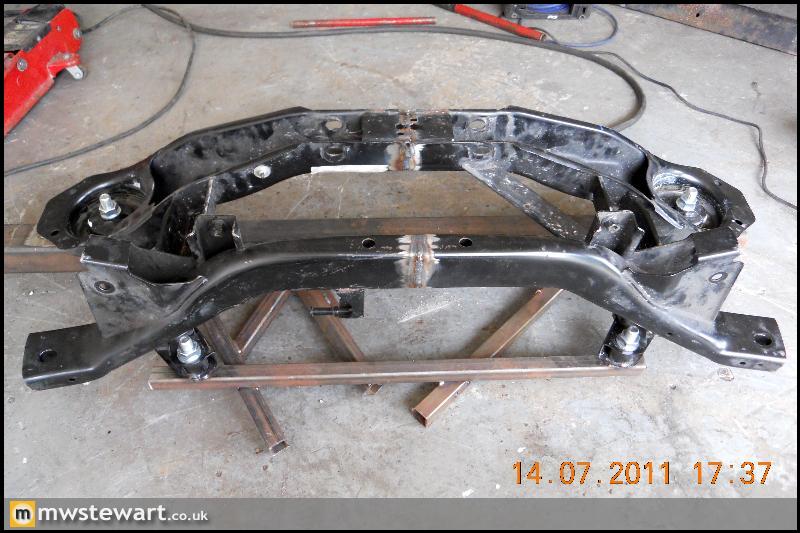
The first step was to create a jig based on the standard Focus subframe. At this stage I marked on two pieces of steel the position of standard Focus mounting points and also new mounting points at a reduced width which would produce standard Fiesta rear track. I fixed bolts to the Steel and bolted it to the unmodified Focus beam to begin fabrication of the jig, this way I ensured that everything was perfectly parallel. Once that was done I welded on bolts in the shortened position and sectioned the beam to suit.
Jig #1 did its job well: here's the shortened subframe welded together but still attached to the jig.
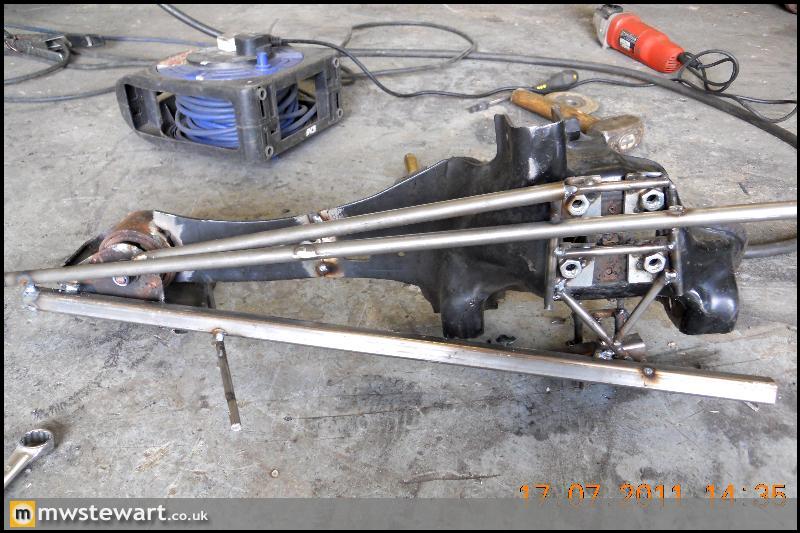
Next up I went back to the Fiesta beam to make a jig that would help me modify the Focus trailing arms, and my life here was made easier by the fact I'd previously upgraded to a Puma/Mk5 Fiesta beam which actually shares the same hub mounting bolt pattern as the Focus; this allowed me to make a jig to provide the Fiesta lower strut mount and forward beam mount based on the common hub mounting face/bolt pattern. The alternative would be to make a jig based on wheel bolt flange and centreline, which would have taken longer.
Here's the horrific looking but sturdy and accurate jig # 2 in action
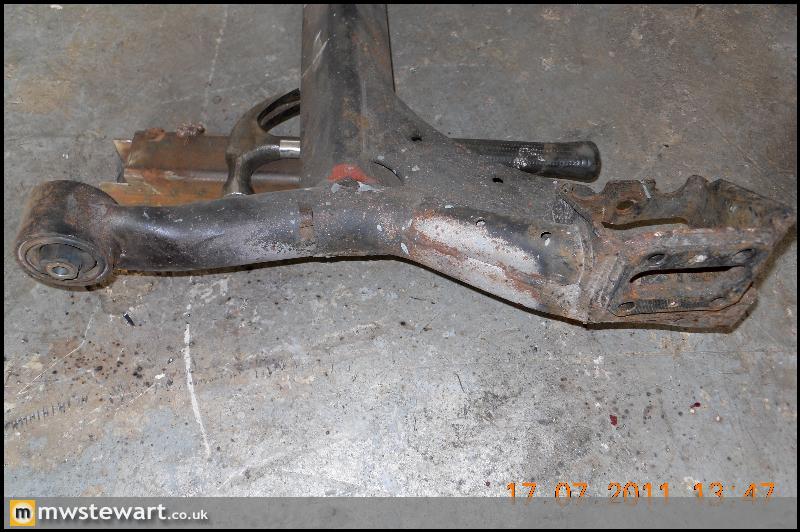
The second jig enabled me to fabricate the Fiesta lower strut mounts, shorten the Focus trailing arms, and change the angle of the trailing arms to suit the position of the Fiesta forward beam mount. I decided at this point to sacrifice the Fiesta beam for its front mounts/bushes to incorporate into the Focus arms, and in doing so replaced the trailing arm Focus bushes which are a weak point.
Top: Standard Focus, Bottom: Modified
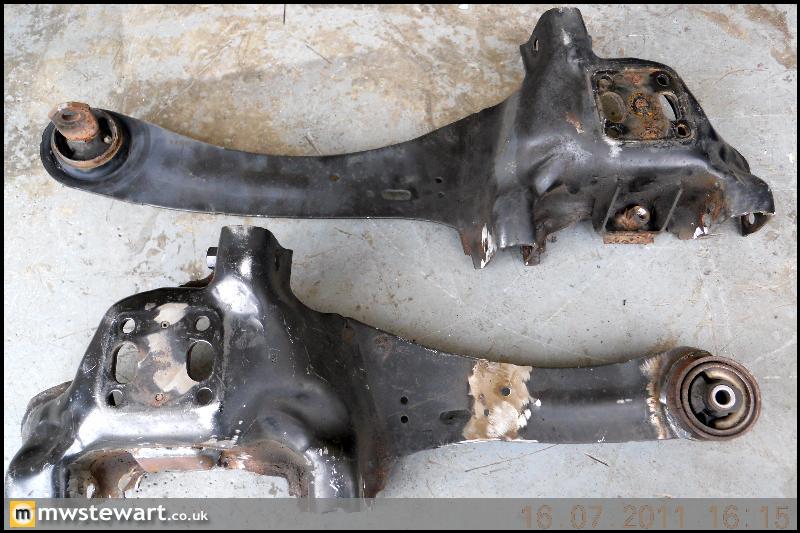
This image shows the shortened trailing arm, the difference between Focus and Fiesta lower suspension mounts, and the reinforcing I made around the new lower mount. I was conscious here that the majority of load on the Focus system would have been taken by the lower arm that houses the spring, so as I was mounting a McPherson strut assembly in place of a damper, I made sure that the shock mount was of far sturdier construction than the original.
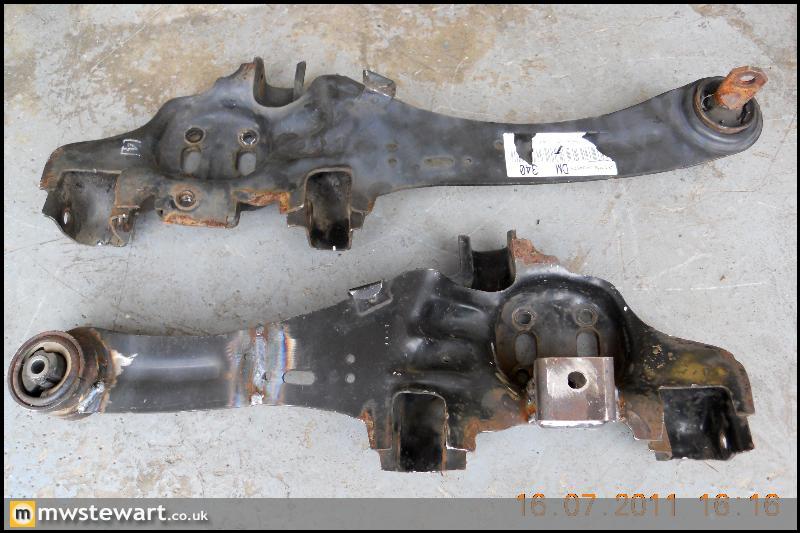
Subframe etc. completed.
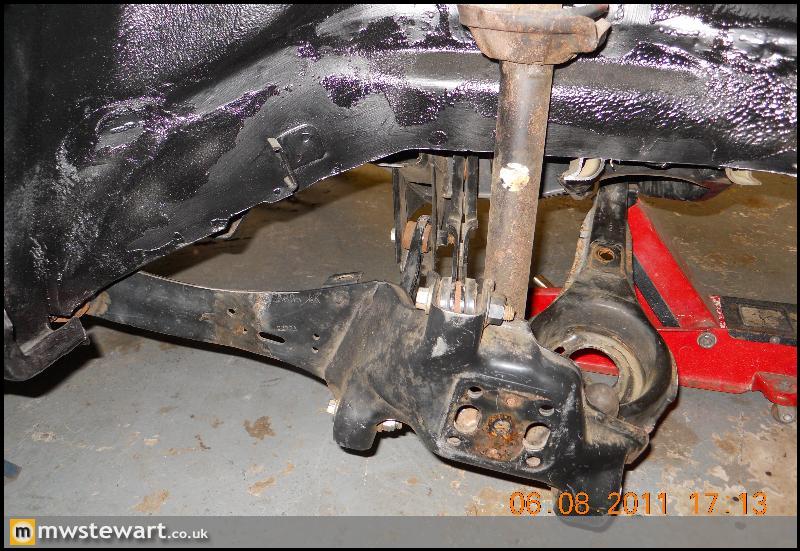
Modified knuckle/trailing arm mounted to the Fiesta.
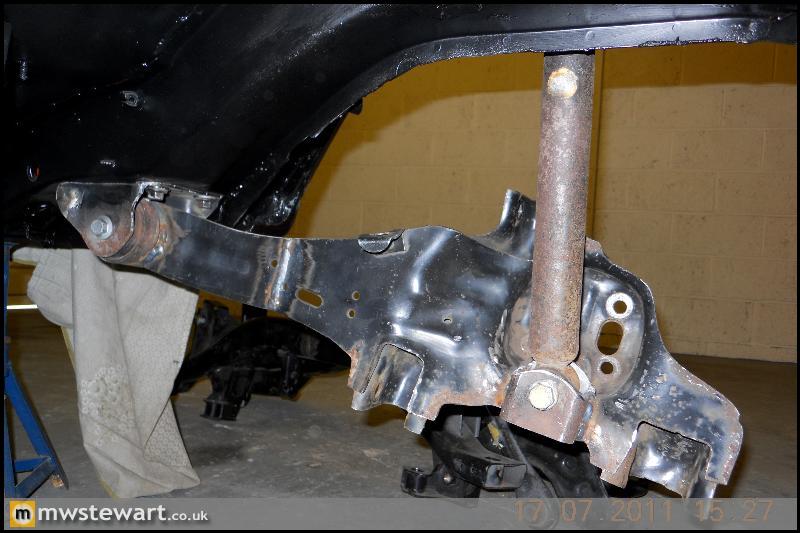
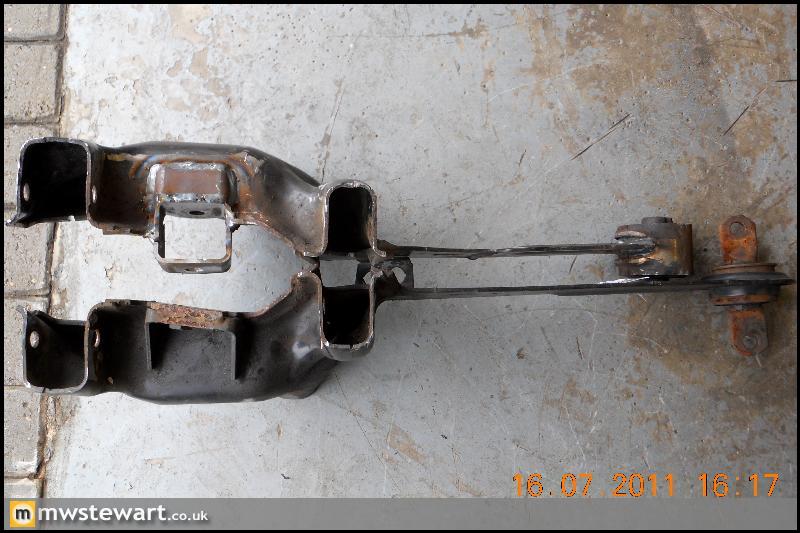
The next stage is to modify the Fiesta chassis to mount the subframe.
Mouse - Thanks, nice 500!
Independent rear suspension, Part 1 – Modification of Focus components
My own requirements were that the Fiesta McPherson struts would remain as would the forward mounting points for a Fiesta rear beam, this way I would not be forced to mix and match suspension and as contingency I could bolt up a Fiesta beam should I ever need to. I started by gathering data for the key dimensions of Fiesta and Focus rear suspension so measurements such as distance between trailing arms, strut mounting points, chassis legs, subframe mounts etc. Based on this data I decided that the best way forward would be to modify the Focus suspension to provide standard Fiesta track width, and to achieve this Focus subframe and knuckle/trailing arm assemblies would be modified to suit the Fiesta struts and forward beam mounts.
The first step was to create a jig based on the standard Focus subframe. At this stage I marked on two pieces of steel the position of standard Focus mounting points and also new mounting points at a reduced width which would produce standard Fiesta rear track. I fixed bolts to the Steel and bolted it to the unmodified Focus beam to begin fabrication of the jig, this way I ensured that everything was perfectly parallel. Once that was done I welded on bolts in the shortened position and sectioned the beam to suit.
Jig #1 did its job well: here's the shortened subframe welded together but still attached to the jig.
Next up I went back to the Fiesta beam to make a jig that would help me modify the Focus trailing arms, and my life here was made easier by the fact I'd previously upgraded to a Puma/Mk5 Fiesta beam which actually shares the same hub mounting bolt pattern as the Focus; this allowed me to make a jig to provide the Fiesta lower strut mount and forward beam mount based on the common hub mounting face/bolt pattern. The alternative would be to make a jig based on wheel bolt flange and centreline, which would have taken longer.
Here's the horrific looking but sturdy and accurate jig # 2 in action
The second jig enabled me to fabricate the Fiesta lower strut mounts, shorten the Focus trailing arms, and change the angle of the trailing arms to suit the position of the Fiesta forward beam mount. I decided at this point to sacrifice the Fiesta beam for its front mounts/bushes to incorporate into the Focus arms, and in doing so replaced the trailing arm Focus bushes which are a weak point.
Top: Standard Focus, Bottom: Modified
This image shows the shortened trailing arm, the difference between Focus and Fiesta lower suspension mounts, and the reinforcing I made around the new lower mount. I was conscious here that the majority of load on the Focus system would have been taken by the lower arm that houses the spring, so as I was mounting a McPherson strut assembly in place of a damper, I made sure that the shock mount was of far sturdier construction than the original.
Subframe etc. completed.
Modified knuckle/trailing arm mounted to the Fiesta.
The next stage is to modify the Fiesta chassis to mount the subframe.
bob1179 said:
Absolutely stunning work there, I have really enjoyed following this thread over the months.
I do have one question though regarding the modified trailing arm, did you get the welds checked for penetration and defects? The last thing you want after all your hard work is a weld failing under load possibly causing damage to your pride and joy.
I can see the standard of your work is second to none, I only ask as it's an area I deal in with work.
Thank you! Although I am confident in my work and would be happy driving with these parts on the car, I would be open to having the parts inspected. Is this done using ultrasonic equipment?I do have one question though regarding the modified trailing arm, did you get the welds checked for penetration and defects? The last thing you want after all your hard work is a weld failing under load possibly causing damage to your pride and joy.
I can see the standard of your work is second to none, I only ask as it's an area I deal in with work.
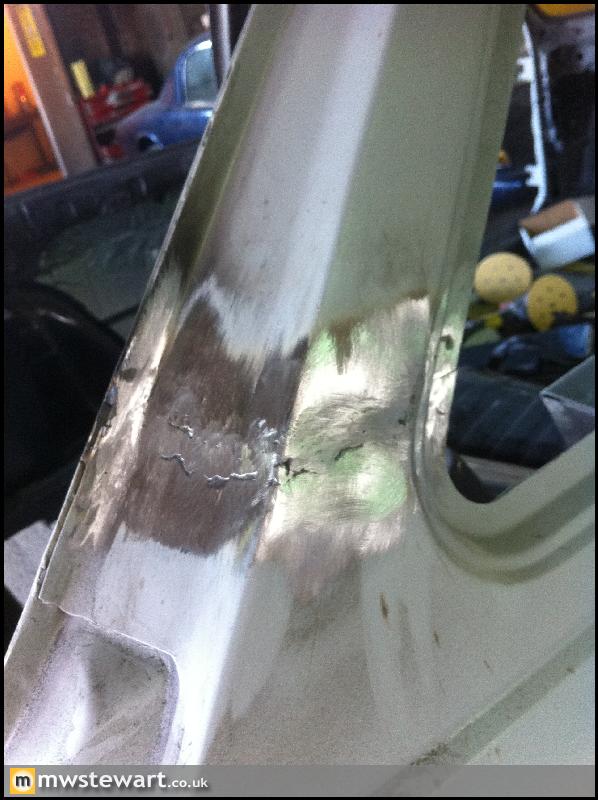
FYI I bevelled the edges of joints and I did get good penetration (the weld nicely sunk and there was a great amount of heat going in to the piece). The surfaces were clean and there aren't any imperfections/impurities that I can see.
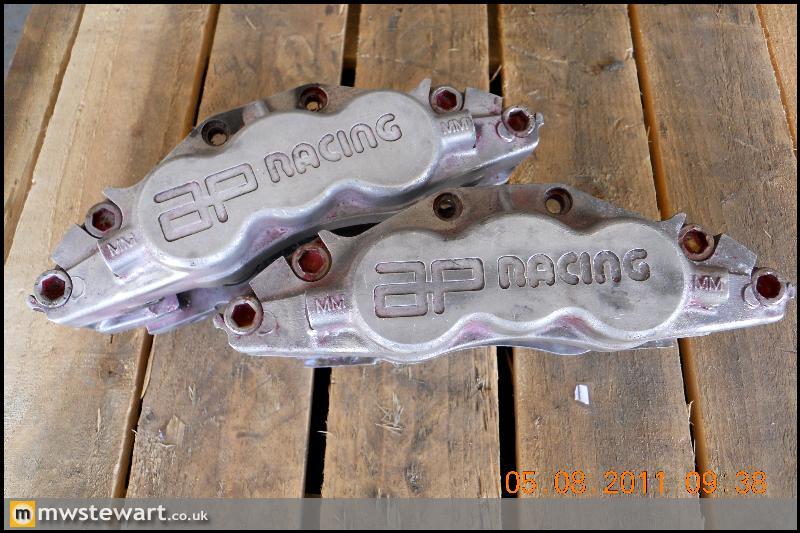
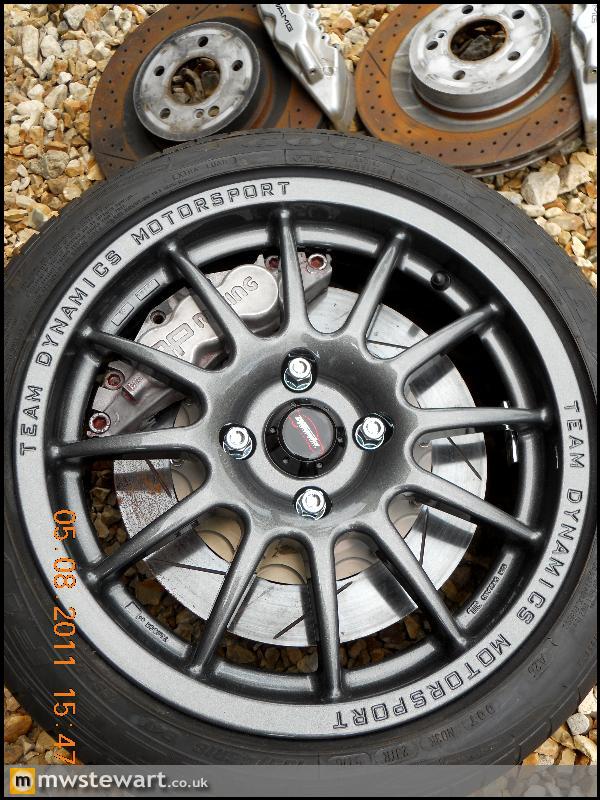
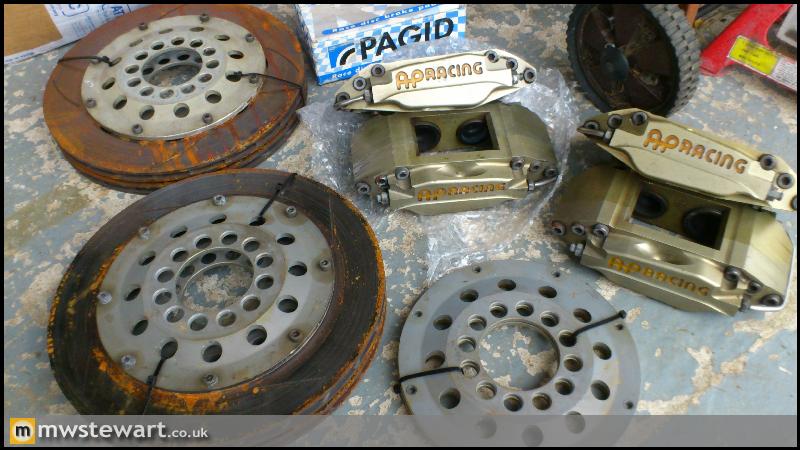
Some new goodies.
6 Pot calipers for the front. AP CP5555 motorsport version:
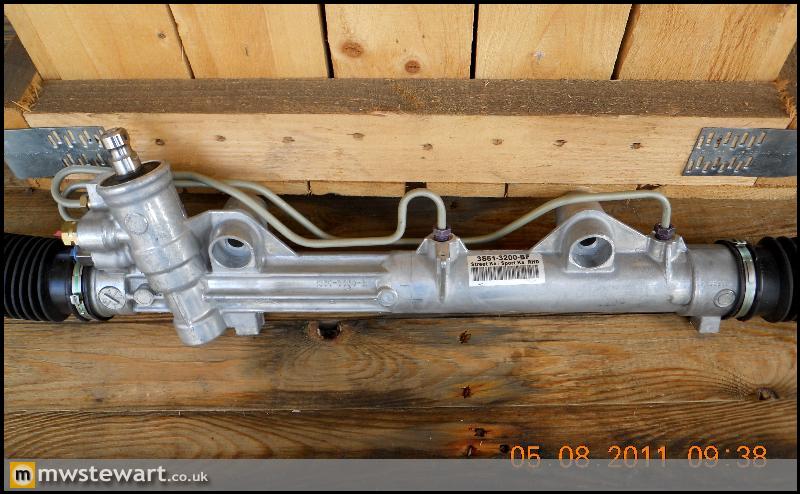
Brand new (not rebuilt) Genuine Ford Street/Sport Ka steering rack, as the Ka platform is a Fiesta it fit my Si. It's a unique part and is cast from a higher grade alloy and has solid mounts rather than rubber bushes.
Ford Focus RS Gearbox, brand new in the crate. Thanks to Tom Peters Ford parts for this. I have three of these gearboxes now so will have to get around to selling one!
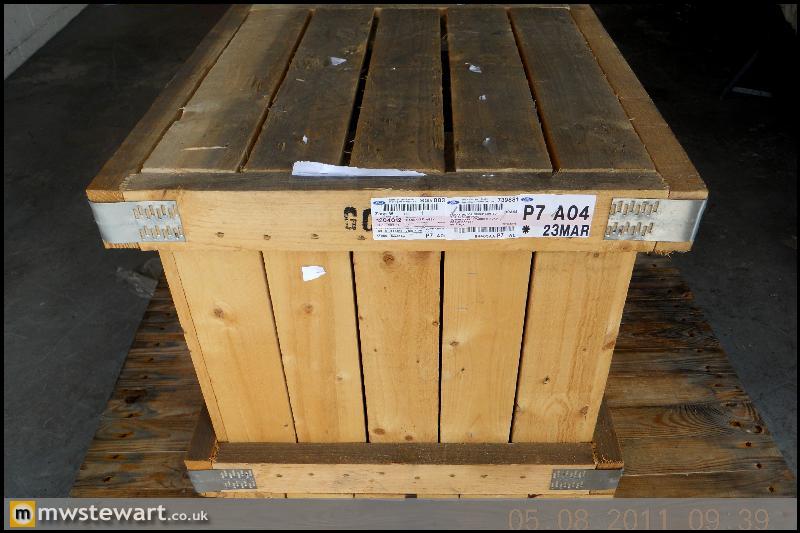
It is essentially a regular 2.0 Zetec Focus gearbox but with shot peened gears and a Quaife LSD. I also noticed that the shift weight is smaller, which is good.
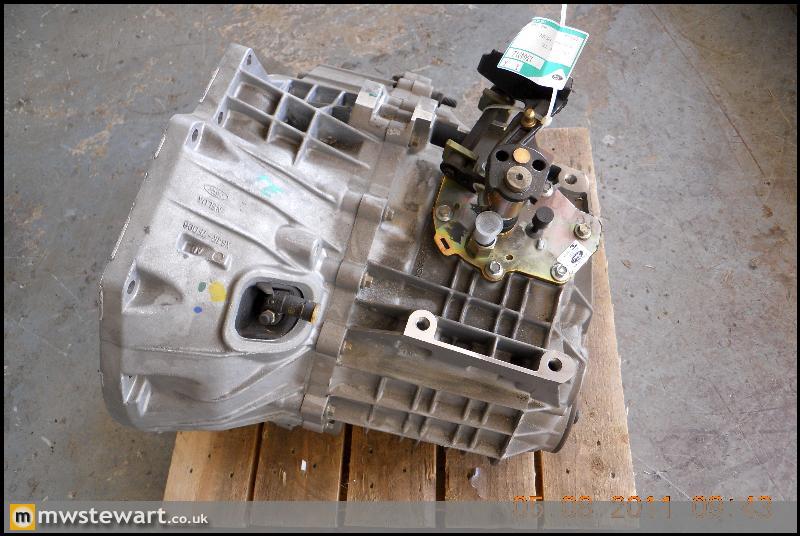
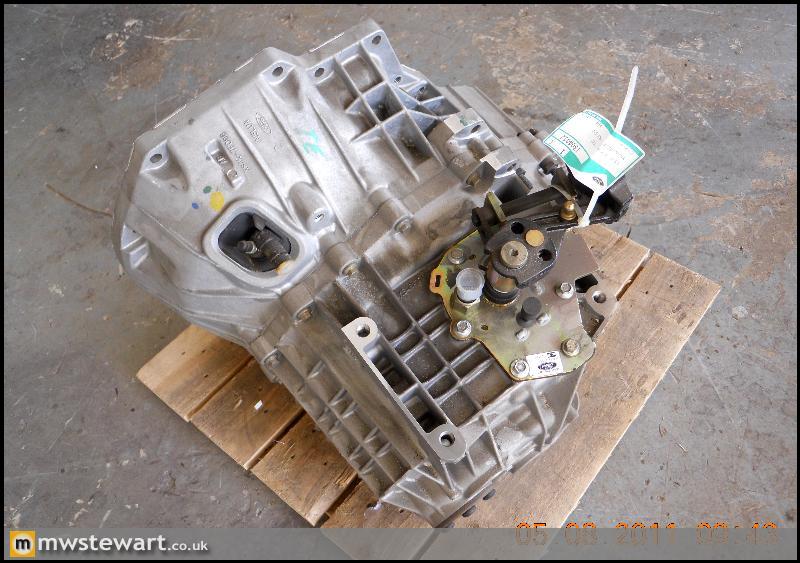
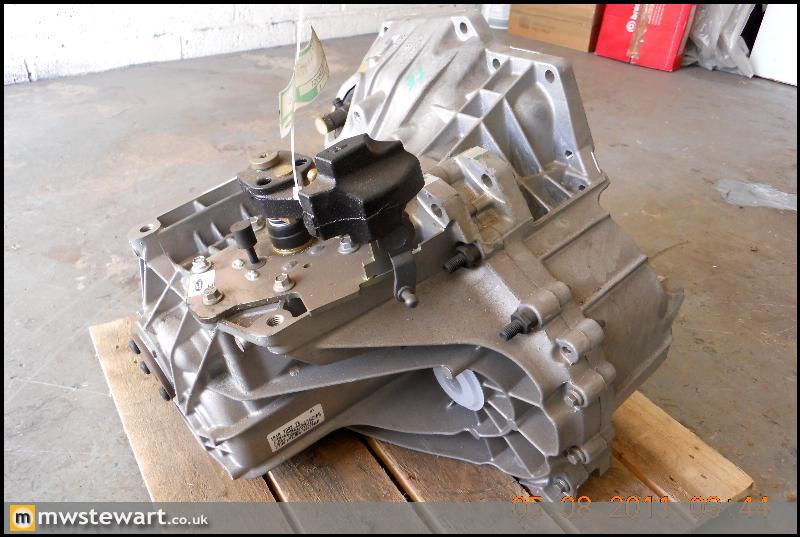
I hope to get the Focus rear suspension finished off this weekend.
6 Pot calipers for the front. AP CP5555 motorsport version:
Brand new (not rebuilt) Genuine Ford Street/Sport Ka steering rack, as the Ka platform is a Fiesta it fit my Si. It's a unique part and is cast from a higher grade alloy and has solid mounts rather than rubber bushes.
Ford Focus RS Gearbox, brand new in the crate. Thanks to Tom Peters Ford parts for this. I have three of these gearboxes now so will have to get around to selling one!
It is essentially a regular 2.0 Zetec Focus gearbox but with shot peened gears and a Quaife LSD. I also noticed that the shift weight is smaller, which is good.
I hope to get the Focus rear suspension finished off this weekend.
Beedub said:
i have those ap 6 pot all round on my little ///M, they are mind bendingly good...... you'll really enjoy the pedal feel and consistan braking....
awesome build....
Thanks Byron, I've been following your build with interest. Good work! I had an E46 M3 at one point so I know how much of a peach that S54 is.awesome build....
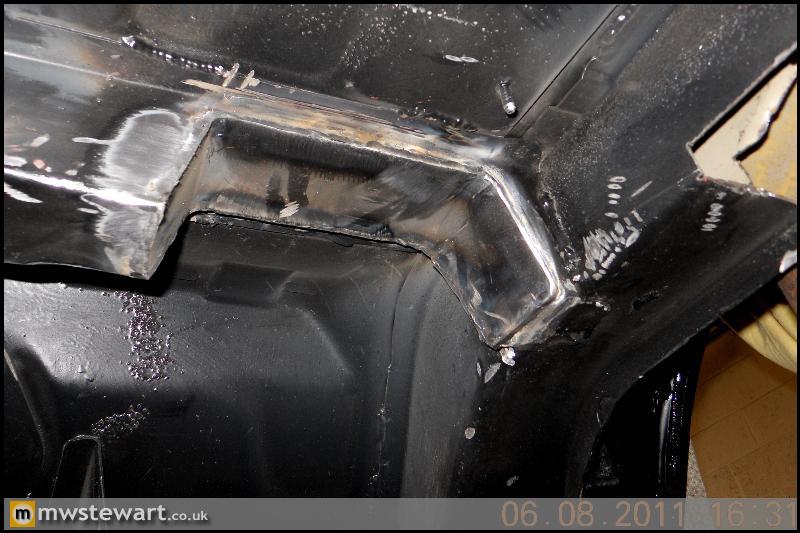
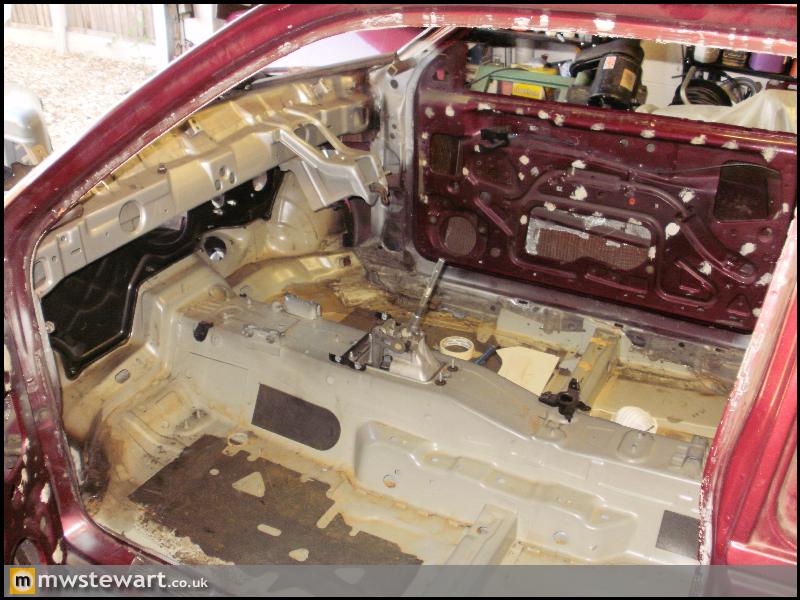
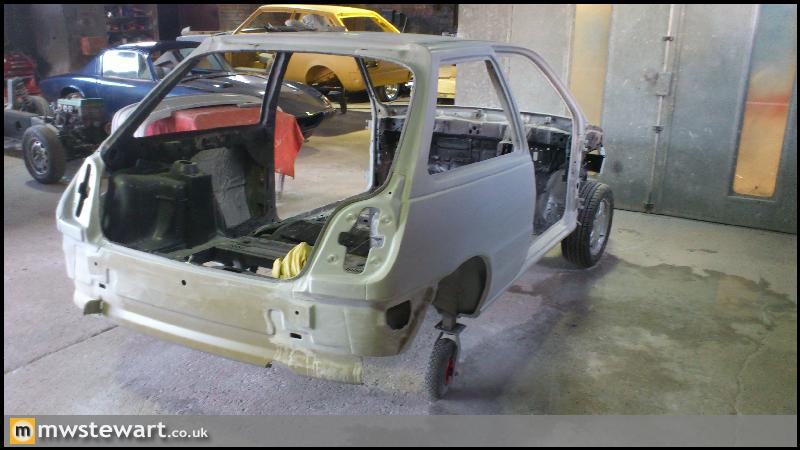
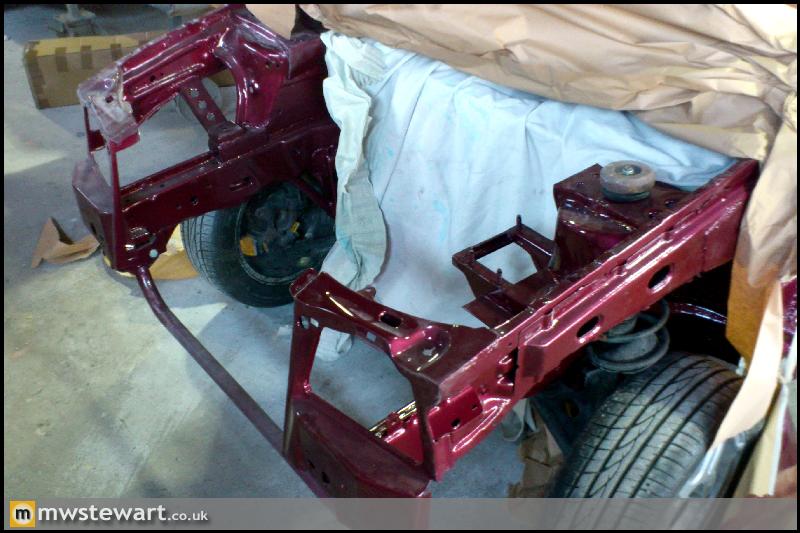
Today I've been working on mounting the Focus sub frame.
First off I had to notch a horizontal chassis member at each end to provide clearance for part of the new sub frame. The loss of strength isn't an issue for me because the two lateral members on the Focus sub frame will make the rear end more rigid than it ever was in standard form. I also had to cut out a section from each side of the main chassis rails in order to make a level bed for the sub frame as the rails slope down from the rear of the car towards the petrol tank area, you can make this out in the foreground of the photo.
Here's the rear end temporarily mounted, you can see the parts of the sub frame that sit in the new notches:
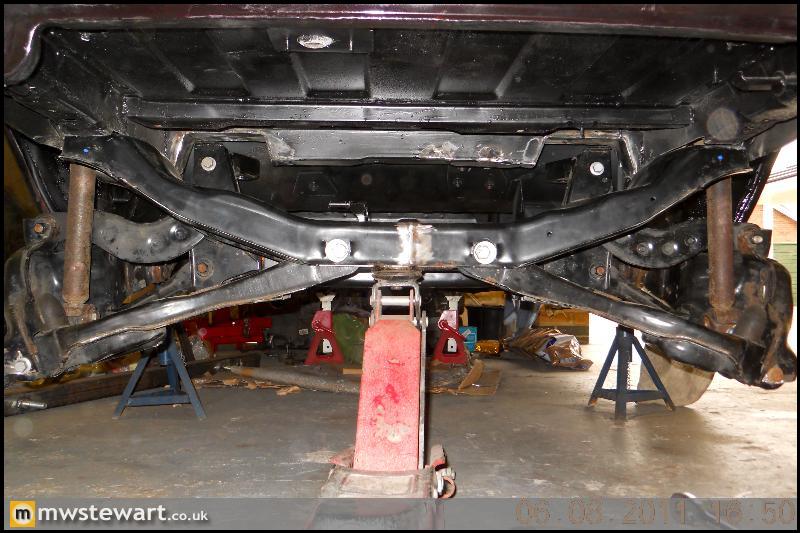
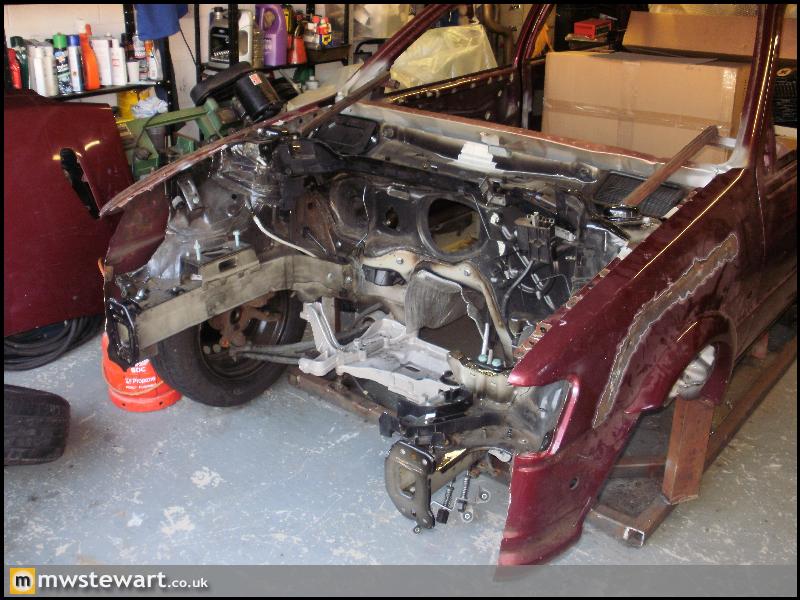
From the front.
Slightly more advanced than the old twist beam!
First off I had to notch a horizontal chassis member at each end to provide clearance for part of the new sub frame. The loss of strength isn't an issue for me because the two lateral members on the Focus sub frame will make the rear end more rigid than it ever was in standard form. I also had to cut out a section from each side of the main chassis rails in order to make a level bed for the sub frame as the rails slope down from the rear of the car towards the petrol tank area, you can make this out in the foreground of the photo.
Here's the rear end temporarily mounted, you can see the parts of the sub frame that sit in the new notches:
From the front.
Slightly more advanced than the old twist beam!
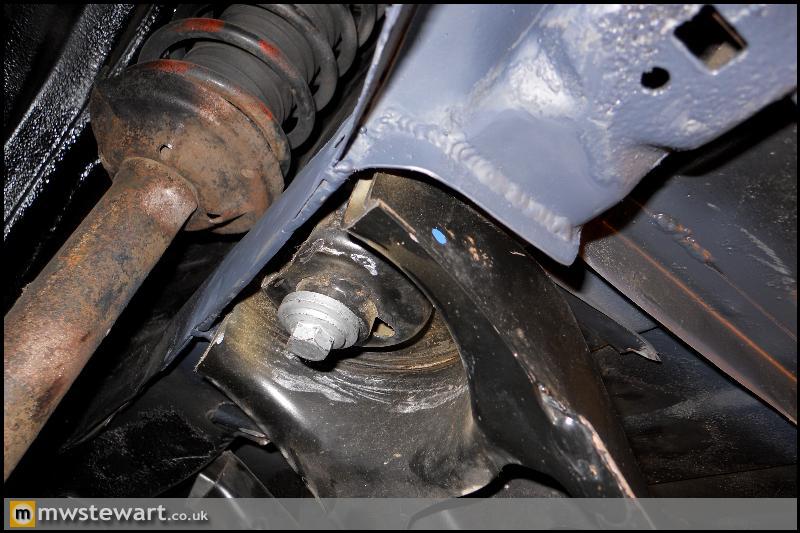
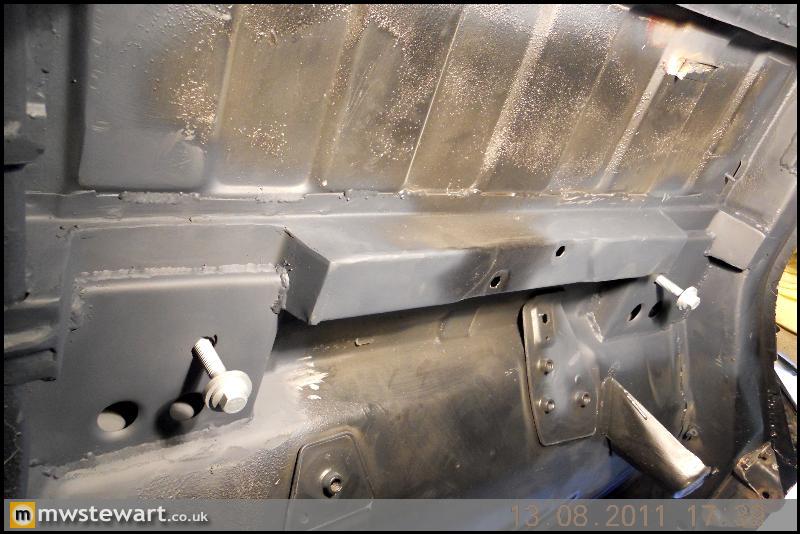
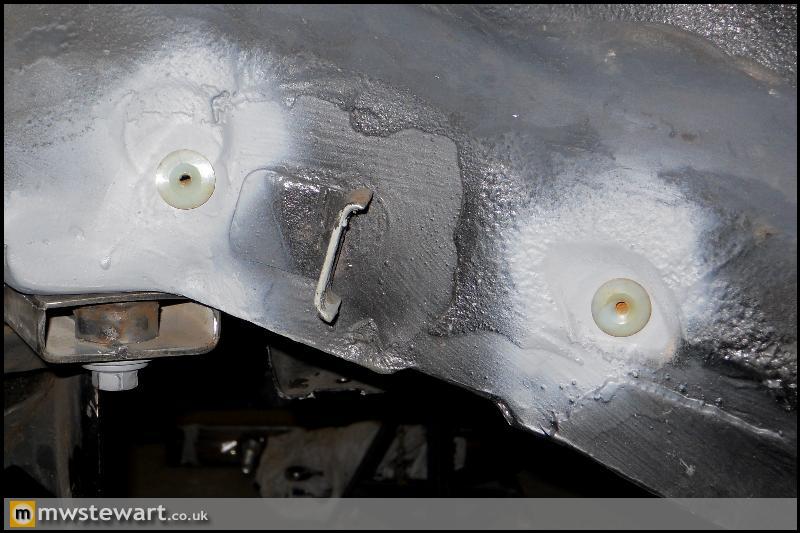
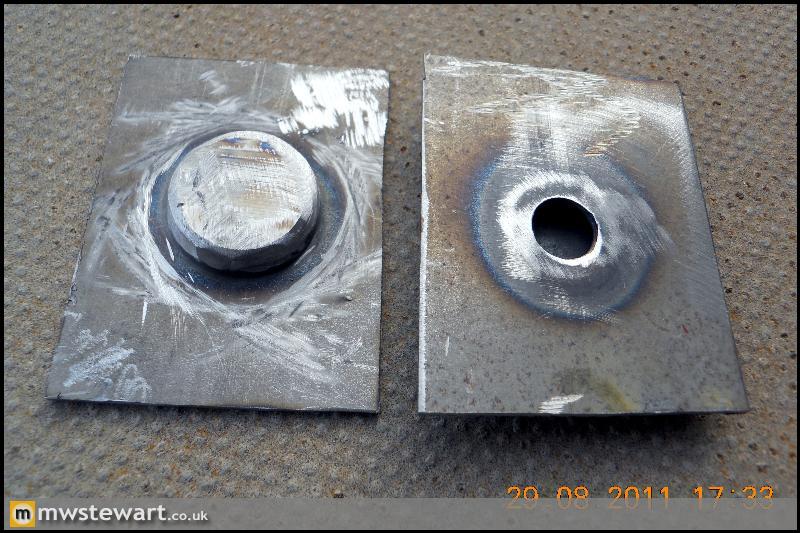
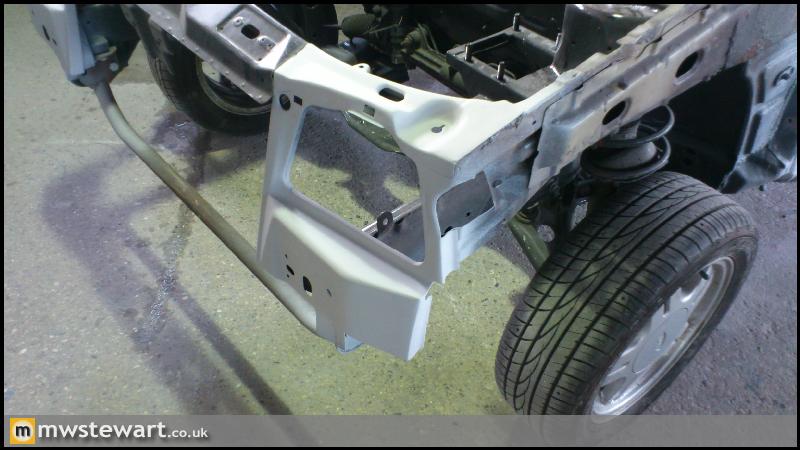
Rear subframe forward mount
I fabricated a 1.5mm thick reinforcement piece for each side of the car, they have a captive nut and a 20mm hole for the locating peg on the subframe. This part will brace the chassis rail and ensure the sub frame is mounted square in the chassis.
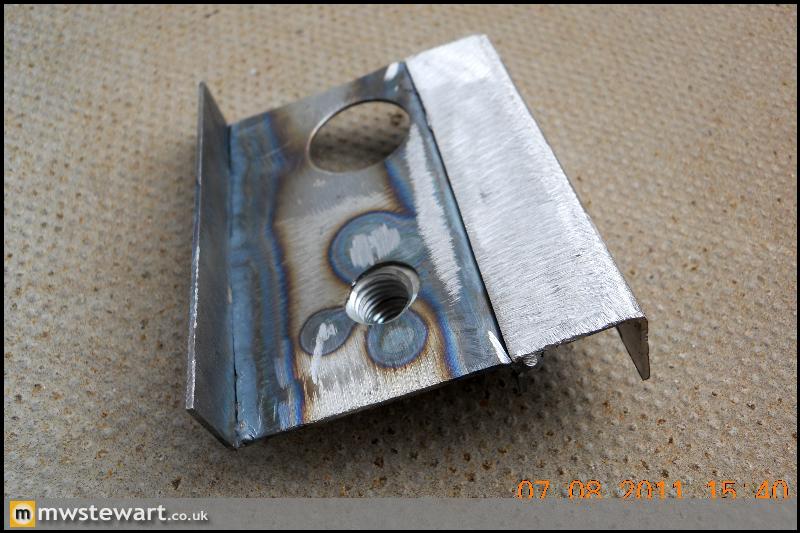
The reinforcement pad sits inside the existing chassis legs and was welded from inside the wheel arch, and also through the outside face of the chassis leg.

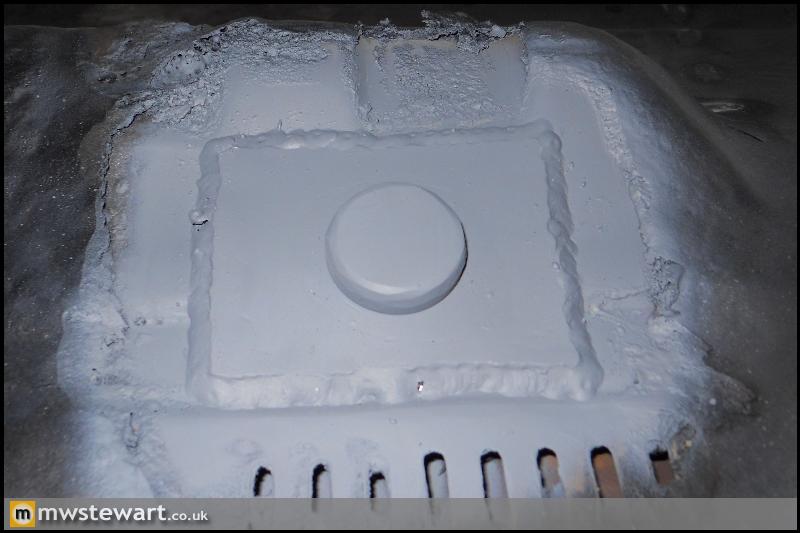
Next were a pair of 1.2mm 'cups' fabricated from 1.2mm sheet.
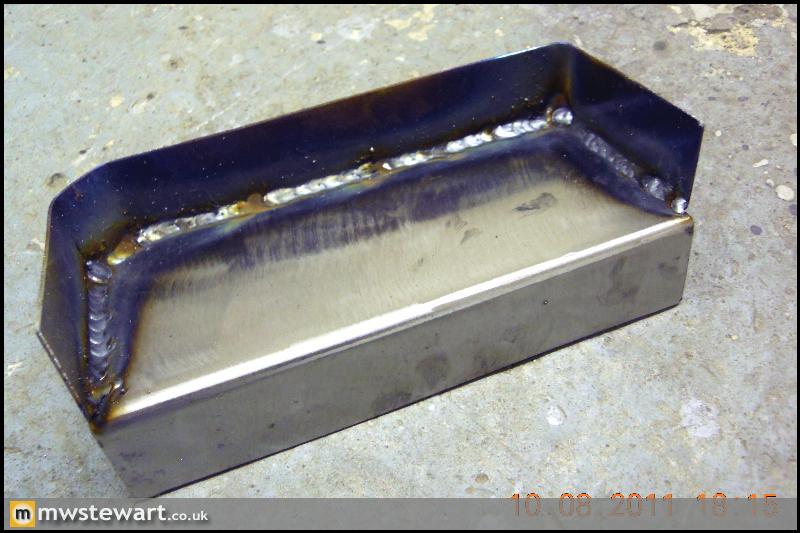
They were welded to the reinforcement pads and the chassis leg which surrounds them.
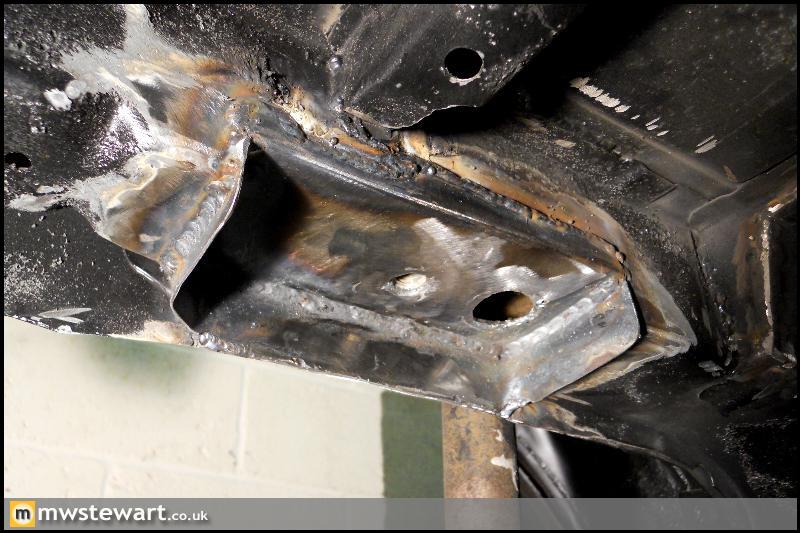
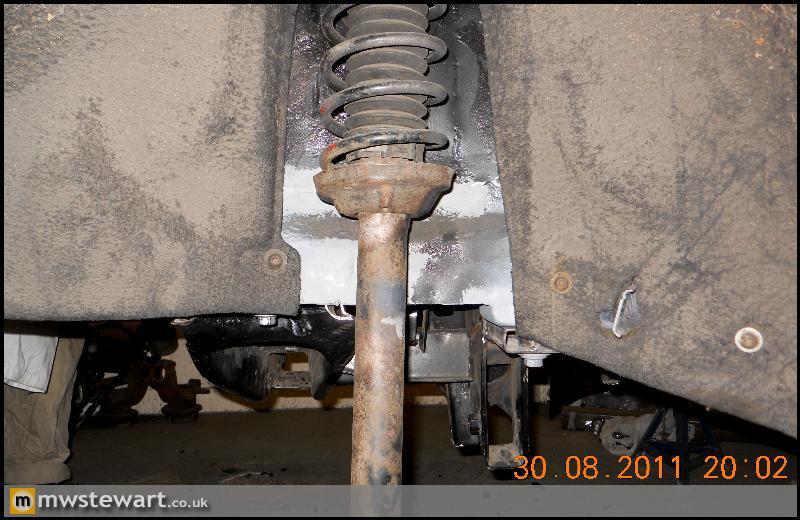
Etch primed and with sub frame mounted.
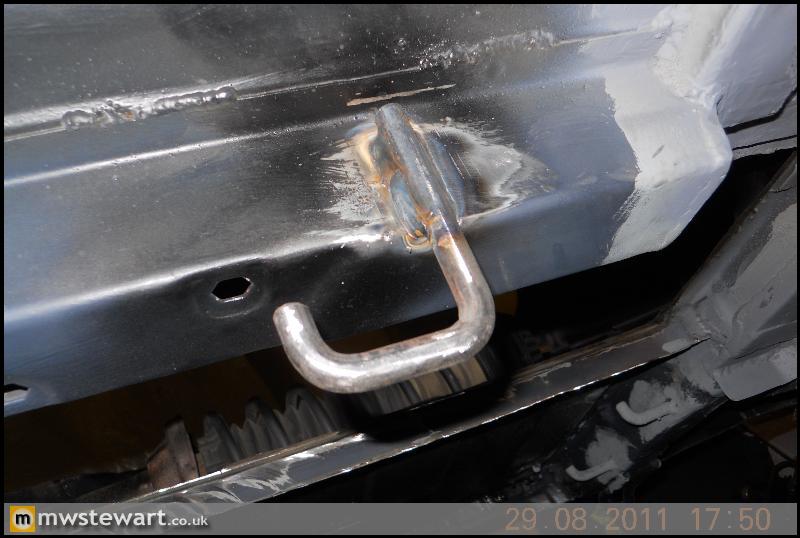
Due to space constraints I will change the exhaust layout; rather than an in-line mounted rear silencer under the O/S boot floor I will have a large transversely mounted silencer under the entire rear section of boot floor. In order to support this I've added additional exhaust mounting points made from 10mm round bar:
There are now two on each side of the rear chassis legs.

I fabricated a 1.5mm thick reinforcement piece for each side of the car, they have a captive nut and a 20mm hole for the locating peg on the subframe. This part will brace the chassis rail and ensure the sub frame is mounted square in the chassis.
The reinforcement pad sits inside the existing chassis legs and was welded from inside the wheel arch, and also through the outside face of the chassis leg.
Next were a pair of 1.2mm 'cups' fabricated from 1.2mm sheet.
They were welded to the reinforcement pads and the chassis leg which surrounds them.
Etch primed and with sub frame mounted.
Due to space constraints I will change the exhaust layout; rather than an in-line mounted rear silencer under the O/S boot floor I will have a large transversely mounted silencer under the entire rear section of boot floor. In order to support this I've added additional exhaust mounting points made from 10mm round bar:
There are now two on each side of the rear chassis legs.
payner2008 said:
I am loving this build. OP, when do you anticipate completion? I am keen to see the finished results.
Hats off to you.
Thank you!Hats off to you.
I've set a target of September 1st for all chassis modifications to be completed including application of new underseal, a painted underside and wax injection/corrosion prevention. Christmas eve is the target to have the engine back in the shell and running.
I'm on track for September 1st
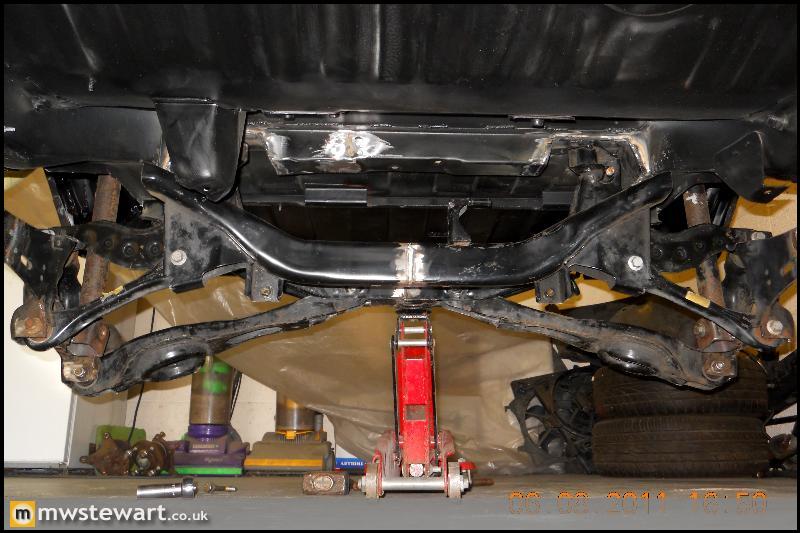
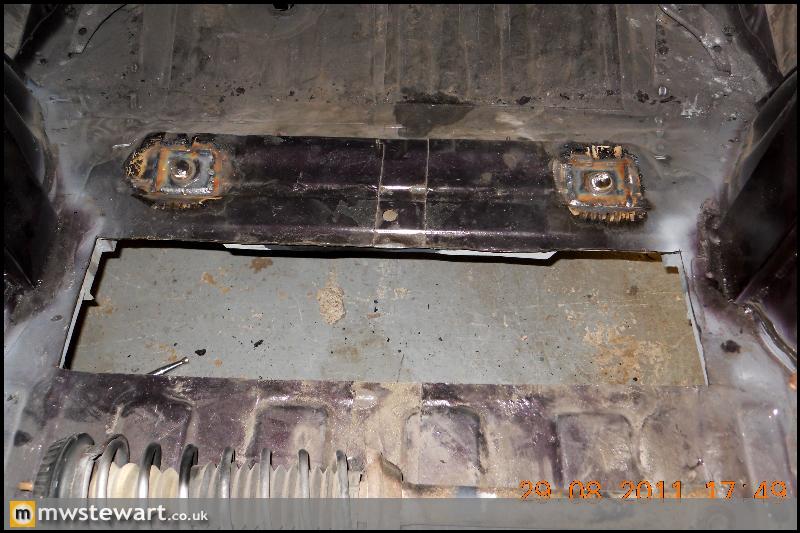
Rear sub frame intermediate mount
I started by bolting the subframe up to the rear mounts I'd already made, this enabled me to mark on the shell the exact position of the intermediate mounting lugs. I then removed the sub frame and welded a boss on the marks I'd just made.
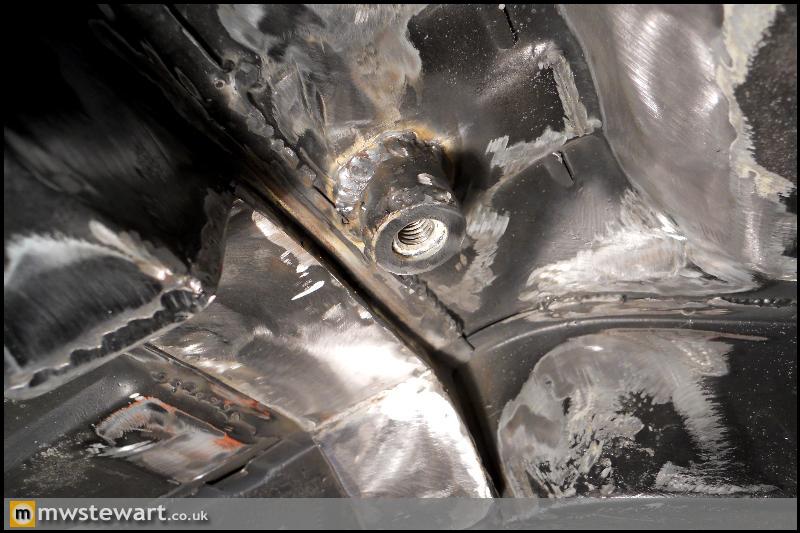
Next up I fabricated a 1.5mm plate which would cover the bosses and box in area around them:
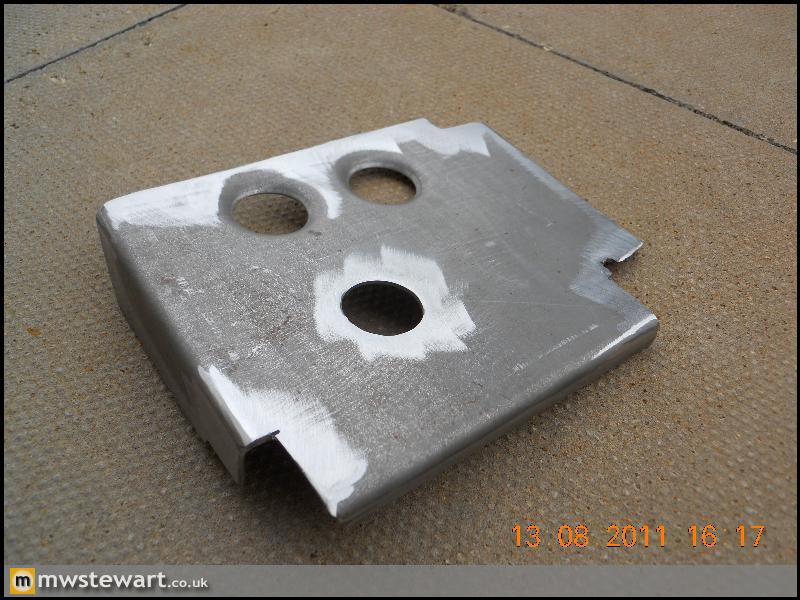
strengthening plate welded in place.
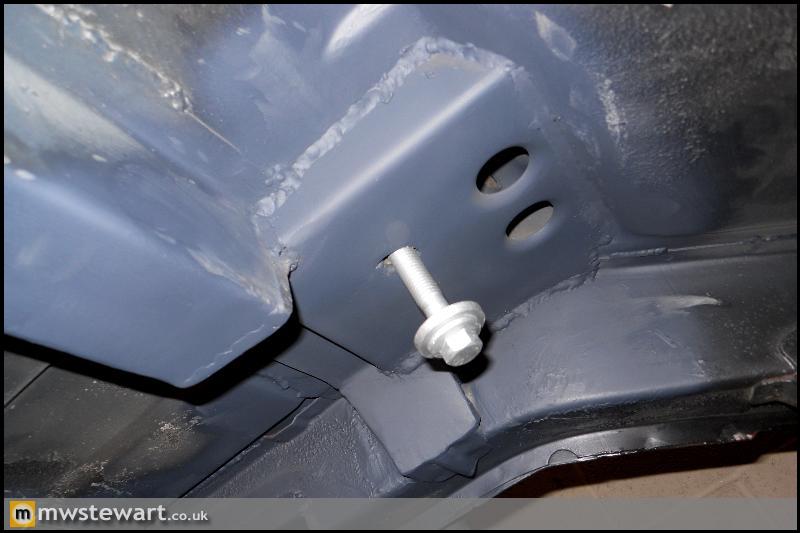
Both sides done.
Sub frame mounted.
I started by bolting the subframe up to the rear mounts I'd already made, this enabled me to mark on the shell the exact position of the intermediate mounting lugs. I then removed the sub frame and welded a boss on the marks I'd just made.
Next up I fabricated a 1.5mm plate which would cover the bosses and box in area around them:
strengthening plate welded in place.
Both sides done.
Sub frame mounted.
Mk4/Mk5/Puma handbrake cable
I wanted to replace the Mk3 handbrake cable with something newer as I don't like the idea of jacking up the car, dropping an exhaust and removing a heat shield just to tighten the cable. The later Fiestas permit cable adjustment inside the car using only a 10mm socket, so thanks to a dead Racing Puma I have the bracket for an in-car adjustment type cable. I modified this bracket so that it could be welded to the Mk3 shell in the same places as the original bracket was removed from:
Mk4/Mk5/Puma rear wheel arch liners
Another modification from a later Fiesta: some rear arch liners. I drilled slotted holes in the rear arches to accommodate four push in fastenings on each side.
A slightly modified arch liner can then be screwed into place. I'm using old parts to mock up with but everything will be plated,coated, refurbished or renewed once I'm rebuilding.
Additional exhaust mount
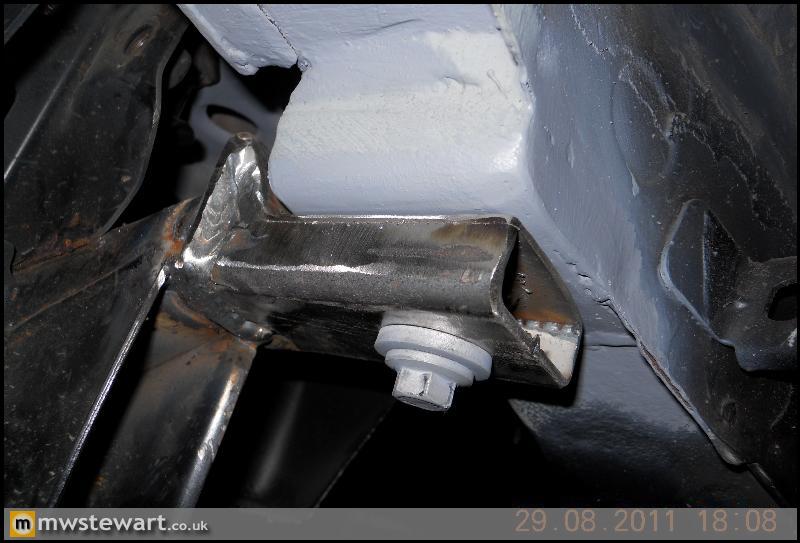
I decided that I will modify the fuel tank so that the exhaust goes straight under it rather than turning at a 90 degree angle to go around the edge of it. A central exhaust mount was added to the rear cross member underneath the boot floor to support the new exhaust layout.
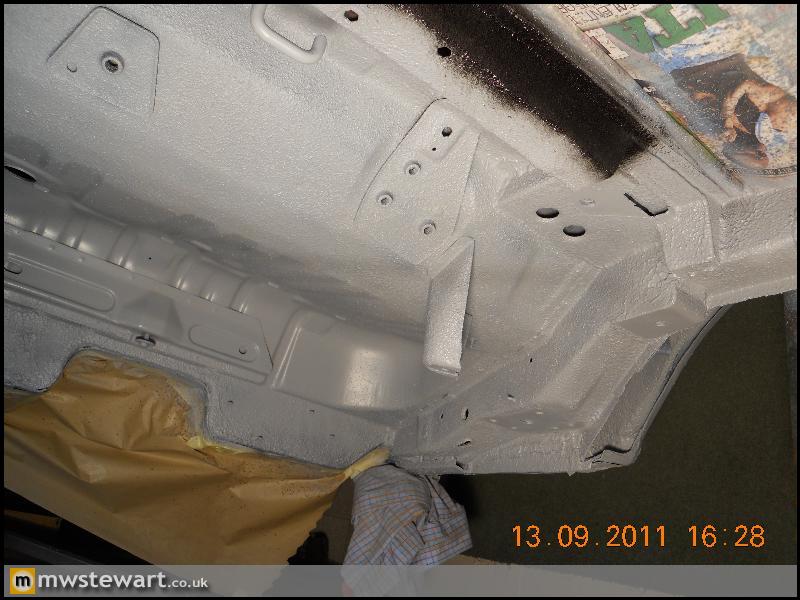
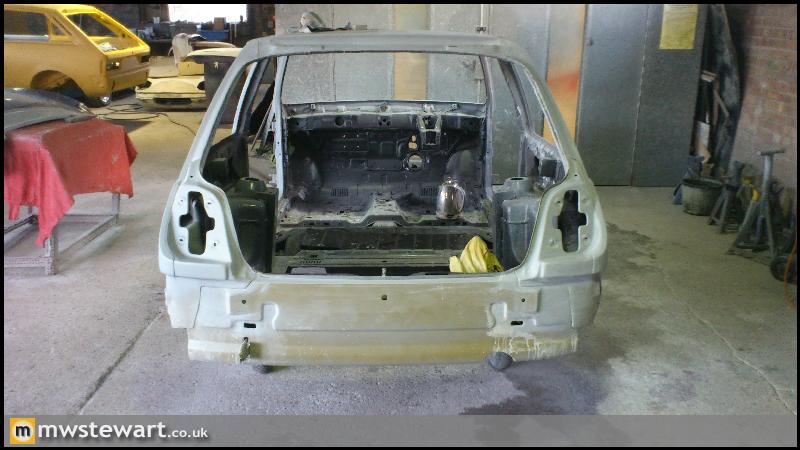
Boot floor modifications
I wanted to ensure thet the rear subframe was mounted using identical bolts for each mount, as per the Focus. This makes maintenance simpler. This did mean that two of the bolts required clearance holes ibn the boot floor, so I made some small 'buttons' and reinforcement plates to conceal the bolts and cover the holes:
Another bonus of fully-independent rear suspension is that there is no longer a beam moving about underneath the entire width of the boot floor, so I've capitalised on this by cutting a section of boot floor from above the new sub frame in order to mount a storage box. I was lucky here in that there is either reinforcement or edges of chassis rails around the entire circumference so I've really only lost a single skin. I will fabricate an aluminium container which will house the battery and fuel pressure pumps.
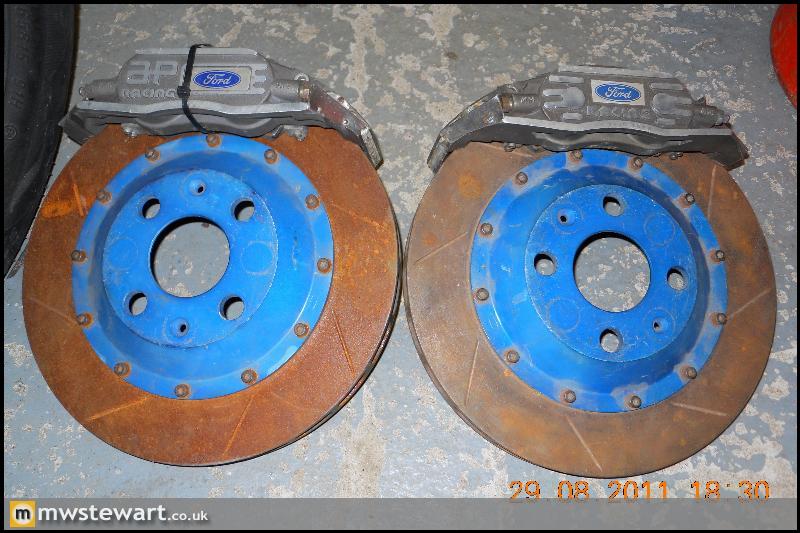
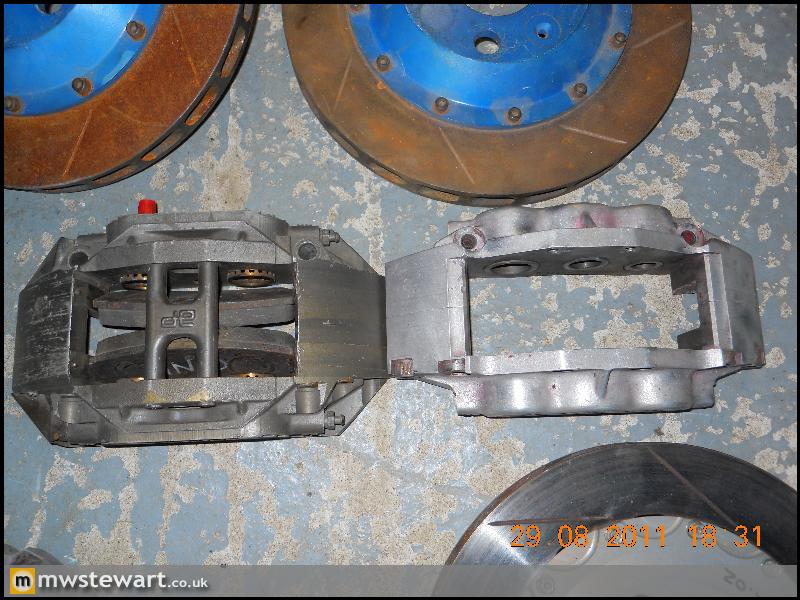
New rear brakes
I bought some more AP's These are Escort Cosworth WRC Tarmac spec rear brakes; the calipers and bells are Ford stamped. I bought them for the discs and bells which will be used on the front of my car, but the calipers are really too large and will be sold on with some different discs. I estimate fluid volume is getting on for close to my 6 pot versions, they really are big rear brakes! I had the opportunity to buy the fronts at the same time which were 378mm discs with 6 pot water cooled calipers. Awesome!
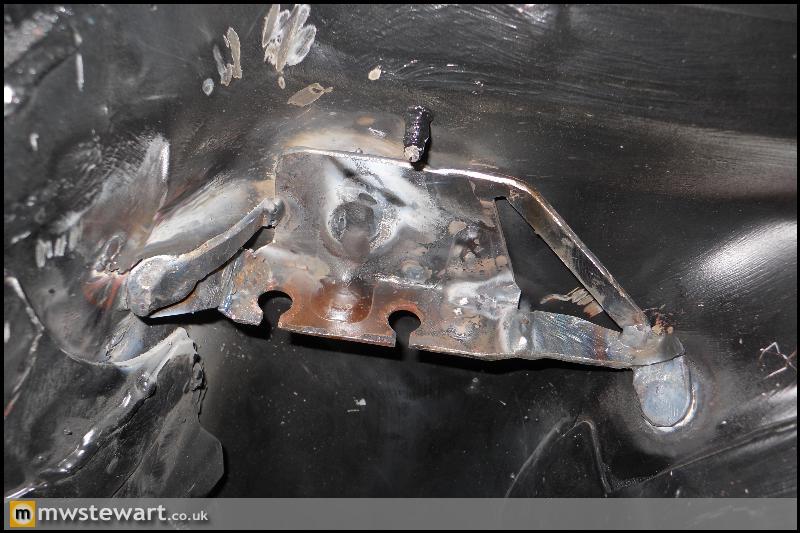
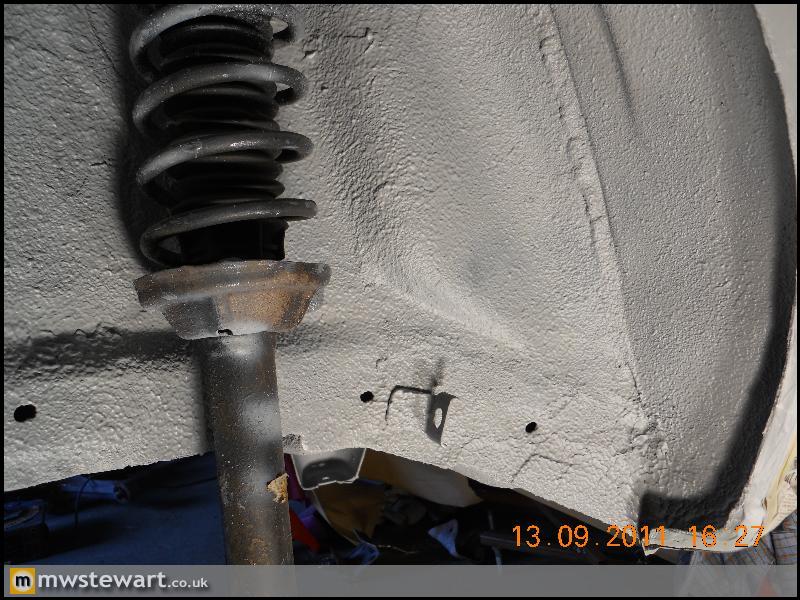
Rear sub frame forward mount
The front section of Focus sub frame interferes with the Fiesta chassis rail which give me two options: I could either notch the Fiesta chassis or cut and modify the Focus sub frame. I chose the latter option as an inspection hole revealed that the high tensile steel safety 'cage' is present in the area of the shell I would need to cut. The chassis in this area of the car slopes both upwards and out towards the sides of the car and I wanted to create a platform that would follow these lines and look as OEM as possible. The following photo illustrates what I ended up with:
I filled in both sides of the platform and blended it into the wheel arch.
Here's the modification I made on each side of the sub frame.
Back together with hubs attached. The eagle eyed will spot that I've welded a reinforcement box section to the trailing arms.

Thankfully that's it for chassis modification!I can now get on with the application of underseal and paint, then start to reassemble the car
I wanted to replace the Mk3 handbrake cable with something newer as I don't like the idea of jacking up the car, dropping an exhaust and removing a heat shield just to tighten the cable. The later Fiestas permit cable adjustment inside the car using only a 10mm socket, so thanks to a dead Racing Puma I have the bracket for an in-car adjustment type cable. I modified this bracket so that it could be welded to the Mk3 shell in the same places as the original bracket was removed from:
Mk4/Mk5/Puma rear wheel arch liners
Another modification from a later Fiesta: some rear arch liners. I drilled slotted holes in the rear arches to accommodate four push in fastenings on each side.
A slightly modified arch liner can then be screwed into place. I'm using old parts to mock up with but everything will be plated,coated, refurbished or renewed once I'm rebuilding.
Additional exhaust mount
I decided that I will modify the fuel tank so that the exhaust goes straight under it rather than turning at a 90 degree angle to go around the edge of it. A central exhaust mount was added to the rear cross member underneath the boot floor to support the new exhaust layout.
Boot floor modifications
I wanted to ensure thet the rear subframe was mounted using identical bolts for each mount, as per the Focus. This makes maintenance simpler. This did mean that two of the bolts required clearance holes ibn the boot floor, so I made some small 'buttons' and reinforcement plates to conceal the bolts and cover the holes:
Another bonus of fully-independent rear suspension is that there is no longer a beam moving about underneath the entire width of the boot floor, so I've capitalised on this by cutting a section of boot floor from above the new sub frame in order to mount a storage box. I was lucky here in that there is either reinforcement or edges of chassis rails around the entire circumference so I've really only lost a single skin. I will fabricate an aluminium container which will house the battery and fuel pressure pumps.
New rear brakes
I bought some more AP's
These are Escort Cosworth WRC Tarmac spec rear brakes; the calipers and bells are Ford stamped. I bought them for the discs and bells which will be used on the front of my car, but the calipers are really too large and will be sold on with some different discs. I estimate fluid volume is getting on for close to my 6 pot versions, they really are big rear brakes! I had the opportunity to buy the fronts at the same time which were 378mm discs with 6 pot water cooled calipers. Awesome! Rear sub frame forward mount
The front section of Focus sub frame interferes with the Fiesta chassis rail which give me two options: I could either notch the Fiesta chassis or cut and modify the Focus sub frame. I chose the latter option as an inspection hole revealed that the high tensile steel safety 'cage' is present in the area of the shell I would need to cut. The chassis in this area of the car slopes both upwards and out towards the sides of the car and I wanted to create a platform that would follow these lines and look as OEM as possible. The following photo illustrates what I ended up with:
I filled in both sides of the platform and blended it into the wheel arch.
Here's the modification I made on each side of the sub frame.
Back together with hubs attached. The eagle eyed will spot that I've welded a reinforcement box section to the trailing arms.
Thankfully that's it for chassis modification!I can now get on with the application of underseal and paint, then start to reassemble the car
Edited by mwstewart on Wednesday 31st August 19:12

joe_90 said:
Stupid question.. how do you know its true? without a full jig?
It's not a stupid question at all. I modified the trailing arms/hubs so that the attachment points were identical to the original Fiesta as this ensured the wheel placement was identical to standard and gave the same hub mounting, shock mounting and trailing arm bush mount positions. This meant I could bolt the entire subframe and suspension together and attach it to the car by the trailing arm bush and shock absorber. I ensured that when all load was off of the Fiesta shocks the Focus suspension was at full droop and mounted the subframe at that height. The only thing I really had to ensure was that the subframe was mounted parallel to the chassis, and to achieve that I measured from various datum points on the shell. I did use a jig to shorten the sub frame, as it was the quickest and easiest way.

Under body protection and paint
The products I have chosen for the under side will provide ultimate protection rather than a show like finish. In the past I completed another project car with a perfect underneath and I was always worried about taking it out in wet weather etc.; the goal for this project is to create something that I can enjoy in any weather without fear of it rusting or degrading. I chose 3M 08800 sealer as this is some of the best protection available, I originally ordered 11 bags which turned out to be very optimistic as in the end I ordered 20.
In total the materials for the under side treatment have come close to £500, which is a lot given the end result is rarely seen, but I figured it's an investment in protection for all the work that has gone in to the shell.
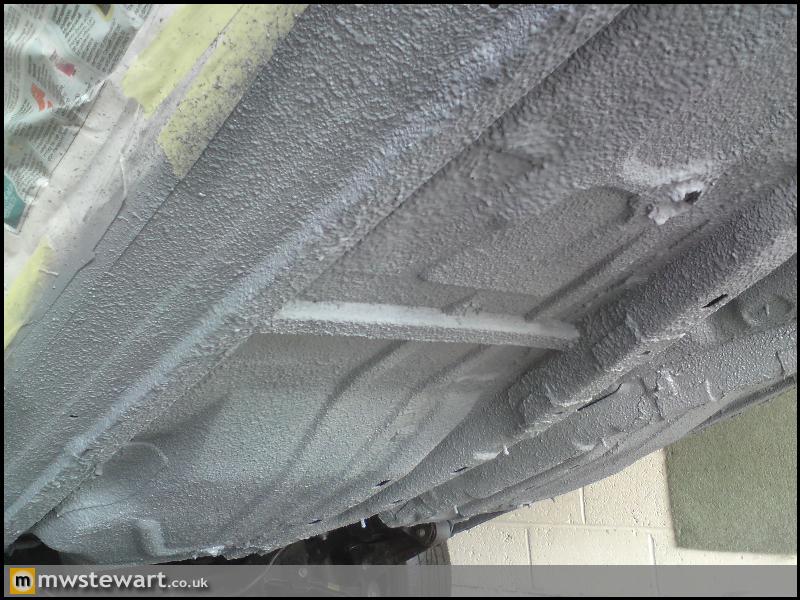
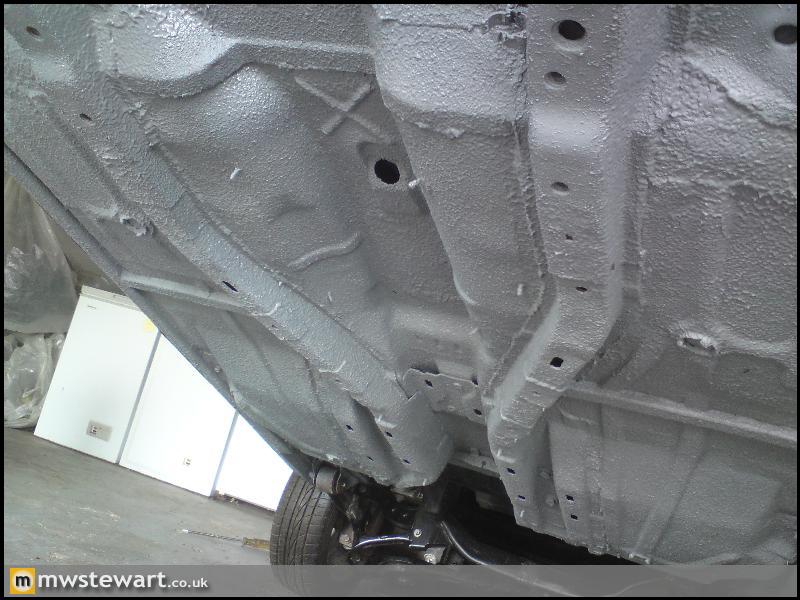
The 3M 08800 is over-paintable within 20 mins, so once that time had elapsed I applied two pack primer, two pack base and two pack lacquer.
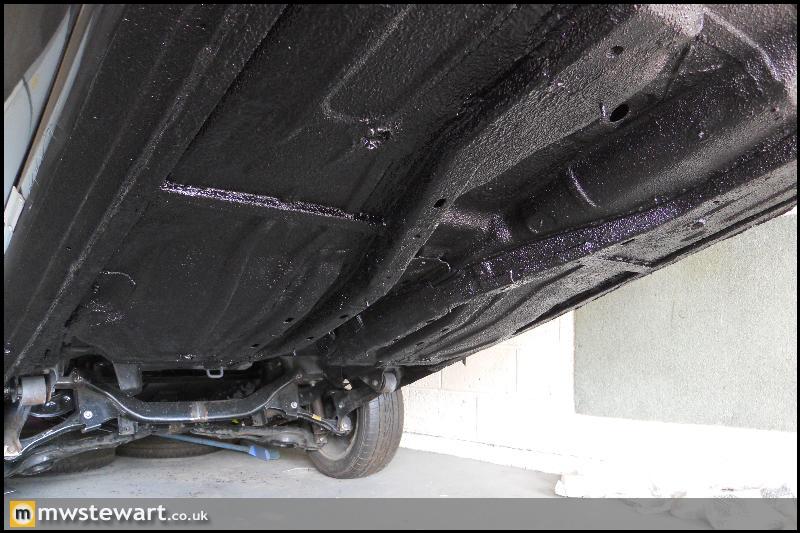
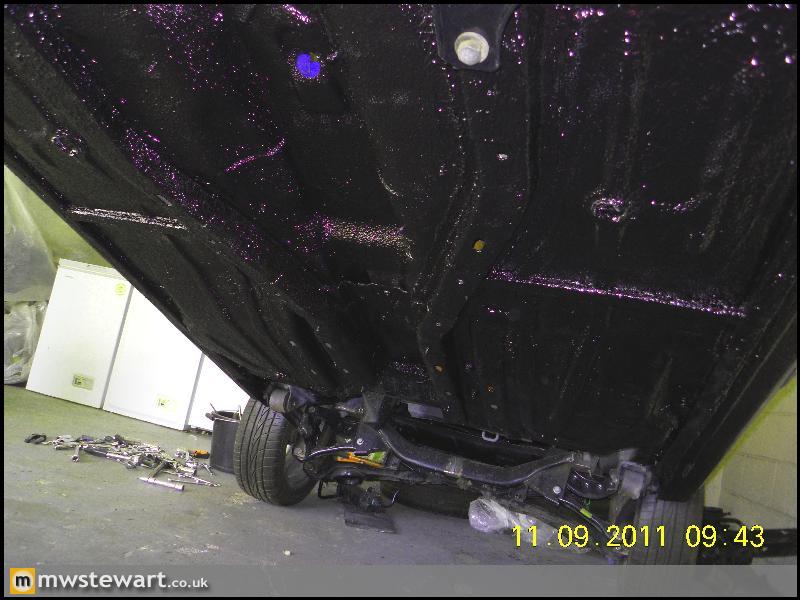
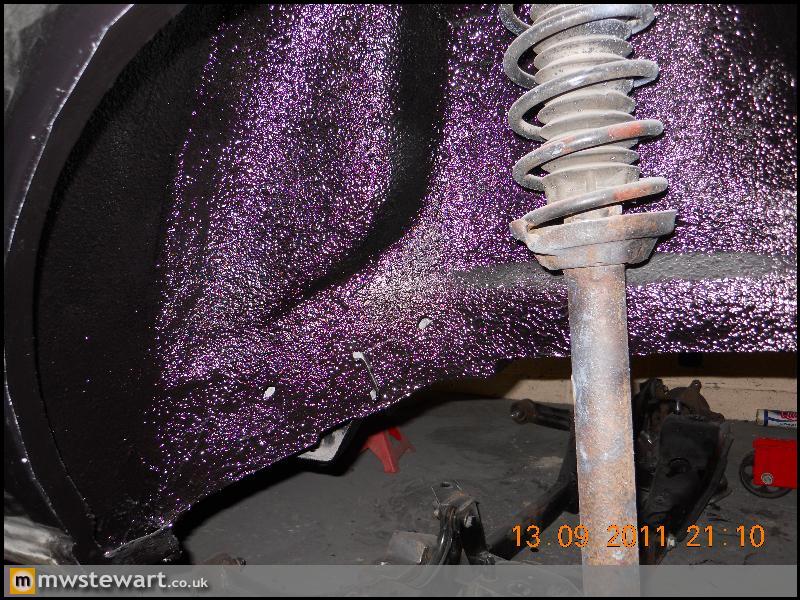
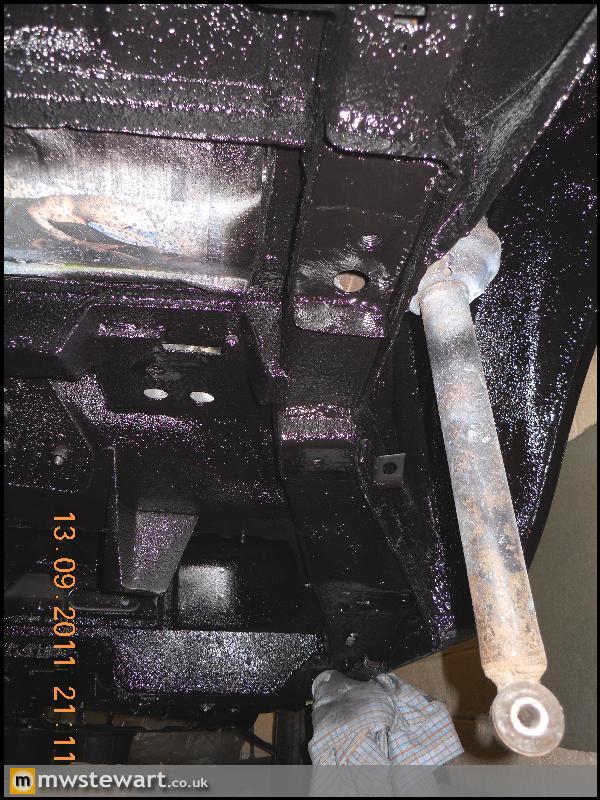
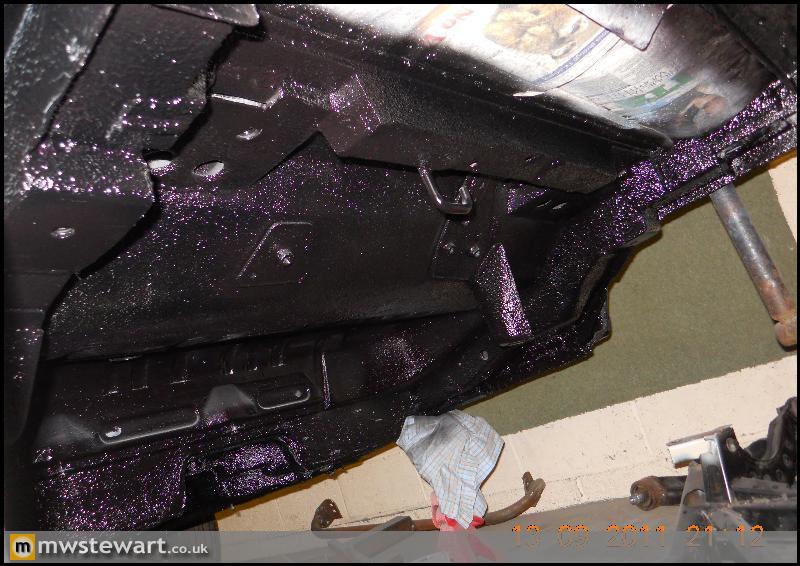
So in total I have 90% Zinc primer, satin black, two coats of 3M 08800, two pack primer, two pack base and two pack lacquer. It should be well protected under there
The next step is wax injection.
The products I have chosen for the under side will provide ultimate protection rather than a show like finish. In the past I completed another project car with a perfect underneath and I was always worried about taking it out in wet weather etc.; the goal for this project is to create something that I can enjoy in any weather without fear of it rusting or degrading. I chose 3M 08800 sealer as this is some of the best protection available, I originally ordered 11 bags which turned out to be very optimistic as in the end I ordered 20
. In total the materials for the under side treatment have come close to £500, which is a lot given the end result is rarely seen, but I figured it's an investment in protection for all the work that has gone in to the shell.
The 3M 08800 is over-paintable within 20 mins, so once that time had elapsed I applied two pack primer, two pack base and two pack lacquer.
So in total I have 90% Zinc primer, satin black, two coats of 3M 08800, two pack primer, two pack base and two pack lacquer. It should be well protected under there
The next step is wax injection.
Edited by mwstewart on Tuesday 13th September 23:01
payner2008 said:
Any updates OP?
I have sent the shell to a body shop for a full bare-metal respray because there were a few areas of my prep/paint that I wasn't entirely happy with. I will have it back for November I’m also still waiting for Pace to make a dry sump pump to my spec: I’ve found the customer service to be slightly lacking so far...
BBS-LM said:
Amazing attention to detail on this project, but I just do not get the Fiesta part, sorry. But good luck with it. biggrin
Thank you - totally understandable It’s by no means the most expensive or technically capable car I’ve owned, but driving these things still puts a smile on my face.hewlett said:
Might it be a good idea to make a simple aluminium flat underside?
I’ve been thinking about this and I’ve bought some plastic under trays from a Mercedes that I hope to adapt, and I’m looking for something else suitable for the engine area.Thanks for the feedback.
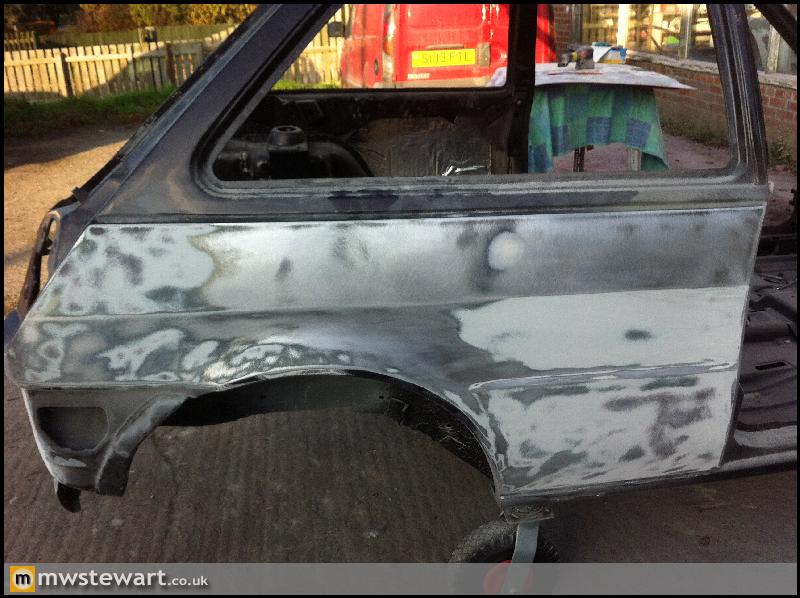
Some snaps from the Bodyshop that show their progress with stripping back to bare metal. The panels look horrendous but they're not; they were all brand new.


I have decided to go for a colour change and switch from 'Dark Aubergine' to another Ford colour called 'Noveau Red'. This was the colour of the car used for one of my other projects and surprise, surprise, it was another Mk3 Fiesta.
The car was one of my first that I'd kept and had gone through various mechanical guises and engine configurations until the last project which saw me purchase a crashed 2008 Golf R32, and from this I transplanted the floor pan and drive train into the Fiesta. The Golf/Quattro car was the 'main' project and the Fiesta in this thread was always intended to be a sideline, but as time has passed I found that my priorities changed and I moved on to bigger and better (though not necessarily more fun) things.
I didn't have time for everything so I decided to 'call it a day' with Quattro project and gave away the converted shell. I still have the majority of the R32 that I need to sell on - it'd only covered 1500 miles.

The closure of the Quattro/R32 project does mean I can liberate many brand new and obsolete Ford parts that I'd been saving and use them on the project car in this thread.
Some snaps from the Bodyshop that show their progress with stripping back to bare metal. The panels look horrendous but they're not; they were all brand new.
I have decided to go for a colour change and switch from 'Dark Aubergine' to another Ford colour called 'Noveau Red'. This was the colour of the car used for one of my other projects and surprise, surprise, it was another Mk3 Fiesta.
The car was one of my first that I'd kept and had gone through various mechanical guises and engine configurations until the last project which saw me purchase a crashed 2008 Golf R32, and from this I transplanted the floor pan and drive train into the Fiesta. The Golf/Quattro car was the 'main' project and the Fiesta in this thread was always intended to be a sideline, but as time has passed I found that my priorities changed and I moved on to bigger and better (though not necessarily more fun) things.
I didn't have time for everything so I decided to 'call it a day' with Quattro project and gave away the converted shell. I still have the majority of the R32 that I need to sell on - it'd only covered 1500 miles.
The closure of the Quattro/R32 project does mean I can liberate many brand new and obsolete Ford parts that I'd been saving and use them on the project car in this thread.
Edited by mwstewart on Tuesday 22 November 10:57

I think the Turbosport thread was the most comprehensive, but I stopped updating that half way in.
Some more snaps from the Bodyshop:
Lead filler work on the quarter panel join:
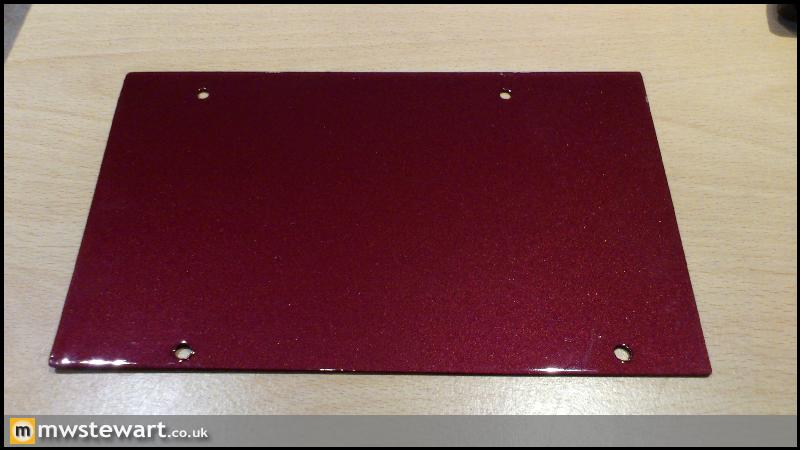
I've specified the 'X5' Ford colour code for Nouveau Red, it is from the 1995 model year and tends to be a richer metallic red than some of the earlier codes. The Bodyshop are spraying some paint samples for me on Friday to make sure I get the shade I'm happiest with.
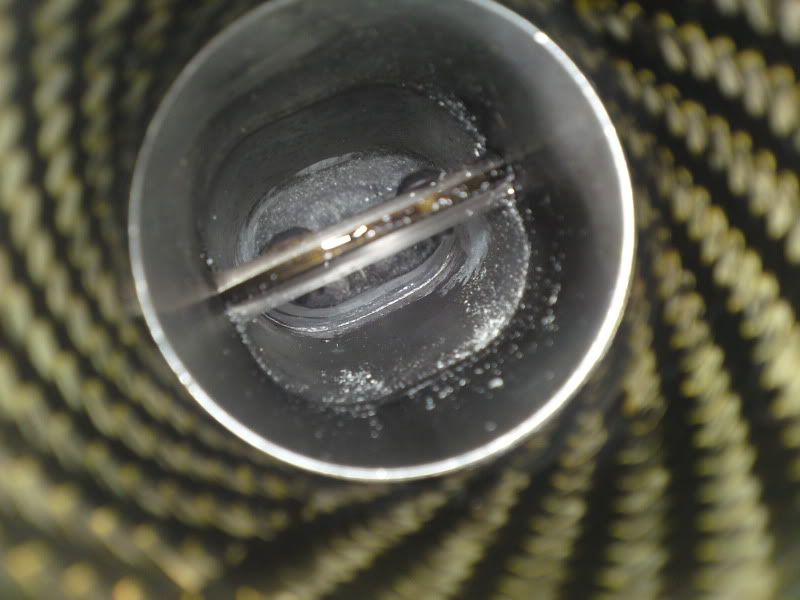
I now have an inlet manifold for the engine, it is a WRC manifold with individual throttle bodies and carbon 'trumpets'. It is currently unfinished but will be complete for the new year. NB The engine below belongs to the previous owner of the manifold.
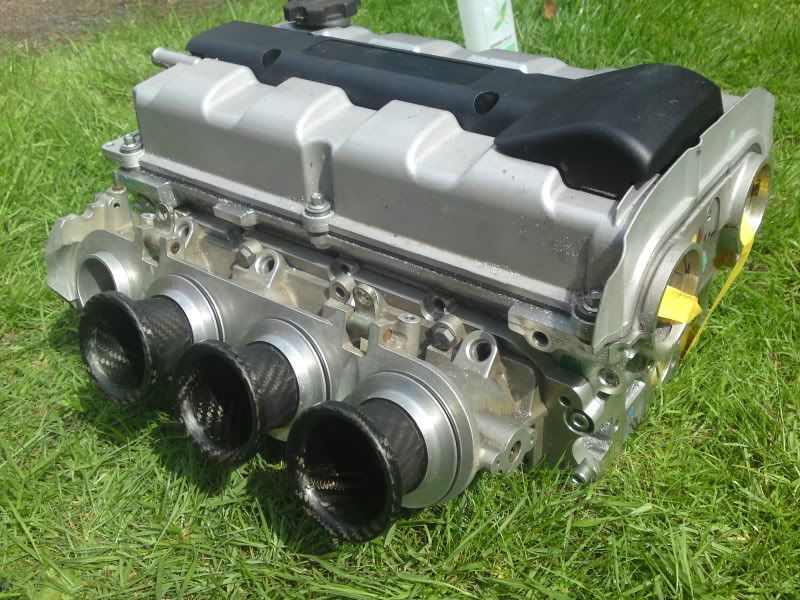
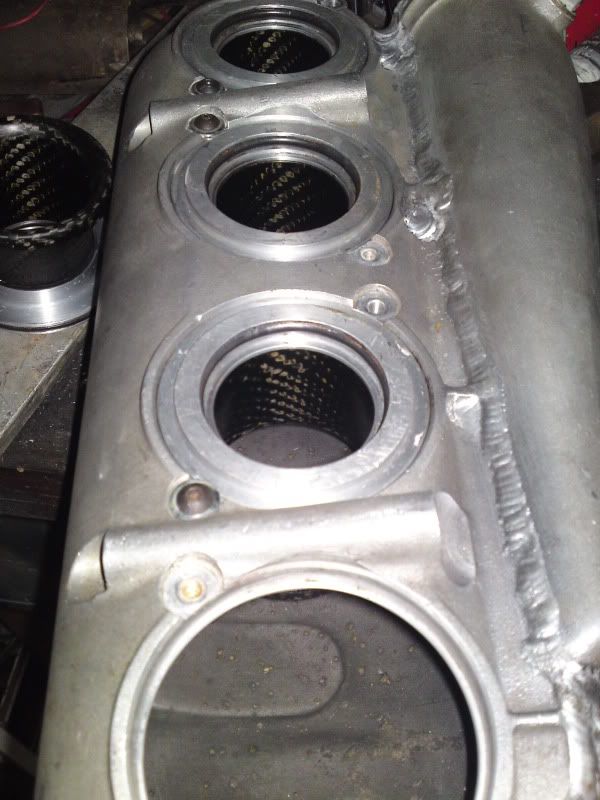
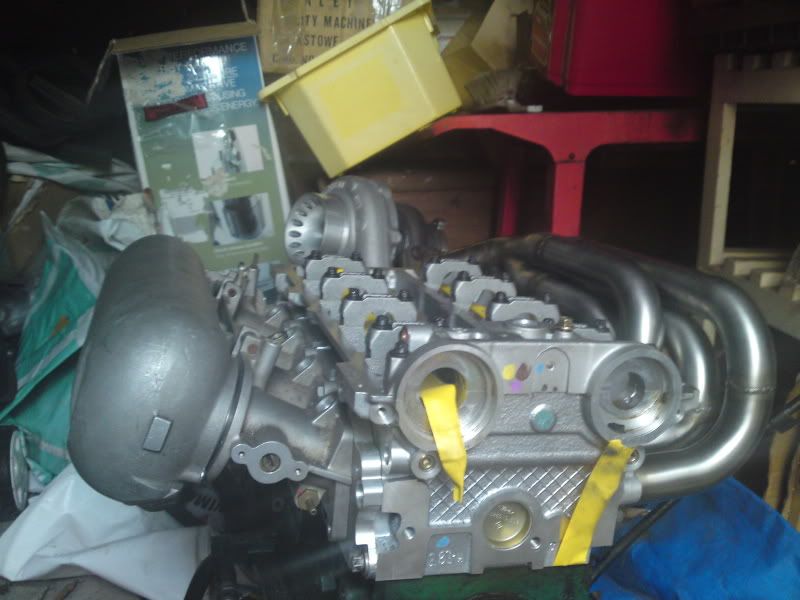
The changes I will make are to create an adapter plate with a taper which makes the most power on a Zetec, and then space the plenum to provide the necessary volume for my engine.
I've been in discussion with Specialist Car Services in Peterborough who have a Superflow-901 Engine Dyno. The result of that discussion was that I'm going for Pectel T6 engine management with wide band Lambda control, Knock sensing, EGT, multiple maps (low power, high power, high octane) and air injector based boost control. The management can be easily set to retard ignition based on EGT or knock, or cut ignition altogether based on other safety parameters.
I require the T6 because it has 'throttle multi-map multipliers' which gives it the ability to support different configurations at every 10 degrees of throttle as required by ITBs.
Some more snaps from the Bodyshop:
Lead filler work on the quarter panel join:
I've specified the 'X5' Ford colour code for Nouveau Red, it is from the 1995 model year and tends to be a richer metallic red than some of the earlier codes. The Bodyshop are spraying some paint samples for me on Friday to make sure I get the shade I'm happiest with.
I now have an inlet manifold for the engine, it is a WRC manifold with individual throttle bodies and carbon 'trumpets'. It is currently unfinished but will be complete for the new year. NB The engine below belongs to the previous owner of the manifold.
The changes I will make are to create an adapter plate with a taper which makes the most power on a Zetec, and then space the plenum to provide the necessary volume for my engine.
I've been in discussion with Specialist Car Services in Peterborough who have a Superflow-901 Engine Dyno. The result of that discussion was that I'm going for Pectel T6 engine management with wide band Lambda control, Knock sensing, EGT, multiple maps (low power, high power, high octane) and air injector based boost control. The management can be easily set to retard ignition based on EGT or knock, or cut ignition altogether based on other safety parameters.
I require the T6 because it has 'throttle multi-map multipliers' which gives it the ability to support different configurations at every 10 degrees of throttle as required by ITBs.
Edited by mwstewart on Thursday 1st December 11:23
Hi Greg,
ITBs in a forced induction application offer much less of a gain than those in an NA application. What I can expect is slightly more power at the top of the rev range and sharper throttle response off-boost. My goal for the engine is driveability, within reason, so the ITBs will definitely help. I also chose a step down from the most extreme set of Cams that Ian offers though the head casting still had to be machined in order to provide clearance for the lobes I must take some photos of the engine.
The next challenge will be the clutch; I'd like to avoid a paddle but may end up going that route. I've seen that the TVR Speed Six engined cars use a 1" x 23 splined triple plate organic clutch that may provide what I'm looking for.
I forgot to add that I finally have a pair of APs that are suitable for the rear. It's hard to find a set which are sized sensibly for something as light as the Mk3, but I finally did. I got a set of four calipers from an F3 car complete with Discs, bells and pads. The discs measure 268x16mm.
If you're familiar with Ap you'll know that a gold anodised caliper means they are made from a billet. This supposedly offer better braking performance and feedback due to increased rigidity, so I'd really like a set for the front now to replace the cast CP5555.
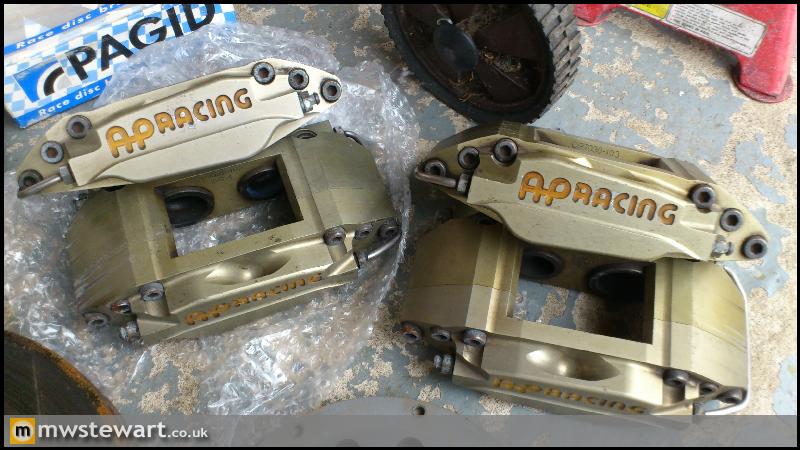
I'll replace the pads but they will suffice for mocking up.
Mark
ITBs in a forced induction application offer much less of a gain than those in an NA application. What I can expect is slightly more power at the top of the rev range and sharper throttle response off-boost. My goal for the engine is driveability, within reason, so the ITBs will definitely help. I also chose a step down from the most extreme set of Cams that Ian offers though the head casting still had to be machined in order to provide clearance for the lobes
I must take some photos of the engine.The next challenge will be the clutch; I'd like to avoid a paddle but may end up going that route. I've seen that the TVR Speed Six engined cars use a 1" x 23 splined triple plate organic clutch that may provide what I'm looking for.
I forgot to add that I finally have a pair of APs that are suitable for the rear. It's hard to find a set which are sized sensibly for something as light as the Mk3, but I finally did. I got a set of four calipers from an F3 car complete with Discs, bells and pads. The discs measure 268x16mm.
If you're familiar with Ap you'll know that a gold anodised caliper means they are made from a billet. This supposedly offer better braking performance and feedback due to increased rigidity, so I'd really like a set for the front now to replace the cast CP5555.
I'll replace the pads but they will suffice for mocking up.
Mark
Edited by mwstewart on Thursday 1st December 13:27
Steve, replied.
02/12/2011
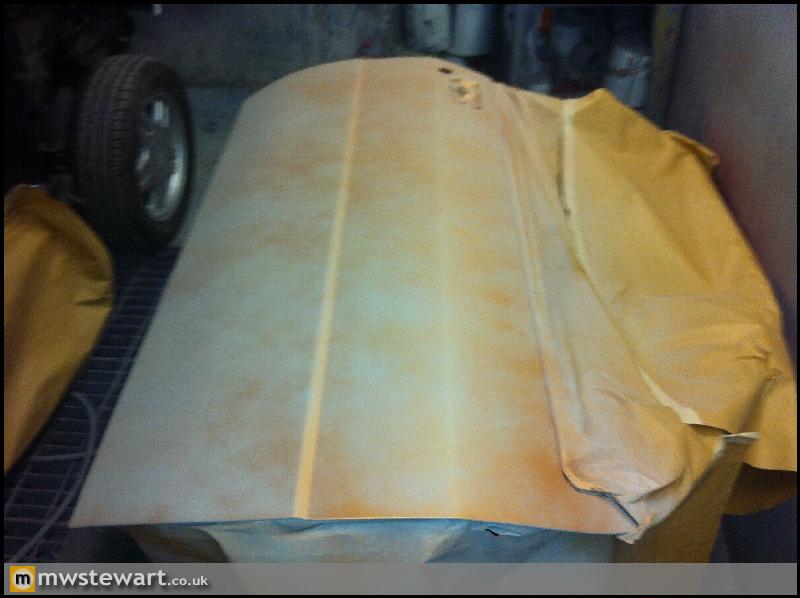
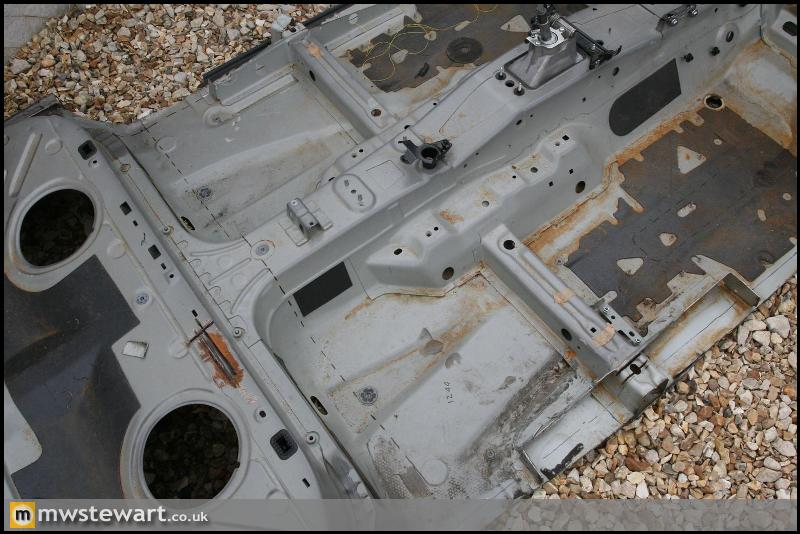
All apertures and sills have been taken back to bare metal:
Part way through preparation. The Olive drab and dark Grey areas are remnants of various guide coats.
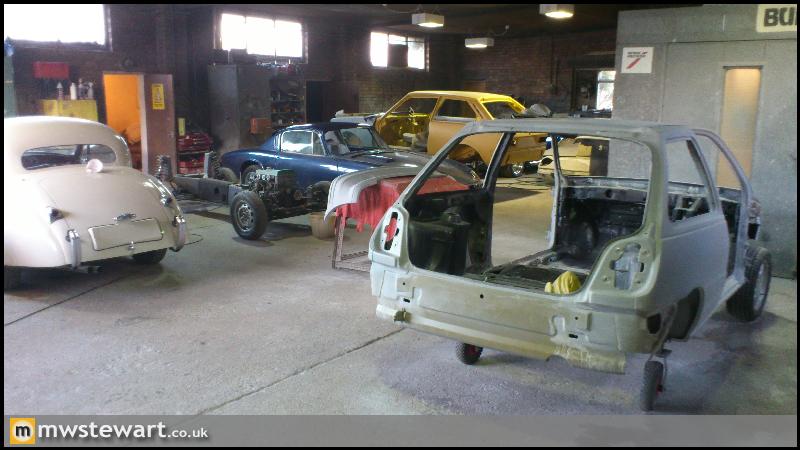
Other customers' cars: Jaguar XK120, Lotus Elite (I think), Lotus Sunbeam. Out of shot: AC Cobra and Lotus Elan.
The chaps sprayed a colour sample for me. I was happy with the first one.
09/12/2011
I went to the body shop today as I'd found some new body kit parts for them to spray, the pieces I'd given them were good second hand items and free from warpage but the mounting studs had suffered their usual demise. The new parts obviously have the studs present and that was precisely the reason I got them; I want to keep the front body kit removable to make removal or (worst case) panel repair easy. The front wings had already been converted to bolt on with that in mind. For the rear arches I will use a bonding agent to prevent the necessity of drilling holes through two skins of fresh metal.
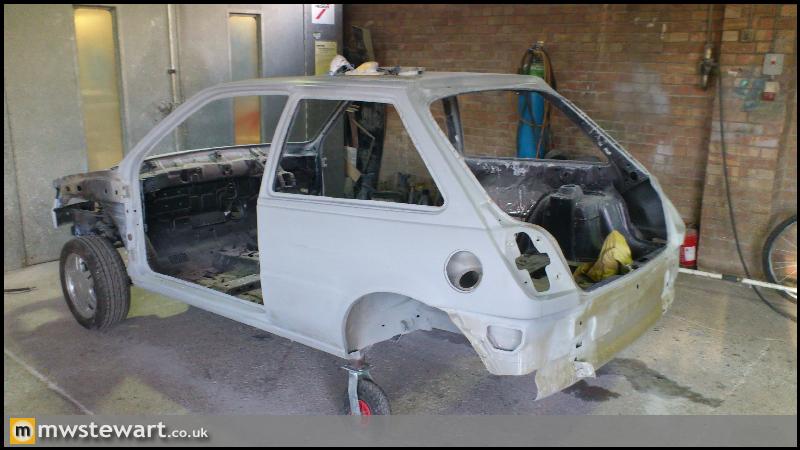
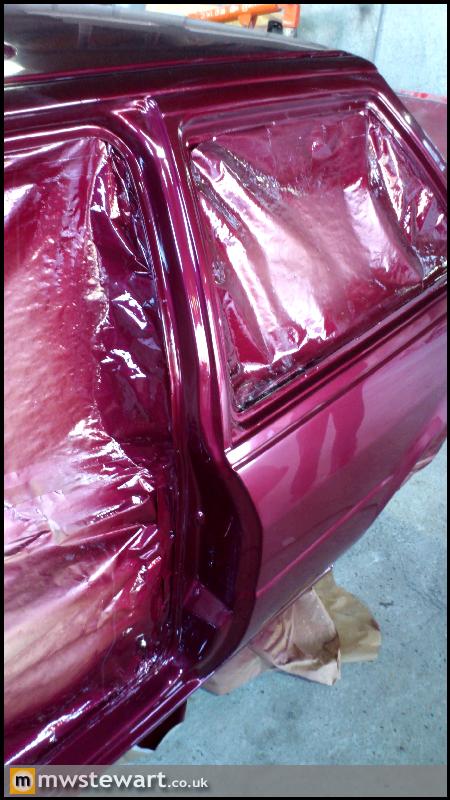
Well, anyway, the car has been painted. The guys at the shop didn't want me to see it because it's only part way through the first stage of buffing. That attitude reassured me they are craftsman, and the finish confirmed it:
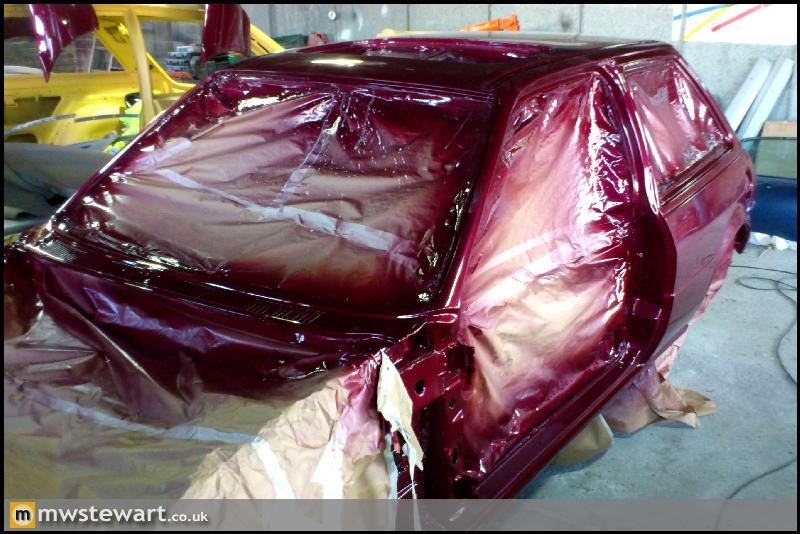
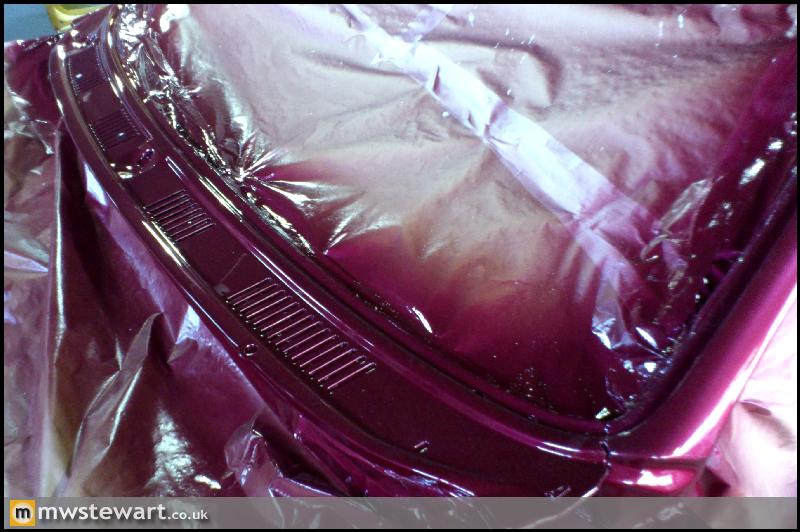
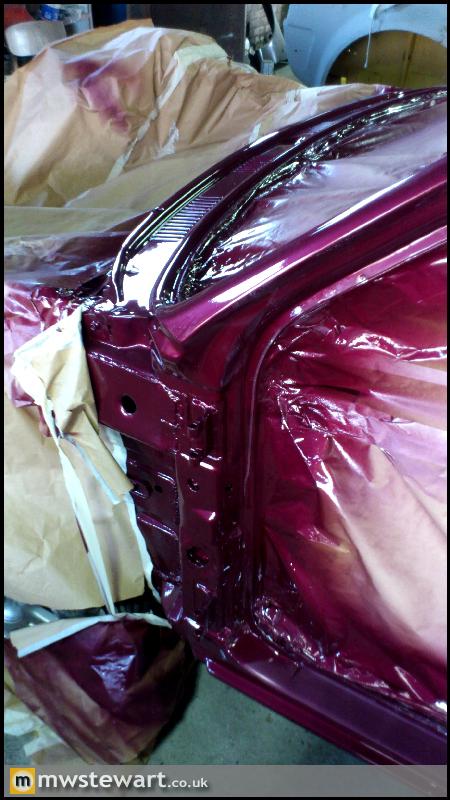
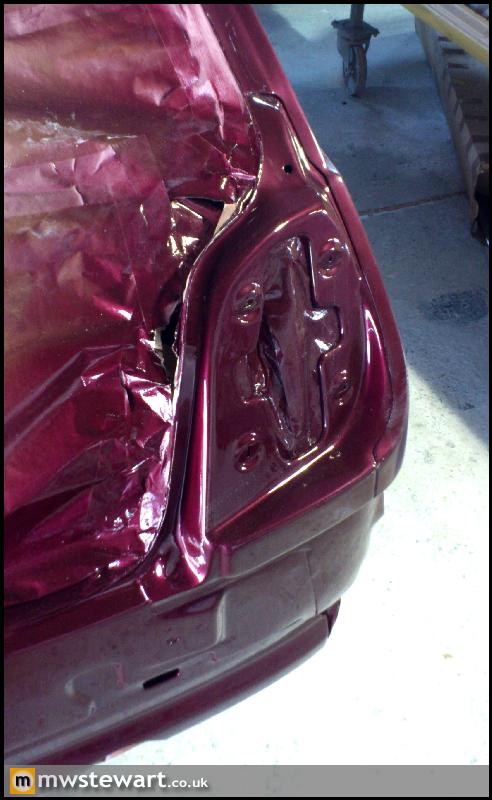
It's hard to capture the quality in photos as pretty much any standard of paint job will look half decent under artificial lighting provided it was finished recently. The depth of shine due to multiple coats of lacquer is just superb:
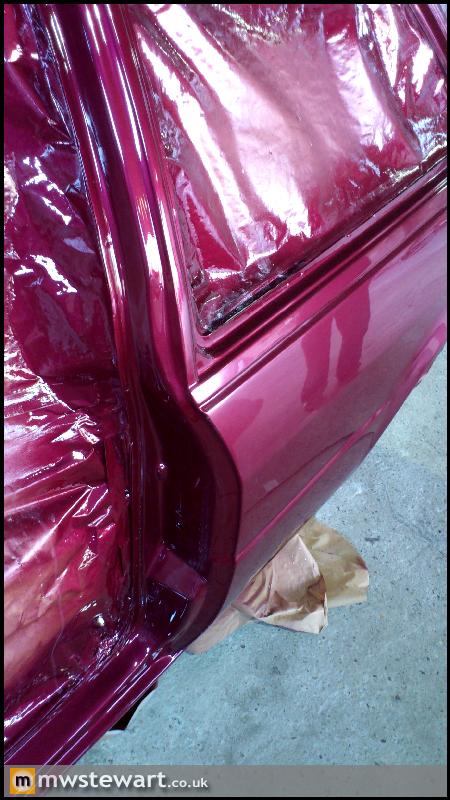
Inside and underneath has been done also. My words to them were "make it perfect and ensure there isn't a square mm of the old colour left":

02/12/2011
All apertures and sills have been taken back to bare metal:
Part way through preparation. The Olive drab and dark Grey areas are remnants of various guide coats.
Other customers' cars: Jaguar XK120, Lotus Elite (I think), Lotus Sunbeam. Out of shot: AC Cobra and Lotus Elan.
The chaps sprayed a colour sample for me. I was happy with the first one.
09/12/2011
I went to the body shop today as I'd found some new body kit parts for them to spray, the pieces I'd given them were good second hand items and free from warpage but the mounting studs had suffered their usual demise. The new parts obviously have the studs present and that was precisely the reason I got them; I want to keep the front body kit removable to make removal or (worst case) panel repair easy. The front wings had already been converted to bolt on with that in mind. For the rear arches I will use a bonding agent to prevent the necessity of drilling holes through two skins of fresh metal.
Well, anyway, the car has been painted. The guys at the shop didn't want me to see it because it's only part way through the first stage of buffing. That attitude reassured me they are craftsman, and the finish confirmed it:
It's hard to capture the quality in photos as pretty much any standard of paint job will look half decent under artificial lighting provided it was finished recently. The depth of shine due to multiple coats of lacquer is just superb:
Inside and underneath has been done also. My words to them were "make it perfect and ensure there isn't a square mm of the old colour left":
Gassing Station | Readers' Cars | Top of Page | What's New | My Stuff