Kelvinators TVR Tasmin
Discussion


8ball_Rob said:
Great write-up, thanks for taking the time to share with the rest of us - I'm enjoying watching this project unfold, and admire your tenacity! I dream of having the skills and knowledge to tackle something like this one day, and until then I'll just have to make do with living vicariously through PH threads such as this one 
+1Sammo123 said:
You’ve got more patience than me! Just knowing how much of a pain those old Kjet injection systems are would of been enough for me to rip it all out and chuck some carbs on there instead 
I've sent a mate a link to this thread cos he's got issues with a 2.8i Capri - one of the best guides I've seenI've done the whole junk EFI and stick carbs on it and it works great however for this I'd have probably got frustrated too but I would drop a 2.9 V6 24V *see note lump and loom in it
 and get 200 bhp out of the box straight of the bat
* Note - while you can still buy a "frog eyed Scorpio" cheap enough to break it for what you need
Just because I've been playing with the Saab, doesn't mean the TVR has been neglected. If anything, I've hit the TVR with some renewed vigour this weekend and got a couple more jobs sorted.
After having issues with the KJet system from the previous post I've left the poor TVR alone for over a month and just ignored it. Motivation has been very low, and to be honest I got to a point where I loathed seeing the car sitting in the garage. Not a good place to be.
This weekend though, I found some motivation.
I started by taking the Saab out and grabbing some more fuel to add to the tanks of the TVR, just so I'm ready to take it out on the road and see if it runs OK or not. I didn't get that far today, but I did fire her up and got the engine up to temp. Amazingly even after sitting untouched for over a month, the engine started first turn of the key, before a complete revolution of the engine was completed. A very good cold start indeed.
Since I wasn't taking the car out for a run I decided to jump into a couple of other jobs I needed done.
First was to install the replacement interior mirror. You don't realise how important one if until you don't have one, even if your rear window is cloudy. The original came with the car, but had been knocked off the windscreen and was badly cracked

It looks like it had been glued on with super glue or something

I don't know what the original mirror was from. I had been told it was a MK5 Cortina mirror, but the Cortina mirror I purchased isn't the same, although it does work fine (and has dip, which the original mirror doesn't). In future though I'd look for a mirror with curved glass, as the Cortina flat glass doesn't give a very wide field of view (guess its made to view through a 4 door sedan, not a very short 2 door).
The mirror I purchased came with a pair of "mirror pads" used to stick the mirror to the screen. They appear to be normal double sided foam tape, but maybe of the VHB (Very High Bond) type.

The only instructions on the pack were to make sure both surfaces were warmed thoroughly, with a hairdryer or similar. I used a heat gun to gently heat the mirror base up before sticking the pad to it, and then gently warming the screen up to attach it. Seemed to work, it's still on the screen and seems well enough stuck. Time will tell if it holds up long term. At least this is one less thing on the list to do


As you may spot, one other thing I changed was to go back to the leather Momo wheel. As much as I love the Futura, the wood rim is a bit slippery when you only have armstrong steering, and the leather gives much-needed purchase to turn the wheels.

The last job for the day was one I had been putting off as it didn't seem like much fun; replacing the weather seal strips around the door and roof openings. The old seals were well buggered, with the D shaped sealing surface being torn from the U shaped mounting section in multiple places. No doubt this was the reason for the car being a swimming pool when I got it, the seals weren't keeping anything out.


Someone had tried to use glue under the seal to help hold it in place. It didn't work. They had also tried to supplement to the destroyed seal with other random bits of seal... that too didn't work.
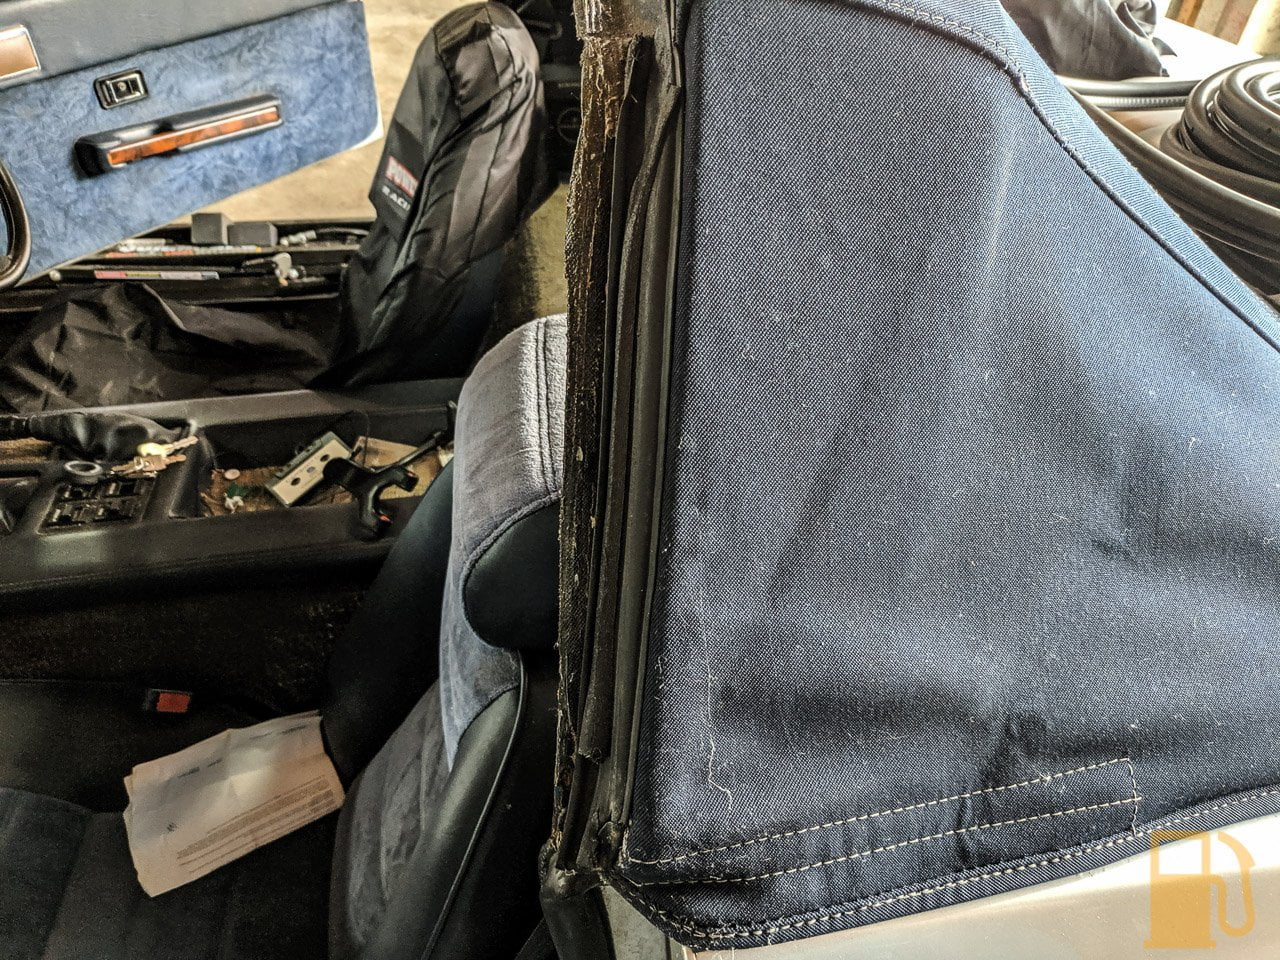
I had ordered 10M of the seal from Racetech in the UK. In hindsight, this is a pretty generic sealing strip, and probably could have sourced it locally or from eBay for less, but oh well. Its this profile

I started on the rear hoop, as it was the shorter section and easy to access and work with

It's as easy as gently pressing the channel into place over the edge, and gently tapping it in with a soft face hammer until you feel/hear it bottom out. The corners are a little fiddly but on the rear hoop its good practice for the harder ones around the screen.

There are a few places where it gets a bit tricky. One of them is the back of the door opening. It has a vertical piece, which meets at the bottom with the horizontal piece. I followed what the seal I removed did, and trimmed the ends of the new seals at about 45 degrees, and forced them into place. The seal can be cut/trimmed with a set of decent side cutters. It does have a metal spine which makes it a bit harder to cut.

The rest of it is a case of going around and tapping the seal into place. I used one continuous run from the back of the door opening, up and over the screen and down to the opposite side door opening. No joins, no less leaks.

Its a time consuming job, especially around the 90 degree turns at the top corners of the windscreen frame, which is a place you need to be very careful of as it can take a bit of extra force to get the seal to seat, but take your time and it should go well. The new seal is much nicer and makes far better contact with the doors, roof panel and windows. It might even keep some water out. I'm not kidding myself though, the seal is a last resort; this is a summer car.
From the 10M roll, I have enough left over to do the top and sides of the boot opening, but not enough for the whole thing. Maybe order another 1M if you want to do that too.
So today was a good day. A couple more jobs off the list. I'm waiting on a flash new hand made German Kjet tester to arrive, and then I will try to set the pressures again. If I still can't, it'll be back to the drawing board. I'm quickly running out of time to go for a WOF inspection to get the car roadworthy, so I'll need a good solid push over December to get the car ready. In the mean time, everything is closed up, with the roof on, to bed the new seals in. First time the roof panel has been on in ages.

Edited by KelvinatorNZ on Sunday 24th November 10:14
I dont know if the wedge is a same as a chim with the weather strip round the rear roof section but when i had my seals replaced where the bottom of the seal meets the door seal on the rear quarters they trimmed it so the d shape part is left about an inch longer than the c section part that grips the roof, this then overlays the door section & when the doors closed clamps the two seals together if that makes sense?
In the quest to both right previous wrongs and make things on this car actually work, I had to have a look at the braking system. It worked, kinda, but needed to be better.
Sitting around for a couple of years does no car any good, and the TVR hadn't had love in a while, so it was anyone's guess when the brakes were last touched.
The main braking system worked OK, albeit there is a fairly bad pulsating through the pedal when braking. I'm hoping this is due to the rust-covered rotors, and not a sticking caliper. The hand brake just doesn't work at all; you fully engage it as hard as you can hulk the handle up, and you can still easily roll the car along the garage floor. Not ideal.
The brakes on this car are... unique. The front calipers are normal, from a Granada I believe. On the Tasmin its two-piston calipers and solid rotors up front. I think the bigger engined cars upgraded to vented rotors with the same caliper (with spacers in the caliper to accommodate the wider rotor).

The rears, on the other hand, are more unusual, having been taken straight from a 70s Jaguar XJ. They're inboard, with the whole brake system in sitting next to the differential, instead of out near the wheels. Way overkill for this little car (so is the differential tbh).


This makes servicing the rear brakes a little less than ideal, as everything is tucked away in the middle of the car, surrounded by bits of suspension and tube frame chassis.
The first step to doing any work on the brakes was to get the car in the air. Unfortunately due to the placement of the frames I couldn't use the Quickjacks to lift the car this time as I wouldn't have the space to change the oil if I did (frame would be right under the sump). The TVR isn't too hard to put on stands though, but the front is low enough that I cant get the jack under it without running it up on boards first.

Before working on the brakes I took the chance to change the oil. It didn't look too bad on the dip stick, but it had to be at least two years old, and who knows how many KM since it was last changed. I drained it out, to find it was a dark grey/brown colour and smelt quite unpleasant. I guess it didn't like sitting either.
A new Ryco Z71 filter and 4.7L of Penrites finest HPR30 finished off the job nicely.


I haven't run the car much since, but the engine does seem to be a little quieter when cold, but now I know and trust what's in it.
Moving right along, onto the brakes. I wanted to check the non-functioning hand brake first, as that's the main issue that will stop the brakes passing a WOF inspection. The system isn't too complicated; There are two little calipers attached to the main calipers in the rear, which are actuated by a cable, to clamp onto the brake rotor. These little calipers are meant to be self-adjusting, but they're known to not self adjust very well and need to be set up right.
Obviously the cable had too much slack in it for a start, as the lever almost points at the sky when pulled, but the real issue is the adjustment of the pads, as there was little to no clamping happening.
To adjust the hand brake, first back the cable completely off using the 13mm nut (green arrow) on the end of the cable. There is another 13mm nut (orange arrow) on the other side of the lever, out of sight, which will need to be "tightened" to allow the slack to be taken out of the cable.

Next the split pin in the adjuster needs to be removed

And using a big screwdriver, turn the screw clockwise until you cannot spin the hub anymore. Now back it off until you can slip a split pin through again, and that's that side done. Now adjust the other caliper the same way.
To finish the job you need to tighten the cable to remove slack. First back the hidden nut (orange arrow in above photo) off and using the nut you can see, wind in on until the slack is taken up, and then wind the hidden nut back towards the lever to lock the cable into place. With any luck, it should all be adjusted now, and ready to go. Three clicks of the lever is ideal.
Since I was under here, I took this as a good opportunity to flush the old brake fluid through and replace it with new, and bleed the braking system. Once again the old fluid is who knows how many years old, and was looking rather brown. Brake fluid should be replaced every two years as it absorbs moisture in the air, and becomes less effective (and can cause issues with blockage and rust if it's really bad).
I used my new vacuum bleeder to suck the old fluid out of the master reservoir. I've seen better fluid. It should be a nice clear yellow. I topped up with fresh Dot 4 fluid.


What came out of the rear brakes was darker than that, so obviously its been a while since the rears had been flushed. Not really that surprised, since the bleeder on the rear is such a pain to get to. Its tucked away behind this tube. Very hard to see, and limited space to swing the spanner.

There is only one bleeder on the rear; on the passengers side. The calipers have a link pipe, so bleeding one bleeds both. I made sure to suck through a lot of fluid to flush both calipers.

With the rears flushed I moved onto the front. The front is comparatively a breeze to work on, even if someone had put a brake hard pipe right in the way of the bleeder. Nothing a gentle bend cant fix.


Strangely, the fluid that came out of the front calipers was much cleaner than the rear. I suspect someone had bled the fronts without bleeding the rear. Nice one.
The vacuum bleeder is good for sucking fluid through, but I have more faith in the old one-man bleeder for actually making sure no air is in the system


You may note that a couple of photos show no brake pads. This was the next job after flushing and bleeding the brakes. I removed the pads to check the pistons weren't stuck and could be pushed back. Turns out the front pads are a set of near new Redstuff Ceramic pads. These are a good high performance street pad. A good upgrade.

Both front calipers responded well, with the pistons moving freely back, so that's a relief.
The rears aren't as much fun to work with. I found it easiest to work on my back with my feet out the back of the car. The pads are held in with two pins, which are secured with an R-clip each (like the fronts). I found on my car that one caliper had both pins inserted the same way, and one had the pins inserted from opposing sides, which meant that the location of the R-clip was different on each caliper


I used a small flat blade to pull the clips out, and then the pins just pushed out by hand. The pads took a little levering to get out but weren't too hard. The pistons on both rear calipers moved freely also, so another win. I'm sure I have receipts for the brake calipers being replaced a few years ago, so might explain why they're still in good shape. So hopefully that means the rotors just need a good hard pounding to get the rust and rubbish off them, and we might have some luck.
Unfortunately even with the hand brake adjusted as it is (three clicks maximum), it's still not quite enough to hold the car on my driveway. It should be enough to pass a warrant, as my driveway is trial by fire and far too steep, but I'm hoping I can bed the pads in and get better performance once I drive the car a bit and the rust is knocked off.
I'm getting closer to having the car ready for its WOF inspection. Slowly but surely, we will get there.
In the meantime, I made the car look a million times better, with one easy step. Tyre shine. The old 10-15 year old rubber was looking somewhat dry.

Sitting around for a couple of years does no car any good, and the TVR hadn't had love in a while, so it was anyone's guess when the brakes were last touched.
The main braking system worked OK, albeit there is a fairly bad pulsating through the pedal when braking. I'm hoping this is due to the rust-covered rotors, and not a sticking caliper. The hand brake just doesn't work at all; you fully engage it as hard as you can hulk the handle up, and you can still easily roll the car along the garage floor. Not ideal.
The brakes on this car are... unique. The front calipers are normal, from a Granada I believe. On the Tasmin its two-piston calipers and solid rotors up front. I think the bigger engined cars upgraded to vented rotors with the same caliper (with spacers in the caliper to accommodate the wider rotor).

The rears, on the other hand, are more unusual, having been taken straight from a 70s Jaguar XJ. They're inboard, with the whole brake system in sitting next to the differential, instead of out near the wheels. Way overkill for this little car (so is the differential tbh).


This makes servicing the rear brakes a little less than ideal, as everything is tucked away in the middle of the car, surrounded by bits of suspension and tube frame chassis.
The first step to doing any work on the brakes was to get the car in the air. Unfortunately due to the placement of the frames I couldn't use the Quickjacks to lift the car this time as I wouldn't have the space to change the oil if I did (frame would be right under the sump). The TVR isn't too hard to put on stands though, but the front is low enough that I cant get the jack under it without running it up on boards first.

Before working on the brakes I took the chance to change the oil. It didn't look too bad on the dip stick, but it had to be at least two years old, and who knows how many KM since it was last changed. I drained it out, to find it was a dark grey/brown colour and smelt quite unpleasant. I guess it didn't like sitting either.
A new Ryco Z71 filter and 4.7L of Penrites finest HPR30 finished off the job nicely.


I haven't run the car much since, but the engine does seem to be a little quieter when cold, but now I know and trust what's in it.
Moving right along, onto the brakes. I wanted to check the non-functioning hand brake first, as that's the main issue that will stop the brakes passing a WOF inspection. The system isn't too complicated; There are two little calipers attached to the main calipers in the rear, which are actuated by a cable, to clamp onto the brake rotor. These little calipers are meant to be self-adjusting, but they're known to not self adjust very well and need to be set up right.
Obviously the cable had too much slack in it for a start, as the lever almost points at the sky when pulled, but the real issue is the adjustment of the pads, as there was little to no clamping happening.
To adjust the hand brake, first back the cable completely off using the 13mm nut (green arrow) on the end of the cable. There is another 13mm nut (orange arrow) on the other side of the lever, out of sight, which will need to be "tightened" to allow the slack to be taken out of the cable.

Next the split pin in the adjuster needs to be removed

And using a big screwdriver, turn the screw clockwise until you cannot spin the hub anymore. Now back it off until you can slip a split pin through again, and that's that side done. Now adjust the other caliper the same way.
To finish the job you need to tighten the cable to remove slack. First back the hidden nut (orange arrow in above photo) off and using the nut you can see, wind in on until the slack is taken up, and then wind the hidden nut back towards the lever to lock the cable into place. With any luck, it should all be adjusted now, and ready to go. Three clicks of the lever is ideal.
Since I was under here, I took this as a good opportunity to flush the old brake fluid through and replace it with new, and bleed the braking system. Once again the old fluid is who knows how many years old, and was looking rather brown. Brake fluid should be replaced every two years as it absorbs moisture in the air, and becomes less effective (and can cause issues with blockage and rust if it's really bad).
I used my new vacuum bleeder to suck the old fluid out of the master reservoir. I've seen better fluid. It should be a nice clear yellow. I topped up with fresh Dot 4 fluid.


What came out of the rear brakes was darker than that, so obviously its been a while since the rears had been flushed. Not really that surprised, since the bleeder on the rear is such a pain to get to. Its tucked away behind this tube. Very hard to see, and limited space to swing the spanner.

There is only one bleeder on the rear; on the passengers side. The calipers have a link pipe, so bleeding one bleeds both. I made sure to suck through a lot of fluid to flush both calipers.

With the rears flushed I moved onto the front. The front is comparatively a breeze to work on, even if someone had put a brake hard pipe right in the way of the bleeder. Nothing a gentle bend cant fix.

Strangely, the fluid that came out of the front calipers was much cleaner than the rear. I suspect someone had bled the fronts without bleeding the rear. Nice one.
The vacuum bleeder is good for sucking fluid through, but I have more faith in the old one-man bleeder for actually making sure no air is in the system


You may note that a couple of photos show no brake pads. This was the next job after flushing and bleeding the brakes. I removed the pads to check the pistons weren't stuck and could be pushed back. Turns out the front pads are a set of near new Redstuff Ceramic pads. These are a good high performance street pad. A good upgrade.

Both front calipers responded well, with the pistons moving freely back, so that's a relief.
The rears aren't as much fun to work with. I found it easiest to work on my back with my feet out the back of the car. The pads are held in with two pins, which are secured with an R-clip each (like the fronts). I found on my car that one caliper had both pins inserted the same way, and one had the pins inserted from opposing sides, which meant that the location of the R-clip was different on each caliper


I used a small flat blade to pull the clips out, and then the pins just pushed out by hand. The pads took a little levering to get out but weren't too hard. The pistons on both rear calipers moved freely also, so another win. I'm sure I have receipts for the brake calipers being replaced a few years ago, so might explain why they're still in good shape. So hopefully that means the rotors just need a good hard pounding to get the rust and rubbish off them, and we might have some luck.
Unfortunately even with the hand brake adjusted as it is (three clicks maximum), it's still not quite enough to hold the car on my driveway. It should be enough to pass a warrant, as my driveway is trial by fire and far too steep, but I'm hoping I can bed the pads in and get better performance once I drive the car a bit and the rust is knocked off.
I'm getting closer to having the car ready for its WOF inspection. Slowly but surely, we will get there.
In the meantime, I made the car look a million times better, with one easy step. Tyre shine. The old 10-15 year old rubber was looking somewhat dry.

Very much reminds me of my father cursing away trying to get his old FHC Tamsin handbrake good enough to pass an MOT. Same on his 350i that followed. They were always crap and only adjusted each year to pass the test- he generally relied on leaving the car in gear when parked because using the handbrake much tended to stretch the cable enough that it quickly became useless (IIRC).
Looks like I might finally have the KJet pressures right. Its running and idling much better. First time its idled under 2000rpm.
https://youtu.be/3VVylMr5BVI
https://youtu.be/3VVylMr5BVI
That is excellent work, nice one. I was slightly concerned that when you were at a low ebb with this and the project was in danger of languishing. I suppose that you are going to elaborate on how you have resolved the plate that wasn't seated properly... or replaced in it's entirety? I apologise for my lack of mechanical literacy.
Sigh, It seems like my life is a never-ending cycle of messing with KJet fuel pressures.
But hopefully, this will help

My quality German made KJetronic pressure testing setup arrived. Huge thanks to MissingParts on eBay, as this is some proper quality gear, and for less than I paid for the other setup.
Nicely crimped ends, with quality rubber and fabric braided hoses


The seller has a great sense of humour. "For oldtimer cars"

I hooked the new setup up, which was a lot easier with the banjo fittings, rather than the generic screw fittings


Now it was time to confirm the readings from the old gauge. Previously the cold control pressure was stone dead on the gauge, at near enough zero psi. This gauge, not so much.

We want cold pressure here, near the green line (depending on ambient temp), otherwise it's too lean when cold

So, what about the system pressure, which wouldn't go over 5bar, no matter how thick of a shim I fitted? Off the gauge; over 6bar

And we want that at 5-5.5bar, on this green line. Too high and the control pressure will be too high also.

Well damn. No wonder it still wasn't happy.
I pulled the two additional shims out, and we dropped to 5bar system pressure. Better, but not perfect.

I knocked the adjustment on the WUR to get the control pressure down to the required half bar, but the car wasn't running right.

The next step was to step back, reset everything and presume that everything I had done with the old gauge was buggered.
Because the system pressure was a tad low I wanted to add my small extra shim and see how that increased pressure (i carefully measured it when I made it, to add 0.5bar). Hah, perfect!

I found this amazing step by step guide, which I followed and it worked perfectly. Big thanks to the author of that.
The first step was to make my WUR adjustable. This is so that if I knock the pressure adjustment down too far I can use a nut to pull the pin back out, instead of having to remove and disassemble it to tap the pin back out by hand. I drilled and tapped the pin to M5x0.8 and using a screw, nut and washer, made it adjustable. The guide that I used is here. The basics of the mod are that you screw the screw in tight (or Loctite it in so it cant turn) and then tighten the nut down to pull the pin out of the body. To push it back down you wind the nut completely out, against the head of the screw and then use a punch and hammer to tap the screw/pin down again.


It would be a lot easier to use if the screw didn't have a flange as there is limited space when mounted on the car, but its what I had on hand.
With the WUR apart again I replaced the O-Ring for the diaphragm and flipped the thin metal diaphragm to the other side to even up any wear.
Following the guide, I found that my initial pressure with no springs/strip was OK, and the pressure could be increased to the correct level by hand. Good.
The next test had me checking the heater works, which when holding it in my hand with power applied, I could confirm it did get warm to the touch. Good.
Next was to test the pseudo-warm pressure by reassembling the WUR with the springs, but without the heater/strip. This applies pressure to the mexican hat and diaphram, to emulate the warm pressure. This should be 3.5bar or HIGHER.

I had just under 3bar. Not enough. This is where I had to get creative and work out how to adjust this. On other WUR, there is an adjustment screw under a brass cap on the base. You drill through that cap, and there is a hex screw to raise or lower the platform the springs sit on. I tried drilling what I thought was the cap, but turns out the base for my platform is actually a pin pressed into the housing. Its the recessed circle with a hole drilled in it.


So, with callipers in hand, I tested/measured to see if I could use a hammer and punch to also adjust that like you do the cold pressure pin. Sure enough, some careful whacks of the adjustment tool, and I had raised the platform, thus increasing pressure on the springs. 4bar is perfect.

I fully reassembled the WUR, heater/strip and all, and reinstalled on the car to test/adjust the cold pressure. I got this easily down to a solid 0.7bar (within the margin of error for the ambient temps, I didn't want to mess around too much getting it lower)

I connected the heater and watched as the pressure slowly increased. The heater and strip were working perfectly.

I got it near the required 2.9bar, but it was still a tad low with the engine running at temp, so I used the one last adjustment available; tapping the main circular unit on the WUR down. This is the part that the two fuel hoses bolt onto. This is also pressed into the body, and like the other two adjustments can be carefully tapped down with a punch. This takes very little to increase the pressure, but be very careful not to punch it down too far or the WUR had to come completely apart again to tap it back out. I alternated tapping the punch on both sides, where the arrows are pointing.

This resulted in a nice 2.9bar when warm. Excellent.

After some tweaking of the idle and CO screws, the results were immediate and obvious. The car ran and idled better than ever, including idling under 2000rpm for the first time. I set the idle to about 1000rpm, which is higher than factory spec, but it felt happier there than the 800-900rpm recommended.
http://youtu.be/3VVylMr5BVI
The only thing left to do was to put on my big boy pants and try taking it for a run. The last time it was on the road it constantly tried to die on me and left me blocking intersections. Not ideal, and no wonder I was nervous.
This time, it started and was driving perfectly. It was pulling strong and felt good... until the hesitation kicked in again at high RPM under load.
The exact same issue as before I rebuilt the Kjet system.
I came home with mixed emotion. The car ran and drove well unless I got on the throttle. Kind of a win, but also a fail.
Mrs Petrol and I were discussing the issue and she reminded me that her old Alto used to buck and hesitate if the fuel was too low...
Surely that's not the issue? Nooooo

If you look at the design of the tanks, the feed to the pump is at the front of the tanks, toward the front of the car. It's possible that under acceleration the little fuel in the tanks was sloshing away from the outlet and starving the pump. Maybe.
The orange arrow is pointing to the fuel outlet on that tank, the other is on the other tank in the same location.

Well, I guess I limp the car to the gas station and chuck some gas in and see what happens.

Well, what does happen is that if you don't have both fuel caps open when you try to put any fuel in the tanks it all comes rushing back out and pukes down the side of the car and onto the ground. Oops.
I added 20L to each tank, at great expense, and guess what, my Wife was right (like usual), the hesitation is completely gone, and it will happily rev out to redline under WOT. Amazing.
The sound and feel of the car is crazy. It's so loud, but makes a great noise. You sit so low, but the car feels big. Even when it's not moving everyone is breaking their necks to see what it is. It's not a car for the shy.
It does leave me wondering a little, if I had just filled the tanks when I first got the car, would it all have been OK anyway? The main issue I had before I rebuilt it all was that hesitation issue. In saying that, it's starting, running and driving better than it ever has since I got it, so the work was well worth it regardless.

I'm stoked. Still some things to tidy, but it is almost ready to go for a WOF check.
But hopefully, this will help

My quality German made KJetronic pressure testing setup arrived. Huge thanks to MissingParts on eBay, as this is some proper quality gear, and for less than I paid for the other setup.
Nicely crimped ends, with quality rubber and fabric braided hoses


The seller has a great sense of humour. "For oldtimer cars"

I hooked the new setup up, which was a lot easier with the banjo fittings, rather than the generic screw fittings


Now it was time to confirm the readings from the old gauge. Previously the cold control pressure was stone dead on the gauge, at near enough zero psi. This gauge, not so much.

We want cold pressure here, near the green line (depending on ambient temp), otherwise it's too lean when cold

So, what about the system pressure, which wouldn't go over 5bar, no matter how thick of a shim I fitted? Off the gauge; over 6bar

And we want that at 5-5.5bar, on this green line. Too high and the control pressure will be too high also.

Well damn. No wonder it still wasn't happy.
I pulled the two additional shims out, and we dropped to 5bar system pressure. Better, but not perfect.

I knocked the adjustment on the WUR to get the control pressure down to the required half bar, but the car wasn't running right.

The next step was to step back, reset everything and presume that everything I had done with the old gauge was buggered.
Because the system pressure was a tad low I wanted to add my small extra shim and see how that increased pressure (i carefully measured it when I made it, to add 0.5bar). Hah, perfect!

I found this amazing step by step guide, which I followed and it worked perfectly. Big thanks to the author of that.
The first step was to make my WUR adjustable. This is so that if I knock the pressure adjustment down too far I can use a nut to pull the pin back out, instead of having to remove and disassemble it to tap the pin back out by hand. I drilled and tapped the pin to M5x0.8 and using a screw, nut and washer, made it adjustable. The guide that I used is here. The basics of the mod are that you screw the screw in tight (or Loctite it in so it cant turn) and then tighten the nut down to pull the pin out of the body. To push it back down you wind the nut completely out, against the head of the screw and then use a punch and hammer to tap the screw/pin down again.


It would be a lot easier to use if the screw didn't have a flange as there is limited space when mounted on the car, but its what I had on hand.
With the WUR apart again I replaced the O-Ring for the diaphragm and flipped the thin metal diaphragm to the other side to even up any wear.
Following the guide, I found that my initial pressure with no springs/strip was OK, and the pressure could be increased to the correct level by hand. Good.
The next test had me checking the heater works, which when holding it in my hand with power applied, I could confirm it did get warm to the touch. Good.
Next was to test the pseudo-warm pressure by reassembling the WUR with the springs, but without the heater/strip. This applies pressure to the mexican hat and diaphram, to emulate the warm pressure. This should be 3.5bar or HIGHER.

I had just under 3bar. Not enough. This is where I had to get creative and work out how to adjust this. On other WUR, there is an adjustment screw under a brass cap on the base. You drill through that cap, and there is a hex screw to raise or lower the platform the springs sit on. I tried drilling what I thought was the cap, but turns out the base for my platform is actually a pin pressed into the housing. Its the recessed circle with a hole drilled in it.


So, with callipers in hand, I tested/measured to see if I could use a hammer and punch to also adjust that like you do the cold pressure pin. Sure enough, some careful whacks of the adjustment tool, and I had raised the platform, thus increasing pressure on the springs. 4bar is perfect.

I fully reassembled the WUR, heater/strip and all, and reinstalled on the car to test/adjust the cold pressure. I got this easily down to a solid 0.7bar (within the margin of error for the ambient temps, I didn't want to mess around too much getting it lower)

I connected the heater and watched as the pressure slowly increased. The heater and strip were working perfectly.

I got it near the required 2.9bar, but it was still a tad low with the engine running at temp, so I used the one last adjustment available; tapping the main circular unit on the WUR down. This is the part that the two fuel hoses bolt onto. This is also pressed into the body, and like the other two adjustments can be carefully tapped down with a punch. This takes very little to increase the pressure, but be very careful not to punch it down too far or the WUR had to come completely apart again to tap it back out. I alternated tapping the punch on both sides, where the arrows are pointing.

This resulted in a nice 2.9bar when warm. Excellent.

After some tweaking of the idle and CO screws, the results were immediate and obvious. The car ran and idled better than ever, including idling under 2000rpm for the first time. I set the idle to about 1000rpm, which is higher than factory spec, but it felt happier there than the 800-900rpm recommended.
http://youtu.be/3VVylMr5BVI
The only thing left to do was to put on my big boy pants and try taking it for a run. The last time it was on the road it constantly tried to die on me and left me blocking intersections. Not ideal, and no wonder I was nervous.
This time, it started and was driving perfectly. It was pulling strong and felt good... until the hesitation kicked in again at high RPM under load.
The exact same issue as before I rebuilt the Kjet system.
I came home with mixed emotion. The car ran and drove well unless I got on the throttle. Kind of a win, but also a fail.
Mrs Petrol and I were discussing the issue and she reminded me that her old Alto used to buck and hesitate if the fuel was too low...
Surely that's not the issue? Nooooo
If you look at the design of the tanks, the feed to the pump is at the front of the tanks, toward the front of the car. It's possible that under acceleration the little fuel in the tanks was sloshing away from the outlet and starving the pump. Maybe.
The orange arrow is pointing to the fuel outlet on that tank, the other is on the other tank in the same location.

Well, I guess I limp the car to the gas station and chuck some gas in and see what happens.

Well, what does happen is that if you don't have both fuel caps open when you try to put any fuel in the tanks it all comes rushing back out and pukes down the side of the car and onto the ground. Oops.
I added 20L to each tank, at great expense, and guess what, my Wife was right (like usual), the hesitation is completely gone, and it will happily rev out to redline under WOT. Amazing.
The sound and feel of the car is crazy. It's so loud, but makes a great noise. You sit so low, but the car feels big. Even when it's not moving everyone is breaking their necks to see what it is. It's not a car for the shy.
It does leave me wondering a little, if I had just filled the tanks when I first got the car, would it all have been OK anyway? The main issue I had before I rebuilt it all was that hesitation issue. In saying that, it's starting, running and driving better than it ever has since I got it, so the work was well worth it regardless.

I'm stoked. Still some things to tidy, but it is almost ready to go for a WOF check.
What a great update - I didn't understand most of it with shims etc, but perhaps I'll read it over a few times and get there!
Perhaps we'll finally get some updates on what it's like to drive.
What is WUR?
Wot is WOT?
BTW your links aren't configured
https://www.benzworld.org/threads/warm-up-regulato...
http://forums.pelicanparts.com/porsche-911-technic...
https://www.tasteslikepetrol.net/cars/alto/
Perhaps we'll finally get some updates on what it's like to drive.
What is WUR?
Wot is WOT?
BTW your links aren't configured
https://www.benzworld.org/threads/warm-up-regulato...
http://forums.pelicanparts.com/porsche-911-technic...
https://www.tasteslikepetrol.net/cars/alto/

Ah yeah, sorry. This is the one forum I use where the software is too archaic to make the links work like normal.
WUR is the Warm Up Regulator, the thing I was pulling apart and adjusting.
WOT is Wide Open Throttle, or full throttle.
In terms of understanding it, a couple of my previous posts go more into detail of what the adjustments are for and what they do, this post kinda presumed you read those so glossed over it a bit. It can be hard to wrap your head around though, it's not that simplest system.
I'll go back and read again... it's not that I glossed over them as you actually write in a very prosaic fashion so your analyses seem deceptively simple... it's actually just all that life and distraction stuff that gets in the way between post, combined with a lack of fact retention 
What a great result, fantastic that your perseverance paid off,
This thread really shows what a valuable resource of knowledge car forums are, I worry that with the proliferation of car enthusiast traffic to social media platforms the creation and archiving of knowledge like this will dwindle away. (sorry to go off on a tangent)
This thread really shows what a valuable resource of knowledge car forums are, I worry that with the proliferation of car enthusiast traffic to social media platforms the creation and archiving of knowledge like this will dwindle away. (sorry to go off on a tangent)
Gassing Station | Readers' Cars | Top of Page | What's New | My Stuff